

A wedding audio lighting checklist is a production plan: it names every voice that must be heard, every light that must work, every circuit that feeds them, and the second way to do each job if the first one fails, so the day does not depend on one battery, one cable, or one person’s memory.
Quick answer
Build your wedding audio lighting checklist in this order: rules and power first (venue sound limits, circuit locations, load-in access), people second (who speaks, where, and into what), light third (what each fixture is for), and backups last (a second path for the officiant’s voice, the music, and the power). Keep audio and lighting on separate circuits where the venue allows it, add up watts before the day, assign one named person to call a weather pause, and test the whole system at the real positions before guests arrive. Electrical hookups, generators, and anything hung overhead belong to qualified staff, not to a helpful relative.
What a wedding audio lighting checklist is for
Most wedding advice treats sound and lighting as two separate shopping errands. One is a DJ or band decision, the other is a decor decision. On the day, though, they share the same power, the same load-in window, the same cable paths, and the same small group of people who can fix a problem. That shared infrastructure is where weddings tend to go wrong, so a good wedding audio lighting checklist treats the two as one production.
This guide is the planning pillar for that production. It gives you a decision framework, a power and redundancy plan you can fill in with your own numbers, questions for your venue and vendors, edge cases, and a day-of run sheet. It does not replace a qualified technician. It helps you hire one, brief one, and notice when a plan has a gap.
The job of the checklist
A wedding audio lighting checklist earns its place by catching things that are easy to forget and expensive to fix on the day. It is not a shopping list and it is not a design mood board. Think of it as a set of answers to a short list of plain questions: can everyone hear, can everyone see, is there enough power, what happens when something breaks, and who decides.
A production plan, not a vendor menu
Vendors sell packages: a ceremony speaker, a dance-floor light bar, a lighting upgrade. A package describes equipment. A production plan describes outcomes and responsibilities, such as “every guest in the last row can understand the officiant” or “the first dance is lit even if the main fixture fails.” Writing outcomes first in your wedding audio lighting checklist keeps you from buying equipment that does not solve a problem you actually have.
How this guide fits with our other guides
Several adjacent topics have their own guides, and we point to them rather than repeat them. For lighting design choices such as string lights, uplighting, candles, and pin spots, read our wedding lighting guide. For how to interview a DJ, use our wedding DJ questions guide, and for the choice between a DJ and live music, see wedding DJ vs band. This wedding audio lighting checklist sits above them: it is about how sound, light, and power fit together and how they fail together.
Who owns which part of the plan
A production falls apart when everyone assumes someone else is checking the power. Decide ownership early and write it into your wedding audio lighting checklist, even for a small wedding. The roles below are common, but your wedding may combine them. A DJ who brings speakers, microphones, and uplights covers three of them at once.
What the couple decides
The couple owns the outcomes and the budget. You decide how many separate spaces need sound, whether the ceremony needs microphones, how loud the evening should be, whether you want the ceremony recorded, and what light levels you want for photographs. You also decide which trade-offs you accept, such as a simpler lighting plan in exchange for a stronger audio backup.
What the venue controls
The venue owns the building, the circuits, the neighbors, and the rules. It decides where equipment may be placed, when vendors may enter, what the sound limit and curfew are, whether haze or open flame is allowed, and whether an outside vendor must be on an approved list or provide proof of insurance. Ask for these rules in writing before you sign with any audio or lighting vendor.
What the vendor delivers
The audio or lighting vendor owns the equipment, the setup, the operation, and the spares. A strong vendor will ask you questions about the site before quoting, bring a written equipment list, name the person who will run the system, and tell you what they will do if a piece of gear fails. A vendor who quotes without asking about power, space, or the weather has not yet planned your wedding.
The limits of this guide
This guide is general planning information. It is not electrical, structural, legal, medical, or financial advice, and it cannot replace the judgment of someone standing in your venue.
Electrical and rigging work belongs to qualified staff
Connecting equipment to a building’s distribution, running a generator, hanging fixtures or speakers overhead, and anything involving a tent frame all carry real injury risk. This guide explains the questions to ask and the math to expect. It does not tell you how to perform any of that work, and you should not ask a friend to try.
Local rules differ, so confirm them
Noise limits, fire rules, generator rules, and permit requirements vary by city, county, and venue. We did not review any specific local ordinance for this guide, and the sources we cite describe general guidance, not the law where you are marrying. Confirm local requirements with your venue, your local officials, and your vendors. Our wedding permits guide covers who issues permits and has a section on sound limits.
Gather the rules, the power, and the room before you choose equipment
Equipment choices follow from the room. A venue with a good house system, two dedicated circuits near the stage, and a flexible curfew needs a different plan from a field with no power and a neighbor who has called the county before. The first job on any wedding audio lighting checklist is collecting facts, because the facts set the limits for everything else.
Ask the venue for the facts that cap the design
Send the venue a short, specific list and ask for written replies. Vague answers such as “we have plenty of power” are a reason to ask again with numbers. Our wedding venue questions guide covers the wider conversation; the items below are the audio and lighting subset.
Power: what exists, where, and how much
Ask where the outlets are, which breaker or circuit each one is on, whether any are dedicated for entertainment use, and whether any are shared with kitchen equipment, heaters, or air conditioning. A common surprise is that the outlets near the dance floor share a circuit with the caterer’s warming equipment. Ask who at the venue can reset a tripped breaker and whether that person will be on site during the event.
Sound rules, curfew, and neighbors
Ask whether the venue has a sound limit, how it is measured, who measures it, and what happens if it is exceeded. Ask when music must end and when equipment must be out. If the venue is outdoors, ask whether a neighbor, a homeowners association, or the local government has ever complained about an event. Our sibling guide on wedding reception noise limits goes deeper on measuring volume and curfew compliance.
Load-in, access, and vendor requirements
Ask what time vendors may enter, where they may park, whether there are stairs, elevators, or gravel, and how far the load-in point is from the stage. Ask whether outside vendors must carry insurance or appear on an approved list, and whether the venue requires its own technician for any hookup. These answers decide how much setup time your vendor needs, which changes the quote.
Walk the site at the hour of the event
A floor plan on a screen hides things that a walk reveals. If you can, visit at the same time of day as your ceremony and again in the evening. Take photos, and take a phone or tape measure.
Distance between the ceremony and the reception
Measure how far the ceremony site is from the nearest power and from the reception space. A long distance means long cable runs, a separate system, or a battery-powered ceremony setup. Each of those has a cost and a failure mode, which is why distance belongs on the checklist early instead of being discovered during load-in.
Sightlines, listening distances, and surfaces
Stand where the last row of guests will sit and note what is between you and the officiant: trees, tent poles, a fountain, traffic, an air conditioning unit. Note hard surfaces such as glass, stone, and tile, which reflect sound and can make speech harder to follow in a ballroom. Note the ceiling height if the room is indoors, because it affects where speakers and lights can safely go.
Weather exposure of the equipment and the people
Look for shade, shelter, and a place to retreat. Ask where guests would go if a storm moved in, and where equipment would be moved. A site with no weather plan for people is also a site with no weather plan for electronics. Our wedding rain plan guide covers the rain decision itself; this guide covers what the equipment needs.
Put the answers on one page
Collect everything into a single document that you and every vendor can read; it becomes the first page of your wedding audio lighting checklist. It prevents the common failure in which the DJ knows the curfew, the lighting vendor knows the circuit, and the photographer knows the schedule, but nobody has the whole picture.
The eight facts every vendor should have
A useful one-page site sheet includes the ceremony and reception locations, outlet locations and circuit information, the sound limit and curfew, load-in time and route, the weather plan, the name and phone number of the venue’s day-of contact, the name of the person who owns each system, and the final timeline. If a fact is unknown, write “unknown, asked on” and the date, so unknowns do not quietly turn into assumptions.
Share it early and update it in writing
Send the sheet to every vendor at the same time, ask each to reply with corrections, and send updates in writing when anything changes. Our wedding vendor timeline guide shows how to coordinate arrival times so audio, lighting, florals, and rentals are not all competing for the same doorway at the same hour.
Decide what each system has to do before you decide what to rent
A decision framework helps your wedding audio lighting checklist because audio and lighting packages tend to be sold as bundles that include more or less than you need. The framework below is our own simplification, not an industry standard. It asks three questions and maps the answers to a production tier, so a small backyard wedding and a large ballroom wedding each get a plan sized to their needs.
Count the zones and the moments
Start with where sound and light need to exist and what each moment demands. A zone is a physical space that needs its own coverage. A moment is a point in the day with a particular audio or lighting job.
The five zones most weddings use
Most weddings use some combination of these: the ceremony space, the cocktail space, the dinner space, the dance space, and the exit or send-off. Many venues combine two or more. On a wedding audio lighting checklist, a single-room wedding has one zone with five jobs, while a ceremony on a lawn followed by a reception in a barn has two or three zones that each need their own equipment, power, and weather plan.
The moments that carry speech, music, or both
Speech moments, such as vows, readings, toasts, and announcements, need clarity above all, and they fail when the microphone, the gain, or the speaker placement is wrong. Music moments, such as the processional, the first dance, and the dancing, need volume, balance, and clean cues. Some moments carry both: a toast that ends with a song, a ceremony with a live musician and a reader. List each moment, mark it as speech, music, or both, and note which light level it needs.
Choose a production tier
The tiers below describe how much planning and redundancy a wedding needs, not how expensive or fancy the equipment is. A small wedding can need a high tier because the venue has no power. A large wedding in a venue with a strong house system can sit at a lower one.
| Question | Tier one | Tier two | Tier three |
|---|---|---|---|
| Spaces needing sound | One | Two or three | Several, or a remote site |
| Voices to amplify | Officiant, a toast or two | Officiant, readers, toasts, announcements | All of these plus live acts or several wireless channels |
| Light jobs | Ambient and a few accents | Dance floor, room, key moments | Layers, control system, effects |
| Minimum power planning | Confirm outlets and circuit | Separate circuits, written load | Written distribution plan, qualified lead |
| Minimum backup | Spare battery, playlist on two devices | Spare mic, second music source, cue sheet | Spare for each critical link, rehearsed switch-over |
Tier one: one zone, few voices, simple light
Tier one fits a single space with one officiant microphone, a playlist, and a few string lights or uplights. The wedding audio lighting checklist at this tier is short: confirm power, test the microphone, bring a spare battery, load the playlist onto two devices, and know who turns lights on. The main risk is assuming that a simple setup does not need a backup.
Tier two: two or three zones, several voices, layered light
Tier two fits a ceremony and reception in different places, with microphones for the officiant, readers, and toasts, a DJ or small band, and lighting for the dance floor and the room. This is where a written plan pays for itself, because there are enough moving parts that one forgotten cable creates a delay. Separate circuits, a spare microphone, a spare music source, and a written cue sheet belong in this tier.
Tier three: several zones, live acts, or demanding sites
Tier three fits large guest counts, live bands, tented or remote sites, moving lights, haze, video, or a venue with strict rules. A wedding audio lighting checklist at this tier benefits from a dedicated audio engineer, a lighting operator, a written power distribution plan, and a rehearsal or full line check. If you are in this tier, the rest of this guide is a starting point for a conversation with your production vendor, not a substitute for one.
Decide who runs it
Equipment does not run itself. The person at the mixer, the person at the light controller, and the person who watches the clock are often the same person at smaller weddings, which affects how much you can ask of them.
When the DJ or band runs everything
Many DJs offer ceremony audio, reception audio, and uplighting as one package. That simplifies coordination, but it also concentrates risk on one person who must play music, run microphones, announce, and watch the lights. Ask how the vendor handles the ceremony and cocktail hour when the same person has to be in two places. Our wedding DJ questions guide has a longer list.
When the venue provides the equipment
Some venues have house speakers, microphones, and lighting. That can be a relief, but ask who operates it, what it includes, whether it has been tested recently, and what the venue’s own backup plan is. If the house system is the only system, a failure has no second path unless you add one.
When you hire a separate audio and lighting company
A specialist company costs more and adds a vendor to coordinate, but it separates the roles and often brings a backup for each. Ask for a named lead technician, an equipment list, a power requirement in watts or amps, and a written description of what happens if a major component fails. Our wedding vendor contract guide covers contract terms to watch for.
Ceremony audio: make every vow and reading understandable
The ceremony is the one part of the day that cannot be redone, and it is mostly speech. A microphone or speaker problem here is more visible than at any other point, and quiet voices outdoors are a common complaint. The ceremony half of a wedding audio lighting checklist is therefore mostly about voices, wind, distance, and a second path for each.
Decide who needs a microphone
Not every speaker needs the same kind of microphone, and not every person in the ceremony needs one. Start by listing who will speak and from where.
The officiant
The officiant usually speaks the most and stands close to the couple, so many audio guides recommend a small wireless clip-on microphone, called a lavalier, on the officiant. Audio-Technica, a microphone manufacturer, notes that an officiant’s lavalier can also pick up the couple’s vows because they stand nearby. That is a manufacturer’s advice, and it is a reasonable starting point, not a guarantee. Test it with the real people standing in the real positions.
The couple and the vows
Vows are quiet, personal, and often spoken facing each other. Options include a lavalier on one or both of you, a small microphone on a stand or the altar that picks up sound from a short distance, or a handheld passed between you. One photography education site suggests clipping microphones on both the groom and the officiant. Choose based on what you are wearing, because a lavalier needs a place to clip and a place for the transmitter to sit, and a dress without a waistband or a jacket can make that harder.
Readers, musicians, and guests who speak
Readers often need a microphone that can be held or sit on a stand. Ask your audio vendor to set the stand height before the ceremony and mark a spot on the floor. Live musicians have their own needs: a string quartet may want no amplification at all, while a singer needs a microphone and a monitor. Decide in advance who handles each, and put it on the sound check list.
Plan speakers and coverage
Speakers are a coverage problem, not a loudness problem. A vendor of wedding sound systems, One Of A Kind Events, advises spreading speakers so that guests far from the source hear as well as those close to it, and avoiding louder volume as a fix. That matches how sound works outdoors, where there are no walls to bounce it back toward the audience.
Where speakers go for a seated audience
Speakers placed at the front, aimed at the audience, keep the front rows from being overwhelmed while reaching the back, if the audience is small and the layout is simple. A longer or wider seating area may need an additional pair partway back, aimed at the rear rows, so that the front pair does not have to be turned up. Ask your vendor to describe where each speaker will go and why, and to mark the spots on the site sheet.
Processional music and cues
The processional is a cue, not just a song. Someone has to start it, and someone has to cue the next piece, the pause, and the recessional. Decide who gives the signal, how they will see it, and what happens if a cue is missed. Our wedding processional order guide explains the usual sequence, and our wedding ceremony guide covers the structure. Ask your audio vendor to rehearse the cues with whoever signals them.
Guests who may not hear well
Plan for guests with hearing loss. The Americans with Disabilities Act guidance on effective communication lists assistive listening systems and real-time captioning among the aids that may be used for people who are deaf or hard of hearing. Whether the law applies to a particular private wedding is a legal question we cannot answer. As a matter of hospitality, you can ask guests on the RSVP whether they would like seating near a speaker, a printed copy of the ceremony script, or another accommodation, and you can ask your vendor whether they offer an assistive listening option.
Record the ceremony as a separate job
A guest recording, a videographer, or a keepsake audio track all depend on the same signal chain or a separate one. Treat recording as its own task on the wedding audio lighting checklist, with its own backup.
A recorder that does not share the failure
If the video’s audio comes only from the speaker system’s mixer, a mixer problem silences both the room and the recording. Photography and videography guides commonly suggest more than one device: a recorder on the officiant, a second on the groom, an ambient microphone near the audience, and the camera’s own microphone as a sync reference. A B&H photography education article suggests starting all devices before the ceremony and creating a clap at the start so the tracks can be aligned afterward. Ask your videographer which of these they use.
Wind, clothing noise, and transmitters
Wind noise is the most common outdoor microphone problem. The same B&H article recommends a windscreen on ambient microphones when it is windy. Clothing rustle and a transmitter that shifts on a waistband also cause noise. Ask your vendor what windshields they bring and whether they test the clip position with the actual clothing, since a rehearsal in a different outfit may not show the problem.
Unplugged ceremonies and guest recordings
If you plan an unplugged ceremony, where guests are asked to put phones away, you may want a clear official recording because guests will not have one. Our unplugged wedding ceremony guide explains how to set expectations. It is worth adding to the wedding audio lighting checklist, before the day, who owns the recording, where the files go, and how they are backed up.
Reception audio: speeches, music, and moving between rooms
Reception audio asks a system to do two different jobs, deliver clear speech and deliver danceable music, and the settings that suit one often hurt the other. The best reception sections of a wedding audio lighting checklist treat speech and music as separate modes and plan the transitions.
Toasts, announcements, and the sound of speech
Toasts are the reception’s riskiest audio moments. Speakers are nervous, they hold the microphone too far away, they are sometimes unrehearsed, and the room is full of conversation.
Handheld, lavalier, or stand
A handheld microphone is easy to hand off but easy to hold badly. A stand removes the handling problem but fixes the height and location. A lavalier is hands-free but needs time to clip on and is awkward for a long series of toasters. Many weddings use handhelds for toasts and ask the host or DJ to hand the microphone over with a short instruction. Ask your vendor to bring at least one extra handheld and extra batteries, as One Of A Kind Events recommends having backup microphones and batteries on hand.
Coaching speakers and holding the microphone
Give toast givers a short note, perhaps with the printed program, saying where the microphone will be, how close to hold it, and how long the speech should run. Our wedding speeches guide covers the structure and timing. If you want a recording of the speeches, decide who owns it before the day, as described in the ceremony section above.
Music under speech and back again
Ask your DJ or band how they handle the transition: music fades before the announcement, speech starts at a set level, music returns cleanly after. One of the sound vendor guides we read recommends that music fade under speech and return smoothly. Make that a stated expectation and ask whoever runs the mixer to confirm it.
Dance-floor sound
The dance floor is where volume, coverage, and the sound limit collide. Good dance sound reaches the whole floor at a level that feels energetic and not painful.
Coverage and speaker placement
As with the ceremony, spread beats loud. A vendor guide suggests distributing speakers so those far from the booth hear as well as those near it, and warns that bass should stay controlled, even when subwoofers are used for impact. Ask where the speakers will be relative to the dance floor and the tables, and whether any guests sit directly in front of a speaker. Our wedding reception guide covers the layout of the evening, including where the dance floor tends to go.
Volume, guests, and the sound limit
Volume is a decision with consequences for guests, vendors, and neighbors. The National Institute for Occupational Safety and Health, which studies workplace noise, treats sound at or above 85 A-weighted decibels as hazardous over a work shift. A wedding is not a workplace, and that figure is not a wedding limit, but it gives a useful reference point for conversation. We return to measurement in the sound-level section below.
Late-night music and the transition to quiet
Ask when the final song will play and how the evening will wind down. Many venues have a hard stop, and the sound limit may drop at a set hour. Plan the last dance and the send-off to fit before the cutoff, with enough time for guests to say goodbye. Our last dance guide is a place to start.
Cocktail hour and separate spaces
If cocktail hour happens in a different space from the ceremony or the dinner, it needs its own audio and its own plan.
A second system or a shared one
Some vendors move the ceremony speakers to the cocktail space, which saves equipment but creates a time crunch while guests are waiting. Others bring a separate pair and a second source, which costs more but avoids the rush. Ask which approach your vendor takes and what the setup timeline looks like.
Background music that still lets people talk
Cocktail hour music works best when guests can talk without raising their voices. One vendor guide advises keeping volume low enough for conversation during this part of the day. Agree on a level with your vendor and ask them to adjust once guests arrive, because a half-empty space sounds different from a full one.
Wireless, frequencies, and feedback
Wireless microphones free speakers from cables, and they also bring radio rules, interference, and battery management. Feedback, the loud squeal that happens when a microphone hears its own speaker, is the other classic failure. Both are largely preventable with planning, and both belong on a wedding audio lighting checklist.
Wireless microphones and the rules that apply
In the United States, the Federal Communications Commission regulates the radio spectrum, and wireless microphones are subject to its rules. Those rules changed during the past decade, which matters if your vendor owns older equipment.
What the FCC says about bands and power
According to an FCC document on the operation of wireless microphones, unlicensed use is allowed on TV channels 2 through 36, below 608 MHz, and in a few other bands. The same document states that microphone use in the 700 MHz band has been prohibited since 2010, and that most of the 600 MHz band was repurposed for wireless service after an auction in 2017. For unlicensed microphones, it lists a maximum power of 50 milliwatts in the TV bands and 20 milliwatts in the 600 MHz guard band or duplex gap. The page we read was last reviewed in October 2019, so confirm the current rules before relying on any detail.
Why this matters for your vendor’s gear
Older microphones that operated in the 600 MHz or 700 MHz bands may no longer be legal to use. The FCC document says that unlawful operation in those bands can lead to fines or criminal penalties. You are not responsible for your vendor’s equipment, but you can ask whether their wireless microphones operate in currently permitted bands, and they should be able to answer immediately. The FCC advises checking the owner’s manual or contacting the manufacturer to learn which frequencies and power levels a given device uses.
In-ear monitors, intercoms, and other wireless gear
Microphones are not the only wireless devices. The same FCC document says that low-power auxiliary equipment such as wireless intercoms, in-ear monitors, instrument links, and cueing devices follows the same frequency rules. A band may use in-ear monitors, a videographer may use wireless audio, and a coordinator may use wireless headsets. All of them share the same radio space in a crowded room.
Frequency coordination and interference
Even legal frequencies can collide. At a wedding, the DJ, a band, a videographer, a photographer, and the venue may each bring wireless gear.
Ask who is bringing wireless equipment
Add a short question to your vendor list: do you use wireless microphones, in-ear monitors, or wireless cameras, and how do you choose frequencies? A good technician can describe scanning the venue’s radio environment before choosing channels and assigning channels so that devices do not overlap. If two vendors bring wireless gear, ask them to coordinate with each other before the day.
Scan, then set up, then test
A professional will usually scan for open channels when they arrive, because the environment changes from venue to venue and from hour to hour. Then they set up and walk the whole area with a microphone to check for dropouts. Ask your vendor whether they do this, and where they will walk. A check in the empty room tells you less than a check with the guests present, so ask whether they will recheck when the room fills.
Batteries as a source of silent failure
Wireless microphones run on batteries, and a dead battery in the middle of a toast is a common and entirely avoidable failure. Ask your vendor how often they change batteries, whether they replace them before the ceremony and again before the reception, and whether the transmitters show battery level on the mixer. Ask where the spares are kept and who knows where they are. Our wireless wedding ceremony audio guide covers battery and interference checks in more detail.
Preventing feedback
Feedback happens when sound from a speaker reaches a microphone and is amplified again, creating a loop. It is most likely when microphones are close to speakers, when gain is high, and when many microphones are open at once.
The causes, according to a microphone manufacturer
Shure, a microphone manufacturer, lists the common causes: a microphone too close to a loudspeaker or monitor, a microphone too far from the person speaking, so that the gain must be raised, excessive gain overall, several open microphones at once, and a hand covering a directional microphone’s capsule. Each cause points to a fix. Place microphones close to the source, away from speakers, turn off those not in use, and avoid covering the grille.
A ring-out routine you can ask for
Shure describes a method called ringing out: raise the level until feedback just begins, identify the frequency, cut that frequency slightly with an equalizer, and repeat until the desired level is reached without over-equalizing. Shure’s page gives approximate ranges for how feedback sounds, with hoots often around 250 to 500 Hz, singing tones near 1 kHz, and whistles above 2 kHz. You do not need to perform this yourself. You can ask your vendor whether they ring out the system at the real positions and how long they allow for it.
Why the ceremony site is the hard case
Outdoors, there are no walls to hold sound, so speakers are often placed close to the microphones that need to be heard. The practical rule is the one that the manufacturer states: keep microphones near their sources and away from speakers, and use as few open microphones as the ceremony needs.
Lighting production: purpose, control, and cues
Lighting design, meaning color, mood, and style, is covered in our wedding lighting guide. This section is about lighting as a production system: what each fixture must accomplish, how it is controlled, who operates it, and what the venue permits. A good wedding audio lighting checklist treats lighting as functional first and decorative second.
Give every light a job
On a wedding audio lighting checklist, a fixture without a purpose is a power draw, a cable, and a failure point. Before approving a lighting plan, ask what each group of lights is for.
Lighting for seeing and being seen
The ceremony needs enough light for guests to see faces and for photographers to work. Toasts need light on the speaker. The dance floor needs enough light to be safe underfoot, and the exit needs light on the path. These are functional jobs, and they should work even if all the decorative lighting fails. Ask your lighting vendor which fixtures cover each function and whether a work light or house light can serve as a fallback.
Lighting for the camera
Photographers and videographers work with the light you give them. Our wedding photography guide and wedding photographer shot list describe what the shoot typically includes. Ask your photographer what light they need for the ceremony, the toasts, and the first dance, and share that with your lighting vendor. Colored washes, haze, and dim candlelight can look beautiful and challenge a camera, so a conversation before the day prevents disappointment.
Lighting for the moments that matter
Decide which two or three moments you most want lit well, perhaps the ceremony, the first dance, and the send-off, and put those at the top of the plan. Our wedding first dance guide covers the dance itself. Spending attention on a few moments is usually a better use of a limited budget than spreading it evenly across the whole evening.
Control: how the lights are operated
Fixtures are controlled in a few common ways, and each affects setup time, cables, and what can go wrong.
Simple fixtures and built-in controls
Many uplights and small fixtures have buttons, remotes, or built-in programs. They are simple, and many run on batteries or a power cord. The trade-off is that each one may need to be set or aimed by hand, and a change during the evening means walking over to it. Ask how many fixtures are in the plan and whether anyone changes them during the event.
DMX and wireless control
For larger plans, technicians often use DMX512, a long-established digital control protocol for lighting. An Adafruit tutorial notes that the DMX512 specification calls for five-pin XLR cable, though three-pin is common in less expensive systems, and that proper DMX cable has an impedance of 110 ohms, with ordinary microphone cable often acceptable for short runs. Some systems use wireless DMX to avoid long cable runs. You do not need to learn the protocol. You can ask whether the lighting is wired or wireless, who runs it, and what happens if the control link drops.
What a fixture does when control is lost
Some fixtures hold their last state when the signal stops, some go dark, and some return to a built-in program. We did not find a general source on this, and it depends on the fixture and its settings. Ask your lighting vendor what the lights will do if the controller loses power or the wireless link fails, and whether a manual fallback exists. That single question tells you a lot about how carefully the system was planned.
Haze, effects, and venue approval
Special effects need permission, and the rules differ by venue.
Haze and fog
Haze and fog machines make light beams visible. We did not find an authoritative source on how haze interacts with smoke detectors, and the answer depends on the machine, the fluid, the room, and the detection system. For that reason, ask the venue directly whether haze or fog is permitted, and ask your vendor to confirm in writing that the venue approved it. Do not assume a machine that worked at another location will be accepted at yours.
Open flame, sparklers, and pyrotechnics
Candles, sparklers, and anything that burns are governed by fire codes. Our wedding lighting guide includes a section on candles and flame. For this guide, the rule is the same: ask the venue and local fire officials, and plan a flameless alternative in case the answer is no.
Moving lights, lasers, and strobes
Moving heads, lasers, and strobes add complexity and sometimes risk, including for guests who are sensitive to flashing light. We did not review a source on this topic, so treat the following as a question and not as a rule: ask your vendor whether strobe or rapid flashing effects are in the plan, and consider letting guests know ahead of time. Ask the venue whether it restricts any effect type.
The power plan: load math, circuits, cords, and generators
Power is where audio and lighting meet. A lighting plan that works alone and an audio plan that works alone can still trip a breaker together. This is the part of the wedding audio lighting checklist where a few minutes of arithmetic prevents the most visible failure of the evening: everything going quiet and dark at once.
The load math
Electrical load is measured in watts, and the capacity of a circuit is measured in amps at a given voltage. The relationship is simple, and you can do it with a calculator and the labels on the equipment.
Watts, amps, and the eighty percent guideline
An explainer from HomeServe, a home-services company, states that watts equal volts multiplied by amps. In the United States, a standard outlet is 120 volts, so a 15-amp circuit can supply 1,800 watts and a 20-amp circuit can supply 2,400 watts. The same explainer says that continuous loads, those drawn for about three hours or more, should stay at or below 80 percent of the breaker’s rating, and it attributes this to the National Electrical Code. That gives about 1,440 watts for a 15-amp circuit and about 1,920 watts for a 20-amp circuit. A wedding evening can easily run for several hours, so the lower figure is the prudent planning number. Your venue’s electrician can tell you what actually applies.
Shared circuits and hidden loads
Outlets on the same branch circuit share one breaker. The HomeServe explainer notes that the breaker’s rating caps the combined load of everything on that circuit, and that power strips and surge protectors do not change this. The practical consequence is that two outlets in different parts of the room may be on the same circuit, and a caterer’s equipment or a heater may be sharing it. Ask the venue to identify circuits, and ask whether a map or labeled panel exists.
Reading labels and asking vendors
Equipment labels list power in watts or amps. If a label lists amps, multiply by 120 to estimate watts. Lighting and audio vendors should be able to give you a total load in watts or amps for their setup. If they cannot, that is a flag. Remember that some equipment draws more at startup than when running, so ask vendors about peak load as well as typical load.
A worked example
The numbers below are invented for illustration. Every device wattage here is an assumption, not a specification, and real equipment varies. Use your vendors’ actual numbers in your own plan.
The audio circuit
Imagine an audio setup with two powered speakers that together draw 500 watts, a mixer and laptop that draw 100 watts, and wireless receivers and chargers that draw 40 watts. The total is 640 watts. Dividing by 120 volts gives about 5.3 amps, which sits comfortably under the 1,440-watt guideline for a 15-amp circuit.
The lighting circuit
Imagine twelve LED uplights at 15 watts each, which is 180 watts, two moving lights at 150 watts each, which is 300 watts, and a haze machine labeled at 700 watts. The total is 1,180 watts, or about 9.8 amps. That is under the 1,440-watt guideline, though not by a large margin, and a haze machine that heats up can draw its full rating for long stretches.
What happens on one circuit
Put both systems on one 15-amp circuit and the total is 1,820 watts, or about 15.2 amps, which is over the circuit’s 1,800-watt rating and well over the 1,440-watt guideline. In practice that is a breaker waiting to trip. The remedy in this invented example is simply to put audio and lighting on different circuits. The figure below shows the idea.

Cords, cables, and distribution
Power gets from the wall to the equipment through cords, and cords are a frequent source of trouble. OSHA, the federal workplace safety agency, lists misuse of extension cords and lack of ground-fault protection among the common causes of electrical injuries.
Gauge, length, and temporary use
A university environmental health and safety guide advises that extension cords are for temporary use, that a lower gauge number means thicker wire, and that longer runs need thicker wire. For loads up to 15 amps, it says 14-gauge cord is suitable for runs up to 50 feet and 12-gauge for runs up to 100 feet. It also says to treat about 80 percent of a cord’s rating as the practical limit and to use cords labeled for outdoor use outside. A rental company or professional crew will usually bring appropriate cords, so your job is to ask, not to buy.
No daisy chains, no strips on cords
The same guide advises never connecting one extension cord to another and never plugging a power strip into an extension cord. It also says to inspect cords before each use for damaged prongs, cuts, worn insulation, or flattened spots, and to retire damaged cords. Ask your vendor whether they follow these rules and whether they bring more cord than they need, so no one is tempted to chain a short one onto another.
Wet ground and ground-fault protection
The same guide says not to use a cord when it is wet, and to use a ground-fault circuit interrupter, or GFCI, in damp areas. At an outdoor wedding, wet grass, a sprinkler system, or a sudden shower turns a power question into a safety question. Ask your vendor how connections will be raised off the ground and protected from water, and whether the circuits you are using have ground-fault protection. A qualified electrician or the venue can confirm.
Cable paths and trip hazards
The university guide says not to run cords through doorways or openings in walls, floors, or ceilings, and not to place items on cords. At a wedding, cables cross aisles, doorways, and dance floors, where guests in heels or a child running can catch them. Ask your vendor how cables will be covered or routed, and where the walking paths are. Our wedding emergency kit guide is a good companion for small fixes on the day.
Generators and remote sites
If the site has no power, or not enough, a generator may be part of the plan. A generator is a piece of machinery that produces exhaust, noise, and heat, and it adds risk.
Safety rules from the federal safety agency
The U.S. Consumer Product Safety Commission’s portable generator safety alert says the exhaust contains carbon monoxide, which cannot be seen or smelled and can reach deadly levels quickly in enclosed spaces. It advises keeping a generator at least 20 feet from doors, windows, and vents, never running one indoors, in a garage, or in a shed, and avoiding wet conditions or using an open, canopy-style cover on a dry surface. It also says to shut the generator off and let it cool before refueling. These are consumer safety rules, and your vendor or rental company should know them better than you do.
Who operates it, and where it sits
A generator needs an operator who knows how to run it, fuel it, and shut it down. Ask who will do that, where it will be placed relative to guests, tents, and the ceremony space, and how noise will be managed. Generator noise can disrupt a quiet ceremony, so ask how far away it can sit and how long the cable run will be. Do not ask a guest or family member to manage one.
Sizing, fuel, and a backup plan
A generator must be sized to the combined load, with room to spare, and it needs enough fuel for the whole event. Ask your vendor to state the load, the generator’s rating, and how long it can run on one tank. Ask what happens if it stops and whether there is a second power path. If the venue forbids generators or requires an approved contractor, ask early, since this affects the quote and the plan.
The redundancy plan: what can fail and what covers it
On a wedding audio lighting checklist, a backup plan is not a pile of spare equipment. It is a map of single points of failure with a named second path for each. Our sibling guide on a wedding AV backup plan focuses on spare microphones, files, and power. This section gives the framework behind it, so you can see which failures matter most for your wedding.
Map the single points of failure
A single point of failure is one component whose failure stops a whole function. The goal is not to remove every one, which is unrealistic and expensive, but to know where they are and decide which to cover.
The signal chain
Voice and music travel through a chain: source, transmitter or cable, receiver, mixer, amplifier, speaker. If any link fails, the chain stops. For the officiant’s voice, the chain might be a lavalier, a transmitter, a receiver, a mixer, and a pair of speakers. Draw it for each important moment and mark the links that have no second path.
The power chain
Power travels from the outlet or generator through cords, strips, and distribution to each device. Mark where one breaker feeds several critical devices and where one cord feeds a whole rack. Moving the ceremony microphone receiver onto battery power or a separate circuit is a common way to remove a single point of failure, but ask a qualified technician before changing any wiring.
The content chain
Music, announcements, and cues also come from files and devices. A laptop that crashes, a streaming service that loses connection, or a phone that receives a call all stop the music. Ask your DJ or band how the playlist is stored, whether it plays without an internet connection, and whether a second device holds the same files.

Build the spare kit
Spares do not need to be elaborate. They need to be right, labeled, and findable by someone other than their owner.
Audio spares
A sensible audio spare kit includes a backup microphone for each type in use, a fresh set of batteries, extra cables and adapters, and a second source for music. The vendor guide we cited says to keep backup microphones and batteries on hand so a single failure does not interrupt a ceremony or a speech. Ask your vendor to list the spares they bring for the wedding audio lighting checklist and where they will be during the event.
Lighting spares
Lighting spares on the wedding audio lighting checklist usually include extra bulbs or fixtures of the most critical type, spare power and data cables, and a work light that can illuminate the space if the main plan fails. Ask your lighting vendor which fixtures are critical, such as the ceremony light or the dance floor light, and whether a spare is on site and can be swapped quickly.
Content and file spares
For music and announcements, the wedding audio lighting checklist should say to bring the same files on two devices and, if practical, a physical copy. For the ceremony, keep a printed cue sheet and a second playlist. For the speeches, keep a charged phone with a recording app in case the main recorder fails. These steps cost almost nothing and protect against the most common content failures.
Write the switch-over rules
A spare on your wedding audio lighting checklist is useful only if someone knows when and how to use it. Write down triggers and owners.
State the trigger in plain words
A switch-over rule reads: if the officiant’s microphone drops out for more than a few seconds, the technician hands the officiant the backup handheld. Choose the number of seconds with your vendor, and put the rule on the cue sheet. Vague plans such as “we will figure it out” tend to cost more time than specific ones.
Name the decider
On the day, the couple should not be the ones deciding. Name a person, perhaps your coordinator or the lead technician, who can authorize a switch and tell the officiant or the DJ. Our wedding vendor timeline guide covers sound checks, power, and the ceremony-to-reception flip.
Practice the switch
A switch you have never practiced is slower than a switch you have. Add a drill to the wedding audio lighting checklist: ask your vendor to practice the microphone swap, the music source change, and the move to backup power during the sound check. Our wedding rehearsal guide covers the walk-through, and it is the natural time to run these drills.
Weather and the outdoor stage plan
Weather is the one variable that every other part of the plan depends on. A strong outdoor plan answers three questions before the day: who decides to pause, where people and equipment go, and how the layout works when the weather is not perfect.
Lightning and storms
The National Weather Service’s safety pages are the primary public reference for weather hazards in the United States. Its safety hub lists roughly twenty-five hazards, including thunderstorms, and links each to forecast information and safety guidance. The decisions about a storm at your wedding belong to you, your venue, and your vendors, and the guidance below is how to prepare for them.
Know what the risk is
According to the National Weather Service’s lightning page, lightning strikes the United States roughly 25 million times a year and kills about 20 people annually, with hundreds more severely injured. It adds that most strikes occur in summer but that people can be struck at any time of year. The page also describes a slogan, “Flash, Dash Inside,” created by and for the Deaf and Hard of Hearing community, a reminder that a warning plan should not depend on hearing a siren or an announcement.
Decide in advance who calls the pause
Name one person with authority to pause the event and move people indoors, and tell every vendor who that person is. Decide in advance how the pause will be announced, how guests will be moved, and how the audio and lighting crew will safely shut down and move equipment. We could not retrieve the National Weather Service’s detailed shelter and timing guidance for this guide, so read the current guidance on its lightning page and ask your venue for its written storm plan, including what counts as a safe shelter on the property.
Protect equipment without risking people
Equipment is replaceable and people are not. A plan that asks a technician to keep working to save speakers is a bad plan. Write down that people move first and gear second, and ask your vendor and the venue what the plan is for gear left outdoors. Our wedding insurance guide covers how to compare policy wording, and our wedding rain plan guide covers the rain decision itself.
Wind, heat, and sun
The National Weather Service safety hub also has wind and heat sections. We did not retrieve their contents, so the points below come from general planning reasoning and from vendor guidance, not from the Weather Service.
Wind and microphones
Wind affects speech in two ways. It makes noise in microphones, and it carries sound away from the audience. A vendor guide notes that without walls or ceilings, sound dissipates faster outdoors and wind can disrupt microphones and make speech hard to follow. Ask your vendor about windscreens, microphone placement, and speaker positions for the prevailing wind. Unsecured lightweight items such as banners or lighting stands can also become a hazard in wind, so ask how stands are weighted.
Heat on people and gear
Electronic equipment can overheat in direct sun, and guests are affected by heat too. Ask your vendor where equipment will sit during the day and whether it will be shaded. Our summer wedding heat plan guide covers the people side, including shade and water. If your ceremony is in full sun, the guide also affects where you put the officiant, because a speaker facing the sun is squinting and the guests behind them are in glare.
Rain, tents, and dampness
Rain adds both an electrical safety question and an audio question. Tents have their own acoustics, with fabric absorbing some sound and rain on the roof adding noise. The University of Washington guide we cited says to avoid using a cord when it is wet and to use ground-fault protection in damp areas. Ask your vendor how they handle a tented plan, and whether they have a weather plan that moves the audio inside quickly. Our outdoor wedding venues guide covers choosing the site itself.
The stage plan
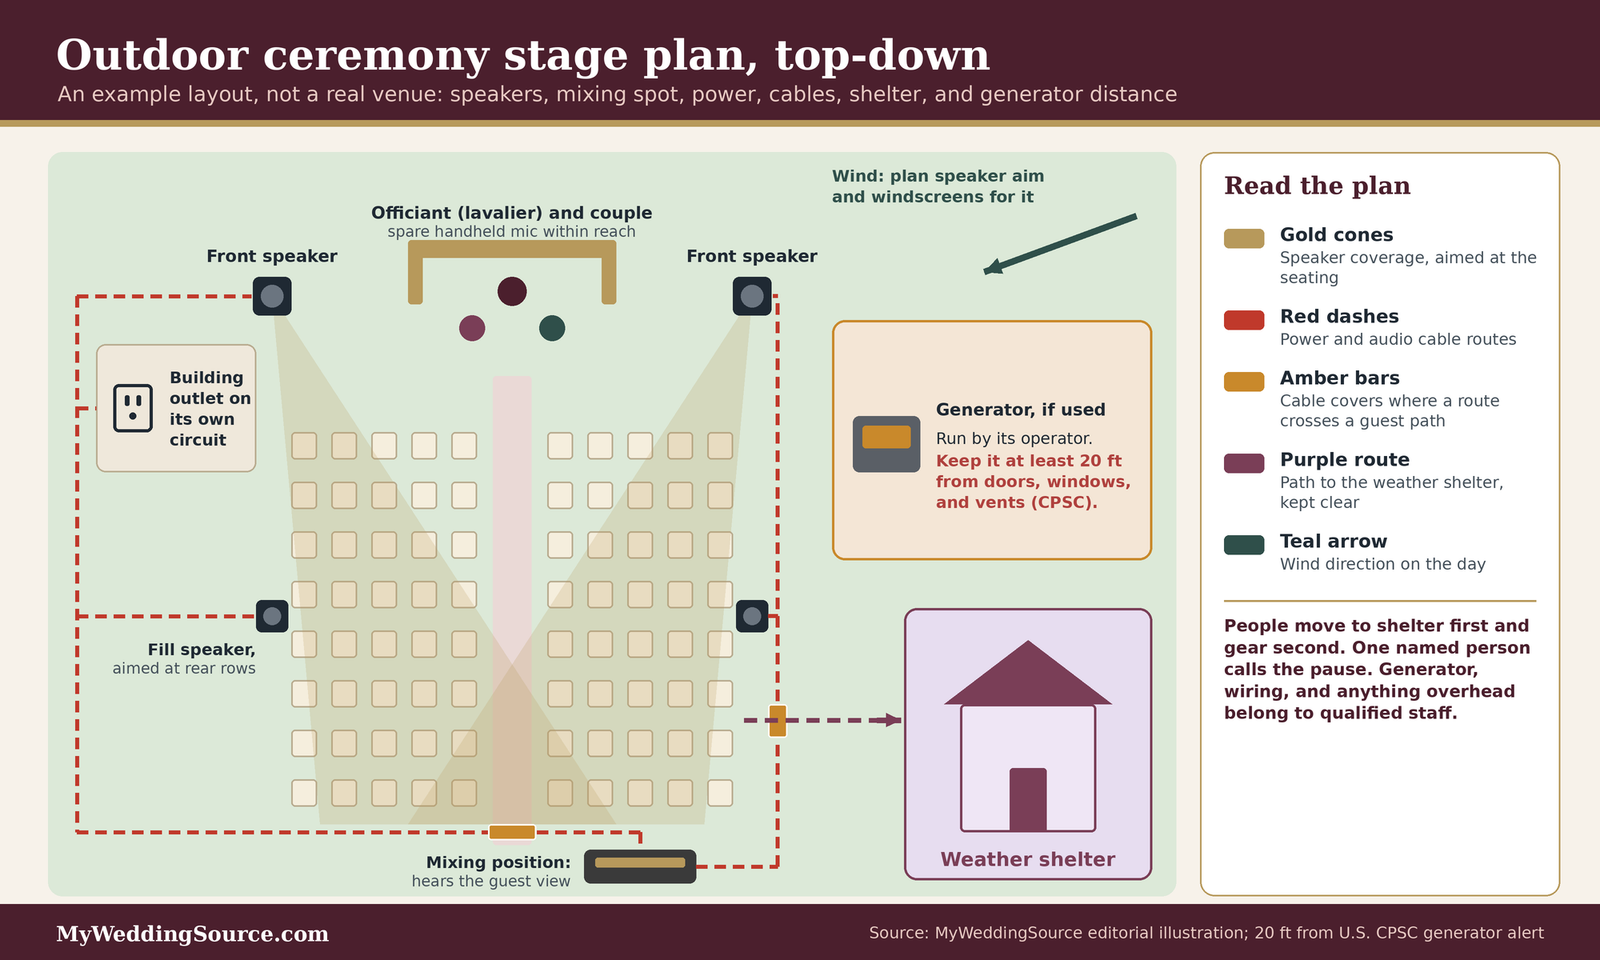
A stage plan is the drawing that goes with a wedding audio lighting checklist, showing where things go. It need not be professional, but it should exist, because it forces decisions that conversation leaves open. The figure below shows an example layout for an outdoor ceremony, drawn from the principles above, not from a real venue.
What goes on the drawing
Mark the ceremony space and aisle, the officiant and couple positions, speakers and their aim, the audio control position, power sources and cable routes, any lighting fixtures, the path guests will use, the weather shelter, and the generator if one is used. Add distances, since a rough measure is better than none. Ask your vendors to review the drawing and correct it.
Where the audio control sits
Whoever mixes the sound needs to hear what the guests hear. A mixing position placed behind the audience, near the middle of the seating area, lets the operator judge the sound from a guest’s position. A position tucked behind the stage hears something quite different. Ask your vendor where they plan to sit and whether they can hear the system from there.
Where the cables run, and where people walk
Draw cable routes and walking routes in different colors and look for crossings. Every crossing needs a cover, a ramp, or a different route. Check that guests in wheelchairs or using walkers can use the main route without crossing a cable, and that the paths to the weather shelter are clear. Our wedding permits guide has a section on sound limits that applies to an outdoor site.
Sound levels, neighbors, and guest comfort
Loud music is part of many weddings, and volume belongs on a wedding audio lighting checklist because it has limits for health, for neighbors, and for the venue. A good plan sets a target, measures it, and agrees on who adjusts.
Know the numbers
Sound is measured in decibels, and the scale is logarithmic, which makes small numeric differences larger than they look.
What the decibel scale means
The National Institute for Occupational Safety and Health explains that noise is measured in A-weighted decibels, written dBA, and that the scale is logarithmic. A sound 10 decibels louder than another is about ten times as intense. In practice, that means a modest-looking increase in level is a large increase in sound energy. When a venue sets a limit, a few decibels matter.
What NIOSH and CDC say about exposure
NIOSH says that noise at or above 85 dBA is hazardous and that its recommended exposure limit is 85 dBA averaged over an eight-hour workday. A Centers for Disease Control and Prevention hearing page gives approximate times before damage may occur: roughly 15 to 45 minutes at about 85 to 90 decibels, roughly one to five minutes at about 95 to 100, and seconds at 105 and above. As we read the page, those ranges are paired in that order, but its labels are inconsistent, so treat the figures as a rough guide. These are occupational and health references, not wedding rules, and a wedding is not a workplace. They are useful for judging whether a plan is reasonable for older guests, children, and the staff who work close to speakers all night.
Why a limit set by the venue still applies
Even if a given level is not harmful, the venue’s limit is a contractual and sometimes legal boundary. Our sibling guide on wedding reception noise limits covers how to measure and comply. For this guide, the point is that audio planning begins with knowing the limit and where it is measured, because a limit measured at the property line is a very different constraint from one measured at the dance floor.
Measure sensibly
Measuring volume is easy to do badly. A casual measurement can calm a nervous venue or start an argument.
What a phone app can and cannot do
NIOSH publishes a free Sound Level Meter app for iOS. NIOSH’s own description says it is not meant to replace a professional sound level meter or to be used for compliance purposes, and NIOSH recommends an external calibrated microphone for better accuracy. In laboratory testing with such a microphone, NIOSH reports the app measured within about one decibel of a reference meter across a mid range of levels. For a wedding, a phone app is a rough check for the couple or the coordinator, not evidence in a dispute.
Who measures, where, and when
If the venue has a sound limit, ask who will measure it, with what, at what location, and how often. Ask what the response will be if the reading is too high: a request to turn down, a warning, a fee, or an end to the music. Write the answers into the agreement. A measurement taken by your own coordinator at a spot agreed with the venue is much more useful than one taken by a guest.
Agreeing on a number with your vendor
Ask your DJ or band whether they can work within the limit, and how they control volume across a night, because crowds get louder as the evening goes on. A vendor who has played the venue before can often describe the reality of the limit. Consider a written agreement that the vendor will follow reasonable requests from the venue to adjust.
Comfort for the people in the room
The room should work for guests of different ages and needs, not just for the dance floor.
Older guests, children, and the quiet corner
Loud music can drive older relatives, young children, and anyone with sensitive hearing out of the room. Consider seating older guests farther from speakers, and consider providing a quieter area, perhaps a lounge or a patio. Ask your vendor whether they can offer a lower level during dinner and raise it after.
Hearing support and captions
The Americans with Disabilities Act guidance on effective communication lists assistive listening systems and real-time captioning, called CART, among the aids for people who are deaf or hard of hearing. In CART, a transcriber types the speech and the text appears on a screen. We did not research what any given vendor offers. If you have guests who would benefit, ask your venue and audio vendor early, and consider a printed ceremony script as a simple addition.
Hearing protection for you and the crew
The people who work closest to speakers, including the DJ, the band, and the audio crew, are most exposed. NIOSH recommends that workers exposed to hazardous noise have yearly hearing tests. If you are a performer or a family member who will stand beside a speaker for hours, ask for a spot farther away or wear hearing protection. Our wedding entertainment ideas guide covers safety, access, and sound limits for entertainment choices.
The checklist itself: a timeline and a day-of run sheet
The sections above explain the reasoning. This section is the wedding audio lighting checklist in the form most people expect: things to do, in order, with owners. Copy this wedding audio lighting checklist into your planning tool and adjust it to your venue.
The planning timeline
Dates on this wedding audio lighting checklist are approximate and depend on your venue and vendors. Our wedding planning checklist covers the wider timeline, and this one covers the audio and lighting portion.
Early: rules, facts, and the production tier
At the start of planning, collect the venue’s sound limit, curfew, power information, load-in rules, and effect policies. Walk the site. Decide your zones, your moments, and your production tier. Decide whether the venue’s house system, your DJ or band, or a separate production company will run each system. Put the key venue facts on your site sheet and the first lines of your wedding audio lighting checklist.
Mid: vendors, contracts, and plans
Choose vendors, and ask each of the questions listed in the questions section below. Get a written equipment list, a written power requirement, a spare list, and a switch-over plan. Share the site sheet with all vendors. Confirm weather plans, shelters, and the person who calls a pause. Ask for the sound limit and the venue’s curfew to be reflected in the contract.
Late: final details, cues, and rehearsal
A few weeks out, send the final timeline, cue sheet, and music list. Confirm load-in times and the person who will meet vendors. Confirm accessibility needs, such as seating near a speaker, a printed script, or an assistive listening option. Plan the rehearsal so that the officiant, readers, and anyone who will use a microphone try it. Review the forecast in the final days and revisit the weather plan.
The day-of run sheet
The run sheet half of a wedding audio lighting checklist is a time-ordered list with a named owner for each line. The structure below suits most weddings. Adjust the times to your schedule.
Load-in and setup
Vendors arrive at the agreed time and meet the venue contact. The audio vendor places speakers and the mixing position, runs cables with covers, and confirms power on the agreed circuits. The lighting vendor places and aims fixtures. The coordinator confirms that cable paths avoid guest routes. Nobody connects anything to the building’s power without the venue’s approval.
Line check and sound check
The audio vendor tests every microphone at its real position, with real batteries, and rings out the system. They walk the guest area while someone speaks, to check coverage and dropouts. They test music from both sources. The lighting vendor sets the ceremony, toast, and dance-floor looks. This is when you test the switch-over rules, not later.
Ceremony, toasts, dancing, and exit
Assign a person to each cue: start the processional music, hand the microphone to the officiant and readers, start and stop recordings, change the lights for toasts and the first dance, and signal the last dance. Keep a spare microphone and spare batteries within reach of the technician. Someone should watch the weather. Someone should watch the clock.
Teardown and end-of-night
Agree on teardown times, who has authority to say the music has ended, and when equipment must be out. Do a short check of the venue for left-behind items and cables. Collect any recordings and make a second copy of any files the same night, so a single device failure does not lose the ceremony.
Quotes, contracts, and costs
Production costs vary widely, and we did not find a reliable published survey that separates audio and lighting production from the larger entertainment budget. This wedding audio lighting checklist therefore gives no price figures. It gives a way to compare quotes fairly.
Cost note
We did not find a trustworthy, independent price survey for wedding audio and lighting production, and we will not quote one we cannot verify. Ask each vendor for an installed price, meaning the full cost to arrive, set up, run, and remove the system, and compare quotes on the same list: equipment, spares, setup hours, operator, travel, power or generator needs, overtime, and what is excluded. A lower quote that leaves out the spare kit or the operator is not the same product as a higher one that includes them. Disclosure: we have no commercial relationship with any vendor named or described in this guide.
What to put in writing
A written agreement makes a plan real. It also protects both sides, because it makes expectations specific.
Equipment, people, and times
The agreement should list the equipment by type and quantity, the named operator, the setup and teardown times, the performance hours, and the power requirement. If the quote says “full sound system,” ask for what that means in speakers, microphones, and sources. Our wedding vendor contract guide covers the rest of the terms.
Spares, switch-over, and substitutions
Ask the vendor to write down the spare kit and what happens if a major piece fails, including a commitment to substitute equivalent equipment. If a vendor reserves the right to substitute, ask for it to be of equal or better quality. If the vendor will not commit to a spare, you can decide whether to bring your own.
Venue rules and responsibility
Ask the vendor to confirm that they have read the venue’s rules, including sound limits, curfew, load-in, and effects. Ask who is responsible if the venue fines the event for a violation caused by the vendor’s equipment or operation. Do not assume it is clear. Ask a lawyer if the amounts or terms are significant, since this guide is not legal advice.
Compare quotes on equal terms
Quotes often look different because they bundle different things.
A template for an installed quote
List the rows you want every vendor to price: speakers and amplification, microphones and spares, mixing and operator, music sources and backups, lighting fixtures and control, power distribution and cords, generator if needed, setup and teardown labor, travel and parking, overtime, insurance, and exclusions. Send the same list to each vendor and ask them to fill in the cells or write “not included.”
What a low quote may leave out
A low quote can leave out the operator, the spares, the weather plan, the overtime rate, or the setup time. Ask each question directly, because vendors may assume a customer who did not ask does not need it. A surprisingly low quote is not a sign of anything wrong, but it is a reason to read the line items.
Time-limited claims and freshness
Vendors sometimes quote prices and policies that change. We checked the sources in this guide on the date shown in the source section, and prices and policies vary by vendor and region. Ask each vendor how long a quote is valid and what the deposit and cancellation terms are, and read them against our wedding insurance guide.
Edge cases that change the plan
Most weddings fit the wedding audio lighting checklist above. The cases below are where it bends, and where a conversation with your vendor matters most.
When the venue controls everything
Some venues require you to use their house audio and lighting, or their approved vendors.
A house system with no backup
If the house system is your only system, ask what happens when it fails and who can fix it. You may decide to bring a battery-powered speaker and a wireless microphone as an independent backup, if the venue allows it. Ask for permission before you bring it.
An approved vendor list
Some venues keep a list of approved vendors, often because those vendors have insurance and know the building. Ask whether the list is a requirement or a recommendation, and whether outside vendors can be approved. Our wedding venue questions guide covers other topics to raise.
When there is no power at the site
A field, beach, or garden with no power changes the plan.
Battery-powered ceremony audio
Battery-powered speakers and wireless microphones can handle a short ceremony without any outlet. Ask your vendor how long the batteries last, how they are charged, and what the spare is. Ask for a test at full volume for the planned duration, since battery life under load can be shorter than a label suggests.
A generator or a separate power source
For a longer or louder event, a generator or another power source may be necessary. The safety rules above apply, and the rental company or vendor should handle operation. Ask about noise, fuel, placement, and a backup power path.
When two acts share one system
A DJ and a live band, or a band and a string quartet, can share equipment or bring their own.
Shared equipment and handoffs
If two acts share a mixer, speakers, or microphones, ask how they hand off and who is responsible when something breaks. Changeovers take time, so plan them into the timeline. Our wedding DJ vs band guide covers the combination.
Separate equipment and competing frequencies
If two acts bring their own wireless gear, ask them to coordinate frequencies before the day, as explained in the wireless section. Ask who has authority over the volume and who handles the venue’s sound limit.
When plans change late
A forecast, a vendor cancellation, or a venue change can arrive in the final weeks.
A forecast that changes the layout
If the forecast shifts, revisit the stage plan, the weather decision, and the shelter. Contact your vendors in writing and ask what they need to change. Our wedding week checklist helps you manage the final days.
A vendor who cannot show up
If an audio or lighting vendor cancels late, ask the venue, your coordinator, and other vendors for referrals, and check the cancellation terms in your contract. A venue with a house system may be a fallback, and a smaller, simpler plan is better than none. Having a written site sheet and cue sheet makes it much easier for a new vendor to step in.
Questions to ask before you hire or sign
Good questions turn a vague package into a wedding audio lighting checklist you can verify. Ask for answers in writing and keep them with your contract.
Questions to ask
- What is the sound limit, how is it measured, and who measures it?
- Which outlets and circuits can we use, and what else shares them?
- What is the total power load of your setup, in watts or amps?
- Who is the named operator, and will that person be at the equipment all night?
- What spares do you bring for microphones, batteries, music, and lights?
- What do you do if the officiant’s microphone fails in the middle of the ceremony?
- Which wireless frequencies do your microphones and monitors use, and how do you avoid collisions with other vendors?
- Who calls a weather pause, and how do you shut down and move equipment?
Questions for the venue
These questions establish the rules and the physical limits.
Rules, power, and access
Ask for the written sound limit and curfew, the circuit map or a description of which outlets share breakers, the load-in time and route, any approved-vendor or insurance requirement, and the policy on haze, open flame, and generators. If a rule is unwritten, ask the venue to write it in an email so that you can forward it to your vendors.
Weather and safety
Ask where guests go in a storm, who decides, and what the venue’s written plan says. Ask whether the venue has ground-fault protection on the outdoor circuits you plan to use, and who can reset a breaker. A venue that has handled storms before can usually describe what happened last time.
Questions for the audio vendor
These questions test how the system is built and what happens when it fails.
Equipment and operation
Ask for a written equipment list, the number and type of microphones, the speakers and where they will go, the named operator, and the sound check time. Ask whether the vendor rings out the system at the real positions and how long they allow for it.
Redundancy and switch-over
Ask what happens if a microphone, receiver, mixer, speaker, laptop, or power source fails. Ask them to describe the switch-over in seconds and steps. Ask where the spares are stored during the event and who can reach them. A vendor with a good answer will usually give it quickly and in detail.
Questions for the lighting vendor
These questions focus on function, control, and approvals.
Function, control, and fallback
Ask which fixtures serve each function, how they are controlled, and what the lights do if control is lost. Ask for the total power load and the circuits needed. Ask whether the plan has a fallback light for the ceremony and the dance floor.
Effects and approvals
Ask whether the plan includes haze, strobes, moving lights, lasers, or open flame, and whether the venue has approved each in writing. Ask for the vendor’s insurance information if the venue requires it. Ask what happens if the venue withdraws approval on the day.
FAQ: wedding audio and lighting questions
Planning and responsibility
Do I need a separate company for audio and lighting?
Not always. Many DJs offer both, and some venues include a house system. A separate company makes sense when the site is large or remote, when several acts share equipment, or when you want a dedicated operator for each system. Ask what each option includes, who operates it, and what spares and switch-over steps are covered in writing.
Who should check the power on the day?
The vendor who owns the equipment is responsible for it, and the venue contact is responsible for the building’s power. Name both on your run sheet, and have the vendor confirm which circuits they are using before setup. Do not ask a guest or relative to handle electrical connections or a generator.
Ceremony audio and backup
Does a small outdoor ceremony need microphones?
Often yes, because sound dissipates quickly outdoors, and wind can make quiet voices hard to follow. Even a small group can lose the vows. A wireless clip-on microphone on the officiant is a common choice. Ask your vendor to test it at the real positions and to bring a spare microphone and batteries.
What is the most common audio failure, and how do I prevent it?
Vendors and manufacturers point to dead batteries, feedback, and wireless dropouts as frequent problems. Prevention is largely planning: fresh batteries before each major moment, microphones kept away from speakers, and a ring-out and walk-through during the sound check. Ask your vendor to describe each step and where the spare microphone will be.
How do I back up the music?
Keep the same playlist on two devices, make sure the main one plays without an internet connection, and keep a physical copy if practical. Ask your DJ or band how they store and switch sources. Test the switch during the sound check, so the first time it happens is not during the first dance.
Power, weather, and sound limits
How much power does wedding audio and lighting need?
It depends on the equipment, so add up the watts from your vendors’ labels or lists. A standard 15-amp, 120-volt circuit supplies about 1,800 watts, and a common planning guideline keeps long-running loads near 80 percent of that, or about 1,440 watts. Your venue’s electrician or your vendor can confirm what applies to your site.
What if it storms during the ceremony?
Follow the plan you made in advance: the named person calls the pause, people move to the designated shelter first, and equipment is secured second. The National Weather Service says lightning can strike at any time of year and offers current guidance on its safety pages. Confirm your venue’s written storm plan before the day.
How loud can the reception be?
It depends on the venue and the local rules, so ask for the written limit, where it is measured, and who measures it. For health context, NIOSH treats sound at or above 85 A-weighted decibels as hazardous over a work shift, though a wedding is not a workplace. Ask your vendor how they control volume across the night.
Your next steps
Collect the facts
Send the venue question list
Email the venue the power, sound limit, load-in, effects, and storm-plan questions above, and ask for written answers. Put the replies on a one-page site sheet and share it with every vendor. Our wedding venue questions guide has more to raise.
Choose your production tier
Count your zones and moments, and decide which tier your wedding audio lighting checklist needs. Decide who runs audio and who runs lighting, and whether the venue, your DJ or band, or a separate company will cover each. Our wedding DJ questions guide helps with the interview.
Write the plan down
Fill in the power and spare lists
Ask each vendor for a power load and a spare list, add them to your wedding audio lighting checklist, and do the arithmetic. Put audio and lighting on separate circuits where the venue allows it. For the broader backup picture, see our wedding AV backup plan guide.
Add the plan to your timeline
Put every line of your wedding audio lighting checklist, including load-in, sound check, cues, and the weather decision, on your day-of timeline. Our wedding vendor timeline and wedding week checklist guides show how to assign each line to a named person, and our wedding rehearsal guide is a good time to practice the cues.
Sources & methodology
How we built this guide
What we relied on
This guide draws on a National Weather Service safety hub and lightning page, a National Institute for Occupational Safety and Health page on noise and its sound level meter app bulletin, a Centers for Disease Control and Prevention hearing page, an FCC document on wireless microphone operation, a Consumer Product Safety Commission generator alert, OSHA’s electrical safety page, ADA guidance on effective communication, a university extension cord guide, a home-services electrical explainer, and manufacturer and vendor guides on feedback, DMX control, and ceremony microphones. Where a statement comes from a manufacturer or a vendor, we say so, because sellers describe their own products. The worked power example uses invented device wattages and our own arithmetic, and it is an estimate for illustration.
What we did not do
We did not test equipment, visit venues, collect vendor quotes, or review any local noise or fire ordinance. We could not retrieve the National Weather Service’s detailed shelter and timing guidance or its wind and heat pages, so we do not summarize them. The FCC page was last reviewed in 2019, and the NIOSH app and CDC pages may have changed since we read them. We found no independent price survey for wedding audio and lighting production, so this guide gives no prices. This guide is general information, not electrical, legal, safety, or financial advice. Ask your venue, a qualified technician or electrician, local officials, and a lawyer about your own situation. Sources were checked on November 12, 2026, and prices, policies, and rules can change.
Commercial relationships
Source list
Government and public-safety sources
- National Weather Service, Weather safety: https://www.weather.gov/safety
- National Weather Service, Lightning safety: https://www.weather.gov/safety/lightning
- Federal Communications Commission, Operation of wireless microphones: https://www.fcc.gov/sites/default/files/operation_of_wireless_microphones.pdf
- U.S. Consumer Product Safety Commission, Portable Generator Safety Alert: https://www.cpsc.gov/s3fs-public/Portable-Generator-Safety-Alert-2017_5123.pdf
- OSHA, Electrical safety: https://www.osha.gov/electrical
- NIOSH, About noise and hearing loss prevention: https://www.cdc.gov/niosh/noise/about/index.html
- NIOSH, New Sound Level Meter App: https://cdc.gov/niosh/bulletin/2017/sound-app.html
- CDC, How much sound can your ears safely take, and for how long: https://www.cdc.gov/nceh/hearing_loss/toolkit/quiz-test.html
- ADA.gov, Effective communication: https://www.ada.gov/resources/effective-communication/
Manufacturer, vendor, and educational sources
- Shure, How to control feedback in a sound system: https://www.shure.com/en-US/insights/how-to-control-feedback-in-a-sound-system
- Audio-Technica, How do you mike a wedding ceremony: https://www.audio-technica.com/en-us/support/audio-solutions-question-of-the-week-how-do-you-mike-a-wedding-ceremony
- B&H Explora, High-quality audio recording at the altar: https://www.bhphotovideo.com/explora/node/32506
- One Of A Kind Events, Wedding sound system guide: https://www.myoneofakindevent.com/blog/wedding-sound-system/
- Adafruit, Intro to DMX: https://learn.adafruit.com/intro-to-dmx/overview
- University of Washington Environmental Health and Safety, Extension cords: https://ehs.washington.edu/system/files/resources/extension-cords.pdf
- HomeServe, How much can you plug into one outlet: https://www.homeserve.com/blog/home-improvement/overloaded-outlet/