

Wedding lighting is easiest to get right when you plan it as a system of power, rules, and moments in the evening, because the same string lights, uplights, candles, and pin spots that look effortless in photographs depend on outlets, anchor points, fire codes, and a camera that needs enough light to work.
Quick answer
Decide what each light is for, then check the room, the power, and the venue’s written rules before you choose a fixture. String lights need anchor points and a support line, uplighting needs outlets or batteries and a clear aim, pin spots need a rigging point above each table, and real candles need permission from the venue and the local fire official. Count watts so one circuit is not asked to do the work of three, keep warm and cool sources from fighting each other, and ask for an installed price that includes delivery, setup, teardown, and a written substitution plan.
A wedding lighting plan often starts as a saved photograph of a tent glowing at dusk. That image is a good place to begin and a poor place to stop. The glow in the photograph came from a specific number of strands, hung from specific poles, powered by a specific source, and photographed at a specific minute of twilight. Your venue has its own ceiling, its own outlets, and its own rules. This wedding lighting guide turns the photograph into a plan you can hand to a wedding lighting vendor, a venue coordinator, a DJ, or an electrician, and it ties each claim to something you can check: a manufacturer’s limits, a public fire-safety page, a government safety notice, or arithmetic we show our work on.
We cover the five elements couples ask about most: string lights, uplighting, candles, pin spots, and the power that feeds all of them. We also cover how wedding lighting looks to a photographer, because the lights you choose decide how readable your pictures are. If you are still building the larger design, our wedding decor guide covers palette, focal points, and layout, and this article goes deeper on the light itself. We do not sell wedding lighting, we did not test fixtures, and we did not collect vendor quotes of our own, so every price we quote comes from a published source we name, and the rest is clearly labeled as our estimate or as an invented example.
Start with the room, the power, and the rules that shape wedding lighting
Before anyone talks about color, someone has to walk the room. The most common reason a wedding lighting design changes late is that a physical fact turned up after the design was approved: a ceiling that is lower than the photographs suggested, an outlet that is forty feet from where the dance floor ended up, or a venue policy about hanging things from the roof. You can find all of those facts in one visit if you know what to look for.
Measure the room before you choose a look
A wedding lighting design is a set of positions in space. Every strand has two ends, every uplight has a floor spot, and every pin spot has a place to hang from. The first job is to turn the room into a short list of measurements and photographs that a vendor can quote from.
Record ceiling height, ceiling color, sightlines, and anchor points
Write down the ceiling height at its lowest and highest points, and note what the ceiling is made of. A white or light ceiling reflects light back into the room and softens the mood, while a dark, open, or very high ceiling absorbs it. That matters for uplighting, because an uplight needs a surface to wash, and it matters for photography, because a flash bounced off a dark ceiling does very little, as a published wedding-photography guide from SLR Lounge points out.
Then look for anchor points. These are the things a string of lights or a support cable could attach to: poles, posts, beams, trees, tent legs, the building wall, or a rigging point the venue provides. Measure the distance between each pair, and photograph each one. A sketch with distances in feet is more useful to a vendor than any description. If trees are involved, ask the vendor how they attach to a tree without girdling the trunk, and ask the venue whether the property owner allows it.
Finally, mark sightlines. Stand where guests will sit and where the couple will stand, and note what a light would be in front of. A bare bulb at eye level is a glare source at a seated table. A pin spot aimed from behind a tall centerpiece gets blocked. Our guide to wedding table settings is a helpful companion when you work out where candles, centerpieces, and place settings share the same square feet.
Walk the venue at the hour you will actually use it
A room at noon is a different room from the same room at nine at night. Daylight pours through windows, string lights look invisible, and uplighting looks like nothing at all. A wedding lighting rental company, Rent for Event, says in its own guide that uplighting is less effective at daytime receptions, where natural light or window treatments do more of the work. That is a seller’s view, but it matches what most people see when they stand in a bright room next to a colored lamp.
Visit once in the late afternoon and, if you can, again after dark. Bring a phone and take photographs from the same four corners each time. Note where the sun comes through the window and when. Note which of the venue’s own fixtures are on, whether they can be dimmed, and who controls them. Ask to see the room with the house lights at each setting, because the lowest setting is the one your design must work with. Then write down the answer to a simple question: when the guests walk in, what is the brightest thing in the room?
Find the venue rules that override inspiration
Venue rules do not care how good the idea looks. They come from fire codes, insurance requirements, building construction, and the venue’s own experience with past events. Asking early costs nothing, and discovering a rule on the wedding day can cost the whole design.
Fire code, open flame, and what you can hang
Three published sources show how different the answers can be. The Minnesota State Fire Marshal’s guidance says candles and decorative open-flame devices may be used in places of assembly and dining if the fire code official is satisfied that safeguards prevent accidental fires and burns, and that candles are prohibited in aisles and exits. Texas A&M University at Galveston, in the policy it gives to people holding events on its campus, prohibits decorative candles in buildings and tents and recommends battery-powered LED candles instead. The San Francisco Fire Department publishes a procedure that requires approval and a permit for open flame on tables in public assembly spaces. These are three jurisdictions with three approaches, and none of them is the rule for your venue.
Hanging is its own category. The Texas A&M policy says decorations cannot block, cover, or attach to fire protection equipment, including sprinkler pipes, and that exit signs and doors cannot be covered. That is one institution’s rule, yet it points at a common venue concern: do not tie anything to a sprinkler pipe, and do not block a sign. Ask your venue where you may attach lights, what hardware is allowed, and whether anything can be fastened to walls, beams, or ceiling grids.
Power access, vendor requirements, and curfews
Ask four questions about electricity: where the outlets are, how many circuits feed them, whether any are on a ground-fault protected circuit, and who is allowed to touch the panel. Many venues restrict who can connect to their power, and some require an approved electrician or a vendor with proof of insurance. Ask whether the venue lists approved wedding lighting vendors, whether outside vendors need to supply a certificate of insurance, and what the load-in and load-out windows are. A wedding lighting company that cannot get into the room until an hour before guests arrive has a very different job from one that has the morning.
Last, ask about sound and light curfews. A venue that ends amplified sound at ten may also expect decor to be out by a certain hour, which affects whether a wedding lighting vendor can strike the design that night or must come back the next morning. Write each answer down and ask for the venue’s rules in writing. Our wedding venue questions guide has a longer list for the whole venue, and these wedding lighting questions fit alongside it.
Decide what each light is for before you buy any of them
Wedding lighting multiplies quickly. A string here, a few uplights there, candles on every table, and soon the plan has six systems that nobody has assigned to a moment. It helps to work out when each light matters and what job it does, so you can remove the ones that do nothing.
Light the day as four moments, not one scene
A wedding is a sequence of rooms and times, not one picture. Each stage needs something different from wedding lighting, and the plan gets simpler when you write the stages down.
Arrival, ceremony, and cocktail hour
At arrival, light has a practical job: guests need to see steps, doors, and the path. The U.S. Department of Energy’s lighting guide, written for homes, gives about 5 to 20 footcandles as an illumination level for finding your way at night, with one footcandle defined as one lumen spread across one square foot. That guide is written for homes, so treat it as a rough scale for walkways, not a specification. A walkway that feels bright to someone coming out of a dim room may be dark to someone unfamiliar with it, so test it with the people who will walk it.
For the ceremony, light the couple and the officiant first. If the ceremony is outdoors in the afternoon, the sun is the wedding lighting plan, and the only decisions are which way the couple faces and how the shadows fall. Our wedding ceremony guide covers the layout. At cocktail hour, light shifts from helpful to atmospheric: strings and candles begin to matter as daylight fades.
Dinner, toasts, and dancing
Dinner needs enough light to see food and faces, but warmth matters more than brightness. Toasts need a light on the speaker or the speaker’s face looks like a silhouette in photographs and on a phone video. Dancing wants motion and color, and that is where a DJ’s lights, uplights, and pin spots start to share the room. Our wedding reception guide covers the order of events, and this is the place to write down which lights change at each cue.
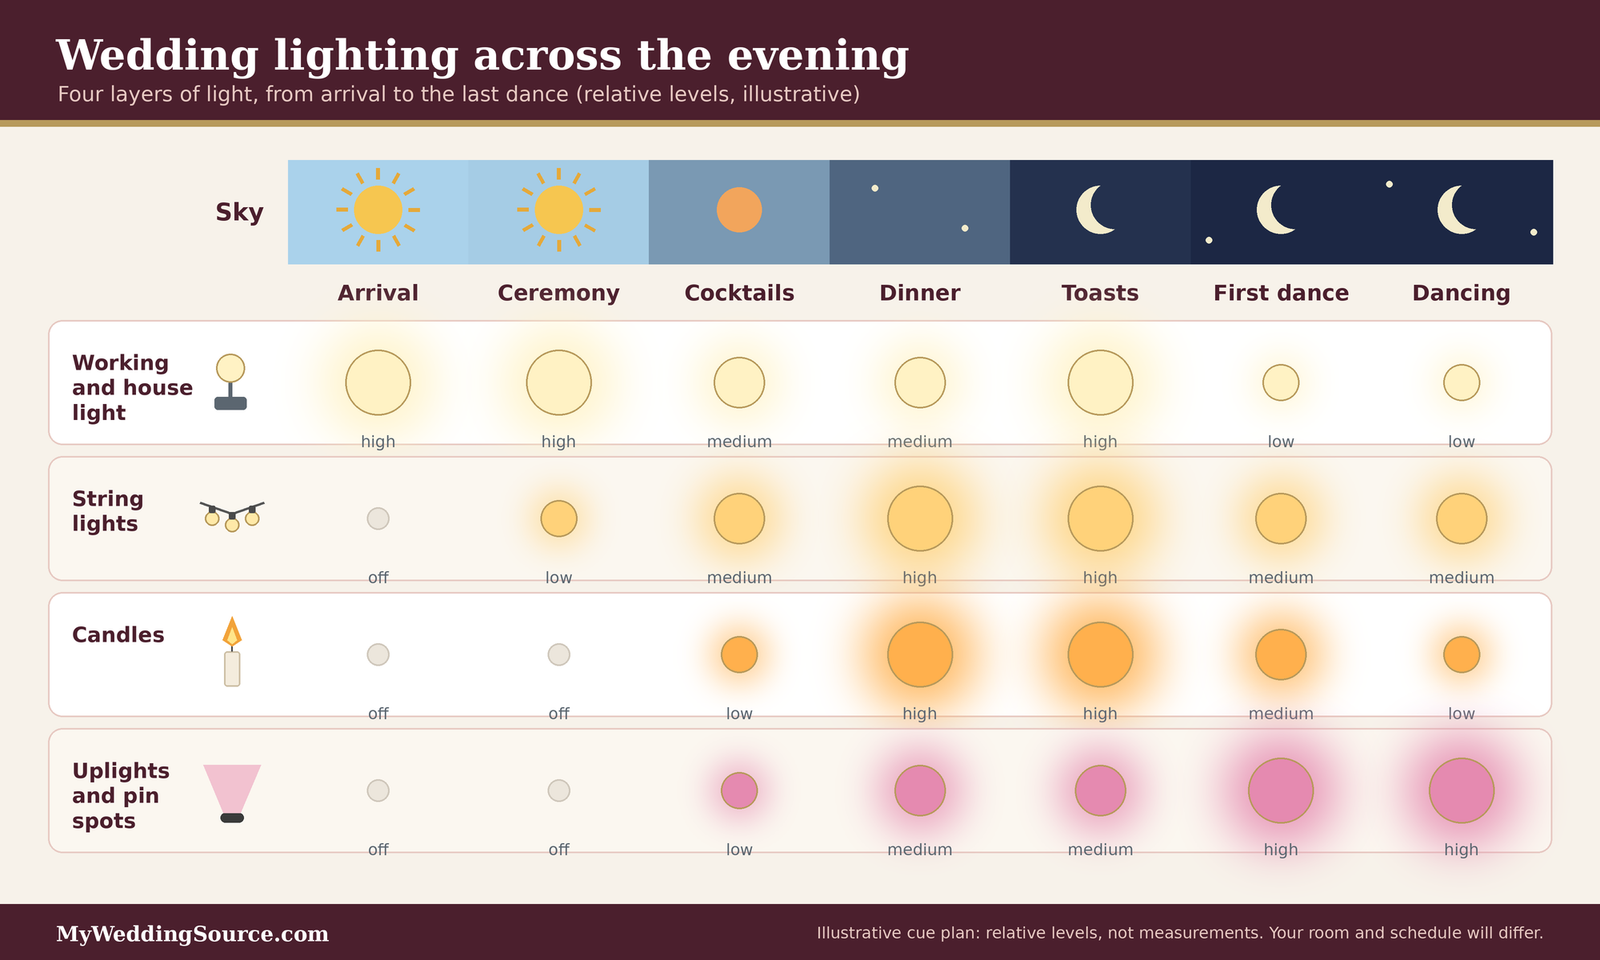
The figure below shows how the four layers of light move through an evening in a typical plan. The levels are illustrative, not measurements, and your room will differ.
Give every source a job and cut the rest
Once you have the stages, assign every source in your wedding lighting plan a job. Five jobs cover most wedding lighting: guiding people, framing the couple, softening the room, helping the camera, and personalizing the space. If a light has none of these, it is a candidate for removal.
Match the source to the job
String lights soften and define a space, especially outdoors and in tents, where they create a ceiling. Uplighting washes walls and columns with color, which can change a room’s mood quickly and cheaply compared with changing the walls. Pin spots pick out a centerpiece or a cake with a narrow beam, which makes tables look finished and gives photographers a bright anchor. Candles add warmth at the table level and a flicker that artificial light rarely matches. A gobo, a small stencil placed in a projector, can put a monogram or pattern on a floor or wall and personalizes a room. A working light, such as a dimmable house light, keeps the room safe when the mood lights go down.
The table below is our design matrix. It compares each source on what it does best, where it needs space, what it needs from the building, and who should be cautious. The entries are editorial judgment based on the sources cited in this guide, not measured performance.
| Source | Best job | Sightline and scale | What it needs | Venue rule to check | Guest impact |
|---|---|---|---|---|---|
| String lights | Soften, define a space | Overhead, runs across open areas | Anchor points, support line, outlets | Attachment limits, tent rules | Soft ambient glow, low glare if shaded |
| Uplighting | Wash walls, set mood | Floor level, aimed up | Outlets or charged batteries | Cords in walkways, house-light control | Color shifts, can tint skin if saturated |
| Pin spots | Highlight centerpieces and cake | Narrow beam from above | Rigging point, aim, power | Ceiling or truss attachment | Bright accent, can glare if mis-aimed |
| Real candles | Warmth at the table | Tabletop, low | Approved holders, supervision | Fire code, venue policy | Flicker and warmth, risk near fabric |
| Flameless candles | Warmth where flame is banned | Tabletop, low | Batteries, replacements | Usually allowed | Steady glow, quality varies |
| Gobo projector | Personalize a wall or floor | Projected at distance | Power, throw distance | Placement, glare | Visible logo, can wash out in bright rooms |
| Dimmable house lights | Safe working light | Whole room | Venue controls | Operator, exit lighting | Controls the whole mood |
Remove the light that has no job
The easiest way to simplify a plan is to write each source on a line with its job, its moment, and what it needs. A string over the cocktail patio has a job and a moment. A second string over the same patio, added because the first one looked sparse in a photograph, may only need more spacing. A pin spot over every table whose centerpiece is already a lit candle may duplicate effort. Cutting wedding lighting is not about spending less; it is about paying for lights that earn their place. The same logic applies to the larger decor plan in our wedding decor guide, where every element is given a job. ## String lights: spans, support, sag, and what to ask a vendor
String lights are the most requested piece of wedding lighting in outdoor and tent receptions, and the one most often under-planned. A strand of lights has no strength of its own. It needs something to carry its weight, something to carry the wind, and something to provide power.
Plan the structure before the strands
The structure is the part nobody sees in the photograph. It decides whether the lights hang evenly through the evening or sag in the middle by the second hour.
Anchor points, support lines, and spacing
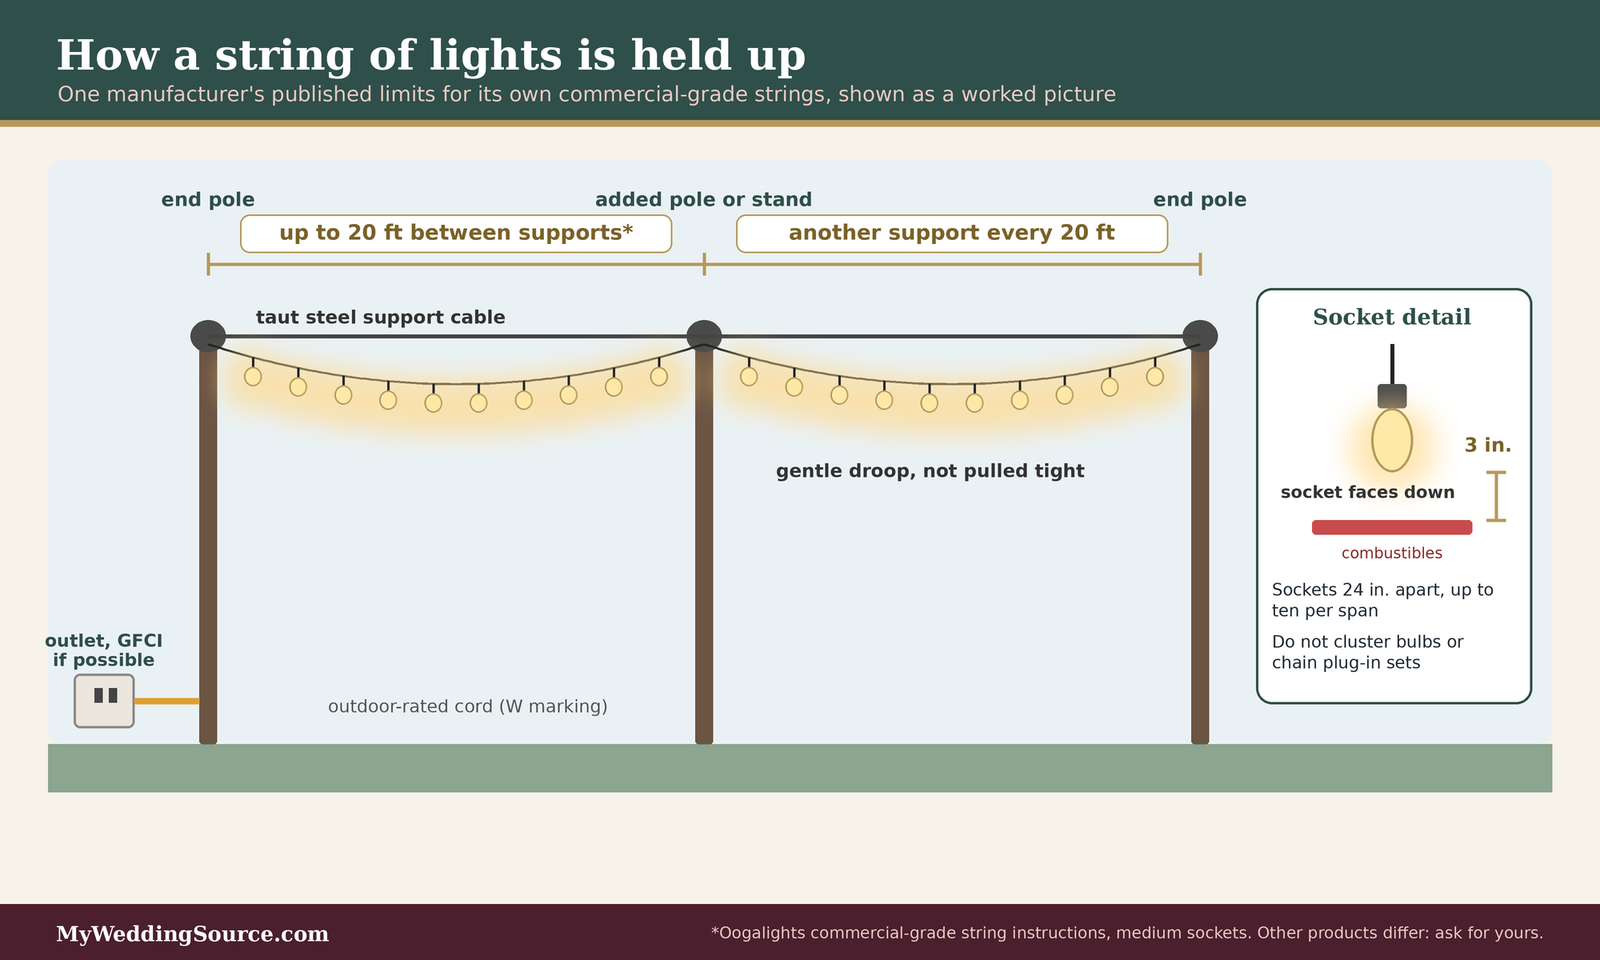
A guide on installing outdoor string lights from Viribright suggests, for a large open area, stretching a steel cable taut between two supports and hanging the lights from the cable rather than letting the electrical cord bear the load. It also says to leave some droop between support points so the strings look natural and are not pulled so tight that they are damaged. That matches how professionals generally describe the job: the cable carries the weight and the lights decorate the cable.
Support spacing depends on the product. Oogalights, a maker of commercial-grade light strings, states in its installation instructions that its medium-socket strings with sockets spaced 24 inches apart can span up to ten sockets, or twenty feet, between supports, and that longer spans need a properly rated cable support system and cable ties and must follow local codes. That is one manufacturer’s limit for its own product, so it is not a universal rule, but it shows that spans are a stated specification and not a guess. Ask your vendor for the maximum span of the product they will use.
Here is a worked example, using the Oogalights limit for illustration only. Suppose a patio is sixty feet long and the only anchor points are a pole at each end. At twenty feet between supports, you would want at least two more support points in the middle, which means adding a pole, a stand, or a tree. If the vendor plans to use a cable system, it needs to be rated for the load and the anchors need to carry the tension. This is the kind of detail that changes a quote, and it is easy to miss if nobody has measured.
Wind, weather, and the last hour of the night
Outdoor wedding lighting faces wind, rain, and temperature changes. Ask the vendor how the design behaves in wind and what the plan is if conditions are poor. The Oogalights instructions say not to replace bulbs during rain or other bad weather and to inspect wire and sockets regularly for weather and UV damage. The Viribright guide suggests using a ground-fault circuit interrupter outlet where possible, and keeping plugs away from standing water. Our garden wedding venues guide covers outdoor sites in more detail, and weather planning there applies directly to lights.
Think about the last hour of wedding lighting too. Some outdoor venues have a time when lights must be off or music must stop. If a string is the only light on the walkway to the parking area, ask what else will light the way when the string goes dark. A battery lantern, a few path lights, or a venue-controlled fixture can serve as the backup.
Choose the string, not just the look
Wedding lighting strings differ in bulb type, socket size, rating, and how they connect. Two strands that look the same in a product photograph can have very different electrical limits.
Bulb type, wattage, and heat
The U.S. Department of Energy says residential LEDs, especially ENERGY STAR-rated ones, use at least 75 percent less energy than incandescent lighting, and that incandescent bulbs release 90 percent of their energy as heat while LEDs emit very little. That has direct consequences for events. A string of LED bulbs draws less power, so more of them can share a circuit, and it stays cooler near fabric, paper, and people. Oogalights lists a limit of 25 watts per medium-base socket and 10 watts per smaller socket for its strings, which is a reminder that the bulbs you put in a socket matter as much as the string itself.
For color, the same Department of Energy guide gives 2,700 to 3,000 Kelvin as the warm range for living spaces, and says color rendering matters even more than color temperature. A warm white string, in the neighborhood of those values, tends to read as candlelight in photographs. Cooler strings can look bluish next to warm room lighting. Ask for the Kelvin rating of any string, and ask a vendor to keep the strings on the same rating if you use more than one type.
Ratings, clearance, and what the string is not for
Look for a rating on the product for the place it will be used. The Electrical Safety Foundation International’s extension cord guidance says to use only cords marked for indoor or outdoor use, notes that outdoor cords carry a W marking, and advises buying cords approved by an independent laboratory such as UL, ETL, or CSA. The same logic applies to strings and the cords that feed them.
Read the limits on the product, too. The Oogalights instructions say its plug-in strings must not be connected to other strings, that sockets must face down and not up, that combustible materials should be kept at least three inches from bulbs, that bulbs should not be clustered, and that the strings are not for ceilings, soffits, or enclosed spaces. They also say the installation of hardwired runs is for qualified, licensed electricians. These are one maker’s rules for one product line, yet they show what a spec sheet can contain. Ask a vendor to show you theirs.
Here is the figure that shows how those pieces fit together on a typical patio run.
Uplighting and pin spots: washing the walls and lighting the table
In wedding lighting, uplighting and pin spots do opposite jobs. Uplighting spreads light across a surface and sets the mood of the whole room. A pin spot concentrates light on one object and makes it the focus. Couples often book one without understanding the other.
Uplighting: a wash of color on the room
An uplight sits on the floor, aims at a wall or column, and tints the surface with light. LED fixtures can mix many colors, which is why they replaced colored gels on older halogen lights.
How many, where, and in what color
Rent for Event, an uplighting rental company, suggests about 14 to 18 units for a wedding of up to 100 guests, 20 or more above that, and as few as nine for an intimate wedding of about 50. Its simplest method is to count the areas you want lit, such as the head table, the cake table, the dance floor, and the side walls. That is a vendor’s guideline and it comes from a company that rents the units, so treat the numbers as a starting point for a conversation and not as a requirement. What is useful is the method: count the surfaces that deserve color, not the guests.
For color, the same company suggests using two or three colors and coordinating them with other lighting, and it describes warm white as neutral and flattering in photographs. Our view, which is editorial, is that saturated colors are the ones to test first. A deep purple or red wash can look striking on a white wall and turn skin and flowers a color you did not plan. Ask the vendor to light a sample wall at the chosen colors, and look at it with a flower or a fabric swatch in front of it. If you want a wedding lighting palette that lasts through the evening, pick one warm tone for dinner and one accent tone for dancing, and let the vendor change from one to the other at a planned cue.
Wired, wireless, and the cord problem
Rent for Event describes two kinds of units. Wired fixtures need outlets, and long cords can be a tripping hazard. Wireless fixtures run on rechargeable batteries with a remote and can go anywhere without a cord, and the company says they run about five to eight hours depending on use. Check that number against your own wedding lighting schedule. If the units are placed at noon for a five o’clock ceremony and the dance ends at eleven, ask whether they will be charged, switched on late, or swapped.
Cords along walls need a plan. Floor-level uplights often end up near walkways, and cords near walkways become trip hazards. The U.S. Access Board’s 2010 ADA Standards set a minimum clear width of 36 inches for an accessible route, and while the standards do not address event cords, the width is a useful benchmark for keeping paths clear. Ask the vendor how cords will be routed and covered, and look at the plan with the narrowest walking route in mind.
Pin spots and gobos: the narrow beam
A pin spot is a small, focused fixture that puts a narrow beam on a single object, usually a centerpiece or a cake. A gobo is a stencil that sits inside a projector and puts a shape, such as a monogram, on a surface.
Where pin spots earn their cost
In wedding lighting, pin spots make a table look finished, because the centerpiece becomes the brightest thing at the table and the faces around it are slightly in shadow. That is a strong look, and it asks for a rigging point above each table, such as a ceiling beam or a truss. The two retailers we found disagree with each other on the price, so we treat the price as unsettled and cover it in the cost section below. What is more useful to know is that every pin spot needs an aim, a person to aim it, and a plan for what happens when a centerpiece is moved.
They are strongest in a dark room with a high ceiling and weaker in a bright or low-ceilinged one. If the room is already bright, a pin spot may only add glare. Ask a vendor to show a mock-up on one table before you commit to a full room.
Gobos, monograms, and when they wash out
A gobo projector throws a pattern, and the distance and the brightness of the room decide how clear it looks. A monogram on a dance floor at the start of the night is a popular use. It can wash out if dancers stand in it, if floor lights are on, or if the surface is dark or textured. Ask the vendor to test the pattern on the actual floor or wall, at the real distance, with the lights at the level you plan to use. If the pattern is part of your branding, ask for a photograph of the test.
Candles and flame: warmth, with permission
Candles do something electric wedding lighting struggles to do: they flicker, and the light moves across faces. They are also the element most governed by fire rules.
Real flame: rules first, then design
If your venue allows open flame, it will likely have conditions. If it does not, you will want a plan that does not feel like a compromise.
What fire officials commonly require
The Minnesota State Fire Marshal’s guidance says decorative open-flame devices may use fuel with a flash point above 140 degrees Fahrenheit, that the flame must sit inside a chimney whose side openings are no larger than three-eighths of an inch, and that a tissue placed at the top of the chimney must not ignite within ten seconds. It says candelabras must be securely fastened so they cannot tip, and kept away from people and drapery. It also says candles are prohibited in aisles and exits, and specifically that wedding candles along the aisle to the altar are not allowed because they can be knocked into the exit path. San Francisco’s procedure describes a similar chimney and tissue test, requires that liquid or solid-fuel devices over eight ounces self-extinguish and not leak faster than a quarter teaspoon per minute, and needs an open-flame permit for approved devices.
None of that makes candles impossible. It does mean the answer comes from your fire official, and a vendor who says candles are always fine is guessing. Ask your venue for its written policy, ask what holders are approved, and ask who will light and extinguish them. Our wedding catering guide covers the staff who might help with that, since caterers often handle table service and will know the venue’s habits.
Placement, fabric, and who is in charge
Keep flame away from anything that burns: napkins, menus, paper signs, tablecloth edges, and dried flowers. Put candles in the middle of a table, not at the edge where an elbow reaches them, and keep them away from tall arrangements that can drop petals or leaves. Name a person to light them and a person to put them out, and make sure it is someone who is not also giving a toast. Check the florist’s plan for dry material and ask whether any arrangements are designed to sit near flame.
If the room is windy, such as a tent with the sides up, an open flame will gutter and may be unsafe. A hurricane glass or an enclosed holder is a common answer, and it is also the kind of device fire officials describe. Ask the vendor for their approved holder, not just the candle.
Flameless candles: when the rules say no
When open flame is not allowed or not practical, battery-powered candles are the common answer. The Texas A&M policy recommends them for exactly that reason.
Choose the glow, not just the shape
Flameless candles for wedding lighting vary widely. Some flicker, some glow steadily, and some look pale or blue next to real flame. Warm color and a gentle flicker photograph best. Ask for a sample and look at it in the dark, next to the other sources in the room. If the candle sits next to a string of warm-white lights and looks cooler than the string, it will look cooler in the picture too.
Count what you need and add spares. Batteries run out and some units fail. Ask whether the vendor will replace batteries before the event, whether candles have timers or remote controls, and what happens if a unit fails mid-reception. Our seasonal wedding flowers guide may help when you combine candles with arrangements, since stems and flame share table space.
Mixing real and flameless candles
Some couples use real candles in a small number of places, such as the head table, and flameless candles elsewhere. That can work when the venue allows it, but ask whether the policy treats each table the same way. If you mix, put them side by side during a test, and check that the flameless ones do not look flat in comparison. Keep the real ones where an attendant can see them. The plan stays simple if one person knows exactly which is which. ## Power for wedding lighting: count watts, route cords, and plan the backup
Every piece of wedding lighting in this guide needs electricity, and the power plan is the part couples rarely see until something trips. A wedding lighting vendor will usually do the load math, but you are the one who knows what else will be plugged in nearby: a caterer’s warming equipment, a DJ’s speakers, a coffee station, a photo booth. Asking each vendor for their power needs in writing is one of the most useful things you can do.
Do the load math before the day
The arithmetic is short. Electrical power in watts is volts multiplied by amps, a basic relationship in electricity. A common household circuit in the United States is rated for 15 amps at 120 volts, so 15 multiplied by 120 gives 1,800 watts of capacity. That is arithmetic, and a particular circuit may have a different rating, so ask your venue or electrician what each outlet is on.
Capacity, headroom, and what shares a circuit
An outlet is not a private supply. Several outlets in a room often share one breaker, and a venue’s kitchen, wedding lighting, and sound equipment can share it as well. A technical explainer we found says that for loads expected to run three hours or more, a circuit is commonly planned at 80 percent of its rating, which would be 1,440 watts on a 15 amp circuit. That explainer also misnumbers a code section, so we use it only as a planning habit and not as a rule. Wedding lighting runs for hours, so it is a reasonable habit to leave headroom, and your electrician can tell you the right figure for your venue and your local code.
Here is a worked example, labeled as an illustration. Say a vendor plans three plug-in strands, each forty-eight feet long with twenty-four medium sockets. The Oogalights instructions give a maximum of 600 watts for that size, based on 25 watts per socket. Three strands at that maximum would use 1,800 watts, which is the entire capacity of one 15 amp circuit before anything else is plugged in. If the same strands use LED bulbs, and we apply the Department of Energy’s statement that LEDs use at least 75 percent less energy, each strand would draw no more than about 150 watts, and the three would draw about 450 watts, or about 3.75 amps. That is our estimate, and the real number is on the bulb and the string label. The point is how much the bulb choice changes the load. The figure below shows it.

Make a one-page load list
Write a list with four columns: what it is, how many, watts each from the label, and which circuit. Add it up per circuit. Include the lights and everything else near them. Ask your DJ, caterer, and photo booth company for their wattage and let your venue coordinator confirm where each can plug in. If the total on any circuit gets close to its limit, move something, switch to LED, or ask the venue about another circuit. A list like this takes thirty minutes and it is the single most useful document for a wedding lighting vendor.
Route cords, protect the connections, and avoid the trip hazard
Power has to travel from the outlet to the fixture, and the path is where most of the practical problems happen.
Cord ratings, gauge, and length
The Electrical Safety Foundation International says an extension cord is a temporary solution, that you should match the cord to the wattage of what it feeds and never use a cord with a lower rating, and that outdoor cords carry a W marking. It also says not to run cords through water or snow, not to use a cord that feels hot or is damaged, and that multi-plug outlets should plug directly into a wall receptacle and not into each other. It lists cord gauge limits by length: for a 100 foot cord, 16 gauge is listed for loads from 1 to 10 amps, 14 gauge for 11 to 13 amps, and 12 gauge for 14 to 15 amps. A thinner wire has a lower number of amps it can carry, which is why a long run needs a thicker cord.
Apply that to the example. A 100 foot run feeding about 3.75 amps falls in the lowest band on that list, while a 100 foot run carrying a full 15 amps needs the thickest listed gauge. Ask your vendor what cords they use and how long each run is. A good vendor can answer in one sentence.
Cover, tape, and keep paths clear
ESFI says cords should not be run through walls, doorways, ceilings, or floors, and says covered cords cannot release heat. Cords that cross a walkway, though, are a different problem, and the answer is a purpose-made cord cover or ramp, which we recommend as editorial judgment and not as a code requirement, so ask your vendor what they use. Route cords along walls and behind furniture where you can, and cross a path at a right angle where you cannot.
The Access Board’s ADA Standards describe a 36 inch minimum clear width for accessible routes and limit thresholds at doorways to one-half inch. Those are building rules, and event cords are not in them, but they give you a sense of how little height a wheelchair wheel or a cane tip tolerates. Walk the cord route in the dim light you plan to use, since a cord that is visible at noon can vanish at dusk.
Plan for outages and for generators
When the power does fail, the plan decides whether it is a pause or a problem. When one does, the plan makes the difference between a pause and a problem.
Know the venue’s backup and your own
Ask the venue what happens if power fails: is there a generator, are exit lights on battery backup, and who do you call? Keep a few battery lights on hand, such as lanterns or flameless candles, so the room is not dark while someone finds the breaker. Check that your photographer and DJ know where the panel is. Our wedding insurance guide explains what event insurance generally does and does not cover, which is worth reading before you assume a power failure is covered.
Generators are for outdoors only
If a generator will power lights at an outdoor or tent wedding, the safety rules matter. The U.S. Consumer Product Safety Commission says to keep a portable generator at least twenty feet from doors, windows, and vents, never to run one indoors, including in a garage or shed, and that carbon monoxide can linger for hours after a generator shuts off. It says that if you must run one in wet weather, protect it under an open canopy on a dry surface where water cannot pool, and that you should turn it off and let it cool before refueling. Place it where guests and staff will not walk, and ask who will refuel it and when. A generator is also noisy, so find out where the sound will carry during the ceremony.
Wedding lighting and photography: what the camera needs
Photographs are what lasts, and cameras see wedding lighting differently than people do. A room that feels warm and soft to guests may be a struggle for the photographer if there is not enough light, or if the light is a mix of colors.
What photographers say they need
Photographers have a stake in your wedding lighting plan, and they are one of the best sources of advice about it. Their guidance is not uniform, but a few themes repeat.
Enough light, bouncing surfaces, and fast lenses
SLR Lounge, a photography education site, notes that bouncing flash off a low white ceiling gives a soft, large-source light, while dark wood, painted, or very high ceilings do not work well for bounce, so the photographer may have to use nearby walls or off-camera flash. Photography Icon, another education site, says that in dim venues photographers often open the lens aperture instead of raising the camera’s sensitivity too far, and recommends fast lenses with apertures such as f/1.4 or f/1.8 for dark rooms. Both are teaching sites, not research, and individual photographers work differently.
What that means for your plan is simple. A very dark reception with a high dark ceiling is harder to photograph well than a warm room with a lower or lighter ceiling. That does not mean you have to avoid a dark room. It means the photographer should see the room and the wedding lighting plan ahead of time and tell you what they will need.
Mixed color and gelled flash
Colored uplighting and warm string lights create a mix of colors. Photography Icon says photographers can place a gel of about half orange on their flash to match string lights and uplights and set their white balance to suit, so the room color stays rich. SLR Lounge says ballrooms often use tungsten light, and recommends orange gels with a custom white balance so flash matches the room. Those are the things a photographer does, but they work best when the room’s lights are consistent. If you use a mix of warm strings, cool white house lights, and a saturated color wash, the photographer has more to correct.
Ask your photographer about your wedding lighting: what color of light is easiest for you, which colors are hardest, and is there a level of dimming you would rather not go below? Our wedding photography guide covers how to choose a photographer, and the wedding photographer shot list helps you name the shots that depend on light.
Test and talk before the day
A rehearsal for the wedding lighting costs little and catches the problems that matter.
Photograph a test, from the guest and the photographer angle
If your vendor can do a mock-up, take photographs of it from where guests will sit and where the photographer will stand, with the lights at the evening setting. Look for glare in the frame, for bare bulbs at eye level, for faces that fall into shadow, and for colors that shift. Do this with a phone if nothing else is available. It is not a substitute for a photographer’s equipment, but it shows the biggest problems. Bring a swatch of your linen or a flower, and see what the light does to it.
Agree on cues with the DJ and the photographer
SLR Lounge advises photographers to ask the DJ which lights stay on and which change, so they are not surprised during the first dance or an entrance. Do the same thing from your side. Write down the wedding lighting cues: what changes at dinner, at toasts, at the first dance, at the start of open dancing, and at the last song. Name the person who controls each one. Our wedding photographer shot list can help you mark which moments need the lights up, such as the cake cutting and the toasts, and which can handle low light, such as dancing.
If you want an exit photograph with sparklers or other lights, ask the venue and the fire official first, as many places restrict them. A battery-powered alternative, such as lanterns or handheld lights, is easier to approve. ## Price the installed wedding lighting, not the photograph
A wedding lighting quote can mean very different things. One vendor’s number includes delivery, setup, a technician for the evening, and teardown. Another’s covers only the equipment. Comparing them without a method is how couples end up surprised by the second invoice.
What published sources say about price
Wedding lighting prices are poorly documented, which is why we lean on method more than on numbers. We did not find a survey from The Knot or Zola that breaks wedding lighting out on its own with a disclosed method, so the figures below come from two commercial blog posts. Both come from sellers, neither describes a sample or a method, and one is internally inconsistent. Read them as a rough sense of scale, not as a benchmark.
What it can cost
Paperlust, a stationery company, published a wedding lighting cost guide in July 2026 (last modified October 2026) that lists uplighting for a full venue at $600 to $2,000, with small venues at $600 to $900 and large ballrooms at $1,200 to $2,000. It lists bistro or string lights at $3 to $5 per linear foot, or $300 to $1,500 installed, pin spots at $20 to $75 per table, and a gobo or monogram light at $150 to $500. Rowabi, a wedding lighting retailer, published a post in December 2025 that gives package ranges of $200 to $1,000 for basic, $1,000 to $4,000 for mid-range, and $4,000 and up for premium, and the same $3 to $5 per foot for string lights. Neither article discloses a survey method, so treat these as seller-published ranges that vary by region, venue, and scope.
Read the ranges for what they include
The ranges leave out the most important facts: whether delivery, labor, a technician during the event, and teardown are in the price. Paperlust describes its string light range as installed, but does not say the same for every item. Rowabi’s own table and text disagree on the pin spot and gobo figures, which is why we do not rely on a single number. When you read a price in a blog post or on a vendor’s site, ask what is included, what year it is from, and whether it is a planned price or a paid one.
Do the simple arithmetic yourself
Here is how to use the published ranges as a sanity check, with all arithmetic labeled as our estimate. Suppose you want 200 feet of string lights. At $3 to $5 per linear foot, the range is roughly $600 to $1,000. Suppose a reception has twelve tables and you want a pin spot at each one. At $20 to $75 per table, that is roughly $240 to $900. If a vendor quotes far above or below those ranges, it is not necessarily wrong, but it is worth asking why. A vendor in a high-cost city, or a design with a complicated structure, may legitimately cost more.
Normalize quotes so they can be compared
Wedding lighting quotes arrive in different formats. Putting each one into the same layout makes the differences visible.
The installed-cost table
The table below is a template for comparing quotes. Fill in one column per vendor. The row names are what to look for, and the example column uses invented numbers from the Paperlust ranges to show how the arithmetic works. It is an illustration of a mid-size room, with 120 guests and twelve tables, and it is not a real quote.
| Line item | Example scope | Example range (illustrative) | What to confirm in writing |
|---|---|---|---|
| Uplighting | Full ballroom wash | $1,200 to $2,000 | Number of units, wired or wireless, colors, who operates |
| String lights | About 200 feet, installed | $600 to $1,000 | Structure, span, power source, teardown |
| Pin spots | Twelve tables | $240 to $900 | Rigging points, who aims, what if a table moves |
| Gobo | One monogram | $150 to $500 | Throw distance, test on the real floor |
| Delivery and setup | Often unstated | Ask | Load-in window, crew size |
| Teardown | Often unstated | Ask | Pickup time, venue curfew |
| Damage and loss | Often unstated | Ask | Who pays, deposit |
| Substitutions | Written plan | Ask | What can change, who approves |
| Example total of listed lines | $2,190 to $4,400 | Excludes unstated lines |
The example total is our own addition of the four priced lines above, and it excludes delivery, labor, teardown, and damage because we could not find a published figure for them. A real quote may be higher.
Separate reusable gear from consumed items
Ask the vendor which items are rented and returned, which are purchased and kept, and which are consumed. Most wedding lighting is rented. A strand of lights you buy for a do-it-yourself setup stays yours, but then you also own the installation, the testing, the teardown, and the storage. Batteries, candles, and tape are consumed. A clear list prevents arguments about what was supposed to come back.
Flag venue labor and electrician fees
Some venues charge for their own staff to attend a wedding lighting installation, to operate house lights, or to supervise open flame, and some require a licensed electrician for any connection to the building’s power. Ask the venue for those fees in writing and add them to the table. A quote that looks cheaper may be more expensive once those fees are counted.
Put the substitution plan and the approvals in the contract
With wedding lighting, products go out of stock, a fixture fails, or a venue changes a rule. A substitution plan decides in advance what happens next.
Define acceptable substitutions
Write down what is acceptable: for example, a warm-white string in the same Kelvin range, a battery uplight in place of a wired one, or a flameless candle in place of a real one if the fire official says no. Also write down what is not acceptable, such as a cooler color or a visibly different bulb. Photographs of the approved items help. This also matters when you combine wedding lighting with flowers and rentals, and our wedding decor guide has a longer list for the whole design.
Require written approval and a clear payment schedule
The Wisconsin Department of Agriculture, Trade and Consumer Protection’s consumer guide for weddings says to get all terms in writing, never sign a blank contract, pay as little as possible up front, and pay by credit card when possible so you can seek help from your card company if something goes wrong. It says a florist’s contract should state delivery times and locations and what replacements cost if your choices are not available, which is a good model for a wedding lighting vendor. Ask for the same: a written list of what will be delivered, when, what can be substituted, and what each payment buys. We are not giving legal advice, and a contract question is worth taking to a qualified professional. Our wedding budget calculator can help you decide how much of your budget wedding lighting should get.
Questions to ask
- What exactly is included in this price: equipment, delivery, setup, a technician during the event, teardown, and pickup?
- How much power does your plan need in watts, and on how many circuits?
- What are the maximum spans and the support method for the string lights, and what is the plan in wind?
- Are the uplights wired or battery-powered, and how long do the batteries last?
- What color temperature are your warm-white fixtures, and can they all match?
- Are candles allowed here, and who has approved the holders in writing?
- Who aims and operates the pin spots, and what happens if a table moves?
- What is the substitution plan, and who approves a change?
- What is the damage and loss policy, and is there a deposit?
Build the timeline and the cue sheet
A wedding lighting plan has two schedules: the planning timeline in the months before the wedding, and the cue sheet on the day. Both are short, and both prevent surprises.
The planning timeline
The months below are our suggestions and should flex with your date, your venue, and your vendors. Our wedding timeline guide covers the full plan, and our wedding planning checklist is useful for the rest.
Months before: rules, power, and a vendor
Once you have a venue and a date, get the rules in writing, including fire policy, hanging limits, and power access. Walk the room and take the measurements from the first section. Ask the venue whether it has approved vendors or requires insurance certificates. Then collect two or three quotes for the same scope, and ask each to visit the room. If you are working with a smaller guest list, our small wedding planning guide can help you scope wedding lighting to the room you actually have, and our wedding venue capacity guide can help you check how furniture, aisles, and lights share the floor.
Weeks before: test, finalize, and confirm
Book a mock-up or a site visit, photograph the test, and decide the final scope. Send the vendor the load list, the venue’s rules, and the cue sheet draft. Share the plan with your photographer and DJ. Confirm load-in and load-out times with the venue in writing, and ask the vendor to confirm the contact person for the day.
The day-of cue sheet
On the day, a one-page cue sheet keeps everyone working from the same plan.
What goes on the sheet
List each moment and what changes: arrival, ceremony, cocktail hour, dinner, toasts, first dance, open dancing, last song, and exit. For each, write which lights are on, which are dimmed, and who is responsible. Add the contact numbers for the vendor, the venue coordinator, and the electrician if there is one. Add where the panel is and where the backup lights are kept. Give copies to your planner or coordinator, your DJ, and your photographer.
Who owns the lights during the event
Name one person who has the authority to say yes when a light needs to change. It might be your planner, a day-of coordinator, or the vendor’s technician. Without one, requests go to the couple, the couple’s parents, and the DJ, and nobody knows who is in charge. If you do not have a planner, ask a friend who is not in the wedding party to hold the sheet.
A decision rule for wedding lighting
If you remember one thing from this guide, make it a short rule. Before you buy any light, write down what it is for, where it hangs or stands, how it is powered, who approved it, and what replaces it if it fails. The rule is short enough to apply to a single candle holder and strong enough to apply to a whole tent.
The five answers every light needs
Each light in the plan should have five written answers. They are the same for a strand of bulbs, an uplight, a pin spot, or a candle, and they turn a vague idea into something a vendor can build and a venue can approve.
Purpose, place, and power
Purpose means the job from the matrix earlier in this guide: guide, frame, soften, help the camera, or personalize. Place means a position you can point to on a sketch, with a distance. Power means a source and a load, either an outlet and a number of watts or a battery and a number of hours. If you cannot fill in those three for a light, the light is not ready to book.
Approval and fallback
Approval means a named person at the venue, or the fire official, has said yes in writing. Fallback means what you will use if the item fails, is not allowed, or cannot be delivered. A fallback does not have to be elaborate. A box of flameless candles, a few battery lanterns, and a warm-white strand held in reserve cover a surprising number of problems.
When an answer is missing
Missing answers are normal in the early months of wedding lighting planning. The skill is knowing which ones can wait and which ones cannot.
Questions that can wait
The exact color of an uplight, the order of dance-floor cues, and the type of candle holder can be settled after the structure and the rules are known. These are choices about look, and they change little about cost or safety.
Questions that cannot wait
Anything about fire rules, power capacity, anchor points, and who is allowed to connect to the building’s power should be answered before you pay a deposit. These are the answers that change a design or end one. It is better to ask now than to learn the answer at dusk on the day.
FAQ: wedding lighting questions
Planning and rules
How many string lights do I need for a tent or patio?
Measure the distance between your anchor points and add the length of any extra runs, then ask your vendor for the maximum span of their product. Spans vary by manufacturer; one maker lists about twenty feet between supports for its strings. Longer gaps need a support cable or extra poles, which can change the quote.
Can I use real candles at my venue?
It depends on the venue and the local fire code. Published guidance ranges from allowing enclosed, secured devices to prohibiting candles in buildings and tents. Minnesota’s fire marshal, for example, prohibits candles in aisles and exits. Ask your venue for its written policy, and plan flameless candles in case the answer is no.
Do I need an electrician for wedding lighting?
Sometimes. Plug-in strings and battery uplights usually do not need one, but hardwired connections do, and some venues require a licensed electrician or an approved vendor for any connection to the building’s power. Ask the venue and the wedding lighting vendor early, and get the answer in writing so nobody guesses on the day.
Power and safety
How much power will my lights use?
It depends on the bulbs. Add the watts from each label and compare the total with the circuit’s capacity, which is 1,800 watts for a typical 15 amp circuit at 120 volts. LED bulbs use at least 75 percent less energy than incandescent ones, according to the Department of Energy, so they often leave room for other equipment.
Is it safe to use extension cords outdoors?
Only with cords marked for outdoor use, which carry a W marking according to the Electrical Safety Foundation International. Match the cord to the load, never daisy-chain multi-plug outlets, and keep connections out of water. Treat cords as temporary, and ask your vendor to cover or route any cord that crosses a walkway.
Where can a generator go at a tent wedding?
At least twenty feet from doors, windows, and vents, and never indoors, according to the Consumer Product Safety Commission. Put it away from guests and from where the ceremony happens, since it is noisy, and keep it dry under an open canopy. Decide who will refuel it, and let it cool first.
Cost and photography
How much does wedding lighting cost?
We found no survey with a disclosed method, only seller-published ranges. Paperlust lists uplighting at $600 to $2,000 and string lights at $3 to $5 per foot, while Rowabi lists packages from $200 to $1,000 up to $4,000 and more. Scope, region, labor, and teardown change the total, so compare installed quotes.
How do I make sure the lighting works for photographs?
Share the plan with your photographer before the day, and ask what light they need and what they struggle with. Dark rooms with high dark ceilings are harder to photograph, and mixed colors need correction. A phone test from guest and photographer positions will show most problems, such as glare and heavy color casts.
Your next steps
Get the facts
Walk the room and collect the rules
Visit at the hour you will use the room. Measure, photograph the anchor points, and ask for the fire, hanging, and power rules in writing. Then use our wedding venue questions guide to cover the rest of the venue, and our banquet hall vs hotel ballroom guide if you are still choosing between room types.
Write the load list and the cue sheet
List every plug-in item with its watts, and sketch the evening’s wedding lighting cues. These two pages are what a vendor, a venue, and a photographer will all want to see.
Choose and confirm
Compare installed quotes
Send each vendor the same one-page brief, and use the template table in this guide to line up what is included. For the wider plan, use our wedding planning guide and wedding decor guide.
Test, then book the details
Ask for a mock-up, photograph it, and confirm the substitution plan and the schedule in writing. Add the wedding lighting deadlines to your timeline and checklist so nothing lands in the last week.
If this is on your list, see also Fall Wedding Colors: Design Ideas, Real Costs, and Venue-Smart Planning.
Sources & methodology
How we built this guide
What we relied on
This guide combines a federal consumer-product safety notice on portable generators, the U.S. Department of Energy’s lighting and LED guidance, accessibility dimensions from the U.S. Access Board, a state consumer-protection guide for weddings, public fire-safety pages from Minnesota, San Francisco, and a university, an electrical safety nonprofit’s extension cord guidance, manufacturer and retailer guides on string lights, uplighting, and pricing, and two photography education sites. Where a statement comes from a seller or a manufacturer, we say so, because sellers describe their own products and prices. The load arithmetic, the worked examples, the design matrix, and the installed-cost template are our own work. The scenario numbers are invented for illustration, and our calculations are estimates.
What we did not do
We did not test fixtures, visit venues, measure light, or collect vendor quotes, and we found no survey from The Knot or Zola that reports lighting on its own. Prices come from two seller-published articles that disclose no method. Fire codes, electrical codes, permits, and contract terms vary by place, and this guide is general information, not legal, safety, electrical, or financial advice. Ask your venue, your local fire official, a licensed electrician, and a qualified professional about your own situation.
Source list
Government and public-safety sources
- U.S. Consumer Product Safety Commission, Portable Generator Safety Alert: https://www.cpsc.gov/s3fs-public/Portable-Generator-Safety-Alert-2017_5123.pdf
- U.S. Department of Energy, Lighting principles and terms: https://www.energy.gov/energysaver/lighting-principles-and-terms
- U.S. Department of Energy, LED lighting: https://www.energy.gov/energysaver/led-lighting
- U.S. Access Board, 2010 ADA Standards, Chapter 4 accessible routes: https://www.access-board.gov/ada/chapter/ch04/
- Wisconsin Department of Agriculture, Trade and Consumer Protection, Weddings consumer guide: https://datcp.wi.gov/Documents/Wedding219.pdf
- Minnesota Department of Public Safety, State Fire Marshal, Candles and open flames: https://dps.mn.gov/divisions/sfm/fire-code/fire-code-information-topic/candles-and-open-flames
- San Francisco Fire Department, Guidelines for candles in public assembly: https://www.sf-fire.org/guidelines-candles-public-assembly
- Texas A&M University at Galveston, Event decorations: https://www.tamug.edu/environmentalhealthsafety/Event_Safety/EventDecorations.html
Electrical, manufacturer, and retailer sources
- Electrical Safety Foundation International, Extension cord safety: https://esfi.org/extension-cord-safety
- Oogalights, Commercial grade light strings installation instructions: https://www.oogalights.com/Downloads/Commercial/Oogalights-Commercial-Grade-Light-Strings-Instructions.pdf
- Viribright, How to plan and install outdoor string lights: https://viribright.com/blogs/insights/how-to-plan-and-install-outdoor-string-lights
- Rent for Event, Everything you need to know about uplighting for your wedding: https://rentforevent.com/blog/everything-you-need-to-know-about-uplighting-for-your-wedding/
- Paperlust, How much does wedding lighting cost (2026 guide): https://paperlust.co/blog/how-much-does-wedding-lighting-cost/
- Rowabi, How much does wedding lighting cost: https://www.rowabi.com/blogs/how-much/does-wedding-lighting-cost
- Industrial Monitor Direct, NEC 15A circuit wattage limits (technical explainer; its code citation should be verified): https://industrialmonitordirect.com/blogs/knowledgebase/nec-15a-circuit-wattage-limits-continuous-vs-non-continuous-load-calculations
Photography education sources
- SLR Lounge, 10 tips for wedding reception lighting: https://www.slrlounge.com/lighting-for-wedding-reception/
- Photography Icon, How to light weddings: https://photographyicon.com/how-to-light-weddings/