
A wedding dress fit and alterations guide should start from the fact that a dress that fits in the fitting room can still fail on the wedding day, because the dress has to stand, sit, climb, hug, dance, travel, and be put on and taken off, so the useful test of fit is movement, not how the gown looks on a pedestal.
Quick answer
In this wedding dress fit and alterations guide, the short version is to judge fit by what you can do in the dress, not only by how it looks standing still. Bring the exact shoes and underlayers to every fitting, run the ten-station fit-and-move protocol before you approve final work, and learn your bustle with a helper before the wedding. Leave structural changes to a professional seamstress, plan the dress’s trip as carefully as the dress itself, and get alteration terms, pickup dates, and fixes in writing.
Most advice about gown fit stops at measurements: bust, waist, hips, hem. Those numbers matter, and a seamstress works from them. But on the day, nobody checks a tape measure. You will be asked to lift your arms for a hug, walk a long aisle in front of guests, sit for a toast, climb steps for photos, and visit the restroom between the ceremony and dinner. This wedding dress fit and alterations guide organizes the whole job around those moments.
Our wedding dress fit and alterations guide has three parts. First, a movement protocol you can run at a fitting with a friend and a phone. Second, the supporting decisions that make the protocol pass: underlayers, alterations, trains and bustles, hems and shoes. Third, the logistics around the dress: heat and long hours, travel and shipping, paperwork, and unusual situations. For the calendar and price side of alterations, our guide to wedding dress alterations covers scheduling and quotes in depth, and we avoid repeating it here.
A note on sources. We drew on federal consumer guidance, a Better Business Bureau article, the Transportation Security Administration, the U.S. Postal Service, a Mayo Clinic page, and several bridal retailers and wedding publications. We name each one where we use it, and retailers describe their own practices, so treat their advice as common practice, not rules. The protocol itself is our own editorial design, not an industry standard. This wedding dress fit and alterations guide is general information. It is not legal, medical, or financial advice, and it does not replace your seamstress, who can see your actual gown.
A wedding dress fit and alterations guide built around movement, not just measurements
Before the protocol, it helps to agree on what we are trying to achieve. A gown is an engineered object with a particular job, and the job changes over the course of the day. Naming the jobs makes it easier to notice which one a given fit problem actually breaks.
What “fits” means once the dress leaves the fitting room
A fitting room is a calm, well-lit space with a mirror, a platform, and a professional who stands in the right place. Your wedding day has none of those. That mismatch is the root of most fit surprises.
The pedestal pose versus the wedding day
On a fitting platform you stand tall, breathe lightly, and hold still while someone pins. A fit that looks excellent in that pose can still pull across the back when you reach forward, gap at the neckline when you lean for a hug, or feel tight once you have eaten. Nothing about that is unusual, and it is not a flaw in the seamstress’s work. It simply means the pedestal pose tests only one posture. The protocol below deliberately takes you out of that pose, one movement at a time, while a professional is still available to adjust.
Four jobs a gown has to do
It helps to separate the dress’s jobs: to be seen (silhouette, lines, how it photographs), to be worn (breathing, sitting, comfort over hours), to be moved (walking, stairs, dancing, train handling), and to be managed (zipping, buttoning, bustling, restroom visits, transport). Retailers and editors mostly discuss the first job. Problems on the day often come from the other three. As you read, ask which job each decision supports, and be wary of a change that improves one job while quietly breaking another.
Who is responsible for which part
Fit is a shared project, and unclear roles are where steps get dropped. Before the first fitting, it helps to know who does what.
The salon and the seamstress
The shop that sells the gown and the person who alters it may be the same business or two separate ones. The Knot’s fitting guide describes a seamstress who checks the bodice first, pins the hem, and, at a later visit, usually starts the bustle. Whatever the arrangement, ask who will be doing the work, whether that person has done your gown’s fabric and construction before, and who is accountable if the result does not meet the agreement. Our wedding vendor contract guide explains why those answers belong in writing.
You and your helpers
You supply information the seamstress cannot see: how the dress will be used, the shoes and underlayers you will actually wear, and how it feels when you move. Your helpers supply hands. The Knot suggests bringing a relative, bridesmaid, or trusted friend to fittings so someone besides you learns how to zip, button, and bustle the gown. Choose that person early, because the helper you pick should also be the person who is near you at the ceremony and reception.
The venue and the day itself
Some constraints belong to neither of you. Aisle width, floor surface, stairs, restroom size, weather, and the order of the day all affect how a dress behaves. If you have not visited the venue wearing something similar in volume to your gown, you are guessing. Later sections show how to turn those unknowns into questions for the venue and the planner.
How to use this guide
You do not need to read this wedding dress fit and alterations guide start to finish. The structure is meant to let you jump to the part of the problem you have.
The protocol is our design, not a standard
The ten-station fit-and-move protocol is an editorial tool we built from common fitting practice and from what people routinely have to do in a gown. No standard body publishes a “mobility test” for wedding dresses, and a passing score does not certify anything. Treat it as a structured way to notice problems early, while changes are still possible and affordable.
What this guide leaves out
This wedding dress fit and alterations guide does not recommend a particular silhouette, designer, or price tier, and we do not tell you how to sew. Structural changes, such as reshaping a bodice, replacing a closure, or moving seams, belong with a professional seamstress who has seen your fabric. Questions about health, such as fainting or injuries, belong with a clinician, and questions about contracts or disputes may call for a lawyer or your card issuer. Where a topic has its own guide on this site, we link to it instead of repeating it, including wedding dress styles for silhouettes and wedding dresses for shopping.
The fit-and-move protocol: ten stations to test before you approve final work
The protocol at the center of this wedding dress fit and alterations guide takes about an hour with a helper. Run it at your second fitting, when the main work is done but changes are still easy, and again, in a shorter form, at your final fitting. Each station has a movement, a pass condition, and a note about what a failure usually points to. Bring the exact shoes, underlayers, and accessories you plan to wear. David’s Bridal and The Knot both tell customers to do so, so that the hem and fit reflect the full look.
Set up the test
Good results depend on conditions, and the wedding dress fit and alterations guide protocol is no exception. A test done in the wrong shoes, or without anyone to watch, tells you little.
Wear the real layers
Wear the same shapewear, bra or built-in support, slip, and shoes you intend to wear on the wedding day, and bring the veil, belt, or jewelry that touches the dress. David’s Bridal advises bringing your wedding shoes, or similar heels, so the hem is set to your actual height, and your wedding undergarments, such as shapewear, a bra, or a slip. If you are still deciding between two pairs of shoes, run the protocol twice. A single change in heel height can move the hem, the waist position, and the way the skirt falls.
Bring a witness and a phone
You cannot see your own back, hips, or hem in motion. A helper can. Ask them to film each station from the front and the back, and to say out loud what they notice: pulling, gaping, bunching, slipping, or anything that makes you adjust your posture. Video is also useful for the seamstress, because it shows the problem as it happens, and the moment you step off the platform it may not be visible any more.
Score each station
Give each station one of three marks: pass (you could do this for hours), fix (it works but something needs adjusting), or rethink (the problem comes from the design, not the fit). The scorecard later in this section turns those marks into decisions. Write the marks down at the time, because memory smooths over small discomforts that feel important at hour four of a wedding day.
Stations one to five: stand, breathe, reach, sit, and step
The first five stations check the basics of living in the dress. Most fit problems show up here.
Station one: stand for five minutes
Stand still, in your shoes, for five minutes while the seamstress talks or while your helper checks details. Notice whether the bodice stays put, whether straps or boning dig in, and whether your feet begin to complain. This also tests the pedestal pose honestly, because long standing is how most ceremonies and receiving lines work. If you feel lightheaded, warm, or unsteady, sit down at once and tell the seamstress. We return to that in the heat and long-hours section.
Station two: breathe in fully
Take a slow, deep breath and let it out, then repeat after sipping water. The bodice should allow your ribs to expand without painful pressure, and it should not ride up or shift. A gown that is snug enough to look good only when you hold your breath is a fit failure, not a styling choice. The Knot advises asking for a chair if you want a snugger fit, so you can confirm you can sit comfortably after that section is altered, and the same logic applies to breathing: test the tightness you are actually asking for.
Station three: reach forward and up
Raise both arms overhead, then reach forward as if hugging someone, and then reach across your body as if taking a glass. Watch the back, sleeves, and armholes. Pulling across the shoulder blades, a neckline that gapes when you lean, or a sleeve that restricts your elbow means the fit needs adjusting, or that the design may need a different support. Many guests will hug you, so the hug reach matters more than the overhead one.
Station four: sit down and stand up
Sit on a regular chair, not a fitting stool, and stay there for a few minutes. Check how the skirt gathers, whether the waist digs in, whether fabric pulls across your thighs or hips, and whether you can cross your ankles comfortably. Then stand up without help. The Knot’s fitting article notes that you should ask for a chair to confirm you can sit comfortably after tightening a section. Do this at every fitting, because a change made to improve standing can make sitting worse.
Station five: walk, turn, and climb steps
Walk the length of the shop in a normal stride, then turn around the way you would at the end of an aisle. Ask whether you can take a normal step without tugging the hem or catching the heel. If the shop has stairs or a curb outside, climb them while a helper holds the train or skirt. Note whether you can see your feet, whether the skirt catches under your shoe, and whether you need to lift fabric by hand. A dress that forces tiny steps is a mobility decision you should make on purpose.
Stations six to ten: turn, hug, bustle, restroom, and long wear
The second half of the protocol tests moments that are easy to forget until they happen.
Station six: dance and spin
Ask your helper to put on a slow song and move as you would at the first dance. Sway, turn, take a few steps, and have your partner or a helper dip or hold you if that is part of your plan. If you have a dance planned, practice the exact choreography in the dress, as our guide to the wedding first dance suggests thinking through. Watch the hem, the shoes, and the support, and note whether the skirt tangles or the bodice shifts.
Station seven: hug and lean
Have your helper hug you from the front, then the side, then lean in for a photo pose. Guests will lean against the bodice, hold your waist, and kiss your cheek. Check whether the neckline holds, whether beads or lace snag on sleeves or jewelry, and whether the zip or buttons hold. Also check how makeup or deodorant transfers to the fabric during a hug, because a pale gown shows marks. This is a good moment to ask about the kind of tape or fixes you will keep in your wedding emergency kit.
Station eight: bustle and unbustle
Have the person who will actually bustle the dress do it, on a timer, while you stand still. Then dance briefly, and check that the bustle holds. Our trains section covers bustle styles and practice, but the test belongs here too: a bustle that works only when the seamstress does it is not finished. Ask the seamstress to watch the helper and correct their technique, and film the process so the helper can review it later.
Station nine: the restroom rehearsal
This is the station people skip and later wish they had not. With a helper, practice what you would do in a restroom stall: lifting the skirt, managing layers, handling the train, and restoring the dress. Ask how long it takes, and how much room it needs. Our sibling guide on how to sit and use the restroom in a fitted wedding dress goes further. At minimum, learn whether you can manage alone, or whether you need a helper, and decide who that helper is.
Station ten: wear it for hours
If the shop allows, and the seamstress is comfortable with it, wear the dress and underlayers for an extended stretch in a realistic setting, such as walking, sitting, eating a light snack, and then removing the dress. Some shops may not allow this for dresses that have not been purchased, so ask about a home trial only if you own the gown and the seamstress agrees. A shorter version is to wear your underlayers and shoes at home for several hours while you do ordinary tasks, which tests everything except the dress itself.
Scorecard and what to do with failures
Once the stations are done, you have a set of marks and a recording. This section helps you turn them into decisions.
A scorecard you can copy
| Station | What you do | Pass looks like | A failure often points to |
|---|---|---|---|
| 1. Stand | Stand five minutes in shoes | Bodice stays put, no sharp pressure | Boning, strap length, shoe height |
| 2. Breathe | Deep breath, then sip water | Ribs expand, nothing rides up | Bodice too snug, support choice |
| 3. Reach | Arms up, forward, across | No pulling, no gaping | Armhole, back width, neckline cut |
| 4. Sit | Sit on a normal chair, stand | Skirt manageable, waist comfortable | Waist or hip fit, skirt volume |
| 5. Walk | Walk, turn, climb steps | Normal stride, hem clears shoe | Hem length, skirt width, heel |
| 6. Dance | Move to a slow song | Hem and bodice stay in place | Hem, support, bustle |
| 7. Hug | Hug, lean, pose | Neckline and closures hold | Neckline, closures, detail snags |
| 8. Bustle | Helper bustles on a timer | Holds through movement | Points, loops, reinforcement |
| 9. Restroom | Rehearse with a helper | Manageable in a small space | Layers, closures, train |
| 10. Wear | Wear for hours | Comfort lasts, nothing slips | Underlayers, fit, fabric |
Pass, fix, or rethink
Within this wedding dress fit and alterations guide, a pass needs nothing. A fix means a seamstress can probably adjust the issue, such as a hem, a strap, a bodice seam, or a loop, and you should ask for the change in writing. A rethink means the cause may be the design, such as a very narrow skirt that cannot accommodate a normal stride or a rigid bodice that does not allow a deep breath. In that case, ask the seamstress what options exist, and be prepared for the answer to involve adding a layer, changing an element, or in rare cases changing the gown. Structural changes should always go to a professional.

Underlayers: what you wear beneath the gown changes how it fits
Any wedding dress fit and alterations guide has to deal with underlayers, because they are part of the fit. A bra, a slip, shapewear, or built-in cups each add or remove volume, change how fabric hangs, and affect comfort over hours. That is why retailers and editors repeatedly tell customers to bring the real thing to fittings, and why choosing underlayers late is a common source of last-minute alteration problems.
Underlayers by silhouette
Different necklines and cuts create different support problems. The notes below paraphrase a bridal designer’s undergarment guide from Val Stefani, a retailer, so treat them as that company’s practical advice and confirm with your own seamstress.
Strapless and sweetheart necklines
Val Stefani’s guide recommends a strapless bra with a grippy band and several rows of hook-and-eye closures, and says it should fit snugger than a standard bra. For a fuller bust, the guide suggests a bustier or corset, which offers boning for support and can smooth the midsection, and may replace separate shapewear. The test to run is the reach and hug stations: if the bodice lifts or slides when you raise your arms, the support is not matched to the dress. Bring the garment you intend to wear, not a stand-in, so the seamstress can fit around it.
Sheath and column gowns
Fitted, thin fabrics show whatever sits beneath them, so Val Stefani’s guide recommends bridal shapewear that extends past the knee to smooth lines. The trade-off is that long shapewear can be warm, restrictive, and harder to manage in a restroom. Test it with the sitting and walking stations. If you cannot take a normal stride or sit without the garment rolling, the problem may be the shapewear, not the gown, and it is much easier to change a garment than a dress. Ask your seamstress to see you in motion before settling on it.
Backless, plunging, and halter styles
The same guide notes that backless and low-back gowns often lack support, and suggests asking an in-house seamstress to sew bra cups into the gown or using flat-lying adhesive bras, which are usually nude and leave few visible lines. For deep-V styles it suggests a nude low-cut bra or bodysuit, and for halters a convertible or strapless bra, with clear straps so color does not show through. If your gown is backless, our sibling guide on choosing undergarments for a backless dress goes deeper. Adhesive products depend on skin, sweat, and heat, so test any adhesive for hours before you commit.
Test underlayers like part of the dress
In any wedding dress fit and alterations guide, underlayers deserve the same attention as the gown, because they are a part of what you rely on all day.
Check them in natural light and under flash
Val Stefani’s guide advises testing undergarments in natural light and under flash photography, since lighting can reveal lines or shades. This is practical because wedding photos use both. Ask your helper to take photos at the fitting with the flash on, in a window, and in the shop’s overhead lighting, and compare them. Lines, seams, or color showing through in one lighting condition may not be visible in another. If you are working with a photographer, our wedding photographer shot list can help you plan which poses will stress the fit.
Test for heat, sweat, and slip
A garment that holds perfectly in an air-conditioned fitting room may behave differently after hours of warmth, and adhesives and silicone grips are particularly sensitive. If your wedding is in warm weather, try wearing your underlayers at home for several hours while doing ordinary things. Notice whether anything rolls, rubs, or slides, and whether seams chafe. This is not a medical test, and if you notice persistent irritation or a skin reaction, talk to a clinician or pharmacist. Our summer wedding heat plan covers wider heat planning.
Check restroom practicality
Underlayers that look perfect can be impractical in a restroom. A one-piece bodysuit, a long-line corset, or multiple layers may take time and room to manage. This is not a reason to avoid support you need, but it is a reason to decide in advance who will help you and how long you will need. Rehearse the restroom station in your underlayers at the fitting, and consider asking whether closures can be changed so that the garment is easier to handle, since a seamstress may be able to adjust them.
Built-in support or separate pieces
Some gowns come with cups or boning, and some do not. Which is better depends on the dress, your body, and how you plan to move.
Asking about sewn-in support
Val Stefani suggests asking the seamstress to sew bra cups into a gown that lacks support. Ask what the cups would be made of, how they would be attached, how they would affect the line of the bodice, and whether they can be removed or replaced if they shift. Sewn-in support is part of the garment, so changes to it are a structural alteration that a professional should make. Ask to see a sample of this seamstress’s work on a similar gown before you agree.
When to change the garment instead of the dress
If a protocol station fails because of an underlayer, the first thing to try is a different underlayer. Changing a garment is cheap, reversible, and fast. Changing the dress is costlier and, once cut, cannot be undone. Try at least two options for any garment that causes a problem, and test both across all ten stations, not only the one that failed. Then tell the seamstress which one you chose, so the final fitting reflects the real combination.
Do not change underlayers after the final fitting
The most avoidable surprise is a new garment that arrives after the last fitting. A different bra band, a new slip, or a replacement pair of shoes changes the fit slightly. If something must change, tell the seamstress and ask whether a quick check is possible. If you cannot revisit, return to the garment that was in place at the last fitting. This guide is not a substitute for the seamstress’s opinion, but the rule is easy to follow: whatever you wore at the final fitting is what you wear on the day.
Alterations through a movement lens: what to ask for, and when
This part of the wedding dress fit and alterations guide looks at alterations differently. They are covered in our wedding dress alterations guide from a scheduling and cost angle. It asks what each fitting is for if the goal is a dress you can move in, and how to describe problems so that a seamstress can solve them.
Fitting visits and what each should test
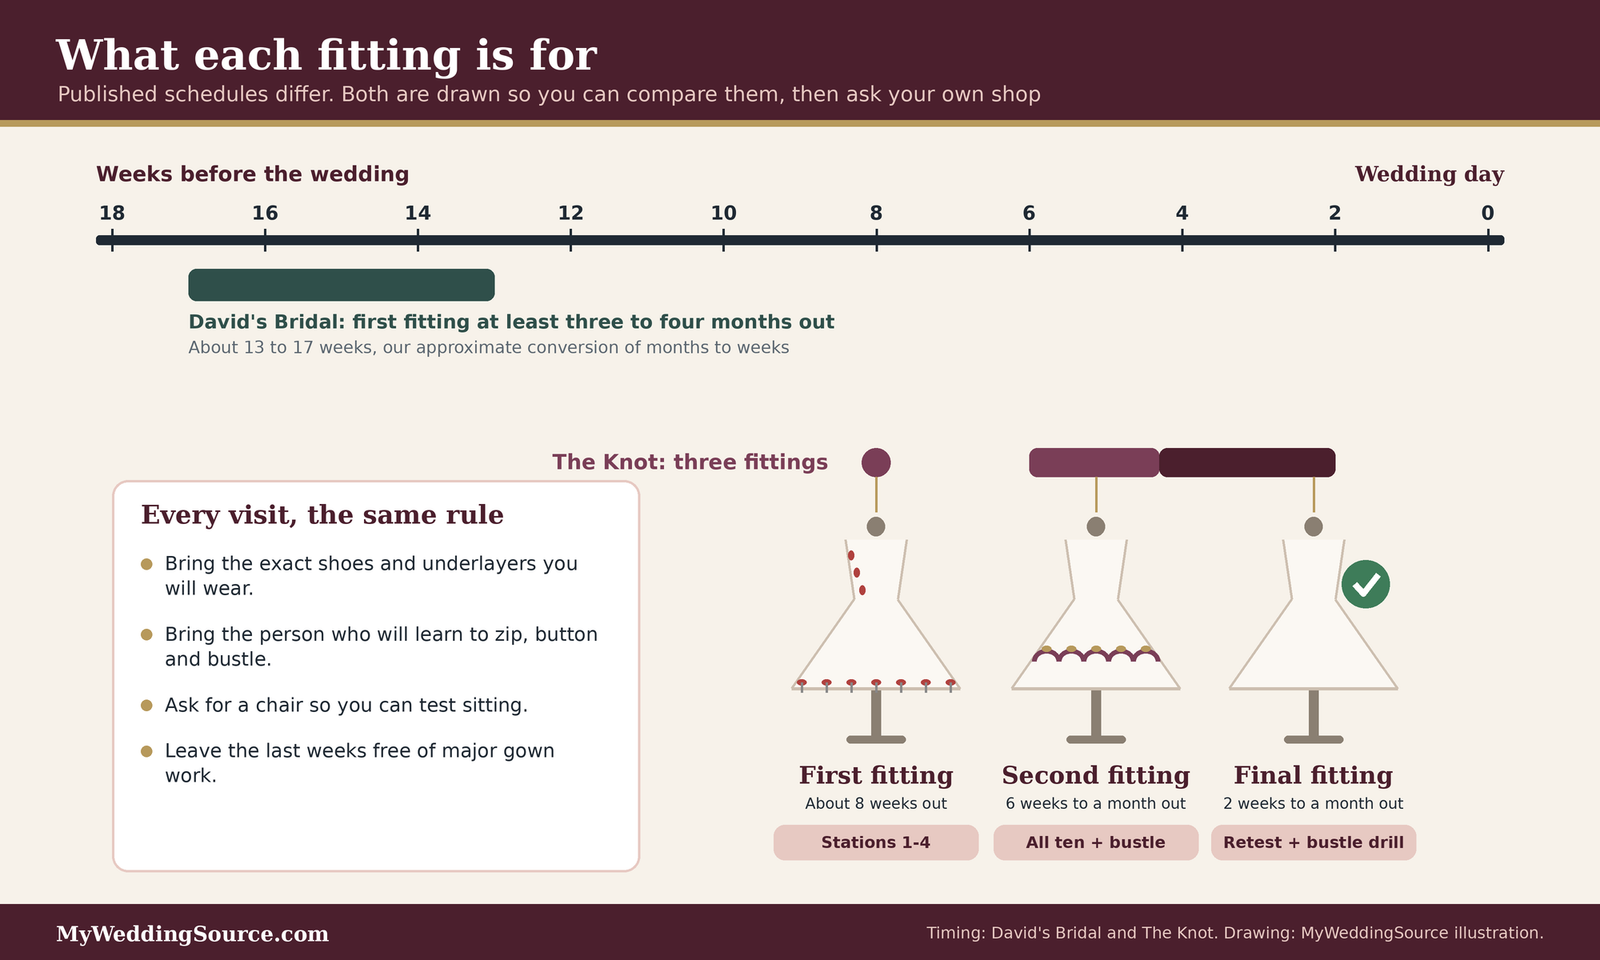
Published schedules differ, and no wedding dress fit and alterations guide can set yours, and the right plan depends on your gown and seamstress. David’s Bridal advises scheduling the first fitting at least three to four months before the wedding, while The Knot describes three fittings beginning about eight weeks out. Both are retailer or editorial guidance, so use them as a range and ask your own shop.
The first fitting sets the plan
David’s Bridal says the first fitting usually takes about an hour. The Knot describes the seamstress checking the bodice first, then pinning the hem, and asks you to speak up about any puckering, bunching, or bulging, and to ask why it happens and how it can be fixed. Use this visit to run stations one through four and describe how you plan to move. Book the next appointment before you leave, as The Knot suggests, so you do not lose your place on the calendar.
The second fitting checks the work
At the second visit, The Knot says the seamstress refines earlier adjustments and usually starts the bustle, and suggests asking which bustle style suits the gown and whether you can see a few options pinned. This is the best time for the full ten-station protocol, because the main work is done but changes remain easy. Bring every layer and accessory. If anything fails, ask for a written list of fixes and a date by which each will be done.
The final fitting is a rehearsal
The Knot places the final fitting about two weeks to a month before the wedding, when the dress should match your vision. Use it to repeat the stations that failed earlier and to practice the bustle one more time. Check every closure, hook, loop, and button, and ask for the final pickup date and any care instructions. A tight timeline is a risk, so avoid agreeing to significant work in the last days, and ask the seamstress what is realistic.
Describing problems in words a seamstress can use
A good description saves time and money. Vague complaints such as “it feels off” often lead to guessing, and guessing often leads to repeated visits.
Say what you did, what you felt, and where
A useful description has three parts: the movement, the sensation, and the location. For example, “when I raise my arms, I feel pulling across my shoulder blades,” or “when I sit, the waistband presses just below my ribs.” Pair that with a video clip. The Knot encourages customers to speak up about puckering, bunching, or bulging and to ask why it happens and how it can be fixed. The “why” matters because it tells you whether the fix is a small adjustment or a design limit.
Separate comfort from appearance
Some problems are about how the dress looks, and some are about how it feels. Try to say which is which. A visible wrinkle at the waist may be cosmetic, and pressure that makes it hard to breathe is a comfort issue. Both are valid, and you decide which matters more. Seamstresses can often solve one by trading off the other, so naming your priority helps them choose. Be honest about your limits, since you will wear the dress for many hours and a slight look compromise may be worth lasting comfort.
Know what a professional should handle
Structural changes, such as moving seams, reshaping bodices, replacing closures, or reworking boning, are professional work, and the quality of the result may depend on the seamstress’s experience with your fabric. This guide cannot judge any individual’s skill. Ask to see examples of similar work, as Pomp and Port suggests when it advises asking bridal tailors for examples of their bustle work, and ask what happens if the result does not meet the agreement. Do not attempt structural changes yourself on a gown you cannot replace.
Body changes, swelling, and the chair test
Your body on the wedding day may not match your body at the first fitting. This is normal, and planning for it is more useful than worrying about it.
Plan for changes without guessing
Weight, hydration, and swelling can shift over months or even hours. This guide does not give health advice and cannot predict your body. Our plus-size wedding dresses and petite wedding dresses guides discuss sizing for particular bodies, and your seamstress can explain how your gown was cut. Ask the seamstress how much room each seam has to adjust in either direction, and whether the shop offers a quick check close to the date if your measurements change.
Use the chair to test a snugger fit
The Knot advises asking for a chair if you want a snugger fit, so you can confirm you can sit comfortably after that section is altered. This is a simple habit that avoids a common trap: a dress that fits beautifully standing and fights you when you sit. At every fitting, ask for a chair, sit for several minutes, and stand up. If the dress grips at the waist or hips when you sit, mention it before the seamstress finishes the seam.
Leave a little room for the day itself
A slightly more comfortable fit at the waist and ribs may serve you better than the tightest possible fit, because you will eat, sit, hug, and perhaps dance. This is a judgment call, not a rule, and it depends on how the dress is built. A sensible question for your seamstress is how much movement the current fit allows and whether any seam can be eased later if needed. If your plan includes a reception meal, test the fit after drinking water and eating a light snack.
Trains and bustles: moving a long skirt through a full day
For a wedding dress fit and alterations guide, trains deserve their own section. A train is the part of a gown most likely to be stepped on, snagged, or forgotten. It is also the part that people photograph most. Handling it well is a skill that takes planning and practice, and the decisions you make about length and bustle style affect every station of the protocol.
Train lengths and the space they need
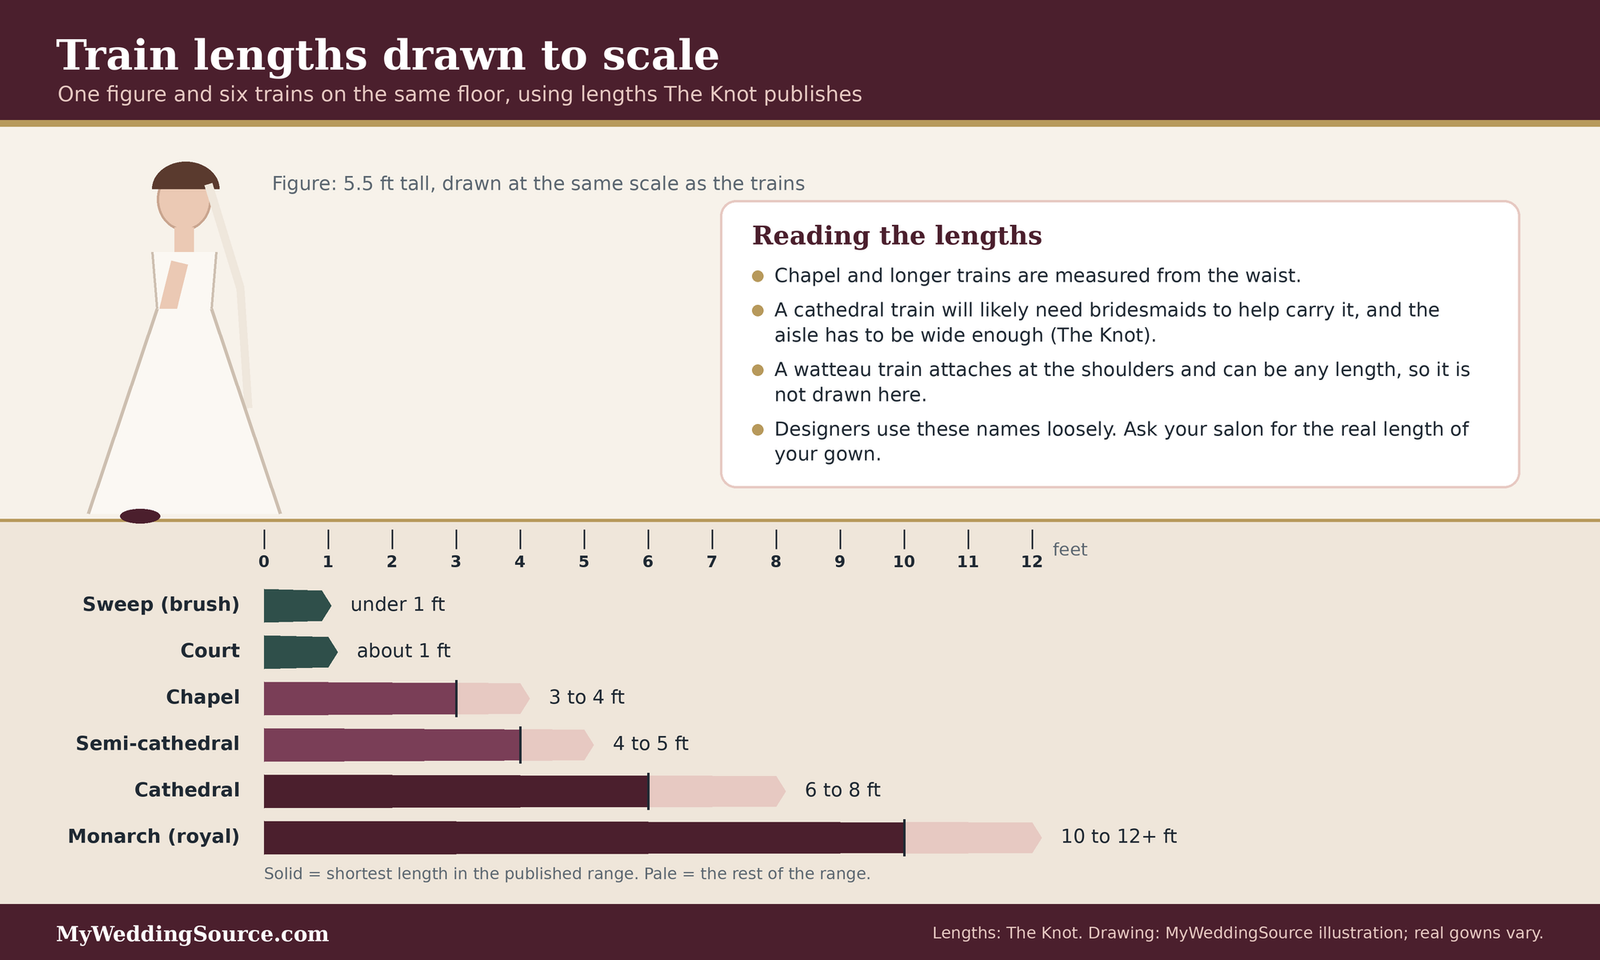
The Knot’s visual guide to trains gives published lengths for each type. These are conventions, not strict rules, and different designers may use the terms differently, so ask your salon to show you the actual length on your gown.
What the published lengths look like
According to The Knot, a sweep or brush train is less than a foot, a court train is about a foot, and a chapel train runs three to four feet from the waist. A semi-cathedral train runs four to five feet, a cathedral train six to eight feet, and a monarch or royal train ten to twelve feet or more. The Knot also describes a watteau train, which attaches at the shoulders and can be any length. The infographic below draws these lengths to scale next to a standing figure. Our sibling guide on wedding dress train lengths covers the venue side in more depth.
Aisle width, surfaces, and stairs
The Knot notes that a cathedral train usually needs bridesmaids to help carry it and advises confirming that the ceremony aisle is wide enough. Beyond width, think about what the aisle is made of. Grass, sand, gravel, and stone each catch a hem differently, and a train that glides on a carpeted floor may drag on rough ground. Ask the venue about stairs, steps up to an altar or stage, and the route from the dressing room to the ceremony. If you can, visit wearing a long skirt, or borrow a long length of fabric, and walk the route.
Who carries the train, and when
A train needs a plan for the ceremony, the photos, the reception, and every restroom visit. Decide who handles it at each point, and make sure they know what they are doing. The Knot notes that you cannot bustle a dress yourself on the wedding day, so plan for bridesmaids or friends to help. Tell the photographer when you need the train arranged and when it will be bustled, so that photos before the bustle are not interrupted. Our wedding day timeline guide can help you place the bustle in the schedule.
Bustle styles and what to ask about them
A bustle lifts the train off the floor for the reception. The Knot explains that the train is folded or pleated into the skirt with hidden hooks, buttons, or ribbons the seamstress sews in. Several styles exist, and the right one depends on the dress.
Four styles described by one retailer
Pomp and Port, a bridal retailer, describes four types. An American or over bustle lifts the train and secures it on the outside of the gown, creating cascading folds, and the retailer says it is secure and suits voluminous ballgowns. A French or under bustle tucks the train under the skirt with hidden ribbons for a billowing look. A ballroom bustle folds the train into the dress so seamlessly that the gown looks designed without one. An Austrian bustle, which the retailer calls rarer, gathers the train down the middle for a ruched effect. The retailer does not match styles to specific train lengths or fabrics, and neither do we.
How many points, and why it matters
The Knot notes that bustles can range from three to eleven points. More points can distribute the weight of a heavy train, but more points also mean more steps for the person doing the bustling. This is a trade-off to discuss with the seamstress, who can assess your fabric and train weight. Pomp and Port makes a related point: if you value clean lines, consider how visible the attachment points are, and if you value freedom of movement, security matters most. Neither choice is wrong, but you should make it on purpose.
Reinforcing the points that carry the load
Pomp and Port advises having your seamstress reinforce the loops or buttons, because bustles often fail when the skirt gets stepped on. That is a useful warning, since a crowded reception floor and a long skirt are a common combination. Ask how the points are attached, what thread or tape is used, and how the seamstress tests the strength. Also ask for a few spare hooks or loops, and ask whether someone at the venue can make a quick repair if a point fails. Add a small sewing kit to your wedding emergency kit.
Practice until the bustle is boring
A bustle that works in the shop may fail on the day if nobody can repeat it. Practice is cheap, and it is the part people skip.
Teach more than one person
Pomp and Port says bustling is a skill, so practice before the wedding instead of teaching someone at the reception. The Knot suggests bringing a relative, bridesmaid, or trusted friend to fittings so that someone besides you learns how to zip, button, and bustle the dress. Teach at least two people, so the plan does not depend on one person being in the room. Give each of them time to do it themselves while the seamstress watches and corrects.
Film the demonstration
The Knot recommends filming the seamstress demonstrating the bustle so your wedding party can practice. Ask permission first, and film both the front and the back. Number the points if the seamstress has not, and ask whether they can be marked with tags or colored thread that you can remove later. Share the video with your helpers, and ask them to rehearse a few times before the wedding, preferably with a similar skirt or with the dress itself if the seamstress allows.
Time it and plan the moment
Time the bustle during a rehearsal, and plan where it will happen: a quiet room, with enough space and a mirror, between the ceremony photos and the reception entrance. Tell the planner or coordinator so the timeline accounts for it. If the timeline is tight, ask the seamstress whether a simpler bustle is possible. Our wedding vendor timeline and wedding hair and makeup schedule guides explain how to fit these tasks around the other people working on the day.
Hems, shoes, and surfaces: the ground your dress meets
A wedding dress fit and alterations guide would be incomplete without the ground. The hem is the place where the dress meets the world. It determines whether you can walk without tripping, and it depends on a decision people often make late: the shoes.
Hem decisions that depend on footwear
Hem work is among the most common alterations. David’s Bridal lists hemming as one of the standard changes, and several retailers tell customers to bring their wedding shoes to the first fitting.
The shoes set the hem
David’s Bridal says to bring your wedding shoes, or similar heels, so the hem is set to your actual height. Pomp and Port advises finalizing your reception shoe height early so the hem and bustle work with your footwear. The reason is simple: a hem set for a heel will be too long in flats, and a hem set for flats will show your shoes in heels. Our sibling guide on wedding dress hem length for flats versus heels covers this decision in detail.
If you plan to change shoes
Many people change shoes between the ceremony and reception. If you plan to, tell the seamstress, and ask how the hem and bustle will work with both pairs. A bustle can raise the skirt enough that a flatter shoe works at the reception, but that is a question for your seamstress, not a guarantee. Bring both pairs to the second fitting and run the walking and dancing stations in each. If you plan more than one outfit, see our later note on second looks.
Surfaces, stairs, and the route
A dress that moves well indoors may behave differently outdoors, and the route matters as much as the destination.
Grass, sand, gravel, and stone
Heels sink in grass and sand, gravel catches a hem, and stone can be slippery. This is general experience, not a measured finding, so treat it as a prompt to ask your venue about the surfaces you will cross. If your ceremony is outdoors, practice walking on a similar surface in your shoes. Our guides to beach wedding dresses and outdoor wedding venues explore these settings in more depth.
Stairs, doors, and elevators
Ask the venue about every set of stairs between the dressing room and the ceremony, as well as the width of doorways and the size of elevators. A full skirt or a long train can be hard to fit through a narrow door, and a staircase needs a helper to lift the fabric. If the route is difficult, ask the venue whether another path exists. If the venue has an accessible route, it may also be the easiest for a large skirt. Our guide to wedding venue questions can help you ask.
Heat, hours, and staying upright
A wedding day is long, and a gown adds warmth, weight, and restriction. Planning for comfort is not a luxury. It also helps you enjoy the day.
Why long standing and warmth deserve a plan
Mayo Clinic describes common triggers for fainting from vasovagal syncope, and two of them are directly relevant: standing for a long time and heat exposure. This is general information and not medical advice, and this guide cannot assess you.
What Mayo Clinic lists as triggers
Mayo Clinic says that vasovagal syncope happens when the part of the nervous system that controls heart rate and blood pressure overreacts, and that common triggers include standing for a long time, heat exposure, seeing blood drawn, fear of injury, and straining. It can also happen with no clear trigger. A ceremony in a warm room, with a long receiving line, in a snug bodice, can combine several of those factors, which is why the standing station in our protocol matters. It does not mean you will faint. It means a plan is sensible.
Warning signs worth knowing
Mayo Clinic lists warning signs before a faint: a change in skin color, lightheadedness, narrowed or blurred vision, an upset stomach, feeling warm, or a cold, clammy sweat. It says that if you feel faint, you should lie down and raise your legs, and if you cannot, sit and put your head between your knees. Share this with your helpers, and agree on a signal. Because a gown can make lying down difficult, think about where you could sit quickly, and who could help.
A practical plan for comfort
None of the following replaces advice from a clinician. If you have a medical condition, or if you have fainted before, talk to your doctor before the wedding.
Build in sitting breaks and water
Plan places and times to sit, such as before the ceremony, between photos, and during the cocktail hour. Keep water within reach, and ask a helper to carry it. Our wedding week checklist and summer wedding heat plan can help you place breaks around the schedule. For a winter wedding, the opposite problem, cold and layers, is covered in our winter wedding weather plan.
Tell the people near you
Your partner, your helper, and your photographer should know the signs and the plan, so that they notice early. Mayo Clinic notes that recovery usually starts within a minute, but that standing up too soon, within about 15 to 30 minutes, raises the risk of fainting again. Tell your helpers not to rush you back up. This is a good reason to plan quiet time and a chair near the aisle and the photo locations.
When to talk to a clinician
Mayo Clinic says fainting can be a sign of a more serious condition and suggests consulting a healthcare professional, especially after a first faint. If you feel unwell in the weeks before the wedding, or if you have had any fainting or near-fainting, make an appointment. Do this well before the wedding, so that you have time to follow any advice. This guide does not provide a diagnosis, and a seamstress cannot assess a health concern.
Travel: getting the dress to the wedding in the shape it left the shop
The last part of a wedding dress fit and alterations guide is the trip. A gown that has been fitted perfectly can still arrive wrinkled, misplaced, or damaged. Whether you drive across town, fly, or ship a gown ahead, the trip deserves a plan. Our sibling guide on wedding dress shipping for destination weddings goes deeper, and our destination wedding checklist places the dress in the wider plan.
Flying with the gown
Policies change, so treat everything below as a starting point and confirm with your airline close to your travel date.
What TSA says
The Transportation Security Administration says wedding dresses are allowed through security checkpoints, and suggests protecting the dress in a garment bag or similar packaging during screening. It also says airlines set their own rules for carrying on or stowing a dress and for carry-on size limits, so check with your airline. If the dress is too large for the X-ray machine, officers will screen it another way, which requires opening the garment bag. Allow time for that, and keep the bag easy to open and close.
Carry-on, checked, or its own seat
The Knot advises keeping the gown with you in the cabin so it never leaves your sight, and treats checking it as a last resort. It suggests an opaque garment bag and, for large gowns, a purchased seat, ideally by a window. If a gown must be checked, The Knot says a tracking tag inside the bag can help you follow it, though luggage delays happen. These are editorial suggestions, not guarantees. If the gown is too large for a cabin, ask the salon about alternatives well before the trip.
Airline policies vary, and they change
The Knot summarizes how several airlines treat garment bags. It reports that American allows a soft-sided garment bag in place of a carry-on and that only some aircraft have hanging closets, which give priority to other items. It reports that JetBlue has no hanging space, so the gown goes in an overhead bin and counts as a carry-on or personal item, and that Southwest crew typically help stow it overhead. These notes were published by The Knot and may be out of date, so verify with your airline and ask the gate agent for help boarding.
Shipping the dress ahead
Shipping a gown is a financial decision as well as a logistical one. The default coverage on most services is small compared with the price of a gown, so it helps to understand what you are buying.
What this actually costs
The U.S. Postal Service says that Priority Mail Express, Priority Mail, and USPS Ground Advantage include up to $100 of insurance in the price, that larger amounts can usually be purchased, and that standard insurance covers up to $5,000 per mailpiece, with fees starting at $2.80 and depending on declared value. Coverage reimburses the actual value of the contents. Compare that figure with your gown’s price and the cost of alterations already paid, and decide how much risk you are willing to carry. Other carriers have their own limits, so read each one’s terms before you ship.
How USPS describes its insurance
The USPS says included coverage requires a USPS Tracking barcode on domestic shipments, and that Priority Mail insurance is not included when you buy certain extra services. It also notes limitations for insuring some products and certain items. We have not verified how any carrier treats garments in particular, so ask the carrier, in writing, whether a wedding gown is eligible for the coverage you want. Do not assume that a declared value means the carrier will pay that amount in every case.
Keep proof and plan the timing
The USPS advises keeping your postmarked mailing receipt and proof of the item’s value. For lost items, it says to file within 60 days of mailing, and for damaged items or missing contents, to file immediately and no later than 60 days after mailing. Take dated photographs of the gown, the bag, and the packing before you seal the box, and keep the tracking number. Ship early enough that a delay does not threaten the wedding date. We do not offer financial or insurance advice, and a broker can explain options in detail.
Consider your wider coverage
Some couples consider event insurance, and some homeowners or renters policies may or may not cover shipped items. This guide cannot tell you what your policy covers. Ask your insurer, and read the exclusions. Our guide to wedding insurance explains what that kind of policy typically involves. If you rent the gown, check the rental agreement, since read the rental agreement closely and see our renting wedding dresses guide.
Arrival: unpacking, steaming, and resting the fabric
The gown has been folded, compressed, or hung in a bag for hours. A short plan for arrival prevents a scramble.
Let the fabric rest
The Knot advises letting the gown breathe for at least 24 hours after travel before wearing it, and hanging it outside its bag in a low-traffic area, away from food and drinks. That implies arriving at least a day early, or having the gown arrive ahead of you. Check the gown right away for damage, take photographs, and report any problem to the shipper or airline in writing, within the timeframe in their rules.
Steam with care
The Knot says that some materials, like silk, should only be pressed, since steam can shrink hems or discolor the fabric, and it advises checking with the designer or dry cleaner on the fabric. It also suggests having a planner or trusted person steam the gown from the inside out. Ask your salon in advance how the fabric should be treated, and write the answer down, because hotel staff and helpers will not know. We cannot recommend a method for your fabric.
Pack the small things
The Knot suggests wrapping the dress in acid-free tissue to reduce creasing, and using the original bag or a sturdy garment bag with a waterproof layer in case of spills. Pack your underlayers, shoes, bustle notes, spare hooks, and a small sewing kit in your carry-on, not a checked bag. If you have a veil, pack it separately and flat. Our wedding emergency kit guide has a longer list.
Contracts, labels, and your rights when fit goes wrong
Most fit problems get solved at the fitting. A few do not, and the paperwork you collected at the start decides how easy the next step is. This section is general consumer information, not legal advice. For a specific dispute, talk to a lawyer or a consumer protection agency.
What the paperwork should say
The Better Business Bureau gives general advice on wedding contracts that applies well to gowns and alterations.
Get the terms in writing
The BBB advises that contracts spell out dates, times, products, quantities, prices, key staff names, delivery or arrival times, cancellation and refund terms, and overtime charges. For a gown and its alterations, translate that into your own list: the specific alterations, the price of each, the dates of each fitting, the date the dress will be ready, and what happens if the result does not meet the agreement. Our guide to wedding vendor contract red flags explains what to look for.
Confirm the gown itself
The BBB says to confirm before the wedding that the gown is new and in the ordered size and color, to find out when it will arrive, and to allow enough time for alterations. It also reminds you to remind the shop of your date. If the gown arrives later than promised, the alteration window shrinks, so ask the shop what happens in that case and who pays for rush work. Put that answer in writing, with the date.
Itemize the quote
Ask for an itemized quote that lists each alteration, so you can see what changes the price and what you are paying for. David’s Bridal says pricing depends on the complexity of the work, the customizations chosen, and the fabric, and that basic work like hemming or strap adjustments is generally more affordable. The page gives no dollar figures, so we do not either. Compare quotes on the same list of work, and ask whether a bustle, cups, or beading are included or separate.
Care labels and cleaning claims
The care label tells you what the maker believes is safe for the gown, and it limits what a cleaner can responsibly promise.
What the Care Labeling Rule requires
The Federal Trade Commission’s Care Labeling Rule requires manufacturers and importers of wearing apparel to attach care instructions, and says each instruction needs a reasonable basis. A label must warn against procedures a consumer might reasonably try that would damage the item, and a drycleaning instruction must note any needed process changes, such as “No steam.” A “Dryclean Only” label is allowed only if the seller has evidence that washing would damage the garment. The FTC notes that custom-made garments from consumer-supplied fabric need no care instructions.
Read the label before you steam or clean
Before you steam, spot-clean, or send the gown out, read the label and ask the salon what it means for your gown. The rule’s examples show why: a label that says “No steam” is a warning, and ignoring it risks damage. If a label is missing or unclear, ask the salon in writing how the gown should be cared for, and keep the reply. Do not rely on an internet tip for a fabric you cannot replace. Our sibling guide on wedding dress stain removal covers what to do before professional cleaning.
Be wary of cleaning guarantees
No cleaner can guarantee an outcome on every stain and fabric, and a claim of one should make you ask for details. The Knot’s guide to preservation says that hidden stains, such as sugar that turns brown over time, need to be removed, and that champagne can oxidize and yellow if left alone, and it advises working with a professional. It suggests starting within about three to four weeks of the wedding and finding a drop-off location before the day. Ask what the service covers, and what it does not.
If something goes wrong
Start with the shop. If you cannot resolve it, the way you paid matters.
Pay in a way you can dispute
The BBB advises paying a deposit, not the full amount, only after both parties have signed, and paying by credit card, because a card makes it easier to dispute a charge if a vendor does not deliver. It recommends avoiding cash, wire transfers, gift cards, and payment apps for deposits. This is the BBB’s general advice, and card terms vary, so read your card agreement.
Watch the deadlines
The FTC says you must report a billing error to your card company within 60 days of when the first statement showing the charge was sent to you, and that the written letter must also go out within 60 calendar days. It says credit card protections are stronger than debit card protections, and that you should contact the card issuer first so you do not lose dispute rights because of timing. Common reasons include goods or services not received as agreed. Keep copies, not originals, of receipts.
Document and escalate
The FTC advises calling the number on your statement, noting the representative’s name and the date, and sending a follow-up letter, by certified mail with a return receipt if possible, to the billing-disputes address. It says you can file a complaint with the Consumer Financial Protection Bureau if you have a problem with the card issuer. Keep photos, videos, quotes, and messages from every fitting, because that record shows what was agreed and what was delivered. For legal questions, consult a lawyer.
Edge cases: when the standard advice needs adjusting
Everything in this wedding dress fit and alterations guide so far assumes an average situation. Real weddings include bodies, abilities, gowns, and conditions that need different answers. We do not have sources for every situation, so this section poses the right questions and leaves answers to the professionals who can see your circumstances.
Bodies and abilities
Good fit starts with how you actually move, and not everyone moves the same way.
Mobility aids and seated wear
If you use a wheelchair, walker, cane, or other mobility aid, or if you will spend much of the day seated, the protocol should be run in that position. Tell the seamstress at the first fitting, so the bodice, skirt length, and train are designed for the way you move. Ask about fabric that bunches when seated, a hem that clears wheels or footrests, and a train that will not catch. Run every station that applies, seated or standing, and ask the venue about accessible routes.
Pregnancy or expected body change
If you are pregnant, recovering from surgery, or expecting your body to change before the wedding, tell the seamstress at the start. This guide cannot predict changes and does not give medical advice. A seamstress can explain how much adjustment a gown allows and how late changes can be made. Ask about a fitting close to the date, and ask what happens if more changes are needed. Your clinician can advise on your health, and your seamstress on the dress. Keep both conversations separate.
Skin, sensory, and comfort needs
Some people react to adhesives, stiff linings, or fabrics, and some find tags, seams, or boning uncomfortable. If you have a sensitivity, tell the shop and test the underlayers and fabric against your skin for a longer time. Ask whether a lining can be changed, and whether tags or seams can be moved. If you notice a persistent skin reaction, talk to a clinician or pharmacist. A comfortable dress is not a luxury, and wearing it for hours is the real test.
Gown types that behave differently
Some gowns come with special rules.
Rented or sample gowns
Rental and sample gowns may have limits on alterations, so ask before you plan any changes. Our renting wedding dresses guide discusses how terms differ. A rental may allow only temporary changes, such as tape or pins, and may charge for damage. If you plan to wear a rental, ask what is allowed, what happens if the fit fails the protocol, and what you must do before you return it.
Detachable sleeves and add-ons
Detachable sleeves, overskirts, capes, and trains add pieces to manage. Ask how each attaches, how long it takes to attach or remove, and what the dress looks like without it. Run the protocol with and without the piece. Our sibling guide on detachable wedding dress sleeves covers fitting and attachment, and our long sleeve wedding dresses guide discusses sleeve styles and movement.
A second outfit or a quick change
If you plan to change gowns or add a second look, double the planning. Each outfit needs its own fit and its own movement test, and the changeover needs time, space, and a helper. Our sibling guide on bridal outfit changes discusses the timing. Ask the seamstress whether the second outfit can be made to hang well with the same underlayers, so that you do not need a second set.
Conditions on the day
The setting and the weather change the fit questions.
Outdoor, beach, and uneven ground
Outdoor ceremonies bring surfaces, wind, and moisture. A long train may catch, a light skirt may blow, and heels may sink. Ask the seamstress whether the hem and bustle can handle the surface, and test the walking station on a similar one if you can. For a beach, our beach wedding dresses guide covers fabric and length questions, and our outdoor wedding rain plan covers what to do if the weather changes.
Cold weather and layers
Winter weddings add coats, wraps, gloves, and tights, and each affects the fit. Run the protocol in whatever you plan to wear over the gown, including the coat you will put on for photos. Ask whether a wrap will catch on the bodice, and whether the train can be managed while wearing it. Our winter wedding weather plan can help you plan the layers.
A tight timeline
If the wedding is close and fitting time is short, prioritize. Ask the seamstress which stations matter most for your gown, and which changes are safest to make late. Do not agree to structural work in the final days unless the seamstress is confident and a second check is possible. A shorter version of the protocol, focusing on sitting, breathing, bustle, and restroom, can still find the biggest problems quickly.
Questions to ask before you approve final work
Bring this list to your second fitting, along with the scorecard from our wedding dress fit and alterations guide. Write down the answers and the date, and ask for anything important to be confirmed by email.
Questions to ask
- Who will do each alteration, and have they worked with this fabric and construction before?
- Can you give me an itemized written quote with the date each fitting and the pickup will happen?
- What is the policy if the result does not meet our agreement, and who pays for fixes?
- Which bustle style do you recommend, how many points, and how are they reinforced?
- Can you teach and film the bustle with my helper, and mark the points?
- What does the care label say, and how should I steam or clean this gown?
- If I ship or fly with the gown, what packing do you recommend for this fabric?
About the alterations
These questions confirm what you are paying for and what happens if it goes wrong.
Scope and price
Ask the shop to list every alteration, including the hem, bustle, bodice work, straps, cups, and any beading or lace work, with a price for each. Ask what is included and what costs extra. David’s Bridal says pricing depends on complexity, customizations, and fabric, so the same gown can cost different amounts at different shops. Compare quotes on the same list, and ask whether any step has an estimated range that may change.
Timing and remedies
Ask for the date of each fitting and the date the gown will be ready, and ask what happens if the dress is not ready, or if a problem is found late. The BBB advises remembering to remind the shop of your date and allowing enough time for alterations. Ask whether rush work is available and who pays. Write down the answer and the date, and ask for it by email, because verbal promises are hard to prove.
Skill and examples
Ask the seamstress to show examples of similar gowns, and especially bustle work, as Pomp and Port suggests. Ask how long they have worked with your fabric and whether they offer a final check close to the wedding. This is not about judging skill from a distance. It is about hearing how they talk about the work, since specific answers are usually a good sign.
About movement and care
These questions connect the fit to the day.
Movement and support
Ask how much room the gown has for breathing, sitting, and reaching, and what can be adjusted later. Ask whether sewn-in support is possible and how it would change the line. Ask which of the ten stations they would be most concerned about on your gown, and why. Their answer tells you where to look hardest, and it often points to something you had not considered.
Care and handling
Ask what the care label says, whether the gown can be steamed, and how it should be hung and stored. Ask whether the salon recommends a particular preservation service, and what happens in case of a spill on the day. The FTC’s care labeling guidance says labels must warn against procedures that would damage the item, so ask the shop to point out those warnings.
About travel
These questions matter if the gown will travel.
Packing and carrying
Ask how the salon recommends packing this fabric, whether a garment bag is included, and how to avoid creasing. Ask whether the gown can be carried on a plane or whether it should be shipped, and what the shop has seen work. The Knot advises keeping the gown with you in the cabin, so ask whether that is realistic for your gown’s volume.
Shipping and claims
If shipping, ask which carrier the salon uses and what coverage it recommends. Ask whether the gown is eligible for the declared value you want, and what documentation a claim needs. The USPS advises keeping your mailing receipt and proof of value. Take photos of the gown before it goes into the box, and keep the tracking number.
FAQ: wedding dress fit and alterations questions
Fit and alterations
How many fittings do I usually need?
It varies. The Knot describes three fittings, beginning about eight weeks before the wedding, while David’s Bridal advises starting at least three to four months out and allowing extra time for further changes. Complex gowns may need more visits. Ask your seamstress for a schedule and a written list of what each visit will cover.
Why should I bring my shoes and underlayers to every fitting?
Both change how the dress fits. David’s Bridal says shoes or similar heels let the hem be set to your actual height, and undergarments such as shapewear, a bra, or a slip let the seamstress fit around them. A new item after the last fitting can shift the fit, so wear the same layers each time.
Can I alter the dress myself?
For small tasks, such as sewing a snap, some people feel comfortable. For structural changes, such as reshaping a bodice, moving seams, or replacing a closure, use a professional seamstress, because a mistake may not be reversible. Ask your seamstress what you can safely do, and ask to see examples of similar work.
Movement and comfort
How do I know if the dress is too tight?
Run the sitting, breathing, and reaching stations. If you cannot take a full breath, sit comfortably, or raise your arms for a hug, the fit probably needs adjusting. The Knot advises asking for a chair when you want a snugger fit, so you can confirm sitting comfort. Mention any sharp pressure or lightheadedness to the seamstress right away.
What if I feel faint during the ceremony?
Mayo Clinic says to lie down and raise your legs, or, if you cannot, sit and put your head between your knees, and it notes that standing up too soon raises the risk of fainting again. Plan a place to sit, tell your helpers, and see a clinician if you have fainted before.
Who should learn the bustle?
At least two people. Pomp and Port says bustling is a skill to practice before the wedding, and The Knot suggests bringing a relative, bridesmaid, or trusted friend to fittings and filming the seamstress’s demonstration. Teaching two people means the plan does not depend on one person being nearby when you need it.
Travel and care
Can I carry a wedding dress onto a plane?
The TSA says wedding dresses are allowed through checkpoints and suggests a garment bag, but airlines set their own rules for stowing a dress and for carry-on size. The Knot advises keeping the gown in the cabin and, for large gowns, considering a purchased seat. Check with your airline close to your trip.
How much shipping insurance is included?
The USPS says Priority Mail Express, Priority Mail, and USPS Ground Advantage include up to $100 of insurance, that larger amounts can usually be purchased, and that standard coverage goes up to $5,000 per mailpiece. Carriers differ and terms can change, so confirm the details with the carrier and ask whether a wedding gown is eligible.
Your next steps
Before the next fitting
Choose your helper and your layers
Pick the person who will learn to zip, button, and bustle the dress, and invite them to the next fitting. Settle your shoes and underlayers before you go, and bring everything. If you are unsure about support for your neckline, ask the seamstress for options before you buy more garments. Our wedding party attire guide may help you plan who needs fitting and when.
Print the scorecard
Copy the scorecard from this wedding dress fit and alterations guide, and bring it with a charged phone. Ask the seamstress which stations they would like to see, and agree on how you will record problems. Take notes during the visit, and ask for a written list of fixes before you leave. If you have not yet seen the venue, ask about aisle width, surfaces, and stairs.
After the final fitting
Lock in the day
Confirm the pickup date, the bustle plan, and who will carry the dress and the emergency kit. Share the bustle video, and place the bustle in the day’s schedule with your planner or coordinator. Review the paperwork and keep copies of every quote, receipt, and message in one place.
Plan the trip and the aftermath
If the gown will travel, decide how, and confirm the airline or carrier rules close to the date. Arrange the steaming plan and a place to hang the dress. Choose a cleaning and preservation service before the wedding, and name the person who will drop off the gown afterward. Our wedding planning timeline can help you place these tasks on the calendar.
Sources & methodology
How we built this guide
What we relied on
This wedding dress fit and alterations guide combines federal consumer guidance on care labels and credit card disputes, a Better Business Bureau article on wedding contracts, Transportation Security Administration and U.S. Postal Service pages, a Mayo Clinic page on fainting, and published advice from bridal retailers and wedding publications. We checked the pages listed below on November 12, 2026, and they may have changed since. Where a statement comes from a retailer or a wedding publication, we say so, because retailers describe their own products and habits. The ten-station protocol and scorecard are our own editorial design and are not an industry standard.
What we did not do
We did not test gowns, measure bodies, or evaluate any seamstress, carrier, or airline. We did not verify airline policies directly, so the airline notes are as The Knot reported them. This guide is not legal, medical, or financial advice. Structural alterations belong with a professional seamstress, health questions belong with a clinician, and disputes may call for a lawyer or your card issuer.
Source list
Government, regulatory, and consumer-protection sources
- Federal Trade Commission, Clothes Captioning: Complying with the Care Labeling Rule: https://www.ftc.gov/business-guidance/resources/clothes-captioning-complying-care-labeling-rule
- Federal Trade Commission, Consumer Advice (consumer.ftc.gov): https://www.consumer.ftc.gov/
- Federal Trade Commission, Disputing credit card charges: https://consumer.ftc.gov/node/298638
- Transportation Security Administration, Wedding dress: https://tsa.gov/travel/security-screening/whatcanibring/items/wedding-dress
- U.S. Postal Service, Insurance & Extra Services: https://www.usps.com/ship/insurance-extra-services.htm
- Better Business Bureau, Wedding tips: https://www.bbb.org/article/news-releases/16783-bbb-wedding-tips
- Mayo Clinic, Syncope (fainting) symptoms and causes: https://www.mayoclinic.org/diseases-conditions/syncope/symptoms-causes/syc-20350527
Retailer and wedding-publication sources
- David’s Bridal, Wedding dress alterations: when to book, costs and what to expect: https://www.davidsbridal.com/content/wedding-planning/wedding-dress-alterations-when-to-book-costs-what-to-expect
- The Knot, Wedding dress fitting 101: https://www.theknot.com/content/the-dress-fitting
- The Knot, Which wedding dress train is right for you: https://www.theknot.com/content/wedding-dress-trains
- The Knot, Wedding dress travel by airline: https://www.theknot.com/content/wedding-dress-travel-by-airline
- The Knot, Wedding dress preservation: https://theknot.com/content/preserving-your-wedding-dress
- Pomp and Port, Bustle types 101: https://www.pompandport.com/blogs/behind-the-seams/bustle-types-101-pick-the-right-bustle-and-practice-it
- Val Stefani, How-to guide to finding the perfect undergarment for your bridal gown: https://www.valstefani.com/Blog/11-wedding-ideas-tips-and-inspiration/192-how-to-guide-to-finding-the-perfect-undergarment-for-your-bridal-gown/