

Wedding transportation signage is the small set of signs, cards, and written pickup cues that turns “the shuttle leaves from somewhere near the hotel” into a spot a tired, dressed-up guest can find on the first try, in daylight or after dark, without calling anyone.
Quick answer
Good wedding transportation signage does five jobs: it names the pickup point with a short letter or word, says where the ride goes, shows when it runs, points with an arrow, and gives one contact for trouble. Make the key word tall enough to read from where guests will first need it. As a planning rule, we use about 30 feet of reading distance per inch of letter height by day and plan for about 20 feet per inch at night, which means roughly 4-inch letters for a sign that must be read from 120 feet away. Put signs at the approach, the turn, the curb, and the boarding spot, then test them with the visibility test below, using someone who has never seen the venue. Check the transportation company’s USDOT number before you pay a deposit, and keep an accessible route to every pickup point. Every figure in this guide that is not attributed to a source is our own planning arithmetic.
Most transportation plans fail in the last hundred feet, which is exactly where wedding transportation signage does its work. The route is fine, the vehicle is booked, and the time is on the invitation, yet a grandmother stands at the hotel’s side door while the van idles at the front. A guest stands at the venue gate watching three other vehicles pass and cannot tell which one is hers. A driver stops at the wrong end of a long parking lot because the only sign says “Shuttle.” Wedding transportation signage is the least glamorous item on the vendor list, and it is one of the few that decides whether the other items work.
This guide is about the signs, not the fleet. If you are still deciding how many vehicles you need and which company to hire, start with our guide to wedding guest transportation planning and our overview of wedding transportation. If you want help with decorative welcome signs, programs, and bar menus, our guide to wedding signage covers that side of the day. Here we assume the rides exist and focus on the part guests actually touch: the sign at the curb, the line in the message, and the card in the windshield. You will find a distance rule you can compute yourself, seven copyable sign templates, a seven-step visibility test, and the questions to put to the venue and the transportation company. Nothing here is legal, insurance, or safety-engineering advice, and where a rule comes from a government source we say which one.
Why wedding transportation signage matters more than it looks
A wedding concentrates a lot of people into a few narrow windows. Guests arrive in clusters, leave in clusters, and are often in a place they have never seen, wearing shoes they did not choose for walking. In that setting a sign is not decoration. It is the only part of the plan that talks to the guest at the moment of the decision.
What signage has to do in the last hundred feet
Directions on an invitation or a wedding website work at home, on a couch, with a map open. They do not work at the curb. The last hundred feet is where a guest must match a written instruction to a physical place, with a driver waiting and other people watching. Wedding transportation signage closes that gap by putting the same words and the same letter in the place the guest is standing.
Guests decide in seconds, not minutes
A person walking out of a hotel lobby decides which way to turn within a few steps. If nothing at eye level answers “where do I go,” they will follow the nearest crowd, a staff member, or their phone. A sign that is readable from the door gives the guest an answer before they have to ask.
One missed pickup can cascade
A guest who misses the 3:30 vehicle is not only late, and that is the cost wedding transportation signage is there to prevent. They may need a second run, a ride from a relative who is already dressed and parked, or a rideshare in a place with few drivers. Our companion guide on guest pickup windows for rural wedding venues shows how one late arrival can push a whole afternoon behind. Clear signage cannot fix a bad schedule, but it removes the avoidable misses that have nothing to do with timing.
Where signage fits beside the rest of your transportation plan
A sign is the visible end of a chain. Behind it sit the pickup schedule, the vehicle capacity, the driver’s instructions, and the message the guest received. If any link disagrees with the sign, guests believe the sign, because it is the only one they can see.
The sign is one of four matching pieces
The four pieces are the message guests receive, the sign they see, the card the driver holds, and the pin on the map. Each should carry the same pickup letter or name, the same destination, and the same time window. Our guide to how to calculate wedding shuttle capacity with staggered departures explains how departure times are set; the sign’s job is to repeat those times, not to invent new ones.
What wedding transportation signage cannot do
Wedding transportation signage cannot call a vehicle, hold a seat, or tell guests a delay is coming. It can only point to the person who can. That is why the contact line matters, and why the visibility test later in this guide includes a step where someone reads the sign and then uses it to reach a real person.
Map the guest’s path before you design a sign
The most common mistake in wedding transportation signage is designing the sign first. A sign belongs to a location, and a location belongs to a path. Walk the path before you open a design program, because the path tells you how many signs you need, how large they must be, and where a single arrow would solve a problem a paragraph could not.
Walk it as a stranger
You know the venue. Your guests do not. The only fair way to plan wedding transportation signage is to walk each route as though you had never been there, with a phone in one hand and a small bag in the other.
Start where the guest starts
For a hotel pickup, start in the room or the lobby. For a venue return trip, start at the reception door. Note every door, corridor, stair, and parking lot you pass, and write down which of them look like the way out when you are not sure. Take photos at standing eye height, because that is the view the sign must win in.
Mark every decision point
A decision point is any place where a guest must choose between two or more ways forward: a fork in a corridor, a pair of doors, a curb with two directions of traffic. Mark each one on a rough sketch. Every decision point without an answer is a place where guests will stop, and a stopped group in a driveway is a hazard as well as an inconvenience.
The four kinds of pickup point
Most wedding transportation signage serves one of four places. Naming them helps you avoid copying a sign meant for one onto another.
Hotel or lodging curb
Guests are relaxed, mostly local to the building, and often in a group. The common failure is a sign at the main entrance when the vehicle uses a side drive. Put the sign where the vehicle will stop, and tell guests which door leads to it.
Venue arrival and boarding zone
This is where vehicles drop off and where return trips begin. Several vehicles, vendors, and guests overlap here, so the sign has to separate the wedding shuttle from caterers, photographers, and private cars.
Remote or informal pickup spot
A trailhead, a field gate, a roadside lot. There may be no street address and no existing signage at all. Wedding transportation signage here does double duty as landmarks, and a pin with a short written note matters as much as the sign itself. Google says its Plus Codes can pinpoint a specific spot such as one of several entrances to a building and can work offline, which helps for places a map does not know.
Return-trip and late-night pickup
After the reception, guests are tired, the light is gone, and some have been drinking. Return-trip wedding transportation signage should be larger, lit or reflective, and written for someone who is not at their sharpest. It also needs to survive a crowd that all leaves at once.
Decide who each sign is talking to
Wedding transportation signage for a guest on foot is not the same as signage for a driver in a moving vehicle. Decide which audience each sign serves, because the answer changes size, wording, and position.
Guests on foot
Guests read at walking pace and from a short distance. They can handle a destination and a time window, and they will look at the sign twice if they need to. Place these signs at eye level and near the place guests wait.
Drivers and the people who book rideshares
Drivers read in motion, often at an angle, and see only a few words. They need a letter or a name large enough to read from the road and an arrow that says where to pull in. Rideshare drivers also rely on the app’s pin, so the sign on the curb should echo the label guests typed into that pin.
The anatomy of a pickup point sign
Wedding transportation signage for a pickup point is a short document. It has a purpose, a reader, and a handful of parts that each answer one question. When any part is missing, the reader has to guess, and a guess at a curb is how people end up in the wrong place.
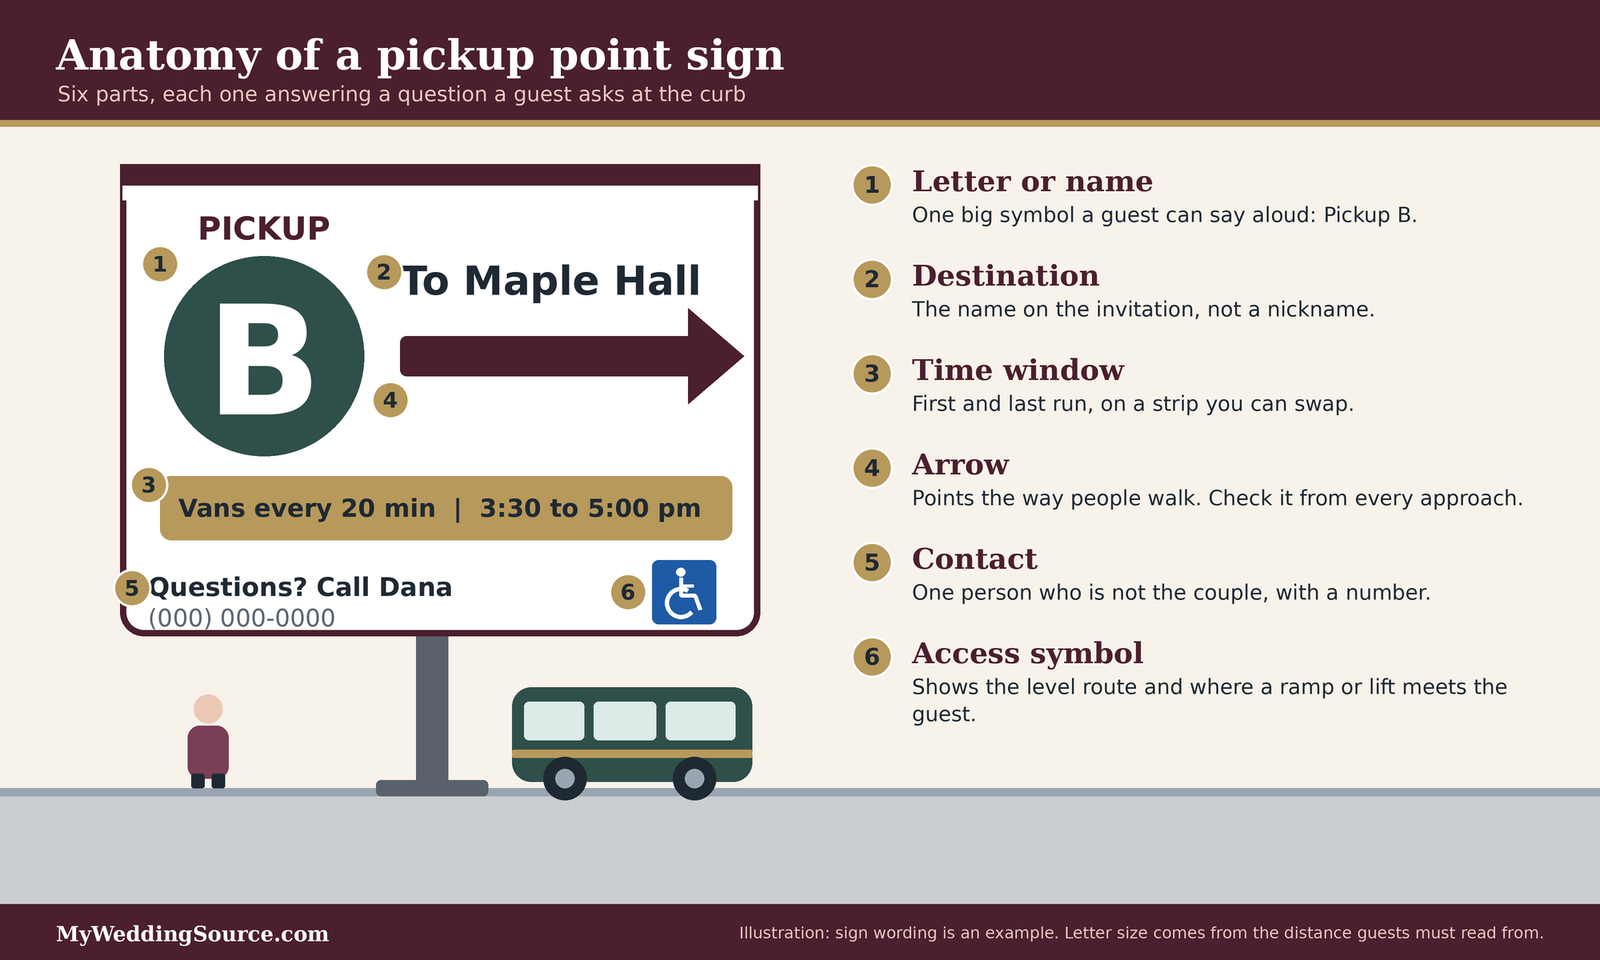
Six things every sign carries
The drawing above labels the six parts. Each part exists because a guest asks the question in order: Is this for me, where does it go, when, which way, and who do I call?
The pickup name or letter
Choose one big symbol: a letter, a number, or one short word. “Pickup B” works because a guest can say it aloud, spell it in a text, and spot it from afar. Avoid names that need explaining. A clever name for the shuttle might be charming in a program and baffling at 5:15 pm when the guest only remembers “the one with the gold sign.”
The destination
Say where the vehicle goes, using the name guests already know from the invitation: the venue name or the hotel name, not a nickname. Add the direction if the vehicle serves several places, for example “To Maple Hall” with an arrow. Leave the street address for the guest message, where it can be copied and pasted.
The time window
Give the first and last run, or the interval, in plain numbers: “Vans every 20 minutes, 3:30 to 5:00 pm.” This is the one part of the sign that can go out of date, so make it easy to update. A removable strip or a sticker for the time keeps the rest of the sign stable if the schedule changes.
The arrow
An arrow is the most readable word you have. Place it where it points the way a guest should walk, and test it from the angle guests approach. An arrow that is correct from the door but points the wrong direction from the parking lot does more harm than none.
The contact line
Give one name and one phone number, ideally a person who is not the couple. The couple will be getting dressed. A day-of coordinator, a trusted friend, or the operator’s dispatcher is a better contact. Keep the number short enough to read in one glance and big enough to see from arm’s length.
The access symbol
When the pickup point has an accessible route and a place for a ramp or lift to deploy, say so on the sign with the International Symbol of Accessibility. The U.S. Access Board says that symbol must label or direct people to accessible entrances and other covered elements in facilities the ADA covers, and that a directional sign should point to the nearest accessible entrance when some entrances are not accessible. A wedding is not necessarily a covered facility, but the logic is good practice for guests: tell them where the accessible way is without making them ask.
Words that work, and words that do not
The fewer words on a sign, the larger each can be. That tradeoff is the heart of wedding transportation signage, and it pushes toward editing.
Use plain, concrete words
Put the thing guests need in the first line, the second line, and nowhere else. “Pickup B. To Maple Hall. Every 20 min.” beats a paragraph. Use the same word every time: if the sign says “Pickup,” the message should say “Pickup,” not “stop” in one place and “meeting point” in another.
Cut what the message can carry
Policies, rules about luggage, and reminders about dress belong in the message guests receive, not on a roadside sign. If a line does not help a guest decide where to go in the next ten seconds, move it to the message or drop it.
Color, contrast, and finish
Wedding transportation signage is only as readable as the difference between its letters and its background. Color is part of that difference, and so is surface finish.
Contrast and glare
The Access Board’s guidance says characters must be either light on a dark background or dark on a light background and have a non-glare finish. It sets no minimum contrast ratio but notes that stronger contrast improves legibility, especially for people with low vision, and that busy or textured backgrounds reduce readability. These are rules for permanent signs, but they are a good checklist for any sign. Choose matte stock over glossy, and avoid placing lettering over a photo or a floral pattern.
Do not rely on color alone
The National Institutes of Health’s News in Health reports that about one in 76 Americans has a color vision defect, that men are affected more often than women, and that most people with these defects have trouble telling apart reds and greens. Do not use a red and green pair to distinguish two pickup points. Use a letter or a shape as the primary identifier and treat color as a bonus. The grayscale step in the visibility test checks this directly.
How big should wedding transportation signage be?
Size is the question people skip when they plan wedding transportation signage, because it feels like a printing detail. It is actually the main reason signs fail: they are readable from a foot away at a desk, and invisible from the door. A simple distance rule, applied before you order anything, fixes most of it.
The reading-distance rule we use
Researchers and sign designers describe the legibility of wedding transportation signage, and every other sign, as a distance per inch of letter height. A Federal Highway Administration research report that measured a changeable message sign found that people with normal vision could read characters from about 40 to 45 feet per inch of letter height, suggested a conservative 40 feet per inch for people with about 20/20 vision, and estimated about 20 feet per inch for people with 20/40 vision, which is the minimum acuity for a license in most states. The same report says the guideline in the federal Manual on Uniform Traffic Control Devices, 30 feet per inch for static signs, falls between those estimates. The study was small, tested people standing still, and used a changeable message sign, so the authors treat the numbers as estimates. We use them the same way.

Our planning figures for wedding transportation signage: 30 by day, 20 at night
For wedding transportation signage we use 30 feet per inch as the daytime figure, because it sits in the middle of the research range and matches the highway guideline. We use 20 feet per inch for dusk, for lit-from-the-front signs after dark, and for any guest you know has low vision. This is our own planning choice, not a standard. It errs on the side of bigger letters, which costs little in print and saves a lot of confusion.
The arithmetic, spelled out
Multiply letter height by the distance figure. Two-inch letters read from about 60 feet by day (2 times 30) and 40 feet at night (2 times 20). Four-inch letters read from about 120 feet by day and 80 feet at night. Six-inch letters reach about 180 feet by day and 120 at night. Eight-inch letters reach about 240 feet by day and 160 at night. These are estimates for a sign facing the reader, in good light, with a plain background. An angled sign, a glossy surface, or a crowd in front of it will shorten them.
Turning distance into a sign size
The distance a sign must be read from is a measurement you can take with a tape or a phone’s measuring app. It is the distance from the first place a guest needs the answer to the sign.
Measure from where guests first need the answer
Stand at the hotel door, the parking lot entrance, or the driveway where a vehicle turns in, and pace the distance to where the sign will stand. If the door is 90 feet from the curb, daylight letters need to be at least 3 inches tall (90 divided by 30), and night letters about 4.5 inches (90 divided by 20). Round up to a size you can print.
Fit the words to the sign
Letter height is the height of a capital letter, not the point size of the font. A bold sans-serif character is, as a rough assumption, a little over half as wide as it is tall, so a three-inch capital letter takes up about two inches of width including spacing. A 15-character line at that size is about 30 inches wide. If the line does not fit, shorten the words before you shrink the letters. “Pickup B” at six inches tall is more useful than “Wedding Guest Shuttle Pickup Location B” at two.
Height, angle, and where the eye looks
Wedding transportation signage can be the right size and still fail if it is too high, too low, or turned away from the people who need it.
Mounting height
The Access Board’s rules for permanent directional and informational signs set a minimum height for the characters they cover and a rule that directional signs be at least 40 inches above the ground or floor. For a temporary wedding sign, we suggest putting the main line at standing eye level, around the middle of the sign at roughly five feet, and adding a second, larger copy higher up when a crowd will stand between the sign and the guests. A tall sign that can be read over people’s heads solves the problem a low sign cannot.
Facing the reader
Turn the sign to face the direction guests approach, not the direction that looks best in photos. A sign parallel to the driveway can be read by a guest standing next to it, but not by a driver turning in. Stand where the guest will stand and look at the sign from there, then fix the angle.
Night, glare, and weather
A wedding does not stop at sunset, and the return trip is often the most important one for wedding transportation signage.
Light after dark
A sign nobody can see is a sign nobody can follow. Look for a spot with existing light, such as a porch fixture or a lamp post, and aim for front light rather than a glow behind the sign. If you add light, ask the venue what is allowed, and prefer battery lights that do not need a cord across a walking path. Reflective material helps for vehicles, but it only works when headlights hit it, so it is a bonus for drivers, not a replacement for light for guests on foot.
Wind, rain, and sun
Print on a stiff, matte board that will not curl, and use a stand that holds in wind. A glossy sign in low sun becomes a mirror, which is why the Access Board asks for non-glare finishes on its covered signs. If rain is possible, laminate or use a sign made for outdoor use, and keep a spare printed set in the coordinator’s bag. Our guide to a guide to outdoor wedding venues and our notes on summer wedding heat planning explain how weather can change where guests stand and wait.
Where wedding transportation signage goes
A guest’s route has four moments when wedding transportation signage earns its place. Put one at each, and the guest never has to guess.

The four positions along the path
The drawing above shows the same driveway and curb with four numbered signs. The numbers match the order a guest meets them.
Position one: the approach
The approach sign tells people they are heading the right way. It sits where a path or road first splits toward the pickup, large enough for a driver and tall enough to read from a distance. If vehicles and guests approach from different directions, give each their own approach sign.
Position two: the turn
The turn sign sits where the guest must choose. Put the arrow where the choice happens, not 50 feet past it. If the turn is a corridor in a hotel, place a sign at eye level on the wall that faces the guest as they reach the corner.
Position three: the arrival
At the curb, the sign names the pickup point and confirms the guest has arrived. This is the sign with the letter, destination, and time window. Make the letter large enough to be seen from the previous position.
Position four: the boarding spot
The last sign marks the place where the vehicle stops, and where a guest who needs more room will board. It should say “Board here” or show the letter again with a boarding arrow, and it should match the place the driver has been told to stop, down to the side of the sign.
Drawing the loading zone to scale
A loading zone is not a place to improvise. The U.S. Access Board describes an accessible passenger loading zone as a vehicle pull-up space at least 8 feet wide and 20 feet long, with an access aisle beside it at least 60 inches wide and the full length of the space, at the same level and connected to an accessible route. It also asks for 114 inches of vertical clearance over the pull-up space, the aisle, and the vehicle route, and for any change in level on the surface to be no steeper than 1:48, about 2 percent.
What this means for a wedding curb
Most wedding curbs will not be built to those standards, and the standards apply to facilities the ADA covers, not to your event. But the dimensions are a useful sketch: a vehicle needs about 8 by 20 feet to stop, and a person who uses a wheelchair needs a clear aisle about five feet wide beside it to get on and off a lift. If your curb is narrower, ask the operator which vehicle fits and where the lift will deploy.
Place signs outside the zone
Keep the signs and stands out of the pull-up space and the aisle. A stand that blocks the aisle does the opposite of its job. Use a sign above the aisle’s edge or on the sidewalk behind the aisle, and keep the access aisle free of boxes, welcome tables, and bags.
The route to the sign
Wedding transportation signage that guests can read but cannot reach is decoration. Check that the way to each sign is open to everyone.
The accessible route basics
The Access Board describes an accessible route as having a clear width of at least 36 inches, a running slope no steeper than 1:20, a cross slope no steeper than 1:48, and a firm, stable, slip-resistant surface. That means a gravel path, a grass lot, or a curb with a lip may be a barrier even if guests without mobility needs do not notice. Walk the path with a rolling suitcase to see what it feels like.
Fix what you can, and say what you cannot
If a path is not accessible, move the pickup point to one that is, or ask the operator to meet the guest at a different place. Say so in the message: “Pickup A has a level path and a ramp.” A guest who knows that in advance does not need to ask. Our guide to wedding transportation for guests using wheelchairs covers the vehicle side of this in detail.
Pickup point sign templates you can copy
These wedding transportation signage templates are the working part of this guide. Each one is written for a specific job, with the words, the size, and the placement notes in one row. Copy the wording, replace the bracketed parts, and check each against the visibility test in the next section. The letter heights come from our planning figure of 30 feet per inch by day and 20 at night, so adjust them after you measure your own distances.
Seven templates for seven places
| Template | Wording on the sign | Key letters, minimum | Where it goes | Watch for |
|---|---|---|---|---|
| 1. Hotel curb | PICKUP [A] / To [Venue name] / Vans every [20] min, [3:30 to 5:00 pm] | 4 in for the letter, 2 in for the rest | At the exact spot the vehicle stops, facing the lobby door | A sign at the main door when the van uses the side drive |
| 2. Venue arrival | WELCOME GUESTS / Drop-off here / Parking [direction arrow] | 4 in | At the drop-off point, facing arriving vehicles | Mixing with vendor loading signs |
| 3. Return trip | RIDES HOME / Pickup [B] / [Hotel name] / Last van [11:30 pm] | 6 in for the letter, 3 in for the rest | At the reception exit and again at the boarding spot, lit | Glare, no light, and guests who do not read small text |
| 4. Accessible boarding | ACCESSIBLE BOARDING / Level path to the van / Ask [name], [phone] | 4 in plus the symbol | Where the lift or ramp will deploy, beside the main sign | A stand or table blocking the access aisle |
| 5. Rideshare zone | RIDESHARE PICKUP / Set your pin to [label] / Match plate and driver | 4 in | Beside the curb that matches the pin in the app | A pin label that does not match the sign |
| 6. Driver windshield card | WEDDING SHUTTLE / [Couple’s last names] / [Venue name] / Call [name] | 3 in | Inside the windshield, dash-level | Glare on the glass at the wrong angle |
| 7. Wrong spot | NOT THE SHUTTLE / Wedding vans are at [B], [direction] | 4 in | Where guests might stop in error, for example a side door | Rudeness; keep the tone helpful |
Template 1: the hotel curb sign
Use this wedding transportation signage template when guests gather at a hotel or lodging for the ride to the venue. It sits at the exact spot where the vehicle will stop, so the guest who reads it is standing in the right place. Put the letter in the largest type, the destination in the second largest, and the time window in a smaller strip you can change. Stand it near the door guests use, not the door the hotel prefers.
Template 2: the venue arrival sign
This sign tells arriving vehicles where to stop and tells guests where to go next. It should work for drivers who do not know the property. Keep the wording to the action: “Drop-off here” and an arrow toward parking or the ceremony. If guests arrive by several routes, give each its own sign rather than cramming them into one.
Template 3: the return-trip sign
Of all wedding transportation signage, the return trip sign is the one most likely to be read in poor conditions. Make the letters larger, add front light or a reflective border, and repeat the sign at the boarding spot. Give the time of the last vehicle so guests do not assume rides run all night. If the last departure changes, update the strip on the sign and the line in the message.
Template 4: the accessible boarding sign
Place this wedding transportation signage beside the main pickup sign, not in a separate corner. It tells a guest where the level path ends and where a ramp or lift will meet them. Add the contact name so a guest can ask for help without finding the couple. Keep it out of the pull-up space and the aisle, and keep the symbol large and matte, as the Access Board’s guidance on symbols suggests.
Template 5: the rideshare zone sign
Rideshare riders see a pin, not a sign. Uber says its app suggests pickup spots that are safer and easier to reach, flags restricted and illegal pickup locations, and lets riders move the pin, and it tells riders to check the driver’s name, plate, and vehicle before getting in. Name your zone with a label guests can type, such as “Maple Hall Side Gate,” and print the same label on the sign. If the venue forbids pickups at some curbs, put a sign there too.
Template 6: the driver’s windshield card
A card on the dash tells guests which vehicle is theirs when several look alike. Print it in landscape on stiff stock, and put the couple’s last names, the venue, and a contact number on it. Give the same card to rideshare drivers if you pre-book rides for guests through a business account, and tell them to display it.
Template 7: the wrong-spot sign
Use this wedding transportation signage only where guests keep making the same mistake, such as stopping at a side door. Keep the tone kind: “Not the shuttle? Wedding vans are at Pickup B, to your left.” A scolding sign makes guests feel they did something wrong. A helpful sign makes them feel the plan was thought through.
A fill-in worksheet
Before you print any wedding transportation signage, fill in one worksheet per pickup point. It takes ten minutes and prevents most reprints.
The fields
For each point, write down the pickup letter or name, the exact spot with a pin or a Plus Code, the destination, the first and last run, the contact name and number, the distance from where guests first need the answer, the letter height that distance requires, whether the route is accessible, and the lighting after dark. Add the sign’s position: approach, turn, arrival, or boarding.
A filled-in example
Here is an invented example, written to show the format. Pickup A, the hotel’s north drive, 90 feet from the lobby door. Destination: Maple Hall. Runs: every 20 minutes, 3:30 to 5:00 pm. Contact: day-of coordinator, phone number written out. Required letter height: 90 divided by 30 is 3 inches by day, so 4 inches to allow for dusk. Route: level, ramp at the north curb. Light: porch lamp, so no added light is needed before 6 pm. Sign position: arrival, plus an approach sign at the lobby door.
Printing and mounting
Wedding transportation signage printed wrong is signage reprinted. A few decisions up front save a rush order.
Materials
A rigid board or foam core with a matte finish handles most cases. Use dark lettering on a light ground for day signs, or light on dark for return signs that will be lit. Avoid thin paper on a stand, because wind will fold it. Ask the printer for a matte laminate if rain is possible.
Mounting and permission
Use a stable stand with a weighted base. Taping a sign to a hotel door, staking one into a lawn, or placing one on a public sidewalk may need permission, so ask the venue or the property manager first. Our guide to wedding permits explains how to ask when a public space is involved. Bring tools to take everything down before you leave.
The visibility test
Wedding transportation signage looks fine on a screen. The only way to know it works is to test it in the place, at the distance, in the light, with a person who has never seen it. This test has seven checks. Each takes a few minutes, and together they cover most of what goes wrong.
Seven checks, in order
Run them with a helper, a printed sample, and a phone. Do them at the venue if you can, and at the same time of day as the real use. If you cannot visit, run them at a similar curb and note what you could not test.
Check one: the distance test
Mount the sample at the real height and walk away until the key word is hard to read. Measure the distance with a tape or a measuring app. Compare it to the distance you need, which you measured earlier. If you fall short, enlarge the letters or move the sign closer, and test again. Note the result in feet.
Check two: the squint test
Squint or take off your glasses and look at the sign from the required distance. You should still see the shape of the key word and the arrow. If everything turns to a smear, the contrast or the letter size is too small.
Check three: the grayscale test
Take a photo of the sign and convert it to grayscale on your phone. If the letter and the background look the same, the color pair is too close in brightness. This catches the red-and-green problem described earlier, since the NIH reports that most people with color vision defects have trouble telling reds from greens.
Check four: the glare and sun test
Look at the sign when the sun is low, or shine a flashlight across it from the side. If a bright patch hides the letters, the finish is too glossy or the angle is wrong. Switch to matte or turn the sign.
Check five: the night test
Visit at dusk or after dark with the real lighting. Stand at the distance you measured, using the 20-feet-per-inch figure. Look for dark spots, glare from headlights, and anything that hides the sign. If you cannot visit at night, add front light and a reflective border and note that the sign was not tested.
Check six: the wind and crowd test
Shake the stand and look for tipping. Have three or four people stand in front of the sign as guests might, and see whether it can still be read. A sign hidden by a crowd needs a higher second copy.
Check seven: the stranger test
Hand the helper only the guest message, not the plan, and ask them to find the pickup point. Time them. Then ask them to call the contact number on the sign and confirm a person answers. If the helper hesitates anywhere, mark the spot and add or move a sign.
The scoring sheet
Use a simple pass, fix, or fail for each check, and write down what you changed.
| Check | What to measure | Pass looks like | Fix if it fails |
|---|---|---|---|
| Distance | Feet at which the key word is hard to read | At or beyond the needed distance | Larger letters or move the sign |
| Squint | Whether shape and arrow remain | Word and arrow still recognizable | Raise contrast, simplify |
| Grayscale | Whether letter and ground differ in gray | Clear difference in gray | Darker letters or lighter ground |
| Glare and sun | Bright patches at low sun or side light | No patch hides letters | Matte stock or change angle |
| Night | Readable at the night distance with real light | Readable without a phone light | Add front light, reflective border |
| Wind and crowd | Tipping, hidden by people | Stands, still readable | Heavier base, higher second copy |
| Stranger | Time to find the point, call answered | Found without help, call answered | Add or move a sign, fix the number |
How to read the sheet
One fail on distance or night matters more than three passes elsewhere, because those two cause most missed pickups. A fail on the stranger test means the whole system has a hole, even if each sign is fine alone.
Keep the sheet with the plan
Save the filled-in sheet with the transportation schedule. If a coordinator or a friend runs the day, it tells them what was tested and what was not.
When to run the test
Timing matters more than most people expect. The test of your wedding transportation signage needs real conditions and enough time to reprint.
Two weeks out, and again on the day
Test the first version about two weeks before the wedding, with time to reprint. Test again on the day, before guests arrive, with the actual signs and the light as it will be. The second test usually takes ten minutes and catches things such as a new parked truck that blocks a sign.
Who should be the tester
Choose someone who has never seen the property and who matches your guests. A tester who knows the route fills in gaps without noticing. Ask a friend from out of town, or a relative who has not seen the venue.
Matching wedding transportation signage to the kind of ride
The same wedding transportation signage does not suit every vehicle. A coach, a van, and a guest’s own rideshare each behave differently at the curb.
Shuttles and motorcoaches
Large vehicles need space, a predictable stop, and a driver who has seen the place. The sign is the guest-facing half of that arrangement.
Check the company before you design around it
The Federal Motor Carrier Safety Administration says interstate for-hire bus companies should have a USDOT number and operating authority, and should carry at least $5 million in insurance. It advises checking the company’s safety rating, where Satisfactory is the best and Unsatisfactory means the company should not be operating, and asking whether drivers hold a commercial license with a passenger endorsement. Do this before you pay a deposit. Rules vary by vehicle size and by whether the trip crosses a state line, so ask the company which rules apply to your trip.
Agree on the stop with the driver
Show the driver your sketch and your sign positions, and ask where the vehicle can legally stop and turn. If the driver says the planned spot will not work, move the sign rather than the driver. A sign at the wrong spot is worse than none.
Rideshare and the pickup pin
A guest who books a rideshare sees a map, not your sign. The sign helps only when it matches what the app shows.
Name the pin and the sign the same way
Choose one label, such as “Maple Hall Side Gate,” and use it in the guest message, on the sign, and in any note to the driver. Uber’s advice to riders is to type the venue name instead of relying on GPS and to place the pin near the street where they will wait. Lyft’s coordinator tool lets someone request a ride for another person and add a note to help the driver find them, such as a gate code or a description, and Lyft advises against including sensitive information there. If you book rides for guests, put the sign’s label in that note.
Use a Plus Code where there is no address
Google’s help page says a Plus Code can pinpoint a specific spot and works offline, though offline you may see a code without a town name. Drop a pin at the real boarding spot, copy the code, and add it to the guest message beside the label. Test the code on a second phone.
Guests who arrange their own rides
Some guests will ignore your plan. A small amount of signage helps them too.
A drop-off sign for private cars
Mark the drop-off point with a simple sign and an arrow toward parking, as in Template 2. Guests who drive themselves also need to know where not to stop, so a clear no-stopping line at the shuttle zone protects the vehicles.
Keep the shuttle zone clear
Ask the venue or a friend to watch the zone during peak times. A private car parked in the pull-up space can block a lift, and a sign alone will not move it.
Edge cases that break good signs
Most wedding transportation signage fails in unusual places. These are the ones we would plan for.
Dark, remote, and no-signal sites
Remote sites remove the fallbacks that make plain wedding transportation signage enough.
No light and no street
Plan for battery lanterns, reflective borders, and a landmark guests can find in the dark. Describe the landmark in words in the message and on the card, because a pin alone may not load. Have a person stand at the boarding spot for the first and last vehicles.
No phone signal
If the contact number will not connect, say so on the sign and give a second way to reach someone, such as a person on site. Print the schedule, and do not make any guest depend on a map that needs data.
Shared venues and busy streets
A venue that hosts other events may carry signs that look like yours.
Other signs, other vehicles
Ask the venue what else is happening that day, and choose a color and letter that will stand out from their signs. Add the couple’s last names to your signs so guests can tell the difference.
Rules about posting
Venues, hotels, and cities may limit where signs can go, how long they can stay, and what they can be attached to. Ask in writing, and get the answer before you print. The Access Board notes that temporary signs posted for seven days or less are exempt from its sign rules, but that exemption does not remove a venue’s own rules.
Guests with low vision, mobility needs, or hearing loss
Planning wedding transportation signage for these guests helps everyone and is best done before the invitations go out.
Ask on the RSVP
Add a simple question about transportation or access needs, and follow up in person. Plan for a named person to meet any guest who asks, rather than relying on a sign alone. Signs are not a replacement for a person.
Accessible alternatives to the sign
For a guest with low vision, give the pickup letter, a landmark, and a staff name in the message, and have someone greet them. For a guest who is deaf or hard of hearing, make sure the boarding information is written, not only spoken. These are our suggestions, and they are not a substitute for talking with the guest about what works for them.
Guests who read another language
Add a second line, not a second sign
If many guests read another language, add a second line in that language, below the English, in a smaller size, and have a fluent reader check it. Keep the letter and the arrow the same so the sign works for anyone.
Symbols that carry across languages
An arrow, a letter, and a clock icon are widely understood. Use them as the main signals, and treat the words as support.
What wedding transportation signage costs, and what to ask
Wedding transportation signage is among the cheaper line items, but the costs can add up when it is bought in a hurry. Plan a small budget and ask the right people.
How the cost builds up
Sign costs usually come from a few pieces: printing, mounting boards or stands, lighting, and any rush charge. We have not found a reliable published price for wedding transportation signage, so we do not quote one. Ask two or three local print shops or sign makers for a price on the same list: the number of signs, their size, the material, matte or laminated finish, and the turnaround. Ask whether stands are included or rented. Add a line for a spare set and for battery lights. A reprint after a failed test is usually cheaper than a missed pickup, which is a reason to test early. Our wedding budget guide shows where small items like this fit in the larger plan.
Questions for the venue
The venue controls the curb, the light, and the rules. Ask before you design.
Questions to ask before you print
- Where may vehicles stop and turn, and where may they not?
- Where can we place signs, and what may we attach them to?
- Is there light at each pickup point after dark, and can we add battery light?
- Is the route from the door to each pickup point level, firm, and at least 36 inches wide?
- What other events or vendors will be using the same drive?
- Who can move a parked car out of the pickup zone?
Ask about permission and timing
Get the answers in writing, with the name of the person who gave them. Ask when you may set up and when you must remove signs.
Ask about the curb and the light
Walk the curb with the venue contact and ask them to point to the spot where vehicles stop. Ask where the lights are and whether they stay on.
Questions for the transportation company
The company knows how vehicles behave at curbs like yours.
Ask about the stop
Where will the vehicle stop, on which side, and for how long? Can it turn around? Which vehicle will serve guests who use a wheelchair, and where does the lift deploy? Ask them to look at your sketch and tell you what needs to change.
Ask about proof
Ask for the USDOT number and look it up, as the FMCSA advises. Ask for proof of insurance. Ask whether the driver has run the route. Do not accept a verbal answer for something that affects safety.
Questions for the sign printer
A printer can tell you what holds up outdoors.
Ask about materials and turnaround
Ask which material suits outdoor use, whether a matte finish is available, how long a reprint takes, and whether they can print a proof at actual size. A proof held up at the real distance is the cheapest version of the distance test.
Ask about the file
Send the printer your template, with the letter heights marked in inches. Ask them to confirm the size before they print, because a mistake in scale can make a sign too small to read.
The day itself: setting up, running, and taking down
A good wedding transportation signage plan needs a person and a checklist. The couple should not be that person.
Setting up
Give one person the job of managing wedding transportation signage, with a printed map and the visibility sheet.
Setup order
Set up wedding transportation signage in this order. Start with the boarding spot, then the arrival sign, the turn, and the approach. Walk the route as a guest after setting up, and fix anything the test would have caught. Take a photo of each sign in place for the record.
Brief the team
Tell the driver, the coordinator, and the greeter where each sign is, and give them the same schedule. Check that everyone uses the same pickup letter.
Running the service
Wedding transportation signage works best when someone watches how guests use it.
Watch the first and last vehicles
The first vehicle shows you whether the system works. The last shows you whether late guests can find it. Keep a person at the boarding spot for both.
Update the time strip
If the schedule changes, update the sign and the message at the same time. Do not leave an old time on a sign.
Taking everything down
The job is not over until the signs are gone.
Collect, count, and clean
Count the signs against your list, collect stands and lights, and leave the curb as you found it. A venue that sees a clean curb is more likely to say yes next time.
Save the file
Keep your templates, the sheet, and the photos. They will help the next family member who needs the same plan.
FAQ: wedding transportation signage questions
Size and wording
How large should the letters on a pickup sign be?
Use the distance guests must read from and divide by about 30 for daylight, or about 20 for dusk and low vision. That is our planning rule, built from federal highway research, not a standard. A guest who must read from 90 feet needs roughly 3-inch letters by day and 4 to 5 inches at night.
What should a pickup sign say?
Five things: a short letter or name, the destination, the run times, an arrow, and one contact. Anything else belongs in the guest message. Keep the wording identical across the sign, the message, and the driver’s card, so a guest who sees “Pickup B” in all three never has to wonder whether they match.
Does color matter on a pickup sign?
Yes, mostly for contrast. Use dark on light or light on dark, a matte finish, and a plain background. The National Institutes of Health reports that most people with color vision defects have trouble telling reds and greens, so never use red against green to separate pickups. Let a letter carry the meaning and color support it.
Placement and rides
How many signs does one pickup point need?
We suggest up to four: one at the approach, one at the turn, one at the curb, and one at the boarding spot. A short, straight route may need only two. Walk the path as a stranger and add a sign wherever a guest has to choose, and nowhere else.
Do rideshare guests need signs too?
Often, yes, because the sign backs up the pin. Name the pickup spot with one label, such as a side gate, and use that label in the guest message, on the sign, and in the app. Uber advises riders to type the venue name and place the pin near the street where they will wait.
Are wedding signs required to follow ADA sign rules?
Not necessarily. The U.S. Access Board says its sign requirements do not apply to temporary signs posted seven days or less, and a wedding may not be a covered facility. Its guidance on contrast, glare, and accessible routes is still a useful checklist. Ask your venue about its own rules, and see an attorney for legal questions.
People and planning
Who should be in charge of the signs on the day?
Not the couple. Pick one reliable person, such as a day-of coordinator, a friend, or the transportation company’s dispatcher, and give them the map, the schedule, and the visibility sheet. Everyone, including drivers and greeters, should know who that person is and how to reach them.
When should I test the signs?
Test a printed sample about two weeks before, which leaves time to reprint, and test again on the day before guests arrive. Run the test at the same time of day as the real use, since low sun and dusk change what a guest can read. Ask someone who has never seen the venue to try it.
Your next steps
Plan the signs
Walk each route and fill in a signage worksheet
Walk every guest route as a stranger, mark each decision point, and fill in one worksheet per pickup point with the letter, spot, destination, times, contact, distance, and letter height. Our guide to wedding transportation shows how this fits beside the vehicle plan.
Ask the venue and the company
Send the questions in this guide to the venue, the transportation company, and the printer, and keep the answers in writing. For the wider plan, use our wedding planning checklist and our wedding vendor timeline.
Test and finish
Print a proof and run the test
Print one sign at actual size, run the seven checks, and fix what fails before the full order. Keep the scoring sheet with your plan.
Brief the team and check the weather
Give the coordinator the map and the sheet, and tell drivers where each sign stands. Our wedding week checklist and winter wedding weather plan can help you plan for conditions on the day.
Sources & methodology
How we built this guide
What we relied on
This guide combines the U.S. Access Board’s published guidance on signs, accessible routes, and passenger loading zones, an FHWA research report on how far letters can be read, FMCSA’s advice on choosing a bus company, the NIH’s description of color vision defects, and the help pages of Google, Uber, and Lyft for pickup pins, Plus Codes, and ride requests. Where a statement comes from a company, we say so, because company advice reflects its own product. The reading-distance figures for specific letter heights, the sign sizes, and the templates are our own planning arithmetic and judgment, and they are estimates. We read these pages while writing in November 2026; rules, apps, and policies change, so check each source again before you rely on it.
What we did not do
We did not test signs in the field, measure any venue, or hire a transportation company. We did not find a published price for wedding transportation signage, so we give none. The Access Board’s sign and loading zone rules apply to facilities the ADA covers and not to a private wedding, and we use them only as a checklist. This is not legal, insurance, or safety-engineering advice. Ask your venue, your operator, and a qualified professional about your own situation.
Source list
Government and public-health sources
- U.S. Access Board, Guide to the ADA Standards, Chapter 7: Signs: https://www.access-board.gov/ada/guides/chapter-7-signs/
- U.S. Access Board, Guide to the ADA Standards, Chapter 5: Passenger Loading Zones: https://www.access-board.gov/ada/guides/chapter-5-passenger-loading-zones
- U.S. Access Board, Guide to the ABA Standards, Chapter 4: Accessible Routes: https://www.access-board.gov/aba/guides/chapter-4-accessible-routes/
- Federal Motor Carrier Safety Administration, Top 3 things to know when planning your next bus trip: https://www.fmcsa.dot.gov/safety/passenger-safety/top-3-things-know-when-planning-your-next-bus-trip
- Federal Highway Administration, Legibility distance research report: https://www.fhwa.dot.gov/publications/research/safety/15027/004.cfm
- Federal Highway Administration, Manual on Uniform Traffic Control Devices: https://mutcd.fhwa.dot.gov/
- National Institutes of Health, News in Health, Can’t see certain colors: https://newsinhealth.nih.gov/2010/02/cant-see-certain-colors
- U.S. Department of Transportation: https://www.transportation.gov/
Company help pages
- Google Maps Help, Find and share a location using Plus Codes: https://support.google.com/maps/answer/7047426
- Uber, Pickup Spots: https://www.uber.com/us/en/ride/how-it-works/pickup-spots
- Uber, Rider pro tips: https://www.uber.com/us/en/newsroom/rider-pro-tips-3/
- Lyft, Requesting rides with Lyft Concierge: https://www.lyft.com/business/launch-guides/concierge/coordinator