
A dance floor wrap is a printed vinyl graphic, usually a monogram, pattern or full-color design, applied over a dance floor so the floor becomes part of the décor. This guide covers the two things that go wrong most often with a custom dance floor wrap: artwork that prints differently than it looked on screen, and a surface that is slippery, unapproved or hard to remove.
Treat the dance floor wrap as a product with three signoffs, in this order: slip, fire and teardown. Get a written slip-resistance statement from the supplier and then test a real sample with your own shoes and a damp patch. Ask the venue and its fire authority what floor coverings they accept, and get that answer before you approve artwork. Confirm in writing how and when the dance floor wrap comes off, and who pays if the floor underneath is marked. Approve artwork only after you have seen a scaled layout and a printed sample on the actual material.
A custom dance floor wrap looks simple in a rendering. A glossy monogram sits in the middle of a clean white floor, the lighting washes over it, and the photographer gets a striking overhead frame. The reality is a stack of materials: the venue’s own floor, the rented dance floor panels, adhesive, a printed film, and usually a clear laminate on top. Each layer has its own failure mode, and the guests only ever feel the top one, usually through the smooth soles of formal shoes.
This guide is written for couples, planners and event designers who are weighing a dance floor wrap and want to avoid three expensive surprises. The first is an artwork surprise: a monogram split across a seam, a color that shifted, a name spelled wrong in four-foot letters. The second is a safety surprise: a floor that grips poorly when it is damp, or a material the venue will not allow. The third is a teardown surprise: adhesive residue, a lifted corner, or a crew that cannot finish before the venue’s curfew.
A note on scope. This is general planning information, not legal, engineering or safety advice. Slip, fire and electrical questions belong to qualified people at your venue and rental company, and the final word on fire rules belongs to the local authority.
What a dance floor wrap is, and what this guide covers
People use the phrase loosely, so it helps to define it. In this guide, a dance floor wrap means a printed graphic film that is applied to the top surface of a dance floor, or laid over it, to carry custom artwork. The artwork might be initials, a date, a pattern, a venue illustration or a solid color field with a border.
A dance floor wrap is not the dance floor itself. The floor is the structure: interlocking panels, a roll-out surface, or the venue’s own hardwood, concrete or tile. The dance floor wrap rides on top. Many suppliers print the design on adhesive vinyl, sometimes add a clear protective laminate, and either apply it to panels before delivery or install it on site.
What this guide leaves out
Other pieces on this site cover the adjacent questions. How large the floor should be for your guest count is a sizing question, and the broader planning of the room belongs in the guide to reception guest flow. This article assumes you have already decided you want a printed surface and now need to buy it safely.
It also does not rank suppliers. Products, adhesives and test methods vary by company and change over time, so the useful skill is knowing what to ask and what to put in writing, not memorizing a brand list.
Why the dance floor wrap deserves its own checklist
Most décor items fail quietly. A centerpiece that is two inches too tall is a nuisance. A dance floor wrap that is slick under a damp spot is a fall risk for a hundred people in dress shoes, many of them moving fast and some of them older. That difference is why this item needs a signoff process rather than a mood-board approval.
There is also a timing problem. The artwork has to be approved weeks before the event, because it is printed to size. But the safety facts, such as the venue’s rules on floor coverings and the supplier’s material data, should be known before the artwork is approved. Couples who do it in the natural order, design first and ask questions later, are the ones who discover that their favorite design cannot be used.
The slip, fire and teardown signoff
The core of this guide is a three-part signoff. It is deliberately simple, so a couple, a planner and a venue manager can all use the same one-page version.
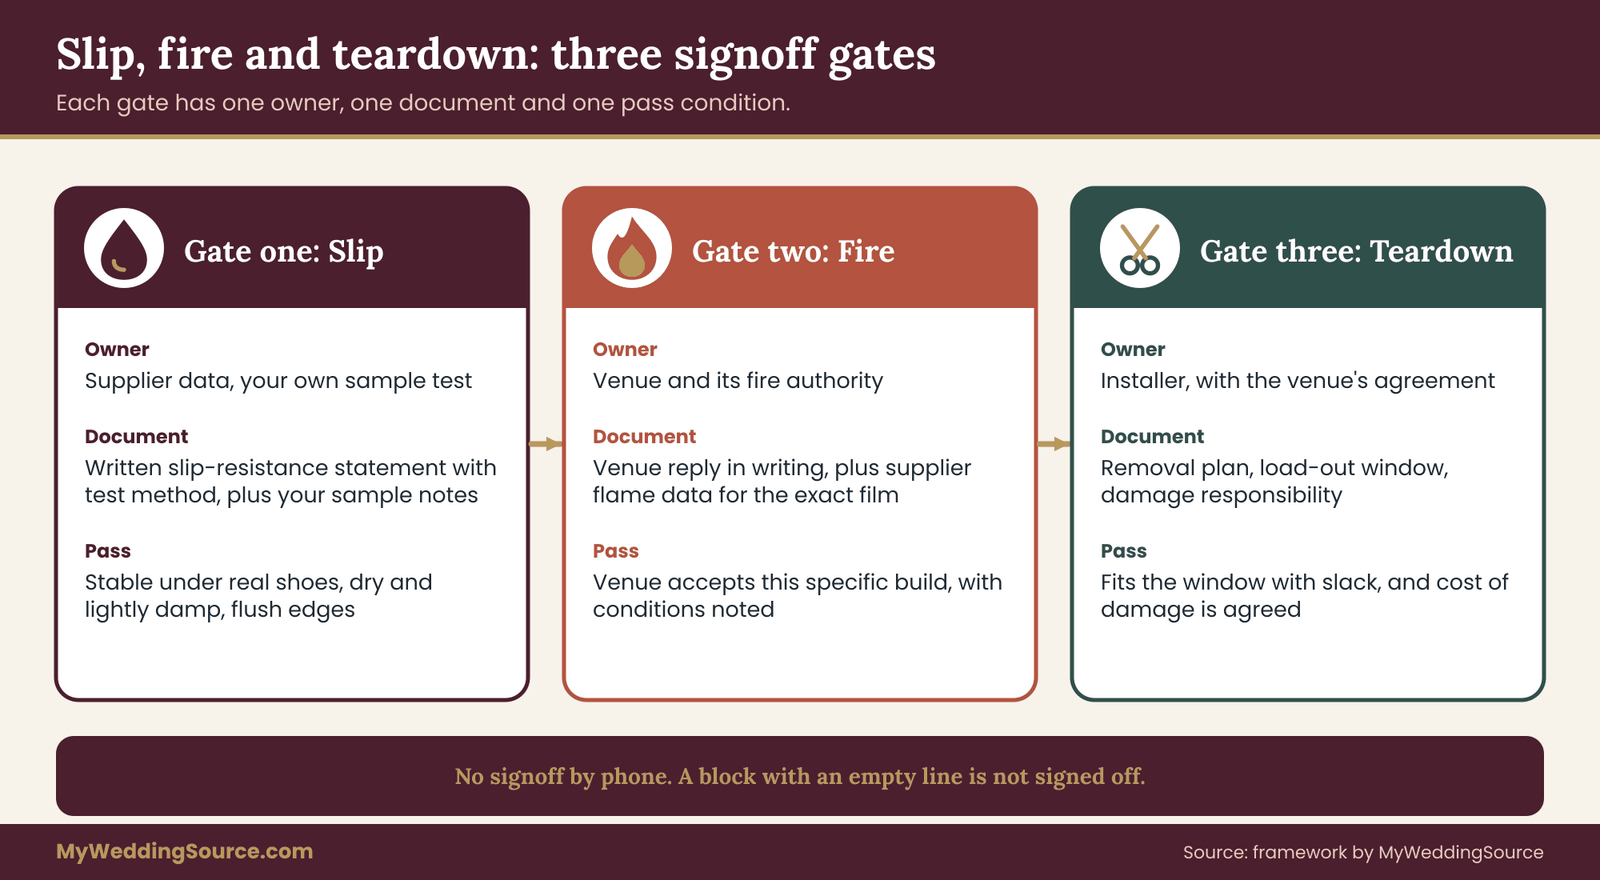
Each signoff has an owner, a document and a pass condition. Nothing is approved on a verbal “it’s fine.” The point is not paperwork for its own sake. It is that three different people hold three different facts, and nobody has the full picture until the facts are in the same place.
Gate one: slip on a dance floor wrap
The slip signoff answers one question: will people be able to stand, turn and dance on this surface in the shoes they will actually wear, including when it is not perfectly clean and dry? The owner is the supplier for the data and you or your planner for the sample test. The document is a written statement of the material’s slip-resistance information, including the test method, plus the result of your own sample test. The pass condition is a sample that feels stable under the shoe types you expect, on dry and lightly damp surfaces, with no raised edges at seams.
Gate two: fire
The fire signoff answers a different question: is this material acceptable in this room? The owner is the venue, and through the venue, the local fire authority. The document is the venue’s written position on floor coverings, plus the supplier’s data on flame performance for the specific film and laminate. The pass condition is the venue stating in writing that the specific product is accepted, or stating what documentation it needs. A supplier saying “it’s fire rated” is not a pass.
Gate three: teardown
The teardown signoff answers the question that people forget until the last night: how does it leave? The owner is the supplier and installer, with the venue’s agreement. The document is a removal plan stating the method, the crew, the time window and the responsibility for residue or damage. The pass condition is a schedule that fits inside the venue’s load-out window with time to spare, and a written statement of who pays if the floor underneath is marked.
Why the order is slip, fire, teardown
The order matters. Slip comes first because it can end the whole idea cheaply: if the available materials do not grip well enough, no artwork can fix it. Fire comes second because it is a venue decision that can invalidate a product you have already chosen. Teardown comes third because it depends on the build you settled on in the first two gates.
Artwork proofs run alongside all three, and they are covered in their own section. The short version is that artwork should be approved last, after the material and the build are known, because the material changes what the printed color looks like and the build changes where the seams fall.
The one-page signoff sheet
You can run the whole process from a single page with three blocks. Each block has four lines: what we asked, who answered, what the document says, and the date it was received. If a block has an empty line, it is not signed off.
That sheet is also useful as a handoff. If your planner leaves the project, or a venue manager changes, the sheet tells the next person which questions have been settled. It fits naturally into the broader vendor paperwork covered in the guide to vendor purchase orders, where each deliverable is tied to an acceptance condition.
Who should be in the conversation
Four people matter. You, or whoever holds the decision. The supplier or print vendor, who knows the materials. The dance floor rental company, if the dance floor wrap rides on rented panels, because it knows the panel system and how adhesives behave on it. And the venue contact who can speak for the floor, the fire authority and the load-out window.
These are often three or four separate companies who have never spoken to each other. Your job, or your planner’s, is to be the one who carries the same question from one to the next. A supplier will tell you their film is fine on “any floor.” The venue will tell you that nothing may be adhered to their floor. Both can be true, and the solution is the build you choose in the next section.
What a pass does not mean
A passed gate is a record that the facts were checked on a given date for a given build. It does not certify anything beyond that. If the supplier changes the laminate, if the venue changes the room, or if you move from a ballroom to a tent, the gates need to be run again for the new situation. Treat a signoff as dated and specific, never as a permanent label on the product.
This is also why the sheet records dates. A fire authority’s position, a supplier’s product line and a venue’s policy can all change between your first email and your event, particularly on a long planning horizon. A signed block that is a year old is a prompt to ask again, not a guarantee.
Choosing the build: panel, direct or overlay
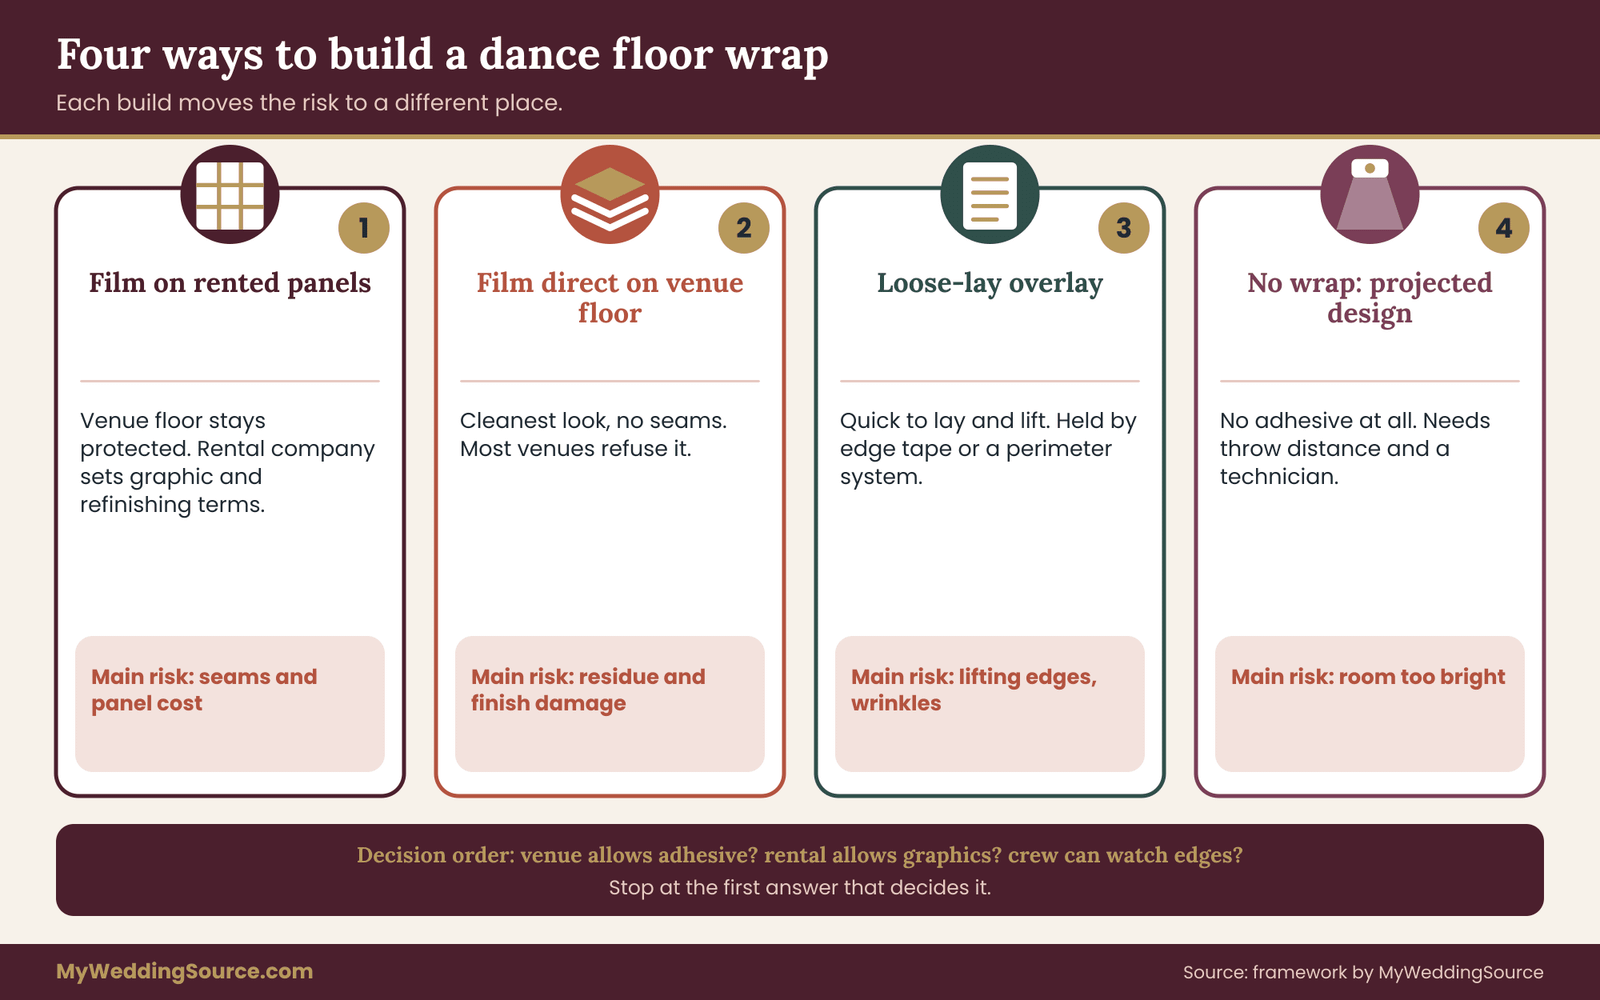
Before artwork, before testing, you have to decide how the dance floor wrap meets the floor. This is the decision that most affects safety, venue permission and cleanup, and it is often made by default because the supplier quotes whatever they usually do. There are four common builds, and each has a different risk profile.
Build one: a dance floor wrap printed on rented panels
Here the dance floor wrap is applied to the top of the rental company’s panels, usually before delivery, and the panels are laid in the room. The adhesive never touches the venue’s floor. The panels are the rental company’s property, so the rental company decides whether it will allow a graphic on them and what it charges to strip and refinish them afterward.
The strengths are clear. Seams are predictable because the panel grid is known. The venue’s floor is protected by the panels. Installation on site is mostly laying panels. The weaknesses are cost and coordination: the rental company may need to set aside dedicated panels, and the print has to match their exact panel size, including any edge trim.
Build two: a dance floor wrap applied directly to the venue floor
In this build the film is adhered straight to the venue’s floor, which might be hardwood, sealed concrete, tile or a ballroom’s own parquet dance area. It gives the cleanest look, with no panel seams, because the venue’s floor is continuous.
It is also the build with the most risk and the fewest venues willing to allow it. Adhesives can pull finish off wood, leave residue on concrete, or lift grout and sealer on tile. Many venues will refuse it outright. Those that allow it usually want to see the material, the adhesive and a removal plan in writing, and some want a test patch in an inconspicuous spot. Treat a direct application as a venue-permission project first and a design project second.
Build three: a loose-lay dance floor wrap
An overlay is a printed sheet or roll laid on top of the floor and held down with edge tape or a perimeter system. Nothing is bonded across the whole surface. It is quicker to lay and to lift, and it does not need a full adhesive bond.
Its main risk is movement. If the edges lift or the sheet shifts under dancing feet, it is a trip hazard, and tape edges are exactly where heels catch. It also tends to show wrinkles if the room is cold, because many films relax and flatten once they warm. If you go this way, ask how the perimeter is secured, how often the crew checks it during the event, and what the sheet’s thickness does at the transition to the surrounding floor.
Build four: no dance floor wrap at all
The fourth option is not a printed floor. It is a plain floor with the design delivered another way: a projected monogram, a patterned light, a painted or stenciled treatment where the venue allows, or a decorative rug in a lounge area off the dance zone. Colored light behaves the same way on a floor as it does on a wall, so test any projected color against skin tones and photos before you commit.
Projection is not risk-free: it needs a throw distance, a dark enough room and a technician. But it removes adhesive, slip and teardown questions entirely. For some couples, the honest answer is that the effect they want costs far less safety and trouble as light than as vinyl.
A decision rule for choosing the build
Use these questions in order, and stop at the first one that decides it.
First, does the venue allow anything adhered to its floor? If the answer is no, build two is out. Second, does your rental company allow graphics on its panels, and will it confirm the removal and refinish terms? If yes, build one is the default. Third, is the floor small, and is the crew able to check the edges during the event? If so, build three is possible. Fourth, if none of these works cleanly, consider the projection or an art treatment off the main floor.
The reason to run the rule in that order is that each step eliminates a whole category of risk. If the venue says no, you do not need to argue about adhesives. If the rental company says yes, most of the venue-floor risk is gone.
Cost logic for a dance floor wrap, without invented numbers
Prices vary too much by region, size and material to quote responsibly, so think in terms of what drives the quote. Size is the obvious one. Material is next: a basic film differs from a textured or laminated floor-grade film. Labor follows: application on panels in a shop is a different job from application in a ballroom overnight. Then comes removal, which is often priced separately. And last is the rental company’s charge for dedicating or refinishing panels.
When you compare quotes, compare the same scope. One supplier may include laminate, installation and removal. Another may quote only the printed film. A low number that leaves out removal is not lower. Ask every vendor for a line-by-line scope that names print, laminate, application, on-site labor, removal and disposal, and then line the scopes up before you compare totals. The guide to the wedding vendor contract explains why scope lines matter once you sign.
Panels, seams and where the dance floor wrap design lives
A panel build has a grid, and every grid has seams. The seams matter for two reasons. They are physical: if the film is applied before the panels are joined, each seam is a place where edges meet, and a poorly aligned edge can catch a shoe. And they are visual: a monogram that crosses four panels will show a hairline at each joint.
Ask the rental company for the panel dimensions and the number of panels in your layout. Ask whether the film is applied panel by panel with a slight gap, or wrapped to the panel edge. Ask whether the panels lock in a way that keeps the film surfaces flush. These details feed straight into the artwork proof, covered next, because the artist must place the focal point away from seams or deliberately align it with them.
Where the dance floor wrap meets the room
Every build has an edge, and the edge is where people actually trip. Where the dance floor wrap or panel ends and the venue’s floor begins, there is a step, a ramp or a flush joint. Ask what the transition is and whether it is beveled. A raised edge is easy to miss in a dark room with colored light and moving crowds.
This is also where accessibility comes in. Guests using canes, walkers or wheelchairs need a transition they can cross without a catch. The Americans with Disabilities Act design standards treat floor surfaces on accessible routes as needing to be stable, firm and slip resistant, and they set limits on changes in level. Whether those rules apply to a private event depends on the venue and the circumstance, so ask the venue, but design as if they do.
A quick note on outdoor floors
If the floor sits on grass, a patio or inside a tent, the build changes again. Moisture, dew, uneven ground and temperature swings all affect adhesion and slip. A dance floor wrap that is fine in a climate-controlled ballroom may not be suitable outdoors, and the supplier should say so plainly.
Ask whether the specific film and laminate are intended for the conditions you expect, whether the base panels are rated for the ground you will use, and what the plan is if the weather turns. A sudden shower on a tent edge is the kind of event that turns a dry floor into a wet one in minutes. The guide on venue technical walkthroughs explains how to confirm the physical details of a site before the vendors arrive, and it is worth doing before you finalize a build.
Making the build decision in writing
Once you have chosen, write the build down in a single paragraph that names the host floor, the base, the film, the laminate if any, the edge treatment and the removal method. Send it to the supplier, the rental company and the venue, and ask each to confirm it by reply. If any of the three suggests a change, it is easier to learn it now than on load-in night.
Artwork proofs for a custom dance floor wrap
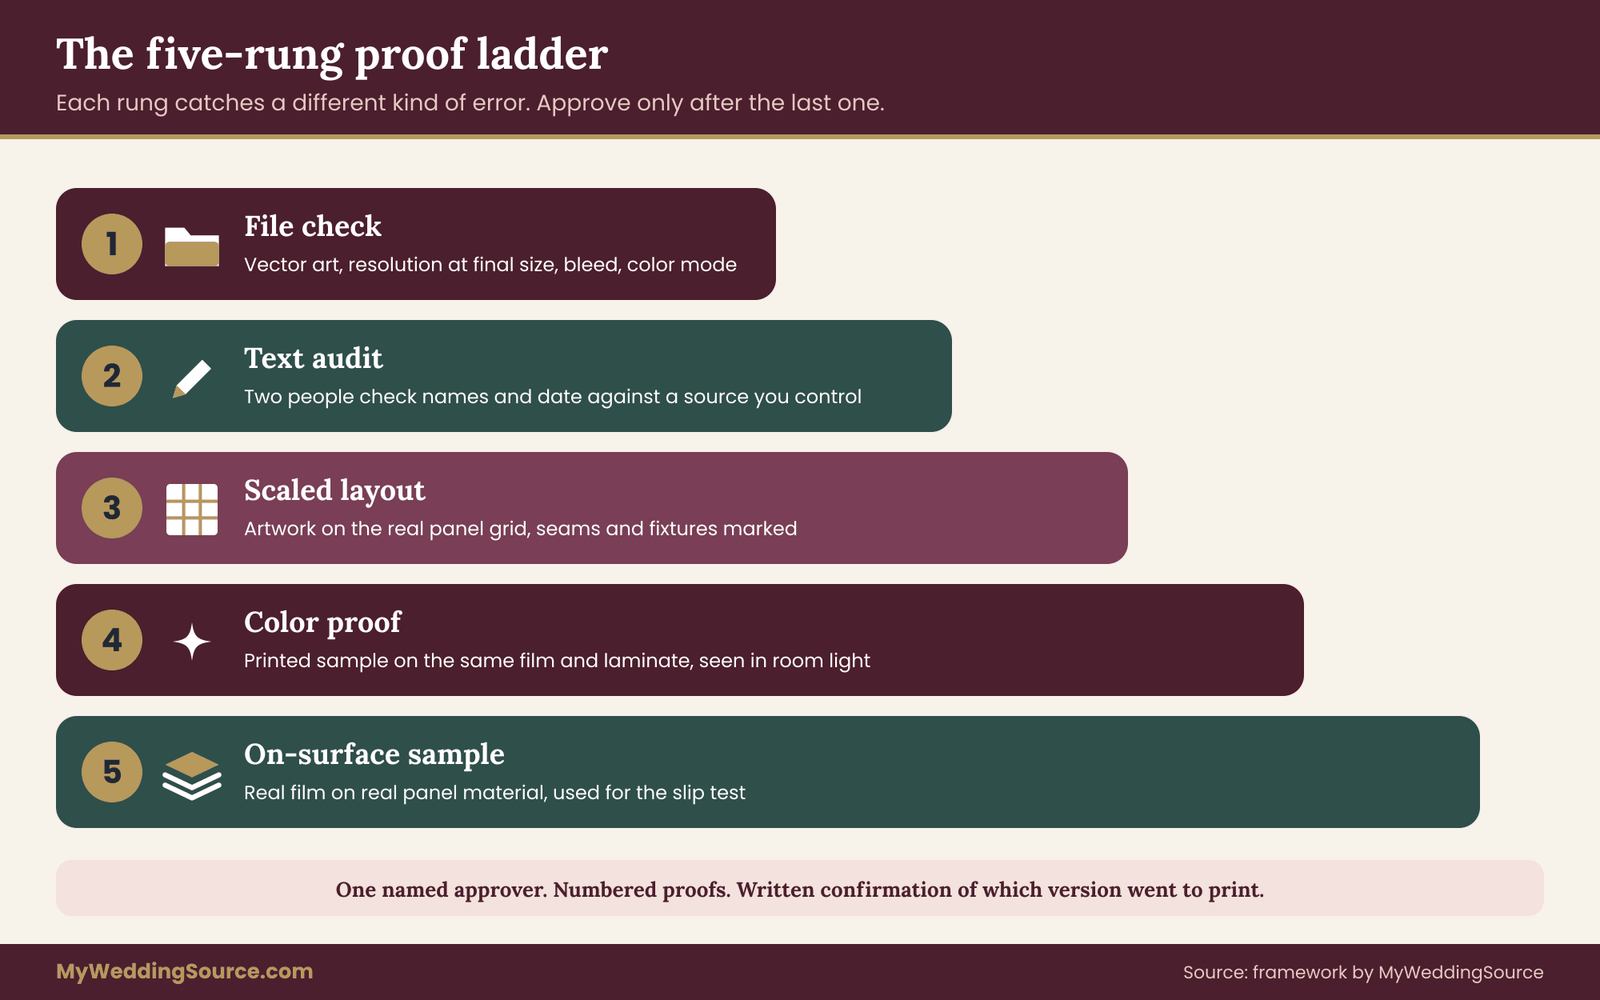
Artwork is where a dance floor wrap becomes personal, and it is also where most of the avoidable mistakes live. A floor graphic is a large print viewed from standing height, from across the room and from overhead, and each view exposes a different flaw. The remedy is a proof ladder: five rungs, each catching a different kind of error, climbed in order.
Rung one: the dance floor wrap file check
The first rung is about the artwork file itself, before anything is printed. Ask the print vendor for their file requirements in writing: accepted formats, whether they want vector artwork, the minimum resolution at final size, color mode, and how much extra bleed they need around the edges.
Vector artwork, which stores shapes as math rather than pixels, scales to any size without softening. A raster image such as a photo or a logo saved as a small picture will blur when stretched to floor size. If your monogram came from a stationery designer, ask them for a vector version. Ask for the vector file in the same package as the final colors, so the printer never has to redraw it.
Rung two: the text audit
Large text is unforgiving. A misspelled name on an invitation is an embarrassment; the same error in letters a foot tall is a permanent photo feature. Run a text audit before layout is final: names, spellings, date format, venue name, any initials or accents, and any punctuation inside the design.
Have two people check the text separately against a source the couple controls, such as a typed note from each partner, rather than against the previous proof. Checking a proof against itself is how errors survive. If a name uses diacritics or a non-English alphabet, confirm that the chosen font includes those characters and does not silently substitute another.
Rung three: the scaled layout
A scaled layout shows the artwork placed on the real floor outline, with the panel grid drawn on top and the room’s fixed features, such as columns, a stage edge or a DJ riser, marked. It answers questions a flat image cannot: where the seams fall, whether the focal point lands on a seam, how much of the design will be under the DJ table, and whether guests at the edge of the floor will see it at all.
Request this layout from the supplier as a drawing with dimensions, and ask for the viewing angle that matters. If the room has a balcony or the photographer plans an overhead frame, the monogram’s orientation matters: text that reads correctly from the entrance may be upside down from the balcony. Decide on one primary viewing direction and write it on the proof.
Rung four: the color proof
On a screen, a rich burgundy is light shining at you. On a floor, it is ink on film under room lighting. The two rarely match without help. Ask for a printed color sample made on the same film and laminate that the final job will use, not on paper and not on a different stock.
Look at the sample in the room’s real conditions, or the closest you can manage: under warm lighting, under any colored light you plan to use, and next to the other décor. Gloss laminate reflects ceiling lights and can wash out dark colors from certain angles. Matte laminate absorbs more and shows color more evenly but can mark more easily. A white base also behaves differently under colored light than a pale gray one.
Rung five: the on-surface dance floor wrap sample
The final rung is a physical sample on the actual build: the printed film and laminate adhered to a scrap of the same panel material, or a test patch if the venue allows one. This is the sample that feeds the slip test in the next section, and it is the only way to see the real texture, sheen and edge behavior.
If the supplier cannot provide a sample on the real material, ask whether they can provide a swatch of the film and laminate with the same finish. A swatch is weaker evidence than a sample on a panel, but it is far better than a rendering. Record in writing what you received and which parts of the build it does not represent.
Approval rules that prevent arguments
Printing is one of those jobs where the proof is the contract. Once you sign a proof, the print is usually produced to it, and a mistake that appears on the signed proof is typically your cost to fix. So set approval rules before the first proof arrives.
Name a single approver, usually one partner or the planner, who signs for the couple. Require the approver to initial every revision, with a date. Ask the vendor to number each proof version, so that nobody approves version three while the print is made from version two. Request that the vendor confirm in writing which version was sent to print. The same discipline appears in the guide to wedding invitation print production, and it carries straight over to floor graphics.
Seams, edges and safe zones on a dance floor wrap
Every proof should define three zones. The seam zone is the strip along each panel joint where alignment may drift by a small amount; keep fine details and thin lines out of it, or design them to cross at right angles. The edge zone is the border where the film meets the floor’s perimeter; keep text and monograms well inside it so nothing is lost to trimming or edge trim. The traffic zone is the area where people will actually dance, which is rarely the exact center.
A useful design habit is to keep the main focal element large and simple. Thin script lettering, tiny dates and delicate patterns do not read at floor scale, and they wear fastest where heels land. A bold, simple mark in the center with a quiet pattern around it survives both the print process and the party.
Fonts, images and permission
If the design uses a commercial font or a third-party illustration, check that the license covers large-format printing and use at an event. Some licenses cover only desktop or stationery use. Fonts licensed for invitations are not automatically licensed for production on products, though many do allow it. Ask the designer which fonts and images are in the file, and check the license terms if there is any doubt.
If the artwork includes a venue’s logo or photograph, a sports team mark or a branded character, permission matters too. When in doubt, replace it with an original element. Nobody remembers a borrowed logo on a dance floor, and it can complicate a vendor’s willingness to print.
Changes to a dance floor wrap after approval
Plan for the possibility that something changes. A guest count shifts and the floor is resized. A venue moves your event to another room. A name needs updating. Ask the vendor at the start what the cutoff is for artwork changes, what a change costs after approval, and what happens if the floor dimensions change.
The answer to that last question is important. A full-floor print is made to size. If the floor shrinks, you may be able to trim; if it grows, you may be buying new panels. Ask whether the supplier can print a “bleed margin” or extra border so a modest size change does not require a reprint.
A short script for the proof conversation
When you send the first request, something like this works: “Please send your file requirements, the minimum resolution at final size, a scaled layout on our panel grid, and a printed sample on the same film and laminate. We will approve in writing with one named approver, and we need each proof numbered.” It is polite, specific and sets the pattern for the whole project.
Keep every proof, every approval and every sample note in one folder. If a question comes up on the event night, or later in a dispute, that folder is your evidence of what was agreed. The habits for filing that evidence are the same ones laid out in the guide to organizing wedding records.
Slip: testing the surface under a dance floor wrap
A dance floor takes more abuse per square foot than almost anything else at a wedding. People turn on one foot, slide, kick off shoes, spill drinks and drag chairs back and forth. A printed film that looks flat and tidy in a studio can behave very differently once it carries a crowd, and the safest approach is to treat slip resistance as something you verify, not something you assume.
What slip resistance means for a dance floor wrap
Slip resistance describes how much grip a surface offers between a shoe sole and the floor. It depends on both sides of that contact: the floor’s texture and material, and the shoe’s sole material, wear and cleanliness. Moisture, dust, powder and sugar all change the result. This is why no single number tells you the surface is safe for every guest.
Laboratory methods measure a coefficient of friction using a defined test device, a defined sole material and a defined surface condition, such as dry or wet. Different methods give different numbers, and static and dynamic measurements are not interchangeable. A figure with no method attached tells you very little, so the first request is always for the method as well as the number.
What to ask the dance floor wrap supplier
Ask for the material’s technical data sheet for the exact film and laminate in your quote. Look for a stated slip-resistance or friction result, the test method used, whether it was tested wet or dry, and whether it applies to the laminate or the bare film. Also ask whether the product is sold for use on floors. Many vinyl films are made for walls and vehicles, and floor use requires a different laminate or texture.
If the supplier says a product is “anti-slip,” ask what that means in testing terms. Ask whether there is a textured or matte floor-grade laminate and what it does to the color. A grippier laminate may change the finish noticeably, which is another reason the sample matters. The answer should arrive in writing. A vague reply is itself information.
The sample test you can run yourself
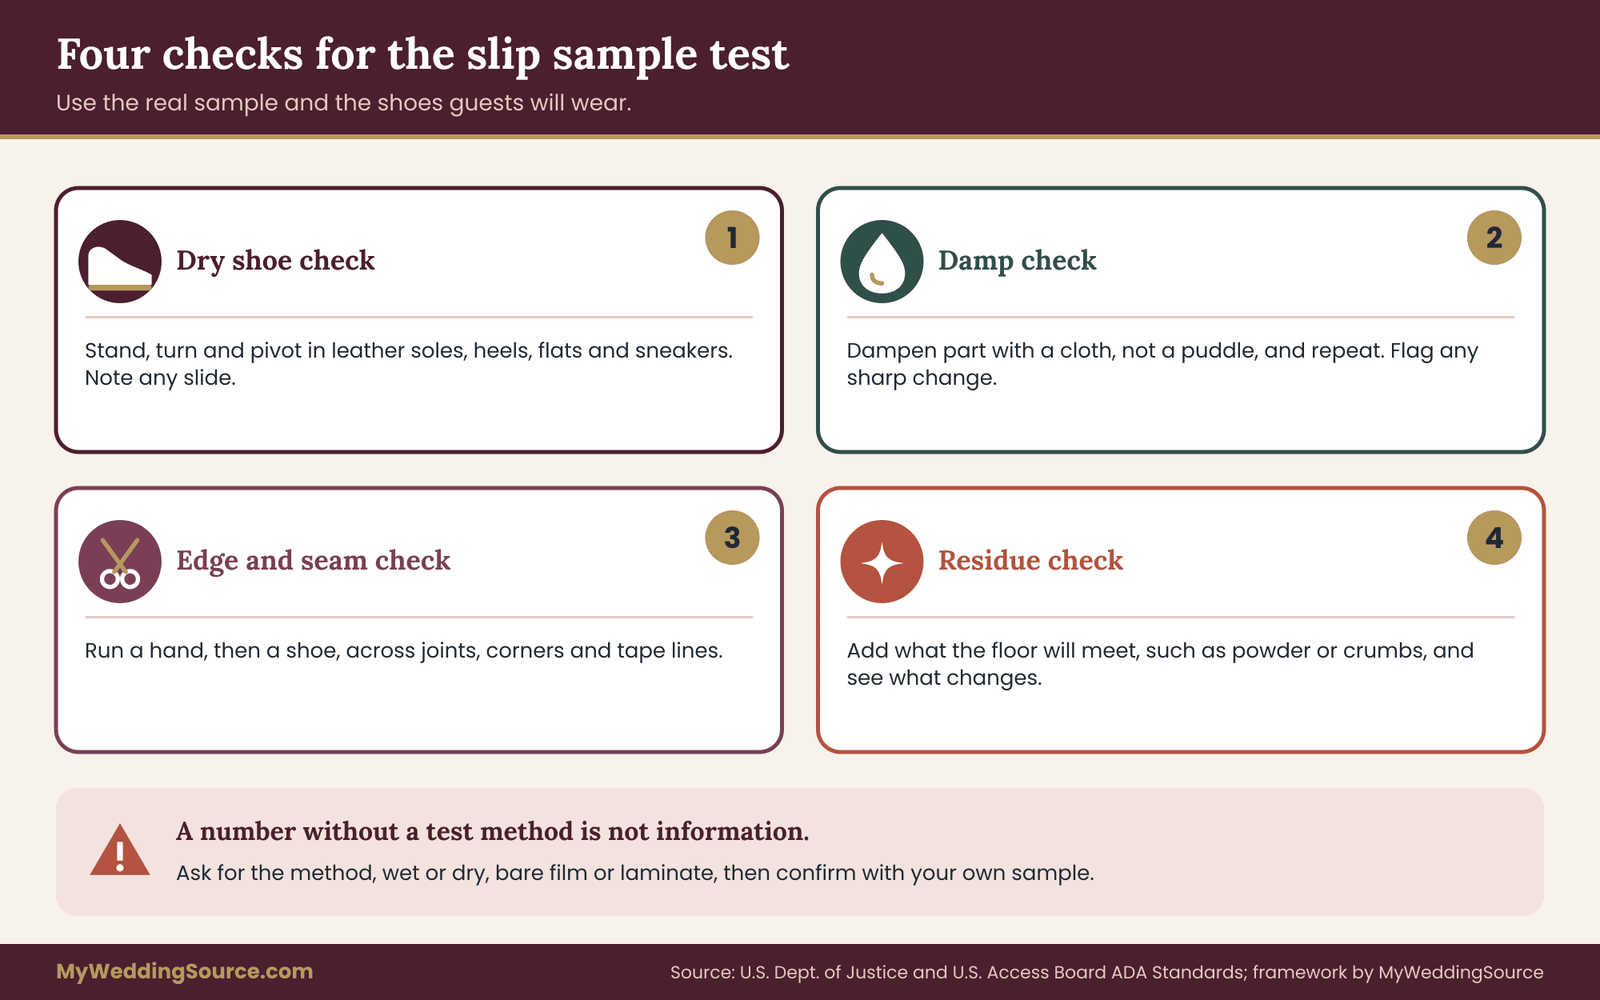
A documented sample test is not a laboratory result, but it is the most useful thing a couple can do. Take the on-surface sample, the real film and laminate on real panel material, and put it on a hard, flat surface. Then run four checks.
First, the dry shoe check. Stand on it in each type of shoe you expect: leather-soled dress shoes, smooth-soled heels, rubber-soled flats and sneakers. Turn, pivot and shift weight. You are looking for any sliding that feels unplanned, not for perfect grip.
Second, the damp check. Lightly dampen part of the sample with a cloth, not a puddle, and repeat. Real events have spilled drinks, condensation from ice buckets and the moisture people carry on their soles from outside. A surface that is fine dry and sharply different when damp should be flagged.
Third, the edge and seam check. Run a hand and then a shoe across any joint, edge or corner of the sample. Raised film edges, lifted corners and thick tape lines catch toes and heels. Fourth, the residue check: sprinkle a little of what the floor will meet, such as a bit of dance wax or powder if a dancer might use it, and see how the surface changes. Note each result and the shoe used, in plain words.
Why shoes change how a dance floor wrap feels
Formal footwear is the main variable. Leather soles are smooth and slide on many finishes, which is part of why they are popular on dance floors, but the same trait means a glossy printed surface can be much slipperier than a bare wood floor. Heels concentrate weight on a small point, which is rough on film and can dent soft materials. Bare feet and socks, which appear after the shoe-swap moment at many receptions, behave differently again.
The practical consequence is to test with the shoes your wedding party and your guests are likely to wear, not just your own. If a significant share of the dancing will be in smooth soles, give those the most weight in your decision. A quick conversation with the wedding party about footwear is an inexpensive check.
The wet problem: spills, haze and weather
Floors get wet in ways no one schedules. Drinks are carried onto the floor despite every sign. A fog or haze machine can leave a fine film on surfaces. A humid room can leave condensation, and an outdoor floor can meet dew or rain. Each of these can change a surface that tested well when dry.
Ask the DJ or lighting vendor whether haze or fog is planned, and what type. Water-based hazers are commonly used, but any airborne fluid can settle, and the film’s manufacturer is the right source for what the surface tolerates. Plan for a floor monitor, a designated staff member or a trusted friend whose job during the event is to watch for wet spots and wipe them promptly with a dry towel. That small assignment prevents most of the problem.
Wear, heels and the long night on a dance floor wrap
Surfaces change over the course of an event. Grit tracked in from outside acts like ball bearings under a smooth sole. Glitter, confetti and sugar from desserts are slippery. Scratches and scuffs from heels reduce gloss and can change how the surface reads under light.
A simple routine helps: sweep or dry-mop before guests arrive, check the floor again before the dancing begins, and do a quick pass after any dessert or toast. Ask the supplier which cleaning method the film tolerates. Harsh cleaners can damage a laminate or leave a residue that is itself slippery, so use only what the supplier approves, in small amounts. The dessert plan matters here too: keep sugar, crumbs and sticky drinks off the dance surface.
Accessibility and transitions
A dance floor is part of the room, and some guests will cross it or approach it with mobility aids. Where the dance floor wrap or its base meets the surrounding floor, check for a flush or gently beveled edge. Look for tape that adds a ridge, panel edges that stand proud, and loose corners.
The 2010 ADA Standards for Accessible Design, published by the Department of Justice and the U.S. Access Board, call for stable, firm and slip-resistant floor surfaces on accessible routes, and they limit abrupt changes in level. Your event may or may not fall under those rules, and the venue can tell you how it applies them. Either way, they are a reasonable benchmark for a transition: if a wheelchair or walker cannot cross it smoothly, a heel will probably catch it too.
Staff briefing and the decision rule
Once the surface is built, the people working the event need to know what to watch. Brief the planner, the DJ and the catering captain on three things: where the wet-spot towels are kept, who has authority to pause the music if the floor needs attention, and what the plan is if part of the dance floor wrap lifts.
Use a simple rule for slip signoff. If the sample passes the dry check, passes the damp check with no sharp change, has flush edges, and the supplier’s written data names a test method and a result, the gate is signed. If the damp check changes the surface sharply, ask for a grippier laminate and test again. If the supplier cannot provide data and the sample feels marginal, change the build or drop the dance floor wrap.
When to say no
It is fine, and sometimes wise, to decide against the dance floor wrap. If guests are likely to include many older relatives, people with balance concerns or toddlers running across the floor, the downside of a slick surface rises. If the supplier cannot name the test method, if the venue is unsure and will not commit, or if your sample feels wrong under the shoes you tested, you do not owe anyone an explanation beyond “we chose a plain floor with a projected design.”
That decision is rarely regretted. A good-looking floor that makes people nervous to dance defeats the point of having one.
Fire: the paperwork behind a dance floor wrap
Fire safety is the gate where couples most often feel out of their depth, and the good news is that you do not need to be an expert. You need to ask the right person the right question and keep the answer. The right person is the venue, because the venue is accountable to the local authority that enforces fire codes, usually a fire marshal or building official.
Why a dance floor wrap raises a fire question
Fire codes regulate what materials are allowed in occupied buildings because materials differ in how readily they ignite and how quickly flame spreads across them. Rules cover curtains, decorations, upholstery and floor finishes, and they are usually stricter for places where large groups gather and exits matter. A printed vinyl film plus laminate is a plastic surface covering a large area, so a careful venue will want to know what it is.
Several standards are commonly referenced in this area. The National Fire Protection Association publishes the Life Safety Code, NFPA 101, which includes provisions for interior floor finishes in assembly occupancies, and other documents, such as NFPA 701, which addresses flame propagation of textiles and films and is more often cited for drapery and hangings. Which standard, edition and test your venue relies on depends on your jurisdiction and the building, so do not assume. Ask.
Who decides
The authority having jurisdiction, often shortened to AHJ, is the organization with the legal power to approve or reject a material or an arrangement. For most weddings it is the local fire marshal’s office or the building department. A venue manager cannot overrule the AHJ, and a supplier’s data sheet does not replace the AHJ’s view.
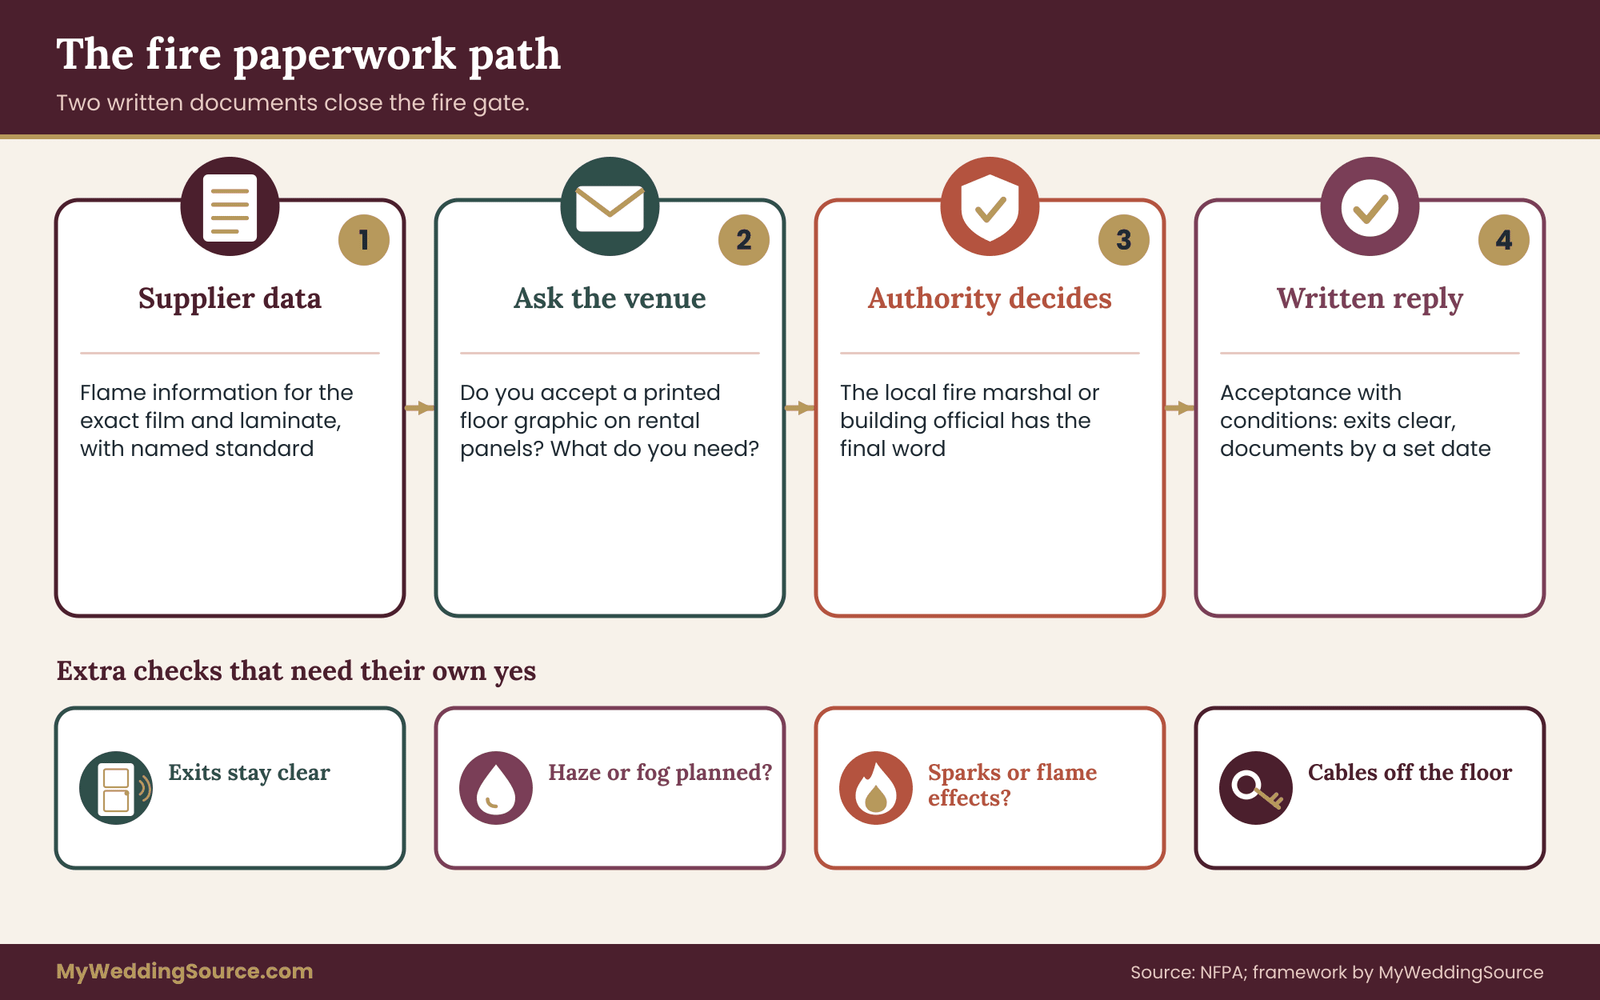
In practice, the venue is your messenger. Many venues have a standing policy for decorations and floor coverings, and some require a permit or an inspection for temporary installations, especially for tents and for anything covering exits. Your question to the venue is therefore: “Do you accept a printed vinyl floor graphic on a rental dance floor, and what documentation or approval do you need?”
What fire information to collect for a dance floor wrap
Ask the supplier for whatever flame-performance information exists for the exact film and laminate. This might be a certificate or a test report referencing a named standard, or a statement from the manufacturer’s data sheet. Ask for the product name and batch or specification details that match your quote, because a certificate for a different product does not help.
If the supplier says the product is “fire retardant” or “fire rated,” ask for the document and the standard it refers to. Those phrases are used loosely. A flame-resistance claim about a drapery fabric does not transfer to a floor film, and a treatment applied to one material does not describe a laminated stack. Keep the response, even if it is a short email, in the signoff folder.
The venue’s answer, in writing
Ask the venue to state its position in a sentence or two by email. Typical answers include a simple yes, a yes with conditions such as keeping exits clear and marked, a request for the supplier’s documentation, or a no. Each answer is useful. A conditional yes tells you what to prepare; a no tells you to change the build before artwork is final.
Keep the sentence precise. “The venue approves a printed floor graphic on rental panels in the ballroom, subject to receiving the supplier’s flame-performance documentation seven days before the event” is a pass with a clear obligation. “Should be fine” is not.
Exits, aisles and egress around a dance floor wrap
Fire rules are as much about getting people out as about materials. A dance floor wrap can interact with egress in several ways: it should not extend into exit paths in a way that changes their surface or visibility, it should not hide exit signs or floor path markings, and it should not carry designs that mimic exit markings or arrows. A bold arrow design is a poor choice if a guest might read it as directional guidance in an emergency.
Ask the venue to review the layout drawing, which you already have from the artwork stage, and mark any exit routes crossing the floor. If emergency lighting or path markers are built into the venue’s floor, a dance floor wrap must not cover them.
Heat, sparks and open flame
Some wedding effects add real ignition risk to a plastic-covered floor. Sparklers, pyrotechnic fountains, confetti cannons using a charged propellant, candles and flame effects all put heat or hot particles near the floor. Many venues restrict or ban them indoors, and a floor graphic adds one more reason to ask.
If an effect involves hot sparks, ask the venue, the effect’s operator and the supplier for their positions in writing before you add it to the schedule. Do not rely on a casual “it’ll be fine.” Cold-spark machines and LED effects are often presented as lower risk, but they still need the venue’s approval and the operator’s own safety statement, because the term describes a type of product, not a guarantee.
Lighting, cables and electrical items on the floor
Many dance floors carry lighting: low fixtures, LED strips under edges, or panels with built-in lights. Electrical work and equipment placement belong to the lighting professional and the venue’s electrician, not to the couple. If the dance floor wrap covers a floor with built-in lighting, ask the lighting vendor how heat and ventilation are handled, and whether the film is compatible with the panel’s light output.
Cables crossing the floor are a trip risk and, if a film is damaged, a hazard. Ask for cable routes to be planned off the dance area where possible, or covered with proper ramps. The guide to wedding signage systems offers a way to think about keeping paths readable and clear, which is a useful lens for any floor-level plan.
Temporary structures and tents
If the dance floor sits inside a tent, fire questions multiply. Tent fabrics themselves usually need flame-resistance documentation, and local rules for tents are often more specific than for permanent buildings. The tent supplier will know what documentation is required for the tent, but may have no view on your floor graphic, so keep the conversation about the dance floor wrap separate and put it to the venue or the AHJ.
The same applies to outdoor decks and rooftops. Ask whether the surface is rated for assembly use and whether any extra approvals apply to coverings. These are venue facts, and the technical walkthrough with the venue is the right time to collect them, alongside access routes and power.
The fire signoff rule
The fire gate is signed when you have two documents: the venue’s written acceptance of the specific build, including any conditions, and the supplier’s written flame-performance information for the specific film and laminate. If either is missing, the gate is open.
When a venue says it needs the AHJ’s approval and the AHJ is slow to respond, treat the dance floor wrap as unapproved and keep a fallback ready. A fallback might be a plain floor with projected artwork, or a dance floor wrap in a simpler form that the venue has already accepted. The worst timing is learning on load-in day that the answer is no, with a custom print sitting in a van.
Keeping the dance floor wrap record
File the venue’s reply, the supplier’s documentation and the date you received each. If the supplier updates the product, ask for updated documentation. If the venue changes its policy, ask for an updated reply. Those pieces of paper are the evidence that you asked the right questions in the right order, and they are easy to lose in an inbox unless you save them with the proofs and the sample notes.
Teardown: removing a dance floor wrap without damage
Teardown is the least glamorous gate and the one that most often causes disputes. The party ends, the guests leave, and a crew has to take a printed floor apart under time pressure while the venue waits to close up. If the plan is vague, the result is a rushed peel, a damaged floor and an argument about who pays.
What removal of a dance floor wrap depends on
How a dance floor wrap comes off depends on the build you chose. On rented panels, the dance floor wrap is usually removed later, back at the rental company’s shop, or the panels are simply collected with the film still on them, and the film is stripped there. In a direct application, removal happens in the room, using heat or solvent and patience. For a loose-lay overlay, removal is mostly lifting tape and rolling the sheet.
Adhesives, films and floor finishes interact, and the combinations are not all predictable. That is the reason a written removal plan matters. It should say who removes the dance floor wrap, with what method, in what time window, and where the material goes afterward.
The load-out window
Every venue has a time by which vendors must be out. Some allow a loading period after the event ends; others have hard curfews and fees for going over. Ask the venue for the exact load-out window and then ask the installer how long removal takes for your floor, including the part that cannot start until the dancing ends.
Compare the two. If the removal estimate fills the whole window, you have no margin, and a delay, a stubborn adhesive patch or a late finish becomes a curfew overage. A good plan leaves slack. If the numbers do not fit, options include scheduling the panels to be collected the next morning, if the venue allows it, or choosing a build that comes off faster. Put the venue’s window on your signoff sheet and compare it with the installer’s estimate in writing.
Residue and floor damage: who pays
Residue is any adhesive left on a surface after the film is lifted. Damage is anything beyond that: lifted finish, a dull patch, scratches from tools, a stain from solvent. Venues and rental companies often have language about floor damage in their contracts, and some charge a flat fee or the cost of repair.
Before the event, ask three questions of each party. The venue: what do you charge or require if the floor is marked, and do you inspect before and after? The rental company: what is your policy on graphics on your panels, and what does refinishing cost? The installer: do you carry insurance for damage during installation and removal, and will you stand behind your removal method?
A vendor’s insurance paperwork matters here, so ask the installer for a certificate of insurance when work happens inside a venue. Ask the venue whether it requires one from every vendor working on site.
Before-and-after documentation
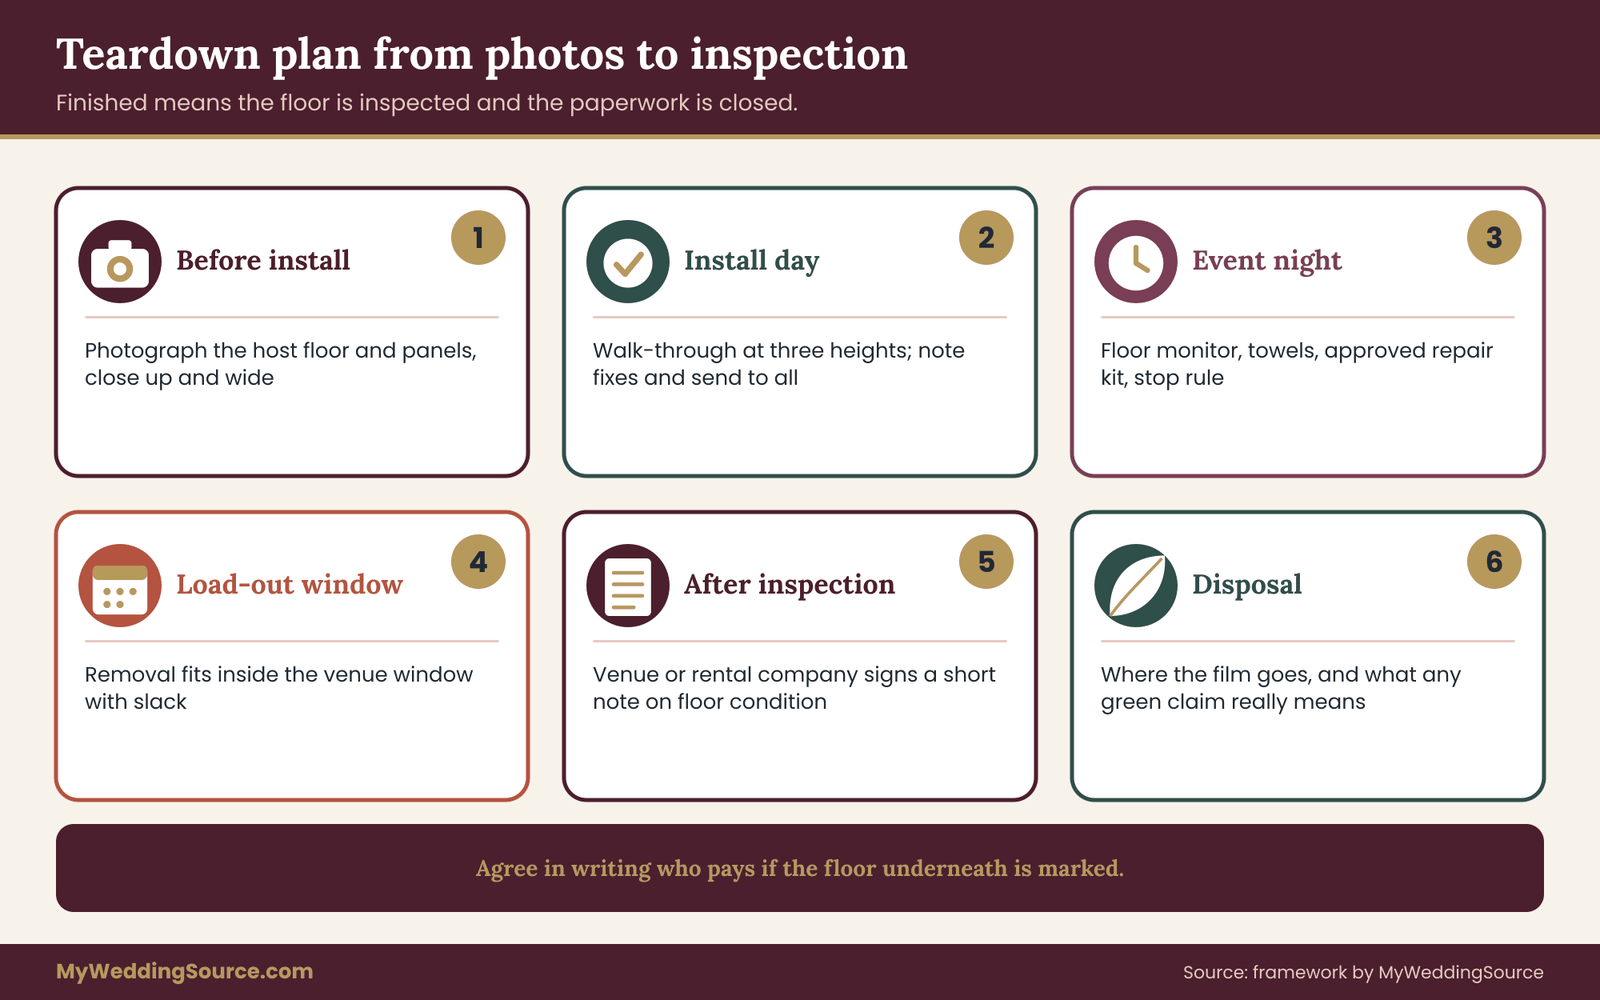
The easiest protection is simple: photograph the floor before anything goes down, and again after removal. Take wide shots and close-ups of the host floor, the panel surfaces and the edges, with the date visible or recorded in the photo’s data. Have the venue manager or the rental company present at the after-inspection, if possible, and ask them to sign a short note that the floor was returned in acceptable condition.
If there is damage, the before photos show what was already there. If there is none, the sign-off note prevents a surprise charge weeks later. This takes minutes and can be handled by a planner or a trusted friend.
Disposal and reuse of a dance floor wrap
A used dance floor wrap is a large piece of printed vinyl, and it ends up somewhere. Ask the supplier what happens to the removed film. Most vinyl films are not easily recycled, and local options vary. Some suppliers will take it back for disposal, some leave it to you, and some venues do not want it in their bins.
If you want to avoid waste, ask whether the print can be sectioned and repurposed, for example as framed pieces or a runner for the home, though the adhesive side and the laminate make this less tidy than it sounds. Be cautious about marketing claims such as “eco-friendly” or “recyclable.” The Federal Trade Commission’s Green Guides explain how such environmental claims should be substantiated, so ask a supplier to explain exactly what a claim means. The broader approach to reducing event waste is covered in the guide on wedding waste reduction.
Keepsake reality
Couples sometimes want to keep a piece of the floor. It is a charming idea and worth planning for in advance. Ask the installer to cut a section from the center before removal, or to lift the monogram carefully, and agree on who does it and when. A hurried hand-cut at the end of the night, in the dark, with a venue manager waiting, rarely goes well.
Also be realistic about what survives. Film that has been walked on, scuffed and exposed to spills may look worn up close. A keepsake from an area near the edge may be in better shape than one from the middle. Treat it as a memento rather than a display piece.
The teardown signoff rule for a dance floor wrap
The teardown gate is signed when you hold a written removal plan that states the method, the crew, the start and end times inside the venue’s load-out window, the destination of removed material, and the responsibility for residue or damage. It also needs the before photos filed and an agreed after-inspection.
If any of these elements is missing, the gate is open. Open teardown gates are the ones that produce fees in the week after the wedding, when everyone is tired and the couple is on a honeymoon.
Install day for a dance floor wrap in detail
Installation is the other half of the schedule, and it has its own constraints. Floors cannot be wrapped, laid or checked while the room is still being used for other setups, and a dance floor often goes down early so that other vendors can work around it. Ask the venue for the earliest access time and ask the installer for their duration.
Plan the order of work. A sensible sequence is: the room is cleared and swept; the floor panels or base are laid and checked for flatness; the dance floor wrap is applied or laid; the edges are checked and trimmed; the surface is cleaned with the approved method; and a final walk-through confirms the signoff items before other vendors bring in anything heavy. The walk-through includes the planner, the installer and, if possible, the venue manager.
The walk-through checklist in prose
At the walk-through, look at the surface from three heights. From standing height, check for wrinkles, bubbles, misalignment and lifted corners. From a crouch, look along the surface toward a light source; raised edges and bubbles show up as shadows. From above, if there is a balcony or ladder, check that the artwork orientation matches the proof.
Then walk it in the shoes you tested earlier, including a turn and a quick step. Check every transition to the surrounding floor. Confirm that cable runs are covered or off the floor, that exit signs are visible, and that the floor towels and cleaning supplies are in place. Write down the time, the person and any items fixed, and send the note to everyone involved. That message becomes part of your record.
Late changes on the day
Occasionally something goes wrong: a corner lifts, a panel is damaged, a spill gets in before the party. Agree in advance who can make the call to repair, to cover an area or to close part of the floor. A designated person with authority and a small repair kit, including the installer’s approved tape and a squeegee, can prevent a small fault from becoming a bigger one.
If the problem is serious, the safe option is to stop dancing on the affected area and block it clearly. A visible, polite barrier is better than a guest finding the hazard with their foot. It is also reasonable to have a backup plan for that scenario, such as shifting the first dance to a clear portion of the floor.
Who pays, and what to put in the contract
A dance floor wrap involves at least three contracts or agreements: the print supplier’s, the rental company’s and the venue’s. Each carries terms that touch the dance floor wrap, and gaps between them are where costs hide. The aim of this section is to name the clauses worth reading rather than to give legal advice.
In the print supplier’s agreement, look for the scope (print, laminate, application, removal), the proof approval process, the change cutoff, the delivery and install dates, the remedy if the print differs from the approved proof, and the refund or reprint terms. In the rental company’s agreement, look for the graphic policy, the refinishing charge, the panel dimensions and the pickup time. In the venue’s agreement, look for floor-covering rules, damage clauses, the load-out window and any insurance requirements.
The gaps between contracts
The most common gap is removal. The supplier may include application but not removal. The rental company may allow graphics but charge to strip them. The venue may require removal by a certain hour. Each party is individually reasonable, and together the couple pays three times or ends up with no one responsible.
Close gaps by naming one party as responsible for each task in a single paragraph, and ask every party to confirm it. The wedding rental planning checklist is a good companion here, because rented panels, tents and lighting all raise the same who-removes-what question; use it to make sure the dance floor wrap’s tasks are not left in the cracks between agreements.
Sample budget logic for a dance floor wrap
Without inventing prices, you can still structure the budget. Create lines for print and laminate, panel dedication or rental uplift, application labor, removal labor, refinishing, disposal, insurance paperwork if charged, and a contingency line for reprints or repairs. Fill each line from written quotes and mark any that are estimates.
A contingency matters because a print is custom. If one panel is damaged in transit, or a name is found wrong after printing, there is no off-the-shelf replacement. Ask each vendor what a partial reprint costs and how long it takes, so that you can size the contingency to the real consequences rather than a guess.
A worked example: Dana and Priya choose a monogram floor
This example is invented, to show how the signoffs run in order. Dana and Priya are planning a ballroom reception. They love the idea of a deep green floor with a gold-toned monogram in the center, and their planner proposes a custom dance floor wrap.
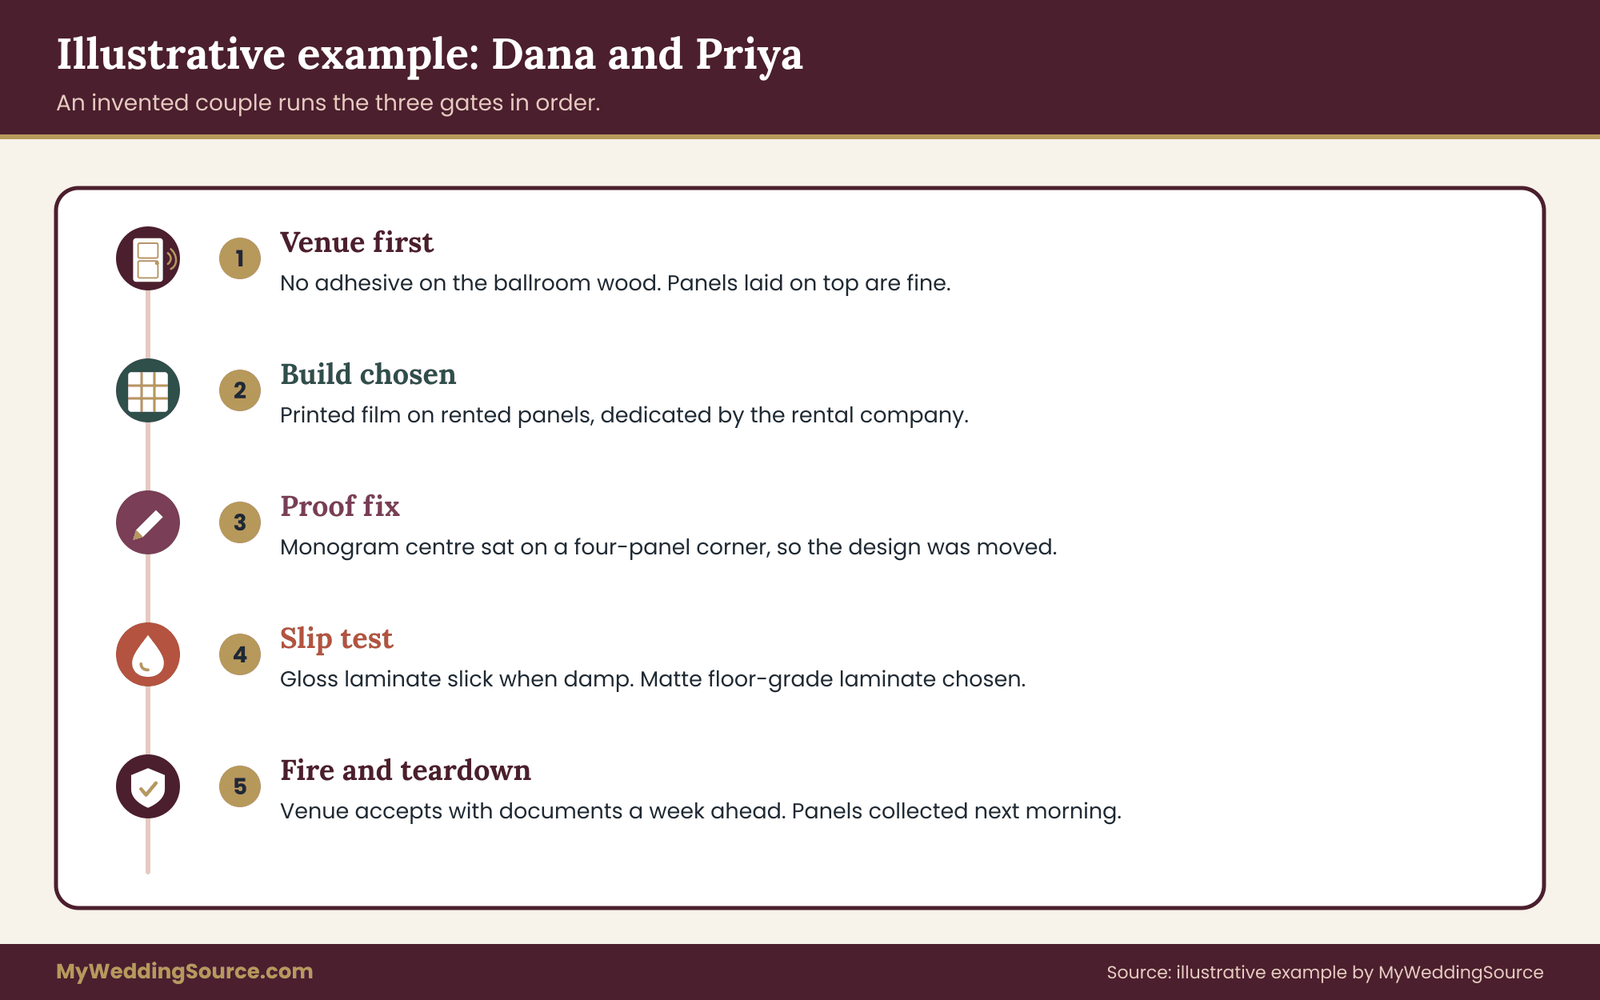
The first call is to the venue, not the printer. The venue manager says nothing may be adhered to the ballroom’s wood floor, but rental panels laid on top are fine, and printed film on the panels needs a note about flame-performance information. That settles the build: printed film on rented panels. The planner asks the rental company, who agree to dedicate a set of panels and quote stripping and refinishing separately.
The proof ladder in action
The designer sends a vector monogram. The print vendor confirms file requirements and sends a scaled layout on the panel grid. The planner sees that the monogram’s center sits exactly on a four-panel corner, so a tiny seam will cut through the middle. They shift the design so that the center falls inside a single panel and the letters avoid the joints.
The text audit finds that one partner’s middle initial in the first draft belonged to an earlier idea. A color sample arrives on the real film. The deep green looks darker than on screen, and the gold reads as brownish under warm lighting. The couple chooses a lighter green and a brighter gold, approves in writing and asks the vendor to number the final version.
The slip test
The sample arrives on a scrap of panel. Dana tests it in leather-soled dress shoes, Priya in heels, and a friend in sneakers. The dry result is fine. Dampened with a cloth, the glossy laminate becomes noticeably slicker under the leather soles. The couple sends the findings to the supplier, who offers a matte floor-grade laminate with a stated test method and result. A second sample feels steadier, and the green looks slightly softer. They accept the trade.
The fire and teardown signoffs
The supplier sends flame-performance documentation for the laminate and film. The venue replies in writing that the build is accepted on rented panels, with a request that the documentation arrive a week before the event and that exit paths stay clear. The planner marks the exits on the layout and confirms the monogram does not extend into them.
For teardown, the venue’s load-out window leaves ninety minutes after the last guest leaves. Because the panels will be collected the next morning, the plan is simple: lift the panels, stack them, and let the rental company strip the film in its shop. The couple has before photos of the ballroom floor and a signed note from the venue after the collection.
What the example shows
Notice what drove each decision. The venue’s rule chose the build. The panel grid shaped the artwork. The slip test changed the laminate, which changed the color, which led back to the proof. The fire documentation was a scheduled delivery, not a last-minute scramble. And the teardown plan fit inside the window with room to spare. Nothing here required technical expertise, only asking in the right order.
Mistakes and edge cases with a dance floor wrap
Most problems repeat. The following are the ones worth guarding against, followed by edge cases that change the plan.
Common dance floor wrap mistakes
Approving artwork before the build is known is the biggest one, because the build decides seams and the material changes color. Accepting “it’s rated” without a document is the second. Testing only in your own shoes is the third. Forgetting removal, or assuming it is included, is the fourth. Letting more than one person approve proofs is the fifth, and it leads to printing from the wrong version.
Other mistakes are smaller but real. Choosing thin script at floor scale. Placing a focal point on a seam. Ignoring the DJ table or a riser that will cover part of the artwork. Booking removal after the venue’s curfew. And treating the dance floor wrap as a décor item that the photographer will handle, when the photographer needs the layout and viewing angle early to plan the overhead shot.
Edge case: a dance floor wrap on a very small floor
On a small floor, a bold wrap can dominate the room and leave little room for dancing. If guests will crowd the floor, consider a simpler design with a bold border and an uncluttered center, and keep any text away from the busiest zone. The question of how large the floor needs to be is a separate one; settle it first so that the artwork fits the real dimensions.
Edge case: a multi-use room
If the dance floor sits in a room also used for dinner, the dance floor wrap may be visible through the whole meal, and chairs may be dragged across it. Ask whether the film tolerates chair legs and rolling carts, and consider placing felt-protected chairs away from the dance floor wrap. If the room flips between ceremony and reception, the floor may be down early, so ask how it is protected from setup traffic.
Edge case: a sequence of events across days
When a floor serves a rehearsal dinner and a reception, or two events in the same space, the surface may need cleaning and a safety check between events. Agree who checks it and when. A floor that was fine on Friday may need attention after Friday’s party.
Edge case: guests who will not dance on it
Some guests will avoid a decorative floor because they do not want to scuff a monogram. Tell the DJ and the wedding party in advance that the floor is meant to be danced on. A short mention by the host is enough.
Edge case: substituting a dance floor wrap material
A supplier may propose a substitution close to the event, such as a different laminate because of a stock shortage. Treat any substitution as a new build: ask for the new data sheet, run the slip sample again if you can, and update the venue’s fire acceptance. Do not accept a substitution on a call without a written record.
Edge case: a dance floor wrap outdoors
For an outdoor or tent floor, ask for a weather plan. Wind can lift edges; rain can soak the surface; dew can form overnight. Ask what the supplier recommends as a cutoff, such as whether a damp base is acceptable for application, and whether they will inspect the floor on the day. If the plan depends on dry weather, decide in advance what the fallback is.
Questions to ask each party
Having questions written down makes the calls short. These are the ones that carry the most weight, in prose so that you can read them aloud.
To the venue: Do you allow printed floor graphics, and on what surfaces? What documentation do you need for flame performance, and by when? What is the load-out window, and are there fees for overrun? How do you inspect the floor before and after, and what do you charge for damage?
To the rental company: Will you allow a graphic on your panels? What are the panel dimensions, and how do the edges and seams work? What do you charge to strip and refinish? Who handles removal, and when do you collect?
To the print supplier: Which film and laminate do you recommend for floor use? What test method and result do you hold for slip resistance and for flame performance? Can you provide a printed sample on the same materials? What are your proof numbering and approval steps? What is your removal method, and do you carry insurance for work on site?
To the lighting and effects vendors: Will you use haze, fog, heat-producing effects or floor lighting? What are the cable routes? Will anything be placed on or fixed to the dance floor wrap?
Your next steps
Start with the venue. Ask what builds they accept and what the load-out window is, and save the reply. Ask the rental company whether graphics are allowed on their panels. Only then brief the designer and request the supplier’s file requirements, data sheets and a sample. Run the proof ladder, run the slip sample test with the shoes you expect, and collect the venue’s written fire position. Finish by writing the removal plan and filing everything together. If any gate stays open close to the event, switch to a plain floor with a projected design rather than approving under pressure.
FAQ
Is a dance floor wrap safe to dance on?
It can be, but safety depends on the film, the laminate, the base and the shoes. Ask the supplier for a written slip-resistance statement that names the test method, then test a real sample dry and lightly damp in the shoes guests will wear. If the damp sample feels noticeably slicker, ask for a grippier floor-grade laminate or choose a plain floor.
Does the venue have to approve a dance floor wrap?
Yes, you should treat venue approval as required. The venue is accountable to local fire and building rules and may restrict floor coverings or anything adhered to its floor. Ask in writing whether a printed graphic is accepted on rental panels, what flame-performance documentation it wants, and when it needs that documentation.
Can a dance floor wrap be applied straight to hardwood?
Some venues allow it, but many refuse because adhesives can pull finish or leave residue. If the venue is open to it, expect to provide the material and adhesive details, a removal plan and possibly a test patch. A printed film on rented panels is usually a safer route for the venue floor.
How do I approve artwork for a dance floor wrap?
Climb a proof ladder: check the file, audit the text against a source you control, review a scaled layout on the real panel grid, inspect a color sample on the real film and laminate, and test an on-surface sample. Name one approver, number each proof version and get the print version confirmed in writing.
What fire documentation should I ask for?
Ask the supplier for flame-performance information that matches the exact film and laminate in your quote, naming the standard it refers to. Then ask the venue what it needs and what its fire authority requires. A supplier saying a product is fire rated is not enough without a document, and the venue’s written acceptance completes the check.
How long does removal of a dance floor wrap take?
It depends on the build, so ask the installer for an estimate for your specific floor and compare it with the venue’s load-out window. Removal on rented panels can happen later at the rental shop, while direct removal in the room takes time and care. Leave slack, and agree in writing who handles residue or damage.
Will a dance floor wrap damage the floor underneath?
It can if the film is bonded directly to the venue floor, because adhesive may leave residue or lift finish. Using rented panels as a base protects the venue floor, though the panels may need refinishing. Take before-and-after photos, ask for the venue’s damage terms and confirm who pays if the floor is marked.
What if the dance floor wrap is not approved close to the event?
Keep a fallback ready from the start. A plain floor with a projected monogram or pattern avoids adhesive, slip and teardown questions, though it needs a throw distance and a technician. If a gate is still open a few weeks out, decide to switch rather than approving under time pressure.
Sources
- National Fire Protection Association (NFPA): codes and standards, including NFPA 101 Life Safety Code and NFPA 701
- 2010 ADA Standards for Accessible Design, U.S. Department of Justice
- Guide to the ADA Standards, U.S. Access Board
- Walking-working surfaces, Occupational Safety and Health Administration
- Slips, trips and falls, National Institute for Occupational Safety and Health
- ASTM International: standards for friction and surface burning tests
- American National Standards Institute (ANSI): standards information
- Green Guides for environmental marketing claims, Federal Trade Commission
- Consumer Product Safety Commission: safety information
- U.S. Fire Administration: fire prevention and public education