
Wedding invitation printing is where a design stops being a file and becomes several hundred pieces of paper with your names, your date and your guests’ addresses on them. This guide covers the unglamorous middle of the process: the printer brief, the proof sign-off, how many pieces to order, how to hand files and data to the people who produce them, and how to check the mailing rules before a single stamp is bought.
For wedding invitation printing, work backward from the mail date. Lock the guest list and wording first, write a one-page brief for the printer, read the proof in several separate passes with a second person, and count pieces by household with a deliberate spare margin. Weigh and measure one fully assembled sample before you buy postage. Keep the address data, the artwork and the approvals in one tracked folder so every handoff has a single source of truth.
Most couples meet their invitations twice. The first time is the design stage, which is pleasant: papers, colors, a mock-up that looks like the wedding feels. The second time is a box on the doorstep, and that is where problems appear. A date that is a day off. A guest’s name missing a letter. A color that looked like dusty rose on a screen and printed as salmon. A suite that weighs a fraction too much for a single stamp.
None of those problems comes from bad taste. They come from skipped checks between the two meetings. This article is about those checks. It does not tell you what the wording should say, since our guide to wedding invitation etiquette covers wording, who gets invited to what, and how to address people. Here the question is practical and narrower: how do you get from approved wording to a finished, correctly addressed, correctly stamped invitation, without paying for the same job twice?
You do not need to use every section. If you are working with a stationery studio that handles wedding invitation printing, proofing and assembly for you, read the proof, quantity and mailing sections so you know what to ask. If you are printing through an online service or a local print shop and doing the assembly yourself, you will want all of it.
What wedding invitation printing involves, stage by stage
It helps to see the whole path of wedding invitation printing before looking at any one step. Wedding invitation printing runs through seven stages, and each one hands something to the next.
- Data. The guest list, the household groupings and the mailing addresses. This is the raw material for quantities, envelopes and postage.
- Design and copy. The layout, the wording and every secondary piece: details card, reply card, map, accommodation insert.
- Brief. A short written specification that tells a printer exactly what you want made, in what quantity, by when.
- Proof. A preview of what will be printed, checked and signed off by you.
- Production. The press run, plus any finishing such as foil, letterpress impression, edge painting, die-cutting or envelope liners.
- Assembly and addressing. Collating the pieces, addressing envelopes, stuffing, sealing and applying postage.
- Mailing. The post office, the delivery window and the replies coming back.

The useful thing about this wedding invitation printing list is that every stage has a deadline set by the one after it. You cannot choose a mailing date without knowing how long assembly takes. You cannot know how long assembly takes without knowing what finishing was ordered. And the finishing decides how long production takes. So the schedule has to be built backward.
Working backward from the mail date for wedding invitation printing
Start from the day the invitations should land in mailboxes. Etiquette sources commonly suggest sending formal invitations roughly six to eight weeks before the wedding, and earlier for destination weddings or weddings on busy travel weekends; our save-the-date timing guide explains how that sits next to earlier notices. Pick your target in-hand window, then subtract.
Allow time for mail itself. First-Class Mail usually arrives within a few days, but a batch sent from one post office can take longer to reach guests in other regions, and holidays slow things down. Many stationery companies suggest dropping invitations at the post office a week or two ahead of the day you want them in hand, to leave a margin.
Subtract the time it takes to address, stuff and stamp. For a few dozen invitations that is a weekend. For a couple of hundred it can be three or four evenings, and more if calligraphy or wax seals are involved. Calligraphers and assembly services often quote a lead time of their own, so ask before you commit to a mail date.
Subtract the printer’s production time. Wedding invitation printing varies enormously here. Digital printing can be quick. Offset runs, letterpress and foil stamping need more setup. Envelope liners and custom-colored envelopes sometimes arrive from a separate supplier and add days or weeks. Ask the printer for a production time in business days, and ask whether that clock starts when you approve the proof or when you place the order. Many shops start it at proof approval, which is why a slow approval eats the schedule.
Subtract proofing time. A realistic proof loop takes longer than people expect, because every correction restarts the review. Plan for at least two rounds, and more if more than one family is weighing in.
Finally, subtract the time it takes to freeze the inputs: the final guest list, the final wording, and the final addresses.
One stationery marketplace publishes a rule of thumb that fits this logic: weigh a sample about fourteen to sixteen weeks before the wedding, buy stamps about eleven to twelve weeks out, and mail about eight to ten weeks out, with international pieces going a week or two earlier. Treat those numbers as one company’s guideline rather than a rule, but notice the pattern. The weighing happens first, long before the mailing, because it can change the design.
Freeze points in wedding invitation printing: what has to be final, and when
A frequent cause of reprints in wedding invitation printing is not an error at all. It is a change of mind after the file has been approved. The cure is a small number of freeze points, agreed in advance, after which changes carry a cost and need a deliberate decision.
The guest list freeze. Before you order, you need a list that is stable enough to count. It does not have to be perfect. It has to be good enough that quantities will not swing by thirty percent. If the list is still moving, read our guest list guide and settle the tiers first, and order the spare margin discussed in the quantity section.
The wording freeze. Once the text is final, it is final. Late changes to a date, a venue name or a dress-code line are the most expensive kind, because they reopen the proof and sometimes the plates. Decide who can approve a change, and what counts as important enough to justify one.
The design freeze. Colors, fonts, paper and finishing choices are locked before the proof is generated. Switching a paper stock after the proof is a new job.
The address freeze. Names and addresses are locked a few weeks before addressing begins. After that point, changes go on a short correction list that is handled by hand.
The file freeze. The moment the proof is signed, the files that match it are archived, named clearly and treated as read-only. Everything printed afterward, including extra copies and reprints, comes from those files.
Write the freeze dates next to your mailing date. If you are working through the broader schedule in our twelve-month wedding checklist, these belong alongside the stationery items.
Who does what in wedding invitation printing
In a small wedding invitation printing project, five jobs get quietly assigned to whoever has time. That is how a proof gets approved by one person who assumed another person had checked the spelling. Name an owner for each job, even if the same person fills several.
- Project owner. One of the couple. Makes final decisions, holds the budget, signs the proof.
- Proof reader. A second person who did not write the wording and does not have the design in their head. Reads with fresh eyes. This is often a parent, a friend or a sibling who is good with details.
- Data keeper. The person who owns the address spreadsheet and is the only one who edits it. Everyone else sends corrections to this person.
- Designer. Whoever produces the artwork, whether a studio, a freelancer, a template tool or one of you.
- Printer contact. One name that the printer deals with. When three people email a print shop with different instructions, the shop works from the most recent message, not the correct one.
If a family member is paying for part of the stationery, decide at the start how much say they have, and put it in writing. It is much easier to agree on this before a proof arrives than after. ## The printer brief for wedding invitation printing
A brief is a short document that tells the printer, in plain terms, what your wedding invitation printing job should produce. Most print shops have an order form, and it covers some of this. A brief covers the rest, and it also gives you a record of what you asked for if there is ever a dispute. Send it with the files, keep a copy, and ask the printer to confirm in writing that they have read it.
A good brief for wedding invitation printing fits on one page. Here is what to put in it.
The job. A name you will recognize later, such as “Invitation suite, October wedding,” and the total number of different pieces: invitation, reply card, reply envelope, details card, outer envelope, inner envelope, and so on. Ask for each piece to be listed separately.
Quantities, per piece. Do not give one number for the suite. Give a number for each item, because items are rarely equal. There are usually more outer envelopes than inner ones, more envelopes than cards (to allow for addressing mistakes), and fewer map cards than invitations if only some guests need one. The quantity section below explains how to calculate them.
Finished size and folded size. In inches, width first, then height. Mention any fold and which way it opens. A square card and a tall narrow card can look similar in a mock-up and mail very differently.
Paper stock. The brand and name if you know it, the weight, and whether it is coated or uncoated, smooth or textured. If you are not sure, say what you want the paper to feel like and let the printer propose a stock and show you a sample.
Printing method and finishing. Digital, offset, letterpress, foil stamping, engraving, thermography, blind embossing, edge painting, die-cutting, scoring, liners. Say which pieces get which finish. If an item has no finish, say so, so nobody guesses.
Colors. The color values you want matched, and how they were specified. If your design is in CMYK, say so. If you are matching a Pantone ink, give the number and say whether the match is critical or approximate. If your colors were chosen on a screen, tell the printer, so they know to expect a shift.
Envelope details. Size, color, flap style, liner, whether the printer is printing return addresses on the flap or the front, and whether recipient addresses are being printed, calligraphed or labeled elsewhere.
Delivery. The ship-to address, a contact phone number, the date you need the finished pieces in hand, and a second, harder date by which they must arrive for the mailing to hold. Ask for the production time to be stated in business days.
Proof requirement. What proof you want before the job runs: a PDF, a physical proof, a press check. See the proof section for what each one shows.
Quantity tolerance. Whether you accept overruns and underruns, and what limit. Printers commonly treat a variance of up to ten percent of the ordered quantity as normal. If you need an exact minimum, say so in the brief and ask how the printer handles it.
Approvals. Who has authority to approve a proof and release the job. Name one person.
Special handling. Anything that matters physically: do not fold, ship flat, keep dry, deliver to a business address, deliver to a signature.
Questions to ask about wedding invitation printing before you order
The brief tells them what you want. These questions tell you how they run wedding invitation printing. The answers shape the price, the schedule and the risk.
- How long does production take, in business days, and when does that clock start?
- What kinds of proofs do you provide, which are included in the price, and what does a physical proof cost?
- If I request changes after proof approval, what happens to the schedule and the cost?
- If the printed result does not match the approved proof, how do you handle it, and what is the time limit for reporting a problem?
- What is your overrun and underrun policy? Do I pay for extra pieces?
- Do you store my files, and for how long? Can I reorder later at the same price?
- Will my paper and ink come from the same batch if I reorder in a few weeks?
- Do you accept files in a particular format? Do you have a template?
- Who will I deal with if there is a problem?
- Do you offer envelope addressing, assembly or mailing services, and what are the terms?
If you are comparing several print vendors, treat the answers like any other vendor vetting: look for specific, consistent answers rather than the cheapest quote. Our vendor due diligence checklist covers references, reviews and contract questions that apply here too. Ask to see samples of work with the same method and paper you are ordering, and if they offer a sample pack, use it. A paper that looks pale pink on a website can print gray in a person’s hand.
Choosing a method for wedding invitation printing
Every method of wedding invitation printing has a look, a cost structure and a set of limits. The right method depends on how many pieces you need, how much your design depends on texture or metal, and how much time you have.
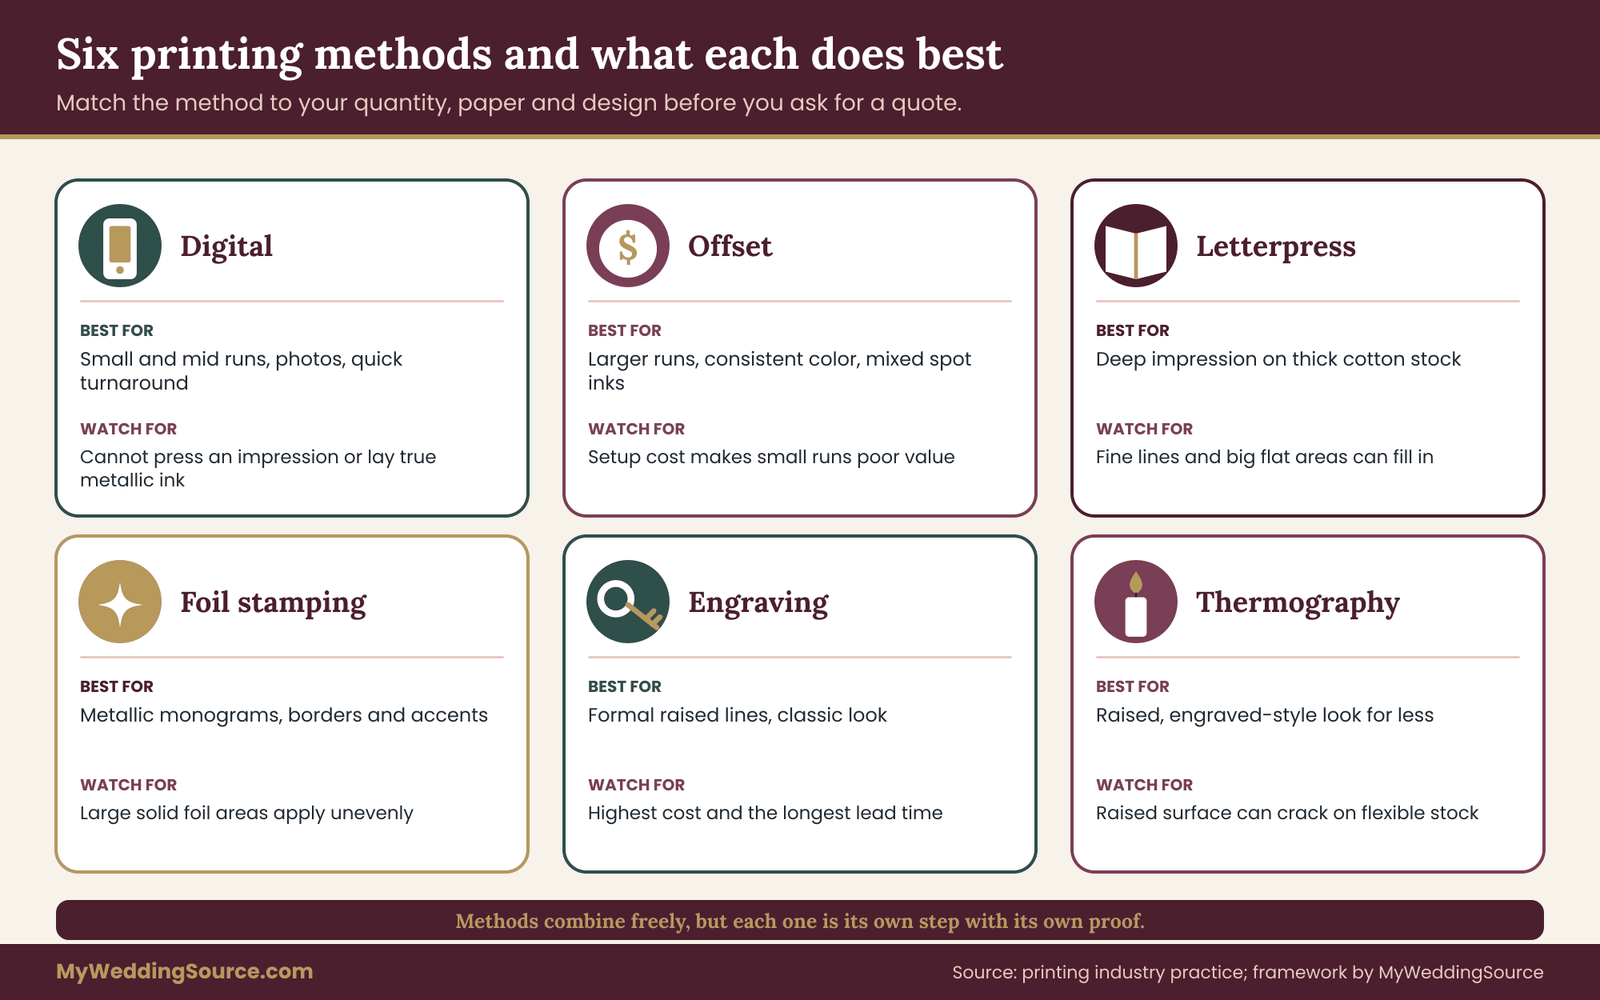
Digital printing. A digital press prints directly from a file, with no plates. It suits small and medium runs, quick turnarounds and designs with photographs, gradients or multiple colors. Setup costs are low, so a run of fifty is not much more costly per piece than a run of a hundred. The limits: it cannot press an impression into paper, and it generally cannot lay down metallic ink the way foil stamping does. Digital color can be very good, but it is worth asking whether your printer’s press is calibrated and whether a hard proof is available.
Offset printing. An offset press transfers ink from plates onto paper. It has setup costs, which means it is better value at higher quantities, and it can deliver consistent color across a large run. It also supports spot colors, meaning ink mixed to a specific color rather than built from four process inks. If your invitations call for a single color, such as deep green on cream stock, offset can produce a rich result.
Letterpress. A raised plate presses ink into soft, thick paper, leaving a visible, feelable impression. It is prized for its texture. It needs thick cotton or similar soft stock to hold the deboss, and it generally prints in one to three colors. Designs with very fine lines, tiny type or large flat color areas can be difficult. Ask the printer to show you a sample of type at the size you are using.
Foil stamping. Metallic or pigmented foil is pressed onto paper with heat. It works well for borders, monograms and small accents. Large solid foil areas are harder to apply evenly. Foil does not combine freely with every paper surface, so test the stock.
Engraving. Metal plates cut the design, and ink sits in raised lines. It is the traditional formal option, and one of the most expensive. Lead times are usually longer.
Thermography. Resin powder is heated on wet ink to form a raised surface. It imitates the look of engraving at a lower cost. The raised surface can crack or flake on flexible stock.
Risograph and screen printing. These offer a handmade, layered look, often with vivid or unusual colors. Registration can vary slightly between sheets, which is part of the appeal and the reason to avoid very tight alignments.
Blind embossing and debossing. Raised or sunken designs without ink. They add texture and can sit alongside printing. They add thickness and can be hard to feed through mail equipment, so check the thickness at the mailing stage.
Methods can be combined. A suite might have digital-printed details and reply cards, a letterpress invitation, and foil on the envelope liner. Combining methods multiplies the proofs you need to see and the schedule, since each method is its own step.
Paper for wedding invitation printing: weight, thickness and mailing
In wedding invitation printing, paper weight is confusing because the numbers mean different things in different paper categories. Text-weight stock is thin and flexible, like the pages of a book. Cover-weight stock, also called cardstock, is firmer and heavier, and it must be scored before folding. Invitations are usually printed on cover-weight stock, but a pound rating in one category does not match the same pound rating in another. Point weight, which measures thickness, is the clearest comparison, so ask your printer to give a thickness in points as well as a weight.
Why does this matter beyond feel? Thickness adds weight, which can push a suite into a higher postage tier, and thick or rigid pieces can cause problems in postal sorting machines. A suite with a thick letterpress invitation, a layered details card, a vellum wrap and a wax seal can weigh more than expected and become nonmachinable. Section six returns to this. For now, build the habit of asking for physical samples of the exact stock and weighing a mock-up early.
Also consider envelope paper. Dark or colored envelopes can show scuffs from sorting machines, and some paper surfaces mark easily. Textured envelopes may not take a printed return address cleanly. Ask your printer whether the envelope stock you have chosen can be printed on, and whether white or metallic ink is available for dark envelopes. ## Quantities for wedding invitation printing: how many to order
Ordering too few is expensive and slow in wedding invitation printing. Ordering too many is wasteful but cheaper. The difference comes from how printing is priced: a large share of the cost is setup, so the first piece costs a lot and each additional piece costs little. If you run short by ten or fifteen pieces, a second run can cost nearly as much as the first run did, and it may not match the original in color. That is the reason to plan quantities with some care, and to accept that a small surplus is the cheaper mistake.
Count households, not guests, when planning wedding invitation printing
Most formal wedding invitation printing counts households. A couple living together gets one invitation. A family with children living at home gets one. An unmarried adult gets one of their own. So the first number you need is the count of mailing addresses, not the count of people.
Work through the guest list in three steps.
- Group guests by address. Couples, families and roommates who are invited together share one invitation. People invited with a plus-one receive an invitation addressed to them and a guest, if your etiquette choice calls for it.
- Mark who is invited to what. If there is a rehearsal dinner, a welcome event or a farewell brunch, note which households get which. Our guide to wedding weekend event planning explains how to structure these so the invitations do not become a puzzle.
- Count each household once. That count is your base number of invitations.
Then add pieces for people who need an invitation but are not guests. Almost every couple forgets some of these, and they add up.
- Your own copies, and copies for each set of parents.
- The wedding party, who often want a keepsake set.
- The officiant, and sometimes vendors or the photographer. Some photographers ask for a complete suite to use for detail photos, so check the contract or ask.
- Grandparents or relatives who will want a second copy to frame.
- A few for photography styling, if you are planning a flat-lay shot.
A typical couple adds somewhere between ten and twenty pieces for these purposes, but your number depends on your family. Count real people rather than guessing a number.
An illustrative example
The following numbers are made up, to show the arithmetic. Your own list will differ.
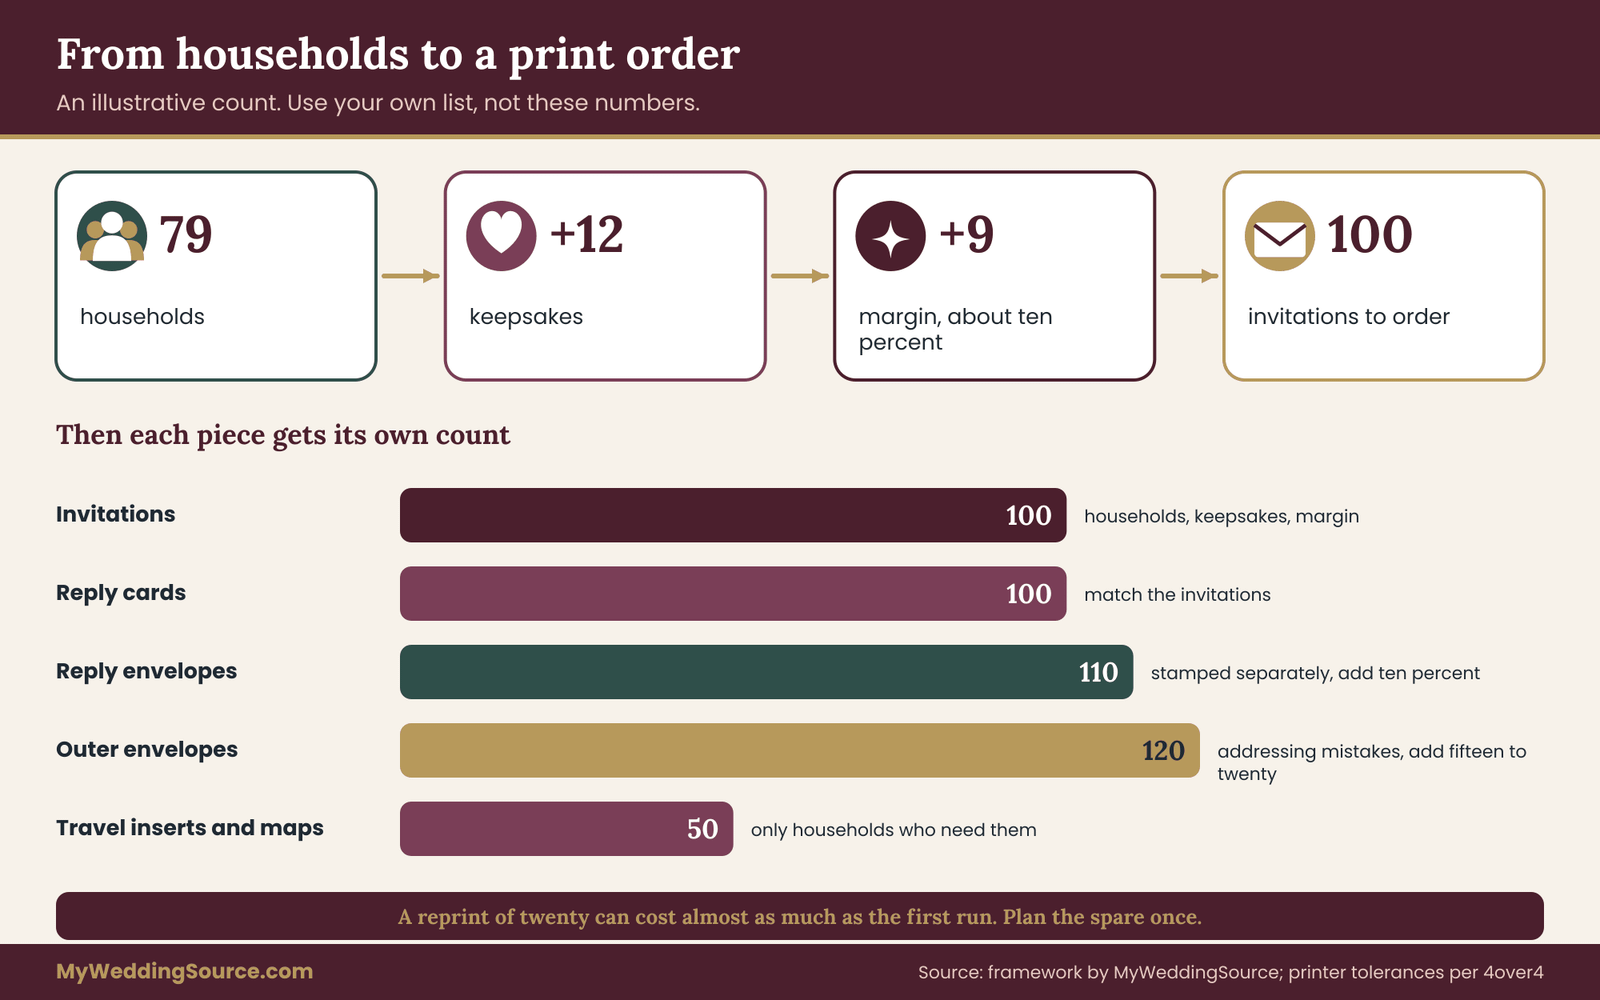
An invited list has 138 people. They live at 79 different addresses. That is the base: 79 invitations.
Add keepsakes: two for the couple, two for each set of parents (four for two sets), two for the wedding party’s families who ask, one for the officiant, and three for photography and styling. That is 12. The running total is 91.
Add a margin for late additions and mistakes. A commonly used planning margin is about ten percent, which comes to nine pieces here. The total is 100 invitations.
Now do the same for each other piece. If every household gets a reply card, you need 100 reply cards. But reply envelopes should be a little higher, because they are printed or stamped separately and are easy to ruin when addressing, so you might order 110. Outer envelopes also need a buffer. Calligraphers, hand addressers and printers occasionally ruin an envelope, and they quote an allowance for it. A common approach is to order outer envelopes about fifteen to twenty percent above the invitation count, so 115 to 120 here.
Details cards, accommodation inserts and maps depend on who needs them. If forty households are traveling and need accommodations information, you might order fifty maps and details cards even though you have a hundred invitations.
Why the spare margin is its own line in wedding invitation printing
Several people quote a ten percent spare. It appears in the advice of stationery companies about postage, and in printer tolerances. It is useful to see that the ten percent in each place covers different risks.
Printer overruns and underruns. Printers commonly treat a variance of up to ten percent in either direction as an acceptable tolerance. In practice, many shops count their output and aim to ship at least what you ordered, but a few will deliver slightly less. If you must have an exact minimum, tell the printer so in the brief and ask how they handle it. If you are passing the job to a mail house or an assembly service, order a larger quantity, because those services allow for some spoilage as they work.
Addressing and assembly mistakes. A misspelled name on an envelope, an ink smudge, a wrong address. A margin of ten to twenty percent on envelopes is common because envelopes are the most-handled piece.
Late guests. Lists change after the order. A relative reappears. A colleague becomes a close friend. A guest declines and you invite someone from a waiting list. A small number of blank spares covers this.
If the margin feels wasteful, remember that in wedding invitation printing spare invitations are not truly wasted. They become keepsakes, photographs and a record, and the unused spare cards can be used for correction notices if they are needed.
Insert-by-insert quantity notes
Invitation cards. Household count, plus keepsakes and spares.
Outer envelopes. Invitation count plus fifteen to twenty percent.
Inner envelopes. If you use them, match the invitation count plus a modest allowance, since they are rarely addressed by hand or may be addressed with just names.
Reply cards. The same as the invitation count, plus a few spare. Some couples print more reply cards than invitations for households with multiple adults who may reply separately.
Reply envelopes. Reply count plus ten to fifteen percent, because stamping them is a separate step.
Details cards. Match the invitation count unless only some guests need them.
Accommodation and travel cards. Only for out-of-town guests, plus a margin.
Maps and directions. Only if needed, since many guests use their phones. A map card can add weight, so consider whether a QR code or a wedding website link is enough.
Belly bands, wraps and liners. Match the outer envelope count, since each outer envelope needs one.
Wax seals or stickers. Count each piece, and order extras. Wax seals break, and sticker sheets get wasted.
Variants: tracking different versions of a piece
Many weddings have more than one version of the same item. A rehearsal dinner invitation for forty people and a wedding invitation for a hundred. A bilingual version. A version for family with extra lines about a family event. The result is that one piece multiplies into several quantities.
Label every version with a short code, for example “INV-A: all guests” and “INV-B: out of town, with travel insert.” Print these codes in a small, discreet place on the proof or on the packaging tag rather than on the finished piece, and track them in your spreadsheet beside each household. When assembly begins, a household’s row tells you which version goes in which envelope. This avoids a common mistake: sending a local family the travel insert, or leaving an out-of-town guest without lodging information.
Reprints and reorders in wedding invitation printing
If you need more wedding invitation printing after the first run, a few facts are useful.
In wedding invitation printing, a reorder is a new setup, so it may cost more per piece than your first run did. It may need to wait in a queue. Paper and ink batches can differ slightly from the first run, which is visible if old and new pieces are side by side. For that reason, if you suspect you will need more, order the full amount at once. If a reprint is unavoidable, ask the printer to match the approved proof and to keep leftover stock for you if they can.
If you are reordering a few pieces because of a late addition, a short digital run may be cheaper than a repeat of the original method, with a note to yourself that color and texture may differ slightly. Not every guest will notice, but you will.
For an overview of how stationery costs fit into the rest of your spending, see our wedding budget guide. Stationery tends to be a small share of the total, but it is a share that is hard to correct once printed. ## Proofing for wedding invitation printing
In wedding invitation printing, a proof is a preview of what will be printed. You look at it, correct it, and approve it. When you approve it, you tell the printer that this is what you want, and the printer will produce it. Printing sources are blunt about what that means: a signed proof is treated as an agreement between you and the producer, so mistakes you approved are usually yours to pay for. That is the reason to treat the proof as the most important step in the process, not the formality it can feel like.
The kinds of proof in wedding invitation printing, and what each one tells you
Not all proofs in wedding invitation printing show the same things. Ordering the wrong kind is an easy way to miss a problem.
Soft proof. A PDF or on-screen preview. It is usually free and fast. It lets you check spelling, wording, layout, placement, bleed and margins. It cannot tell you how a color will look on paper. Screens show color as light in RGB, while presses lay down ink in CMYK or in mixed spot colors, so the two often differ.
Digital hard proof. A single print made on a color-managed proofing printer, intended to simulate how the press will behave. It is much cheaper than running a press, and it is accurate enough for many colors. It helps you judge color relationships. It may not show the paper’s texture or the way an ink sits on the stock.
Contract proof. A digital hard proof that the shop agrees to treat as the color reference. If the final result is supposed to match it, the contract proof is what both sides compare against. Ask whether your printer offers one.
Physical sample on the actual stock. A print on the real paper, sometimes with the real finish. It shows how the paper takes ink, how metallic or letterpress effects behave, and how the piece feels. For letterpress, foil and engraving, this is the closest you can get to the final result without running the job.
Press proof and press check. A press proof is printed on the actual press with the actual stock. A press check means you attend the press in person, review the first sheets and approve them before the full run goes ahead. It is the most accurate and the most costly, and it is typically for large runs or color-critical work. Most invitation orders do not need one, but if you are paying for a specialty method in a large quantity, ask about it.
Two cautions apply to all of them. First, a proof is a prediction. Sheets from the press can differ slightly from a proof, since proofing paper is often brighter and has different absorption than the final stock. Second, spot colors on a screen are only simulated, and some spot colors cannot be reproduced exactly by process inks. If you are matching a particular color, ask for a physical swatch.
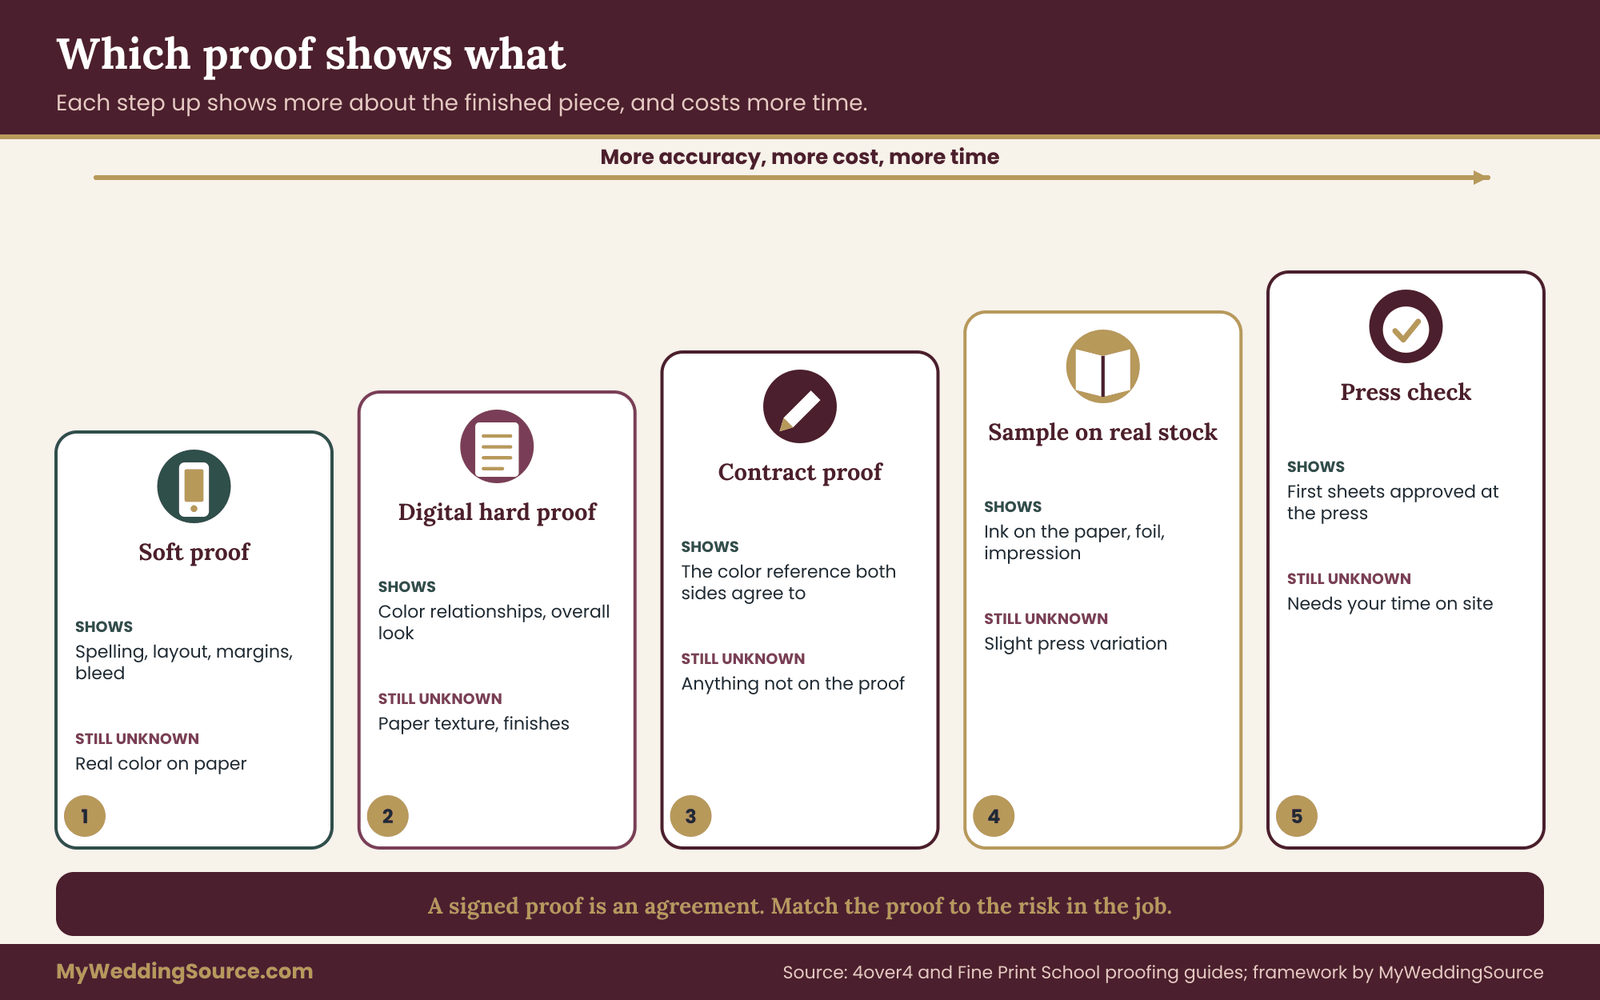
Match the proof to the risk in wedding invitation printing. If you are doing a plain digital run on white cardstock, a soft proof and a careful read may be enough. If you have a metallic ink, dark envelopes, a delicate color or an expensive method, spend on a physical proof. The cost of the proof is small next to the cost of a rerun.
Six reading passes for wedding invitation printing
In wedding invitation printing, people find errors on a proof in proportion to how deliberately they look. Reading it once, quickly, is a good way to approve a mistake. A better method is to read the proof in separate passes, each with a single purpose. This is slower, and it catches far more in wedding invitation printing.
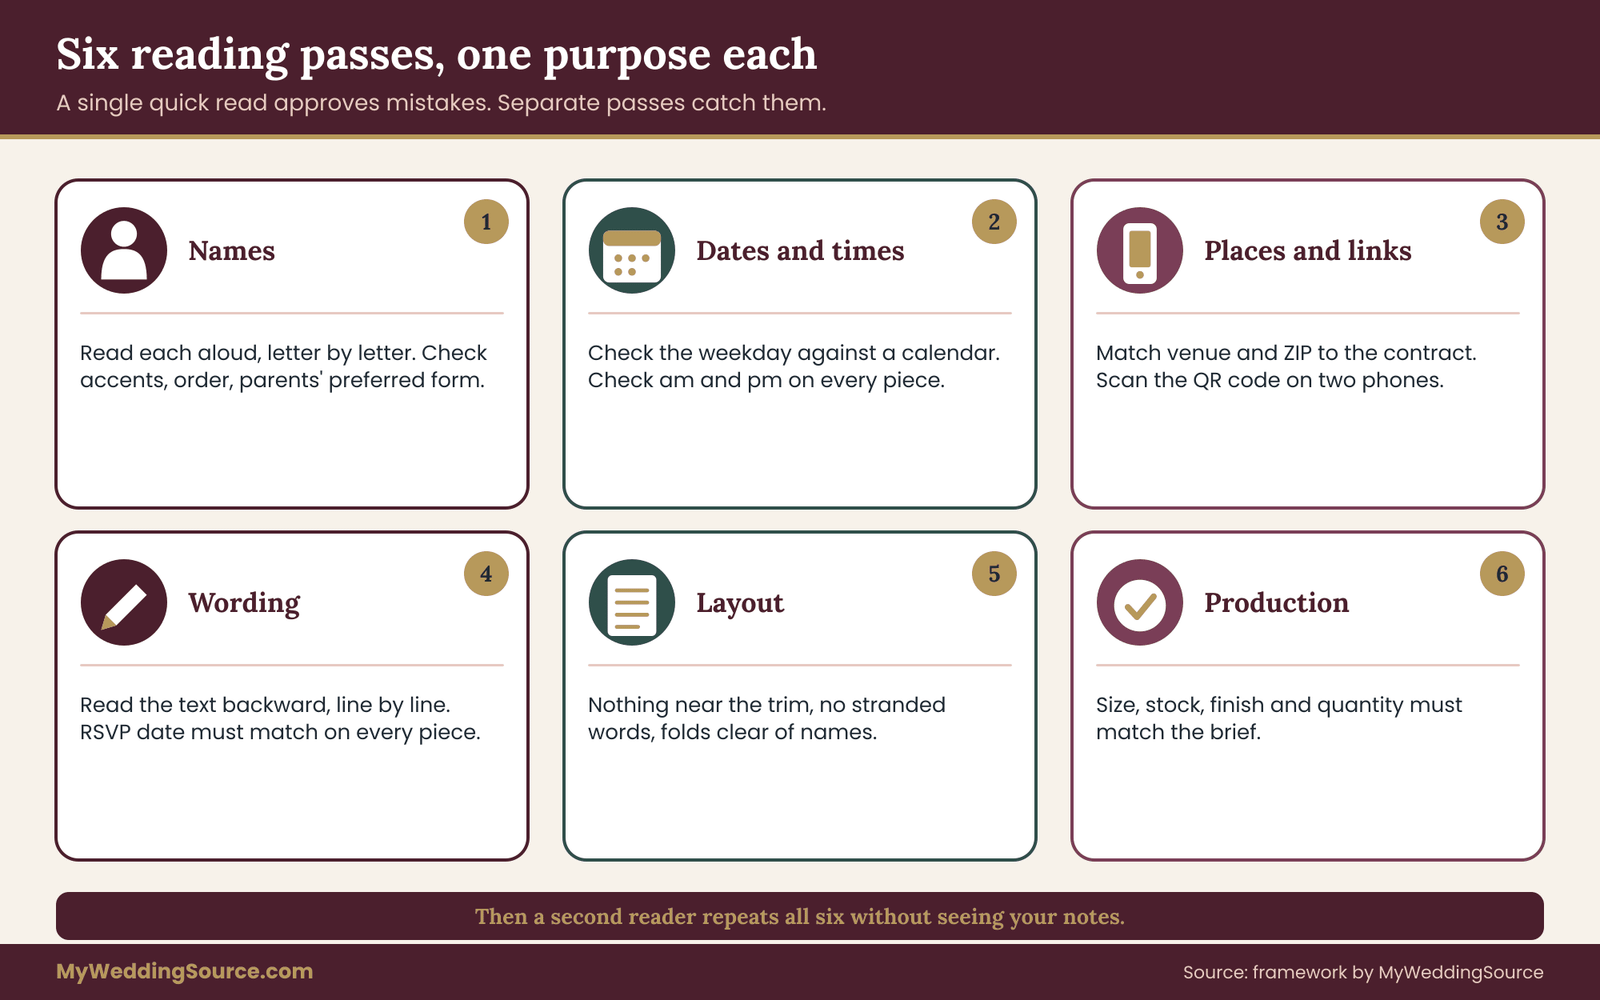
Pass one: names and titles. Read every name aloud, letter by letter. Confirm spelling, accents and diacritics, honorifics and suffixes, and the order of names. Check the names of both sets of parents if they are included, and confirm how they want to be listed. If you are using a family’s preferred form, such as a first name that differs from a legal name, check it with them rather than assuming.
Pass two: dates, days and times. Confirm the date, the day of the week, the time, and whether it is morning or evening. Open a calendar and verify that the date and weekday match, since a wrong weekday is a surprisingly common error. If you have a ceremony and a reception at different times, check both. If your guests will be in different time zones, think about whether you need to spell it out.
Pass three: places and links. Confirm the venue’s name and address against the venue’s own contract, not from memory. Check the city, state and ZIP code. If there is a website address, type it in a browser and make sure it loads the right page. If there is a QR code, scan it with at least two different phones. The printed code should lead to the right place, and the page should work on a phone with a poor signal.
Pass four: wording and tone. Read the text slowly for typos, punctuation, repeated words and missing words. Read it backward, one line at a time, so your eyes cannot skip ahead on familiar phrases. Check that the dress code, the RSVP deadline and any special instructions agree between pieces. A reply date that does not match the date on the invitation causes real confusion later.
Pass five: layout. Check that nothing important sits close to the trim edge, that text is aligned, that margins are even, that lines break where intended and that no word is stranded alone on a line. If the piece folds, check that the fold does not run through a name. Check the order of pages if the piece has multiple panels.
Pass six: production details. Compare the proof to the brief. Is the size correct? Is the paper right? Is the finishing applied to the pieces you expect? Is the quantity correct? Are the envelopes the color you ordered? If there is a foil or letterpress element, does the proof show where it will be?
After each pass, mark what you found and tick the pass off. Then ask a second reader to repeat the process without looking at your notes. The second reader is the most valuable step of all. People tend to see what they expect to see. A new reader sees what is on the page.
A sign-off grid, in words
A common way to run this is a sign-off sheet with each item, a reader’s initials and a date. If you prefer to keep it simple, write the following list in a shared document and have each reader tick the line when they have checked it.
- Names of the couple, spelled and ordered correctly.
- Names of the hosts or parents, correct and approved by them.
- Date, day of the week, and time verified on a calendar.
- Venue name, address and ZIP verified against the contract.
- Website and QR code tested on two devices.
- RSVP deadline and instructions consistent across all pieces.
- Dress code, if included, matches the plan.
- Reply card: return address correct, return envelope stamped or addressed as planned.
- Details card: accommodations, parking and timing correct.
- Spelling and punctuation read twice by two people.
- Trim size, folds and bleed match the brief.
- Colors checked against a physical swatch or hard proof.
- Quantities per piece match the order.
- Finishes applied to the right pieces.
When every line is ticked by the right people, the project owner signs. Keep the signed version in your project folder, along with the date and the proof’s file name.
Color in wedding invitation printing: what to expect and how to reduce surprises
Color problems are the most common reason wedding invitation printing disappoints. Several practices help with wedding invitation printing.
Work in CMYK if your printer is using process inks, and check what color mode your design software is using. A file created in RGB and converted at the last minute can shift in unpredictable ways. A bright screen color, such as a vivid teal or a hot pink, can fall outside what CMYK can print and will appear duller on paper.
Ask for a physical color reference. For a critical color, a swatch on the actual stock is worth more than any screen view. If you are matching a specific Pantone, look at the printer’s own swatch book, noting that printed guides can fade and may be out of date.
Look at proofs in good, neutral light. A color that looks warm in a lamp-lit room may look different in daylight. If possible, view under daylight near a window, not under colored bulbs.
Remember the paper. A cream stock lowers brightness and shifts every color a little warmer. A textured stock changes how ink sits. A dark envelope changes how a metallic ink looks. If you picked colors from a digital mock-up on white, expect some change.
Accept a margin. Even with excellent proofing, printed color can vary slightly from sheet to sheet and between runs. If your design depends on a tight color relationship, such as an envelope liner that must match a card exactly, ask the printer how they control it, and order both pieces in the same run if you can.
Errors that proofs commonly miss
Some mistakes survive even careful proofing, because they are about things that do not appear on the proof.
Data errors in addresses. The proof shows a layout with sample text. If addresses are printed by a data merge, the proof may show only a few. Ask for a proof of at least a handful of different records, including the longest names and addresses, to see how the layout handles them.
Variants that were not proofed. If you have three versions of a piece, each needs its own proof. A change made to one version will not appear in the others unless someone makes it.
Differences between proof and file. A proof is generated from a file. If the file changed after the proof was made, the output will not match. Lock the file when the proof is approved and note the file name and date.
Finish placement. A foil stamp or a die cut is positioned by a physical tool. A small misregistration may not show on a flat proof. Ask for a drawing of the placement or a physical sample.
Envelope printing. Envelopes are not always proofed as carefully as cards in wedding invitation printing. If a return address is being printed on the flap or front, ask for a proof of the envelope with the real flap, the real size and the correct orientation.
When a problem appears after wedding invitation printing
Even with good proofing, something may go wrong in wedding invitation printing. How you respond depends on the cause.
If the printer deviated from the approved proof, the wedding invitation printing problem is theirs to fix, so document it with photos, compare the piece to the proof side by side, and contact the printer promptly. Most shops have a time limit for reporting problems, often a few days after delivery. This is one of the questions to ask before you order. If the error is theirs, they typically offer a reprint or a credit.
If the error was in the approved proof, the printer is generally not responsible. Look for cheaper fixes before reprinting. A small correction can sometimes be handled with a printed slip, a sticker or a short enclosure. Etiquette sources treat corrected enclosures as acceptable for errors of date or time, though a clean reprint is preferred if the budget allows. For a large problem, a digital reprint of the affected piece may be faster and cheaper than redoing the whole run.
If the problem is only a color difference and the proof was a soft proof, you may have little recourse. This is one reason to buy a physical proof when color matters.
Whichever way it goes, decide quickly. Time is the thing you cannot buy back. ## Print-ready files for wedding invitation printing, and clean handoffs
In wedding invitation printing, a handoff is the moment when something you own moves into someone else’s hands: a design file to a printer, an address list to a calligrapher, a finished box to your house. Each one is a chance for information to get lost. Treat them as planned events with a checklist, not as an email with an attachment, whatever the size of your wedding invitation printing order.
Preparing files for wedding invitation printing
If a designer produces your artwork, they will normally know how to prepare it. If you are making it yourself, or editing a template, these basics prevent the most common file problems. They come from standard prepress practice, so confirm the details with your printer, who may have a template with exact specifications.
Bleed. Printing happens on larger sheets that are cut down to size. If artwork stops at the edge of the finished piece, tiny cutting variations can leave a thin white line. Bleed is extra artwork that extends past the trim line to cover this. A common bleed is one eighth of an inch on each side. Background colors, photographs and patterns that reach the edge should extend into the bleed.
Safe zone. The mirror image of bleed. Keep important text and details a comfortable distance inside the trim edge, so a slight shift in cutting does not clip a word. Your printer’s template will show their recommended margin.
Resolution. Images should be sharp at the size they will print. For most print work, that means about 300 pixels per inch at the final size. A photo that looks fine on a phone can look blurry on a card if it is too small. Do not enlarge a small image to fit; it will not gain detail.
Color mode. Use CMYK for process printing, unless your printer says otherwise. An image or design in RGB may shift when converted. Spot colors, such as a Pantone ink, should be set up as spot colors, not recreated from CMYK values, if the printer will mix an ink.
Black. Large dark areas often use a mix of inks, called rich black, for depth, while small text and thin lines use a single black ink to stay crisp. Mixing inks in small type can cause fuzzy edges. Ask the printer what values they prefer.
Fonts. Embed the fonts or convert text to outlines so nothing is substituted when the printer opens the file. If you use a font under a license, check whether it covers commercial printing. A typeface licensed for personal use on a computer may not allow embedding in a file sent to an outside printer.
File format. A high-quality PDF is the most common request, exported at print quality with bleed included, and with images not overly compressed. Ask whether the printer wants a particular PDF standard.
Fold, die and finishing layers. If a piece has a fold, a score line, a die cut, foil or letterpress, these are usually supplied as separate layers or separate files, in a specified color, so the printer can make the tools. Do not mix them into the visible artwork, and do not guess. Ask for the printer’s template.
Pages and order. For multi-piece suites, name each file by piece and version, and confirm which side is front and which is back. A reply card is a different file from the invitation.
Who owns the files
When a designer creates artwork for you, ask in the contract who owns the files, what you may do with them, and whether you will receive the print-ready versions. Some designers supply final PDFs only. Some keep the source files and charge for changes. Some license artwork for a specific use. None of these is wrong, but you should know before the printer asks for something the designer has not agreed to give. If you plan to reuse the artwork on a wedding website, signs or programs, check that the terms allow it. If you want to use an image, font or illustration created by a third party, make sure you have the right to print it.
Likewise, if you use an online template, read the terms about commercial printing and about whether the service will print from files that you modify.
Naming and versioning
A shared folder with files called “final,” “final2” and “really final” is a common cause of the wrong version going to wedding invitation printing. A simple convention prevents it.
- Name files with the piece, the version and a date:
invitation_v3_2027-03-04.pdf. - Keep the file that was approved in a separate “approved” folder and do not edit it. If you need changes, make a new version.
- Keep a short change log, one line per change, with the date and who requested it.
- Tell the printer which version is the right one in the email that sends it, and repeat the file name.
When you sign a proof, record the file name and date beside your signature. If a question arises later, you can show precisely what was approved.
What goes in the handoff package for wedding invitation printing
When you are ready to place the order, send the printer everything at once so they can start without asking follow-up questions.
- The brief, covering quantities, sizes, stock, finishing, colors, delivery and deadlines.
- Print-ready files, with bleed, and with finishing layers set up as the printer requested.
- A mock-up or reference image showing how the pieces fit together.
- Color references, such as swatches or a notes list.
- Contact details for the person who can approve the proof.
- The delivery address and a backup contact.
Ask for a written confirmation that includes the quantity, the production time, the delivery date and the proof process. Keep it with the signed proof.
When the delivery arrives
Open the boxes promptly. Do not wait until assembly weekend. Check the following in order.
- Count. Count a sample from each box, and weigh the rest if the printer counts by weight. Compare the total to the order and to the tolerance in the brief.
- Compare to the proof. Place a delivered piece next to the signed proof. Look at color, wording, size, finish and paper.
- Check lots. If cartons come from different batches, note which pieces came from which. Do not mix them within a single batch of mailings if the color differs.
- Inspect finishing. Look for flaking foil, uneven impression, scuffed edges and glue marks.
- Check the envelopes. Look at the printing and the flaps, and open a few to confirm the liners and glue.
- Photograph anything wrong, with the packaging, before moving it.
- Report problems. Contact the printer within the time limit they gave you.
Store the pieces flat, away from moisture, direct sun and heat. Paper warps, and foil and wax can suffer in a warm room.
Addresses, data and privacy in wedding invitation printing
In wedding invitation printing, an address list is personal data. It contains names, homes and sometimes phone numbers and email addresses of people who did not ask to be in a spreadsheet. It is easy to treat it casually, and it is worth treating with care. This is a short section, but it matters.
Share only what each vendor needs in wedding invitation printing
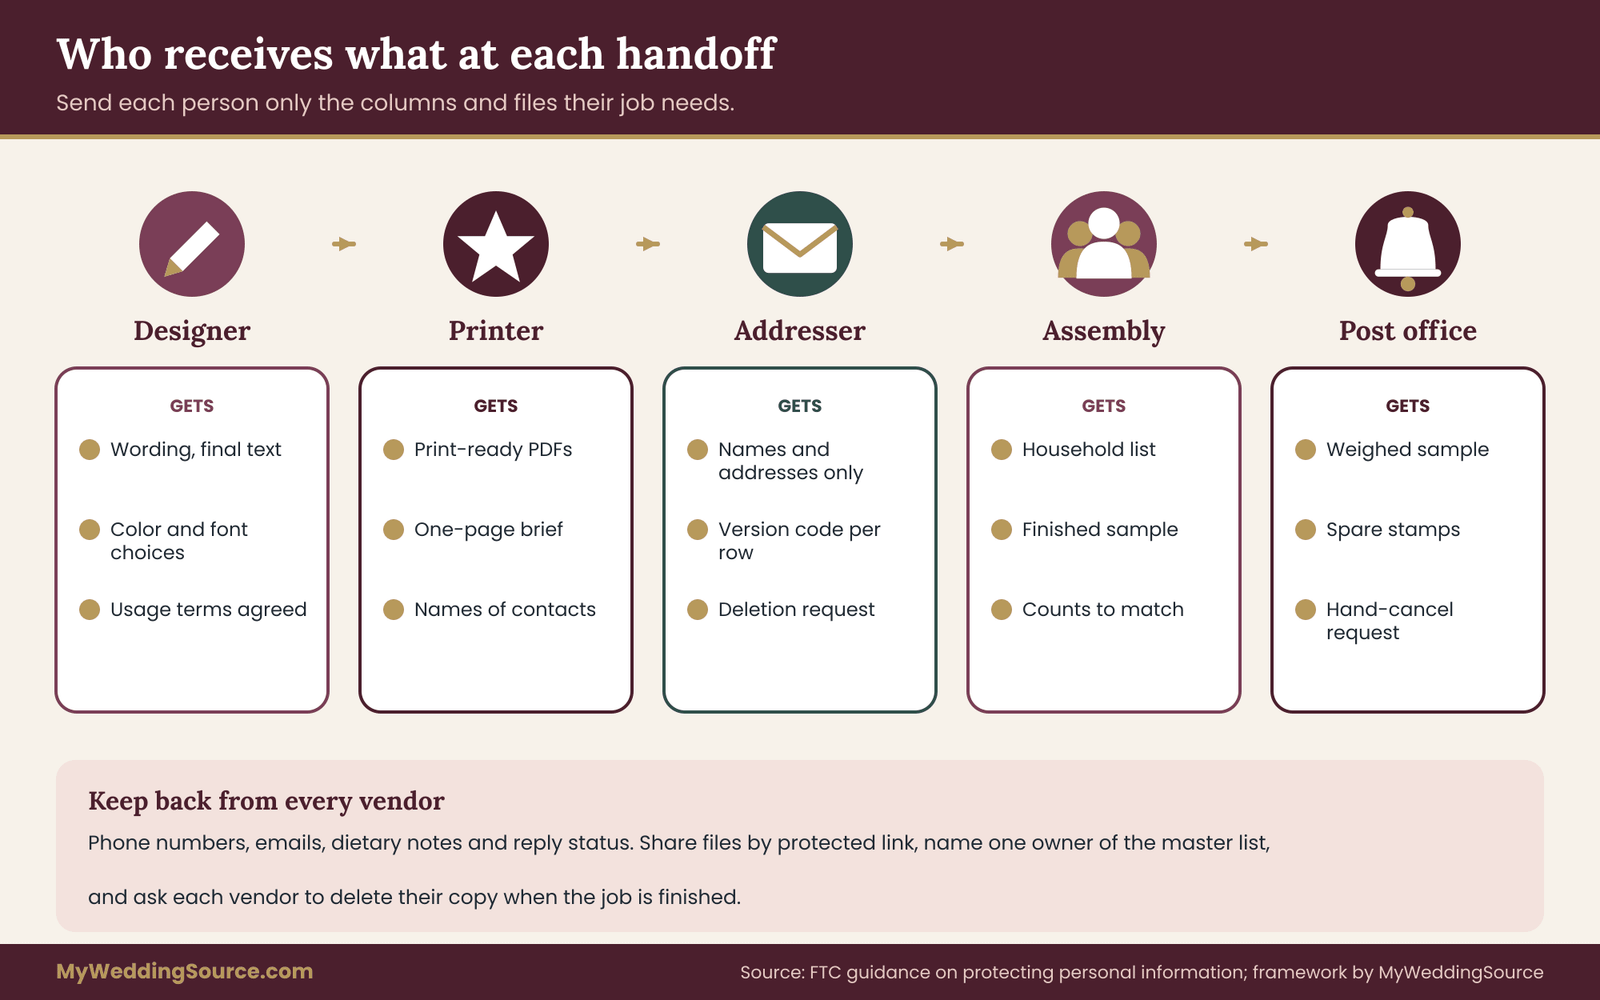
A printer who is printing recipient addresses needs names and mailing addresses. They do not need phone numbers, email addresses, dietary notes or reply status. A calligrapher needs the same. Strip the extras before you send the file. This is a general data practice often called data minimization: collect and share only what is necessary, and delete it when the need ends. A federal guide on protecting personal information for businesses frames the same idea as taking stock of what you hold, keeping only what you need, protecting it, and disposing of it properly.
For a wedding, that translates into a few habits.
- Keep one master list, and send each vendor a copy limited to the columns they need.
- Send files through a protected link or an encrypted method rather than as an open email attachment when you can. Do not post lists in public documents or group chats.
- Ask vendors what they do with the data afterward, and ask them to delete it once the job is complete. If they have to keep it for a reorder, ask for how long.
- Do not share addresses of guests who have asked you to keep their location private. Some guests have safety reasons for a private address, and you should be told not to put it on a shared document. If a guest asks that their address not be shared, send their invitation yourself.
- When the project ends, delete the copies you no longer need, including old exports and screenshots.
Make the list mailable
Post office sorting equipment reads addresses, and a clean address helps your invitation get to the right place. The Postal Service publishes addressing standards. They recommend a block format, where every line shares the same left margin, and uppercase letters are the preferred style for automated processing, though lowercase letters and other fonts are acceptable if they are readable by the optical character recognition used on mail. For wedding invitations, calligraphy and decorative fonts are common, and most deliver fine, but a highly ornate script on a dark envelope is harder for machines to read.
If your guests live in large buildings or apartment complexes, make sure the apartment or unit number is on the correct line. If you are not sure of an address, ask the guest. A wrong ZIP code can delay delivery, and an incorrect unit number can mean the invitation is returned.
Your data keeper can reduce problems with a few checks before the list goes to a printer or addresser.
- Look for missing fields, such as no ZIP code or no unit number.
- Look for duplicates, such as the same household listed twice.
- Check abbreviations and formatting for consistency.
- Check names against how each household wants to be addressed.
- Send a short message to anyone you have not seen in a while, asking them to confirm their address.
- Mark which households receive which version of each piece.
Translations and special characters
If any piece is bilingual or contains names with accents or non-Latin characters, ask a fluent reader to proof that version and ask the printer to confirm that their font and software handle the characters. A missing accent mark, a substituted letter or a broken character can change a name or a word, and it is easy to miss unless a person who knows the language reads it. If you include a translation, check which text is the main text and which is the courtesy translation, and make sure they say the same thing.
Consent for photos and personal details on stationery
If your suite includes a photo of someone other than the couple, or a family name, confirm that the person is comfortable having it printed. For a couple’s engagement photo, the photographer’s contract may restrict use, so check the usage terms before printing it on a card. Our guide to wedding invitation etiquette addresses naming and wording, and this section concerns the production side: the permission to print and the safe handling of the information behind it. ## Mailing rules to check before wedding invitation printing begins
Most postage surprises in wedding invitation printing come from decisions made weeks earlier, at the design stage. A square envelope looks lovely and costs more to mail. A thick, stacked suite looks luxurious and weighs more than expected. A wax seal looks classic and can make a piece unsuitable for sorting machines. None of this is a reason to give up a design you love. It is a reason to check the rules before you commit to it, when changing is cheap.
Rates change, so this section on wedding invitation printing describes the rules and the method, not a price. Confirm current prices at the post office or on the Postal Service website before you buy stamps in bulk.
Shape rules that affect wedding invitation printing
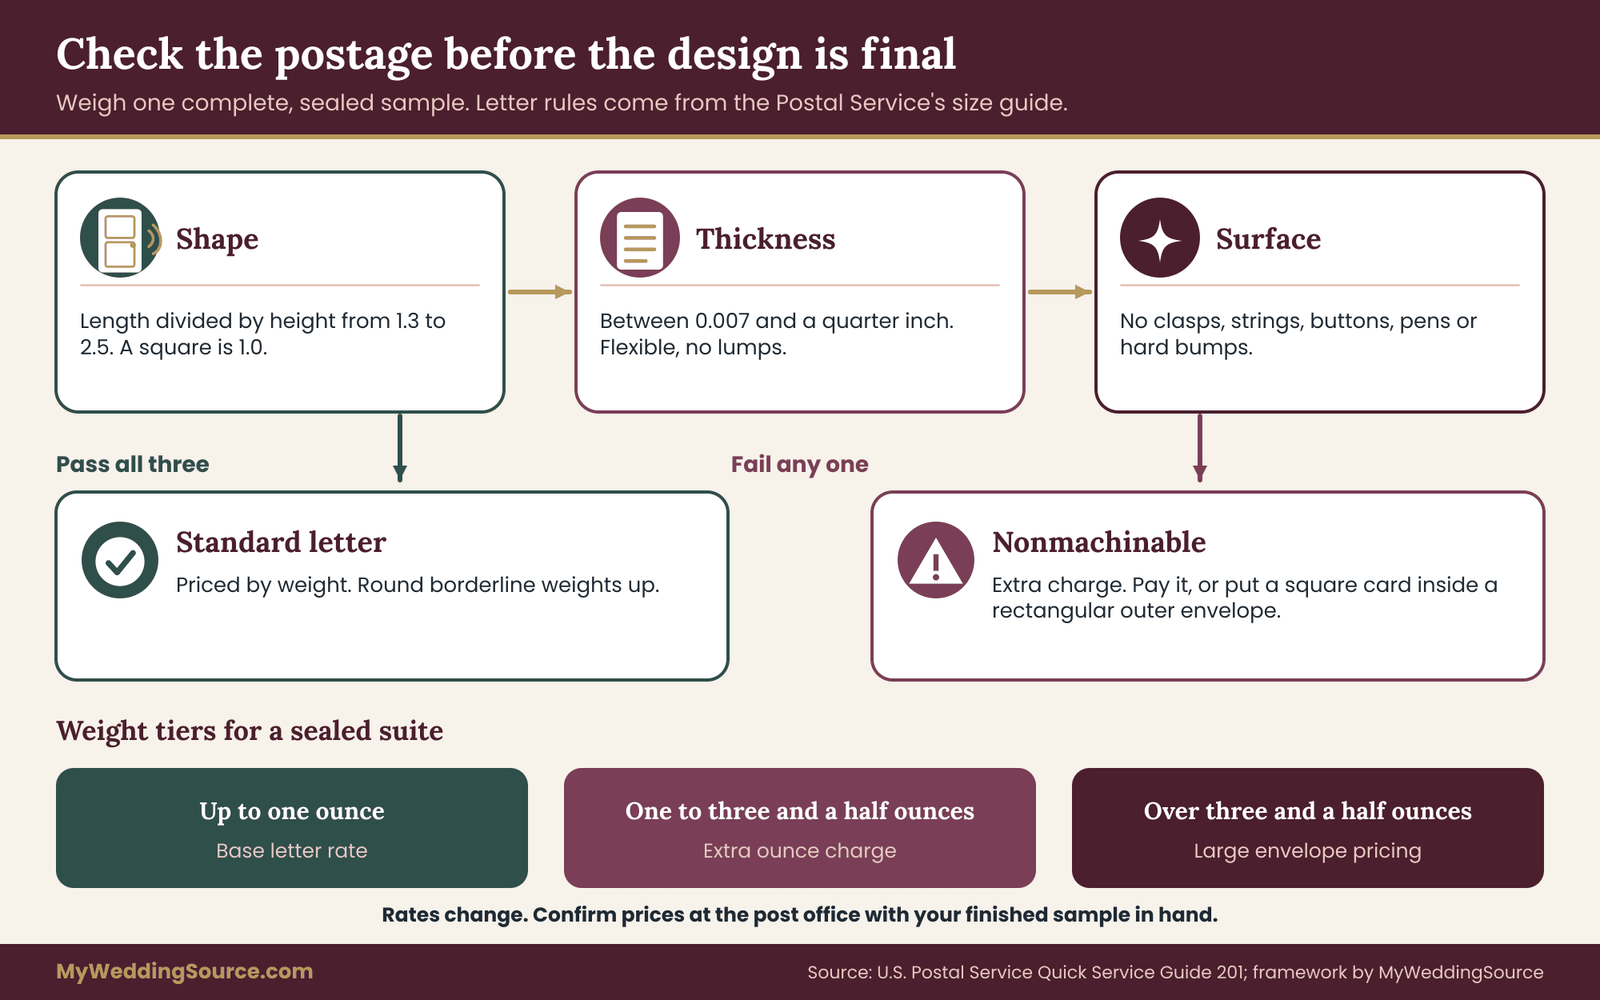
The Postal Service’s quick guide to letter-size mail lists the dimensions of a standard letter. Letters it can process by machine fall within the following limits.
- Length: at least five inches and no more than eleven and a half inches. Length is the side parallel to the address as it is read.
- Height: at least three and a half inches and no more than six and an eighth inches.
- Thickness: at least seven thousandths of an inch and no more than a quarter inch. A thin piece, at nine thousandths of an inch, must also be more than four and a quarter inches high or six inches long, or both.
- Aspect ratio: the length divided by the height must fall between 1.3 and 2.5.
- Shape: rectangular, with four square corners and opposite sides parallel. Cardstock letters may have corners rounded to a radius of no more than an eighth of an inch.
A letter that fails any of these is nonmachinable, and the Postal Service charges more to process it. The guide also lists characteristics that make a letter nonmachinable on their own: clasps, strings, buttons or similar closures, a rigid piece, an address that runs parallel to the shorter side, and items such as pens or keys that make the thickness uneven.
Here is how that applies to invitations.
Aspect ratio and envelope size. A standard A7 envelope, which measures five and a quarter by seven and a quarter inches, has a ratio of about 1.38, so it falls within range. A larger A9 or A10 envelope also passes. A square envelope has a ratio of 1.0, which fails. Square envelopes are one of the most common sources of unexpected postage. If you love the square, there are two usual choices: pay the extra charge on every piece, or put the square invitation inside a rectangular outer envelope.
Thickness. A flat suite of cardstock is usually well inside the limit, but layered suites, thick letterpress sheets, acrylic pieces, wooden inserts and padded wraps can add up. A package that approaches a quarter inch thick is risky. A suite that is bulky in one spot, such as an uneven pile of inserts or a lump from a button, can also be treated as uneven.
Rigidity. A piece that does not bend slightly can be rejected by machines. Heavy acrylic, wood and metal are the usual causes.
Closures and decorations. Buttons, ribbons tied in bulky bows, strings with tags and clasp closures can make a piece nonmachinable. Flat ribbon and thin wrap-around bands are usually fine, but check by mailing a sample.
Wax seals and bumps. A seal on the envelope flap can create an uneven surface. Some couples place the sealed invitation inside a plain outer envelope. Others ask the post office to cancel by hand. Hand-canceling means the clerk stamps each piece instead of running it through a machine. Not every post office offers it, and policies vary, so call ahead and ask about lead time and any charge. A nonmachinable surcharge may still apply.
Weight, and why you weigh a finished sample from wedding invitation printing
First-Class letter postage is priced by weight, with a base rate for the first ounce and an additional amount for each ounce after that. A flat, single-sheet invitation in a plain envelope often falls under an ounce. A suite with a reply card and envelope, a details card, a map, a belly band, a liner and an outer and inner envelope often does not. A suite weighing just over an ounce is priced at the next tier, and the difference over a hundred or more invitations is real money.
The method is simple.
- Assemble one complete, sealed sample. Include every insert, the reply card and envelope, any wrap, any embellishment and the real postage-bearing envelope.
- Have a post office clerk weigh and price it. Several stationery companies note that this is free. Alternatively, use a kitchen scale that is accurate to a tenth of an ounce.
- Round borderline weights up. If your sample is 0.95 ounces, it will vary slightly across the batch, so plan for the possibility that some pieces weigh over the line.
- Weigh again if you change anything: a thicker stock, an extra card, a heavier envelope liner.
- Write the final weight, the postage per piece and the date on your project sheet.
If a design needs to lose weight, there are quick fixes. Choose a lighter paper for secondary cards. Print the details on the back of another card. Replace a map with a link. Drop a liner. Use a lighter outer envelope. It is much easier to make these changes before printing than after.
If the finished suite weighs more than three and a half ounces, it moves out of the letter class and into the large envelope class, where different pricing applies. At that point it is worth rethinking the design.
The reply envelope
Reply envelopes need postage too, and they follow the same shape rules. A small reply envelope with a standard stamp usually works, but weigh a complete reply, meaning the card in its envelope, to confirm. Postcards can be cheaper if they meet the postcard size and thickness rules, so it is worth checking whether a postcard-style reply works for your design. Some couples add an online response option, and that is useful as a backup. Keep a paper option as well for guests who are less comfortable with websites, and check that your website works on a phone.
Stamped replies tend to come back faster than unstamped ones, and the cost is small compared with chasing missing responses. If you do stamp them, count the stamps into the total and add them to the postage purchase.
Buying stamps and planning a margin
Once you have a weight and a rate, work out how many stamps you need. Multiply the number of mailed invitations by the postage per piece, and add reply envelopes if they are stamped. Add a margin of about ten percent for addressing errors, late additions and keepsakes. If rates are likely to change between your purchase and your mailing, ask the post office how forever stamps work and whether extra ounce stamps are priced differently from standard stamps.
Some stamps have designs that suit weddings. Whatever you choose, test that the stamp’s size does not conflict with the address and barcode area on the envelope. The address block, not the stamp, is what the machine looks for, and a decorative design that crowds it can cause problems.
Assembly day after wedding invitation printing arrives
Assembly in wedding invitation printing is a production line in miniature, and a few simple habits make it quicker and cleaner.
- Set up a station. A clean, large table, good light and enough space to lay out all the pieces in order.
- Pre-check the pieces. Open a few boxes of each piece and look for flaws before you build a stack.
- Use a sample as a reference. Put one completed suite in view so everyone assembles it the same way.
- Stack in order. The stuffing order is usually the largest piece at the back, with the smaller pieces layered on top, facing the flap side of the envelope, so the guest sees the invitation first when they open it.
- Use the data. Print a household list with the version code beside each name. Assemble by version, not by memory.
- Count as you go. Keep a tally of finished envelopes so you know when to stop and whether anything is missing.
- Keep wet things away. Lick or sponge seals sparingly. If you are using wax, add it last.
- Set aside any piece that looks wrong, whether a smudged name or an envelope with a crease.
- Spot check. Open a few finished envelopes to make sure the inserts are in the right order and the right versions.
If you have helpers, assign roles, such as one person stuffing, one sealing and one stamping. It prevents mistakes and makes the job feel less long.
Test mail
Before sending the full batch, mail a few test pieces. Send one to yourself and one to a friend in another part of the country, and ask the friend to tell you how it looks when it arrives. Look for damage, scuffs, a crushed corner or a postmark smudged across the address. You will learn something about how your suite handles the mail, and you will have time to adjust. Several stationery sources also suggest spot-checking a handful of finished envelopes at the post office counter before you mail the rest, to confirm the postage is correct.
Mailing day: the last step after wedding invitation printing
Take the invitations to the post office in trays or boxes, in batches if the number is large. If you have asked for hand-canceling, bring the pieces unsealed if the clerk needs to inspect them, or confirm the process in advance. Ask the clerk to check the postage on a few pieces. Keep a record of the date and the number mailed.
If you are mailing outside the country, check the international rules and the time needed. Ask for guidance on any customs or content restrictions, and allow extra time.
Then watch for the first responses. If addresses were wrong, returned invitations will come back, and you will need to reissue them quickly. Keep spare envelopes for this purpose, and the spare margin from the quantity section will be worth every piece. ## A worked example of wedding invitation printing, start to finish
The following wedding invitation printing case is illustrative. The people, numbers and dates are invented to show how the steps connect, and your own project will differ. It also shows where a plan saves money and where it saves a reprint.
Jo and Sam are marrying on a Saturday in mid-October. They want formal invitations in the mail about eight weeks ahead, in the third week of August. They choose a letterpress invitation on thick cotton stock, a digitally printed details card and reply card, and a lined A7 envelope.
Weeks sixteen to fourteen: sample and decisions
They work out their guest list and group it by household: 71 households, including the two sets of parents. They agree with their parents that the list is frozen except for a short waiting list of four households.
Jo orders sample packs from two printers and a paper swatch book. One printer’s cotton stock takes the letterpress impression well. The other has a better envelope selection. They choose the first printer for the cards and a separate supplier for the lined envelopes, and they write the delivery date of each into their schedule.
They assemble a mock-up using blank stock cut to size, add every insert, and take it to the post office. The clerk weighs it at just over an ounce, which means every piece would cost an additional ounce of postage. They look for savings. The map card, which most local guests do not need, becomes a link on the wedding website. The details card moves to a lighter stock. The new mock-up weighs less than an ounce, and the post office confirms it.
Weeks thirteen to eleven: brief, files and proof
Sam writes the one-page brief. It lists seven separate pieces, each with its own quantity, and includes the finished size, paper, method, color values, envelope specifications, delivery dates and proof requirements. Jo’s designer sets up print-ready files with a one-eighth inch bleed and sends separate files for the foil and letterpress layers as the printer’s template requires. The designer also hands over the license terms for the typefaces.
The printer sends a soft proof within two days. Jo and Sam read it in six passes, one purpose per pass. On the dates pass, Sam opens a calendar and finds the weekday on the details card is wrong: it says Sunday for the reception brunch when the date falls on a Saturday. Neither of them noticed it on the first reading. Jo’s sister, who did not write the wording, finds that one parent’s name is missing an accent.
The printer fixes both and sends a second proof. Because the letterpress impression and the paper color matter to them, the couple pay for a physical sample on the real stock. It confirms the impression depth and shows that their blush pink looks a little more orange on cream than on the screen. They adjust the ink slightly and approve.
Sam signs the proof sheet, notes the file names and date, and archives the approved files in a read-only folder.
Weeks ten to nine: quantities, printing and delivery
Their base count is 71 households. They add 14 for keepsakes, parents’ extras, the wedding party and the photographer’s styling, plus the four waiting-list households. The total is 89, and they round to 100 to cover mistakes and late changes.
They order 100 invitations, 100 details cards and 100 reply cards. For the envelopes, they order 125 outer envelopes, because they expect to lose a few during addressing, and 115 reply envelopes. They order 40 travel inserts for the households that are staying in a hotel, with a few spares, and they label them as version B in the data sheet.
The printer indicates that quantities may vary by up to ten percent, and Jo asks for a minimum in writing. The printer confirms it will ship at least the ordered number. The delivery arrives on schedule.
Jo and Sam open the boxes the same day. They count samples from each box, compare a printed invitation to the signed proof side by side, and check the foil and envelope liners. Everything matches, except that a carton of reply envelopes is a slightly different shade of white. They note the carton and keep it separate from the rest.
Weeks eight to six: addressing and assembly
The data keeper, Jo’s brother, cleans the address list: he finds two missing ZIP codes, one duplicate household and an apartment number on the wrong line. He sends a copy to the calligrapher that contains only names and addresses, without phone numbers or notes, and asks the calligrapher to delete the file after the job. A guest who had asked to keep her address private receives her invitation directly from Jo.
Over two evenings, Jo and Sam, with three friends, assemble the suites at a clean table with a completed sample as reference. They use the version codes to place the travel insert in the right envelopes. They count as they go.
Week five: mailing
Before mailing, they send test pieces to themselves and a friend and spot-check ten finished envelopes at the post office. Stamps are purchased for 100 invitations plus 100 reply envelopes, with a ten percent margin. The sealed envelopes carry a printed liner but no wax, so they do not need hand-canceling. They mail the invitations in the third week of August.
Within a week, three envelopes come back with address problems. They use spare envelopes, correct the addresses and resend them. The invitations arrive, the replies come in, and the spare cards go into a keepsake box.
What made this work was not any single step. It was that each one answered a question that the next step would otherwise have asked in a hurry.
Common mistakes in wedding invitation printing
Most problems in wedding invitation printing fall into a small number of repeating patterns. Check your own wedding invitation printing plan against this list.
- Approving a proof after one quick read. The cure is separate passes and a second reader.
- Choosing a design before checking the postage. Square envelopes, wax seals and thick stacks all affect the cost.
- Counting guests instead of households. This leaves you with a quantity that is too high, or too low once you add keepsakes.
- No spare margin on envelopes. Addressing mistakes are normal, and a replacement run is costly.
- Letting the file change after the proof. If a file changes, the proof no longer represents it.
- Relying on a screen for color. Order a physical swatch or proof when color matters.
- Missing the proof-to-production clock. Slow approvals delay the schedule, and some printers start their clock only at approval.
- Sending too much data to vendors. Share the name and address columns and nothing else.
- Skipping the test piece. A single trial mailing reveals problems that a design review does not.
- No named decision-maker. When three people send conflicting instructions, a printer follows the most recent one.
- Overlooking the return path. Reply envelopes, return addresses and response methods are part of the suite and need postage and proofing too.
- Forgetting to ask about reorders. If you may need more, ask how the printer stores files and whether a reorder will match.
Limits of this wedding invitation printing guide
This guide to wedding invitation printing describes common practice and public rules, but it cannot account for your printer’s own policies, your state or your design. Postal rules and prices change, so check them with the Postal Service before you buy postage. Printing terms vary by company, so read your printer’s agreement, especially its proof, error and reprint policies. If a contract is large or a dispute arises, consider asking a lawyer, or contact your state’s consumer protection office. Nothing here is legal advice. Treat the figures that appear in the text, such as bleed size or tolerance percentages, as common starting points to confirm with your printer, not as promises.
FAQ
How far ahead should wedding invitation printing start?
Work backward from your mailing date. Many couples mail formal invitations about six to eight weeks before the wedding, and earlier for travel-heavy or holiday weekends. From that date, subtract assembly and addressing time, the printer’s production time, and at least two rounds of proofing. Fourteen to sixteen weeks before the wedding is a common time to start weighing samples and choosing a printer, but a simple digital job can be done more quickly.
How many extra invitations should we order?
Start with the number of households, add keepsakes for the couple, parents, wedding party and officiant, then add a margin of about ten percent for late additions and mistakes. Envelopes usually need a larger margin, often fifteen to twenty percent, because they are handled the most. If the quantity is large or the method has high setup costs, order extras up front, since a reprint can cost nearly as much as the original run.
What is the difference between a soft proof and a hard proof?
A soft proof is an on-screen preview, good for checking wording, spelling, layout and margins. A hard proof is a physical print, which shows how color and paper behave. Screens and presses reproduce color differently, so a soft proof cannot confirm color. If color, metallic ink or texture matters, ask for a hard proof or a physical sample on the real stock.
Can we fix a mistake after wedding invitation printing is finished?
Sometimes. If the printer deviated from the approved proof, report it promptly and ask for a reprint or credit. If the error was in the approved proof, the printer is generally not responsible. A small correction can sometimes be handled with a printed slip or a sticker, and a clean reprint of the affected piece is the tidier option. Decide quickly, since time is the main constraint.
Do square envelopes cost more to mail?
They can. The Postal Service treats a letter with an aspect ratio below 1.3 as nonmachinable, and a square envelope has a ratio of 1.0. Nonmachinable letters are charged extra. You can pay the charge, or you can put the square invitation in a rectangular outer envelope. Ask the post office to price a sample before you decide.
Do wax seals and embellishments affect postage?
They can. Hard, uneven surfaces, closures and rigid parts can make a letter nonmachinable, and heavier suites cost more to mail. Some couples ask for hand-canceling, which is not available everywhere and may not remove a surcharge. The simplest check is to assemble a complete sample and have the post office weigh and price it.
What should we send a printer, and what should we keep back?
For wedding invitation printing, send the print-ready files, the brief, the quantities, the delivery details and a contact. If the printer is printing recipient addresses, send only names and mailing addresses. Keep phone numbers, emails, dietary notes and reply status out of the file. Ask the vendor to delete the data after the job is finished, and share it by a protected link rather than an open attachment.
Who owns the files after a designer creates the invitation?
It depends on the contract. Some designers supply final print-ready files only, some keep the source files and charge for changes, and some license artwork for a single use. Ask before you hire, and confirm that you can give the files to a printer, reuse them on a website or signs, and reorder later.
Your next steps
Begin wedding invitation printing with three tasks this week. First, write down your mail date and work backward to the dates for proof approval, file freeze and address freeze. Second, group your guest list by household and count the pieces you need, including keepsakes and a margin. Third, assemble a blank mock-up of the full suite and take it to the post office to be weighed and priced.
Then write the one-page brief, ask your printer the ten questions, and plan a proof process with six passes and a second reader. Keep every approved file and signed proof in one folder. If you want to see how stationery fits into the wider schedule, our wedding planning checklist puts the stationery milestones next to the rest of the tasks.
Sources
- Letter-size mail: Quick Service Guide 201, U.S. Postal Service
- Domestic Mail Manual 201, Physical standards for letters, U.S. Postal Service
- Publication 28, Postal Addressing Standards, U.S. Postal Service
- Format of the address block, Publication 28, U.S. Postal Service
- Protecting Personal Information: A Guide for Business, Federal Trade Commission
- What is proofing in printing, 4over4
- Proofing, Fine Print School
- Will I always receive exactly the quantity I order, 4over4
- Prepress checklist: how to prepare your design for print, Vistaprint
- Text weight vs. cover weight, Smartpress
- Postage for wedding invitations, Minted
- Wedding invitation postage guide, Paperlust
Printing text in two languages adds proof steps. See bilingual wedding invitation design for layout, translation review and reading order.