
A venue technical walkthrough is the visit where you stop admiring the room and start testing it: measuring doors and aisles, tracing the route a delivery truck will take, finding every power outlet, and getting each vendor to confirm in writing that the space works for them. This guide shows how to run a venue technical walkthrough from first tour to final sign-off, with a survey pack you can build yourself.
Run a venue technical walkthrough in two passes. The first happens before you sign: confirm capacity, load-in access, power, rules and hours, and measure anything that decides whether your plan fits. The second happens a few weeks before the wedding, with your key vendors on site or on a shared call: walk every route, mark power and storage, and collect a written yes from each vendor. Keep the results in one survey pack of notes, measurements, photos and signed confirmations. Safety, fire, electrical and permit questions belong to the venue and local officials, so use your venue technical walkthrough to ask the right questions, not to answer them yourself.
Most wedding venues look their best at a first tour. The light is good, the staff is welcoming, and the room is empty and clean. What you do not see is the Saturday-night version: forty chairs stacked in a corridor, a band unloading through the same door as the caterer, a cake that has to travel through a kitchen it does not fit through, and a photographer who finds out at 4 p.m. that the sunset spot is a locked storage yard.
None of these problems is rare. They tend to appear because nobody ever stood in the room with a tape measure and asked, “Will this actually work for each person who has to do a job here?” A good venue technical walkthrough answers that question before it becomes expensive.
You do not need an engineering background. You need a method, a few cheap tools, and the willingness to ask direct questions of the venue manager and your vendors. This article gives you the method. It also draws a clear line around what you should not try to judge yourself: fire code, structural loads and electrical safety are decided by qualified people, and your job is to find out who they are and what they require.
What a venue technical walkthrough is, and what it is not
A tour is a sales conversation. You see the best spaces, hear about packages and prices, and decide whether you like the place. A tasting is a food conversation. A venue technical walkthrough is different: it is an operations conversation, and its output is information, not a feeling.
Think of it as a short inspection with three questions behind every item on the list.
- Does it fit? Will the people, furniture, equipment and food that you have planned physically fit in the spaces, through the doors and onto the surfaces available?
- Can it be reached? Can everyone and everything get to the place where they are needed, at the time they are needed, by a route that works?
- Who has confirmed it? Has the person responsible for each part, whether the venue, a vendor or a municipal office, said yes in a way you can point to later?
Notice that the third question carries as much weight as the first two. A measurement you took alone is a note. A measurement the caterer has checked against their equipment and confirmed in an email is a plan.
What a venue technical walkthrough covers
A thorough venue technical walkthrough usually covers these areas:
- Space and layout: dimensions, ceiling heights, columns, sightlines, floor plan and the number of people it can hold.
- Access routes: parking, drop-off, loading dock, doors, corridors, elevators, stairs, ramps and surfaces, for both vendors and guests.
- Power and lighting: outlets, circuits, dimmers, generators, extension needs and emergency lighting.
- Sound and neighbors: where speakers can go, sound limits, curfews and how music affects nearby spaces.
- Back-of-house: kitchen, prep space, storage, restrooms for staff, trash, water and spaces for getting ready.
- Safety and rules: occupant load, exits, candles and open flame, tents, decorations, permits and insurance requirements.
- Connectivity: Wi-Fi and cell reception for livestreams, payments and communication on the day.
- Vendor needs: what each vendor requires, and who has confirmed it.
What a venue technical walkthrough is not
It is not an engineering survey or a code inspection. You are not certifying that a building is safe. Nobody expects you to calculate loads on a floor or check that a panel is wired correctly. If you suspect something is wrong, the right move is to tell the venue manager and ask for a qualified person to look at it.
It is also not a negotiation about price. Keep that for a separate conversation. When you are measuring doors, the venue manager is much more likely to give you full, honest answers if you are not simultaneously asking for a discount.
Who should be at the venue technical walkthrough
A venue technical walkthrough works best with a small group of people who each have a job. The venue manager or site contact is essential, because only they can say what is allowed. Beyond that, the right group depends on how complicated your event is.
For a simple event, such as a seated dinner for sixty guests at a restaurant-style venue, you and one other decision maker are enough. Bring your caterer’s contact details and be ready to forward measurements.
For a typical wedding, add your planner or day-of coordinator if you have one, and invite the caterer, the band or DJ, and the photographer to join in person or at least to receive your notes and answer questions. If you are using a rental company, a quick call with their delivery team helps.
For a large or complex event, with tents, a stage, a generator or an unusual site, invite the rental company’s site manager and anyone providing power or staging. If an outdoor space or a historic building is involved, ask the venue whether a facilities or maintenance lead can attend. They know the quirks.
You do not always need everyone in the room. Some vendors will say, “Send me the floor plan and the loading photos, and I’ll tell you.” That is a perfectly good way to do it. What matters is that every vendor with a physical requirement sees the real conditions or credible evidence of them.
Choose a lead for the venue technical walkthrough
Name one person to run the venue technical walkthrough, take notes and own the follow-up. In most weddings that is the planner, the coordinator or one half of the couple. If you do not have a lead, notes get lost and questions get asked twice. The lead’s job is simple: keep the list moving, write down each answer and who gave it, and send a summary within a day.
When to run the venue technical walkthrough
The mistake many couples make is to treat the venue technical walkthrough as a single event close to the wedding. By that point, the venue is already booked, the deposit is paid and any serious problem is expensive to fix. A better approach uses three visits.

Visit one: the pre-contract check. Before you sign, you want answers to the questions that could change your decision. Is the capacity enough for your guest list? Can your caterer work in the kitchen? Is there a curfew that ends the party earlier than you want? Is the access route manageable for a ninety-person guest list with elderly relatives? You do not need a full survey. You need the five or six facts that would make you walk away.
Visit two: the detailed survey. Once you have signed, usually several months before the wedding, do the thorough measurement pass described in this guide. At this point you know your vendors, so you can ask them to review the measurements and tell you what they need.
Visit three: the final venue technical walkthrough. Between two and four weeks before the wedding, walk the day in order with your key vendors and the venue contact. This is where you finalize positions, timings and power. Our vendor timeline shows how this visit fits with the other deadlines in the final month.
Some venues hold the final venue technical walkthrough on a fixed schedule and invite all vendors at once. Others expect you to organize it. Ask early which applies, because the final venue technical walkthrough often has a booking deadline of its own.
What to ask before the venue technical walkthrough
You can save an hour on site by asking the venue to send the following in advance. If a venue cannot provide these, that is information too.
- A scaled floor plan, ideally as a PDF or drawing, with room dimensions and exits marked.
- The posted or approved occupant load for each space you plan to use.
- The venue’s rules for vendors, decorations, candles, sound and end time.
- A list of required or preferred vendors, and the insurance certificate requirements for outside vendors.
- The load-in and load-out schedule, including the hours included in your rental.
- Photos or a description of the loading area and any elevators.
- A note on what is included: tables, chairs, linens, lighting, sound equipment and staff.
When you have these, your first visit can focus on checking and measuring, not on asking for basics. ## Building your venue technical walkthrough survey pack
The survey pack is the single set of documents that records what you found. It does not need to be fancy. A shared folder with a few clearly named files works better than a beautiful binder nobody updates.
What goes in a venue technical walkthrough pack
- The base plan. The venue’s floor plan, or a sketch you draw yourself if none exists. Mark north, entrances, exits, restrooms, stairs and any fixed features such as columns, bars or built-in stages.
- A measurement sheet. A simple list of what you measured, with the number, the location and the date. Keep units consistent, and write inches or feet next to each number.
- A route log. A step-by-step description of each route, from street to the spot where a vendor needs to be, with the narrowest point and any obstacles noted.
- A power map. The location of each outlet you may use, which circuit it appears to be on if the venue knows, and who controls the panel.
- A rules summary. One page with the venue’s own rules, from end time to candle policy, written in plain language with the name of the person who confirmed it.
- Photos and short videos. Labeled by location and direction, so that a vendor who has never been there can follow your route on a phone.
- Vendor confirmations. Emails or signed notes in which each vendor says they have reviewed the pack and what they need.
- A contact sheet. Names and mobile numbers for the venue contact, the vendors and the person who will let people in on the day.
Tools for a venue technical walkthrough
You do not need professional equipment, but a few cheap tools make your numbers reliable.
- A tape measure of at least twenty-five feet, and a laser distance measure if you can borrow one. A laser measure is faster and means you do not need a second person at the other end of a long wall.
- A notebook or a notes app, and a pen that works. Phones die and apps freeze.
- A phone camera, with photos taken in a consistent order. A good habit: one wide photo, one close-up of the key detail, and one with the tape in frame to show scale.
- A flashlight, to check dark corners, storage rooms and the underside of stages.
- A free sound-level app for a rough reading of ambient noise. It is not a calibrated instrument, but it can tell you whether a space is naturally quiet or loud.
- A small plug-in outlet tester, which is inexpensive and shows whether an outlet is wired correctly. It does not replace an electrician, and you should only use it on outlets the venue says you may touch.
- A copy of your guest count, your vendor list and your draft timeline, so you can compare what you find against what you plan.
Photo method for a venue technical walkthrough
Photographs are the most useful part of the pack when they follow a system. Start at the street and move through the route in the order a vendor will. Take a photo at each door, each corner and each change of surface. Name the file with a number and a place, for example “03 service door from outside” and “04 service corridor toward kitchen.” When you share them, the order tells the story.
Photograph signs, too: occupant load notices, exit signs, no-parking signs and posted rules. If a venue later disputes what was said, a dated photo of a posted rule is hard to argue with.
Measuring the room during a venue technical walkthrough: what matters and how to do it
Measuring is where most couples either do too little or measure everything and learn nothing. The goal is to measure what could change your plan, not every wall.
Start with the question, then measure
Before you pick up the tape, write down what you need to know.
- Will the number of guests fit with a dance floor, a head table or sweetheart table, a bar and a buffet?
- Will the ceremony chairs fit in the ceremony space with an aisle?
- Do the sightlines work, so that guests at the back can see the couple?
- Is there enough height for the lighting, draping or floral installation you have in mind?
- Is there room for the band, a stage, a DJ booth and a photo area without blocking a path?
Every measurement should connect to one of these questions. If it does not, skip it.
In a venue technical walkthrough, measure usable space, not total space
A hall that is sixty feet by forty feet has twenty-four hundred square feet on paper. Very little of that is usable for tables. Subtract fixed features such as a bar, a stage, columns and a coat check. Subtract the paths that must stay open, including exit routes and service paths. Subtract the dance floor and the space around it. What remains is the area you can fill with seating.
This is why asking “how many people does the room hold?” gets a misleading answer. The venue’s number is often a legal maximum or a standing capacity. Your seated dinner with a dance floor will need more space per guest than that number suggests. The practical approach is to plan the layout, count the tables and see how many people it seats.
Tables, chairs and the space around them
A table is not only its top. A round table needs the space where chairs are pulled out and where servers walk behind guests. Ask your rental company for the exact dimensions of the tables and chairs you will use, and ask your caterer how much space they need between tables for service. Then measure the room against those numbers.
One reliable way to estimate is to work out a footprint per table. Take the table diameter, add the space needed for chairs on each side, and add the service clearance. Multiply by the number of tables. The result tells you how much floor area your dinner needs before the dance floor, bar and stage.
Different jurisdictions set their own minimum aisle widths, and these affect your layout. As one published example, a federal agency’s guidance for outdoor event tents calls for aisles of at least 44 inches when the occupant load is over 50, and 36 inches at 49 or fewer. The number for your venue will depend on its occupancy type and local code. Ask the venue and the fire official what applies, and plan the layout to meet it.
A worked example of venue technical walkthrough measuring (illustrative)
Here is how the arithmetic works for a made-up reception hall. The numbers are invented for the example, so replace them with your own.
The hall is 60 feet by 40 feet, which is 2,400 square feet. A bar along one short wall takes 20 feet by 6 feet, or 120 square feet, plus 4 feet of queue space in front, or 80 more. A DJ and a small stage take 12 feet by 10 feet, or 120. A dance floor of 18 feet by 18 feet takes 324. Two exit paths at 4 feet wide and about 20 feet long take roughly 160.
Add those up: 120 plus 80 plus 120 plus 324 plus 160 is 804 square feet. The room has 2,400, so about 1,596 square feet remain for tables.
Now suppose the tables are 66-inch rounds. Add chair space and service clearance and say each table needs a 12-foot by 12-foot footprint, which is 144 square feet. Divide 1,596 by 144 and you get about eleven tables. At eight guests each, that is eighty-eight seats. If your guest list is a hundred and ten, you now know before signing that this hall is too small for a seated dinner with a dance floor, or you need a smaller dance floor, a different layout, or a bigger room.
That calculation takes ten minutes and prevents a very expensive surprise.
Heights and sightlines
Ceiling height matters more than most couples expect. It limits where you can hang lighting or floral installations, what kind of draping fits, and how tall a tent or structure can be. Measure the clear height under the lowest obstruction in the area you plan to use, such as a beam, a sprinkler head, a light fixture or an air duct. Write down both the typical ceiling height and the lowest point.
Columns, half-walls and low ceilings also affect sightlines. Stand at the back of the room, at the farthest table, and look at the spot where the couple will stand for toasts. If a column blocks the view, tell the planner and consider moving the toast area, adding a screen or placing the head table elsewhere. The same applies to the ceremony: stand where the last row of chairs will be and check whether you can see the altar or arch.
Fixed features and things you cannot move
Make a list of everything you cannot move, and mark each on your plan. Typical items are columns, built-in bars, fireplaces, permanent stages, fire-rated doors, radiators, thermostats and wall-mounted signs. For each, note whether it can be covered, decorated or avoided. A venue may allow draping over a thermostat but not blocking a fire extinguisher cabinet. Ask rather than assume.
Floors and surfaces
Walk the floor in your shoes. Note the surface, whether it is wood, tile, carpet or stone, and whether it is level. Dance floors need a flat surface. A band’s equipment needs a solid base. High heels and long dresses behave differently on cobblestones and polished marble. If a floor looks slippery when dry, ask what happens when it is wet, and whether the venue can add mats at entrances.
For rented dance floors or staging, ask the rental company what surface they need. A portable dance floor over grass, for instance, requires a prepared, level base. If the venue’s floor has an unusual finish, check that heavy equipment will not damage it. Many venues have rules about caster wheels, rolling carts and adhesive tape, and some require floor protection under heavy gear. Our rental planning checklist covers what to ask the rental company about delivery and site conditions. ## Access routes in a venue technical walkthrough: how everything and everyone gets in
If measurements are the first half of a venue technical walkthrough, routes are the second. A room that fits your plan on paper is useless if the cake cannot reach it. Routes fail at the narrowest, lowest, steepest or most locked point, so your job is to find that point before the vendors do.
Think in chains, not in places
Every item that arrives at a wedding travels along a chain of steps: the street, the parking or loading area, an entrance, one or more corridors, possibly an elevator or stairs, and finally the room. The chain is only as good as its weakest link.
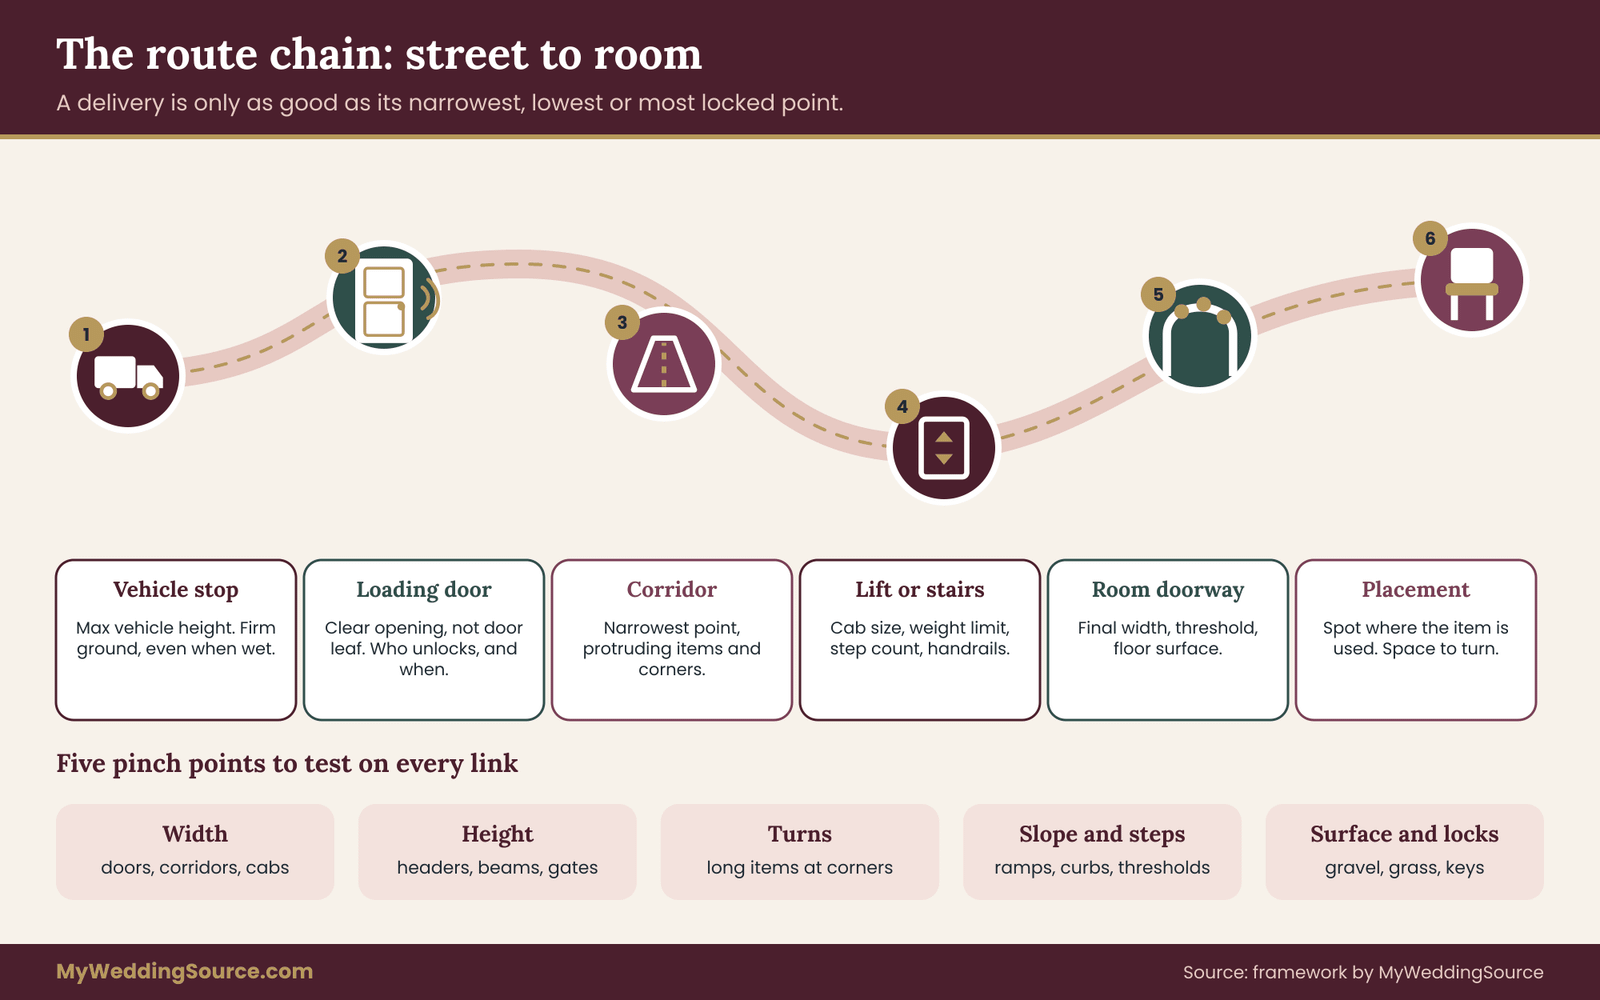
For each important delivery, write out the chain and look for five kinds of pinch point.
- Width. Doors, corridors, elevator cabs and gaps between furniture.
- Height. Door headers, low ceilings, beams, overhangs and the clearance for a delivery vehicle under a gate or a covered drop-off.
- Turns. A long item may fit through a door and still not make the corner beyond it.
- Slope and steps. Ramps, curbs, a single stair, a threshold, or a lawn that tilts toward a patio.
- Surface and control. Gravel, wet grass, cobblestones, locked doors, key cards and gates that only staff can open.
Walk the chain with the biggest item in mind. For a band, that may be a drum riser or a rolling rack of cases. For the caterer, it may be a tall rolling oven rack or a pallet of beverages. For the florist, it may be a ceremony arch or a tall installation. For the rental company, a stack of folding chairs on a dolly. For the baker, a tiered cake that has to stay level.
Trace the vendor route during the venue technical walkthrough
Start where the vendor will arrive and ask each of these questions.
- Where do vehicles stop? Is there a dock, a curb, a lot or a lawn? Is the surface firm, and could a loaded truck get stuck if it rains?
- What is the clearance? Ask for the maximum vehicle height and length that can reach the unloading spot. Box trucks and trailers can be much taller than a sedan.
- How far is the carry? Measure the distance from the vehicle to the room. A carry of thirty feet and a carry of three hundred feet are different jobs, and the second may need more people or more time.
- Which door is it? Is it the main entrance, a side door or a service door? Is it unlocked, and by whom, and at what time?
- What is the narrowest point? Measure doors for clear width, which is the actual opening when the door is open, not the width of the door leaf. Measure corridors at the narrowest spot, including anything that sticks out of a wall.
- Are there elevators? If so, measure the cab and the door, and ask for the weight capacity and whether a freight elevator exists. Ask who operates it.
- Are there stairs or steps? Count them, and check for handrails and landings. A short flight can make a heavy item impossible without extra labor.
- Where do items wait? After unloading, does an item have a safe place to stay while the vehicle moves away, or does it block the path?
Write the answers into your route log, and photograph the narrowest points with a tape in frame.
A venue technical walkthrough route example (illustrative)
Suppose a florist plans a freestanding ceremony arch that is 7 feet tall and 6 feet wide, built in two sections for transport. The venue’s service door is 32 inches wide. The corridor beyond it turns left after eleven feet and is 40 inches wide.
The florist’s arch sections are each 36 inches wide at their widest. Thirty-six is greater than thirty-two, so the sections will not pass upright through the door. Laid flat, a 36-inch-wide section lies on its side with a thickness of, say, 14 inches. It will pass through the door, but turning the corner into a 40-inch corridor requires the section to be carried flat and rotated, which may not work with a 7-foot length in an 11-foot approach.
There are three options. The florist can build the arch in smaller sections, the venue can open the wider main door for that delivery, or the arch can be assembled on site at the ceremony space. The point is that you learn about it three weeks ahead, not on the wedding morning. A single tape measure and a florist’s dimensions were enough.
Load-in and load-out windows to confirm at the venue technical walkthrough
Routes are tied to time. A route that works at 10 a.m. may be blocked at 3 p.m. because another event is using the dock, or because guests are arriving. Ask the venue for a schedule, and make a simple timeline of when each vendor arrives.
- When can each vendor start? Some venues will not let vendors in before a certain hour, or while another event is underway.
- How much time is included? Many venues count setup and breakdown within the rental period. If your band needs ninety minutes to set up and your rental period starts forty-five minutes before the ceremony, one of those numbers has to change.
- Who else is using the route? If the caterer, the band, the florist and the rental company all arrive at the same door, stagger them. A simple arrival schedule with fifteen- to thirty-minute gaps often prevents a traffic jam.
- What about load-out? Many problems appear at the end of the night. A band that is exhausted, a late curfew and a locked door create a bad ending. Ask when vendors can load out and whether anyone from the venue is present.
Our guide to wedding guest transportation covers the guest side of arrival and departure, and it is worth reading alongside this section because vendor and guest traffic often share the same driveway.
Parking and the drive in
Parking decides how guests and vendors feel on arrival. Ask how many spaces the venue controls, whether vendors can park near the entrance and whether there are rules about street parking. Ask about overflow plans. If the venue is on a narrow rural road, ask whether large vehicles can turn around and whether there is a place for a shuttle to stop.
Find out where the signs go. A venue that is hard to find costs you time. Check the address on a map, drive in once and note whether the entrance is obvious. Mark any confusing turns, and plan to add temporary signs where the driveway splits.
Guest routes and accessibility in a venue technical walkthrough
Vendor routes keep the event running. Guest routes decide whether everyone can attend comfortably. Walk both with the same attention.
Start with the route from arrival to seat
Follow the path a guest will take, from the place they park or are dropped off to their seat, to the restrooms and to the bar. Do it as a guest who uses a wheelchair, a walker or a cane would, not only as a person who walks easily. If you do not know what barriers look like from that point of view, ask a friend who does, or consult a disability organization.
For each stage, check these points.
- Drop-off and parking. Is there a drop-off area close to the entrance, with a level surface? Are there marked accessible parking spaces, and how far are they from the door?
- Surface. Is the route paved, smooth and firm, or is it gravel, sand or thick grass? Loose surfaces make wheelchairs and walkers hard to use.
- Slope. Are there slopes or steps? Steps need an alternative, such as a ramp or an accessible entrance, and the alternative should be easy to find and use.
- Doors. Are doors wide enough, and can they be opened without much force? Are thresholds low?
- Restrooms. Is there an accessible restroom, and is the route to it open and well lit?
- Seating. Are there spaces for wheelchairs in the ceremony and at dinner, in places where the guest can sit with their party, not only at the back?
Numbers worth knowing
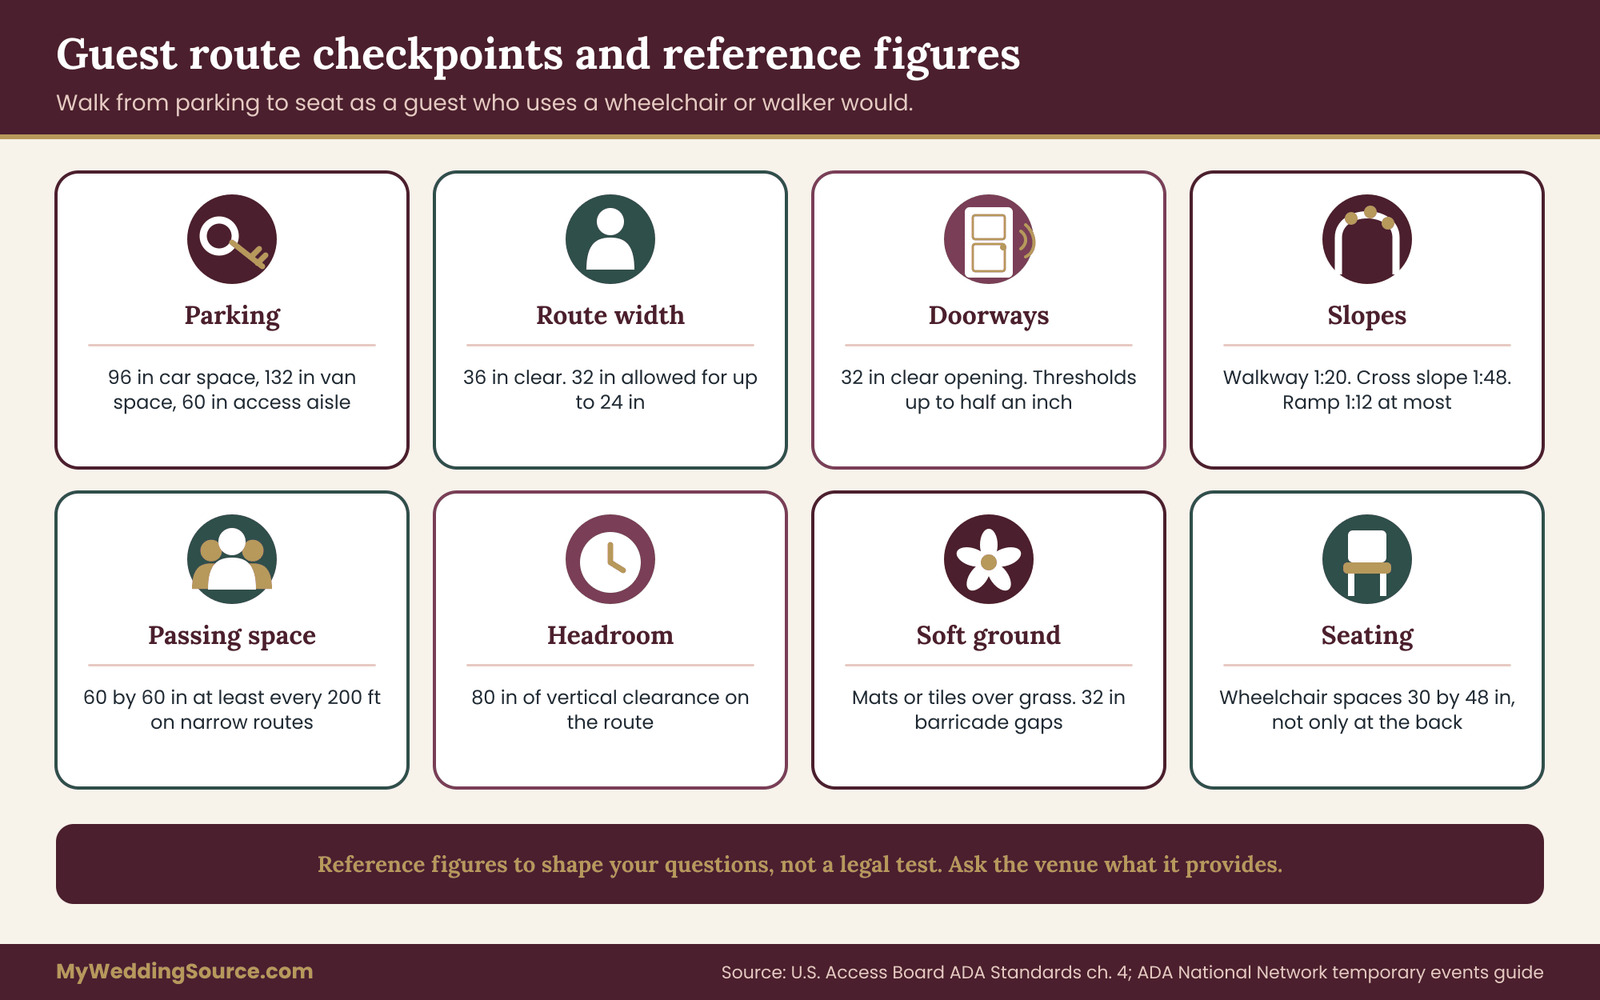
If a venue falls under the Americans with Disabilities Act, its accessible routes are expected to meet the ADA Standards for Accessible Design. These are legal standards, and your venue’s obligations depend on how it is classified, so treat the following as a reference list for your questions, not as a legal test.
According to the federal Access Board’s published ADA standards, an accessible route is generally at least 36 inches wide, though it may narrow to 32 inches for a short stretch of up to 24 inches. A doorway needs a clear opening of at least 32 inches. Where a route is narrower than 60 inches, passing spaces of 60 by 60 inches are expected at intervals of no more than 200 feet. The running slope of a walking surface is generally no steeper than 1:20, the cross slope no steeper than 1:48, and a ramp no steeper than 1:12. Thresholds are limited to a half inch, and an accessible route needs 80 inches of vertical clearance.
The ADA National Network’s guide to temporary events adds practical points that apply to weddings held outdoors or in unusual spaces. It notes that interlocking rubber tiles or perforated plastic mats can create a firm path over grass, that barricades should leave at least a 32-inch opening for wheelchairs, and that car parking spaces should be 96 inches wide and van spaces 132 inches wide, each with an access aisle of 60 inches.
You do not need to memorize these. They help you ask better questions, such as “How wide is the narrowest doorway on the path from the parking lot to the ceremony?” and “Can we lay mats over the lawn?” If the answers are unclear, ask the venue what accessibility features it has and what it can provide for your date. Our guide to outdoor wedding rain planning is useful here too, because a wet lawn is the most common reason a good route becomes a bad one.
Who is responsible
Under Title III of the ADA, private businesses that serve the public, which the law calls public accommodations, must remove physical barriers when that is readily achievable, and must communicate effectively with people with disabilities. Some venues are not covered, such as a private residence or certain religious organizations, and a venue’s responsibility is separate from yours as a host. Do not assume. Ask the venue directly what it provides and what it expects you to arrange.
If a guest needs an accommodation, such as an interpreter, a reserved seat, a quiet room or help with transport, talk to the guest early and to the venue as soon as you know. For deeper coverage of communication access, signage and seating, the ADA National Network’s temporary-events guide is written for event organizers and is worth reading. ## Power, lighting and connectivity: what the venue technical walkthrough should check
Power is the item that most often surprises couples during a venue technical walkthrough, because nobody thinks about it until a breaker trips in the middle of the first dance. Fortunately, a basic power plan is mostly arithmetic and a few phone calls.
What a venue technical walkthrough should reveal about power
You do not need to understand wiring. You need to learn three things for every power-hungry vendor.
- Where can they plug in? The location of outlets near the stage, the kitchen, the ceremony space, the bar and the photo area.
- How much can that outlet supply? Whether it shares a circuit with other outlets, and whether anything else will run on the same circuit.
- What happens if it fails? Who can reset a breaker, where the panel is, and who has the key.
Ask the venue manager to show you the electrical panel and to tell you who is allowed to use it. Often, only venue staff may touch it. Ask whether outlets are labeled by circuit. If they are not, the venue may be able to tell you which areas are grouped together.
A few numbers that make power easy to reason about
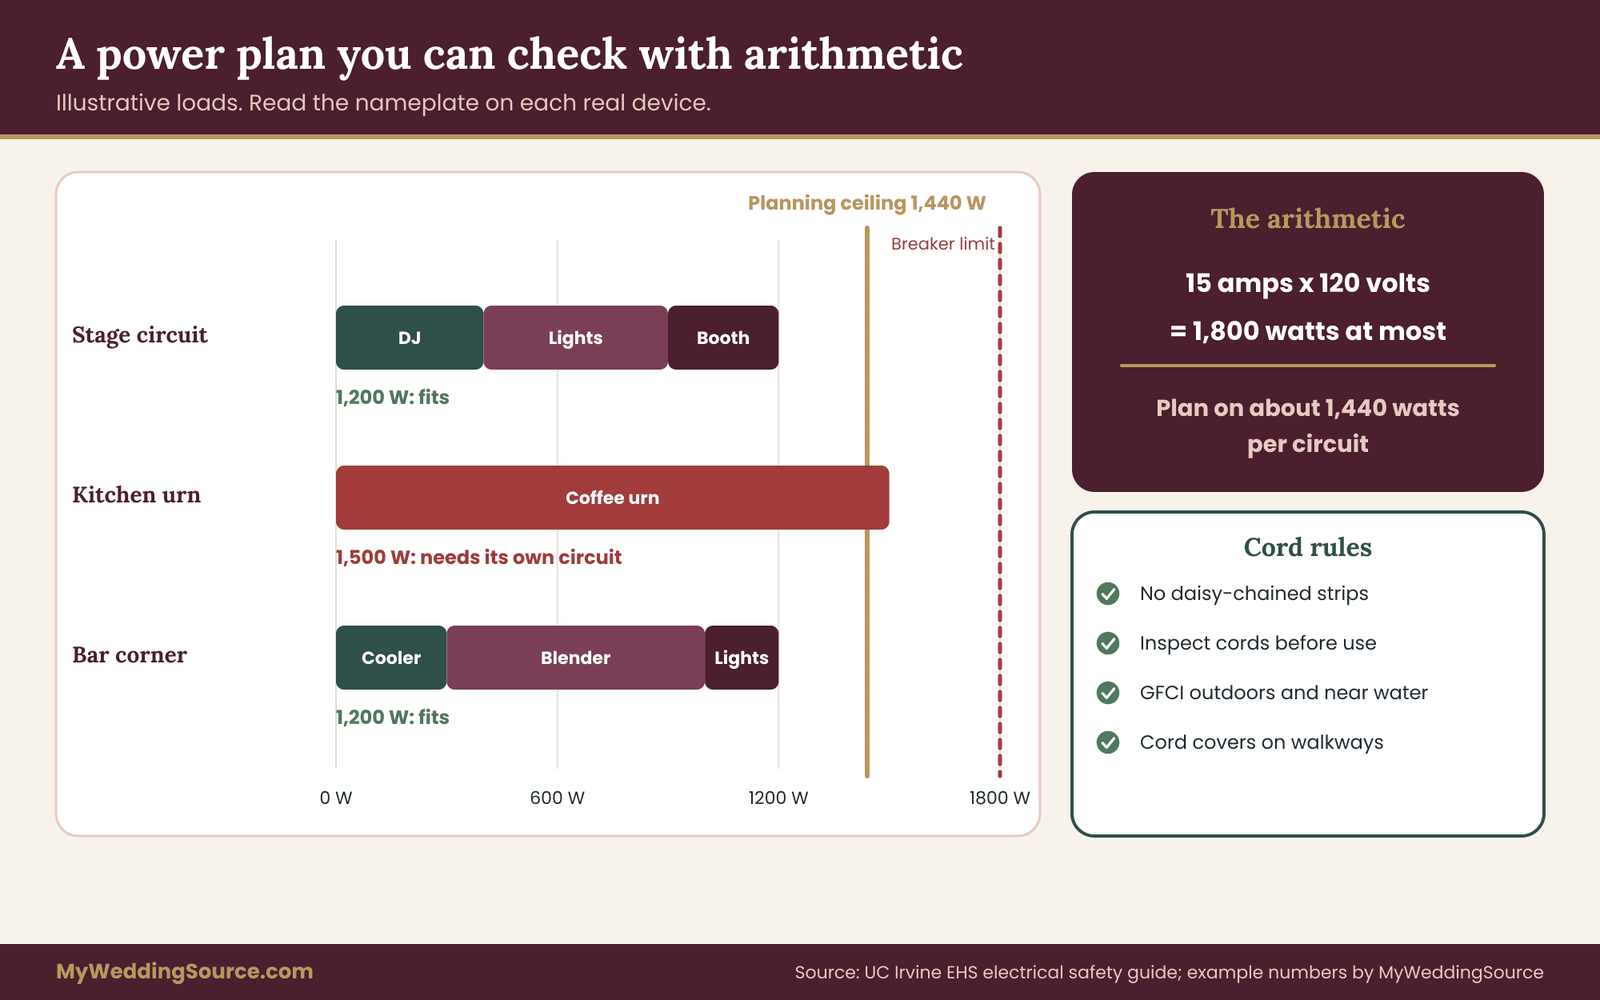
Electrical equipment is rated in watts, and the rating is printed on a label, called a nameplate, on or near the device. A standard household-style circuit in the United States is commonly 15 or 20 amps at 120 volts. Multiplying amps by volts gives watts. A 15-amp circuit at 120 volts is therefore 1,800 watts at most.
You should not plan to use all of it. A university environmental health office, in its electrical safety guide, gives a working limit of 1,440 watts, or 15 amps, in total for a power strip, and it advises plugging high-current devices directly into the wall. The same guide warns against chaining power strips and extension cords together, notes that extension cords are meant for temporary use, and lists warning signs of an overloaded circuit, such as tripped breakers, flickering lights, a burning smell, or warm outlets.
For planning, a simple rule is to treat 1,440 watts as the practical ceiling on a 15-amp circuit, and to give heavy appliances, such as a large coffee urn, a warming cabinet or a space heater, a circuit of their own.
A venue technical walkthrough power example (illustrative)
Imagine a small venue where the reception hall has two wall outlets near the stage that share one 15-amp circuit, and one outlet in the corner by the bar on a different circuit. The numbers below are made up. In real life, read the nameplate on each device or ask each vendor for its draw.
The DJ’s setup needs 400 watts. A lighting rig needs 500. A photo booth needs 300. Add those: 400 plus 500 plus 300 is 1,200 watts, which is under 1,440. All three can share the stage circuit, though with only 240 watts to spare, you would not add anything else.
The caterer wants a coffee urn that draws 1,500 watts. That is more than the 1,440-watt planning limit on its own. It cannot share a circuit with anything, and might trip the breaker alone. The fix is to put it on a dedicated circuit, move it to the kitchen, or ask the caterer for a different model.
The bar’s corner outlet powers a cooler at 300 watts and a blender at 700 watts, giving 1,000 watts. That works if they do not run along with the bar’s string lights. If the lights draw 200 more, the total is 1,200 watts, still under the ceiling.
The lesson is not that every venue is tight. It is that you want to know the numbers before the day. A short list of “who plugs in where” is enough.
Cords, safety and when to call a professional
Extension cords are often needed, and they are also a leading source of problems. A few guidelines, drawn from published electrical safety guidance, are worth following.
- Inspect cords before use. Do not use a cord that is frayed, split or has a damaged plug.
- Use cords rated for the load and for the location. Outdoor cords should be rated for outdoor use.
- Do not run cords through doorways, under rugs or across walkways where guests will walk. If a cord must cross a path, use a proper cord cover.
- Use ground-fault protection near water or outdoors. A ground-fault circuit interrupter shuts off power quickly if it detects a leak of current and reduces the risk of shock.
- Never daisy-chain power strips or extension cords.
If a vendor says they need more power than the venue offers, such as a large band, a lighting designer or a food truck, do not improvise. Ask the venue about temporary power options, and ask the vendor whether they bring their own generator or distribution equipment. Large events often use a licensed electrician, and many venues require one.
Generators
A generator can solve a power shortage, and it also creates risks, including exhaust fumes, noise, fuel and heat. The rules differ by jurisdiction and venue, so ask the venue and the fire official before you rely on one. As an example of the kind of requirement you may meet, a federal agency’s published event guidance calls for generators to be at least five feet from tents and to be fenced or enclosed, for exhaust to be directed away from openings and air intakes, and for generators never to be operated or refueled inside buildings. Another city’s tent permit guidance calls for propane containers to stay outside the tent.
These numbers are examples, not rules for your wedding. What you should take from them is a set of questions.
- Is a generator allowed at this venue and for this event?
- Who supplies it, who operates it and who refuels it?
- Where will it sit, and how far is it from guests, tents and openings?
- How is the noise managed? A generator next to a ceremony is distracting.
- Is a fire extinguisher nearby, and who is responsible for it?
Lighting
Lighting changes with the time of day, and a room that is bright at a noon tour can be nearly dark at a late dinner. During your venue technical walkthrough, ask the venue to show you the lighting controls, and find out whether they can be dimmed in zones. Note the following.
- Switches and dimmers. Where they are, who can use them, and whether the lights have preset scenes.
- Emergency and exit lighting. These must stay on and visible, and decorations should not block them.
- Sunset time. If you plan an outdoor ceremony or portraits, check the sunset time on your date and work backward. Our winter weather plan explains how early sunsets change the day.
- Dark corners. Parking areas, paths and restrooms need light. If the venue is outdoors, ask whether the path lights work.
Lighting vendors, whether for uplighting, string lights or a dance floor, will want to know about rigging points, ceiling heights and outlet positions. Our audio and lighting checklist lists what to confirm with the production team.
Wi-Fi and cell reception
Many couples forget connectivity until the livestream fails. Check three things during the venue technical walkthrough.
- Is Wi-Fi available, and for whom? Ask whether the network is public or private, how fast it is, and whether it can handle a livestream, a payment terminal or a photo booth upload. Do not trust a number on a brochure. Test it with a speed test app at the spot where the equipment will sit.
- Is cell reception good? Walk the whole route with your phone and note dead zones. A venue in a valley or a stone building may have no signal. If you rely on texts to coordinate the day, a dead zone is a problem.
- What is the backup? A wired connection, a hotspot or an offline plan for the stream is better than hoping.
If a livestream is a priority, test it at the final venue technical walkthrough, at the time of day when the room will be full and other users are online.
Sound, noise and neighbors
Sound has two sides: what guests hear and what neighbors hear. Both are worth checking on site.
The guest side
Stand where the ceremony will take place and talk at normal volume. Then talk to a friend at the back row. If you cannot hear one another, a microphone is likely needed. Echoing rooms with hard surfaces, such as stone, glass and tile, blur speech. Outdoor spaces lose sound to wind, traffic and nearby noise.
Walk the room during dinner. If the music will be in the same space, find where speakers can be placed so that guests at the nearest tables are not overwhelmed. A band’s volume is hard to correct in a small room, so ask the band what the room’s size and shape mean for their setup.
Hearing health
Loud events are not only annoying. The National Institute for Occupational Safety and Health recommends keeping noise exposure at work to an average of 85 A-weighted decibels over an eight-hour shift, and notes that louder levels reach risky exposure faster. That guidance is aimed at musicians and crews, and it also gives a useful reference for you as a host. If a DJ or band regularly plays above that level for long periods, staff and older guests are exposed. A free sound-level app can give you a rough reading during a venue visit or a rehearsal. It will not be perfect, and it still tells you whether you are in the right range.
The neighbor side
Ask the venue about noise limits and curfews. Many venues have a fixed end time for amplified music, set by a local ordinance, a permit or a neighbor agreement. Ask whether music has to move indoors after a certain hour, whether there is a decibel limit and whether the venue measures it. Find out what happens if the limit is exceeded.
Ask also about the ceremony. An outdoor ceremony with a microphone may fall under a different rule than a reception inside. If the site is near houses, ask whether the venue or the neighbors need notice. A short note to nearby residents, with a phone number, can prevent a complaint on the night.
Ask your band or DJ to aim speakers toward guests and away from nearby homes, and make sure they hear the venue’s limits before they plan their set. ## Capacity, exits and permits in a venue technical walkthrough: asking the right people the right questions
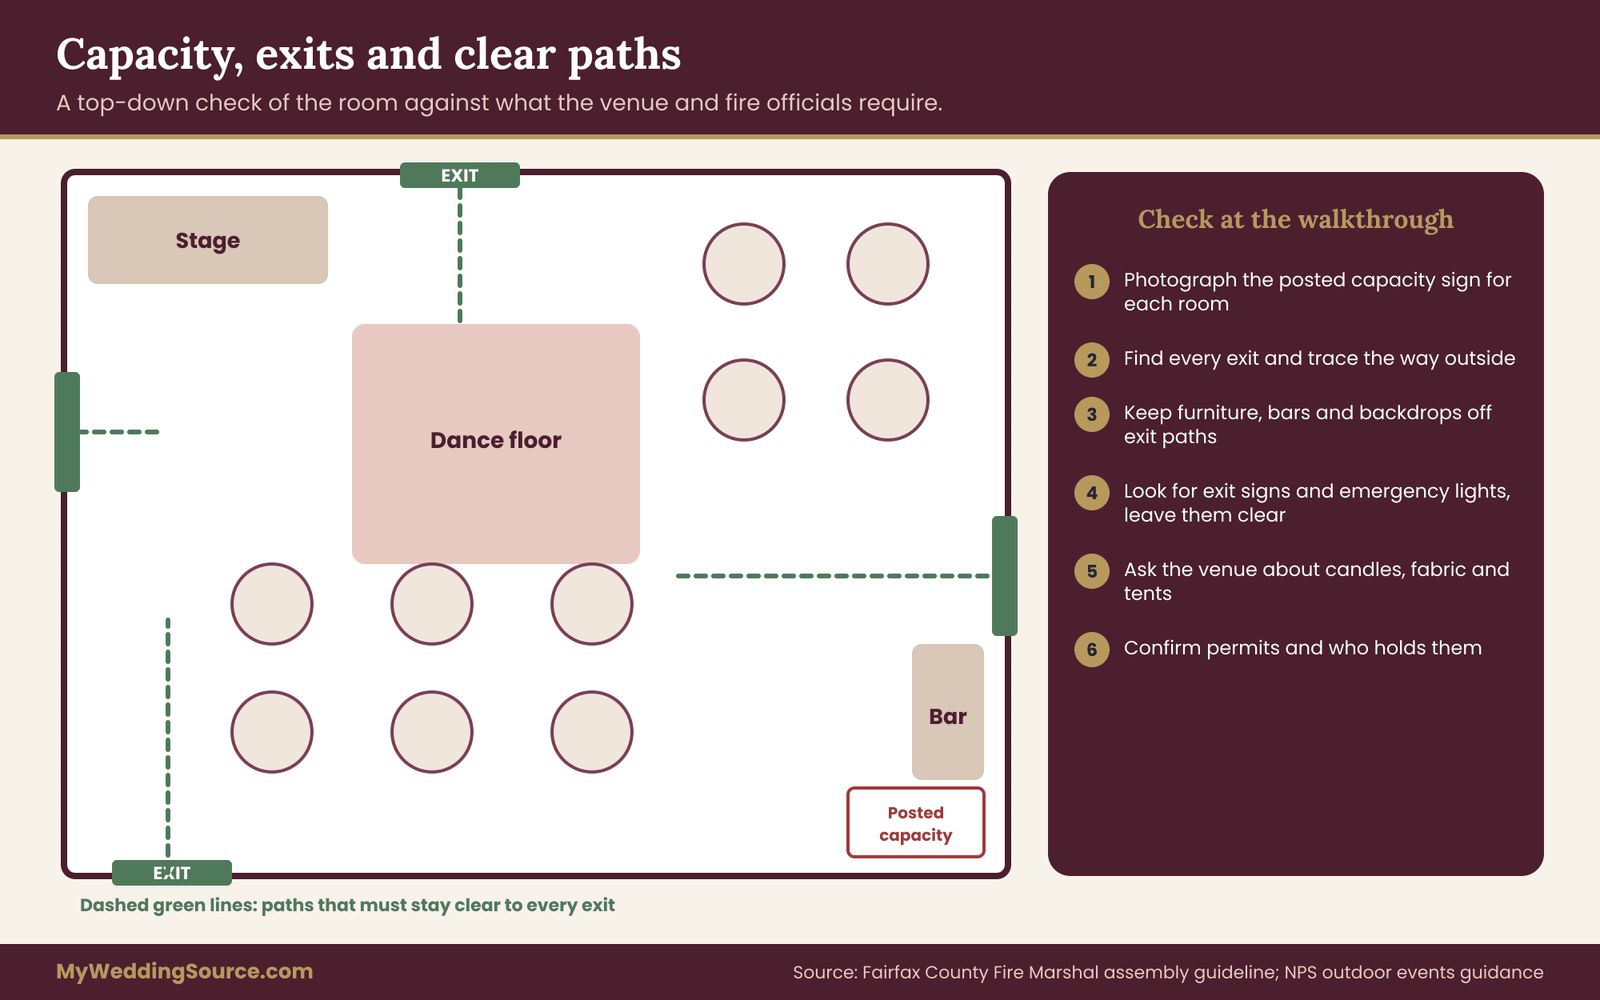
This is the part of a venue technical walkthrough where you most need to remember your role. Fire and life-safety requirements are set by local codes and enforced by fire officials, often called the authority having jurisdiction. The venue’s staff and its permits tell you what applies. You are not there to judge compliance. You are there to learn what the limits are and to make sure your plan stays inside them.
Occupant load and posted capacity
Every public space that is used for gatherings has an approved occupant load, which is the maximum number of people allowed in it at once. A county fire marshal’s guideline for assembly spaces says the approved occupant load should be kept, and that a sign showing it should be posted in a visible place near the main entrance or exit.
During your venue technical walkthrough, find that sign for each room you plan to use, and photograph it. Then compare it with your plan.
- Does the total headcount fit? Count guests, the wedding party, vendors who are working in the room, and musicians. Some venues count everyone physically present.
- Is the number for the layout you planned? The posted number may assume rows of chairs, which fits more people than tables. If your plan uses tables and a dance floor, ask whether the same number applies.
- Does it cover every space? The ceremony space, the cocktail hour area and the reception hall may each have their own number. A guest list that fits the reception may not fit the room where cocktails are served.
If your guest count is close to the limit, ask the venue manager to confirm in writing that your layout is acceptable. Do not push the limit. A fire official who arrives on a busy night can ask you to stop an event that is over capacity.
Exits, aisles and emergency lighting
Exits matter more than décor. The same county guideline lists the kinds of things that fire inspectors look for: exit doors that open without a key or special effort, exit discharge areas that are clear and lit at night, aisles and corridors free of tripping hazards, exit signs that are visible and lit, and emergency lighting that works.
Your plan has to respect these. During the venue technical walkthrough, walk the exits.
- Locate every exit from the room, not only the main door.
- Check that nothing blocks them, including your planned furniture, a bar, a photo backdrop or a dessert table.
- Trace the route outside. An exit that opens onto a locked yard or a narrow strip of grass is a problem.
- Notice the signs and lights, and make sure no decorations cover them.
- Ask who is in charge of unlocking doors and managing the crowd in an emergency.
Décor, candles and flame
Decorations are often where a beautiful plan and a safe plan collide. The same county guideline says that hanging fabrics such as curtains and draperies should be noncombustible or flame-resistant, that flame-resistant decorations should not cover more than 10 percent of the total wall and ceiling area, and that candles and open-flame devices must be approved by the fire marshal and kept out of aisles, exits and places where people stand. Those are one county’s rules. Yours may differ, and that is the point of asking.
Before you finalize décor, ask the venue:
- Are candles allowed, and what kind? Many venues allow flameless candles only, or require candles to sit in enclosed, stable holders.
- Is there a limit on hanging materials, fabric or greenery?
- Do fabrics, drapes or backdrops need a flame-retardant certificate? If so, who must provide it, and who must see it?
- Are sparklers, lanterns or fireworks allowed? In most venues, they are not.
- Can anything be attached to walls, ceilings or fixtures, and with what materials?
Tell your florist, rental company and decorator what the venue says. They will often have a certificate for their fabrics, or can suggest flame-retardant alternatives.
Tents, structures and outdoor equipment
A tent is a temporary building, and many places treat it as one. Permit rules differ by city and county.
As one example, a metropolitan fire marshal’s guidance requires an operational permit for tents larger than 400 square feet, asks for a flame-resistance certificate under the NFPA 701 standard that matches the label on the tent, and calls for three feet of space between the tent fabric and its contents. Applicants are told to have an inside layout and a site diagram ready. A federal agency’s guidance for outdoor events asks for at least two exits for tents holding from 50 to 499 people, aisle widths of at least 44 inches when the occupant load is above 50, and a minimum of seven feet of head clearance at exits.
Again, treat these as illustrations. If your wedding includes a tent, ask the tent company whether it handles permits, and ask the venue and the local fire office what they need. Many tent companies know the local rules well, and they often file the paperwork for you. In a few places, even a modest tent needs approval, so ask early.
Heating, cooking and fuel
If you plan heaters, outdoor cooking or food trucks, ask about fuel and flame rules. Published guidance for outdoor events commonly restricts open flames inside tents, requires propane to be stored outside, and sets distances between cooking equipment and other structures. Your caterer should know the rules that apply to their equipment, so ask them to review the site and confirm.
Permits, insurance and licenses
A venue technical walkthrough is a good moment to ask about paperwork. A well-run venue will have answers ready.
- Event permits. Does the event need a permit from the city or county, for example for a tent, amplified sound, street use or a large crowd?
- Alcohol. Does the venue hold a license, and does it cover your event? If you bring your own alcohol or a caterer serves it, who holds the license and the insurance? Our bar service guide covers the questions to ask a bar vendor.
- Vendor insurance. Many venues require certificates of insurance from outside vendors, naming the venue as an additional insured. Ask for the exact wording and the deadline.
- Event insurance. Some venues require the couple to buy liability insurance for the event. See our wedding insurance guide for how policies work.
- Security. Does the venue require or provide security, and is there a charge?
None of this is legal advice. Requirements change, and your venue and your local officials are the final word.
Emergency planning
Finally, ask what happens if something goes wrong. Where is the nearest hospital, and how long does an ambulance take to reach the venue? Who has a key to the first aid kit and the defibrillator, if there is one? Where is the assembly point if the building must be evacuated? Who tells the guests? Your coordinator and the venue manager should know the answers, and the answers belong in your pack.
Back-of-house in a venue technical walkthrough: kitchens, storage and vendor spaces
The front of the house gets the photographs. The back of the house decides whether the day runs on time. Many a venue technical walkthrough spends ten minutes on the kitchen and an hour on the ballroom, and the couple finds out on the day that the caterer has nowhere to plate and the band has nowhere to put its cases.
The kitchen and catering space
Ask the caterer to see the kitchen, or to review photographs and measurements of it. Ask what kind of kitchen it is. A full commercial kitchen with cooking equipment is different from a staging kitchen meant only for reheating and plating.
- Equipment. Which ovens, burners, refrigerators and warming equipment are there, and what is the caterer allowed to use?
- Refrigeration and ice. Is there enough cold storage for food, drinks, desserts and cake? Where does ice come from and where is it stored?
- Water and drains. Are there sinks, hot water and a place to dispose of wastewater?
- Prep and plating space. Is there a counter or table big enough for the service style you chose? A plated dinner for 100 needs a lot of linear counter space.
- Trash and recycling. Where do bags and boxes go? Who removes them, and when? A kitchen with nowhere to put trash fills up fast.
- Vendor meals. Where do staff eat, and where can the band and photographer take a break?
Storage and staging
Rentals, decorations, gifts, the guest book and vendor gear all need a place to sit before and after use. Ask the venue where things can be stored, for how long and who is responsible. Ask whether early delivery is allowed, and whether storage is locked.
For the end of the night, ask where gifts and personal items go. A small locked room or a staffed table prevents losses. Our flower logistics checklist covers storage and cooling for flowers, which often have specific needs.
Getting-ready rooms and vendor spaces
If the couple or wedding party will get ready at the venue, visit those rooms. Check power for hair tools, mirrors, lighting, seating, a place to hang a dress and a lock on the door. A bright window helps the photographer, and a nearby restroom helps everyone. Ask if the room is available early, and whether there is a charge.
Vendors need smaller things too: a place to charge gear, a table for a DJ, a spot for a photographer to leave a bag, and a quiet place to eat. These are small details, and they make people more willing to go the extra mile for you.
Outdoor and tent sites: what changes in a venue technical walkthrough
An outdoor space brings extra questions, because nature does not follow a floor plan. If any part of your event is outside, add these to your venue technical walkthrough.
Ground and slope
Walk the ground in the shoes you plan to wear. Note whether it is firm or soft, flat or sloped, and whether it holds water. A lawn that looks level can slope enough to tilt a cake table or make a dance floor unstable. Ask the rental company what ground conditions their tents, flooring and stages need. Ask how they anchor a tent. Stakes go into the ground, and they can damage underground lines or irrigation. Where stakes are not allowed, such as on a patio or a roof, tents use weights.
Underground and overhead hazards
Ask the venue where buried utilities, irrigation lines and septic systems are, and mark them before any staking. In the United States, calling 811 before digging is the standard way to have underground utilities marked, so ask the venue or the tent company who handles that. Look up as well: low branches, power lines and roof edges affect tents, lighting and vehicles.
Weather, shade and sunset
Check where the sun will be at the time of the ceremony, where shade falls, and where the wind funnels. An outdoor ceremony facing straight into a low sun is hard on everyone. Plan a rain location and decide who makes the call and by when. Our guide to outdoor wedding rain plans gives a framework for that decision.
Restrooms, water and comfort
If the site has no permanent restrooms, or too few, plan portable ones and find out how they will be delivered, where they will sit and how far from the ceremony. Check for drinking water, shade, handwashing and a place for guests to sit during cocktail hour. In hot or cold weather, plan for comfort.
Insects, animals and local rules
Ask about local conditions, such as mosquitoes, ticks, wildlife, bees near flowers, or livestock if the venue is a farm. Ask whether any area is off limits, and whether there are rules about alcohol, amplified sound or open flames outdoors. ## Vendor needs after the venue technical walkthrough: collecting a real yes from each person
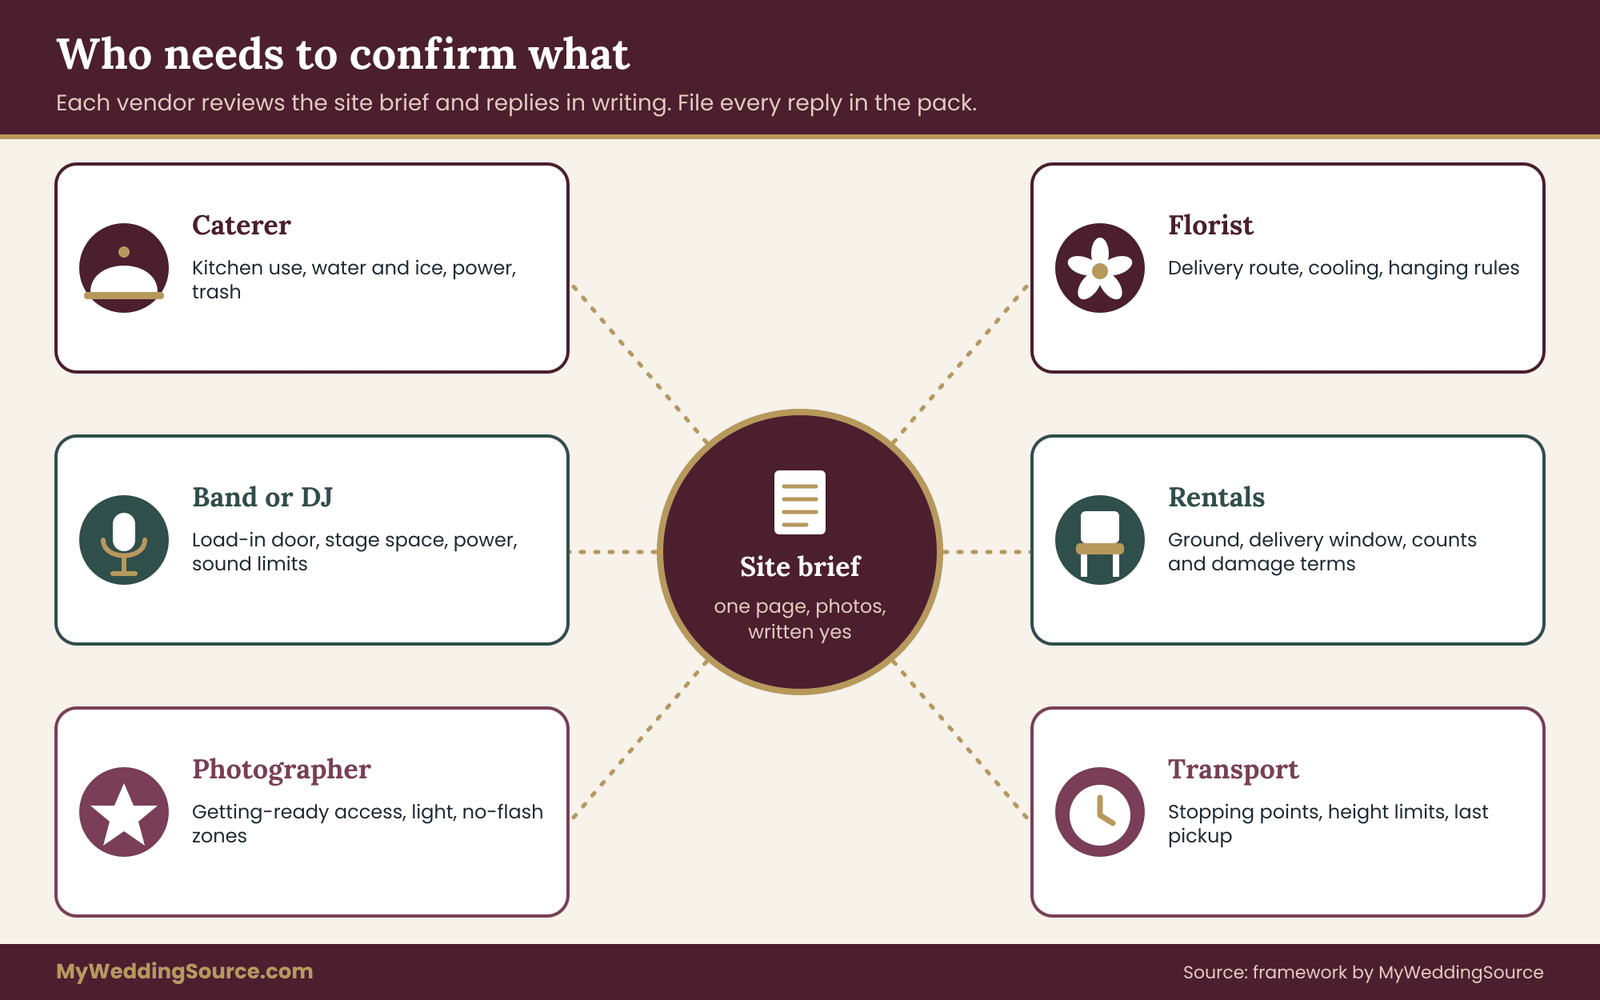
A venue technical walkthrough has no value if the results stay in your notebook. The step that turns observations into a plan is vendor sign-off, which means each vendor sees the facts that affect them and tells you, in writing, whether the plan works.
How to run vendor sign-off after the venue technical walkthrough
The process is the same for every vendor, and it takes less time than it sounds.
- Send a one-page site brief. Include the venue address, the arrival route and door, the load-in window, the space the vendor will use, the measurements of the narrowest points, power available and the venue’s rules that affect them. Attach photos.
- Ask three specific questions. What do you need that is not here? What in this brief is a problem? What would you like changed?
- Offer a visit. Some vendors want to see the site, and others are happy with the brief. For complex setups, a short site visit or video call is worth the time.
- Record the answer. Ask the vendor to reply by email, listing anything they need and confirming the plan. File the reply in the pack.
- Close the loop. If a vendor asks for something, such as an extra outlet or a later load-in, take it to the venue and report back.
A short sample message you can adapt:
“Hi Sam, here is the site brief for our June 14 wedding at the venue. It covers the arrival route, the service door, a 90-minute load-in window starting at 2 p.m., and the stage area. The narrowest doorway on your route is 32 inches wide, and the stage has two outlets on a shared circuit. Could you review it and tell us if anything doesn’t work for your setup? If it does, a quick ‘confirmed’ reply is all we need. If not, tell us what you need and we’ll sort it out with the venue.”
Notice that it states facts, asks a direct question and makes it easy to say yes. That is much more effective than “Let us know if you have questions.”
What each vendor typically needs to confirm
Every vendor has a different set of concerns. These lists are starting points. Ask each vendor to add their own.
Caterer. – Kitchen access and what equipment they may use – Water, drainage, ice and refrigeration – Route from the kitchen to the service area, and the width of doors on it – Power for warming equipment, and which circuits – Staff parking and entrance, and a place for staff breaks – Trash and recycling – Cooking rules: whether open flame or propane is allowed – Service time windows and the venue’s end time
Band or DJ. – Load-in door, route and distance – Stage or floor space and whether a riser is allowed – Power at the stage, on which circuit and whether it is shared – Ceiling height and any overhead restrictions – Sound limits and curfews – Space for gear cases that is out of sight – A place to change and to eat
Photographer and videographer. – Access to the getting-ready rooms and the ceremony space before guests arrive – Light conditions at the time of the ceremony and portraits – Places where flash or drones are not allowed – Permission for locations they plan to use, such as a roof, a garden or a private room – A plan for rain and early sunsets – Power to charge gear, and a safe place for bags
Florist or decorator. – Delivery route and time, and the dimensions of large pieces – Refrigeration or a cool space for flowers – Rules on hanging, adhesives, candles and open flame – Ceiling height and rigging points for installations – Water access for buckets and arrangements – The teardown schedule and who removes things – A place to dispose of green waste
Rental company. – Delivery and pickup windows and the route – Ground conditions for tents, flooring and stages – Measurements for tables and chairs against your plan – Who signs for the delivery, and who counts items at pickup – Rules about damage and loss, and the venue’s own requirements
Transportation provider. – Where vehicles can stop, wait and turn around – Height and weight limits on driveways and gates – Pickup points that guests can find – Timing for departures, and the last pickup – Access for guests with wheelchairs or walkers
Officiant and ceremony musicians. – Where they will stand and where the microphone can be – Sound reinforcement and the path for the processional – Shelter or shade for outdoor ceremonies – A quiet place to wait before the ceremony
Hair and makeup. – A room with natural light, mirrors and outlets – Seating, space for a team and a place to store kits – Timing relative to the photographer’s schedule – Whether the room is available at the time needed
Day-of coordinator or planner. – A copy of the whole pack, the contact sheet and the timeline – The authority to speak with the venue’s staff – The location of the panel, the first aid kit and the emergency exits
Our vendor due diligence checklist goes into how to vet vendors before you hire them, which is a separate step from site sign-off.
When a vendor raises a problem
Treat problems as the point of the exercise. A vendor who says, “That door is too narrow” is saving you from a day-of failure. When a problem appears, work through these options in order.
- Change the plan. Use smaller sections, a different layout or a different product.
- Change the access. Ask the venue to open a different door, schedule a different time or provide staff.
- Change the vendor. If the problem cannot be solved and the vendor’s needs are not met, you may need a different vendor. Do this early.
- Change the space. If the room cannot serve your plan, consider a different part of the venue. In rare cases, a different venue is a better answer, which is why the pre-contract visit matters.
Document the solution in writing, and make sure the venue and the vendor have both seen it.
The one-page site card from your venue technical walkthrough
A pack with thirty pages is useful for planning, but on the day nobody has time to read it. Create a one-page site card for each key person, such as the coordinator, the caterer and the band. It should hold only what they need on the day.
A sample site card for a band might read:
Venue: the garden pavilion. Arrive: 2:00 p.m. at the service gate on the east side. Call the venue manager when you are five minutes away. Load-in route: gate, paved path 120 feet to the pavilion. Narrowest point is the pavilion door at 36 inches. Stage: 16 by 10 feet, left side. Power: two outlets at stage left, shared circuit, planning limit about 1,400 watts. Sound: amplified music must end at 10:30 p.m. by city ordinance. Contact: the coordinator and the venue manager, with phone numbers listed.
Keep it short and put the most urgent item first. Print copies and send a digital version. The best site card is the one a vendor can read in a minute on a phone.
Putting your venue technical walkthrough in writing
After a venue technical walkthrough, send a summary within a day to the venue manager and the vendors. It should list what was measured, what was agreed, what is still open and who will follow up. This message is a record. If a question arises later, you can point to it.
Then check your contracts. Verbal agreements at a venue technical walkthrough are good, and written terms are better. Look for these points in the venue contract and your vendors’ contracts.
- Access hours. The times each party may enter and must leave, including setup and teardown.
- Included services. Tables, chairs, staff, lighting, sound, power and storage.
- Fees for overtime and extras. What each extra costs, and how it is approved.
- Restrictions. Rules about candles, décor, sound, vendors and end time.
- Responsibility for damage. Who pays for what, and how damage is assessed.
- Changes. What happens if the layout, the guest count or the timing changes.
- Insurance and permits. Who must provide them and by when.
If the venue agrees to something that is not in the contract, such as an early arrival, a different door or use of a particular room, ask to add it by email or as an amendment. Rules vary by contract and by state. For a large or unusual event, consider asking a lawyer to review the paperwork.

Common mistakes in a venue technical walkthrough
Most failures in a venue technical walkthrough are about method, not knowledge. These are the ones that appear most often.
- Walking the room once, with only the venue manager. The people who will work in the space have not seen it, and their needs are unknown.
- Measuring the room and not the route. The hall is big enough, but the door is not.
- Trusting nominal capacity. The posted number and your layout are different things.
- Assuming power is available. An outlet exists, and it may be on the wrong circuit or too far from the stage.
- Skipping the load-out. Many problems appear at the end of the night, when everyone is tired.
- Visiting only in daylight. Many venues look different after dark. Check lighting, paths and parking at night.
- Taking a verbal yes. A promise from a staff member who leaves before your wedding is worth little.
- Ignoring the weather route. The indoor plan should be just as well checked as the outdoor one.
- Leaving guests out. Vendors get a thorough route check, and guests with limited mobility get an afterthought.
- Waiting too long. A final venue technical walkthrough two days before is too late to change a layout.
The limits of a venue technical walkthrough
A good venue technical walkthrough reduces surprises. It does not remove them. You will not see the room full, the weather on the day, the other event that arrives early, or a staff change. Some findings will also be outside your competence: a fire alarm that looks odd, a railing that moves, an outlet that sparks. Report them to the venue and ask them to have a qualified person check.
Remember too that rules change. Fire codes, permit rules, venue policies and local ordinances can be updated, and different officials may read them differently. Treat the numbers in this article as examples and use the venue and your local officials as the authority. If you are unsure whether something is allowed or safe, ask before you plan it, not after you have bought it. ## FAQ
What is a venue technical walkthrough, and how is it different from a tour?
A tour is a sales visit that shows you the best of the place. A venue technical walkthrough is an operations visit. You measure routes and rooms, find power and storage, check rules and hours, and ask each vendor to confirm that the space works for their job. The result is a set of notes, photos and written confirmations, not an impression.
How long does a venue technical walkthrough take?
The pre-contract check often takes thirty to sixty minutes if you arrive with a short list. The detailed survey for an average wedding usually takes two to three hours, longer for tents or large outdoor sites. The final venue technical walkthrough with vendors can be an hour. The timing depends on how many spaces you use and how many people join.
Who should come to the venue technical walkthrough?
The venue manager or site contact is essential. Beyond that, bring the person who will lead on the day, such as a planner or coordinator, and invite the caterer, the band or DJ and the photographer. For tents, stages or generators, invite the rental company’s site lead. Vendors who cannot attend should receive your notes and photos and confirm in writing.
What should I measure first in a venue technical walkthrough?
Measure what could change your decision. That usually means the narrowest door or corridor on the route from the loading area to the room, the usable floor area after subtracting fixed features, and the lowest ceiling point where lighting or décor will go. Then measure anything a vendor flags, such as a stage area or a kitchen counter.
Do I need a venue technical walkthrough for a simple venue like a restaurant or backyard?
A shorter version still helps. A restaurant has its own kitchen and staff, so you mainly confirm capacity, power for any outside vendors, the end time and the route for deliveries. A backyard needs more attention than people expect, because power, restrooms, ground conditions, parking, neighbors and weather are all yours to solve.
Can I run a venue technical walkthrough myself without a planner?
Yes. The method works with a tape measure, a phone and a clear list. A planner brings experience and speed, but the key habits are simple: ask for documents in advance, measure the route, write down who confirmed what, and send a summary after the visit. For large or unusual events, a coordinator or the venue’s event manager can help.
What if the venue won’t let my vendors join the venue technical walkthrough?
Ask why. Some venues limit access because of other events or insurance rules. Offer alternatives: a video call in which the venue contact walks the route, a floor plan with photos, or a short visit at a set time with the venue contact present. Vendors can still sign off on a detailed brief. If the venue refuses any reasonable way to share information, treat that as a warning.
What if the venue technical walkthrough shows a problem after I have signed?
Tell the venue manager and the affected vendor as soon as you can. Many problems have fixes: a different door, a rearranged layout, a smaller piece or an extra staff member. Ask for the solution in writing, and check whether it changes costs or timing. If the problem is large, review your contract for what it says about changes, and consider legal advice.
Your next steps
Start with the paperwork. This week, email the venue and ask for the floor plan, the posted capacity for each space, the vendor rules, the insurance requirements and the load-in schedule. Book the detailed survey for a day when the room is empty, and tell your key vendors the date.
On the day, bring a tape measure, a phone and the list in this guide. Work in order: street to loading area, loading area to room, room to restrooms, kitchen to service area. Write down every measurement and who told you each rule. Send a summary within a day, and ask each vendor to confirm. Then put a final venue technical walkthrough on the calendar, two to four weeks before the wedding, and take the one-page site cards with you.
If you want to see how the venue fits into your wider plan, our guide to choosing a wedding venue covers costs, questions and red flags, and the vendor timeline shows where the final venue technical walkthrough fits.
Sources
- ADA Standards for Accessible Design, Chapter 4: Accessible Routes, U.S. Access Board
- A Planning Guide for Making Temporary Events Accessible to People with Disabilities, ADA National Network
- Introduction to the ADA: Title III, public accommodations and commercial facilities, ADA.gov
- Assembly occupancy guideline, Fairfax County Fire Marshal
- Tents and membrane structures permit guidance, Nashville Fire Marshal
- Fire and life safety requirements for outdoor events and tent use, National Park Service
- Electrical safety reference guide, University of California, Irvine Environmental Health and Safety
- Hearing loss and music, NIOSH feature, CDC archive
- Site inspection checklist: 11 things event planners should never forget to ask, BizBash
- ADA Title III regulations, 2010, U.S. Department of Justice
- Safe Tenting Standard, American Rental Association
- Call 811 before you dig, Common Ground Alliance
Weak signal and limited power can derail a livestream or a shared photo album. Pair this walkthrough with our digital contingency plan so every file, login and backup has a clear owner.
Ask about vehicle sizes, time windows and fees early. The guide to loading dock rules shows what to confirm in writing before load-in day.