
A wedding vendor final walkthrough is the planned, one-month-out review where you and each person who is being paid to work your wedding check the same facts, the same schedule, and the same paperwork, so that the surprises happen in an email thread in October instead of on the wedding morning.
Quick answer
Treat the wedding vendor final walkthrough as two linked jobs. First, a walkthrough of the place itself with the venue contact (and ideally your planner or coordinator), where you stand in each space and talk through arrival, setup, service, and exit. Second, a short confirmation round with every vendor, where you compare the contract, the timeline, the headcount, the payment schedule, and the proof that the business is still operating and insured. Start about a month out. Put every answer in writing, and send one shared summary afterward so everyone is working from the same page. This guide is general education, not legal advice, and contracts and consumer rules differ by state.
Most couples have already done the exciting part by now. The venue is booked, the caterer has been tasted, the playlist is half done. What is easy to underestimate is how much of a wedding day is made of small agreements between strangers: which door the florist uses, who unlocks the room for the band, how many plates the kitchen is plating, and who is allowed to move a table. A wedding vendor final walkthrough is the moment to turn those unspoken assumptions into spoken, written ones.
This guide is built to be used, not just read. You will find a packet to assemble before you start, a paper-trail check for confirming each business is still in good standing, a timeline from about thirty days out to the final week, a route for walking the venue, question banks for each vendor type, a decoder for reading the answers you get back, and a set of edge cases for the situations that rarely make it into checklists. We cross-reference our own guides on wedding vendor timelines and vendor communication deadlines rather than repeating them, and we keep this article focused on one job: the final review.
What a wedding vendor final walkthrough is, and what it is not
The phrase gets used loosely. Some people mean a tour of the venue with the manager, some mean a planner’s call with the vendor team, and some mean a final email to everyone. All of those can be part of a wedding vendor final walkthrough, but none of them is the whole thing on its own. Being clear about what you are doing keeps you from stopping at the pleasant part.
Two meetings, one goal
A complete wedding vendor final walkthrough has two parts that feed each other. The first happens in person, at the place where the wedding will happen. The second happens by phone, video call, or email, with each vendor who is not standing in the room with you.
The site walkthrough
In a wedding vendor final walkthrough, this is the in-person visit, usually with the venue’s point of contact and, if you have one, your planner or day-of coordinator. A wedding-planning site that covers final venue visits describes it as one of the last chances to see the space before the day, and advises bringing your signed vendor contracts so you can check details on the spot. In practice you are walking the day in order: where guests park, where they enter, where they wait, where the ceremony happens, where cocktails happen, where the meal happens, where the vendors work, and how everyone leaves.
The vendor confirmation round
Each vendor who will not be at the site portion of the wedding vendor final walkthrough gets their own shorter check: a call or a written exchange in which you confirm date, arrival time, address, what they are bringing, who is coming, what you have paid, what you still owe, and how to reach them that day. The Better Business Bureau advises confirming details in writing well ahead, ideally one to two months out, and then making a final check one to two weeks before the wedding. The wedding vendor final walkthrough at thirty days is the long confirmation; the check at two weeks is the short one.
What the walkthrough is not
It helps to name three things a wedding vendor final walkthrough is not, because each one tempts couples into the wrong behavior.
It is not a chance to renegotiate
A walkthrough is for confirming and clarifying, not for opening new demands. If you realize you need something that is not in the contract, that is a change request, and it should be handled as one, with a written change and a price. Our guide to wedding contract change orders explains how to ask for one without souring the relationship. Keeping the two things separate also protects you, because a vendor who feels ambushed in a confirmation call tends to answer defensively and vaguely.
It is not the rehearsal
The rehearsal is a run-through of the ceremony with the people who walk in it, usually a day or two before the wedding. Our wedding rehearsal guide covers that. A wedding vendor final walkthrough happens earlier, involves the businesses rather than your family, and is about logistics and paper rather than who stands where.
Why a month out is the useful moment
Thirty days is not a magic number for a wedding vendor final walkthrough, and it is a convention rather than a rule. It is useful for a practical reason: it is late enough that most of your decisions are made and early enough that a problem can still be fixed.
Late enough that details are real
By about a month out, the guest list is close to settled, the menu is chosen, the timeline has a draft, and the vendors have mostly assigned staff to your date. Asking who is actually coming and what they are actually bringing yields real answers instead of “we will figure that out closer to the date.”
Early enough to fix things
A florist who discovers a flower is unavailable can substitute. A caterer who learns about a guest’s allergy can plan the kitchen. A band that finds out the stage is too small can bring a smaller rig. Every one of those fixes gets harder and more expensive as the date approaches, and some become impossible in the last few days. A wedding vendor final walkthrough a month out leaves room for the second and third attempt, not just the first.
Assemble your wedding vendor final walkthrough packet first
You will get much better answers if you arrive with the same documents in front of you that the vendor has. A short, boring packet is worth more than a long, enthusiastic conversation.
The documents to gather
Print or save the following, in one folder you can open on a phone. If a vendor says “that is not what our contract says,” you want to see the contract, not rely on memory.
Contracts, proposals, and change records
Collect every signed contract, every proposal that the contract refers to, and every written change since signing. If the contract says “per proposal dated” a certain date, that proposal is part of the agreement. For a wedding vendor final walkthrough, our overview of the wedding vendor contract explains what a complete one usually contains, and a Wisconsin consumer-protection publication on avoiding wedding problems advises never signing a blank contract and making sure costs and delivery dates are spelled out. For the wedding vendor final walkthrough, the point is simpler: every claim you are about to check has a source document.
Payment record and remaining balances
Make a one-page list of each vendor, the total price in the contract, what you have paid, the date and method of each payment, and what remains with its due date. If you track this in a sheet, our credit card reconciliation guide shows a way to match charges to contracts. The list tells you which vendors are paid in full, which have a balance due before the wedding, and which are due on the day, and that matters because the wedding vendor final walkthrough is when you confirm the method and the person who will take the payment.
The names and roles to confirm
Weddings go wrong at handoffs. A wedding vendor final walkthrough is the best time to find the handoffs and put a name beside each.
One name per job
For each vendor, write down who will actually be there, who the lead is, and how to reach that person on the day. For the venue, write down the person who can unlock doors, the person who can approve a layout change, and the person who is on site if something breaks. The Knot, a wedding-planning publisher, advises exchanging emergency contact information about a week before the wedding and giving vendors the numbers of your planner or venue coordinator plus a family member or wedding party member who can act for you. That is a good habit, and a month out is when you decide who those people will be.
Your own decision-maker
Choose one person on your side who can answer a vendor’s day-of question without finding you. This is usually a planner or coordinator. If you do not have one, it may be a trusted friend or relative who is not in the wedding party and is not about to have a camera in their face. Our guide to wedding planners versus coordinators helps if you are weighing a day-of hire, and our wedding party coordination checklist covers the roles for the people close to you.
The paper-trail check: still in business, still insured, still on contract
An independent check of business registration and complaint records deserves a place in a wedding vendor final walkthrough, and we want to be clear about its limits. It is not an investigation. It is a quick, repeatable check, done once more at about thirty days, that the business you signed with is the business that will show up.
You presumably did some of this before you signed. Our guides to wedding vendor due diligence and to verifying a wedding vendor’s business registration and reviews cover that first pass. The month-out version is shorter and asks a different question: has anything changed since I signed?
Registration and complaint record
The goal of this step in a wedding vendor final walkthrough is to confirm the vendor is operating under the name on your contract and that nothing alarming has appeared since you booked.
Match the name on the contract to the name on the record
Contracts are often signed by a legal entity that is different from the brand name on the website. Check that the business name, the owner or representative, and the address on your contract match what you see when you search your state’s business registry. Registries differ by state, and some states let you search by name online while others require a request. If the names do not match, that is not automatically a problem, since many businesses operate under a trade name, but it is a question worth asking in plain terms: “Your contract is under one name and your brand is another. Can you confirm that is the same business?”
Look at complaint records again
Wisconsin’s consumer-protection agency suggests checking the Better Business Bureau and the state bureau of consumer protection for complaints before booking, and staying in touch after signing to confirm the vendor is still in business and prepared for your date. A month out, you are looking for new patterns, such as several recent complaints about missed delivery, no-shows, or refunds that never arrived. One unhappy review is noise. A cluster of similar ones from recent weeks deserves a direct question to the vendor. Keep a dated screenshot or note of what you saw, because the page may change.
Know the warning signs of trouble
The Michigan Attorney General’s consumer protection pages describe warning signs of a business in trouble: missed delivery dates, requests for extra money before delivery, and explanations for delay that keep shifting. Those signs apply to wedding vendors too. If a vendor you could reach easily in the spring now takes two weeks to answer, or suddenly asks for a payment that is not in the contract, treat it as a reason to slow down and ask questions rather than a reason to assume the worst.
Insurance and certificates
Many venues require outside vendors to carry liability insurance, which makes it a natural part of a wedding vendor final walkthrough, and many contracts say so. A month out is a good time to see the paper.
What a certificate of insurance shows
A commercial insurer, Progressive, describes a certificate of insurance (often shortened to COI) as a short summary, usually one page, that shows what coverage a business carries, including coverage types, policy limits, and policy dates. It can also show whether a party has been named as an additional insured. It is a summary and not the policy, which is why it is useful for a quick check and not for knowing the full terms.
What to look for, and what it cannot tell you
Compare the effective and expiration dates with your wedding date, since a policy that lapses before the wedding does not help you. Check that the coverage lines match what the venue or contract requires, for example general liability. If the venue asks to be named as an additional insured, the certificate is where you or the vendor can see whether that was done. A certificate cannot tell you whether a particular claim would be covered, and we are not in a position to say what any policy would pay. If a coverage question matters to you, ask the insurer or a licensed professional. Our general guide to wedding insurance explains the different kinds of coverage couples sometimes buy for themselves.
Contract and payment alignment
The third part of the paper trail in a wedding vendor final walkthrough is simply making sure the contract and your record of payments agree.
Confirm what is paid and what is due
State the balance back to the vendor in writing: “Our records show we have paid this amount and the remaining balance is this amount, due on this date by this method. Is that right?” It is a small step that catches a surprising number of mismatches early, such as a tax that was not in the original estimate or a payment recorded under the wrong date.
Confirm the cancellation and replacement terms still stand
If a vendor cannot perform, what does your contract say happens? Our guide to the wedding vendor replacement policy explains what these clauses usually look like and what to ask. A month out is not the time to renegotiate them, but it is the time to know what they say, so that if something changes you are not reading them for the first time under stress.
Questions to ask for the paper-trail check
- Is the business name on our contract the same business that will be at our wedding, and who is the legal owner or representative?
- Can you send a current certificate of insurance showing policy dates that run past our wedding date?
- Does the venue or any other party require us to be listed as an additional insured, and has that been done?
- Please confirm in writing what we have paid, what we owe, when, and by which method.
- Who is the named person who will lead our event, and is anyone else on your team substituting?
- If you could not perform, what does our contract say happens, and who would you contact on our behalf?
| Item | What to check | Where it usually comes from | If it does not match |
|---|---|---|---|
| Business name | Same name on contract, invoices, and public record | Contract, state business registry, website | Ask the vendor to confirm in writing which entity you hired |
| Complaint record | No new pattern of similar complaints | BBB listing, state consumer protection office, recent reviews | Ask the vendor directly; keep dated notes |
| Insurance | Policy dates run past the wedding; coverage types match requirements | Certificate of insurance from the vendor | Ask for an updated certificate before the wedding |
| Named staff | Lead person and team match what was promised | Contract, proposal, vendor email | Ask in writing who is substituting and why |
| Payments | Paid and remaining amounts agree on both sides | Your payment list, vendor invoice | Correct in writing and keep both copies |
| Change records | Every change is written and dated | Email, signed change orders | Ask the vendor to restate the current scope |
The thirty-day timeline for a wedding vendor final walkthrough
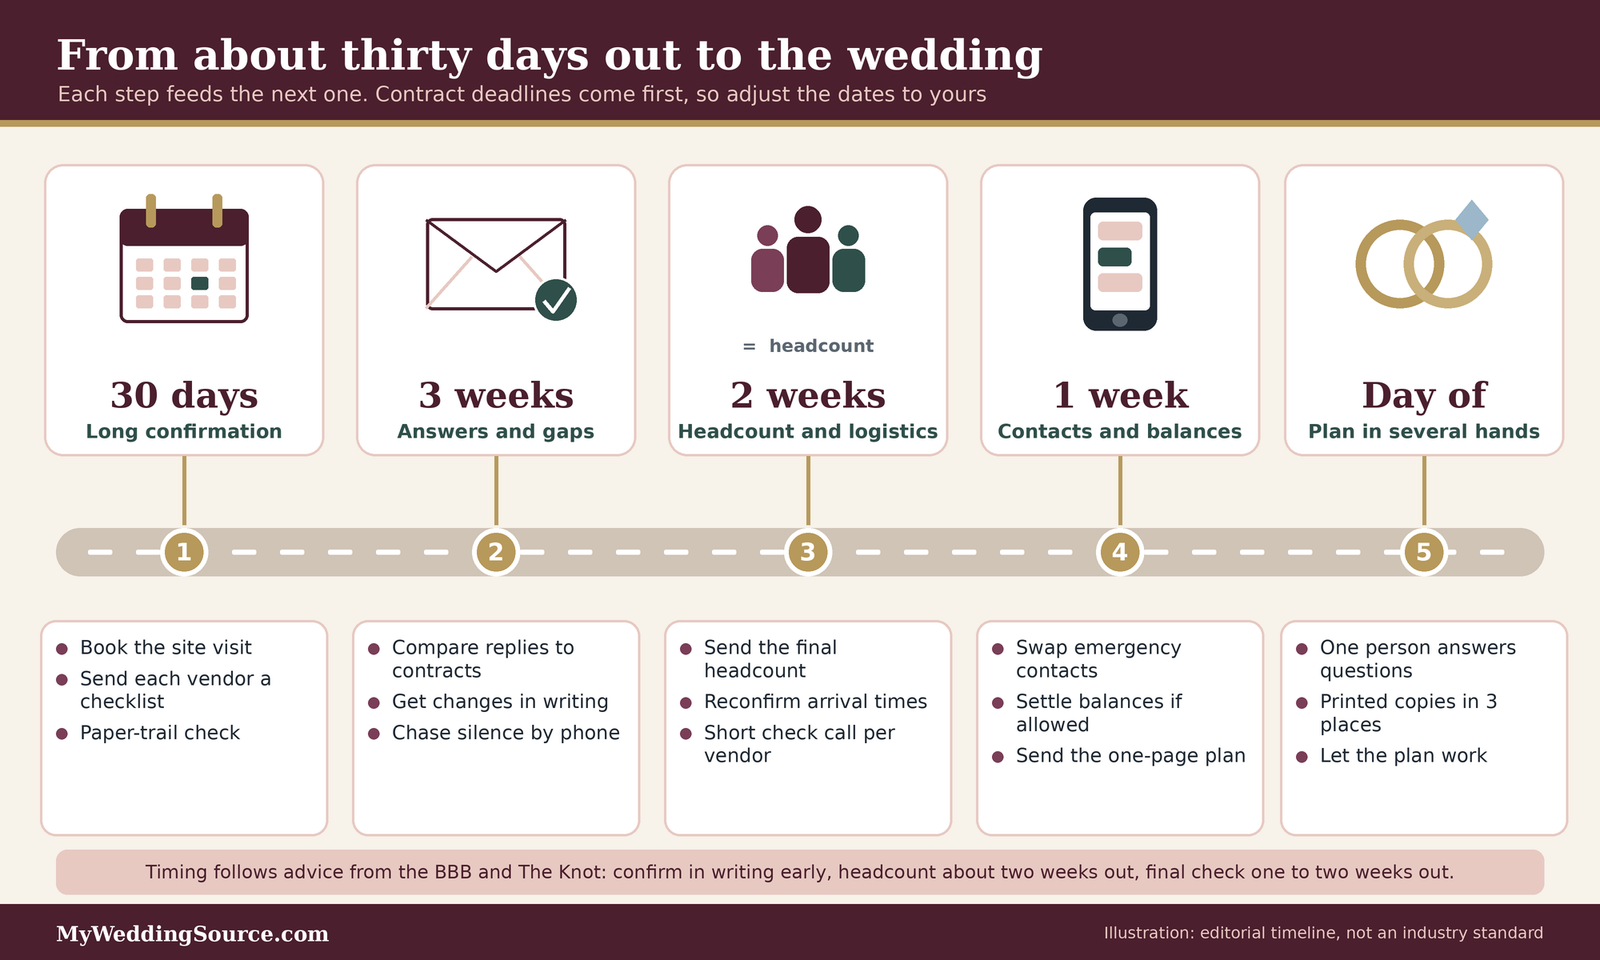
Thirty days sounds like a lot for a wedding vendor final walkthrough until you try to schedule five vendors and a venue manager in the same month. The timeline below sequences the work so that early steps feed later ones. The timing is based on advice from wedding publishers and consumer-protection sources, summarized in the figure, and you should adjust it to your contracts, because a vendor’s own deadlines override our suggestions.
About thirty days out: the long confirmation
This is the heaviest week of the wedding vendor final walkthrough process, and it is mostly scheduling and reading.
Book the walkthrough itself
Ask the venue contact for a date and time for the wedding vendor final walkthrough, and ask who will attend. Planning sites advise including whoever will handle your personal items and gifts so those details get named too. If a planner or coordinator is on your team, have them join. If you are doing this alone, bring a printed copy of the timeline and a notebook, not just a phone, because you will be walking and pointing.
Send the confirmation list to every vendor
Send each vendor the same short message with their own checklist: date, arrival time, address, load-in route, who is coming, what they are bringing, power or space needs, meal needs, the timeline draft, remaining balance, and emergency contact. Ask for answers by a specific date, a week or so later, and say that you will follow up by phone if you do not hear back. Our guide to wedding vendor communication deadlines covers how to set response dates without nagging.
Do the paper-trail check
Run the checklist in the previous section while you wait for answers to your wedding vendor final walkthrough messages. It takes less time than it sounds, and doing it early gives you weeks, not days, to react to anything odd.
About three weeks out: the answers and the gaps
By now you should have answers from most vendors and a short list of the ones who have gone quiet.
Compare answers against the contract
Read the replies against the contract. When an answer differs from the contract, do not assume bad faith. It may simply reflect a change you agreed to by phone and nobody wrote down. Ask the vendor to restate the current plan in writing, and keep the new version beside the old.
Chase silence early
Follow up by phone with any vendor who has not replied to your wedding vendor final walkthrough request, and make a note of the date and time of each attempt. The sooner you find out that a vendor is hard to reach, the more options you have. If you do end up needing a different vendor, our guides on vendor replacement and subcontractors explain how that situation usually works.
About two weeks out: headcount and final details
Two weeks out is a common point for the final headcount, and many contracts set their own date.
Send the final headcount
The Knot advises sharing the final headcount with vendors about two weeks before the wedding, and that includes caterers, venues, rental companies, florists, bakers, and planners, as well as vendors who need meals, such as photographers and musicians. Check each contract for its own final-count deadline, which may be earlier. Our guide to vendor meals explains how to count the people who are working your wedding but are not guests.
Reconfirm arrival and logistics
The Knot also advises reconfirming each vendor’s arrival date, time, and location one to two weeks before, and checking pickup and drop-off times with your transportation company. The BBB advises a final check with each vendor in that window, by call or email, covering date, time, address, and final details. This is the short call that follows the long one.
The final week: contacts, payments, and a calm schedule
The last week of a wedding vendor final walkthrough is not for new decisions. It is for locking in what you have decided and making sure the right people can reach each other.
Exchange emergency contacts
Give vendors the numbers of your planner or venue coordinator and a trusted person who can act for you. The Knot suggests doing this about a week out. Ask each vendor for a mobile number that someone will actually answer on the wedding day, not just an office line.
Settle balances before the day when you can
The Knot recommends paying vendors before the wedding day when possible and preparing any tips in labeled envelopes, and the BBB lists one to four weeks out as a window for final payments. Check each contract, though, because some require payment on the day, and some vendors prefer a specific method. Our wedding-week checklist pulls the final seven days together.
Walking the site: the route for your wedding vendor final walkthrough
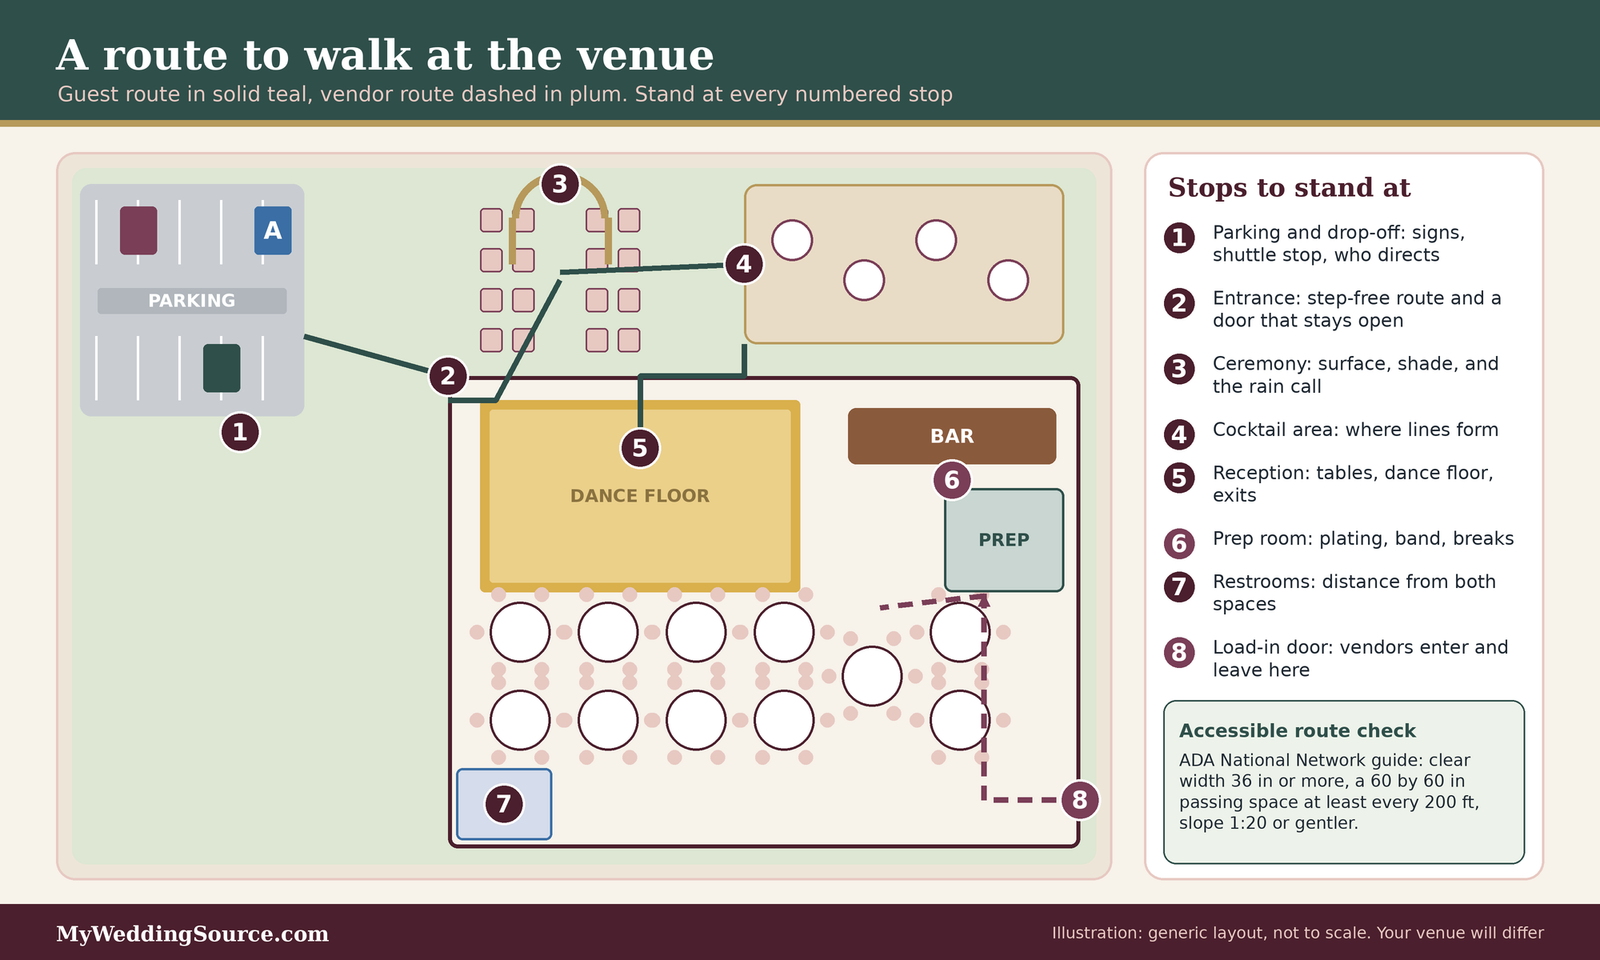
The most useful thing you can do at the venue during a wedding vendor final walkthrough is walk the day in the order it will happen, slowly, with the contacts who will be there. Do not just admire the room. Stand where a guest stands, where a caterer stands, and where an older relative will stand when it starts to rain.
The figure below sketches a typical route as numbered stops. Your venue will differ, so use it as a prompt for your own list. The accessible-route figures come from the ADA National Network’s planning guide for temporary events, and we explain them in the guest route section.
The guest route: arrival to departure
Start your wedding vendor final walkthrough where your guests start. Many problems at weddings are really arrival problems, and you only find them by walking in from the parking area as a first-time visitor would.
Parking, drop-off, and signs
Ask where guests park, where rideshares and shuttles stop, and who will direct them. If you are using a shuttle, confirm the pickup point and loop with the transportation company, and see our guest transportation planning guide for how to think about timing. Look for signs. Ask whether the venue allows temporary directional signs, where they may be placed, and who puts them out and takes them down.
Accessible routes, surfaces, and seating
If any guest uses a wheelchair, walker, cane, or has trouble with distance or uneven ground, walk the route with those needs in mind. The ADA National Network planning guide lists dimensions for temporary events, including a clear route at least 36 inches wide, a 60-by-60-inch passing space at least every 200 feet, and a slope of 1:20 or gentler along the route, with ramps allowed up to 1:12. It also advises that grass be cut short and firm, and it names deep carpet, sand, gravel, and cobblestones as surfaces to avoid, with interlocking tiles or perforated mats suggested for long routes over soft ground. Those figures are a guide to what to look for. They are not a legal determination about your venue, and your venue’s own obligations depend on how it is classified. If you plan to have a ceremony on grass, ask what happens if it rains, because tall, wet, or muddy grass is the exact condition the guide warns about.
Restrooms and the quiet room
Walk to the restrooms from the ceremony space and from the reception space, and count how far each one is. Ask how many stalls are available and whether the venue brings in extra units for larger events. Ask whether there is a quiet room, a cooler spot, or a place to sit for a guest who needs a break. These are small questions that decide whether a long day feels welcoming.
The vendor route: load-in to load-out
Every wedding vendor final walkthrough should include a route for the vendors, because they have a route of their own, and it is nearly always less glamorous than the guest route. Walking it with them in mind makes everyone’s day easier.
Loading dock, doors, elevators, and carts
Ask where vendors enter, where they may park to unload, and how long they have. Walk from the vehicle door to the setup spot and note stairs, narrow corridors, and elevators. If the florist is bringing arches or the band has a heavy rig, those stairs matter. Our guide to venue load-in restrictions explains the types of limits venues commonly set, such as time windows, door access, and elevator rules.
Power, water, and staging space
Find the outlets, the circuit limits if the venue will tell you, the water source, and the places where deliveries can stage before setup. If the DJ, band, or lighting vendor needs dedicated power, ask the venue to confirm it in writing rather than relying on the vendor’s assumption. Our audio and lighting checklist explains what to ask. Do not attempt to solve electrical questions yourself. Ask the venue and the vendors, who are qualified to answer them.
Prep rooms and break areas
Ask where the caterer will plate, where the band will warm up, and where the photographer can leave a bag. Planning advice for final venue visits notes asking whether performers have a room to get ready and take breaks. A cramped back-of-house is one of the most common causes of delay, and it costs nothing to look at it a month out.
The weather and safety route
The third route in a wedding vendor final walkthrough is the one nobody enjoys walking, which is why it is worth doing. You are looking for shelter, exits, and the places where a plan might fail.
Shelter, backup space, and the decision time
Find the rain or storm location and ask who decides to use it, when the decision is made, and how guests will be told. If the backup space holds fewer people, ask how the layout would change. Our summer wedding heat plan and the weather sections of our other guides cover what to prepare in advance.
Exits, fire lanes, and flame rules
Look for exits and make sure nothing in your layout blocks them. If you plan to use candles, sparklers, a send-off with anything lit, or any other open flame, ask the venue what its rules are and whether local fire officials require a permit. We cover this in more detail below, because rules vary by place.
First aid and emergency access
Ask where the first-aid kit is, who on staff is trained, and how an ambulance would reach the site if one were needed. Keep a copy of the venue’s address and any gate codes in your packet so that a caller can give them quickly. Our wedding emergency kit guide covers the small items to have on hand.
Questions to ask the venue during the walkthrough
- When can the first vendor enter, when must the last one be out, and what happens if anyone runs over?
- Where do guests park, and where do shuttles and rideshares stop?
- Which route is step-free from parking to the ceremony, the reception, and the restrooms?
- Where is the backup space, who makes the call, and by what time?
- What are the rules for candles, sparklers, open flames, confetti, and fog or haze?
- Where can vendors plate, warm up, store cases, and take breaks?
- Who is on site that day, and what is their mobile number?
- Are tip jars allowed, and is a service charge already included?
- Who unlocks and locks each space, and who closes out the night?
Questions to ask each type of vendor at the thirty-day mark
Use the questions below as a starting bank for your wedding vendor final walkthrough, and cut anything your contract already answers. The purpose is not to quiz vendors. It is to give each one a chance to say what they need from you, which is often more useful than what you need from them.
The venue and the coordinator
In any wedding vendor final walkthrough, your venue contact is the one person who knows the building, the rules, and what other events are scheduled around yours.
Timeline and access
Ask for the venue’s version of the timeline and compare it with yours, line by line. Check when the couple and wedding party may arrive, when vendors may begin setup, when music must end, and when everyone must leave. Planning advice for final venue visits notes that late departures can mean extra hourly charges, so confirm the hours in your contract and our guide to vendor overtime rates explains how those charges often work.
Layout and capacity
Confirm the floor plan with real numbers: how many tables, what shape and size, and where the dance floor, bar, cake table, gift table, and photo spot go. Our guide to wedding venue capacity explains why a room’s maximum is not always the number that works comfortably.
The caterer and the bar
Food is where time, temperature, and headcount meet in a wedding vendor final walkthrough, which makes it the most operational part of a wedding.
Headcount, menu, and dietary needs
Confirm the final entree counts, the dietary needs, and how they will be labeled and served. For allergies, ask how the kitchen handles them, and do not accept a promise of “allergen-free” without a description of the process. Tell the caterer about any vendor meals and any children’s meals. If you have not finalized the menu, our caterer tasting guide can help you ask better questions.
Service style, staffing, and timing
Ask how many servers and bartenders will be there, how service will run, and when each course or station will open. Ask when the kitchen needs access and what it needs from the venue: power, water, a prep space, a way to dispose of waste. Ask who will cut the cake and whether a cutting fee applies, and what happens to leftovers, since policies vary.
Food holding and safety
Ask how the caterer keeps hot food hot and cold food cold for the length of service, and what it does for an outdoor or hot-weather event. We cover the published guidance in the next section. A caterer who answers confidently and specifically is reassuring. One who has never been asked is worth a follow-up.
The photographer and videographer
In a wedding vendor final walkthrough with a photographer, the paper and the people are the two things to confirm.
Who is coming and what they need
The Wisconsin consumer-protection guide advises confirming that the person who will shoot your wedding is the person you vetted, and naming that person in the contract. Ask who the lead and any second shooter are, what time they begin, how long they stay, and what they need: a meal, a place to charge batteries, a quiet corner for portraits. Share your shot priorities and the family-photo list, and see our photographer shot list guide for ideas.
Light, location, and delivery
Ask them to look at the venue’s lighting at the times you will be there, and to suggest the portrait location. Confirm the delivery date and format in writing. Our photography deliverables guide explains what to look for in a delivery clause.
The florist and rental companies
Both bring physical objects to a place that has its own rules, so logistics matter more than design at this stage.
Delivery, setup, and substitutions
Ask for the delivery window and the setup plan: what goes where, who moves it, and when it is collected. The Wisconsin guide notes that florist contracts should list delivery times and locations, who transports the flowers, and what happens if chosen flowers are not available. Ask about substitutions now, while you can still react. Our floral logistics checklist goes deeper.
Quantities, damage terms, and pickup
For rentals, check the order line by line against your final headcount and layout, confirm delivery and pickup times, and ask what you or the venue are responsible for if something breaks. Do not assume a damage waiver does what you hope. Read what it covers.
The DJ, band, and officiant
In a wedding vendor final walkthrough with performers, space, power, and a clear schedule matter more than anything else.
Sound, power, and schedule
Share the timeline and the announcements list, confirm the setup time, the sound check, any venue volume limits, and the end time. Ask whether the performers need a meal, a green room, and parking near the door. Our wedding DJ questions guide can help if you are still defining what you want.
The legal piece for the ceremony
Your officiant is not only a vendor, and the wedding vendor final walkthrough should cover the legal side too. In most places, there are legal steps for the marriage to be valid, and those vary by state. Confirm with your officiant and your local marriage license office what is required, who signs, and how the license is returned. We are not able to give legal advice, and rules differ, so rely on your local office.
Hair, makeup, and transportation
These services run on a clock, so they belong in every wedding vendor final walkthrough, since almost everything else on the day depends on it.
Beauty schedule
Confirm the schedule, the number of people, the address, and the space needed, including outlets and good light. Our hair and makeup schedule guide shows how to build it backward from the first photographs.
Vehicles and drivers
Confirm vehicle type, pickup times and addresses, the route, the driver’s number, and what happens if a vehicle breaks down. If a vehicle must carry anyone who uses a mobility device, confirm that the vehicle can in fact do so, in writing. Our wedding transportation guide covers the basics.
Food, heat, and weather: the limits worth knowing before the day
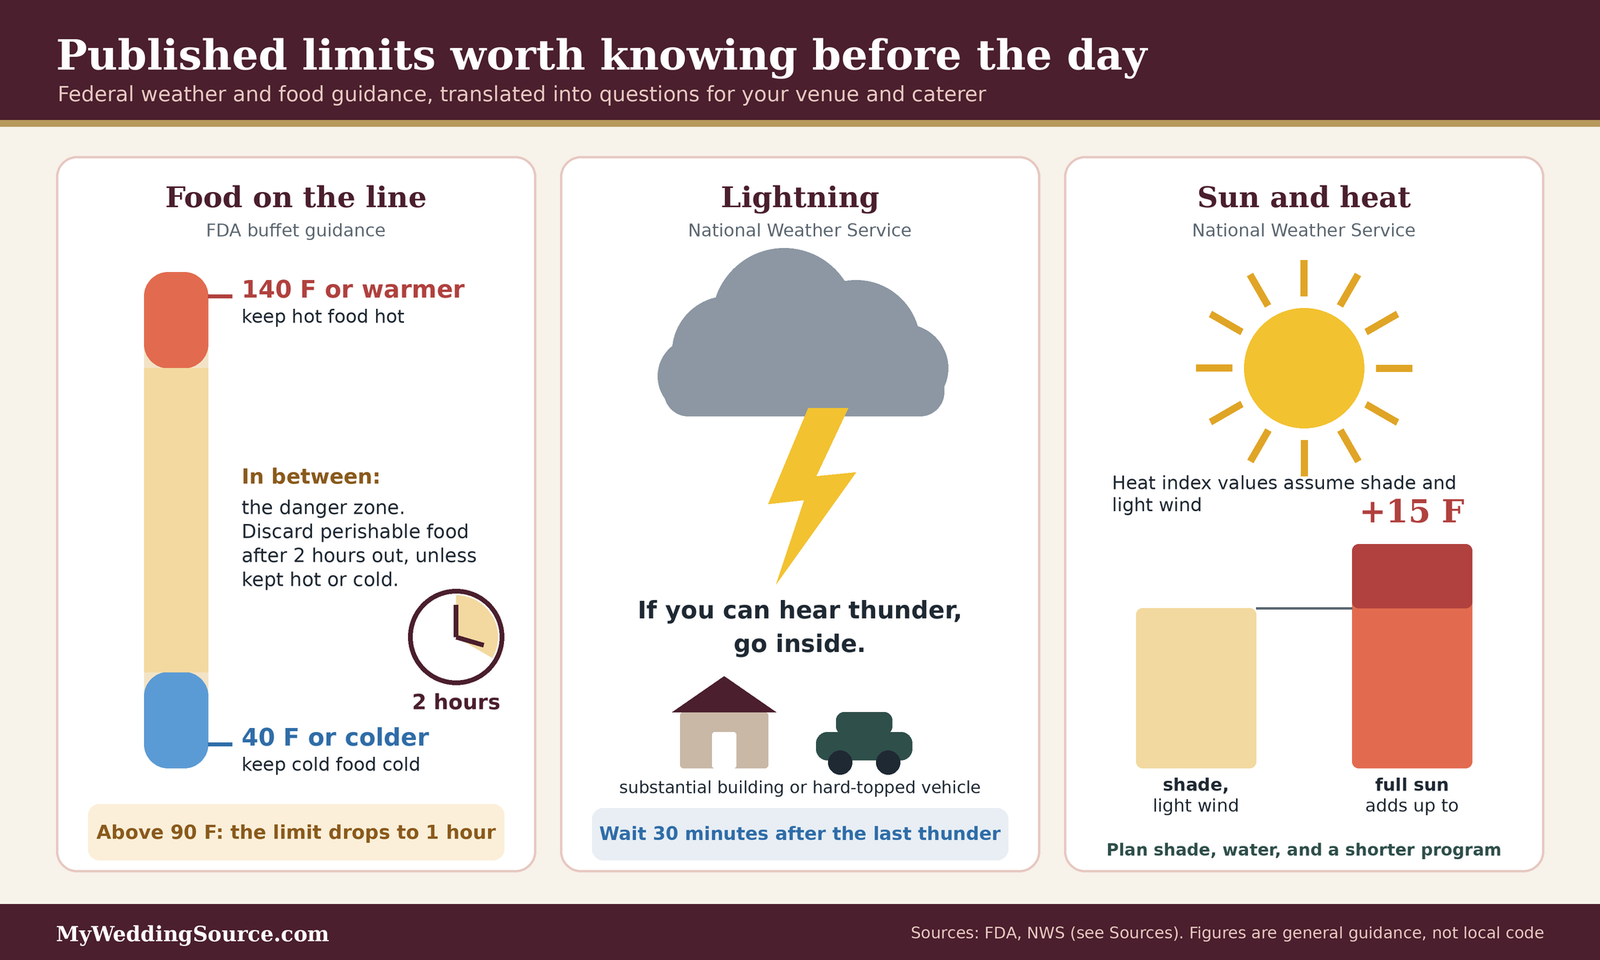
Some of the questions in a wedding vendor final walkthrough have published numbers behind them. Having a few of those numbers in your head makes you a better partner to your caterer and venue. The figure summarizes them, and the notes below explain each in plain terms.
Food temperatures and time
You are not going to inspect a caterer’s kitchen, and you should not try. You can ask informed questions, and you can notice whether the answers sound like a plan.
Hot food, cold food, and the two-hour rule
The U.S. Food and Drug Administration’s guidance on serving safe buffets says hot food should be kept at 140 degrees Fahrenheit or warmer and cold food at 40 degrees or colder, that perishable food left at room temperature for more than two hours should be discarded unless it is being kept hot or cold, and that the safe holding time drops to one hour when the area is above 90 degrees. It also advises putting cold dishes on ice if they will sit out for more than two hours and warns that some warming equipment holds food at only 110 to 120 degrees, so you should check the label. These are home-and-buffet guidelines from a federal agency. Professional caterers work under local health codes, which can differ, and we cannot say which rules apply to your caterer.
What to ask the caterer
Ask: “How do you hold hot and cold food during service, and what changes if it is hot out?” You want to hear about equipment, thermometers, ice or refrigeration, and swapping out dishes in small batches. The FDA guidance itself recommends preparing several small platters and swapping in fresh ones rather than letting one dish sit, and not topping off partly filled dishes. A caterer may do something different and still be safe. The point is that they have an answer.
Cooking temperatures in context
FoodSafety.gov, a federal portal, lists safe minimum internal temperatures, such as 165 degrees for poultry and casseroles and 145 degrees for fish and for steaks, roasts, and chops of beef, pork, and lamb, with a three-minute rest for the whole cuts. You do not need to memorize that list. It is useful as a reminder that cooked food has numbers, and that a professional kitchen should be tracking them.
Heat and lightning
Weather is the thing you cannot negotiate, so the wedding vendor final walkthrough has to cover it, and a month out is when you decide how you will respond to it.
Heat
The National Weather Service explains that the heat index combines air temperature and humidity, that its values assume shade and light wind, and that full sun can raise them by as much as fifteen degrees. For a ceremony in direct sun, that is a good reason to plan shade, water, and a shorter program, and to ask the venue and vendors what they provide. Outdoor workers are also affected, and the same NWS page notes federal workplace guidance on shade, work-rest schedules, and scheduling strenuous work earlier or later in the day. Your vendors are working in the same conditions as your guests.
Lightning
The National Weather Service’s lightning guidance is blunt: if you can hear thunder, you are close enough to be struck, and people should go inside a substantial building or a hard-topped vehicle and stay there until thirty minutes after the last thunder or lightning. It lists rain shelters, small sheds, and open vehicles as unsafe. A tent or open-sided canopy is, in effect, a rain shelter, so it does not count as lightning shelter under that guidance. If your ceremony or reception is outdoors, ask the venue who watches the sky, who makes the call to move people, where they go, and how long a delay the timeline can absorb.
Fire, flames, and decorations
Flame effects make good photographs, so any wedding vendor final walkthrough should raise them, and they are also the area where local rules matter most.
Candles and open flames
Fire codes are local. As one example, the Fairfax County, Virginia fire marshal publishes rules for open-flame decorative devices at gatherings that require a permit for open flames in certain public-assembly settings, ban candles in aisles and exits and in places where people stand, prohibit passing lit hand-held candles between people, and note that battery-operated candles can remove the need for a permit in those occupancies. That is one county’s rules. Yours may be stricter, looser, or organized differently. Ask the venue what applies, and ask whether a permit or inspection is required and who obtains it.
Sparklers, lanterns, and send-offs
Ask directly about sparklers and any other lit send-off. Planning guidance for venue visits suggests asking who will direct guests to line up for the send-off and confirming the venue’s rules if sparklers are planned. If the answer is no, a battery-powered or non-flame alternative is usually available, and it is better to learn that now.
Reading the answers: a decoder for the responses you get back
A wedding vendor final walkthrough produces a lot of answers, and some will be reassuring and some will not. The decoder below is our own editorial framework, not an industry standard. It sorts responses into three groups so you know which ones need action.
Green answers: specific, written, and consistent
A green answer gives a name, a time, a number, or a document, and it matches your contract.
Examples of green
“Our lead will be on site from the stated time. Here is her mobile number, and here is our current certificate.” “We have updated your headcount in the system and the revised invoice is attached.” “The kitchen has a prep room, and the venue confirmed access in writing.” These answers cost the vendor effort, which is a good sign.
What to do with green
Save the message in your folder and move on. Do not re-ask. Repeated checking of a confident vendor can come across as distrust.
Amber answers: vague, verbal, or late
An amber answer might be perfectly fine, but it is missing something that would let you confirm it.
Examples of amber
“Do not worry, we will handle it.” “We usually do it this way.” “I think the venue allows that.” “Someone from our team will be there.” Each of these may be true. None of them is checkable.
What to do with amber
Turn it into a written, specific question: “Could you tell me who will be there and send their number?” “Could you confirm with the venue in writing?” Give a date for the answer. Most amber answers turn green with one polite follow-up.
Red answers: contradictions, new fees, or silence
A red answer is one that conflicts with your contract, introduces an unexpected cost, or does not arrive.
Examples of red
A vendor requests payment that was not in the contract. A vendor says a different person will attend with no explanation. A certificate shows a policy that ends before your wedding. A vendor does not reply to three attempts across two weeks. A venue contradicts what the contract says about hours or fees.
What to do with red
Slow down and document. Reply in writing, quote the contract, and ask a plain question: “Our contract says this. Your message says that. Can you help me understand the difference?” If the issue involves money or a possible breach, our guides to contract change orders and the vendor replacement policy can help you understand your options, and a licensed attorney or your state’s consumer-protection office can advise on your rights. We cannot tell you what a contract means for your particular situation.
| What you hear | Color | What it usually means | What to do next |
|---|---|---|---|
| A name, a time, a number, and a document | Green | The vendor has a plan and has written it down | File the message; no follow-up needed |
| “We will handle it” with no details | Amber | Probably fine, but unconfirmed | Ask the same question in writing with a response date |
| “I think the venue allows it” | Amber | Nobody has checked | Ask the venue directly and ask for written confirmation |
| A new fee not in the contract | Red | A scope or price change, or a mistake | Ask for the contract clause or a written change order before paying |
| A different person is coming | Red | A staffing change, possibly a subcontractor | Ask who, why, and whether the contract allows it |
| No reply after repeated tries | Red | Poor communication or a business problem | Escalate by phone, then to any named backup; keep notes |
Money at the thirty-day mark: balances, methods, and protections
Most vendor contracts have a final balance due somewhere in the last month, so the wedding vendor final walkthrough is also a money check. A wedding vendor final walkthrough is a sensible time to confirm exactly what will be due and how it can be paid.
What the final balances can include
Final balances are often more than the original quote. Depending on the contract, they can include tax, a service charge, gratuity, overtime, a cake-cutting or corkage fee, a travel or lodging fee, a late headcount change, or a delivery charge. The BBB advises asking whether tax, gratuity, and service fees are included in quoted prices and asking venues about extras such as cake cutting or corkage. Ask each vendor for a written final invoice before the wedding. We do not list typical amounts here, because prices vary widely by region and vendor.
Final balances and who collects them
The question is not only how much, but when, by whom, and in what form.
Confirm the amount, date, method, and person
For each vendor, write down the amount, the due date, the accepted method, and who will collect it. If a vendor says the balance will be collected on the wedding day, ask whether that is a contract requirement or a preference, because paying earlier removes one task from a busy day. The Knot advises paying vendors before the wedding day where possible. If you choose to pay on the day, assign one person, such as your planner or a trusted relative, to hand over labeled envelopes or payments so that you are not doing it in your wedding clothes.
Ask about the final invoice
Ask each vendor to send a final invoice that shows the total, what has been paid, and what remains. If the invoice differs from your records, resolve it in writing now. This is also when you can ask about any fee that has appeared since the contract, using our guides on overtime rates and travel and lodging fees to understand what is common.
Payment protections
How you pay can affect your options if something goes wrong, so use the method your contract specifies, and understand the tradeoffs.
Credit cards and billing disputes
The Wisconsin consumer-protection guide advises considering a credit card because the card company may help if something goes wrong, and the BBB advises using a credit card for deposits and avoiding cash, wire transfers, gift cards, and payment apps for deposits. The Federal Trade Commission explains that under the Fair Credit Billing Act you can dispute certain billing errors in writing, with the letter reaching the card issuer within sixty days after the first bill showing the error was sent, and that covered errors include goods or services not delivered as agreed. The FTC also explains that for problems with the quality of what you bought, additional conditions apply, including trying to resolve the issue with the seller first and, in many cases, that the purchase was made in your home state or within 100 miles of your billing address. These rules have limits and exceptions, and we are not able to tell you how they would apply to your situation. If a dispute becomes necessary, contact your card issuer promptly, since the deadlines run from the statement date, not from the wedding date.
Keep records either way
Keep receipts, invoices, and any messages about delivery dates. The Michigan Attorney General’s consumer protection pages advise gathering receipts and invoices showing what you ordered, what you paid, and when delivery was promised, and keeping notes of phone conversations with names and dates. The habit takes minutes and can matter a great deal later.
Tips and meals
Both are small line items that tend to cause day-of friction when nobody has planned them.
Tips
Decide in advance who will tip whom, in what amount, and who will hand it over. Some contracts include a service charge or gratuity, so check before adding more. The Knot suggests preparing tips in labeled envelopes ahead of time.
Vendor meals
Ask each vendor whether they need a meal, whether a vendor meal is in the catering count, and where they will eat. Our vendor meals guide walks through the counts.
Edge cases a wedding vendor final walkthrough should anticipate
Most checklists describe the normal case; a wedding vendor final walkthrough also has to plan for the abnormal one. These are the situations that tend to cause trouble, each with a calm way to approach it.
When a vendor goes quiet or closes
During a wedding vendor final walkthrough, this is the scariest scenario and, thankfully, not the most common one. It is also where a month of lead time matters most.
Escalate in steps
Call, then email, then message through any other channel you have, and note each attempt. Ask the venue and any planner whether they have heard from the vendor recently. If the business operates through a team, ask for another contact. Check the business’s public pages and your state’s business record to see whether anything has changed.
Protect yourself while you work out what happened
The Michigan Attorney General’s consumer guidance for a business that closes suddenly says to dispute credit card charges with the card issuer and ask that related charges be removed, to ask your bank to place a stop payment on a check, to ask your bank to stop automatic payments, and to file a complaint, including with the attorney general of the business’s state if it is out of state. Which of those apply depends on how you paid and what happened. If the vendor is simply late or disorganized and not closing, a calm written request with a deadline is usually the better first step. If you decide you need a replacement, our guide to the wedding vendor replacement policy explains how contracts usually treat that situation, and consider speaking with an attorney before you cancel or withhold payment.
When the person or the company changes
Sometimes, during a wedding vendor final walkthrough, you learn that the vendor you hired is not the one who will arrive.
A different staff member
A different photographer, DJ, or lead is not necessarily a problem, but it is a change. Ask who it is, why, and whether the contract allows it. Ask to see samples of the substitute’s work. The Wisconsin guide’s advice about naming the specific photographer in the contract is the reason: if the person was named, a substitution needs your agreement.
A subcontractor
Some businesses use subcontractors for certain services, such as extra staff, rentals, or specialty items. That is common and often fine, but you should know about it. Our guide to wedding vendor subcontractors explains what to ask about who is accountable if a subcontractor does not perform.
When the numbers change
Headcount and menus do not stay still, and the wedding vendor final walkthrough is where changes surface.
A late guest-count change
If your guest count changes after the headcount deadline, ask the vendors what they can adjust and at what cost. Some can add; some cannot, particularly for food and rentals. Ask early and in writing. A smaller change is easier than a larger one, and a vendor who knows about a possible change in advance can often accommodate it better than one who hears on the day.
A new dietary or access need
If a guest tells you about a new allergy or access need, tell the caterer and the venue the same day, in writing, and ask them to confirm what they will do. For access needs, ask the venue before you assume. For allergies, do not rely on a general promise; ask how the kitchen will handle it.
When you cannot be there
Not everyone can attend a wedding vendor final walkthrough in person a month out, especially if the wedding is far from home.
A remote walkthrough
Ask the venue contact to do a video call and walk the route while you watch, and ask them to photograph each stop. Send them your list in advance. It is a weaker substitute than being there, but it covers most of the practical questions.
A stand-in
Ask your planner, coordinator, or a trusted person who lives nearby to attend and take photographs and notes. Give them the packet and your list. Our destination wedding checklist covers the extra layers when you are far away.
When the venue is also a vendor
Some venues provide catering, rentals, and staff. That can simplify the wedding vendor final walkthrough, because one team answers for several things, but it also concentrates risk.
One contact for everything
Ask the venue to name one person who is accountable for each service. When a single business holds the food, the bar, the staff, and the space, a single missed handoff can affect several things at once.
Separate the services in writing
Ask for a written breakdown of what the venue provides and what outside vendors provide, so that you can see where the responsibilities begin and end.
Documenting the walkthrough and sharing the plan
A wedding vendor final walkthrough that lives only in your memory helps nobody. The last step turns what you learned into one document that everyone can use.
The one-page summary
A summary does not need to be elaborate. It needs to be accurate and short enough to be read.
What goes in it
Include the date and address, the timeline with times, each vendor’s lead name and mobile number, arrival and load-in times, the load-in route, power and space notes, the weather plan and decision time, the headcount and any dietary or access notes, the remaining balances and who handles them, and the emergency contacts. Add any open items with an owner and a due date.
How to send it
Send it to every vendor, the venue contact, your planner, and the trusted person who will act for you. Ask for a reply to confirm they have read it and for corrections by a specific date. The Knot advises giving each vendor a tailored version of the timeline and keeping both digital and printed copies, and that is a good model: everyone gets the whole picture, and each vendor also sees a highlighted version of their own part.
Who holds what on the day
Decide during your wedding vendor final walkthrough who will carry which papers and who will answer which questions.
Printed copies and the folder
Print a few copies, and put one in the hands of the planner or coordinator, one with your trusted person, and one in a bag you will have. Include the contracts, the certificates, the payment record, and the summary.
The question line
Choose one person to answer vendor questions so that you are not interrupted. Tell vendors who it is. Our wedding party coordination checklist covers how to brief the people around you.
Your next steps
This week
Block the time
Put the site visit and the vendor confirmation round of your wedding vendor final walkthrough on the calendar now, and ask the venue contact for two possible dates. Invite your planner or coordinator and the person who will act for you on the day. Open our vendor timeline beside your own so the dates agree.
Build the packet
Gather the contracts, change records, payment list, and the latest timeline into one folder. Then send the confirmation list to each vendor with a reply-by date. If you want the larger picture first, our wedding planning checklist shows where this step sits.
The next two weeks
Walk the site and run the paper-trail check
Walk the guest, vendor, and weather routes of your wedding vendor final walkthrough with the venue contact, take photographs at each stop, and write the answers down. Run the paper-trail check while replies come in, and follow up by phone with anyone who has not answered.
Send the summary
Send the one-page summary to everyone, ask for confirmation, and set a reminder to send the final headcount about two weeks before the wedding, or earlier if a contract says so.
The final stretch
Reconfirm and settle up
Close out your wedding vendor final walkthrough with a short reconfirmation call to each vendor, settle balances where your contracts allow, and put emergency contacts in everyone’s hands. Our wedding-week checklist covers the last seven days.
Let the plan work
After this, resist the urge to re-check everything. The point of a wedding vendor final walkthrough is that the plan now lives in writing, in several hands, and does not depend on you remembering it.
Wedding vendor final walkthrough FAQ
Timing and scope
When should I do a wedding vendor final walkthrough?
About a month before the wedding is a practical starting point, because details are settled but changes are still possible. Then make a short reconfirmation with each vendor one to two weeks out. Your contracts may set their own deadlines for headcount, payments, and changes, and those take priority over general advice.
Who should come to the venue walkthrough?
The venue’s point of contact and, if you have one, your planner or day-of coordinator should come. Many planning sources also suggest including whoever will handle your personal items and gifts. Bring your signed contracts and a printed timeline. If you cannot attend, a video tour or a trusted stand-in works for most questions.
Do I need a walkthrough with every vendor?
Not an in-person one. The venue visit covers the space, and each other vendor needs a shorter call or written confirmation covering date, arrival time, address, staff, and balance. Vendors with heavy setup needs, such as the florist, band, or rentals, benefit most from a quick site conversation with the venue present.
Paperwork and money
What documents should I bring?
Bring signed contracts, any proposals they refer to, written changes, your payment record, the draft timeline, and each vendor’s certificate of insurance if you have one. Keep digital copies on your phone and printed copies with your planner. If a vendor disputes a detail, the signed documents are what settle it.
Should I check a vendor’s registration and complaints again?
A quick recheck is reasonable at the one-month mark. Confirm the name on your contract matches the public record, look for any new pattern of similar complaints, and ask for an updated certificate of insurance if the old one expires near your date. It is a light confirmation, not an investigation.
How should I pay final balances?
Follow the method your contract specifies, and pay before the wedding when the contract allows it. Consumer agencies generally suggest credit cards over cash, wire transfers, or payment apps because disputes can be easier. Dispute rights have deadlines and conditions, so ask your card issuer how they apply to you.
When something is off
What if a vendor will not answer?
Document each attempt, then escalate by phone, then through the venue or your planner. Check whether the business is still operating. Ask your contract what happens if a vendor cannot perform, and consider asking an attorney or your state consumer-protection office before you cancel or withhold payment. Starting a month out gives you real options.
What if a vendor changes the plan or adds a fee?
Ask for the change in writing and compare it with your contract. If the contract supports it, you will see the clause. If it does not, ask for a written change order that states the new scope and price before you agree. A calm question gets better results than an accusation.
Sources & methodology
How we built this guide
What we relied on
This guide combines advice from federal and state consumer-protection and public-health sources, a local fire marshal’s published rules, an accessibility planning guide for temporary events, the Better Business Bureau, a commercial insurer’s explainer on certificates of insurance, and wedding-planning publishers. Where a statement comes from a publisher or insurer, we say so, because their advice reflects their own business and habits. The timeline, the response decoder, and the route figure are our own editorial frameworks. They are not industry standards. We checked each source page on November 12, 2026, and pages change, so confirm current details before you rely on them.
What we did not do
We did not inspect any venue or vendor, and we did not review any contract. We are not lawyers, insurers, health professionals, or fire officials, and nothing here is legal, financial, insurance, or safety advice. State laws, local codes, and contract terms differ, and the Fairfax County fire rules are one example, not a national rule. For legal questions, consult a licensed attorney or your state consumer-protection office.
Source list
Government and public-agency sources
- Federal Trade Commission, Using credit cards and disputing charges: https://consumer.ftc.gov/articles/using-credit-cards-and-disputing-charges
- U.S. Food and Drug Administration, Serving safe buffets: https://www.fda.gov/food/buy-store-serve-safe-food/serving-safe-buffets
- FoodSafety.gov, Safe minimum internal temperatures: https://www.foodsafety.gov/food-safety-charts/safe-minimum-internal-temperatures
- National Weather Service, Lightning safety overview: https://www.weather.gov/safety/lightning-safety-overview
- National Weather Service, Heat index: https://weather.gov/safety/heat-index
- Wisconsin Department of Agriculture, Trade and Consumer Protection, Avoiding wedding catastrophes: https://datcp.wi.gov/Pages/Publications/Wedding219.aspx
- Michigan Attorney General, Consumer alert on business sudden closure: https://www.michigan.gov/consumerprotection/protect-yourself/consumer-alerts/shopping/business-sudden-closure
- Fairfax County Fire Marshal, Open flame decorative devices: https://www.fairfaxcounty.gov/fire-ems/fire-marshal/open-flame-decorative-devices
Accessibility, consumer-organization, insurer, and publisher sources
- ADA National Network, Planning guide for making temporary events accessible to people with disabilities: https://adata.org/guide/planning-guide-making-temporary-events-accessible-people-disabilities
- Better Business Bureau, Weddings: key dates and tips: https://www.bbb.org/article/news-releases/19283-weddings-key-dates
- Progressive Commercial, What is a certificate of insurance (COI) for vendors: https://www.progressivecommercial.com/business-resources/vendor-coi/
- The Knot, Last-minute questions to ask wedding vendors: https://www.theknot.com/content/last-minute-questions-to-ask-wedding-vendors
- WeddingWire, Final venue walk-through: https://www.weddingwire.com/wedding-ideas/final-venue-walk-through