
Wedding directional signage is the set of signs that tells guests where to go once they leave their car, a shuttle or a drop-off point at a large outdoor venue. This guide shows how to build a guest route, test it by walking it, and place each sign at the exact point where a guest would otherwise stop and wonder.
Walk every guest route from arrival to seat with someone who has never seen the site. Mark each spot where that person slows down, looks around or chooses between paths. Those are your decision points. Put a deciding sign that points to each branch at every fork, a confirming sign just past every merge and wherever the walk runs long without a cue, and a warning sign only where a hazard is real. Check each sign from the guest’s eye level, in the light of the actual start time, then confirm placement rules with the venue.
A large outdoor venue changes what wedding directional signage has to do. At a hotel ballroom, guests follow the crowd and a staff member at the door fixes whatever goes wrong. On a sixty-acre estate, a vineyard, a farm or a park, the ceremony lawn may be out of sight from the parking field, the restrooms may sit behind a hedge, and the nearest staff member may be a five-minute walk away.
Guests arrive in clusters, in dress shoes, often carrying a child or a gift, and they are already slightly anxious about being late. A sign that would have been decoration indoors becomes the only thing standing between a guest and a wrong turn, so wedding directional signage carries real weight.
Good wedding directional signage is therefore less about style and more about sequence. The question is not “what should the sign say” but “where will this guest be standing when they need to know, and what will they already have seen?” This article builds the answer in order. First the job each sign does, then a repeatable route test, then the placement diagram that comes out of the test, then readability, access, permissions, setup and a worked example.
A note on scope. This is general planning information, not legal, safety or accessibility advice. Venue rules, local codes and accessibility requirements differ from place to place, so confirm anything that affects safety or placement with the venue and the relevant authority. The article points to the agencies that publish those rules so you can check the current version yourself.
If you are planning the whole signage package, including the welcome sign, seating display and menu, the guide to wedding signage as a system covers readability, proofing and venue permissions across every sign. This article stays narrower. It deals only with wedding directional signage, the signs that move people from one place to another across open ground, which is the part that most often goes wrong at a big site.
What wedding directional signage has to do at a large venue
It helps to separate four jobs, because one sign rarely does all of them well. Couples tend to order a set of matching signs that all say roughly the same kind of thing, such as a name plus an arrow, and then discover that some positions needed something different.
Deciding. A deciding sign stands at a fork. It must show where each branch leads, so the guest can choose. It needs the most careful placement, because a guest who reaches a fork without information will pick a path at random or turn around to ask someone.
Confirming. A confirming sign stands along a straight stretch with no choices. Its only job is to say “yes, keep going.” Guests who walk a long distance without any cue begin to doubt themselves, and doubt is the thing that produces phone calls to the couple’s relatives. A confirming sign can be very small and very simple.
Naming. A naming sign stands at a destination and says what the place is: ceremony, cocktail hour, restrooms, guest book, accessible seating. It confirms arrival and lets a guest who has wandered in from another direction work out where they are.
Warning. A warning sign tells guests about a hazard or a closed route: a step, a slope, a gate that is not part of the event, a service road, a drainage ditch. It is the only type with a safety purpose, so it should be rare, clear and agreed with the venue.
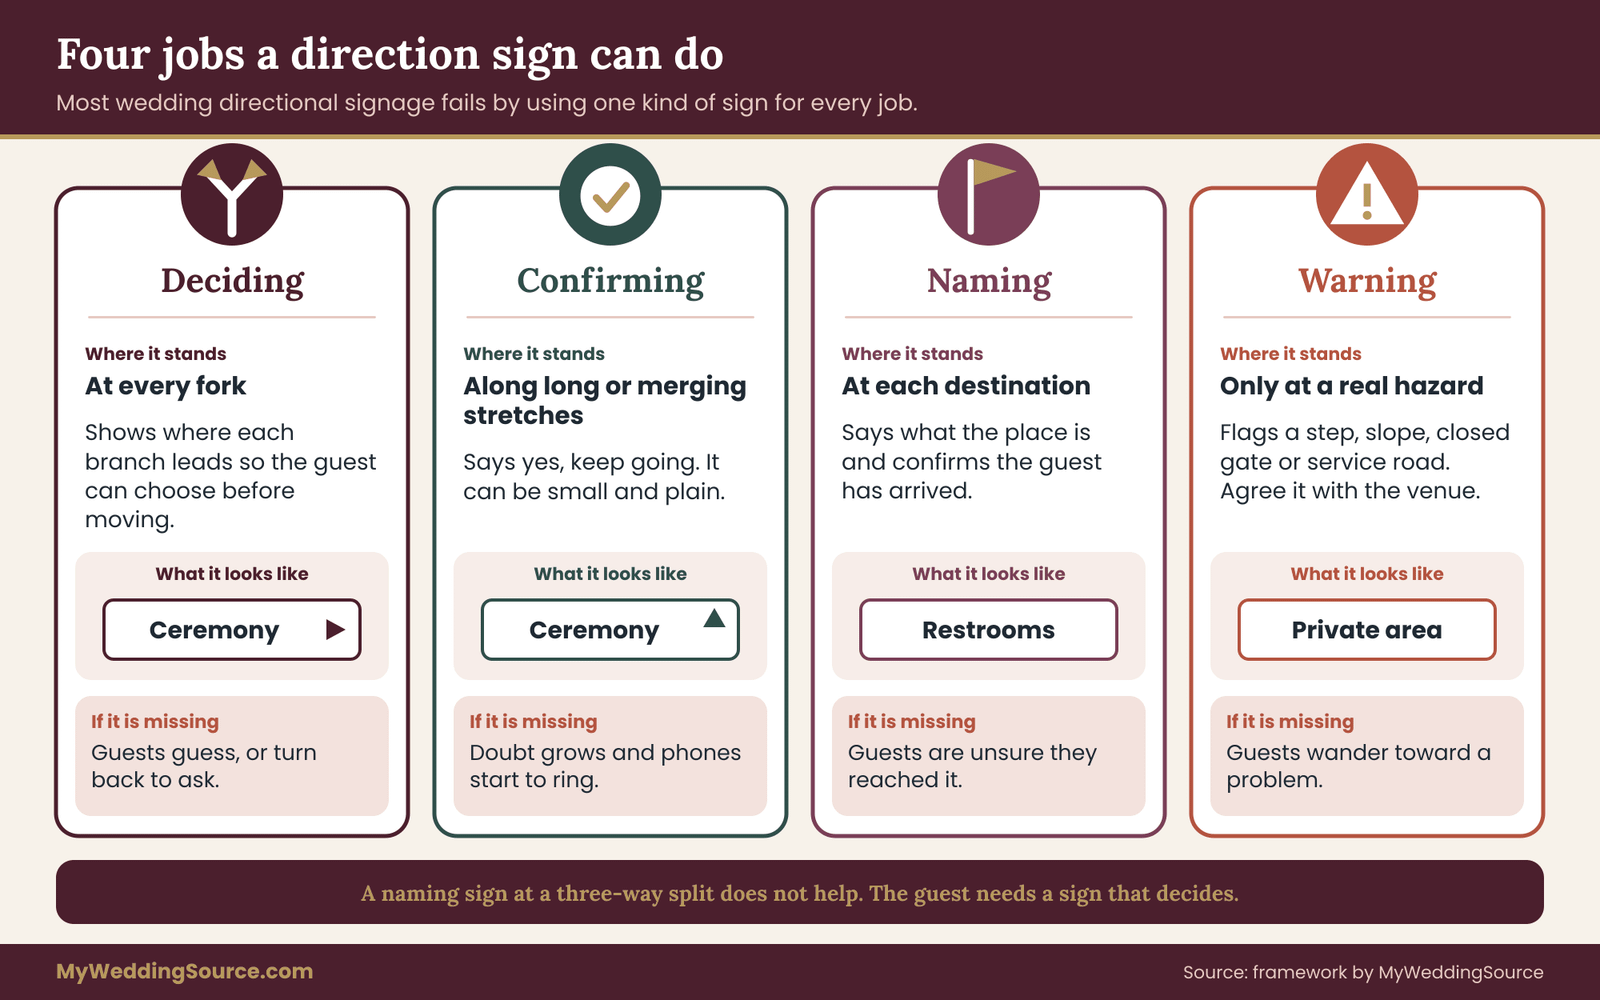
Most of the trouble with wedding directional signage comes from using a naming sign where a deciding sign is needed. A sign reading “Ceremony” with an arrow works fine at a fork where the arrow points left. It fails where the path splits three ways and the ceremony is somewhere beyond one of them. In that case the guest needs the sign to commit to a branch.
What this guide on wedding directional signage does not cover
Wedding directional signage here means signs for guests on foot, including guests who use mobility devices. It does not cover road signs for vehicles outside the property, traffic control or parking management, which fall under the venue’s own rules and, on public roads, local traffic authorities. If your event involves a shuttle on public streets, or if guests will park along a public road, those arrangements belong with the venue, the shuttle company and the local authority, not with a decorative sign order.
It also does not cover the printed welcome sign, the escort card display or the menu board. Those are indoor-style signs even when they stand outdoors, because guests read them standing still. The signs in this guide are read while walking, often from a distance, often in a hurry.
Why a big outdoor site breaks the usual signage habits
Most advice about wedding signs comes from smaller settings. It assumes guests can see the next destination, that a staff member is nearby, and that a sign can be read from a few feet away while the guest stands still. Large outdoor venues break each of those assumptions in specific ways.
Sightlines are long, and they are not clear
Indoors, walls limit what a guest has to consider. Outdoors, a guest can see a hundred possible paths: the gravel track, the mown strip, the service road, the line of cars. Without a cue, the eye goes to whatever looks most like a path, which is not always the one you want. A wide lawn does not read as a route at all. Guests will cross it diagonally, step over flower beds and end up where they should not be.
Distance also hides destinations. A ceremony site that looks obvious from the arch itself may be invisible from the parking area because of a rise, a tree line or a building. Couples who know the site well make a classic mistake here. They remember the view from the ceremony spot and forget that no guest has ever seen it from the car.
Guests arrive from several directions at once
At a compact venue everyone comes through one door. At a large one, guests may arrive by car into a field, by rideshare at a gate, by shuttle at a drop-off loop, on foot from a nearby hotel, or by an accessible entrance closer to the ceremony. Each of these origins starts a different walk. A set of wedding directional signage that works well for the people who park in the main lot can be useless for the people who step off a shuttle at a point you did not consider.
This is why the route test later in the article starts from every arrival point, not from the main entrance. A venue’s “front door” is a concept from the venue’s brochure. Guests do not necessarily arrive there.
The ground, light and weather change the sign
Wedding directional signage that looks sharp on a table in a living room can fail outdoors for reasons that have nothing to do with design. Direct sun produces glare on glossy boards. A low evening sun puts a sign into silhouette from one side. Grass and gravel make easels tilt. Wind turns a freestanding board into a sail. A wet lawn swallows stakes. Each of these is predictable, and the readability section later in this guide gives a short check for each.
Staff and help are far away
At a large venue the venue coordinator, the planner and the couple’s relatives are often busy at the ceremony site or the reception tent during guest arrival. A lost guest may have to walk back a long way to ask. That raises the cost of every sign that fails. It also raises the value of a modest investment: a few well-placed signs at the right points can remove the need for most help.
The honest trade-off
More wedding directional signage does not make a better route. Too many signs create their own confusion, because guests start reading each one and comparing it with the last. They also add cost, setup time and clutter in photographs. The aim is the smallest set of signs that leaves no guest in doubt, and the next sections show how to find that set by observation rather than by guessing.
Before moving to the test, one practical point about timing. Planning wedding directional signage is easier if you can visit the site at about the hour the event will begin, on a day with similar weather. A site visited at noon in summer looks different at five in the afternoon in autumn. If you cannot visit at the right time, plan to check the signs on the day itself, and treat the earlier visit as a draft.
The guest route test for wedding directional signage
The guest route test for wedding directional signage is a simple observation exercise. Someone who does not know the site walks each route from arrival to destination while you watch, and you write down every place where they slow down, stop or choose. The places you record become the decision points, and the decision points tell you where wedding directional signage goes. It replaces opinion with evidence, which matters because the couple and the planner are the worst possible judges of whether a route is obvious. They know the site too well.
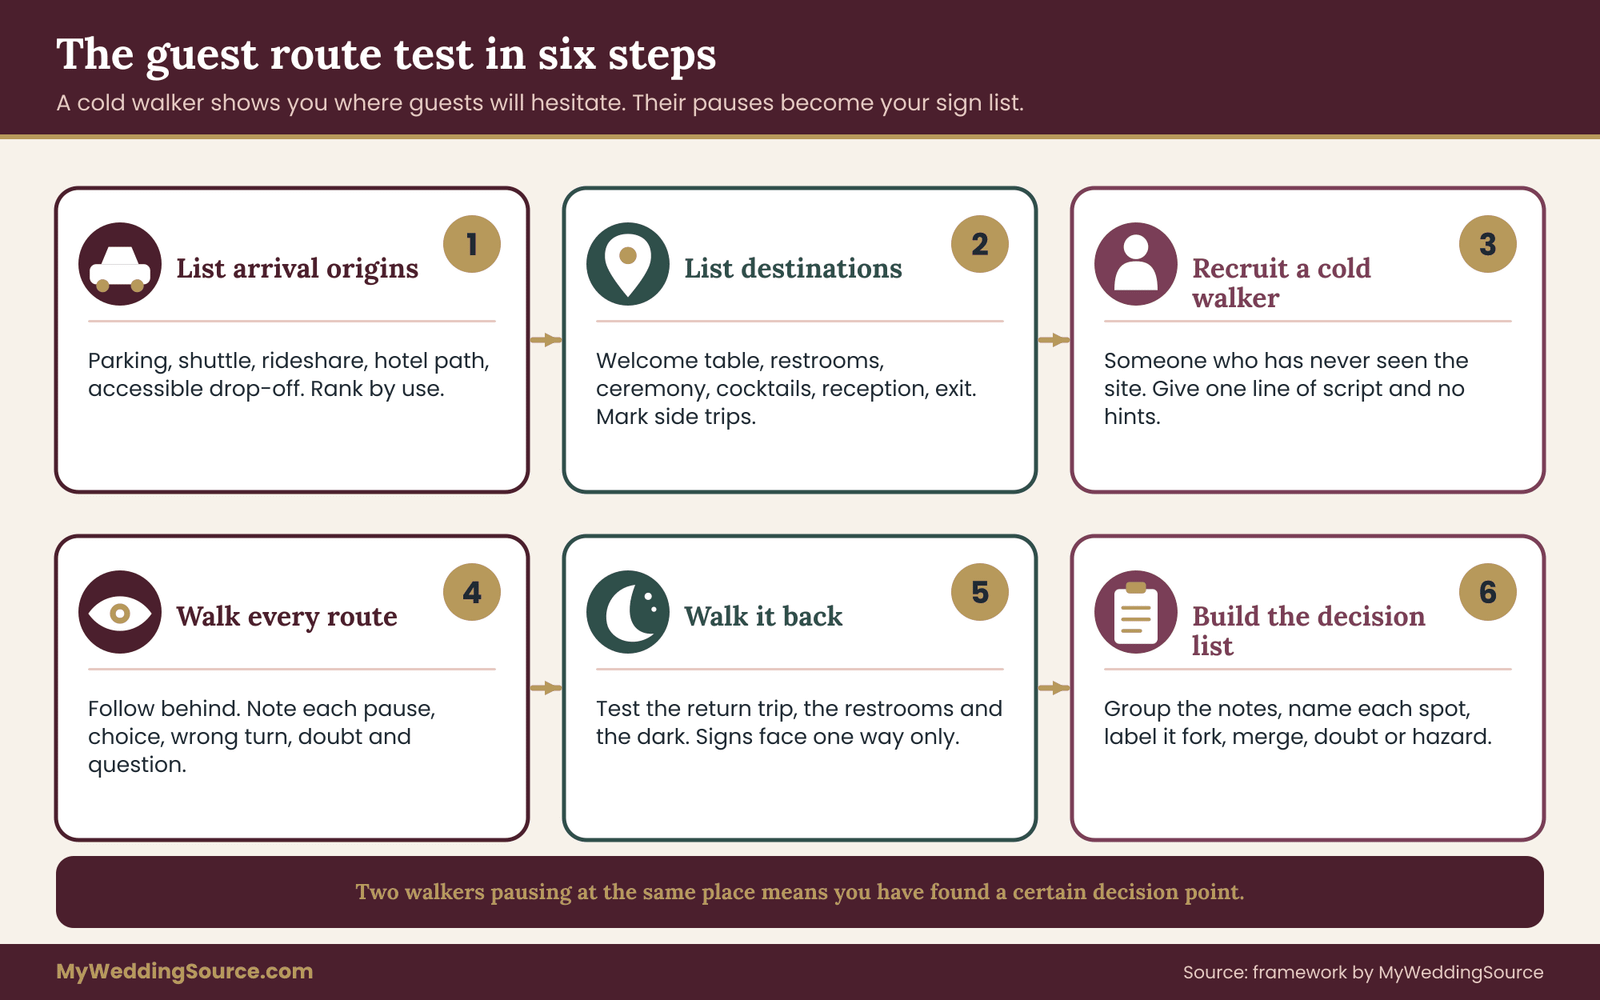
The test has six steps, and the order matters.
Step one: list the arrival origins
Write down every way a guest can reach the property. Typical origins at a large venue include the main parking field, an overflow lot, the rideshare drop-off, a shuttle stop, a hotel walking path, a bike rack and the accessible drop-off. Ask the venue which of these actually exist and where each one is. If guests can be dropped at a gate that the venue considers a service entrance, you want to know now.
Then estimate how many guests will use each origin. You do not need numbers. Rank them: most guests, some guests, a few guests. A route used by most guests earns a complete set of wedding directional signage. A route used by a few guests, such as an accessible drop-off, still earns a complete set, because those guests have fewer options if the route fails. This is a decision rule worth keeping: route use decides how many signs, but route difficulty decides how careful they must be.
If you are working out where guests will stay and how they will arrive, the guide on coordinating guest hotels across different budgets and mobility needs helps you find out which arrival origins are likely before you walk anything.
Step two: list the destinations in order
Write the destinations a guest might need, in the order they will need them. A typical large-venue list: check-in or program table, restrooms, ceremony seating, accessible seating, cocktail area, reception tent or hall, bar, guest book, photo area, coat or gift table, parking exit. Mark which ones are on the main path and which are side trips. Restrooms are the classic side trip. They are needed by every guest at least once, and they are often placed away from the main routes.
Step three: recruit a cold walker
Ask a friend, relative or colleague who has never visited the site to do the walk. This person is called the cold walker. Their lack of knowledge is the entire point. A person who has been to the venue before will recognize landmarks and go the right way for the wrong reasons. If you cannot find an unfamiliar person, ask someone who has not seen the site for a long time, or ask a friend to bring a family member.
Brief the cold walker with a script like this, and nothing more:
“You are a guest. You have just arrived here. Find the ceremony. Please think out loud as you go, and I will not help unless you ask.”
Do not say where the ceremony is or which way is correct. Do not add hints when they hesitate. If they ask a question, write it down, because a question is a missing sign.
Step four: walk each route with the cold walker
Start at one arrival origin and follow the walker at a short distance, behind and to the side so you do not influence their choices. Carry a notepad or use a voice memo on your phone. Mark each of these events:
A pause. The walker slows or stops for more than a moment. Note where and why, in their words if they speak.
A choice. The walker faces two or more plausible paths and picks one. Note which they chose and whether it was correct.
A wrong turn. The walker goes somewhere that is not the route. Note where they turned and what made it look right.
A doubt. The walker says something like “Is this right?” or looks back. Note the distance since the last cue.
A question. The walker asks anything. Write the exact question.
You can also take a photograph from the walker’s eye height at each event. These photographs become the evidence you show the venue and the sign maker later, and they keep your wedding directional signage tied to what guests really did.
Run the walk once from each origin on your list. It sounds long, but at most sites each walk takes less than ten minutes, and a few origins share most of the route. If you can use more than one cold walker, even better, since different people stumble in different places. When two walkers pause at the same place, you have found a certain decision point.
Step five: run the reverse walk
Guests go back as well as forward. After the ceremony they move to cocktails, after the reception they leave, and during the evening many need the restrooms or a quiet spot or their car. Ask the cold walker to find the way back to the parking area from the reception, and then to the restrooms from the dance floor. The return trip often reveals problems that the arrival trip hid, because wedding directional signage that faces one direction is invisible from the other. A sign with an arrow on one side only works for walkers heading toward it.
The reverse walk also tests the evening. Even in a small group, a walk at dusk or in the dark is a different exercise. Ask whether the route will still read when lighting changes, and record what you will need to add for guests leaving after dark.
Step six: turn the notes into a decision-point list
After the walks, copy each pause, choice, wrong turn and doubt onto a single list. Group notes that are near each other. Give each group a short name, such as “gravel split after the gate” or “tree-line bend.” Next to each, write which of four types it is, which the next section explains. The list for wedding directional signage will usually have between six and fifteen items at a large venue. That number is a reasonable range, not a target. A site with one clear path may have only four.
What to do when the test finds nothing
Sometimes the cold walker goes straight to the destination without pausing. That is useful information. It means the route is obvious, so the site may need very little wedding directional signage: naming signs at the destinations and a couple of confirming signs. Do not add wedding directional signage just because you ordered a set. Return the extras or save them for the reception, where they may do more good.
What to do when the test finds too much
Occasionally the opposite happens. The walker is lost at every turn, and the route seems to need a sign every few steps. This usually means the route itself is the problem, not the amount of wedding directional signage. Look for a way to simplify the path: use a different drop-off, lay a clear path across a lawn with a runner or a line of cones the venue approves, ask staff to stand at a fork, or move a destination. The most efficient fix is often to reduce the number of choices rather than to label each one.
Who should do the test, and when
The test for wedding directional signage is most reliable at about three to six weeks before the wedding. By then you know the guest count, the vendor positions and the ceremony layout, but there is still time to order or print signs and adjust the plan.
If the venue has a technical walkthrough scheduled for vendors, ask whether you can add the route test to the same visit. The guide to the venue technical walkthrough explains how to measure access routes and vendor needs, and the two visits fit together well. A walkthrough tells you what the site can physically carry. The route test tells you how a guest will read it.
Common mistakes in the route test
Several errors recur. The first is using the couple as the walker. The second is testing in the wrong light or the wrong season. The third is testing only the main route and ignoring the side trips to restrooms and the accessible path.
The fourth is explaining the route out loud while the walker is still deciding, which erases the evidence. The fifth is skipping the photographs, then trying to describe a problem to the sign maker in words. Each of these is easy to avoid with a short checklist, and the next section turns the results into something you can place.
Decision points: where wedding directional signage belongs
Every pause, choice, wrong turn and doubt from the route test falls into one of four types. Classifying them matters because each type of wedding directional signage calls for a different sign in a different spot. A single rule, such as “put a sign every fifty feet,” ignores the difference and produces signs in the wrong places.
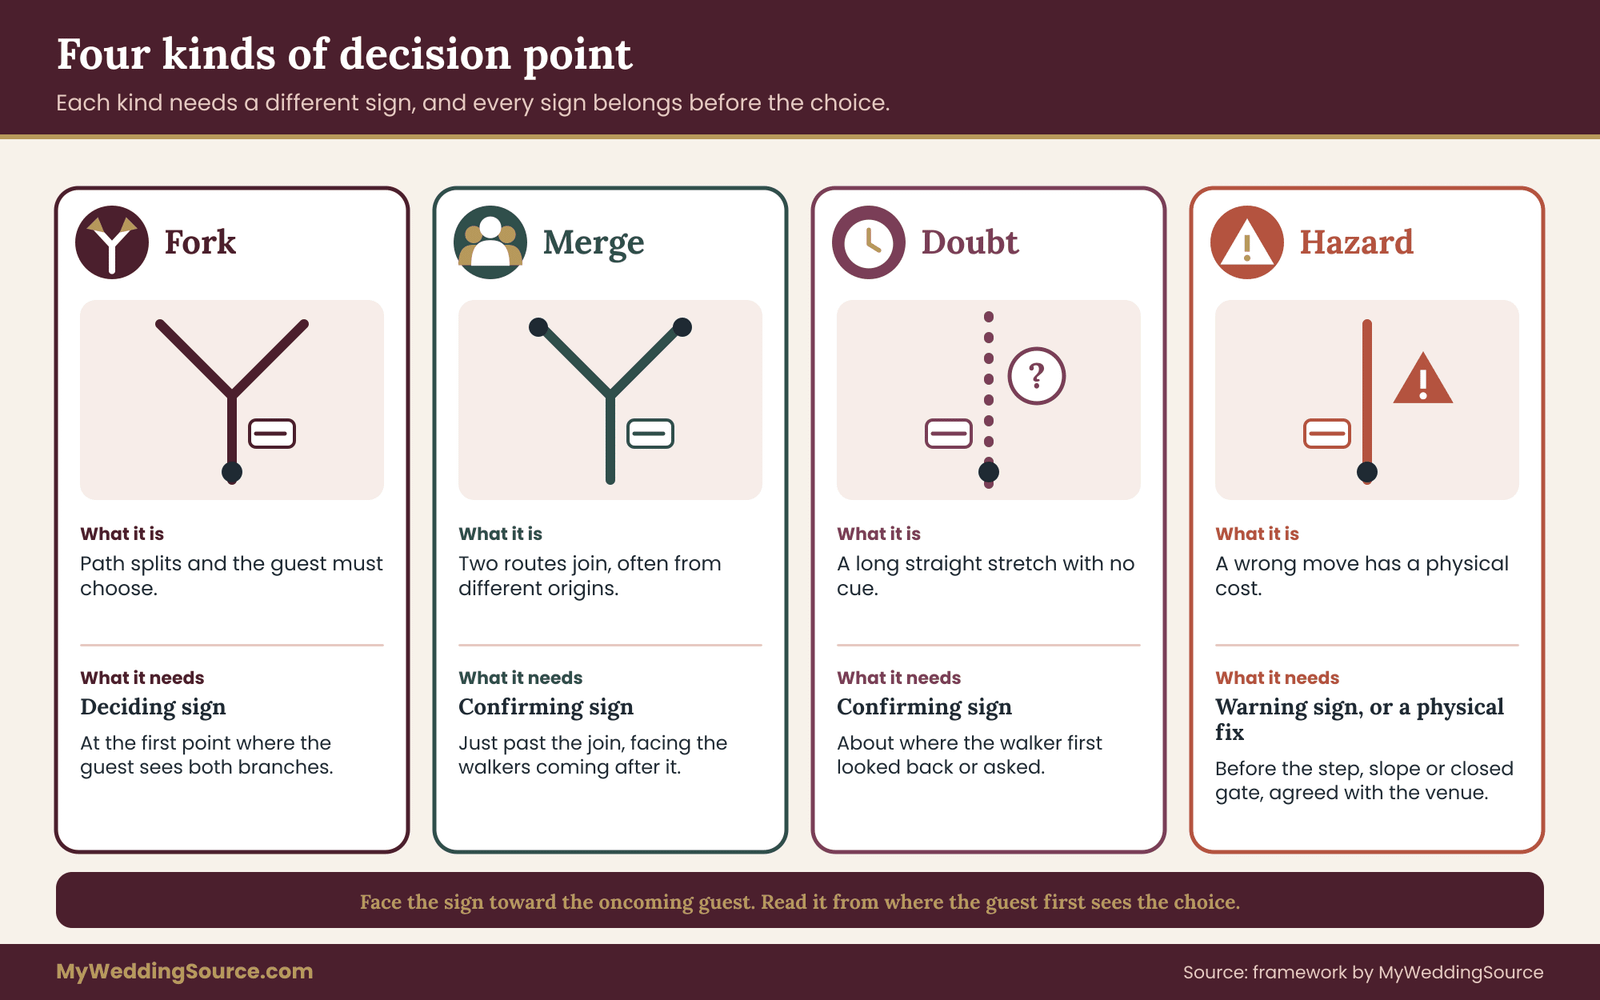
The fork. The path splits and the guest must choose. A fork needs a deciding sign: arrows to each branch, each labeled with where it goes. Stand at the point where the guest first sees both branches, not at the point where the branches separate. A sign placed after the split arrives too late, because the guest has already chosen.
The merge. Two paths join, often with guests coming from different origins. At a merge, a guest arriving from the side may not realize they are on the main route, and the guests already on the main route may not realize others are joining. A merge needs a confirming sign placed just past the join, facing the walkers who come after it, and often a second sign before the join on the side path.
The doubt. A straight stretch with no choices that runs long enough that guests start to wonder. Doubt does not depend on a fixed distance. It depends on visibility and expectation. A walk of two hundred feet along a clear hedge-lined path produces little doubt, while a hundred feet across an open field with no path markings produces a lot. You find doubts from the walker’s own comments and glances, and you place a confirming sign at about the point where the doubt began.
The hazard. A place where a wrong move has a physical consequence: a step down, a steep slope, an uneven stone path, a drainage ditch, a pond edge, a closed gate, a road crossing. A hazard needs a warning sign or, better, a physical fix agreed with the venue. A sign is the weakest control for a hazard. If a guest in heels would trip, the venue may prefer to add a ramp, a mat or a barrier, and your sign supports that fix rather than replacing it.
The placement rule for wedding directional signage: before the choice
For wedding directional signage that decides or confirms, the placement rule is the same. Put the sign where the guest will see it before they need it, with enough time to read it and act. In practice this means three things.
First, the sign faces the approaching guest. It is perpendicular to the path or angled slightly toward oncoming walkers, never parallel to the path where it can only be read by someone already beside it.
Second, the sign is visible from the point where the guest first sees the decision. Walk backward from the fork until the sign is no longer legible, then move it a few steps closer. If a hedge, a parked car or a tent wall blocks the view, the sign is useless there, however close it is.
Third, the sign does not compete with another sign. Two signs close together fight for attention. If the venue already has a permanent sign at a fork, work with it. Place your sign so the venue’s sign and yours say compatible things, or ask the venue whether the permanent sign can be covered for the event.
Sign height and angle
Guests read wedding directional signage at different heights. An adult standing reads at about eye level. A guest in a wheelchair reads lower, and a person with a walker or a cane often looks down at the ground to watch their steps. A sign at standing eye level is the usual choice for deciding signs, since it is the most visible from a distance.
For signs near a path edge, consider a second, lower sign on the same stake or easel, or choose a board that extends from low to mid height so it reads from several heights. The accessibility guidance published by the U.S. Access Board and the Web Accessibility Initiative treats people with different reaching and viewing positions as a design baseline, not an exception, and the same thinking applies here.
Avoid placing wedding directional signage so low that tall guests have to stoop, or so high that a seated guest cannot read them. Test by sitting down. If you are able, ask a friend who uses a mobility device to check a few signs on the day of the venue visit, or at least sit in a folding chair at the spot and look.
The order of signs along a route
A well-built set of wedding directional signage has a rhythm. A guest leaves the arrival point and sees a first sign that confirms the entry to the guest route. They walk and see a confirming sign when doubt would otherwise start. They reach a fork and see a deciding sign with their destination named. They pass through a merge and see a confirming sign. They arrive and see a naming sign.
Write this out as a sequence for each route, with each sign numbered. A typical main-route sequence at a large venue might have between four and eight signs. A side route to restrooms might have two or three. Sequence is a useful discipline because it exposes gaps. If sign three says “Ceremony” and sign four says “Cocktail Hour” and the guest never sees how to get from one to the other, the sequence is broken.
The decision-point diagram
Once you have the list of decision points, draw them as a wedding directional signage diagram. The diagram does not need to be pretty. Use a printed aerial image or a venue map as the base, mark the arrival origins, draw each route as a line, put a circle at each decision point and write its type next to it. Then add the signs as numbered squares at the positions you chose.
This diagram is the most valuable document in the process, for three reasons. It lets the venue approve placement without a site visit. It lets the sign maker see how many signs of each kind you need. And it gives the person who sets up the signs on the wedding morning a map instead of a spreadsheet.
Label each sign on the diagram with four items: its number, its type (deciding, confirming, naming or warning), the text it carries, and which direction it faces. Add a fifth item if relevant: how it is mounted, for example a ground stake, a freestanding easel or a clip on a fence. The mounting decisions are covered in the readability section.
Counting signs before you order
A rough count of the wedding directional signage you need comes from the diagram. Count deciding signs: one per fork, plus one per extra arrival origin that feeds the fork. Count confirming signs: one per merge and one per doubt. Count naming signs: one per destination that is not obviously identifiable, such as restrooms or the guest book table. Count warning signs: only those the venue agrees are needed.
For a mid-sized estate with two arrival origins and six destinations, a total in the range of ten to sixteen signs is common, but this is an observation about a typical result, not a formula. The right number comes from your diagram. Add a small reserve for signs that turn out to be needed on the day, but do not pad the count to make the order feel complete.
Two-sided signs and one-way thinking
Whether a sign should have text on both sides depends on whether guests approach it from both directions. A sign at a fork that serves guests arriving from the parking field may be useless for guests leaving the ceremony. If your reverse walk shows doubt in the other direction, either print both sides or place a second sign facing the other way. Many couples order a single-sided sign and put it on the “wrong” side of a path, so it only serves half the traffic.
A neat alternative for the return trip is to avoid new signs altogether. After the ceremony, a person from the wedding party or a staff member stands at the first fork and directs guests, or you place a small number of “this way to cocktail hour” signs that appear only after the ceremony. Moving or covering signs mid-event is a staff job, so ask the venue or planner whether someone is available.
How decision-point thinking saves money
Wedding directional signage costs money, and a route of eighteen identical signs costs more than one of nine different signs placed well. The decision-point approach reduces cost in two ways. It removes the signs that serve no decision, and it lets you spend more on the few that matter, such as a larger board at the main fork. A well-made, larger sign at the busiest decision point is a better use of budget than ten small identical ones spread along a path.
It also cuts the expense of corrections. A sign ordered before the route test may carry the wrong text, wrong arrows or wrong size, and reprinting costs money and time. Running the test first means the order is right the first time. The same habit that protects any vendor order applies here: agree the list, the text and the positions in writing before anyone prints.
Making wedding directional signage readable outdoors
Readability for wedding directional signage outdoors is a different problem from readability on a screen or a table. The guest is moving, the light is uncontrolled, the background is busy, and the reading time is short. A useful working standard is the three-second read: a guest approaching at walking pace should be able to take in the destination and the direction in about three seconds, without stopping. If they must stop and study the sign, it is working as a notice board, not a direction sign.
One message per sign
Each piece of wedding directional signage should carry one idea, and for most positions that means one to three destinations and an arrow for each. Resist adding a welcome line, a date, the couple’s names or a quotation to the same board. Those belong on the welcome sign. On wedding directional signage, extra words reduce the size of the important ones and slow the read.
Use plain words that match what guests will hear elsewhere. If the invitation says “ceremony on the Lawn,” do not label the sign “Nuptials Garden.” If the venue calls the tent “the Barn” but the program says “Reception,” pick one word and use it everywhere, including on the day-of schedule, the program and any verbal directions the greeters give. Mixed names are a source of confusion even when each is accurate.
Arrows do the heavy lifting
An arrow is the fastest part of wedding directional signage. Make it large, solid and unambiguous. A clear arrow pointing along the path is better than text that says “to the left.” Avoid decorative arrows with curls, feathers or flourishes, which can read as ornaments, and avoid arrows that point diagonally when the path turns at a right angle, since they invite shortcuts across lawns and flower beds.
Check each arrow against the real path from the guest’s position. A sign that says “Ceremony” with an arrow pointing up, placed on a path that curves right behind a hedge, will send guests straight into the hedge. If the path curves, the arrow should follow the guest’s first step, not the final bearing to the destination.
Letter size, spacing and contrast
The right letter size depends on how far away the guest first needs to read the sign, so size is a test, not a table. Print one sample sign at the size you are considering, set it up at the actual position, and walk back until you can no longer read it comfortably. If the distance where you can read it is shorter than the distance from the guest’s first view of the decision, enlarge it. Do this with the person who will read it, in their own glasses, rather than with someone who has excellent eyesight.
Contrast matters more than color. Dark letters on a light background or the reverse are far more readable than a gentle pastel on a cream board, which can disappear in bright sun. The brand palette of a wedding, with muted sage on ivory or blush on white, looks lovely in photographs and fails at forty feet. A simple fix is to keep the decorative colors for the border or a small motif and set the actual words in the darkest color in your palette.
The Web Accessibility Initiative at the World Wide Web Consortium publishes contrast guidance for digital content, and its principles, such as not relying on color alone and keeping strong contrast between text and background, carry over to printed signs. The guidance targets screens, so treat it as a useful reference rather than a printed-sign standard, and verify with a real test outdoors.
Spacing counts as well. Tight letters and narrow lines blur at a distance. Choose a typeface with open spacing and clear letter shapes, and avoid heavy scripts for the direction words. A script can remain on the welcome sign, where guests stand still and read it up close. On wedding directional signage, use a simple upright face and keep the script for a small flourish if you want one.
Glare, shadow and low sun
Glossy surfaces reflect the sky. A glossy sign facing the sun can turn into a mirror at certain angles and times of day. Matte finishes, such as a matte print, chalkboard paint or painted wood, avoid this. If you choose acrylic or a laminated board, test it at the planned start time.
A low sun behind a sign puts it into silhouette. A low sun in front of the walker makes them squint and look away. Note the sun’s direction at the ceremony hour and turn the key signs so that guests approach them with the sun at their back or at their side.
Shadow works the other way. A sign standing in the dappled shade of a tree can have stripes of light and dark crossing the letters, which makes it hard to read. Move the sign to an even patch of light or shade rather than a mix of both.
Evening and the dark
Many weddings run past sunset, and wedding directional signage that reads in daylight can vanish. Decide in advance who needs to read signs after dark and which signs they need. Typically these are the restrooms, the exit and the path to the parking area. Options include solid, high-contrast boards under existing path lighting, battery lanterns placed beside the sign, or small battery lights you attach to the stake. Check with the venue before using anything with a flame, since many venues prohibit open flames or restrict candles outdoors for fire safety.
Do not assume that string lights over the reception tent light the path to the car. Walk the return route at dusk, or ask the venue about the planned lighting. A short, bright, well-aimed light at a fork is more useful than a general glow across a lawn.
Mounting: what holds the sign up
The mounting method decides whether your wedding directional signage is still upright when the first guest arrives. Common options each have a clear trade-off.
Ground stakes. A sign on a stake pushed into the ground is stable in soft soil and low wind, and it takes little space. It fails in hard, dry or rocky ground, and it is unusable where the venue forbids puncturing the ground, for example over irrigation lines or on a historic site. Ask the venue before you buy stakes.
Freestanding easels. An easel is quick to place and move, and it needs no ground fixing, but it tips in wind and sinks into soft grass. Weighted feet or sandbags hidden by a flower arrangement help. Heavy signs on lightweight easels are a classic failure.
Clip or tie to existing fixtures. A sign attached to a fence, a post or a tree is stable and avoids the ground, but the venue may restrict nails, wire or ties on trees and railings. Soft ties and clamps are often acceptable, though you should confirm. Never attach anything to a living tree without the venue’s approval, since ties and wire can harm it.
Hanging signs. A sign hung from a hook, an arbor or a shepherd’s crook is effective for signs close to the path, but it swings in a breeze and may twist so that its face turns away. A weight or a second tie at the bottom steadies it.
Weighted bases and pedestal stands. These suit hard surfaces such as terraces and paved paths. They cost more and need transport.
Wind, rain and heat
For wedding directional signage, wind is the primary enemy. A flat board of any size acts as a sail. Choose boards with a lighter weight but a sturdier mount, use foam core or acrylic with caution outdoors, and set the stake or the base deeper than you think necessary. If the forecast is gusty, ask whether wind-permeable boards or smaller signs can serve the key forks. Never lean a sign against a tent pole where a gust can drag it along.
Rain affects paper, foam core and cardboard. If the day may be wet, use water-resistant boards such as coated plastic, painted wood or acrylic, or put paper signs in clear sleeves. Lamination can curl in sun, so test it. The National Weather Service publishes safety guidance on lightning and wind, and the venue may have its own severe-weather plan. Wedding directional signage should not be the thing that sends guests across an open field during a storm, so ask the planner how routes change if the weather turns.
Heat matters too. Dark boards left in sun can warp or fade, and adhesives soften. Stage signs in the shade until setup, and place them as late as the schedule allows.

Language and symbols
If a meaningful number of guests read another language, consider adding a second language on the main forks or using widely understood symbols for restrooms and accessible routes. A symbol should be paired with a word at least on the first sign, since a few symbols are not universally recognized.
The International Symbol of Accessibility is a recognized sign for accessible features, and the Access Board’s ADA guidance explains where permanent accessible signs are expected at a facility. Your temporary sign may not need to meet those permanent-sign requirements, but using the same symbol in the same way keeps things clear.
A proof test before printing
Before sending wedding directional signage to print, do three checks. Print a draft at actual size on ordinary paper and tape it to a stake, then read it from a distance at the real location. Show the draft to a person who has not seen it and ask what it says and where it points; if they hesitate, rewrite.
And check each sign’s text against the diagram, so that sign six really says what the diagram says it will. The wider proofing and printing steps for the whole signage set are covered in the site guide to signs as a system.
Wedding directional signage for guests with different needs
A route that works for a thirty-year-old guest in flat shoes may not work for a grandparent with a cane, a parent with a stroller, a guest in a wheelchair, a guest with low vision or a guest who finds crowds stressful. At a large outdoor venue, these differences are not edge cases, and wedding directional signage has to account for them. Most guest lists include several of them, and the ground makes them more important than they would be indoors. Gravel, grass, slopes, steps and long distances all affect who can use which route.
The central principle is simple and worth stating plainly: the accessible route should be a real route, signed as clearly as the main one, and ideally the same route for everyone. A route that sends some guests the long way around a service building while everyone else cuts across the lawn is a poor design. A route that everyone can use, with signs that everyone can follow, avoids the problem.
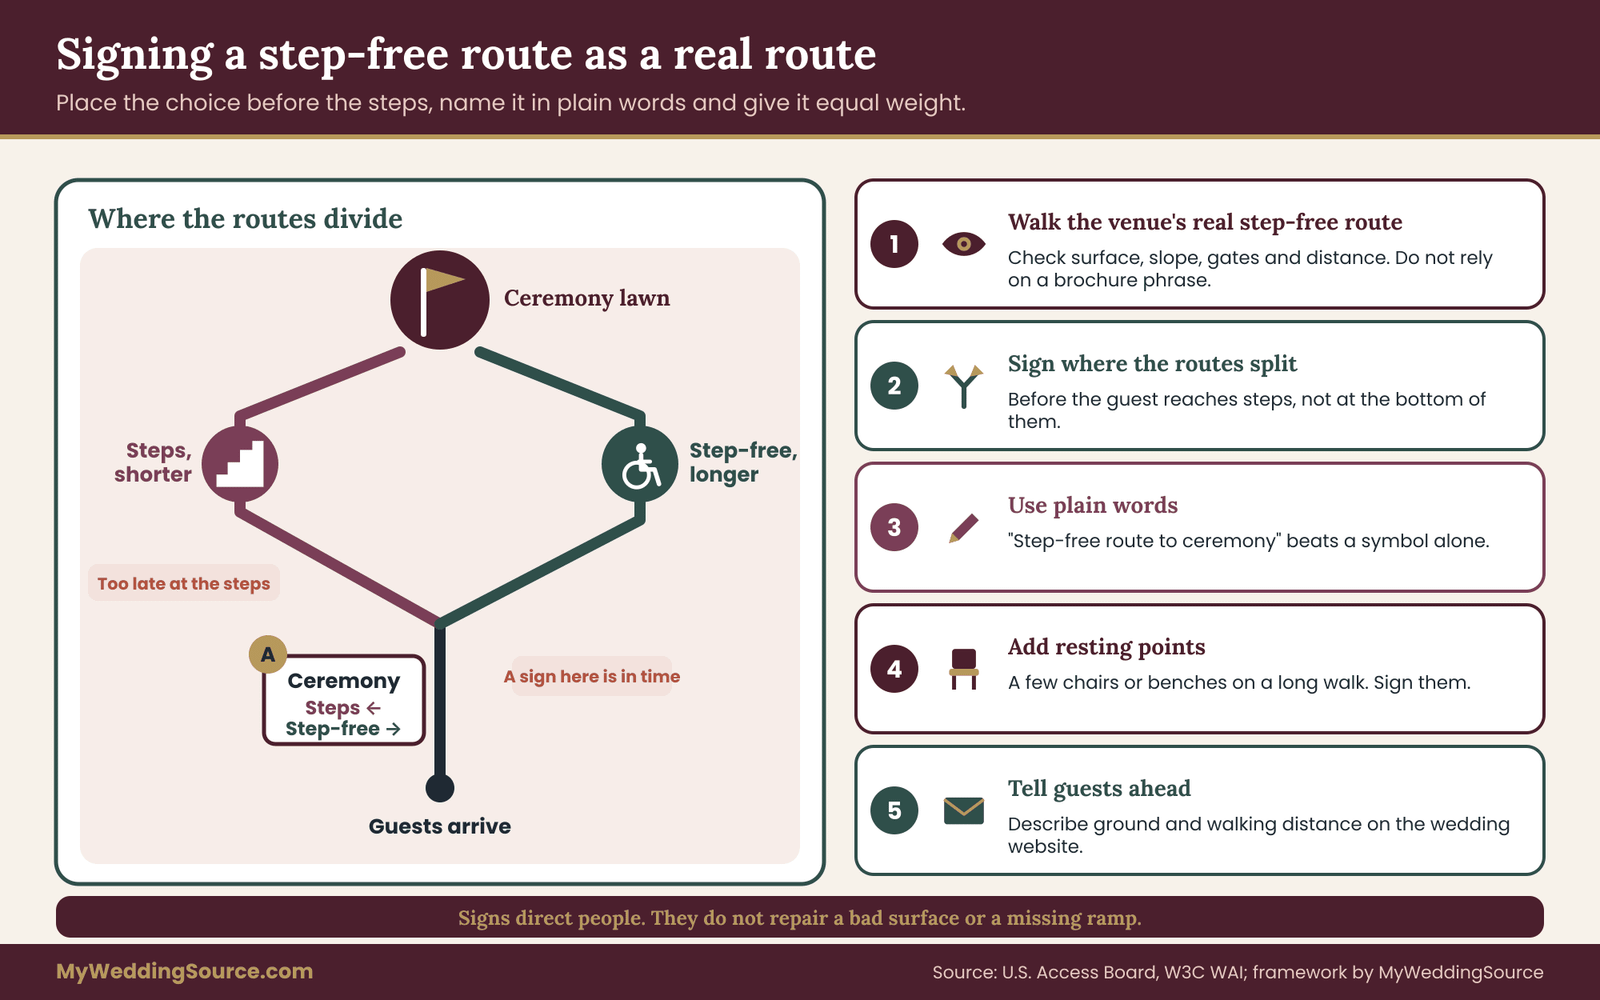
Find out what the venue’s step-free route actually is
Before signing anything, ask the venue to show you their step-free route from the accessible drop-off or parking to every destination: ceremony, restrooms, cocktail area, reception. Do not rely on a brochure phrase such as “wheelchair accessible.” Walk it, or ask a person who uses a wheelchair or walker to walk it with you. Note surface changes, slopes, gaps, gates, steps, heavy doors and narrow points. Surfaces that look firm can be soft after rain. Gravel that looks neat can be difficult for wheels and canes.
The accessible wedding venue red flags guide lists the warning signs to look for when choosing a venue, and several of them, such as a long unpaved approach or a ceremony site reached only by steps, affect how you sign the route. If the venue’s accessible route is long or indirect, your wedding directional signage has to carry more of the load, and you may want to talk to the venue about alternatives such as a closer drop-off, a golf cart or a temporary path surface.
The U.S. Department of Justice and the Access Board publish the federal accessibility standards that apply to many public places, and the venue may be responsible for the permanent parts of the route. A temporary event setup raises different questions, such as whether a rental ramp or matting is needed. Ask the venue what it provides and what it expects from you, and keep any answer in writing.
Make wedding directional signage treat the accessible route as the main route
Many venues use a separate accessible entrance with its own tiny sign, so the accessible guests arrive at an entrance that looks like a service door. If the venue’s step-free route is the same as the main route, simply say so by treating it as the main route and signing it once. If the routes differ, sign both, give them equal visual weight, and place the first sign of the accessible route at the point where guests first need it, such as the accessible parking or drop-off.
At forks, use text that names the route in plain words, such as “Step-free route to ceremony,” rather than a symbol alone. A symbol is useful as an addition, but plain words make it clear to a guest who is helping a relative or does not recognize the symbol.
Place step-free wedding directional signage at the decision point, before the guest commits to the stepped route. A sign at the bottom of the steps saying “Step-free route this way, around the building” comes too late, because the guest has already walked to the steps. Put it where the two routes diverge.
Warn without scaring
If a route has a feature that some guests may want to avoid, such as a slope, a gravel stretch or a long distance, a brief, neutral note helps them decide. “Gravel path, ten minutes’ walk” gives a guest information without implying that they should not come. Avoid language that sounds like a rule or a judgment. The aim is to let people choose.
Telling guests before the day also helps. A short paragraph on the wedding website or in the invitation insert can describe the ground, the walking distance between the parking area and the ceremony, the shuttle or golf cart option and the location of step-free seating. Guests then arrive prepared, and the wedding directional signage on the day confirms what they already know.
Seating and resting points
Distance is a form of difficulty. If the walk from parking to ceremony is long, the route needs somewhere to pause. Ask whether the venue has benches along the way, or whether you can place a few chairs at the midpoint with a small sign saying “Rest here.” Guests who tire quickly will not necessarily ask for help. They will turn back, or they will arrive at the ceremony after it begins. A small number of chairs along a long route can make a visible difference.
Accessible seating at the ceremony should be named, not hidden. A sign that says “Seating with space for wheelchairs and walkers” at the end of the aisle helps guests find a place that suits them, and an usher can then follow up. The guide to reception guest flow shows how to think about movement between entry, seating, food and exit, and many of the same ideas apply to the walk between the ceremony and the reception.
Low vision and sign contrast
Guests with low vision rely heavily on contrast, large letters, simple fonts and matte surfaces in wedding directional signage. The advice in the readability section matters even more here. A dark-on-light sign at a good size, free from glare, helps everyone. Avoid placing signs against a busy background such as a flower arrangement, a patterned fence or a window with reflections, where the sign loses its edges.
Also consider a verbal layer. A greeter at the arrival point who says, “The ceremony is straight ahead along the gravel path, about a five-minute walk,” supports the signs and helps guests who cannot read them.
For guests who use screen readers or navigation apps on their phones, a text description on the wedding website or in the digital program, with the main route in short steps, extends the same information to a different format. The W3C Web Accessibility Initiative offers guidance on writing clearly for digital content, which applies to a route description just as much as to any other page.
Guests with children, strollers and gifts
Parents with strollers need smooth paths, and they often need to know where a changing space or a quiet area is. Guests carrying gifts need the gift table in a visible, early position. Guests who arrive late need a route that does not walk them through the middle of the ceremony. If your venue has a late-arrival path, sign it quietly and consider a greeter. For more on supporting families, babies and older relatives on the day, see the guide to guest care operations.
None of this means adding more signs for every possible need. The task is to find the needs that apply to your guests and make sure the route handles them, with signs as a supporting layer.
Crowds, sensory load and quiet spaces
Some guests find crowds, noise or bright light hard. If the arrival area is busy, a direct route to a quieter spot may help, and a small sign can offer it. A quiet seating area away from the music during the reception can serve guests who need a break, and a simple sign saying “Quiet seating” tells them it exists. This is optional and depends on the site, but it is the kind of detail that guests remember kindly.
Testing with real guests
If any of your guests have mobility or vision needs, ask them privately and respectfully whether they would like to look at the wedding directional signage plan. Some will be glad to give advice, and many have practical knowledge of what works. Do not assume that one person’s needs represent everyone with a similar condition. Offer, listen and adjust, without making anyone a spokesperson. If a guest prefers not to be involved, leave it there.
If you cannot involve anyone, consider these checks yourself: sit in a folding chair at each sign and try to read it; walk the route pushing a wheeled object such as a stroller or a loaded suitcase on the actual surface; walk it in dress shoes or heels; and walk it with a bag in each hand. Each takes only a few minutes and reveals problems that standing on the lawn in comfortable shoes never would.
What wedding directional signage cannot fix
Wedding directional signage directs people. They do not repair a bad surface, an unlit path, a missing ramp or a steep slope. If the route test and the accessibility walk reveal a real barrier, the most effective response is usually to change the route or the surface, and the sign follows the change. Ask the venue and the rental company about matting, ramps, a closer drop-off or a shuttle. Keep the written answers, along with the date and the name of the person who gave them, so that anyone setting up on the day knows what was agreed.
Venue permissions and setup for wedding directional signage
A wedding directional signage plan that the venue has not seen is a draft, not a plan. Large venues often have rules about what can be placed where, and the rules exist for reasons: irrigation lines under the lawn, protected plantings, fire lanes, historic fabric, vehicle routes, insurance conditions and neighbors. Asking early costs nothing. Finding out on the wedding morning that stakes are forbidden costs a lot.
What to ask the venue, in order
Send the diagram of your wedding directional signage and a short list of questions, and ask for answers in writing. The core questions are these.
First, may signs be placed on the ground with stakes, and if so, are there areas where stakes are not allowed? Second, may signs be attached to fences, posts, railings, trees or buildings, and with what methods? Third, are there any areas where signs are not permitted at all, such as fire lanes, near emergency exits, over irrigation heads or beside power equipment?
Fourth, may signs be placed on or beside the entrance road or at the property’s public gate, and does the venue or the local authority have rules about signs visible from a public road? Fifth, are there permanent signs that the venue expects to remain visible, and which of them can be covered or supplemented? Sixth, who is allowed to place and remove signs, and when can setup begin? Seventh, are lights, lanterns or candles allowed along paths, and what type?
Add two questions that people often forget. What is the plan if the weather prevents outdoor use, and do routes change? And who at the venue should receive a copy of the final diagram, so that the day-of coordinator and the venue staff are working from the same map?
“We have a draft map of our guest route with numbered sign positions. Could you look it over and tell us which positions work, which do not, and why?”
A message like this is easy to answer and tends to produce better replies than a general question about what is allowed. A venue manager can look at a map and say “not there, that is the irrigation line” in a moment. They may also suggest a better spot, since they know where guests tend to wander.
Places where the rules may be stricter
A working farm, a historic property, a park and a vineyard each have particular concerns about wedding directional signage. Public parks and some historic sites may need a permit for any signage, and may restrict the materials, the number of signs or the way they touch the ground. A farm or barn setting may have livestock, machinery and unpaved lanes with their own safety needs, which the barn wedding venues guide touches on from a venue-choice point of view.
A vineyard may restrict anything that could damage vines or disrupt picking. A beach or a lakeside may have rules about stakes, wind and protected habitat. When the venue is public land, the managing agency, not the venue’s event coordinator, may be the authority, so ask who to contact.
Wedding directional signage on or near public roads is a separate matter. Local authorities regulate signs in the public right of way, and the Federal Highway Administration’s Manual on Uniform Traffic Control Devices sets the national framework for road signs and traffic control. A decorative wedding sign at a country road junction is not a traffic control device, and many places prohibit unofficial signs there. If guests may get lost on the way to the property, rely on a clear written address, map link and driving instructions, and ask the venue what it recommends for the entrance.
Safety and emergency access
Never place wedding directional signage in a way that blocks an exit, a fire lane, a hydrant, a fire extinguisher or a route that emergency vehicles may use. Keep signs clear of the edge of paths, so they are not a trip hazard, and make sure stakes are not left as hidden projections. Anchors, sandbags and cables should be marked or covered. If you put lights along a path, secure the cables and keep them off walking lines.
The National Fire Protection Association publishes safety codes that many local authorities adopt, and the venue will usually have its own fire and life-safety rules for events. Ask the venue rather than interpreting codes yourself. If the venue has an emergency plan that includes a gathering point, ask whether it should be signed, and whether it would confuse guests if its sign looked similar to your direction signs. A separate, venue-supplied, plainly marked emergency sign is better than a decorative one.
Who sets up, who checks, who takes down the signs
A route with ten or more pieces of wedding directional signage needs a named person and a schedule. Decide who places the signs, when, and in what order, and who walks the finished route to check it. Do not assign this to the couple on the wedding morning. A planner, a venue coordinator, a reliable friend or family member, or the sign vendor can do it. Give them the diagram, a printed list of signs with numbers, directions and mounting methods, and a short instruction sheet.
A workable instruction sheet fits on a single page. It lists each sign number, its position as a description a stranger could follow (“at the gravel fork thirty steps past the gate, on the left”), the way it faces, the mounting method and any special step, such as “use sandbags.” It also lists what to do if a position does not work and who to call. Number each sign on the back, in small writing, with the same number as the diagram, so that a loose sign can be put back where it belongs.
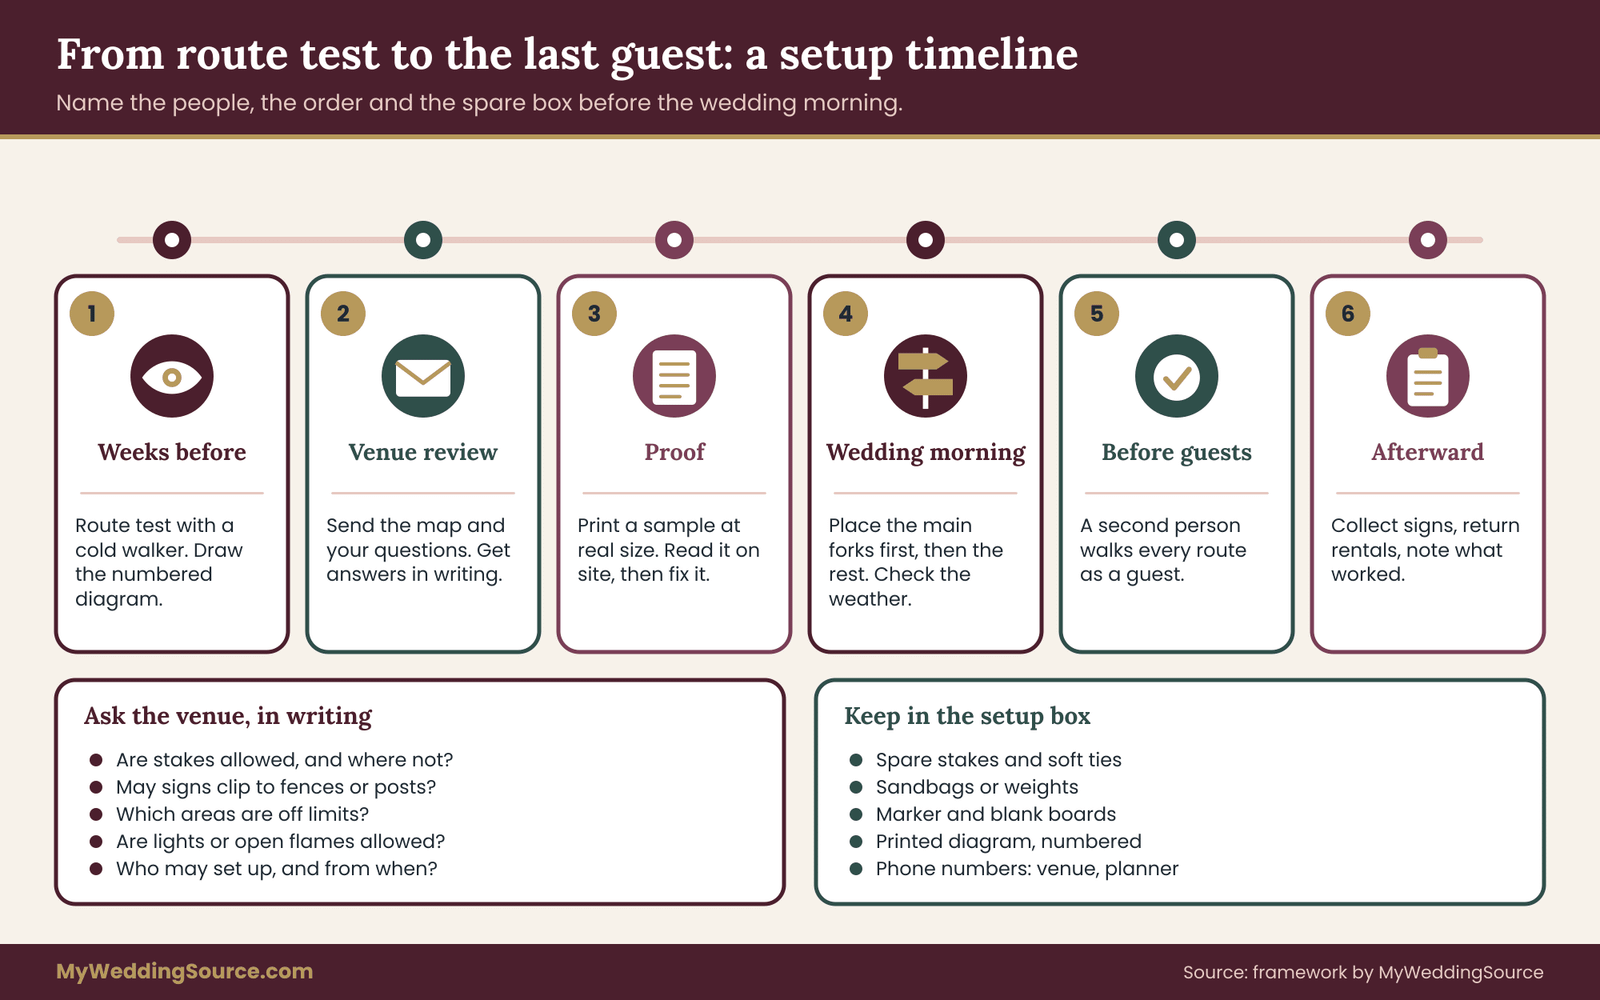
Plan the timing so signs go up after any vendor deliveries and vehicle movements that could knock them down, and before the first guest. Setup of the key forks should happen early, so there is time to adjust. If a tent or a catering truck blocks a sightline, you want to find out an hour before arrival, not after.
Takedown matters as well. Ask who removes the signs and when, and where they go. If you are renting boards or stands, there may be a return deadline or a fee for damage. If the signs are personal items, assign a person to collect them so that they are not left in the grass or thrown out.
The walk-through before guests arrive
Once the wedding directional signage is up, repeat the route test in a short form. Walk each route from each arrival origin, reading the signs the way a guest would, and check four things: every sign stands upright and is readable from where the guest first sees it, every arrow points the right way, no sign is hidden behind a vehicle, a tent or a person, and the path itself is clear and safe. A person who did not set up the signs should do this walk, since they will see problems the installer misses.
Fix what you can, make a list of what you cannot fix, and share it with the coordinator, who can redirect guests at the trouble spot. Treat the walk as a quick check, not a redesign. If a sign is in the wrong place, move it. If it says the wrong thing, a handwritten or hastily printed replacement sometimes serves until a proper one is available, but it is better to avoid the situation by proofing carefully earlier.
Cost logic without invented numbers
Prices for wedding directional signage vary widely by material, size, quantity and region, so no single figure is useful here. A better way to think about cost is in terms of what you are paying for. Printing or painting costs rise with size and material quality.
Mounting costs rise with the strength required, because a sign that must survive wind needs a heavier base, which costs more to buy, rent and transport. Labor costs rise with the number of positions, because each sign must be carried, placed, checked and removed. Rental versus purchase matters too, since a one-day event rarely justifies buying large, heavy stands that you will not use again.
Use the diagram to get quotes. Give the sign maker the number of signs, the sizes, the finish and the mounting type, and ask for a written quote that lists each. Compare options by listing what each includes. A cheaper board that needs a separate stand can end up costing more than a combined unit.
If you are renting stands, easels or lighting, the rental planning checklist explains how to confirm quantities, delivery and return terms. Hand rentals the same discipline as printing: confirm exactly what is included, who delivers, who collects and what happens if an item breaks.
Build in a small reserve
Reserve a small amount of budget and a small number of spare materials for wedding directional signage problems that appear on the day: a sign that blows over and cracks, a position that turns out to need an extra sign, a stake that does not hold.
A few spare stakes, ties, sandbags, a roll of removable tape (if the venue allows it), a marker and a few blank boards cost little. Keep them in a labeled box with the setup person. It is far easier to fix a leaning sign with a spare stake than to improvise with a bridesmaid’s shoe.
A worked example: a guest route at an invented estate
The following example of wedding directional signage is invented to show the method. The couple, the venue and the details are fictional, and the numbers are chosen for illustration only.
Maya and Daniel are marrying at Larkspur Hill, an imaginary sixty-acre estate with a hilltop ceremony lawn, a terrace for cocktails, a reception tent in a lower meadow, a barn with restrooms and a gravel parking field. The ceremony begins at five in the afternoon in October. About a third of the guests are staying at a hotel in town and will come by shuttle. The venue has an accessible drop-off on a paved loop close to the barn.
The arrival origins and destinations
Maya lists three origins: the gravel parking field, the shuttle stop on the paved loop, and the accessible drop-off, which turns out to be the same loop at a different point. She ranks parking as most guests, shuttle as some, and accessible drop-off as a few. Her destination list, in order, is: welcome table and program, restrooms in the barn, ceremony lawn, accessible seating, terrace for cocktails, reception tent, and the exit.
What the cold walker found
A friend of Daniel’s cousin, who has never visited, agrees to walk the routes. Maya gives the standard script and follows at a distance. From the parking field, the walker pauses at the gate, since two gravel tracks leave it. One goes uphill toward the ceremony, the other along a hedge to the barn.
She picks the barn track, which is wrong for the ceremony but right for restrooms. Further on she asks, “Is this still the way?” at a long, open stretch beside a vineyard where she has seen no sign for what feels like a long time.
From the shuttle stop, the walker has an easier time, since the paved loop leads straight to the barn, but she reaches a merge where the paved path meets the gravel track from the parking field and cannot tell which way the ceremony lies. She also steps toward a gate that leads to a service yard, which is open and looks like a path.
On the reverse walk, from the reception tent back to the parking field, the walker follows the lit tent-side path and then loses the route in the dark meadow because nothing marks the point where the path turns toward the gate.
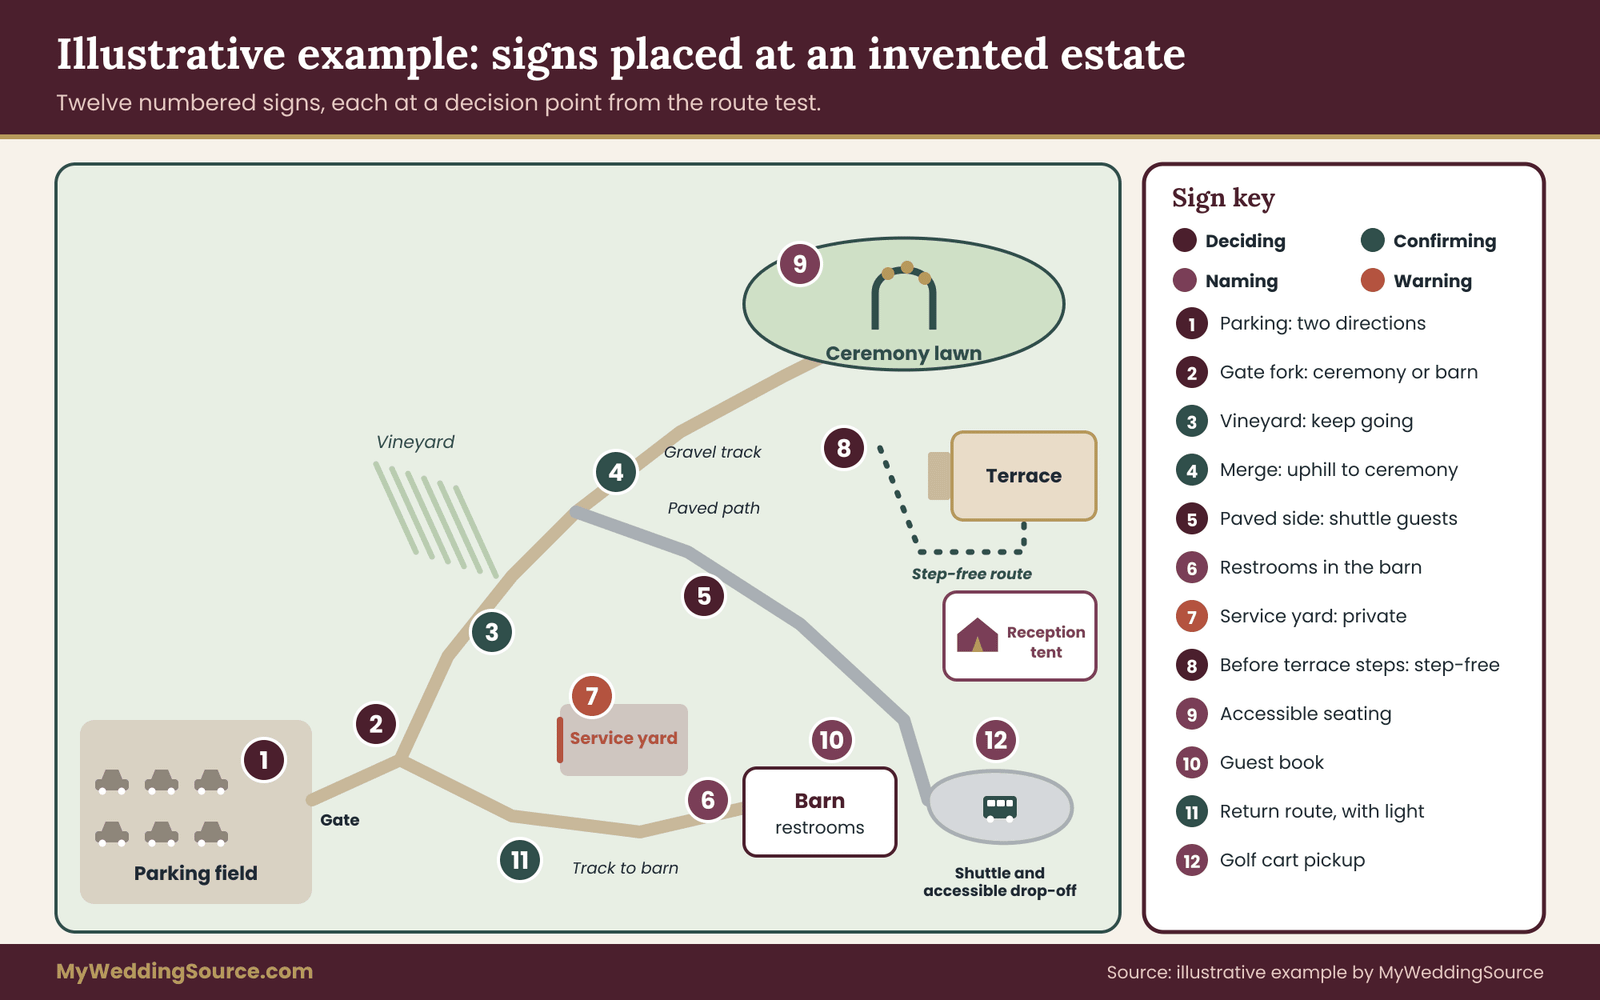
The decision-point list
Maya turns the notes into a list of decision points and classifies each.
The gate fork, where two gravel tracks leave the parking field, is a fork and needs a deciding sign. The vineyard stretch is a doubt and needs a small confirming sign. The paved-and-gravel junction is a merge and needs a confirming sign past the join, plus a sign on the paved side.
The service-yard gate is a hazard of a mild kind, a closed area that looks open, and the venue agrees to close the gate and add a “Private, please do not enter” sign. The terrace steps are a fork, where the step-free route continues around the east side, and need a deciding sign before the steps. The dark meadow turn is a doubt on the return trip and needs a confirming sign with a light.
She then adds naming signs at three destinations that are not obvious: the restrooms in the barn, the accessible seating at the ceremony and the guest book table. She skips a naming sign for the ceremony lawn, because the arch and the chairs make it obvious once guests arrive.
The wedding directional signage set
The first draft of the set has eleven signs. Sign one stands just inside the parking field and names the two directions: ceremony uphill, restrooms and welcome table along the hedge. Sign two, at the gate fork, repeats this with arrows. Sign three is a small confirming sign beside the vineyard. Sign four, at the merge, confirms the uphill route for guests from both the field and the loop.
Sign five, on the paved side, is a deciding sign for shuttle guests. Sign six names the restrooms, sign seven is the closed-yard notice agreed with the venue, sign eight is the deciding sign before the terrace steps with a step-free route, sign nine names the accessible seating, sign ten is the guest book marker, and sign eleven is the return-route confirming sign with a battery light.
Notice what is missing. There is no sign for every path, no sign repeating the couple’s names, and no sign on the straight stretches that did not produce doubt. The route test has pruned the wedding directional signage down to what guests need.
What Maya sends the venue
Maya sends the venue the diagram with eleven numbered positions and a short note asking about stakes, the fence fixing at the gate, the light on sign eleven and whether the venue can close the service-yard gate. The venue replies that stakes are fine in the parking field and along the hedge, but not near the terrace, where irrigation runs under the lawn.
It suggests a freestanding easel with a weighted base at sign eight. It also offers a golf cart for guests who prefer not to walk uphill and asks Maya to add a small sign for the cart pickup. She adds a twelfth sign.
This is how the system should work. The diagram started a conversation that changed the plan in a useful way, and the venue’s local knowledge improved it.
The setup morning
On the wedding day, the setup is assigned to Maya’s aunt, who has the diagram, the instruction sheet and a box with spare stakes, ties and sandbags. She places signs one to five first, since guests may come early, then the rest. A second person who did not install them walks each route as a guest.
The check finds that sign two faces slightly away from the track and is hidden by a catering van parked at the gate. The van is moved and the sign is turned. Sign eight blows over in a gust, and sandbags fix it. The final walk takes less than twenty minutes.
At the ceremony start, two greeters stand at the gate fork for the first twenty minutes, and then move to the barn. Guests arrive at various times, and nobody calls Maya’s phone for directions.
Why this example works
The example does not show perfect planning. It shows a process that lets problems appear early and cheaply. The cold walker found three issues in an hour. The venue found two more issues in a few minutes. The setup check caught two more on the morning. Each was small, and each would have been annoying or worse if found by guests.
Day-of troubleshooting for wedding directional signage
Even a tested route can meet surprises. The most useful habits are a short list of checks, a person assigned to fix problems, and a willingness to change the plan.
The fifteen-minute reset before guests arrive
About fifteen to thirty minutes before the first guest arrives, one person walks the route in guest order and confirms each piece of wedding directional signage. They carry the box of spares and a printed copy of the diagram. They check that each sign stands, faces the right way, can be read from where the guest first sees it and is not hidden. They note anything that has changed since setup: new vehicles, moved tables, a tent flap, a vendor’s equipment. Then they report to the coordinator.
When a sign fails
If a sign falls, breaks or is missing, replace it with the best available option, even if temporary. A clear handwritten board on a spare stake is better than no sign. If the sign cannot be replaced, assign a person to stand at the position until it can, since a person at a fork does the same job. Keep a list of which signs are most important, such as the main fork and the merge, and fix those first.
When guests ignore the wedding directional signage
Some guests will still go the wrong way. Do not assume that this proves the sign is poor, but do check whether many guests make the same mistake. If three or more guests take the same wrong turn, treat it as new evidence and adjust: move the sign, make the arrow clearer, add a second sign, or put a person there. After the event, note the change so a later project can use it.
When weather changes
If rain or wind arrives, ask the coordinator whether the route should change. A rain plan often moves the ceremony or the reception to a different location, which makes most of the signs wrong. Plan one short list of replacement signs for the rain route in advance, or have the venue and planner agree who will redirect guests in person. A direction sign that points to a location that is no longer in use is worse than none.
Mistakes that appear again and again
Ordering a set of matching wedding directional signage before testing the route. Placing signs where the couple can see them rather than where the guest decides. Facing signs parallel to the path. Relying on pastel text. Using a single-sided sign on a two-way path. Mixing names for the same place. Ignoring the return trip and the dark. Forgetting that guests with different needs follow different routes. Skipping the venue’s approval. Leaving setup to a person who has not seen the diagram. Each of these is common and each is avoidable with the process above.
Fitting wedding directional signage into the wider day
Wedding directional signage is one layer in a set of guest cues, alongside greeters, the program, the website, the seating display and the venue’s own staff. The wedding seating chart guide covers how to help guests find a place once they arrive, and the best results come when the two plans share a map: the route that brings guests to the ceremony lawn leads logically into the seating the ushers guide them to.
When a guest knows where to go and where to sit, they relax, and the couple can spend the first hour of the wedding on the people, not the logistics.
Reviewing afterward
Within a week of the wedding, ask the planner or the venue what they noticed. Which signs did guests ignore, and where did they ask for help? If you plan another event, or if friends will use the same venue, a short note about what worked is a gift. Keep the diagram and the instruction sheet with your wedding records, so that they are easy to find if the venue asks for details or a rental company needs a count.
Your next steps
Start your wedding directional signage plan with the arrival points. This week, ask the venue for a site map and a list of every way a guest can arrive. Then book an hour at the venue, at about the time of day of the ceremony, with one person who has never seen the place. Walk each route with the cold walker, write down every pause, choice, wrong turn and doubt, and photograph each from guest height.
Next, sort the notes into forks, merges, doubts and hazards, draw the diagram, and number the signs. Send the diagram and your questions to the venue and ask for written answers. Only then order or print the wedding directional signage, with a draft test at actual size. Assign a setup person, give them the instruction sheet and a spare box, and arrange a second person to walk the finished route before guests arrive. With that process, your wedding directional signage will do its job quietly: guests will find their way without noticing the signs at all.
FAQ
How much wedding directional signage do we need for a large outdoor venue?
There is no fixed number. It comes from your route test. Count one deciding sign for each fork, one confirming sign for each merge or stretch that causes doubt, a naming sign for destinations that are not obvious, and warning signs only where the venue agrees a hazard exists. Many mid-sized sites end up with roughly ten to sixteen signs, but a simple site may need only four or five.
Where exactly should wedding directional signage be placed?
Place it before the guest has to choose, facing the oncoming walker, and visible from the point where the guest first sees the decision. Walk backward from the fork until the sign becomes hard to read, then move it closer. At a fork, the sign should show every branch. Along a long straight stretch, a small confirming sign belongs at about the point where doubt begins.
Can wedding directional signage go at the road or the venue gate?
It depends on who controls the land. Inside the property, ask the venue. On or beside a public road, local authorities regulate signs in the public right of way, and unofficial signs at junctions are often prohibited. Ask the venue what it recommends at the entrance, and give guests a clear address, a map link and written driving directions so they do not rely on roadside signs.
What size and color should wedding directional signage be?
Size depends on how far away the guest first needs to read the sign, so test it. Print a sample at actual size, set it up on site and walk back until you cannot read it comfortably. For color, favor strong contrast: dark letters on a light matte background, or the reverse. Keep pale decorative colors for borders and small motifs, since pastel text can disappear in bright sun.
How do we keep signs standing in wind or on soft grass?
Use a mount suited to the ground. Stakes hold in soft soil but not in hard or rocky ground, and the venue may forbid them. Easels need weighted feet or hidden sandbags. Set stakes deeper than seems necessary, avoid large flat boards in gusty weather, and keep spare stakes and ties on site. Ask the venue where staking is permitted before you buy anything.
How should wedding directional signage support guests who use wheelchairs or have trouble walking?
Find out the venue’s real step-free route and sign it with equal weight to the main route, naming it in plain words. Place the sign at the point where the routes divide, before the guest reaches steps. Check surfaces, slopes and distance on foot or on wheels, add resting points on long walks, and describe the ground on your wedding website so guests can plan ahead.
Should wedding directional signage cover the return trip and the dark?
Yes. Signs facing one direction are invisible from the other, and a route that reads in daylight can vanish at night. Walk the return route at dusk, note where guests might lose the path, and add confirming signs with a safe light at those spots. Ask the venue about path lighting and about any limits on lanterns or open flames.
Who should set up and check wedding directional signage on the wedding day?
Not the couple. Name a planner, coordinator, venue contact or reliable friend, and give them the diagram, a numbered list of positions with mounting methods, and a spare box. Have a second person who did not install the signs walk each route as a guest before arrival. That second pair of eyes finds hidden or misaligned signs. Decide beforehand who takes the signs down.
Sources
- Web Accessibility Initiative (WAI), World Wide Web Consortium
- ADA.gov, U.S. Department of Justice Civil Rights Division
- ADA Standards for Accessible Design, U.S. Department of Justice
- Americans with Disabilities Act accessibility guidelines and standards, U.S. Access Board
- Manual on Uniform Traffic Control Devices, Federal Highway Administration
- Lightning safety, National Weather Service
- Wind safety, National Weather Service
- National Fire Protection Association, codes and standards
- Heat and health, Centers for Disease Control and Prevention