

A reception floor plan is easy to draw and hard to get right, because the tables are only half of it: the width of every aisle, the route a server takes from the kitchen, and the way guests get to a bar, a restroom, or an exit decide whether the evening feels calm or crowded.
Quick answer
Build the reception floor plan from the aisles outward. For each lane between tables, add the space that seated guests need behind their chairs to the clear width the lane must carry. In this guide’s arithmetic, a 36-inch lane (the federal accessible-route minimum) works out to about 74 inches between table edges, a 44-inch service aisle to about 82 inches, and a 60-inch turning lane to about 98 inches. In our worked example, a 40 by 60 foot room holds about 15, 12, or 8 round tables depending on which lane you choose, so the aisle decision changes guest count more than almost any other choice. These are planning benchmarks, not legal limits: your venue, caterer, and local fire authority set the real numbers, and you should get them in writing.
This guide is for couples, planners, and family members who are building a reception floor plan for a ballroom, a tent, a barn, or a restaurant buyout and want to check it with arithmetic instead of guesswork. You will learn how to turn a room into a seating ceiling, how to size aisles for guests, servers, and wheelchair users, how to trace the paths that caterers, bartenders, and band crews actually use, and what to ask when your reception floor plan moves outdoors under a tent. It includes a lane-width ladder, a worked capacity example, a path-crossing map, a wind-securement checklist with a vendor stop-work rule, and a list of questions to put to the people who will set the room up.
One limit up front. We are not engineers, fire marshals, or lawyers. Occupancy limits, exit counts, and tent rules are set by local authorities and differ from place to place, and this article does not publish a universal occupancy number or any do-it-yourself electrical or rigging instructions. Where we cite a number, we say who published it and why it may not apply to you.
What a reception floor plan has to do
Most people picture a floor plan as a drawing of circles and rectangles. A working reception floor plan is better understood as a promise about movement: it says where guests will walk, where staff will carry food, where vendors will wheel equipment, and where everyone will go if they need to leave quickly. Tables, a dance floor, and a cake stand are just the objects that those movements go around.
The plan is a set of paths, not just a set of tables
A table count tells you how many people can sit. It does not tell you whether the person in the wheelchair can reach the table, whether the server with a full tray can pass a guest who has pushed back a chair, or whether the line at the bar blocks the way to the restroom. Those answers live in the empty space, so the empty space deserves as much attention as the furniture.
Guest paths
Guests move in a few predictable ways: from the entrance to the bar or seating, from the seat to the dance floor, from the seat to the restroom, and out at the end of the night. A guest path needs a clear width that someone using a mobility device can use, and it needs to stay clear when people are standing, queuing, or carrying a drink. Planning guest paths first keeps the reception floor plan from turning into a puzzle where the aisles are whatever is left over.
Service paths
Service paths are the routes that food, drinks, cake, linens, and trash take through the room. A plated dinner puts servers at every table. A buffet or station setup moves the movement to a line. A bar needs restocking, ice, and glass collection. Each of these crosses guest paths somewhere, and the crossing points are where spills, delays, and awkward waiting happen. Our guide to catering service planning covers the food side in more depth. Here we focus on the geometry.
Why the numbers come from several places
There is no single rulebook for a wedding floor plan. Several kinds of source each cover a slice of the problem, and a careful plan reads all of them while knowing which ones apply.
Federal accessibility figures
The 2010 ADA Standards for Accessible Design, published by the U.S. Access Board, give widely used dimensions for accessible routes, turning space, clear floor space, and dining surface heights. They are written for buildings and facilities, and a temporary wedding layout is not automatically governed by every one of them, but they are the benchmark that most venues and planners reach for when they ask whether a guest who uses a wheelchair can get to a seat. We use them as a planning benchmark for the reception floor plan and say so each time.
Local fire authorities set occupant and aisle rules
Occupant load, exit count, and aisle width for gatherings are enforced locally. Different fire authorities publish different figures, and some publish none for the situation you are in. In the sources we read, one agency gave a minimum aisle of 44 inches for tent seating above 50 occupants and 36 inches for 49 or fewer, another required the floor plan of a tent to show aisle widths without stating a number, and a state page used a seating-distance table instead. When this guide gives a figure from one of them, treat it as an example of the kind of rule you may meet, not as the rule that applies to your venue.
Who reads a reception floor plan
A floor plan is a working document that several people will use for different reasons. Writing it with those readers in mind makes it clearer and makes mistakes easier to catch.
The venue and the fire authority
Venue staff read a reception floor plan to see whether it fits the room, the power, and the house rules. A fire authority, where one is involved, reads it to check exits, aisles, and occupant load. Several of the tent pages we read say a drawing is required for larger structures and that it must show table spacing, aisle widths, and exits. Even when no reviewer asks for one, drawing your reception floor plan to scale gives you the same check on your own work.
Vendors and family
Caterers, bartenders, rental crews, and the band read the reception floor plan to find where to stand, stage, plug in, and park a cart. Family members read it to see where they will sit. A single drawing with a clear key and a short list of notes can serve all of them, which is why the reception floor plan should be a shared file and not a sketch on one person’s phone.
Start with the room you actually have
A venue may quote a capacity for your reception floor plan that comes from a fire code, a banquet rule of thumb, or a sales brochure, and those are three different numbers. Before you place a single table on the reception floor plan, find out which one you were given and then measure the room you will really use.
Measure net space, not the brochure number
Gross square footage is the room from wall to wall. Net square footage is what is left once you take out everything that guests cannot stand or sit on. The Madison, Wisconsin fire department’s outdoor-assembly handout defines net area as gross area minus bars, stands, portable restrooms, and fixed obstructions, which is a useful definition for any reception space. Our guide to wedding venue capacity explains why the stated capacity and the comfortable capacity can differ.
Subtract the fixed things
Walk the room, or study a dimensioned drawing, and write down on your reception floor plan what stays put: columns, built-in bars, stage platforms, fireplaces, door swings, kitchen pass-throughs, sound and lighting positions, and any wall that carries a radiator or a service panel. Doors that swing into the room claim a quarter circle of floor, and a pair of double doors claims two. Treat each of these as a keep-out shape on your reception floor plan.
Ask for a dimensioned drawing
Ask the venue for a scaled floor plan with measurements and, if possible, a version in a format your planner or rental company can open. A software vendor’s list of common layout mistakes includes not understanding the space you are designing for, and not seeing the space in person, since columns, low ceilings, and power access may not appear on a drawing. Compare the drawing to the room on a site visit with a tape measure, because venues remodel and drawings go stale.
Convert space into a seating ceiling
Once you have net square feet for the reception floor plan, you can estimate the most guests a space could ever hold under common fire-code factors. The result is a ceiling, not a target, and it is the first number to compare with your guest count.
The fifteen square feet factor, and what it is
Two state fire authorities and one city fire department we read all used a factor of 15 square feet of net floor area per person for seating at tables and chairs. The Minnesota State Fire Marshal’s page lists it alongside 7 square feet per person for chair seating without tables and for standing areas and dance floors, and 5 square feet per person for waiting and queuing areas. The Maine Fire Marshal’s Office lists 15 and 7 for table seating and standing room. Divide net area by 15 and you have an upper bound for a seated dinner. As an illustration of our own arithmetic, a 2,400 square foot net room divides to 160, which is a legal-style ceiling and not the number of guests who will be comfortable.
Why jurisdictions disagree
The Madison handout uses 5 square feet per person for standing space where Minnesota lists 7. Neither is wrong; they are different authorities applying different adopted rules. That mismatch is the main reason this guide never states a universal occupancy limit. Ask your venue which factor its local authority uses, and ask who signs off on the final count. Our venue questions guide lists other questions worth asking at the same visit.
The lane ladder: how wide should an aisle be
An aisle between two tables is not just the gap you see on a reception floor plan. Chairs sit in it, guests push them back, and the lane has to carry someone through while those chairs are occupied. The simplest reliable method is to build the width from its parts and then pick the lane the job requires.
Build the width from its parts
Every aisle between seated tables has three layers: a chair zone behind guests on one side, the clear lane, and a chair zone behind guests on the other. The edge-to-edge gap between the tables is the sum of all three.
The chair zone
We need a number for the space that a seated guest occupies behind the table edge. The Maine Fire Marshal’s seating guidance measures the clear aisle width to a line 19 inches out from the table edge, perpendicular to that edge, where seating sits between a table and an aisle. We use 19 inches as the chair zone throughout this guide. It is one agency’s measuring convention, and a person with a larger chair or a longer reach needs more, so treat it as a working number and not a promise.
The clear lane
The clear lane is the part that has to stay open for walking, carrying, or rolling. Its width depends on who uses it. A lane that is fine for one standing guest may be too tight for a server with a tray or for a wheelchair user making a turn. The rest of this section sets out three lane widths with a different job each.

Three lanes, three jobs
Each lane width has a published figure behind it, and each one changes the edge-to-edge gap. All gaps below are our arithmetic: two 19-inch chair zones plus the lane.
The 36-inch guest lane
The 2010 ADA Standards set a minimum clear width of 36 inches for an accessible route. They allow it to narrow to 32 inches for a length of up to 24 inches, as long as those narrow segments are separated by segments at least 48 inches long and 36 inches wide. Adding two chair zones gives about 74 inches between table edges, or roughly 6.2 feet. This is the tightest lane in this guide, and it is a floor, not a recommendation. It suits a side lane used by guests only, with no food service and no queue.
The 44-inch service aisle
The National Park Service’s National Capital Area tent guidance calls for a minimum aisle of 44 inches for seating at tables where the occupant load exceeds 50, and 36 inches where it is 49 or fewer. Adding two chair zones to 44 inches gives about 82 inches, or roughly 6.8 feet. We use 44 inches as a stand-in for a service aisle because a server carrying a tray or a bus tub needs more than a bare walking lane, but the right width for your caterer’s equipment is something to confirm with the caterer. Note that the NPS page was last updated in March 2021, so check for newer requirements before relying on it.
The 60-inch turning lane
The ADA Standards describe a turning space for wheelchair users as a circle at least 60 inches in diameter, or a T-shaped space that fits within a 60-inch square. The Access Board’s accessible-routes guidance adds that a route narrower than 60 inches needs a passing space of 60 by 60 inches, or a T-shaped one, at intervals of no more than 200 feet. A 60-inch lane plus two chair zones is about 98 inches, or roughly 8.2 feet. You do not need this width everywhere. You need it at the places where someone has to turn: the entrance to a seating area, the approach to an accessible table, and the corners where two aisles meet.
Cross-check with local table-spacing rules
A second kind of rule skips the lane and states the distance between tables directly. That gives you a way to test the ladder.
How the 74-inch figure lines up
The Maine Fire Marshal’s seating page gives minimum distances between adjacent tables that depend on chair positions: 36 inches when no chair backs face each other, 55 inches when one table has a chair back facing the other, and 74 inches when chairs are back to back. Our 36-inch lane plus two 19-inch chair zones comes to 74 inches, the same as the back-to-back figure. That agreement is arithmetic, not proof, but it suggests the 19-inch chair zone is a sensible working value, and it shows that a fire-code style distance and an accessibility-style lane can describe the same gap.
Why a flat five-foot rule can fall short
A common rule of thumb says to leave at least five feet from one table edge to the next. One event-layout software company states it that way and adds room for wheelchairs or strollers. Five feet is 60 inches. Subtract two 19-inch chair zones and the clear lane left between seated guests is about 22 inches, which is narrower than the 36-inch accessible-route minimum. A rule of thumb like this can work for tables that are rarely occupied at the same moment, but it should not be the number you use for a main aisle. Every reception floor plan starts from a table choice, and our guide to wedding table shapes shows how round, rectangular, and long tables change the spacing problem.
Fit tables to the room: a worked example
The ladder gives your reception floor plan three edge-to-edge gaps to choose from. The next step is to see what each one does to a real room. The example below is deliberately simple so you can repeat it with your own measurements, and every figure in it is our own estimate.
Walk through the arithmetic
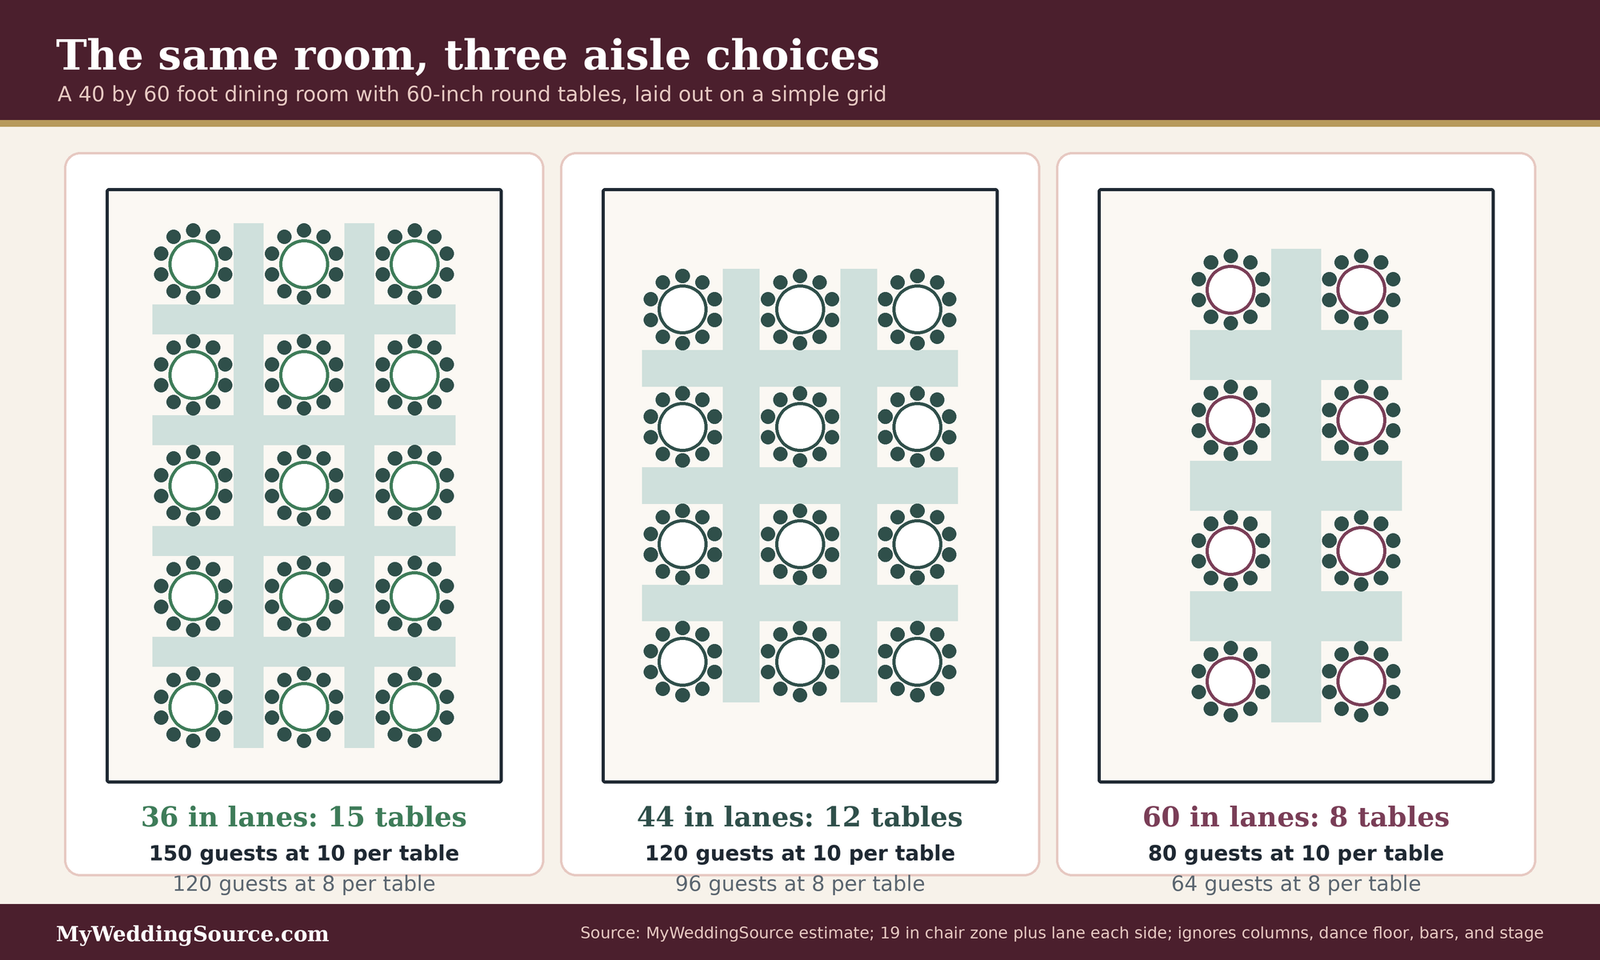
Assume a dining room that measures 40 feet by 60 feet, which is 2,400 square feet, with nothing in it but tables. Assume 60-inch round tables, because a rental retailer’s sizing chart lists that size as seating 8 to 10 guests. Assume a 19-inch chair zone around every table and one lane of the chosen width between neighboring tables and between the outer tables and the walls.
The table module
A table module is the table plus the space it claims. For a 60-inch round table, the module across a lane is the table width, the chair zone on each side, and the lane that the module shares with its neighbor. That is why the gap between table edges is the number to use: 74 inches for the 36-inch lane, 82 for the 44-inch lane, and 98 for the 60-inch lane. The distance from the center of one table to the center of the next is the table width plus that gap, so 134, 142, or 158 inches. Put another way, one table claims roughly an 11 to 13 foot square of floor in the middle of the room before you think about anything else.
Count rows and columns
Along each wall, you need a lane plus a chair zone before the first table edge, so we subtract that from both ends of the dimension and then see how many table-plus-gap steps fit in what is left. On the 40-foot side, the 36-inch and 44-inch layouts fit three tables across and the 60-inch layout fits two. On the 60-foot side, the layouts fit five, four, and four tables. Multiply across and along, and the results are 15, 12, and 8 tables.
Read the result honestly
The numbers look precise, so it helps to say plainly what they show and what they do not.
What changes with the lane
At 10 guests per table, the three layouts seat 150, 120, and 80. At 8 guests per table they seat 120, 96, and 64. Going from the narrowest lane to the widest cuts the table count nearly in half in the same room. The room’s net area divided by the 15 square foot factor gives a ceiling of 160, and the narrow-lane layout reaches 150 guests, which is 16 square feet each. That means the tightest layout is already close to a table-and-chair occupant load ceiling in this example, and it leaves no space for a dance floor, a bar, or a buffet. The wide-lane layout gives about 30 square feet per guest at 10 per table, which is roomy but costs seats.
What the grid leaves out
A grid is an easy way to count tables in a reception floor plan, but it ignores columns, door swings, a dance floor, a head table, a bar, a cake, a band, a photo booth, and the extra width at turns. Real layouts use mixed lanes, and a good reception floor plan marks which is which: a wide spine that carries traffic and service, narrower side lanes where only seated guests pass, and an offset arrangement that tucks tables into gaps. A tight grid on paper that works only when nobody sits down is not a reception floor plan. Treat the example as a way to see the trade-off, then re-run it with your actual room shape and the reception floor plan you intend to build.
A short method you can repeat with your own room
You can do this on paper in about twenty minutes. The aim is to see the lane choice before you see the guest count, so that you cut seats for a reason and not by accident.
Four steps
First, write down the net dimensions of the dining area after subtracting fixed objects. Second, choose the table size and the number of guests you will seat at each one. Third, choose a main lane, a side lane, and a turn space, and compute the edge-to-edge gap for each as two chair zones plus the lane. Fourth, count how many tables fit across and along, multiply, and compare the seats to your guest count and to the venue’s stated capacity. If you are short, change one thing at a time: first the table count per row, then the guests per table, then the side lanes, and last the main lane.
Check the plan against the guest list
Before you share the reception floor plan, check it against the final guest list, the head count by table, and any special seating needs. Count the seats on the drawing and confirm they match the number of chairs you will rent plus a small, agreed spare count. If the guest count changes after the invitations go out, rerun the arithmetic instead of adding a chair to a table, because a single added chair per table shrinks every lane in the reception floor plan by the same amount.
Where to cut seats first
Cut seats before you cut lanes. One fewer guest per table removes a chair from the table’s footprint and makes the aisle usable, while squeezing a lane makes every guest and every server pay for it all evening. Our seating chart guide covers who sits where once the layout is set, and the dance floor size guide helps you decide how much floor to protect before you count tables.
Service paths: caterer, bar, and vendor routes
Servers, bartenders, rental crews, and the band all move through the room, and they do not move at the same speed or at the same time. A service path is a route that someone will use repeatedly while guests are present, so it needs a clear width, a destination, and a plan for what happens when it meets another path.
Map the routes before you place tables
Start with the kitchen or service door and the places that need regular supply. Draw the shortest direct route to each on the reception floor plan, and then move tables to keep those routes open rather than the other way around.
The kitchen door and staging space
Every kitchen door needs a small area where trays, carts, or hot boxes can wait without blocking a guest aisle. Ask the caterer where they plan to stage and how many staff will work the room at once. A plan that routes every server through the same narrow lane will back up even if the lane is wide enough for one person. If the caterer works from a mobile or temporary kitchen, ask where it sits relative to the tent or room and how the route stays clear in wet weather.
Buffet, stations, and plated service
The route changes with the service style. For plated dinners, servers reach every table, so most lanes become service lanes at some point and the 44-inch service aisle matters. For a buffet or food stations, movement concentrates in a line, and the question becomes how much space guests need to queue and to turn away from the line with a full plate. A hospitality training page suggests keeping at least four to five feet between tables around a buffet and staggering guests’ access to the line at larger events. That is general training advice, not a code, but it supports giving a queue its own space. A family-style meal changes the problem again, since platters travel down a table, and our guide to family-style service for long tables covers that. Our grazing tables guide is a useful companion if you plan a spread instead of a line.
The bar and its resupply
A rental company that publishes tent-planning guidance describes a bar zone as more than the bar itself: it includes the service width, the back-bar and working space, and the front approach and queue, and it recommends calculating each bar separately. That is a good way to think about it. Ask where ice, glassware, and kegs arrive, who restocks, and when. Our guides to bar service planning and bar ice planning go into volumes. For the reception floor plan, the key point is that the restock route should not cross the queue.
Find the crossings
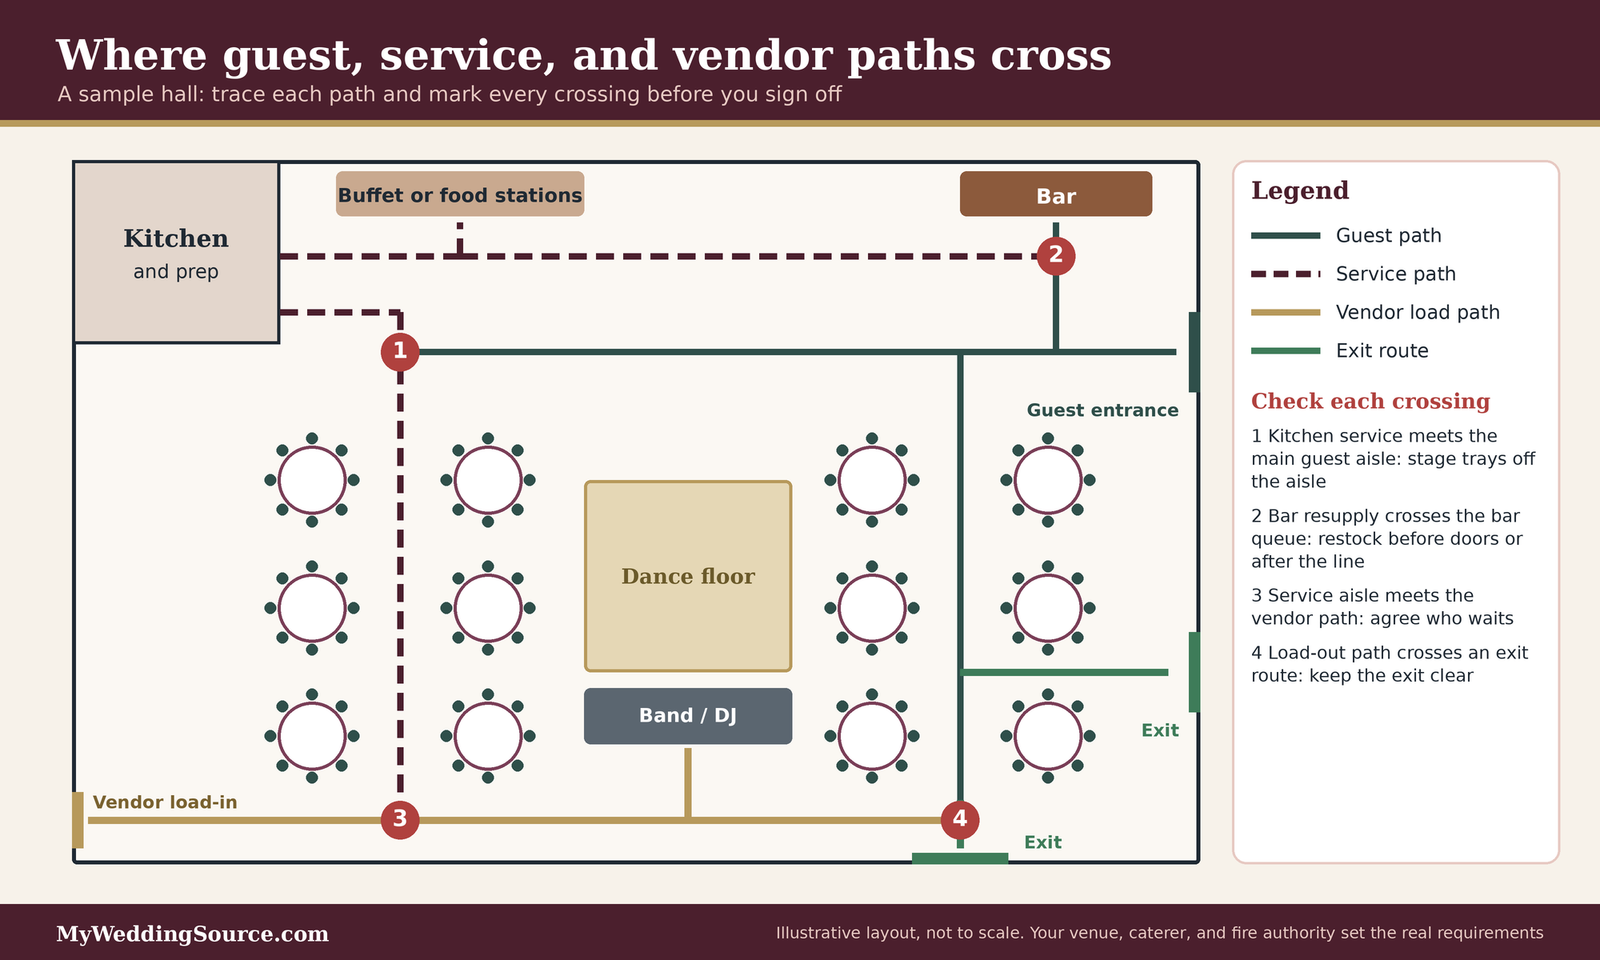
Draw every path on one plan in different colors, and mark each place where two cross. The map below shows an example with four crossings. Your hall will have its own.
Queues
A queue is a path that stands still. A bar line, a buffet line, a photo booth line, and a coat check line all take space that is not on a typical drawing. If a queue forms in an aisle, it blocks everything behind it. Give each queue a place to form that is not a through-route, and keep it away from the restroom approach and exits. If you plan a photo booth, include its line in your reception floor plan.
The dance floor and the band
Dance floors fill at predictable times, and service paths that cut across or beside them become obstacles at the busiest part of the night. A band or DJ also needs a load-in route and a position near power. Our live band stage plot guide explains what the band needs, and our audio and lighting checklist covers cable runs, which are one more thing that should not cross an aisle. Where cable must cross a walkway, ask the vendor how it will be covered and who checks it.
Vendor load-in and load-out
Rental crews, florists, the band, and the cake delivery all arrive before the event and leave after it. A load-in route that is clear at 10 a.m. may be full of tables at 11 p.m. Ask the venue about dock access, doorway widths, elevator limits, and quiet hours, and read our guide to wedding venue load-in restrictions. Plan the load-out route as carefully as the load-in route, and keep it clear of exits.
Rules for who waits
Even a good reception floor plan has crossings. The reception floor plan is complete when each crossing has a rule about who goes first.
Timing windows
Many crossings can be solved with time instead of space. Restock the bar before doors open or during a toast, not at the peak of the line. Clear plates during a speech that holds guests in their seats, not during open dancing. Cut the cake at a point when the dance floor is not full. Put these windows in the day-of timeline so that every vendor sees them, and note them on the reception floor plan beside the crossing they affect. Our vendor timeline guide shows how to share one schedule.
Put the rule in writing
Write a short line for each crossing in the floor plan notes: for example, who has right of way, who owns the path, and who calls a pause. Share the reception floor plan with the caterer, the venue coordinator, the band, and the rental company, and ask each to confirm in writing that the paths they need are marked. A verbal yes on a site visit tends not to survive a staff change.
Accessibility in the reception floor plan
Accessibility belongs in the first draft of a reception floor plan, not in a late revision, because the fixes later are usually expensive in seats. A route that works for a wheelchair user also tends to work for a server with a cart, a guest with a walker, a parent with a stroller, and an older relative who walks slowly.
Routes to every table
An accessible route has to reach every seating area a guest might use, not only a designated spot near the door. The ADA Standards require an accessible route to all dining areas in restaurants and cafeterias, including raised, sunken, and outdoor areas, which is a reasonable principle to apply to a reception even where the rule does not strictly govern it.
Clear width, turns, and surfaces
When you review the reception floor plan for access, use the lane ladder: at least 36 inches clear on the routes that lead to seating, with 60-inch turning space where people need to turn around, and passing space where a narrow route serves two-way traffic. The Access Board’s guidance says surfaces on an accessible route should be firm, stable, and slip resistant, with a running slope no steeper than 1 in 20 and a cross slope no steeper than 1 in 48. Temporary flooring over grass, cords, thresholds, and the edge of a rental dance floor all affect this. Our guide to dance floors over grass covers surface issues, and our guide to accessible wedding dance floors goes deeper on floor edges and transitions.
Space at the table
At the table itself, the ADA Standards call for a clear floor space of at least 30 by 48 inches, which is the footprint a wheelchair user needs to pull up. They also describe dining surfaces with tops between 28 and 34 inches high. A typical banquet table may not match every one of those details, and a rental company can tell you which tables work. Ask for a table with open space beneath it, not one with a central pedestal or heavy legs at the corners, and leave a chair out of the setting to make room instead of asking a guest to squeeze in.
Placement that does not single anyone out
Where you put accessible seating says something about how you treat the guest in it. In a reception floor plan, a table in a corner next to the kitchen door is a bad answer even if it is technically reachable.
Mix seats instead of grouping them
Place accessible seating at several tables near family and friends, close to the routes that lead to the dance floor and restrooms, and away from the loudest speakers if noise is an issue. Our guide to seating for guests who cannot stand for long periods covers extra seating at standing moments such as cocktail hours and toasts.
Quiet space, service animals, and signs
Think about who else needs space: a guest with a service animal needs floor area at the table and a clear approach, and our service animals guide covers etiquette and logistics. A guest who needs a break may value a quieter spot reachable by a short, clear route. Good signage that points to restrooms, accessible routes, and exits reduces the need to ask, and it keeps lanes from filling with people looking for directions.
Tent and outdoor receptions: the wind-securement checklist and stop-work rule
An outdoor reception adds a layer that an indoor hall does not have: the roof is a rented structure, the walls may be fabric, and the weather decides how the day goes. The reception floor plan has to fit the tent, the tent has to be permitted where a permit is required, and the people who put it up and take it down have to be willing to stop work when conditions change.
What changes outdoors
Beyond the lane arithmetic, three things become more important: the permit threshold, the exits, and the clearances around the structure.
Permit thresholds differ
Two fire authorities we read set different thresholds. The City of Portland, Oregon’s fire bureau requires a Fire Marshal permit for an outdoor tent over 700 square feet, and a public assembly permit for events of 50 or more people confined by tents or similar structures. The Marysville Fire District’s tent standard requires a construction permit for a tent over 400 square feet, with exceptions for certain open-sided tents of 700 square feet or less that meet separation conditions. The National Park Service’s National Capital Area page requires plans and drawings for assembly tents over 900 square feet and for all cooking tents. The takeaway is not any one number. It is that you cannot assume your tent is too small to need a permit, so ask the venue and the tent company who pulls the permit for your location and what drawing they need.
Exits and clearances
Tent exit rules in the sources we read are specific. Portland’s page lists a minimum of two exits, each 72 inches wide and 80 inches high, a maximum travel distance to an exit of 100 feet, and battery-backed exit signs. The Marysville standard says guy wires and support ropes may not cross a means of egress below 8 feet. The NPS page lists one exit for fewer than 49 people and two exits for 50 to 499, requires furnishings not to block exits or their visibility, and calls for 7 feet of head clearance. These numbers differ because the authorities differ. They show what a reviewer of a reception floor plan may look for: exits that are visible, reachable by an aisle, and not blocked by a dessert table, a lounge set, or a guy wire.
Keep the plan current as the forecast changes
A tent reception floor plan should have a second version for bad weather. If the vendor lowers sidewalls, closes the tent, or moves guests to a building, the table count, lanes, and exits may change. Ask the tent company and venue to review both versions of the reception floor plan ahead of time and to say which one applies at which forecast. Our guide to outdoor wedding venues covers other things that change when the reception is outdoors.
The wind-securement checklist
This is a list of questions and checks, not instructions. Securing a tent is a job for trained crews and, where required, engineers and inspectors. Your role is to make sure the questions are asked and the answers are written down. Our guide to ceremony wind limits covers the ceremony side of the same subject.
What to ask the tent vendor
Ask the tent company, in writing, how the structure will be anchored on your surface, since stakes, ballast, and weights suit different ground. Ask whether the tent is rated for a particular wind condition and who set that rating, what the sidewalls do in gusts and whether they will be rolled up or removed, and who will be on site during the event and who has authority to make a call. Ask for the permit and any structural information required in your area, because the Marysville standard says submittals must include structural stability information and anchorage details. Ask what the plan is if utility lines or buried irrigation prevent staking, and who locates them. Ask how décor, lighting, and rentals hung from the structure are attached and who approves them. Our outdoor infrastructure checklist lists the other site questions that belong beside these.
Write a stop-work rule
A stop-work rule is a short written agreement that says what conditions pause setup, service, or the event itself, and who decides. We cannot tell you the right wind speed for your tent. The National Weather Service’s wind page notes that sustained winds of 40 to 50 miles per hour can cause isolated wind damage and that thunderstorm winds can exceed 100 miles per hour, but a tent’s own rating and the vendor’s procedures are what govern your decision. The rule should name one person on the vendor side with authority to stop, state that a stop call is not a breach of contract, say what happens next (guests moved into a building, service paused, sidewalls lowered or removed per the vendor’s plan), and say how the decision is communicated to the planner and the couple. Agree on it before the day, because nobody wants to negotiate it in a gust.
What not to do yourself
A few jobs are better left alone, and saying so is part of a safe reception floor plan.
No do-it-yourself rigging or electrical work
Do not rig, anchor, or modify a tent, and do not run power yourself. Leave structure, anchoring, and electrical connections to licensed or trained professionals and to whatever inspection your authority requires. A family member who offers to hang lights from the tent frame is being kind, and the answer should still be no unless the tent company approves it.
Generators, cords, and heaters
If power comes from a generator, put its location on the reception floor plan with the exhaust and fueling away from guests. The NPS guidance says to keep generators at least 5 feet from tents, with protection from the public, and to arrange accessible cords to minimize trip hazards, and it notes that tents using gas heating or cooking should be checked for carbon monoxide hourly. Those are one agency’s rules, but the principle applies anywhere: power, fuel, and heat belong outside the aisle network. Our generator rental guide explains what to ask the supplier.
Edge cases that change the plan
A grid of round tables is the easy case. Real receptions bring odd rooms, mixed furniture, and extra features, and each one changes the arithmetic.
Long tables, round tables, and mixed layouts
Round tables are forgiving because every guest can see the others and chairs fan out evenly. Long rectangular tables use space differently, since the aisles run along their full length and the chair zones sit on both sides.
Long tables and family-style service
A long table needs a chair zone on each long side and a lane beside each one, so the same 19-inch assumption applies, but the lane is much longer. The distance from one end of the table to the nearest cross-aisle matters too, because a guest in the middle has to get out. Put cross-aisles at least every few seats, and ask the caterer how platters will move. See our family-style service guide for the food side.
Mixed furniture and lounges
A lounge area with sofas and low tables takes up less height but more floor than people expect, and its edges become informal queues. If you add lounge seating, model it as a block with its own approach lane, and ask the rental company for its dimensions. Our rental planning checklist lists what to confirm.
Odd rooms and extra features
Not every venue is a rectangle, and not every reception is one room.
Columns, narrow rooms, and multiple rooms
A column removes a table from the grid and creates a pinch point beside it, so check that the lane on each side still meets your chosen width. In a long narrow room, you may need one central spine with tables on each side and no cross-aisle, which makes the spine your only route, so give it the wider width. If the reception spans several small rooms, each doorway becomes a bottleneck, and our guide on how to plan a reception in a venue with multiple small rooms is written for that case.
Cake, favors, photo booth, and guest book
Small features have small footprints and large effects. A cake table needs a safe approach for cutting and a spot out of the dance traffic. A guest book table draws a line at the entrance. A photo booth draws a queue and may need power. Give each a labeled rectangle on the reception floor plan, with a queue space beside it, and see our guides to wedding cake and photo booths for practical details.
Questions to ask before you finalize the reception floor plan
A reception floor plan is only as good as the answers behind it. Ask for the answers in writing and keep them with your contracts.
Questions worth asking before you sign off
- What is the venue’s stated capacity for a seated dinner with a dance floor, and which rule or factor produced it?
- Who is the final authority on occupant load and exits for my date and reception floor plan, and do they need to see a drawing?
- What is the minimum aisle width the venue or fire authority expects for tables, and does it differ for a main aisle?
- Where will the caterer stage food, and which route will servers use between the kitchen and the tables?
- Where will the bar be restocked, and when?
- What are the load-in and load-out routes, times, and restrictions for each vendor?
- If the reception is under a tent, who pulls the permit, who is rated to secure the structure, and what is the written stop-work rule?
- Which rental tables and chairs are you using, and what are their exact dimensions?
About the room and the rules
These questions confirm the space and the authority behind it.
Capacity and who decides
Ask for the capacity as a number and as a document: what it assumes, who calculated it, and whether it covers a layout with a dance floor, bar, and stage. Ask whether the venue will approve your layout and whether a fire inspection is needed. If the answer is that the venue “usually allows” a layout, ask for it in writing.
Tables, chairs, and dimensions
Ask for exact dimensions of the tables and chairs, not just the names. A rental retailer notes that tabletop items such as chargers, florals, and candles increase the footprint and that wider specialty chairs may reduce how many guests fit at a table, so the reception floor plan should use the real items. Our table settings guide shows how place settings change the footprint.
About the people who work the room
These questions confirm that the paths work for the people who use them.
Caterer and bar
Ask the caterer how many servers work the room, how they carry food, whether they use carts, and where they need to stage. Ask the bar team how many bars, where they restock, and how long they expect the lines to be at the busiest time.
Venue coordinator and rental company
Ask the coordinator to walk the reception floor plan against the room and mark the doors, outlets, and any hazards. Ask the rental company who sets up, when, and whether they will place tables from your drawing or from their own judgment.
What a better reception floor plan can cost
The choices you make in a reception floor plan tend to show up in the budget in indirect ways: the number of tables you rent, the size of the tent or room, and the time vendors need to set up. We do not quote prices here because they vary by region, vendor, and season, and any number we gave would be a guess.
Where layout meets the budget
A wider aisle usually means fewer seats in the same room, so the cost shows up as a larger room or tent, a second seating area, or fewer guests at the same price. Ask the venue and rental company for itemized quotes for each layout you are considering, and ask whether changes after the contract is signed carry a fee. Our venue cost guide explains how space and price relate.
Space versus seats
When you weigh costs, ask which reception floor plan each space allows. If you must choose between a tighter reception floor plan and a larger space, compare the full cost of each, including rentals, tent sidewalls, extra staff, and any permit or inspection. A layout that fits fewer guests per table can still cost less overall if it avoids a bigger tent.
Tent size and what drives it
A rental company’s tent-planning guidance notes that frame tents come in widths of 20, 30, 40, and 50 feet, with lengths in five-foot increments. It also says that dining space should be calculated from the table-and-chair module and not squeezed to fit a smaller tent, and that a dance floor is a fixed rectangle chosen from the event’s own plans. Sizes jump in steps, so a plan that needs just over one size may be cheaper to adjust than to upsize.
Extra staff and time
A complex layout takes longer to set up and may need more staff to serve. Ask the caterer and the rental company whether a different layout changes their labor, and ask the venue about overtime for early arrivals or late tear-down. Our guide to vendor overtime rates covers how those fees work.
Questions for budget conversations
Costs are easier to compare when each option is described the same way, so treat the budget conversation as another use of the reception floor plan.
Ask for the same plan in two versions
Ask the venue or planner to price two versions of the reception floor plan: one with the lanes you would choose and one with the tightest lanes that meet the rules. Compare seats, rentals, and staffing for each, and decide whether the extra space is worth the difference to you.
Keep the reception floor plan in the contract file
Attach the final reception floor plan to the venue and rental contracts, so that everyone is working from the same drawing, and note any changes with a date. If a vendor later asks to change a lane or move a table, you will have a clear reference for what was agreed.
FAQ: reception floor plan questions
Aisle width and capacity
How wide should aisles be in a reception floor plan?
It depends on who uses the aisle. The 2010 ADA Standards set a 36-inch minimum clear width for accessible routes, and one federal tent guide asks for 44 inches above 50 occupants. Add roughly 19 inches of chair space on each side to get the gap between table edges. Confirm the requirement with your venue and fire authority.
How many guests fit at a 60-inch round table?
A rental retailer’s sizing chart lists 8 to 10 guests for a 60-inch round, and says to allow 24 to 30 inches of table space per guest. Place settings, centerpieces, and wider chairs reduce the number, so use the lower figure when you plan to include large tableware or a full set of décor.
What is the usual square footage per guest for a seated dinner?
Fire authorities we read use 15 square feet of net floor area per person for table-and-chair seating, with 7 square feet for standing areas and dance floors in some jurisdictions. That is a legal-style ceiling, not a comfort target. Ask your venue which factor its local authority applies before you rely on it.
Service and access
How do I plan service paths for a buffet or bar?
Draw the route from the kitchen to each station and from the restock point to each bar, then mark every place a path crosses a guest aisle or queue. Give each queue its own space away from through-routes, and agree in writing on timing windows for restocking and clearing so crossings do not coincide with peak traffic.
How do I make a reception floor plan accessible?
Provide a route at least 36 inches wide to every seating area, with 60-inch turning space where people must turn, and a firm, stable, slip-resistant surface. Place accessible seats at several tables, not in one corner. Ask the rental company for tables with enough knee and floor space and leave a chair out of the setting when needed.
Where should the dance floor go relative to the tables?
Put it where it can be reached by a clear route from most tables, away from the kitchen door and the main service lane, and near the band or DJ. Keep it from forming a barrier between seating and restrooms. Our dance floor size guide explains how much space to reserve for your guest count.
Tents and approvals
Do I need a permit for a wedding tent?
Often, but not always. Thresholds in the sources we read ranged from tents over 400 square feet to over 700 square feet, with separate rules for events of 50 or more people and for cooking tents. Ask the venue and the tent company who handles permits where you are, and confirm with the local fire authority.
What should a wind stop-work rule say?
It should name one person with authority to stop work or the event, state that stopping is not a breach, set what happens next, and say how the decision is shared with the planner and couple. It should follow the tent vendor’s own rating and procedures. We cannot give you a safe wind speed for your structure.
Your next steps
Measure and calculate
Gather the dimensions
Ask the venue for a scaled drawing and the stated capacity, and walk the room with a tape measure. Write down net dimensions, fixed objects, doors, and power. Then run the four-step method in this guide with your own numbers and note the guest count each lane choice allows.
Pick lanes by job
Choose a main lane, a side lane, and a turn space, and mark where each applies. Keep the main spine and the route to accessible seating at the wider widths, and save the narrow lanes for places that only seated guests pass.
Trace the paths and get it in writing
Draw and review the crossings
Draw guest, service, and vendor paths in different colors, mark each crossing, and write a rule beside it. Share the reception floor plan with the caterer, venue coordinator, band, and rental company, and ask each to confirm it in writing. For the wider schedule, see our reception guide and vendor timeline guide.
Confirm the approvals
Ask who approves the final reception floor plan and whether a drawing, permit, or inspection is required. If you are under a tent, get the vendor’s anchoring information and the written stop-work rule before you sign.
Sources and methodology
How we built this guide
What we relied on
This guide combines accessibility dimensions published by the U.S. Access Board, weather information from the National Weather Service, tent and assembly guidance from several local and federal fire authorities, state fire marshal pages on occupant load and table spacing, and planning advice from rental, software, and hospitality sources. Where a statement comes from a vendor or a training site, we say so, because it reflects that source’s products and habits. The table-gap figures, the worked capacity example, and the per-guest area comparisons are our own arithmetic from the published dimensions and are estimates. We checked sources on November 12, 2026. One National Park Service page we cite was last updated in March 2021, so check for newer rules.
What we did not do
We did not inspect any venue, survey any tent, or review any local code in full, and this guide is not legal, engineering, or fire-safety advice. We did not publish any universal occupancy limit, any wind speed for a tent, or any electrical or rigging instruction. Requirements differ by city, county, and state, and your venue, vendors, and local authority decide what applies to your reception.
Source list
Government and public-authority sources
- U.S. Access Board, 2010 ADA Standards for Accessible Design: https://www.access-board.gov/ada/
- U.S. Access Board, Guide to the ADA Standards, Chapter 4: Accessible Routes: https://www.access-board.gov/ada/guides/chapter-4-accessible-routes/
- U.S. Department of Justice, 2010 ADA Standards for Accessible Design: https://www.ada.gov/law-and-regs/design-standards/2010-stds/
- National Weather Service, Weather Safety hub: https://www.weather.gov/safety
- National Weather Service, Wind safety: https://www.weather.gov/safety/wind
- National Park Service, National Capital Area fire and life safety requirements for outdoor events and tent use: https://www.nps.gov/nama/learn/management/fire-and-life-safety-requirements-for-outdoor-events-and-tent-use.htm
- City of Portland, Oregon, Fire and Rescue, Outdoor tent permit requirements: https://www.portland.gov/fire/permits-inspections/outdoor-tent-permit-requirements
- Minnesota Department of Public Safety, State Fire Marshal, Occupant loads in assembly buildings: https://dps.mn.gov/divisions/sfm/fire-code/fire-code-information-topic/occupant-loads-assembly-buildings
- Maine Department of Public Safety, Fire Marshal’s Office, Seating arrangements: https://www.maine.gov/dps/fmo/inspections-plans-review/seating
- City of Madison Fire Department, Calculating capacity and exiting for outdoor places of assembly: https://cityofmadison.com/fire/documents/Calculating%20Capacity%20and%20Exiting%20for%20Outdoor%20Places%20of%20Assembly%20Handout.pdf
- Marysville Fire District, Standard for tents, membrane structures, and special events: https://www.marysvillefiredistrict.org/app/download/7250676721/MFD+Standard+for+Tents+Membrane+Structures+and+Special+Events.pdf
Industry, rental, and training sources
- Party Rental Ltd, How many people can sit at a table: https://help.partyrentalltd.com/en_US/how-many-people-can-sit-at-a-table
- Aisle Planner, Event layouts: mistakes planners make when designing a floor plan: https://aisleplanner.com/blog/art-events/event-layouts-10-mistakes-event-planners-make-when-trying-design-perfect-floor-plan
- Curated Events, How to calculate tent sizes for fall receptions: https://curatedevents.com/blog/how-to-calculate-tent-sizes-for-charleston-fall-receptions/
- Hospitality Institute, BHA303 course page: Planning buffet area requirements: https://hospitality.institute/BHA303/planning-buffet-area-requirements
- Event Safety Alliance: https://www.eventsafetyalliance.org/