
Disposable cameras are single-use film cameras that many couples put on reception tables so guests can take candid pictures. This guide explains what disposable cameras can and cannot capture, how exposure conditions limit the results, and how to work out what each kept photo really costs once development, scans and shipping are counted.
Disposable cameras work best in bright, even light and at close range, and they struggle in dim rooms, at long distance and in mixed light. Judge them with a simple model: map the light at each part of your day, estimate how many frames will turn out usable in that light, then divide your total spend (cameras, development, scans, shipping) by the kept frames. Run one test camera at your venue first. If the cost per kept photo and the look both suit you, place cameras where the light is good and skip the dance floor.
Disposable cameras have a loyal following at weddings for an understandable reason. Guests who would never hand a professional a candid moment will happily snap a friend mid-laugh with a cheap plastic camera. The pictures come back with grain, a slightly warm cast and a flash that flattens faces. Some couples love that look. Others open the envelope after months of waiting and find a stack of dark, blurry frames and a few gems.
The difference between those two outcomes is rarely luck. It comes down to two things you can plan for: the light each guest will be standing in when they press the button, and the total price of turning a roll of exposed film into pictures you can actually share. This article treats both as planning problems and gives you a worked method for each.
A note on scope. This is general information, not legal, tax or financial advice. Camera models, film types, lab prices and shipping rules change often, so every price in this article is an illustrative placeholder that you should replace with a current quote from your own supplier and lab.
What disposable cameras can and cannot do at a wedding
Start with an honest list of strengths. Disposable cameras are cheap to hand out, easy to understand and fun to hold. They need no charging, no app and no sign-in. A grandparent who dislikes phones can use one without help. They also shift the mood at a table: people notice that a camera is “special” and often take more care over what they shoot than they would with a phone they use fifty times a day.
Now the limits. Almost everything on a disposable camera is fixed. The lens, the focus distance, the shutter speed and the aperture do not change, and you cannot preview a shot. The camera cannot adjust to a dark hall or to a bride standing in front of a bright window. It gives you one exposure setting for every scene and leaves the rest to the film and the flash.
That is why this guide keeps returning to exposure conditions. A camera that cannot adapt rewards the situations it was built for and punishes the rest. Understanding which parts of your wedding day fall on which side is the most valuable thing you can do before you buy anything.
Where disposable cameras earn their place
Disposable cameras do their best work when light is plentiful and subjects are near. Think of a cocktail hour on a terrace in the afternoon, a lawn game under open sky, guests crowded around a table with a bright overhead window, or a group of cousins lined up a few steps away. In those scenes the fixed settings land close enough to correct, and the flash, if it fires, only fills in shadows.
They also earn their place when the goal is not technical quality. If you want unposed faces, odd angles, thumbs over the lens and a record of how your guests saw the day, a roll of disposable film delivers that in a way that a polished gallery rarely does. The imperfection is the point.
Where disposable cameras struggle
They struggle in low light beyond the reach of the flash, which is where most receptions spend their best hours. A dance floor lit by colored lights and a few string bulbs is exactly the situation a fixed exposure cannot handle. The flash reaches only a short distance, so people at the edges of the floor fall into darkness while the person nearest the camera glares white.
They also struggle with distance. The lens is fixed focus and wide, so a speaker at the front of the room becomes a tiny shape in a large frame. And they struggle with backlight: a couple standing with a sunset behind them turns into silhouettes unless the flash fires and the guest is close.
What this article will not do
This guide does not rank brands, and it does not claim that film is better or worse than digital.
It also does not repeat the broader question of whether and how to plan professional film coverage, which is a different decision with its own budget. Questions about who may be photographed and how images are used are covered in more depth in the guide to wedding photography consent. Its job is narrower: to help you decide whether disposable cameras belong in your plan, and if so, where, how many, and at what real cost per photo.
How disposable cameras work, and what that means for your photos
You do not need to be a photographer to plan this well, but a few facts about the camera explain nearly every good and bad result. The details below describe typical models. Read the packaging on the exact camera you buy, because film speed, frame count and flash range differ between products.
What is fixed and what the guest controls
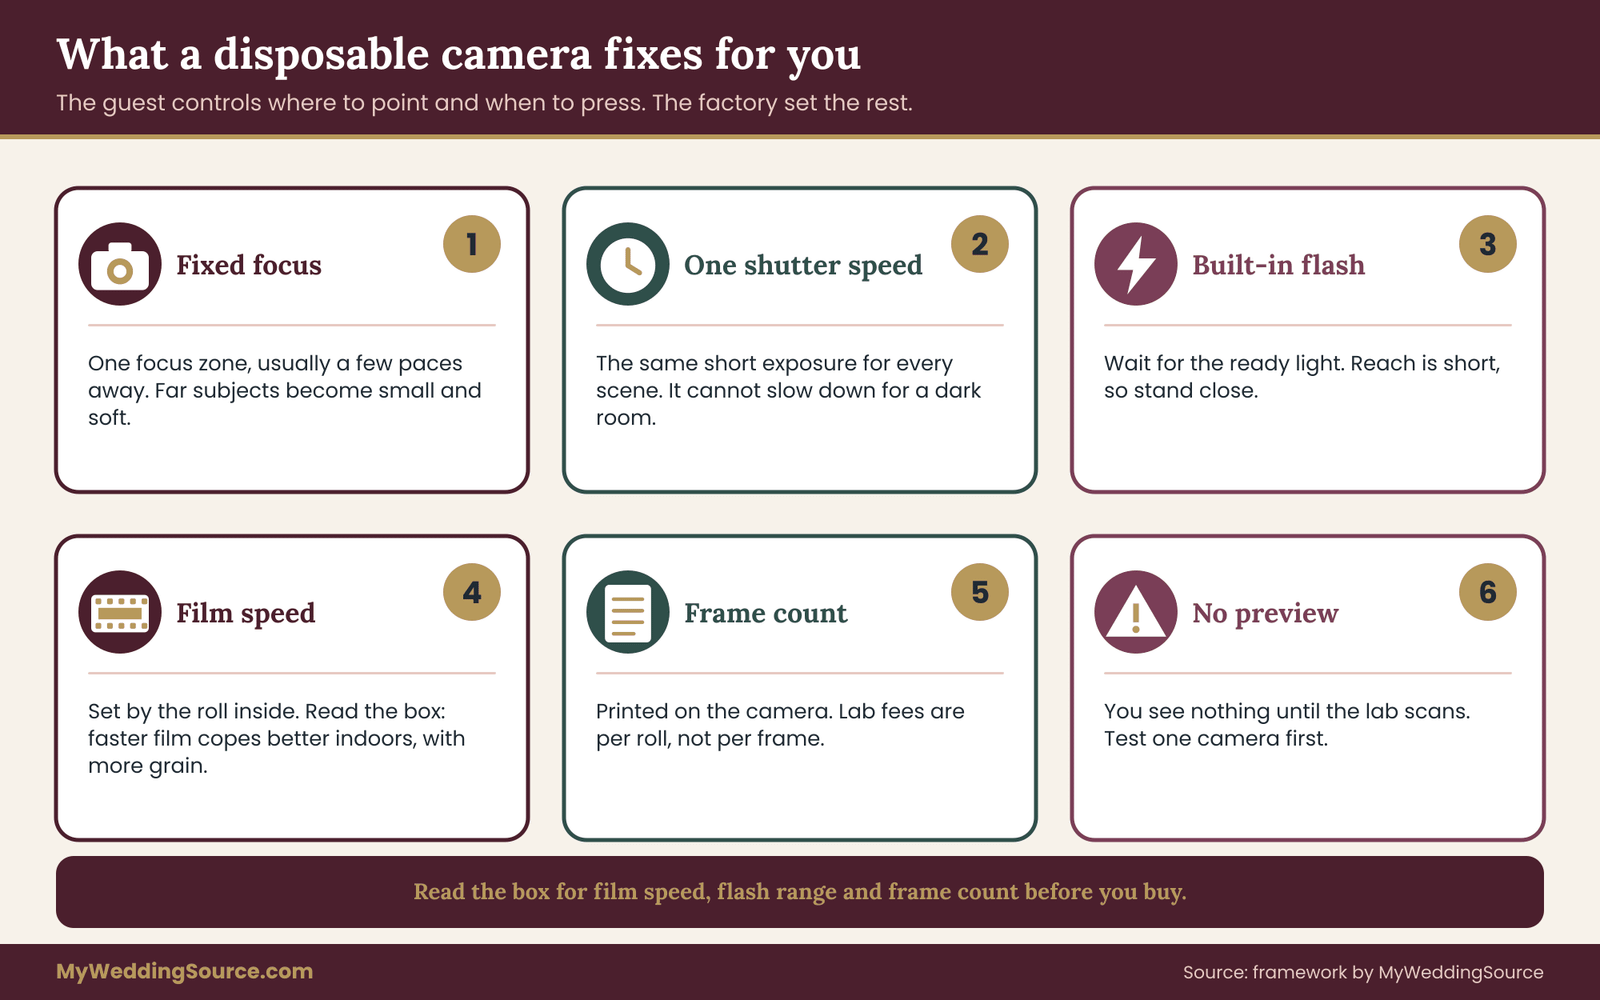
A guest controls three things: where to point the camera, when to press the button, and whether to wind the film forward. Everything else is set at the factory. The lens focuses on a fixed zone, usually a few paces to a modest distance away. The shutter opens for a single short interval. The aperture is a single small opening. The film inside is already loaded and cannot be changed.
Many models include a built-in flash that you switch on by pressing a button or sliding a lever. The flash needs a few seconds to charge, and a small light tells you when it is ready. If a guest presses the shutter before the light comes on, the flash may not fire and the photo can come out dark. This single habit explains a surprising share of ruined frames, and it is worth printing on the table card that sits beside each camera.
Another fixed feature is the wind-on wheel. Most disposable cameras require the guest to turn a thumbwheel after every shot. If they forget, the next press either does nothing or double-exposes the same frame. A frame counter on top shows how many shots remain, and a guest who watches it tends to take better care.
Film speed and why it matters
The film inside is rated by speed, written as an ISO number. Many disposable cameras are loaded with a medium-fast color film, but some use a slower film suited to daylight and a few use faster or black-and-white film. Read the box rather than assuming. A faster film tolerates dimmer light but shows more grain. A slower film is cleaner in sunlight and unforgiving indoors.
Because the camera cannot change its settings, the film speed is effectively the camera’s whole personality. When you compare two products, compare the film speed, the flash range stated on the packaging and the number of frames. Those three facts predict most of what you will see.
Frame count and what it means for planning
Frame counts vary by model, and the number printed on the camera is the number to use. A common count is in the high twenties, with some models offering fewer or more. The count matters for two reasons. It limits how many pictures one guest or table can contribute, and it sets the denominator of your cost model: total spend divided by usable frames cannot exceed the number of frames that were actually exposed.
Plan for the fact that not every frame will be used. Guests forget cameras at tables, lose them in coat rooms or take them home as souvenirs. A reasonable planning rule, which you should adjust after your own test, is that you will not get every frame back. The cost model later in this guide builds that assumption in.
Why you cannot check as you go
Unlike a phone, a disposable camera gives no feedback. There is no screen, no retake and no way to tell a good shot from a bad one until the film is developed weeks later. That has two consequences. First, you cannot fix a bad habit mid-event, such as a guest shooting every frame with the flash off in a dim hall. Second, you carry all the uncertainty to the lab, where the film is processed and the results arrive.
The remedy is a short test and a clear card. A test roll before the wedding shows you what your venue’s light does to the fixed settings. A table card tells guests the three habits that matter most: wait for the flash light, stand close, and wind the film after every shot. Neither costs much, and both improve the odds noticeably.
The slow feedback loop
Time is the last hidden cost. Film must be collected, sent to a lab, developed and scanned before anyone sees an image. Depending on the lab, the season and the shipping method, that can take days or several weeks. If you want photos for a thank-you note or an anniversary slideshow, build the wait into your calendar from the start. The logistics section later in this guide shows a timeline you can adapt.
The exposure map: where disposable cameras succeed across your day
The first half of the model is an exposure map. It is a simple exercise: walk through your wedding schedule, name the light at each stage, and give each stage a plain grade for how well a fixed-setting film camera will cope. You do this on paper before you buy anything, and the result tells you where cameras belong and where they will only waste film.
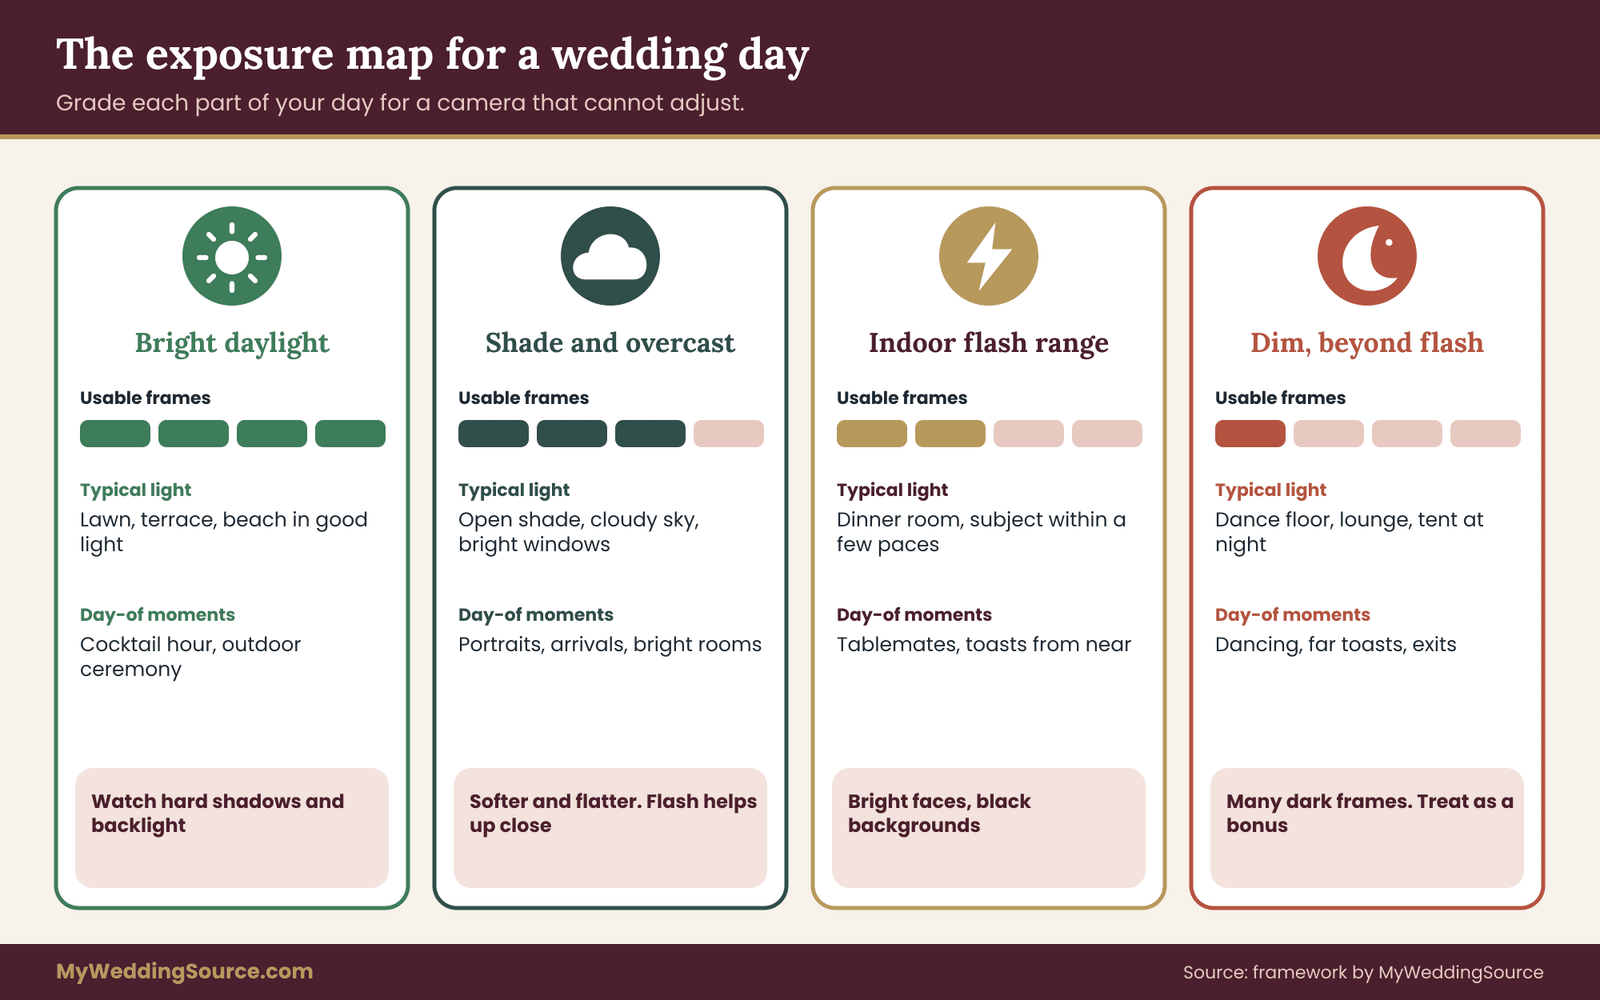
The grades are planning labels, not measurements. They describe how forgiving a situation is for a camera that cannot adjust. Use four conditions, because that is the range most weddings actually produce.
Condition one: bright, even daylight
This is the friendliest condition. A sunny terrace, an open lawn, a beach in late morning or a bright covered porch gives the film plenty of light, so the fixed shutter and aperture land close to correct. Faces are readable, colors are clean and the flash either stays off or adds a light fill.
The caution is hard noon sun with deep shadows under hats and eyebrows, and strong backlight when a guest shoots toward the sky. Even so, this is the condition in which most guest frames will turn out usable. If your ceremony or cocktail hour happens outdoors in good light, that is where disposable cameras should start.
Condition two: shade, overcast sky and bright indoor rooms
Open shade, a cloudy afternoon and rooms with large windows are workable, but the margin is thinner. Film that is happy in full sun can come back a little dark and flat when light drops by even a small amount. The flash helps if the subject is close, but it can also leave a pale, harsh face against a darker background.
For planning, treat this as a middle grade. You will still keep a decent share of frames, and the images will look softer and more muted than daylight ones. That is not a flaw if the muted look suits you.
Condition three: indoor flash range
Most dinner rooms fall here. The ambient light is low, so the camera depends almost entirely on its flash. When a guest stands close to the subject, within the range printed on the box, the flash lights the face well enough. Past that range, the frame drops into shadow, and the background disappears into black.
The practical result is a particular style: bright foreground subjects, dark backgrounds, red eyes sometimes, and shiny skin. Some people call it a party look and enjoy it. If you want to see the room, the decor or the dance floor in your disposable camera photos, this condition will not deliver it.
Condition four: dim rooms beyond flash reach
A dance floor, a lounge with candles or an outdoor tent at night all belong here. The scene is far darker than the film and fixed exposure can handle, and the flash only reaches a few paces. Guests shooting across the floor will get black frames with a few glowing dots.
This is the grade where cameras waste the most film. It is also the part of the night when guests are most likely to hold a camera, because the energy is highest and the disposable cameras are already out. If your budget is tight, this is the condition to design around, which the next section addresses.
Building your own exposure map
Take your day-of timeline and mark each segment with a condition. A short example for an afternoon outdoor ceremony and an evening reception might read like this: arrival and ceremony, condition one; cocktail hour on the lawn, condition one; family portraits in open shade, condition two (the family photo list tells you which groups to schedule there); seated dinner in a tented room, condition three; toasts, condition three; cake cutting, condition three; dancing, condition four.
Then add two columns in your head. First, how many guests will realistically hold a camera during each segment. Second, how close they will be to the action. A cocktail hour has many guests with many chances, so cameras get used. A seated dinner has guests who stay in one place and shoot their own tablemates, which works well at flash range. Dancing has the most energy and the worst light.
Do not skip the step of asking the venue about lighting. Some venues dim the room automatically after dinner, and some bring in colored lights that change the look of a flash photo. A short call or a visit during a similar event will tell you more than any guess.
Reading the map
When you finish the map, count how many segments fall in conditions one through three and how many fall in condition four. If most of your day is bright and close, disposable cameras are a natural fit. If most of the guest activity happens late in a dim room, the disposable cameras may still work as a novelty, but the cost per kept frame will rise sharply, and you should expect a low yield.
A useful variation is to mark where the cameras will physically sit. Disposable cameras placed at dinner tables will be used during dinner, in condition three. Cameras left on a welcome table or handed out at the ceremony will be used in condition one. Disposable cameras left on a dance-floor bar will be used in condition four. The placement is the control you have over the light, so choose it on purpose.
Common mistakes when reading the map
One mistake is trusting your eyes. Human vision adapts so well that a room that looks bright can be far too dark for film. If you can read a menu comfortably but have to lean in, the room is probably condition three or four for a fixed camera. Another mistake is to judge only the ceremony. The ceremony is often the brightest moment of the day, and it can mislead you into thinking the whole event will be easy.
A third mistake is to ignore the sun’s position. A terrace that is bright at three o’clock may be backlit and shadowed at six. If your event runs through the golden hour, plan for the way direction changes the grade: low sun behind your subjects is a condition-two or worse problem, while low sun behind the guest holding the camera is a gift.
How the map feeds the cost model
The map matters because it sets the share of frames that fall into each condition, and the cost model uses those shares. A day that puts most frames in conditions one and two will produce more usable pictures per camera than a day that puts most frames in conditions three and four. Two couples can buy identical cameras and pay identical lab bills and still end up with very different costs per kept photo, simply because their light was different.
Flash range, dim receptions and why frames go dark
Flash is both the main strength and the main trap of a disposable camera. It lets the camera work indoors at all, but it does so in a narrow band of distances. Understanding that band is the quickest route to better results, and it is the core of the second half of the model.
Finding the working range
The packaging usually states a flash range, often in meters and feet. Treat the stated range as an upper limit for a well-judged shot, not a promise. Subjects at the far edge of the range may look dim, and subjects very close to the lens can look washed out. The sweet spot is a middle distance of a few steps.
You can find your own range with a quick test. Place a friend at several distances in a room similar to the venue, take one frame at each distance and note them on a card. When the film is developed, you will see where faces stop being readable. That is your usable range for that camera and that light.
Why guests shoot beyond range
Guests do not read ranges. They shoot what they can see. At a toast, they stand at their table and aim at the head table, which is usually well beyond a small flash’s reach. At the first dance, they shoot from the edge of the floor. Those frames are not bad because the guest was careless. They are bad because the situation asked the camera to do something it cannot do.
You can reduce this with a short instruction on the table card: “Get close. Aim at someone within a few steps.” Short, positive instructions work better than long warnings, and a picture of a smiling face a short distance away helps even more. You will find a sample card layout in the infographic later in this article.
The effect of the flash on faces and rooms
A direct, small flash flattens faces and throws hard shadows on walls behind. In a room with white walls the shadows are mild; in a room with dark curtains or a tented ceiling, the subject floats against black. Reflective surfaces such as mirrors, glass and polished tables return a hot spot where the flash bounces straight back. Warn guests about shooting into mirrors, and consider whether your decor includes large reflective pieces near the disposable cameras.
Skin tones also change. A small flash on a fast film can give a slightly cool, pale look, and tungsten room lights mix with it and add a warm cast on the background. This blend of cool foreground and warm background is common in disposable camera pictures and is part of their recognizable character. If you dislike it, do a test before committing.
Charge time and battery notes
The flash must charge after each use, and the time grows if the battery is cold or weak. A guest who fires rapid shots at a party often presses the shutter before the light is ready, and the flash fails to fire. A table card line such as “Wait for the little light” saves many frames. Some camera models also keep the flash on only for a limited time, so guests may need to press the button again after a pause.
Because the battery is built in and cannot be replaced, a camera that has sat for a long time or in a hot car may behave oddly. Keep cameras in a cool place before the wedding and check the packaging for an expiry or “develop by” date. Film loses sensitivity with age, and expired film often looks dull or shows color shifts.
The dim-room rule
If you accept only one rule from this section, make it this: do not count on disposable cameras to document the dance floor. That does not mean you should forbid them there. It means you should not budget for dance-floor frames as if they will be usable. Treat anything beyond flash range in a dark room as a bonus, and let your professional photographer, a phone or a second system cover the moments you care most about.
That framing also protects your expectations. When you know in advance that a third of the dance-floor frames will be dark, the ones that turn out feel like a pleasant surprise rather than a disappointment.
A short test protocol with measurable checks
The cheapest way to replace guesswork with data is a test camera. Buy one camera of the model you plan to use, take it to your venue or a similar room at the same time of day, and shoot a planned set. Aim for one frame in each of the four conditions, plus a few at different distances. Keep a written list of what you shot and from where.
When the film is developed, grade each frame as keep, borderline or discard against your own standard, and write the result next to the list. Count the keeps. That count is your measured yield for each condition. You can use it directly in the cost model, and you will know whether the look is acceptable to you before spending on a full order.
Add two measurable checks while you are at it. Record the date you dropped the film at the lab and the date the scans arrived, so you know the real turnaround. Record the all-in cost of that test roll, including shipping. Those two numbers will anchor the next section.
The development cost model: from box price to cost per kept frame
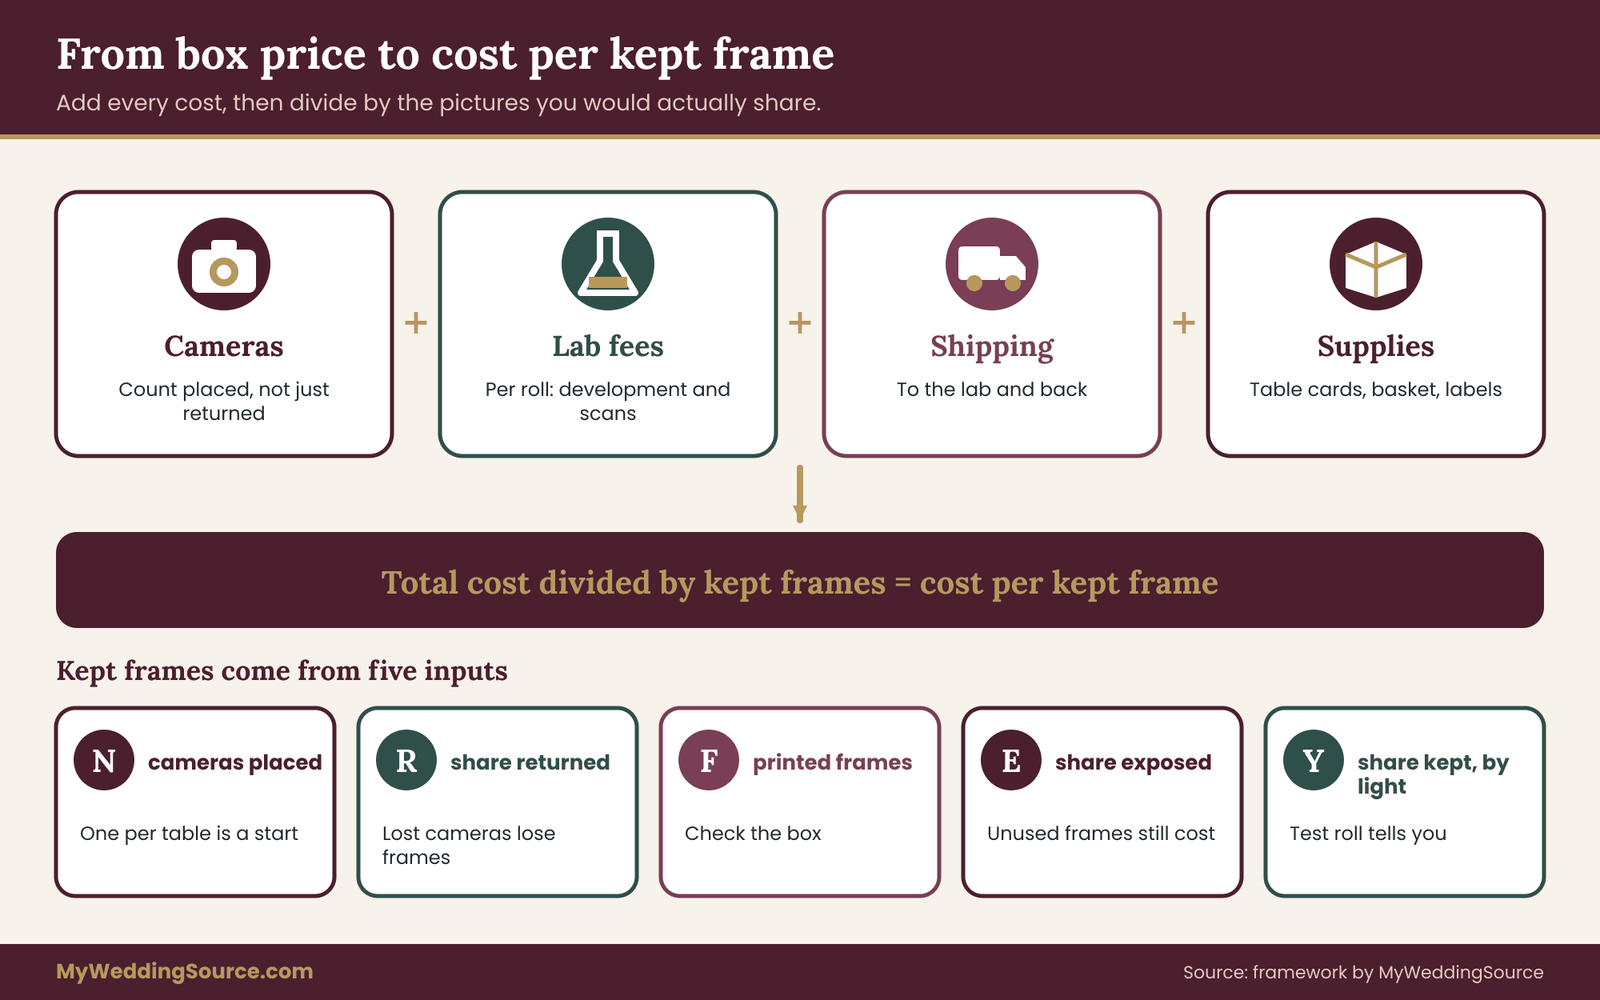
The second half of the method is arithmetic. The sticker price of a camera is only the first line of the bill. Real spending includes development, scanning, shipping, supplies and sometimes prints, and the number that matters is how much you pay for each picture you would actually share. Call that figure the cost per kept frame.
The pieces of the bill
Start by listing every cost, even the small ones, and check the total against your overall wedding budget. The camera itself comes first, and many sellers offer a price break on larger orders, so ask for a quote before deciding on a count. Next comes development, which turns exposed film into negatives. Then scanning, which turns negatives into digital files you can share. Some labs bundle both into one price, and some charge separately for each step.
After that come shipping costs. Getting cameras or film to the lab usually costs something, and so does return shipping for negatives or prints. If you collect disposable cameras in person and drop them off, you may avoid shipping, but you will spend time. Finally, add the small supplies: table cards, a basket or box, labels, a pen and any envelope you use to carry film safely.
Optional costs appear if you want more than files. Prints cost extra, as do online galleries from the lab, higher-resolution scans, returned negatives and rush service. Decide before you order which of these you need, because the cheapest quote usually covers only basic development and low-resolution scans.
Writing the model as a plain formula
The model needs five inputs. N is the number of cameras you put out. F is the printed frame count on each camera. R is the share of disposable cameras that come back to you. E is the share of frames guests actually expose. And Y is the share of exposed frames that turn out good enough to keep, which depends on the light.
Kept frames equal N times R times F times E times the average yield across your conditions. Total cost equals the cameras you bought, plus lab charges for the disposable cameras that came back, plus shipping and supplies. Cost per kept frame is total cost divided by kept frames. Put the formula on a single sheet and fill in your own numbers.
Two details matter here. Cameras cost money whether or not they return, so a low return rate hits you twice: you pay for the camera and you lose its frames. Lab fees usually apply per roll, not per frame, so a roll that guests leave half-shot costs as much to process as a full one.
Choosing the yield for each condition
The yield is the least certain input, which is why the test roll matters. If you have no test results yet, use rough planning values that you label as assumptions. A common-sense ordering is enough to start: highest yield in bright daylight, a middle value for shade and flash-lit dinners, and a low value for dim rooms beyond flash range. Replace every assumed value with your test result when you have one.
Do not borrow percentages from articles or forums as if they were facts. Yields depend on the camera, the film, the guests and the room, and no reliable general figure exists. The honest approach is to treat the first run of numbers as a scenario and let your test roll replace the guesses.
Defining a kept frame
Decide your standard before you look at any pictures. A kept frame is one you would be glad to put in an album, send to a relative or show at an anniversary. A frame with the right moment but a dark face may still be a keeper if the moment is rare, so many couples use two tiers: keepers, and sentimental saves that are not worth sharing widely. Count both, but keep them separate, because cost per share-worthy frame and cost per sentimental frame tell different stories.
Without a standard, the denominator drifts. Couples who judge generously end up with a pleasantly low cost per frame that they cannot compare with any other option. A written standard keeps the comparison fair.
A worked example with illustrative numbers
The following example uses invented figures to show the method. Prices are placeholders, and yields are assumptions. None of them describes a real product, lab or result. Replace each one with your own quote and your own test data before relying on the output.
The setup
Imagine a wedding with about eighty guests seated at ten round tables. The couple considers one camera per table. Each camera holds twenty-seven frames, so ten disposable cameras give two hundred seventy frames. The planning price is eighteen dollars per camera, the lab charges twenty dollars per roll for development and basic scans, return shipping for the batch costs fifteen dollars, and table cards cost ten dollars in total.
The couple expects their frames to fall across four conditions. Twenty percent will be shot in bright cocktail-hour light, forty-five percent at dinner under flash, twenty-five percent on the dance floor, and ten percent in shade during portraits and arrival. For the assumed yields, they use sixty percent for bright light, forty-five percent for dinner flash, fifteen percent for the dance floor and forty percent for shade.
Scenario A: ten cameras, everything comes back
The spend is the cameras at one hundred eighty dollars, lab fees at two hundred dollars, shipping at fifteen and cards at ten, for a total of four hundred five dollars. On the frame side, the cocktail-hour share is about fifty-four frames at sixty percent, which is roughly thirty-two kept. Dinner is about one hundred twenty-two frames at forty-five percent, roughly fifty-five kept.
The dance floor is about sixty-eight frames at fifteen percent, roughly ten kept. Portraits and arrival are about twenty-seven frames at forty percent, roughly eleven kept. The total is about one hundred eight kept frames. Divide four hundred five by one hundred eight and you get a cost of about three dollars seventy-five per kept frame.
Scenario B: shift cameras away from the dance floor
Now suppose the couple places eight disposable cameras instead of ten and keeps them away from the dance floor, so only about ten percent of frames fall in the dim condition. The new mix is twenty-five percent bright, fifty-five percent dinner, ten percent dim and ten percent shade, across two hundred sixteen frames.
Spend drops to one hundred forty-four for cameras, one hundred sixty for lab fees, fifteen for shipping and ten for cards, for a total of three hundred twenty-nine dollars. Kept frames come to about ninety-eight, so the cost per kept frame falls to about three dollars thirty-six. The couple pays less in total and gets only about ten fewer usable pictures, because they stopped paying to process the weakest frames.
Scenario C: what low returns do
Go back to scenario A, but suppose only seven of ten disposable cameras make it back. The couple still bought ten cameras, so camera cost stays at one hundred eighty. Lab fees fall to one hundred forty, for a total of three hundred forty-five dollars including shipping and cards. Kept frames fall to about seventy-six, since three disposable cameras’ worth of pictures is gone.
The cost per kept frame rises to about four dollars fifty-five. Losing thirty percent of the cameras raised the per-frame cost by roughly twenty percent, even though the lab bill dropped. The lesson is that collection matters as much as exposure.
Scenario D: guests do not finish the rolls
Return to scenario A once more and suppose every camera returns but guests use only about eighty percent of the frames. The lab still charges for ten rolls, so spend stays at four hundred five dollars. Frames drop to about two hundred sixteen, and kept frames drop to about eighty-six. The cost per kept frame climbs to roughly four dollars seventy.
This is the scenario that surprises couples most. Unused frames are invisible until the lab sends the scans, and there is no refund for them. Placing fewer disposable cameras and encouraging guests to use them fully usually beats placing many and watching them go half-empty.

What the example teaches
Three lessons come out of these figures. First, the number of cameras matters less than where they go and whether they return. Second, the dim-room frames cost nearly as much to process as the good ones but yield far fewer keepers. Third, the unit cost per kept photo in these invented scenarios lands in a narrow band, and every decision moved it by less than two dollars. The method does not give you a magic number. It gives you a way to see which choices move the number and which do not.
Remember that none of these figures is a forecast. They exist to show you how to run the calculation, and your own result may be higher or lower. A test roll and a real quote will tell you far more than any example.
Comparing the result with other ways of getting candid photos
Once you have a cost per kept frame, you can compare it with alternatives, but compare carefully. A professional photographer’s hourly rate, a photo booth rental or a guest photo album app does not share your cost structure, so a per-frame comparison is only the beginning. The next section sets out the alternatives and how to weigh them against the numbers you just produced.
Before you move on, write down your own version of the model with real quotes. Use your venue’s light, your guest count and your lab’s price list. The activity takes about half an hour and replaces a great deal of worry with a single comparable number.
Hidden costs worth adding
A few costs hide outside the main formula. Time is one: someone must gather disposable cameras, check the counter, pack them, drop them off or mail them and manage the scans. Put an honest value on that person’s hours, even if you pay nothing. Another is the replacement of cameras that guests take home, which counts against the return rate.
A third is storage. Scans are digital files that need a safe home, and the negatives should be kept in a cool, dry place in their sleeves. If you plan to scan again later at higher quality, that is another lab visit. A final hidden cost is regret: if you buy disposable cameras and then cannot collect them, you pay for pictures you never see. Building collection into the plan is cheaper than hoping for it.
Disposable cameras versus phones, a photo booth, instant film and reloadable cameras
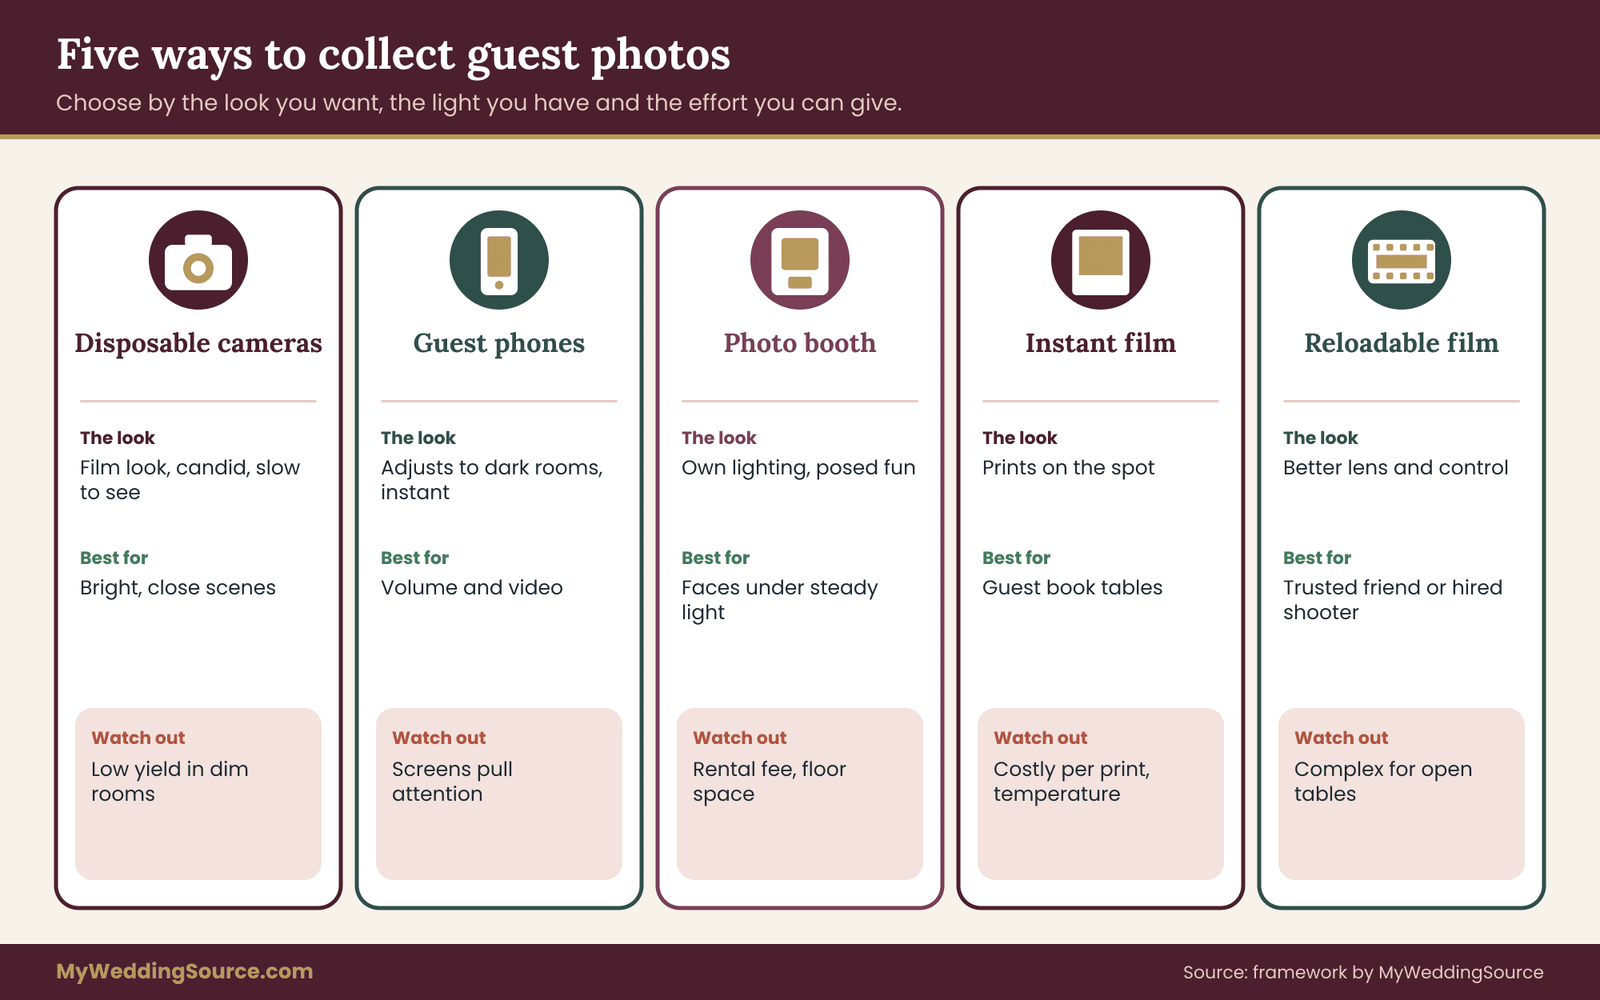
Disposable cameras are one of several ways to collect guest photos. Each alternative trades differently between cost, look, effort and risk, and the right choice depends on what you want from the pictures. This section compares them in plain terms so that you can decide whether disposable film belongs in your plan at all, or only as a small extra.
Guest phones and a shared album
Phones have the strongest case on pure image quality. They adjust to dim rooms, show a preview, record video and can take many frames at no marginal cost. A shared album gathers them in one place without any lab. The cost is close to zero, and the results arrive the same night.
The trade is mood and attention. A phone pulls guests toward the screen and the message that just arrived.
Some couples ask guests to keep phones away during the ceremony for that reason, and the idea of an unplugged ceremony is covered in its own guide on this site. A phone album also depends on guests actually uploading, and on a clear plan for who owns, moderates and stores the files, which is the territory of the consent questions covered later in this guide. For the file side of a shared album, the guide to wedding day digital operations explains backup and permissions.
Disposable cameras as a mood choice
Disposable cameras fit couples who want a physical, slower, slightly imperfect set of images and who accept the exposure limits. They suit table-based guest participation, they photograph well in bright places, and they create a small ritual of collecting and waiting. Their weakness is the cost per kept frame and the long delay, which you now have the tools to estimate.
They also hold up in one situation that phones do not: a venue or ceremony where phones are discouraged, or where a camera that looks like a toy is more welcome than a glowing screen. If your event has a phone-light policy, a handful of cameras can keep the candid spirit alive without breaking the rule.
Hired photo booth
A photo booth gives every guest a framed, lit, repeatable image. Because the booth supplies its own lighting, the exposure problem disappears. Prints or digital copies arrive on the spot. The cost is a rental fee and floor space, and the images are posed portraits, not candids.
A booth and a set of disposable cameras do different jobs. If you want faces and silly poses under good light, a booth is more dependable. If you want unposed moments across the room, cameras and phones are closer to the goal. Booth prices vary widely by market, so request quotes in writing and read the terms on delivery files and data handling before you sign.
Instant film cameras
Instant cameras print a photo within minutes. Guests can see what they shot, share a print and leave a copy in a guest book. The cost per photo is usually higher than for disposable film, and the film is sensitive to temperature, so a cold lawn or a hot car can spoil results. The flash and exposure limits are similar in spirit: you work best in good light and at close range.
Instant film suits a guest-book activity or a small table where guests will place photos and write notes beside them. It does not suit the goal of collecting a large volume at low cost. If you like the idea, compare the cost per print to your disposable result before choosing one over the other.
Reloadable film cameras
A reloadable 35 mm camera accepts film you choose and has better lenses and adjustable settings. In experienced hands, the pictures are better than any disposable result. In guests’ hands, the camera adds complexity: focus, film loading and a higher chance of broken parts or loss. These are better suited to a hired photographer or a few trusted friends than to open tables.
If you want a film look with higher quality, the add-on conversation with your photographer is a better route than handing reloadable cameras to guests. That is a different decision with a different budget, and it belongs in your photography brief and contract.
Professional coverage as the backbone
Whatever you decide about guest disposable cameras, they should not be the only record of the key moments. The ceremony, the portraits, the first dance, the toasts and the family groups are the pictures you will want in thirty years. A trained photographer handles light, distance and timing in ways a fixed camera cannot. Treat disposable cameras as a supplement that adds texture and candid angles, not a replacement for planned coverage.
Share your shot priorities with the photographer so that the two efforts complement each other. A short conversation about which moments the photographer will cover, and which are left to guests, prevents gaps. The list of family group photos is a good starting point for making sure the group shots are covered by someone with the right equipment.
A simple decision rule
Use three questions. First, do you want guest-made candids with a film look, and will you accept that many frames will be weak? Second, does your cost per kept frame, from the model, fit your budget compared with a phone album or booth? Third, can you commit to collecting the cameras and processing the film on a schedule?
If you answer yes to all three, disposable cameras are a sound addition. If you answer no to the first, choose a phone album or a booth. If you answer no to the second, reduce the number of disposable cameras or change the placement. If you answer no to the third, skip them, because film that never reaches a lab costs the same as film that does.
Collecting, developing and scanning: the logistics
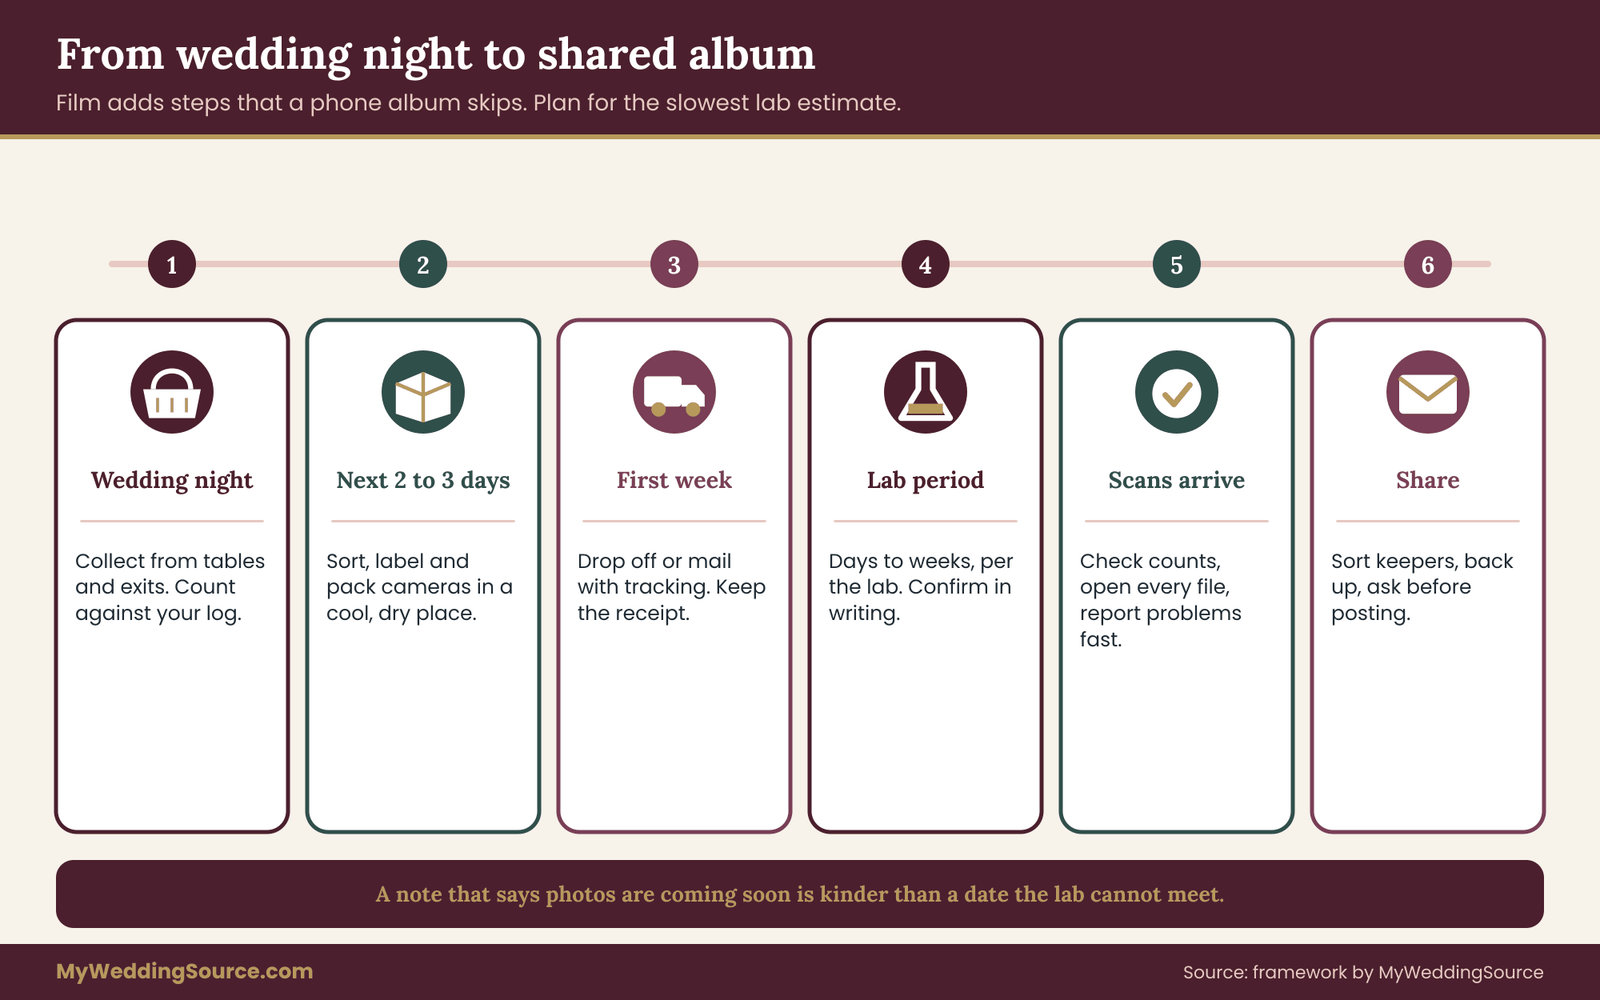
The pictures only exist once the film is developed, and the film only gets developed if someone collects the cameras and sends them to a lab. That chain is where many disposable camera plans quietly fail. A clear owner, a clear deadline and a clear route for each camera solve nearly all of it.
Choose the collector before the wedding
Name one person to be responsible for the disposable cameras. It should not be either of the couple. A trusted relative, a member of the wedding party or a planner works well, as long as the person will stay until the end of the evening. Tell them what to do in plain steps: collect cameras at the close of dinner or the end of the night, check each counter, put each camera in a labeled bag and take the bag to a safe place.
It helps to make the handoff part of your vendor timeline, the way you schedule the cake cutting or the shuttle. If you maintain a day-of schedule, add a line for camera collection with a time and a name. The vendor timeline guide on this site shows how to build that schedule.
Collecting in the room
Disposable cameras go missing in two ways: guests carry them off, and cameras sit forgotten under a napkin. Two habits reduce both. First, announce the collection point once, near the end of dinner, and place a clearly marked basket or box by the exit. Second, have the collector make a final sweep of tables, restrooms and coat areas after the room clears.
Count what you have. If you placed ten disposable cameras and have eight, you know right away, and you can message the guests at the missing tables while memories are fresh. A friendly text the next morning recovers more cameras than a notice weeks later.
Protect the film until it reaches the lab
Film is sensitive to heat, moisture and, in rare cases, certain scanners. Keep the disposable cameras out of cars in summer, away from windows and away from damp. Put them in a bag in a cool room. If you must fly with exposed film, check the airline and security agency guidance before you travel, since security screening rules for film are published by the agency and should be confirmed for your route.
Do not open the cameras to remove the film. Labs have tools for that, and opening a camera in light can expose and destroy the roll. If a camera is cracked or the film looks damaged, tell the lab when you send it, so they can handle it carefully.
Choosing a lab
Ask a few questions of any lab before you send film. What is the price per roll for development and scans? Is the disposable camera body accepted as it is? What scan resolution is included? How long does a typical order take, and does it change in busy seasons? How are results delivered, through a download link, a drive or discs, and for how long do links stay active?
Also ask whether the lab handles batches, since ten rolls sent together may carry a bulk rate or a single shipping charge. Ask how they handle damaged or blank rolls, and whether they refund or credit for a failed roll. Get the answers in writing, not from memory.
Mailing versus dropping off
Mailing saves a trip but adds shipping cost and transit risk. Use a tracked, insured service and pack disposable cameras in a padded box. Dropping off at a local lab removes shipping risk and lets you ask questions in person, which is valuable for a first order. If a local lab exists in your area, compare its total price with a mail-in service including shipping both ways.
Postal rules about what you can ship, and how film and batteries travel, are set by the carrier and may change, so check the carrier’s published guidance before you send a batch. The carrier’s website will also tell you about packaging and insurance.
Scan quality and what to request
Labs typically offer a standard scan that is fine for screens and small prints. A higher-resolution scan costs more and is useful only if you plan large prints. For a stack of guest candids, a standard scan usually suffices. Ask for the files in a common format and request the negatives back if you want to keep them, since some labs return them and some discard them after a period.
Check each batch of scans soon after they arrive. Confirm that the count matches, that no frame is cropped in a way that cuts off faces and that the files open. Report problems quickly, because labs often have time limits for claims.
Timeline from the wedding to the gallery
A realistic schedule has five stages. The wedding night is for collection. The next two or three days are for sorting, counting and packing. The following week is for shipping or drop-off. The lab period then runs for however long the lab quotes, often several days to a few weeks. After the scans arrive, spend an evening sorting keepers and sharing them.
Plan your thank-you notes and any sharing plans around the slowest estimate, not the fastest. A note that says “photos coming soon” is kinder than a note that promises a date the lab cannot meet.
Who owns the pictures
Guest-made pictures raise questions about who owns them and who may post them. Ownership of a photo generally begins with the person who pressed the button, so your guests hold rights in what they shot unless you agree otherwise. Many couples add a short line on the table card saying that the cameras and film belong to the couple and that guests are lending their eye for the evening. The copyright office provides plain-language information on how photographs are protected.
If you plan to publish or print the pictures widely, consider asking for permission in writing, particularly for any photograph that shows other people. The photography consent guide on this site covers how to set expectations about images of guests, and it is worth reading before you design a table card.
Setting up tables and guest habits for better disposable cameras results
You cannot control the light, but you can control where the cameras sit, how many there are and what guests are told. This section turns the exposure map and the cost model into a physical setup. The aim is to put each camera where it will be used in good conditions, and to give guests just enough instruction to avoid the most common mistakes.
How many cameras to place
Start from the tables, not the guest count. One camera per table gives each group a shared tool and a reason to pass it around. Two per table tends to leave one unused. At a wedding with long tables, one camera per section of eight to ten guests is a reasonable starting point, but test your own layout, because a camera that sits at the far end of a long table is easy to forget.
Then adjust for your cost model. If the dance floor is your weakest condition, do not add disposable cameras for it. If the cocktail hour is your strongest, consider a basket near the bar or the lawn, where light is best and guests move freely. A smaller number of well-placed cameras usually beats a large number scattered everywhere, because each camera that returns half-used costs a full roll.
Where to put them
Place disposable cameras at dinner tables for flash-range candids of tablemates, which is condition three at its best. Place a few at the welcome area or cocktail space, which is closest to condition one. Avoid placing them at the dance floor edge unless you accept low yield. If your venue has a patio or garden, a small basket there invites guests to shoot in daylight.
Keep cameras from direct sun on the tables before guests arrive. A camera left in a sunny window can overheat, and heat harms film. A shaded basket or a table card holder keeps them cool and visible. If you set up hours before, ask the venue staff to keep the area out of the sun.
The table card
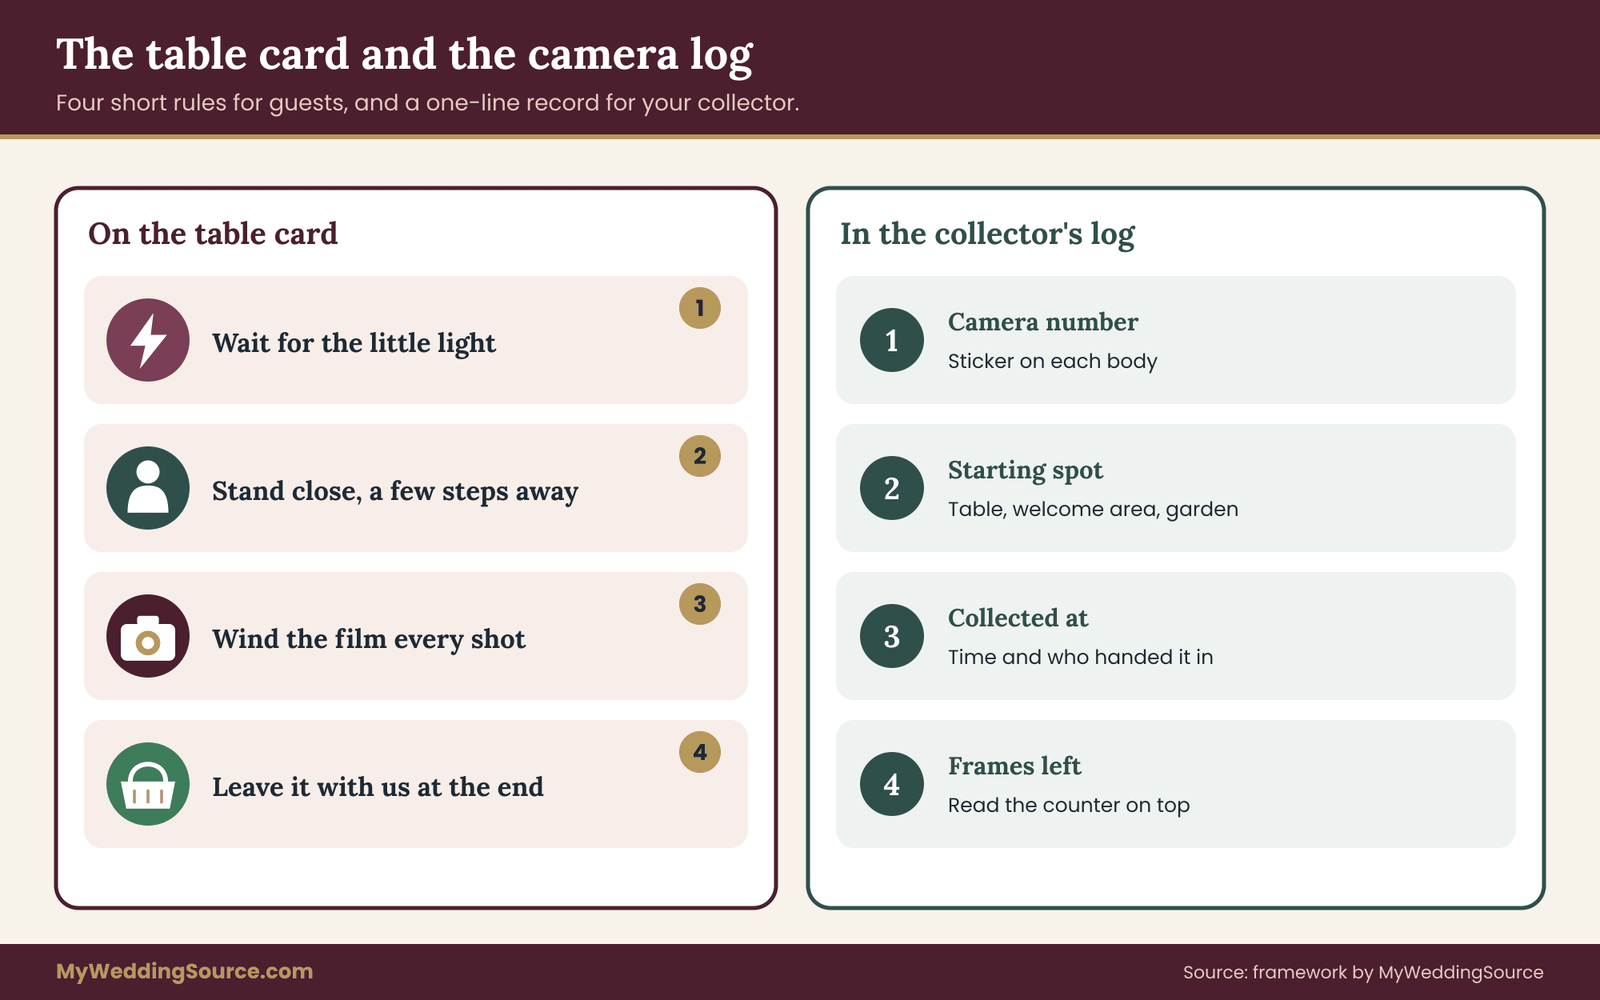
A short card does more than any speech. Keep it to a handful of lines and use plain language. The card should tell guests three things: wind the film after every photo, wait for the flash light before shooting, and stand close, within a few steps of the person or group. Add a line about what to do when the camera is full or the counter reaches zero.
A fourth line can ask guests to leave the camera on the table or in the basket at the end of the night, not to take it home. Phrase it kindly: “Please leave this with us. We cannot wait to see what you saw.” Resist long rules. A card with eight instructions is a card nobody reads.
Handling the counter
Most disposable cameras show a frame counter on top. Tell guests the number of shots at the start, and encourage them to take a few at each stage of the evening rather than burning the roll during cocktail hour. A card line such as “Shoot a little now and a little later” spreads frames across the event, which gives you a broader record and a better chance of a few good ones in each light.
If your collector is willing, a mid-evening check can help. A quick walk to see which cameras are nearly full and which have barely been used lets the collector move disposable cameras from quiet tables to lively ones. Some couples find this too fussy, and that is fine, but at a larger wedding it can raise the number of exposed frames.
Children and cameras
Children love a camera, and children can also drop one, open one or lose one. If children attend, give a few cameras to a parent or an older relative at each table rather than to the children. Some couples create a small children’s table with one camera and a supervising adult. Keep film out of reach of very young children, since the battery and small parts in a camera are a hazard.
If a parent hands a camera to a child, the pictures can be delightful and unexpected, with low angles and odd framing, so it is not a bad idea at all. It simply changes the yield, so allow for it in your cost model and do not count those frames as an exposure problem.
Alcohol and attention
As the evening goes on, guests become less careful. Disposable cameras get dropped, forgotten and carried off. Move your collection earlier if the night looks lively, perhaps at the end of the main meal rather than the end of the party. Alternatively, collect cameras at dessert and offer a few extra disposable cameras near the dance floor with a lowered expectation of results.
If you serve alcohol, consider where cameras sit relative to drinks and food. A spilled drink on the camera body will not stop the film inside, but a wet camera is more likely to be dropped and lost. Place them in a basket or tray with a rim.
Recording what you placed
Number each camera with a sticker or a small tag and record where it started. If disposable cameras come back with the sticker still on, you can match them to a table, and you can later compare the yield by location against your exposure map. That comparison turns your own wedding into the data that helps the next couple you advise.
Keep a one-line log: camera number, starting spot, collection time, frames left on the counter. The log takes five minutes and gives you the exposed-frame share you need for the model. It also helps if a lab asks which batch a roll belongs to.
Privacy, consent and rights for guest-shot pictures
Guest pictures involve other people, and they leave your control as soon as a guest presses the button. Thinking about consent before the wedding costs nothing. It sets guest expectations, protects your relationship with people who value privacy, and keeps your later sharing clear.
Who might not want to be photographed
Some guests have good reasons to avoid being photographed or posted. A person may be in a sensitive job, may be leaving a difficult situation or may follow a faith or family tradition that discourages images. Others simply dislike seeing themselves online. Disposable cameras seem harmless because the pictures vanish into a lab for weeks, but once the scans arrive, the images are ordinary digital files that can be copied and posted.
The guide to setting photography boundaries covers image-use expectations with guests in more detail. Use it to decide in advance what you will and will not share, and how guests can opt out. The brief version is to ask, to be specific and to make declining easy.
Setting expectations in writing
A short line on the invitation website or the table card is enough. State that cameras will be around, that pictures will be developed and viewed by the couple, and that the couple will ask before posting anyone’s image publicly. This is not a legal contract, and it does not need to read like one. It simply tells guests what to expect.
Be careful about promises you cannot keep. If you say no pictures will be posted, then you must hold to it, even for a lovely shot of a friend. If you want freedom to share, say so plainly and offer a way to ask for removal.
Copyright and who may use the images
The person who takes a photograph usually holds the rights in it by default, even if you bought the camera and the film. If you plan to print the pictures in an album, post them or share them in a slideshow, you are generally fine as the host with the guests’ implicit permission. If you plan to publish them more widely, such as in a magazine, on a vendor’s site or in advertising, you should ask the photographer guest and any identifiable people for written permission.
The Copyright Office offers plain information about how photographs are protected and how permission works. If your plan involves anything beyond personal use, read it, and consider speaking to a lawyer for your situation. The point here is practical: a simple sentence on the table card handles the ordinary case, and more care applies only if you plan broader use.
Minors and sensitive settings
Pictures of children raise extra considerations. Parents often have strong views about images of their kids online. If you plan to share guest pictures, consider asking parents first, and consider leaving children’s faces out of anything posted publicly. Where a wedding touches a sensitive setting, such as a house of worship that restricts photography or a venue with security rules, check the rules before disposable cameras appear on tables.
Some venues restrict flash during ceremonies, and some places of worship do not allow photography at certain moments. Ask the venue and the officiant, and if flash is limited, keep cameras away from that part of the day.
Storing and sharing the scans
Once the scans arrive, treat them like any other wedding records. Save the originals in a master folder, make copies in at least two other places and decide who gets access. The guide to organizing wedding records explains how to keep photo files safe and how to plan a backup that survives a lost drive.
If you want to share, a private album with a link gives you more control than a public post. Many couples send a link to the guests who took the pictures and let them download their own. That is a considerate way to credit the people who shot them, and it reduces the chance of an unwelcome post.
Disclosure when a vendor is involved
If you buy disposable cameras or lab services from a vendor who also sponsors your event or offers a discount in exchange for mentions, disclose the arrangement when you recommend them. Honest disclosure is a basic expectation of consumer protection guidance, and the Federal Trade Commission publishes plain explanations of how endorsements should be disclosed. Most couples never face this, but if you share your experience publicly, the same honesty applies.
Making opt-out simple
Offer a visible, low-pressure way for a guest to opt out of pictures at the event. A small sign at the welcome table, a discreet note on a place card or a quiet word to the collector can all work. The collector should know what to do if a guest asks that a particular roll or frame not be shared, and should pass the request to you.
A simple record of those requests protects everyone. When the scans arrive, check them against your list before sharing, and remove any frame that crosses a stated boundary. This small step shows respect and keeps your relationships intact.
Edge cases: when conditions change the plan
The model assumes an ordinary wedding with a mix of light and a normal schedule. Real weddings are not always ordinary. This section covers situations that shift the exposure map or the cost model, with a short rule for each.
Strong midday sun and beach glare
Bright sun sounds ideal, but very bright scenes on sand or water can overwhelm a fixed exposure and wash out highlights. Guests squinting into the sun also produce poor faces. If your ceremony is on a beach at midday, expect some frames to be too bright and many faces to be shadowed under hats. The fix is simple: shoot with the sun behind the photographer and ask guests to look for open shade for portraits.
For planning, keep beach and midday outdoor frames in condition one but lower the yield slightly in your assumptions. A test roll in the same kind of light is the only reliable way to adjust. Remember also that sand and salt are hard on cameras, so keep them in a bag until needed.
Cold weather and winter weddings
Cold slows the flash recharge and can weaken the battery, which makes the camera less reliable. Film itself tolerates cold better than heat, but a camera that sits outdoors in freezing air may misbehave. If your wedding is in winter, keep disposable cameras indoors until guests need them and warm them in a pocket before use.
Winter light is often low and slanted, so many frames will fall in conditions two and three, even outdoors. Daylight hours are shorter, which means a late-afternoon ceremony may be nearly dark by the time cocktail hour starts. Adjust your map to reflect the real hours of daylight on your date.
Evening and night weddings
If most of the event happens after sunset, the exposure map tilts toward conditions three and four. Cameras will still work at close range with flash, but the share of usable frames will fall. For a night wedding, consider placing disposable cameras only at dinner tables and at the arrival area where lighting is stronger, and treat the party hours as outside the plan.
A smaller number of cameras may make more sense here. The cost model will show that the cost per kept frame rises when most frames land in dim conditions, and your decision may be to limit disposable cameras to a few tables or to choose another option for the evening.
Venues with rules about flash or photography
Some venues, such as museums, churches and historic houses, restrict flash or photography. A disposable camera that cannot use its flash becomes a daylight-only device. Ask the venue for its rules in writing, and ask whether the restrictions apply to guests as well as vendors. If flash is banned, change the plan: either choose a different tool for that part of the day or place cameras only in areas where flash is allowed.
Likewise, check any rules about leaving items on tables and about what the staff may collect at the end. Some venues will not hold items overnight, and some charge for lost property handling. A short email avoids surprises.
Destination weddings and travel
Traveling with disposable cameras adds new questions. Film passing through airport security can be inspected by hand on request, and agencies publish guidance on how film travels, so check the current guidance for your route. Pack cameras in a carry-on, not in checked luggage, and bring a clear plastic bag so that screening staff can see them easily.
Shipping exposed film home from another country brings customs and delay risks. For an international destination, it may be easier to carry the disposable cameras back with you and drop them at a lab after you return. Plan for a slower turnaround, and allow for the effect of travel on the return rate: guests who fly home with a camera in their bag are unlikely to mail it back.
Rain, humidity and outdoor tents
Moisture is the enemy of cameras and film. A rainy-day plan should include a dry basket, a few zip bags and a covered collection point. Humid air can fog lenses, and a lens that fogs at the start of a shot produces a hazy frame. Tell guests to wipe the lens with a soft cloth if it looks cloudy.
Tents change the light. A white tent can glow with soft, even light by day and turn into a dim cave at dusk. Treat the tent as condition two or three depending on the time, and test if you can.
Large guest counts
At a large wedding, the number of disposable cameras that will return and the share of frames used both become harder to predict. A bigger event also means more tables and more distance from the collector. In that case, consider assigning two collectors, dividing the room into halves and giving each a basket and a log. Add a small buffer of extra cameras only if the cost model supports it.
For very large events, the cost of managing disposable cameras may exceed the benefit. Think about using fewer cameras in carefully chosen spots rather than trying to cover every table.
Small weddings and elopements
At a very small wedding, one or two disposable cameras may be enough, and the cost per kept frame will depend mainly on the lab’s fixed charges and shipping. Because batch savings vanish, the price per roll may be higher than in larger orders. You might compare the result with a single roll in a reloadable camera held by a friend, which gives better control over exposure.
An elopement or courthouse ceremony usually happens in unpredictable light and in a short time. Disposable cameras can be a fun, low-pressure addition for the people present, but they should not be the only record. The courthouse photography guide on this site covers planning for those settings.
Guests who bring their own cameras
Some guests bring their own film cameras or professional gear. That is a different situation from the cameras you provide, and it needs a different conversation. If a guest with serious equipment wants to shoot, check with your photographer about shared access and positions, so that nobody blocks a key shot. The consent guide linked earlier helps set expectations about the use of those images as well.
Lost, damaged or blank rolls
Even with a good plan, some rolls fail. A camera may jam, the film may be ruined by light or heat, or the lab may report a blank roll. Plan for a small loss without panic. Ask the lab how failed rolls are handled before you send them, and whether any credit applies. If a roll was ruined by lab error, ask for a remedy in writing. If it was ruined by handling, accept it as part of the cost of the method.
The cost model absorbs this through the return rate and yield figures. If you have never lost a roll before, a modest allowance in your assumptions is more honest than a perfect one.
Questions to ask your photographer, venue and lab
Use this list as a short script. It turns the model into conversations, and it gives you measurable answers to enter in your plan. Ask by email when you can, so that the replies are on record.
For your photographer
Ask which moments they will cover and which they would like guests to handle. Ask whether they are comfortable with guests holding disposable cameras near them, and where they would like cameras to stay clear of their shot lines. Ask whether any of the guest pictures may appear in their own portfolio, and under what terms.
Many professional contracts say photographers own their images, so check that the contract for your professional coverage does not conflict with your plan for guest pictures. The vendor contract guide on this site shows what to look for in the clauses.
For your venue
Ask about lighting after dinner and whether it changes. Ask about flash and photography rules, table decor limits, and who handles lost property. Ask whether a staff member can place disposable cameras on tables and gather them at close, and whether that carries a fee. Ask where you can store cameras on the day and whether the space is cool and shaded.
For the camera seller
Ask for the film speed, the frame count, the flash range and the date the film should be developed by. Ask whether bulk pricing applies, whether disposable cameras can be returned unused and how long shipping takes. Ask whether the camera is recyclable and whether the seller has a return program for the shells. If you care about waste, the guide to wedding waste reduction covers how to think about single-use items.
For the lab
Ask for the all-in price per roll, the scan resolution, the turnaround time and the delivery method. Ask whether they return negatives and how long they keep files online. Ask what happens with blank or damaged rolls. Ask whether there is a minimum order, a rush option or a discount for a batch.
Measurable checks to write down
Turn the answers into a short list of numbers you can compare after the wedding. The list should include the all-in cost, the number of cameras placed, the number returned, the frames exposed, the frames kept and the days from the wedding to the scans. After the event, calculate your actual cost per kept frame and compare it with the model.
Keep these figures with your wedding records. They are useful if you recommend the idea to a friend, and they help you judge your own decision with a clear head. If your result is better or worse than the model, note why, so that the next version of your plan improves.
Reviewing the results and what to do with them
When the scans arrive, give yourself a calm first evening. Open the files without judging them, and look at the whole set before you sort. Many couples find that their first reaction is disappointment at the dark frames and delight at the best ones, and that both feelings fade once the pictures are sorted.
Sort in two passes. In the first pass, mark every frame as keep, borderline or discard against the standard you wrote down earlier. In the second, look at the borderline frames again a few days later. Moments that looked weak at first, a blurred hug or a face half hidden, often earn a place when you view them beside the others.
Then compare your actual numbers with the model. If the cost per kept frame came out higher than expected, look at the three levers: return rate, frames exposed and yield by condition. If returns were low, improve collection next time. If frames were left unused, adjust the table card. If yield was low in a specific condition, you now know to avoid that condition. Whatever you decide, record it.
Your next steps
First, build your exposure map on a single page: your timeline, the light at each stage and a grade for each. Second, buy one test camera, shoot a planned set at your venue or in similar light and send the roll for development to learn your real yield and turnaround. Third, fill in the cost model with real quotes for cameras, lab fees and shipping.
Fourth, decide how many disposable cameras to place and where, and write a short table card with the three habits that matter. Fifth, name a collector, write the camera log and add collection to your day-of schedule. Sixth, set expectations with guests about privacy and posting, and review the consent guide if you plan to share widely. Finally, keep the scans and your numbers with your other wedding records.
If the model says the cost per kept frame is higher than you are comfortable with, that is a useful result. You can reduce the number of cameras, place them in better light or choose a different tool, and you will have made the choice with open eyes. If it says the cost is reasonable and the test roll looks good, you can go ahead with confidence that the disposable cameras will be a small, enjoyable part of a day that is covered by more dependable tools.
FAQ
Are disposable cameras worth it at a wedding?
They can be, if you value candid, film-look pictures from guests and accept that many frames will be weak. Work out your cost per kept frame with a test roll, since the camera price is only part of the bill. If the result fits your budget and you like the look, they make a nice supplement. They should not be your only record of key moments.
How many disposable cameras do I need?
Start with one per table or one per eight to ten guests, then adjust using your cost model. Fewer well-placed disposable cameras usually beat many scattered ones, because each roll costs the same to process whether guests finish it or not. Keep a few extra for the cocktail hour, where the light is best, and skip the dance floor.
Do disposable cameras work in a dark reception?
Poorly, beyond the reach of the flash. The flash covers only a short distance, so subjects close to the camera look bright and the rest of the room disappears. A dark dance floor will produce many unusable frames. Treat dim-room pictures as a bonus, and rely on your photographer or phones for the moments you care about most.
How long does it take to get photos from disposable cameras?
It depends on the lab, the season and how you ship the film. Expect from several days to a few weeks after the lab receives the rolls, plus the time to collect cameras and send them. Ask your lab for its current turnaround in writing, and plan thank-you notes and sharing around the slower estimate.
What does it cost to develop disposable cameras?
Labs set their own prices, usually per roll, and charges differ for development only, development with scans and prints. Shipping, rush service and extras add to the total. Because prices change, get a current quote and enter it in the cost model. Divide the full spend by the frames you actually keep to see the true cost per photo.
How do I stop guests from taking the cameras home?
Place a basket near the exit, announce the collection point once and assign a collector to sweep tables at the end. Add a friendly line to the table card asking guests to leave the camera with you. Number the disposable cameras and keep a log so you can message the people at any missing tables the next morning.
Can I share guest photos online?
You can usually share pictures for personal purposes, but it is courteous to ask before posting anyone’s image publicly, especially children and guests who value privacy. Tell guests what to expect on the invitation website or table card, and offer an easy opt-out. For wider commercial use, get written permission from the photographer and any identifiable people.
Should I use disposable cameras instead of a photographer?
No. Fixed settings, short flash range and the lack of any preview make disposable cameras unsuitable as the only record of a ceremony, portraits or speeches. Hire coverage for the moments you will want in thirty years, and let guest cameras add candid texture. Share your priorities with the photographer so the two efforts complement each other.
Sources
- Copyright Office, U.S. Copyright Office
- Disclosures 101 for social media influencers and endorsements, Federal Trade Commission
- Personal archiving: preserving your digital memories, Library of Congress
- Preservation resources for families, National Archives
- Back up business data, Cybersecurity and Infrastructure Security Agency
- Traveling with film and cameras, Transportation Security Administration
- Mailing and shipping guidance, United States Postal Service
- Batteries and recycling, Environmental Protection Agency
- Photographic film information, Kodak
- Photographic film resources, Ilford Photo