
Film coverage is the share of your wedding day that your photographer records on film instead of, or alongside, digital files. This guide gives you a method for deciding where that share goes, how many frames it buys, and which scan specification to write down so the pictures reach you in a form you can print, share and keep.
Treat film coverage as a frame budget. Score each part of the day for light, repeatability and value, and give film to the moments that score well on all three. Convert the plan into rolls using the frames per roll of the format your photographer shoots. Then choose a scan tier before you sign: pixel dimensions, file type, bit depth, color handling, cleanup, borders, file naming and delivery date. Confirm all of it in writing, and test the first delivered batch against your own measurable checks.
Most couples who want film at their wedding start from a feeling. They like the soft color, the grain, the way a roll of film makes a photographer slow down and choose. That is a perfectly good reason.
But a feeling does not tell you how much film to buy, which moments to give it, or what you will be holding at the end. Those answers come from decisions that sit between the camera and the finished file, and most of them are made without you unless you ask.
Picture two couples who each book “film coverage” for the same price. The first gets a handful of rolls shot at the getting-ready, the portraits and the ceremony, scanned at a size good for a screen and a small print.
The second gets the same number of rolls spread thinly across eleven hours, many of them shot in a dim reception room, scanned at the lowest size the lab offers. Both hired film. Only one made a plan. The difference is not talent or taste. It is allocation and specification, and both can be written down in an evening.
This guide is built around two tools. The first is a scoring method for allocating film across the day, which gives you a defensible answer to “what goes on film and what stays digital.” The second is a scan specification you can fill in line by line, which tells the lab and the photographer exactly what a finished image should be. Together they let you compare quotes honestly, because you will know what each quote leaves out.
A note on scope. This is general information, not legal, tax or financial advice. Copyright, contract and consumer-protection rules differ by state and by vendor, and they change. Where a rule matters, this guide points you to the agency or vendor that publishes it, so you can confirm the current version yourself.
What film coverage means on a wedding day
In plain terms, film coverage is the part of the day that is exposed on photographic film, developed at a lab and turned into digital scans (and sometimes prints). It sits somewhere on a line. At one end is a film-only approach, where every picture of the day is on film.
At the other end is a few rolls shot as a flourish while digital does the heavy lifting. Most real weddings land in the middle, with film coverage assigned to chosen moments and digital covering the rest.
Three words come up constantly in quotes, and they are worth separating. Film coverage is the plan: which moments, how many frames. Development is the lab process that turns exposed film into negatives you can hold. Scanning is the step that converts those negatives into files. Couples often hear one price for all three. Treating them as separate lets you see where the money and the risk really are.
A film frame is also a different kind of unit from a digital frame. A digital photographer can fire dozens of frames in a few seconds and sort them later. A film photographer has a fixed number of exposures per roll, and each one has a cost. That limit shapes how a good film shooter works, which is slower and more deliberate, and it shapes what you should expect to receive. Fewer frames, each chosen with care, is the normal pattern.
The difference between film coverage and a film add-on
Some photographers sell film as an add-on, a defined extra package on top of a digital package. Others sell a film-first or film-only approach. A film add-on is one way to buy film coverage, but the plan underneath is the same either way: someone has to decide which moments go to film and what the scans look like.
If you want to see how an add-on is typically structured, how rolls are counted, and how a turnaround should read, the live guide on this site about film add-ons covers that ground. This article does something different. It focuses on how to divide the day and how to specify the scans.
What film coverage is not
Film coverage is not a promise that pictures will look a certain way. Film stocks have characteristic color and grain, but the final look depends on the stock, the light, the exposure, the lab and the scanner settings. Two labs can scan the same negative into noticeably different files.
If you want a look, ask for samples that were shot, developed and scanned the way your coverage will be, and confirm that the samples are the photographer’s own work or are licensed for the purpose. Do not read a gallery as a guarantee about your day.
It is also not automatically better or worse than digital. It is a different set of strengths and costs. Film handles bright highlights gently, produces a particular grain structure and rewards patient shooting. It struggles in very low light without special handling, it cannot be reviewed on the spot, and every mistake is permanent. None of that is a reason to avoid it. It is a reason to place it deliberately.
Why film coverage is a frame budget, not a time budget
Digital coverage is usually sold in hours. “Eight hours of coverage” is a sensible unit because a digital shooter produces images continuously and the limit on the day is the photographer’s time. Film coverage behaves differently. A roll holds a fixed number of exposures, and once it is used up it has to be changed.
The cost of the film, its development and its scanning all scale with the number of rolls. So the honest unit for film coverage is frames, with hours as a rough guide to when they get used.
This matters because the same eight hours can consume very different amounts of film. A photographer who shoots one frame of each family grouping and three of the first kiss uses film slowly. A photographer who shoots the dance floor in bursts uses it quickly. If your quote lists hours of film coverage but no roll or frame count, you do not know how much you have bought. Ask for both, and ask what happens at the end of the last roll.
How frames per roll set the ceiling
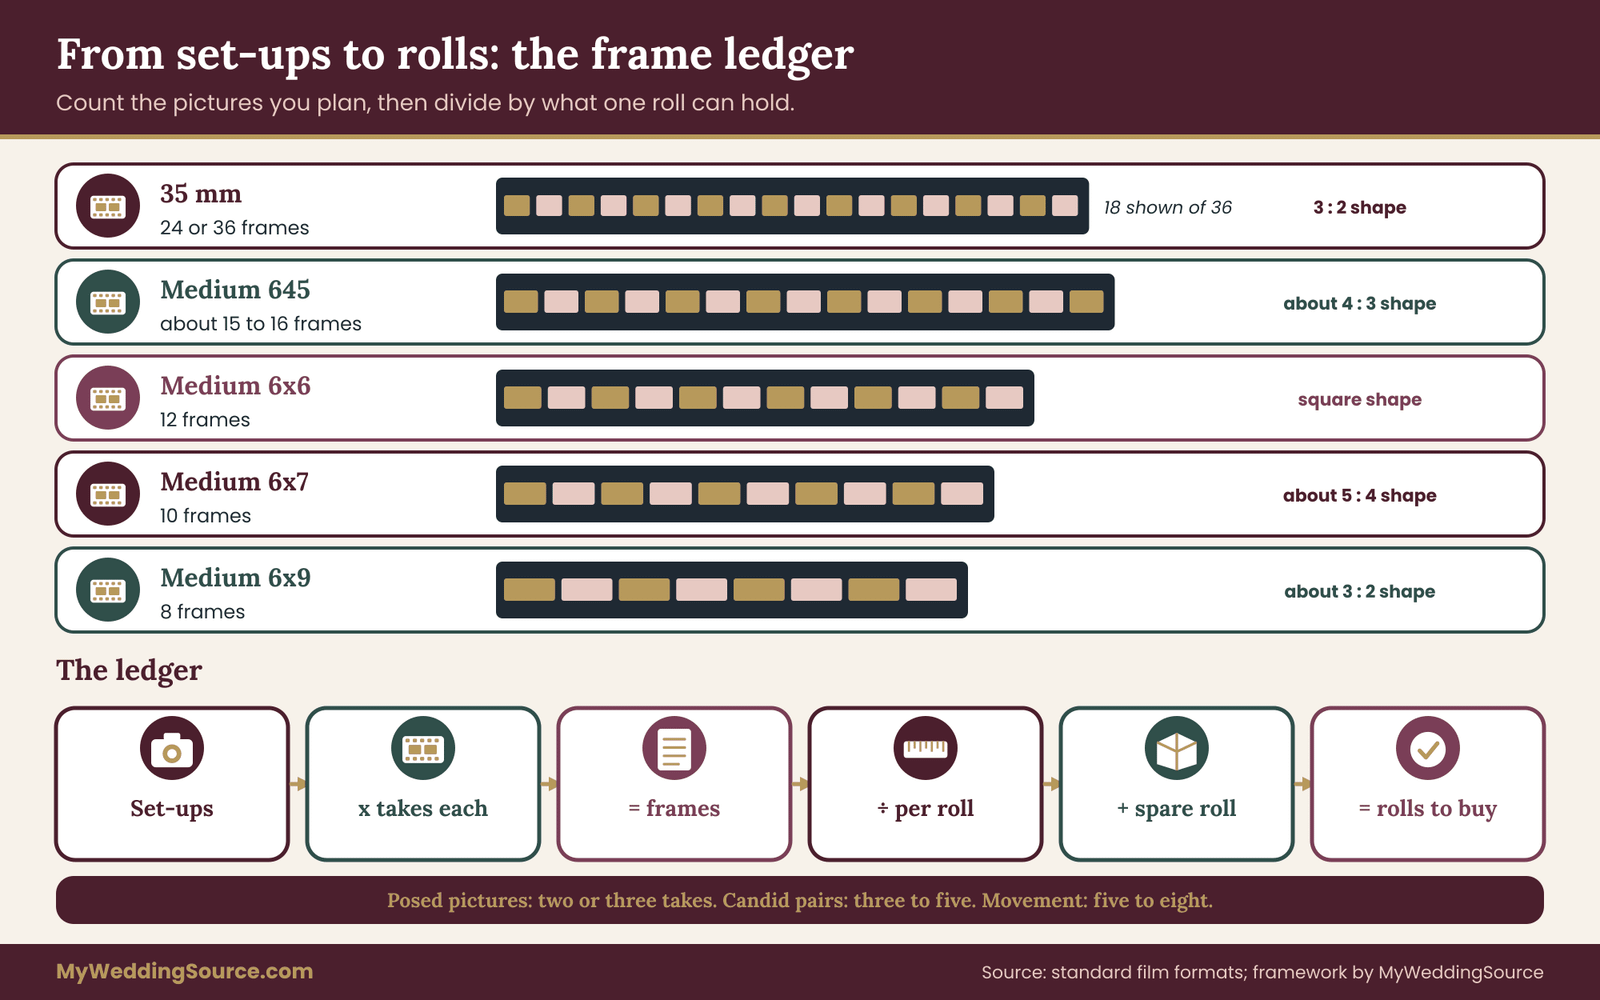
The two common film sizes used by wedding photographers are 35 mm (often called 135) and medium format (usually 120 film). Rolls of 35 mm film are commonly sold in lengths of 24 or 36 exposures. Medium format rolls give fewer frames because each frame is larger.
A 120 roll yields about 16 frames at the 645 size, 12 at the square 6×6 size, 10 at 6×7 and 8 at 6×9, depending on the camera. These are standard formats, and your photographer can tell you which camera and format they use.
The ceiling matters because it caps what film can do in a short window. If a first dance lasts four minutes and the photographer is shooting medium format 645, a single roll is all they have for that moment and every other moment until the next change. Experienced film shooters plan reloads around quiet beats for exactly this reason. You can help by knowing which moments you most want to protect.
The three levers inside every film coverage plan
Every film coverage plan is controlled by three levers, and you can see all of them on a quote if you look. The first is the number of frames, which sets how much film you get. The second is the scan specification, which sets how good each frame is once it becomes a file. The third is the digital safety net that runs in parallel, which sets what happens if film fails.
Raise one lever and the others usually have to move with it. A large number of frames scanned at a low specification gives you a lot of small files. A small number of frames scanned to a high specification gives you a few that can be printed large. Neither is wrong. They answer different needs.
Why allocation matters before you ask for a quote
Couples often ask for a quote first and decide on allocation afterward. That order costs you leverage. If you arrive with a rough allocation (which blocks of the day, roughly how many frames, what scan quality), the photographer can price your actual plan rather than a generic package.
You also avoid the situation where the quote is cheap because the scanning tier is the lab’s default and the allocation is thin. Having your plan written down turns a vague conversation into a comparison of like with like.
Who this guide is for
It is written for couples who have already decided they want some film, or who are curious enough to cost it out. If you have not yet chosen a photographer, read the guide on this site about the wedding vendor contract so you know which terms to look for, and use the wedding family photo list to decide which formal pictures the family expects, since those shape how much film you will want to assign to them.
It is also for couples who already booked a photographer and are now being asked, mid-planning, “do you want film?” You can answer with specifics. The sections below take it in order: scoring the day, allocating film block by block, specifying scans, costing the chain, weighing trade-offs, checking what arrives, and a worked example.
Words to know before you start
A few terms recur. A frame is one exposure. A roll is one strip of film, loaded and developed together. A negative is the developed film itself. A scan is the digital file made from a negative. A lab is the business that develops and scans.
A keep rate is the share of frames that end up delivered. A tier, in this guide, is a named level of scan specification. None of these requires technical knowledge. They are labels for the things you will be negotiating.
The Film Weight method for film coverage allocation
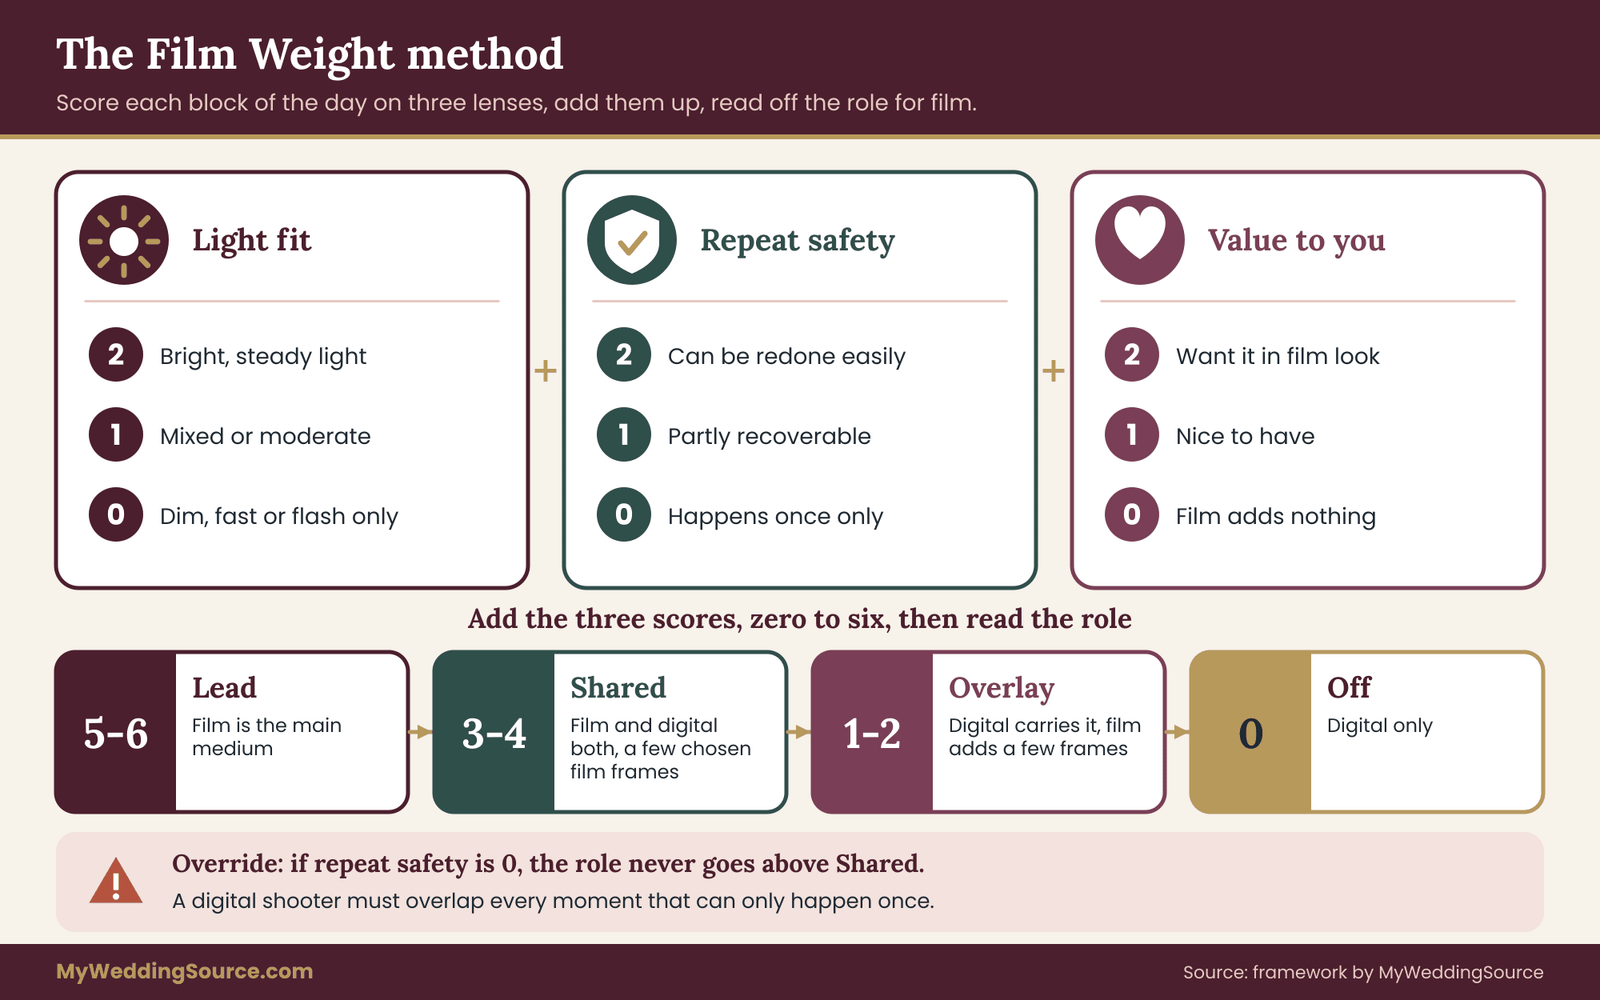
The Film Weight method turns a vague wish into a short list of decisions. You split the day into blocks, score each block on three lenses, add the scores, and read off a role for film in that block.
It takes about twenty minutes, it works with a pen and paper, and it gives you something concrete to hand a photographer. The method is not a law of photography. It is a structured way of deciding, so that the choices come from the day itself rather than from whatever a package happens to include.
Every score in the plan exists to answer one question: how much film coverage does each block deserve? The three lenses are light fit, repeat safety and value. Each is scored from zero to two. A total of six is the highest a block can reach. The scores are your judgment, informed by what the photographer tells you about their own film practice, and they should be revised when you learn more.
Lens one: light fit
Light fit asks whether the block will give film what it needs. Film, especially slower and finer-grained stock, wants plenty of light. Bright daylight, open shade and big windows suit it. Dim rooms, fast action and venues where flash is restricted do not. A two means the light will be good and steady: a daytime outdoor ceremony, portraits in open shade, a bright getting-ready room with big windows.
A one means mixed or moderate light: an overcast day, an interior with some window light, an evening ceremony with a few hours of dusk left. A zero means the light is dim, changing or artificial: a candlelit dinner, a dark dance floor, a barn with low string lights.
You do not have to know the exposure details. Ask your photographer one question for each block: “How would you light this on film?” A confident answer names a stock, a speed or a plan for flash, and shows the photographer has thought about film coverage in that room before.
A vague answer is information too. If your photographer says they would shoot the dance floor on film with an on-camera flash, you have learned that the look will be a direct-flash look. That may be exactly what you want, or it may not, but at least you chose it.
Lens two: repeat safety
Repeat safety asks how survivable a failure would be. Film can fail in ways digital rarely does. A roll can be loaded wrongly, a frame can be missed, a lab can mishandle a batch, and nobody finds out until days later. Repeat safety scores how well the block recovers from that. A two means the moment can be redone or re-posed easily: portraits, details, a table setting, a group picture that can be retaken before the cake.
A one means it can be partly recovered: a first look that has a second take on the couple’s walk away, a bridal party moment with several similar frames. A zero means it can never happen twice: the processional, the vows, the kiss, a toast from someone who will not repeat it.
This lens is the one most couples forget, and it is the one that protects you. The point is not that irreplaceable moments should not be on film. It is that they should not be on film alone. Whatever the block scores, a zero on repeat safety means a digital shooter runs in parallel.
You can get film pictures of your vows and a digital record of them at the same time. That overlap is the difference between a risk and a gamble, and it is the core safety rule of any sensible film coverage plan.
Lens three: value
Value asks how much you care about having this moment in the film look. It is the lens that belongs entirely to you. A two means you would be disappointed to see this block only in digital: the portraits you will hang on a wall, the quiet getting-ready frames, a particular family portrait.
A one means you would like it but will not mind either way. A zero means film adds nothing for you here: the vendor table, the transportation, the venue details you photographed yourselves.
Be honest with this lens. Couples who score every block a two end up with a plan that is film everywhere, which defeats the purpose of having a scoring method. If you find yourself scoring everything the same, imagine you could only choose three blocks for film. Which three do you reach for first? Those get twos, and the rest of your film coverage can be scored more modestly.
Adding up and reading the role
Add the three scores. A block that totals five or six is a candidate for a lead role, where film is the main medium and digital shadows it only where repeat safety is low. A total of three or four suggests a shared role, with film and digital both used and film getting a few chosen frames.
A total of one or two suggests an overlay role, where digital carries the block and film adds a handful of frames if the photographer wants them. A zero means film is off for that block, which is a perfectly good answer.
Then apply the override. If repeat safety is zero, the role can never be higher than shared, and the digital shooter must overlap. The override exists because the total can hide a dangerous number. A block can reach four with a perfect light score and a high value even though a failure would be unrecoverable. The override catches it.
A scored example: three blocks side by side
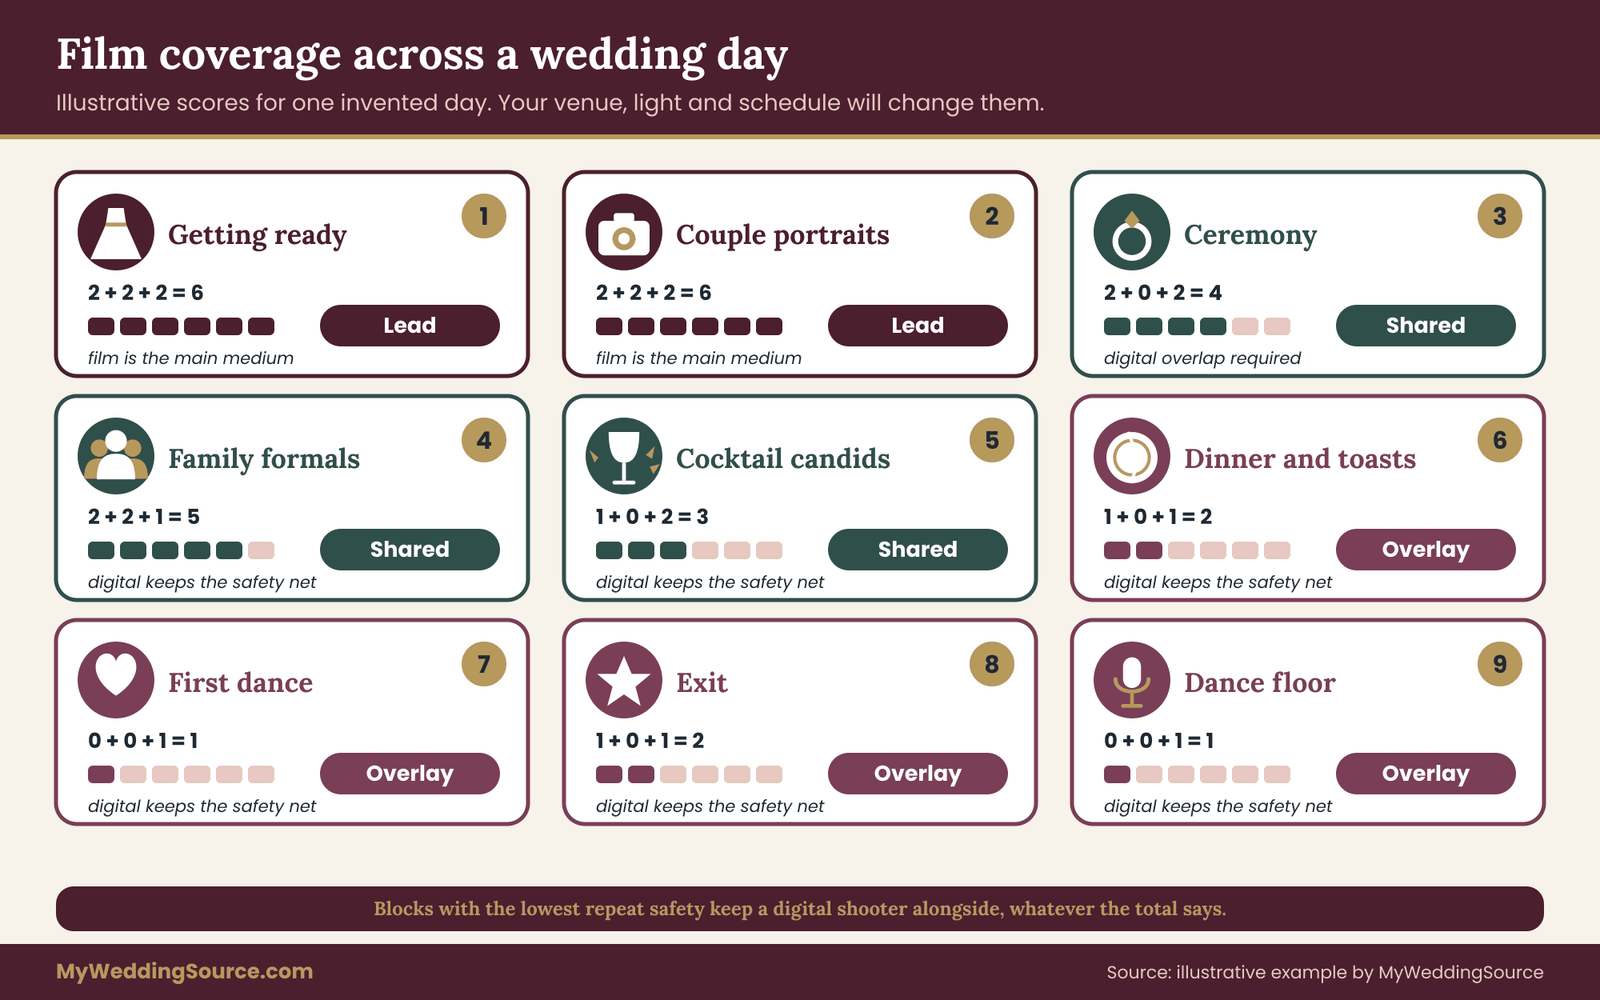
Consider three blocks from a typical day. The couple’s portraits in open shade at four in the afternoon score two for light, two for repeat safety (they can be retaken) and two for value, a total of six: a lead role with film as the main medium.
The ceremony on the same lawn scores two for light, zero for repeat safety and two for value, a total of four, but the override applies, so film runs as a shared role with a digital shooter overlapping. The reception dance floor scores zero for light, zero for repeat safety and one for value, a total of one: an overlay role, where digital carries the block and film might add a few frames in a lit moment.
The method just did what it is supposed to do. It gave film coverage the best light and the lowest risk, kept it alongside digital where the stakes were high, and kept it from struggling in a dark room. You did not need a photographer’s vocabulary to get there.
What to do when your scores disagree with your photographer
Sometimes your scores and your photographer’s advice point in different directions. You may score the dance floor a high value, and your photographer may say the room is too dark for film without a flash look they dislike. Treat the disagreement as useful, since your film coverage plan will be better for having both views.
It means one of you has information the other lacks. Ask the photographer what they would do instead. They may suggest a different block that carries the same feeling, such as the last song in a bright exit, or a staged group picture before the lights go down.
The goal is not to win the argument. It is to make the trade-off visible, so the decision is yours. If the photographer simply declines to explain their reasoning, that is also worth noting before you commit.
Keeping the method honest
Three habits keep the Film Weight method honest. First, score before you see prices, since a price will bias your sense of value. Second, write down the date and the venue assumptions behind each score. If the ceremony moves from outdoors to a hall, light fit changes, and the allocation should be redone.
Third, share the scores with your photographer in writing, since a film coverage plan that lives only in your head cannot be held to anything, and since that record is what you will refer to if the day goes differently from the plan.
The method also gives you a clean vocabulary for contracts, because film coverage described by role is far easier to sign than film coverage described by mood. Instead of “some film coverage,” a contract can say “film lead for portraits, film shared with digital overlap for the ceremony, digital primary for the reception with film optional.” That is a plan a photographer can sign and a lab can be briefed on.
How the day’s scores reshape your quote
Once you have scores for each block, you can see what you are asking for in total. A day with two lead blocks and three shared blocks needs more film than a day with one lead and four overlays. The next sections turn those roles into frames, which is how film coverage becomes a number you can price, and then into rolls, so you can read a quote line against your own plan.
The scoring is also reversible. If a quote comes in higher than you expected, you can drop a block’s value score by one and see what that does to the roles, which is a calmer way to trim film coverage than asking for “less film.”
Allocating film coverage across the day, block by block
With the method in hand, you can walk through a typical day and assign roles. The blocks below are common ones. Yours may differ, and a wedding with no first look or no formal reception will simply skip some.
For each block you will find the usual scores, the role they tend to produce, and the practical points that change the answer. Treat the scores as starting positions and adjust them for your venue, season and schedule, because film coverage always has to bend around the real day.
Getting ready
Light fit is often a two if the room has large windows and a one if it does not. Repeat safety is a two, because the dress, shoes, rings and flowers can all be arranged again. Value is high for many couples, since these quiet frames are where film’s patient look shows well. That usually adds up to a lead role.
The practical catch to film coverage in this block is space. A small, crowded room makes a medium format camera awkward and a wide lens unavoidable, so ask about the room. If the room is dim, the role may drop to shared, with digital doing the dressing-room action and film picking up the window-lit details.
First look and couple portraits
This is where film coverage usually does its best work. Open shade, time to compose, repeatable poses and a couple who care how it looks: light fit two, repeat safety two, value two. Lead role. Because the photographer controls the pace, this block is also where slower, larger-format cameras make sense. A film coverage plan that gives portraits the most film often delivers more usable pictures than one that spreads the same rolls thin across the evening.
Be aware of the sun. Late afternoon light is flattering but short, and a film photographer who has to reload during the best ten minutes will miss it. Ask whether they plan to carry pre-loaded backs or a second film camera for this block, since that choice sets how much film coverage the portraits can actually hold.
The wedding party
Group pictures with friends are repeatable and easy to light, which makes them a good film candidate, but they also eat frames. Ten people jumping or laughing in one frame can take five takes to get right. Many couples score value at one here and give the block a shared role: a few considered frames on film and a digital burst for the jumping and laughing.
The ceremony
The ceremony is the block where the override matters most. Light is usually good outdoors and moderate indoors, value is usually two, and repeat safety is zero. The role is shared with a digital overlap, always. The film shooter can take the processional, the moment before the vows, the kiss and the recessional, and the digital shooter covers the whole thing. Ask the photographer to confirm in writing that the digital shooter covers the vows, rings and kiss regardless of what film catches.
Also ask about shutter noise and positioning. Film cameras can be louder than digital mirrorless ones, and some officiants or venues restrict where a photographer can stand during the ceremony. If the ceremony space is tight, the better answer may be one film camera from the back and one digital camera from the aisle.
Family formals
Formal family pictures are the block where preparation matters most. The list is fixed, the groups are repeatable and the time is limited. They are usually a candidate for a shared role, with a film frame or two of each important grouping and a digital frame for safety. The family list is what turns this block from a rush into a routine.
The family formals list approach on this site shows how to build one, and the same list tells you how many frames to assign. A list of twelve groupings at two takes each is twenty-four frames, which is most of a 35 mm roll, so you can see at a glance whether film for formals is affordable.
A practical rule: if you ask for film in formals, make the list short and the order logical. Every minute spent hunting for an aunt is film burning, not frames.
Cocktail hour and candids
Candid moments are the heart of what many couples want from film. They score well on value, usually a two, and on light fit if the cocktail hour is outdoors or near windows, but they score poorly on repeat safety because the moments cannot be staged. Shared role.
A photographer might carry a compact 35 mm film camera and shoot candid frames while a digital shooter works the room. The risk is that film is slow at the exact kind of fast, unplanned moments candids depend on, so keep expectations realistic about film coverage in this block. A handful of keepers from one roll is a fine result.
Reception details and room
The room before guests arrive is a one-time moment for the photographer but a low-stakes one for you. Repeat safety is one, because the room does not move, and light fit is variable. Details such as the cake, the place settings and the signage can be photographed in whatever light is available, and film does this well with a steady hand.
Many photographers will choose film for the room if the light is decent and digital if the room is lit only by uplighting and candles. You do not need to micromanage this block; film coverage here is a bonus, not a priority.
Dinner, toasts and the cake
Toasts and speeches are irreplaceable, which means a digital shooter runs on all of them, but the lighting is usually modest and the pace is slow, which suits film. Many couples allocate a small number of film frames here as a shared role. Audio is worth considering separately; the dedicated guide on this site covers wedding day digital contingency planning if you want a backup plan for recordings and files.
First dance and the dance floor
Dim light, fast motion and low repeat safety add up to the weakest block for film. A dance floor with a flash can look wonderful on film in the right hands, but the look is flash-lit and the keep rate drops.
Most couples keep film coverage light here and assign overlay, with film used for the opening dance and the first few songs while the room is still lit, and digital covering the rest. Remember that guests are also dancing and that flash pointed at a dark room will affect everyone. Discuss it with the photographer before you decide.
Exit or send-off
A bright exit, with sparklers or bubbles and plenty of light, can be a good film moment. A dark exit with a distant car is not. Score it according to your actual venue and do not assume the exit will be photogenic simply because it is the last frame of the day.
Turning roles into a frame ledger
Once every block has a role, you can estimate frames. A simple method for sizing film coverage is to count the set-ups in each block, multiply by the takes per set-up, and add the totals. A set-up is a distinct picture: one portrait pose, one family grouping, one candid scene.
Takes per set-up is a planning number: two or three for posed pictures, three to five for candid pairs of people, five to eight for movement. These are planning ranges, not standards, and a good film photographer will tell you what they actually use. The result is a frame ledger for your film coverage, and dividing it by frames per roll gives a number of rolls.
Add a spare roll for every change of format and one more for the day. Spares cover misloads, light that changes and the moments no one planned for. A plan that fills every roll exactly has no margin, and the day will always spend some.
Reload beats and why they matter
Every roll change is a pause in the camera that is shooting film. A photographer on a tight schedule schedules those pauses for quiet moments: during the signing, while guests are seated, after the last portrait. Ask about reload beats. A photographer who has already thought about when the film camera will be quiet is a photographer who has done this before, and the answer will tell you how the allocation will actually work on the day.
When the schedule moves
Weddings run late. The portrait window shrinks, a ceremony starts twenty minutes behind, a family grouping takes longer than planned. When the schedule moves, the allocation moves with it, and the photographer has to decide in real time where the remaining film goes. Agree on a priority order for film coverage in advance.
A one-line instruction such as “if we run late, protect portraits and the ceremony frames and cut candids” gives the photographer permission to make a call without asking you at a stressful moment. The next part of this guide moves from deciding what gets shot to deciding what you receive.
The scan specification matrix that goes with film coverage
A negative is not a picture you can send to a relative. It becomes one only when a scanner turns it into a file, and the scanner, the settings and the person operating it all leave a mark on the result.
This is why two couples with identical film coverage can receive very different files. A scan specification is the list of choices that define what a delivered file should be, and it is the second half of any film coverage plan. Writing it down turns “scanned” from a vague promise into something you can check.
The matrix has ten lines. Each line is a question with a few possible answers, and later you will group the answers into four tiers. You do not have to understand the engineering. You need to know what each line affects, so that you can tell which ones matter for your film coverage.
Line one: pixel dimensions
Pixel dimensions are the width and height of the delivered file, and they set the largest print you can make without visible softness. A common print rule is about 300 pixels per inch, so an 8 by 10 inch print needs roughly 2,400 by 3,000 pixels, and a 16 by 20 inch print needs roughly 4,800 by 6,000. These are arithmetic, not guarantees, since a film frame has its own grain and softness.
A 35 mm frame measures about 36 by 24 millimeters, or 1.42 by 0.94 inches. Scanned at 2,000 pixels per inch it produces a long edge of about 2,835 pixels. At 4,000 pixels per inch it is about 5,669. Medium format frames are larger, so the same scan setting gives a larger file. Ask for the long-edge pixel count in writing, not a vague word such as “high resolution,” because that phrase means different things at different labs and says nothing about your film coverage.
Line two: file format
Most delivered scans are JPEG files, which are compressed and small, or TIFF files, which are lossless and large. JPEG is fine for screens, albums and ordinary prints. TIFF preserves more detail and handles heavy editing better, and it also takes much more storage.
A lab might offer JPEG as standard and TIFF as an upgrade. If you plan to print big or to have the files retouched, ask for TIFF on the frames that matter. If you plan only to share and make small prints, JPEG is a sensible choice.
Line three: bit depth
Bit depth is how many tonal steps each color channel can hold. Eight bits per channel is standard for JPEG and is enough for most viewing. Sixteen bits per channel is common for archival scans and gives more headroom when someone adjusts shadows and highlights. The practical effect is visible mainly when a file is edited heavily. If a photographer will do the edits for you, you may never need to see the difference.
Line four: color profile
A color profile tells software how to interpret the numbers in a file. sRGB is the standard for screens and web galleries and is the safe default. Wider profiles keep more color information for editing and print. A file that arrives with no profile can look different on different screens. Ask which profile is embedded, and whether the files you receive are meant for sharing or for editing.
Line five: scanner type
Labs use several kinds of equipment. Fast lab scanners built into processing machines handle large volumes cheaply and are common for standard scans. Dedicated film scanners, including high-end drum scanners, produce higher-quality results at a higher cost and take longer.
Some photographers photograph negatives with a digital camera on a light panel, which is a different method again. None is wrong for film coverage as such. Each has its own look and its own limits, so ask which method will be used and which tier you are paying for.
Line six: color and tonal rendering
Scanner software can correct color automatically, apply a lab look or leave the file flat for editing. A lab-corrected scan looks finished but may differ in color from frame to frame. A flat scan looks muted and needs editing, but it is consistent. Neither is better. The question is who finishes the file. Ask whether the delivered scans are corrected, whether they are matched to the photographer’s own look and how consistent colors are across a roll.
Line seven: dust and scratch cleanup
Film picks up dust and scratches. Scanners often have a hardware or software function that reduces them, and the photographer or lab may also retouch spots by hand. Automatic dust removal tends to work well on color negative film and often works poorly on traditional black-and-white film, so ask about both if your coverage includes both. Ask what cleanup is included, what “light” or “full” retouching means and whether visible marks will be fixed on request.
Line eight: borders, edges and cropping
Some scans include the black border and the edge markings of the film, which many people like as a visible sign that the picture came from film. Others are cropped tightly. Aspect ratios also differ by format: a 35 mm frame is about three to two, while medium format frames vary.
If you want to print on standard sizes such as 8 by 10, a crop will be needed. Ask whether the scan will be delivered full frame, cropped to the image or both, and who decides.
Line nine: naming and ordering
A scan archive with no logic is unusable. File names should carry the roll number and frame number so that a file can be traced back to a negative, and the files should be in the order they were shot. Ask for the naming scheme. If you are likely to dispute a missing frame, roll and frame numbers are how you will find it. They also help you pair film scans with the digital files from the same moment.
Line ten: delivery and storage
Scans usually arrive through an online gallery or a download link. Ask how long the files stay online, whether full-size files are included or only web-size versions, and whether you can receive a drive. A gallery that expires after a year can quietly leave you with nothing. Whatever the method, download everything and keep it in more than one place. The guide on this site about organizing wedding records after the event shows a simple three-copy habit for exactly this.
Reading a quote against the ten lines
Most quotes for film coverage name only two or three of these lines. “Scans included” is a phrase that stands in for all ten. You can fill in the rest by asking, and the answers sort themselves into a pattern.
A lab that quotes by the roll with a standard fast scan is offering one pattern. A photographer who scans in-house on a dedicated scanner is offering another. A different quote for the same rolls is often a different answer on lines one, three, five and seven.
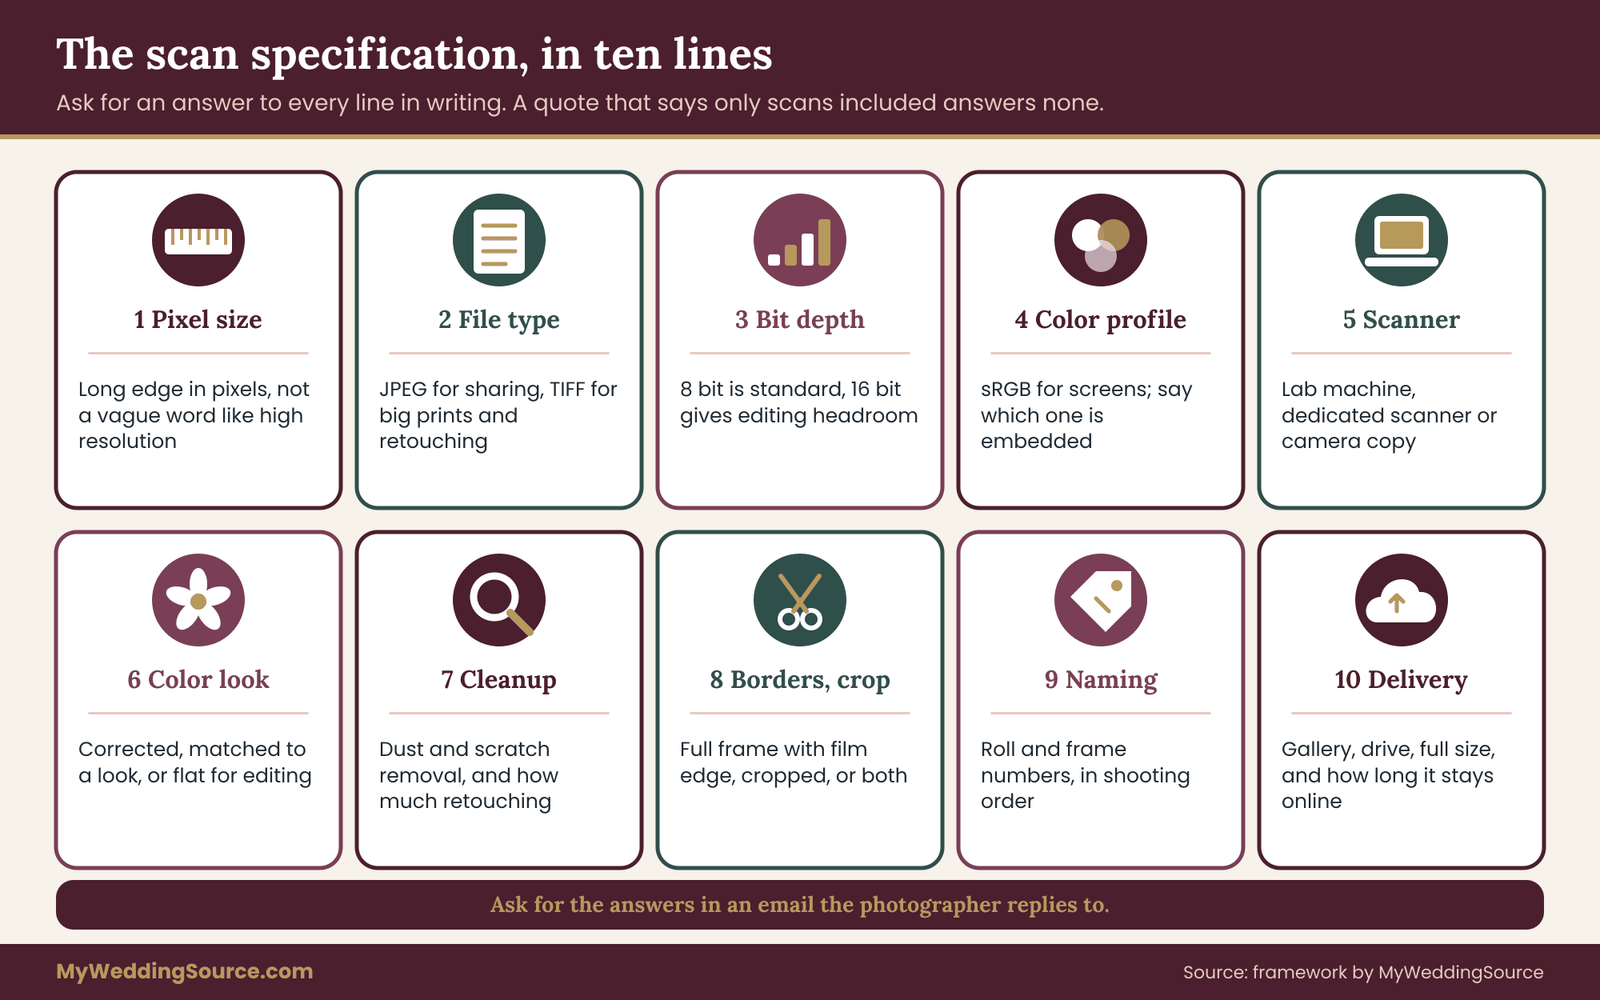
A blank specification to adapt
You can copy this into an email to a photographer, along with your film coverage roles. It is short on purpose.
“For the film frames, could you confirm the long-edge pixel count, file type, bit depth, color profile, scanner method, color treatment, dust cleanup, border choice, file naming and how long files stay online?”
Photographers who shoot film regularly will answer in minutes. If a photographer needs time to look it up with the lab, that is also a normal answer, and a good one if it comes back in writing.
What to do when the answer is “it depends”
Sometimes the answer to a line is “it depends on the frame.” That is reasonable. A lab may scan most frames at a standard size and rescan the best ones at a higher setting. The key is to know the rule. Ask what triggers a rescan, who chooses the frames, how many are included and what a rescan costs. A rule written down is worth more than a promise that the best frames will be treated well.
Why the matrix belongs in the contract
Anything on the ten lines that affects what you receive from your film coverage should appear in the agreement. The vendor contract guide on this site lists the clauses worth checking, and the film lines fit into the deliverables section.
A contract that says only “film coverage” and “film scans” leaves every one of the ten lines open. A contract that says “film scans, long edge at least 4,000 pixels, TIFF, sRGB, dust cleaned” does not. You can add that detail yourself, in an email the photographer replies to, if the contract template has no room for it.
Choosing a scan tier for each role in your film coverage
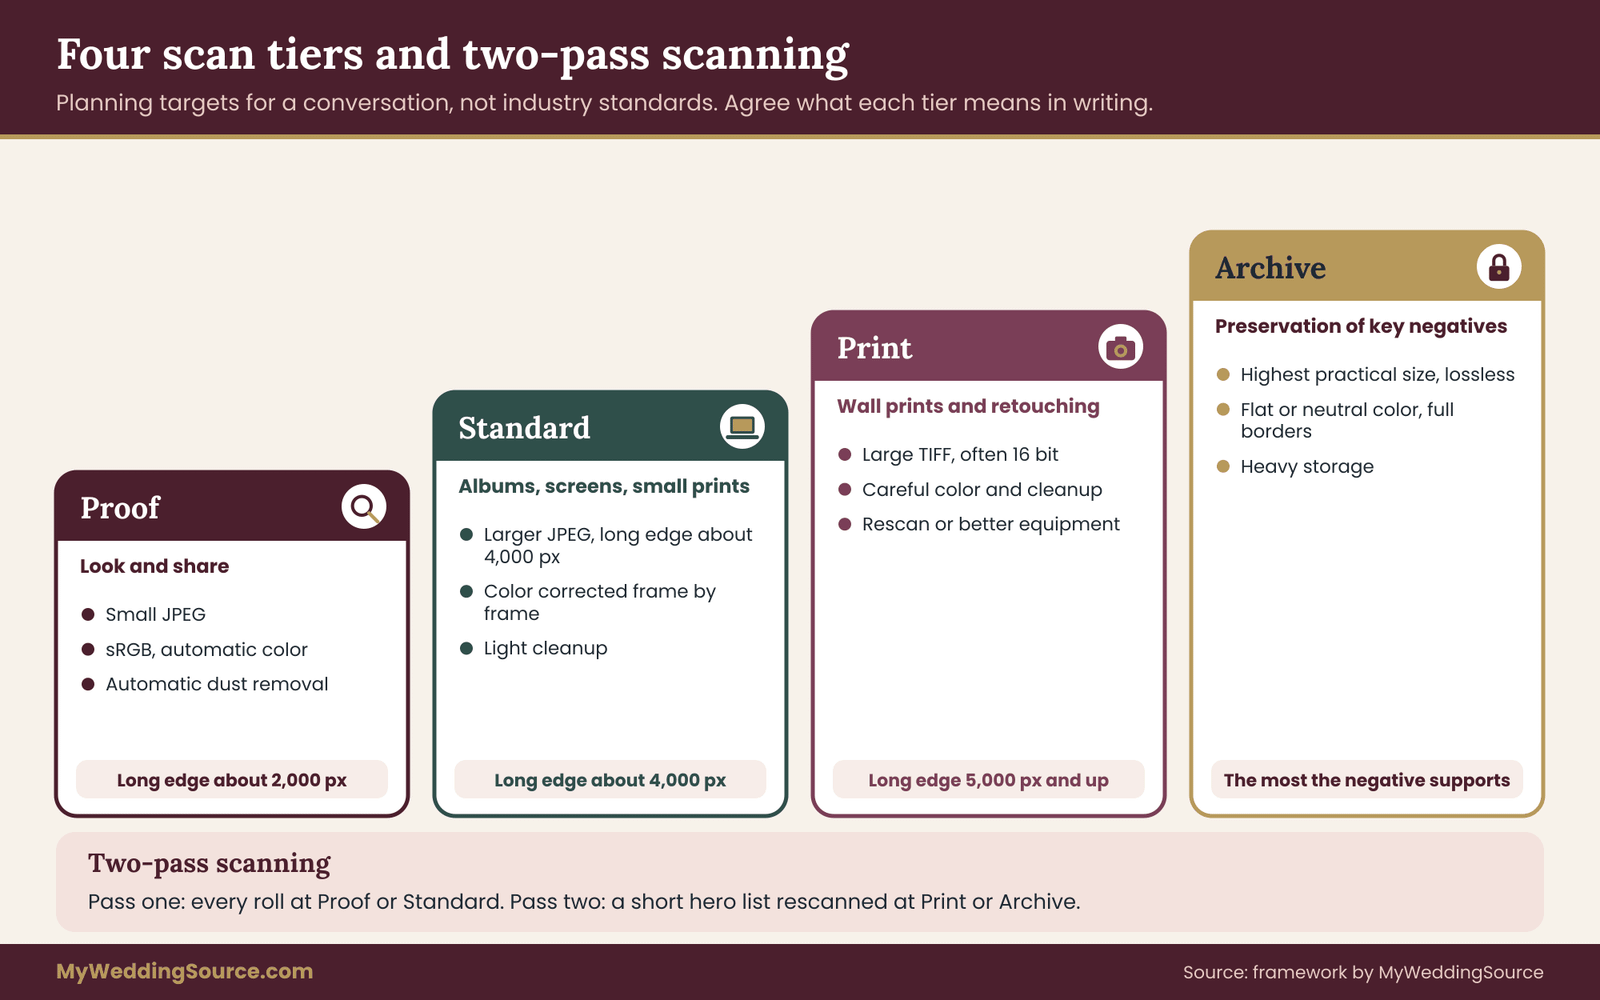
Ten lines are too many to negotiate frame by frame, so film coverage needs a shorthand. Bundling them into tiers makes the decision manageable. A tier is a named set of answers to the ten lines. This guide uses four: proof, standard, print and archive. The names and the numbers below are planning targets for conversation, not industry standards, and your lab may name its own levels differently. What matters is that you and the photographer agree on what each tier means in writing.
The four tiers in plain terms
The proof tier is for looking, not for using. Files are small, usually JPEG at a modest long edge, in sRGB, with automatic color and automatic dust removal. They are good for choosing which frames you like and for sharing on a phone. They are the cheapest tier and the one most often included by default.
The standard tier is the working tier. Files are JPEG at a larger long edge, in sRGB, with color corrected frame by frame and light cleanup. They suit web galleries, albums and prints up to a moderate size. For many couples this is the tier that delivers everything they need from most frames.
The print tier is for pictures you will enlarge or retouch. Files are larger, often TIFF, often sixteen bits per channel, with careful color and cleanup. A print-tier scan may be made on better equipment or rescanned from the negative with more attention. It costs more per frame and takes longer.
The archive tier is a preservation scan: highest practical resolution, lossless file, full borders, flat or neutral color so that nothing is baked in. It is the right tier for a few negatives that you want to be able to reinterpret in twenty years, and it is rarely needed for a whole wedding.
Matching roles to tiers
Here is the allocation logic. Film lead blocks are where your best frames will come from, so they justify a standard baseline with print-tier upgrades for the short list. Shared blocks should default to standard, since you will mostly use them in an album or on a screen. Overlay blocks can sit at proof or standard, because few of those frames will become wall pictures. Archive is a deliberate extra for a handful of frames.
This produces an approach worth naming: two-pass scanning, a cost-control habit for film coverage. In the first pass the lab scans every frame at proof or standard. You and your photographer choose a hero frame list, typically a small number of frames you want to enlarge, frame or retouch.
In the second pass those frames are rescanned at print or archive tier. Two passes save money because the expensive tier is applied only where it matters. It also separates two decisions that people tend to mash together: which pictures are good, and which pictures deserve the best scan.
A quick test for a print tier
How large will you print? Divide the long edge of the file by 300 to see the print size in inches at a standard print resolution. A file with a long edge of 3,000 pixels supports a 10 inch print at that rule.
A file with a long edge of 5,669 pixels, which is about what a 35 mm negative gives at 4,000 pixels per inch, supports roughly 19 inches. Those are guides, not limits, because prints viewed from a distance can be made at lower resolutions with acceptable results. But the arithmetic tells you whether a quote’s standard tier can plausibly make the wall pictures you have in mind.
What the files will cost you in storage
Higher tiers produce bigger files, and the numbers add up faster than people expect. A 35 mm scan at 4,000 pixels per inch is about 5,669 by 3,780 pixels, which is roughly 21.4 million pixels. At sixteen bits per channel with three channels, an uncompressed file is about 129 megabytes. At eight bits it is about 64 megabytes. A full 36-exposure roll at the sixteen-bit setting is therefore a little under five gigabytes before any compression.
Ten rolls of that would be around 46 gigabytes. That is manageable on any modern drive, but it is worth knowing before you ask for archive-tier scans of everything. Compressed JPEG files at the same dimensions are far smaller. You can ask the lab or photographer for the typical file size of a delivered scan at each tier, and then multiply by the number of frames.
When to ask for negatives back
Scans are copies. The negative is the original, and it can be rescanned later at higher quality as scanning technology improves. Some photographers return negatives to the client, some keep them for a period and some sell them back.
If you want the option to rescan, ask about it and add it to the agreement. Negatives need cool, dry, dark storage in archival sleeves, and the Library of Congress publishes preservation guidance for photographic materials that covers the basics. A drawer in a sunny room is not storage.
Decision rules for choosing tiers
If you are unsure, use three rules. First, never pay for a higher tier across the board without testing it. Ask for the same frame scanned at two tiers and compare them at the size you intend to use. Second, tie the tier to a use: albums and screens need standard, walls need print, a legacy needs archive. Third, write the hero frame list into the agreement, so the second pass is a promised step and not a courtesy.
What film coverage costs: from allocation to rolls to scans
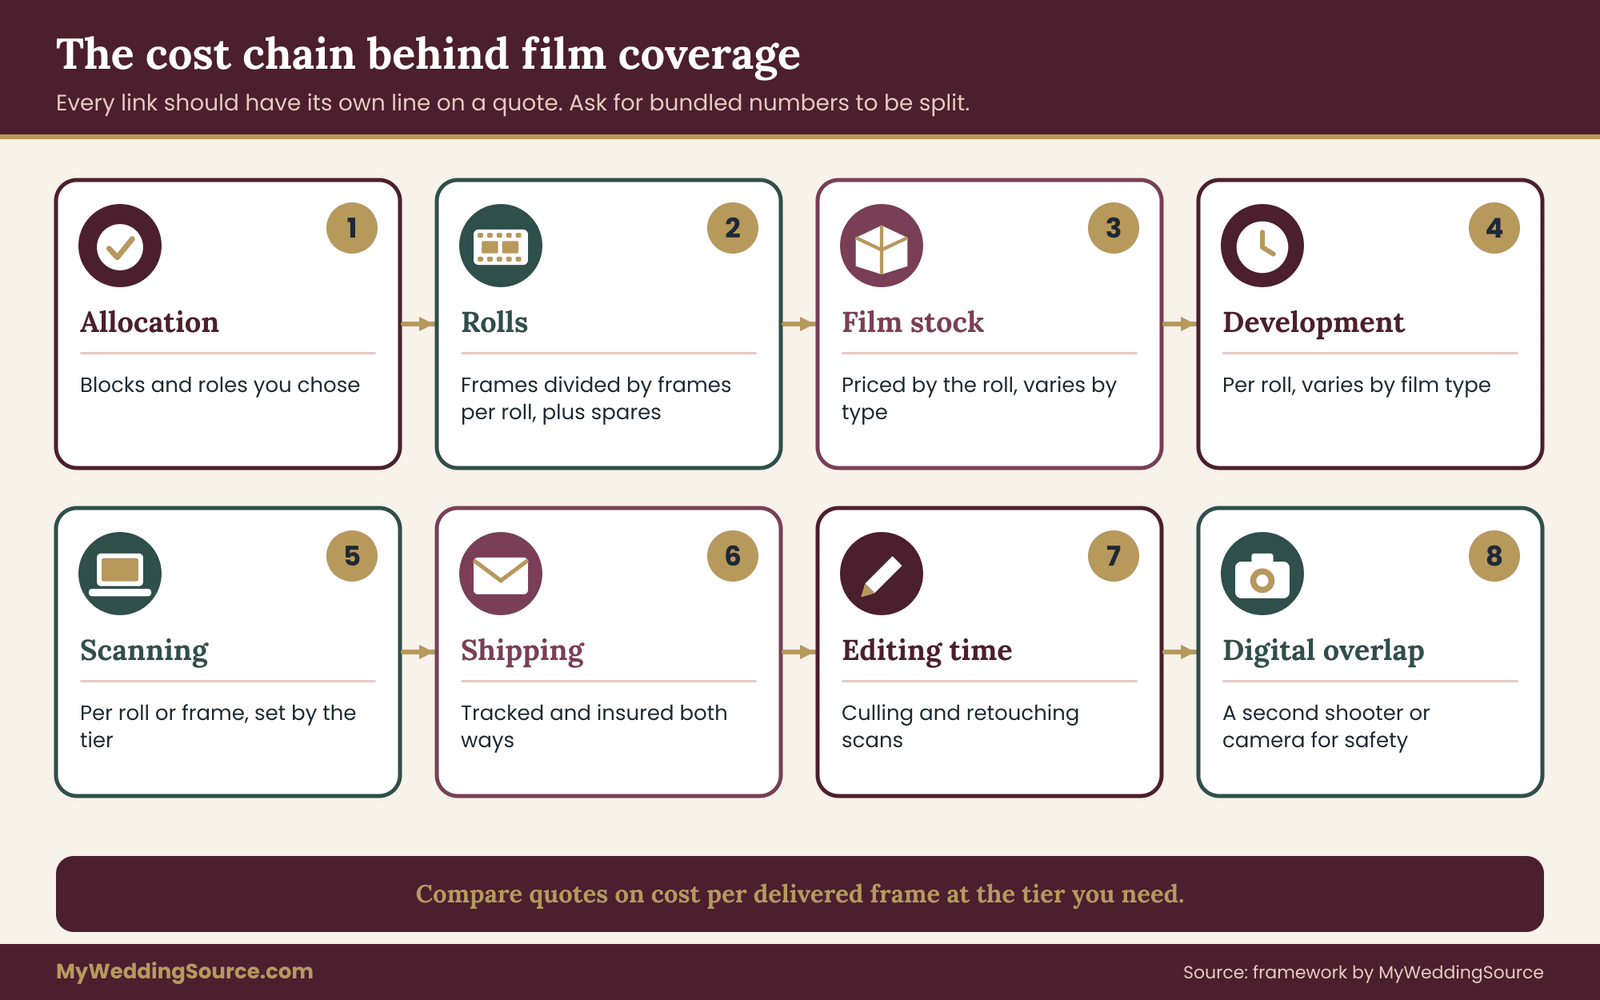
Film coverage costs more per frame than digital, and it costs in more places. The easiest way to read a quote is to follow the chain that produces it. Each link has its own line, or should. If one number on a quote bundles several links, you can ask for it to be split.
The cost chain
The chain begins with the photographer’s time. A film shooter works more slowly, carries more equipment and sometimes brings a second person to handle loading and metering. The next link is film stock, which is bought by the roll and varies by type. After that comes development, which is charged per roll and usually differs by film type.
Then scanning, which is charged per roll or per frame, depending on the tier. Add shipping and insurance, since film travels to a lab and back, and any editing or retouching the photographer does on top of the lab scans. Finally, any digital overlap shooter you add for safety sits beside the chain as its own cost.
The chain explains why a quote can look low and still disappoint. A low quote may price the stock at cost and scanning at the lowest tier, leaving every upgrade as an extra. A higher quote may include rescans and retouching. You cannot compare totals until you compare what is inside them.
How the allocation drives the chain
Everything in the chain of film coverage scales with rolls, except the photographer’s time, which scales with how complicated the plan is. Your frame ledger from earlier gives a roll count. The roll count multiplies stock, development and scanning.
A plan with fewer, better-chosen frames costs less than a plan with the same hours of film coverage and no limit on rolls. This is why the allocation method matters for budget, not only for taste: dropping one overlay block can remove a whole roll without touching the pictures you care about.
Scanning tier multiplies the scanning link. If every roll is scanned at print tier, that link grows with every roll. If only the hero frames are scanned at print tier in a second pass, it grows only with the short list. That is the budget case for two-pass scanning.
Comparing two quotes on one measure
To compare quotes fairly, use a cost per delivered frame at the tier you need. Add every cost of the film coverage in the quote: the film coverage fee, stock, development, scanning at your tier, shipping and any upgrade you need. Divide by the number of frames you expect to receive.
Delivered frames equal frames shot multiplied by the keep rate, which is the share of exposed frames that end up in the gallery. Ask each photographer for their typical keep rate. It is a number they can estimate from their own work, and the answer tells you whether they cull hard or deliver almost everything.
This measure is not perfect, because a few exceptional frames can be worth more than a hundred ordinary ones. But it stops you from comparing a thirty-frame package scanned at print tier with a three-hundred-frame package scanned at proof tier as if they were the same product.
Pricing models you will meet
Quotes tend to follow one of a few shapes. A flat add-on charges one fee for a defined film coverage package with a set number of rolls. A per-roll model charges for each roll shot, plus development and scanning. An hourly model adds a surcharge to the photographer’s rate for time spent shooting film.
A hybrid includes a set number of rolls and charges extra beyond them. Each shape rewards a different behavior. A flat add-on gives you cost certainty but little flexibility. A per-roll model lets you scale up and down but can drift upward on the day if no one watches the count.
Where costs hide
The cost traps are usually small lines. Express development to meet a deadline. Shipping with tracking and insurance. Scanning at a higher tier for frames you assumed were included. Rescans after you choose hero frames. Retouching beyond a stated number. Negative storage or return fees. Gallery hosting after a first year. Ask about each in advance, and ask for the answer to be in writing.
Fitting the plan to the budget
If the total is too high, cut in this order. First, lower the value score on the blocks you can live without and let their roles drop. Second, reduce the number of formats, since each format adds film stock, loading and scanning settings.
Third, lower the baseline tier for overlay blocks. Last, reduce frames in lead blocks, since that is where film coverage delivers the most. The wedding budget guide on this site shows how to set a photography line and to see what each trade does to the other categories.
The principle is simple. When trimming film coverage, cut from the bottom of the Film Weight list, not from the top, and keep the digital overlap on every block with a repeat safety score of zero.
Trade-offs between film coverage and digital coverage
Every frame given to film is a frame not given to digital, or at least a moment of the photographer’s attention spent differently. That is the central trade-off, and the rest are variations on it. Understanding them keeps you from treating film as a free upgrade. It is a choice with a price that is partly financial and partly about how the day is photographed, and film coverage deserves the same scrutiny as any other line of the plan.
Attention: one photographer, two kinds of camera
A single photographer who carries film and digital cameras divides their attention. Changing cameras takes seconds that a moment may not have. Reloading takes longer. The photographer has to decide, for each moment, which camera gets the shot, and the decision costs something.
This is why a single shooter doing heavy film coverage often delivers fewer total images than the same photographer shooting only digital. Ask how many digital frames and how many film frames you can expect, not only the total, because film coverage changes the mix.
With two photographers the split is easier. One can specialize in film, with the roles you assigned, and the other covers digital overlap. That costs more, but it is the cleanest way to give a lead role to film in blocks where repeat safety is low.
If a second shooter is not in the budget, the ceremony is where the override matters most: confirm that the primary shooter will use digital for the vows, rings and kiss, with film frames added only when the moment allows.
Frames: fewer, chosen more carefully
A film frame is finite. A digital photographer can shoot a burst of a laughing moment and pick the best frame later. A film photographer will usually take one or two. The consequence is that film coverage produces fewer pictures of any single moment, and it depends more on the photographer’s timing.
For some couples this is the appeal. For others, who like to see many variations of the same scene, it is a drawback. Think about which kind of viewer you are before you decide how much film coverage the day gets.
Light and flash
Film needs light, and a dim venue changes the picture. There are three honest options in a dark room: use faster film, which brings more grain; use flash, which changes the look and affects guests; or leave film coverage out of that block. Faster film pushed in development can work, but exposure latitude shrinks and results vary by stock.
Flash on film has a long tradition at weddings, but it has to be a deliberate choice. If a dim reception is part of your plan, ask to see film samples from a similar room, and read the guide on this site about wedding photography consent for how to tell guests what to expect when cameras are in use.
Speed of delivery
Digital galleries can arrive in days or weeks. Film adds shipping, lab time, scanning and a second round of editing. Even a well-run process may take longer, and a lab with a backlog in peak wedding season may take longer still.
If you need pictures by a deadline, such as a holiday card or a family event, give the photographer the date and ask whether film can meet it. A plain statement of the deadline, put in the agreement, is more reliable than a promise to hurry. The wedding vendor timeline on this site can help you see where delivery sits against other dates.
Risk and recovery
Digital risk is mostly about storage and card failure, both of which can be reduced by shooting to two cards and backing up on the day. Film risk is different. A camera can misfire, film can be loaded wrongly, a roll can be exposed to light, and a lab can damage a batch.
None of these is common with an experienced photographer and a reputable lab, but any one could affect a roll you cared about. The practical protection is shorter rolls for the irreplaceable moments, a second film camera, and a digital shadow, all of which the allocation method already encourages.
Ask what the photographer does with exposed film between the venue and the lab. Where is it stored overnight, how is it shipped, and who tracks it? A roll in a hot car or a postal mishap is a risk that can be reduced with simple handling. The answer should be calm and specific, since careful handling is part of film coverage, not an extra.
Travel and X-ray screening
If the photographer, or you, will fly with undeveloped film, airport screening is a known concern. The Transportation Security Administration publishes guidance on carrying film through checkpoints, including how to ask for a hand inspection and why checked baggage screening can damage film. Because the guidance can change, check the TSA page before any trip, and let the photographer know that you are a destination couple if relevant. For local weddings this is rarely an issue, but for destination weddings it belongs on the list.
Heat, weather and handling
Film is sensitive to heat and humidity. A bag left in a hot car, a summer ceremony in direct sun or a humid coastal venue can all affect it. Experienced film photographers keep film cool, keep it in shade between uses and plan around weather. Ask what the plan is for a very hot day, and for rain, since a film camera that has no weather protection may be put away at the first drops.
Mixing film and digital in one album
When film and digital frames sit together in one gallery or album, the look can feel inconsistent. Film frames have grain and a particular color response, and digital frames have a different texture. Some photographers edit digital frames to sit near the film look, and others keep the two distinct by labeling film pages.
Ask to see a sample of a mixed gallery. The color treatment line of the scan specification (line six) is the part that makes matching possible, since a flat scan can be graded to match, and a lab-corrected scan has its color already set.
Edge cases worth deciding in advance
A few unusual situations deserve a sentence each. A small ceremony with only an hour of coverage may not justify a second format, so one camera and a few rolls may be the right scale. A courthouse wedding often has restrictions on equipment and time, so check the rules before assigning film.
An evening ceremony with a long gap before dark may push the film blocks earlier. Black-and-white film has its own development and scanning requirements, so decide whether you want it for particular blocks and ask the lab about cleanup, since dust-removal tools often behave differently on it.
If the weather forces a move indoors, treat that as a rescore. Light fit drops, so the role drops with it. Agree in advance who makes the call and how quickly.
Vendor questions and contract language for film coverage and scans
The best protection against a disappointing delivery is a list of specific questions asked before the deposit. They are short. They are not adversarial. A photographer who works with film regularly will find them familiar. Group them by what they protect, so that every part of the film coverage has an answer.
Questions about coverage
Ask which blocks will be film lead, which shared and which overlay, and whether the allocation is written into the agreement. Ask how many rolls are included, which format, and how many frames per roll that means. Ask what happens if more rolls are needed on the day and who decides.
Ask what the plan is for reload beats in the ceremony and portraits. Ask whether a digital shooter will overlap the vows, rings and kiss, and whether that overlap is in the agreement. Ask how the photographer will protect priority blocks if the schedule runs late.
Questions about scans
Ask for answers on the ten lines: long-edge pixel count, file type, bit depth, color profile, scanner method, color treatment, cleanup, borders and cropping, naming and delivery. Ask what tier is included, what the next tier costs and how two-pass scanning works for your hero frames. Ask how many hero frame rescans are included. Ask for the keep rate, the number of delivered frames per roll in recent work, and which lab will be used.
Questions about handling and timing
Ask where exposed film is kept on the day and overnight, how it is shipped, how it is tracked and what insurance applies. Ask the lab’s typical turnaround in your wedding month and the photographer’s delivery date for scans. Ask what happens if a roll is lost or damaged and what remedy is offered. A written remedy, such as a refund of the film fee for the affected roll or a re-shoot of a portrait session where possible, is far better than a general reassurance.
Questions about rights and files
Copyright in photographs generally belongs to the photographer unless a signed agreement says otherwise, and what you receive is typically a license to use the images. The United States Copyright Office explains the basics of ownership and registration. Ask what use you may make of the scans: prints, albums, personal sharing and any commercial use. Ask whether you may order prints from a lab of your choice. Ask whether negatives are returned, stored or retained, and for how long.
How to write it down
A short addendum is enough. List the allocation by block with its role. List the roll count and format. List the scan specification by tier, with the hero frame rule. List delivery dates, remedy for loss and the digital overlap requirement. Ask the photographer to confirm by reply. The guide on this site about vendor purchase orders shows how to turn an agreement into a confirmed scope and acceptance step, and the same logic works for a photography addendum.
A short script for the conversation
“We would like film coverage for portraits and the ceremony, with digital overlap for the vows and rings. Could you tell us the roll count, the format, and what the scan specification includes? We would also like to understand how hero frame rescans work.”
A photographer who answers that clearly has likely done it before. A photographer who answers with a package name and a price may be offering a fine service but has not yet told you what the service contains. That is worth another message, not a lost deposit.
Red flags and green flags
Green flags are specific: a named lab, a stated tier, a roll count, a delivery date and a remedy for loss. Red flags are vague: “film included,” “high resolution scans,” “we will see on the day.” A third kind of flag is refusing to put anything in writing. If specifications cannot be confirmed in a message, treat the film coverage as unspecified and decide whether you are comfortable paying for it on that basis.
Checking film coverage when the scans arrive
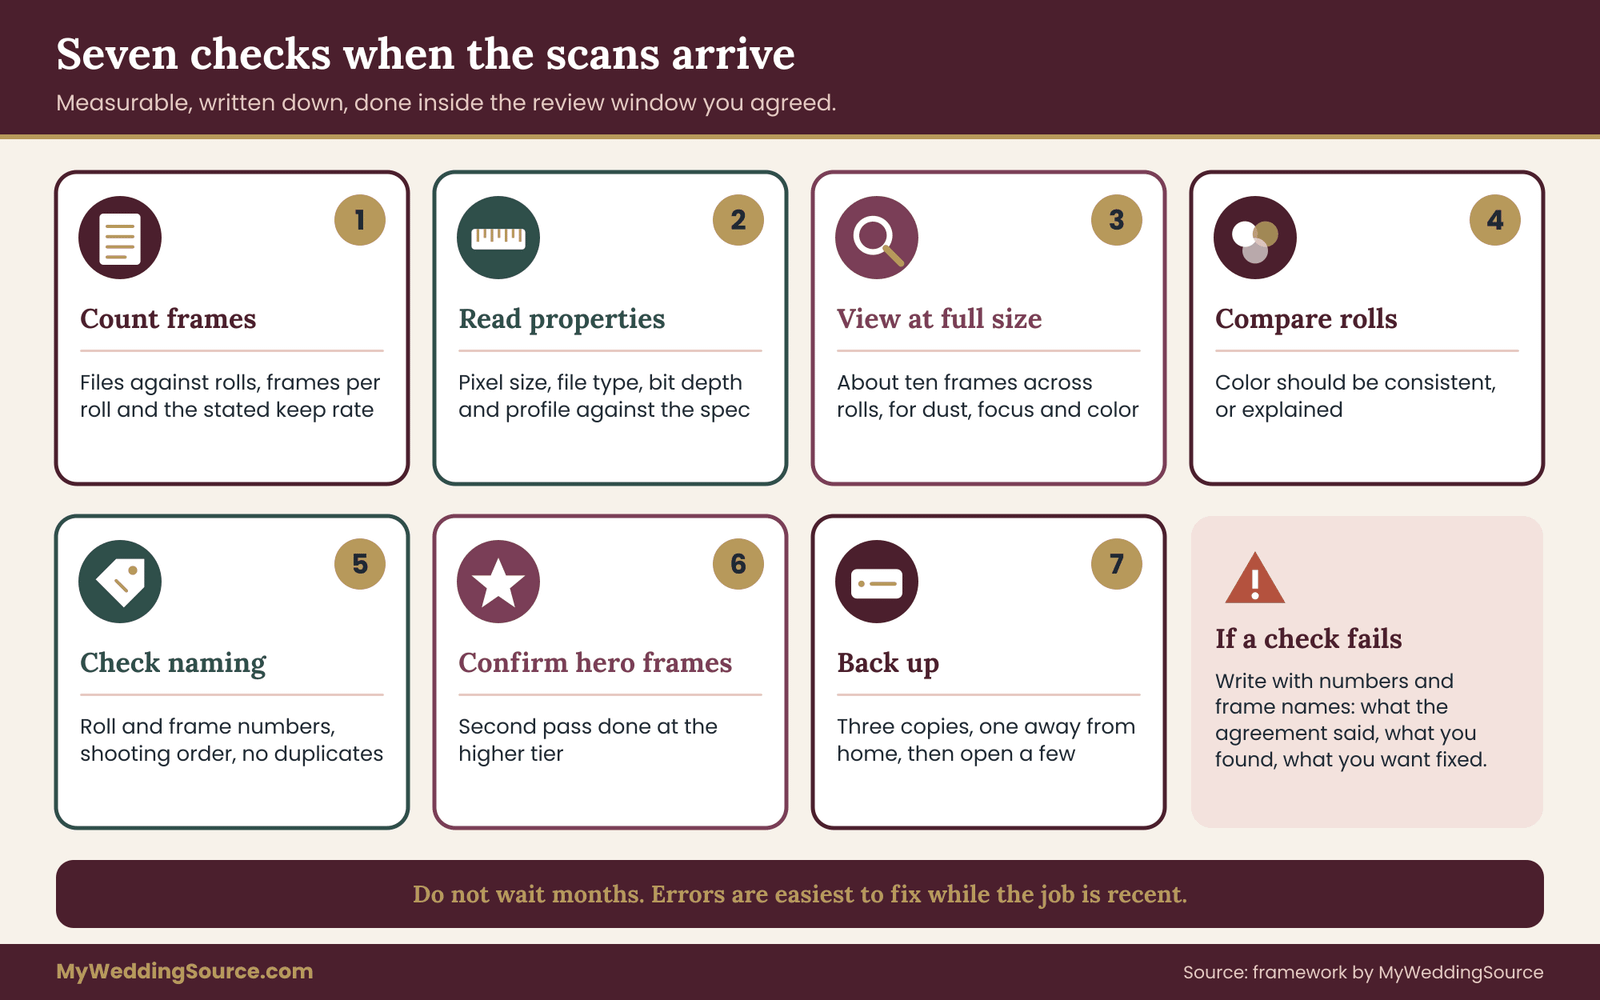
Delivery is where plans meet files. A set of film scans can look lovely in a gallery and still fall short of what the agreement says, and the time to find out is soon after delivery, not a year later. A short, measurable check takes under an hour and settles most questions about your film coverage. Do it with the written specification beside you, and keep notes of what you find.
Check one: count the frames
Compare the number of delivered files with the number of rolls and frames per roll in the film coverage agreement. A 36-exposure roll rarely delivers 36 frames, because some frames are test frames, blanks or misses, so use the photographer’s stated keep rate as a reference.
What you are looking for is a gap that the keep rate does not explain: a whole roll missing, or a roll that has far fewer frames than the others. Use the roll and frame numbers in the file names to see where any gap falls.
Check two: read the file properties
Open the file information on your computer for a sample of files. Look at pixel dimensions, file type, bit depth and color profile. Compare them with the specification line by line. If the agreement said a long edge of at least 4,000 pixels and the files measure 2,800, you have a clear, measurable gap. Put the numbers in a message instead of saying the files “seem small.”
Check three: look at the sample at full size
Choose about ten frames across different rolls and blocks, and view them at one hundred percent. Look for dust marks, scratches, soft focus, strong color casts and clipped highlights or shadows. A few specks are normal on film. A pattern, such as the same smear on every frame of one roll, points to a lab or handling problem. Note frame numbers so that the photographer can find them.
Check four: compare color across rolls
Look at several frames of the same scene or similar light from different rolls. They should be broadly consistent. If one roll is clearly warmer or cooler than the others, ask whether it was scanned on a different day or with different settings. If your specification asked for matched color, ask for a correction. If you chose flat scans, expect differences and plan the grading.
Check five: confirm naming and order
Files should be in the order they were shot, with roll and frame numbers in the names. Scrambled files, duplicates and names that carry no roll information make later questions hard to answer. If the naming is unclear, ask for a key.
Check six: confirm the hero frames
If your agreement includes two-pass scanning, check that the second pass was completed. The hero frames should be delivered at the higher tier and should measure up to the specification. If you have not yet chosen them, set a date for choosing and write it down.
Check seven: back everything up the same week
When the checks are done, download the full set and copy it to at least two more places, one of them away from home. The records guide linked earlier describes the habit. Online galleries expire. A backup that you have not opened is not a backup, so open a few files from each copy.
What to do if a check fails
Write to the photographer calmly, with numbers and frame names. State what the agreement said, what you found and what you would like done. Most problems are fixable: a missed rescan, a wrong setting, a batch to rescan. If the photographer disagrees, ask them to show what the agreement says and what they delivered.
If you paid by credit card and the problem is not resolved, the Consumer Financial Protection Bureau explains how billing disputes work, including that written notice generally has to arrive within a limited period after the statement date, so keep an eye on dates.
How long to wait before you review
Do not leave the files for months. Agree a review window with the photographer, for example a couple of weeks after delivery, and use it. Photographers and labs can usually fix a scan error while a job is recent. After a long gap, the same error may be harder to prove and harder to correct.
A worked example: one couple’s film coverage plan
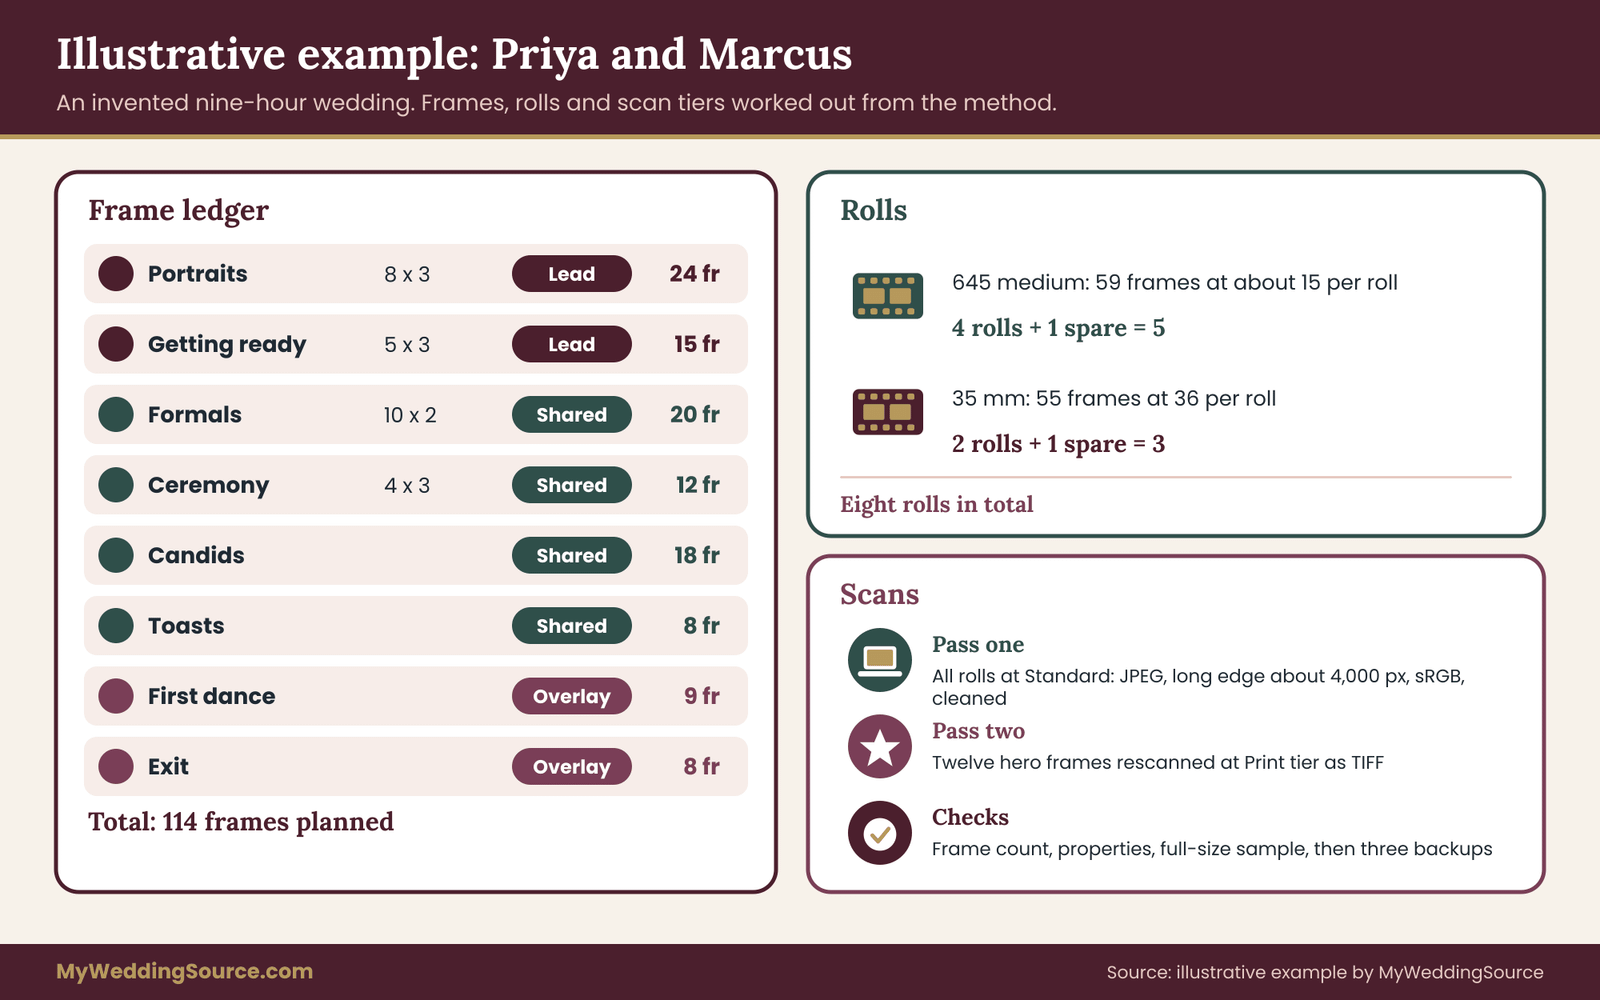
Here is an invented example to show the method end to end. Priya and Marcus are planning a nine-hour wedding in a garden venue, with an outdoor ceremony, a tented reception and a modest budget. They want film coverage for the soft look of their portraits and the ceremony, but they do not want to give up complete digital coverage. Everything below is illustrative, not a recommendation for any particular photographer or price.
Step one: score the blocks
They list eight blocks and score light, repeat safety and value. Getting ready in a bright room scores two, two and two for six, a lead role. Couple portraits in open shade score two, two and two for six, lead. The ceremony scores two, zero and two for four, and the override makes it shared with a digital overlap. Family formals score two, two and one for five, which would be lead, but they choose shared to protect time.
Cocktail candids score one, zero and two for three, shared. Dinner and toasts score one, zero and one for two, which would be overlay, and they add a few frames as a shared role since the toasts matter to them. The first dance scores zero, zero and one for one, overlay. The exit scores one, zero and one for two, overlay.
Step two: build the frame ledger
For portraits they plan eight set-ups at three takes each, which is 24 frames. Getting ready is five set-ups at three takes, 15 frames. Formals are ten groupings at two takes, 20 frames. The ceremony is four key moments at three takes, 12 frames. Cocktail candids are 18 frames, toasts eight, the first dance nine and the exit eight. The total is 114 frames.
The photographer shoots portraits, getting ready and formals on 645 medium format at about 15 frames per roll. That is 59 frames, or four rolls, plus a spare, so five. The ceremony, candids, toasts, dance and exit are 35 mm at 36 frames per roll. That is 55 frames, or two rolls, plus a spare, so three. The film coverage plan needs eight rolls in total. They would not have reached that number by counting hours.
Step three: choose scan tiers
They ask for standard-tier scans of all rolls, in JPEG at a long edge of about 4,000 pixels, sRGB, lab-corrected color, dust cleaned. They also ask for two-pass scanning: after the proofs arrive they will choose twelve hero frames for print-tier rescans, delivered as TIFF files. Priya and Marcus want to print a few large pictures for their home, and the arithmetic says a 4,000-pixel long edge supports about 13 inches, so the print tier matters for those twelve.
Step four: write it down
They send a short email to the photographer listing the roles by block, eight rolls with formats, the scan specification and the hero frame rule. They ask about the lab, the delivery date, the remedy for a lost roll and the digital overlap on the ceremony.
The photographer replies with answers and one change: the dinner block will be digital only, since the tent will be lit with string lights. They accept it, and the ledger drops by the eight toast frames, which still leaves the 35 mm count at two rolls plus a spare. The change is a rescored block, not a broken plan.
Step five: the day and the checks
On the day, the schedule slips by twenty minutes. The photographer follows the instruction to protect portraits and the ceremony, and cuts candid frames. When the scans arrive, Priya counts the files by roll and finds one 645 roll with eleven frames, where the others have around thirteen.
She checks the properties of ten files, and all are in line with the specification. She finds a color cast on one roll, writes to the photographer with the frame names and receives a corrected set a week later. She backs up the full set to a drive and a cloud account, and they pick the hero frames before the review window closes.
The couple did not do anything unusual. They scored, counted, specified, wrote down and checked. That sequence is the whole method for film coverage, and it works for a weekend elopement as well as a large wedding.
Your next steps
Start small with your film coverage. Take twenty minutes to list the blocks of your day and score light fit, repeat safety and value for each. Mark the roles, and apply the override on any block where a failure could not be recovered. Count set-ups and takes to get a frame ledger, then divide by frames per roll for your photographer’s format and add spares.
Next, fill in the ten lines of the scan specification, choose a tier for each role and decide whether two-pass scanning fits your budget. Send the questions to your photographer and ask for a written reply. Put the allocation, the specification, the delivery date and the remedy for loss into the agreement, using the contract checklist to check the surrounding terms.
After the wedding, run the seven checks within your review window, back up the files in three places and choose your hero frames. If you are still deciding between vendors, use cost per delivered frame at your chosen tier to compare. Keep the whole plan in one message thread so that you can find it years later.
FAQ
How much film coverage should my wedding day have?
There is no standard share. Use the Film Weight method: give film to blocks with good light, low repeat risk and high personal value, and keep digital overlap on moments that cannot be repeated. Many couples end up with film leading portraits and getting ready, sharing the ceremony and formals, and leaving the dance floor to digital. Fewer, better-chosen frames usually serve you better than spreading rolls thin across the whole day.
Is film coverage priced by the hour or by the roll?
Both models exist. Some photographers sell a flat package with a set number of rolls, some charge per roll plus development and scanning, and some add an hourly surcharge. Ask which model applies, how many rolls are included and what happens when more are needed on the day. Comparing cost per delivered frame at your chosen scan tier is a fair way to line up different pricing shapes.
What should a film scan specification include?
At minimum: pixel dimensions on the long edge, file type, bit depth, color profile, scanner method, color treatment, dust and scratch cleanup, border and cropping choice, file naming and how long files stay online. Ask for these in writing and tie them to a tier. A phrase like “high resolution scans” does not say enough, because labs use it for very different results.
Do I need TIFF files or are JPEGs enough?
JPEG is enough for web galleries, albums and modest prints. TIFF is worth asking for on the frames you plan to enlarge or have retouched, because it is lossless and holds more detail for editing. A practical middle path is two-pass scanning: standard JPEG scans for everything, then TIFF rescans for a short hero list that you choose after seeing the proofs.
Can film coverage include the ceremony and vows?
Yes, but with digital running alongside. A vow or a kiss cannot be repeated, and film can fail in ways you cannot see until the lab results arrive. Ask the photographer to confirm in writing that a digital camera will cover the vows, rings and kiss regardless of the film frames taken. That way you get the film look without staking the record on it.
How long do film scans take to arrive?
Longer than digital galleries, because film must be shipped, developed, scanned and edited. The time depends on the lab, the season and the scan tier. Ask for a date, not a range, put it in the agreement and mention any deadlines you have, such as a holiday card. If the schedule matters, ask what a rush option costs and what it includes.
Should I ask for the negatives?
You can ask. Negatives are the originals and can be rescanned later, but they need cool, dry, dark storage in archival sleeves. Some photographers return them, some store them for a period and some charge a fee. Decide whether you will store them properly, then settle it in the agreement. If you want the option of future rescans, put it in writing.
What if the scans do not match the agreement?
Compare the files with the written specification and gather measurable facts: frame counts, pixel dimensions, file types, sample frame names. Write to the photographer with those facts and say what correction you want. Most problems are fixed by a rescan or a corrected batch. If a card payment is involved and the problem is not resolved, check the dispute time limits with your card issuer and the Consumer Financial Protection Bureau.
Sources
- U.S. Copyright Office: ownership, licensing and registration basics for photographs.
- Federal Trade Commission: consumer protection and advertising guidance relevant to vendor claims.
- Consumer Financial Protection Bureau: credit card billing dispute rules and time limits.
- Transportation Security Administration: traveler guidance on carrying photographic film through screening.
- Library of Congress Preservation: care and storage of photographic negatives and personal digital archives.
- National Archives Preservation: guidance on caring for photographs and digital files.
- Federal Agencies Digital Guidelines Initiative: technical guidance on digitizing photographic materials, including resolution and file formats.
- Cybersecurity and Infrastructure Security Agency: guidance on backing up important data.
- Kodak: official manufacturer information on professional photographic film.
- ILFORD Photo: official manufacturer information on black-and-white film and processing.