
Night portraits are the planned photographs of the couple, and sometimes the wedding party, made after dark, and a very dark venue is the hardest place to make them. This guide gives you a practical way to plan night portraits when the room, the barn, the garden or the tent has almost no light of its own: a one-page scout sheet that covers light, power, space, permission and time, plus the questions to put to your photographer and venue.
Plan night portraits as a small, scouted production, not a hopeful moment after dinner. Visit the venue at the hour you will shoot, check five things (light, power, space, permission and time), and score each one as a blocker, a workable fix or ready. Get written permission from the venue and from any vendor whose equipment or fire rules touch the night portraits plan. Keep the night portraits session short, pick one or two spots, and decide in advance what happens if the night portraits spot turns out to be darker than expected.
Some of the most striking wedding pictures are made in the dark. A couple lit by a single soft source against a black sky looks very different from a couple squinting into a flash in a bright room. Photographers who work with night portraits on purpose usually plan them, and the planning is mostly logistics: where the light comes from, where the power comes from, and who has agreed to what.
The trouble starts when a venue is dark in a way that nobody noticed during a daytime tour. A barn with few windows, a garden with no path lighting, a tent with a dark liner, a historic hall that dims its lamps on purpose: all of these look charming at two in the afternoon and become a problem at nine at night. By then the photographer is working with what the room gives them, and the couple is waiting.
This article is written for the couple who will be paying for and living with the result. It does not tell your photographer how to do their job. It tells you what to measure and ask, so the photographer can say yes with confidence, and so the venue, the planner and the other vendors are not surprised on the day.
A note on scope. This is general planning information, not legal, tax or financial advice. Venue rules, fire codes, permits, insurance requirements and contract terms vary by place and change over time, so confirm the current version with the venue, the local authority or your photographer before you rely on any of it.
What night portraits are and what a dark venue changes
In this guide, night portraits means posed or lightly directed images of the two of you, made after the natural light has gone, in or near the wedding venue. They are separate from the candid coverage of the reception, and they are separate from the evening golden-hour block that an editorial portrait session might use.
If you want to plan the daylight side of the evening, a daytime portrait block works from sunset windows and slots, and this article picks up where the light runs out. Your family group photos belong to a separate list, which the wedding family photo list guide explains, so keep them out of the dark and in good light.
Night portraits differ from daytime portraits in one basic way. In the daytime the light is free, large and everywhere. At night every photon is brought in on purpose, from a flash, a continuous lamp, a candle, a string of bulbs or the venue’s own fixtures. Each of those sources has a cost, a power need, a size, a color and a set of rules attached to it. Planning night portraits is really the work of choosing sources and clearing them.
A dark venue makes that work harder in three ways. There is less existing light to build on, so more has to be added. There are fewer surfaces that bounce light back in a flattering way, because dark walls and dark ceilings absorb it. And there are often more restrictions, because the reason a venue is dark is frequently deliberate: an atmosphere the owner wants to protect, a fire-safety layout, a neighborhood that dislikes bright lights, or a historic building with limits on what can be attached to it.
Who this plan is for
This plan suits you if your reception is in a space that feels dim to the eye, if your photographer has said that low light is possible but needs planning, or if you are choosing between two venues and one of them is much darker. It also suits couples who love the look of night images and want to protect the time for them.
It is less useful if the reception is in a bright ballroom with white walls and good ceiling light. In that case you can ask your photographer a shorter version of the questions here and move on.
What this guide will not do
It will not give you exposure numbers, because the right settings belong to your photographer and their equipment. It will not promise a particular look, because results depend on the people, the place and the weather. And it will not replace the photographer’s own site visit. What it gives you is a shared checklist, so the conversation with your photographer starts from facts about the venue rather than from guesses.
The one-page scout sheet in brief
The method has five lines. Light asks what illumination exists and what must be added. Power asks where electricity or batteries come from. Space asks whether there is room for a photographer, an assistant, a light stand and a clear background. Permission asks who must agree in writing. Time asks when the night portraits session fits without costing your guests or your schedule.
Each line is scored zero, one or two. Zero means a blocker that must be solved before you sign or before the day. One means workable if a named person does a named fix. Two means ready. The total, out of ten, tells you whether to go ahead, go ahead with fixes, or change the night portraits plan. Later sections walk through each line and a worked example.
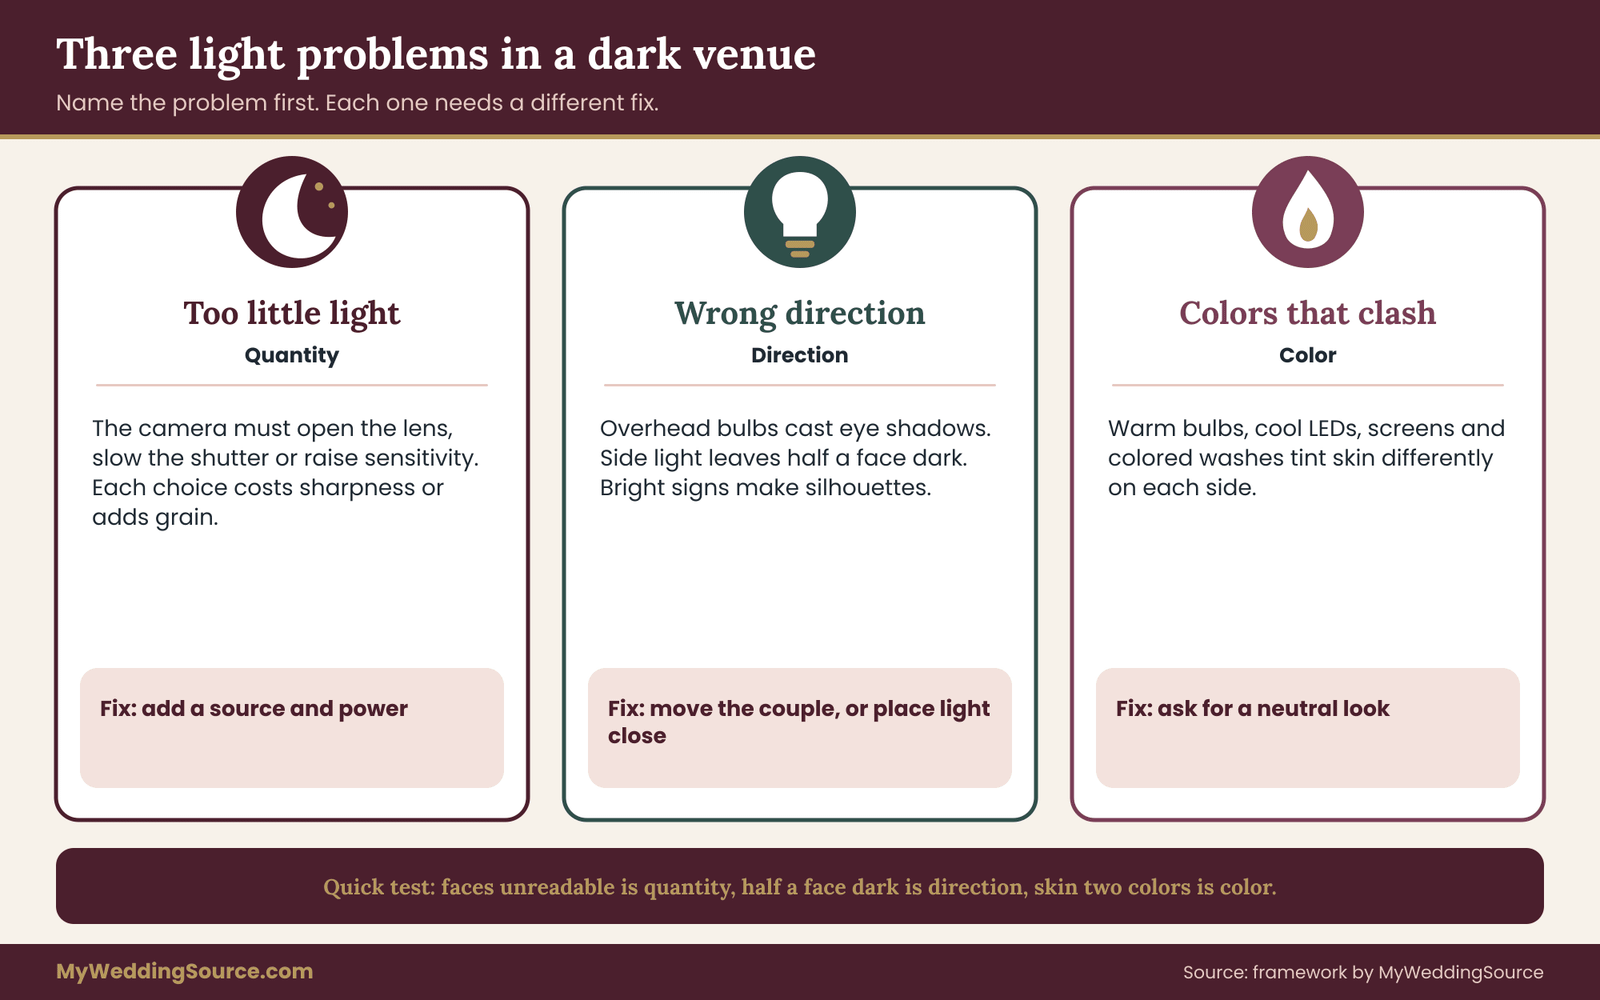
The illustration above sets out the three problems that darkness creates and the question each one raises. The rest of the guide turns those questions into things you can check on a site visit.
Why a dark venue is hard: three light problems
Before you scout, it helps to know what you are looking for. A dark venue causes three separate problems, and they call for different fixes. Mixing them up leads to the wrong purchase or the wrong request.
Problem one: there is not enough light
This is the obvious one. A camera records light, and when there is little of it the camera has three choices. It can open the lens wider, which lets in more light but makes the area in focus thinner, so a small movement can put a face out of focus.
It can slow the shutter, which lets in more light but blurs anything that moves, including a smiling couple. Or it can raise the sensitivity, which brightens the picture but adds visible grain. Every one of these has a limit, and a very dark venue pushes a camera against all three at once.
The practical meaning for you is that existing light alone, in a very dark room, usually gives you one of two outcomes: soft and slightly blurred pictures, or grainy ones. Neither is wrong as an artistic choice. Both are worth knowing about before the day. When your photographer says they can work with the light, ask them to show you low-light samples from similar venues, and ask which of the three trade-offs they prefer.
Problem two: the light comes from the wrong direction
A dark venue often has a few strong sources that sit in awkward places: a bare bulb overhead, a doorway spilling light from one side, a candle table at hip height. Overhead light casts shadows into eye sockets and under the chin. Light from far to one side leaves half of a face dark. Light from a single bright background, such as an exit sign, can turn a couple into silhouettes.
Direction is a problem you can often solve by moving the couple a few steps, which is why the scout visit matters. It is also a problem that added light can solve, if the added light is placed where it flatters. A small source close to the couple looks soft. The same source across a room looks hard. Size and distance matter more than raw power, a point your photographer will understand and that is worth hearing them explain.
Problem three: the colors do not match
Most venues at night have more than one kind of light. Warm bulbs, cooler LED fixtures, a screen glowing blue, and candle flames all differ in color. A camera can correct for one kind at a time. When two or three are mixed in the same frame, skin looks orange on one side and blue on the other, and the correction that fixes one problem worsens another.
Colored uplighting adds a further layer. Washes of pink, amber or blue on the walls change how the room reads, and they will tint anything that bounces off those walls. If your venue plan includes colored washes, ask whether they can be switched to a neutral setting for the length of the night portraits session. That is a request for the lighting vendor or venue staff, not something a photographer can fix alone, which is one reason the permission line on the night portraits scout sheet exists.
How the three problems combine
In real venues the problems stack. A dark barn with a few warm bulbs has too little light, from the wrong direction, in a single color. A tent with a black liner and colored uplights has too little light, bounce that goes nowhere, and a color cast. A garden after dark has no light at all, but also no mixed color, which is its own kind of simplicity.
Seeing which problem dominates tells you what to ask for. If the main problem is quantity, you are asking about added light and power. If it is direction, you are asking about position and space. If it is color, you are asking the venue and the lighting vendor to cooperate. The scout sheet is built so that each line answers one of those questions.
A quick test for which problem you have
Stand where the portraits would be made and look at the faces of the person next to you. If you can barely see their expression, the problem is quantity. If you can see them but half the face is dark or the eyes are in shadow, the problem is direction.
If their skin looks a different color on each side, the problem is color. Take a phone photo with no flash in the same spot. Phones adjust aggressively, so the picture will look better than the room, but it still shows the direction and color problems clearly. Keep that photo for the night portraits scout sheet.
The scout sheet for night portraits
The scout sheet is the heart of the plan. It is a single page you fill out, ideally together with your photographer, during a visit to the venue at the hour you intend to shoot. It has five lines, each scored zero, one or two, with a space for a note and a name for who owns any fix.
Here is how to use it. Visit the venue once, at dusk or later on a day with similar weather to your wedding date if you can. Bring the photographer if the budget allows. If it does not, ask the photographer for a short call afterward and read them your notes. Fill out the night portraits sheet on the night portraits spot, because memory will smooth out the problems within a day.
Line one: Light
Score the light by asking what is already there and what has to be added. Walk to the one or two spots where you might make night portraits. Note every source you can see: ceiling fixtures, wall sconces, string lights, candles, window light from outside, a lit sign. Write down whether each is warm or cool, high or low, steady or flickering, and whether the venue controls it with a dimmer.
Score zero if there is almost no light and no clear plan to add any. Score one if the existing light is weak but a specific source, such as a portable flash or a small continuous lamp, will cover it. Score two if the existing light is already workable in the night portraits spot, perhaps because of a lit doorway or a row of warm bulbs at a flattering height.
Line two: Power
Added light needs power. Continuous lamps and some flashes run on batteries, and others plug in. Walk the route from the spot to the nearest outlet and measure it, even roughly, by pacing it out. A long cable across a floor guests will walk on is a trip hazard, so note it.
Score zero if the only power is far away or shared with something that cannot be interrupted, such as the sound system. Score one if the power is available but needs an extension, a covered cable or an assistant to place it. Score two if the equipment is fully battery-based, or if a clean outlet is close to the night portraits spot. Ask your photographer which of their lights run on batteries and for how long, so the answer is theirs and not yours.
Line three: Space
Night portraits need room. The photographer needs to stand back enough to frame the couple, and an assistant or light stand needs a clear footprint that nobody will walk through. There also has to be something behind the couple that looks like a deliberate background, not a stack of chairs or a trash area.
Score zero if the night portraits spot is a narrow corridor, a crowded corner or a place guests must pass. Score one if the space works once furniture is moved or a rope line is placed. Score two if there is a clear area at least a few steps deep on all sides with a pleasant, simple background. Measure the clear area by pacing it, because your eye will overestimate it. The venue technical walkthrough guide shows how to record measurements and access routes in a form vendors can use.
Line four: Permission
Permission asks who has to say yes. The venue controls fixtures, dimmers, fire rules, noise and where equipment can go. The planner or coordinator controls the schedule. The sound and lighting vendor controls any colored washes and the stage lights. The caterer or bar controls access to service areas. If sparklers, candles, lanterns, haze or a drone are in the night portraits plan, a fire authority or an aviation rule may apply as well.
Score zero if you do not know who must approve, or if someone has said no. Score one if you know who to ask and the question is in progress. Score two if every approval is in writing. A later section gives a map of who to ask and a script for each.
Line five: Time
Time asks whether the session fits. Night portraits take minutes, but those minutes come out of a reception with its own flow. Look at the schedule and find the point where a short absence costs the least: not during the toast, not during the first dance, not while the cake is cut. Add buffers for walking, for the dress, and for the photographer to set up.
Score zero if the only slot collides with a fixed event. Score one if a slot exists but depends on a vendor running on time. Score two if the slot has a buffer on each side and the guests have something pleasant to do while you are away. The wedding vendor timeline guide is useful for building the hour-by-hour sheet that this line feeds into.
Totaling the night portraits sheet
Add the five scores. Any single zero is a blocker, and the rest of the total does not cancel it. A total of eight to ten means go ahead. A total of five to seven means go ahead with named fixes, each with an owner and a date. A total below five means you should seriously consider another plan: a different spot, a daylight slot for the main portraits, or a short additional session on another evening. The next sections show how to take the measurements behind each score.
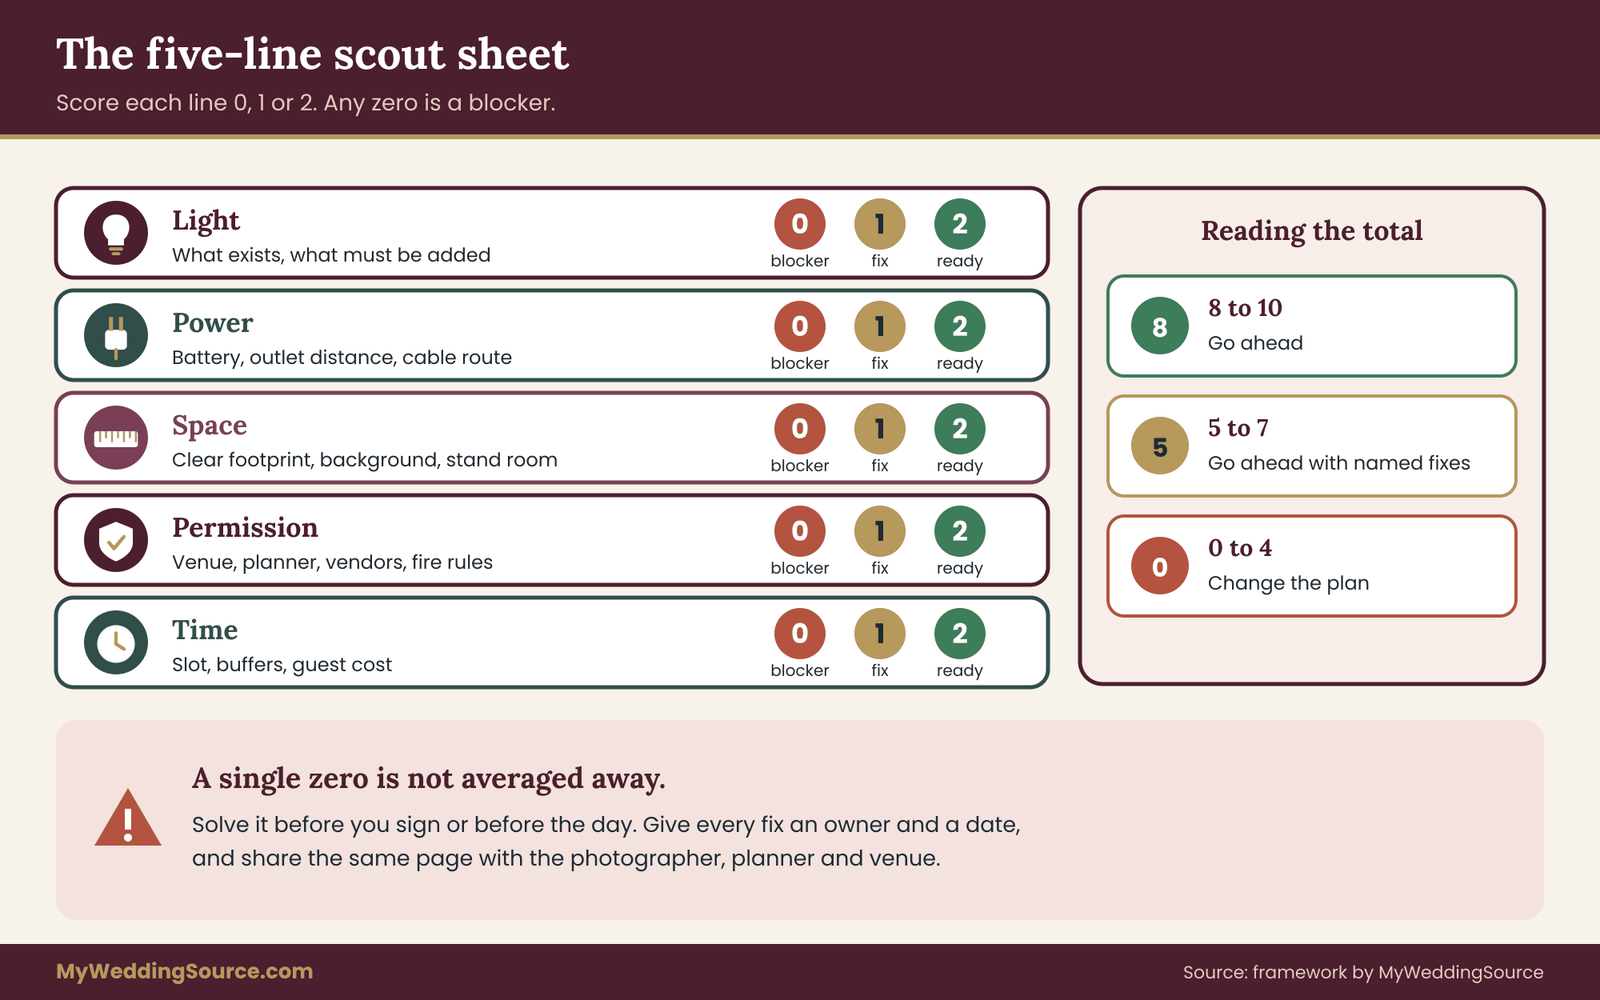
The sheet fits on a single page, and it works best when the same page goes to the photographer, the planner and the venue, so everyone is looking at one set of facts. ## Measuring the dark: checks you can take on a site visit
A scout sheet is only as good as the readings behind it. You do not need special equipment. A phone, a notebook, your own footsteps and a willingness to stay at the venue until it is properly dark will give you most of what matters. The point is to replace the phrase “it seemed dim” with facts that a photographer, a planner and a venue manager can all read the same way.
Arrive at the right hour
Daylight lies about a venue. A barn with open doors at four in the afternoon is bright. The same barn at nine, with the doors shut against bugs and the overhead bulbs dimmed for dinner, is a different place. Look up the sunset time for your date and city, then plan to be at the venue from about thirty minutes before sunset until it is fully dark. Watch the room change. Note when the windows stop helping and when the venue staff begin to dim fixtures.
If your date is months away, the season may differ from the day of the visit. Sunset in spring is not sunset in autumn, and foliage, open doors and moonlight all change the picture. Treat the visit as a test of the venue’s own lighting and layout, and plan to confirm the time-dependent parts again closer to the date.
Take three reference photos in each spot
In every spot you might use, take three phone photos without flash: a wide shot showing the background, a head-height shot of a person standing in the night portraits spot, and a shot looking straight up at the ceiling or sky. Add a short note on the time. These three images answer most of the questions your photographer will have, and they let you compare spots later without relying on memory.
Ask a friend or your partner to stand in the spot so you can see how a face reads. An empty frame shows you the background but not the main problem, which is what the light does to a person.
Read the surfaces
Bounced light is the cheapest light there is, and your photographer may use it. A flash pointed at a light-colored ceiling spreads into a large, soft source. The same flash pointed at a black ceiling gives almost nothing back. A ceiling painted a strong color, or covered in a colored wash, will return a tinted light.
Note the ceiling height, the ceiling color, the wall color and the floor. Write them as plain words: high, dark wood, bare beams; low, white, smooth; fabric, white, tented. These words tell a photographer whether bounce is realistic. They also tell you whether the room swallows light, which is common in barns with dark wood and in ballrooms with deep wall colors.
Count and classify the light sources
On the scout sheet, list every source in the night portraits spot and mark each as warm, cool or mixed, steady or moving, and controlled by whom. A row of warm string bulbs at head height can be a gift, because it gives soft, flattering, directional light. A flickering candle is lovely to look at but is hard to photograph without motion blur. A single bright exit sign is a fixed condition that may force a change of angle.
Mark which sources can be turned off or dimmed for the night portraits session and which cannot. A source you cannot switch is part of the scene. A source you can switch is a request, which feeds the permission line.
Measure the footprint
Pace out the clear area. Count steps from the night portraits spot where the couple would stand to the place where the photographer would stand, and count how deep and wide the clear space is on each side. As a rough guide, one adult step is a bit under a yard. Note whether guests, servers or the bar line cross the area, and whether a rope, a stanchion or a chair could close it for ten minutes.
Then measure from the night portraits spot to the nearest outlet and to the nearest door or loading route. A light stand, a case and an assistant all have to travel that route. If the route passes through a kitchen or across a dance floor, mark it.
Run a test with the photographer’s own settings
If your photographer can join, ask them to take a few test frames in the spot with the settings they would use, and to tell you what they see. Ask what would have to be added, such as a flash on a stand, a small continuous light or a reflector, and where it would go. Ask for the test frames afterward. They are the best objective record of the line one score.
If the photographer cannot join, ask them to look at your three reference photos and the notes, then tell you honestly whether they would add light, and what kind. A good photographer will not be offended by the request. A photographer who says they will simply “make it work” without discussing light, power or space deserves a follow-up question.
Check the environment around the night portraits spot
Some conditions are outside the room. Wind can make candles and sparklers unsafe and can move a light stand. Cold shortens battery life and affects how long guests will tolerate waiting outside. Insects gather around bright lights near open doors in warm months. Rain, even light, changes the outdoor plan completely. Write down the likely weather for your season, and decide in advance what happens if the outdoor spot is not usable.
Record the readings on the sheet
Write the findings in the note space on each line. Use specific language: “dark wood ceiling, about two stories, no bounce,” “warm string lights at head height on the north wall, controlled by the venue switch near the bar,” “nearest outlet is forty paces away, behind the buffet,” “clear area four steps deep, then chairs.” Notes like these become the shared language for everyone who reads the page later.
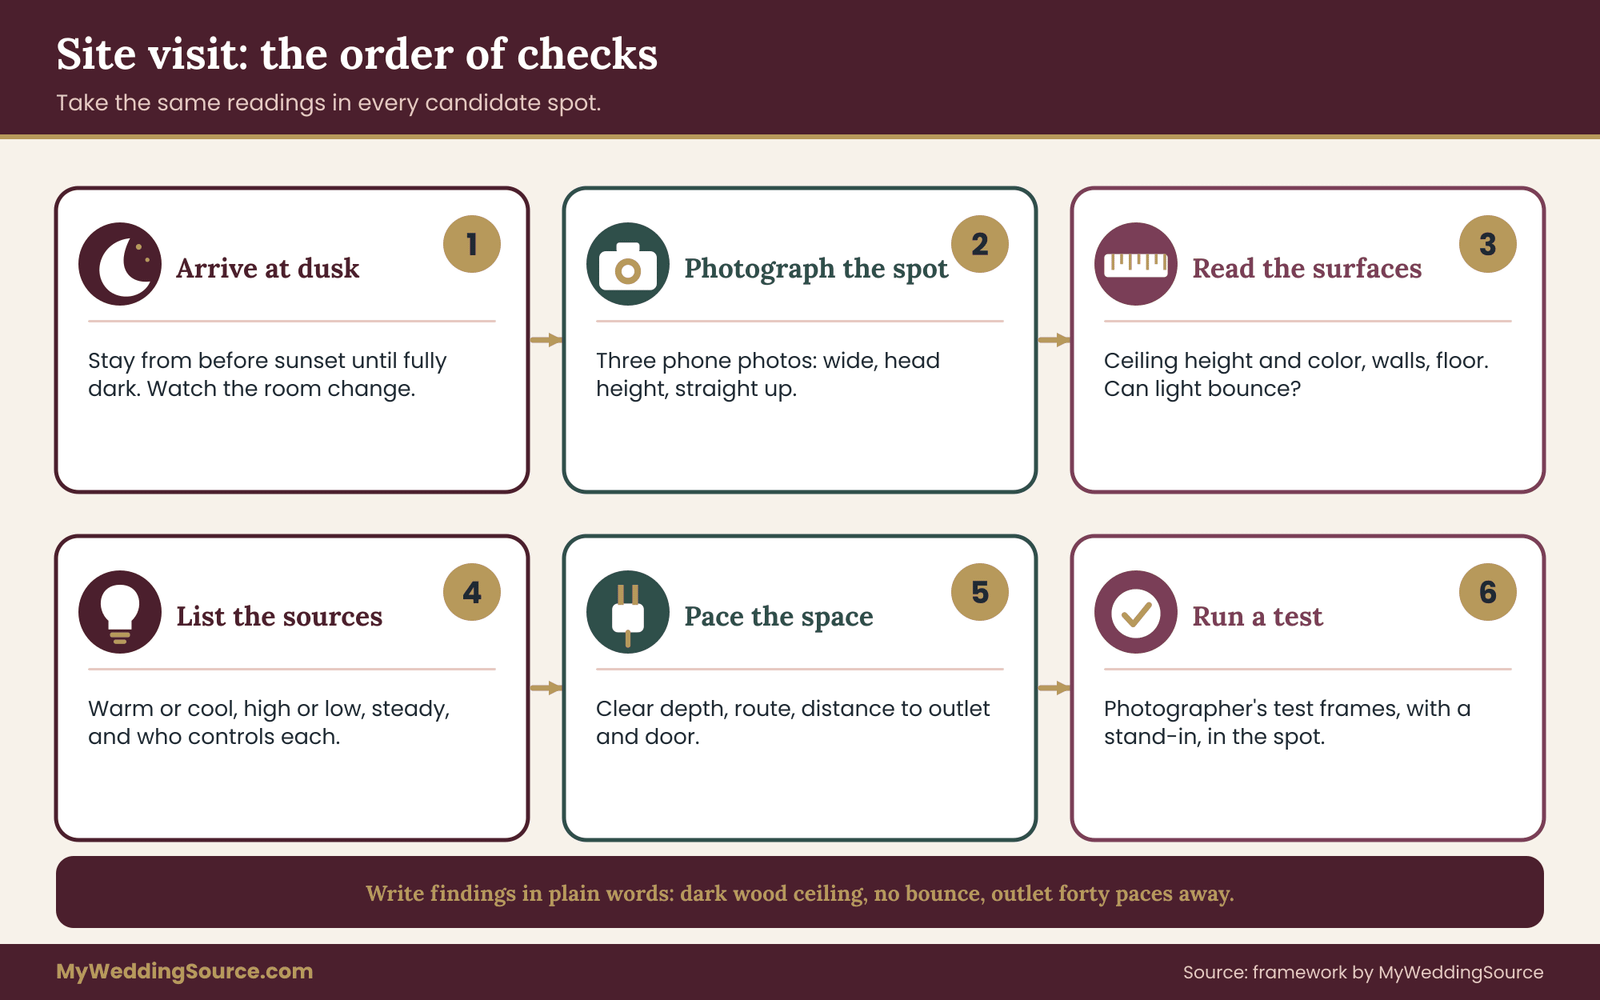
The illustrated steps above show the order to follow on the visit. Once you have the readings, you can talk about options sensibly, and that is the subject of the next section.
Lighting approaches for night portraits, compared
There are several ways to light night portraits, and no single one suits every venue. Each approach brings a different look, a different power need, a different set of permissions and a different guest experience. The comparison below is in plain language, because the right choice depends on your venue, your photographer’s equipment and your tolerance for fuss. Your photographer will have their own preferences, so use this as a way to ask informed questions.
Existing light with a wide lens and higher sensitivity
The simplest approach uses the light already in the room, with a lens that opens wide and a camera that handles high sensitivity well. It needs no extra equipment or power, no extra permission and almost no time. It also gives the most natural look, because the room’s own light is the light on your faces.
It works best in venues with a warm, even, low source at a flattering height, such as lanterns, string bulbs or candles in numbers. It struggles in truly dark spaces, where the result tends to be soft, grainy or both. Ask your photographer to show low-light samples from venues like yours, and ask how they handle focus when the light is thin.
On-camera flash, direct or bounced
A flash on the camera is quick and reliable, and a bounced flash off a light-colored ceiling or wall can look fairly natural. A direct flash gives sharp, flat light with hard shadows behind the subject, which some couples like for its candid, snapshot feel and others dislike.
Bounce depends on the surfaces you measured. In a white-ceilinged hall it can be an excellent answer. In a barn with dark beams or a tent with a black liner it often fails. The permission line is simple, because most venues allow flash during a reception, but a ceremony or a quiet moment may have its own rules. Ask your photographer to show how direct and bounced flash change skin tone and mood in samples, which helps you decide how much of it you want.
Off-camera flash on a stand or held by an assistant
A flash placed away from the camera, on a stand or in an assistant’s hand, can give directional, shaped light, and it can be modified with a softbox, an umbrella or a grid. This is the standard approach for deliberate night portraits in a dark venue, because it lets the photographer put a small, controlled source where it flatters and keep the background dark.
It needs space for the stand, a person to hold or move it, and a clear place for the assistant to stand. Most off-camera flash units run on batteries, so power is usually easy. The cost is in the team and the time. It also draws attention, because guests can see the equipment and the flash pops, so the comfort section later covers how to brief the room.
Continuous light: LED panels and wands
A continuous light stays on, which lets everyone see the result as it changes. It helps with focus in the dark, works for short video clips, and does not flash in anyone’s eyes. LED panels, tubes and wands are common, and many are battery-powered and adjustable in color temperature.
The trade-offs are power and softness. A battery panel gives less light than a strong flash, so the subject has to be close and the background must be dark enough to carry the look. A larger continuous source needs mains power and a bigger footprint. Continuous light is a good choice if you want a calm, quiet session and your venue is small enough for the lamp to dominate the scene.
Venue-supplied light: spots, pinspots and lit features
Some venues and lighting vendors can place a spotlight, a pinspot or a wash on a particular area. A pinspot on a couple against a dark room can give a pleasing, theatrical look, and it uses the venue’s own power and rigging. It needs coordination, because the person who operates the lights has to be in the right place at the right time, and a spot designed for centerpieces may not suit portraits.
If your lighting vendor is already booked, ask whether a short portrait cue can be added to the run of show. The cost may be small or nothing if the equipment is already on site, and the permission is easy because the vendor controls the fixtures. If the room is also using colored washes, ask for a neutral setting for the length of the night portraits session.
Practical light: lanterns, candles and string bulbs
A few bright, warm, small sources placed near the couple can serve as both decoration and light. Lanterns held at waist height, a row of candles in glass on a table, or a strand of bulbs draped on a fence all give a soft glow and a warm color. They photograph well in a dark setting because the light is close and low.
They bring their own rules. Open flame is often restricted indoors, and many venues require flameless candles. Battery lanterns are easier, though their color and brightness vary. If you plan to buy decor for this purpose, buy it early and test it in the night portraits spot, since a cool white LED candle and a warm bulb will not look alike in the same frame.
Sparklers, handheld lights and light trails
Sparklers, handheld LED wands and long-exposure light trails make lively pictures, and they are popular at send-offs. They also carry real safety and permission questions. Sparklers burn very hot and drop hot debris, and many venues ban them. Check the venue’s rules and any local fire authority guidance before planning them. Consumer safety agencies publish guidance on sparkler use, and the sources list at the end of this guide points to one.
If sparklers are not allowed, battery LED wands or flameless lanterns can give a similar look without the fire risk. Ask the venue and the photographer, not just a vendor’s marketing page, because the answer depends on the place.
Choosing between approaches
A short decision rule helps. If the night portraits spot scores two on light, use existing light and keep the kit small. If it scores one, plan one added source, most likely off-camera flash or a continuous light, and a place for the assistant. If it scores zero, either solve the problem with a venue-supplied source or move the night portraits session. The more sources you add, the more permission, power and space you need, so add only what you need.
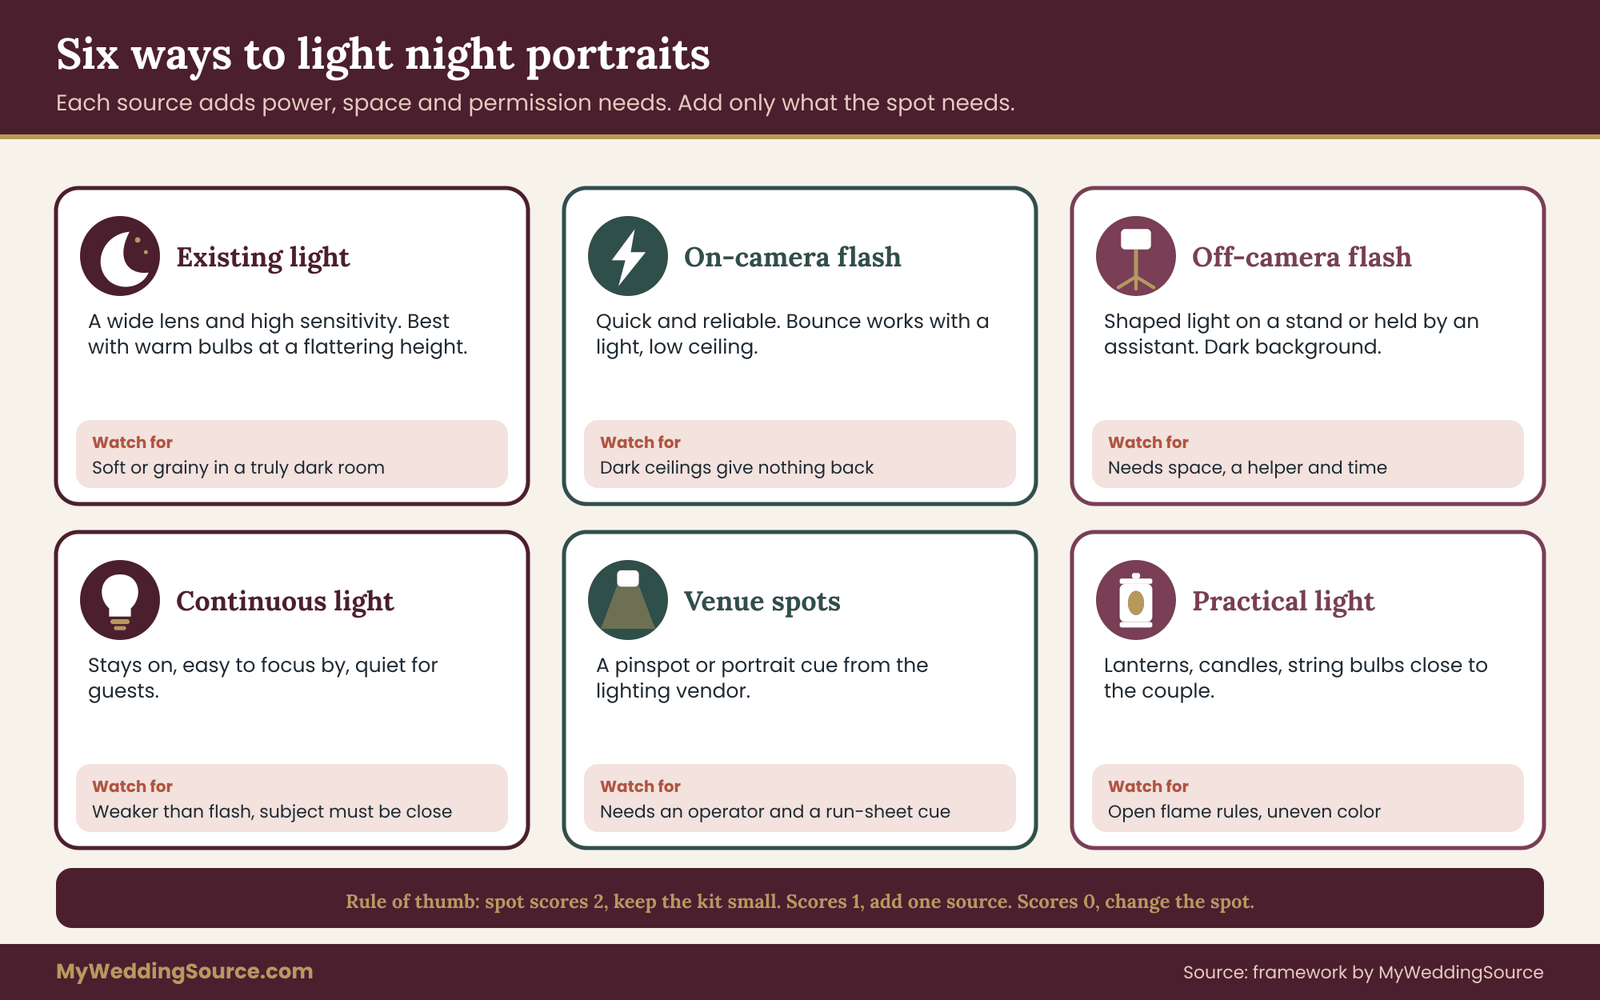
The cards above summarize each approach, what it needs and what to watch. Whatever you choose, write it on the night portraits scout sheet so the venue and the planner can see what will physically appear in the room. ## The permission map: who must say yes to night portraits
Permission is the line most couples leave blank. They assume that because the venue is booked and the photographer is hired, anything that happens inside the venue is allowed. That assumption fails more often than you would expect when night portraits involve stands, cables, bright flashes, flame, haze or a walk into an unlit area.
Permission also protects you. A written yes turns a vague hope into a plan, and it gives the photographer something to show the venue’s night staff if a question comes up on the day. The permission map below lists the people who commonly hold a veto, what each one controls and what to ask.
The venue or site manager
The venue controls the building, the grounds and the rules about where people and equipment can go. Ask whether light stands and cables are allowed in the spot you chose, whether any area is off limits after dark, whether there are noise or light curfews, and who has the key to doors, gates or switches. Ask about sparklers, candles and haze by name, because rules about them are often stricter than rules about cameras.
If the venue is a park, a historic site or a public property, there may be a separate permit for commercial photography or for staging equipment. The National Park Service, for example, publishes its own rules about photography and filming on park land, and other public lands have their own. Check the site’s own pages, or ask the venue directly. The sources list at the end includes a starting point.
The planner or day-of coordinator
The coordinator owns the run of show. They decide when you can step away, who tells the DJ, who holds the cake and who watches the doors. Ask them to place the session on the timeline with buffers, and to name who will be your point of contact while you are away. Share the night portraits scout sheet with them early, so they see the footprint, the equipment and the route.
If you do not have a coordinator, name a calm friend or family member for the role and brief them in writing. The same habit of collecting measurements and routes for vendors applies here.
The sound and lighting vendor
If a DJ, a band or a lighting company controls the room’s fixtures, they control your light. Ask whether they can set the room to a neutral, steady look for the night portraits session, switch off colored washes in the portrait area, add a pinspot, or leave a dimmer at a set level. Ask what it costs and who operates it, and request that the cue be added to their own run sheet.
Be specific. “Can you make the room darker?” is a different request from “Can you hold the stage wash off for ten minutes while we shoot at the south wall?” Specific requests are easier to say yes to, and easier to check afterward.
The caterer and the bar
The caterer controls service routes, back-of-house doors and sometimes the power in the kitchen area. If your plan uses a service corridor as a shortcut or a quiet backdrop, you need the caterer’s agreement. If the night portraits session takes you away at the moment dinner is served or a toast is planned, the caterer also needs to know the timing. A short note through the coordinator is usually enough.
The fire authority or the venue’s safety officer
Open flame, sparklers, lanterns, haze and anything that blocks an exit may be subject to fire safety rules. These rules are set locally and enforced by a fire marshal or the venue’s own safety plan. Standards bodies such as the National Fire Protection Association publish model codes that many jurisdictions adopt in some form, but you should treat the local rule, as relayed by the venue or the local fire office, as the one that applies.
Ask the venue directly whether any of your planned items need approval, and record the answer next to the access routes from your technical walkthrough notes. If they do, ask what the approval requires, how far ahead it must be requested and who submits it. Do not rely on a photographer’s or a vendor’s assurance alone for anything involving fire.
Drone operators
A drone at night adds another layer. In the United States, the Federal Aviation Administration sets rules for drone operation, including conditions for flying after dark, and the venue may add its own ban. If your photographer or videographer plans a drone shot, ask whether the operator is certified, whether the venue allows it, and whether the night portraits plan has been checked against current FAA guidance. The FAA’s own pages are the place to confirm current requirements.
Neighbors, guests and other events
If the venue shares a site with another event, or sits near homes, bright lights and noise at night may matter. Ask the venue whether neighbors have complained about past events, and whether there is a time after which flashes and music must stop. If the night portraits session happens near other guests, a short announcement to the room avoids surprises. The consent planning guide covers the broader question of guest comfort and image use, and it pairs well with this plan.
Your own photographer’s permissions
Do not forget the photographer. Some photographers have their own limits on what they will do, such as a maximum number of locations, a requirement for an assistant, or a rule against working in an unlit path for safety reasons. Ask them for these in writing, and ask whether any of them carry extra cost.
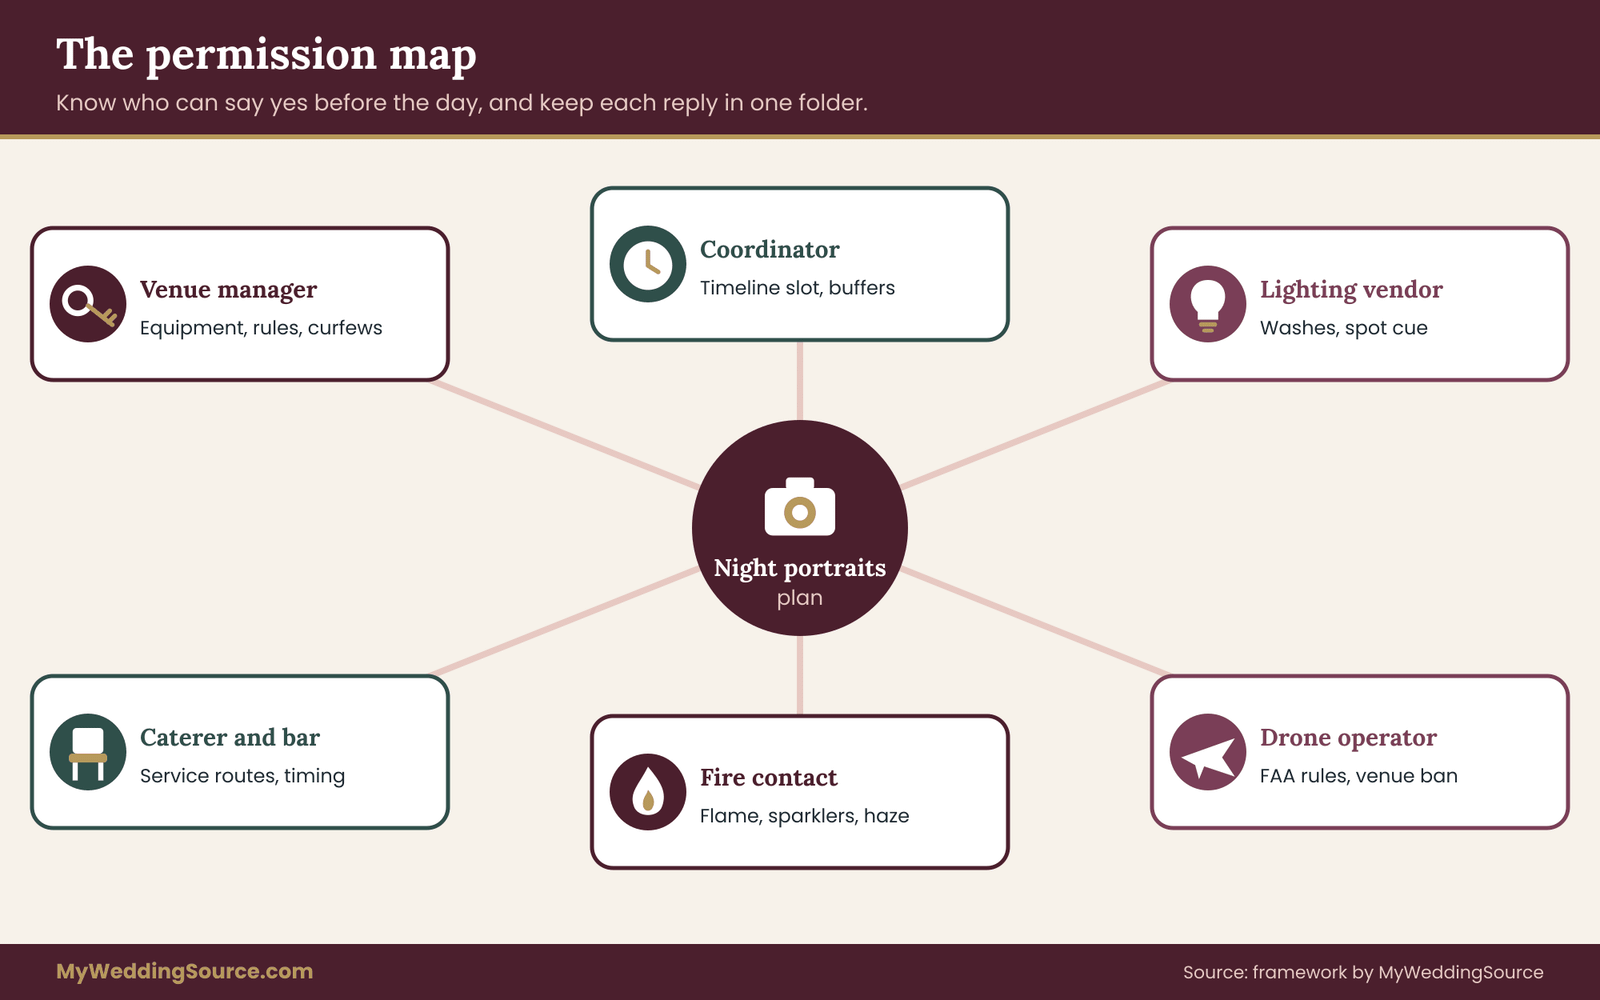
The map above shows how the approvals radiate from the plan. You do not need all of them for every wedding, but you should be able to say, for each, whether it applies and whether it is done.
Scripts for the five most common requests
Short scripts make the conversation easier. Adjust the wording to your own voice and keep the request specific.
To the venue: “We would like about fifteen minutes of portraits at the south wall after dinner, using a battery flash on a stand. Is the night portraits spot available, and are there any rules about equipment or light after dark that we should know?”
To the coordinator: “Could you place a fifteen minute portrait window after the main course, with five minutes before and after for walking and setup? We will send you the scout sheet with the night portraits spot and route.”
To the lighting vendor: “Could the colored washes be switched to a neutral warm setting near the south wall for ten minutes during the portrait window? Is there a cost, and can you add it to your run sheet?”
To the photographer: “Based on these photos and notes, would you add light in this spot? If so, what, where would it go, and do you need an assistant, power or a clear area?”
To the fire contact: “We would like to know whether flameless candles are allowed in this room, and whether sparklers are allowed on the grounds. If they are, what approval is needed and how far in advance?”
Getting the answers in writing
A reply by email counts. Save each one in a single folder, label it with the vendor’s name and the date, and add the key line to the night portraits scout sheet. If a vendor answers by phone, send a short email afterward that restates what you heard and ask them to confirm. Keep the folder with your other vendor records. The vendor contract guide explains what belongs in a contract and where a written side agreement fits.
Questions for your photographer, and what to put in the contract
The conversation with your photographer is where the night portraits scout sheet turns into a service. Photographers differ widely in how they handle dark venues. Some carry a full lighting kit and an assistant by default, some treat night work as an extra, and some prefer to work with only the available light. None of these is wrong, but you should know which one you are buying.
Questions about experience and approach
Ask which dark venues the photographer has shot recently, and ask to see a full set from one of them, not only a highlight. Look at whether the faces are clear, the color is consistent and the background reads as a choice. Ask how they plan for night portraits: whether they scout, what gear they would bring, whether they bring an assistant, and how they handle focus in the dark.
Ask what they need from you and the venue. Good answers are specific: a clear area, a quiet window, a person to hold a light, a few minutes of buffer. A vague answer is a signal to dig further.
Questions about time and schedule
Ask how long they need for setup, for shooting and for packing up. Ask how many minutes of the couple’s time the session takes. Ask what happens if the schedule slips: do they shorten the night portraits session, move it or drop it, and who decides. A photographer who can describe a short version and a long version of the night portraits session gives you an easy fallback.
Questions about gear and backups
You do not need to know the gear in detail, but you do need to know that there is a backup. Ask what happens if a flash fails or a battery dies, and whether there is a second camera body. Ask whether the lights are battery-powered, how long they last and whether spare batteries are carried. These are fair, specific questions and good photographers answer them without hesitation.
Questions about editing and delivery
Night images are often edited more heavily to balance color and reduce grain. Ask whether the delivered images keep the look you saw in the samples, how many night portraits you can expect, and when they will arrive. Ask whether the photographer will deliver any images from the night portraits session that were not selected, so you can see the alternatives. These points belong in the contract, not in conversation alone.
Contract terms that protect the night portraits plan
Ask that the contract or an addendum state the following in plain words: the planned night portrait session, its length and its location; the equipment and assistant included; the schedule window; what happens if weather or time prevents the session; any extra fee; and the photographer’s right or duty to reshoot. If they offer a short makeup session on another evening, put the terms in writing, including who pays and the time frame.
Also check how the contract treats the images. In the United States, photographers usually hold the copyright in the photographs they take, and a client receives a license to use them. The U.S. Copyright Office explains the basics on its website. Make sure the license allows personal prints and sharing, and ask whether you can use night images for things like a thank-you card or a wedding website.
Budget logic: where night portraits change the quote
Night portraits can change the price in several ways, and the sources of cost are worth knowing even if you do not know the exact numbers. A dedicated assistant adds labor. Extra lights and stands add equipment fees or a higher package. A longer day or a late finish can add overtime. A lighting vendor’s portrait cue may carry a small charge. A venue may charge for extended access or for after-hours staff.
You can lower the cost by shortening the night portraits session, by choosing a spot that scores two on light, by using equipment the photographer already owns, and by using a battery source that needs no cabling. You can also move part of the night portraits session to a daylight slot and keep only a short, simple set at night.
The right balance depends on how much you value the look. Write the figure beside the choice on the scout sheet so the trade-off is visible, and ask for any quote to be itemized so you can see what each element costs.
A caution about samples and promises
Photographers show their best work. A sample from a well-lit venue says little about your dark one. Ask for samples from the darkest venues they have shot, and treat them as evidence of style, not a promise of a result. Beware of anyone who promises a particular outcome in a venue they have not seen. A responsible photographer will want to scout, will say what could go wrong and will explain the fallback. ## Choosing a time and a place for night portraits
The best light plan fails if the night portraits session lands at the wrong moment or in the wrong corner. Time and place are the last two lines of the night portraits scout sheet to settle, because they depend on everything before them: how dark the night portraits spot is, how much equipment it needs and who has agreed. Once those are known, you can weigh slots and spots against a handful of simple costs.
Four slots after dark
Immediately after sunset, in the blue hour. For a short time after the sun sets, the sky keeps a deep blue glow that gives a dark venue some natural fill and a lovely background. It is the easiest of the night slots, because the sky does part of the job. The trade-off is that it falls during dinner or the toasts in many schedules, and it passes quickly. If your venue is outdoors or has large windows, this slot is worth protecting.
Between dinner and the first dance. This is the most common slot. Guests are fed, the room is warm and nothing important is scheduled for a few minutes. The sky is dark, so the session depends entirely on added light, and the room is often at its dimmest. It costs guests little, since they are eating dessert or visiting.
During the dance set. If the room is full of dancing and the music is loud, a short absence can go unnoticed, and you can bring some party energy into the pictures. The cost is noise, crowds and your own tiredness, and the risk is that the dance floor drags you back before you have finished.
Late, near the send-off. A final quiet session or a send-off with lights can produce a lovely close to the evening. It also faces the greatest risk of delay and fatigue, and guests may be leaving. Treat it as a bonus, not as the only slot.
How to pick the slot
Use a simple rule. Count the minutes you will be away in each slot, including setup, walking and the buffer on both sides. Then ask what each slot costs in guest attention and in your own comfort.
If the sky still gives some light, take the blue hour. If it does not, take the gap between dinner and the first dance, and set the second slot, late in the evening, as a backup. Do not schedule a night session in the same ten minutes as a toast, a speech or a cake cutting.
Keep group and family pictures out of this block, since a list built for formal family photographs belongs in good light earlier in the day. A short session is usually better than a long one. Fifteen to twenty minutes of attention, a few set-ups and a plan to finish are enough for most couples. Longer sessions stretch the schedule, tire guests and rarely improve the pictures, because the best images tend to come in the first few frames of each set-up.
Choosing the spot
Choose the night portraits spot using the five lines of the night portraits scout sheet, and add a few simple tests.
Start with the background. A dark background with one or two small lights can look rich and quiet. A background of stacked chairs, signage or a bright doorway looks cluttered or distracting. Look behind the couple in your reference photos and ask whether that is what you want in the picture.
Add a walk test. A spot a short walk away, on a clear, flat, lit path, will get used. A spot across a field in heels will not. Count the minutes it takes at the speed of the slowest person in the party, and add some for the dress or the suit.
Add a safety test. The route and the night portraits spot must be safe in the dark for everyone involved, including the person carrying equipment. Look for steps, uneven ground, cables, ponds, parked cars, livestock fences and anything else that is hard to see. If the route is not safe, either light it or choose another spot.
Add a privacy test. If you want a quiet session, avoid places where guests, servers or other parties pass. A rope or a coordinator can hold a spot, but not forever.
Indoor, outdoor and in-between spots
Indoor spots give shelter, power and a controllable environment, but they often have the most mixed light and the least space. Outdoor spots give space and open sky, but need light for the entire scene, add the weather risk and may involve a walk. In-between spots, such as a covered porch, an open barn door, a carport, a greenhouse or a lit tent entrance, can combine shelter with a little ambient light from the room behind. They are often the best compromise in a dark venue.
When you scout, rank two spots, not one. Name a first choice and a fallback, and note the changeover plan. If rain, wind or an unexpected event closes the first, the photographer should know where to go without a discussion.
A simple schedule block
For a fifteen-minute night session, a workable block looks like this: five minutes before for the photographer to place and test the light with a stand-in, five minutes of shooting with the couple, and five minutes after for the couple to rejoin and the photographer to pack down. If an assistant is helping, the photographer can set up while the couple finishes a course. The coordinator should know the three times and who is watching the room.
Ask your photographer to use a stand-in for setup. A friend, a bridesmaid or an assistant who stands in the night portraits spot lets the photographer set the light before you arrive, which cuts the time you spend waiting and keeps the couple fresh.
A worked example: night portraits in a dark barn
The following example is invented to show how the scout sheet is used. It is not a report of a real wedding, and the numbers and details are illustrative only. The couple, whom we will call Maya and Daniel, have booked a rustic barn for a late-spring wedding with about ninety guests.
The venue at dusk
At the daytime tour, the barn felt warm and bright, with big doors open to a field. At the dusk visit, a week before the date, Maya and Daniel notice that the doors will be closed against insects, the main light comes from a few warm bulbs on the beams high above, and the walls and ceiling are dark wood. The venue manager tells them that the string lights outside the doors are switched on at dark and that a single outdoor outlet serves the side porch.
They take reference photos in three spots: the center of the dance floor, a corner by the bar and the covered side porch with the string lights behind it. The first looks like a dark cave on the phone. The second is dim and crowded. The third shows a soft glow behind a person, with a little light on the face from the doorway.
Filling out the night portraits sheet
Light. The dance floor scores zero, because the overhead bulbs are high and dim, with dark wood returning nothing. The bar corner scores zero as well. The porch scores one, because the string lights give a warm glow at head height but the face needs a little added light to read clearly. The photographer, after seeing the photos, agrees and says an off-camera flash with a small softbox would solve it.
Power. The photographer’s flash and a spare run on batteries, so power scores two. The porch outlet is a backup for a small continuous light.
Space. The porch is about five steps deep and two steps wide, with a rail on one side. The photographer would stand in the grass in front, and an assistant would hold the flash to the side. Space scores one, because the grass is uneven and the path to the porch needs light. The venue manager agrees to add two ground lights along the path.
Permission. The venue allows a flash stand on the porch and will leave the string lights on. The DJ agrees to keep the dance floor colored lights from spilling onto the porch. The coordinator approves a fifteen-minute window after dinner. The caterer is told through the coordinator. Everything is in writing, so permission scores two.
Time. The dusk is at a convenient point, since the blue hour falls during the main course. The window after dinner has five minutes of buffer on each side. Time scores two.
The total and the decision
For the porch, which they chose, the scores are light one, power two, space one, permission two and time two. The total is eight, so the decision is to go ahead, with two named fixes. The fixes are the ground lights along the path, owned by the venue manager and due before the guests arrive, and the flash and softbox, owned by the photographer.
They also write a fallback. If rain closes the porch, the night portraits session moves to the barn’s wide entry vestibule, which scored one on light and one on space during the visit, and the photographer will use a bounce flash off a white banner the couple agrees to hang.
What the example shows
Three things stand out. First, the dance floor, the spot most couples imagine, scored zero, and the porch, a spot nobody had noticed, scored best. The sheet moved the night portraits plan to a better place. Second, the fixes were small and specific, each with an owner. Third, the fallback was written before it was needed.
The couple did not need a special permit, expensive equipment or a long session. They needed a visit at the right hour, a handful of photos, a few polite questions and a page that everyone could read.
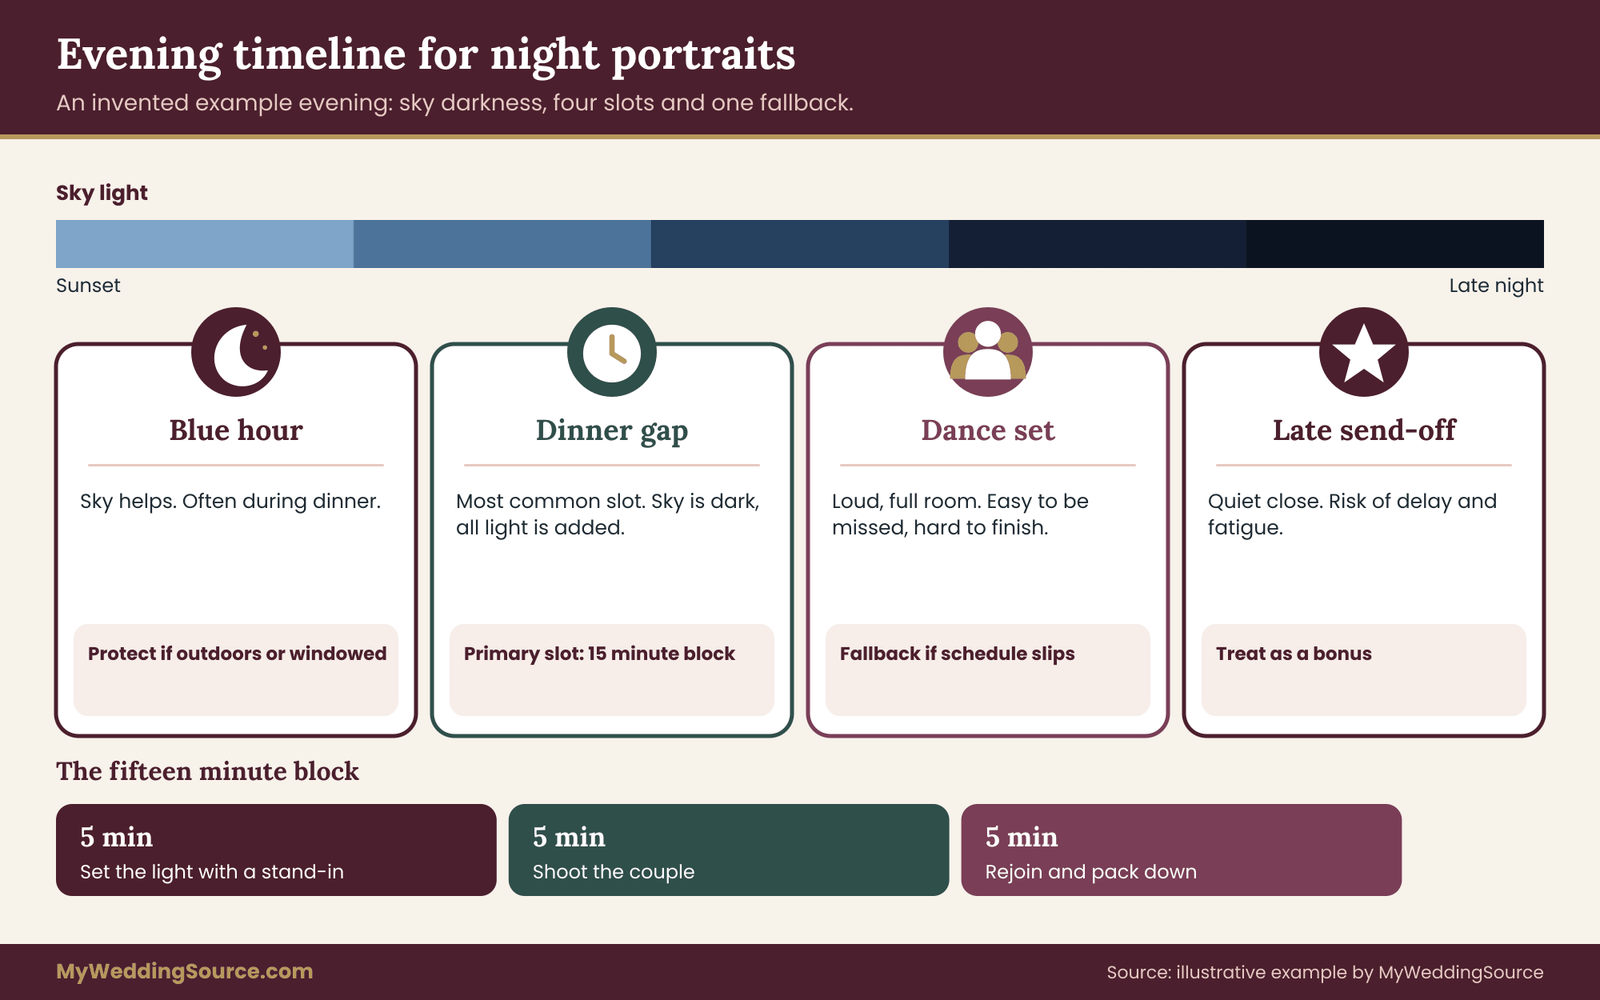
The timeline above shows the evening for Maya and Daniel, with the darkness of the sky, the slot they chose and the fallback. The same layout works for any venue.
Adapting the example
If your venue is a hotel ballroom, the dance floor may score well and the problem may be color, from uplights or a stage wash, so your fixes will be mostly permission fixes. If it is a garden, the problem may be that there is no light at all, so your fixes will be about added light and a lit path.
If it is a historic hall, the problem may be restrictions, so your fixes will focus on what the building allows. The method is the same, and only the weights change. ## Keeping guests comfortable and safe during night portraits
A portrait session pulls the two most important people out of their own party, in the dark, with equipment and light. Guests notice. A little preparation turns that absence into part of the evening instead of a gap in it, and it keeps everyone safe on the way.
Tell the room what is happening
A short, friendly announcement works better than silence. The DJ, the band leader or the coordinator can say that the couple will step out for a few minutes for photographs, that a bright flash may be visible near the side porch, and that the dessert table or the dance floor is open. Guests who know what is going on will not wonder where you are, and they will not wander into the shot.
If guests might see flashes at a distance, a sentence about it prevents alarm. If some guests have light-sensitive conditions, such as photosensitive epilepsy or migraines triggered by bright flashes, ask the coordinator to tell them where the night portraits session will take place, so they can avoid the area. Collect such needs through your guest form well before the day, and handle them with discretion. The guide on consent and guest boundaries shows how to collect these preferences without making anyone explain themselves.
Keep a rope or a person at the edge
A clear footprint is part of the plan. Ask the coordinator to place a rope, a stanchion or a friendly person at the edge of the space so guests do not walk through the frame or trip over a stand. A simple sign that says “photos in progress” on a stand can help. The person should be someone guests will listen to, not a stranger from the catering team.
Light the path, not only the picture
The route to the night portraits spot matters as much as the night portraits spot. Guests, servers and the photography team all use it, in the dark, often carrying things. Uneven ground, steps and cables are hazards. Ask the venue to add path lights, or bring battery lanterns, and walk the route yourself at night before the day to confirm it is safe.
Accessibility is part of this. If the couple, a family member or a guest uses a wheelchair, a walker or a cane, the route must be firm and wide enough, and the surface must be safe in the dark. The U.S. Department of Justice publishes information on the Americans with Disabilities Act, and the U.S. Access Board publishes accessibility guidelines, including guidance about routes and lighting. If a guest with a mobility need wants to see the night portraits session, plan a place for them to watch from a safe, lit spot.
Cables, stands and batteries
Every cable in a public area is a trip hazard. Ask the photographer to use battery gear where possible, to tape or cover any cable that must cross a path and to weigh down light stands, since a stand in a crowd can fall. Ask that any stand near guests has someone watching it. Batteries should be handled by the photography team, and lithium packs should not be left in a hot vehicle or in the sun.
Children, pets and the late hours
Children are drawn to lights and equipment. If children are present, brief the parents, and ask the coordinator to keep the session away from play areas. If a pet is part of the day, remember that flashes and unfamiliar stands can startle animals. The guest flow guide for receptions helps you think through where people will be at each stage of the evening, so the night portraits session sits in a quiet part of the room.
Alcohol, cold and tiredness
Late in the evening, guests and members of the wedding party may have been drinking, and the couple may be tired. Keep the night portraits session short, avoid steep or uneven ground, and be ready to stop if anyone feels unwell. In cold weather, have a coat or shawl ready, and a warm place to wait. These details feel small, and they decide whether the night portraits session is a pleasure or an ordeal.
Safety with flame, heat and haze
If your plan includes flame, such as candles or sparklers, set a safety rule: a named adult responsible, water or a suitable extinguisher near, clear space and no loose fabric close to flame. A dress and a veil catch fire more easily than you might think. Many couples find that battery candles and LED wands give the look they want with none of the risk. If you use haze, check with the venue, because it can set off smoke detectors in enclosed rooms.
Edge cases for night portraits in a very dark venue
Not every dark venue looks like the barn in the worked example. The following cases come up often, and each has a typical problem and a typical fix. Treat them as prompts for the scout visit, not as rules.
A tent with a white or black liner
A white tent liner can act as a large soft reflector at night, which helps a bounce flash a great deal. A black liner absorbs light and gives almost nothing back. Ask the tent company about the liner color, and note whether the tent has side walls, because open sides allow in the colors of the surrounding scene. If the tent is lit by colored uplights, ask for a neutral setting for the session.
A ballroom with deep wall colors and a high ceiling
A formal ballroom can be elegant and dark at the same time, especially with dim chandeliers and dark paneling. Bounce is poor and the ceiling is out of reach. The answer is usually an off-camera source close to the couple and a clean background such as a drape or a doorway. The lighting vendor can help with a pinspot or a controlled spot.
A garden or field with no power and no light
A garden after dark is blank. Everything must be added, so the night portraits plan relies on battery flashes, continuous lights and lanterns. The risks are the path, the insects and the temperature. Bring battery lanterns for the route, plan a shorter session and schedule it before the guests are too tired. A lit tent entrance or a veranda may provide a better backdrop than the open dark.
Candlelight only, by design
Some venues and some couples choose candlelight as the main light. It is beautiful and quite dim. Photographs by candlelight usually need a wide lens, a still subject and a tolerance for grain and soft focus. If you want sharper night portraits, ask your photographer about adding a small source close to the couple, so the candles stay the main look and a little extra light reads on the faces.
A venue that forbids flash or equipment
Some places, such as certain historic halls, museums and houses of worship, prohibit flash or stands. In that case the options narrow to existing light, a battery lantern that the venue accepts or a different location. Ask the venue exactly what is forbidden and whether a small continuous light is acceptable. If neither works, plan your main portraits for the daylight, and keep the night session short and simple, using only what the room gives you.
Rain, wind and cold
Weather can close an outdoor spot. Plan a covered fallback, such as a porch, an entry, a vestibule or a tent edge, and place it on the night portraits scout sheet. In wind, candles and open flame become unsafe, and light stands need weights. In cold, batteries drain faster, and a short session is kinder to everyone.
Dark skin tones and white dresses in low light
Photographing a range of skin tones and a bright white dress in the same dark frame is a technical challenge. The camera tends to expose for the brightest object, and faces can fall into shadow, or the dress can lose detail. A skilled photographer handles this with the position and size of the light source and by metering for the faces. Ask to see low-light samples that include a range of skin tones and a white or ivory garment, and ask what the photographer does to keep faces and fabric readable.
Mixed screens, signs and LED walls
A screen, an LED wall or a bright sign can dominate a dark scene and cast a blue cast on skin. Ask whether such sources can be dimmed or switched off in the night portraits spot for the length of the night portraits session. If they cannot, move the spot.
When the answer is no
Sometimes the honest result is a score of three or four, or a zero that cannot be fixed. That is useful information. You can choose another venue spot, move the main portraits to a different time of day, add a short second session in a better place, or accept a simpler night look with the light that exists. The goal of the night portraits sheet is to let you choose, not to force a session that will disappoint.
Your next steps
Here is a short sequence to follow, in order.
- Schedule a dusk visit. Visit the venue from half an hour before sunset until dark, and bring your partner and, if possible, your photographer.
- Fill out the night portraits scout sheet. Score light, power, space, permission and time on the night portraits spot, and write notes on the surfaces, sources and footprint.
- Take the three reference photos in each candidate spot, and send them to your photographer with the sheet.
- Choose an approach. Decide which lighting approach fits the lowest score, and name who provides it.
- Send the permission requests. Write to the venue, the coordinator, the lighting vendor and any other party on the map, and file the replies together.
- Update the contract. Ask your photographer to add the night portraits session, the equipment, the schedule window and the fallback to the contract or an addendum.
- Put the night portraits session on the timeline. Place a short window with buffers, name a point of contact and plan an announcement.
- Walk the route at night a week before, and fix any hazard.
- Hold a short briefing the day before with the photographer, the coordinator and the lighting vendor, using the night portraits sheet as the agenda.
If you do these in order, the day itself should feel calm. If any step turns up a blocker, you have time to change the night portraits plan instead of discovering it at nine in the evening.
FAQ
How long should night portraits take at a wedding?
Fifteen to twenty minutes of shooting is enough for most couples, plus a few minutes before and after for walking and setup. Longer sessions tire guests and the couple, and the best frames usually come early in each set-up. Ask your photographer for a short version and a longer version, and decide in advance which one you will use if the schedule slips.
Can night portraits work in a venue with almost no light?
Yes, but they need added light, such as an off-camera flash, a continuous lamp or a venue-supplied spot. Existing light alone in a very dark room tends to give soft or grainy images. Scout the venue at night, show your photographer reference photos and agree on the source, the power and the night portraits spot before the day.
Do I need my venue’s permission for flash and stands?
Often yes. Venues control where equipment can go, what light is allowed after dark and whether noise or light curfews apply. Ask in writing, name the night portraits spot and the equipment, and keep the reply with your vendor records. Places like museums and historic halls may forbid flash or stands entirely, so ask early.
Are sparklers safe for night portraits?
They carry real risks, because they burn very hot and drop hot debris, and many venues ban them. Check the venue’s rules and local fire guidance before you plan them, and consider battery LED wands or flameless lanterns instead. Never rely only on a vendor’s assurance, and keep a responsible adult and water nearby if they are allowed.
What if it rains on the night I planned the session?
Plan a covered fallback and write it on the scout sheet before the day. A porch, an entry, a vestibule or a tent edge can work if it has some light and a clean background. Tell your photographer and coordinator which spot is the fallback and who decides. If neither spot works, a short makeup session another evening may be possible if the contract allows it.
Should my photographer bring an assistant?
For deliberate night portraits in a dark venue, an assistant is often the difference between a smooth session and a slow one. They hold or move a light, carry gear and watch the stand. Some photographers include one, and others charge extra. Ask what is included, and get it in the contract with the cost.
How do I know which lighting approach to choose?
Use your scout sheet. If the spot already has workable light, keep the kit small and use the room’s own light. If it is weak, add one source, most often a flash or a continuous light. If it is very dark, plan a venue-supplied source or move the night portraits spot. Each extra source adds power, space and permission needs.
What should I do if my photographer has never shot at this venue?
Share your reference photos and scout sheet, and ask them to visit or at least review the notes. Ask for samples from similar dark venues, and ask what they would add and where it would go. If they dismiss the questions, consider whether they are the right fit. A photographer who scouts and plans is a safer bet for night work.
Sources
- U.S. Copyright Office: copyright basics and licensing
- ADA.gov: Americans with Disabilities Act information
- U.S. Access Board: accessibility guidelines and standards
- National Fire Protection Association: fire and life safety codes
- U.S. Consumer Product Safety Commission: fireworks and sparkler safety
- Federal Aviation Administration: drone rules and night operations
- National Park Service: photography and filming on park land
- Occupational Safety and Health Administration: workplace safety
- U.S. Fire Administration: fire prevention and safety