
Wedding detail photos work best when each object is photographed in the moment it is actually used, not arranged on a styled board after the fact. This guide gives you a three-state shot list, a one-page object brief and a simple handoff routine, so your rings, stationery and florals tell the story of the day with very little staging.
Pick six to ten objects that mean something to you. For each one, ask for photos in up to three states: before the day starts, while it is in use, and after it has done its job. Write a one-page brief that names the owner, the location, the time it is available and the person who hands it over. Allow only light staging, such as moving an object to a window or a plain surface, and give the photographer a short, protected window to work in.
Most couples have seen the typical detail photo. A ring on a satin cushion, an invitation suite fanned out on linen, a bouquet laid beside a pair of shoes. They are pretty, and many of them look nearly identical from one wedding to the next. The problem is not that they are bad pictures. The problem is that they say very little about the two people who owned the objects.
This article is about the opposite approach. Instead of asking what arrangement will look good, you ask what each object did on the day, who touched it, where it sat and what state it was in at the beginning and the end. Those answers produce wedding detail photos that look different from anyone else’s, because the objects and the day are different. They also require much less staging, which saves time, protects fragile items and keeps the photographer out of your getting-ready room for less of the morning.
A note on scope. This is general information about planning and about photo rights, not legal advice, and the terms that apply to you are the ones in your own contract. Where a rule matters, the article points you to the agency or the document that settles it.
What wedding detail photos are for
A detail photo is a picture of a thing rather than a person or a group. That sounds obvious, but it changes what the picture has to accomplish. A portrait can rely on faces. A group shot can rely on who is standing together. A picture of a ring or an invitation has no face to carry it, so it has to carry meaning some other way: through light, through context, through the evidence of a hand, or through a clear relationship to another object.
In practice, wedding detail photos do four jobs for a couple.
They record the physical world of the day. In thirty years you will not remember the exact stationery font, the stems in the bouquet or the engraving inside the band. A set of well-made wedding detail photos is the only reliable record of those choices, which cost real money and real thought.
They connect the people photos to each other. A gallery that jumps from the ceremony straight to the first dance feels abrupt. Quiet pictures of objects slow the pace and give the eye somewhere to rest. A close frame of a boutonniere pin or a program on a chair is often the glue that makes an album read as a sequence.
They carry sentimental weight that people cannot. A grandmother’s brooch, a father’s watch or a borrowed handkerchief may be easier to photograph than a feeling. If the person who owned the object is not in the room, or is no longer living, the object photo can hold their place in the story without anyone having to perform sadness for the camera.
They serve vendors and future you. Florists, stationers, bakers and rental companies all want clear images of their work, and you may want to reorder, repair or resell something later. Clean frames in your wedding detail photos answer questions that would otherwise take a long search through the full gallery.
Notice what is missing from that list. Detail photos are not meant to prove that the wedding was stylish, and they are not meant to produce social media content. Those can be pleasant side effects. If they become the goal, the shooting drifts toward arranging and away from observing, and that is where excessive staging begins.
A working definition of “excessive staging”
Staging is not a bad word. Any photographer moves an object into better light, wipes a smudge or turns a card to catch an edge. That is ordinary craft, and it takes seconds. That is true of every kind of wedding detail photos, from a single ring to a full table.
Staging becomes excessive when it needs props that were not part of your day, when it takes the object out of circulation for longer than the day can spare, or when the result no longer looks like anything that happened.
A practical test is to ask whether a guest who watched the object being used would recognize the photo. If the ring is on a pile of dried moss that nobody brought to the venue, they would not. If the ring is in the officiant’s hand an inch before it goes on a finger, they would.
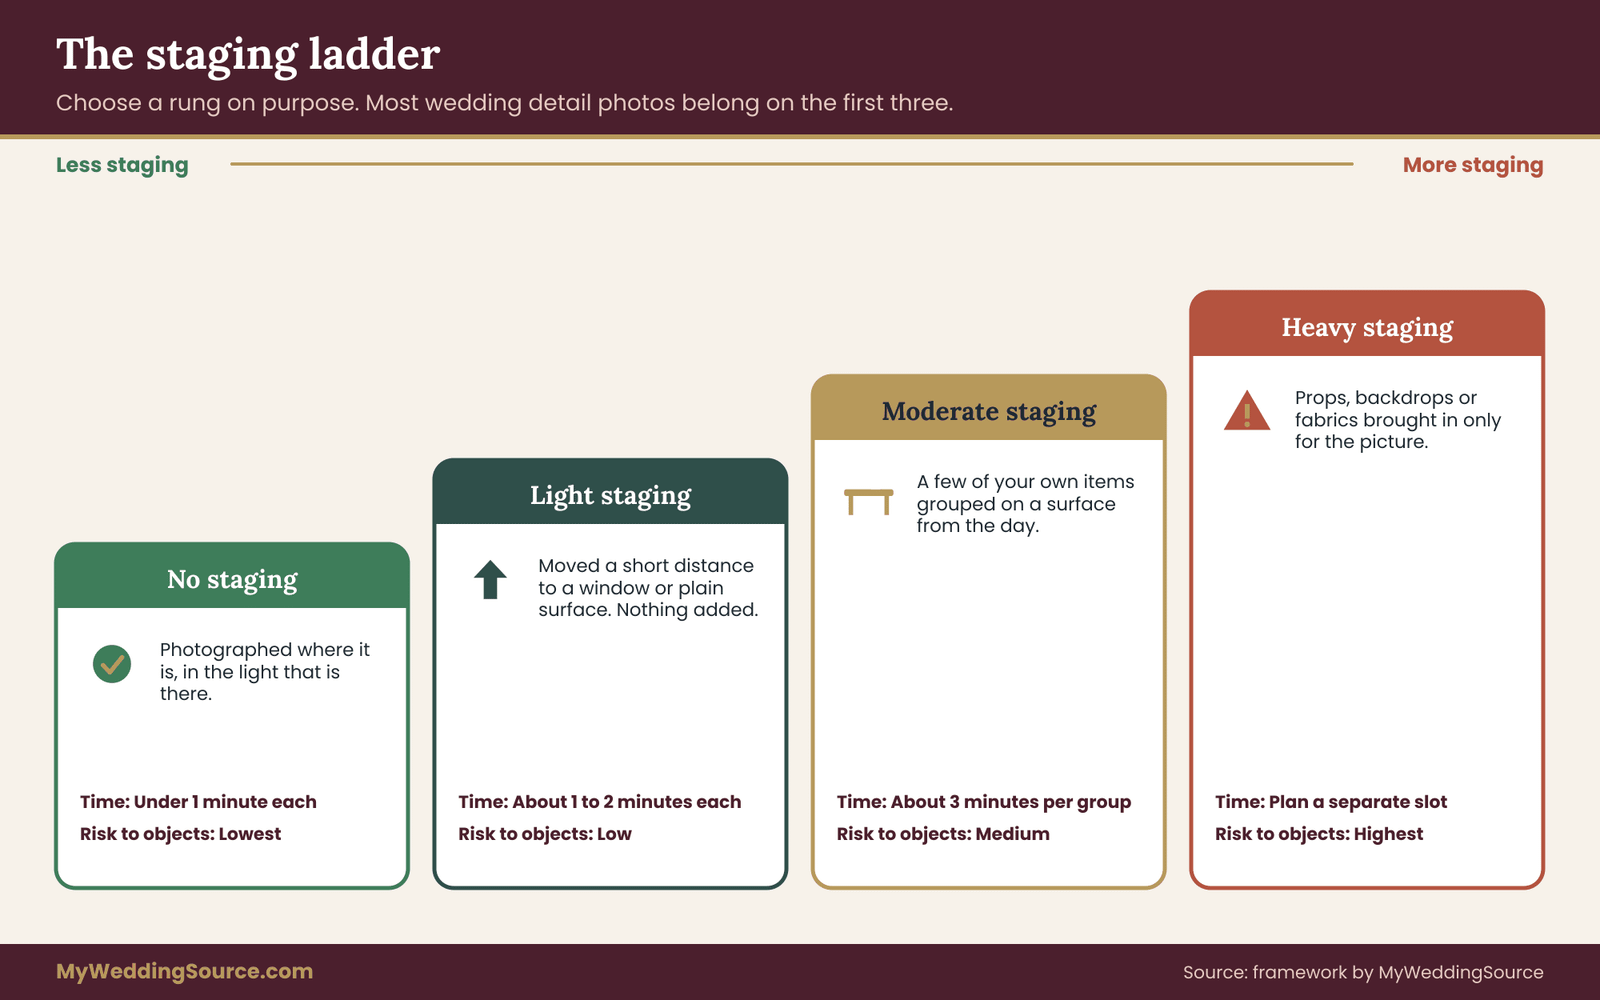
Here is a rough scale you can use in conversations with your photographer.
No staging. The object is photographed where it already is, in the light that is already there. A program on a chair, a place card on a table, a bouquet resting on a counter.
Light staging. The object is moved a short distance, usually to a window, a plain table or a neutral surface, and perhaps turned or cleaned. No props are added.
Moderate staging. A few items are grouped together on a surface that belongs to the day, such as the ring box, the invitation and a sprig from the bouquet, all of which you already own.
Heavy staging. Props, backdrops, fabrics, ribbons or extra flowers are brought in only for the picture.
This guide leans toward the first three levels and treats the fourth as a deliberate choice that deserves its own conversation and its own time. If you love that look, nothing here forbids it. The point is to choose it on purpose rather than let it take over the schedule because it is the default. Think of the scale as a dial for your wedding detail photos, not a rule.
Why a styled pile tells less than a found moment
The difference between a pile and a moment is not taste. It is information.
A styled pile has one kind of information: the objects exist and they go together. A found moment has several. It shows where the object was, what else was nearby, what time of day it was, how the object was being handled and sometimes the beginnings of an emotion. A picture of a hand lacing a shoe is not about the shoe. It is about the hurry, or the calm, of a particular morning. Wedding detail photos need more than that to hold up in an album.
The hidden cost of arranging
Arranging takes more time than people expect, and the time comes out of something. In a typical getting-ready sequence the photographer has a limited window before the couple must be dressed, fed and in a car.
Every extra minute spent building a flat-lay is a minute not spent on the mother adjusting a veil or the friend laughing at a toast written on a napkin. If you want both, you need to decide where the minutes come from, and the shot-list method later in this guide makes that trade explicit. Wedding detail photos are the part of coverage most easily stretched, so decide the limit before the morning begins.
Arranging also exposes objects to risk. Rings are small and easy to drop. Antique lace snags. Fresh flowers wilt under warm lights. A fragile invitation can crease when someone reaches across it. Handling objects for the camera adds touches, and every touch is a chance for damage or loss. A method that lets objects stay in use until the moment they are needed reduces that exposure.
Sameness and the search for specific
Photographers see the same arrangements over and over, and some will tell you that couples request them because they appear in saved images online. Saved images are a fine starting point for a conversation about light, color and mood. They are a poor script. If your shot list is copied from someone else’s gallery, the photos will be about that wedding. Your wedding detail photos will be more useful if they describe your own objects.
A better move is to describe your own objects. A cheaper, simpler way to say this is to write down, in a sentence each, what is special about the things you will have on the day: that the ring was resized from a grandparent’s, that the invitations were printed on a press a friend owns, that the bouquet includes sweet peas from a family garden. Those sentences produce a shot list that cannot be duplicated, because nobody else has your grandparent or your garden.
What a story needs
A story needs at least two things and a change between them. In a photograph, the two things might be an object and a hand, or an object and a place, or two objects that were never together before the wedding. The change is time: the same thing early and late, whole and used, waiting and in motion. That is the whole idea behind wedding detail photos that read as a story.
This is the logic behind the three-state method in the next section. It does not ask the photographer to be clever. It asks for a repeatable structure: show the thing before, show it working, show what remains. Because the structure is simple, you can describe it on a single page and a photographer can keep it in a back pocket while still working fast. It keeps wedding detail photos organized by what happened, not by how they look.
Where this fits with your other photo planning
This guide covers objects only. If you are working out who stands where in family portraits, the wedding family photo list handles that, and it is a different kind of planning with different pressures. If you are deciding between a documentary, editorial or film approach, you should settle the overall approach before you settle the object list, because your photographer’s style shapes how much staging feels natural to them. Wedding detail photos then fit inside that approach rather than fighting it.
Rights and permissions also matter for objects in a way people forget. Many details belong to other vendors, such as a florist’s arrangement, a baker’s cake or a stationer’s design, and you will probably want to share the images with those vendors. The wedding photography consent guide covers guests and image use, and the same questions about who may post what apply to wedding detail photos, only with fewer privacy worries. We return to this in the questions section.
The three-state method for wedding detail photos
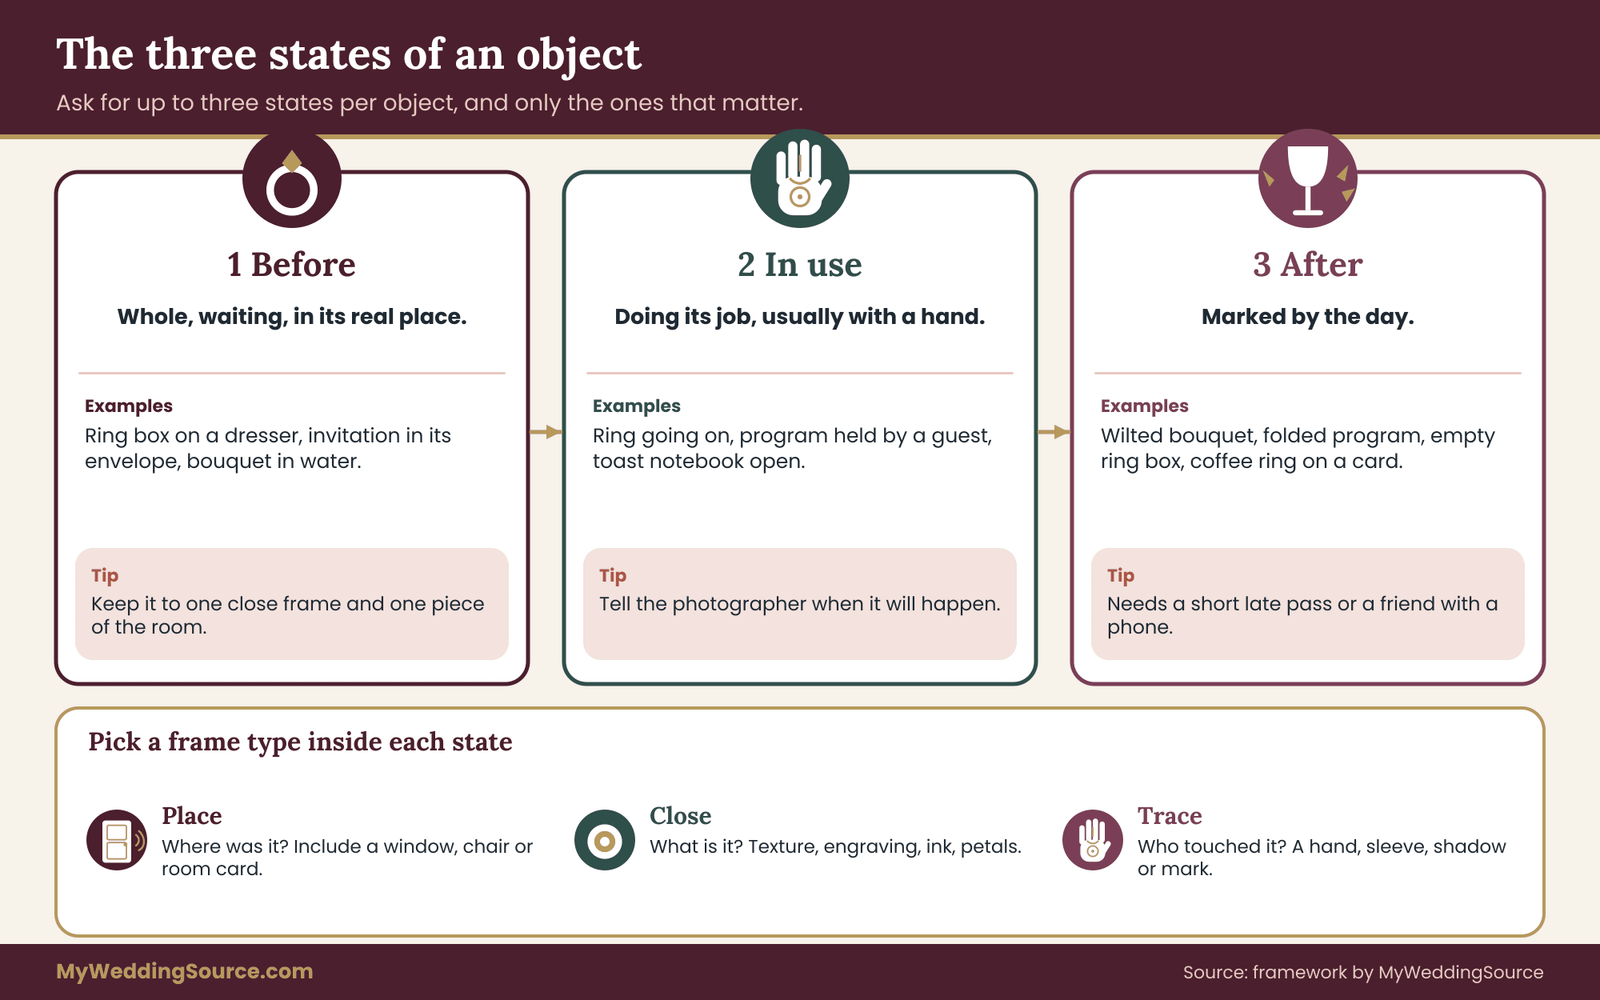
The three-state method is the core of this guide. For each object on your list, you decide which of three states are worth photographing: before, in use and after. You do not need all three for every object. Most objects deserve one or two, and a few earn all three.
State one: before
The “before” state shows the object whole, untouched and in the place where it waited. A suit jacket on a hanger, a ring in its box, an invitation still in its envelope, a bouquet in water. This is the state that most people picture when they say wedding detail photos, and it is the one that most easily slips into arranging.
The discipline for this state is simple: photograph the object where it actually is, or move it a very short distance to better light. If the ring box lives in a bag until the ceremony, the photographer needs a reason to ask for it early, and the handoff section later explains how to do that without anyone losing it. Good wedding detail photos in this state look like a quick glance at a real room.
Before frames carry the least emotion on their own, so they work best when the setting adds something. A dress on a door in a hotel room with a visible view tells you where the morning happened. The same dress on a plain white wall tells you very little. Ask the photographer to include one piece of the room, a window, a chair back or a printed room card, so the picture is anchored to a time and a place.
State two: in use
The “in use” state is where the story lives. The object is doing its job, and usually a person is involved, even if only a hand. A cufflink being fastened. A ring being slid on. A bouquet being passed to a friend. A program being read by a guest on the third row. A place card being picked up and turned over. In-use frames are where wedding detail photos earn the word story.
These frames are not staged in the usual sense because the use is real. What the photographer needs is a position and a heads-up. The brief tells them the moment is coming, so they can stand close enough, with the right lens and the right light, and they are not trying to catch a ring exchange from the back of the room with a long zoom.
In-use frames are also the ones that take the most coordination, because they depend on timing. The one-page brief described below is built mainly to make these frames possible. If you take only one idea from this article, take this one: tell the photographer when each important object will be used, not just that it exists.
State three: after
The “after” state shows the object once it has done its job and carries the marks of the day. A bouquet drooping on a hotel dresser at midnight. A program folded into a back pocket. The ring box, empty, beside a half-finished drink. Shoes under a table. A place card with a coffee ring.
Couples often forget this state entirely because the photographer’s contract and the usual timeline end near the end of the reception. Yet after frames can be the most affecting pictures in a gallery, because they show the day having happened. They also need almost no staging. The objects are already in their natural, rumpled, used condition.
The photographer only needs a short window near the end of the night, or, if the coverage ends earlier, a quick pass through the room as guests start to leave. Wedding detail photos from this state are the ones couples say they did not know to ask for.
If your coverage ends before the reception does, say so in the brief and decide whether the after frames matter enough to adjust the timeline or to ask a friend to take a few phone pictures for you. The article on wedding day digital contingency plans covers backup arrangements for files, and the same thinking applies to a backup for a missing state.
Combining state with frame type
Within each state you can ask for up to three kinds of frame. The names below are only labels for conversation. Use whatever words your photographer prefers.
The place frame shows the object within its surroundings. It answers where. A wide enough crop to include the table, the window, the doorway or the chair.
The close frame shows the object itself, filling most of the picture. It answers what. Texture, engraving, ink, petals, stitching.
The trace frame shows evidence of a person. A hand, a sleeve, a shadow, a lipstick mark on a glass. It answers who and sometimes how it felt.
Put states and frames together and you have a grid of up to nine possible pictures per object. That grid is a menu, not a quota. Most objects need two or three cells from it.
A bouquet might want a before place frame (in the vase in the room), an in-use trace frame (being handed over) and an after close frame (wilting on the dresser). A ring might want an in-use close frame (the exchange) and an after trace frame (the hands at the cake table). That keeps your wedding detail photos focused on the few cells that matter.
Choosing the cells that matter
How do you decide which cells to ask for? Use three decision rules.
Ask where the meaning lives. Is the object important because of how it looks, how it was made, who gave it or what it does? A hand-lettered sign matters for its look, so a close frame carries it. A grandparent’s watch matters because of who wore it, so a trace frame with a hand or a wrist carries it. A garter or a toast flask matters for what it does, so an in-use frame carries it.
Ask whether the state will exist anyway. Some states take no extra effort. After frames of a table at the end of the night will exist if someone is there to see them. Before frames of a printed program will exist if the photographer arrives before guests do. Do not spend precious schedule minutes creating a state that you could get for free by being in the right place at the right time.
Ask what would be lost. If the object disappeared tomorrow, which picture would you miss? That is the cell to protect. Everything else is optional.
Why three and not more
It would be easy to add more states: during setup, during transport, during cleanup. Do not. Three is enough to show a change, and more than three begins to resemble a documentary project that the day cannot support. Keep the method small enough that you can say it from memory to a friend who is holding your bouquet. Three states keep wedding detail photos simple enough to brief in a minute.
The keepsake object shot brief
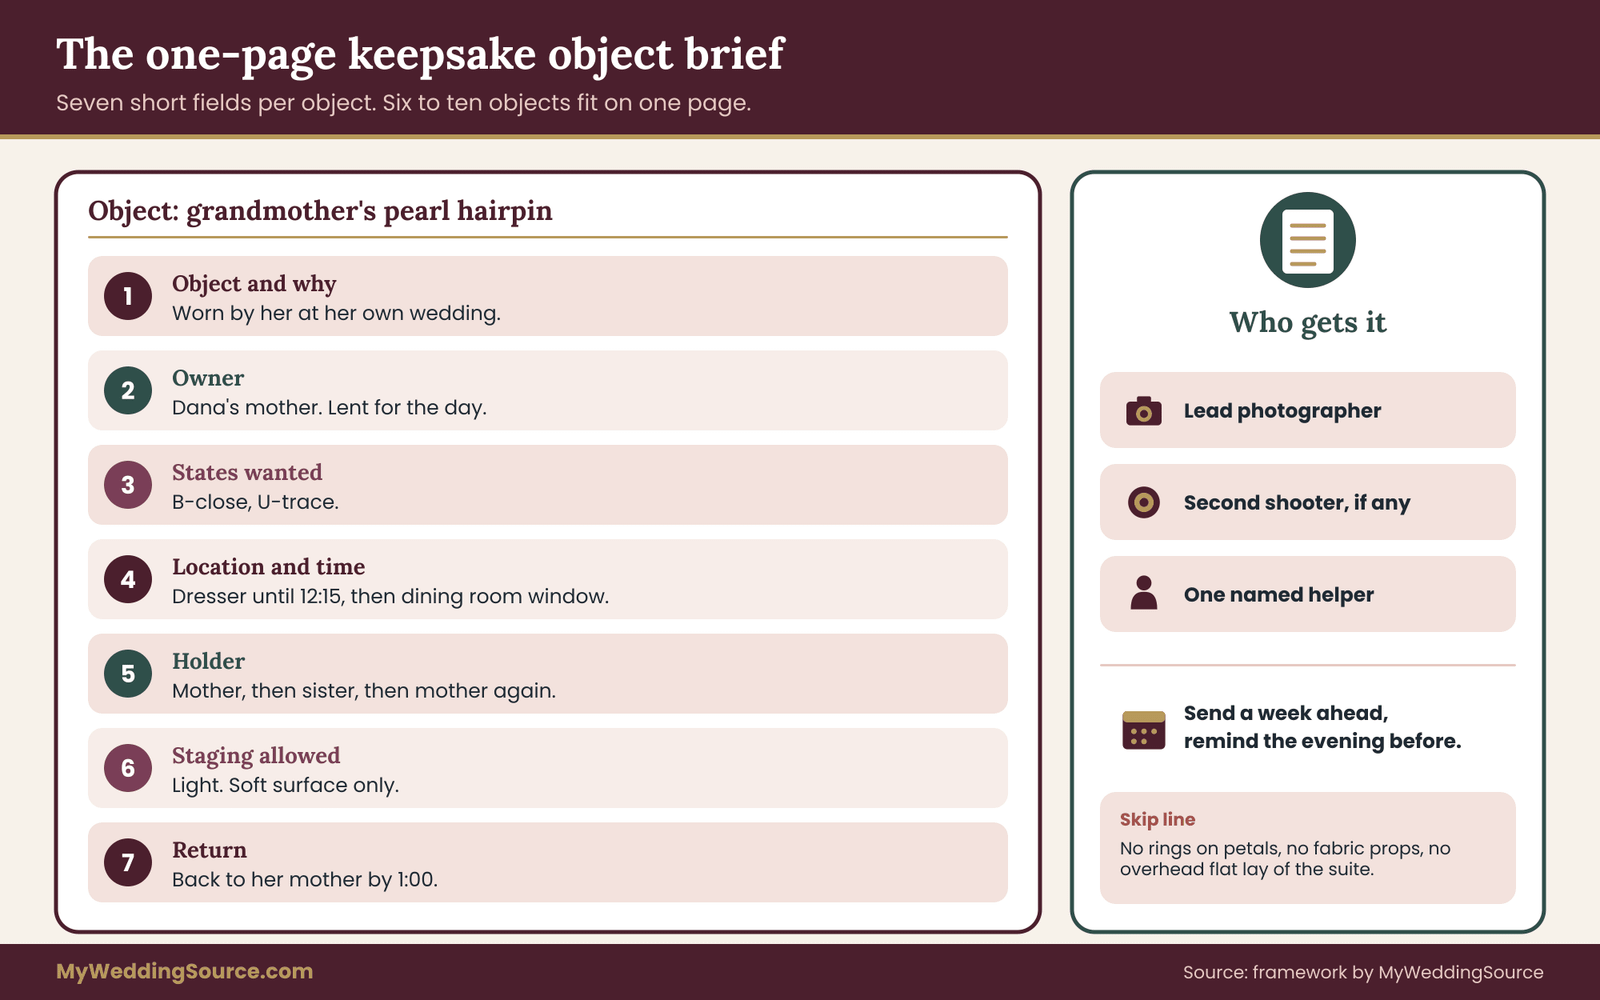
The shot brief is a single page, or a single screen, that your photographer and one trusted helper both receive in advance. It turns the three-state method into a working document. A brief for the whole day can hold six to ten objects without becoming unwieldy, and for each object it records what the photographer needs to know and what the helper needs to do. It is the most practical tool for planning wedding detail photos.
The fields on the brief
For each object, write down the following. Keep each answer to a line or two.
The object and why it matters. A short phrase is enough: “Grandmother’s pearl hairpin, worn by her at her own wedding.” Never assume the photographer knows. They will not guess that the plain-looking pin matters more than the flowers beside it.
The owner. Who owns the object right now, and whose permission is needed to handle it? An heirloom may belong to a parent. A rental may belong to a vendor. A borrowed item may belong to a friend. If the owner is someone other than you, record their name and say whether they are comfortable with the object being photographed away from them.
The states wanted. List which of before, in use and after you want, and which frame type for each. Use a short code if you like, such as B-close, U-trace, A-place.
The location and time. Where will the object be, and when will it be available? “In the hotel room until 1:30, then with the maid of honor in the car, then at the ceremony table at 3:45.” This is the field that most often saves a shot, because the photographer cannot read your mind about movement.
The holder. Who is carrying the object at each point? This leads straight into the handoff routine in the next section.
The staging allowed. Choose from none, light, moderate. If you want something other than the default, say what and why. If the object is fragile, say so: “Do not place the lace on any surface that is not clean and dry.”
The return. Where does the object go when the photographer is done with it? A brief that ends at “photographed” is incomplete. Rings should return to a named person. Stationery goes back into a box. Flowers go back to water.
How long the brief should be
Resist the urge to write a long document. If the brief is more than a page, the photographer will skim it, and the helper will not read it at all. Six to ten objects is a good range for most weddings. Fewer than six usually means you are leaving obvious things out. More than ten means you are listing everything you own, and the photographer will not be able to treat any of it as a priority. A short brief keeps wedding detail photos realistic.
If you are not sure which objects to include, sort your list into three piles. The first pile is objects that carry personal meaning: heirlooms, gifts, handmade items. The second is objects that cost real money and that you or a vendor will want a record of: the invitations, the bouquet, the cake topper, the signage.
The third is objects that are simply lovely. Put every item from the first pile on the brief, the top few from the second, and one or two from the third. That balance tends to produce a gallery that feels personal without looking like a catalog.
Who gets the brief
Three people should have it: the lead photographer, a second shooter if there is one, and one named helper. The helper is not a vendor. It is a friend, a family member or a coordinator who knows the objects and can move them. The brief fails when it exists only in the photographer’s inbox, because nobody is physically responsible for putting the ring box in the right place at the right minute. Without a helper, wedding detail photos depend on luck.
Share the brief at least a week before the wedding, and again, as a short reminder, the evening before. If you are working with a coordinator, ask them to fold the key timings into the main run-of-show. The wedding vendor timeline guide explains how to set up that master schedule so everyone, including the photographer, works from the same clock.
A short script for the photographer
When you send the brief, a few plain sentences help it land. For example: “Attached is a one-page list of the objects we care about most, with the moments we think they will be in use. We would rather have fewer, more honest pictures of these than a long staged session. If any of the timings do not work for you, tell us which ones and we will adjust.” Photographers hear vague requests about wedding detail photos all the time, so a specific message stands out.
That message does three things. It signals that you respect the photographer’s judgment. It makes clear that the brief is a priority list and not a set of orders. And it opens the door to a revision without making anyone defensive. Photographers are generally glad to receive this kind of specific, calm information, because it lets them do their best work.
The ownership handoff: who holds each object
A shot brief tells the photographer what you want. The ownership handoff tells everyone who is responsible for each object at each moment. Without it, the best brief in the world fails in the same few ways: the object is in someone’s bag, the person with the bag is in the car, and the photographer is waiting in an empty room. Wedding detail photos fail at the handoff far more often than they fail at the camera.
Name one holder per object
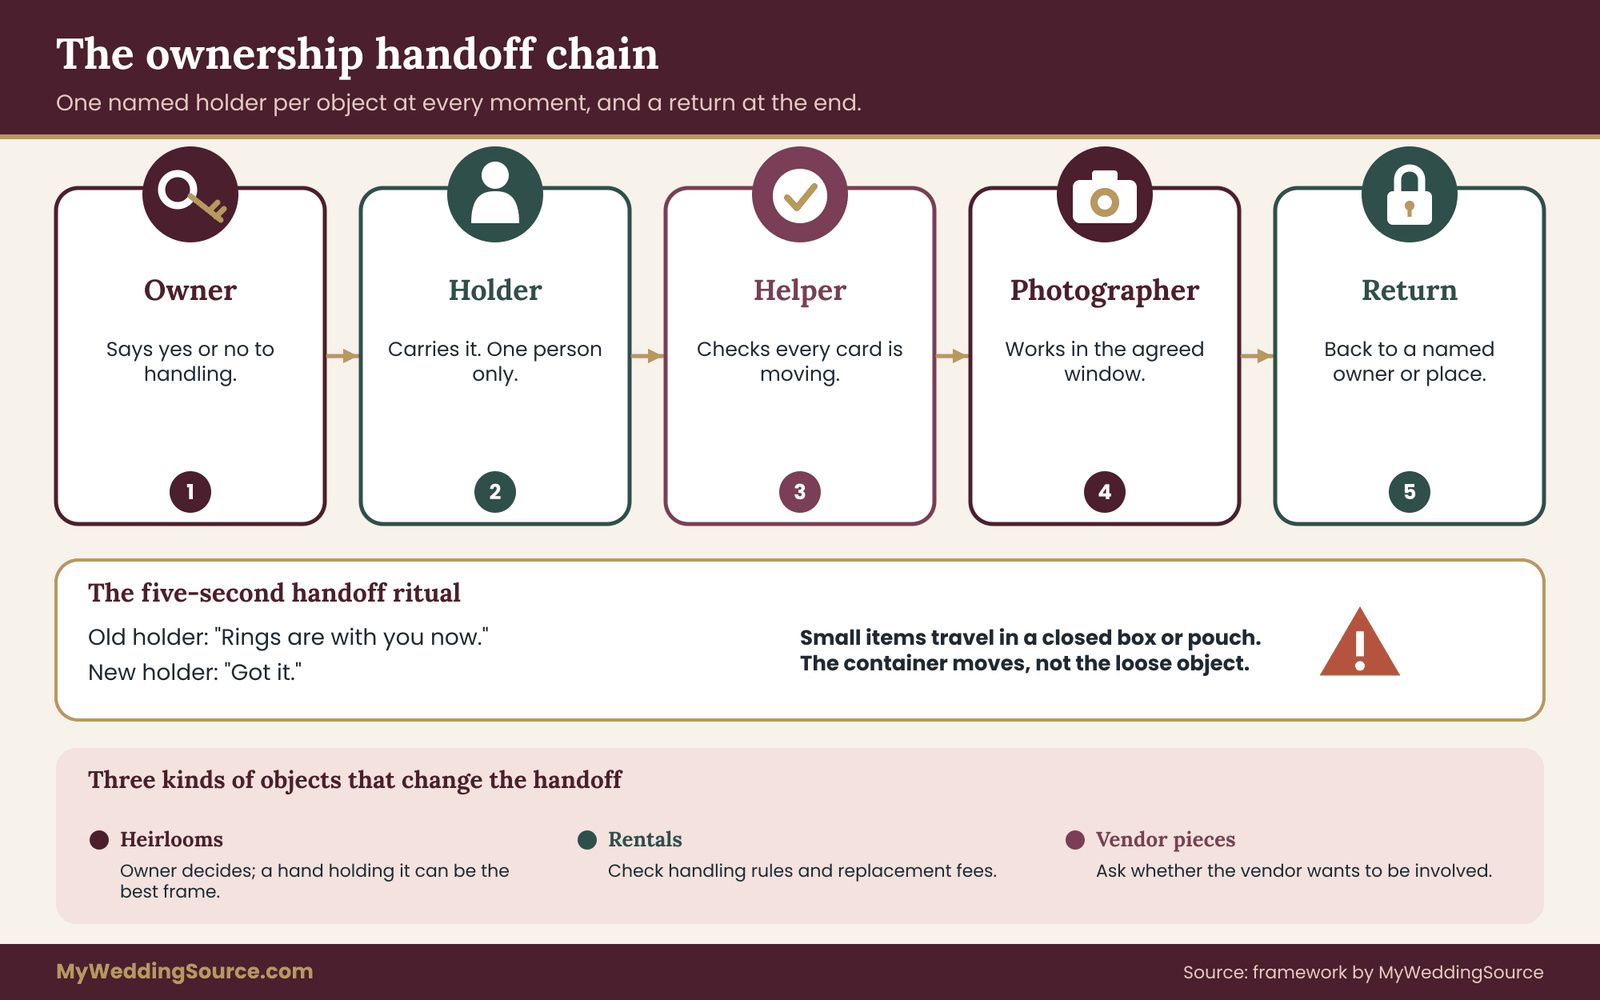
The rule is simple. At any moment, exactly one named person holds each object on the brief. Not “the bridesmaids.” Not “whoever is nearby.” One person, one object, one stretch of time. This holds for every object behind your wedding detail photos.
When the holder changes, the old holder says so out loud to the new holder, and the new holder says “got it.” That small ritual sounds fussy, but it prevents the most common loss scenario, in which two people each assume the other has the ring box. It takes five seconds and costs nothing.
The handoff card
If you like paper, write each object on a small card, with its name, current holder, next holder and the time of the next change. If you prefer a phone, a shared note works as well. The card format matters less than three habits.
Every card has a return. The card does not end when the photographer is finished. It ends when the object is back with a named owner or in a named place.
Every card has a backup name. If the holder gets pulled away, a second person is named. This is especially important for rings and for any item that must appear at the ceremony.
Every card is visible to the helper. The helper is the person who checks the cards during the day. They do not hold everything. They simply make sure each card is moving.
Who should be the helper
Look for someone who is calm, who will not be giving a toast, and who is not in the front row of every portrait. A sibling who is not in the wedding party, a close friend, a day-of coordinator or a trusted cousin all work. Avoid putting the helper role on the maid of honor or best man, because their hands and minds will be full. The helper makes wedding detail photos possible without being in them.
Brief the helper in person, if possible, with the page in front of you. Walk through the three states, point out which objects are fragile or borrowed, and name the three moments that matter most. A ten-minute conversation the week before saves an hour of confusion on the day.
Borrowed, rented and inherited objects
Some objects belong to someone else, and that changes the handoff. Three situations are worth planning for.
Heirlooms owned by family. Ask the owner whether they are comfortable with the object being photographed away from them. Some will say yes happily. Others will want to hold it themselves while it is photographed, which can make for a better picture, since a hand is a trace frame. If an elder is nervous about the object leaving their sight, build the photo around them rather than around the object. A photograph of their hand holding the brooch is often better than one of the brooch alone.
Rentals. Many rentals, such as linens, candle holders and signage, come with replacement fees and handling rules. Ask the rental company what they expect, and tell the photographer if any item has restrictions. Do not move rented pieces to a different venue or a different surface without checking.
Vendor-owned pieces. A florist’s arrangement, a baker’s cake or a stationer’s sample often belongs to the vendor until the event is complete. Ask whether the vendor wants to be present for or involved in the photos. Many do, because the pictures serve them as well.
The chain of custody for the smallest items
Small, valuable things get their own mini-protocol. Rings, earrings, a watch, a pendant and a pin all share the same risks: they fall, they roll, they get left on a sink. Wedding detail photos of jewelry deserve a mini-protocol of their own.
For these, the rule is to keep them in one container that has a visible cover, such as a box or a small pouch, and to let the container, not the loose object, move between holders. The photographer opens the container, takes the pictures over a soft surface and closes it again. The closing is part of the routine. If the object is out, someone is looking at it. If nobody is looking at it, it is in the container.
Rings: the smallest object with the most steps
Rings deserve their own section because they appear in more states than anything else on the brief and because they are the easiest object to lose. Among wedding detail photos, rings are the highest-stakes subject.
What rings actually do on the day
Follow a pair of wedding rings from morning to night and you find several distinct moments. They are carried to the venue. They may be shown to the photographer before the ceremony. They are handed to the officiant, a ring bearer or a best person. They are exchanged. They are worn, photographed again in portraits and in dancing. They are taken off for a moment, perhaps at the cake or while washing hands. They are put back on or tucked away at the end of the night.
Each of those moments is a possible frame, but only some are worth asking for. The ones that tell the story of the object are usually these: the rings waiting, the exchange, and the rings worn at a quiet moment afterward. Few wedding detail photos have as many possible moments as rings do.
The shot list for rings
A compact ring list might read like this.
Before, close. The rings together in their box, or on a plain surface in window light, taken once, early, in under two minutes. This is the one place where light staging is nearly always acceptable, because the rings are not yet in use.
In use, close and trace. The exchange itself, from a position near enough to see the ring on the finger and the hand receiving it. This is not a staged picture. It simply needs the photographer to know the moment is coming and to stand where they can see.
After, trace. The two hands together, with the rings on, in a casual moment. At the table, on a shoulder, around a glass. This one is a gift of the day, and the brief only needs to remind the photographer that it is welcome.
Rings and the ceremony without a ring bearer
Not every ceremony has a ring bearer, and the rings need to get from one place to another regardless. Whichever way the rings travel, your brief should simply mirror whichever option you choose. If the best person carries the rings, name them as the holder. If the officiant holds them, say so, and tell the photographer to expect the rings to appear at the officiant’s table or hand.
Engraving, resizing and the story in the metal
If a ring has been resized from a relative’s, engraved, or made from reused metal, say so on the brief. A close frame of an engraving is one of the better pictures an object can give you, but only if the photographer knows it is there. Engravings are small, and they usually need a macro lens or a close focus distance and a patient angle.
They also catch light badly if the metal is polished and the surface is not angled correctly, so ask whether the photographer has the tools to capture them. If not, you may want a separate close-up made with a good phone camera in daylight, which is a reasonable backup.
Rings and safety
Never ask for a ring picture in a place where the ring can fall into water, a floor grate or deep grass. Outdoor ring pictures on rocks, tree stumps or moss look lovely and cause an astonishing number of lost rings.
A soft cloth below the surface, a person’s hand beneath the object and a low drop distance all reduce the risk. If the setting is not safe, move the picture to a table or a lap. A ring photographed safely is worth more than a spectacular one that ends in a search. Safety comes before style in wedding detail photos of rings.
Stationery, florals and the rest of the table
Stationery and flowers make up most of the remaining objects on a typical brief, and they behave differently from rings. Stationery is stable and can be photographed any time. Flowers are alive and change by the hour. The difference should shape your timing. Both appear in nearly every set of wedding detail photos.
Stationery: choose the pieces that carry the design
A full invitation suite can include an outer envelope, an inner envelope, the invitation, a details card, a response card and an envelope, a liner and a wax seal. Photographing every piece creates the pile described earlier. Instead, choose the two or three pieces that carry the design: perhaps the invitation, the envelope with its address in calligraphy and the response card with its stamp. The same restraint applies to every part of your wedding detail photos.
Ask yourself what a guest would remember. If the envelope liner was a surprise, include it. If the typography was the standout, include a close frame of the invitation text. If the printing method was unusual, such as letterpress or foil, a close frame at a low angle shows the texture, which a flat overhead picture cannot.
Day-of stationery in use
The most overlooked stationery frames are the ones where the paper is working. A ceremony program held by a guest. A menu beside a plate. A place card at a seat. A table number in a holder. A sign pointing to the right door. These are in-use frames, and they cost no staging because they exist as part of the room. These are some of the quietest wedding detail photos in a gallery and often among the most truthful.
The best time for them is just before guests arrive, when the room is tidy and the light is still good, and again during the meal, when hands and glasses have joined the scene. If you want both, the brief should say so, so the photographer can plan a pass through the room at each time.
If you have designed signage with care, the wedding signage system guide explains how readable signs are planned, and your brief can borrow its list of sign locations to tell the photographer where to look.
Florals: capture them while they are at their best
Flowers have a short window. Some varieties hold up for hours, and others wilt quickly in heat. Ask the florist which pieces are most delicate and when the arrangements will be at their best, and plan the before frames for that moment. A bouquet photographed an hour after it was made will look fuller than the same bouquet after three hours in a warm room. Flowers set the clock for wedding detail photos more than any other object.
The in-use frames for florals are usually a hand-off, an aisle moment or a table with guests around it. The after frames, such as a bouquet on a dresser or petals scattered on a table, work well because the wilting is part of the story. If you want to preserve the flowers or give them away, say so on the brief, so they are returned to water as soon as the photographer finishes.
Related objects: bundling without overstaging
Sometimes the photographer will want to place two or three objects together, such as the invitation, the ring box and a stem from the bouquet. This is the moderate staging level, and it can be reasonable if three conditions hold. The items are all yours or the vendor has agreed. The surface is a real one from the day, such as a table or a windowsill.
And the grouping takes under three minutes. If the grouping needs more than that, the picture is no longer a detail photo. It is a still-life session, and it deserves its own slot in the day. If grouping runs long, treat it as a separate session apart from your wedding detail photos.
Minimal staging rules for wedding detail photos
Once the brief and the handoff are in place, most of the staging question answers itself. What remains is a short set of rules about light, surface, time and permission. These rules are what keep wedding detail photos looking like the day instead of like a set.
Rule one: move the object to the light, not the light to the object
Natural light from a window is the cheapest and most flattering tool for small objects. Soft, directional daylight shows texture in paper, shine in metal and color in petals without any equipment. The usual advice is to find a window that is not in direct sun, because direct sun creates hard shadows and glare on glossy surfaces. Daylight is the simplest friend of wedding detail photos.
Before the day, ask your photographer how they handle dark rooms. Some bring small lights and reflectors, and some prefer to work with what is there. Either approach is reasonable, but you should know which one you are getting. If the getting-ready room has one small window and a ceiling light with a yellow cast, the photographer may ask to move the objects to a different room, and that is a good moment for the brief’s location field to have a second option.
For indoor receptions, the light is usually warm and dim, and details often look their best when they are shot at the table with the available candlelight or lamps. Do not ask the photographer to flood the room with flash for a picture of a place card. The article on flash photography at weddings explains how flash changes color and mood, and the same trade-offs apply to objects.
Rule two: use surfaces that belong to the day
A surface is part of the story. A hotel windowsill, a wooden chair, a linen napkin, a table at the reception, a car seat or the lid of a piano all say where the day happened. A white foam board or a piece of fabric bought for the purpose says only that someone built a photo area. Real surfaces make wedding detail photos feel like a place.
If the photographer wants a neutral surface for a close frame, a plain table is fine. If they want a particular color or material, ask whether it already exists in the room before bringing anything in. Many hotel rooms have a dark wood desk, a white bed sheet or a gray carpet that works well. A pale surface is not required for a pleasing picture. It is required only when the object itself is pale and needs contrast, which is when the closest available dark surface helps.
Rule three: put a clock on every setup
The simplest control against excessive staging is a time limit. Assign each setup a number of minutes and keep it. A typical budget for a wedding detail photos session might be ten minutes for the whole collection of before frames, with no single object getting more than a minute or two. If the schedule has more room, extend it, but decide in advance. A clock keeps wedding detail photos from swallowing the morning.
The ten-minute window works because it forces a ranking. When the photographer knows they have ten minutes and six objects, they will choose the best light, the best angle and the least fussy surface. When they have forty minutes and an open brief, they will arrange. This is not a criticism of photographers. Any craftsperson with unlimited time will use it.
Put the window in the timeline, and protect it. Tell the helper to keep other people out of the room, to keep the objects in reach, and to give the photographer a clear start and end. A closed door and a quiet room are worth more than a dozen props.
Rule four: respect fragile, flammable and venue-restricted items
Some staging ideas create genuine risk. Candles on stationery, loose petals near an open flame, dried flowers with fabric, glitter on a surface that must be cleaned later, and anything left on a stair or a walkway all deserve a pause. Venues often have written rules about open flame, confetti, petals and surface protection.
If you want a staged scene that includes any of these, ask the venue first, and ask the photographer to check with you before improvising. Safety rules apply to wedding detail photos exactly as they do to everything else at the venue.
The Consumer Product Safety Commission and the National Fire Protection Association both publish general guidance on candle safety, and a venue’s own fire rules take priority over a photographer’s idea. If there is any doubt, switch to battery-powered candles for pictures or leave the flame out of the frame.
Rule five: keep the color story calm
Wedding detail photos look better when the palette is limited. Objects that already share a few colors, such as the bouquet, the stationery, the ribbon and the signage, will tie together without any help. The wedding color palette guide explains how to choose a small set of colors that works across the day, and a tight palette also makes it easier for a photographer to place objects together if you ever decide to.
If an object clashes with the rest, such as a bright orange gift box or a colorful pack of tissues, move it out of the frame instead of asking the photographer to remove it afterward. A cropped or cloned frame is more work than a one-second shift of a hand.
Rule six: leave a trace of the person
An object alone is a still life. An object with one trace of a human being becomes a moment. A trace can be a hand, a sleeve, a shadow, a reflection or a mark. Ask the photographer to include one when it is natural. A hand holding the invitation suite for a close frame. A sleeve resting on a table beside a ring. A shadow passing across a menu. A trace turns wedding detail photos from a collection into a story.
A trace does not require a model. It requires a person who is already there. If you are the one holding the object, you are the trace, and the picture will feel more like you than any prop could. Candid wedding detail photos usually include one.
Rule seven: say what you do not want
Not everyone likes every common detail idea. If you dislike a ring pressed into a flower, or you would rather not have a veil draped over a chair, say so. The brief can include a short “skip” line: “No rings on petals, no fabric props, no overhead flat-lay of the whole suite.” Photographers appreciate clear limits because they remove guesswork. Saying what you dislike makes wedding detail photos easier to deliver.
Timing the details across the day
A day has a natural rhythm for objects, and matching your shot list to it keeps the work light. Wedding detail photos follow that rhythm if you let them.
Morning: before frames and the first in-use moments
The morning is for before frames. Objects are whole, rooms are quiet and the light is often soft. This is the time for the ring box, the invitation, the shoes, the jewelry and the garment. It is also the time for the first in-use moments: fastening cufflinks, putting on earrings, pinning a boutonniere. Plan wedding detail photos for the quiet part of the morning.
Aim to finish the detail work before the dressing sequence begins in earnest, or at least before the couple is rushing. If the time for wedding detail photos slides into dressing, the objects will end up unphotographed or hurried.
A good rule is to place the wedding detail photos session at the start of the photographer’s time, not at the end of the getting-ready block. If the room is tight, say so in the brief, because the space available decides how many objects can be set out at once.
Midday: ceremony details in use
Before guests arrive, the ceremony space holds a second set of before frames: programs, signage, aisle markers, flowers, chairs, the officiant’s table. These are best photographed in the short gap between final setup and arrival. As the ceremony begins, the same objects move into the in-use state, and the photographer will typically choose a few of them while keeping their focus on the people.
Be realistic here. During the ceremony the photographer is not able to study a program on a chair. If you want a specific object frame, such as the ring exchange or a reading from a handwritten page, flag it in the brief. Otherwise, assume the ceremony will produce mostly people pictures and plan to catch ceremony objects before or after. Wedding detail photos taken during the ceremony itself are limited by what the photographer can reach.
Afternoon and evening: reception details
Reception details are best captured in two passes. The first pass is just before guests enter, with tables set, candles lit, menus and place cards in position. The second pass is during or after the meal, when the objects are in use or have been used. Wedding detail photos at the reception are really two sets, early and late.
The first pass is the one most couples remember to ask for. The second pass is the one that carries the story, because it shows a place that has been lived in. Ask the photographer for a short walk around the room after dinner, when plates have been cleared and glasses are in hand, and again near the end of the night.
After the reception: the last frames
If coverage includes the end of the night, ask for a few after frames of the room, the bouquet and the objects that have been through the day. If coverage ends earlier, ask a friend to make a few phone pictures, or take them yourselves the next morning.
A bouquet on a hotel dresser the next day, a pile of folded programs or a pair of shoes by the door can finish the sequence with very little effort. Even a few late wedding detail photos change how the gallery ends.
The handoff of files
Detail photos are small pieces of a large gallery, and they are easy to lose in the volume. Ask the photographer how the gallery will be organized and whether wedding detail photos will be grouped together or interleaved with the day. For long-term storage and organization, the wedding records after the event guide explains how to archive photos and keep copies in more than one place, and a folder named for details makes them easier to find when a vendor asks for them months later.
A worked example: one page, one day
The following example is invented and illustrative. It shows how the method turns into a real brief, and it deliberately uses a modest wedding so you can see the decisions rather than the budget. Names, objects and times are made up. It shows what wedding detail photos look like when the thinking is done at one kitchen table.
The couple and the day
Dana and Marcus are marrying on a Saturday in October at a restored mill with a ceremony at four in the afternoon and a seated dinner afterward. They have one lead photographer for eight hours and no second shooter. They are getting ready in two places, a rented house for Dana and a room at the mill for Marcus. They do not want a styled flat-lay. They do want to remember a handful of specific things.
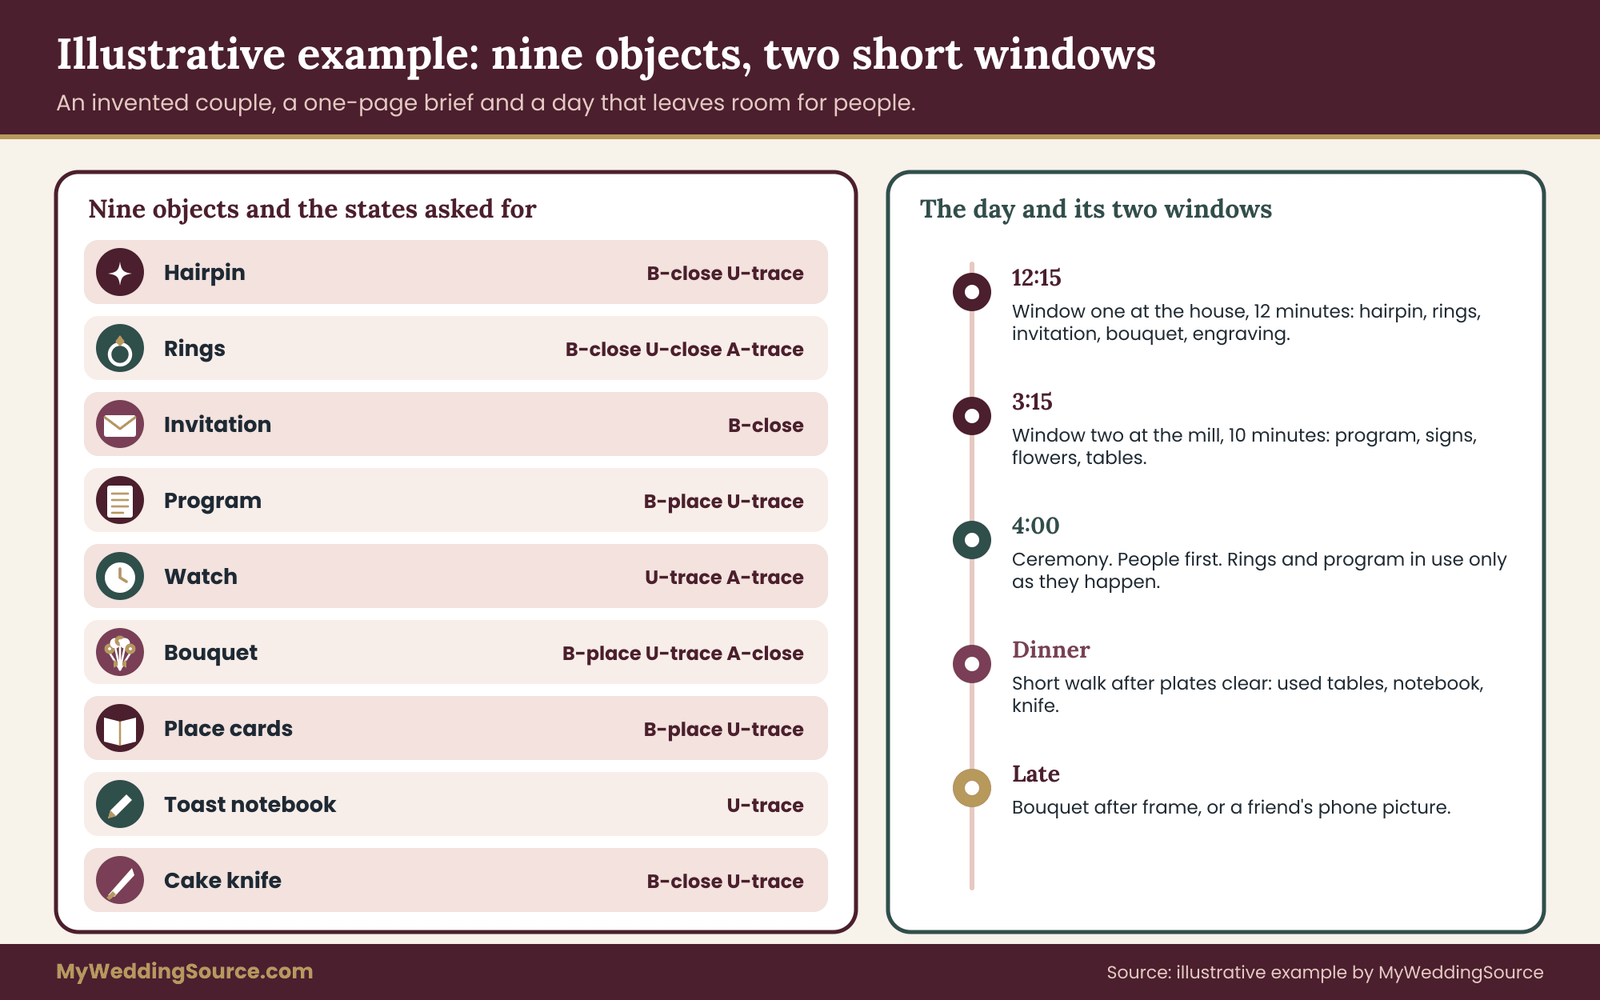
They sit down for an hour and list what matters. The list has nine objects.
Dana’s grandmother’s pearl hairpin. Owned by Dana’s mother, lent for the day.
The wedding bands. Marcus’s is plain. Dana’s was resized from her grandmother’s ring and has a short engraving inside.
The invitation and its envelope. Printed on a friend’s press, with a hand-lettered address.
The ceremony program. A single folded sheet, with a short note from the couple on the back.
Marcus’s father’s watch. Marcus will wear it for the ceremony.
The bouquet. Dahlias and sweet peas from Dana’s aunt’s garden, tied with a plain ribbon.
The place cards. Handwritten by Dana’s sister on small pieces of card.
The toast notebook. A pocket notebook in which Marcus’s best friend has written his speech.
The cake knife. A family knife that belonged to Marcus’s grandparents.
That is nine objects, which fits inside the six-to-ten range. They decide not to include the shoes, the garment bags, the champagne glasses or the ribbon spool, because none of those carries a story that they would miss.
Choosing states and frames
For each object, Dana and Marcus decide which states and frame types matter.
The hairpin gets a before-close frame (on the dresser) and an in-use trace frame (being pinned in by her mother). Its meaning lives in who owned it and who is placing it, so the trace frame matters more.
The rings get a before-close frame, an in-use close frame at the exchange and an after-trace frame with their hands at dinner. Dana adds an engraving close frame, which she knows needs a macro approach and a still moment.
The invitation gets a before-close frame at a low angle to show the printing texture, and nothing more. The envelope gets a close frame of the calligraphy.
The program gets a before-place frame on a chair at the ceremony and an in-use trace frame in a guest’s hand.
The watch gets an in-use trace frame as Marcus fastens it, and an after-trace frame at the table. Its meaning lives in the wrist.
The bouquet gets a before-place frame in the vase at the house, an in-use trace frame as it is handed over before the aisle, and an after-close frame on the dresser late that night. The last one depends on whether the photographer is still there, so they treat it as optional and ask a friend to take a phone picture as a backup.
The place cards get a before-place frame of the table at the first pass, and one in-use frame of a guest picking up a card.
The toast notebook gets an in-use trace frame at the time of the toast, and nothing else.
The cake knife gets a before-close frame and an in-use trace frame at the cutting.
The ownership handoff for the example
They name a helper, Dana’s cousin Priya, who is not in the wedding party and will be at the mill all day. Priya gets the one-page brief and a handoff card for each object.
The hairpin begins with Dana’s mother, who brings it to the house, hands it to Dana’s sister for the pinning and takes it back afterward. Dana’s mother then keeps it until the end of the night. The rings begin in a small box with Marcus’s brother, who has been told to hand the box to the officiant before the ceremony and take it back from the officiant afterward, then give it to Priya for safekeeping.
The invitation and the program are in Priya’s tote bag. The bouquet moves from the vase at the house to the car with the florist’s care card, and from the car to the aisle with Dana’s sister. The toast notebook stays in the best friend’s jacket. The cake knife goes from the caterer’s cart to the table with the caterer, and returns to Marcus’s mother when dinner ends.
Every handoff has a named person and a time, and every card ends with a return. When something is out of place, Priya knows who to ask.
The detail window
They agree on a twelve-minute detail window at the house, beginning at 12:15, before Dana starts dressing. In that time the photographer will capture the hairpin, the rings, the invitation, the bouquet in the vase and the engraving. Priya will bring the objects to a window in the dining room and stay beside them. These two windows hold nearly all of their wedding detail photos.
At the mill, a second ten-minute window starts at 3:15, before guests arrive. The photographer will capture the program on a chair, the signage, the ceremony flowers and the reception tables. Priya will keep the venue staff out of the room for the ten minutes.
During the ceremony the photographer focuses on people, as agreed. The in-use frames of the rings and the program come from the moments themselves. During the dinner, the photographer takes a short walk through the room after plates are cleared, to capture the used tables, the notebook during the toast and the cake knife at the cutting.
What the finished set looks like
In the finished gallery, the detail photos are not a block. They are spread across the day, with a small group in the morning, a few in the ceremony sequence and a handful in the reception.
In total, Dana and Marcus receive about two dozen wedding detail photos, and almost every one carries a trace, a place or a state change. They can identify the hairpin, the watch and the cake knife and trace each to a person. They did not need to bring a single prop that was not part of the day.
What they would adjust next time
Dana notes two things afterward. First, the photographer needed more than ten minutes at the house, because the light in the dining room shifted when a cloud passed. A twelve-minute window with a quiet fallback of three more minutes would have been more realistic. Second, they forgot to tell the photographer about the toast notebook until the day before, and the brief was updated in a rush. The lesson is to send the brief a week ahead, not the night before.
These are small, honest corrections, not failures. A method for wedding detail photos should survive a cloud and a late message. The point of the brief is not to guarantee a particular outcome but to put the odds on your side and leave room for the day to do what it does.
A note on the invented numbers
The times and counts above are illustrations. They are not benchmarks, and they do not reflect an average wedding. Your own numbers will depend on your venue, your light, your photographer’s pace and the number of objects you care about. Use the example as a pattern for the thinking, not as a target to hit.
Alternatives compared: found moments, a staged table and a flat lay
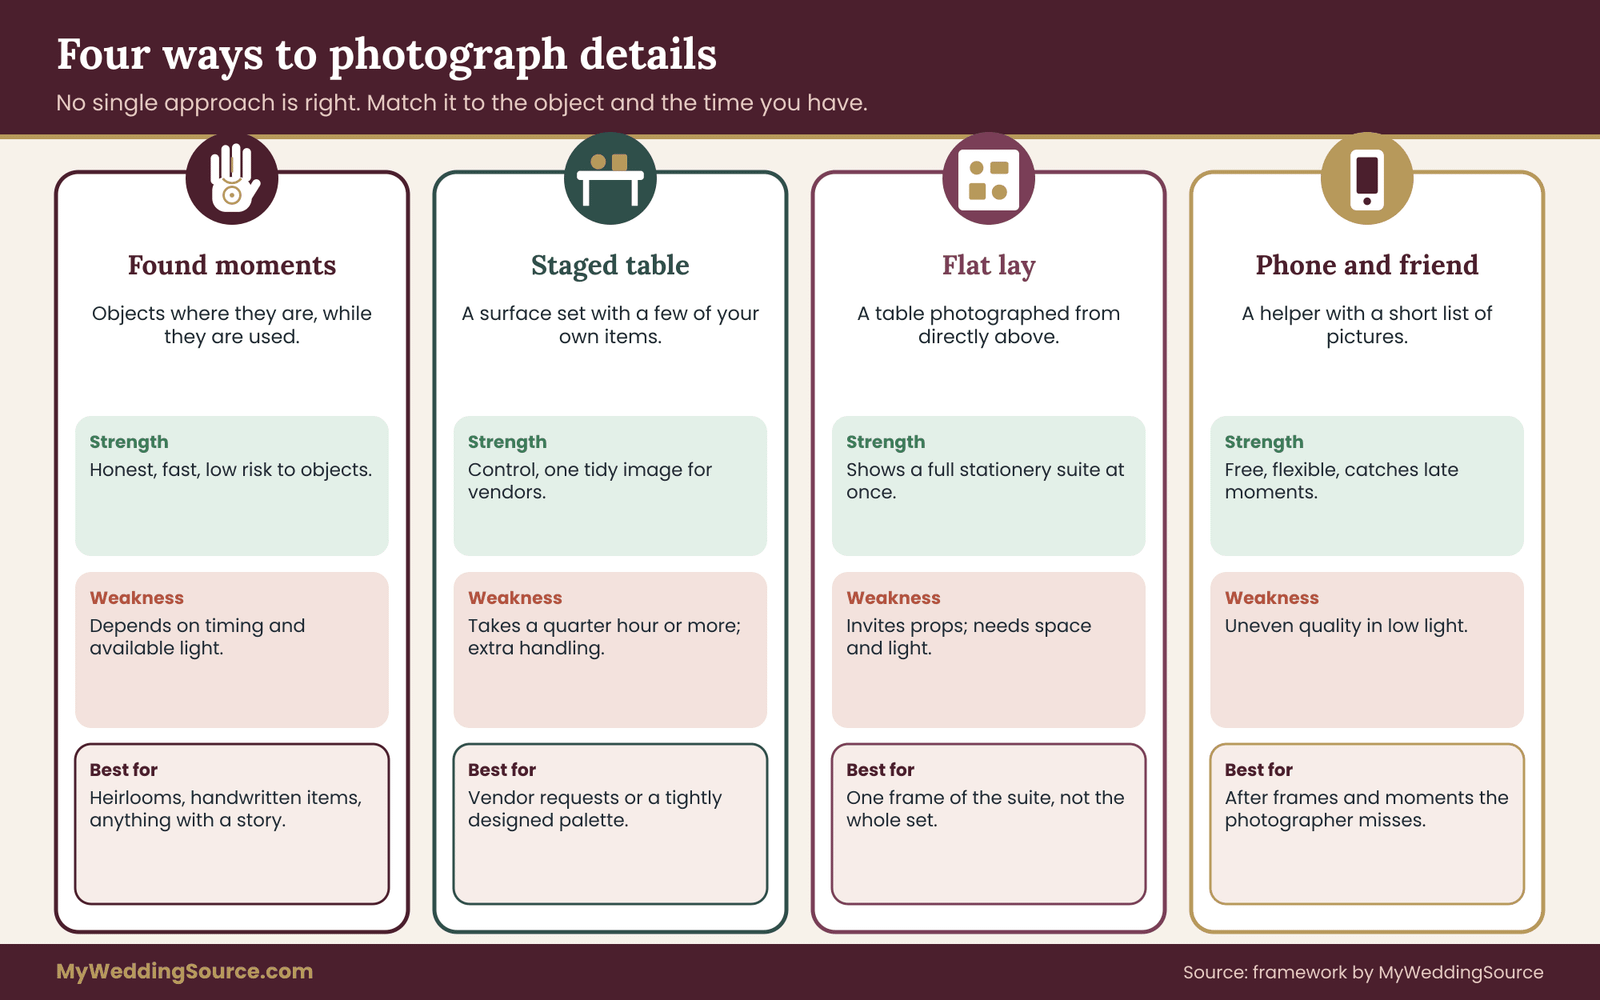
The three-state method is not the only way to approach wedding detail photos. Three common alternatives each have a place, and knowing the differences helps you choose on purpose.
The found-moment approach
This is the approach described in this guide. Objects are photographed where they are and while they are used, with light staging only. Its strengths are authenticity, speed and low risk to the objects. Its weaknesses are that the results depend on the photographer’s timing and the light that happens to be available, and that some pieces will not look tidy.
Choose it when you value a record of the day over a polished catalog, when your objects are meaningful rather than decorative, and when the schedule is tight. For most couples, this is the approach that gives wedding detail photos the most meaning per minute.
The staged table
In the staged table approach, the photographer sets up a surface, often near a window, and arranges a selected group of objects with some care. The arrangement may use items from the day only, or it may add a few props. It takes longer than found moments, typically a quarter hour or more, and it produces a small number of polished images.
Its strengths are control and consistency. The photographer can choose the best angle and light, and every object appears together in a way that suits a vendor’s portfolio. Its weaknesses are the time cost, the added handling and the risk that the picture says more about the photographer’s style than about your day.
Choose it when a vendor wants a clean image of their work, when your design is unusually coordinated or when you simply love the look. If you choose it, protect the time, and be honest with yourself about what you are trading for it. Whatever you choose, make the choice about wedding detail photos deliberately.
The flat lay
A flat lay is a staged table photographed from directly above. It is the most recognizable of all wedding detail photos, and the one most likely to include props. Because the camera looks straight down, the arrangement has to be balanced across the frame, which encourages adding items to fill gaps.
Flat lays can be lovely, and a few are a good idea for a suite of stationery where the layout is part of the design. The risk is that they dominate your wedding detail photos. A full flat lay takes planning, space and careful handling of every piece.
If your venue room is small, the light is poor or the objects are fragile, the flat lay is the first thing to cut. If you decide to include one, this method simply asks you to limit it to a single frame within a larger set.
The phone-and-friend approach
A fourth option costs very little: ask a friend or relative to take phone pictures of specific objects at specific moments. Modern phones handle close frames and daylight well, and a helper who knows the objects can catch moments the photographer cannot.
This works best as a supplement, not a substitute. It fits after frames at the end of the night, quiet frames while the photographer is busy elsewhere and objects that have strong meaning but small visual presence. Its limits are consistency and low-light performance. Make it easier by giving your friend a short list of three or four pictures, not a free-for-all.
How to choose among them
Match the approach to the object and the constraint.
For objects that carry stories, such as heirlooms and handwritten items, use found moments, because the story is in the use.
For objects that represent vendor work, such as a florist’s arrangement or a stationer’s suite, use found moments for most frames and one staged frame if the vendor requests it.
For the small collection of items that are simply decorative, use a short staged group in the time you have left.
For after frames and moments the photographer cannot reach, use the phone-and-friend approach.
This mix keeps the story intact and still gives vendors and you a few clean images.
Questions to ask your photographer about wedding detail photos
The brief works best when your photographer understands it and agrees with it. A conversation of fifteen minutes, before or soon after you book, settles most of the issues. These questions also help you compare photographers, because their answers reveal their working style. Settle these points before wedding detail photos become a source of tension on the day.
Questions about approach
How do you usually handle detail photos on a wedding day? Listen for whether the answer leans toward arranging or observing. Neither is wrong, but you want to know what to expect.
How long do you usually spend on details in the morning, and can that be shortened or lengthened? This gives you the time budget for wedding detail photos. A photographer who says “as long as you want” may not be thinking about the schedule, and one who says “ten to fifteen minutes” has a plan.
Do you bring your own surfaces, props or lights? If the answer is yes, ask what they bring and whether you can see examples. If you do not want props, say so now.
Can you photograph objects in use, such as the ring exchange or a toast notebook? A positive answer means they will watch for the moment. If they say the ceremony is only for people, adjust your expectations.
Questions about coverage
Will you be present for the end of the night, or does coverage end earlier? This determines whether after frames are possible.
Do you have a macro lens for engravings and small details? Some do, and some do not. If an engraving matters to you, ask for a sample close frame.
If we want more than a certain number of objects on the brief, does that change the price or the time? Some photographers treat details as part of coverage, and others limit the time. Ask early.
Questions about handling and safety
How do you handle valuable or borrowed items? A careful photographer will describe a routine: soft surface, low drop distance, return to the owner, no loose rings outdoors. If the answer is vague, spell out your handoff rules.
Do you have any concerns about our brief? Invite pushback. A photographer who flags a timing problem now is saving you from a missed shot on the day.
Questions about rights and sharing
This is the part couples most often skip. Detail photos often feature the work of other vendors, and you may want to share images with them. The questions below keep everyone on the same page. Rights questions matter for wedding detail photos because other vendors’ work appears in them.
Who owns the copyright in the photos, and what license do I receive? In the United States, copyright in a photograph generally belongs to the person who made it unless there is a written transfer or the work is made under certain employment or commissioned-work arrangements.
Your contract usually gives you a license for personal use. The U.S. Copyright Office explains the basics on its website, and your contract is what governs your situation. The wedding vendor contract guide covers what to look for when you read these clauses.
May my other vendors use these images, and may I share them? Florists, stationers and bakers often ask. Check whether the contract allows you to pass images along, whether credit is required and whether the photographer wants to approve the use. A short email can settle this and avoid awkwardness later.
May you use my detail photos in your portfolio or marketing? The answer may be yes by default. If you would prefer not to have an engraving, an address or a handwritten note shown publicly, say so. Objects can carry personal information, such as a name on an envelope or a date on a card, and it is reasonable to ask that those be hidden or cropped.
How long will the gallery stay online, and can I download full-resolution files? The answer determines how long you have to collect the details and keep them. Downloading and copying files early matters, because galleries can expire.
What a good answer sounds like
A good answer is specific, calm and willing to adapt. A photographer who says “I usually take about ten minutes for details, and I like to include a hand when I can. Send me your list and I will tell you what is realistic” is giving you a useful answer. One who says “I will take care of everything” without asking what matters to you is not wrong, but you will need to be more explicit in the brief to protect the pictures you care about.
If the photographer pushes back on your brief, listen. They may know something about the venue, the light or the schedule that you do not. The goal is a shared plan, not a win.
Measurable checks before and after the day
A method is easier to trust when you can check it. These checks do not predict how good the pictures will be. They tell you whether the brief is working and whether the delivered gallery matches what you asked for. Checks make wedding detail photos easier to judge.
Before the day: five checks
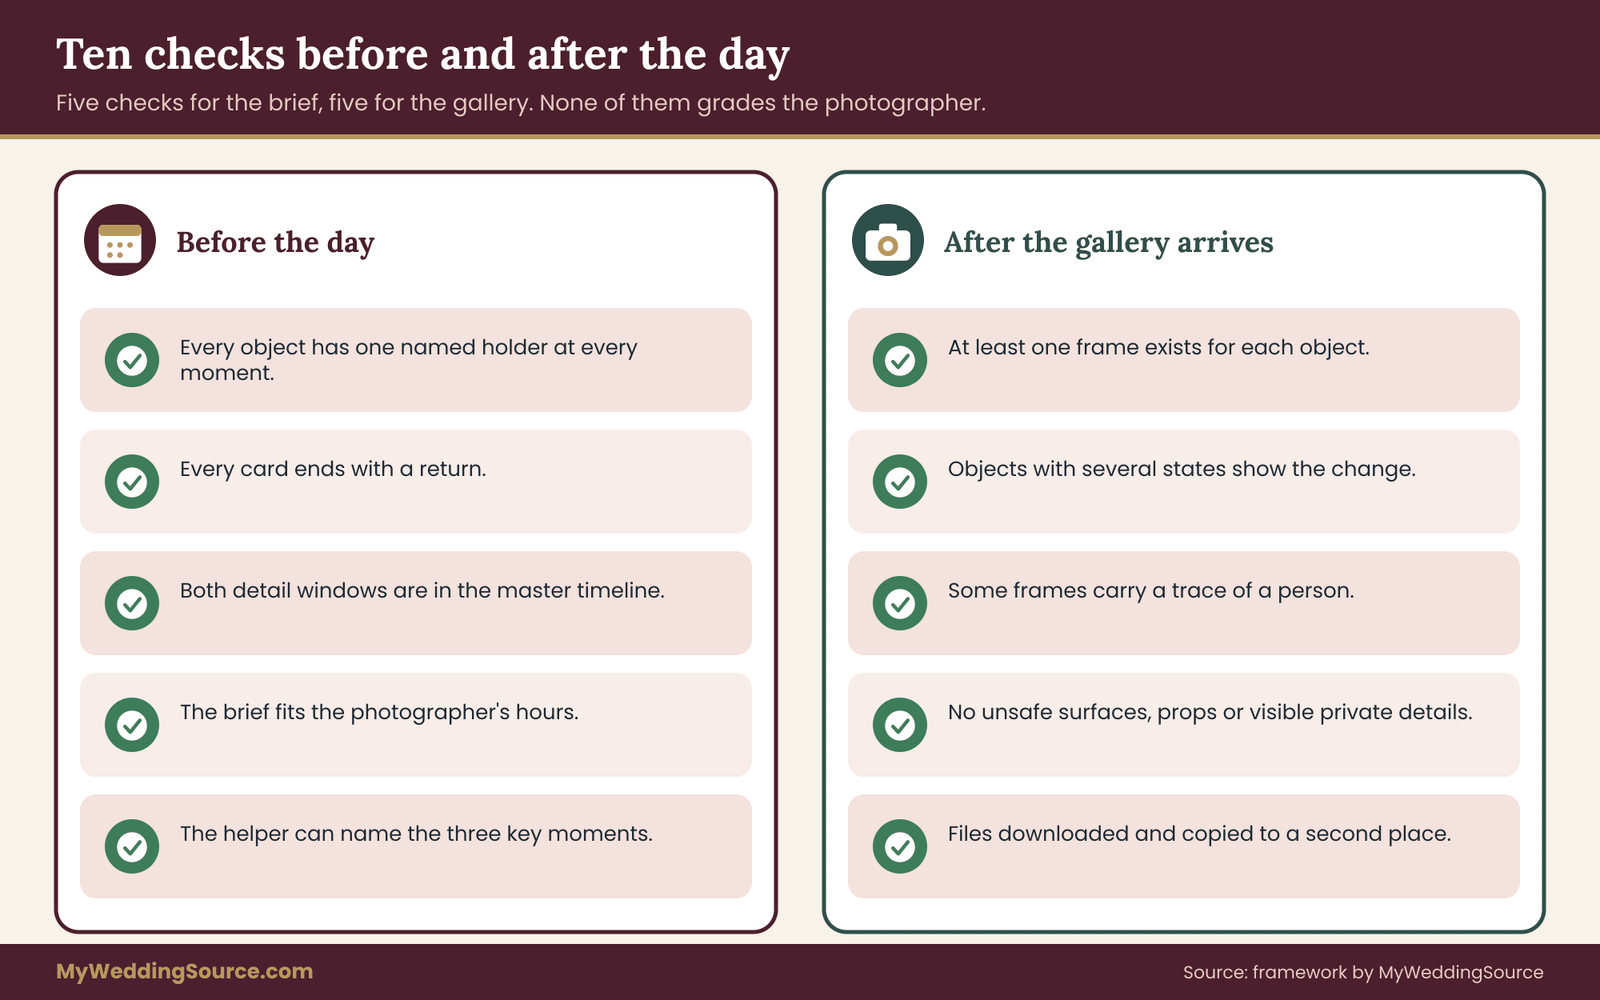
Every object has one holder at every moment. Read the handoff cards. If any object has a gap, a “we will figure it out” or a group name instead of a person, fix it.
Every object has a return. Look at the last line of each card. If the card ends at “photographed,” add where it goes next.
The detail windows are in the master timeline. Open the run-of-show and look for the morning window and the pre-ceremony window. If they are only in the brief, the rest of the team will not protect them. The wedding vendor timeline approach puts every vendor on one clock.
The brief fits the photographer’s time. Add up the minutes in your detail windows and compare them with the hours of coverage. If details take up more than a small slice of the early timeline, trim the list.
The helper has read it. Ask them to tell you, in their own words, which three moments matter most. If they cannot, sit down together for ten minutes.
After the day: five checks
Once the gallery arrives, compare it with the brief. You are not grading the photographer. You are making sure that nothing important was lost and that you can use what you received.
Count by object, not by picture. For each object on the brief, find at least one frame. If an object has none, note it. Do not worry, because some objects are legitimately missed. But a note lets you ask a polite question while the memory is fresh.
Check the states. For the objects where you asked for more than one state, look for the change. If the bouquet appears only before, ask whether an after frame exists. If the gallery has several near-identical before frames and no in-use frame, you have learned something about the timing.
Look for a trace in at least some frames. A set with no human trace anywhere is a set of still lifes, and you may want to note that for next time or for any further sessions.
Look at the edges. Check for fingers in odd places, objects on unsafe surfaces, unwanted props or visible personal information such as an address or a phone number on a card.
Check the file basics. Make sure you can download full-resolution files, that the details are labeled or grouped in a way you can find, and that you have a plan to keep copies in more than one place. This is a step to do early, because galleries can expire.
A simple score
If you like numbers, keep it light. Give each object a mark: covered in the state you asked for, partly covered or missing. You will probably find that most objects are covered, a few are partly covered and one or two are missing.
That is a normal result, and the point is to learn, not to score the day. Share your notes with the photographer in a short, specific message, and, if the missing item matters, ask whether a reshoot of an object is possible. Objects, unlike moments, can sometimes be photographed again.
Edge cases and what to do about them
No method survives every situation unchanged. These are the cases that come up most often, with a way to adjust.
Rain, wind or poor light
Bad weather changes the day’s rhythm. Rain is hard on outdoor objects but gentle on indoor light, which is often softer and easier for close frames.
If the ceremony moves indoors, take the before frames of ceremony details in the new space, and let the rain become part of the story: a wet umbrella beside the program, a damp bouquet being shaken out. If wind is a problem, skip loose paper and light fabric in the open, and use clips or weights outside the frame. Weather rarely ruins wedding detail photos; it changes them.
Objects that cannot be handled
Some objects are too fragile or too sacred to move. A framed photograph of a late relative on a memory table, a very old document or an item held by someone who prefers not to let go. The answer is to photograph them where they are, with the person who cares for them, and to include only the light and the context that already exist. Ask the person who cares for the object how close the photographer may come and whether they would like to hold it.
Very small or very rushed weddings
At a courthouse or a micro wedding there may be no getting-ready sequence and no reception. The method still works if you shrink it. Choose three objects, ask for one or two states each and use a five-minute window before or after the ceremony. A ring, a bouquet and a signed document can tell the whole story. Small weddings can still produce strong wedding detail photos from three objects.
Destination and travel weddings
Objects travel, and some may not make it. Keep the list short, check items in carry-on bags and name a backup for anything that cannot be replaced. Photographers who travel may have less time for details, so ask early how much time is realistic.
No second shooter
With a single photographer, details compete with people. Be selective. Put your highest priority objects in the early windows, rely on the found-moment approach for the rest and use friends for supplemental phone frames.
Disagreements about what matters
Families sometimes want different objects photographed, especially if heirlooms are involved. Keep the brief short, decide together which objects carry the most meaning and let the owner of an heirloom decide how it is photographed. If a disagreement cannot be settled, the simplest compromise is a short, separate moment for the contested object, with the owner present, rather than competing for space on the main list.
Common mistakes with wedding detail photos
Most problems come from a handful of repeated mistakes. Wedding detail photos suffer from the same few errors again and again.
Listing everything. A brief with thirty objects is a catalog. Keep it to the pieces that carry meaning.
Forgetting the owner. An heirloom handled without its owner’s consent can cause real hurt. Ask first.
Skipping the handoff. The ring box in the wrong bag is the classic failure. Name a holder.
Over-trusting the timeline. If the details are not in the master schedule, they will be the first thing to slide.
Letting staging grow. One prop invites another. Set a time limit and stick to it.
Ignoring the after state. The most affecting pictures are often taken when the day is nearly over.
Not checking rights. If a vendor wants your images, or if you want to share them, settle the terms in writing.
Copying someone else’s list. Your objects are different. Write your own.
Your next steps
Start with a list of objects. Spend twenty minutes writing down everything that matters, then cut it to six to ten using the three piles: meaning, money and loveliness. Next, choose the states and frames you want for each, and write a one-line reason. Then name a holder for every object and a helper for the day. Wedding detail photos begin with that list.
Send the brief to your photographer at least a week ahead, and ask the questions in this guide. Put the detail windows into your master timeline, with the help of the wedding family photo list if you are also scheduling portraits, so the two do not collide.
After the day, check the gallery against the brief, download your files and keep copies in more than one place. Done calmly, the whole process takes a few evenings, and the result is a set of pictures that look like your day and nobody else’s.
FAQ
How many wedding detail photos should we ask for?
There is no fixed number. A useful target is a brief of six to ten objects, which usually produces a few dozen wedding detail photos in a full-day gallery. Count by objects that matter to you rather than by image totals, and ask your photographer what is realistic for your timeline. More frames do not make a better set. A short list of meaningful objects tends to look more personal than a long one.
Is it rude to tell a photographer what to photograph?
No. Photographers generally welcome a short, specific list, because it saves them from guessing. The key is to present it as priorities rather than orders, and to leave them room to use their judgment about angle and light. If they push back on timing or style, treat it as useful information about the venue and the day.
What if our photographer prefers heavily styled wedding detail photos?
Ask how long that style takes and which items they would add. You can request a smaller version, such as one styled frame of the stationery within a larger found-moment set. If the two approaches conflict, it may be a sign that their style does not match yours, and it is worth discussing before you sign.
Do we need to be present for the detail photos?
Not usually. A trusted helper can bring objects to the photographer and take them back, which lets you start dressing or relax. Be present only for the pictures that need you, such as a hand holding an heirloom. Otherwise, a clear brief and a reliable helper are enough.
How do we protect valuable rings during photos?
Keep rings in a closed box or pouch between uses, and let the container, not the loose ring, travel between holders. Photograph over a soft surface and a short drop distance, avoid water, grass and grates, and name one person responsible at each moment. If a setting looks risky, move to a table or a lap.
Who owns the copyright in our detail photos?
In the United States, copyright in a photograph generally belongs to its creator unless a written agreement says otherwise. Your contract usually gives you a license to use the images, often for personal purposes. Read the usage terms, ask about sharing with other vendors, and see the U.S. Copyright Office website for general information.
Can our florist or stationer use the photos?
Possibly, but permission comes from the photographer’s license, not from the vendor’s wish. Ask whether the contract allows you to share images, whether credit is required and whether the photographer wants to approve the use. A short written confirmation, kept with your records, prevents confusion later.
What if we do not get an object we cared about?
Check the brief and the gallery, then write a short, specific message asking whether a frame exists. Some objects can be photographed again after the wedding, such as stationery, rings or a bouquet that was preserved. If the object has already changed or is gone, a phone picture of whatever remains can still help complete the record.
Sources
- U.S. Copyright Office
- Copyright FAQs, U.S. Copyright Office
- Copyright basics, U.S. Copyright Office
- Personal archiving: preserving your digital memories, Library of Congress
- Back up business data, Cybersecurity and Infrastructure Security Agency
- Candle safety, Consumer Product Safety Commission
- Candle safety, National Fire Protection Association
- National Archives and Records Administration
- Advertising and marketing guidance, Federal Trade Commission
- Smithsonian Institution Archives: preservation resources