
Reception interior design is the work of turning a bare rented room into a place where furniture, fabric and light all point the same way. This guide gives you a zoning plan and a layered texture specification you can hand to a venue, a rental company and a lighting vendor, so every choice has a job and nothing fights for the same corner of the room.
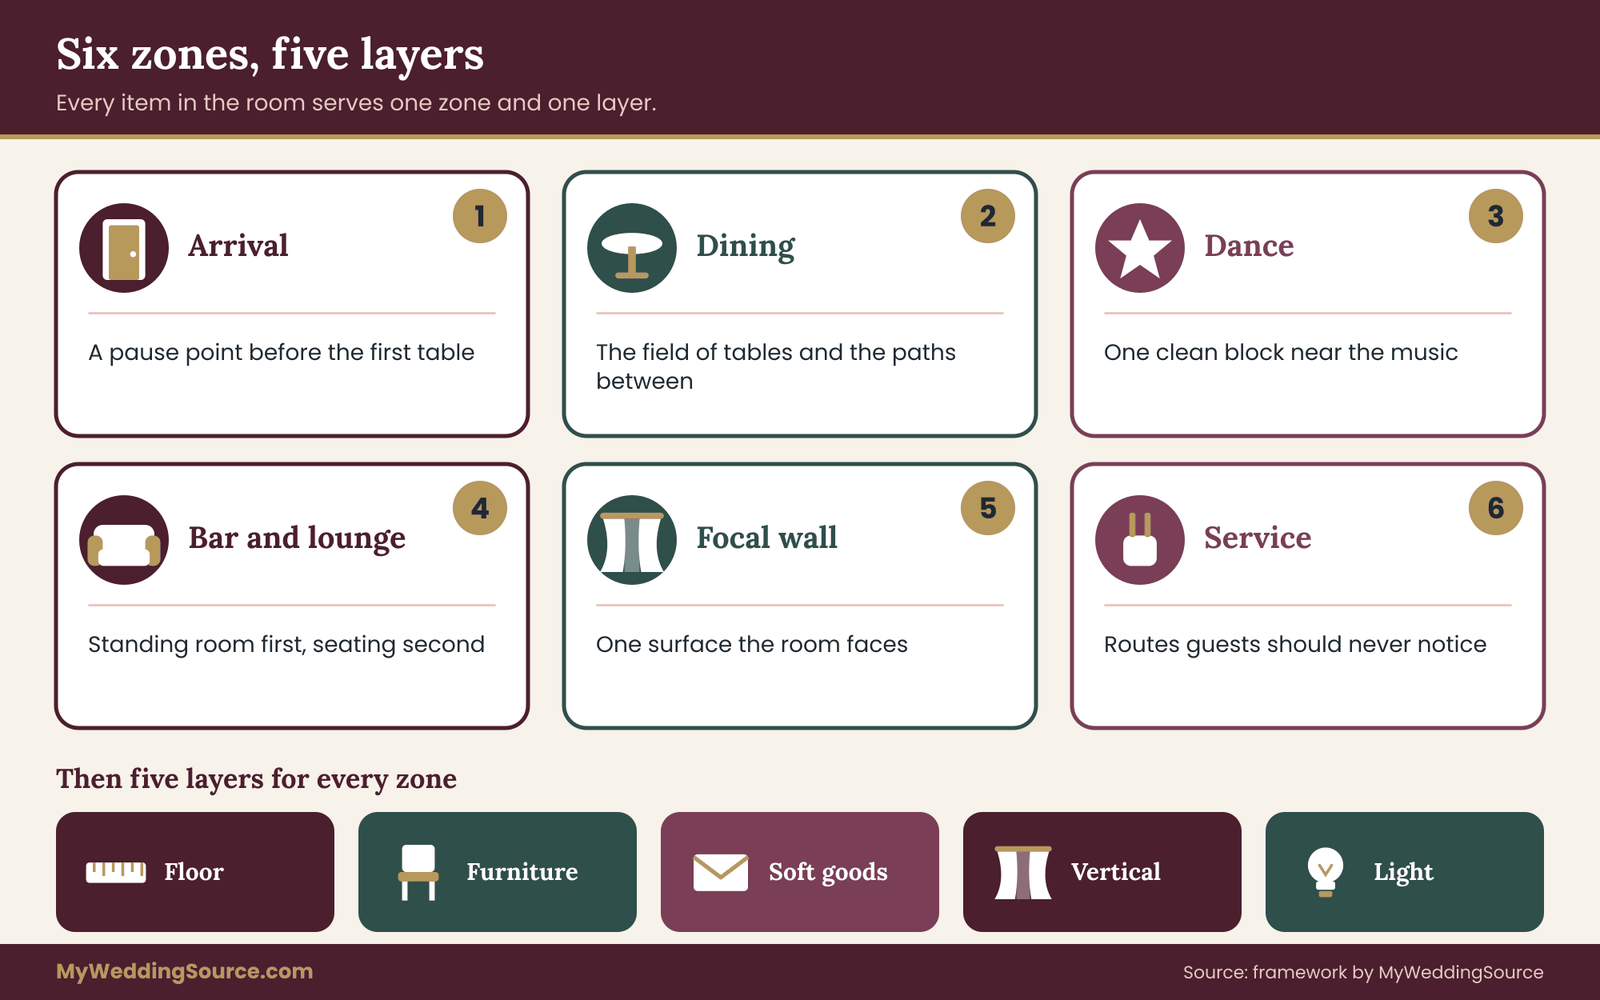
Decide what the room must do before you decide how it looks. Divide the floor into six zones (arrival, dining, dance, bar and lounge, focal wall, service), give each zone one purpose, and then specify five layers for it: floor, furniture, soft goods, vertical surfaces and light. Keep each zone to three dominant textures. Send the plan to the venue early, because drapery, rigging, candles and extra electrical load all need written approval. Reception interior design works when the plan is on paper before the first rental quote arrives.
Most couples start with a mood board. It is a fine place to find out what you like, and a poor place to decide what a room needs. A board of velvet sofas, floor-length drapes and hundreds of tiny lights tells a vendor nothing about where the dance floor goes, how guests reach the bar, or whether the ceiling can hold anything at all.
Then the quotes arrive, the rental list grows, and a month before the wedding someone discovers that the sofas block the door to the kitchen.
The reception interior design method here fixes the order of operations. First you measure and map. Then you assign zones. Then you add layers of material, one zone at a time, and light comes last because light is what reveals every earlier decision, good or bad. At the end of the reception interior design process you have a short spec for each zone that a vendor can price and a venue can approve.
A note on scope. This is general planning information, not legal, safety or engineering advice, and it does not replace the written rules of your venue, your local fire authority or a licensed professional. Rigging, flame resistance, open flame and electrical work always need qualified approval, and the sections below say where to ask.
What reception interior design covers in a rented room
The phrase gets used loosely, so it helps to say exactly what is inside it. In this guide, reception interior design means every physical decision that shapes how the room looks and behaves once guests are inside it: the layout of tables and lounge pieces, the fabric that softens walls and windows, the surfaces guests touch, and the lighting that sets the mood from cocktail hour to the last song.
Reception interior design does not include the florals as a topic of their own, the cake, or the signage system, although all of them sit inside the room and need space. Those have their own guides on this site, and where they affect the plan you will see a short pointer rather than a repeat.
Three things make a wedding room different from a house or a restaurant. The first is time. You get access to the space for a fixed window, often a few hours before guests arrive, so every element has to be installable by a small crew in that window. The second is turnover. Everything leaves again at the end of the night, which rules out anything that needs patching, painting or fixing to the building.
The third is crowd behavior. Guests move in waves, from ceremony to cocktails to dinner to dancing, and a design that looks fine empty can jam up when a hundred people stand up at once.
The cost of designing in the wrong order
Getting the order wrong is the most common reason reception interior design looks busy and works badly. A few patterns repeat. Couples rent lounge furniture, then discover there is no floor space left once tables are set. They order sheer drapes for a wall, then learn the venue forbids anything attached to the walls. They choose chandeliers, then learn the ceiling has no approved rigging points and the room has a sprinkler system that must stay clear.
None of these are failures of taste. They are failures of sequence, and the reception interior design plan below puts the constraints first so taste has room to work inside them.
Who should own the plan
One person should hold the master floor plan, and that person does not have to be the designer. In a small wedding it is often a partner. In a larger one it may be a planner or the venue’s event manager. What matters is that every vendor who adds something to the room sends it to the same person, and that the person checks each addition against the plan before it is approved.
If you are working with a professional designer, treat the reception interior design plan in this guide as a briefing document. It shows what you have decided, what is open, and which constraints came from the venue. A designer can then spend their time on judgment rather than on discovering the basics.
The zone-and-layer method on one page
The reception interior design method has two axes. Zones are about where things happen in the room. Layers are about what each zone is made of. Every element you add to your reception interior design should be traceable to one zone and one layer. If you cannot say which zone a rental item serves, it is probably decoration without a job, and it is the first thing to cut when the budget tightens.
The six zones. Arrival, dining, dance, bar and lounge, focal wall, and service. Arrival is the first ten feet inside the door, where guests slow down, find their table and decide how the evening feels. Dining is the field of tables. Dance is the floor, plus the band or DJ position.
Bar and lounge is where people stand and linger. The focal wall is the surface guests face most, often behind the head table or the cake. Service is the part of the room you want guests to forget: caterer routes, the DJ’s cables, the back of the bar.
The five layers. Floor, furniture, soft goods, vertical surfaces and light. Floor means rugs, dance flooring, carpet tiles and the existing surface. Furniture is every hard object people sit at, on or against. Soft goods are linens, upholstery, cushions and anything fabric that is not hanging on a wall. Vertical surfaces are walls, drapes, screens and backdrops. Light covers overhead, mid-height and low sources.
The three-texture rule for each zone
Inside each zone, limit the dominant textures to three: one hard, one soft and one that catches light. A dining zone might use a matte wood table, a heavy cotton linen and a brass candleholder. A lounge zone might use a leather sofa, a wool rug and a glass side table.
The rule is not about taste. It is a way to keep a zone in your reception interior design readable. When a zone has six competing textures, the eye has nowhere to rest and the room feels cluttered even when the floor is clear.
The rule also helps reception interior design with pricing. A vendor can quote three textures per zone. They cannot quote “a layered, eclectic feel.”
How the plan travels to vendors
Each zone gets a one-page spec card that lists its purpose, its footprint, the three textures, the light level and the open questions. The cards add up to the whole plan. You send the floor plan and the relevant card to each vendor, never the whole mood board, and you ask them to reply with what they can supply, what it costs and what approvals they need from the venue.
That last question matters most. A rental company knows its own fire documentation. A lighting company knows its own electrical load. Neither knows your venue’s rules unless you tell them, and neither is responsible for finding out on your behalf unless the contract says so. The planning stages below show where each approval fits.
Reading the room before you design anything
Reception interior design depends on facts about the room, and most of those facts are free. They cost an hour with a tape measure and a short, specific email to the venue. Skipping this step is how couples end up designing for a room that does not exist.
Start with the dimensions that decide layout: the length and width of the usable floor, the ceiling height at the lowest and highest points, the position of every door, and the position of anything fixed that cannot move, such as columns, pillars, built-in bars, fireplaces, stage steps and thermostats.
Mark each on a rough sketch. The venue may already have a scaled plan, and asking for it saves time. If the venue has a technical walkthrough process, the guide to the venue technical walkthrough explains what to measure and who should be on the call.
The seven facts to collect from the venue
Send one email with a numbered list so the answers come back in the same order. The facts below decide most of what you can do.
First, the usable floor area for the reception, and whether another event, a bar line or a service corridor shares it. Second, ceiling height and ceiling type: a flat ceiling, exposed beams, a drop ceiling or a tent. Third, what may be attached to walls, ceilings and beams, and by whom. Fourth, the rules on open flame, including taper candles, votives, tea lights and cake sparklers.
Fifth, the electrical supply: how many outlets and circuits are available in the room, and who is allowed to connect equipment. Sixth, the fire marshal’s requirements for aisles, exits and tables, including any approved capacity. Seventh, load-in access, which doors and elevators vendors may use and when.
Write the answers into your reception interior design plan next to the item they affect. If a reply is vague, ask a narrower question. “Can we hang fabric?” invites a quick no. “Can fabric be draped from the existing ceiling track, if the fabric carries a flame-resistance certificate?” invites a useful answer.
The approval list you will build as you go
Keep a running list with three columns in your head, even though you will write it as plain lines: what the item is, who must approve it and what document proves it. A swag of fabric needs the venue and usually a flame-resistance document. A string of lights needs the venue and a statement of electrical load. A rented heater needs the venue and, in some places, the fire authority. A chandelier hung from a ceiling point needs a rigging professional and venue sign-off.
When the list has no names against an item, the item is not ready to be ordered. That rule alone prevents the most expensive reception interior design surprises, which are the ones discovered during load-in.
“Before we order drapery, could you confirm what may be attached to the walls, ceiling or track, and what fire documentation you require for fabric?”
What to photograph on the site visit
Take photos with a purpose. Shoot each wall straight on, so you can see where outlets, vents, thermostats and exit signs sit. Shoot the ceiling from the center of the room, then from each corner. Shoot every door from inside and outside. Shoot the floor, because carpet, stone and hardwood each change how rugs, risers and chair legs behave. Include the view from the guest entrance, since that is the first view every guest has.
Then take one more photo from the spot where the head table or sweetheart table will be. It shows what the two of you will look at for most of the evening, and it often reveals an exit sign, a speaker stack or a stack of venue chairs that nobody mentioned.
Drawing the zoning plan for reception interior design
With the facts in hand, start the drawing stage of reception interior design: draw the floor. Use graph paper, a free floor-planning tool or the venue’s own scaled plan. The software matters far less than the habit of drawing to scale, because scale is what exposes the problems. A table that looks small on a mood board occupies a surprising amount of floor once chairs are pulled out and people are sitting in them.
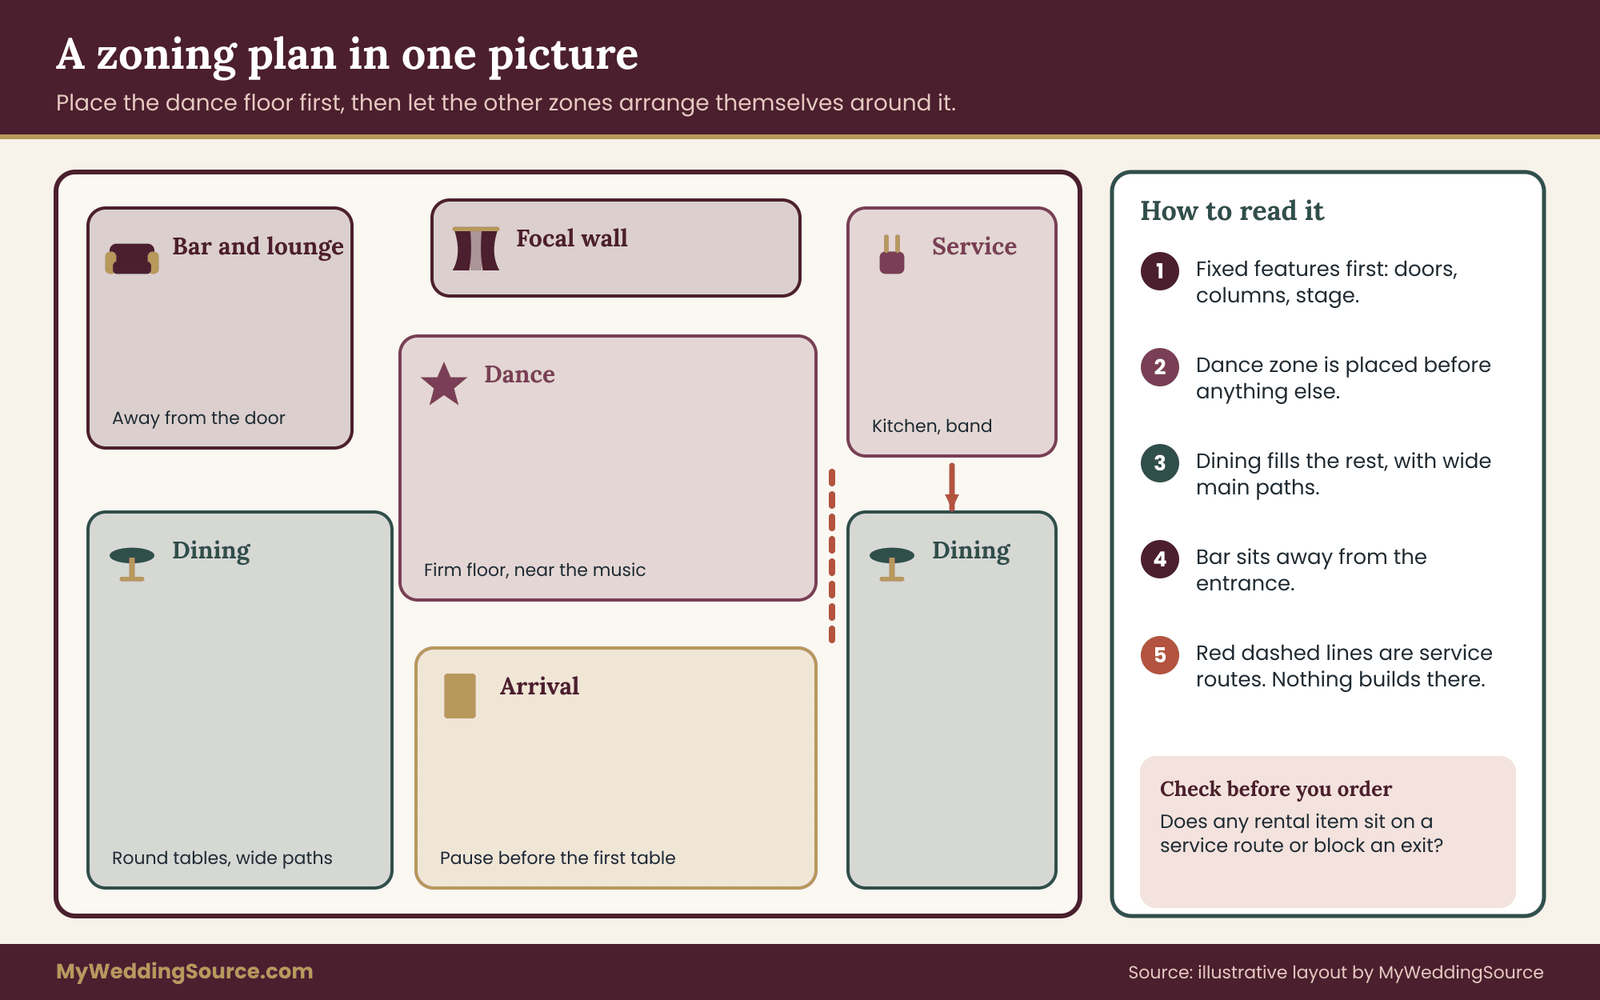
Place the fixed things first: doors, columns, stage, built-in bar, exit paths. Then place zones in this order: dance, dining, bar and lounge, arrival, focal wall, service. The order is deliberate. The dance floor is the zone that most needs to be a single clean block, so it gets placed first and the rest arrange themselves around it.
Placing the dance zone
In reception interior design the dance zone needs a firm floor, a clear sightline to the music and an edge that guests can reach without crossing a service route. It works best when it sits near the center or toward one long side of the room, with seating on at least two of its sides. A dance floor tucked in a corner feels like an afterthought, and a floor placed far from the bar and lounge splits the evening in two.
Size it for the crowd you expect on the floor at once, not the full guest count. Many couples find that something like a third to a half of guests are on the floor during peak songs, but that depends heavily on the crowd and the music, so treat it as a planning guess and ask your band or DJ what they have seen in rooms of your size.
If the venue’s floor is carpet, ask whether a rental dance floor is needed and how it is laid, since a floor that rides up is a trip hazard.
Placing the dining zone
In reception interior design, tables fill whatever space is left, but they should not simply fill it. Leave generous paths between tables, wider where servers carry trays and wider again on the main route to the dance floor and the restrooms. As a planning habit, many planners keep roughly five feet between table edges on main routes.
That is a rule of thumb for comfort, not a code requirement. Your venue and local fire authority set the actual minimum aisle widths, and your rental company’s spec sheet gives the true diameter of each table.
Round tables encourage conversation and use space efficiently. Long rectangular tables feel dramatic and communal, but they need straight runs and make it harder for servers to reach the middle. A mix is common: rounds for most guests, one long table for the wedding party or family. The seating logic behind the choice, including how to group guests, is covered in the wedding seating chart guide, and it should come first because it decides how many seats each table needs.
Placing the bar and lounge zone
The bar and lounge zone is the pressure valve of a reception interior design. It absorbs the cocktail-hour crowd, the guests who do not dance and the line that forms whenever the bar opens. It needs more standing space than you expect and less seating than you want. A few soft seating groups invite conversation, but a lounge area that holds twenty seats in a room of a hundred and twenty guests can quietly eat the space the bar queue needs.
Keep the bar away from the entrance, so arriving guests do not form a line across the door. Keep it away from the dance floor edge as well, or the queue will drift into the dancers. A position along a side wall, with room for a queue that runs parallel to the wall, is the safest. For how beverage service shapes this decision, the wedding bar service planning guide covers the operational side.
Placing arrival, focal wall and service
Arrival needs a pause point. Guests who step through a door into a crowded view tend to stop and block the entrance, so give them a quiet buffer of floor before they meet the first table. This is where the seating display, the welcome sign and perhaps one piece of soft lighting live. The way guests flow from the door to their seat is a topic on its own in the reception guest flow guide, and your reception interior design plan should be checked against it.
In reception interior design, the focal wall is the surface that most photographs and most eyes will meet. Choose it deliberately. It is usually the wall behind the head table, the wall behind the cake, or the wall behind the band. Pick one, not three, and let the other walls stay quieter. A room with three equal focal points has none.
Service is the zone that reception interior design most often forgets. The caterer needs a route from the kitchen to every table, the band needs a load path, and the venue staff need access to their own storage. Draw these routes on the plan in a different color and treat them as no-build corridors. Any rental item that lands in a service route moves.
Furniture as architecture: seating, tables and lounge pieces
Furniture is the layer of reception interior design that builds the room. Walls and ceilings are given, but chairs and tables create the rooms inside the room: the dining field, the lounge pocket, the sweetheart table with its own small stage. Treat furniture as architecture and the rest of reception interior design gets easier, because every other layer hangs from it.
Choosing by job, not by photo
Start every furniture decision in reception interior design by naming the job. A chair has to be sat in for two hours at dinner. A lounge sofa has to be sat in for twenty minutes at a time by people holding drinks. A high-top table has to hold a plate for a few minutes while someone talks.
A bench has to take weight from two or three people without anyone worrying about it. When the job is clear, the right piece is usually obvious, and the photo that inspired you becomes a reference for color and shape rather than a shopping list.
Guest comfort deserves more weight in reception interior design than most couples give it. A beautiful chair that is hard or narrow turns a ninety-minute dinner into a long wait, and the guests who feel it most are older relatives, pregnant guests and anyone with back pain.
Ask the rental company which chairs they stock for long dining and whether any have arms, which many older guests find easier to rise from. Offer at least some seating with a standard seat height and a firm back, even if the majority is more decorative.
Table shapes and what they do to the room
Round tables are the default in reception interior design because they suit conversation and pack well. A table that seats eight tends to feel close and sociable, and one that seats ten feels more spread out. Rental companies publish seating guidance for each table size, and that guidance is the figure to use, since linens, centerpieces and chairs all add to the footprint. Ask for the actual dimensions of the chairs and tables you plan to rent, and use the numbers in your drawing.
Rectangular and farm-style tables suit a more relaxed or rustic room. They create long sight lines and a strong horizontal rhythm, and they pair well with draped ceilings and low light. Their downsides are practical. Guests in the middle cannot leave without disturbing others, and servers cannot reach across them as easily. Use a rectangular layout when the room has the length for it, and keep at least one clear crossing point between runs so people can get to the restrooms without climbing past a stranger.
Mixed layouts can work well if you give each shape a reason. A long head table at the focal wall with round tables in the field creates a clear hierarchy. Round and rectangular tables scattered at random read as an accident.
Lounge furniture without losing the dance floor
Lounge furniture is where couples most often overspend on reception interior design and where plans most often go wrong. A sofa takes far more floor than its seat count suggests, because people need to stand in front of it, set drinks on a table beside it and walk around it. A common mistake is to place three or four lounge groups near the dance floor, where they quickly become a place to leave bags, jackets and half-finished drinks.
Choose one or two lounge groups and give them a purpose. One group near the bar can serve guests waiting for drinks. One group away from the speakers gives conversation a quiet corner for older guests. Each group needs a rug or other floor definition so it reads as a distinct place, a low table so drinks have a surface, and a clear path around it.
If you cannot draw that footprint on your floor plan with the clear paths marked, you do not have space for the group.
Think about who will use it. If many guests will arrive in formal clothing, a low, soft sofa that requires a deep sit may be uncomfortable. A higher seat with a firm cushion works better for long gowns and tailored suits. This is a good question to put to the rental company, which knows its own stock.
Furniture for accessibility and comfort
Plan for guests who use wheelchairs, walkers or canes before you finalize the layout. Federal accessibility standards generally call for accessible routes at least 36 inches wide, though the rules have exceptions and local codes may differ, and the U.S. Access Board publishes the details. A wedding is not necessarily a place where those rules apply in the same way as a public building, but the number gives you a practical minimum to design from, and wider is kinder where the room allows it.
Keep a clear, level path to every table, to the restrooms and to the dance floor edge.
Leave open spaces at tables so a wheelchair user can sit at the table rather than behind a row of chairs. A simple way to do this is to ask rental staff to remove one chair at designated tables during setup, then place the extra chair elsewhere. Do not mark the table with a sign, and do not place the guest where the plan is awkward. The aim is that nobody has to ask.
The guest-care side of this, including older relatives and children, is covered in the guide to guest care on this site, and your reception interior design plan should be read alongside it.
Heights, sightlines and the eye-level band
Furniture sets the height of the room for most of the evening, so it anchors reception interior design vertically. Seated guests see the world from about the height of a table, and standing guests see over it. A room built entirely at seated height feels flat, while a room that mixes seated tables, a few high-tops and the occasional tall element feels layered.
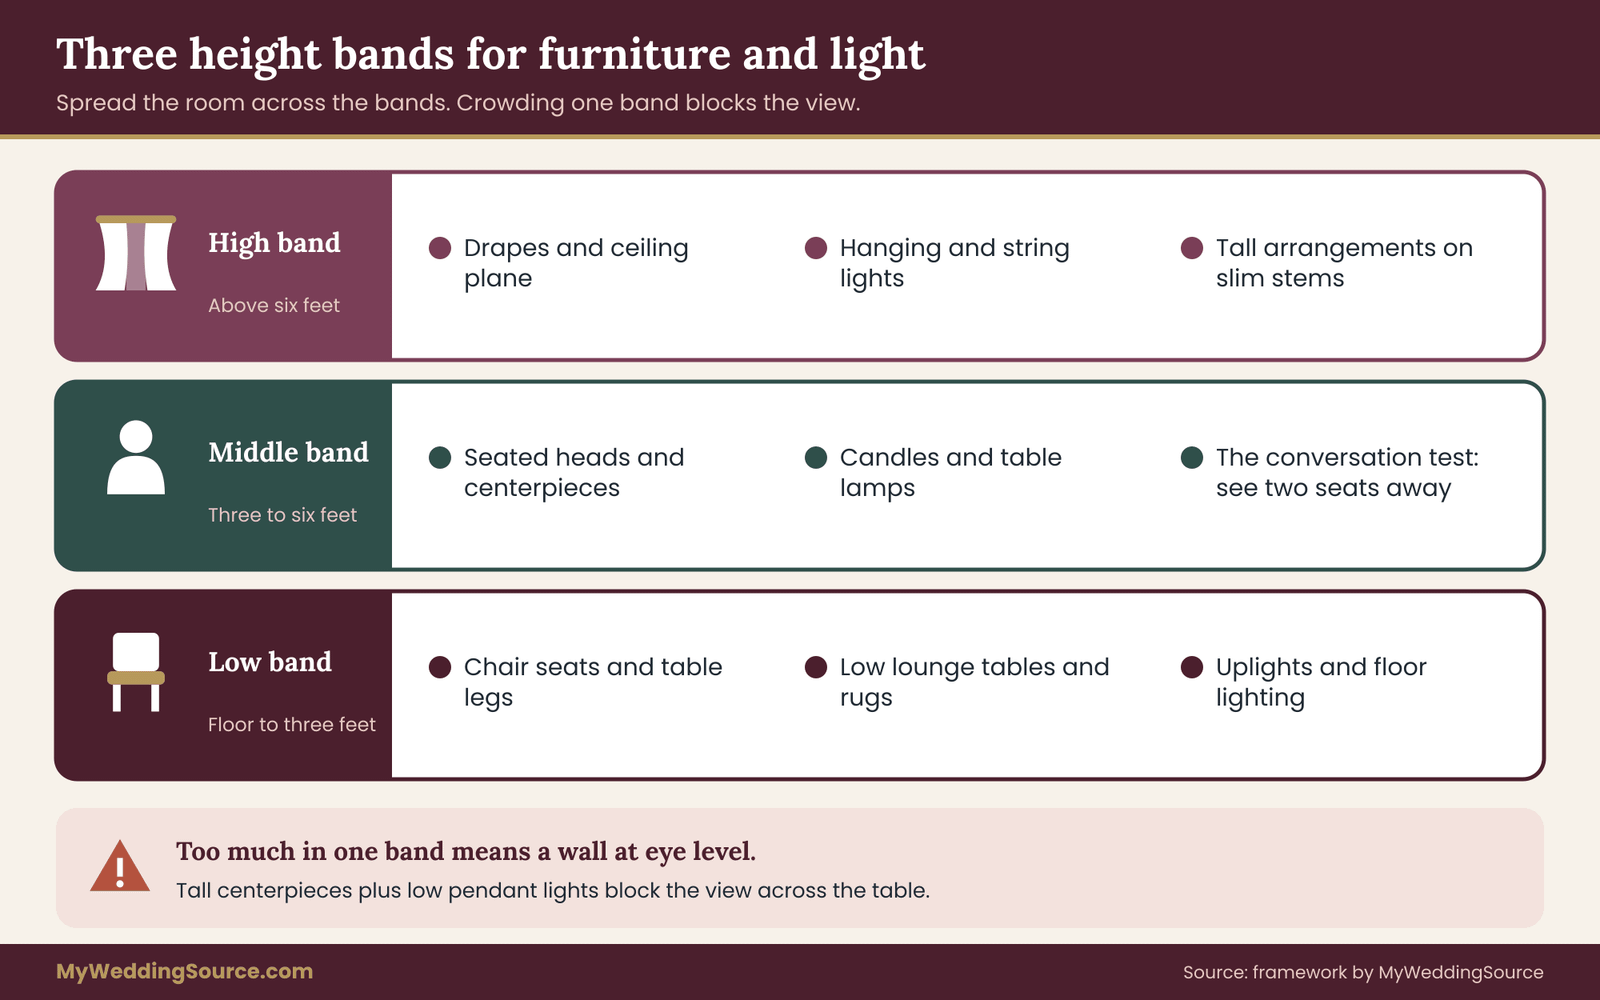
Think in three bands. The low band is the first three feet above the floor: table legs, chair seats, low lounge tables and floor lighting. The middle band is from three to six feet, where seated heads, centerpieces and standing guests are. The high band is above six feet: drapes, hanging lights, tall arrangements and the ceiling plane.
Most visual problems in reception interior design come from putting too much in one band. A room with tall centerpieces and low hanging lights ends up with a wall of obstruction at eye level, and guests cannot see across the table.
A useful check is the conversation test. Sit at a table in the drawing and ask whether you can see the person opposite and the person two seats away. If the centerpiece sits at eye height, it fails the test. Tall arrangements should be raised on slim stems, above the sightline, or kept low enough to see over.
What to specify for each furniture item
Every piece in your reception interior design needs a short line in the spec. State the item, the quantity, the dimensions from the rental company, the color or finish and the zone it serves. Add one line on the comfort test it must pass, and one on the clearances it needs around it. For example, “Lounge group B, near the bar: one three-seat sofa, two armchairs, one low table, 8 by 10 feet rug, 36 inches clear around the group, firm seat height.”
That level of detail does two things. It forces you to check that the group fits, and it gives the rental company a precise request. A vendor who receives a photo and the words “make it cozy” will quote something. A vendor who receives dimensions will quote the right thing, and the reception interior design stays on budget.
Ask the rental company three questions before you commit. What is the condition policy, and are items inspected on return? What are the delivery and pickup windows, and do they match the venue’s load-in? And who is responsible for setting furniture to the plan, or do you pay extra for that? The rental planning checklist covers the paperwork and the timing in more detail.
Drapes and soft walls in reception interior design
Fabric on walls and ceilings does four jobs at once in reception interior design. It hides things you would rather not see, such as bare block walls, stacked chairs or a loading door. It softens sound, because a hard room bounces speech and music around. It changes the apparent shape of the room, so a wide box can feel like a smaller, warmer space.
And it gives the light something to fall on. Of all the layers, fabric is the one that most often needs written approval, so it deserves its own plan.
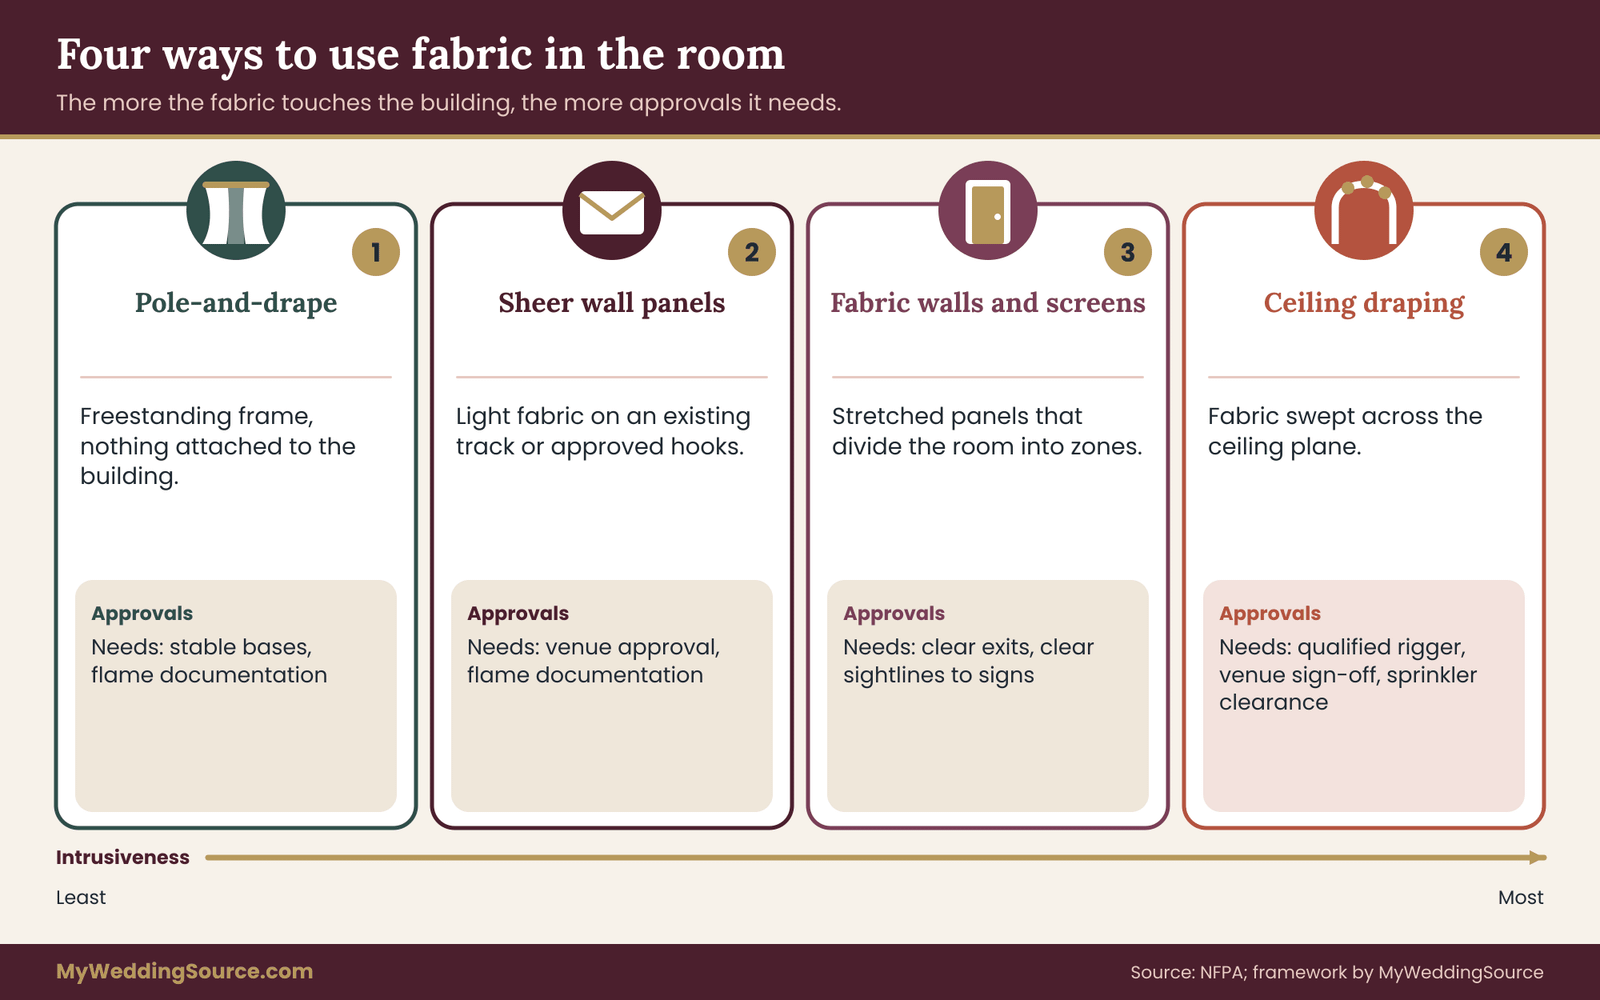
The four common drapery approaches
Pole-and-drape. In reception interior design this means fabric panels hang from a freestanding frame, like a stage curtain. This is the least invasive option because nothing attaches to the building. It is the usual choice for hiding a wall, creating a backdrop behind a head table, or sectioning off a service area. The limits are height, since the frame has a maximum, and stability, since a tall frame near a busy path needs weighted bases.
Sheer wall panels. Light, loose fabric hung from an existing track, rail or approved hooks along a wall. Sheers soften windows and glass, filter daylight and give a room a gentle texture. They need an approved place to hang, and most venues that allow them already have a track or a method.
Ceiling draping. Fabric swept across the ceiling and gathered at a center point or along beams. Ceiling draping creates the strongest change in a reception interior design and has the strictest requirements. It usually involves rigging, which means attaching something to the building structure, and it can interfere with sprinklers, smoke detectors and lighting. Only a qualified rigger working with the venue should handle this.
Fabric walls and freestanding screens. Panels stretched on frames or hung from truss to create a temporary wall. They define zones without touching the venue and work well to divide a large room. They take floor space, need support and must not block exits or sightlines to emergency signs.
Flame resistance is not optional
In many places, fabrics used in reception interior design and other public assembly spaces must meet a flame-propagation standard or be treated to meet one, and the fire authority can ask for proof. The National Fire Protection Association publishes the standard commonly referenced for drapery fabrics, known as NFPA 701, along with the broader fire and life-safety codes that local authorities adopt in different forms. Which version applies, and whether your fabric must carry a certificate or a label, depends on the venue and the local rules.
What does that mean for you in practice? Ask the venue what documentation it requires for fabric before you order anything. Ask the drapery vendor whether their fabric is inherently flame resistant or has been treated, and whether they can provide a certificate or a care label that says so. Ask whether any treatment is time-limited, since some topical treatments wear off with washing or time.
Do not buy fabric from a general retailer and assume it will pass. And do not treat fabric yourself with a spray unless the venue and the fire authority have agreed to it in writing.
The same caution applies to anything flammable near a flame. If candles will be used, the venue’s rules on open flame and distance from fabric control the plan, not the mood board.
Rigging, ceilings and what you must not attach
Fabric hung overhead is a load on a structure. Ceilings in many venues are not designed to support extra weight, and a hook screwed into a ceiling tile or a sprinkler pipe is a serious hazard. Rigging points, where they exist, have a rated capacity, and a qualified professional works within it. Anything beyond a lightweight, approved attachment belongs to a rigger.
Ask the venue whether it has existing rigging points and a rated capacity, who is allowed to use them and whether a licensed rigger must be present. If the answer is no points, no rigger, then ceiling drapery is off the table, and the plan should use pole-and-drape, sheers on a track or fabric on freestanding frames instead. This is not a loss for reception interior design. A room with a strong focal wall, good light and a considered floor plan rarely needs a ceiling treatment.
OSHA publishes general safety information for working at height and with electrical equipment, which is a useful reminder that installers, not guests or couples, are responsible for work on ladders and lifts. Leave it to the crew and keep family members off ladders on the day.
Cords, tie-backs and the small safety details
Details that seem trivial matter in reception interior design near children and crowds. Long loose cords on tie-backs and blinds are a strangulation hazard for young children, and the Consumer Product Safety Commission publishes guidance on window covering cords. If a venue’s windows have blind cords, ask that they be secured. If your drapery uses ropes, loops or tassels near the floor, keep them out of reach of children, and keep loose fabric hems clear of walking routes.
Fabric that pools on the floor looks luxurious and collects dirt and trips. Specify a hem that clears the floor by about an inch if guests will walk beside the fabric, or place the pooling only where nobody walks, such as behind a head table.
Choosing fabric: weight, color and finish
In reception interior design, fabric reads differently in daylight and in warm artificial light, so test a swatch in the room at the hour of the reception if you can. A sheer cream fabric that looks airy at noon may look yellow under warm bulbs. A deep color absorbs light and can make a small room feel smaller, but it can also make a large, cold room feel intimate.
Weight affects how a fabric hangs and how it behaves in moving air. Heavy fabrics like velvet and heavy cotton fall in straight, formal folds and absorb sound well, which helps a loud room. Light fabrics like voile and chiffon move with air and glow when lit from behind, but they need more fullness to avoid looking thin.
Fullness, the ratio of fabric width to the space it covers, is a key spec. Ask your vendor what fullness they recommend for the effect you want, because flat, tight fabric looks cheap while generous fullness looks expensive for the same material.
Match fabric colors in your reception interior design to the palette you have already chosen. The wedding color palette guide explains how to build a palette with a few anchor colors and one accent, and the same discipline applies here: pick the fabric after the palette, not before.
What it costs, in logic rather than numbers
Prices for reception interior design vary a great deal by region, vendor and season, so this guide gives no figures. Instead, understand what drives the cost. Fabric quantity grows with the width and height of the area and the fullness you choose. Labor grows with height, complexity and rigging. Rental fabric costs less than buying but may carry cleaning and damage fees. Treatment and certification add cost and are not optional where required. Finally, install and strike time costs money, because crews bill for the hours they work.
When two quotes look different, compare them on these five drivers rather than the total. A low quote that excludes labor or treatment is not low. Ask each vendor to price three versions of the same area: a minimal version, the version you want and a version with an extra element. The gaps show where the money goes and give you something to trade.
Rent or buy
In reception interior design, buying fabric makes sense when you will reuse it, or when you can resell or donate it afterward. It rarely makes sense for large drapery that needs treatment and certification. Renting is usually simpler for anything big, and a good vendor takes responsibility for flame documentation and installation. For small items such as table runners or a few sheers for your own windows, buying is fine.
If the sustainability of what happens after the wedding matters to you, the guide to reducing wedding waste covers what to ask vendors about reuse and disposal.
Lighting layers for reception interior design
In reception interior design, light is the last layer you decide and the first thing guests notice. It decides whether a room feels like a restaurant, a ballroom or a warehouse, and it decides how everyone looks in every photograph. A well-planned light layer does the work of a dozen decorative purchases, and a poorly planned one undoes them.
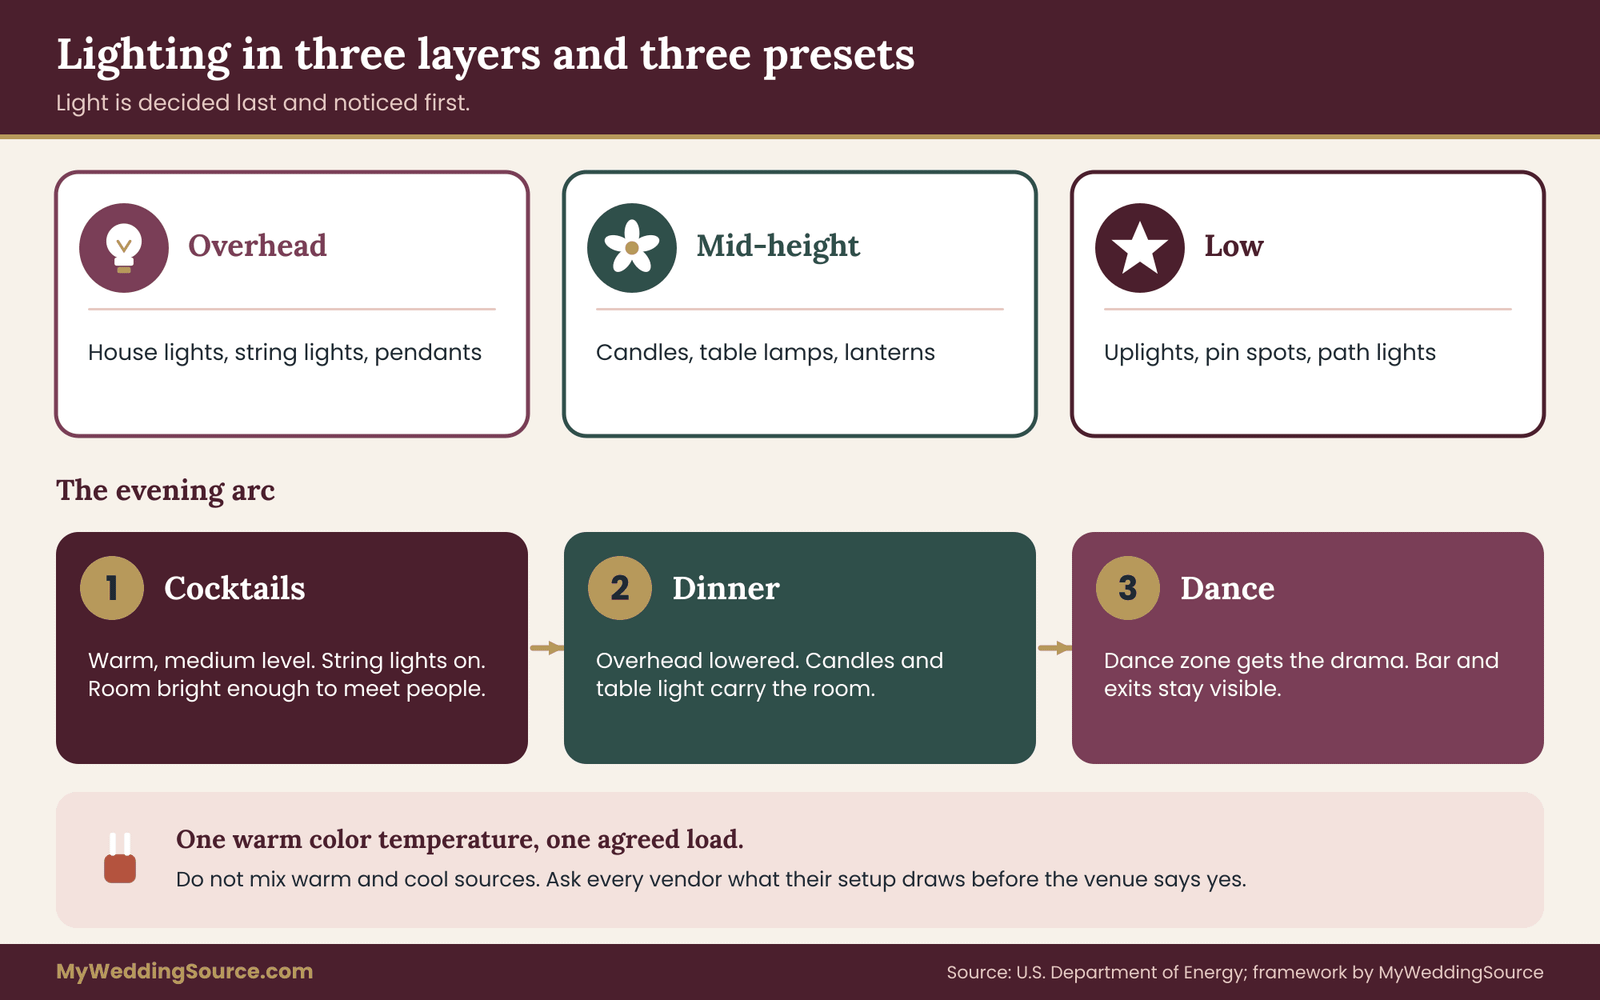
Plan light for your reception interior design in three bands, matching the furniture bands you already drew. Overhead light is the ceiling plane: existing fixtures, chandeliers, string lights and pendant lights. Mid-height light is what sits at eye level: candles, table lamps, lanterns and sconces. Low light is what lives near the floor: uplights along walls, pin spots on centerpieces and path lighting. A room lit in all three bands feels dimensional. A room lit only from above feels flat and harsh.
Start with what the venue already gives you
Most venues have a house lighting system, and for reception interior design it is both an asset and a constraint. Ask whether the lights are dimmable, whether the dimmers are on a central panel and who controls them. Ask whether the house lights can be set to a warm preset for the reception.
A room with good dimmers and warm bulbs may need almost nothing added. A room with harsh fluorescent tubes that cannot be dimmed may need a lot, or may need some of them switched off entirely.
Switching off house lights can matter as much as adding new ones. Many rooms look dramatically better with the overhead lights lowered or off and the work done by mid and low light instead. Ask the venue whether that is allowed, since some jurisdictions require certain lights to stay on for emergency egress. Exit signs and emergency lighting stay on, and nothing in your plan should cover them.
Color temperature and the warmth rule
Color temperature, measured in kelvins, describes how warm or cool a white light looks. Lower numbers look warm, yellowish and candlelike. Higher numbers look cool, bluish and clinical. For a dinner and dance setting, many designers prefer warm light, commonly described as warm white and often sold in the range around 2700 kelvins. The U.S. Department of Energy explains these ratings in its consumer guidance on LED lighting, and the same pages explain how to read a bulb’s label.
The rule that matters more than the number is consistency. Mixed color temperatures in one room look like a mistake. A warm string of lights beside a cool LED panel makes both look off. Pick one warm range for the whole room, ask each vendor for the specification of their products, and request samples or a test if you are mixing sources.
Colored light, such as a wash of pink or blue on a wall, is a separate decision, and it should be used on one surface, not all of them.
The evening arc: cocktails, dinner, dance
Light in reception interior design should change through the evening because the room’s job changes. During cocktail hour, guests are moving, meeting and photographing, and the room can be a little brighter. During dinner, light should drop to a level where faces are lit softly and people can still read a menu card. When dancing begins, the dance zone gets more drama and the dining zone steps back.
Write the arc into your reception interior design plan as three presets. Preset one is cocktails: house lights at a warm medium level and string lights on. Preset two is dinner: overhead lowered, candles and table lights carrying the room. Preset three is dance: overhead low, dance zone lit with movement or color if you want it, and the bar and exits visible enough to be safe.
Ask the lighting vendor whether they can program these and who changes them on the night. If it is nobody, the lights will stay in one state for four hours.
Candles, flame and the venue rules
In reception interior design, candles are the oldest warm light source, and venues treat them with caution. Many forbid taper candles and allow only votives in enclosed holders, and some allow only battery-operated flameless candles. Ask in writing what is permitted, what holders are required, how far from fabric and florals the flame must be, and who lights and extinguishes them. Insurance may also have a say, so ask whether the venue requires vendors to hold liability coverage.
Flameless candles have improved and now look convincing in many settings, and they remove the fire question from your plan. They still need batteries and a charge or replacement schedule, and a bank of a hundred of them is a task for someone on the day. Assign that task before the day arrives.
Power, load and who may plug things in
Every light in a reception interior design needs power, and power in a venue is not unlimited. A room has a number of circuits, each with a limit, and plugging too many things into one circuit trips a breaker in the middle of a speech. Heaters, coffee urns, band equipment and bars with refrigeration all share the supply.
Ask the venue how many outlets and circuits serve the room and which ones are reserved for the caterer and the band. Ask each lighting vendor how much power their setup draws and whether it runs from a single outlet or needs several. Ask whether the venue requires its own electrician for connections, and whether there are fees.
Keep extension cords out of walkways, tape them down where they must cross a path, and prefer cords rated for the job. Equipment that is certified by a recognized testing laboratory, with a mark such as UL, has been tested against safety standards, and a professional lighting vendor should be able to say what theirs carries.
The general principle is simple. If a vendor cannot tell you what their setup draws, they are not ready to light your room.
Lighting the focal wall and the faces
The focal wall is the right place to spend light in reception interior design. A wall washed from below with warm uplights gains height and depth, and the fabric or backdrop in front of it glows. Keep the light off the guests’ faces at the head table if you can: uplights placed too close shine under the chin and look unflattering in photographs.
Faces matter most at dinner. A candle in the middle of a table flatters, as long as it is low enough to see over. A pin spot above each table can flatter even more, but it creates a pool of light that leaves the edges of the room dark, which is a look some people love and others find gloomy.
If your photographer or videographer has an opinion on minimum light levels, ask for it early. Share the look you want with your photographer early, and treat light level as one of the first things to discuss.
Light and the dance zone
Dance lighting is the part of reception interior design most often handed to the DJ, and it should be agreed in the plan. Moving lights and strobes are not for every couple or every guest. People with photosensitive conditions can be affected by flashing light, so a sensible approach is to avoid fast strobes and to tell the DJ in advance. Haze and fog machines can set off smoke detectors in some venues, and the venue should approve them first.
Keep dance lighting out of the dining zone. A beam of moving color across a table of people eating is irritating. Aim lights so they stay within the dance floor and the wall behind it, and ask the DJ or lighting company to confirm where each fixture points.
Writing the layered texture specification
The specification is the document that turns your taste in reception interior design into something a vendor can build. It is short on purpose. One card per zone, one line per layer, and a final line for open questions. You can write it in a notes app or on paper. The test of a good spec is that a stranger could set up your zone from it without calling you.
The anatomy of one zone card
Each card has seven lines.
Purpose. One sentence about what the zone does. “Dance zone: hold up to half the guests at peak, with the band at the north end.”
Footprint. Dimensions and position on the plan, with the clear paths around it.
Floor. The surface and anything laid on it. “Existing hardwood, rental dance floor 16 by 20 feet, no rug.”
Furniture. Items, quantities, dimensions, finishes. “None in the zone except two high-tops at the edge.”
Soft goods. Linens, cushions, rugs, throws. “No soft goods on the floor. Fabric appears only on the wall behind the band.”
Vertical surfaces. What hangs or stands upright. “Ivory sheer panels on the existing track, certificate on file.”
Light. Source, height, warmth, preset. “Warm string lights overhead, dimmed at the dance preset, uplights on the wall, no strobes.”
The seven lines make you decide something about every layer in every zone, which is exactly the point. The blanks show where you have not decided yet, and an undecided blank is a risk you can see rather than one you will discover on the day.
Texture trios and how to choose them
The three-texture rule for reception interior design gets applied at the card level. Choose a trio for each zone: one hard, one soft, one that catches light. Then choose a connecting thread across zones so the room feels like one place. The thread can be a color, a material or a finish.
If brass appears in the arrival zone, it should appear somewhere in the dining and bar zones too, perhaps as a candleholder or a bar rail. If linen texture appears at the dining tables, a linen-like fabric on the sweetheart table keeps the link.
Contrast between zones is welcome. A calm, matte dining zone beside a more reflective, glossy bar zone gives the room rhythm. What does not work is a different palette in every zone, because the room reads as a set of unrelated stalls. If the room has strong built-in features, such as dark wood or stone, build your trios around what is already there, since fighting the building costs money and rarely wins.
Value, not just color
In reception interior design, designers talk about value, meaning how light or dark a surface is, and value matters more than hue in a dim room. Under low light, many colors collapse into dark shapes, while light-valued surfaces such as ivory linen and pale wood still read. If your dining zone will be dim, make sure the tablecloth, the plates or the candleholders carry some lighter value, or guests will be eating off a dark void.
A quick check is to take a photo of your sample swatches in the room, convert it to grayscale on your phone and see which items still separate from each other. If everything turns the same gray, the zone will look flat.
Scale and repetition
In reception interior design, scale is the relationship between objects and the room. Small items in a large room look lost, and large items in a small room look crowded. The fix is usually repetition rather than size. A hundred small candles read as a single warm layer when they repeat evenly, while three large candles in a big room look sparse. Repeat a few elements consistently, such as the same candleholder on every table, and the eye reads order.
Odd numbers and grouping help too. Three items of different heights usually look more natural than two matched ones. But the rule needs a limit: grouping creates clutter if every table has a different mix. Repeat the same grouping on every table, with minor variation in the florals only.
Handing the spec to vendors
For reception interior design, send each vendor the floor plan, the relevant zone cards and a clear question list. The rental company gets furniture and soft goods. The drapery vendor gets vertical surfaces and the venue’s attachment rules. The lighting vendor gets the light layer, the presets and the electrical answers. The florist gets the dining and focal zones, with heights. Everyone gets the plan’s load-in schedule, so crews do not collide.
Ask every vendor to reply in writing with the items, quantities, dimensions, approvals needed and what happens if the venue says no. Put the answers on the plan, and keep the written replies in one folder. That folder becomes a record you can lean on if something is delivered wrong. Get those replies before you pay any deposit.
Reception interior design in three illustrative rooms
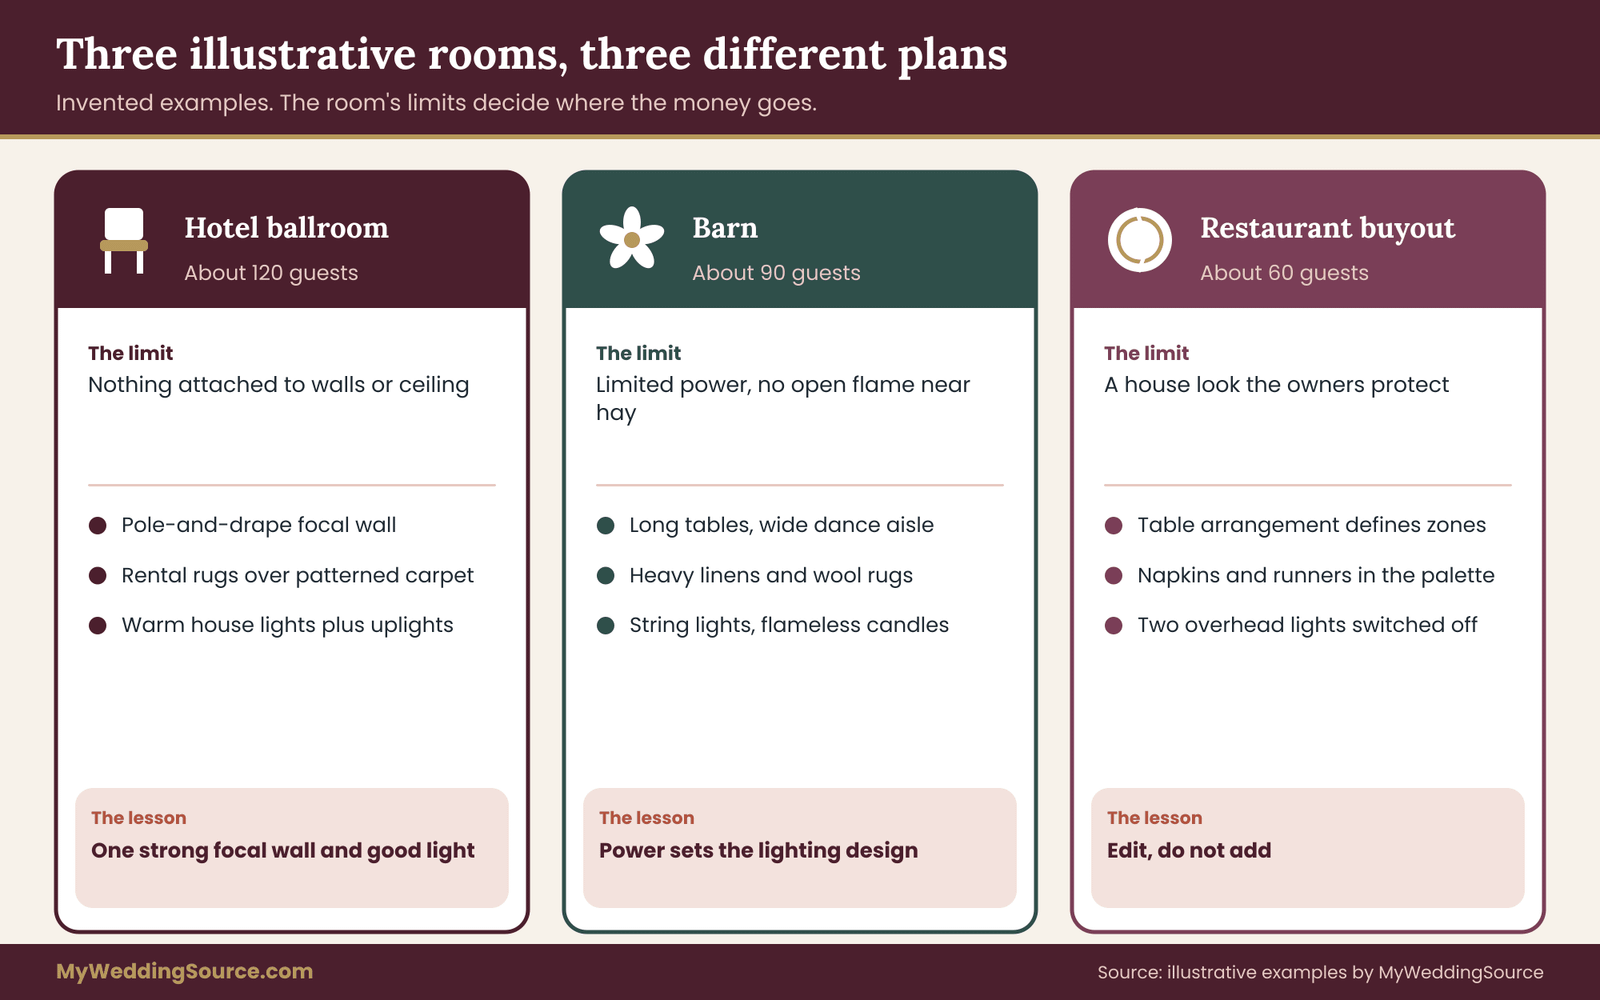
The three reception interior design rooms below are invented to show how the method behaves in different conditions. They are not case studies of real couples, and the numbers are examples only. Use them to see how a zone plan changes when the room changes.
Room one: a hotel ballroom for about 120 guests
The ballroom is a large, rectangular room with a low ceiling, patterned carpet, no windows and a house lighting system that dims. The constraint is that nothing may be attached to walls or ceiling, and the hotel has its own banquet furniture and an in-house audiovisual team.
The plan uses pole-and-drape behind the head table to create the focal wall and hide a service door. Round tables sit in the center, with the dance floor along one long side so the carpet pattern is covered. The bar and lounge zone sits at the far end from the door, with two lounge groups on rental rugs that define them over the carpet.
Light work is done mostly by the hotel’s dimmable house system set warm, with uplights on the drape and candles in enclosed holders at tables.
The reception interior design lesson is that a room with strict limits needs a strong, single focal wall and good light, rather than many small interventions. The hotel’s own banquet chairs and tables keep the budget in check, and money goes to the drape and the light.
Room two: a barn for about 90 guests
The barn has exposed beams, a concrete floor, large doors that open to the outside and limited electrical supply. The venue allows lightweight string lights on the beams with its own staff attaching them, forbids open flame near hay storage and has no air conditioning.
The plan uses long rectangular tables running the length of the barn, a wide aisle for the dance floor in the middle, and the bar near the large doors so airflow reaches the queue. Texture comes from the barn itself, so soft goods carry the warmth: heavy linens, wool rugs under the lounge area and a few sheer panels on the window frames.
Light comes from string lights on the beams, flameless candles at the tables and a few uplights on the beams, all run from separately fused circuits agreed with the venue’s electrician.
The reception interior design lesson is that power sets the lighting design in a rural venue. The couple asked the lighting vendor for a written load estimate before choosing fixtures. Venue choice itself shapes all of this, and the wedding venues guide explains how to compare spaces on exactly these constraints before you sign.
Room three: a restaurant buyout for about 60 guests
The restaurant has finished walls, a permanent bar, a good sound system and a house look the owners care about. Guests will sit at the restaurant’s existing tables, and the staff will serve from the regular kitchen.
The reception interior design plan keeps the restaurant’s character and adds little. Zones are defined mainly by table arrangement: a long table for family, small tables for others, a clear dance corner by pushing two tables aside after dinner. Soft goods and light carry the identity, with cloth napkins and runners in the palette, candles in the restaurant’s own holders and one cluster of fresh flowers on the bar.
The lighting stays under the restaurant’s control, with the owner agreeing to turn off two bright overhead lights during dinner.
The lesson is restraint. In a room that already has a strong interior, reception interior design means editing, not adding, and the best budget decision may be to leave most of the room alone.
Mistakes that undo reception interior design
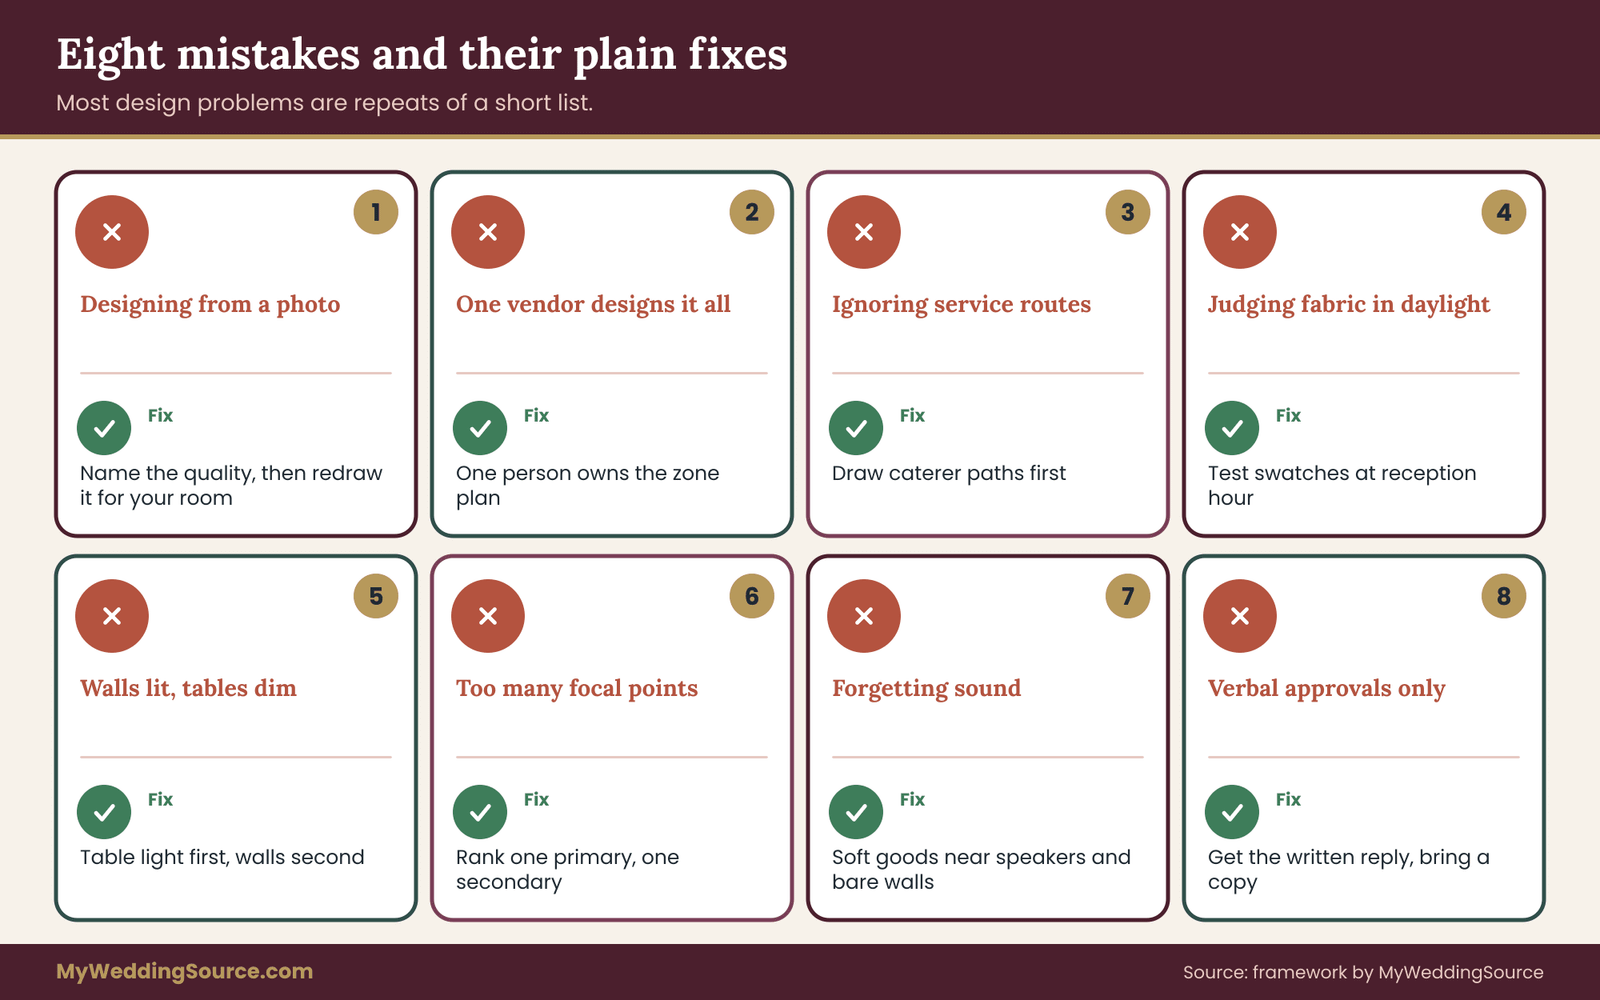
Most reception interior design problems are not mysterious. They come from a short list of repeated mistakes, and each one has a plain fix. Reading the list before you place a single order is cheaper than learning it at load-in.
Designing from the photo instead of the room
A photo shows one angle, one lens, one lighting setup and usually a room several times larger than yours. Copying it exactly ignores your ceiling, your doors, your power and your guest count. Use the photo to name what you like, such as warm light, layered linens or a draped backdrop, and then ask what that quality needs in your own room. The fix is to write the quality down in a sentence and design it again from your floor plan.
Letting one vendor design the whole room
A rental company sees furniture, a florist sees flowers and a lighting company sees light. Each will happily fill the whole room if you let them, and the result is three layers competing for the same spot. The fix is that one person owns the zone plan, and every vendor receives only the cards for the zones they serve. When a vendor proposes an addition, it gets a zone and a layer or it does not go in.
Ignoring the service route
Couples draw guests walking through the room and forget that food, drinks, cake and equipment have to move through it too. A table placed in a service corridor looks fine on paper and causes a spill or a delay on the night. Draw the caterer’s routes on the plan in a distinct color before you place any furniture, and keep them clear. Ask the caterer to look at the drawing, since they know where their carts really go.
Choosing finishes in daylight and dining in dusk
A swatch that looks right at a showroom window can look wrong in a dim ballroom. Dark fabrics vanish, shiny ones glare and warm tones shift. The fix is to test samples in the room, or in similar light, at the time of day your reception will happen. If you cannot visit, ask the vendor for photos of the same fabric in a room lit like yours, and treat those as a better guide than a catalog picture.
Over-lighting the walls and under-lighting the tables
Uplights on every wall make a room look expensive in a photo and leave the tables dim. Guests spend most of the evening at a table, so the light that matters most for them is mid and low light on faces and food. The fix is to set the table light first and add wall light afterward, with a limit of one or two walls. Wall light should support the focal wall, not outshine the guests.
Too many focal points
A room with a floral arch, a draped head table, a neon sign, a dessert wall and a photo backdrop has five stages and no audience. The eye cannot settle and nothing looks special. The fix is a ranking. Choose one primary focal point, one secondary and let the rest be quiet. The primary gets the best light and the cleanest surface behind it.
Forgetting how the room sounds
Hard walls and floors make a room echo, and speech becomes harder to follow at the exact moment guests want to hear the toasts. Fabric helps, as do rugs and upholstered furniture, but they only help if they are in the right places. Soft goods near the speakers and along the longest bare wall do the most.
If your room echoes during the site visit when it is empty, it will be louder when full. Treat sound as part of reception interior design, and ask your band or DJ where they would place speakers.
Skipping the written approval
Verbal agreements disappear. A venue coordinator who says “that should be fine” may not be the person on duty at load-in, and the person on duty has no record of the conversation. The fix is a short email that lists the items you plan to bring, the attachments involved, the flame rules and the power draw, and asks for a written reply. Keep the reply in your vendor folder and take a printed copy on the day.
Decision rules to carry with you
When a choice comes up and the plan does not answer it, use these rules in order. If it blocks an exit or a service route, it moves. If it needs approval and has none, it waits. If it serves no zone, it goes. If it duplicates something that already works, it goes.
If it adds a fifth texture to a zone, remove the weakest of the five. If two items compete for the same wall, keep the one that serves the focal point. And if the budget forces a choice between more items and better light, choose the light.
These rules sound severe, and they are meant to be. Reception interior design succeeds by subtraction more often than by addition, and a room that has been edited with discipline usually looks calmer and more expensive than one where everything was kept.
Comparing options and setting the budget
Every zone in a reception interior design offers choices, and the choices trade off against each other. Rather than a grid, think of three questions for each option: what does it cost in money, what does it cost in approvals, and what does it cost in floor space or time? A choice that is cheap in money but expensive in approvals, such as ceiling draping, may be a poor buy in a venue with strict rules.
Where the money usually goes
Reception interior design spending falls into five buckets: furniture rental, fabric and drapery, lighting, floor and structure, and labor for setup and strike. Labor is the bucket most often forgotten, and it grows with every item that needs installing at height or fitting to a plan. A simple room with fewer, better-chosen items can cost less overall than a busy room with many cheap ones, because each extra item adds handling time.
Set a ceiling for each zone of your reception interior design before you collect quotes, then adjust as quotes come in. A reasonable starting question is which two zones matter most to you, because those get the larger share. For many couples the focal wall and the dining table dressing carry most of the visual weight, while the arrival and service zones can stay modest.
The couple who loves dancing might shift money to the dance floor and light. The decision is yours, and writing it down prevents it from being made by whichever vendor sends the first quote.
For the wider budget picture, including how reception design sits beside catering and photography, the wedding budget guide on this site covers how to set categories and track them.
What to trade first when the budget is tight
Cut in this order. First, remove decoration that has no zone and no job. Second, reduce quantity of repeated items, such as fewer candles per table, and increase consistency of what remains. Third, replace rented soft goods with the venue’s own where they are acceptable. Fourth, simplify the vertical layer, for instance one focal wall in place of three. Last of all, cut light, because light is the cheapest way to make a room feel considered.
Do not cut safety, certification or labor to save money. A fabric without flame documentation, a lighting setup without a load estimate or a rigging job done by a friend are all savings that can end an evening.
Questions worth asking every vendor
Before any deposit, ask for answers in writing to a small set of questions. What exactly is included, with quantities and dimensions? What approvals does the item need from the venue, and who obtains them? What documents can the vendor provide, such as flame-resistance certificates, insurance certificates or load estimates? What are the delivery, install and strike times? What happens if an item arrives damaged, is not approved on site or is not available? Who sets it to the plan, and what does that cost?
The answers tell you as much about a vendor as their portfolio does. A vendor who answers clearly and quickly has done this before. A vendor who sends a photo and a price has not told you what you are buying.
Limits of this method
The reception interior design method is a planning tool, not a guarantee. It does not replace a venue’s rules, a fire marshal’s decision or a qualified professional’s judgment. It cannot tell you what your local code requires, what a particular fabric’s certificate says or whether a particular ceiling can hold a particular load. For those, go to the venue, the issuing authority and a licensed professional.
It also has aesthetic limits. A plan can make a room work, and it cannot make it feel the way you want. Taste comes from you or from a designer you trust, and the plan simply makes sure your choices fit the room and survive the day. If you are working with a designer, the plan helps you talk to them, and they may improve it.
When to bring in a professional
Hire a professional for reception interior design when the room needs rigging, when ceiling treatments are central to your vision, when the electrical supply is limited and your lighting needs are large or when the venue requires licensed contractors. An event designer can coordinate zones and layers across vendors, and a lighting designer or rigger handles loads and safety. Check each professional’s insurance and ask for a written scope, as covered in the vendor questions above.
You can also hire a professional for a narrow slice, such as a single consultation on the floor plan or the lighting presets, and do the rest yourself. Many designers offer this, and it costs far less than full service while catching the most expensive mistakes.
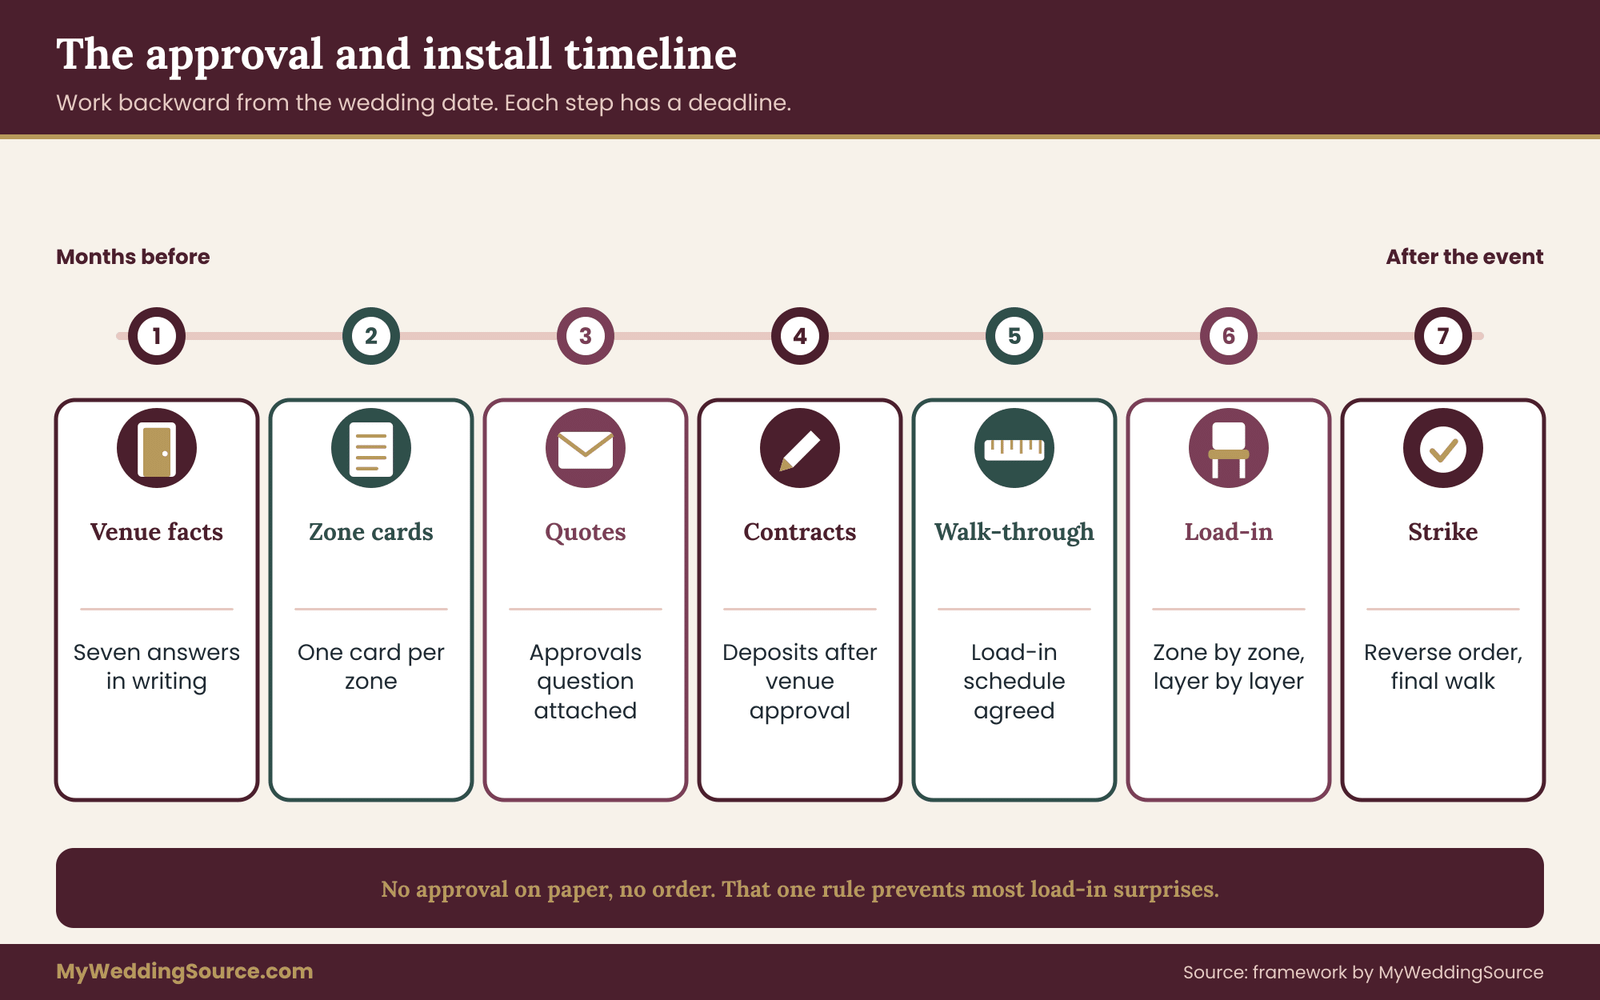
The approval and install timeline
The reception interior design plan only works if approvals land in the right order. Work backward from the wedding date and give each step a deadline.
Reception interior design starts with the venue conversation: facts collected, rules written down. Next comes the zone plan and spec cards. Then you request quotes, with the approvals question attached to each. After that you choose vendors, sign contracts and pay deposits, at which point the venue approves the final plan in writing.
Close to the wedding, you confirm delivery windows, build the load-in schedule and walk the room with the lead vendors. On the day, a single person checks each zone against its card. After the event, strike follows the reverse order, and a final walk confirms nothing was left behind or damaged.
Load-in day: a checking routine
On load-in day, work zone by zone rather than vendor by vendor. Furniture arrives first, since everything else depends on its position. Floor and structure come next, then fabric and vertical elements, then lighting and finally the small items: candles, linens and signs. Check each zone against its card before the next layer goes in. Mistakes are cheap to fix at the furniture stage and expensive to fix after the drapes are up.
Keep the reception interior design plan printed and taped near the entrance, with a name next to each zone. Anyone with a question looks at the plan first. Photograph each finished zone from the guest’s point of view as a record, and test the lighting presets before the doors open. Walk the room once as a guest would, from the door to the table, and then once as a server would, from the kitchen to the farthest table. If either walk feels cramped, move something now.
Strike and return
Strike is part of reception interior design. Ask each vendor when they remove their items, and make sure the venue’s end time leaves enough time for it. Rented items usually have return conditions, and photographing the condition at the end of the night protects you from unfair damage claims. Assign one person to stay until the last vendor leaves. That person should not be either of you.
Your next steps
This week, collect the venue facts: floor area, ceiling, attachment rules, flame rules, power and load-in. Send the seven questions in one email and write the answers on a sketch of the room.
Next, draw the floor to scale and place the six zones, dance floor first. Write one card per zone, using the seven lines, and note where the card has blanks. Then send each vendor their cards and the approvals question, and compare quotes on the five cost drivers instead of the totals. Finally, get the venue’s written approval of the final plan before you pay anything non-refundable.
Done in that order, reception interior design stops being a pile of purchases and becomes a short document that a room, a crew and a budget can all follow.
FAQ
What is the first step in reception interior design?
Collect the facts about the room before choosing anything decorative. Measure the usable floor and ceiling height, mark doors and fixed features, and ask the venue what may be attached to walls and ceilings, what flame rules apply and how much power is available. Those answers decide which layouts, drapes and lights are possible, so they belong at the start of the plan rather than the end.
How many zones should a reception room have?
The method here uses six: arrival, dining, dance, bar and lounge, focal wall and service. Smaller rooms may combine two, such as arrival and the bar, but each job still needs space. The point of zoning is that every item you add can be traced to one purpose. If an item serves no zone, it is decoration without a job and is the first to cut.
Do wedding drapes need to be flame resistant?
Often, yes. Many venues and local fire authorities require fabric in public assembly spaces to meet a flame-propagation standard or carry treatment documentation, and NFPA publishes the standard commonly referenced. The exact rule depends on where you are, so ask the venue what proof it needs, and ask the vendor for a certificate. Do not apply a flame retardant yourself without written agreement from the venue.
Can I hang fabric or lights from the ceiling?
Only if the venue allows it and, for anything heavy, a qualified rigger works within the rated capacity of an approved point. Never attach anything to sprinkler pipes, ceiling tiles or fixtures that were not designed for it. If the venue has no approved points, use pole-and-drape, sheers on an existing track or freestanding frames, all of which avoid the building entirely.
How much space do I need between tables?
There is no single figure. Many planners allow roughly five feet between table edges on main routes as a comfort guide, but the venue and local fire authority set the actual minimum aisle and exit widths, and accessible routes generally call for at least 36 inches. Use the rental company’s real table and chair dimensions, draw to scale, and ask the venue to approve the layout.
What color temperature is best for reception lighting?
Most designers choose warm white for a dinner and dance room, often in the region of 2700 kelvins, because it flatters skin and feels like candlelight. The more important rule is consistency: do not mix warm and cool sources in one room. Ask each lighting vendor for the specification of their products, and test a sample in the room if you can.
How do I keep a lounge from taking over the dance floor?
Limit the lounge to one or two groups, each with a purpose, a defined rug or floor area and clear paths around it. Place them away from the dance floor edge and the entrance. If you cannot draw the full footprint, including the standing room in front of each sofa and the walking space around it, you do not have room for the group.
Should I hire an event designer or do this myself?
Both can work. A simple room with few rules suits a couple with a clear plan and good vendors. Hire a professional when the room needs rigging, ceiling treatments, heavy electrical work or licensed contractors, or when you want help coordinating several vendors. A narrow paid consultation on the floor plan or lighting can catch costly errors without full service fees.
Sources
- National Fire Protection Association, codes and standards, including NFPA 701 and NFPA 101
- National Fire Protection Association, home page and safety resources
- U.S. Access Board, ADA Accessibility Standards
- U.S. Department of Justice, ADA.gov, information and technical assistance
- Occupational Safety and Health Administration, safety and health topics
- U.S. Consumer Product Safety Commission, window covering cord safety
- U.S. Department of Energy, lighting choices to save you money
- UL Solutions, product certification and the UL Mark
- U.S. Fire Administration, fire prevention and safety resources
- Federal Trade Commission, consumer advice on contracts and deposits