

Wedding nails are on camera in nearly every close-up of your hands, your rings, and your bouquet, so the useful questions are practical ones: what finish will survive the day, when should it be done, and how do you test the look before you commit to it?
Quick answer
Choose your wedding nails by working backward from the conditions they have to survive: hours of hugging, hand-holding, dressing, eating, and photographs in several kinds of light. Book at least one trial, photograph it, and live in it for a full day. Sources disagree on timing, so plan for either a service one to two days before the wedding (Zola’s advice) or a fresh gel set on the day itself (WeddingWire’s advice), and keep a touch-up kit with a named person. This is general beauty information, not medical advice.
Nails are one of the few beauty details you cannot hide, and wedding nails are no exception. Your makeup can be adjusted by someone standing next to you, and a hairstyle is mostly fixed once the veil is on, but your hands are held, photographed, and kissed all day. That is why wedding nails deserve a short, deliberate plan instead of an appointment squeezed in between other errands. If you want the wider beauty picture first, our bridal makeup guide covers the face side of the same decisions, and this guide stays focused on the hands.
Here is how this guide to wedding nails is organized. We start with the result you want and the conditions it must survive, then work through shape, length, and color, compare the common nail systems, build the wedding-morning schedule backward from the photo deadline, and finish with risk control and a contingency kit. Where a claim comes from a source, we name it. Where it is our own arithmetic or judgment, we label it as an estimate or a recommendation.
Start with the desired result and the conditions it must survive for wedding nails
Most people open an inspiration board and pick the prettiest photo. That is a reasonable first step and a poor last one, because a photo shows a manicure on its best day, in flattering light, usually under a ring light and often retouched. A better approach is to write down the result you want in plain words, then list the situations your nails will actually face. The design that fits both is the one to book.
Define finish, texture, coverage, and durability for wedding nails
Four terms do most of the work in a nail consultation, and they are worth defining for yourself before you talk to a technician. Finish is how light behaves on the surface: glossy, matte, sheer, pearly, or metallic. Texture is what you feel and what can catch on lace, tulle, or hair: flat polish is smooth, while three-dimensional art, stones, and raised designs are not. Coverage is how opaque the color is, from a clear coat to a solid shade. Durability is how long the whole thing looks the way it did on day one.
These four trade against each other. A sheer, glossy look hides growth and small chips well but shows an uneven surface. A deep, opaque color looks rich and shows every chip at the tip. A matte finish photographs softly but can look uneven if the base was not smooth. Writing down which two traits matter most to you, for example “sheer coverage and low snag risk,” gives the technician a brief they can actually work with.
Match choices to weather, photography, dress, and skin needs for wedding nails
Think of four conditions as a checklist. Weather: heat and humidity make hands swell slightly and sweat, while cold dries cuticles and makes polish brittle. Photography: you will be photographed outdoors in daylight, indoors under warm bulbs, and at some point under direct flash, and a color that looks fine in one can shift in another. Dress: beading, lace, and tulle can snag long or textured nails, and a satin or crepe gown shows hands cleanly. Skin and hands: the shade of your skin, how long your fingers are, and whether you wear your engagement ring all change how a color reads.
Zola’s color guide makes a related point about matching: it suggests polish should complement your bouquet instead of clashing with it and that lighter, brighter shades suit summer while deep reds suit cooler months. Those are one publication’s styling suggestions, not rules, but they illustrate the kind of cross-check that works. Hold a swatch next to the flowers, the fabric, and your ring before you decide. Our seasonal wedding flowers guide can help you pin down what the bouquet will look like.
Avoid choosing from filtered inspiration alone for wedding nails
Social media images are made to be looked at on a phone, often edited for brightness and skin tone, and shot with a ring light that removes shadows and washes out chips. Real life is less flattering: you will look at your nails from a few inches away, in motion, and the photographer will look at them through a macro lens during ring shots.
Treat an inspiration photo as a starting point for your wedding nails and ask three questions about it. Is the nail short or long, and is that realistic for you? Is the finish one that holds up for weeks, or is it a wet-looking effect that dulls quickly? Would the design still make sense next to your actual ring and your actual bouquet? The Knot’s 2026 trend report quotes nail artists who favor healthy, buffed nails with natural shine and sheer, tone-on-tone looks, which is a reminder that a quiet manicure is a legitimate result, not a fallback.
Schedule a realistic trial for wedding nails
A trial is a rehearsal for the real appointment, and it is the single most useful thing you can do for your wedding nails. It answers questions no photo can: how the color looks on your skin, how it feels after a day of normal use, how it reads in a photograph, and how your skin reacts to the products. Zola’s nail advice recommends trying several designs or shades on salon visits before the wedding and then choosing a favorite, and The Knot’s Kate Boswell wrote that she booked a fresh gel manicure each month before her own wedding to settle on a look.
Plan the trial for your wedding nails far enough ahead that you have time to repeat it. A good rule of thumb, which is our recommendation and not a sourced rule, is to hold the first trial two to three months before the date, a second shorter one if you change anything, and then stop experimenting. That leaves room for a bad reaction to clear and for the nails to grow back from any aggressive removal before the ceremony.
| Desired result | Condition to test | Photography check | Wear-time check | Correction if it fails |
|---|---|---|---|---|
| Soft, natural look | Bare hands next to your ring and a swatch of the dress fabric | Daylight near a window, no flash | Check at hour 8 for chips at the tips | Try a sheerer or lighter shade, or add a thin top coat |
| Visible color | Compare against bouquet stems and lipstick | Indoor warm light and one flash photo | Check after washing hands several times | Choose a shade one step lighter or less saturated |
| Shimmer or chrome | Look under direct light and from the side | Flash photo for glare or hot spots | Check for dulling or edge lifting after a day | Reduce coverage or move shimmer to one accent nail |
| Longer nails | Put on a coat sleeve, glove, or lace sample | Hand-on-lace and hand-on-bouquet shots | Notice snags while dressing and carrying items | Shorten by a few millimeters or round the corners |
| Embellishments | Brush against fabric and hair | Close-up ring photo | Check at hour 24 for loose stones | Remove or glue only on the ring-finger nail, one to two days before |
As the graphic below shows, wedding sources do not agree on when to book, which is why a trial matters; it tells you how your own nails behave after one day and after two.

Test the look for several hours for wedding nails
A trial that lasts the length of the appointment is not a trial. Get the nails done in the afternoon of a day when you will use your hands normally, and plan to keep them for at least a full day and ideally for a week. Wash dishes, carry groceries, type, open a car door, and put on a coat. Wear a necklace, a bracelet, and your engagement ring. Note what snags, what chips, and what you keep fidgeting with.
Pay particular attention to the first six to eight hours, because that is roughly how long a wedding day lasts from dressing to the send-off. If a tip chips or a corner lifts in that window, the design is not ready for your day, however pretty it looked on the table. Write your observations in your phone while they are fresh, because by the wedding week you will remember only the compliments.
Photograph it in daylight, flash, and indoor light for wedding nails
Take three simple photographs of your hands with your phone. The first is in open shade or near a window in daylight. The second is indoors under the warm lamps you would find in a reception venue or a hotel room. The third is with flash, which tends to bleach pale colors and can make shimmer look white. Hold the hands in the poses a photographer will ask for: flat on the dress, wrapped around the bouquet stems, and with the ring finger forward.
Compare the three photos with the swatch in your hand. A nude that looks soft in daylight can look chalky under flash, and a white French tip can look grey under a warm bulb. If your photographer shares a detail-shot list, our wedding photographer shot list shows how ring and hand close-ups are typically requested, and our wedding photography guide explains how to brief a photographer on the details you care about.
Choose shape, length, and color for wedding nails
Shape, length, and color feel like style decisions, and they are, but each one also has a practical consequence. Shape affects how easily a nail chips or snags. Length affects how you handle a bouquet, a fork, or a zipper. Color affects how the nails sit beside your ring and how they read on camera. The sections below separate the style question from the practical one so you can weigh both.
Pick a shape that suits your hands and your day
For wedding nails, shape is the outline of the free edge, and the common options are square, squoval (a square with softened corners), round, oval, and almond. Their definitions are standard in salons, but how they look on a particular hand varies, so the most reliable method is to try a shape on one nail or ask a technician to file a sample before the full set.
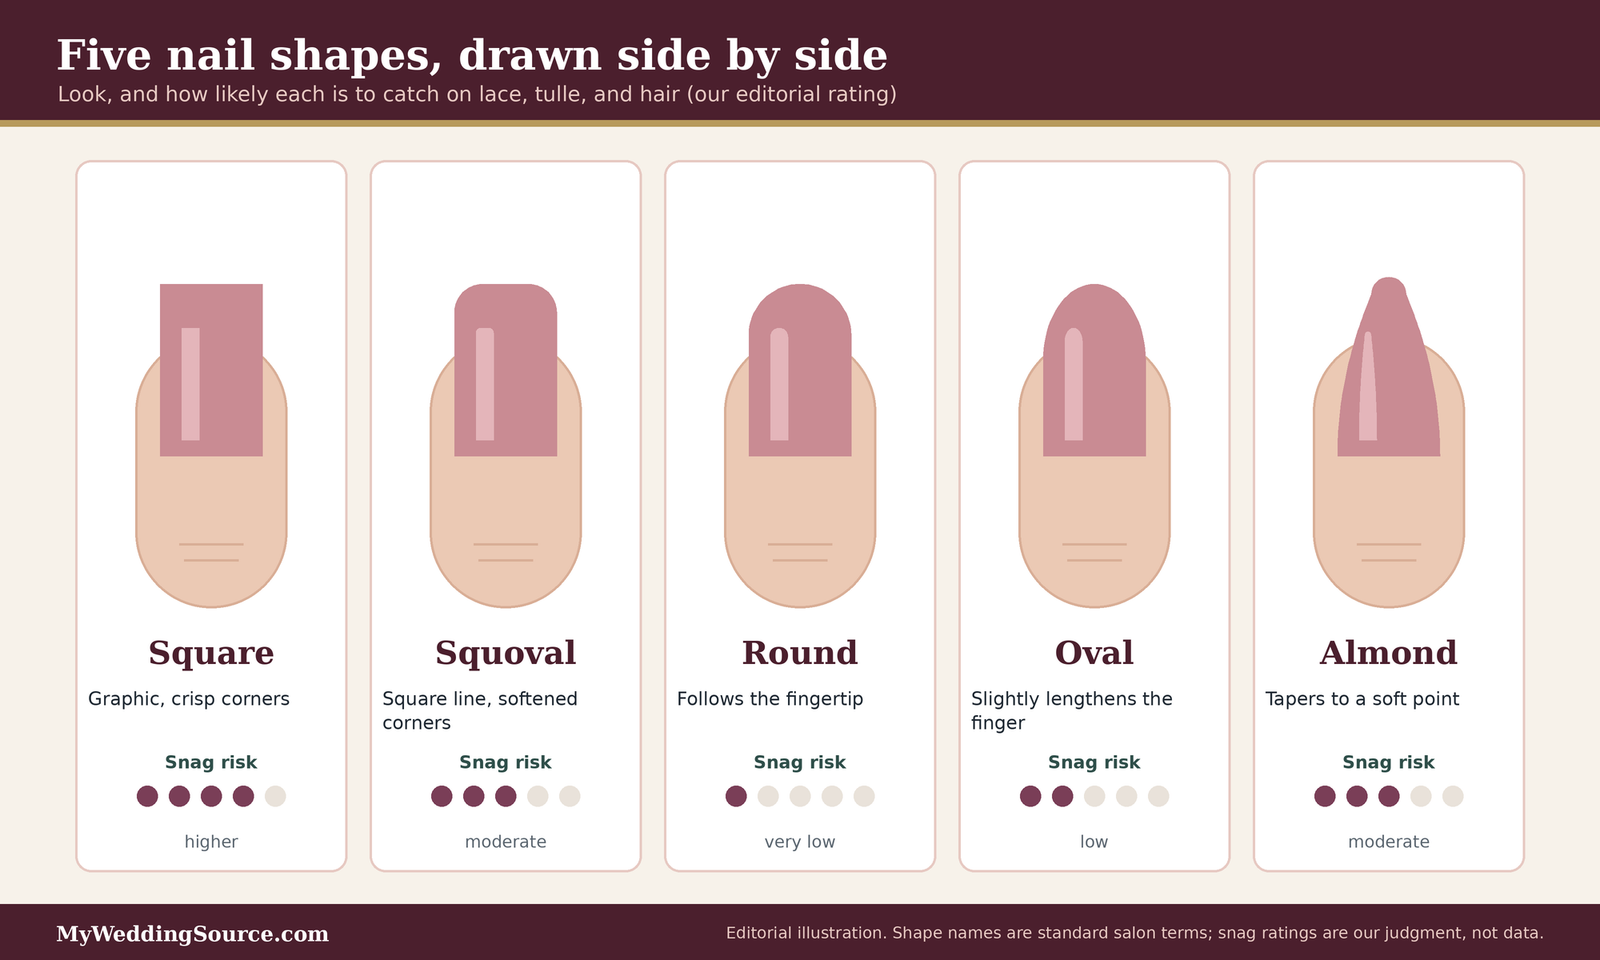
How each common shape looks and wears
Square is the most graphic shape and has two corners that can catch on fabric. The Knot’s short-nails guide calls square understated and notes that it keeps focus on the engagement ring. Squoval keeps the clean line of a square and rounds the corners, which many people find more forgiving under lace and tulle. Round follows the natural curve of the fingertip and is a low-maintenance choice for shorter nails. Oval lengthens the finger slightly and sits softly beside a ring. Almond tapers to a softer point and, according to the same Knot guide, looks sleek and timeless when paired with a nude polish.
Our infographic summarizes these as an editorial comparison of look and snag risk, not as measured data. Snag risk generally rises with length and with sharper corners, which is common sense and our own assessment rather than a published statistic. If your dress has delicate beading or open lace, put the rounder shapes higher on your list.
Use your ring and hand shape as the guide
If you wear an engagement ring every day, put it on while you look at nail shapes. A rounded or oval nail echoes a round or oval stone, while a square nail echoes an emerald cut or a straight-edged band. This is a styling idea, not a rule, and plenty of people prefer contrast. The point is to look at the nail and the ring together instead of in isolation, because that is how the photograph will show them.
Finger length and nail bed width matter too. A long nail bed has room for almost any shape, while a short, wide nail bed can look wider with a square edge and slimmer with a softly rounded one. A technician can show you in a minute by filing one nail. Our engagement ring shapes guide explains the stone outlines you may want to echo or contrast.
Choose a length you can live in
Length is the wedding nails decision that most affects daily function, which is why it is worth deciding early. The Knot reports in its 2026 trend piece that short natural nails are trending and that couples are moving away from long coffin and almond shapes with elaborate designs. That is a trend report, and trends change, but it points to something practical: short and medium nails are easier to live in when you are dressing, hugging, eating cake, and holding a bouquet.
Check the length against the dress and the getting-ready tasks
On the wedding morning you will do things with your hands that you rarely do in a normal day: fasten tiny buttons, thread earrings, pin a veil, tie a robe, and perhaps zip a gown behind you. Long nails make each of these slower. If you already wear long nails and are comfortable, keep them. If you are adding length for the wedding, add it for a trial first and dress in your actual shoes and accessories for a practice session.
A simple test is to try on the dress or a similar garment and complete the closure yourself. If you cannot, that does not rule out long nails, but it does mean a helper should handle the closures and you should keep a nail file in your kit.
Consider growing out your natural nails, with realistic expectations
Some people want a natural length they can paint instead of an extension. The AAD notes that fingernails take about six months to grow out fully, so a plan to grow your natural nails should start at least that far ahead and works best alongside gentle care. WeddingWire’s guidance on healthy nails suggests moisturizing the cuticles daily, avoiding biting and picking, and building habits months before the date.
Be honest about your starting point. If your nails split or peel easily, growing them out may be slower and less predictable, and a technician or a dermatologist can tell you more than a list of tips can. Our guidance on growing out wedding nails is general and not medical, so if you see unusual changes in your nails, the AAD recommends seeing a board-certified dermatologist.
Pick color and finish for the dress, bouquet, and hand
Color is where the sources agree most on wedding nails. The Knot’s trend report names neutrals, sheer pinks, blushes, and soft pastels as the dominant colors, with classic blush, nude, and champagne described as timeless. Zola reports that its survey found couples leaning toward neutral and classic shades. Neither publication suggests those are the only valid choices, and both mention deeper reds, burgundies, blues, and metallics as ways to make a more personal statement.
Neutral, sheer, and French looks
Sheer neutrals and soft French looks are popular for a reason: they flatter a wide range of dresses and skin tones, and they hide small chips and growth better than a solid, opaque color. The Knot’s trend piece describes a “barely there” French in which the tips and base are close in tone, and a “no-mani mani” in which nails look like your own but better. Zola’s nail expert also calls vanilla French nails elegant for weddings.
If you choose one of these looks for your wedding nails, the most important check is the tone of the neutral. Nude polishes lean pink, beige, or peach, and the same bottle looks different on different skin. WeddingWire’s guidance notes that shades look different on different skin tones, and suggests testing several during weekly manicures. Hold your candidate shades against your hand in daylight, not just under salon lamps.
Bolder colors, chrome, and accent nails
If you want something stronger, you have plenty of room. Zola’s color guide lists burgundy, deep red, navy, dark olive, and metallic gold and silver among the darker options, and coral, hot pink, and bright blue among the bright ones. The Knot’s short-nails piece suggests that red can echo a lipstick or a bouquet, that a gold French tip can suit a gold ring, and that blue can be a way to include “something blue.”
Bolder wedding nails reward more testing. A dark shade shows chips sooner at the tip, a bright shade can clash with flowers, and chrome or shimmer can reflect flash in surprising ways. An accent nail is a middle path. The Knot notes that a sparkly accent nail on the ring finger draws the eye to the ring, which is useful to know if you want that attention and equally useful if you do not.
Compare nail systems by how long they last and how they come off for wedding nails
The product on your nails matters as much as the color, and it shapes how wedding nails behave over a long day. Natural nails with regular polish, gel polish, dip powder, acrylic, and gel extensions all behave differently in wear, removal, and risk. The sources we reviewed are clinical and consumer-health pages, a government page, and wedding publications, and none of them publishes a head-to-head test of wear time. So the comparisons below are what those sources say, plus our own labeled reasoning, and your own trial is the real test.
Know what each option is made of and who it suits
The Cleveland Clinic describes gel as a polish that is cured under a UV or LED light in two to three coats, and says it goes on and looks like regular polish. It describes dip powder as colored powder set with glue and a clear activator, needing no lamp, and acrylic as a powder mixed with a liquid monomer that hardens in air and produces a thick, strong nail. All three, it notes, involve buffing or filing the natural nail, which may weaken it, and it says plain polish generally causes the least harm.
Gel polish and gel extensions
Gel polish is the option most wedding sources mention for wedding nails, because it resists chipping. Zola’s hair, makeup, and nail timeline says gel manicures resist chipping best, and WeddingWire’s healthy-nails guide recommends a gel manicure for the wedding day itself, to prevent chips on the day and during the honeymoon. Gel extensions, such as the Gel-X set The Knot’s Kate Boswell had each month before her wedding, add length with a gel-based tip.
The trade-offs come from the process. Gel requires curing under a lamp and usually requires soaking or professional removal. The AAD advises asking for gel that soaks off instead of gel that must be filed off, and notes that filing thins the natural nail. A 2024 dermatology review also describes allergic contact dermatitis from the acrylates in gel products as a recognized problem, which is one reason a patch test and an early trial make sense.
Dip powder, acrylic, and plain polish
Dip powder and acrylic are often chosen for strength. The Cleveland Clinic says dip can last up to four weeks, and the AAD’s dip-powder guidance also says dip nails can stay chip-free for up to four weeks. Acrylic is described as very strong and long-lasting, though no timeframe is given, and it needs fill-ins as the nail grows.
Plain polish is the gentlest option for wedding nails and the easiest to repair. It chips sooner, so it suits people who want the lowest-risk path and are willing to carry a bottle for touch-ups. A clear or sheer coat can look polished and requires very little removal. If you are sensitive to acrylates or have skin that reacts to products, a plain polish plan may be the sensible one, and a dermatologist can advise you personally.
Plan removal and breaks before you book
Removal is where most damage to wedding nails happens, and it is rarely discussed in wedding articles. Zola’s nail expert says improper removal is the main cause of nail damage and recommends having acrylic or gel removed professionally or being very gentle. The AAD says not to pick at chipping polish and to avoid prying it off with orange sticks, scraping, or filing.
Take breaks, and do not stack heavy services right before the wedding
Dermatology sources lean toward moderation. The AAD advises considering a gel manicure for special occasions only, and skipping polish for a week or two so nails can recover. It also warns that touch-ups every two to three weeks on artificial nails can seriously damage natural nails. For dip, the AAD suggests waiting a month after removal before another gel or dip manicure, and using regular polish in the meantime.
WeddingWire’s guidance goes further for wedding timelines. It suggests skipping gel manicures in the months before the wedding because repeated application and removal can cause ridges that take months to grow out, and starting weekly regular manicures one to two months out to care for the nails and test shades. That is one publication’s approach, and it conflicts with Boswell’s monthly gel sets, so consider your own nails’ history when you choose.
Know what safe removal looks like
The AAD’s removal guidance for gel wedding nails, from Dr. Shari Lipner, describes protecting the skin with petroleum jelly, wrapping acetone-soaked cotton against each nail with plastic wrap, waiting about ten minutes, then wiping the polish off with a warm, wet washcloth and washing the hands with gentle soap. It specifically says to avoid foil, because plastic wrap seals better, and to avoid wrapping so tightly that circulation is cut off. It also recommends rubbing petroleum jelly into the cuticles daily for a week afterward.
A separate AAD page on gel manicures suggests soaking about fifteen minutes in a foil wrap, so even dermatologist pages differ in detail. We follow the more recent removal guide, but we suggest having a professional do your removal in the weeks around the wedding, since a rushed removal is when damage happens. This is general information, not medical advice.
Compare quotes without inventing a price
We did not find a reliable national average for wedding nail services in the sources we checked, and nail pricing varies widely by city and by technician, so we are not publishing a price range. What we can offer is a method for comparing the quotes you collect, which keeps you from comparing a base price against an all-in price.
Cost note
Ask every salon for the same all-in quote: the service for each person, any removal of an existing set, nail art or embellishments per nail, a travel or on-site fee if the technician comes to you, a deposit, a cancellation rule, and the gratuity customary in your area. Divide the total by the number of people so you can compare. For example, an illustrative group quote of $480 for six people is $80 per person, while an illustrative $55 base price plus $15 removal and $10 art is also $80. The numbers here are made up to show the arithmetic, not real prices, and our math is an estimate.
Normalize the quote per person and per service
Write every quote as a per-person, all-in number. If a salon offers a group rate, ask what is included and whether anyone’s removal or art is extra. If a technician travels to your hotel, ask whether travel time is billed and how many people can be done at once. Zola’s timeline notes that assigning services to several stylists shortens the morning, so the number of technicians matters as much as the price.
A quote that looks cheaper because it excludes removal or art may not be. A quote that includes a trial may be better value than a slightly lower quote without one. The goal is not to find the lowest number but to find the number that matches your plan.
Decide where to spend and where to save
Spending on wedding nails tends to pay off in two places: a technician who is gentle at removal and clear about products, and a plan that gives you enough time. Savings are usually easy in nail art. Zola’s nail expert suggests skipping rhinestones and decals to save money and keep attention on the engagement ring. A single accent nail gives most of the visual effect for a fraction of the cost of a full set of art.
If budget is tight, consider whether regular polish for your wedding nails with a good top coat and a small touch-up kit is enough, and use the money you save on a trial appointment instead. Our wedding budget calculator can help you place beauty services in your wider budget.
Think about wedding nails, rings, and photographs together
Your hands are in more photographs than almost any other part of you, because rings, bouquets, and handshakes all happen at hand level. Zola’s nail expert notes that couples show their hands and rings often and appear in many photos, so nail designs matter. The sections below help you plan nails with the rings and the photographer in mind.
Put your ring and band next to your color on purpose
If your engagement ring is a showpiece, quiet wedding nails keep attention on it. Zola’s nail expert recommends skipping rhinestones for that reason. If your ring is simple, bolder nails will not compete. Look at the metal, too. The Knot’s short-nails guide suggests a gold French tip for a gold engagement ring, which is a pairing worth checking against a swatch.
Compare against the metal and the stone
Hold your ring hand in daylight with a few candidate shades beside it. Cool pinks and silvery neutrals often sit comfortably with white metals, and warm nudes and champagne can sit comfortably with yellow and rose gold. That is a styling observation, not a rule, and your own eyes are the best test. Our wedding ring metals guide explains how metals differ in color and finish.
If you are adding a wedding band to an engagement ring, bring both to the nail trial. A glossy nail beside a brushed band reads differently than beside a high-polish one. Our wedding bands guide and engagement ring guide can help you finish the ring side of that comparison.
Plan for ring exchange and ring-finger focus
The ring exchange is the moment when your hand is most closely watched and most likely to be photographed in close-up. Try the ring-finger nail on its own at your trial, and make sure the ring slides on easily over any texture or stone. If you plan an accent nail, the ring finger is the traditional place for it, and the Knot notes it draws the eye to the ring.
If your ring size changes with heat, ask your jeweler about it before the wedding, and keep hand care in mind, because dry, cracked skin and swelling can make a ring feel different. Our ring sizing guide explains how fit can change with time of day and temperature.
Plan the hands your photographer will see
A photographer will likely photograph your hands in several situations: the ring exchange, the bouquet, the dress details, and a few posed detail shots. Zola’s hair and makeup article suggests asking your photographer to capture beauty preparation, which can make good keepsakes. That includes your manicure if the appointment happens on the wedding day.
Brief the photographer on the details you want
Tell your photographer in advance if you want close-ups of your wedding nails, your ring, or both, and share a photo of the nail design. A photographer who knows your color can adjust exposure to avoid washing it out. If you will be photographed in flash at the reception, share the result of your flash test photo so they can plan around it. Our wedding photography guide covers how to brief photographers on details.
If you have a particular nail design you want to appear in a shot, such as a pearl accent or a hidden birthstone, tell the photographer early. The Knot’s trend report describes a partner’s birthstone placed under the free edge as a peek-a-boo detail, and a detail like that is easy to miss if nobody knows to look for it.
Prepare your hands for close-ups
Dry skin, ragged cuticles, and hangnails show in close-up photos even when the polish is perfect. WeddingWire’s guidance suggests cuticle oil or cream daily, hand cream regularly, especially in winter, and avoiding pulling at hangnails because that can cause infection. Zola’s nail expert recommends daily cuticle oil and a hand mask to help the manicure last.
The AAD advises never letting anyone push or cut your cuticles, because that can cause inflammation and infection, and suggests asking whether the technician sterilizes tools. If you want neat cuticles for your wedding nails, moisturizing them for weeks beforehand is a gentler path than cutting them just before the wedding.
Build the wedding-morning process backward from the photo deadline for wedding nails
A wedding morning is a chain of dependent tasks, and wedding nails can break the chain in two ways: by taking longer than planned, or by being smudged by the next task. The way to protect against both is to start from the fixed point, the time you must be dressed and ready for photographs, and subtract each service, transition, and buffer.
Calculate service time by person for wedding nails
Zola’s timeline guidance suggests working backward from the ceremony time, adding each service for each person, and assigning each service to a specific stylist because more stylists shorten the schedule. The same article lists a manicure at 20 to 30 minutes and a pedicure at 30 to 45 minutes, and suggests booking nails one or two days before the ceremony.
Those are publication estimates for a basic manicure. Gel with removal, art, or extensions can take longer, so ask your technician for a realistic time for your design and use that, not a generic figure. As an editorial assumption, we use 45 minutes per person in the example below to represent a gel set with some care, but your number may be higher or lower.
Include setup, transitions, touch-ups, and travel for wedding nails
Service time is only part of the schedule. Add setup time for the technician, transitions between people, drying or curing time, a short touch-up window, and travel if the salon is not in your getting-ready location. Zola’s article recommends leaving a “spillover and travel time” block at the end of the schedule, and its samples leave 45 minutes to 1.5 hours.
Here is the editorial arithmetic for a group. Suppose six people each need 45 minutes. One technician needs 6 x 45 = 270 minutes, or four and a half hours. Two technicians need about 135 minutes, or two and a quarter hours, if the work divides evenly. That is our own estimate and an illustration, but it shows why the number of technicians changes the whole morning.
| Time | What happens | Duration | Notes |
|---|---|---|---|
| Day before | Manicure appointment | 45 to 60 minutes | One to two days before follows Zola’s advice; gel resists chips best |
| 9:30 a.m. | Light breakfast and hydration | 30 minutes | Avoid gripping hard items; nails stay untouched |
| 10:00 a.m. | Hair and makeup | 90 minutes | Keep hands away from wet hair products |
| 11:30 a.m. | Buffer for delays | 30 minutes | Flexible time that absorbs spillover |
| 12:00 p.m. | Nail check and top-coat touch-up | 15 minutes | Kit stays with the maid of honor or a planner |
| 12:15 p.m. | Travel to the venue | 30 minutes | Count it both ways if the salon is off-site |
| 12:45 p.m. | Dress, veil, accessories | 45 minutes | Nails fully dry before this step |
| 1:30 p.m. | Dressed and ready; detail photos begin | Fixed point | The photo deadline the whole schedule is built from |
| 4:00 p.m. | Ceremony |

Add buffer before getting dressed for wedding nails
The most common timing mistake with wedding nails is cutting the drying buffer. Regular polish is the riskiest here, because it can smudge in a zipper, a clutch, or a seat belt. Gel is cured under a lamp, and the Cleveland Clinic notes it dries quicker than acrylic or dip, so it tolerates a tighter window. A buffer of at least 30 minutes before the dress goes on is our recommendation for regular polish, and a shorter one is reasonable for cured gel.
Zola’s article raises a related point: styling the bride first protects her schedule but leaves more time for smudges, while styling her last keeps her look fresh but risks running late. That tension applies to nails as well. If you are doing nails on the morning of the wedding, schedule them before hair and makeup so you have time to dry and are not asked to use your hands for heavy tasks right after.
Coordinate accessories and clothing with the beauty plan for wedding nails
The final fittings happen on the wedding day, and nails interact with every item you put on. A veil comb, a zipper, tiny buttons, jewelry clasps, and a bouquet can all catch or damage nails. The earlier you test these combinations, the fewer surprises you will have.
Test veils, necklines, earrings, and getting-ready clothing for wedding nails
Wear the veil and comb with your nails and note any catches. Put on your earrings and necklace without help and see how long it takes. Pull a button-front robe or shirt over your head and watch for snags. If you will wear gloves, try them on over your nails, because a long or textured nail can poke through thin fabric.
If any of these steps cause problems, change the nail, not the day. Shorten the length, round the edges, or remove a raised embellishment. Our wedding party attire guide and bridesmaid dresses guide are useful if your bridal party’s nails also need to work with their clothing.
Avoid last-minute product or color changes for wedding nails
The final week is the wrong time to try a new brand, a new color, or a new technician. Zola’s nail expert suggests having embellishments applied one or two days before the wedding, so they are less likely to fall off, which is a timing point, not an invitation to try something new. A tried look is a safer look.
If you do decide to change your color, make the change at least a week ahead and photograph the new color in the same three lights you used for your trial. If you cannot do that, keep the original plan. A familiar manicure that looks fine is better than a new one you have not tested.
Control risk in the final weeks for wedding nails
The final weeks are for protecting the wedding nails you have decided on, not for new experiments. Nail products can cause allergic reactions, infections, and damage, and a reaction in the last week can mean bare, sore nails on the day. The good news is that most of the risk control is simple: stop experimenting, test early, and know who to call.
Stop experimenting with unfamiliar treatments or products close to the wedding
Think of the last four weeks before your wedding nails appointment as a freeze period. By then you should have your technician, your product, your color, and your shape. Anything new, whether a different brand of gel, a different salon, or a first-time dip manicure, brings uncertainty you cannot afford. The AAD’s dip-powder guidance notes that allergic reactions to adhesives can start hours to days after a manicure, which is a good reason to avoid first-time products late.
Use professional medical or skin advice for reactions or procedures
If you have a history of skin reactions, eczema, asthma, or allergies to acrylates, formaldehyde, or acetone, talk to a board-certified dermatologist before choosing a system. The FDA notes that traces of monomer in artificial nails can cause redness, swelling, and pain in the nail bed of people who have become sensitized to methacrylates, and that formaldehyde can make nails brittle and cause irritation and allergic reactions. It also says to tell your doctor if you have a reaction and offers a way to report it to the agency.
This guide cannot diagnose anything, and a technician is not a clinician. If something looks or feels wrong, such as swelling, fluid-filled bumps, lifting nails, or persistent pain, stop the service and seek care. The AAD suggests that if a reaction lasts two to four weeks, you should see a board-certified dermatologist, and it advises that unusual nail changes deserve professional attention.
Protect your skin from UV during gel curing
Gel polish is cured under a lamp, and that lamp emits ultraviolet light. The Skin Cancer Foundation’s expert says both UV and LED nail lamps emit UV radiation, mostly UVA, and that even the most intense lamps present a moderate UV risk that is much lower than indoor tanning. It suggests applying broad-spectrum sunscreen about 20 minutes before the session, while noting that this does not protect against a rare cancer that can develop under the nail.
The AAD recommends a broad-spectrum, water-resistant sunscreen with SPF 30 or higher before the manicure, or dark opaque gloves with the fingertips cut off. The AAD also advises LED lights over UV lights because they emit less UV and cure faster. For regular polish, the Skin Cancer Foundation’s expert says air-drying or a fan without UV is the safest option. None of this is a reason to panic, but it is a reason to build sunscreen into your routine, particularly if you plan several gel sessions before the wedding.
Patch-test where appropriate for wedding nails
For wedding nails, a patch test is a small, early trial of a product on one nail so that any reaction shows up while there is still time to recover. It is most relevant for dip, gel, acrylic, and anything new to you. It is not a substitute for medical advice, and it does not catch every problem, but it is cheap and easy.
Use the AAD’s one-nail test for dip powder
The AAD’s dip-powder guidance gives a clear procedure. Have only one nail done with dip powder, then wait seven days. If there is no reaction, you can do the rest of your nails. If there is a reaction within seven days, remove the color right away, let the skin heal, and avoid dip nails. If a reaction lasts two to four weeks, see a board-certified dermatologist. The same page lists the signs to watch for: swelling, itching, or discoloration around the nail, fluid-filled bumps, and nails lifting.
The AAD guidance is specific to dip powder, and we are not aware of an equivalent official procedure for every other product, so apply the idea with care. The principle, which is our own recommendation, is to test any unfamiliar system on one nail, early, and to leave a gap of weeks before the wedding.
Check your bare nails each time the color comes off
The AAD’s dip-powder page also recommends looking at your bare nails each time you remove color, watching for lifting, swelling or discoloration of the skin around the nail, thickening, or any other change. If you see one, skip the next manicure and leave your nails bare for two to four weeks, seeing a dermatologist if the problem lasts beyond four weeks.
That advice fits the wedding timeline well. A short bare-nail check after each removal gives you a chance to catch a problem months ahead. It also tells you whether your nails need a break before the wedding, so that you arrive at your final manicure with healthy nail beds.
Prepare touch-up and contingency supplies for wedding nails
Even well-planned wedding nails can chip, lift, or snag. A small kit and a clear owner turn a minor problem into a two-minute fix. The point is not to be ready for every disaster but to cover the likely ones.
Assign who carries the touch-up kit for wedding nails
Give the wedding nails kit to one person with a clear name: the maid of honor, a sibling, or a planner. Make sure that person knows which polish, top coat, and file belong to you and where to find them. Tell your photographer and your technician who the wedding nails contact is, so that no one is hunting for the bag.
A simple kit includes the exact polish and top coat you used, a nail file, a few cotton swabs, a small bottle of remover only if your plan allows quick fixes, a clear nail glue or a spare press-on if your technician recommends one, cuticle oil, and a small hand cream. Our wedding emergency kit guide covers the wider list of what to carry for the day.
Plan for humidity, tears, wind, heat, and veil removal for wedding nails
Think through the weather and the logistics. In heat and humidity, hands can swell slightly and sweat, which can make a ring feel tight and make some designs lift. Our summer wedding heat plan and winter wedding weather plan cover the climate questions for the day as a whole. In wind, a veil can catch on a longer or textured nail. If you cry, your hands will probably go to your face, so plan for tissue and for a gentle touch near your eye makeup.
Veil removal, at the end of the ceremony or before the reception, is a moment when a nail can catch on a comb or a pin. Ask a helper to remove it, and tell them to slide out the comb in the direction it was placed. These are practical notes from the logic of the situation, not from a source, so test them in your trial run.
Questions to ask before you book wedding nails
Good questions about wedding nails protect you from vague promises and from surprises on the day. Ask for the answers in writing, and keep them with your confirmation.
Questions worth asking before you book
- Which system will you use, and is the gel soak-off or does it have to be filed off?
- Do you use LED or UV lamps, and can I wear gloves or sunscreen during curing?
- How do you sanitize tools, and do you pour dip powder into a separate container for each client?
- How long will my set take, including removal and art, and how many technicians do you assign to a group?
- What are your travel, deposit, cancellation, and late-arrival rules?
- Can I book a trial, and will you save my exact colors and shape?
- What happens if a nail lifts or breaks before the wedding, and do you offer a repair or touch-up?
Ask about the service and the products
A technician who is happy to explain the process is a good sign. The AAD suggests asking whether tools are sterilized, and the Cleveland Clinic recommends choosing a certified technician who follows hygienic practices and asking how tools are cleaned. The FDA notes that state and local authorities regulate salon operations and the licensing of nail technicians, so you can check the licensing rules where you live.
Ask about products, lamps, and hygiene
Ask which brand and system the technician will use and whether you can see the ingredient list. The FDA advises reading labels and checking the ingredient statement for formaldehyde and related names if you want to avoid it. Ask about lamps and offer to bring your own sunscreen or gloves, and ask how the technician handles shared containers, particularly for dip powder, since the Cleveland Clinic and AAD both suggest powder be poured or sprinkled instead of dipping into a shared jar.
A clear answer is more useful than a long one. If a salon cannot tell you what is in the product, how the tools are cleaned, or how removal works, that is useful information.
Ask about removal, repair, and the aftercare plan
Ask how removal works and how long it takes, and whether the technician soaks off gel or files it. Ask what aftercare they recommend, and when you should return for repairs. Zola’s nail expert suggests cuticle oil daily and a hand mask, and the AAD suggests petroleum jelly for the cuticles in the days after removal.
Make sure you know what to do if a nail lifts the morning of the wedding. Ask whether the technician offers emergency touch-ups and how to reach them. A plan for the unlikely bad day is worth more than a promise that it will not happen.
Ask about the schedule and the paperwork
The business side of booking wedding nails is where surprises hide. The same questions you would ask any wedding vendor apply here: what is included, what costs extra, and what happens if something changes.
Ask about time, travel, and group bookings
For a group, ask how many technicians will be present and how long each person’s service will take. Ask about on-site travel fees, setup requirements such as a table and light, and how the technician handles late arrivals. Zola’s timeline guidance suggests sharing your itinerary with everyone at least two to four weeks before the wedding, so confirm the plan in writing with the technician by then.
If your wedding party is large, consider a split: some people at a salon the day before and others on-site, so the morning schedule stays manageable. Our plan wedding timeline and wedding planning checklist show where beauty bookings fit among the other tasks.
Ask about deposits, cancellations, and substitutions
Ask about the deposit, the cancellation window, and what happens if your technician is ill on the wedding day. A substitution policy matters more than it seems, because a different technician on the morning may not know your design. Ask whether notes and photos from your trial will be shared, and whether a backup technician can follow them.
Keep the confirmation email, the quote, and any notes in one place. This guide gives general information and not legal advice, so for any contract for a group or on-site service, read the terms yourself and ask the vendor to clarify anything unclear before you pay.
FAQ: wedding nails questions
Timing and trials
When should I get my wedding nails done?
Sources differ. Zola’s guidance suggests booking one to two days before the ceremony so the manicure looks fresh, while WeddingWire suggests a gel manicure on the wedding day itself to prevent chips. Choose based on your nails’ history and your schedule, and test the plan with a trial so you know how your nails look after one and after two days.
How many trials do I need for wedding nails?
For wedding nails, one trial is the minimum, and two is better if you change anything. Zola recommends trying several designs or shades before the wedding, and one nail artist quoted by The Knot booked a fresh set monthly to settle her look. Hold the first trial two to three months out, which is our own suggestion, and stop experimenting about a month before.
Shape, length, and color
What color is safest for wedding nails?
Sheer neutrals, blush, and soft French looks are the most common choices, according to The Knot and Zola, and they tend to hide chips and photograph softly. Safe does not mean required: burgundy, navy, or metallic shades work if you test them in daylight, indoor light, and flash against your bouquet and ring.
Should I choose short or long wedding nails?
Choose the length you can live in for your wedding nails. The Knot reports a trend toward short, natural nails, and short or medium nails make dressing, hugging, and holding a bouquet easier. If you prefer length, try it on a trial day with a similar garment and a veil comb, and ask a helper to handle closures.
Durability and safety
Are gel nails a good choice for a wedding?
For wedding nails, often yes, because gel resists chipping better than regular polish, according to Zola and WeddingWire. The trade-offs are UV exposure during curing, possible allergic reactions to acrylates, and removal damage. Dermatologists suggest sunscreen or fingerless gloves, LED lamps, soak-off gel, and breaks between sets. Test early, and ask a dermatologist if you have a history of skin reactions.
How can I avoid nail damage before the wedding?
To protect wedding nails, take breaks, avoid picking, and have gel or acrylic removed professionally. The AAD suggests skipping polish for a week or two between gel sets, avoiding touch-ups every two to three weeks on artificial nails, and never cutting cuticles. Moisturize daily with cuticle oil or petroleum jelly. See a board-certified dermatologist if you notice unusual changes.
Can I do my wedding nails at home?
Plain polish is the easiest to do yourself and to repair, and a touch-up kit helps. Gel, dip, and acrylic are harder: Zola’s nail expert says improper removal is the main cause of damage, and the AAD recommends having gel removed by a professional or following its careful steps. For wedding nails, a trial with a technician is a safer start.
Is it safe to try a new nail product the week of the wedding?
We would not try a new product on your wedding nails that week. The AAD notes that dip powder reactions can begin hours to days after a manicure, and recommends a one-nail test and a wait of seven days. Use a product you have already worn without trouble, and if you must try something new, test it on one nail weeks earlier.
Your next steps
Decide and test your wedding nails
Write your brief and book a wedding nails trial
Write the result you want from your wedding nails in a sentence, list the conditions they must survive, and book a trial two to three months out. Keep notes and photos from three kinds of light. Our bridal makeup guide can help you align your nails with the rest of your look.
Settle the system and the timing
Choose the nail system you can live with for your wedding nails, check it with a patch test if it is new to you, and decide whether you prefer the day-before or day-of approach. Add the dates to your wedding planning guide timeline.
Prepare the day
Build the back-timed schedule and name your kit holder
Use the table in this guide to build your own wedding nails schedule from the photo deadline, share it with your technician and wedding party two to four weeks ahead, and name the person who carries the kit.
Keep the last month calm
Freeze your wedding nails plan about a month before the wedding, keep moisturizing, and treat any sign of a reaction as a reason to call a professional. For the last-week details, see our wedding week checklist.
Sources & methodology
How we built this guide
What we relied on
This guide combines dermatology guidance from the American Academy of Dermatology and the Skin Cancer Foundation, a Cleveland Clinic overview of nail systems, an FDA page on nail care products, a 2024 dermatology review of gel nails, and wedding-industry guidance from The Knot, Zola, and WeddingWire. Where a statement comes from a publication or a nail artist quoted in it, we say so. The back-timed schedule, the quote-comparison example, and the group-time arithmetic are our own illustrations and estimates, and the prices in the cost note are invented for the arithmetic.
What we did not do
We did not test products, measure wear time, or survey salons, and we did not find a reliable national price average, so we do not publish one. Wedding-industry sources differ on timing and on gel, and dermatology pages differ on removal details. This is general information, not medical advice. See a board-certified dermatologist about reactions or persistent nail changes, and check your state’s rules for salon licensing.
Source list
Government, clinical, and professional sources
- U.S. Food and Drug Administration, Nail care products: https://www.fda.gov/cosmetics/cosmetic-products/nail-care-products
- American Academy of Dermatology, Gel manicures: tips for healthy nails: https://www.aad.org/media/news-releases/gel-manicures-dermatologists-share-tips-to-keep-nails-healthy
- American Academy of Dermatology, Removing gel polish: https://www.aad.org/public/everyday-care/nail-care-secrets/basics/pedicures/removing-gel-polish
- American Academy of Dermatology, Artificial nails: tips for reducing nail damage: https://www.aad.org/public/everyday-care/nail-care-secrets/basics/pedicures/reduce-artificial-nail-damage
- American Academy of Dermatology, Dip powder manicure tips: https://www.aad.org/public/everyday-care/nail-care-secrets/basics/pedicures/dip-powder-manicure
- Skin Cancer Foundation, Ask the expert: UV lamps at the nail salon: https://www.skincancer.org/blog/ask-the-expert-are-the-uv-lamps-in-the-dryers-at-the-nail-salon-safe-to-use/
- Cleveland Clinic, Acrylic, gel, or dip nails: https://health.clevelandclinic.org/acrylic-gel-or-dip-nails-understanding-the-pros-and-cons-for-your-health/
- Bansal et al., Dermatologist-driven aesthetic nail enhancement, Indian Dermatology Online Journal (2024), PubMed Central: https://pmc.ncbi.nlm.nih.gov/articles/PMC11753538/
Wedding-industry sources
- The Knot, 2026 wedding nail trends: https://www.theknot.com/content/wedding-nail-trends
- The Knot, Short wedding nails: https://www.theknot.com/content/short-wedding-nails
- Zola, Wedding nail trends with a celebrity nail artist: https://www.zola.com/expert-advice/zola-ganzorigt-reveals-wedding-nail-trends
- Zola, Most popular wedding nail colors: https://www.zola.com/expert-advice/most-popular-wedding-nail-colors
- Zola, How long wedding hair and makeup usually take: https://www.zola.com/expert-advice/how-long-does-wedding-hair-and-makeup-usually-take
- WeddingWire, How to have healthy nails for your wedding day: https://www.weddingwire.com/wedding-ideas/how-to-have-healthy-nails