
Pinspot lighting is a narrow, focused beam aimed at a single centerpiece, and it is one of the few reception lighting choices that can make a table look finished from across the room. This guide covers the parts that decide whether it works: beam angle, fixture position, power, rigging, setup time and cost per table.
Pinspot lighting is worth the setup when four things are true: the ceiling or truss already has a safe, approved place to hang fixtures, the room is dim enough for a small beam to show, the centerpiece has enough texture or height to reward being lit, and the table layout is final. Choose a beam only slightly wider than the centerpiece, place the fixture so the shadow falls where nobody looks, and ask for a written load-in time per fixture before you sign. If any of those four conditions fails, a simpler light source usually costs less and looks better.
A centerpiece is usually the most photographed object on a reception table and the least lit. Candles flicker at the wrong height, ceiling lights flatten everything, and the room lights are often dimmed for the dancing that follows dinner. Pinspot lighting fixes that one narrow problem. A small fixture, hung above or beside the table, throws a tight circle of light onto the arrangement and leaves the rest of the table in softer dark. Guests see a glowing center and a calm room.
The catch is that this is a technical decision dressed as a decorating one. Pinspot lighting has to be mounted somewhere, powered from somewhere, aimed by someone, and aimed again after the table is dressed. Each of those steps has a cost, a time requirement and a person who can say no, usually the venue. Couples who treat it as a small styling add-on tend to discover the extra steps at the walkthrough, when the options have narrowed.
This guide is written for couples, planners and the person who ends up holding the lighting quote. It does not teach you to program lights. It gives you a way to decide, with a few measurements and a short test, whether pinspot lighting suits your room and your budget, and a way to ask the right questions of the people who do the work.
A note on scope. This is general information, not legal, tax or financial advice. Rigging, electrical work and fire-safety rules are set by your venue, your local authority and the qualified professionals who do the work, so treat everything here as preparation for those conversations, not a replacement for them.
What pinspot lighting does at a wedding table
The word pinspot comes from the beam. A pinspot is a small fixture, traditionally built around a compact reflector lamp, that casts a narrow, bright circle of light. In theatre and retail it has long been used to pick out a single object: a product on a shelf, a mirror ball, a performer’s hands. At a reception the object is a centerpiece, a cake, a sign or, sometimes, the couple’s table.
Three things make pinspot lighting different from other lighting a couple might consider. First, the beam is narrow and hard-edged compared with a wash or an uplight, so it lights an object rather than a space. Second, it is almost always mounted above the table, which means it needs a structure to hang from.
Third, its effect depends heavily on what is underneath it. Pinspot lighting on an empty table looks like a spot on a tablecloth. Pinspot lighting on a textured arrangement looks like the centerpiece is glowing from within the room.
That last point is worth sitting with. Pinspot lighting does not add decoration. It increases the contrast between the centerpiece and everything around it. If the arrangement is low, flat or uniform in color, the extra contrast has little to show. If it has depth, glass, petals, metal or varied height, the light picks out those surfaces, and the centerpiece reads as the focal point of the table.
Where it sits among lighting choices
A reception room is usually lit in layers. There is general light that lets people see their food, accent light that shapes walls and features, decorative light that adds atmosphere, and task light for things like the cake cutting. Pinspot lighting belongs in the accent layer, but it behaves like a task light because it has to hit a precise spot. That dual nature explains most of the planning difficulty.
For the broader question of how furniture, fabric and light fit together in a room, the wedding rental planning checklist is a good place to see what else is competing for ceiling access, power and load-in time. This article stays with one narrow fixture and one narrow decision.
What you are actually buying
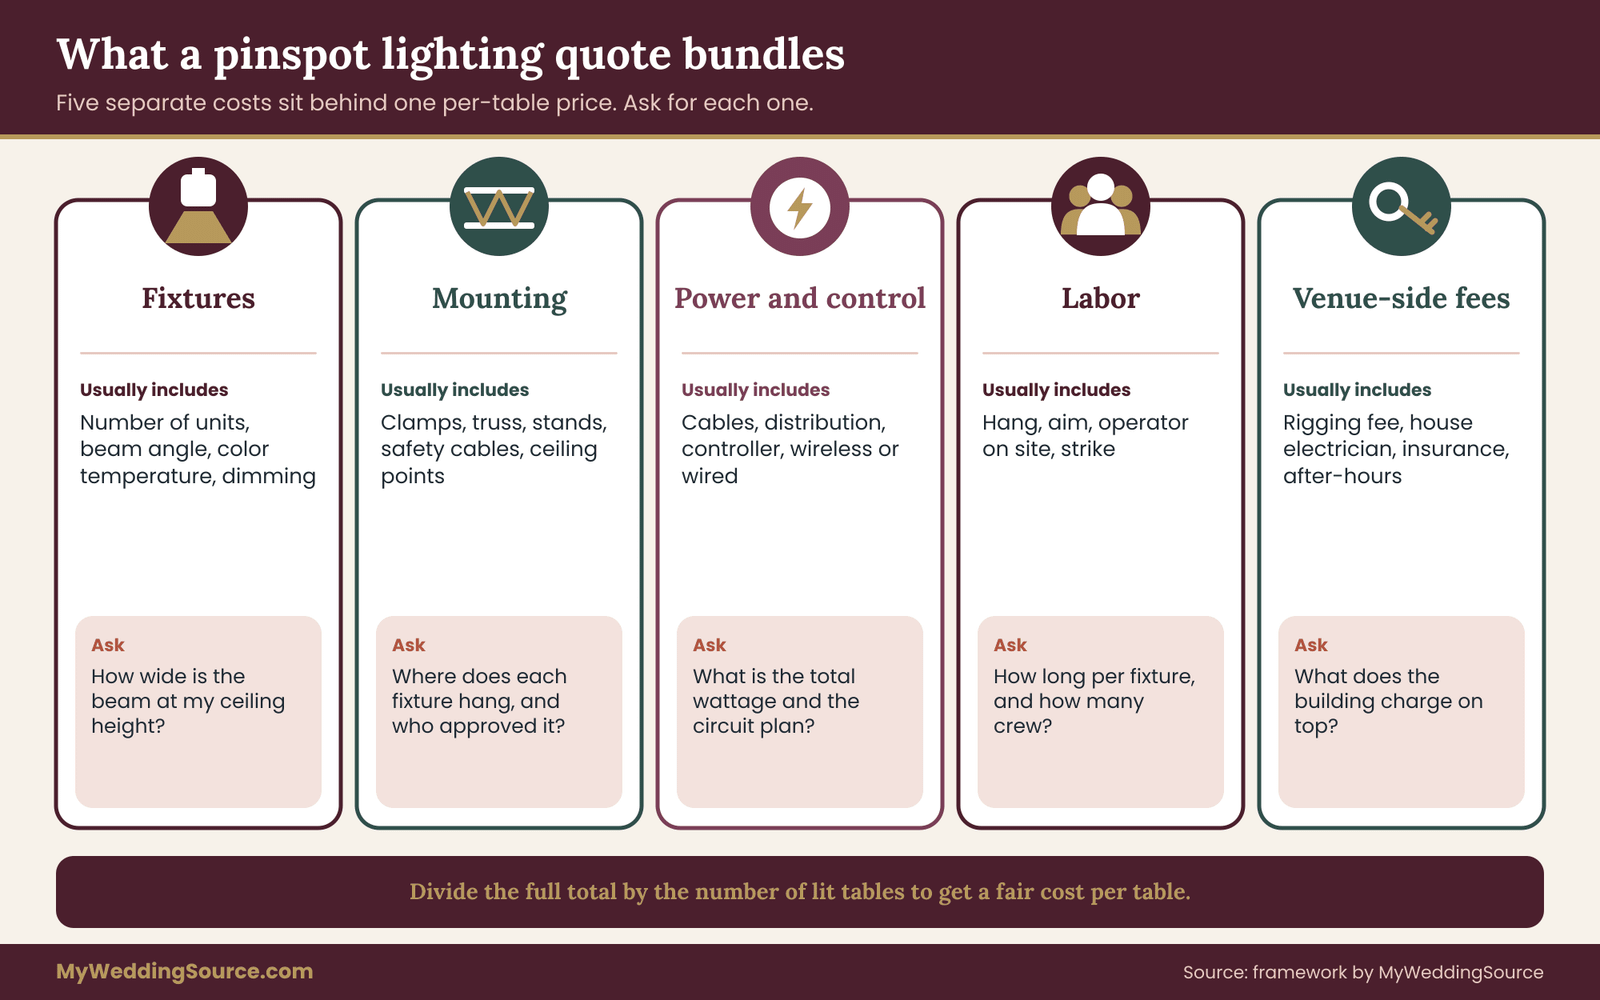
When a lighting vendor quotes pinspot lighting, the quote usually bundles several separate things, and it helps to pull them apart in your head.
The first is the fixtures themselves: the number of units, their beam angle, their color temperature and whether they are dimmable. The second is the mounting hardware: clamps, trusses, stands, safety cables or ceiling attachments. The third is power and control: cable runs, power distribution, and sometimes a control desk or wireless control. The fourth is labor: installation, aiming, an operator who stays or someone on call, and teardown. The fifth is venue-side cost: any rigging fee, insurance requirement, engineering sign-off or after-hours charge.
Couples tend to compare the first item only. The fixtures are often the smallest part of the total. When you hear a per-table price, ask what it includes, because a low figure that excludes labor and rigging is not a low price. The wedding vendor contract guide shows how to read quotes and their terms line by line. The costing section later in this guide gives a simple way to compare quotes on equal terms.
The five gates
To keep this practical, the rest of the guide is organized around five gates. A pinspot lighting plan has to pass all five, and a failure at any gate is a reason to change the design, not to push harder.
The position gate asks whether a fixture can sit at a height and offset that lights the centerpiece without dazzling guests. The shadow gate asks whether the centerpiece and the fixture position together produce a shadow you can live with.
The power gate asks whether the room can supply and control the load. The rigging gate asks whether the fixture can be hung safely and whether the venue approves it. The time gate asks whether the load-in schedule allows each fixture to be mounted and aimed after the tables are dressed.
You will meet each gate in its own section. The five gates also double as a vocabulary for talking with a vendor. If a lighting designer can answer all five for your room in plain words, you are likely working with someone who has done this before.
When pinspot lighting is a good fit
Not every room suits pinspot lighting, and not every centerpiece deserves a spotlight. This section sets out the conditions under which pinspot lighting tends to earn its cost, and the ones under which it tends to disappoint.
The room
Pinspot lighting needs contrast, and contrast needs a dim room. In a sunlit tent or a room with bright general lighting, a small beam on a table is washed out. The effect of pinspot lighting is strongest in an evening reception where the general lights are lowered to a warm, low level and pinspot lighting provides the only bright points on the tables. If your reception overlaps with daylight, the beams will barely register until later, which may or may not suit your timeline.
The ceiling matters just as much. Fixtures have to hang from something. A ballroom with a lighting grid or exposed truss is the easy case. A room with a flat, finished ceiling and no attachment points is the hard one, because the fixtures then need stands, and stands sit in the guest space.
A very high ceiling lengthens the throw, which widens the beam spot and may require a narrower fixture. A very low ceiling shortens it, which makes a tight spot easy but leaves little room to keep the fixture out of the sightline. The measurements in the next section turn those impressions into numbers.
The centerpiece
Ask what the light will land on. Pinspot lighting rewards depth and sparkle: clear glass, candle holders, metallic accents, textured greenery, layered petals, a tall arrangement with a sculpted outline. It does less for a low, uniform bowl of one flower in one color, where the light mostly produces a bright disc.
Height is a second variable. A tall centerpiece lifts the top of the arrangement closer to the fixture, which changes both the beam width at that height and the shadow below. A very tall centerpiece can also block sightlines across the table, which is a separate problem that lighting makes more obvious, not less. If your florist is still deciding between a low and a tall design, settle that before the lighting conversation, because the lighting depends on it.
The layout
Pinspot lighting is unforgiving about table position. A fixture is aimed at a point in space. If the table moves a foot, the beam moves off the centerpiece. That is easy to ignore when the floor plan is a diagram and expensive to discover when it is a room with a hundred chairs. Pinspot lighting suits a layout that is locked early, measured on the floor and unlikely to change at the last minute.
The same logic explains why couples with flexible seating, a late guest count or a venue that reserves the right to rearrange tables often do better with a light source that travels with the table. We will compare those alternatives later, without reopening broader questions of reception design that other guides on this site handle.
A short fit check
Before you spend time on quotes, run a quick fit check. Is the reception mostly after dark, or in a room you can darken? Is there a truss, grid or approved attachment point above the tables, or will fixtures need stands? Is the centerpiece textured or tall enough to reward a spotlight?
Will the table layout be final at least a week before the event? If the answer to two or more of those is no, the idea may still be possible, but it is no longer a simple one, and you should expect the quote and the schedule to reflect that. ## Beam angle and throw: the math behind pinspot lighting
Every fixture used for pinspot lighting is described by a beam angle, and the beam angle is the single number that controls how much of the table gets lit. It is worth learning one formula, because it lets you check any quote on paper before anyone brings a ladder.
Beam angle, field angle and what the data sheet means
Lighting manufacturers usually publish two angles. The beam angle is the width of the cone where the light has fallen to half of its peak intensity. The field angle is wider, where the light has fallen to about a tenth. The Illuminating Engineering Society defines these terms, and fixture data sheets generally follow them. The practical meaning is that the visible spot always looks a little larger and a little softer than the beam angle alone suggests, because light keeps falling off past the half-intensity edge.
For pinspot lighting this matters because the edge of the spot is what guests see. A fixture with a sharp edge draws a visible circle on the tablecloth. A fixture with a soft edge fades out gently, which most people find more flattering around food and faces. Ask the vendor whether the fixture has a hard or soft edge, and whether the beam angle on the data sheet is adjustable with a lens or fixed.
The throw formula
The diameter of the spot at the target depends only on the beam angle and the distance from the fixture to the target, which lighting people call the throw. For a beam angle called A and a throw called D, the spot diameter is two times D times the tangent of half of A. You do not need to remember it. A calculator, or the search box on a phone, gives the answer in seconds.
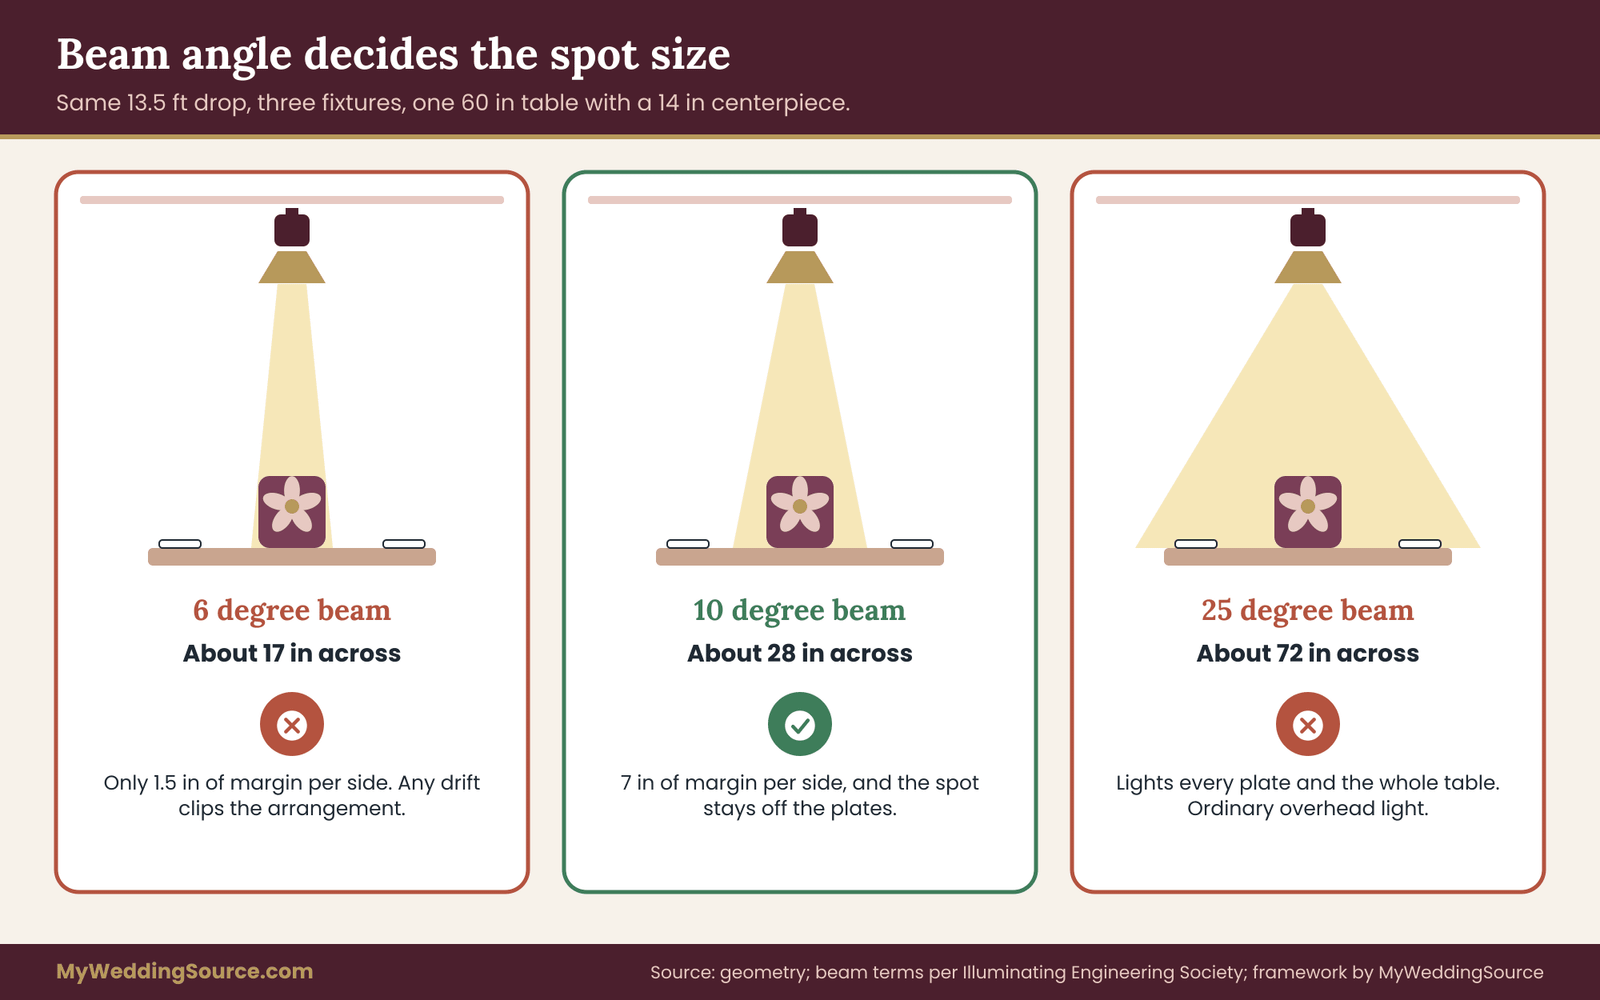
Here is a worked example with invented numbers, so you can see the scale. Suppose a fixture hangs 16 feet above the floor and the tabletop is 2.5 feet above the floor. The throw straight down is 13.5 feet.
A fixture with a 10 degree beam angle makes a spot about 2.4 feet across, or roughly 28 inches. A 6 degree fixture at the same throw makes a spot about 17 inches across. A 25 degree fixture makes one about 6 feet across, which is wider than many round tables.
Choosing a spot size for the centerpiece
The rule that follows is simple. The spot should be somewhat wider than the centerpiece, and much narrower than the table. A spot that is exactly the width of the arrangement clips its edges the moment the aim drifts by an inch or two, and aim does drift. Table settings get bumped, floors flex, and a fixture on a truss can shift slightly when someone knocks a cable.
A useful margin is a few inches on each side of the arrangement. In the example above, a centerpiece 14 inches wide sits comfortably inside the 28 inch spot from the 10 degree fixture, leaving 7 inches of margin each side. The 6 degree fixture leaves only 1.5 inches of margin, which is too tight to trust. The 25 degree fixture lights the plates and glasses too, which turns a dramatic effect into ordinary overhead light.
There is a second limit on the upper side. The spot should stay inside the ring of place settings. On a 60 inch round table, the plates sit roughly 20 inches or more from the center, but check your own table and place setting size. If the spot reaches the plates, guests will see their food and hands lit by a hard circle, which most people find less appealing than a softly lit centerpiece.
Why distance changes the answer
The same fixture does different things in different rooms. Move the ceiling from 12 feet to 20 feet and the spot from a 10 degree fixture roughly doubles in diameter, because the throw has nearly doubled. That is why you cannot choose a beam angle from a catalog without knowing the mounting height. Rental companies often stock more than one lens or fixture model for exactly this reason, and a good vendor will ask for your ceiling height before quoting.
It also means that a venue with several ceiling heights, such as a main room with a tray ceiling and a lower perimeter, may need different beam angles in different places. Ask whether the quote assumes one fixture model for the whole room.
Brightness is not beam width
Narrowing the beam concentrates the same light into a smaller area, so a tight spot looks brighter on the table than a wide one from the same fixture. Because of that, beam angle and brightness are linked. If a fixture has an adjustable lens and a dimmer, you can often settle on a spot size first, then dim to taste.
Ask whether the fixtures dim smoothly, and whether dimming changes the color temperature, which matters for how food and skin tones look. Older halogen fixtures warm and yellow as they dim. Many LED fixtures hold color steady but may have a minimum brightness below which they flicker or switch off.
Color temperature is the other number to ask about. Warm light, in the range often described as warm white, flatters candlelight, wood and gold. Cooler light makes white linen and clear glass look crisp but can feel clinical at dinner. Whatever you choose for pinspot lighting, ask that all fixtures in the room match, because a mix of warm and cool spots across tables looks like a mistake rather than a design.
Lighting position for pinspot lighting: height, offset and tilt
Once you know the beam you want, the next gate is position. Where the fixture sits relative to the table decides three things at once: the spot size, the shadow, and whether the beam passes through anyone’s eyes.
Directly overhead versus offset
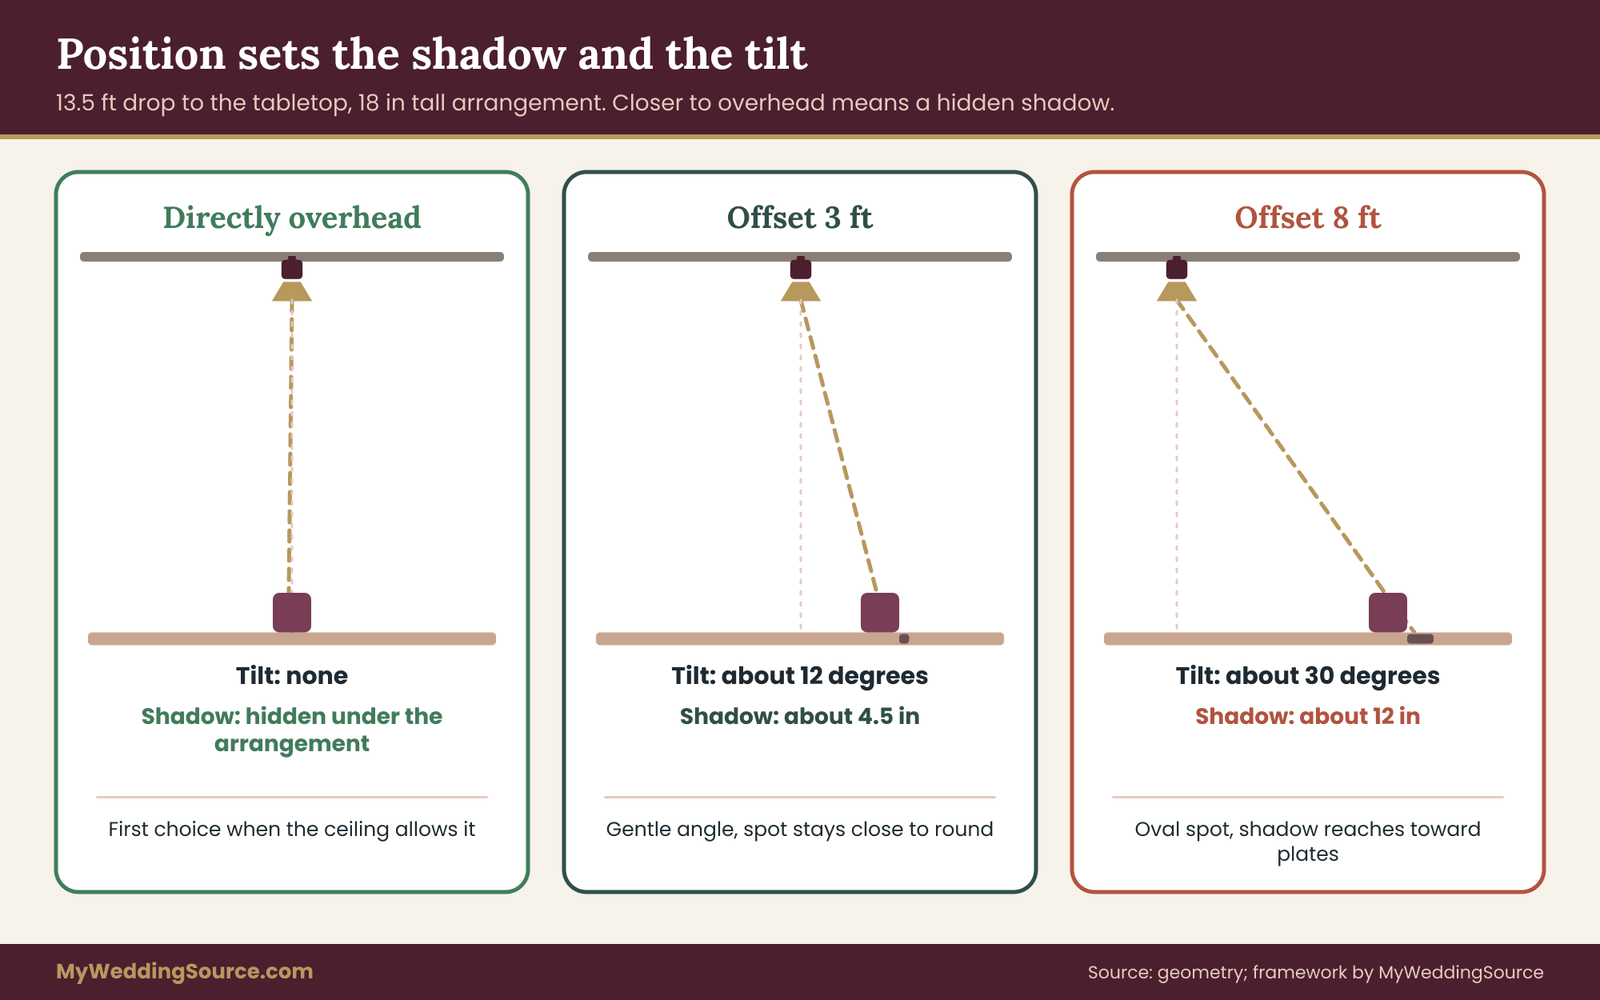
The simplest position is directly above the center of the table, pointing straight down. The throw is shortest there, the spot is a clean circle, and the shadow of the centerpiece falls almost entirely beneath the arrangement, where it is hidden. Guests see a glowing object with no dark shape behind it. If the room allows overhead mounting, this is usually the first choice for pinspot lighting.
The trouble is that directly overhead positions are the ones that need the most rigging. The fixture has to hang above each table, which means one attachment point or one truss run per table. In many rooms the available points do not line up with the tables. The alternative is an offset position, where the fixture hangs to one side and aims at an angle. It gives you more flexibility in where to hang, at the price of a longer throw, an oval spot and a visible shadow.
The offset formulas
Two small calculations describe an offset position. The tilt, meaning how far from vertical the fixture leans, is found from the horizontal offset and the vertical drop. In the earlier example, a fixture offset 3 feet to one side with a vertical drop of 13.5 feet leans about 12.5 degrees from vertical. That is a gentle angle, and the spot stays close to round.
The shadow is the more interesting number. An object of height H, lit from a fixture offset by distance S and hanging at a vertical distance V above the tabletop, casts a shadow on the tabletop of length H times S divided by V minus H.
In the example, a 1.5 foot tall arrangement with a 3 foot offset and 13.5 foot drop casts a shadow about 4.5 inches long. That is a small shadow, mostly under the arrangement. Move the offset to 8 feet and the same arrangement casts a shadow about 12 inches long, which reaches toward the plates.
The eyeline rule
Glare is the failure that couples notice first. A guest looking across the table can see a fixture directly if it is aimed at them, or if its beam crosses their line of sight at eye level. The rule is to keep the beam above eye level where it travels through the room, and to let it reach eye level only at the centerpiece, where it is blocked by the arrangement.
In practice, that means offset positions should be on the side of the table away from the main guest sightlines, such as toward a wall or the room perimeter, and aimed steeply downward. A fixture that is low and flat across the room throws light into eyes and onto walls.
A fixture that is high and steep puts almost all of its light on the tabletop. Check this by sitting in the chairs, not by standing, because seated eye level is much lower than the height of someone standing beside the table.
Position and the people who walk beneath it
Fixtures and their cables hang in a space where servers, guests and tall relatives walk. Clearance is a safety question, not only a lighting one. Venues commonly set a minimum clear height for anything hung over a guest area, and trusses and cable runs have to stay clear of exits and sprinklers. The venue technical walkthrough guide covers measuring the room and asking what the building allows, and those same measurements feed the position gate here.
If a fixture position is inside that clearance zone, or too close to a sprinkler head or a ceiling vent, the fixture moves, not the rule. A good lighting designer will already know this and will draw alternative positions. A weak one will say that it can be made to work, which is a reason to ask for the answer in writing.
Writing down the position
For each table type, write down four numbers: mounting height above the floor, horizontal offset from the center of the table, the tilt angle that results, and the expected spot diameter. Four numbers per table type is all a vendor needs to confirm and all you need to check the quote.
If your room has one table size, you have one set of numbers. If you have a head table, round tables and a cake table, you have three, and the head table or cake table often wants a different fixture. ## The tabletop shadow test for pinspot lighting
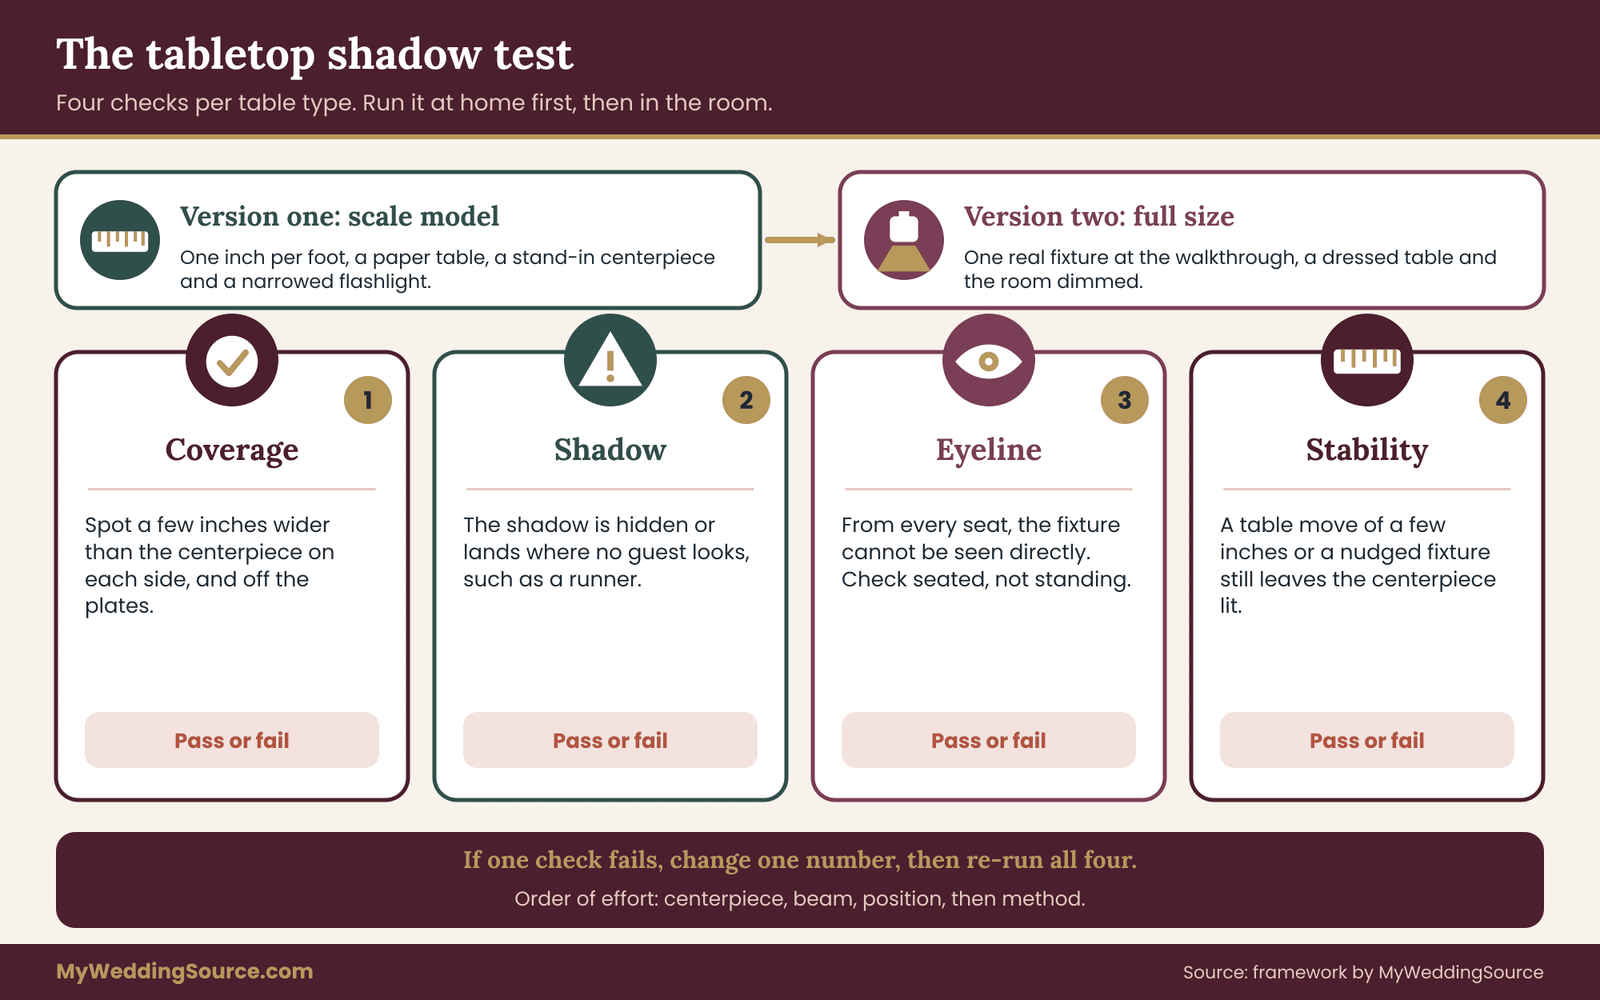
This is the original piece of the guide: a short test you can run before you pay a deposit. It checks the position gate and the shadow gate together, using the numbers from the previous section and one stand-in for the real thing. It does not replace a rehearsal of the real pinspot lighting. It tells you whether a rehearsal is worth booking.
What the test answers
The test answers three questions about pinspot lighting at a given table. Does the spot cover the centerpiece with a safe margin and stay off the plates? Where does the centerpiece’s shadow land, and is that spot one a guest will look at? And does the beam reach a seated guest’s eyes on its way down? If all three answers are acceptable, pinspot lighting suits that table. If one fails, you change a number, such as the offset, the beam angle or the centerpiece height, and test again.
Version one: the scale model
You can run the first version at home on a desk, which is useful because it costs almost nothing and can be done before any vendor is hired. The trick is that angles do not change with scale. A shadow geometry that works at one-twelfth size works at full size.
Take a sheet of paper and draw a circle for the table, scaled at one inch to one foot. A 5 foot table becomes a 5 inch circle. Mark the plate positions as small circles near the edge. Cut or fold a stand-in for the centerpiece at the same scale, so a 14 inch wide, 18 inch tall arrangement becomes a block just over one inch wide and one and a half inches tall. A cork, a small spice jar or a rolled paper tube works.
Then set a small light at the scaled mounting position. For a drop of 13.5 feet, that is 13.5 inches above the paper, and for an offset of 3 feet, it is 3 inches to the side. A phone flashlight works if you narrow it with a paper tube so that it behaves like a tight beam. You are not judging brightness here, only where the shadow and the spot fall. Photograph the paper from directly above, then from a low angle at seated height scaled down.
What to look for in the scale model
Look at the shadow first. Draw a line around it and compare its reach to the plate marks. A shadow that stays within the circle of the centerpiece or the center of the table is hidden. A shadow that stretches toward a plate is visible to the person at that seat, and probably to the people across from them.
Then look at the spot. Even with an imperfect beam, you can see roughly how wide it is in proportion to the table. A spot wider than the ring of plates will light every plate, so narrow the beam or raise the fixture. A spot that barely clips the arrangement needs a wider angle or a closer fixture.
Finally, check the eyeline. Put a small paper figure or a pencil at seated head height scaled down, and look from its position back at the light. If you can see the light source directly, a guest at that chair can too. Offset positions that look comfortable from above often fail this check, which is why it matters to look from seat height as well as from above.
Version two: the full-size check at the walkthrough
The scale model is a screening tool. If it passes, ask the lighting vendor to run a full-size version at the venue, ideally during the technical walkthrough or an equipment check. The vendor places one fixture at the intended height and offset, puts a stand-in centerpiece of the right height on a table of the right size, and darkens the room to the level of the reception.
You are looking for the same three things, now with the real light. Photographs matter here. Take one from the seat of the person who will face the centerpiece, one from the next seat over, and one from across the room. Look at the images later, away from the room, because dim rooms trick the eye and cameras do not.
If a full-size check is not available, ask for photographs or video from the vendor of the same fixture at a similar throw. That is weaker evidence than a test in your room, because ceiling height and room color change the result, but it is better than a catalog image, which is usually shot in perfect conditions.
Scoring the test
For each table type, give the test a pass or a fail on each of four checks. The coverage check passes when the spot is at least a few inches wider than the centerpiece on each side and does not reach the plates.
The shadow check passes when the shadow is hidden under the arrangement or falls on a space no guest looks at, such as a table center or a runner. The eyeline check passes when no seated guest can see the fixture directly. The stability check passes when a bump of a few inches to the fixture or the table does not clip the arrangement.
The stability check is the one that gets skipped. Imagine the table moved 6 inches, or the fixture’s aim shifted slightly, and ask whether the centerpiece is still inside the spot. If it is not, you either need a wider beam, or a firm rule that tables are placed on floor marks, or both.
A worked example
Consider an invented couple, Maya and Daniel, with a ballroom that has a lighting truss at 16 feet and 60 inch round tables. Their florist plans a centerpiece 14 inches wide and 18 inches tall on a mirrored tray.
They test a fixture at 16 feet directly over the table with a 10 degree beam. The throw is 13.5 feet and the spot is about 28 inches across. Coverage passes, with 7 inches of margin per side, and the spot stays inside the plate ring.
The shadow falls straight down and is hidden. The eyeline passes because the fixture is overhead. Stability passes with a thin margin: a 6 inch table move leaves only about an inch to spare on one side, and a foot would clip the arrangement, so they decide to mark table positions on the floor.
Then they test the same truss position, but the truss runs only along one wall, so the fixture sits 8 feet to one side. The tilt is about 30 degrees, the spot is oval, and the shadow of the 18 inch arrangement stretches about 12 inches across the tablecloth toward the guests on the far side.
The shadow check fails. They have three choices: move to a different truss line, use a lower centerpiece, or accept the shadow as part of the look. They choose to ask the venue whether a second truss run can be added, and they pause the decision until they hear back.
Reading the example
Notice what the test did. It did not tell them whether pinspot lighting looks good in the abstract. It told them which positions would work in their room, and it surfaced a problem, the second truss run, while they could still change course. That is the value of testing pinspot lighting before booking, rather than rehearsing after.
Notice also that the decision did not require anyone to be an expert. The numbers are the ones a vendor already uses, expressed in simple terms. If a vendor is reluctant to share beam angles, mounting heights or offsets, treat that as information about how carefully the design has been thought through.
When the test says no
A failed test is useful. If the only positions available produce a long shadow, a hard glare line or a spot that cannot be centered, you have learned that pinspot lighting does not suit this room as designed. The remedies, in order of effort, are to change the centerpiece, to change the beam, to change the position and finally to change the lighting method.
Changing the centerpiece is often the cheapest: a lower arrangement casts a shorter shadow, and a more compact one fits a narrower beam. Changing the beam means a different lens or fixture. Changing the position means a different truss line, stands or a different table layout. Changing the method means one of the alternatives covered in a later section, which exist because pinspot lighting is not right for every room.
Re-run the test after any change
Each of the four numbers interacts with the others. Raise the fixture to shorten a shadow and the spot widens. Narrow the beam to protect the plates and the stability margin shrinks. Swap the centerpiece for a taller one and the shadow lengthens. Keep the four numbers written down, change one at a time and re-check all four checks before you accept a new design. It takes a few minutes with the scale model and saves a great deal of argument in the ballroom.
Power and control for pinspot lighting
The power gate is where many quotes quietly go wrong, because the electrical load of modern fixtures is small and the cabling around it is not. The question is rarely whether a building can supply enough power. It is where the power comes from, how cables reach each fixture, and who is allowed to connect them.
Wattage, circuits and the older halogen case
Start with the data sheet. Each fixture lists its power draw in watts. Add up the fixtures on a circuit and compare the total with the circuit’s rating. A common rule in electrical practice is to keep continuous loads to about 80 percent of a circuit’s rating, and the National Fire Protection Association publishes the electrical code that standardizes such rules.
A typical 15 amp circuit at 120 volts is rated for 1,800 watts, and 80 percent of that is 1,440 watts. Your electrician or the venue’s engineer confirms the actual numbers for your building.
Here is the contrast. Many LED fixtures used for pinspot lighting draw somewhere between a few watts and a few tens of watts each, according to their data sheets, so twenty of them add up to a small fraction of one circuit.
Older halogen fixtures built around low-voltage reflector lamps often draw tens of watts each plus transformer losses, and twenty of those can approach a meaningful share of a circuit. If your vendor is using older stock, ask for the total wattage and for the circuit plan, not only the fixture count.
The sensible request is a one-page power summary: number of fixtures, watts per fixture, total watts, number of circuits needed and where each circuit is. A vendor who does this regularly can produce it quickly. A vendor who cannot may be improvising.
Where the power comes from
Venues generally manage power in one of three ways. Some have dedicated outlets in the ceiling or on a truss for production use. Some allow tie-in to a distribution box in a utility room, usually through the venue’s electrician. Some restrict vendors to wall outlets only, which makes ceiling-hung fixtures a cable-management exercise.
Ask which of those applies in your room and whether there is a fee. Ask also whether the venue requires its in-house electrician for any connection, which is common in hotels and convention-style spaces. The cost of that requirement can exceed the cost of the fixtures themselves in a small installation, and it is far easier to hear about it before booking.
Cables, runs and trip hazards
Every fixture needs a cable, and every cable needs a route. In a hung installation, cables run up the truss and along it, and the visible part is only the drop near the fixture. In a stand-based installation, the cable runs across the floor. Floor cables are a trip hazard, and venues commonly require covers or ramps over any cable that crosses a walkway. Cable covers add cost and add to load-in time, so they belong in the quote.
Ask where the cables will run relative to exits, aisles and servers’ paths. The Americans with Disabilities Act standards cover accessible routes, and a cable across the route to an accessible seat or restroom is a problem the same as a missing ramp. If you have guests who use mobility devices, raise this early, and see the Americans with Disabilities Act pages on accessible routes for the official standards. A cable hidden beneath a rug that bunches is no better than an exposed one.
Control: manual, wired or wireless
Pinspot lighting is often switched on and off together. If you want dimming, scenes or timed changes, the fixtures need a controller. The standard protocol is DMX512, maintained under standards developed by the Entertainment Services and Technology Association. It runs over dedicated control cable from a console or a controller to each fixture, in a daisy chain.
Wireless control exists and is increasingly common, since it removes the control cable, but it relies on radio, and a crowded wireless environment can interfere. A reception with a band, a DJ, a videographer, guest phones and other vendors all transmitting is a crowded environment. The Federal Communications Commission regulates the use of radio equipment, and a reputable vendor will know which frequency band its equipment uses. Ask whether there is a wired fallback if the wireless link drops.
Flicker and cameras
One technical detail is specific to modern LED fixtures. Many dim by switching rapidly on and off, and some produce a flicker that the eye cannot see but a video camera can, especially at certain shutter speeds.
If your videographer or a livestream will capture the reception, tell the lighting vendor, and ask whether the fixtures are rated as flicker-free at the dimming levels you will use. A quick test on camera at the walkthrough will show it. The same question applies to a photographer shooting with fast shutter speeds.
The power summary and who signs
By the end of this gate, you should be able to point to a one-page summary that lists the fixtures, the total wattage, the circuit plan, the source of power, who connects it, any venue electrician fee, the cable routes, the control method and the fallback. If one of those lines is blank, the gate is not closed. That is not a reason to cancel. It is a reason to put a name and a date next to the blank.
Rigging and venue approval for pinspot lighting
The rigging gate asks a simple question with serious consequences: can each fixture be hung or stood safely, and does the venue approve it? Hung equipment can injure people if it falls, and venues carry the liability, so their rules are firm.
What counts as rigging
Rigging means attaching something to a structure so that it stays up. For pinspot lighting that can mean a clamp on a pipe or truss, a connection to a ceiling grid, a stand with a boom arm and weights, or a freestanding truss with its own base.
Each has a different load path, and each calls for different approval. A clamp on a truss that is already rated for lighting is the easy case. A new attachment to a finished ceiling, a beam or a chandelier mount is the hard one, and many venues forbid it outright.
The Occupational Safety and Health Administration publishes workplace safety rules relevant to work at height and to the handling of loads, and professional rigging follows industry practice and standards that go beyond those. The practical point for a couple is that this work should be done by qualified people, with the right hardware, rated for the load, and with a secondary safety attachment on each fixture where required. Ask what hardware is used and who is responsible.
What venues commonly ask for
Rules vary by building, so treat this as a list of questions, not a list of requirements. Does the venue allow hung equipment at all? Is there an approved rigging point, truss or grid? Does the venue use its own rigger or house crew?
Is there a rigging fee, a weight limit or an engineer’s sign-off? Is a certificate of insurance required from the lighting vendor, and with what coverage? Does the fire marshal need to review the layout? The wedding vendor contract guide covers how to read the insurance and liability terms that often come with these requests.
Venue requirements around fire safety often cover flame resistance of materials, clearance from sprinklers and the use of heat-producing fixtures. NFPA publishes widely used fire safety codes, and local authorities adopt and enforce their own versions. Pinspot lighting itself usually needs little beyond clearance and secure mounting, but any fabric, paper or foliage near a hot fixture is an issue, which is another reason to ask about heat output from older halogen fixtures.
Approval is a document, not a conversation
Verbal approval from a venue manager is useful and incomplete. Staff change, memories fade, and the person who said yes on a call may not be the person on duty at load-in. Ask for approval in writing, with the date, the name of the approver, the scope (number of fixtures, mounting method, locations) and any conditions. Forward the same summary to the lighting vendor so that both sides are working from one document.
Include in that document who is responsible for the work, whether the venue’s crew or the vendor’s, and what happens if the room is not as described. If the lighting plan depends on a truss that the venue is supposed to provide, state it. If it depends on a ceiling height or clearance, state the number.
Ceiling and clearance checks
The numbers that decide rigging feasibility are few. The height of the ceiling or truss above the floor, the height of any obstructions such as sprinklers, vents and chandeliers, the weight rating of attachment points if the venue publishes them, and the horizontal distances between available attachment points.
Get them from the venue in writing, and compare them with your position numbers from the earlier gate. If a position needs an attachment point that does not exist, either the position changes, or the venue adds a point, which is a cost and a lead time.
If the venue says no to hanging anything
Some venues refuse any hung equipment, and the answer is no more negotiable than a fire code. In that case, pinspot lighting is still possible with stands, but it changes the math. Stands place fixtures at a lower height, usually well below a ceiling truss, which shortens the throw and narrows the spot for a given beam angle.
They also place equipment, bases and cables on the floor of the guest space, where they take room and attract bumps. If stands have to be placed between tables, check that aisles remain wide enough for servers and for guests with mobility aids. Many couples in that situation find that one of the alternatives suits the room better, and that is a fine outcome. ## Setup time: where pinspot lighting gets expensive
The time gate is the one couples underestimate most, because setup time does not appear on a product photo. It appears on the invoice, as labor, and in the schedule, as a conflict with every other vendor who needs the room.
The sequence that cannot be shortened
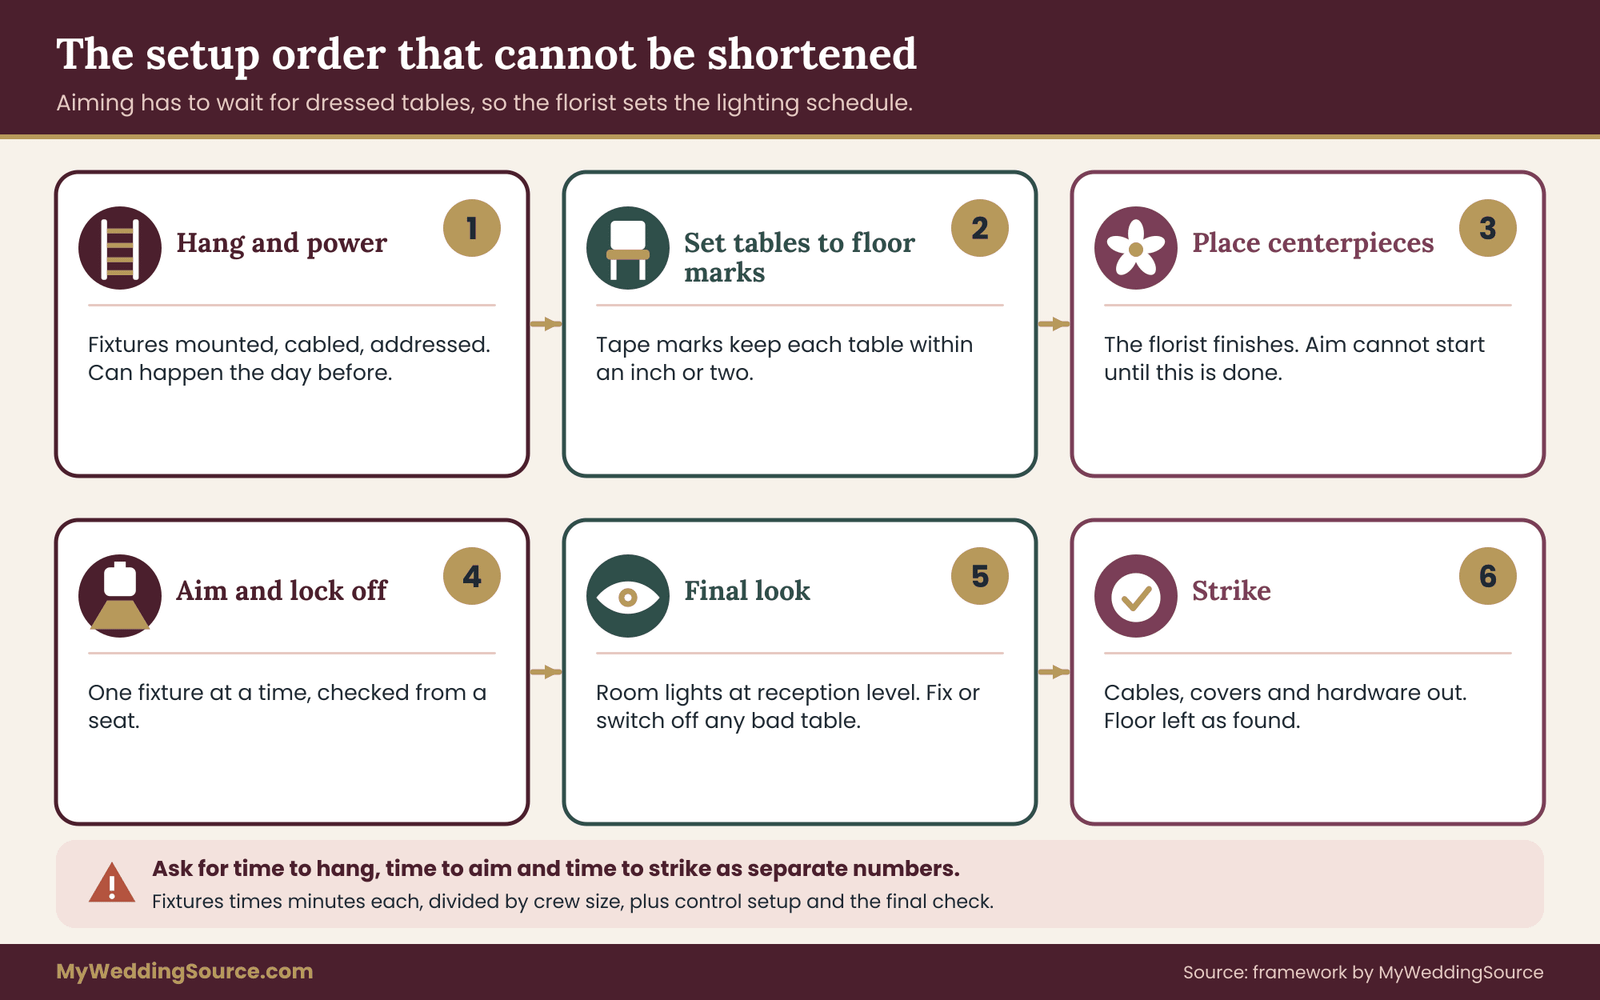
Pinspot lighting has an order of operations that cannot be rearranged much. The fixtures are hung or stood, powered and addressed. The tables are set to their final positions. The centerpieces are placed. Only then can the fixtures be aimed, because aiming means pointing each beam at a real arrangement on a real table. Last comes a check with the room lights at the reception level.
That order creates a dependency chain. The lighting crew cannot finish until the florist has placed the centerpieces, and the florist cannot place them until the tables are set, and the tables cannot be set until the floor plan is marked and the rental company has delivered. If any link slips, the aiming slips. A vendor can hang fixtures in advance, but without dressed tables the aim is a rough guess, and a rough aim is the one that fails the stability check from the shadow test.
Estimating time without invented numbers
This guide does not give a number of minutes per fixture, because the answer depends on the fixture type, the mounting method, the crew size, the ceiling height and whether the room is already rigged. The honest approach is to ask the vendor for a time estimate and to test it with simple arithmetic.
Ask for the estimate in three parts: time to hang and power, time to aim, and time to strike afterward. Multiply the per-fixture figures by the number of fixtures and divide by the crew size, then add the time for the control setup and the final check.
If the vendor’s total is much shorter than your result, ask what they know that you do not. They may have pre-assembled truss, a crew that has worked in the room before or a simpler fixture. Those are good answers. A vague answer is not.
Aiming is the slow part
Hanging is mostly mechanical. Aiming is careful, and it is done one fixture at a time. Each fixture has to be pointed, focused, locked off and checked from the guest’s viewpoint. In a dim room, work with a ladder or a lift is slower and needs more safety attention. If the room has tall ceilings, the crew may need a lift, which is another piece of equipment that has to be brought, charged and approved by the venue.
Ask whether the crew aims with the room lights off and the tables dressed, and whether the process includes a final walk-through with you or your planner. A final walk-through is optional for the vendor and valuable for you, because it is your last chance to change a position before guests arrive.
Fitting the load-in into the day
Most reception rooms have a fixed window for vendors to enter and set up, and that window is shared. Rentals arrive, tables and chairs are set, linens go on, florists and decorators work, and the caterer needs access. Add lighting rigs and aiming to that list, and the window becomes tight. The wedding vendor timeline guide explains how to sequence these arrivals and where to leave buffers.
For pinspot lighting, there are two sensible strategies. The first is early access: negotiate with the venue for the lighting crew to hang and power the fixtures the day before, leaving the aiming for the morning of the event. This shortens the live window but may cost extra venue time.
The second is a long final window: keep everything on one day, but start the lighting crew early and give them an agreed hold on the room for aiming after the florist finishes. This needs a careful schedule, and a named person who tells the florist when to be done.
Tolerances and floor marks
Once the fixtures are aimed, anything that moves a table breaks the aim. That includes the caterer rolling carts between tables, a server adjusting a chair, or a guest sliding a table closer.
The best defense is a simple one: mark each table position on the floor with a small piece of tape, and ask the floor team to set tables to the marks before the lighting crew begins aiming. A table that is within an inch or two of its mark is within the tolerance of a spot designed with margin.
Ask the vendor whether the crew checks the aim again after the room has been used, for instance after the cocktail hour, and who will do it. If nobody is on site during the event, nobody can fix a bumped fixture. For a large guest count, many couples decide that a technician on site for the opening hour is worth the cost, since the opening hour is when photographs are taken.
What to put in the contract about time
The contract should state when the crew will arrive, how long the room is reserved for lighting, who aims after the florist, what happens if the florist is late, and whether there is an extra charge for waiting time. It should state strike time, when the fixtures come down, and who removes cables and hardware. These lines protect both sides. They make it clear that a late centerpiece delivery is a scheduling problem, not a defect in the lighting, and they make the cost of delay predictable.
Is pinspot lighting worth the cost? A decision rule
Everything so far leads to the question most readers actually asked: is it worth it? The answer depends on cost per table, what else the same money could do, and how many of the five gates the room passes.
Building a fair cost per table
Take the full quote, not the fixture price. Add the equipment, the mounting hardware, power distribution and cables, labor for installation and aiming, an operator or technician if included, strike, any venue rigging fee, any venue electrician fee, insurance charges and taxes. Divide the total by the number of lit tables. That figure is your cost per table.
Here is an example with invented round numbers, to show the method and not a market price. Suppose the total quote is 3,000 dollars for 20 lit tables. The cost per table is 150 dollars. Suppose a different quote offers a lower fixture price but adds a venue electrician fee and an hour of waiting time, bringing it to 3,400 dollars. The cost per table is 170 dollars. The method shows the comparison, and it prompts questions about what each line covers.
Comparing with what else the money does
Cost per table is useful only next to alternatives. Compare it with the cost per table of adding something to the centerpiece itself, such as more florals, a taller vase or additional candles. Compare it with battery-powered table lamps or candles, covered in the next section. Compare it with spending the same amount on a single focal point in the room, such as a lit entrance or a lit cake table, where one fixture serves many guests.
The right comparison is by effect on the guest, not by cost alone. A guest at table 14 experiences the table in front of them and the room around it. If every table has a glowing centerpiece, the room feels designed. If only half do, the room feels uneven. That uneven feeling is a reason to either light all tables or light none, and use the money elsewhere.
The worth-it rule
A simple rule helps keep the decision honest. Pinspot lighting is worth it when it passes all five gates, when the cost per table is comfortably inside the line you set for decor, and when the centerpiece is something you would be sad to see in a dim room.
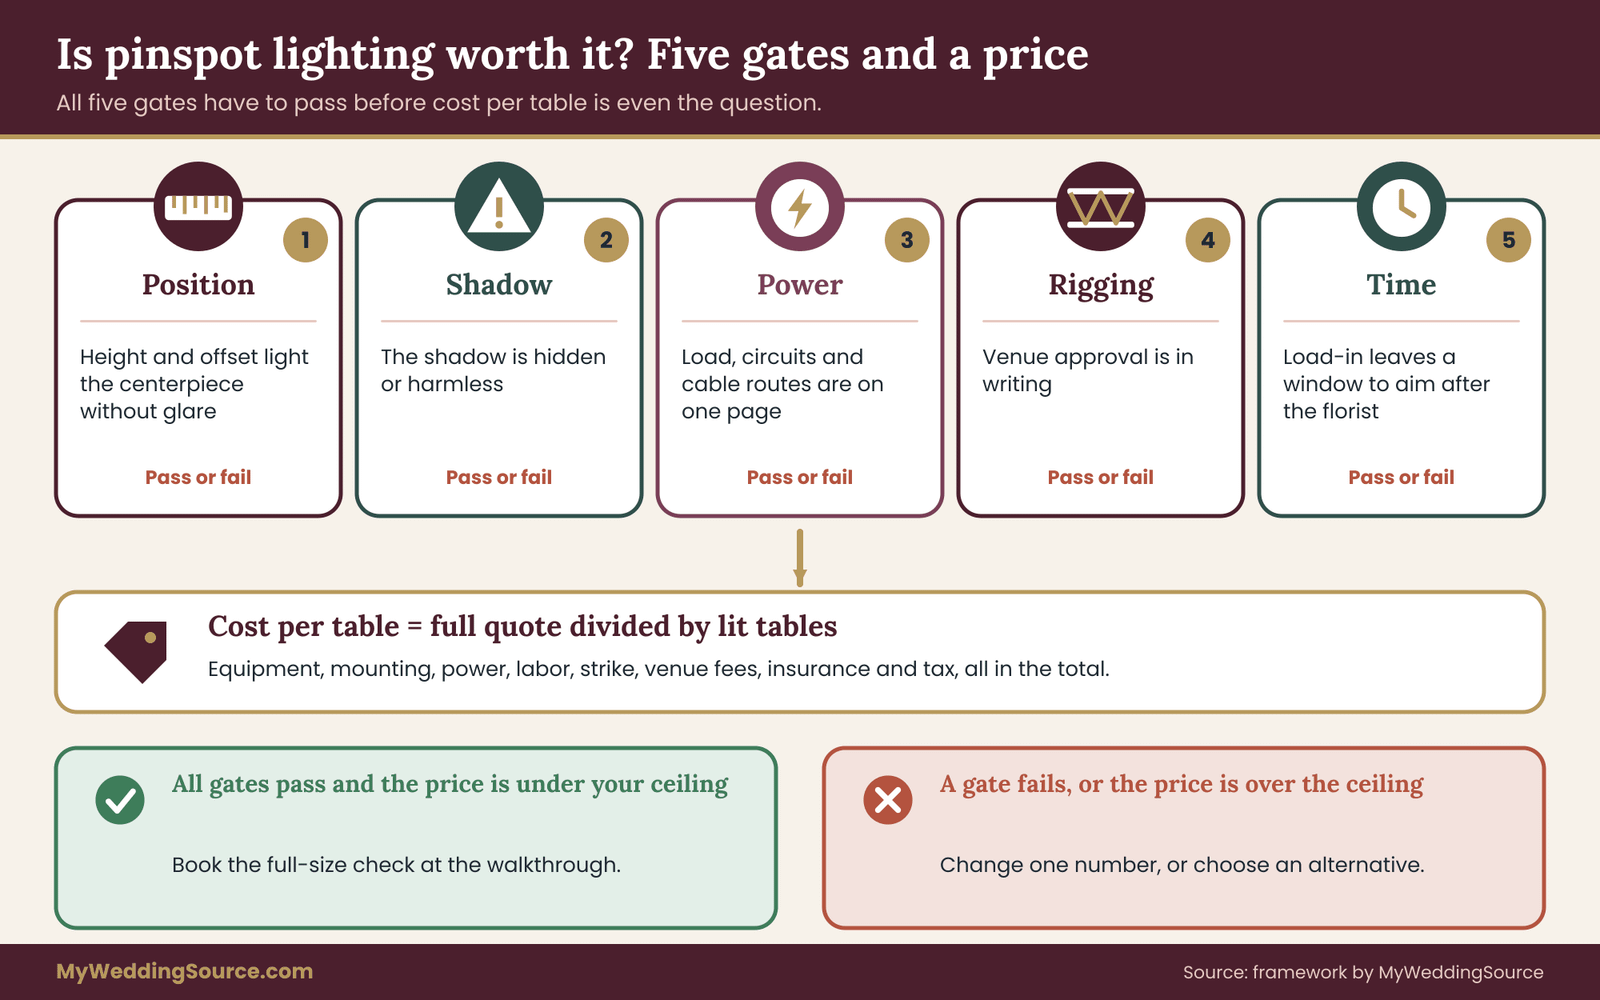
If it passes the gates but the cost per table is more than you are willing to spend, the answer is no, and that is a good decision. If it fails a gate and the cost per table is low, the answer is also no, because a cheap solution that does not work is not cheap.
Partial approaches can be reasonable. You can light only the head table and the cake table, where photographs concentrate, and leave guest tables to candles. You can light the tables nearest the dance floor or the entrance. The partial approach works if it is deliberate and visible as a choice, and less well if it looks like an unfinished job.
Hidden costs to ask about
Several costs of pinspot lighting hide behind phrases like “includes setup”. Ask about minimum charges for short events, overtime if the room opens late, fees if the venue’s crew must supervise, cable cover rental, additional lifts or ladders, and the cost of changing the layout after the aim is set. Ask also about damage terms. If a fixture is knocked over or a lamp breaks, who pays? The wedding rental planning checklist outlines the general terms to check in any equipment rental, and those apply here.
A budget guard
Put a ceiling on pinspot lighting before you collect quotes. Decide the highest cost per table you would accept and the highest total, and write both down. When a quote arrives above either number, you have a pre-made reason to ask for a simpler design rather than trying to justify the price in the moment. Couples who do this tend to ask better questions, because they are looking for ways to meet the number, not ways to defend it.
Where to cut without hurting the look
If the cost per table is too high but you still like pinspot lighting, there are honest ways to reduce it. Use fewer lit tables and make that choice visible. Use a single beam angle across the room, which reduces rental variety. Choose positions that reuse existing truss.
Move aiming to a single window, so the crew works once. And choose centerpieces that tolerate a wider beam, which removes the need for tight aim and the labor that comes with it. Each of these trades a little precision for a lower bill, which is a normal trade in any lighting design. ## Alternatives to pinspot lighting, compared in prose
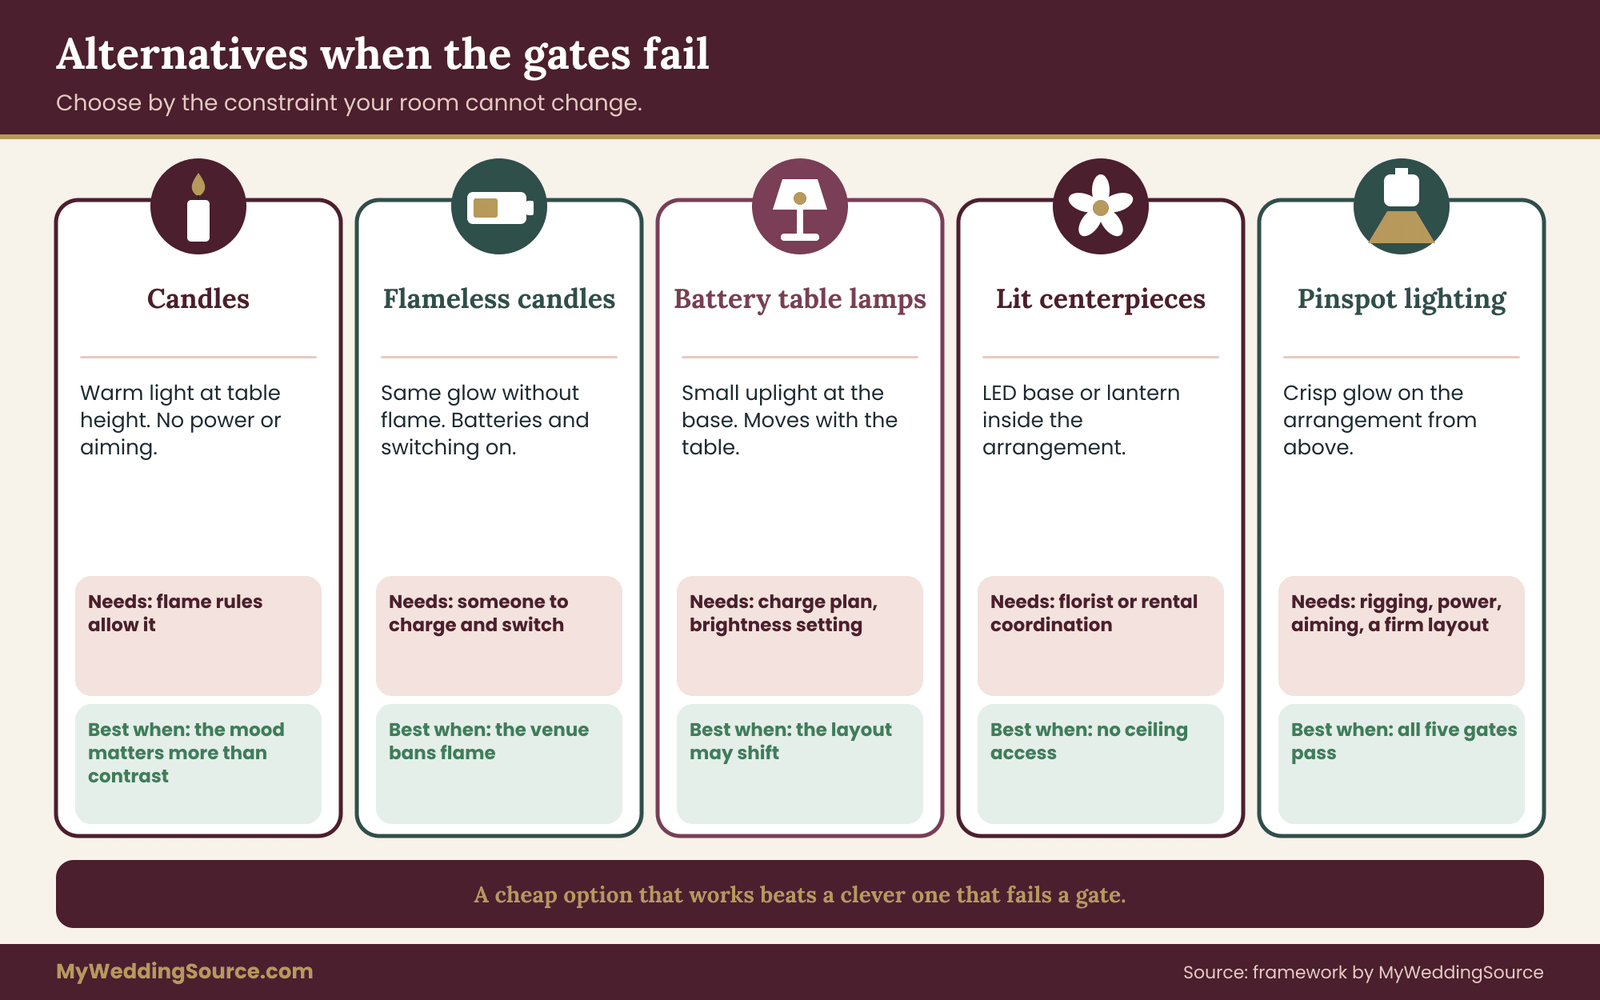
Pinspot lighting is one way to make a centerpiece visible in a dim room. It is not the cheapest, and it is not the most forgiving. Comparing it fairly means looking at what each alternative does well, what it costs in setup and what it demands from the room.
Candles and flameless candles
Candles light the table from within. A cluster of votives or tapers puts warm light at table height, close to faces, which is flattering and needs no mounting, power or aiming. The limits are that open flames are restricted or banned in many venues, that candles at the wrong height create glare, and that the light they give the arrangement is soft and modest.
Flameless candles solve the rule problem and keep the glow, and some are very convincing. They are a reasonable substitute where the venue bans flames. They need batteries or a charging routine, and they need someone to switch them on. They do not shape light on the centerpiece the way a narrow beam does, but for many receptions they give most of the mood at a small fraction of the setup.
Battery-powered table lamps and small uplights
A small battery lamp or a compact uplight placed at the base of the centerpiece lights it from below. It is portable, needs no rigging and travels with the table, which makes it tolerant of layout changes. Some run for a limited time on a charge, and the stated battery life depends on brightness, so ask for the figure at the setting you will use, and plan charging and switching on as a task for someone.
The look is different. Light from below makes shadows that point upward and can look dramatic on tall arrangements, and unflattering if it shines into a guest’s face. For low centerpieces, a small uplight can look very good. This option fits couples whose room has no hanging points or whose layout is likely to shift.
Room-level uplighting and house lights
Washing walls or the ceiling with colored light changes the room’s mood but does not light centerpieces. It is a separate decision, and often a complementary one. The same goes for dimming the house lights to a lower level: it creates the dim room that helps pinspot lighting read.
If you are choosing between the two, ask whether the budget is better spent on room mood or on table detail. A reasonable answer for many receptions is a little of each, but the specifics belong to the broader reception lighting conversation.
Lit or built-in centerpieces
Some centerpieces carry their own light: a glass vase with an LED base, a lantern, a branch arrangement with small lights wired in. They are self-contained, have no aiming problem and survive a table move. They also depend on batteries or a power source, and the light they give is more a glow than a spotlight, so the arrangement looks lit from the inside rather than shaped by light.
For a room with no ceiling access, this is often the most reliable way to get a glowing table. The cost is typically paid through the floral or rental vendor and is easy to compare with a lighting quote per table.
Tabletop spotlights on small stands
A compact spotlight on a short stand, placed at the edge of the room or a nearby table, can aim across at a centerpiece. This reproduces some of the effect without rigging, but it introduces glare risk and floor equipment, and it needs aiming just as a hung fixture does. The eyeline rule from earlier applies strictly: a beam crossing at seated eye level will be seen by guests. This option is rare for good reason.
A side-by-side view in words
Consider the same centerpiece in each option. With pinspot lighting, the arrangement has a crisp glow, the table around it is softer, and the setup needs rigging, power, aiming and a locked layout. With candles, the table has warm, close light and little contrast on the arrangement, and the setup is simple.
With battery lamps, the arrangement is lit from below and moves with the table. With built-in lighting, the arrangement glows by itself. With nothing added, the arrangement relies on the room light and looks as the room allows.
Picking by the room’s constraint
A shortcut helps. Find the constraint that is hardest to change in your room and let it choose. If the ceiling cannot support hung equipment, choose from the battery, built-in or candle options. If the layout is going to change late, choose something that travels with the table.
If the room is bright and cannot be darkened, no table lighting will be visible, and the money is better spent on the centerpieces. If the ceiling is accessible, the layout is firm and the room is dark, pinspot lighting is the option the constraints favor.
Edge cases and design choices for pinspot lighting
The earlier sections assume a standard room, standard tables and a standard centerpiece. Real events have exceptions, and a few of them are common enough to deserve their own notes.
High ceilings and tents
In a very high room, the throw is long, the spot is large for a given beam angle, and the fixtures need a narrower lens or a more powerful unit to keep a bright, small spot. A longer throw also makes small aiming errors larger: at the same angular error, the spot moves farther on the table. Ask the vendor whether the fixtures chosen are meant for the throw you have.
In a tent, the structure may not support hung equipment at all, since tent poles and frames carry specific loads and tent suppliers set their own limits. Ask the tent supplier before anyone proposes hanging anything. Wind movement is another factor: a tent that flexes will move a fixture slightly, which affects aim. Stands, battery options and built-in lighting often suit tents better.
Low ceilings
A low ceiling makes a short throw. The spot from a narrow fixture is small, and the fixture is close to guests’ heads, which raises glare and clearance concerns. Pinspot lighting near the ceiling of a low room may sit within reach of a tall guest, so clearance and the heat of the fixture matter more. In low rooms, a wider beam from a higher mount, or a different method altogether, is often wiser.
Mirrors, glass and reflective trays
Mirrored trays and glass vases reflect the beam. Pinspot lighting aimed straight down onto a mirror bounces light straight back up, which can dazzle people looking toward the light and creates a bright spot on the ceiling. A slight tilt sends the reflection away from guests.
Glass catches the beam and sparkles, which is often the reason to use the light at all, but glossy surfaces need a short test to check where the reflections land. The shadow test from earlier covers it if you add a reflection check from seat height.
Colored linens and the color palette
The color of the linen changes how the spot looks. A white tablecloth reflects the beam and lights the area around the centerpiece with bounced light. A dark tablecloth absorbs it and keeps the spot more contained. Metallic or sequined linens create glare and sparkle that compete with the arrangement. If you are choosing linens and light together, the wedding color palette guide helps you check that the colors work as a set, and a swatch under the test light is more reliable than a photograph.
Different table shapes and sizes
Round tables are the easy case for pinspot lighting, because the center is clear. Rectangular tables with a long runner, such as a family-style table or a head table, need more than one spot or a wider beam. Place a fixture at each arrangement and aim each at its own piece. A long, low runner can be lit with a series of narrow spots or washed with a wider beam from one fixture, depending on what you want to emphasize.
Cocktail tables and small high-top tables are a poor match for pinspot lighting, since the surface is small, the guests stand, and the centerpiece, if any, is minimal. The cost per table rises quickly for lighting small tables, and the effect is slight.
Cake tables, signs and the guest book
The same pinspot lighting works on other objects. A cake on a table is often the best use, because it is one object with a specific cutting time and a lot of photography. A welcome sign, a seating display or a guest book table can be lit with a single spot.
These uses add a little to the quote and often a lot to the experience, because guests walk past them. When budgets are tight, lighting a handful of high-value objects is often better than lighting every table. Think about guest movement through the room, which the wedding reception guest flow guide treats in detail.
Dancing, moving guests and late changes
After dinner, tables are often moved or pushed aside for dancing. If pinspot lighting has been aimed at tables that move, the beams will land on the floor or on empty space. Decide before the event whether the tables stay, whether the lights switch off at the dance transition or whether the beams are kept as accents on cake and sign tables only. A cue for the technician and a clear instruction to the venue crew prevent the room from looking wrong at the moment the energy changes.
Also consider what happens if the plan changes on the day, such as a weather move from an outdoor space to an indoor one. A lighting design built for one room does not transfer to another. Ask what the fallback is and who decides.
Guests with light sensitivity
Some guests are sensitive to bright or focused light, and some have conditions that make flicker or strong contrast uncomfortable. A tight spot above a table can be a problem for someone seated directly beneath it, particularly if the fixture is close. Mention it to the vendor if you know of a guest with such a concern, and consider the seating of that guest relative to the beams.
Vendor questions and contract terms for pinspot lighting
A good vendor conversation is short and specific. The questions below follow the five gates, and each has a reason behind it. You do not need to ask all of them in one call, but any that go unanswered belong in the contract.
Questions about the design
Ask what beam angle the vendor proposes for pinspot lighting at your ceiling height and why. Ask for the mounting height, offset and tilt for each table type, as in the four numbers described earlier. Ask whether the fixtures have a hard or soft edge, and whether the lens is adjustable.
Ask for a photograph or video of the same fixture at a similar throw. Ask whether the vendor will run the full-size shadow check in the room before the event. If the answer is no, ask what they do instead to confirm the aim.
A short script helps if you are unsure how to begin. You might say: “Our ceiling truss is at sixteen feet and our tables are sixty inches. We would like a spot slightly wider than a fourteen inch centerpiece. What fixture and mounting position would you suggest, and what shadow will we see?” That sentence gives the vendor the numbers they need and tells them you are checking the design, not only the price.
Questions about power, rigging and the venue
Ask for the one-page power summary and the circuit plan. Ask who connects power and whether the venue’s electrician is required. Ask how the fixtures are mounted, what hardware is used and whether each has a safety attachment. Ask whether the vendor has worked in your venue before and whether the venue has approved the plan in writing. Ask for the vendor’s certificate of insurance and confirm that it names the venue if the venue requires it.
If the vendor says the venue will be fine with it, ask to see that in writing, or ask whether you should request it from the venue yourself. A vendor who has already worked in the building usually has a contact and a template, which makes the request quick.
Questions about time and people
Ask for the arrival time, the time to hang and power, the time to aim and the time to strike. Ask how many crew members will be on site and whether an operator will stay for any part of the event. Ask what happens if the florist or rental company is late. Ask how the crew will know that the tables are final, and who gives the signal to begin aiming. Ask whether the crew re-checks aim before guests arrive.
These questions also reveal how the vendor thinks. Someone who has a clear answer to each has a process. Someone who says it depends may be right, but should be able to say what it depends on.
Questions about cost
Ask for an itemized quote, with equipment, hardware, power, labor, strike and any venue-related fees listed separately. Ask what is included in the per-table figure. Ask about minimum charges, overtime, waiting time, cable covers, lifts and damage terms. Ask what the cancellation and change terms are, and what the deposit covers. The wedding vendor purchase order checklist is useful for turning a quote into a clear order with line items, quantities and delivery details, so that nothing is left to assumption.
Contract language worth requesting
Several short clauses protect you. State the number of fixtures, the beam angle and the mounting positions as they stand in the design. State the arrival time, the reserved window and the aiming sequence. State that the vendor will obtain or confirm the venue’s written approval, and what happens to the fee if the venue refuses.
State who pays if the layout changes after aiming. State the strike time and the condition in which the room is left. The general reading of such terms is covered in the wedding vendor contract guide, and the points above fit inside any standard agreement.
Add a clause for a fallback. If the pinspot lighting plan fails a gate late, such as the venue withdrawing approval, what is the alternative, and what does it cost? Agreeing on that now is far easier than negotiating it in the room.
A fair way to compare two quotes
Put the two quotes side by side with the same items in the same order: fixtures, mounting, power, labor, strike, venue fees, extras and total. Compute the cost per table for each. Check that both quotes assume the same number of lit tables and the same beam angles.
A quote that is lower because it lights fewer tables, or uses a wider beam, is not comparing the same thing. Then compare the answers to the time and rigging questions. The better quote is often the one with fewer blanks, not the lowest total.
Day-of operation and teardown
A well-planned installation can still go wrong on the day if nobody owns it. Assign it.
One owner, one checklist
Name one person on the day who knows the plan and can speak to the lighting crew. That person might be your planner, a venue coordinator or a trusted friend with a clear brief. Give them a short sheet: table positions, the fixture count, the beam intent, the contact number of the lighting lead and the cue for lights on and off. The sheet should fit on one page. The aim is that nobody has to phone you during the cocktail hour.
The final look
Before guests enter, walk the room with the lights at reception level. Look at each table from a seat. Check that the spot covers the centerpiece, that no guest can see a fixture directly, that cables are covered and that no table has shifted from its floor mark. Fix what is simple, such as a nudge to a table, and note what is not. If one table has a problem, it is better to switch that fixture off than to let it distract.
During the event
Pinspot lighting usually needs little attention once running. The risk moments are the transition from dinner to dancing, when tables and chairs move, and any moment when staff clear plates and brush against a table or a stand. Brief the venue staff that the tables are aimed, and ask them to return tables to their marks if they move them. If an operator is present, agree on the cue for dimming or switching off at the dance transition.
Teardown
Strike is the reverse of setup, and it is also a schedule problem. Venues have curfews, and crews need time to lower, coil and pack. Agree a strike time in the contract and make sure the florist and the rental company do not block access to the tables before the lights come down.
Ask that cable covers, tape and hardware are removed and that the floor is left as found. If a fixture was hung from the venue’s structure, ask for a short sign-off that nothing was left behind.
Your next steps
Pinspot lighting does not have to be decided in one sitting. Work through the following in order, and stop when a gate fails.
First, run the fit check from earlier in this guide: dim room, accessible ceiling, a centerpiece worth lighting and a final layout. Second, collect the room numbers: ceiling or truss height, obstructions, table size and centerpiece size. Third, run the scale-model version of the tabletop shadow test and write down the four numbers for each table type. Fourth, ask the venue, in writing, what it allows for hung equipment, power and fees.
Fifth, request two itemized quotes, with a power summary, a rigging method and a time estimate. Compute the cost per table for each and compare it with your budget guard and with one or two alternatives. Sixth, if one quote passes, book the full-size shadow check at the walkthrough. Seventh, put the approvals, the aiming sequence, the strike time and the fallback into the contract. Eighth, name the day-of owner and give them the one-page sheet.
If at any point a gate fails and there is no reasonable fix, the better choice is usually one of the alternatives. That is not a failure of the idea. It is the test doing its job before money is spent.
FAQ
What is pinspot lighting at a wedding?
Pinspot lighting uses small fixtures with a narrow beam, usually mounted above or beside a table, to light a single object such as a centerpiece or cake. It adds contrast between the object and the dimmer room around it. Because the beam is tight, it needs careful aiming, a firm table layout and an approved place to hang or stand the fixture.
What beam angle should I choose for a centerpiece?
For pinspot lighting, choose a spot a few inches wider than the centerpiece on each side, and narrower than the ring of plates. The spot diameter is two times the throw times the tangent of half the beam angle. At a throw of about 13 feet, a 10 degree beam gives a spot near 28 inches. Check the final number with your vendor.
Do pinspots need to be hung from the ceiling?
Most pinspot lighting is hung, because overhead positions keep the beam above guests’ eyes and give the shortest, cleanest throw. Stands are an alternative when hanging is not allowed, but they lower the mounting height and put equipment and cables in the guest space. Always get the venue’s approval in writing for any hung or stand-mounted fixture before you book.
How much power does pinspot lighting need?
Pinspot lighting power depends on the fixtures. Check each data sheet for watts, add up the load and compare it with the circuit rating, keeping continuous loads to the common 80 percent guideline. Many LED units draw little, while older halogen units draw more. Ask your vendor for a one-page power summary and have the venue confirm who connects it.
How long does setup take?
Pinspot lighting setup varies with the fixture type, ceiling height, crew size and whether truss already exists. Ask the vendor for separate times to hang, aim and strike, then multiply by fixture count and divide by crew size. Aiming must wait until tables and centerpieces are in place, so schedule it after the florist, not before.
How much does pinspot lighting cost?
Pinspot lighting costs vary widely by market, fixture type, venue fees and labor, so any single number would be a guess. Use cost per table instead: add equipment, mounting, power, labor, strike and venue fees from the full quote, then divide by the number of lit tables. Compare that figure with candles, battery lamps and built-in lighting.
What causes shadows and glare, and how do I avoid them?
An offset fixture casts a shadow from the centerpiece across the tablecloth, and a low or flat beam can reach seated guests’ eyes. Keep fixtures overhead where possible, or offset toward the room perimeter and aim steeply downward. Run the tabletop shadow test, and check the view from a seat, not from standing height.
When is pinspot lighting not worth it?
Pinspot lighting is usually not worth it in a bright room, in a venue that forbids hung equipment, with a low or uniform centerpiece, or when the table layout will change late. It also loses value if the cost per table exceeds your decor ceiling. In those cases, candles, battery lamps or lit centerpieces usually give more for less.
Sources
- National Fire Protection Association (NFPA): codes and standards for electrical and fire safety
- Occupational Safety and Health Administration (OSHA): workplace safety rules for work at height
- U.S. Department of Energy: lighting basics and LED information
- Illuminating Engineering Society (IES): lighting terms and standards
- Entertainment Services and Technology Association (ESTA): entertainment technology standards including DMX512
- U.S. Consumer Product Safety Commission (CPSC): extension cord and electrical safety
- UL Solutions: product safety certification
- ADA.gov: accessible routes and the Americans with Disabilities Act standards
- Federal Communications Commission (FCC): radio equipment rules