
A wedding details insert is the small printed card that travels in the invitation envelope and tells guests where to be, when to be there, how to get there and whom to call. This guide shows how to build one that works for guests who do not use QR codes, do not carry a smartphone, or simply cannot get a signal when they need the answer.
Treat the printed wedding details insert as the main source and any QR code as an optional extra. Put every fact a guest needs to arrive, dress, park, eat and reply on the wedding details insert itself. Add a phone number a real person answers. Set the type large enough to read without glasses in a dim hallway. Then run the access-alternative review in this guide: list each fact, decide which “door” reaches it (paper, a person, a screen), and make sure no essential fact has only one door that needs a phone.
Somewhere in the last few years a quiet habit took hold in wedding stationery. The invitation arrives with a small square of black and white pixels, and everything useful sits behind it: the schedule, the hotel block, the registry, the dress code, sometimes even the reply form. It looks tidy. It also assumes that every person on your list owns a recent smartphone, has a data plan or Wi-Fi, can hold a camera steady at a printed square, and trusts a code enough to open it.
Plenty of your guests meet none of those conditions on a given day. A grandmother keeps a flip phone because it works. A cousin’s phone is cracked and the camera no longer focuses. A guest has low vision and cannot find the code at all. A family drives through a canyon where nobody has coverage. Another guest is careful about privacy and does not scan codes from paper. None of them is behaving unreasonably, and each of them may miss your wedding’s start time because the one place that listed it required a screen.
This article is about a different habit: designing the wedding details insert so it stands on its own. The card does not have to be fancy, and it does not have to be large. It has to be complete, legible and trustworthy when it is read alone at a kitchen table, in a car, or on a refrigerator door six weeks later.
A note on scope. This is general information, not legal, tax or financial advice. Postal rules, printer terms and venue policies differ and change, so where a specific rule matters, the article points to the organization that issues it and asks you to confirm the current version before you print.
What a wedding details insert does for guests without a smartphone
An invitation card and a wedding details insert do different jobs. The invitation announces the event and asks for a reply. It is often formal in wording, short, and designed to look like the rest of your wedding. The wedding details insert is the practical companion. It answers the questions a guest would otherwise text you at eleven at night: What time should I be seated? Is the ceremony outdoors? Is there parking? Are children welcome? Where is the hotel? Who do I call if I am lost?
If you want a refresher on how the invitation suite fits together and what wording belongs on each piece, the site’s guide to wedding invitation etiquette covers the formal side. The card in this article is the part etiquette books mention least and guests use most.
For a guest without a smartphone, the wedding details insert is not a convenience. It is the only complete record they will hold. They cannot look up the venue’s website on the drive, they cannot open a calendar attachment, and they cannot check a link when the schedule changes. If the wedding details insert is thin, they depend on you or a relative to fill the gaps, and that is a lot to ask of a couple in the final weeks before a wedding.
There is a second, quieter benefit. A good card reduces the number of questions you personally have to answer. Every fact that appears clearly on paper is a fact nobody has to text you about. Couples who treat the wedding details insert as a communication tool, rather than a decoration, often find that the last month is calmer.
What the card is not
It is not a replacement for the invitation, which carries the host line, the names and the formal request. It is not a wedding website printed small. And it is not a place for every detail you can think of. A card with sixteen sections and four typefaces becomes unreadable, and unreadable is worse than a missing QR code.
The right mental model is a one-page briefing for a guest who has never seen the venue. A briefing includes the facts that change what the guest does: when to leave home, where to park, what to wear, whether to bring cash or a gift, what to do if they need help. It leaves out the story of how you met, the registry ideas and the playlist.
Why paper still earns its place
Paper has three properties a screen does not. It works without power or signal. It does not expire when a page is taken down. And it can be handed to someone else: a daughter driving her mother, a neighbor watching the house, a hotel desk clerk helping a confused arrival. A printed card can sit on a dashboard, a nightstand or a refrigerator. A link in a text thread sinks under newer messages.
None of this means screens are bad. A wedding website remains the best place for a long registry list, a photo gallery or a live update. The point is the order of dependence. Paper carries what a guest needs to attend. The screen carries what a guest might enjoy.
Who is affected when wedding details sit behind a QR code
It helps to be specific about who loses out, because “older guests” is only part of the picture, and designing for that single group tends to produce a card that is still hard to use for everyone else.
Guests with no smartphone. Some people use a basic phone by choice or cost. A basic phone cannot scan a code, and it may not open a web page well. These guests are not necessarily elderly. Some are teenagers whose families limit devices, some are adults who avoid smartphones, and some are guests whose phone was lost or broken that month.
Guests with a smartphone but no connection. Venues in the countryside, mountains, old stone buildings and basements often have poor service. A guest who planned to scan the code at the venue door will find nothing loads. Guests traveling from abroad may have roaming switched off to avoid charges and will not turn it on to open a wedding page.
Guests with low vision, tremor or limited dexterity. Pointing a camera at a small printed square and holding it still is a physical task. For someone with low vision it may be impossible to locate the code on the page. For someone with a tremor it is frustrating. These guests may use a magnifier and a large-print copy more happily than any code.
Guests who avoid scanning for privacy or safety. Security agencies and consumer protection offices have warned that a printed code hides its destination until it is scanned, and criminals have pasted fake codes over real ones in public places. A guest who has taken that advice to heart will not scan a code on an envelope. They are not being difficult; they are following a sensible habit.
Guests who read slowly or in a second language. A screen full of small text in a scrolling page is a lot to take in. Someone who reads English as a second language, or who has a reading difficulty, may do much better with a short card in plain wording, perhaps with a translated copy folded in beside it.
Guests who rely on someone else. A caregiver, an adult child or a spouse may manage the older guest’s calendar. They need a physical item they can read to the person, put on a calendar and keep in a coat pocket.
Reading that list, you may recognize people on your own guest list. That recognition is the starting point. You do not need statistics about phone ownership to justify a printed card; you need to look at your own list and ask a short question for each household: if the code did not work for them, how would they find out?
A quick household check
Open your guest list and mark any household where the answer is not obvious. You are not collecting sensitive information. You are making a private working note, and the rule is to hold it lightly. Some couples simply highlight the names of people they would phone instead of text. Others note guests who asked for large print or a phone call in the past. If a guest has told you about an access need, use that information only for their benefit, keep it out of shared documents, and do not label people in ways they would not choose.
Households that come to mind first are usually the right ones to design for. If even one-fifth of your guests would struggle with a code-only system, a printed wedding details insert is not a courtesy; it is how the invitation does its job.

The cost of a code-only approach
The cost shows up in small ways first. A few guests call to ask for the address. A relative asks you to print the schedule at the last minute. Someone arrives at the wrong entrance because the map was behind the code. Each case is manageable. Together they eat the time you were saving by moving details onto a page nobody can print.
The larger cost is trust. A guest who feels the invitation was not meant for them, because it assumed equipment they do not own, may reply late, reply with doubt, or stay home. A card that quietly includes them costs a few cents per copy and removes the risk.
Printing costs are worth stating plainly without inventing numbers. An extra insert adds some paper, some printing and a small amount of weight to the envelope. How much depends on your printer and on current postal rates, which you should confirm with the issuing agency. The next sections show how to keep the wedding details insert light, legible and inexpensive so that adding it does not push your invitation into a more expensive mailing class.
The access-alternative review for a wedding details insert
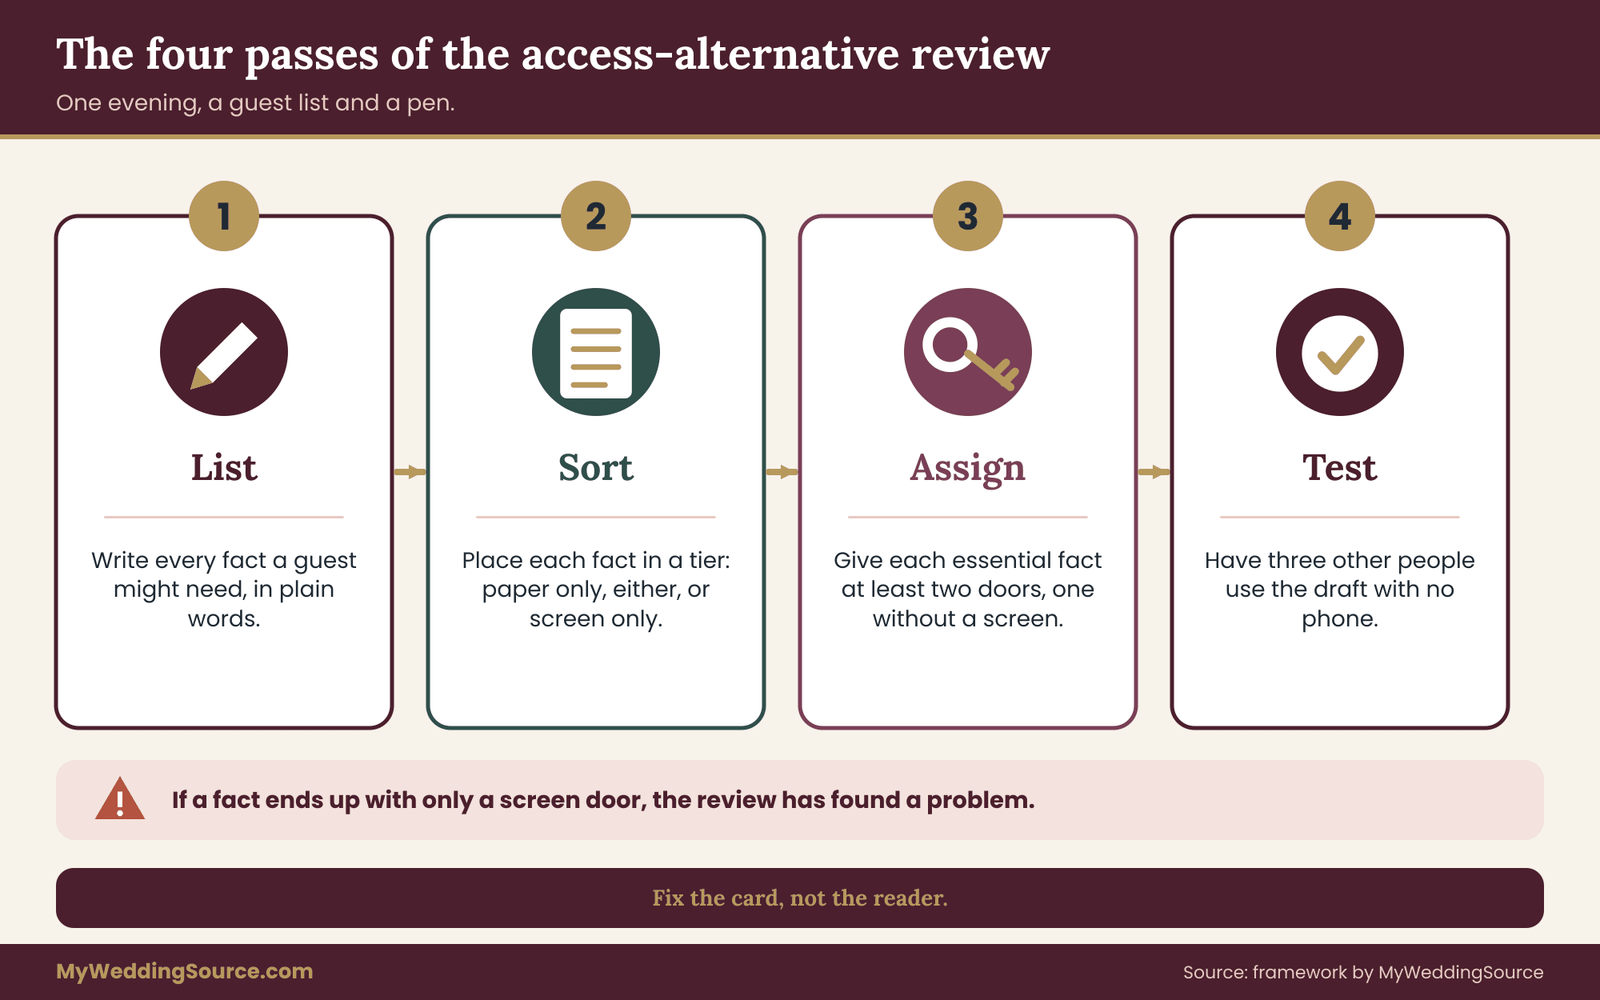
This is the working method of the whole guide. It has four passes and takes one evening with a guest list and a coffee. The aim is not to make the wedding details insert longer. The aim is to find the places where a guest’s path to a fact depends on a device, and to give that fact a second route that does not.
Pass one: list every fact a guest might need
Write each fact on its own line, in plain words, before you think about design. Include the obvious ones and the ones you only think of when you imagine a stranger arriving. A starter list: ceremony date, ceremony start time, ceremony address, reception address if different, reception start time, what time guests should be seated, parking, drop-off point for guests who cannot walk far, dress code, whether the ceremony is outdoors, weather plan, whether children are invited, hotel name and booking deadline, shuttle times, how to reply and by when, meal choices if you collect them, gift preferences, and a contact number for the day.
Then add the questions your friends asked while you planned. If three people asked about parking, parking goes on the list. If someone asked whether they could bring a plus-one, the answer belongs on the invitation or in your direct message to them, not on a general card.
Pass two: sort each fact into a tier
Sort the list into three tiers, and be strict about the first.
Tier one: paper only. These facts a guest needs to attend at all, or the day goes wrong without them. Date, time, address, parking, dress, reply deadline and a contact number. These must appear on the printed card in full. No code, no link, no “see website.”
Tier two: paper or screen. These help but are not essential. A hotel list with a booking deadline, a shuttle timetable, a note about the weather plan. Put the short version on paper. Offer the longer version on a page for those who want it.
Tier three: screen only. These are extras. A registry list, a photo gallery, a story page, a song request form. They can live online without hurting any guest who never sees them, because nobody needs them to arrive.
The strictness matters. The most common failure is quietly promoting a tier-one fact into tier two because it is long. Parking directions are a good example. They are long, so they migrate to the website, and then the guest with a basic phone arrives without them. If a fact is essential and long, it gets shortened, not moved.

Pass three: assign each fact its doors
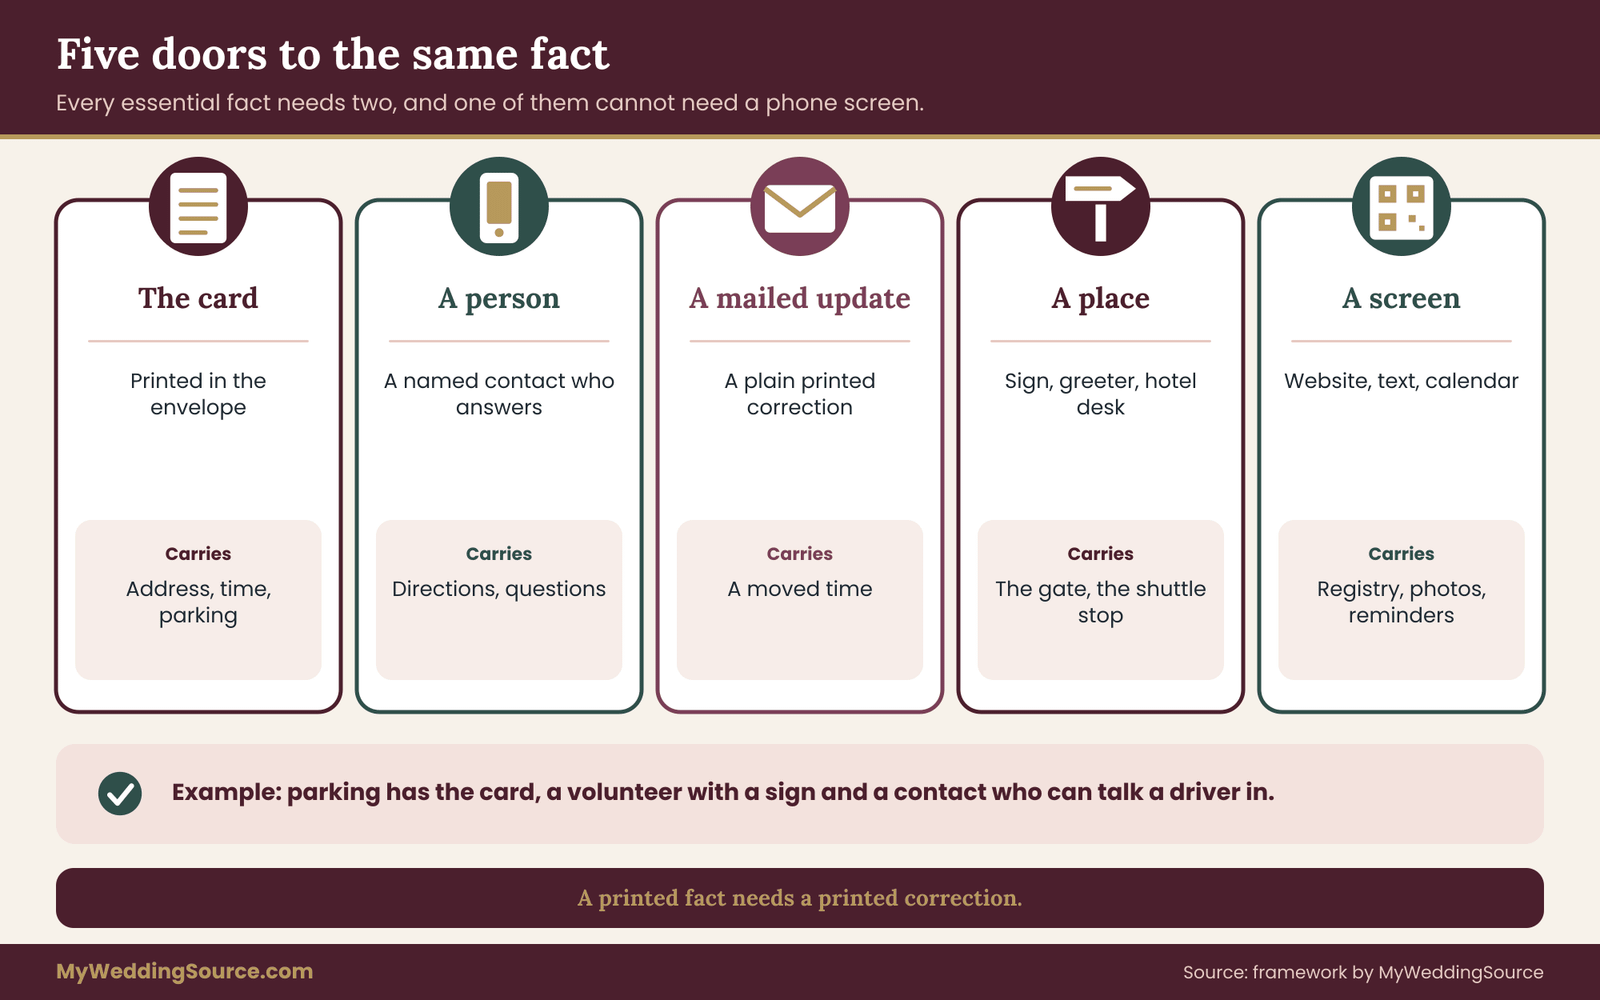
A door is a way a guest can reach a fact. There are five worth considering.
- The card. A printed wedding details insert in the envelope.
- A person. A named contact who answers the phone, ideally two people with different schedules.
- A mailed update. A printed correction sent to households that cannot get a screen update.
- A place. A sign at the venue entrance, a staff member, or a hotel desk holding the information.
- A screen. A website, a message thread or a calendar file.
For every tier-one fact, require at least two doors, and require that at least one of them is not a screen. For the date and the address that usually means the card and a person. For the dress code it may mean the wedding details insert and the invitation itself. For a late change it usually means a screen for most guests and a phone call or mailed note for a few.
Write the door assignment out on one sheet. Seeing the empty cells is what tells you where the weak points sit. If a fact has only a screen door, the review has found a problem.
Pass four: test the card on someone who is not you
A review that only you read finds only the errors you are able to see. Give the draft to three people and ask each to do one short task. The tasks are described in detail in the section on design, but the principle is simple: someone who has not followed your planning for a year should be able to answer ten practical questions from the wedding details insert alone, in under two minutes, without a phone.
If your test reader keeps flipping the card over, squinting, or asking “where does it say,” the wedding details insert is not finished. Fix the card, not the reader.
A short example of one fact through the review
Take parking. It starts on your list as a note: “venue has a small lot, overflow at the church next door, street parking is limited after four.”
In pass two it lands in tier one, because a guest who cannot park will be late, and being late to a ceremony is the exact failure the card exists to prevent.
In pass three it gets doors. The wedding details insert carries two lines: where to park first, and where to go when the lot is full, with the street name of the overflow lot. A person door is added: the contact number, with a note that the contact can talk a driver in. A place door is added too: a volunteer with a sign at the entrance to the lot. The screen door is optional: a map on the wedding page.
In pass four a test reader says, “It says overflow is at the church next door, but which church?” The card gets the church’s name and the street. That is the review working as intended.
Why a review beats a rule
You could simply adopt a rule such as “everything on paper.” It would fail in practice, because the wedding details insert would swell and the font would shrink. A review keeps the card short by being honest about which facts are essential. It also gives you a record of the decisions, which is helpful when a relative asks why the registry is not printed on it. The answer is: it is tier three, and we put it where people who want it can find it.
Who should do the review
If you are planning with a partner, do pass one separately and compare. Each of you will remember questions the other did not hear. If a family member helps with invitations, ask them to do pass four. Older relatives are often excellent test readers because they notice what is unclear without being embarrassed to say so.
For a wedding with a planner or coordinator, share the tier lists with them. Coordinators often know the venue’s quirks: which door the caterer uses, which lot fills first, which hallway guests wrongly choose. Fold those facts into the wedding details insert before it prints. The printer cannot fix a missing fact after the run.
Recording the result
Keep a one-page sheet, kept with your invitation proofs, that lists each tier-one fact and its doors. When the printer sends a proof, check the proof against that sheet rather than against memory. This is the same discipline the site’s guide to wedding invitation print production recommends for proofing: compare the proof with a written source of truth, not with how you remember the text.
The sheet also becomes your plan for changes. If the hotel block deadline moves, you know which doors carry that fact and which of them you must update. Without the sheet, you will remember to update the website and forget the households who only have the wedding details insert.
A word on privacy while you do this
The review touches guest information, so handle it with care. Keep the household notes in a private document. Do not publish a list of who needs which format. When you contact a guest to ask what suits them, make the question open and kind: “Would you like a large-print or paper copy of the details?” is easier to answer than “Do you have a smartphone?” and it avoids putting anyone on the spot about their devices or abilities.
The next section turns the tier-one list into actual card content.
What belongs on the wedding details insert
With the tier-one list in hand, the content of the wedding details insert is mostly decided. This section goes through each block, with wording ideas and the reasoning behind them, so you can write a card that is short but complete.

The time and place block
Lead with the facts that decide whether a guest shows up at the right door at the right hour. Give the full date with the day of the week, the ceremony start time, the name of the venue, and the full street address including city and state. Put the address in a form a driver could read aloud. Add the reception location and time even if it is the same building, because many guests will assume a gap that does not exist, or a gap that does.
Be careful with times. A single time printed without context causes more trouble than almost any other detail. Say what the time means: “Guests seated by 4:30. Ceremony begins at 4:45.” If the doors open earlier, say that too. If the ceremony and the reception are separated by a break, say how long the break is and where guests might spend it.
Write out the date in words rather than only numerals. “Saturday, June 12” cannot be misread as a day-first or month-first date, which matters for guests who travel from countries that write dates the other way around.
The getting-there block
Directions printed on a card are different from directions on a map app. The app knows the traffic and speaks to the driver. The wedding details insert has to help someone who is lost, or someone driving for the first time in a strange place, or someone riding in the back seat. Offer three things: the street address, a short landmark-based description of the final approach, and the parking or drop-off instruction.
A landmark line might read: “The entrance is the second driveway after the white barn, marked with a green sign.” Keep it to one or two sentences. Do not include a long turn-by-turn route, because routes change with roadworks and with the direction a guest arrives from.
For a venue with a confusing entrance, say so plainly. “The venue has two gates. Use the north gate on Mill Road; the south gate is for deliveries.” That sentence saves a dozen phone calls.
The parking and access block
State where to park, whether there is a fee, where to go when the lot is full, and where guests who cannot walk far should be dropped. If the venue has step-free access, name the entrance. If the ceremony is on grass or gravel, say that, because guests with a walker, a cane or heels will want to know. Many couples avoid mentioning terrain because it feels unglamorous. Guests are grateful for it.
If you have arranged a shuttle, give the pickup point, the times and the return times in a short list. Shuttle schedules are one of the most error-prone facts on any card. Check them with the shuttle company the week before printing, in writing.
The dress and weather block
State the dress code in plain words and give an example: “Cocktail attire. Dark suits and knee-length dresses are typical.” Avoid terms that mean different things in different regions without a gloss. If the ceremony is outdoors, say so and say what happens in rain: “If it rains, the ceremony moves indoors to the same venue. No change of time.” A one-line weather plan removes a great deal of anxiety.
If guests will walk on uneven ground, or stand for a long period, or sit in direct sun, mention it. These are practical notes, not drama.
The reply block
Do not hide the reply method. If you have a printed reply card in the envelope, say how to return it and the date by which you need it. If you offer a phone reply, print the number and the hours when someone answers. A guest without a smartphone may be happy to call, and may like to talk to a human about meal choices or a plus-one.
The wedding details insert should not duplicate the reply card’s own text, but it should point to it: “Please return the enclosed reply card by August 1.” The date should match the date on the wedding details insert exactly. A mismatch between the two documents is one of the commonest proofreading errors. The guide to wedding RSVP etiquette goes into reply deadlines and follow-up in more depth.
The lodging block
If you have a hotel block, give the hotel’s name, address, phone number, the booking code or the instruction to mention the wedding, and the cutoff date. Keep the language neutral about price. Rates change, and an inaccurate rate on a printed card cannot be corrected. Say “ask for the wedding rate” and give the phone number rather than quoting a figure.
For guests who need accessible rooms, a short line helps: “To request an accessible room, tell the hotel when you book.” The site’s guide to wedding guest hotels discusses block structure and mobility needs for the booking side.
The contact block
This block carries the most weight for guests without a smartphone, and it is the one couples most often get wrong. Provide two contacts, with names and phone numbers, and say when they will answer: “Call or text Dana at 555-0114 between 9 a.m. and 8 p.m. until the wedding. On the day, call Marcus at 555-0172.” Use numbers you will keep. Do not give a number that belongs to a person who will be getting a hairstyle at the time of the call.
Do not give an email address on the card as the only contact, because it assumes the very thing the wedding details insert is designed not to assume. A phone number serves everyone, including the guest who has a landline.
On the day itself, designate someone who is not in the wedding party to carry the phone. A parent, a friend who is a guest, or a coordinator works. The couple and attendants should not be the people answering.
The children, plus-one and etiquette notes
If you need to say that the event is adults only, or that children are welcome, say it kindly on the invitation envelope or in a direct conversation. The wedding details insert may carry a gentle line, but it is the wrong place to open a dispute. For a gift note, a neutral line such as “Your presence is what matters” is fine, but avoid pointing guests to a registry link that may not work for them. If you want to mention a registry, print the store name and say how to find it.
What to leave off
Leave off anything that is not required to attend. The story of your proposal. The full order of service. Long thank-you paragraphs. A seating chart, which does not exist yet. The playlist. Anything that will change before the wedding. If you are unsure whether to include a fact, apply a quick test: if a guest never saw it, would they do something wrong or arrive at the wrong time? If not, it belongs on the screen, or nowhere.
Wording that works without a screen
A few short phrases help guests who are not looking at a phone. Say “call” rather than “tap.” Say “the enclosed card” rather than “the form on our site.” Say “at the front desk” rather than “using the app.” Say “ask for” rather than “use the link.” These small changes tell a guest the card was written for them.
Avoid phrases that point away from the wedding details insert without giving the fact itself. “More details to follow” and “details on our website” leave a guest with nothing. If something is not decided yet, say when it will be: “Shuttle times will be mailed in September.”
Reading level and tone
Keep sentences short. Aim for the reading level of a clear newspaper article, which is easy for most adults and also easy for people reading in a second language. Avoid jargon from the wedding industry. “Cocktail hour,” for example, is fine. “Ceremony site reveal” is not. Keep the tone warm and calm, the way you would speak to a guest at your door.
A sample block, written out
Here is how a short, complete block might look, written in prose so you can adapt it: “Saturday, June 12. Guests seated by 4:30. Ceremony at 4:45 at Hartwell Barn, 218 Mill Road, Fairmont. Park in the lot beside the barn; if it is full, use the church lot across Mill Road and take the signed path. Guests who need a short walk can be dropped at the front gate. Dress is cocktail attire. The ceremony is outdoors on grass; if it rains, it moves into the barn at the same time. Dinner follows at 6:00.”
That block is about seventy words. It answers when, where, how, what to wear and what if. It does not need a phone, and it does not ask the guest to trust a code. Every other block on the wedding details insert should have the same property: a guest reading it alone can act on it.
Designing a wedding details insert people can read
A complete card that nobody can read has failed in the same way a code-only card fails. This section covers the design choices that decide whether the wedding details insert is usable in a dim hallway, a moving car or a pair of reading glasses left at home.
Size and shape
Choose a size that fits the envelope without bending and that a guest can hold in one hand. Many couples use a card that is smaller than the invitation, so it sits behind it in the stack. A taller, narrow card can fit more lines of text at a readable size than a small square one. Whatever you choose, ask your printer for a flat proof on the real stock and check that it fits the envelope with a little room to slide in and out.
Resist the urge to use a tiny card to keep postage down and then shrink the type to fit. A small card with small type is the worst combination. If one card cannot hold the tier-one facts at a readable size, use a folded card or two sides, or move to a second insert for lodging and travel. Two clear cards read better than one crowded one.
Type size and typeface
Set the main text at a size that is comfortable for a guest without reading glasses. A common approach in accessible print design is to use body text of around twelve to fourteen points at minimum, with key facts, such as the date and the address, set larger. Large-print guidance for people with low vision usually begins at eighteen points. You do not have to make the whole card large print, but you should know where the line is and offer a large-print version on request.
Choose a plain typeface for the practical text. Ornamental scripts can look lovely on an invitation, but they are hard to read in small sizes and impossible for some guests with low vision or dyslexia. A common pairing is a decorative face for the heading and a clear serif or sans serif for everything else. Avoid setting long passages in capitals, in italics or in thin weights.
Leave space between lines. Tight line spacing makes text harder to track, especially for people who read slowly. A little extra air around each block improves legibility far more than a smaller typeface saves space.
Contrast and color
Dark text on a light, plain background is the safest choice. Pale gray text on cream, gold foil on white, or white text on a pastel will look elegant in a photograph and disappear in a real room. Test contrast by looking at the proof in poor light, from arm’s length, and by photocopying it in black and white. If the copy is hard to read, the wedding details insert is relying on color to carry meaning.
Do not use color alone to separate information. If the ceremony block is blue and the reception block is green, a guest with color vision differences may not tell them apart. Add a heading and a rule, so the structure survives without color.
Be wary of busy backgrounds, watermarks and textured paper under small text. A faint floral behind the address line can make a digit look like another digit. Keep the text area plain.
Hierarchy and layout
Use headings to tell the reader where to look. A short heading above each block, such as “When,” “Where,” “Parking,” “What to wear” and “Who to call,” lets a guest find the answer in seconds. Keep the headings in the same style and the same order every time, so that the wedding details insert feels predictable.
Set the most important facts first and largest: the date, the time and the address. Place the contact block at the bottom of the wedding details insert where it is easy to find and, if possible, repeat it on the back in larger type so that a guest can find it by turning the card over.
Align text to the left. Centered text reads well for a short invitation line but poorly for a block of practical information with several lines, where the eye has to find a new starting point on every line. Left alignment with a consistent margin gives a clear edge to read down.
Numbers and dates
Write phone numbers in the usual local grouping with area code and separate the groups with spaces or hyphens. Write times with a.m. or p.m. spelled consistently. Write the date in words as well as numbers if there is any chance of confusion. Do not mix twelve-hour and twenty-four-hour times. Put the day of the week next to the date so guests catch a mismatch with their own calendar.
Digits are easy to mistype and hard to catch in a proof, so read every number aloud against the source. Phone numbers, street numbers and ZIP codes are the usual victims.
Maps and drawings
A simple drawn map can help more than a screenshot. If the entrance is confusing, a small sketch with the road, the entrance, the parking and the building, labeled in large text, answers the question in a glance. Keep it uncluttered: three or four labeled marks, a north arrow if needed, and no more. A printed map screenshot with tiny street labels is nearly useless, so avoid it.
Ask whether the venue already has an approved map or site plan you can adapt. Some venues provide one; others prefer to approve what you use. If the venue has trademarks or an official map, check their rules about reuse before you print.
Language and translation
If a meaningful number of your guests read another language more comfortably, offer a translated card. Two options work well. One is a bilingual card with both languages on the same card, with the same facts in the same order. The other is a second insert in the second language, enclosed with the households who would prefer it. Translations should be checked by a fluent reader who is not you, and numbers, times and addresses should match exactly. Whichever you choose, give the translator the final English text only after it is locked.
The back of the card
The back is useful space. A short “In case of trouble” line with the contact name and number, the venue’s phone number and a note about what to do if the guest gets lost often earns more gratitude than anything on the front. Do not print the back with a pale tint that makes handwriting difficult. A guest may want to jot a note: a carpool name, a hotel confirmation number or a reminder.
A note on materials
Heavy, glossy or foil-stamped stock can look luxurious and read poorly. A glossy surface glares under lights, and a deep letterpress impression can hide small characters in shadow. If you love a special finish, use it for the border or the heading and keep the practical text on a flat, matte area. Ask the printer for a sample of the same stock before you commit, and judge readability under a lamp, not under shop lighting.
The glovebox test and the other tests
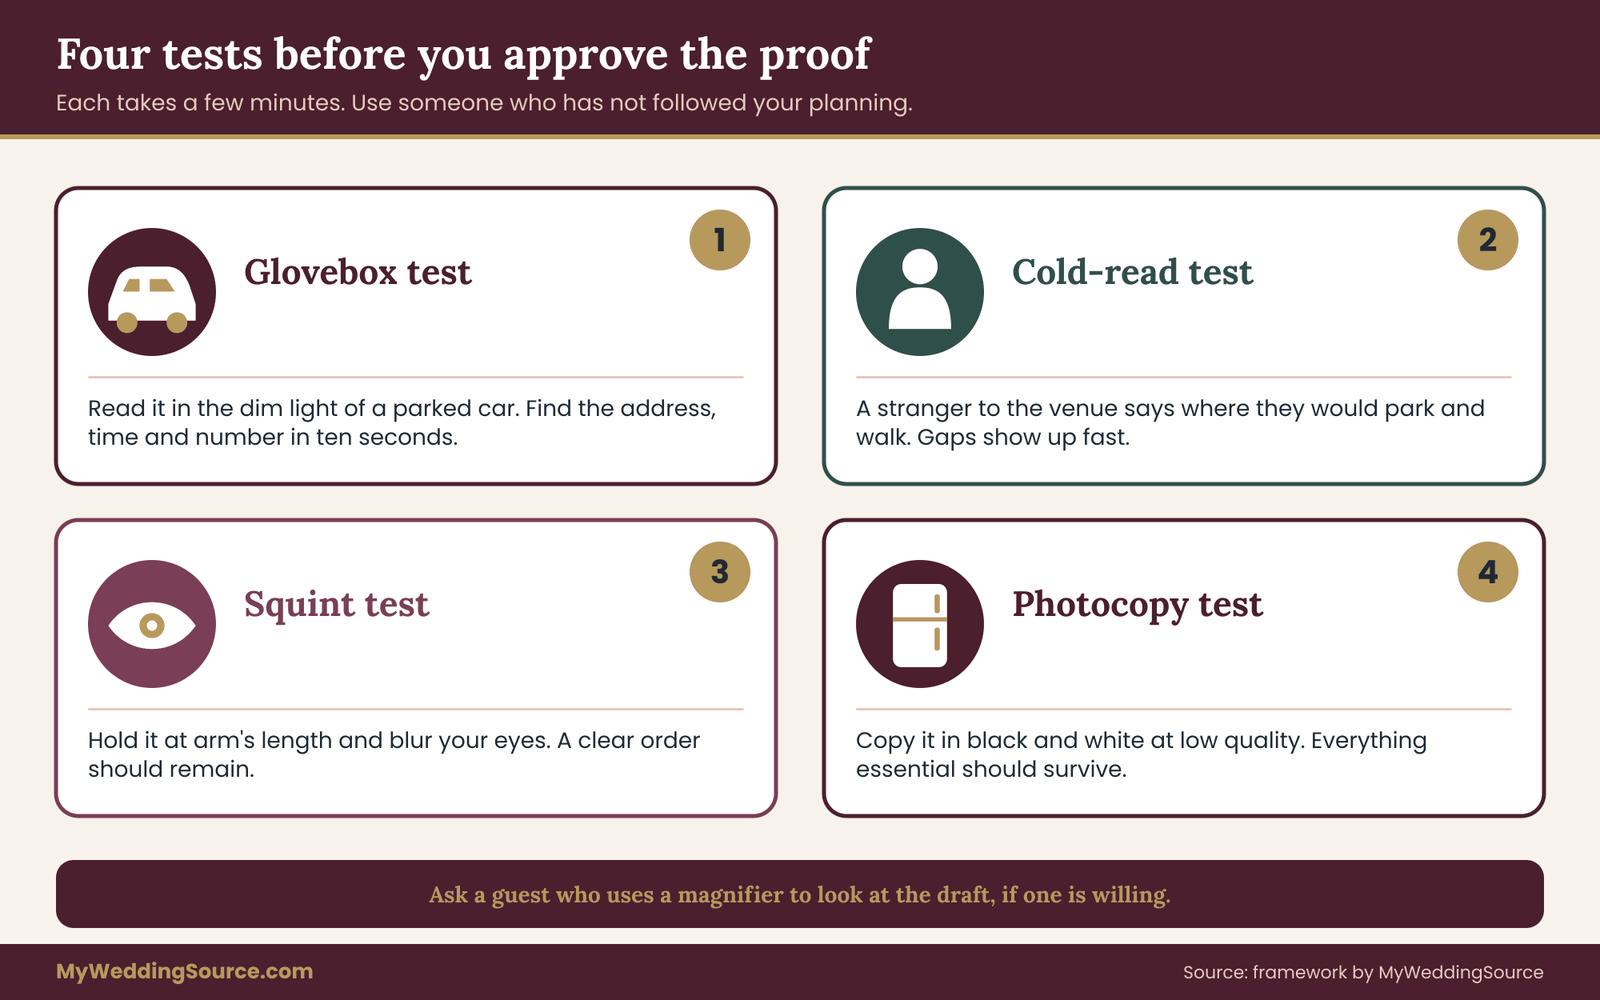
Test the draft with four short trials. They take little time and they find most problems.
The glovebox test. Hand the wedding details insert to someone and ask them to read it in the dim light of a parked car. Can they find the address, the time and the contact number in ten seconds?
The cold-read test. Ask someone who has never seen the venue to describe, in their own words, where they would park and where they would walk. If they cannot, the getting-there block is unclear.
The squint test. Hold the wedding details insert at arm’s length and blur your eyes. You should still see a clear order: heading, key facts, supporting detail. If everything blurs into one mass of text, add space and weight to the headings.
The photocopy test. Copy it in black and white at low quality. Everything essential should survive. If a guest’s relative makes a copy for a refrigerator, the wedding details insert should still work.
Ask a guest who uses a magnifier or large print to look at the draft if one is willing, and thank them for it. People with lived experience of access barriers often spot problems in minutes that a sighted reader misses for hours.
Offering a large-print or alternate copy
You do not need to print a large-print version for every guest. A better approach is to say on the invitation envelope or in a note that a large-print or plain-text copy is available on request, with a name and a phone number. Prepare a larger-type version of the same card in advance, which is easy if you design the wedding details insert in a layout program, and keep a few spares. Some guests will ask. Many more will be glad you offered.
A large-print copy is not a different card. It carries the same facts in the same order at a larger size, usually on a plain white page. Do not reformat the content on the larger version, because that creates a second document to proof.
Print, postage and proofing checks for the wedding details insert
A well-designed card can still go wrong at the printer or in the mailbox. This section covers the production side: quantities, proofs, the printer handoff and the postal checks that matter when you add an extra piece to the envelope. For the broader process, the site’s guide to wedding invitation print production sets out proofing, quantities and handoffs for the whole suite. Here the focus is what changes when the suite includes a card meant to be read without a screen.
Decide the quantity by household, not by guest
Invitations are mailed to households, so count households. Add copies for the people who will ask for a replacement, for your own files, for the venue and coordinator, for your parents or the hosts, and for the large-print or translated versions you may need. A reasonable habit is to order a modest overage beyond the household count, then confirm with the printer how much extra is cheap at your run size. Reprinting a small number later is often costly because of setup charges, while a few extra cards in the first run cost little.
Also count the cards you will hold back for a later mailing. If you plan a second mailing to guests whose addresses arrive late, or an update card in the autumn, those need their own quantities.
The printer handoff
Give the printer a short written brief rather than only a file. List the wedding details insert size, the paper stock, the print method, the quantity, the finished folding if any, and the delivery date. Say which text must not be altered and who has the authority to approve the proof. Attach the tier-one fact sheet from the access-alternative review, so that the printer can see what the wedding details insert must carry.
Ask the printer to tell you, in writing, what they will and will not check. Many printers check layout and printing flaws but do not verify addresses, times or phone numbers. Treat the wording as your responsibility. Ask what happens if you find an error after approval, and what the reprint terms are. A copy of the printer’s terms belongs in your file.
If you use a print-on-demand service or an online template, read the proof screen carefully. Automatic text fitting can shrink type without telling you, and it may change line breaks. Compare the proof against the specification you gave, line by line.
Proof in three layers
Proof the wedding details insert in three separate passes, with a different reader for each.
The first pass is for facts. Check every date, time, address, phone number, ZIP code and deadline against its source: the venue contract, the hotel confirmation, the shuttle quote. Do not check from memory or from another draft, because drafts carry forward the same mistake.
The second pass is for wording and typography. Read the wedding details insert aloud. Look for repeated words, missing words, awkward line breaks, an orphaned number at the end of a line, and a heading that falls at the bottom of the wedding details insert without any text after it.
The third pass is for use. Hand the proof to a reader and run the glovebox, cold-read and photocopy tests from the design section. If the proof is a digital file, print it at actual size on plain paper first. Text that looks fine on a screen at a large zoom can be much smaller than you thought.
Keep a signed or dated approval, whether on paper or in an email thread, and keep the final PDF. If a printing error turns up later, the approved file and the printed sample are the evidence.
Check the physical sample
A digital proof cannot show paper weight, ink coverage, or whether the type is crisp on the stock. Ask for a printed sample, or a small test run, on the final paper. Look at it flat on a table, then in a car, then in bad light. If the printer cannot provide a physical proof, ask whether they can send a sample of the same stock with a similar print method.
Postage and the extra insert
Adding a card changes the weight and sometimes the thickness of the envelope. Postal pricing depends on weight, size, shape and sometimes on rigidity or on whether the piece can be processed by machine, so a stack that was acceptable with one card may need more postage with two. The rules are set by the United States Postal Service. Its Domestic Mail Manual is the authority, and its customer service and local post office can answer questions about a specific piece.
The sensible step is to assemble one complete sample envelope with every insert, including the wedding details insert, the reply card, any tissue or liner, and the reply envelope. Take that sample to the post office before you print the full run. Ask the clerk to weigh it, measure it and tell you the postage for your mailing method. Do this for the heaviest version of the suite, for example the one with a translated card included, because that is the one that sets your postage.
Also ask about the return envelope. A reply card that is too stiff or an envelope that is too small can cause problems for guests who mail replies. Confirm that the size you chose can travel in the mail as a letter.
Do not assume a rate you saw online last year still applies. Postal rates and rules change, and so do surcharges for unusual shapes. Check with the issuing agency close to the mailing date, and note the date you checked.
Stack order and enclosures
Assemble the suite so that the wedding details insert sits in a place where a guest will not miss it. A common order, front to back, is the invitation, the details card, then the reply card and its envelope. If the details card is smaller than the invitation, place it on top of the invitation so it does not slip out when the envelope is opened. Some couples put a thin line on the invitation saying “Details enclosed,” which is worth doing because a guest who has been trained to expect a code may not look for a card.
Do not staple or glue the wedding details insert in place. A loose card is easier to take out and place on a refrigerator.
Address and data handling
If you print any personal information on the wedding details insert, handle it carefully. A phone number belongs to a person, and printing it widely shares it with everyone on the guest list. Use a number you are comfortable giving out. A number from a free voice calling service that forwards to a person is a reasonable middle path if you want to avoid exposing a personal line, but test it, and make sure the forwarding works for a landline caller.
Do not print guests’ names, addresses or health details on a general card. If a guest has an accessibility need, handle it in a separate, private message. The site’s guide to wedding guest list management covers how to keep guest information organized without sharing more than you need to.
If you keep a QR code on the card
If you decide to keep a code as an extra, treat it as something that needs checking. Print a test copy, scan it with two different phones, and confirm the destination is the page you expect. Print the full web address in plain text next to the code, so that a guest who prefers not to scan can type it, and so that anyone can see where the code leads. Check the contrast and the size of the code on the final stock. A code printed on a textured or glossy surface may not scan reliably.
Be honest about what the code leads to. A code that opens a page with tier-three information is fine. A code that opens a page with the only copy of the schedule is the problem this guide is about.
Delivery and receiving
Ask the printer where the order will ship and who must sign for it. Count the boxes on arrival. Open one box and check a sample against the approved proof before you start stuffing envelopes. If anything is wrong, photograph it and tell the printer the same day. Delay weakens your position, because a printer will reasonably ask why you did not notice earlier.
A timeline in prose
Work backward from your mailing date. Finalize facts first, because a fact that moves after printing is expensive. Then run the review and the tests, then send the brief to the printer, then proof, then approve, then print. Leave buffer for a reprint. If your invitations go out at the usual lead time for your kind of wedding, you will have several weeks between mailing and replies; the details card should be in the mail at the start of that window, not added later.
The next section deals with the case where you want the extras a screen offers, and how to keep them from becoming the only door.
Keeping a QR code beside a wedding details insert, not in front of it
None of this argues for throwing away your wedding website or banning codes. A website is the right home for content that is long, visual or changing. The question is how to offer it without making it the gate. This section gives rules for that, and for building the human channels that serve the guests a screen does not.
Rules for using a code as an extra
Four rules keep a code in its place.
Rule one: the code never carries a tier-one fact alone. If the date, time, address or contact number appears only behind the code, move it onto the wedding details insert.
Rule two: the code is labeled. A small caption such as “Registry and photos” tells guests what is behind it and tells those who do not scan that they are missing nothing essential. An unlabeled code invites worry.
Rule three: the address is printed beside the code. Anyone can type it, and anyone can read where it leads. This also removes the worry about a covered or swapped code.
Rule four: the page is a mirror, not a trap. The website should repeat the tier-one facts in the same words as the wedding details insert, so that a guest who goes online finds the same information and no different version. If the card and the page disagree, guests will not know which to trust.
Keep the website short and readable
The page that the code leads to should load quickly on a poor connection. Avoid large images and autoplay video at the top. Put the tier-one facts at the top in plain text, not inside an image, because text can be enlarged and read aloud by assistive software and an image of text cannot. Offer a plain “print this page” option or a downloadable file, so a guest’s family member can print the schedule for a relative who will not use the page.
If your wedding website is hosted on a service that may change, take a copy of the content offline as a document and store it with your files. The site’s guide to digital contingency planning for the wedding day describes how to prepare for a page that fails when guests need it.
Calendar files and reminders
A calendar attachment suits guests who use calendars and does nothing for those who do not. Offer it as an extra on the page, and do not rely on it. For the guests who do not use one, a card that fits on a refrigerator door does the job. If you have a relative who manages another household’s calendar, it is kind to tell them the date and time in a short call, because they will enter it faster than they will find it on the wedding details insert.
Building the people door
Phone numbers on paper are only useful if someone answers. Decide in advance who will take calls before the wedding, who will take them on the day, and what they know.
Before the wedding. One or two people, ideally not the couple, answer calls and texts about the details. Give them the tier-one fact sheet, the hotel and shuttle information and a short list of questions that go to the couple. Tell them which questions they can answer and which to pass along. Give them permission to say, “I will find out and call you back.”
On the day. One person carries a phone that is turned on and charged, with the contact list and a copy of the schedule. This person should not be a member of the wedding party. If the venue has a coordinator, the coordinator may be this person, but confirm it. The site’s guide to wedding guest care planning goes into who looks after guests on the day and how to hand over that role.
What they say. Give the contacts a few plain phrases. When a guest calls lost: “Tell me the last road you passed or what you can see.” When someone asks for a copy: “I can mail one today. What is your address?” When a guest says they cannot use the website: “That is fine. I will read it to you, or I can send a printed copy.” The contacts should never ask why a guest does not use a device.
The mailed update
The most important rule in this section is that a printed fact needs a printed correction. If the ceremony time moves, a text to the guests who use texts is not enough. Households that rely on the wedding details insert need a card.
Plan for this before you print. Keep a mailing list that marks which households receive updates by mail and which by message or phone. Keep a small supply of blank cards or a template that matches the original so an update looks official and is not confused with junk mail. Keep stamps ready.
A mailed update should be short and specific: what changed, from what to what, and which card it replaces. For example: “Change of time. The ceremony will begin at 5:00 p.m., not 4:45 p.m. All other details on your card are unchanged.” Do not add decorative text. A plain card is quicker to read and harder to misread.
Using a person door for the households who cannot be reached by card
Even a thorough card misses some people. A guest may have moved, or may have lost the wedding details insert, or may be away for the summer. A phone call is the fallback. Make a short call list for households you have not heard from by the reply date, and call them rather than texting. A voice can confirm that the right person has the right facts. Keep the call short and warm, and write down who you reached.
If you cannot reach a household, ask a relative who knows them whether they have the details. Do this with care, and do not share more of the guest’s information than the relative already holds.
Places that carry the facts
A place door means information is physically available where the guest is. Signs at the venue entrance, a printed schedule at the welcome table, a staff member who knows the day’s timeline, and a printed notice at the hotel desk all work. A sign that reads “Ceremony: this way, 4:45” does the work of a hundred messages.
If guests are likely to arrive confused, put a person at the first decision point. A parking volunteer and a greeter can turn a poor connection from a crisis into an inconvenience. The site’s guide to wedding signage systems explains how to plan signs so guests can find their way without asking.
Hotel and travel partners
Hotels and shuttle operators are partners in the same task. Give the hotel front desk a one-page printed copy of the schedule and the contact numbers, and ask them to keep it behind the desk for guests. Many hotel desks will do this if asked in advance, and some may not, so ask well before the wedding and check that the printed copy matches the wedding details insert. A guest who loses the card at the hotel can pick up a fresh one at the desk.
What a layered system looks like in practice
Picture a guest named Walter, who uses a basic phone and does not read email. He receives the envelope, reads the wedding details insert at the table and puts it on the refrigerator. A week before the wedding his daughter phones the contact number to ask about parking, gets a clear answer and writes it on the wedding details insert. On the day Walter follows the signs, parks in the overflow lot, and walks in on time. A screen was never required, and no one had to explain anything twice.
Now picture Priya, who uses her phone for everything. She scans the code, sees the same facts in the same words, adds the date to her calendar, and looks at the registry. She never touched the card after the first glance. Both guests are well served by the same design because the wedding details insert and the page say the same thing.
That is the aim of the layered approach. It does not give some guests a worse experience. It gives every guest a route that fits them.
A worked example: one wedding details insert from review to mailbox
The following example is invented to show the method end to end. The couple, the venue and the numbers are made up, and the choices are illustrations rather than recommendations for any real place.
Imagine Maren and Tobias, who are marrying at a converted farm venue forty minutes from the nearest town. They have ninety-six households on the list. They first built a one-page website and a code for the invitation, and then looked at their guest list with the household check from earlier in this guide.
Five households stood out. Maren’s grandmother uses a basic phone. Tobias’s uncle has low vision and uses a magnifier. A pair of family friends are driving in from a mountain town and will lose signal on the last stretch. Two cousins avoid scanning codes. A neighbor’s family reads Spanish more comfortably than English. None of these facts was surprising once they were written down.

Pass one and two: the list and the tiers
The couple listed twenty-two facts. They put eleven in tier one: date, ceremony time, seating time, venue name, street address, the gate to use, parking and overflow, dress and weather plan, reply deadline, hotel block deadline and the contact numbers. They put six in tier two, including the shuttle timetable and the detailed hotel list. They put five in tier three: registry, photo page, song requests, the story of how they met and a map of local restaurants.
They found one tension. The shuttle timetable was long, with four pickups and four returns. It had drifted to tier two because of its length. After talking it through they moved it back to tier one, because a guest who misses the shuttle misses the ceremony, and they cut it down to the two pickup times and the last return, which fit in four lines.
Pass three: doors
They built a one-page sheet with each tier-one fact and its doors. Date and address had the card, the invitation and a person. Parking had the wedding details insert, a sign and a volunteer. The shuttle had the card, a printed copy at the hotel desk and a person. The reply deadline had the wedding details insert, the reply card and a phone reply option.
The sheet showed one empty cell: the weather plan had only the wedding details insert. The couple added a person door by asking their coordinator to call the two households without smartphones if the plan changed, and a mailed note as a backup if the change came more than a week ahead.
Pass four: the tests
They printed the draft at actual size and ran the four tests. The glovebox test caught a pale gray gold heading that vanished under a dome light, so they switched the headings to a deep green. The cold-read test caught a gap: the reader said she would park in the barn lot and walk, but the wedding details insert did not say that the lot filled early. They added a line about overflow. The squint test showed that the dress and weather block ran into the parking block, so they added space and a rule between them. The photocopy test passed after the color change.
Tobias’s uncle looked at a large-print proof and suggested larger numerals for the phone numbers and a clearer break between the two names. They made both changes and adopted a policy of offering large-print copies on request, with eight spare copies printed on plain white paper.
The printer handoff and postage check
The couple sent the printer a one-page brief listing the wedding details insert size, stock, quantity and approver, with the tier-one sheet attached. They ordered a modest overage beyond the household count for replacements, for the coordinator and the hotel desk, and for large-print and Spanish copies. A fluent friend checked the Spanish translation against the English, and a second reader checked the numbers.
They assembled a sample envelope with the invitation, the wedding details insert, a reply card, a reply envelope and the Spanish card, and took it to the post office to be weighed and measured before the run was approved. The clerk’s answer set the postage for the whole mailing, and the couple noted the date and the answer in their file. They did not rely on any rate they had read months earlier.
The code
They kept a code, but only for the registry and photo page. It was labeled “Registry and photos,” and the web address was printed under it in plain text. The page repeated the tier-one facts in the same words as the wedding details insert, and an offline copy of the page was saved to their files.
After mailing
Three weeks after mailing, they called the households without replies, starting with the five they had flagged. Maren’s grandmother had put the wedding details insert on her refrigerator on day two. The mountain friends asked about the last stretch without signal, and the couple told them to download the route before leaving town and gave them the landmark on the wedding details insert. The neighbor’s family returned a reply card with a note of thanks for the Spanish copy.
Two months before the wedding the shuttle company moved one pickup by ten minutes. The couple checked their sheet: the shuttle had a card door, a hotel-desk door and a person door. They mailed a short plain correction card to the households who rely on paper, texted the others, replaced the sheet at the hotel desk and told the contact person. A guest who had already pinned the old card to the refrigerator got a new card within the week.
The result was not dramatic. Nobody sent a thank-you note for the access-alternative review. But the phone rang less than it might have, the guests without smartphones arrived on time, and the couple spent the final week on other things.
What the example shows
Three habits did most of the work. The couple tested the card on other people. They kept the wedding details insert and the website in agreement. And they treated a change after printing as a communication task with several doors, not a one-line text. None of the steps required money beyond a small amount of printing and postage; they required a few evenings and a willingness to be told the wedding details insert was unclear.
Edge cases and when the card needs more
Not every wedding fits the plain model. These cases show how the review adapts.
A destination or multi-day wedding. A wedding with several events may need a longer card or a folded schedule. Keep tier-one facts for each event on one side, and keep travel information separate. Do not fold the whole itinerary into small type. Two readable inserts beat one that needs a magnifier.
A venue with no signal and no Wi-Fi. Say so on the card. Guests who know in advance can download directions, take the wedding details insert and plan. A venue with no coverage also makes the on-the-day contact number harder to use, so name a landline at the venue or a person at the entrance who can help.
Guests who travel from abroad. Spell out the date, include the country-code form of the contact number, and give times in the local time zone with the zone named. Note that a local mobile number may not work from abroad and give an alternative, such as a number that accepts calls from overseas, if you have one.
Guests with sensory or cognitive disabilities. Some guests may prefer a plain text version, a recorded phone message, or a conversation. Keep the offer open and respond to the guest’s lead. Do not guess what someone needs. The card is a starting point, not a final answer.
A tight budget. Cut elsewhere before cutting the wedding details insert. A folded single sheet printed on a home or office printer can meet the standard if it is legible and accurate. The test is whether the facts are complete and readable, not whether the paper is expensive.
A small wedding. If you are inviting twenty people, you may not need a printed card at all. A phone call and a hand-written note may do the same job more warmly. The review still applies: list the facts, find the doors, and check that each guest has a route that works for them.
A late change of venue. If the venue changes after the card is mailed, treat it as an emergency. Call the guests without screens first, then mail a card, then send messages to the rest. The facts that matter most are the new address and the new start time.
Limits of this approach and what to verify
This guide offers a method, not a guarantee. A good card reduces confusion; it does not remove it. Some guests will lose the wedding details insert, some will not read it, and some will call anyway. That is normal.
It also cannot decide local facts for you. Postal rules, including size, weight, shape and the postage for each, belong to the Postal Service, and you should confirm the current version with the issuing agency or a post office clerk before you print. Printer terms, proof policies and reprint charges belong to your printer and should be confirmed in writing. Venue policies on signs, maps and reuse of site images belong to the venue. Hotel block terms belong to the hotel. Accessibility obligations and guidance for public venues are set by official agencies, and a venue’s own accessibility statement is a better source than assumptions.
Be careful with claims about what percentage of guests have smartphones or prefer paper. Those numbers vary by age, region and year, and a figure from a survey may not describe your guests. Use your own list as your evidence. The household check is more reliable than any national average.
Finally, the guest information you collect while doing the review is personal. Keep it in a private file, use it only to help the guest, and delete notes you no longer need after the wedding.
Your next steps
Work through these in order, over about a week.
- Write your tier-one fact list tonight, with every fact a guest needs to attend.
- Mark the households you would phone rather than text, and ask each, kindly, what format they prefer.
- Assign two doors to each tier-one fact, with at least one that is not a screen, and note the empty cells.
- Draft the wedding details insert in plain language, with headings and a contact block that carries two named phone numbers.
- Run the glovebox, cold-read, squint and photocopy tests with three people who are not you.
- Prepare a large-print copy, and a translated copy if your guest list calls for one.
- Build a sample envelope with every enclosure and have the post office weigh and measure it before you approve the print run.
- Decide who answers the phone before the wedding and on the day, and brief them.
- Set up a list of households that receive updates by mail, with a template for a plain correction card.
- Keep any code as a labeled extra, with the web address printed beside it, and make the page repeat the card.
FAQ
Do I really need a printed details card if I have a wedding website?
If you want every guest to arrive informed, yes. A website serves guests who have a device, a connection and the habit of using it. A printed card serves the rest, and also serves the first group when their phone fails. The wedding details insert does not need to be long. It needs the essential facts, a phone number and a legible layout, so the website becomes an extra instead of a requirement.
What is the minimum a wedding details insert must include?
The date and day of the week, the start time with a seating time if different, the venue name and full street address, parking or drop-off instructions, the dress code and weather plan, the reply deadline and method, and at least one phone number that a real person answers. Anything beyond that, such as a registry or a photo page, can live online without harming any guest.
Should I still include a QR code?
A code is fine as an optional extra for long or visual content, such as a registry or a gallery. Label it so guests know what it opens, print the web address in plain text beside it, and make sure the page repeats the essential facts from the card. Never place the only copy of the date, address or contact number behind a code.
How big should the type be?
Body text of about twelve to fourteen points is a common minimum for comfortable reading, with the date, time and address set larger. Large-print guidance for people with low vision usually starts around eighteen points. You can offer a large-print copy on request instead of printing every card that way. Test the proof at actual size, in dim light, before you approve it.
How do I ask guests whether they need a different format without being awkward?
Ask an open, kind question that does not mention devices or ability: “Would you like a paper or large-print copy of the details?” Put it in a note on the envelope or in a short call. Guests can answer yes or no without explaining anything. Keep any answers in a private file, and use them only to give that guest what they asked for.
How do I handle a change after the cards are mailed?
Send a short printed correction to households that rely on paper, and message the others. State what changed, from what to what, and which card it replaces. Update the website to match, replace any sheet left at the hotel desk, and tell your phone contacts. Do not rely on a single text, because a guest without a smartphone would miss it entirely.
Will an extra insert raise my postage?
It can, because postal pricing depends on weight, size, shape and thickness. The only reliable check is to assemble one complete sample envelope, with every enclosure, and have it weighed and measured at a post office before you print. Use the heaviest version of your suite for the test, and confirm current rules with the Postal Service, since rates and standards change.
Is a translated card worth the cost?
If guests read another language more comfortably, a translated card is one of the most welcoming things you can include. Keep the same facts in the same order, have a fluent reader check it, and verify that numbers, times and addresses match exactly. You can enclose the translation only with the households that would use it, which keeps the cost small.
Sources
- United States Postal Service
- Domestic Mail Manual, Postal Explorer
- USPS Frequently Asked Questions
- ADA.gov: Americans with Disabilities Act information
- Section508.gov: accessibility and readable documents
- Plain Language Action and Information Network
- Federal Trade Commission: consumer information
- Federal Communications Commission: consumer help
- Cybersecurity and Infrastructure Security Agency