

Nonmachinable postage is the extra First-Class Mail charge that some wedding invitations trigger because of their shape, closure, thickness or address layout, and it is far cheaper to find out before the envelopes are printed than after the stamps are on. This guide gives you a specification checklist and a sample-mail test you can finish in one afternoon, with a worked example and the exact questions to ask your printer and your post office.
Measure the finished, stuffed envelope, not the empty one. Divide its length by its height; a result below 1.3 or above 2.5 means nonmachinable postage under USPS rules. Then check for closures such as buttons, strings and clasps, plastic or non-paper exteriors, lumps and stiff inserts, an address printed parallel to the short side, and thickness above one quarter inch. Build one complete sample, weigh it, take it to your post office for a written or verbal ruling, and mail it to yourself. Only then approve the print run.
Most couples learn about nonmachinable postage in the worst possible place: at the post office counter, holding a box of two hundred sealed and stamped invitations while the clerk explains that every one of them needs more postage. The surcharge is not large per piece, but it is applied to every piece, and the stamps you already bought will not cover it. Square envelopes, ribbon closures, wax seals and a few other pretty choices are the usual causes of nonmachinable postage on invitations.
None of this means you should give up the square envelope or the ribbon. It means you should decide on purpose. A couple who knows their wedding invitation nonmachinable postage cost before ordering can choose to pay it, redesign around it, or move one element to the response card. A couple who finds out at the counter has only the first option, and not much time to weigh it.
A short note on scope. This is general information about mailing wedding invitations, not legal, tax or financial advice, and postal standards and prices change. The article points to the official USPS sources so you can confirm the current rules and amounts yourself before you print.
This guide is deliberately narrow. The broader job of proofing, quantities and handing files to a printer is covered in the wedding invitation print production guide, and wording, timing and who gets invited belong to the wedding invitation etiquette hub. Here we stay on one question: will this exact envelope, stuffed and addressed the way you plan, travel at the standard letter price or the higher one?
What nonmachinable postage means for wedding invitations
The United States Postal Service sorts most letter-size mail on automated equipment. Machines read the address, apply a barcode and push each piece through a sorting path at speed. A piece that is shaped, closed or built in a way that can jam or misfeed that equipment is classed as nonmachinable. It is still delivered, but it costs more to process, and First-Class Mail letters in that class pay a surcharge on top of the base price.
The word “machinable” sounds technical, but the idea is plain. Picture a flat, uniform, flexible rectangle that slides smoothly between rollers. That is a machinable letter. Now picture a square envelope that the equipment might feed on the wrong edge, or a piece with a button standing proud of the paper, or a stiff acrylic card that will not bend around a roller. Those are the pieces that cause trouble, and the rules were written to catch them.
Wedding invitations run into these rules more than ordinary mail because they are designed to be noticed. Ordinary mail is mostly white rectangles with windows. An invitation suite may have a square envelope, a pocket fold, a ribbon, a vellum wrap, a wax seal, an enclosure card, a tissue liner and a hand-lettered address running up the short side. Every one of those choices is reasonable on its own. Together they can land the piece in the higher price class without anyone noticing.
The surcharge is the point, not the delay
It helps to be clear about what actually happens. A nonmachinable invitation is not refused, slowed to a crawl or marked down in some way. It simply requires additional postage. The standard letter price covers a machinable piece. The nonmachinable postage surcharge is an added amount, listed with the other mailing prices in USPS Notice 123 on the Postal Explorer site. This guide does not quote the amount because prices change on a schedule you should check yourself, and a figure printed here could be out of date by the time you read it.
If the piece is under-stamped, the usual outcomes are that it is returned to you for more postage or delivered to the guest with postage due. Neither is the first impression a couple wants to give. A guest who has to pay to receive an invitation, or who never receives it because it came back, is the real cost. The extra cents are minor by comparison.
Where this fits in the invitation timeline
The nonmachinable postage check belongs before print approval, and ideally before envelope purchase. Envelope size and style are often chosen early, long before the printer is asked to produce the suite. If the envelope itself is the problem, as with a square format, you want to know at the sourcing stage. If the problem is an add-on such as a seal or a wrap, you have until the final proof.
If the problem is the address layout, you have until the guest list file goes to the printer or calligrapher. The wedding vendor timeline is a useful place to anchor these dates, and the check described here takes less than a day once the sample pieces exist.
The letter-size box every invitation has to fit
Before asking whether a piece is machinable, confirm that it is a letter at all. Letter-size pricing applies only inside a defined box of dimensions. Outside it, the piece is priced as a large envelope, often called a flat, which typically costs more than a letter, so compare the current amounts in Notice 123 before assuming it is the cheaper route. This is the first gate.
According to the USPS Domestic Mail Manual, section 101 on First-Class Mail, a letter-size piece must be at least 5 inches long, 3-1/2 inches high and 0.007 inch thick. Pieces more than 6 inches long or more than 4-1/4 inches high need to be at least 0.009 inch thick. At the top end, a letter can be no more than 11-1/2 inches long, 6-1/8 inches high and one quarter inch thick, and it can weigh no more than 3.5 ounces.
Pieces that go over those maximums pay flat-size prices. The manual also requires the piece to be rectangular, with four square corners and parallel opposite sides.

“Length” and “height” have a specific meaning here, and it is worth getting right. Length is the longer dimension of the piece and height is the shorter one. Do not confuse them with your design orientation. A tall portrait invitation envelope that is 5 inches wide and 7 inches tall still has a length of 7 and a height of 5 for the aspect ratio check that follows.
What the limits mean for popular invitation sizes
Most standard invitation envelopes fit comfortably. A common A7 envelope, which holds a five-by-seven-inch card, measures 5-1/4 by 7-1/4 inches. That is inside the box on every dimension. Larger A9 and A10 envelopes also fit on length and height. The trouble begins when a couple moves up to an oversize suite. A six-by-nine-inch invitation needs an envelope more than 6-1/8 inches high, which pushes the whole piece into flat pricing before machinability is even discussed. A seven-inch square envelope is over the height limit for the same reason.
Because of that, the first filter on any oversize idea is the height measurement. If the finished envelope is taller than 6-1/8 inches on its short side, you are in flat territory, and the right questions change from “will this trigger the nonmachinable postage surcharge” to “what will the flat price be across the whole guest list, and does the design justify it?” That is a legitimate decision, but it is a different one, and it deserves a real number rather than a surprise.
Thickness: the quarter-inch ceiling
Thickness is the dimension couples forget. A suite with a heavy invitation card, an insert, a map, an enclosure card, a response card and its envelope, plus a liner, adds up. Each layer of heavy cotton stock or letterpress stock is thicker than office paper, and pocket folders add their own bulk.
If the stuffed envelope is more than one quarter inch thick at its thickest point, the piece leaves the letter class. The checklist later in this guide has you measure the stack with a ruler, and the thickness section explains uneven thickness, which can be a separate problem from total thickness.
Weight is a different gate
Weight and machinability are separate questions. A letter that weighs more than one ounce pays additional postage for each additional ounce, whether or not it is machinable. A heavy suite that is also nonmachinable pays both. The weight section later in this guide separates the two so you can price them independently. For now, the point is only that the 3.5 ounce ceiling for letter pricing is a limit, not a target, and many full-size wedding suites are heavier than they look.
Why the sample-mail test beats guessing
The temptation is to look at the rules, decide your envelope looks fine and move on. Rules written for machines are precise, and invitations are not. A designer sees a ribbon and thinks “decorative.” The postal standard sees a string. A designer sees a charm tucked into the envelope as a keepsake. The standard sees an item that may make the thickness uneven. The checklist and the test in this guide exist to translate between the two views before money is spent.
The test has two parts that do different jobs. The specification checklist is a desk exercise: you compare the written USPS standards to measurements of a real, assembled sample. The sample-mail test is a field exercise: you take that sample to the post office, ask for a ruling, and then actually send one through the mail.
The checklist catches the obvious problems cheaply. The field test catches the ones that depend on how a particular clerk or sorting facility treats your particular design. You need both, because the standard leaves room for judgment on pieces that fall near a line.
Treat the post office answer on nonmachinable postage as important, but not infinite. Window clerks are asked to price an enormous range of mail, and a verbal “that looks fine” for one piece is not a promise about two hundred. A later section explains how to ask the question so that the answer is useful, how to record it, and what to do if you get conflicting answers from two counters.
The aspect ratio check for nonmachinable postage
The single most common cause of nonmachinable postage on wedding invitations is the shape of the envelope. USPS defines a letter as nonmachinable if its aspect ratio, which is the length divided by the height, is below 1.3 or above 2.5. That is a plain division problem, and you can do it with a ruler and a phone calculator before you order a single envelope.
The method has four steps. Measure the longer side of the finished envelope, which is the length. Measure the shorter side, which is the height. Divide the length by the height. Compare the result to the range from 1.3 to 2.5, because that range decides whether nonmachinable postage applies on shape. If the answer falls inside that range, the shape passes this one nonmachinable postage check. If it falls outside, the piece is nonmachinable on shape alone, no matter how plain or well made it is otherwise.
Measure the envelope itself, with the flap closed, and not the card inside. A five-by-seven-inch card in an A7 envelope is not a five-by-seven mailpiece. The mailpiece is the envelope, which is a quarter inch larger on each side. Vendors sometimes list the card size in the product name and the envelope size in smaller type, so check which number you are reading.
Worked ratios for common envelope sizes
The figures below use the nominal sizes that stationery suppliers publish. Real envelopes vary by a fraction of an inch between manufacturers, which matters most for sizes close to a limit, so measure the ones you actually buy.
An A2 envelope, at 4-3/8 by 5-3/4 inches, divides to about 1.31. That passes, but only just. A slight difference in cutting or a thick suite that makes the envelope bow can change the measured number, so an A2 deserves a real measurement rather than a catalog assumption. An A6 envelope, at 4-3/4 by 6-1/2 inches, comes to about 1.37, which passes with a little room.
An A7, at 5-1/4 by 7-1/4, comes to about 1.38. An A9, at 5-3/4 by 8-3/4, comes to about 1.52. An A10, at 6 by 9-1/2, comes to about 1.58. A number ten business envelope, at 4-1/8 by 9-1/2, comes to about 2.30, which passes at the long end.
Now the failures. A six-and-a-half-inch square envelope divides to exactly 1.0, well under 1.3. A five-and-a-half-inch square is the same. Any square envelope fails, and so does any near-square, such as a five-by-six-inch envelope at 1.2. At the other end, a slim envelope that is four inches high and eleven inches long divides to 2.75, over 2.5, and a three-and-a-half by nine-inch envelope divides to about 2.57. Those narrow formats look elegant for menus and programs, and they are fine for table stationery, but they are not friendly to the mail.

Why square and near-square envelopes fail
Postal equipment is built around the assumption that letters have a clear long edge and a clear short edge. The equipment uses the proportions to orient the piece, read the address and handle it in the transport path. A square piece gives the machine no obvious long edge to work with, and it can tumble or feed unpredictably. That is the practical reason the standard sets a lower limit of 1.3 rather than simply requiring “rectangular.”
If you love a square invitation, you have several honest options, and none requires abandoning the design. You can keep the square card and mail it in a standard rectangular outer envelope. You can accept the nonmachinable postage surcharge across the whole guest list and budget for it. You can keep the square for the formal invitation and send the rest of the correspondence, such as save-the-dates, in standard shapes.
Or you can use a square only for hand-delivered invitations, such as the ones for the immediate family and the wedding party. Which of these is right depends on the guest count and on how much the square matters to the overall design, and the cost section later in this guide shows how to put a number on it.
The outer envelope sets the shape
A common source of confusion is the nested suite. The invitation may be a square card in a square inner envelope, all placed in a larger outer envelope. Only the outer envelope is the mailpiece. The inner envelope travels inside and is not subject to the aspect ratio test. So a square inner envelope is a design choice with no postage consequence, while a square outer envelope is a postage decision. If the printer is quoting a “square suite,” ask directly which envelope is the outer one and what its dimensions are.
The same logic applies to the response envelope tucked in with the invitation. It is a separate piece that you are asking guests to mail back to you. If it is square, your guests will meet the problem you avoided, and the stamp you pre-print or pre-stick on it may not cover the nonmachinable postage surcharge. A rectangular reply envelope with a standard ratio avoids that. The wedding RSVP etiquette page explains how couples handle the response card and its postage, and this check is the postal side of the same decision.
Measure the stuffed envelope, not the empty one
The ratio rule uses the dimensions of the finished piece, and an overstuffed envelope is not the same shape as an empty one. A flat suite in a snug envelope keeps its edges square. A thick stack in a tight envelope bulges in the middle, and the envelope may grow a few hundredths of an inch in each direction.
For most ratios that means nothing. For an A2 at 1.31, it might matter. This is another reason the sample has to be assembled with every real component, in the same order the guests will receive them.
Also measure the envelope on a flat surface, with the flap sealed or closed the way it will be mailed. Lay a rigid ruler or a straightedge across the widest point and read it at the edge. Write the measurements down, with the supplier’s size name beside them. When a clerk or a printer later asks what you measured, you will have the numbers rather than a memory.
Rounded corners, die cuts and unusual outlines
The Domestic Mail Manual requires a letter to be rectangular with four square corners and parallel opposite sides. In the manual’s text, the allowance for slightly rounded corners, up to a radius of one eighth inch, is stated for cardstock, card-type pieces, not for envelopes. A standard envelope with a pointed or euro-style flap is very widely mailed and is not usually a concern, because the body of the envelope is still a clean rectangle.
A pocket-style or die-cut outer envelope with a scalloped body edge, a curved top or cut-out shapes is another matter, and it is the kind of design to put in front of a postal clerk as part of the sample test.
If your envelope has any shape that is not a plain rectangle, treat that as a flag to test, not a reason to assume either way. The rule exists because irregular outlines can catch on the machinery, and a clerk who sees your sample can usually tell you quickly whether it is likely to be a problem.
A small tool: the ratio cheat sheet in your head
You do not need to calculate every time. A quick mental test works for most invitation envelopes. If the long side is at least one and a third times the short side, you pass the low end. A seven-inch envelope needs a short side of 5.38 inches or less to pass. If the long side is more than two and a half times the short side, you fail the high end.
For most wedding sizes, the only realistic failure is on the low end, which means squares and near-squares. Keep the exact numbers for the sizes that sit close to the line, and measure those yourself.
One more point about paper and envelopes sold in sets. Some vendors bundle matching envelopes with a suite, and the bundled envelope is sized to look right, not to clear the postal ratio. When the printer says the envelope comes with the package, ask for its exact outer dimensions before you agree, the same way you would ask for the card stock weight. It is one question, it takes a minute, and it settles the shape question for the whole order.
Closures, seals and add-ons that trigger nonmachinable postage
Shape is a number you can calculate, and shape is only one source of nonmachinable postage. Add-ons are judgment calls, and they are where wedding stationery most often gets into trouble. The USPS standard lists several features that make a letter nonmachinable regardless of its ratio, and a few of them describe things couples love: closure devices, plastic or non-paper exteriors, and items that make the thickness uneven.
The manual’s wording for closures is “clasps, strings, buttons, or similar closure devices.” Notice the word “similar.” A button-and-string closure on a pocket envelope is a clear case. So is a ribbon tied around the outside of an envelope, a twine wrap, a metal clasp, a brad or a snap. A bow tied around a suite and then dropped into an outer envelope is a different case, because the outer envelope is what travels. The question to ask is always what is on the outside of the thing the postal service will actually handle.
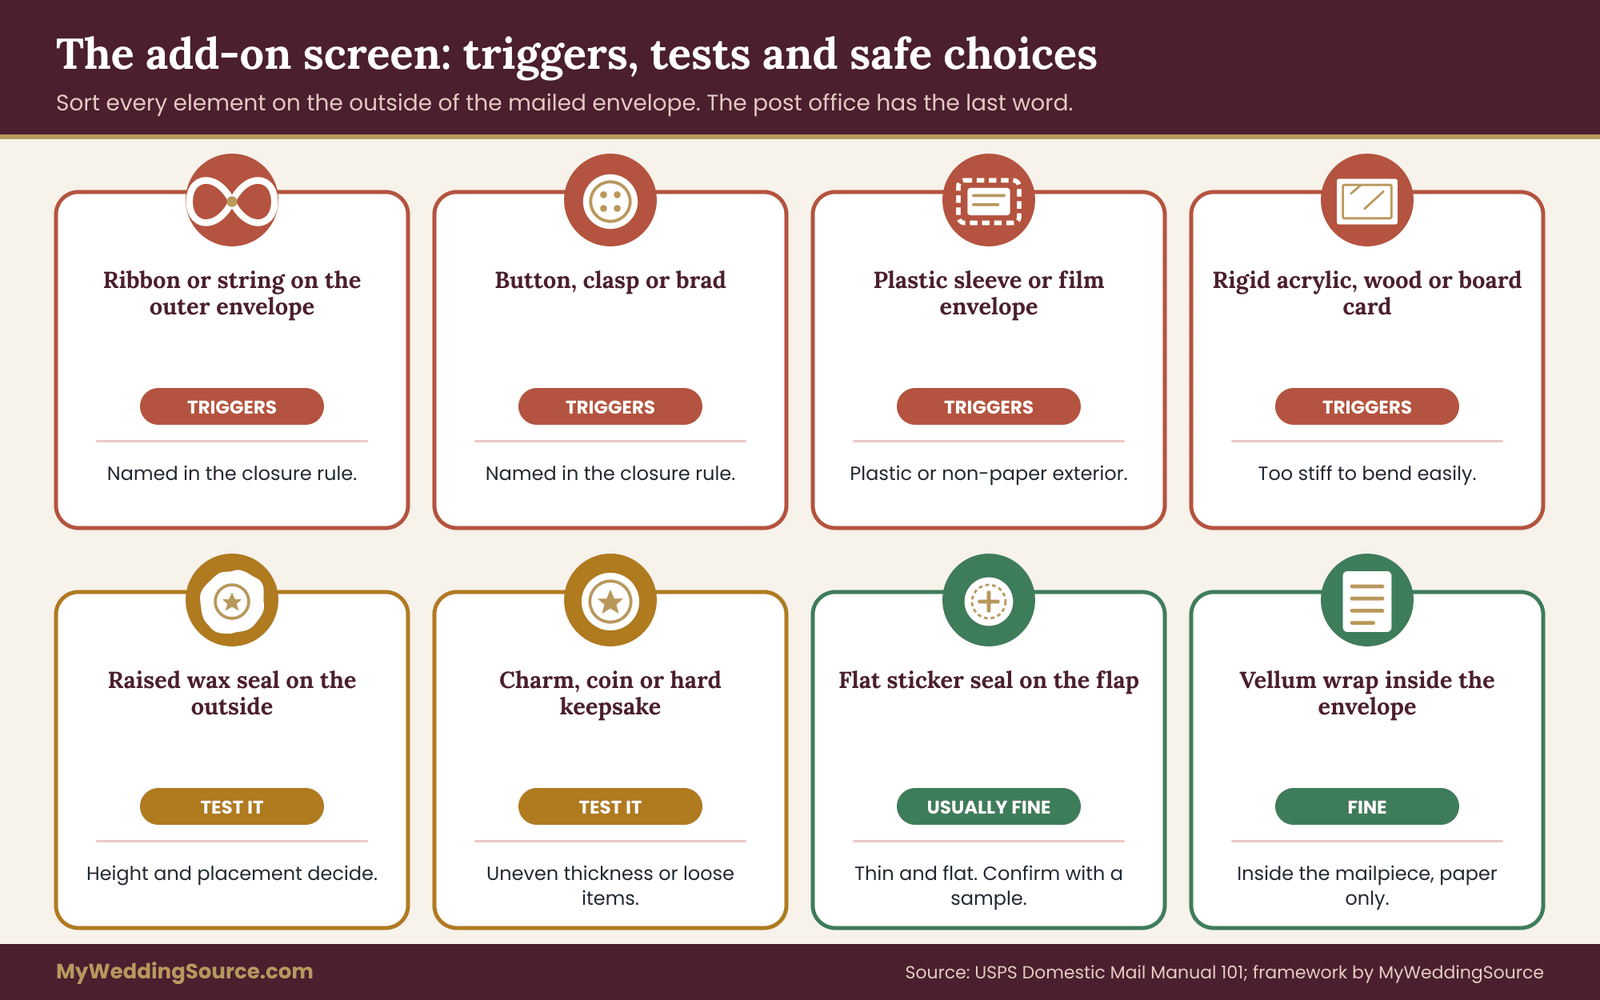
The add-on screen, item by item
Go through the finished design one component at a time and sort each into one of three groups: clearly triggers the nonmachinable postage surcharge, needs a test, or clearly fine. Here is how common wedding elements usually sort, with the caution that the post office has the final word on any piece near a line.
A string, ribbon or cord that closes the outer envelope belongs in the first group. So does a button, a clasp or any hardware used to hold it shut. A plastic outer sleeve, a clear polybag around the suite, a shrink wrap or an acetate envelope belongs there too, because the standard names pieces that are polybagged, polywrapped or enclosed in plastic, and pieces that have a non-paper exterior. Paper envelopes with a plastic or cellophane window are treated differently, because windows in paper envelopes are a normal, accepted feature.
A wax seal on the outside of the envelope belongs in the second group. It is not a string or a button, but a raised, hard, brittle lump on the face or flap of the envelope can make the thickness uneven and can chip or catch in equipment. Whether a given seal counts is something the post office has to look at, and it depends on the size and height of the seal and where it sits.
A thin, flat adhesive seal sticker is a much lower risk than a thick melted-wax dome, and a seal on the inner envelope or on a wrap inside the mailer is not a postal issue at all.
Loose keepsakes belong in the second group as well, and sometimes the first. The standard calls out items such as pens, pencils, keys or coins that make the thickness uneven, and loose keys or coins that are not affixed to the contents. A wedding favor tucked into the envelope, such as a pressed flower, a small charm, a packet of seeds, a lavender sprig or a coin, can fall under this language.
Flat, light items that lie evenly within the suite, such as a pressed leaf in a card, are different from hard objects that stand up from the paper.
Confetti, glitter and loose paper punches are worth a separate note. They are not named in the standard, but they shed, and they can end up inside the equipment or scatter on the guest’s table. They also leave a mess on the person who opens the envelope. Most printers advise against them for that reason alone.
Plastic, vellum and what counts as paper
Vellum has a complication. Translucent vellum is a paper product, and a vellum wrap or jacket inside an envelope has no postal consequence. A vellum outer envelope is different from an acetate or plastic one. Ask the supplier whether a given translucent envelope is paper or film, because some products sold under pretty names are film. A film envelope falls under the non-paper exterior language. If the supplier cannot say, or the answer is vague, make the sample with the real product and let the post office judge it.
Metallic and foil finishes are usually applied to paper, and they are not a postal issue by themselves, though a heavy foil layer can make an envelope stiffer. Pearl and shimmer papers are also paper. The nonmachinable postage rule is not about glamour. It is about whether the material is paper, whether it flexes, and whether anything protrudes.
Rigid and heavy elements
The next category is rigidity. The Domestic Mail Manual makes a letter nonmachinable if it is too rigid to bend easily around a curve under tension, and the text describes the test in terms of belt tension around an 11-inch diameter turn. You cannot replicate that at your kitchen table, and you do not need to. The practical sign of a rigid piece is that it does not flex when you press the middle of it with your thumb while holding the ends.
Acrylic invitations, wood veneer cards, thick board-mounted pieces, and invitations on thin metal sheets are the classic examples. A stack of heavy cotton cards in a pocket fold may also be stiffer than expected.
Rigidity is easy to miss because it does not change the measurements. Two envelopes of the same size can behave very differently, depending on what is inside. If the suite is stiff, a rigid insert such as a chipboard backer, a mounted card or an acrylic panel is the likeliest reason. A common and inexpensive fix is to ship the stiff piece separately from the rest or to substitute a thinner version for the mailed copies, keeping the acrylic version for the couple and the family.
Thickness and lumps
Thickness has two parts. The first is the overall ceiling, one quarter inch for a letter. The second is evenness. The standard speaks of items that make the thickness uneven. A suite that is a quarter inch thick across its entire face is a thick letter but a letter. A suite that is an eighth of an inch thick at one end and a quarter inch thick at the other, because a lump of hard material sits in one corner, is a candidate for the surcharge. Machines stack, grip and feed pieces expecting even thickness.
To check, put the sealed sample flat on a table and press a ruler across it at several points. Look for gaps beneath the ruler. A small gap that grows toward one end means a lump or a wedge. Then measure the thickest point with the ruler or, better, a pair of calipers, which are inexpensive and give you a number to write down. Also run your hand along the outside. If you can feel a distinct hard bump, so can a machine.
Layers of paper stack more than most people expect. A heavy invitation card, a layered backing, a belly band, an insert card, a map, a response card in its envelope and a liner can add up to a stack that is near the quarter inch ceiling on its own. If the measurement is close, remove one component for the sample and see how much you gain. Often an enclosure card or a second insert can be merged into the invitation, or moved to the wedding website, which is easier to update anyway.
Too thin is also a problem
The manual also sets a minimum thickness of 0.009 inch for pieces more than 6 inches long or more than 4-1/4 inches high, so a very thin, light piece in a large format may be nonmachinable too. This rarely affects a stuffed invitation, but it can affect a flat, single-sheet announcement, a folded self-mailer or a lightweight save-the-date mailed without an envelope. Self-mailers and booklets have their own preparation rules in the manual, and a piece mailed that way should be reviewed with the post office using the same sample test.
What about the flap and the glue?
Envelope flaps and glue are an easy source of worry that rarely matters. A standard gummed flap, a peel-and-seal strip or a plain adhesive closure is the normal way to close a letter and is not a closure device in the sense of the rule. The issue is hardware and cord, not adhesive. What does matter is that the piece stays shut. A flap that pops open in the sorting equipment is a risk to your invitation, whatever the postal class, so use a dependable closure and press it down along its full length.
If you are using a decorative seal sticker, keep it small, flat and positioned on the flap, not along the edge where the machinery grips. And if the plan involves an outer wrapper tied with something, consider moving the ribbon inside, onto the invitation or the inner envelope. The guest still gets the ribbon when they open it, and the mailpiece is a plain paper envelope. That small change keeps most of the look and takes the closure out of the postal question entirely.
Address placement and the nonmachinable postage rule
One item on the USPS nonmachinable list has nothing to do with the envelope itself. A letter is nonmachinable if it “has a delivery address parallel to the shorter dimension of the mailpiece.” In everyday terms, the lines of the address should run along the long side of the envelope. If the lines run up the short side, you have a nonmachinable piece, even if the envelope is a perfect A7 with no embellishment at all.
This catches wedding stationery in a way that is easy to miss, because invitation designers often rotate things on purpose. A vertical, portrait-style envelope that opens along its short edge may seem natural to address the way you would a book cover, with the lines reading across the narrow dimension. A calligrapher may turn the envelope to fit a long guest name. A mail merge template may be built in the wrong orientation for the paper. The result looks beautiful and prices as nonmachinable postage.
Reading orientation correctly
Lay the envelope on the table with the flap side facing down and the address side facing you. Find the long side. The address lines should be parallel to that long side, which means you read them left to right along the length. The return address and the stamp sit at the usual positions, with the stamp in the upper right corner as you look at the address side.
If you turn the envelope so that the short side runs along the bottom and the address now reads vertically, the address is parallel to the short side and fails the check.
For envelopes with the flap on the short end, sometimes called a “wallet” or “booklet” style, the address needs the same care. Booklet-style envelopes open on the short side, and many designers treat that as the top. If the address is arranged to read with the opening at the top, the lines run across the short dimension and the piece is nonmachinable. The fix is to address it along the long side, even if that means the flap is on the left or right when you read the address.

Keeping the address area clean
Address orientation is one factor. Legibility is another, though it is not on the nonmachinable list. Automated equipment reads the address with optical scanning, and that works best when the address is dark ink on a light, plain background, in a clear area with nothing printed behind it. Dark envelope colors with metallic or white ink, patterned liners showing through a thin envelope, decorative borders crowding the address block and swirling script all make reading harder.
A piece that cannot be read by machine may be diverted to hand processing, and the delay can add days to delivery.
Some designs address the invitation in white or metallic ink on a dark envelope. It can be done well, but it needs testing, because contrast under scanning light is not the same as contrast to your eye. Make the test envelope, address it the way it will be done on the real ones and ask the post office whether they have concerns. The USPS Postal Explorer site also publishes address formatting standards, and the usps.com address tools let you standardize each guest address, which reduces both delivery trouble and returned mail.
Printed versus handwritten addresses
Both are acceptable to the mail system and neither adds nonmachinable postage by itself, provided they are clear and correctly oriented. Calligraphy is often slower and more expensive than printing, and it is also the point where a rotated or oddly spaced address most often appears, because the artist is composing a design.
If you are using a calligrapher, give them the orientation rule in writing before they start, along with a sample envelope showing the right position of the address block, the return address and the stamp area. Ask them to send a photo of the first finished envelope before they do the rest.
If your printer does digital address printing from a spreadsheet, the file is where mistakes get repeated two hundred times. Check one proof on the actual envelope stock, not just on a screen layout, and check that every line of the address runs along the long side. The guest list guide covers building a clean master list, and a household address file with standardized formatting makes this step simpler.
Return address and stamp positions
Put the return address in the upper left of the address side, and leave the upper right corner clear for postage. If you are using a return address stamp or printing the return address on the back flap, the flap placement is common for formal invitations and does not affect machinability, though a return address on the front helps USPS return an undeliverable piece. Whichever you choose, keep it clearly separate from the delivery address and do not let it run along the short side.
How to run the sample-mail test
The specification checklist covers the paper facts about nonmachinable postage. The sample-mail test confirms them with the people who will actually handle the mail. It has six steps, and a couple can finish all of them in a week without any special tools.

Step one: build one complete, final-intent sample
Assemble a sample with every component that will be in the real mailing, in the same order, using the same stock, the same envelope, the same liner, the same seal and the same address layout. Do not use a stand-in for anything that affects thickness, weight, stiffness or surface. If the real stock is not available yet, ask the printer for a mock-up or buy a handful of the real envelopes and cards. A sample made of different paper is a test of different paper.
Ask for two samples if you can. One goes to the post office and stays with them if they want it, and one stays with you as the reference. A third, mailed to yourself, is useful for the delivery check in step six.
Step two: measure and record
Write down the length and height of the sealed envelope, the aspect ratio, the thickest point, and any visible lumps. Take a photo of the front, the back and an edge view. Add the weight, using a kitchen scale that reads in grams or ounces, or the post office’s scale if you have access to it. Put the measurements in one note, along with the supplier name and envelope size code. That note is the record you will refer to when the printer, a clerk or your own memory disagrees.
Step three: run the nonmachinable screen
Go through the list: aspect ratio, closure devices, plastic or non-paper exterior, uneven thickness or loose hard items, rigidity, thickness below 0.009 inch where it applies, and address orientation. Mark each as pass, fail or unsure. Anything unsure goes to the post office. Anything failing goes to the cost step, and then to a design decision.
Step four: ask the post office
Take the sample to the retail counter, preferably at a time when the line is short, and ask a specific question. Do not ask whether the invitation is “okay.” Ask whether the piece, exactly as it is, qualifies as a machinable letter or whether it needs the nonmachinable postage surcharge, and what the total postage would be for one ounce and for the actual weight.
Ask the clerk to note any feature that drove the answer. If the sample is near a line, ask whether a different component would change the result. That is the information you want for the printer.
Some post offices have staff who handle mailpiece design questions more regularly than retail clerks do. USPS also offers support to people who mail in quantity, and larger postal facilities may be able to direct you. The Postal Explorer pages explain the options. If your local counter is unsure, it is reasonable to ask who handles mailpiece design questions.
Step five: write the answer down
Immediately after the conversation, write what you were told, the date, the name or description of the clerk and the location. Take a photo of the sample next to the receipt or the pricing screen if the clerk weighed and priced it. A written note is not a legal ruling, but it is a useful record if a different clerk gives a different answer later and you need to explain what the first one said. It is also what you hand the printer, so that the production decision is based on the same information.
Step six: mail one to yourself
Add the correct postage for what you were told, address the sample to a real address you can check, such as your own or a friend’s, and mail it through a collection box or the counter. Note the dates. When it arrives, inspect it for scuffs, crushed corners, a lifted flap or a seal that has cracked.
You are testing for damage as much as for postage. A piece that arrives intact and without postage due is evidence that the design works. A piece that arrives marked, bent or short on postage tells you what to change while there is still time.
Keep in mind that one successful mailing proves less than it seems. It shows that the piece, on that day, through that route, was processed. It does not prove every route is the same. That is why the written postal answer and the measurements matter at least as much as the mailed copy.
Weight, ounces and the real postage per envelope
Nonmachinable postage and weight are independent, and the postage on a wedding invitation is usually the sum of both. A one-ounce machinable letter pays the base letter price. Each additional ounce adds a fixed amount, and a nonmachinable letter adds the nonmachinable postage surcharge on top. The current figures for all three are in Notice 123 on Postal Explorer. This section is about getting the weight part right, because many suites are heavier than their owners expect, and an accurate weight is what makes the cost estimate in the next section trustworthy.
Weigh the complete sample on a kitchen scale, or on the post office scale, in ounces. Round up to the next whole ounce, because postage steps by the ounce, and a piece that weighs 1.1 ounces pays as a two-ounce piece. If the sample is near a whole-ounce line, such as 0.95 or 1.9, there is a real chance that the printed versions will differ by a little, so test a handful of the finished pieces from the first delivery too.
A difference of a fraction of an ounce across the real envelopes can move a whole batch into the next price step.
Where the weight comes from
Cotton and letterpress cards are dense. A layered invitation with a backing sheet, a printed envelope liner, a response card with its own envelope, a direction card and a thin belly band adds up fast. The envelope itself weighs more than people think, especially lined or heavy-stock envelopes. A few practical points help. The liner and the stock weight of the envelope usually matter more than a single card does. A response card with a pre-addressed envelope is two more pieces. A thick, textured paper weighs more than a smooth paper of the same thickness.
If the total is just over an ounce, small changes can bring it back under. Dropping an enclosure card by moving the information to the wedding website, switching from a lined to an unlined inner envelope, or using a lighter stock for the response card are all changes that preserve the look of the main invitation. If the total is well over, accept that the mailing is a two-ounce mailing and plan for it, rather than making design compromises for a few hundredths of an ounce.
Domestic versus international guests
Everything above applies to domestic mail. International pieces use different prices and, in some cases, different dimensional rules, and the nonmachinable postage surcharge as discussed here is a domestic First-Class Mail concept. If some guests live abroad, ask the post office for the international price of the identical sample, using the actual destination countries.
Rather than guess, make a short list of the guests outside the country and price those pieces separately. For a handful of overseas guests, hand-carrying invitations or sending an electronic version in advance is sometimes a reasonable alternative, though the formal paper piece is still worth sending.
Pricing nonmachinable postage before you order
Once you know whether the sample is machinable and what it weighs, you can price the mailing. The arithmetic is simple, and doing it before ordering gives you something concrete to decide with. Look up the current surcharge in Notice 123, and write it down with the date.
The core formula for nonmachinable postage is the nonmachinable postage surcharge multiplied by the number of pieces that will carry it. If your guest list produces a given number of mailed invitations, count households, not guests, because couples and families usually receive one envelope. Add the response envelopes only if they will carry a surcharge, and if you are pre-stamping them, which is a choice you control. Then add the number of mailings, because a save-the-date, the invitation and a later update each pay separately.
Counting what really gets mailed
People tend to overestimate and underestimate at the same time. They count guests rather than households, so the number looks high. They forget the extra pieces: the invitations sent to vendors who might want one as a keepsake, the spares for corrections, the ones for the officiant and the parents, and the ones that will be returned and re-sent. A sensible count is households plus a small, specific reserve for reprints and replacements. Use the master address list from the guest list guide to count households, and keep that figure fixed through the cost comparison.
Do not use a statistic you found elsewhere for how many invitations “usually” come back. Use your own list and your own risk: if you know several addresses are uncertain, plan a few extra pieces and a correction round. The point of the count is to be honest about your own mailing, not to match an average.
The three-way comparison
Once you have the nonmachinable postage surcharge and the count, you can compare three options without guesswork. Option one is to keep the design and pay. Multiply the surcharge by the number of pieces, and add that to the budget as a line item. Option two is to change the design so that the piece is machinable.
Subtract the nonmachinable postage surcharge saving, and add whatever the change costs, such as a different envelope, a redesign charge or a reprint. Option three is a hybrid: keep the design for some recipients, such as the family and the wedding party, and use the standard version for the rest.
The right answer is often the hybrid, and sometimes the plain redesign, but it is not always cheaper to change. If the nonmachinable postage surcharge across the list is smaller than the cost of re-sourcing envelopes, the honest choice is to pay it and move on. If the nonmachinable postage surcharge is large relative to the stationery budget, a small design change that removes it may be the best value in the whole suite. Put both numbers side by side, and decide on the numbers rather than on a feeling that postage is an annoyance.

What goes in the budget
Postage is one of the line items that couples forget, or lump into “stationery” without breaking it down. Give it its own line, with separate entries for save-the-dates, invitations, response postage and any later mailings. Record the assumptions beside each number: the weight, the machinable status, the date the price was checked and the source. The wedding budget guide explains how to structure the categories, and a separate postage line makes it obvious later if prices change before you mail.
Price changes are a real consideration. USPS adjusts mailing prices on its own schedule, and wedding mailings span months. If you buy stamps early, ask what stamps cover, and confirm whether the stamp you buy is a Forever stamp that stays valid for the one-ounce price, or a stamp with a fixed value that may fall short if prices rise. Additional-ounce and surcharge amounts are paid with extra stamps or by metering, so a plan that relies on a single stamp per envelope is a plan that is only complete for a one-ounce machinable letter.
Stamps, meters and the counter
You have a few practical ways to pay the postage. You can buy stamps at the counter, buy them online, use a postage printing service or use a meter. Each has its own requirements, and a few of them print postage with a barcode that is meant for the right piece class. For a nonmachinable piece, the counter is often the safest way to be sure the right total is applied, at least for the first batch.
If you decide on stamps, bring the sample and the full count, and ask the clerk to confirm the exact stamp combination to put on each. Write it down so a friend or family member helping with stuffing and stamping can follow it without asking.
Some couples want decorative stamps on the invitation. That is fine, as long as the total value of the postage is correct. Mix the stamps to fit the total, and keep them away from the address block. Ask the counter whether hand cancelling is available for your batch, since the clerk will tell you what your local office can do. Hand cancelling is not something to assume.
Response cards, envelopes and the return trip
The reply side deserves the same check, and it is often neglected. A response card mailed back as a postcard has its own size and thickness limits in the manual, and a response card in a reply envelope is a letter like any other. If the reply envelope is a plain, rectangular, standard-ratio piece with the address along the long side, it will be machinable.
If the designer rotated the address or chose a square mini-envelope, the same issues apply, with the added problem that your guests, not you, are the ones who will hit them.
Decide whether to pre-stamp the reply or ask guests to supply the postage. That is an etiquette question as much as a postal one, covered in the RSVP etiquette guide, but the postal fact that matters here is that a pre-stamped reply must carry enough postage for the way it will actually be mailed. A stamp that was right for a standard reply envelope will be short if the reply envelope turns out to be nonmachinable.
Another option is an online RSVP, which sidesteps the reply postage entirely, as long as every guest can reasonably use it. For older relatives who would rather mail a card, a small number of paper replies can be handled as a separate, standard-format item.
A worked example: the Hartley and Mbeki suite
Numbers make this easier to follow, so here is an invented couple, Dana Hartley and Samuel Mbeki, working through the checklist. They are not real people, and the dollar figures below are round placeholders chosen to show the arithmetic. Your own numbers come from Notice 123 and your own quotes.
Dana and Samuel have 118 households on the list. They add 12 pieces for reprints, the officiant, both sets of parents and a few spares, which makes 130 pieces to plan for. Their first design is a square suite in a 5-3/4 inch square outer envelope with a dome of melted wax on the flap, a satin ribbon tied around the inner invitation, a map, a reception card and a response card with a rectangular reply envelope. The address is hand lettered, running up the short side to suit the calligrapher’s layout.
Running the screen
They start with the checklist. The outer envelope is 5.75 by 5.75 inches, so the aspect ratio is 1.0, which is below 1.3. That is a fail on shape alone. The wax seal is raised and hard, so it goes in the “needs a test” group. The ribbon is on the inner invitation, not the outer envelope, so it is not a closure on the mailpiece. The height of 5.75 inches is inside the 6-1/8 inch limit, so the piece stays a letter rather than a flat.
The address runs parallel to the short side, which is a second fail. The stuffed thickness measures about a fifth of an inch at the thickest point with calipers, under the quarter inch ceiling. The complete sample weighs a little under two ounces on the kitchen scale, so they plan for a two-ounce piece.
So the design has two clear nonmachinable postage failures, shape and address orientation, and one open question, the seal. Before going further they note that the address orientation can be fixed at no cost, because the calligrapher has not started. That leaves the shape.
Pricing the options
Suppose, for illustration only, that the surcharge is fifty cents. Option one is to keep the square and pay the nonmachinable postage surcharge on all 130 pieces, which adds sixty-five dollars to the postage line. Option two is to switch to a rectangular outer envelope. Suppose a new set of envelopes with matching liner and a reprint of the outer-envelope elements would cost ninety dollars more than the square ones.
Then switching costs more than paying, and the simple rule is that redesign wins only when the number of pieces exceeds the change cost divided by the nonmachinable postage surcharge. Here that is ninety divided by fifty cents, or 180 pieces. At 130 pieces, they are below that line.
Option three is the hybrid. Twenty-four pieces will be hand delivered to the wedding party and local family, so those can be square with a seal and no postage at all. The other 106 pieces go in a standard rectangular outer envelope, with the square invitation and inner envelope inside, which looks nearly the same on opening. That removes the nonmachinable postage surcharge on all of the mailed pieces. The cost is the rectangular outer envelopes, at a price they can compare to the sixty-five dollars.
The point of the example is the method for nonmachinable postage decisions, not the answer. With different numbers, such as a larger list or a higher surcharge, the result flips. The break-even rule, change cost divided by surcharge, is the shortcut that lets any couple decide in a minute.

What they decide and in what order
Dana and Samuel choose the hybrid. They fix the address orientation first, since it is free. They ask the post office about the wax seal using a real sample, and the clerk says a seal on the inner envelope inside the outer one is no concern, so the seal moves inside and the outer envelope stays plain with a flat adhesive sticker. They weigh a finished sample again, since the outer rectangular envelope adds a little.
It still falls in the two-ounce class, so the estimate holds. They record the answer, mail one to a friend across town, and the sample arrives with no postage due and no damage. Only then do they approve the print run, with the envelope size, the address layout file and the sample photo attached to the order.
Notice what did not happen. Nobody argued about whether square envelopes are nicer. Nobody paid a surcharge by accident. And the decision took three short steps, a screen, a price comparison and a field test, each of which any couple can do.
Talking to your printer and the post office
The checklist is only useful if the information reaches the people who produce and mail the suite. Printers and calligraphers are experienced with stationery design, and many are also familiar with postal rules, but not all, and few will volunteer a problem they did not notice. A short, specific brief avoids the situation in which each side assumes the other checked.
What to tell the printer
Send the printer the measured outer envelope size, the target aspect ratio range and the address orientation rule in writing before design begins, not at proof stage. Ask the printer to confirm whether any element on the outer envelope is a closure device, a raised seal, a plastic or film material or a rigid component. Ask for a physical mock-up with the real stock when the design involves anything that affects thickness or stiffness. And ask whether the quoted price includes the envelopes at the dimensions in the quote.
“Our invitations will be mailed First-Class as letters. Please confirm the outer envelope’s exact dimensions, that the address block runs along the long side, and that nothing on the outside is a string, button, clasp or plastic.”
If the printer is also doing the mailing, such as stuffing, stamping and delivering to the post office, ask who is responsible for postage and the weight and machinability decision. The more handoffs there are, the more likely each party assumes the other has checked. The print production guide covers the handoff documents in more detail, and the postal check belongs on that list. For vendor paperwork in general, the purchase order checklist is a good way to record the specifications you agreed to.
What to ask the post office
Go in with the sample, the measurements and a specific question. Ask whether the sample qualifies as a machinable letter, whether anything on it is likely to be a problem and what the postage would be. Ask what would change the answer. If you are mailing a large batch, ask whether the office has anyone who reviews mailpiece design and whether the answer would be the same at the facility that will process your mail.
“Is this piece, as it is, a machinable letter, or would it need the nonmachinable postage surcharge? If it would, what feature causes it, and what would you change to avoid it?”
If you get an unclear answer, ask politely whether another clerk or a supervisor can take a look. A clerk who is unsure is doing the right thing by checking. And if two counters disagree, take the DMM section number, 101.1, and the sentence from the standard that applies to your piece, and ask which interpretation the local office uses. The goal is not a debate. It is a written record of what the mailing will cost.
When the answer is “maybe”
Some pieces sit near a line, and the honest answer from a clerk is that it depends on how the equipment handles it. In that case, you have two reasonable choices. You can change the design so it is clearly inside the standard, which removes the doubt. Or you can budget for the higher price and treat any saving as a bonus. What you should avoid is relying on an uncertain “probably fine” for the whole run, because the cost of being wrong lands on every piece at once.
If you are close to the event date, favor certainty. A slightly less elaborate envelope that is clearly machinable is better than a decorative one that might trigger returns or postage due in the weeks when guests are deciding whether to attend, book travel and respond.
Edge cases: save-the-dates, self-mailers and special formats
The same screen applies to every mailing in the sequence, but some formats raise their own questions. Treat each mailing as its own piece with its own sample, rather than assuming the invitation result carries over.
A save-the-date mailed as a postcard has its own dimension and thickness limits for card-priced mail, set out in the Domestic Mail Manual, and a card that is too large or too thick is priced as a letter. A save-the-date that is a magnet or a thick board is a different case altogether, because rigidity and thickness both matter. If you want a keepsake magnet, mail it in an envelope that you have sample-tested, and expect the weight and rigidity questions to come up.
A self-mailer, such as a folded card that is closed with a tab or sticker and mailed with no envelope, is subject to its own preparation rules, and the standard lists a self-mailer not prepared to those rules as nonmachinable. If your design is a tri-fold or a bifold announcement, bring the finished sample to the post office and ask about tabbing and closure, because the answer turns on exactly where and how the fold is secured.
Destination weddings and overseas guests add the international question described earlier. Any guest outside the United States needs the international price for the identical sample, and some countries have their own limits on contents and size. Your post office can price a sample to a given country, and for a small number of overseas guests it is worth doing that individually.
Hand-delivered invitations skip postage entirely, and that is a good place for the design you love most. Put the square, the wax, the ribbon and the acrylic in the hands of the people who will receive them in person, and use the standard version for the mail. It lets the elaborate pieces be elaborate without turning the whole list into a surcharge.
Late invitations and corrections, such as a changed venue or a missing guest, are usually mailed as simple cards in plain envelopes. Keep a small stock of plain, standard-ratio envelopes for that purpose. They are cheap, they are machinable and they let you send a replacement quickly without a new sample test.
Mistakes that lead to nonmachinable postage surprises
Most nonmachinable postage surprises fall into a short list of patterns. Knowing them helps you spot a problem in your own design before it costs anything.
The first is measuring the card instead of the envelope. A card size in a product name says nothing about the envelope that carries it. The second is testing an empty envelope and mailing a stuffed one. The third is assuming the supplier’s catalog dimension is exact, which matters for envelopes close to the 1.3 line. The fourth is adding the ribbon, seal or charm at assembly time, after the sample was approved, because someone had a good idea the night before stuffing.
The fifth is rotating the address because it looks better, or because a template was built that way. The sixth is buying stamps for a one-ounce machinable letter and discovering at the counter that the suite weighs more. The seventh is relying on a single “looks fine” from a clerk and not writing down what was said. The eighth is treating the reply envelope as an afterthought. The ninth is leaving the postal check to the last week, when changing envelopes is no longer possible.
Underneath these is one habit that fixes most of them: do the check once, with a real sample, early, and put the result in writing where everyone on the project can find it. That includes whoever helps with stuffing, since a late change by a well-meaning helper is a common way for a tested design to become an untested one.
Mailing day: a short routine
When the printed suites arrive, do not assume they match the sample. Pull several at random and measure and weigh them. Compare them to the sample record. If the envelopes arrived in a slightly different size or the stock feels heavier, you want to know before the whole batch is stamped.
Stuff and stamp one test batch of ten and take it to the counter before doing the rest. Ask the clerk to confirm that the total postage on those matches the plan. This takes a few minutes, and it confirms the whole chain at once: dimensions, weight, class and stamp combination. If it passes, finish the batch. If the clerk finds a problem, you have ten affected pieces rather than two hundred.
Write the addresses and the stamps in the order that makes later checking easy, keep a list of what was mailed on which date, and keep the receipt if you pay at the counter. If anything comes back marked, the record tells you whether the postage was right, and the returned piece usually carries a label that explains the reason. A returned piece is also an address data point, and the guest list file is worth correcting immediately.
Keep a few finished spares until after the RSVP date. They are useful for corrections, for the photographer’s flat lay and for the keepsake box that will matter to you years from now.
Your next steps
Work through these nonmachinable postage steps in order, and keep each result in one note you can share with your printer and anyone helping you mail.
- Measure the outer envelope you plan to use, divide length by height and confirm the result sits between 1.3 and 2.5.
- List every element on the outside of the envelope and mark any string, button, clasp, plastic, raised seal or hard object for testing.
- Check that the address runs along the long side, and give that rule in writing to your printer or calligrapher.
- Assemble one complete sample with the real stock, weigh it and measure its thickest point.
- Take the sample to the post office, ask the specific question, and record the answer, the date and the location.
- Look up the current surcharge in Notice 123, count your households and compare keep, redesign and hybrid options with the break-even rule.
- Mail one sample to yourself, inspect it, and only then approve the print run.
When the postal question is settled, return to the broader production plan in the invitation print production guide and the timing and wording guidance in the invitation etiquette guide.
FAQ
What is nonmachinable postage on a wedding invitation?
It is an added First-Class Mail charge for letters that postal equipment may not handle smoothly. Common triggers are square or very narrow envelopes, strings, buttons or clasps, plastic exteriors, uneven thickness, rigid pieces and an address that runs parallel to the short side. The surcharge is paid on top of the regular letter postage, and the current amount is in USPS Notice 123.
Are square wedding invitation envelopes always nonmachinable?
A square envelope has an aspect ratio of 1.0, and USPS treats a length-to-height ratio below 1.3 as nonmachinable. That applies to the outer envelope that is mailed. A square invitation or inner envelope placed inside a standard rectangular outer envelope has no effect on postage, because only the outer piece travels through the mail.
How do I calculate the aspect ratio of my envelope?
Measure the longer side and the shorter side of the sealed envelope in inches, then divide the longer by the shorter. The result must be between 1.3 and 2.5 to pass this check. An A7 envelope at 5-1/4 by 7-1/4 inches comes to about 1.38, which passes. Measure the envelope you actually bought, since sizes vary slightly between suppliers.
Does a wax seal make an invitation nonmachinable?
USPS does not name wax seals specifically. The rules cover closure devices and items that make the thickness uneven, and a raised, hard seal can raise that question. A flat adhesive seal is less likely to matter. Because the answer depends on the size and placement of the seal, bring a finished sample to your post office and ask.
Does the way I address the envelope affect postage?
Yes. A letter is nonmachinable if its delivery address runs parallel to the shorter dimension. Address the envelope so the lines run along the long side, with the stamp in the upper right and the return address in the upper left. Check calligraphy templates, booklet-style envelopes and mail-merge layouts for this before anything is printed.
Is nonmachinable the same as extra ounce postage?
No. Weight and machinability are separate. A letter over one ounce pays for each additional ounce, whether or not it is machinable, and a nonmachinable letter pays the surcharge in addition. A heavy, square suite can pay both. Weigh the complete sample and check each question separately against the current price list.
Can I just ask the post office instead of doing all this?
Yes, and you should, but go with a finished sample, measurements and a specific question. Counter staff see a wide range of mail, and a vague question gets a vague answer. Write down what you were told, the date and the location, and consider mailing one piece to yourself to confirm the result.
What if my invitation is thicker than a quarter inch?
A letter may be no more than one quarter inch thick. Above that, the piece is priced as a large envelope, which typically costs more than a letter. Check the current amounts in Notice 123. Options include thinning the suite, merging inserts, moving details to the wedding website or accepting the flat price for the whole list.