

Most wedding day accessories fail for boring reasons: a clasp that catches lace, a comb that slides when you laugh, shoes that were fine for twenty minutes and miserable by hour five. This guide treats your jewelry, veil, hair pieces, shoes and wraps as one system, so you can check how they fit together, how they move, and what you will do when one of them lets you down.
Plan wedding day accessories in four passes. First, list everything and decide who owns each item. Second, test every piece against the dress for compatibility: snag, weight, scale, color and skin reaction. Third, run a movement test in full dress, ideally at the final fitting. Fourth, build a backup kit in three tiers (pocket, bag, car) and give one named person charge of it. Anything you cannot test before the day should have a plain, comfortable substitute within reach.
Nobody remembers the earrings you chose. They remember the moment the veil pulled loose during the recessional, or the bride limping in socks by nine o’clock, or the best friend with a sewing kit who saved the day. Accessories are small, so they are planned late, bought separately, and never tested together. That is exactly why they cause so many small emergencies.
The good news is that most of these problems are predictable. They come from the same handful of causes, and a few hours of testing before the wedding catches nearly all of them. This guide walks through the process in the order you would actually do it, with the checks, sample wording and kit lists you can copy.
What counts as wedding day accessories
It helps to define the category, because people use the word loosely. For planning purposes, wedding day accessories are everything you wear, carry or attach that is not the dress or suit itself. Grouping them by how they relate to your body makes the planning clearer.
- Worn on the garment. Belts, sashes, brooches, button covers, detachable sleeves, trains with loops, capes and wraps.
- Worn on the body. Earrings, necklaces, bracelets, watches, anklets and rings.
- Worn in the hair. Veils, combs, pins, headbands, crowns, flowers and hair jewelry.
- Worn on the feet and hands. Shoes, heel protectors, insoles, gloves and tights or stockings.
- Carried. Bouquet, clutch, handkerchief, fan, umbrella and phone.
- Hidden. Undergarments, fashion tape, shapewear and anything that holds the garment in place.
That last group is the most important and the least glamorous. Hidden items decide whether everything else stays where it should. A strapless dress that slips is not an accessory problem, but a missing piece of tape or a wrong bra will cause it.
This guide is for the couple or the person dressing for the wedding, whichever outfit that is. Where it says “the dress,” read it as “the outfit.” A suit has lapel pins, cufflinks, belts, ties, pocket squares and shoes, and the same four tests apply to all of them.
The four tests every one of your wedding day accessories should pass
Instead of choosing items one at a time and hoping, put each accessory through the same four questions. An accessory that passes all four is safe to rely on. One that fails any of them needs a change or a backup.
Test one: compatibility. Does it work with the garment, with your hair and skin, and with the other wedding day accessories? This covers snagging, weight, scale, color, metal tone and any reaction to the material.
Test two: movement. Does it stay put when you move the way you will actually move? Sitting, climbing stairs, hugging twenty people, dancing, getting into a car, using the restroom.
Test three: endurance. Does it stay comfortable across the whole day? A pair of earrings can feel light for an hour and heavy for ten. Shoes, tight bracelets and rings that swell in the heat all fail this test late in the day.
Test four: recovery. If it fails anyway, what is your backup, and how fast can you reach it? Recovery is what separates a funny story from a crisis.
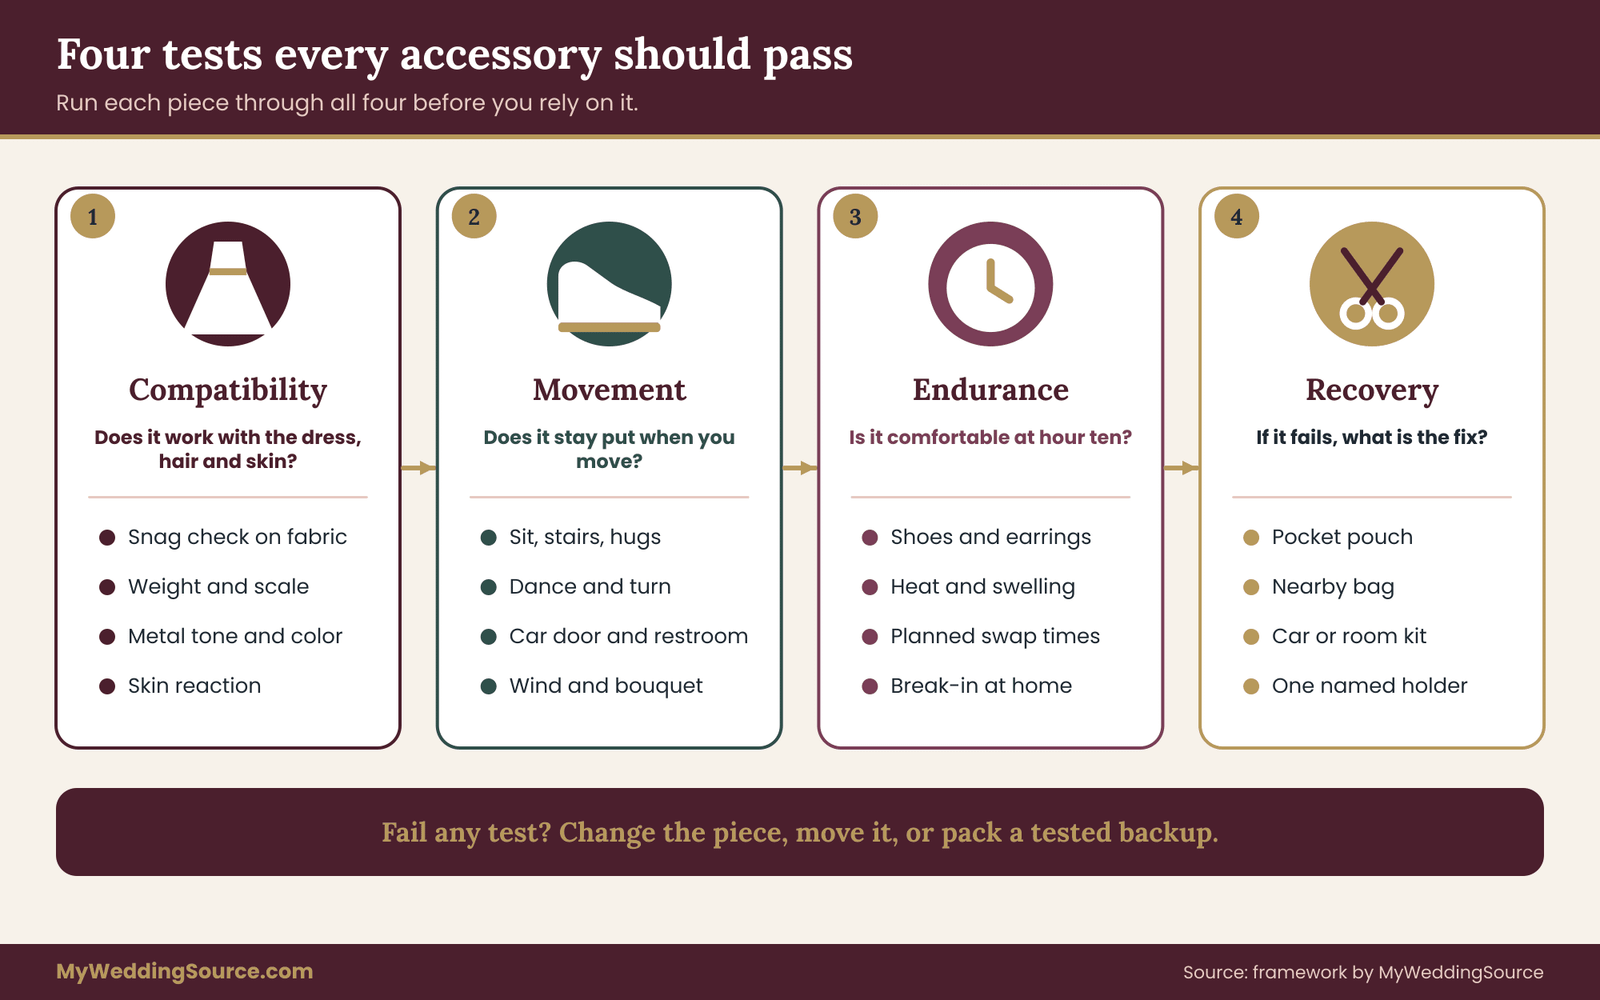
Most couples do the first test informally and skip the rest. Doing all four is not much more work, and the extra testing is where the real protection comes from.
Build one master list of wedding day accessories
The first practical step is a single list of everything you will wear or carry. Write it as a plain document or note that you and one other person can open. It does not need to be elegant. It needs to be complete.
For each item, record the following:
- What it is and a short description, such as “pearl drop earrings, silver-tone posts.”
- Who owns it. Yours, borrowed, rented or a family heirloom. This matters later for insurance and returns.
- Where it comes from and when it arrives, including any return deadline.
- Its test status. Not tested, fitted with the dress, or movement tested.
- Where it lives on the day. On you, in your emergency bag, in the car or with a named person.
- Its backup. A second pair, a simple substitute, or “none, acceptable.”
Keep one list. Couples often end up with three versions across a notes app, a spreadsheet and a screenshot. When something goes missing, you will not know which one is current. If you are already tracking the wedding in a general plan, add the accessory list to it, and cross-check it against your wedding planning checklist so nothing is double-booked.
Decide who holds which wedding day accessories
Assigning a place for each item matters as much as listing it. Many day-of mishaps are not breakage. They are items left in the wrong bag. A strap protector in the hotel room is no help in the church.
A workable pattern has three locations. What you wear stays on you. A small bag holds the items you may need in the first half hour: tape, a spare earring back, a safety pin or two, blister plasters. A larger bag stays with a trusted person and holds the rest. If you have a wedding party, this fits naturally into the roles described in the wedding party coordination checklist.
Photograph all wedding day accessories once
Before the day, take a clear photo of each accessory on a plain background, and one photo of the full set laid out together. The photos help you spot items that clash, confirm that nothing is missing when you pack, and prove what you owned if a rental or insurance question comes up. Store them with the list.
Why one focal point beats five wedding day accessories
Most visual advice about wedding day accessories boils down to a single principle: choose one place where the eye lands, and let everything else support it. This is also a practical rule, because a restrained set has fewer parts that can fail.
If the dress has a detailed neckline, keep the necklace simple or skip it. If the veil is dramatic and heavily embellished, choose plain hair pieces. If the earrings are the statement, the neckline and hair should be quiet. The point is not to follow a fashion rule, but to reduce the number of competing items that need to be adjusted, fastened and protected through the day.
A simple way to apply this is the focal-point check. Lay out the complete outfit, step back, and ask where your eye goes first. If it goes to three places, remove or simplify one.
The trade-off with personal wedding day accessories
Meaningful pieces, such as a grandmother’s brooch or a necklace from your partner, can break the focal-point rule and that is fine. If an item matters to you, plan around it and treat it as the focal point. The other accessories become supporting players. Just remember to give heirlooms more careful handling, which is covered later in this guide. ## Compatibility: how wedding day accessories meet the dress
Compatibility is the first test and the one with the most surprises. An accessory can look perfect on its own and still fight the garment, the hair or the skin. The conflicts fall into a few categories, and each can be checked in minutes once you know to look.
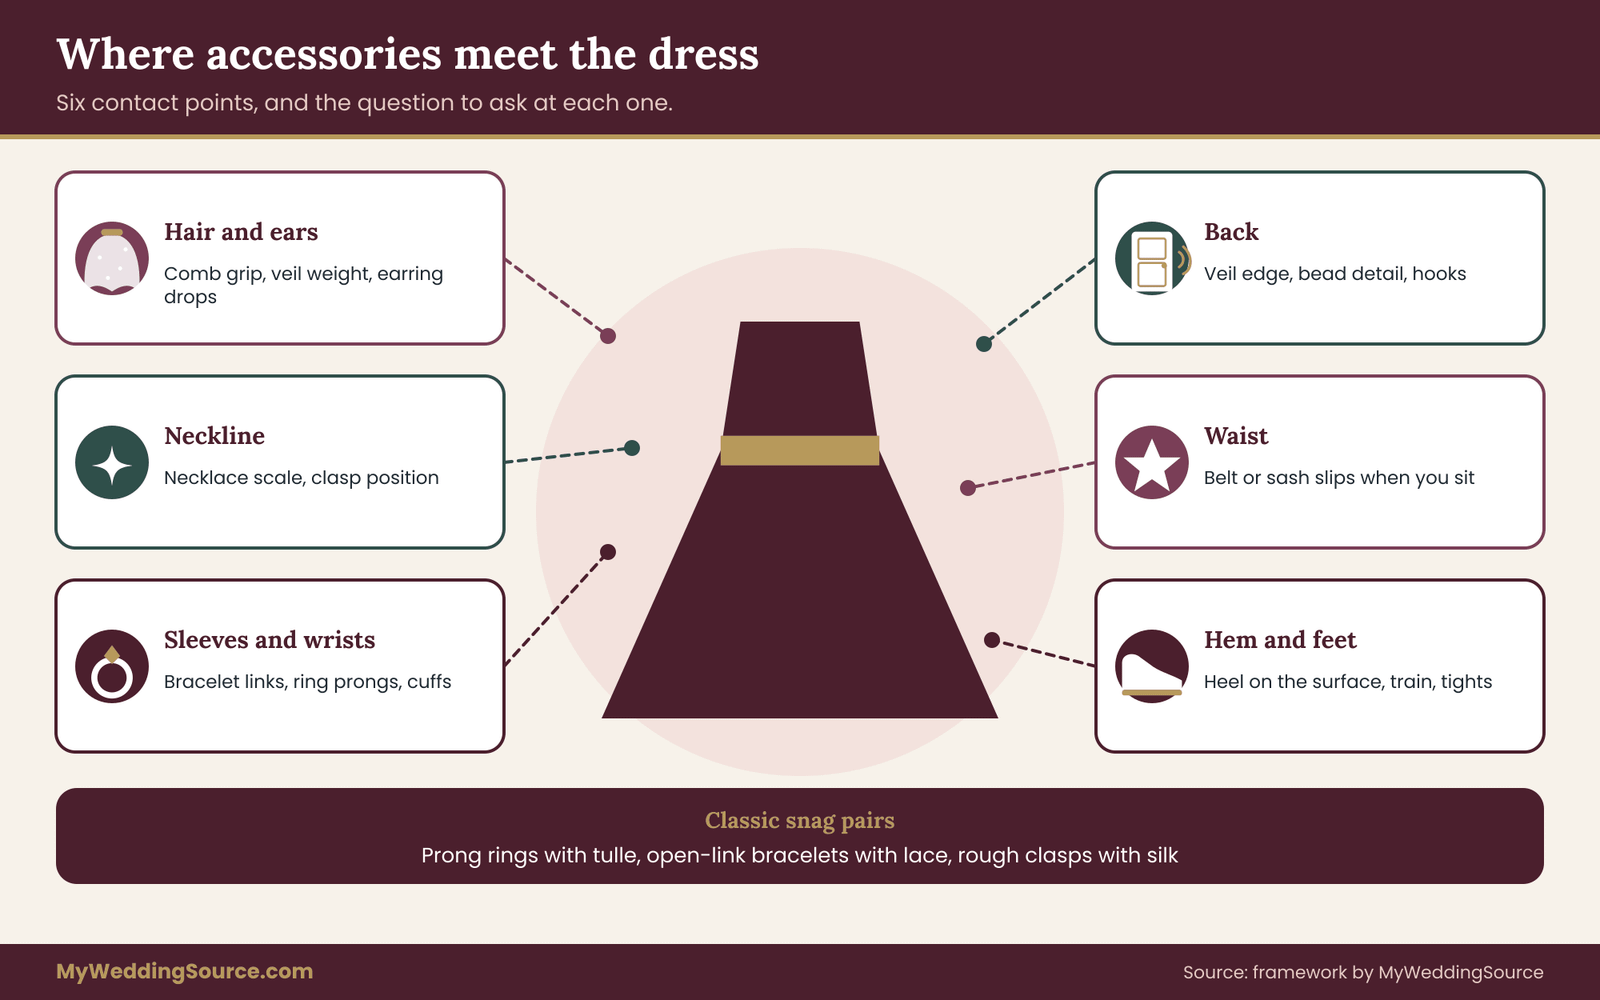
Snag risk: when rough wedding day accessories meet delicate fabric
Fine fabrics catch on anything with an edge. Lace, tulle, chiffon, organza, silk and beaded or sequined fabrics are the usual victims. The things that catch them are usually small: a prong on a ring, a rough clasp, a bracelet with open links, an earring with a sharp post, a hair comb with exposed teeth, or the hook of a bra strap.
To check snag risk, run a simple test. Take each piece of jewelry and drag the clasp, setting or edge gently across a hidden part of the garment, such as an inside seam allowance or a spare piece of the fabric. If the thread pulls, you have your answer. Do not run this test on the visible part of a finished dress, and do not do it without the dressmaker’s permission if the garment is not yet fully paid for.
Typical risky pairings include:
- Prong-set rings or large cocktail rings against tulle or lace, especially when you gather a full skirt in one hand.
- Chunky or open-link bracelets against sleeves, cuffs and lace edging.
- Long dangle earrings against hair, veil netting and high collars.
- Rough pearl-string knots against satin and silk, which can pull a thread.
- Metal hair combs and pins against veil tulle, which can tear when pulled out in a hurry.
If a piece snags, you have three choices: change the piece, change where it sits, or cover the risky part. A bracelet with a smooth, closed design is a simple swap. A ring may be worn on a different hand, or you can cover the setting with a small stretch of fabric when handling the skirt. A bad clasp can be replaced by a jeweler.
Weight and balance in wedding day accessories
Weight shows up late, so it must be tested on purpose. A heavy earring pulls on the earlobe and stretches it during hours of wear. A large hair piece can tilt or give you a headache. A long, heavy necklace swings and slaps against a bodice when you hug someone. A thick belt can dig in once you have eaten.
Weigh anything doubtful. A kitchen or postal scale will do. There is no universal safe number, because comfort depends on the person, but you can compare items against each other and against earrings you already wear for a full day without problems. If a new pair is much heavier than your usual, expect discomfort and plan a lighter swap for the reception.
Scale and proportion across wedding day accessories
Scale means how big an accessory looks against the person and the garment. A delicate necklace disappears against a high, detailed neckline. A chandelier earring can overwhelm a petite face or a short veil. A wide sash can shorten a short torso. A tall crown can clash with a floor-length veil.
The simplest method is to try everything on together and take photos from a few distances: close, half-length and full-length, plus one from behind. Photos often show proportion problems that a mirror hides. If you have a stylist or a seamstress, ask them to look at the photos as well. They may spot a scale mismatch immediately.
Metal tone, color and finish of wedding day accessories
Accessories will look odd together if they use mismatched metal tones or whites that clash. Warm white, ivory, champagne and blush all read differently under different light, and a stark white pearl may look cold against ivory lace. Gold, rose gold, silver and platinum can all work together, but only if the mix looks intentional.
Test colors in the light where you will be photographed. Daylight, candlelight and flash look different. Check the dress, the veil, the hair pieces and the jewelry in daylight near a window, then under the kind of indoor light your venue uses. Take the swatch or the actual piece, not just a photo on a screen, because screens distort color.
A practical rule: let the dress set the white, and then match metal tones to a single family, with at most one deliberate exception. Mixed metals are fine when you repeat them: for example, two silver pieces and two gold pieces arranged on purpose, not a random scatter.
Skin and material reactions to wedding day accessories
Some reactions are not about looks at all. Nickel allergy is common, and it typically causes an itchy rash where the metal touches the skin. According to the Mayo Clinic, earrings and body jewelry are among the most common triggers, alongside rings, bracelets and necklaces, and symptoms usually appear within a couple of days of contact. It can also come from clothing fasteners such as zippers, snaps and bra hooks.
If you know you react to certain metals, choose pieces labeled nickel-free or made of materials you tolerate, and test them on your skin before the wedding. Do not wait until the morning to discover a rash. A reaction that appears two days after the wedding is also a problem if you are about to leave on a honeymoon. If you have never had a reaction, a short skin test of a day or two is still sensible for any new metal you plan to wear for ten hours, particularly earrings.
A few practical points:
- Plated pieces can wear through. Underlying metal may touch skin once the plating thins.
- A clear coat of jeweler’s lacquer on the inside of a ring or on a post can reduce contact, but it wears off and is not a cure.
- Fabric-covered or plastic earring posts are a gentle alternative for sensitive ears.
- If you have a skin condition, ask your dermatologist or doctor for advice before choosing metals.
The Federal Trade Commission publishes guidance on how terms such as “plated” and “gold filled” and descriptions of pearls and gemstones may be used in jewelry marketing. It is a useful reference when you are reading a product description, and a reason to ask a seller for the exact composition if the listing is vague.
Pearls and soft stones among wedding day accessories
Pearls and some soft stones need different care from metal. The Gemological Institute of America advises that hair spray, perfume, cosmetics and perspiration can damage pearls, and that pearls should not be cleaned with ultrasonic or steam cleaners. It recommends wiping cultured pearls with a soft cloth after wear, and making sure any string is fully dry before you put them on.
For the wedding, that points to a clear rule: pearls go on last. Do hair, makeup and fragrance first, let everything dry, and then add pearl jewelry. Wipe them down at the end of the day. Keep them away from heat and strong light for long periods.
Hair and headpiece compatibility with wedding day accessories
A veil is not just a decoration. It is an engineered object that has to attach to hair or a headpiece, stay in place against wind and movement, and come off gracefully. Compatibility here means three things: the hair style provides an anchor, the veil’s weight suits that anchor, and the attachment can be removed without wrecking the hair.
Tell your hairstylist what veil and hair pieces you are using, and bring them to the trial. A style that looks lovely without a veil may offer nothing to attach to. If your veil is long or heavy, your stylist may build a secure base, for instance a braid or a small pinned section, and place the comb into it. If you plan to remove the veil after the ceremony, ask how to do that without unpinning the whole style. Our guide to bridal hair and makeup planning explains how to schedule trials and what to bring.
Also consider the veil against the dress. A cathedral veil with a beaded edge over a lace back may catch. A veil with a rough edge may snag a delicate bodice. Try the veil against the dress at a fitting, and walk around with it while someone watches how it falls.
The dress label and the maker’s advice on wedding day accessories
Care and handling instructions for the garment itself belong to the maker. The Federal Trade Commission’s Care Labeling Rule requires manufacturers and importers of covered clothing to attach a permanent label with care instructions, and it applies to many garments but exempts some items, including shoes, gloves and hats. Check the label inside your dress, and ask the dressmaker or boutique about anything you plan to attach, such as a brooch or a pin. Pins and adhesives can leave marks on silk. Some fabrics should never be pinned in visible places.
If the label says “dry clean only,” do not try to spot-clean marks from wedding day accessories off it yourself. Keep a note of what is on the label, and bring that to the person who will clean the dress after the wedding. The FTC has also published a guide for wedding gown labels that explains the labeling requirements for gowns. ## Movement: testing wedding day accessories in motion
Standing in front of a mirror is the easiest possible test, and it tells you almost nothing about how wedding day accessories behave over a day. Real wear involves bending, sitting, turning, hugging and dancing. The movement test puts everything on at once and asks you to do the things you will actually do.
The best time for this is your final dress fitting, when the garment is finished and the tailor is in the room. If that is not possible, do it at home within a week of the wedding, with someone who can watch and take photos. You need at least thirty minutes, the full outfit, every accessory and the shoes you plan to wear for most of the day.
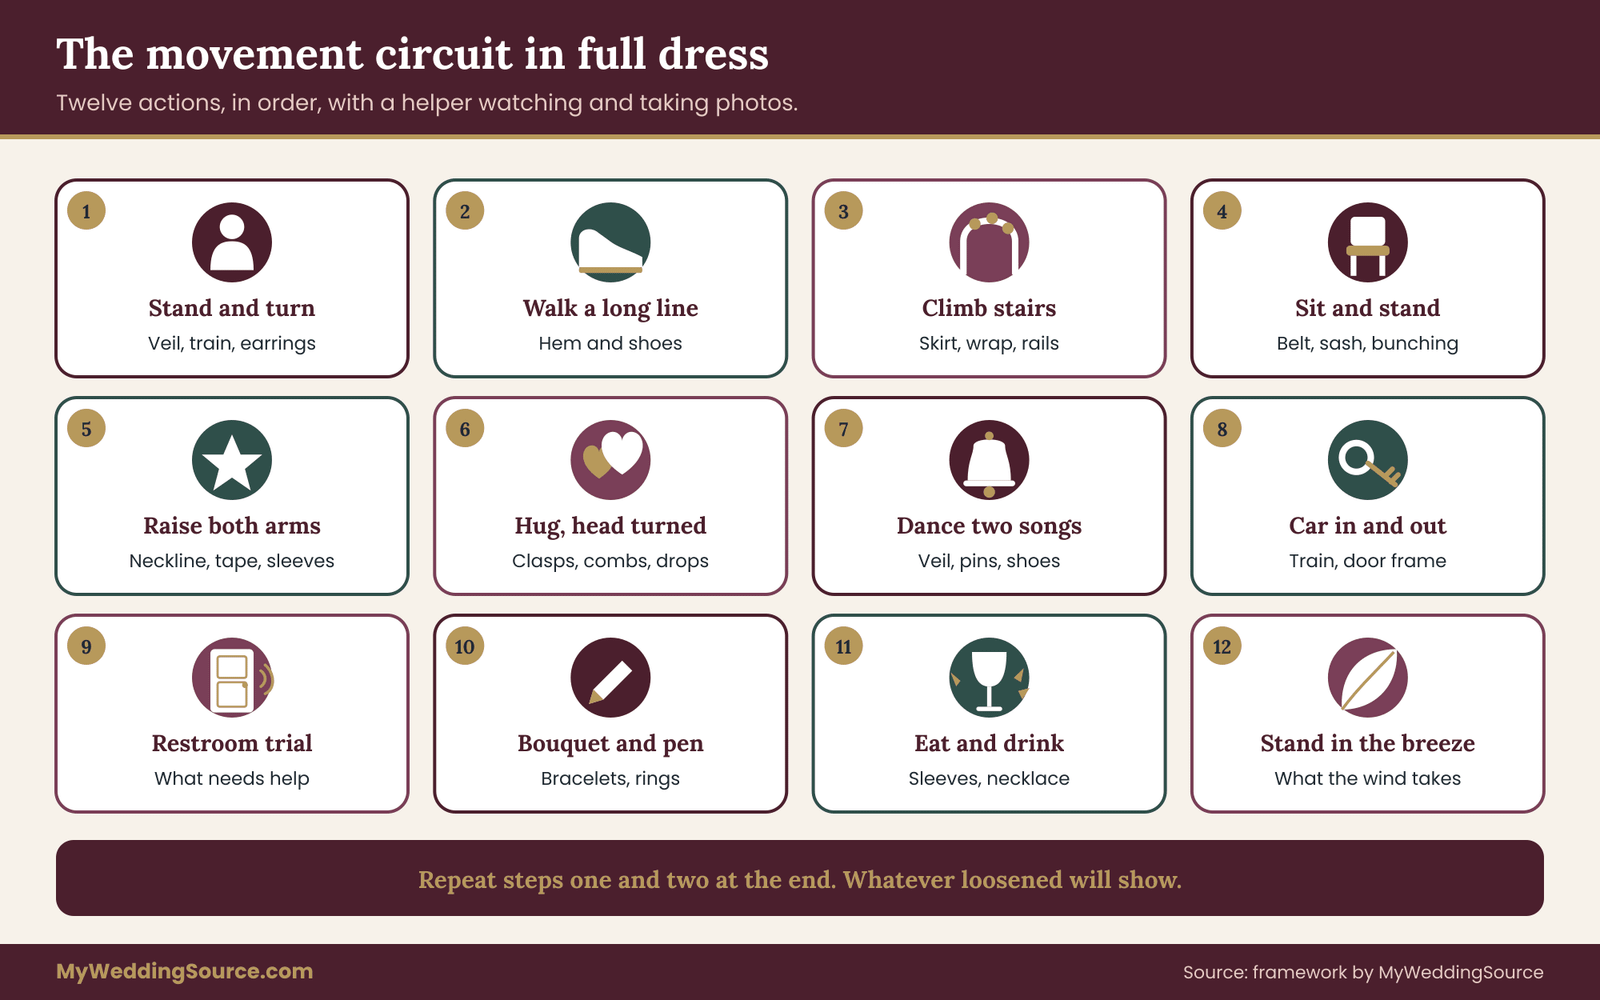
The movement circuit for wedding day accessories
Work through these actions in order. Have your helper note anything that shifts, catches or feels uncomfortable.
- Stand and turn. Slow full turns, then quick turns. Watch the veil, train and long earrings.
- Walk a long line. Fifteen or twenty steps, then back. Notice how the hem, the shoes and any loose layers behave.
- Climb and descend stairs. Use real stairs, not one step. See how you manage the skirt, and whether a veil or wrap catches on a railing.
- Sit and stand three times. In a chair like those at the venue if you can. Check bracelets, belts, sashes and how the dress bunches.
- Raise both arms. As you would for a group cheer or a hug. See whether the neckline, sleeves and necklace move and whether tape holds.
- Hug with the head turned. Hug your helper from each side. This is where earrings, hair combs and necklace clasps get caught.
- Dance for two songs. Including a spin and a dip if you plan them. Notice the veil, flowers in the hair and the shoes.
- Get into and out of a car. Sit, swing your legs, stand. This tests the train, veil and hairpiece against a door frame.
- Use the restroom. Yes, really. See what you can manage alone and what needs help. Note what you would need to remove or hold.
- Hold the bouquet and sign a document. Check bracelets and rings against the flowers and the pen hand.
- Eat and drink. Lift a fork and a glass. See whether sleeves, necklaces and hair pieces interfere.
- Walk outside. If it is windy or damp where you are, even better. Stand in the breeze and watch what the wind takes.
At the end, repeat the first two items. Things loosen over time, and you will see what moved.
Reading the results of your wedding day accessories test
A failure is information, not a reason for panic. When something shifts, ask three questions. Is it a fixing problem, such as a loose pin, a weak clasp or a comb with no grip? Is it a placement problem, such as a bracelet resting where the sleeve ends? Or is it a design problem, such as a veil too heavy for the style you want?
Fixing problems are the easiest to solve. A seamstress can add a hidden loop or a hook, a stylist can adjust the pinning, and a jeweler can replace a clasp. Placement problems can be solved by moving the piece or using tape or a small stitch. Design problems may require a different piece, and that is a good thing to learn two weeks before the wedding, not on the morning.
How specific wedding day accessories tend to behave
The details vary by person and garment, but a few patterns repeat often enough to be worth checking.
Veils and hair pieces. These are tested by head movement. Turn your head sharply, look down, and tilt back. A veil that is secure in a straight-on photo may slip when you hug a tall relative. Ask whether a second comb or a few extra pins are possible. Check how the veil is released after the ceremony, and who will do it.
Earrings. Posts with secure backs hold better than hooks. Heavy drops tug on movement. If you plan to swap earrings between ceremony and reception, pack the second pair in your small bag and tell someone where it is. Always have spare backs.
Necklaces. Long necklaces swing and tangle. Short necklaces sit under high necklines or against a collar and can be pulled by buttons or lace. Check the clasp. Small lobster clasps are more secure than spring rings for many people, but they are fiddly to fasten alone, so someone else may need to help.
Bracelets and watches. These are the main snag culprits on sleeves and skirts. A bracelet that spins on the wrist will keep catching, and a loose one slides over your hand when you reach up. If you wear a smartwatch, consider whether you want it in photos at all.
Rings. Fingers swell with heat, salt and standing. A ring that is snug in the morning can be tight by evening, and a loose one can slip off during hugs. Rings for the ceremony itself have their own rules, including whether gloves must come off, which is discussed below.
Belts and sashes. These move up when you sit and dig in after you eat. A sash with a hidden hook or a few stitches at the back will stay level. A stiff belt may need a notch of give.
Shoes. Heel height, sole grip and width decide comfort. A heel that sinks into grass is a different problem from a heel that slips on a polished floor. If the wedding is outdoors, our outdoor wedding rain plan explains how to prepare for wet ground, and the same thinking applies to shoes: have a plan for the surface you will actually stand on.
Wraps, capes and gloves. These add warmth and can catch on jewelry. Test them on and off, because you will do both several times. If you wear gloves, practice removing the left glove, or the one that holds the ring, with no fuss, and decide who holds it.
Gloves and the ring exchange among wedding day accessories
If gloves are part of the outfit, plan the ring exchange explicitly. Many couples forget that a glove has to come off before a ring can go on. There are several approaches. You can remove the glove during the ceremony and hand it to your maid of honor or someone nearby. You can wear gloves with a small opening at the ring finger, if the style suits. Or you can skip gloves for the ceremony altogether.
Rehearse it. Taking off a tight satin glove while holding a bouquet and keeping your composure takes practice. Talk with your officiant about when the glove will come off, so there is no long pause in front of guests.
Endurance: staying comfortable across the whole day
A wedding day is long. Between hair, photos, ceremony, reception and farewell, wedding day accessories can be on for ten to twelve hours or more. Comfort changes over that time, and what feels fine at noon may not at nine.
Heat makes feet and fingers swell and increases sweat. Cold stiffens fingers and shortens the time you can stay outside without a wrap. Long standing makes shoes tighter. Eating and drinking changes how belts and waistbands feel. Dancing loosens hairstyles and shifts pins.
Plan the swaps for wedding day accessories
The most reliable answer to endurance problems is a planned change of items at a known time. Common swaps include:
- Shoes. Many people change to flat or lower shoes before the reception dance floor. Choose the second pair in advance, break them in, and put them where they can be reached.
- Earrings. Switch from statement earrings to lighter ones for the reception if weight matters.
- Veil. Remove it after the ceremony and photos, or switch to a shorter piece.
- Wrap or jacket. Add one for evening temperatures. Check that it works with the dress sleeves and the jewelry.
- Hair pieces. Take out the heavy ones when the hair starts to tire.
A swap should be a plan, not a reaction. Put it on the timeline. If you are working with a photographer, tell them when the change will happen so they can capture the main look first. Our wedding vendor timeline shows how to fit this into the schedule.
Comfort checks for the body and wedding day accessories
Wear the shoes you intend to dance in for several evenings in the weeks before the wedding, at home and for increasing lengths of time. Do not wear new shoes straight out of the box. Try a thin insole or cushioning pad if you need it, and check that it does not change how the shoe fits. Blister plasters belong in the kit, applied early at the first sign of rubbing, not after the skin breaks.
If you have a medical condition, such as circulation problems, joint problems, or sensitive skin, discuss accessory choices with your doctor. The advice here is general planning guidance, not medical advice.
Weather and wedding day accessories
Wind, rain, cold and heat all affect wedding day accessories differently. Wind lifts veils and loose hair. Rain spots satin and makes heels slip. Cold makes metal jewelry uncomfortable and stiffens fingers, which affects the ring exchange. Heat makes adhesives fail, sweat shifts makeup and tape, and metal warms against skin.
For winter weddings, add warm layers that suit the outfit and plan how you will handle them. Our winter wedding weather plan covers contingency steps for cold-weather dates. For any weather risk, a good approach is to decide in advance which wedding day accessories you will drop or swap if conditions are poor, and write that down. ## Getting dressed: the order that protects your wedding day accessories
Even perfectly chosen pieces can be ruined by the order in which they go on. A perfume spritz on pearls, a necklace on before a dress goes over the head, or a veil pinned before the hair is finished can all create trouble. A written dressing order, even a short one, removes the guesswork when everyone is nervous and the schedule is tight.
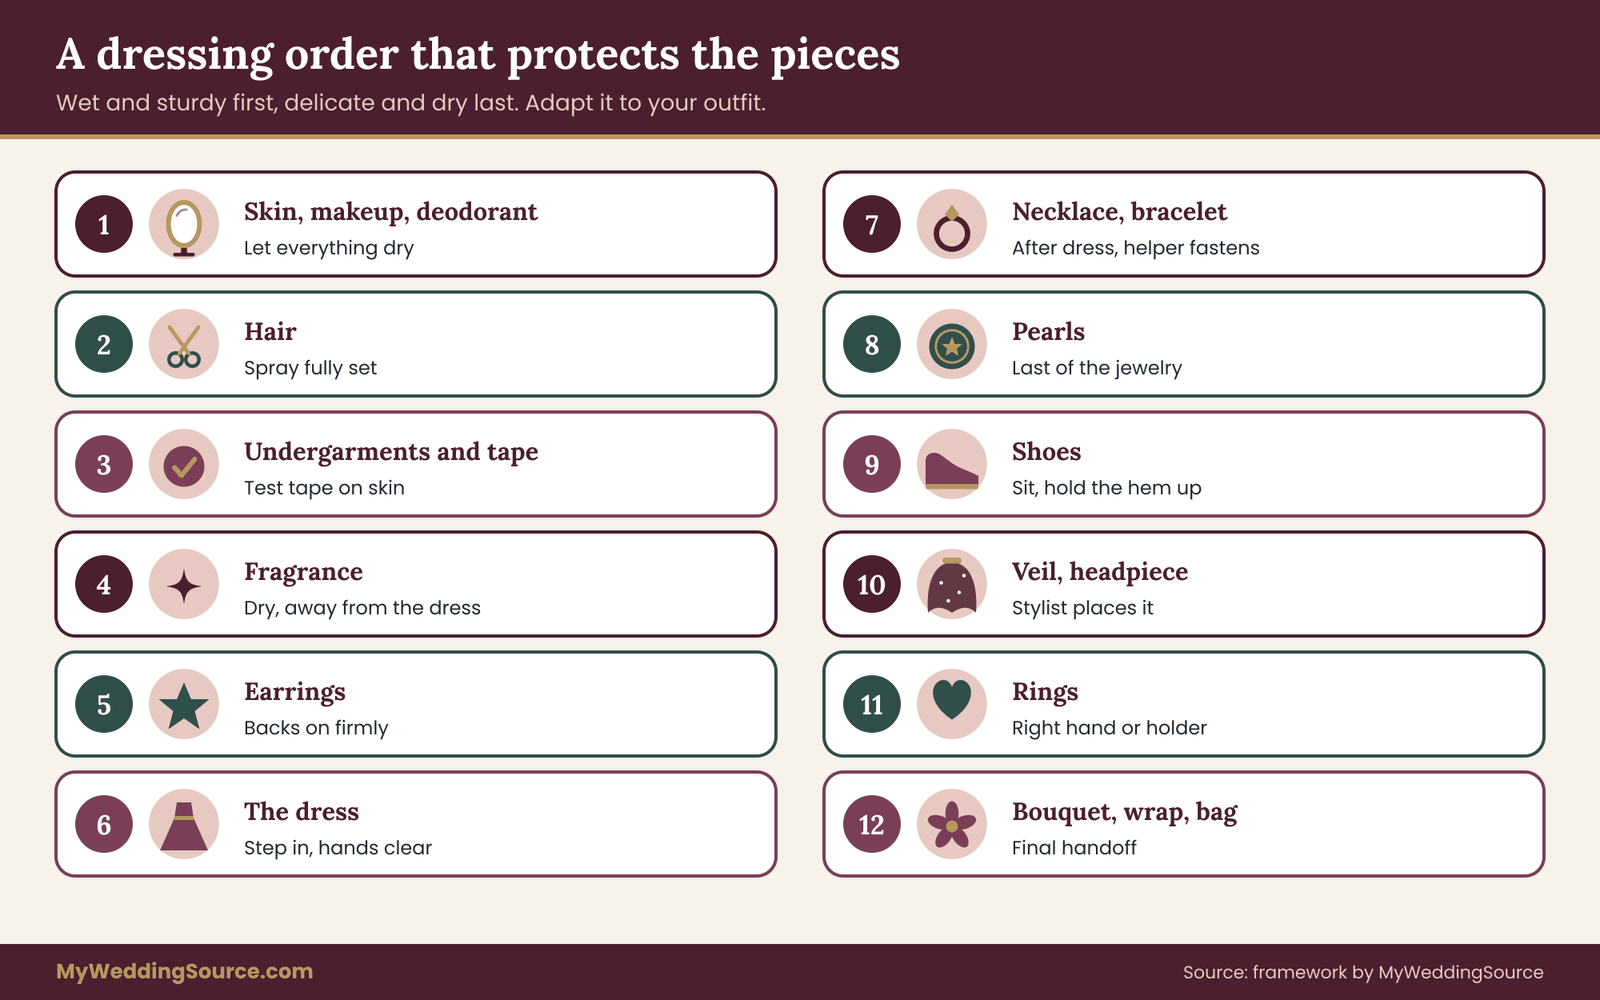
A dressing sequence for wedding day accessories that works for most outfits
Adapt this to your own garment. The principle is to go from the least delicate and most “wet” to the most delicate and most “dry,” and to keep anything that could snag away from anything it could snag until the last moment.
- Skin care, makeup and deodorant. Let everything dry. Lotion and sunscreen can leave marks on fabric, so be sparing near necklines and underarms.
- Hair. Styling comes before anything that goes over the head. Hair spray should be fully set before jewelry goes on.
- Undergarments, shapewear and adhesives. These go on before the dress. Apply fashion tape to clean, dry skin in the places you want it, and test that it holds. Test adhesives on a small patch of skin first, because they can irritate.
- Fragrance. Apply it early and give it time to dry, away from the dress and jewelry.
- Earrings. Many people put these in after hair and makeup, before the dress, so they are not caught by the garment as it goes on. Put the backs on securely.
- The dress. With help, and with hands clear of jewelry that might catch. Step in rather than pull overhead if the design allows.
- Necklace and bracelet. After the dress, so they do not tangle with straps or lace. Someone else fastens a back clasp.
- Pearls. Last of the jewelry, once everything else is dry.
- Shoes. Sit down to put them on, with the hem held clear.
- Veil and headpiece. Last, so the hair is not disturbed. Ask your stylist to place it.
- Rings. On the correct hands, or handed to the person who holds them.
- Bouquet, wrap and small bag. Hand them over at the last step.
Photograph the final look from several angles, and ask your helper to check the back, the hem and the sides. A common slip is a tag, a pin or a bit of tape left visible.
Who helps with wedding day accessories, and how they should be briefed
Dressing takes two or three people at most. More hands usually make it more chaotic. Pick people who are calm and not squeamish, and tell them exactly what you expect. A short briefing makes a difference. Explain which items are delicate, the order, and what to do in an emergency. You might say, “Please do not tug on the lace. Fasten the necklace after I have the dress on. If anything catches, stop and tell me.”
If a hairstylist and a dressmaker are present, agree who does what. Many stylists place the veil themselves. Many boutiques provide a dresser who helps with buttons and trains. Ask in advance, so you know who will be there and for how long.
Buying and checking wedding day accessories
Buying wedding day accessories is a part of planning that people tend to treat casually. Each piece is small, but together they cost money, take time to arrive, and interact with each other. A deliberate approach avoids duplicates, returns and last-minute substitutes.
Set the order and the deadline for wedding day accessories
Work backward from the final fitting. Anything that must be fitted with the dress, such as the veil, the shoes, a belt, a wrap and any jewelry you want checked for snagging, should arrive before that appointment. Allow time for returns and exchanges. Custom pieces, alterations and anything engraved or resized have longer lead times, so order them first. If you do not know a lead time, ask the maker directly and add a margin.
A reasonable pattern is to decide the main pieces early, to have them in hand for the final fitting, and to leave a short window afterward for a swap. Our plan wedding timeline guide can help you place these deadlines among the larger tasks.
Ask about materials and care for wedding day accessories
For any piece you will wear for hours, ask what it is made of and how to care for it. Sellers differ in how clearly they describe materials. If a listing uses terms like “plated,” “filled,” “sterling,” “cultured” or “simulated,” ask what they mean for that item. The Federal Trade Commission’s Jewelry Guides set out how such terms should be used in marketing, which means a reputable seller should be able to explain what the item is made from.
Useful questions include:
- What is the base metal, and what is the plating or finish?
- Is it nickel-free, and how is that determined?
- Are the stones natural, lab-created or simulated, and are they glued or set?
- What is the clasp type, and can it be replaced?
- What are the care instructions, and what damages it?
- What is the return and exchange policy, and is there a deadline?
- If it must be resized or repaired, who does it and how long does it take?
Keep the answers with your master list. If a seller cannot or will not answer, treat that as a reason to look elsewhere.
Compare wedding day accessories on the total, not the sticker
An inexpensive item with a weak clasp, a nickel allergy or a return window that closes before your fitting is not cheap. When comparing options, consider the price, the delivery time, the return terms and any alteration cost. If you are watching your costs, your wedding budget can show how wedding day accessories fit alongside larger items, and where it is sensible to spend more.
Avoid last-minute purchases of wedding day accessories from unknown sources
In the final weeks, couples often buy something on impulse because they have seen a better version. That is fine if there is time to test it. A piece that arrives two days before the wedding, with no chance to check snagging, comfort or return, should be treated as untested, and you should have a backup that is tested.
Borrowed, rented and family pieces
Many people wear something borrowed, and many rent jewelry, headpieces or wraps. These add sentimental value and save money, but they come with obligations.
Agree the terms for borrowed wedding day accessories in writing
If you are borrowing from a friend or relative, a short written note avoids misunderstandings later. It does not have to be formal. It should say what the item is, what condition it is in, who will return it and by when, and what happens if it is damaged or lost. A message exchange works.
If you are renting, read the rental agreement. Look for a damage deposit, fees for cleaning or repair, return deadlines, and whether the item can be altered, pinned or adjusted. Some rental pieces cannot be resized or have restrictions on how they may be worn. Ask what is considered damage, because a small snag may count.
Photograph the condition of wedding day accessories before and after
Take clear photos of the item before you wear it, including any existing flaws. Take photos again when you return it. This protects both sides.
Handle heirloom wedding day accessories with extra care
An heirloom is often irreplaceable, and its value is emotional. Treat it as a high-risk, high-value item. Have it checked by a jeweler for loose stones, weak clasps and worn prongs before the wedding. Decide whether to wear it throughout or only for the ceremony and portraits. Plan where it will be stored when it is not on you, and who is responsible for it. Do not leave it in a bag at the reception unattended.
If the item is valuable, ask your insurance provider whether your existing policy covers it for the day, and what documentation they need. Coverage differs, and you should read the terms for yourself. Our wedding insurance guide explains how event policies work, which is different from insuring a specific piece of jewelry.
Check which wedding day accessories must be returned and when
Put return dates on your timeline. A rental or borrowed piece left in a hotel room after a late night is a common cause of loss. Name one person, not “the wedding party,” as responsible for collecting and returning each item. Add it to the master list with a date. ## Emergency backups for wedding day accessories
A backup plan is not pessimism. It is what lets you stay calm when something small breaks, because you already know what to do. The aim is not to carry a hardware store. It is to match each likely failure with a quick fix that you can reach within a minute or two.
The three-tier kit for wedding day accessories
Think of the kit in three layers, according to how fast you can reach it.
Tier one: on you or within arm’s reach. A tiny pouch, tucked into a clutch, a pocket or the bag of a person standing next to you. It holds things that solve problems in seconds: tape, a few safety pins, spare earring backs, a blister plaster and a tissue.
Tier two: with a named person nearby. A small bag held by someone who stays close during the ceremony and photos. It holds the next level of fixes: a needle and thread in the dress color, a spare pair of flat shoes, a second set of hair pins, mints, wipes and a stain pen.
Tier three: in the car or the getting-ready room. A larger bag or box with spare items that need more time or space: a steamer if the venue allows one, a second pair of tights, a spare strapless solution, extra tape, a mirror and a few tools.
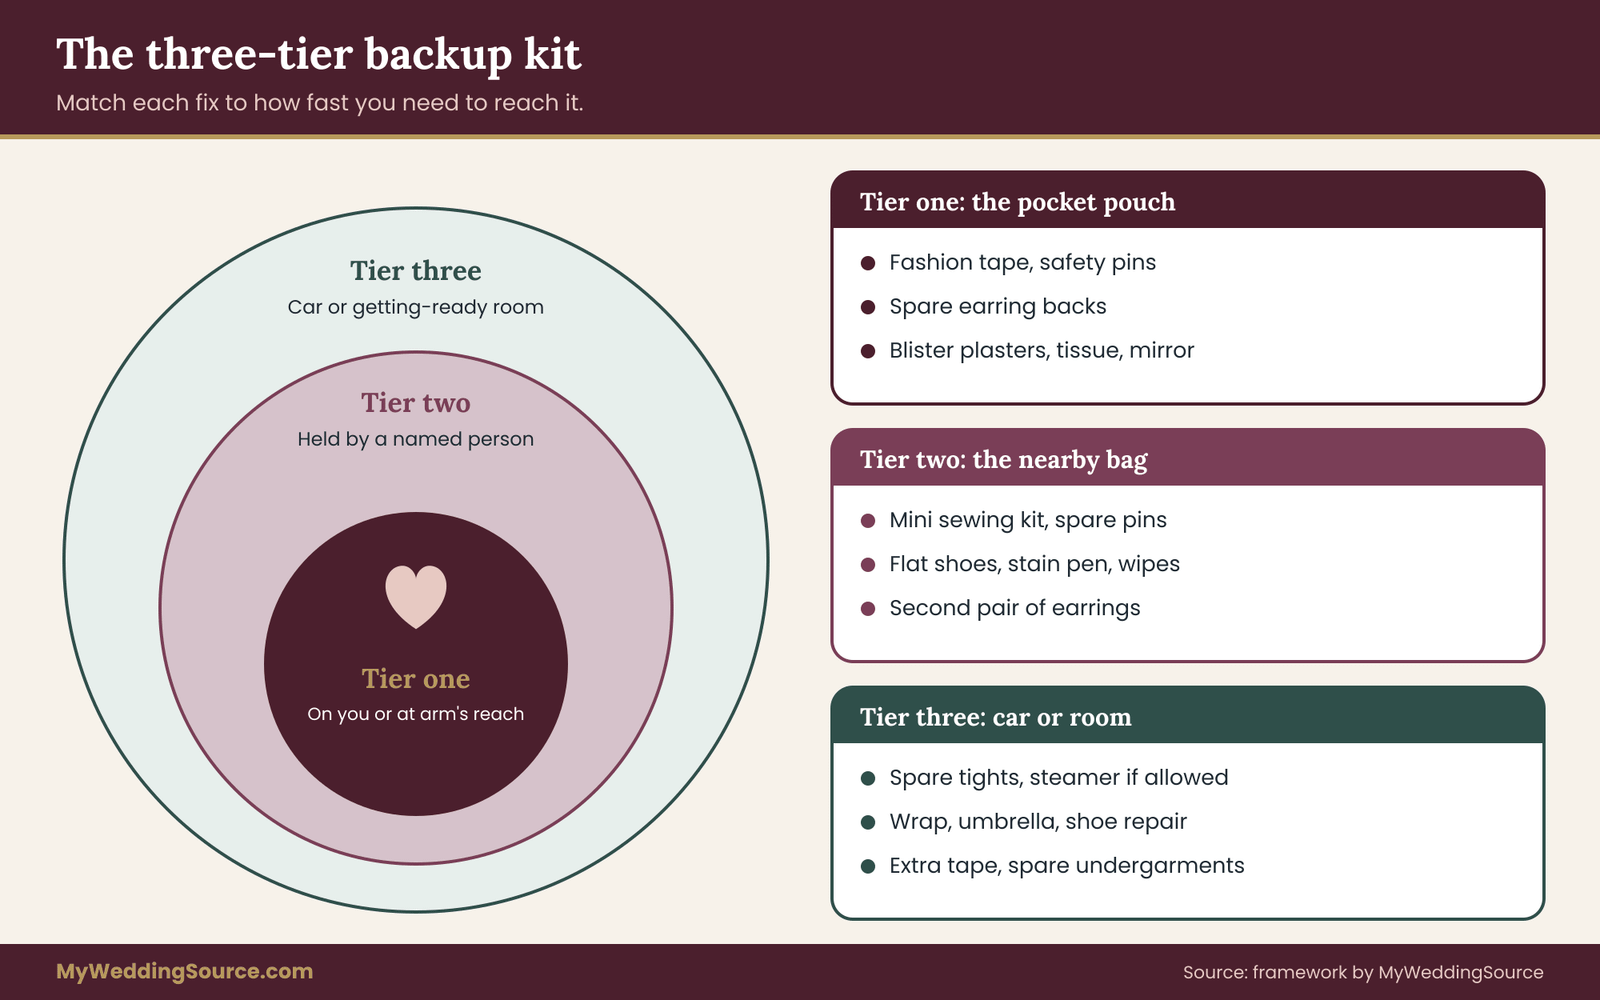
The reason for layers is speed. A safety pin in a car is no help in the aisle. A sewing kit in your pocket is bulky. By matching the item to the time it takes to reach it, you keep the first layer light and the others useful.
What goes in each tier
Use this as a starting point and adjust it to your outfit. Keep the exact list on your master list, so that whoever is carrying it knows what is inside.
Tier one, the pocket pouch
- Clear fashion tape and a few spare strips
- Three or four safety pins in different sizes, kept closed
- Two or three earring backs that fit your posts
- Blister plasters or cushioning pads
- A small clear nail polish or a tiny bottle for tiny snags in tights
- A folded tissue and a small mirror
- A hair pin or two that match your hair color
- A few mints
Tier two, the nearby bag
- A mini sewing kit with thread that matches the dress and the lining
- A few extra hooks and eyes, and small buttons if the dress has them
- A lint roller or a few strips of tape for lint
- A stain pen or wipes, tested on a hidden area first
- A comfortable pair of flat shoes or slippers
- Spare bobby pins, a comb and a small can of hair spray
- A hand towel to protect the dress when you eat or sit
- Water and a small snack
- Spare tissues, a phone charger and a power bank
- Any medication you take, labeled and in the original packaging
- Your spare pair of earrings, in a small box
Tier three, the car or the room
- A second pair of tights or stockings in your shade
- A steamer, if your venue and the dress maker allow it
- Extra tape, extra pins and a spare set of undergarments
- A wrap or jacket in case of cold
- A small umbrella and clear rain covers for shoes if the forecast is uncertain
- A repair kit for shoes: heel tips, glue and a small file, if you can use them
- A mirror and a bright light for close work
- A spare phone cable and a small tool kit, if you are comfortable using it
What to leave out of the wedding day accessories kit
A few items are better left out, or handled with care.
Coin and button batteries. Many small lit accessories, light-up favors and decorations use button or coin batteries. The Consumer Product Safety Commission warns that swallowed coin batteries are a serious danger to young children and can cause severe internal burns in as little as two hours. A federal standard now requires secure battery compartments on consumer products, but loose spare batteries in a bag are still a hazard if children are around. If you carry spares, keep them in their original packaging and out of reach.
Sharp tools. A small pair of embroidery scissors is useful. A large pair is not. If you are flying to a destination wedding, check the rules before you pack. The Transportation Security Administration says scissors under four inches can be kept in a carry-on, and that sewing needles can generally go in carry-on or checked bags, but a screening officer makes the final decision at the checkpoint. If in doubt, buy the small items at your destination.
Strong adhesives and solvents. Glue can ruin fabric and skin. Leave anything stronger than fashion tape to professionals, unless it is for shoes and clearly labeled.
Anything you have not tested. Test stain removers on a hidden corner of fabric, adhesive on your skin, and shoe fixes on an old pair. A product you have never used is a risk.
Fixes for the wedding day accessories failures that happen most often
Knowing the likely failures lets you rehearse the response. Here are common ones with a quick sequence for each.
A snag in lace or tulle. Stop moving. Do not pull. Find what is caught, and release it slowly. If a thread has pulled, push it back to the inside with a pin or a fine needle, or snip it flush on the inside, only if you are sure. Do not cut a loose loop on the face of the dress. Note it and show the dressmaker later.
A loose hem or a strap that slips. A small safety pin on the inside, or a strip of tape, will do. A seamstress can fix it properly after the wedding. If a hem catches under a heel, a quick tuck or a hidden pin helps.
A lost earring back. Use a spare from the pocket pouch. If none are available, a small piece of eraser or a button cover can hold a post for a short time.
A veil that slips. Ask the person with the extra pins to re-anchor it, working the pin into the base of the hair, not the veil alone. If it will not hold, remove it, and give it to someone to carry.
A broken heel or a blister. Swap to the flat shoes. A plaster protects the skin. Keep the photos for the moments when you can choose.
A stain. Blot, do not rub. Use a tested stain wipe on a hidden area first, and dab. For oily stains on silk, it is often safer to leave them for the cleaner.
A rash from jewelry. Remove the piece, rinse the skin and swap to a tested alternative. If it is severe, or you have breathing trouble, get medical help.
A ring that is too tight or too loose. Cold water and a little time can reduce swelling. A thin strip of tape or a small adhesive guard can make a loose ring stay put for the ceremony. If the ring will not go on, do the exchange with the ring on a finger it fits, or a different ceremony hand, and sort the sizing later.
A zipper or button that sticks. Do not force it. Ask your dresser to look, and bring the dress maker’s contact details in your kit. For problems with fit and structure, our wedding dress fit and alterations guide explains what a seamstress can adjust and when to schedule fittings.
Rehearse the emergency, briefly
Spend ten minutes with the person who holds the kit. Show them the bag, explain what is in it, and walk through two or three likely problems. This is worth doing because panic makes people forget where things are.
You can give them a short message to keep on their phone:
“Thank you for holding the emergency bag. It has tape, pins, a sewing kit, flat shoes and spare earring backs. If anything breaks, find me quietly and fix it in a private spot. Do not worry about the schedule, I will adjust. The dress maker’s number and the stylist’s number are on the first page of the list. If it is a medical problem, call for help first.”
The aim is to remove the pressure on them to improvise.
Moving, storing and traveling with wedding day accessories
The days before the wedding are when many items are lost or damaged. A little planning prevents it.
Store them in one place
Keep every accessory in one labeled box or bag, away from pets, children and damp. Use small pouches or cases for jewelry and hair pieces so they do not tangle. Store pearls, silver and delicate pieces separately, wrapped in soft cloth. Hang the veil, or store it flat in tissue, according to its maker’s advice.
Pack with a list
Before you leave for the venue, check every item against the master list. Tick each one off as it goes into a bag, and tick it again when it arrives. Keep rings, valuable jewelry and anything irreplaceable with you or with a trusted person, not in a bag that goes in the trunk.
Flying with your pieces
If you are flying, keep valuables and delicate wedding day accessories in your carry-on. Check airline rules on liquids, tools and batteries. Fragile pieces such as a veil may need a garment bag or a hard case, and you should ask the airline about storing it onboard. If you must check a bag, put a duplicate list inside it, and keep photos of everything on your phone.
When you arrive, unpack immediately, hang what needs hanging, and check each item against the list. If anything was damaged in transit, you will still have a few days to fix or replace it. For wider travel planning, the same habit of checking a list against what you packed carries over to honeymoon travel. ## A worked example: one set of wedding day accessories, tested
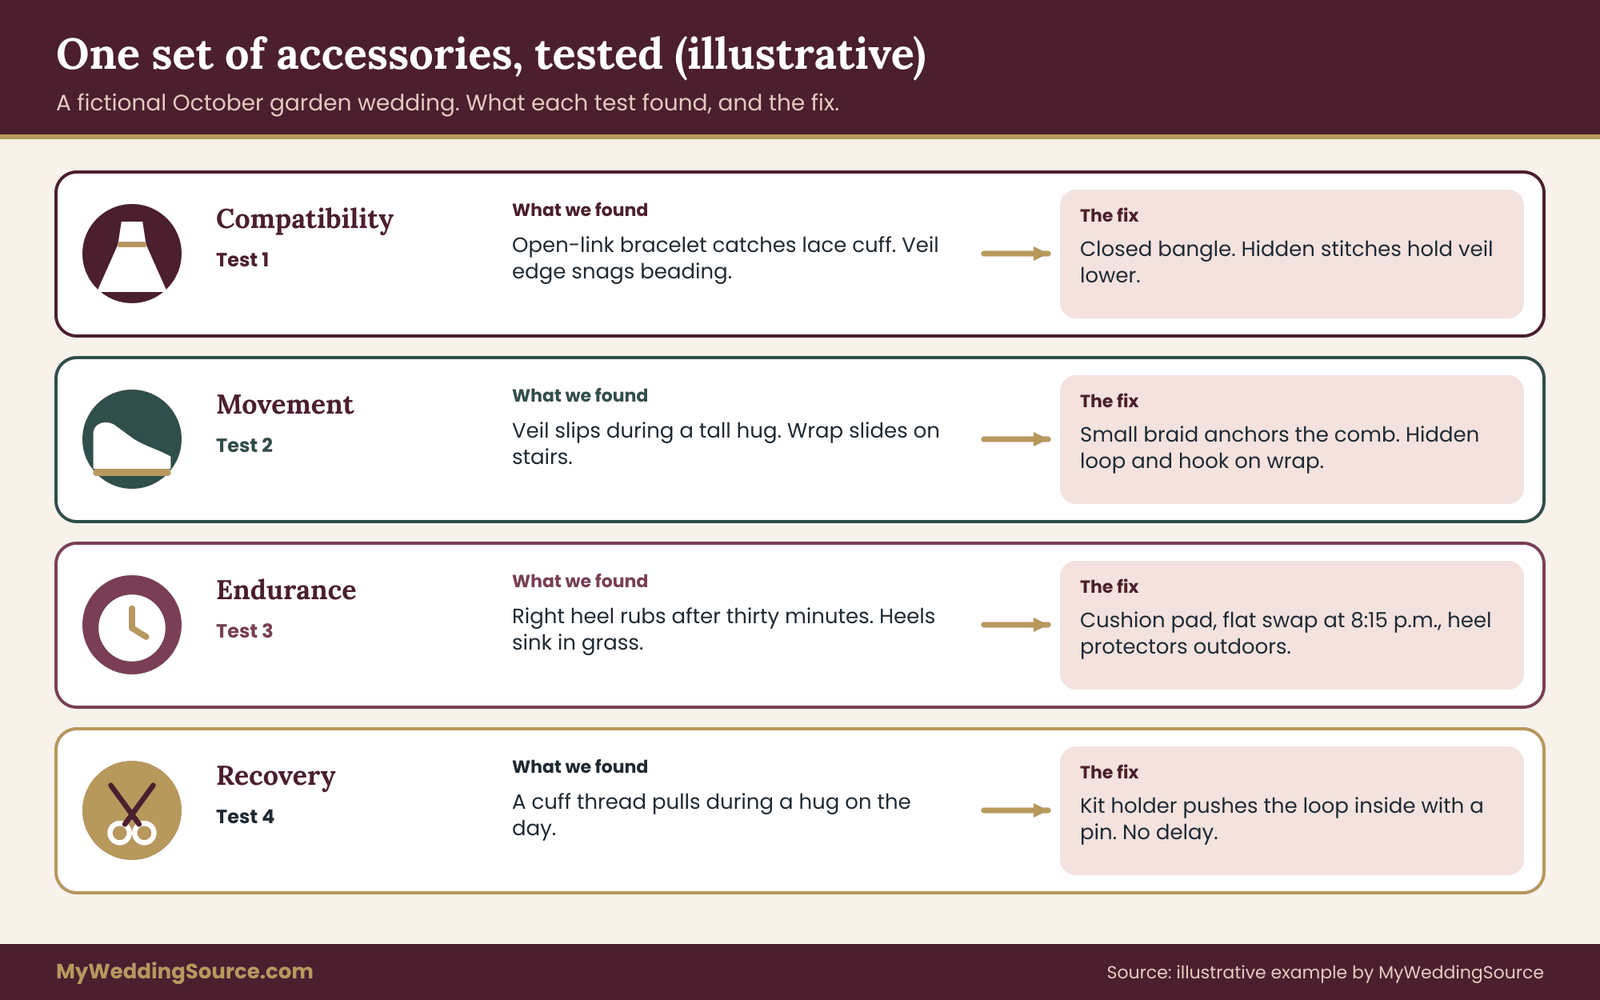
The example below is illustrative. It is a fictional couple and a made-up set of items, written to show how the four tests change real decisions. It is not a recommendation for any particular product, and your own pieces will behave differently.
Priya is marrying in a garden in early October. Her dress is ivory crepe with lace sleeves and a low back. She has chosen a cathedral veil with a lace edge, pearl drop earrings, a thin gold bracelet, a pair of block-heeled satin shoes and a lace-trimmed wrap. She is also wearing her grandmother’s ring on her right hand. Her hairstylist plans a low chignon.
Test one: compatibility
At the fitting, Priya’s seamstress runs the snag check. The bracelet’s open links catch the lace on the sleeve cuff, so Priya swaps it for a smooth closed bangle in the same gold tone. The veil’s lace edge snags on the back of the dress where the beaded detail sits, so the seamstress adds a few hidden stitches to keep the veil lower and away from the beads. The pearl earrings pass the weight check, but the stylist notes that the heavy drops tug the chignon forward, so Priya chooses a lighter pearl stud for the ceremony and keeps the drops for photos.
Priya also remembers a reaction she once had to cheap earrings. She wears the new post earrings at home for two days and has no problem. Her grandmother’s ring is checked by a jeweler, who finds a slightly loose prong and tightens it before the wedding.
Test two: movement
During the movement circuit, three things come up. The veil slips when Priya hugs her tall brother, because the comb sits in smooth hair. The stylist adds a small braid under the chignon to give the comb something to hold. The wrap slides off her shoulders on the stairs, so the seamstress sews a small hidden loop at the shoulder and adds a hook. The block-heeled shoes pass the walking test indoors, but on the lawn at the venue, they sink slightly. Priya adds a pair of heel protectors for the outdoor ceremony and plans to remove them for dancing.
Test three: endurance
Priya wears the shoes for the full circuit and notices rubbing on her right heel after thirty minutes. She places a cushioning pad on the heel and decides to change into flat shoes after the first dance. She schedules the swap for 8:15 p.m. and tells her photographer. She also decides to remove the veil after portraits, and her maid of honor will carry it.
Test four: recovery
Her kit has three tiers. The pocket pouch holds tape, pins, two spare earring backs and plasters. Her cousin Mei, who agreed to be kit holder, carries the second bag with a sewing kit, flat shoes, spare pins, a stain pen and the second pair of earrings. The car holds a spare pair of tights, a steamer and a small umbrella. Priya’s list shows where each item lives, and Mei has a copy on her phone.
On the day, a thread pulls on the lace cuff during a hug. Mei notes it, pushes the loop back to the inside with a pin, and moves on. The veil is released after the portraits, as planned. Nobody sees the shoe swap, because it takes place during dinner.
None of these steps was complicated. What mattered was that each problem was found early, when there was time to fix it, and that the response was planned.
When the plan differs: special situations
The method above works for most weddings, but some situations need a slightly different approach.
Suits, tuxedos and the groom’s side
Accessories on the other side of the wedding follow the same four tests. Cufflinks, tie bars, pocket squares, lapel pins, watches, belts, braces and shoes can all snag, slide or pinch. Cuffs and collars interact with watches. A heavy belt buckle can catch on a vest. Tie bars slip. Shoes must be broken in as much as any other. Rental suits add an extra layer: ask what alterations are allowed, what the return deadline is, and what counts as damage.
The kit works as well. A small supply of collar stays, spare buttons, a lint roller and a spare tie clip can solve most problems. The party coordination checklist mentioned earlier is a good place to record who is responsible for what.
The wedding party and family
Bridesmaids, groomsmen, parents and children all wear wedding day accessories too. You do not have to control everything, but you should decide a few things in advance. Are jewelry colors and metal tones coordinated? Are shoes specified, and are flat options permitted? Do you want the same style of hair pieces, or is it open? Share a short note with the wedding party that explains what you expect and what you are leaving to them.
For young attendants, keep it simple. Flower girls and ring bearers do not need much more than comfortable shoes, a basket or pillow and a plan for what happens if they refuse to walk. Avoid small hair pieces with sharp edges, and avoid any accessory with a loose battery, as noted above.
Accessibility and sensory needs
Accessories can interact with mobility aids, sensory sensitivities and medical devices. If you use a wheelchair, a cane or a walker, consider how a train, a veil and a long skirt interact with it. A shorter or detachable train may be safer. If you use hearing aids, consider how a veil and hair pieces will sit against them. If you are sensitive to textures or tags, test everything against your skin for a long period. If you wear a medical alert bracelet, decide whether to wear it as is, or to find a version that suits the outfit, and do not remove it unless your doctor says it is safe.
Plan for the recovery tier of the kit to include things that matter to you, such as medication, a spare hearing aid battery, or a calming tool. Keep those items accessible to you and to the person holding the kit.
Religious and cultural wedding day accessories
Many weddings include wedding day accessories with religious or cultural meaning: head coverings, ceremonial jewelry, garlands, sashes, sacred threads and more. These often come with rules about who may handle them, when they are worn, and how they are stored. Talk with the officiant, an elder or a family member who knows the tradition. Ask about handling, storage and what to do if something breaks. Build the answers into your plan. In many cases, the right backup is a second set made or blessed in the same way, not a general substitute.
Destination and outdoor weddings
Travel, weather and unfamiliar surfaces change what works. Sand, grass, gravel and cobblestones all affect shoes. Humidity affects hair and veils. Heat affects adhesives and metal. If you cannot test on-site, ask the venue about the surface and the climate, and choose accordingly. Pack your emergency kit in carry-on luggage, and keep a spare of anything difficult to replace locally.
Placing the work on a timeline
Accessory planning is easier when each pass has a date. The timeline below is a template. Move the dates to fit your own schedule.
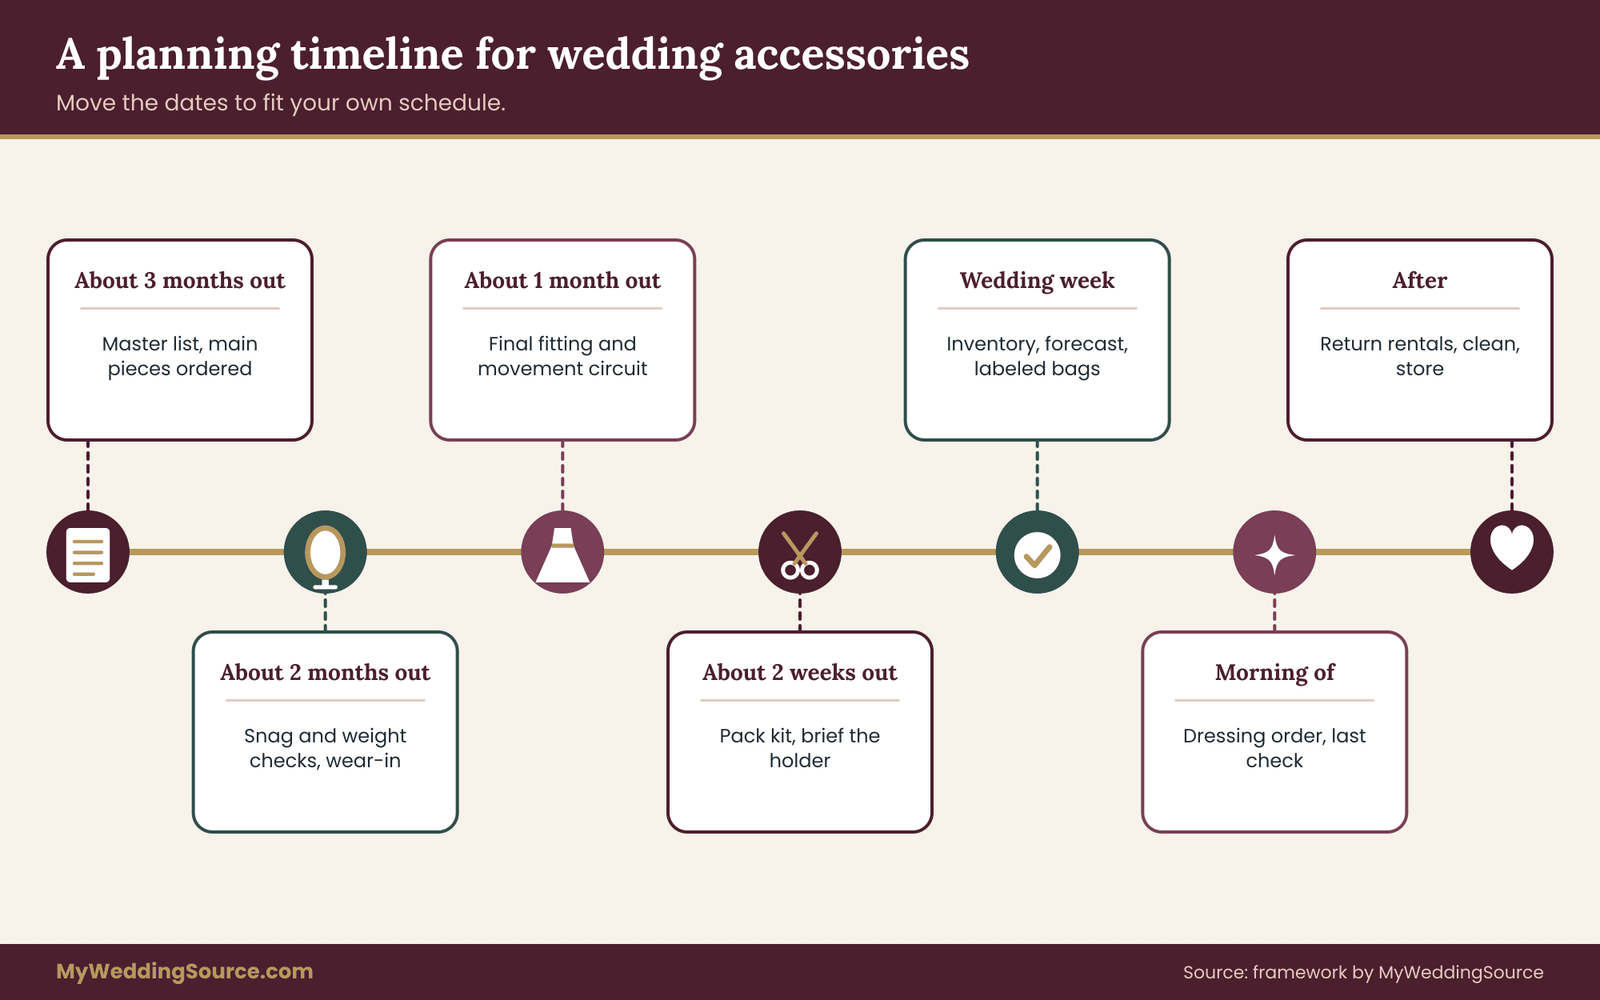
About three months before. Decide the main pieces, make the master list, and order anything with a long lead time or alteration needs. Book the final fitting and the hair trial.
About two months before. Collect pieces as they arrive. Run the snag and weight checks. Wear new shoes and earrings at home. Test adhesives and any skin-contact items.
About one month before. Hold the final fitting with every item, run the movement circuit, and photograph the complete outfit. Confirm any alterations. Order backups for what failed.
About two weeks before. Pack the three-tier kit. Brief the kit holder. Write the dressing order and the swap times. Confirm return dates for rentals and borrowed pieces.
The week of the wedding. Check the forecast and adjust. Do a final inventory against the list. Prepare the labeled bags. Pack carefully and keep valuables with you.
The morning of. Follow the dressing order. Do a last check from every angle. Hand the kit to the holder and walk away.
After. Return rentals, clean and store pieces, and note what worked for next time.
The plan wedding timeline guide mentioned earlier places this inside the larger schedule. If you are using a planner or coordinator, share the accessory list and the swap times with them as well.
Mistakes that cause most accessory problems
After enough weddings, the same errors show up again and again. Most are easy to avoid once you know them.
- Testing pieces one at a time. Each piece passes alone, then fails against the others. Test the full set together.
- Skipping the movement test. A static fitting hides the problems that appear when you sit, hug or dance.
- Buying late. A piece that arrives days before the wedding cannot be tested or returned.
- Wearing new shoes for the first time on the day. This is the classic cause of blisters and early exits.
- Putting pearls on before hair spray and perfume. This damages the surface and dulls the luster.
- Assuming a heavy veil will stay put. Hair type, style and comb choice decide this, not hope.
- Not asking about metals. Skin reactions can appear days later and spoil a honeymoon.
- Forgetting spare earring backs. They are small, easy to lose and often the first thing missing.
- Leaving the kit in the wrong place. A kit in the car is no use during the ceremony.
- Failing to brief the kit holder. They need to know what is in the bag and what to do.
- Overloading the look. More pieces means more things to fasten, protect and replace.
- Ignoring return dates for borrowed items. They get lost or forgotten after the party.
Limits of this guide
This guide offers a planning method, not a guarantee. Accessories fail even when they are well tested, and no checklist can account for every garment, material or body. A few limits are worth stating plainly.
It is not medical advice. If you have allergies, circulation problems, skin conditions or other health concerns, ask a qualified professional. It is not a substitute for the advice of your dressmaker, tailor, stylist or jeweler, who can see the actual pieces. It does not set rules for religious or cultural items, and it cannot replace the guidance of the community that holds those traditions. It does not cover legal or insurance advice. Terms and coverage vary, and you should read your own contracts and policies.
Material and care information in this article comes from public guidance by government agencies and professional bodies, listed in the sources. Always follow the care instructions that come with your own items, and check current rules before you travel. Where a rule may change, such as airline screening policies, confirm it with the official source close to your travel date. ## After the wedding: cleaning, storing and returning
The job is not finished when the music stops. Accessories carry sweat, makeup, food and hair product, and the way you handle them in the next few days decides how they look in ten years.
Collect everything the same night, or the next morning. Pins, earring backs and small hair pieces vanish in hotel rooms and venue changing areas. Use the master list to check them off. Ask the kit holder to do a quick sweep of the bags.
Separate by type. Jewelry, hair pieces, the veil, shoes, wraps and rentals each need their own handling. Put rentals and borrowed items aside for return first, and note the date and the person who will return them.
Clean gently. Wipe metal jewelry with a soft cloth. Wipe cultured pearls after wearing, as the Gemological Institute of America advises, and wash them only gently with mild soap and water if needed. Never use ultrasonic or steam cleaners on pearls. Use only the cleaning method the maker recommends for other stones and settings, and take valuable pieces to a jeweler.
Take the dress and veil to the cleaner quickly. Tell the cleaner about any stains, including the ones you do not remember causing, and mention anything that was pinned or taped. Follow the care label, and ask the cleaner about preservation.
Store with care. Use acid-free tissue or soft pouches, and keep everything away from heat, light and damp. Keep pieces separate so they do not scratch or tangle.
Record what you learned. Note which pieces worked, which failed and what you would do differently. If a friend or sibling is marrying later, the notes are a useful gift.
FAQ
When should I start planning wedding day accessories?
About three months before the wedding is a sensible starting point, as long as the dress is already chosen. Accessories depend on the dress, so they are easiest to plan once you know the neckline, sleeves, fabric and train. Pieces with long lead times, such as custom jewelry or alterations, should be ordered first. If your wedding is sooner than that, do the same steps in a shorter window and rely more on simple, tested pieces.
Do I really need a movement test?
Yes, because it finds the problems that a mirror cannot. Veils slip, bracelets catch and shoes rub only when you move, and many of those failures appear in the first ten minutes of a movement circuit. Thirty minutes at your final fitting, or at home in the week of the wedding, is enough. Ask a helper to watch and take photos, since you cannot see yourself from behind.
What should go in a wedding day emergency kit?
A small pouch with fashion tape, safety pins, spare earring backs and blister plasters covers most problems. A second bag, held by a trusted person, can add a mini sewing kit, flat shoes, hair pins, a stain pen and a spare pair of earrings. A larger bag in the car holds extra tights, a steamer and a few other backups. Keep the exact contents on your master list, and avoid loose coin batteries and sharp tools.
Who should carry the kit?
Choose one named person who will stay near you during the ceremony and photos and who is calm in a crisis. A bridesmaid, sibling or close friend often fits. Give them the list, show them where everything is, and agree on a quiet signal for when you need help. If you have a planner or coordinator, they may carry their own kit, but do not rely on it for personal items.
Can I wear jewelry I have never worn before?
You can, but test it first. Wear new pieces at home for a day or two, especially earrings and anything that touches the skin for hours, to check for irritation and weight. Run a snag test against the dress at a fitting. If you cannot test a piece, bring a tested alternative in your bag and decide beforehand when you will switch.
How do I protect pearls on the wedding day?
Put them on last, after hair spray, perfume and makeup are dry. The Gemological Institute of America advises that cosmetics, hair spray, perfume and perspiration can damage pearls. Wipe them with a soft cloth after wearing, avoid ultrasonic and steam cleaners, and make sure any string is dry before you wear them. Keep them away from long exposure to heat and strong light.
What if I have a metal allergy?
Ask your doctor or a dermatologist for advice, and choose materials you know you tolerate. Nickel is a common trigger, and according to the Mayo Clinic, a reaction usually appears within a couple of days of contact. Look for pieces described as nickel-free, ask the seller how that is determined, and test any new metal on your skin well before the wedding. Keep a tolerated pair of earrings in your backup kit.
How do I handle borrowed or rented wedding day accessories?
Write down the terms: what the item is, its condition, who will return it and when, and what happens if it is damaged. Take photos before and after you wear it. For rentals, read the agreement for deposits, damage definitions and return deadlines. Give one named person responsibility for returning each item, and add the date to your timeline.
Your next steps
Start with a single list. Write down every accessory you plan to wear or carry, note who owns each one and where it will be on the day, and mark which have not been tested. That one document tells you what to do next.
Then book the final fitting and plan the movement test around it. Ask your seamstress to run the snag check and your stylist to review the veil and hair pieces. Order any backup items that the tests call for, and pack the three-tier kit about two weeks before. Brief the person who will hold it, and keep the dressing order where everyone can see it. If you would like to place these tasks within the larger plan, the wedding planning checklist is a good companion.
Sources
- Pearl care and cleaning, Gemological Institute of America
- Nickel allergy: symptoms and causes, Mayo Clinic
- Guides for the Jewelry, Precious Metals, and Pewter Industries, Federal Register
- Jewelry guides, Federal Trade Commission
- Clothes captioning: complying with the Care Labeling Rule, Federal Trade Commission
- Wedding gown labels: unveiling the requirements, Federal Trade Commission
- What kind of care instruction is required on apparel labels, American Apparel and Footwear Association
- Making families safer from button cell or coin battery dangers, Consumer Product Safety Commission
- Sewing needles, Transportation Security Administration
- Sharp objects, Transportation Security Administration
- Nickel allergy: dermatologists share tips to avoid exposure, American Academy of Dermatology via Newswise
For a wider view of what to carry, pin and wear on the day, see how the cape vs veil choice plays out in wind, with different hairstyles and on a tight ceremony layout.