
A final fitting is the last chance to find problems in a custom suit while the tailor can still fix them for free. This guide gives you a three-pass inspection for the final fitting: a still check, a movement check and a delivery acceptance check, so you leave the shop knowing the suit is right, or knowing exactly what must change and by when.
Treat the final fitting as an inspection, not a try-on. Pass one is still: collar, shoulders, chest, sleeves, length, trousers, all under good light and in the shirt and shoes you will wear. Pass two is movement: reach, raise, sit, stairs, hug, ring exchange, a few dance steps. Pass three is delivery: every flaw written down with a fix and a date, then a signed acceptance only when the list is closed. Bring your own shirt, shoes, belt and phone, and book the final fitting early enough to allow one more adjustment.
Most grooms walk into the final fitting expecting to nod, pay and leave. The tailor pins a hem, says it looks great, and the suit goes into a bag. That is a perfectly normal way to run the final fitting, and it is also the reason some groom suits arrive at the wedding with a collar that lifts when he raises his arm, one sleeve a little longer than the other, or a jacket that pulls across the back the moment he hugs his mother.
A custom suit, whether made to measure or fully bespoke, is built from your measurements and a pattern the maker adjusts for you. That is its whole advantage over a rental or an off-the-rack suit. It also means the final fitting carries more weight than a normal store fitting. By this point the cloth has been cut, the jacket assembled and the main alterations made. What remains is verification, and a few small corrections that are cheap now and expensive or impossible later.
This article is about that verification. It does not decide whether you should wear a suit or a tuxedo, and it does not walk through choosing fabric or a tailor. For the first question the site has a separate guide, and for the second you will find the vendor-side material in the wedding vendor due diligence checklist. Here the suit already exists. Your job is to inspect it properly.
A note on scope. This is general consumer information, not legal, tax or financial advice, and tailors differ in their standards, their terms and their remedies. Where a point depends on your contract or on a rule from an agency, the article tells you whom to ask so you can confirm the current version.
What the final fitting is for
The word “fitting” suggests that the point of the final fitting is to see whether the suit fits. That is only one third of it. A good final fitting answers three separate questions, and each one has a different kind of evidence.
Does it fit while you stand still? This is the visual check most people picture. The collar sits against your neck, the shoulders end where yours end, the chest is neither tight nor hollow, the sleeves and trousers are the right length. Evidence here is what you and the tailor can see in the mirror and measure with a finger or a ruler. Everything in this part of the final fitting can be checked by eye.
Does it keep fitting when you move? A suit that looks perfect on a still groom can fall apart in action. Wedding days are full of movement: signing a license, lifting a flower girl, hugging a long line of relatives, dancing, getting into a car. Evidence here comes from a short, deliberate set of movements that you perform in the shop before anyone pins anything.
Is it the suit you ordered, in the condition you were promised? This is the delivery question. The fabric matches the swatch you approved, the buttons and lining are right, the stitching is clean, the labels are accurate, the extras you paid for are present, and the balance you owe matches the contract. Evidence here is the order form, the contract and your own notes.
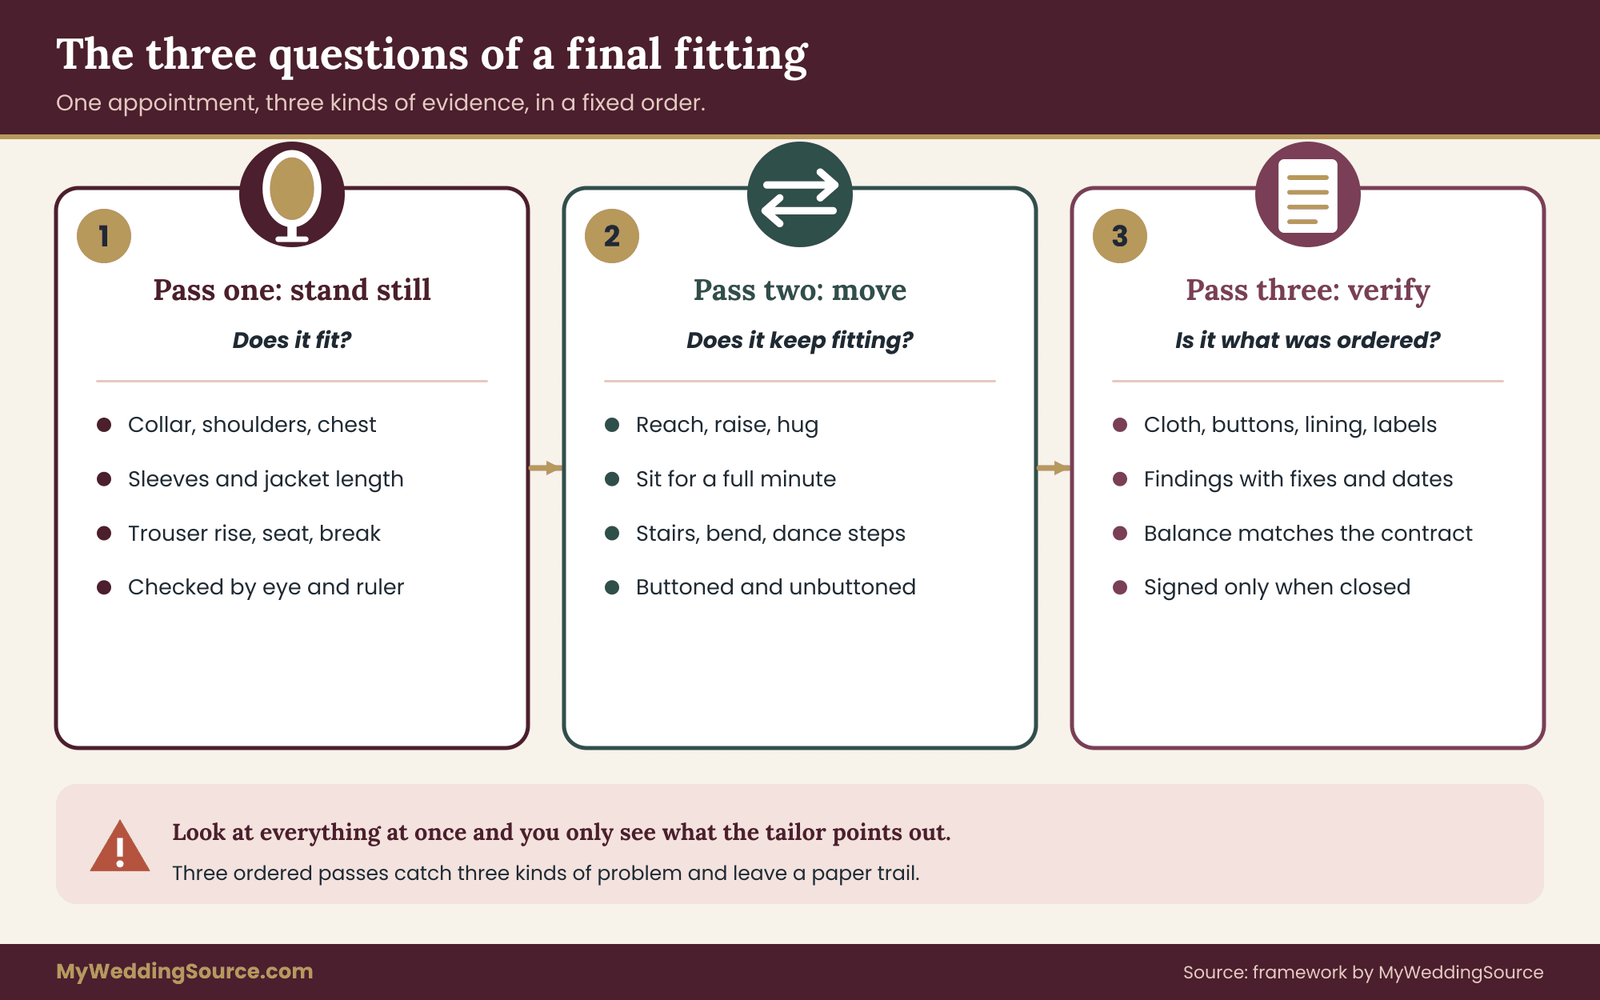
Separating the three questions has a practical benefit. When you look for everything at once, you tend to see only what the tailor points out. When you run three passes in order, each with its own short checklist, you catch problems of different kinds, and you leave a paper trail that shows what was found and what was agreed.
Why the final fitting is the point of no return
Think of the weeks before the wedding as a funnel. Early in the process, changes are cheap: a different lapel width, a different fabric, a new measurement. After the cloth is cut and the jacket built, changes get narrower. After the final fitting, they narrow again, because the tailor will make the remaining corrections, deliver the suit, and move on to the next customer whose wedding is also on a calendar.
Some corrections are routine at the final fitting: shortening a sleeve, adjusting a hem, taking in a waist by a small amount, tightening a collar. Others are not. Moving a shoulder seam, re-cutting a collar, or changing the balance of a jacket is a significant job, and in some cases the honest answer is that it cannot be done without a new garment.
The earlier you find a structural issue, the more options you have. This is why the final fitting date matters as much as the inspection itself, and why the preparation section below starts with the calendar. The same logic applies to gowns, and the wedding dress fit and alterations guide shows how the timing works on the other side of the aisle.
What “custom” does and does not promise
The term custom is used loosely. Made to measure usually means a maker adjusts an existing pattern to your measurements, with a defined list of changes allowed. Bespoke usually means a pattern drawn for you, often with more than one fitting along the way. Some shops use “custom” for a suit with a handful of altered dimensions. The label does not tell you what remedies you are entitled to, and it does not guarantee a good fit.
What it should give you is a written order that lists your measurements, the fabric, the style choices and the shop’s remedy if the result is wrong. Find that document before the final fitting. If it does not exist, ask for it now. A calm request such as the following is fine:
“Before our final fitting, could you send the order sheet with my measurements, the fabric reference and your alteration and remake terms?”
Having the sheet changes the final fitting. When the sleeve is long, you can compare it with the number on the sheet and ask whether the garment was built to that number or whether it drifted. That is a factual conversation rather than a feeling.
Prepare for the final fitting: calendar, clothes and tools
Most of what goes wrong at a final fitting was decided before the final fitting. Three things matter: when it happens, what you wear, and what you bring.
Book it early enough to fix what you find
Count back from the wedding date. You want the final fitting to leave room for the alteration itself, a short pickup window and a buffer for the unexpected. The honest range depends on the shop, and only the shop can tell you its turnaround, so ask it directly: how long do final adjustments take, and what is the latest date you will guarantee for a wedding?
A sensible planning rule is to treat the final fitting as a gate, not a deadline. If the shop says adjustments take about a week, do not book the final fitting nine days before the wedding. That leaves two days of slack, and a single missed pickup or a reworked sleeve uses it all.
Booking earlier costs you nothing, and a second quick visit for a small correction is far better than a first visit with no room to correct anything. Think of the first final fitting as a rehearsal that happens to have real consequences.
The wedding vendor timeline on this site shows where attire sits among the other vendor deadlines, so you can place the final fitting without colliding with a travel week or a rehearsal.
Dress exactly as you will on the day
A suit is built to hang over a specific shirt, a specific waistline and a specific shoe. Test it with the real ones. Here is what to bring and wear:
- The wedding shirt, pressed, with the collar style and cuffs you chose. A casual shirt has a different collar height and cuff thickness and will mislead you.
- Dress shoes with the sole and heel you will wear. A shoe changes how the trouser breaks and how you stand.
- The belt or braces (suspenders) you plan to use, if any. Braces change where the trouser sits.
- The tie or bow tie, or at least the collar button closed so you see the real neck line.
- The same undershirt or none, as on the day. Layers change the fit more than most people expect.
- A watch or bracelet if you will wear one, because it affects the cuff.
If the shirt is not ready, say so and reschedule rather than judge the suit over a different one. A collar check over the wrong shirt is worthless. A final fitting in the wrong clothes proves very little.
Bring the small tools
You do not need much. A phone with a working camera, so you can photograph each issue as it appears and keep a dated record. Your wallet, phone and keys, or whatever you will realistically carry in the jacket and trouser pockets, because pockets that look clean empty can bulge when used. A small notebook or a notes app, because you will want to write the findings in the room, not from memory in the car.
If you can, bring one honest friend or family member who is not afraid to say that something looks off. The point is not taste; it is a second pair of eyes, and a view from the back, which you cannot get in the mirror. Ask your helper to look at the back at every stage of the final fitting.
The order of a final fitting inspection
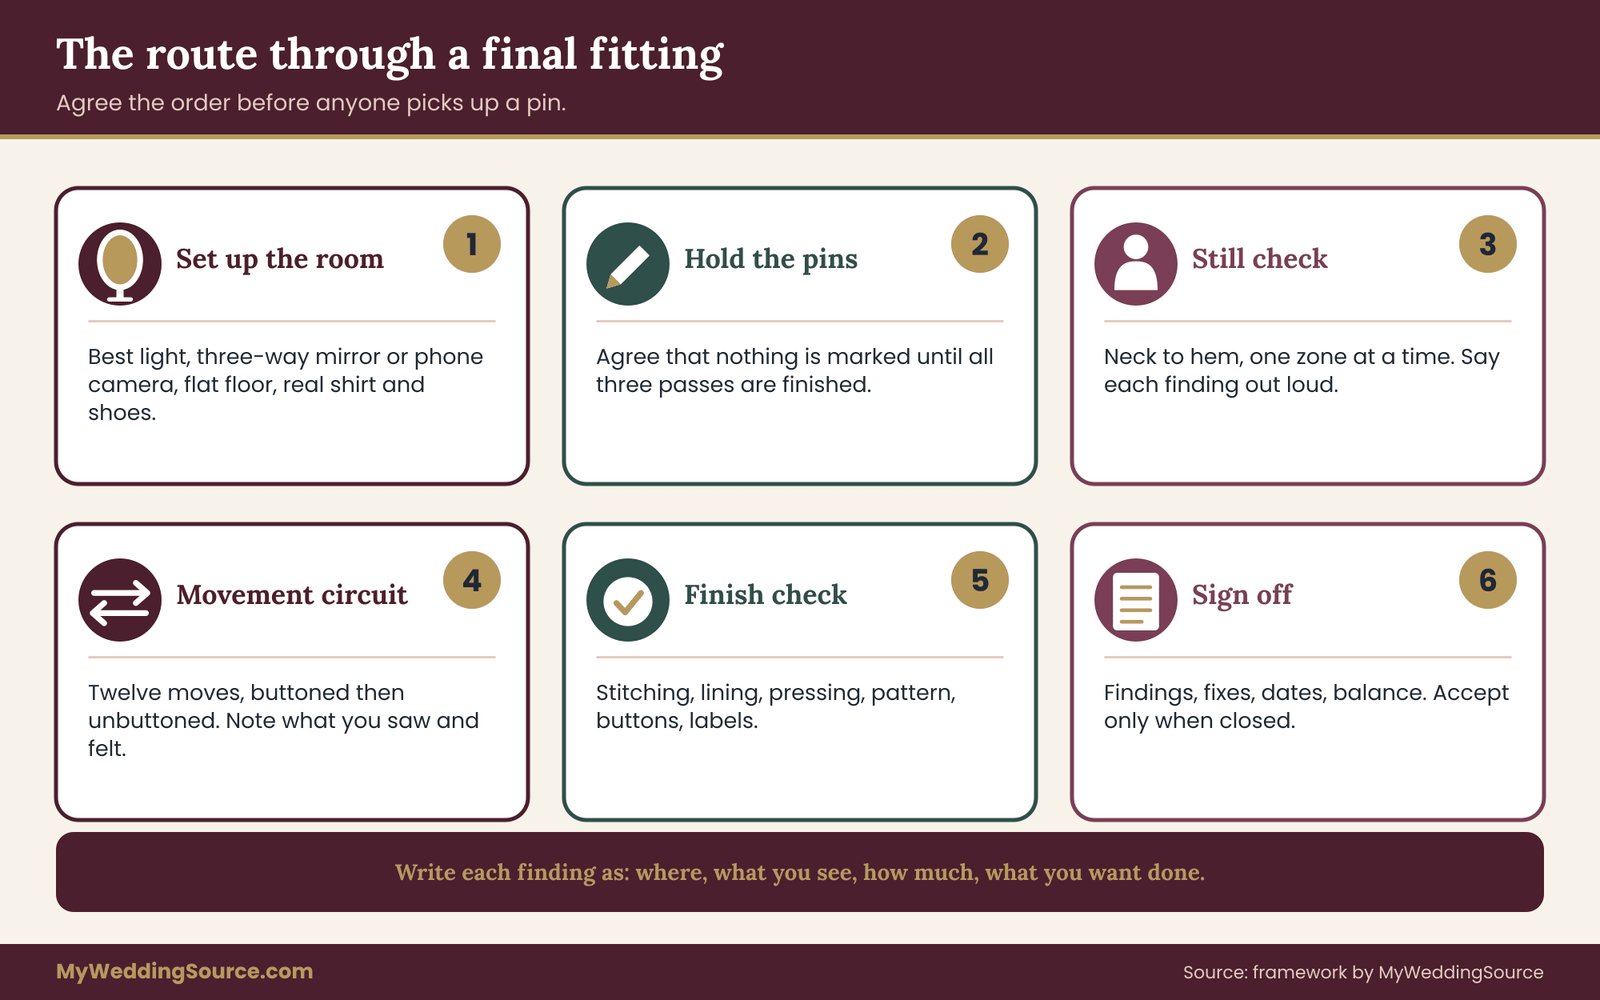
Once you are in the shop, resist the urge to let the final fitting run on the tailor’s schedule. A short, steady order keeps you from skipping steps and keeps the conversation friendly. The sequence below takes a little longer than a casual look, and it is the reason this kind of final fitting finds problems that a quick check does not. Allow an hour for the final fitting rather than twenty minutes.
Set up the room before you put the suit on
Ask for the best light available. Shop mirrors and spotlights are flattering by design; a window or a plainer overhead light is more honest. If the shop has a three-way mirror, use it, and if it does not, a phone camera held by your helper gives a rear view. Stand on a flat floor, not on a raised fitting platform with the hem pinned for a different shoe.
Ask the tailor how they will mark changes, and agree that nothing is marked until you have finished all three passes. This matters more than it sounds. Pins and chalk placed during the still check bias everything that follows, and a tailor who is already fixing the first problem tends to stop looking for the second. Hold the markings until the final fitting is finished.
The three passes in order
Pass one, stand still. Button the jacket the way you will wear it. Stand naturally, with your weight even on both feet, arms relaxed, looking straight ahead and not at yourself. Work from the neck downward, a zone at a time, and say each finding out loud so the tailor can respond. The next three sections cover this pass.
Pass two, move. Only after the still pass is complete do you run the movement circuit. You will do it with the jacket buttoned and then unbuttoned. This is a separate section because it is where the surprises are.
Pass three, verify and accept. The construction check and the delivery documents come last, because they take time and because any new alteration list needs to be settled before you pay a final balance.
A shorthand for your notes
Write each finding as a short line with the same four parts: where, what you see, how much, and what you want done. For example: “Left sleeve, longer than right by about half an inch, shorten left.” A line like that is easy to confirm on pickup. A line such as “sleeves feel off” is not.
Rank findings in three groups. Must fix means the suit is not acceptable for the wedding until it is corrected. Should fix means it will probably bother you during the day. Note means it is a preference or a detail to watch. This ranking does real work later, when you decide whether to accept the suit, ask for a remake or leave a small point alone.
Static checks: collar, shoulders, chest and balance
The still pass begins at the neck because the neck is where the garment is anchored. If the collar and shoulders are wrong, nothing below them can be fixed by adjusting the lower half, and a tailor will often say so.
Collar: the line that shows in every photograph
Look at the back of the neck in the three-way mirror or on camera. This is the first thing to look at in any final fitting. The jacket collar should rest against the shirt collar and sit slightly below it, so a band of shirt collar shows above the jacket. If a gap opens between the jacket collar and your neck, the suit has what tailors call collar gap or standing collar. If the jacket collar rides up over the shirt collar, or the shirt collar disappears, the collar sits too high.
Check this with your arms down and then with your arms forward, as if hugging. A small amount of movement is normal. A collar that leaves a visible hollow behind your neck, or one that lifts away entirely, needs correction. Photographs from behind, such as during the ceremony or a walk-out, will capture this clearly. It is one of the most frequent complaints about a suit and one of the most visible.
Also check the front of the collar and lapel. The lapel should lie flat against the chest and roll gently, not bubble or pop open. A lapel that will not lie flat points to a problem in the construction or the chest fit, and it deserves a note even if the tailor says it will relax.
Shoulders: where the jacket ends and you begin
The shoulder seam should meet your own shoulder bone, at the point where the arm begins. Look for three things. First, whether the shoulder edge extends beyond your shoulder, making a small shelf or a drooping line. Second, whether it ends short of your shoulder and pulls, so the fabric has a dimple near the sleeve head. Third, whether the sleeve head, the top of the sleeve where it meets the shoulder, is smooth or rippled.
Shoulders are among the hardest areas to change. They define the structure of the jacket, and moving them can disturb everything around them. Flag any shoulder concern as a must fix, say so immediately, and ask the tailor directly what can be done and what cannot. A plain answer from them now saves an argument later.
Chest and front: drape, not strain
The chest should sit smoothly, with a little ease so that the jacket can close and open without strain. Look for horizontal pulling across the button, called an X-shaped crease around the closure, which usually means the jacket is too tight at the waist button. Look for a vertical hollow below the collar, which can mean the chest is too loose or the shoulders are cut for a different posture.
The front panels should hang straight and cover each other cleanly when buttoned, without gaping or overlapping. The front edges should not curl outward. If the jacket has a button stance, the place where the single or top button sits, check that it falls near your natural waist, since this affects how the jacket is balanced when you stand.
Balance: the front-to-back lean
Balance describes how the jacket hangs from front to back. A well-balanced jacket falls cleanly from the shoulders with the hem level and the vents lying flat. Signs of poor balance are easy to spot once you know them. If the hem rides up at the front or sticks out at the back, the jacket may be cut for a more upright posture than yours.
If wrinkles radiate from the neck toward the shoulder blades, the fit may be too short in the back or the collar may be pitched wrongly. If the vent in the back splays open, the seat may be too snug or the jacket too short in the back.
Stand your natural way for this check. The common temptation is to straighten up because you are in a mirror. Ask your helper to watch you as you walk a few steps and settle back into place, because that is your real posture.
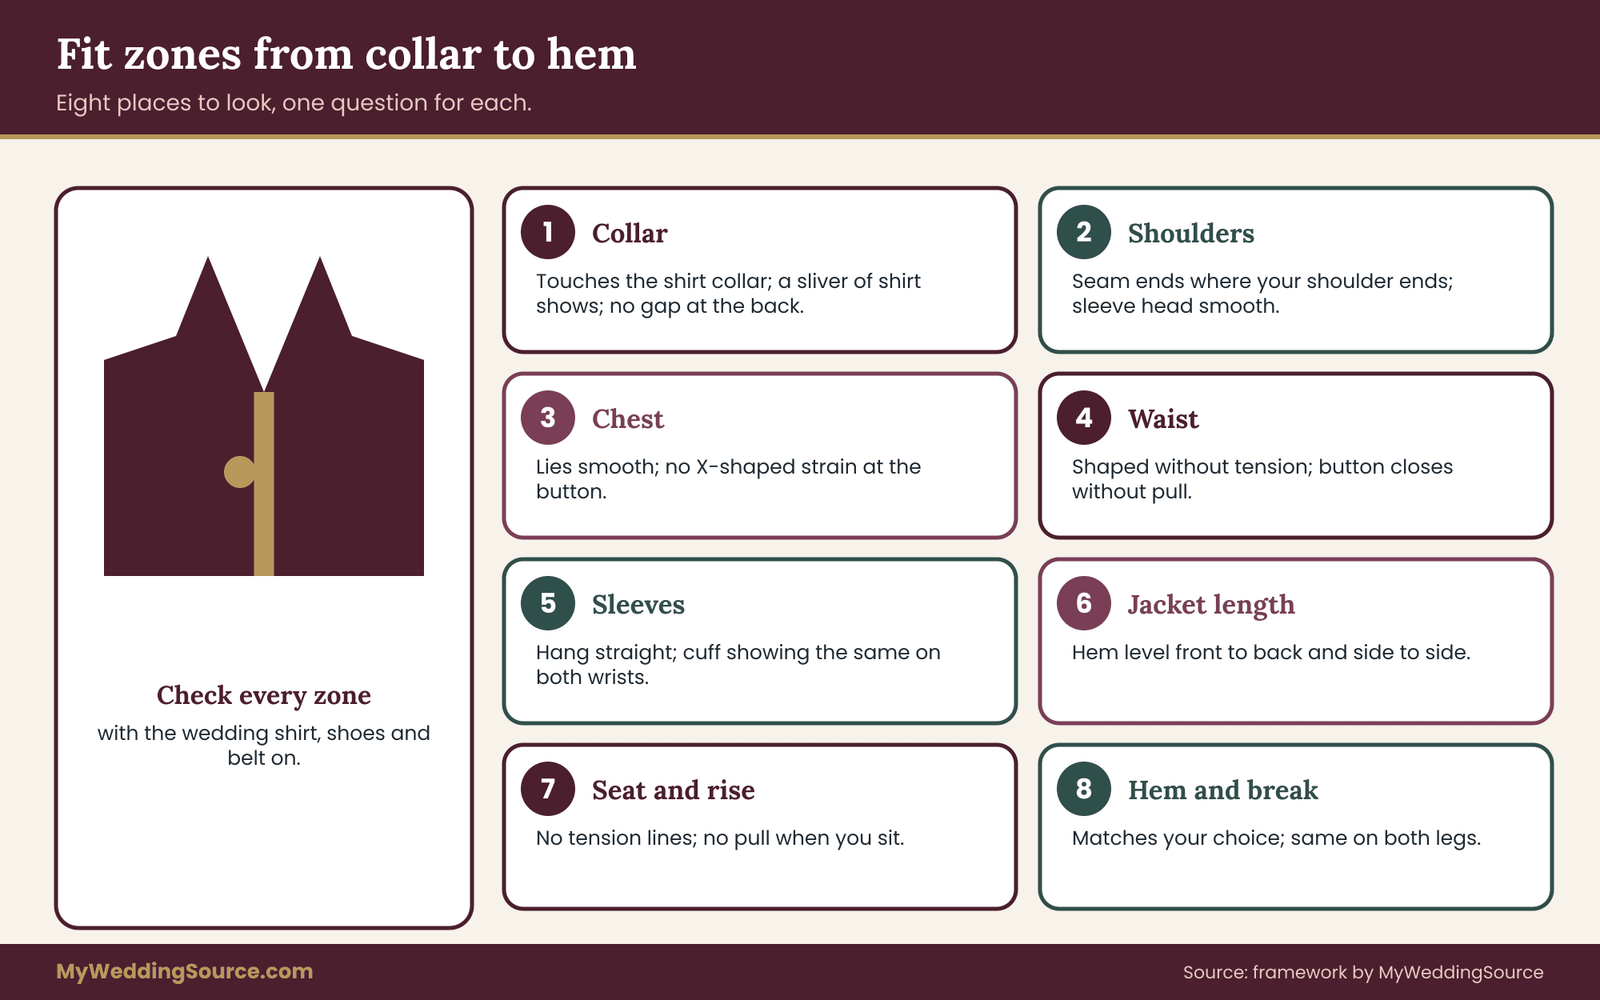
Fit zone summary
A quick mental map helps keep the order straight: neck, shoulders, chest, waist, hips, back, sleeves, length. For each, you are asking one question, does it sit where it should and is it comfortable. The comparison below is a reasonable cheat sheet for what to see and what to flag.
- Neck: collar touches the shirt, a sliver of shirt collar shows, no gap at the back.
- Shoulders: seam ends where your shoulder ends; no ripples at the sleeve head.
- Chest: lies smooth; no X-shaped strain at the button; no large hollow.
- Waist: suppressed without tension; button closes without pull.
- Back: drapes cleanly; no horizontal pulls under the collar or across the shoulder blades.
- Hips and vent: vent hangs closed; no flare at the seat.
If any of these fails, write it down using the where-what-how much-what you want format. Do not accept the explanation that fabric will relax. A final fitting is the time to settle the matter, not to hope. Sometimes it will, but wool does not undo a poor pattern, and a wedding day is a poor moment to wait and see.
Sleeves, cuffs and jacket length
Sleeves and length are the most routine adjustments, which is exactly why they are worth checking carefully. They are quick to change, but only if you ask.
Sleeve length and the shirt cuff
With your arms relaxed at your sides, the jacket sleeve should end around the wrist bone, showing a small amount of shirt cuff. There is no law on the exact number. Many tailors work from a convention of roughly a quarter to a half inch of cuff showing, and some prefer a little more or a little less depending on cuff style and personal preference.
Your final fitting is where that convention meets your actual wrists. Ask your tailor what their standard is, then judge by eye and by photograph. The thing you are looking for is consistency on both arms and enough cuff to look intentional.
Do this check twice. Once with arms down, once with arms raised as if reaching for a doorframe. When you lift your arms, the sleeve rides up, and the shirt cuff may disappear or the jacket cuff may pull away from the wrist. A sleeve that is perfect at rest and too short when you reach is a classic sign that the armhole or sleeve pitch is not right. We return to this in the movement section.
Sleeve hang and pitch
Pitch is the angle at which the sleeve is set into the jacket. With a correct pitch, the sleeve hangs straight and slightly forward, following the natural curve of your arm. With a wrong pitch you see twisting wrinkles across the sleeve, or a diagonal drag from the sleeve head toward the front or back. These wrinkles usually appear as soon as the arms hang, and they are often noticeable in photographs.
If both sleeves show the same twisting, the pattern is the issue. If only one sleeve twists, check your posture first. Many people carry one shoulder slightly lower or forward, and a good tailor adjusts for that asymmetry deliberately. Do not assume a single twisting sleeve is a defect; ask what the tailor sees. Keep the question for the end of the final fitting if the tailor is busy.
Jacket length
Length is judged with the arms hanging. A frequent guide is that the jacket should cover the seat, and your cupped fingers should roughly meet the hem. As with the cuff, treat this as a convention and not a rule. A shorter, modern cut and a classic longer cut both exist, and the right one is the one you ordered. What you can check is that the hem is level front to back, level side to side, and in proportion to your legs when you view the whole figure.
Take a step back from the mirror, or have your helper take a full-length photo. Full-length photographs taken during the final fitting are also useful on pickup day. A jacket that is a little too long makes the legs look shorter and a jacket that is too short can look cut off. If you ordered a particular length and it differs from the order sheet, say so plainly.
Pocket and button details on the jacket
Check the pocket flaps and the placement of any pockets. Flaps should lie flat, not flip outward, and both should sit at the same height. If you ordered a ticket pocket or a breast pocket, confirm it is there. Check that the buttons on the sleeve, which are commonly decorative on a made-to-measure suit but functional on a fully bespoke one, match what you ordered.
If you ordered working sleeve buttonholes, test one. Working cuffs matter in one situation in particular: the tailor can no longer easily lengthen the sleeve, so any change has to come from shortening.
Trousers: rise, seat, break and hem
Jackets get the attention, but trousers are where many a final fitting quietly fails. You will sit in them for hours, dance in them and stand in photographs with the lower half of the suit in full view. They are also often cheaper and quicker to adjust than the jacket, so every finding here is worth raising.
Waist and rise
The waistband should sit at your natural waist or wherever the style you ordered places it, close to the body without pinching. Check that the button closes without tension and that the waistband does not gap at the back. Slip a finger between waistband and body; there should be a little room, but not a visible space. If you wear braces, the trousers should be cut to carry them, and the final fitting should be done with the braces on.
Rise is the distance from the crotch seam up to the waistband. Too short and the trousers pull when you sit. Too long and they bunch at the crotch and make the legs look short. The simplest test is the sitting test in the movement section, but you can already see it standing: horizontal pulling lines at the crotch usually mean the rise or the seat is too tight, and loose folds there usually mean it is too generous.
Seat and thighs
Look from the side and from the back. The seat should follow your shape without tension lines pointing toward the crotch, and without a baggy drop. The thighs should have room to bend. A useful habit is to take one comfortable step forward with each leg and watch the fabric. A smooth fold behind the knee is normal. Strong diagonal pulls from the hip are not.
Break and hem
Break is the fold that forms where the trouser front meets the shoe. A “no break” hem just touches the shoe. A slight break shows one gentle fold. A full break shows more. This is a style choice and no one setting is correct, so confirm that the hem matches what you chose, and that it matches in height on both legs. Check it with the dress shoes you will wear, not a pair you borrowed.
The back of the hem should be slightly longer than the front, following the shoe’s heel, so that it does not ride up as you walk. Stand naturally and look at the back view. If the hem tilts the wrong way or catches on the heel, that is a quick alteration and worth requesting.
If the trouser has a cuff, check that both cuffs are the same depth and that the fold sits cleanly. Plain hems should be level and well finished. Ask what stitching the tailor uses on the hem, and ask whether a hem can be let down later, since some alterations leave a permanent mark and others do not. Raise this at the final fitting, before the hem is cut.
Pockets and pocket contents
Put your phone, keys and wallet where you will actually carry them, or decide to leave them out. Do this early in the final fitting so the pockets are tested loaded. Check that pockets lie flat when empty and do not splay open. Slanted side pockets should close; a pocket that gapes will bulge at the hip. If a pocket spoils the line when loaded, the answer is usually to use another pocket or carry less, and it helps to find that out now rather than at the reception.
Movement tests that belong in every final fitting
A suit that fits only while you stand still is a photograph, not a garment. The movement pass takes about five minutes and is the heart of a good final fitting. Do it with the jacket buttoned first and then unbuttoned, because you will open and close it many times during the day.
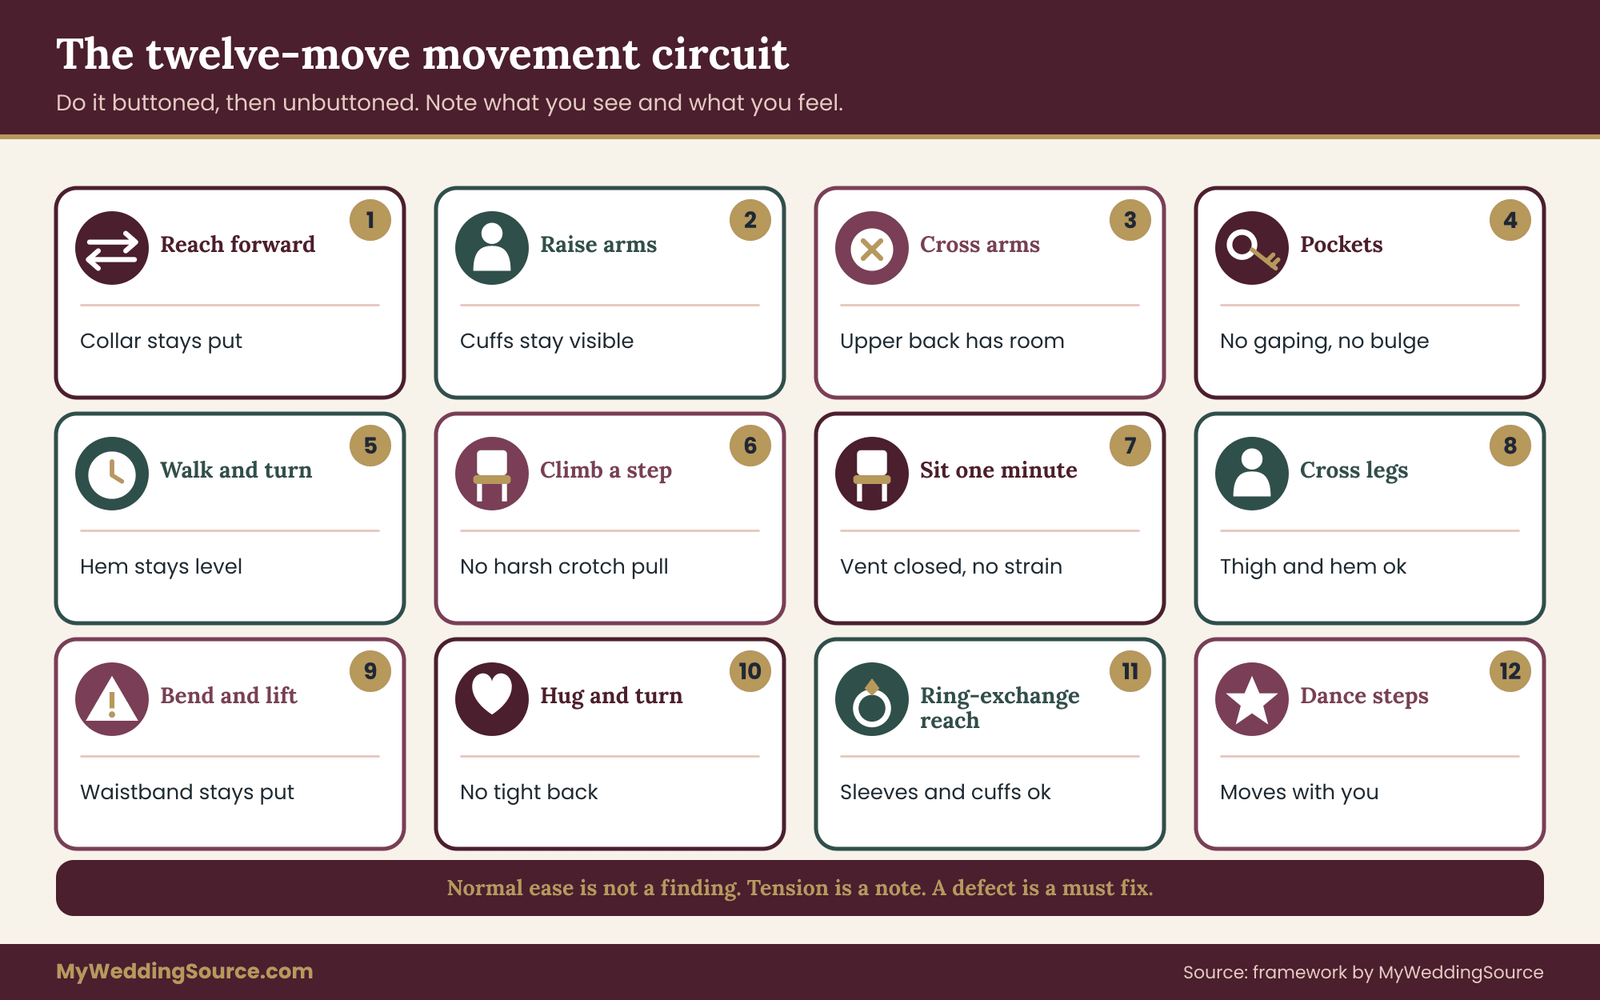
The movement circuit
Go through the following list slowly, and say what you feel as well as what you see. A tailor who watches you move will often catch what the mirror does not.
- Reach forward with both arms, as if hugging someone. Watch the back of the jacket and the collar. A little tension across the shoulder blades is normal; a hard horizontal pull, or a collar that lifts off your neck, is a finding.
- Raise both arms to shoulder height and then overhead. The jacket will lift; the question is by how much, and whether the sleeve rides up past the shirt cuff or the body of the jacket rides up past the waistband. Watch the sleeve cuffs and the lapels.
- Cross your arms lightly in front of you. This shows whether the upper back and the armholes have enough room.
- Reach into pockets. Put a hand into a trouser pocket and a jacket pocket. See whether the jacket pulls open or the pocket bulges.
- Take a few steps and turn around. Check that the hem stays level and that the trouser leg does not catch.
- Climb a stair or two if there is one, or lift your knee as if climbing. The trousers should move with you without a harsh pull at the crotch or the thigh.
- Sit down on a standard chair. This is the single most revealing test. Look at the buttoned jacket, whether the front pulls or the vent splays, and look at the trousers across the lap and at the thigh. Then unbutton and sit again.
- Cross your legs at the knee, and then uncross. Check the thigh and the hem.
- Bend to pick something up from the floor, such as a pen. Check the back of the trousers and the waistband.
- Hug and turn as you would at the reception, with the jacket buttoned and unbuttoned.
- Offer a hand and a ring-exchange motion, with your arm out and your hand turned, and then bring your arms together at the front.
- Dance a few steps, or at least sway and turn. This is a short test, not a performance. Keep it brief; the final fitting still has a paperwork half to finish.
How to read the results
After each movement, note two things: what you saw and what you felt. A suit can look fine and feel restricting, and that matters, because you will be wearing it for hours. A suit can also feel comfortable and show a flaw in the mirror, in which case the flaw will probably show up in photographs. Record both, because the final fitting is the only place you can compare the two.
Separate three types of result. Normal ease is a small shift that corrects itself when you return to standing. Tension is a pull that does not worry the eye but that you feel. A real defect is a visible distortion or a restriction that would affect something you need to do on the day, such as lifting your arms, sitting at a long dinner or moving a child onto your hip.
Normal ease is not a finding. Tension is a note. A defect is a must fix. Keep the same scale for the whole final fitting. This matches the three-level ranking you set up at the start of the final fitting.
The sitting test in detail
Because sitting is such a revealing action, it deserves a closer look. Sit as you would at the head table or in the ceremony seat, not in a posed way. Check these points:
- Does the jacket close cleanly, or does the button strain? If it strains, you will be opening it each time you sit, which is common, but the jacket should not be unable to close at all.
- Does the vent open to show the seat of the trousers? A small opening is normal, a wide gap is not.
- Do the trousers pull at the thigh or at the knee?
- Does the waistband dig in, or does it gap?
- Does the collar stay in place when you lean forward to pick up a glass?
Sit for a full minute, not a few seconds. A final fitting that rushes the sitting test misses the most useful minute. Comfort that disappears after sixty seconds becomes discomfort over a long dinner, and a wedding dinner is long.
Why you should repeat movement with the jacket open
Most jackets are worn open more often than closed once the ceremony ends, especially in the evening. An open jacket moves differently: the front edges swing, the lapels fall, the lining may show. Do the circuit once more, unbuttoned, and look at how the jacket drapes. This also tells you whether the lining is cut generously enough and whether the jacket looks tidy in motion.
If you plan to remove the jacket at the reception, check the waistcoat or shirt fit on its own too, since you will be seen without the jacket.
A symmetry audit with simple measurements
Human bodies are not symmetrical, and a good suit knows it. A tailor may deliberately cut one shoulder higher or one trouser leg longer to match your posture. What you want to catch in the final fitting is accidental asymmetry: differences that are not the result of your body, but of the construction.
What to compare, left against right
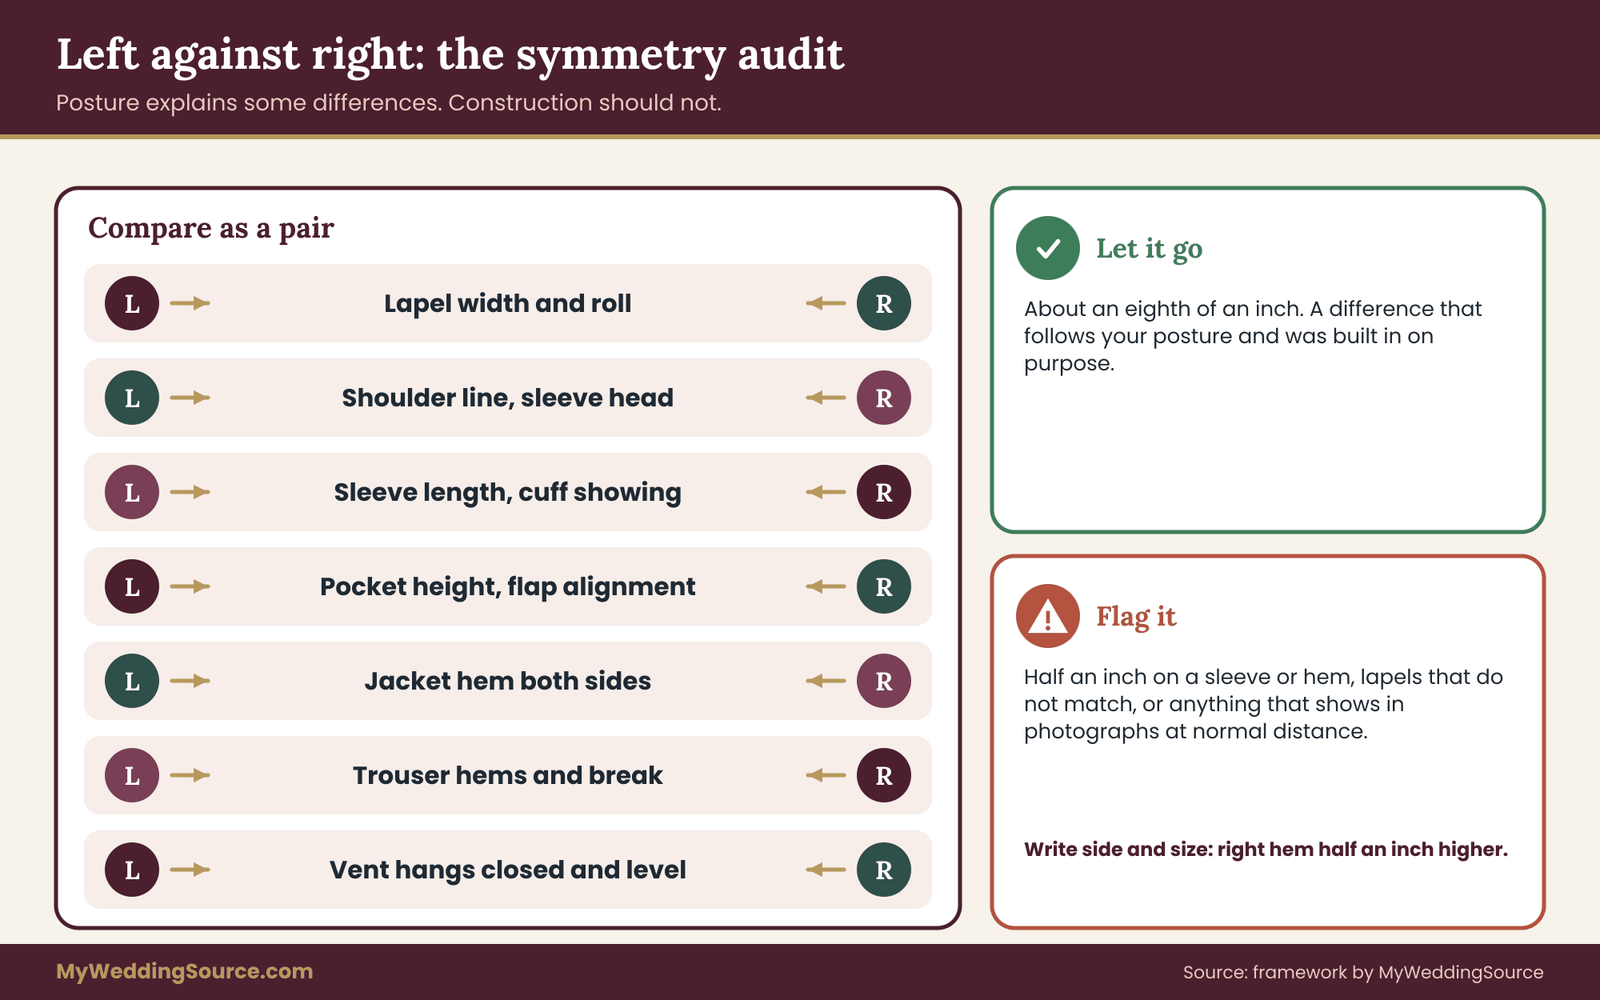
Stand straight in front of the three-way mirror or have a full-length photo taken. Do this part of the final fitting before any pins go in. Then compare, as a pair, each of the following:
- Lapel width and roll on each side.
- Shoulder line and the way each sleeve head lies.
- Sleeve length and the cuff showing on each wrist.
- Pocket height and flap alignment.
- The hem of the jacket on both sides.
- The two trouser hems and their break.
- The side vents or center vent, whether they hang closed and level.
Measurement helps here. Ask the tailor for a tape measure and check a few distances in the same way on each side: from the collar seam to the sleeve cuff, from the shoulder to the hem. The goal is not to find a perfect match. A final fitting that finds no difference at all is rare and should make you look twice.
It is to find a difference that is bigger than your posture would explain. An eighth of an inch is not worth a conversation; half an inch on a sleeve is.
Posture-driven asymmetry
Before you flag a difference, check whether it follows your body. If your right shoulder sits lower, the right sleeve may appear longer, and a thoughtful tailor will already have adjusted for that. Ask: “Did you build in any adjustment for my shoulders or my posture?” If the answer is yes, ask to see it on the order sheet. If the answer is no, you have a fair reason to ask for a correction.
This is also the moment to be honest about habits. If you carry a bag on one shoulder all week, or you stand with one hip out, your final fitting posture may differ from your wedding posture. Standing in your relaxed, usual way is better than standing in the most correct way you can manage, because the suit should be right for the person who will wear it, not for a model.
When asymmetry is a finding
Treat asymmetry as a finding when it is visible in photographs at normal distance, when it is larger than posture explains, or when it affects comfort. Write it with a side and a measure: “right trouser hem sits half an inch higher than left with the same shoe.” A line like that can be checked on pickup.
Also decide whether you want the correction to match the longer side or the shorter side. Shortening is easier than lengthening, so a hem or sleeve that can be shortened to match the other side is usually the practical fix.
Construction and finish: the details that fail later
Fit is what you see. Construction is what keeps the suit looking right after three hours of wearing it. A final fitting is not a factory inspection, and you are not expected to have a tailor’s eye, but a handful of simple checks catch the common finish problems before you take the suit home.
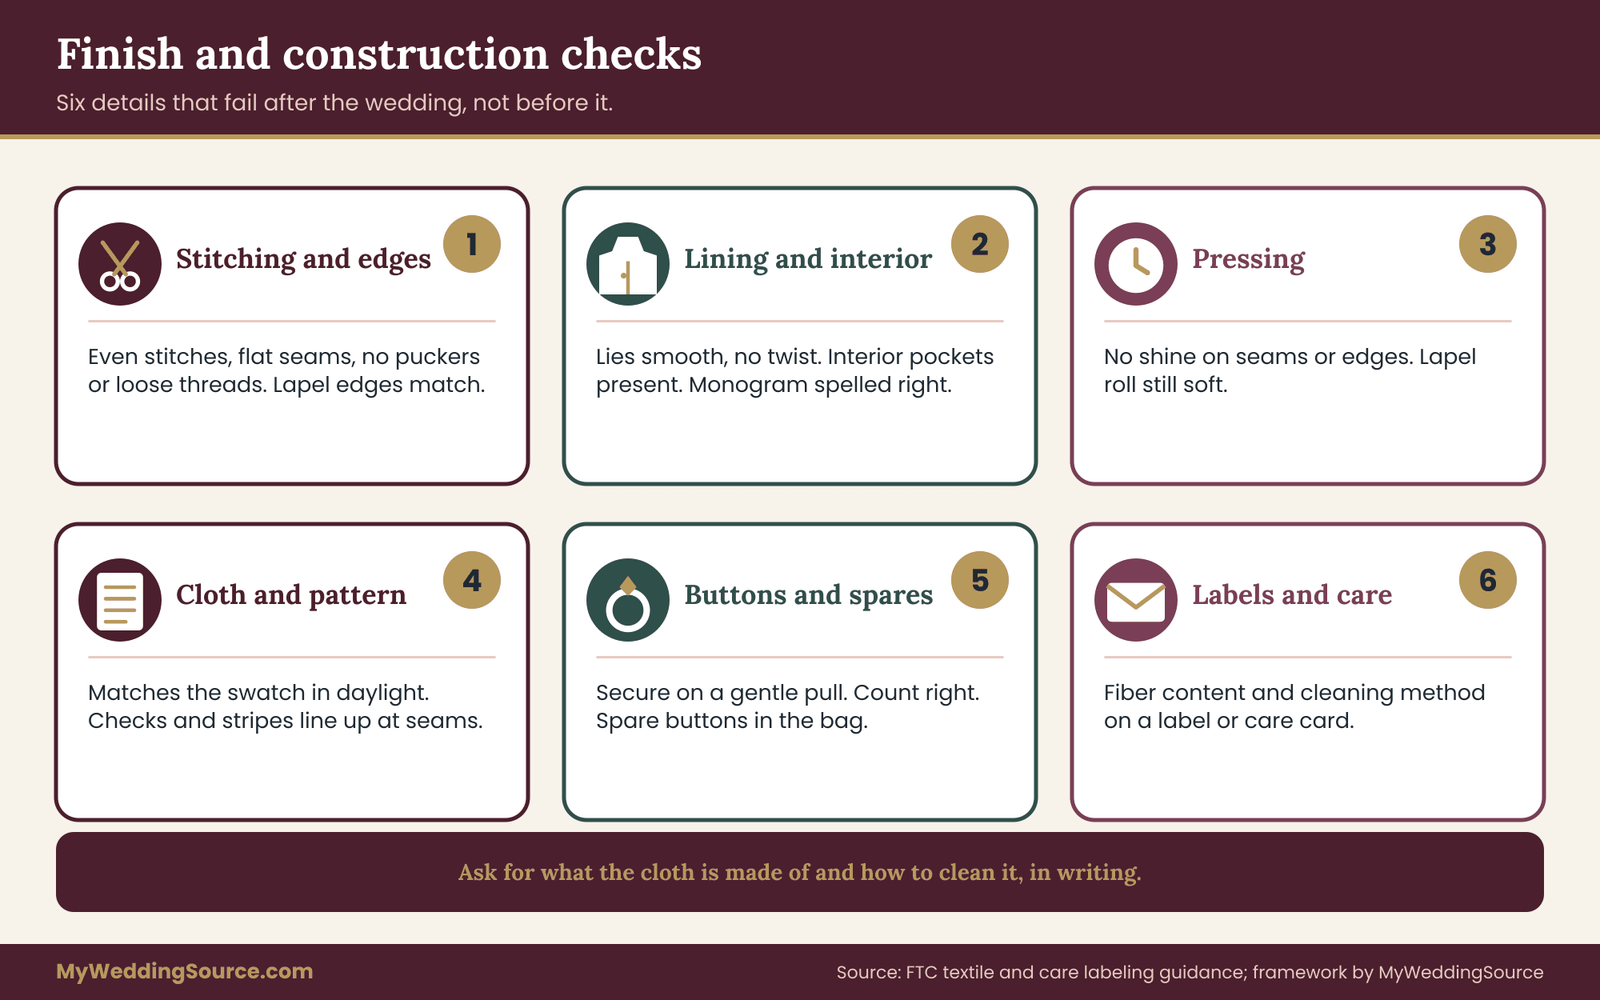
Stitching, seams and edges
Run your eye along the lapel edge, the pocket edges, the cuffs and the hem. Stitching should be even, and the thread should lie flat, with no loose ends, skipped stitches or puckering. Seams should lie flat along the shoulder, down the back and along the trouser leg. A seam that puckers can mean the thread tension was off or that the cloth was stretched while sewing.
Look at the lapel edge in particular. It should have a clean, slightly rolled edge, and the two lapels should look the same. Check the pocket corners for strain, and the buttonholes for clean, tight edges. Buttonholes should be tidy and the thread should match the fabric, or the contrast you chose.
Lining, interior and pressing
Open the jacket and look inside. The lining should lie smoothly without twisting, and it should be cut with enough room that it does not pull the outer cloth. The interior pockets should exist where you ordered them. If you asked for a monogram or a name label, check the spelling and the placement now. A misspelling is easy to fix before delivery and painful after. A final fitting is the cheapest time to catch it.
Pressing matters more than it appears. A jacket that has been pressed too hard can show a shine on wool, and a lapel pressed flat may lose its roll. Look for shine on seams and edges, and check the lapel roll once more. If something has been over-pressed, ask the tailor how it will be corrected, because some marks are permanent.
Fabric, color and pattern
Compare the cloth with the swatch or the reference on your order. Check the color in daylight as well as in the shop light, because some colors shift. If the suit has a pattern such as a check or a stripe, confirm that the pattern lines up across the front seam, at the pockets and across the back seam. Mismatched patterns at the seams are a recognized flaw and worth a note. Say so during the final fitting, not at home.
Rub a small hidden area gently and feel the cloth. You are checking that it feels like what you ordered, not testing it destructively. If you chose a particular fiber blend, ask to see the label that discloses what the cloth is made from.
Buttons, spare buttons and small parts
Check that every button is secure by giving it a gentle pull, that the number of buttons is right, and that the thread shank is long enough for the cloth. Ask for spare buttons, which tailors often provide, and ask for a small amount of spare thread or a mini repair patch if offered. If the shop does not usually include spares, you can ask for them to be sewn into the inside pocket or bagged with the suit.
Labels and care information
Textile products sold in the United States generally carry labels that disclose fiber content, country of origin and care instructions, under rules enforced by the Federal Trade Commission. Custom garments made for an individual customer can follow somewhat different practices, and the details depend on how the garment is made and sold.
You do not need to resolve that yourself. What you can do is ask the maker to tell you what the cloth is made of and how to clean it, and to write that on the receipt or on a care card if there is no sewn label.
This is not a trivial point for a groom suit. If you plan to have the suit steamed, pressed or cleaned after the wedding, the care information tells you what the cloth tolerates. The FTC’s pages on textile and care labeling are the place to confirm the current requirements, and you will find them in the sources at the end.
A short note on the interior check for smell and damp
If the suit has been stored or steamed before your appointment, smell the garment briefly and check the cloth for damp. A suit that feels damp may have been steamed just before you arrived, which is fine, but you should not accept a bagged garment that is still damp. It can grow marks and shape distortions in the bag.
Delivery acceptance: what to sign and what to hold back
Delivery acceptance is the step most couples never think about. It is the moment when you agree that the suit is what was ordered and that the shop has met its obligations. In practice it is the last item of the final fitting. Treat it as a formal step, even if the shop does not. The end of the final fitting is the natural moment for it. It protects you, and it protects the tailor too.
What acceptance means
Accepting a garment generally means you confirm it matches the order and that you have no outstanding objections. Once you have accepted it and taken it away, it is harder to argue later that something was wrong, because the shop can reasonably say you saw the suit and approved it. For a wedding suit, that matters. If you find a problem a week after you sign, a shop may treat it as a new request rather than a defect.
That does not mean you should refuse to accept. It means you should accept in stages. Accept the points that are right, list the points that are not, and sign only when the list is closed or when a dated plan for closing it is written down. That is what a careful final fitting ends with.
The acceptance sheet
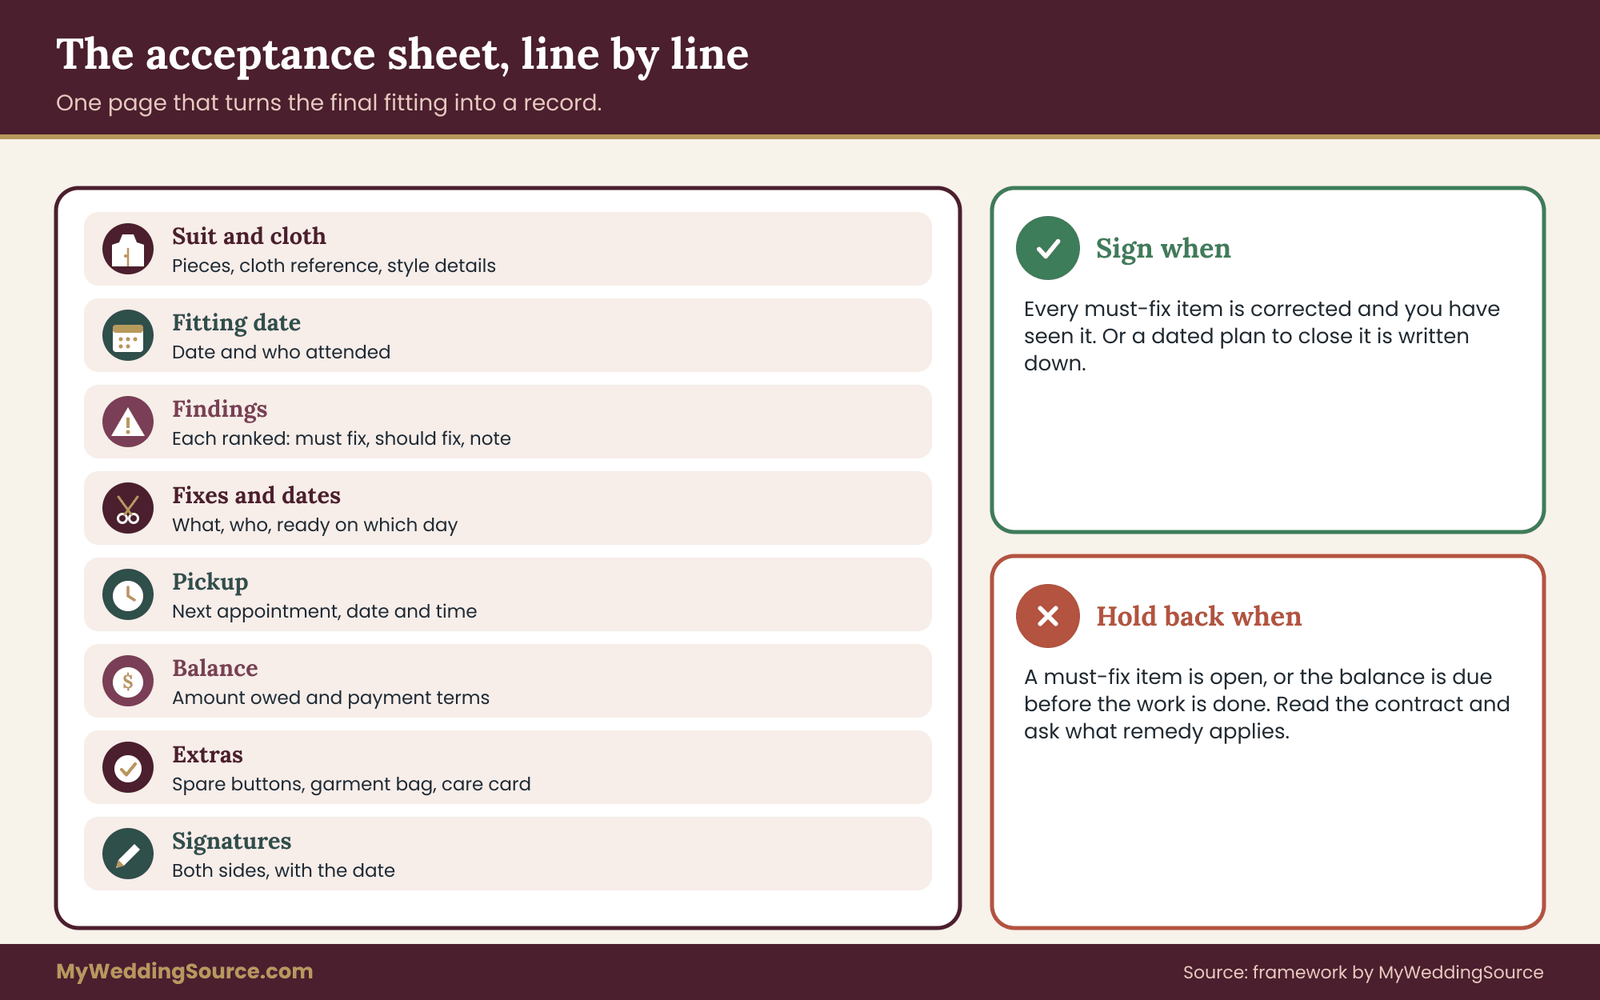
Ask for, or write yourself, a one-page sheet with these parts:
- The suit description: garment pieces, cloth reference, and style details.
- The date of the final fitting and who attended.
- The list of findings, each with the ranking you used: must fix, should fix, note.
- For each fix, what will be done, who will do it, and the date it will be ready.
- The next appointment or pickup date and time.
- The balance owed and the payment terms.
- Any spare items you were promised: buttons, extra trousers, a garment bag.
- Signatures and the date.
You can keep this brief. The sheet turns the final fitting into a record instead of a conversation. Many tailors will happily initial a short list you have written. The point is that you leave with something in writing, and that the tailor knows you will check it at pickup.
What to hold back
If the suit has must-fix items, do not accept it and do not make the final payment until those items are corrected and you have seen them. A fair arrangement is that you pay any balance at pickup, after you have checked the corrections. If the shop requires full payment before it begins the final adjustments, read the contract carefully and ask what remedy applies if the work is not completed to your satisfaction.
The wedding vendor contract guide explains how to read payment terms and remedy clauses, and the wedding cash-flow planning guide shows where final balances usually land in a wedding budget.
If you paid a deposit by credit card and later dispute a charge, the Consumer Financial Protection Bureau explains how billing disputes work and the time limits that apply. Those limits are short, so keep your receipts and your dated notes. A written acceptance sheet with open items is stronger evidence than a memory.
The pickup check
The pickup is a mini final fitting. Treat it as a second, shorter final fitting. Do not take the bag and leave. Try the suit on, in the shirt and shoes, and run through your list line by line. It takes ten minutes. Confirm each fix, run two or three of the movement tests, and then sign the acceptance. If a new problem has appeared, such as a hem that was shortened too much, raise it right then.
At this point the purchase order checklist on the site is a useful model, since it follows the same logic of scope, delivery and final acceptance across any vendor that supplies a physical product.
Packing and transport
Ask how the suit will be packed. A breathable garment bag, a proper hanger and tissue in the sleeves help it keep its shape. Plastic dry-cleaning film can trap moisture. If you will carry the suit on a plane or in a car, plan how: laid flat in a suit carrier, hung on a hook in the back seat and never folded in a trunk.
Ask the tailor for a simple folding or hanging method if you are traveling. If someone else will collect the suit for you, give them a note naming the person, the date and the check you want done.
What to do if you cannot attend the pickup
Sometimes you cannot be there. Delegate carefully. Send a trusted person with your checklist, ask them to photograph each finding being corrected, and ask the shop to confirm in writing that you authorize the pickup. A short message is enough. If anything is unclear, the helper should not sign acceptance on your behalf. They should photograph, pick up only if the shop allows return of the suit within a window, and call you.
Fix, redo or accept: comparing your options
By the end of the three passes you will probably have a list. Most lists are short and routine. A few contain something that is not a simple alteration. This section helps you decide what to do with each item, using the ranking you built during the final fitting and some plain cost-and-time logic.
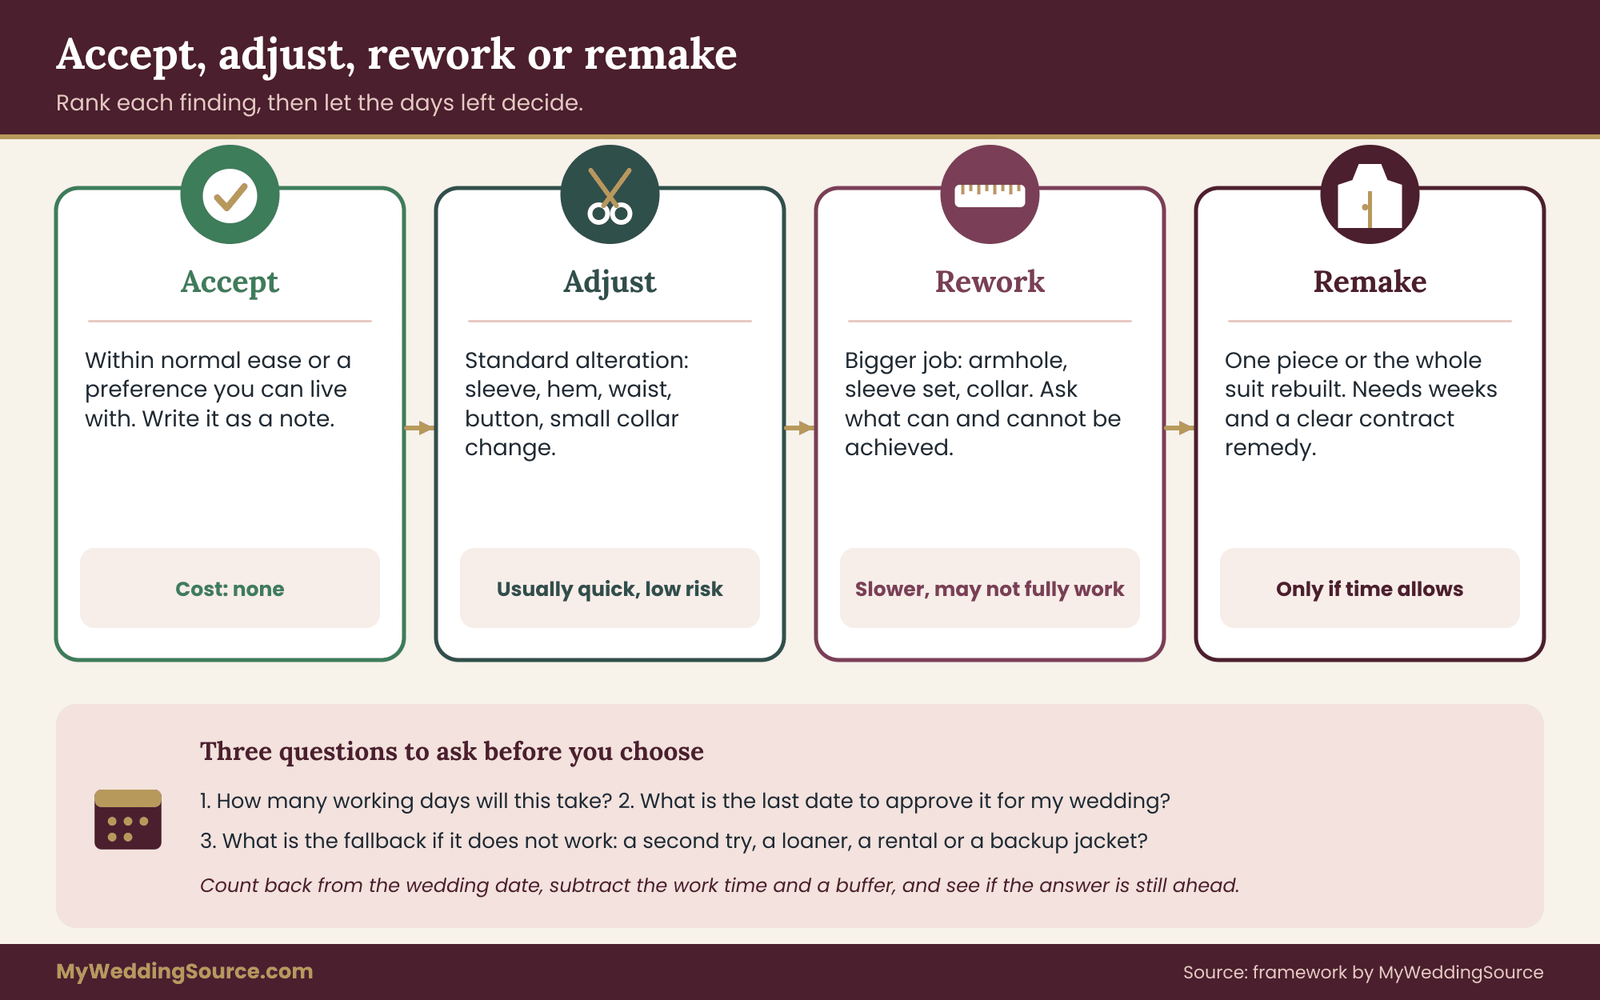
Four possible responses
For every finding, there are only four honest responses, and it helps to name them.
Accept. The issue is within normal ease, or it is a preference you can live with. You write it as a note and move on. Accepting a note is not a defeat; it is a way of keeping the list useful.
Adjust. The tailor can fix it with a standard alteration: a sleeve, a hem, a waist, a button position, a collar tweak. This is the usual outcome for most findings, and the question is only the date.
Rework. The fix is bigger than a standard alteration, such as changing shoulder construction, re-setting a sleeve, or re-cutting a collar. It takes longer, may carry some risk to the cloth, and may not fully succeed. Ask for a clear statement of what can be achieved and what cannot.
Remake. The suit, or one piece of it, is rebuilt. This is the most expensive option in time, and for a wedding with a fixed date it is often unrealistic unless you act early. Whether the shop will do it, and who pays, depends on the contract and on whether the error was the shop’s or a change of mind on your side.
Deciding by time left, not by feeling
The deciding factor is almost always calendar time. A rework or a remake that would be sensible with eight weeks left is a gamble with two. Ask the tailor three questions, and write down the answers.
First, how long will this specific correction take, in working days? Second, what is the latest date by which you must approve it for the suit to be ready for the wedding? Third, what is the fallback if it does not work, for example a loaner, a rental, or a different jacket?
Then do the arithmetic yourself. Count back from the wedding date, subtract the correction time, Do this sum at the final fitting, not afterward: count back from the wedding date, subtract the correction time, subtract a buffer for pickup and a possible second adjustment, and see whether the answer is still in the future.
If it is, proceed. If it is not, the choice is between accepting a known flaw, or choosing a backup. That is a real decision, and it is better to make it deliberately now than to discover it on the wedding morning.
Who bears the cost
A tailor will generally correct genuine mistakes in the garment at no charge, such as a sleeve cut shorter than the measurement on the order, a misspelled label or a wrong button. Changes that stem from your instructions or from a change in your body, such as weight loss, a different shoe height or a new preference, may be charged. The boundary can be fuzzy, which is why the order sheet and your notes matter.
Do not guess at the answer. The final fitting is the right time to ask, while the shop is still listening. Ask: “If I find something after pickup, how is it handled, and is there a time limit?” Then write the answer next to your notes. If the shop’s terms are vague on this point, treat it as a reason to settle your items at the final fitting, not later.
A comparison of the fix paths
Here is a prose comparison of the common responses so that you can match your finding to the right path.
A hem, cuff or sleeve length difference is almost always an adjustment. It is quick and low risk, and you should usually take it, especially if you may need to lengthen later, because lengthening is the harder direction and may not be possible.
A waist that is slightly tight or loose is usually an adjustment too, within the allowance the seams provide. Beyond that allowance the tailor may be working with cloth that is not there, and the honest answer will be that it cannot go further.
A collar gap is variable. Sometimes it is a small correction, and sometimes it points to shoulder or posture issues that need a deeper change. Ask the tailor which they believe it is and why, then ask how they will check that it worked.
A shoulder problem is rework or remake territory. Be wary of promises that it will be fine on the day, and ask for a plain statement of the risk.
A construction flaw, such as a puckered seam, a lopsided lapel or a pattern that does not match, is a quality issue. Raise it as such, and ask what the shop’s remedy is. This is not about being difficult; it is about the suit you paid for.
A worked example: three findings, three decisions
The following case is invented, for illustration only. It does not describe a real person or shop. It shows how the ranking and the calendar work together.
Marcus has a made-to-measure wool suit for a spring ceremony. His final fitting is scheduled three weeks before the wedding, and the shop has told him that standard adjustments take about a week and that it prefers to finish all work at least ten days before an event. He brings his wedding shirt, black oxford shoes, a belt, his phone and a friend.
What the three passes found
In pass one, Marcus notes that the jacket sleeves look fine at rest but that the left cuff shows about half an inch more shirt than the right, and the right trouser hem is slightly higher than the left over the same shoe. The collar sits well. The shoulders look right.
In pass two, he reaches forward, and the back of the jacket pulls across the shoulder blades, though the collar stays put. When he raises his arms, both sleeves ride up and the shirt cuffs disappear. When he sits, the jacket button strains slightly, the vent opens a little, and the trousers feel snug across the thigh.
In pass three, he checks the construction and finds the lining slightly twisted at the left armhole, and the interior label spells his surname with a missing letter.
How Marcus ranks and responds
He writes each line with side, size and requested action, and he ranks them.
The left cuff and right hem difference are should-fix items. Both are quick adjustments, and he asks the tailor to match the shorter side in each case.
The reach test, with a tight back, is a must-fix. He asks the tailor what the cause might be. The tailor says the armhole is slightly small for his shoulder movement and offers to open the armhole by a small amount, with a note that results depend on the cloth available in the seam. Marcus asks what happens if it does not work, and the tailor offers to reassess at pickup, with enough time left for one more attempt.
The sleeves riding up when he raises his arms are a note. Both sleeves do the same thing, which suggests it is a feature of the pattern. Marcus decides that he will not be holding his arms overhead for long, and he accepts it, but writes it down so that the pickup check includes it once more.
The trouser snugness while sitting is a should-fix. The tailor can release a little at the seat. The lining twist and the misspelled label are quick fixes and are listed too.
The decision and the paper trail
Marcus signs nothing yet. He asks the tailor to write the list on the shop’s own form or to initial his, with the dates: corrections ready in eight days, pickup appointment at that time, balance payable on pickup. He pays no further money until the pickup check. He photographs the issues, and he saves the photos with the date.
At pickup, he repeats the three passes in a shorter form. The sleeve and hem are level, the label is right, the armhole is more comfortable, and the seat is released. He still feels a little tension when he reaches forward, notes it as acceptable, and signs. The case shows the point of the process: nothing dramatic happened, but nothing was left to chance, and every decision is on paper.
The lesson is not the details of Marcus’s suit, which are invented. It is the order: find, rank, ask for a fix and a date, verify, then accept.
What the example does not claim
The example does not say these fixes always work. Alterations depend on the cloth, the seam allowance and the maker. It also does not suggest that every suit needs a list this long. Many final fittings produce two or three notes. The method is the same either way, and a short list takes only a few minutes.
Vendor questions, edge cases and the final week
The earlier sections assume a straightforward shop and a straightforward body. Real weddings add complications. This section collects the questions worth asking, the edge cases that change what you do at the final fitting, and a simple plan for the last days before the wedding.
Questions to ask the tailor, and what good answers sound like
You do not need to interrogate anyone. A handful of calm, specific questions at the final fitting tells you whether the shop is organized and whether you will be protected if something is off. Ask them in a friendly tone, and write down the answers. These questions belong at the start of the final fitting, not the end.
“What is your standard for sleeve cuff and trouser break on this suit?” A good answer names a convention and shows it on you. A vague answer suggests the shop works by eye, which is fine if the result is right, but it is harder to hold anyone to.
“What can still be changed, and what cannot?” A confident tailor will list what is easy, what is risky and what is impossible. Be wary of a shop that says everything can be fixed without explaining how.
“How long do the corrections take, and what is the latest date that works for my wedding?” You want a date, not a promise of “plenty of time.” If the shop quotes a week, ask whether that is business days and whether pickup falls inside it.
“If I find something after I take the suit home, how is it handled?” Look for a time limit and a process. If there is none, ask for one in writing.
“Is there a fallback if a correction does not work?” This might be a second attempt, a loaner, or a refund of a portion of the cost. Knowing the fallback tells you how much risk you are carrying.
“Can you put the corrections and dates in writing?” A shop that is organized will do it without fuss. A shop that resists is giving you information.
A friendly script for opening the conversation can be short:
“I would like to run through the suit carefully today and make a list. Can we agree that nothing is final until the list is closed?”
Most tailors respond well to this. It signals that you are serious and organized, and it spares them from a surprise complaint after delivery.
Weight changes and body changes
Many grooms lose or gain a few pounds before the wedding, whether through exercise, stress or the simple chaos of planning. A suit built to measurements taken weeks or months ago may no longer match. If your weight has changed since the order, say so at the start of the final fitting, and ask whether the garment has enough seam allowance to adjust. A tailor will tell you what is possible in either direction. Taking in is easier than letting out, because letting out requires cloth in the seams.
If you expect further change before the wedding, tell the tailor. A garment built tight for an expected weight loss that does not happen will fail in the movement pass. Aim for a fit that suits your body as it is, within a small margin, and leave the future out of it.
A suit from a remote or online order
If the suit was ordered from a measuring service that works remotely, you may have no earlier fitting to compare against. In that case, the final fitting is effectively your first, and it carries the weight of two. Book a local tailor to evaluate it if the vendor does not offer in-person service, and check the return and remake terms before you try it on.
Ask in writing how long the window for corrections is and whether the vendor pays for alterations or only reimburses part. The wedding vendor due diligence checklist covers the general questions worth asking any vendor before you commit.
Also confirm shipping and insurance if the suit travels. Carriers publish their own claim rules, and if a garment is lost or damaged in transit, you will need receipts and photos. The postal service and major carriers set time limits on claims, so ask the vendor which carrier is used and keep tracking records.
Destination and weather
If the wedding is abroad or in a hot or humid climate, test the suit for the conditions. A wool jacket that feels fine in a cool shop can be heavy in the heat. The final fitting is the moment to ask whether the lining is breathable, whether a half-lined jacket is an option, and how the cloth handles creasing after a flight.
If you are traveling, plan to hang the suit as soon as you arrive and to steam it lightly. The wedding day accessories planning guide offers a general approach to packing and backup items that applies to attire as well.
Matching sets and groomsmen
If your groomsmen wear related suits or a tailored vest and trousers, the final fitting for you is separate from theirs, but the pickup dates should be consistent. Ask the shop to confirm that all pieces for the group are ready on the same day or earlier. If a vest or waistcoat is part of your suit, test it as a separate garment: it should lie flat when you sit, the back strap should be adjustable, and the lower point should not ride above the trouser waistband.
Prior alterations and other people’s work
If you ask a second tailor to alter a suit that the first made, be aware that this can affect the first shop’s responsibility. Keep the original maker involved in decisions that change construction, and ask in writing whether outside alterations affect any remedy. If you have an urgent last-minute need, a local tailor can often do hem and cuff work, and you should tell the original shop what was changed. Say so as soon as the final fitting is over.
The final week
Once the suit is accepted, the work is not over. A short plan for the final week keeps the suit in good shape and gives you time to catch anything new.
- Seven to five days before: hang the suit in a closet, out of plastic if it is wool, with the jacket on a shaped hanger and the trousers on a clip hanger or folded over a padded bar. Do a short run-through with the shirt and shoes, to confirm nothing has shifted.
- Four to two days before: check the small items: spare buttons, pocket square, tie or bow tie, belt or braces, socks, cuff links. Steam gently if the cloth has creases, keeping the steamer a short distance from the cloth.
- The day before: lay out everything, including the garment bag for transport, and assign someone to carry it if you are traveling to the venue.
- The morning of: dress with time to spare, sit once and raise your arms once, and note anything that bothers you so that a helper can adjust it before photographs.
A last-minute check of the sort described above takes a few minutes, and it gives you a chance to ask the shop for a quick fix if something small has slipped. This is another reason to schedule the final fitting early: a small second appointment is a fix, and a late first appointment is a gamble.
When the suit arrives with a problem you missed
It happens. A groom takes the suit home, tries it on in the bedroom mirror and finds a flaw that did not show in the shop. Do not panic and do not alter it yourself. Photograph the issue in good light, note the date, and contact the shop quickly with a short message that says what you found, how it differs from your final fitting list and when the wedding is.
“I picked up the suit on the date shown and noticed the issue in the attached photo. The wedding is on the date below. Can you see me this week?”
A calm and specific message gets a faster answer than an angry one. A good final fitting list makes that message easy to write. If the shop does not respond, you will have a dated record, and a dispute can be handled by the steps described earlier. This is where the written acceptance sheet pays for itself, since it shows what was and was not on the list at pickup.
Keeping the suit after the wedding
A well-fitted custom suit usually outlasts the wedding by years. Keep the acceptance sheet, the order sheet and the care instructions in the same folder as your wedding records, since you may need them if the suit needs repair or if you order another. The guide to organizing wedding records after the event covers where to file them. If you gain or lose weight later, the order sheet will help any tailor see what the original build allowed.
Your next steps
You do not need to do everything in this guide. Here is a short order of work that covers the essentials.
- Find the order sheet. Get the written order with your measurements, the cloth reference, style choices and the shop’s remedy terms. If it does not exist, ask for it today.
- Book the final fitting with a buffer. Ask the shop how long corrections take and book the final fitting so that a second visit is possible. Treat the date as a gate.
- Collect what you will wear. The pressed wedding shirt, the shoes, the belt or braces, the tie and anything you will carry in your pockets.
- Plan the three passes. Print or copy the lists from this guide: still check, movement circuit, delivery check. Bring a friend and a phone.
- Write findings in the where, what, how much, action format and rank them as must fix, should fix and note.
- Get the corrections and dates in writing. Do not make a final payment until the must-fix items are corrected and you have seen them at pickup.
- Do a short pickup check with the shirt and shoes, repeat two or three movement tests, and sign the acceptance sheet only when the list is closed.
- Store and pack the suit with care, and keep the paperwork with your other records. For help with the wider timeline, the wedding planning checklist shows where attire fits among everything else, and the fit and alterations guide is a useful companion if the wedding party includes tailored gowns.
If you do only one thing, do step two. A final fitting with time to spare turns almost every problem into a small one.
FAQ
What is a final fitting for a custom suit?
It is the last scheduled appointment where you try on the nearly finished suit and the tailor makes small corrections before delivery. For a groom, it works best as an inspection with three parts: a still check of fit, a movement check, and a delivery check of the order, finish and paperwork. Anything found here can usually be fixed without a new garment.
How long before the wedding should the final fitting happen?
Ask the shop how long corrections take and how long it needs before an event, then work backward and add a buffer for pickup and a possible second adjustment. A later date leaves no room to fix anything. An earlier date costs you little, and a quick second visit for a small correction is far easier than a first visit with no time left.
What should I wear to the final fitting?
Wear what you will wear on the wedding day: the pressed wedding shirt, the dress shoes, the belt or braces, and the same undershirt or none. Bring your usual pocket items and a phone for photographs. A different shirt or shoe changes the collar, cuff and break, so judging the suit in the wrong ones can hide real problems.
What movements should I test in a custom suit?
Reach forward as if hugging, raise both arms, cross your arms, reach into pockets, walk, climb a step, sit for a full minute, cross your legs, bend, turn and dance a few steps. Do them buttoned and unbuttoned. Sitting and reaching are the most revealing, because they stress the back, the collar, the seat and the sleeves.
Is some asymmetry normal in a custom suit?
Yes. Bodies are not symmetrical, and a good tailor may cut one shoulder or sleeve differently to match yours. What to flag is asymmetry that your posture does not explain, such as sleeves or trouser hems that differ by half an inch, lapels that do not match, or pockets at different heights. Ask whether any adjustment for posture was built in.
Should I pay the balance before the suit is corrected?
It is usually safer to pay the balance at pickup, after you have checked that the corrections were made. Read your contract first, since some shops require payment before final work begins. If so, ask in writing what remedy applies if the work falls short, and keep receipts and dated photographs in case you later need to dispute a charge.
What if I find a problem after I take the suit home?
Photograph it in good light, note the date and contact the shop promptly with a short, specific message that includes the wedding date. Do not alter the suit yourself or let an outside tailor change the construction without telling the shop. Your acceptance sheet shows what was on the list at pickup, which helps in resolving it.
Can a custom suit be remade if the shoulders are wrong?
Sometimes, but not always, and not quickly. Shoulders define the structure of a jacket, so moving them is a major job, and a remake needs weeks. Ask the tailor what can be done, what the risk is and what the fallback is, then count the days left before the wedding. If time is short, a backup jacket may be the safer choice.
Sources
- Federal Trade Commission, business guidance on textile and care labeling rules: https://www.ftc.gov/
- FTC consumer information on shopping, refunds and complaints: https://consumer.ftc.gov/
- Consumer Financial Protection Bureau, credit card billing disputes and consumer complaints: https://www.consumerfinance.gov/
- USA.gov, consumer protection and how to file a complaint: https://www.usa.gov/
- International Organization for Standardization, standards on clothing size designation and body measurement: https://www.iso.org/
- ASTM International, textile and apparel standards: https://www.astm.org/
- AATCC, textile testing and care standards: https://www.aatcc.org/
- United States Postal Service, insurance and claims for shipped items: https://www.usps.com/
- National Institute of Standards and Technology, measurement and standards information: https://www.nist.gov/