
A bridal suit worn outdoors has to work at several temperatures, not one. This guide gives you a temperature and layering change checklist for the whole day, so every layer of your bridal suit has a job, a reason and a person responsible for handing it to you.
Plan a bridal suit for an outdoor wedding as a stack of three layers (a base layer next to the skin, the bridal suit itself, and an outer layer you can add or remove) and plan each change point in the day: dressing, ceremony, photos, cocktail hour, dinner and dancing. Fit the bridal suit while wearing the actual layers, write down the temperature you expect at each change point, and name one person who carries the extras. If you can say what you will add or remove at each point, the bridal suit will feel right at any hour.
Most advice about wearing a bridal suit outside focuses on the cloth. That matters, and another guide on this site covers how to compare fabrics. This guide starts one step later. Once you know the cloth you like, the question is what happens to a person wearing it for nine or ten hours while the sun moves, the wind changes and the evening cools.
A bridal suit does not have the built-in layering options of a gown with a removable overskirt or a long veil, so the layering has to be designed on purpose.
A short note on scope. This is general planning information, not legal, tax or financial advice. Weather, venue rules and heater safety rules differ by place, so where a rule matters, check it with the venue and with the agency that issues it.
What a bridal suit asks of you outdoors
A bridal suit is a tailored jacket with trousers or a skirt, worn as the main wedding outfit. Some people wear a matching set, some wear a jacket over a jumpsuit, and some build the bridal suit outfit from separate pieces. For this guide, the label covers all of those. What they share is a structured, usually lined jacket and a clear separation between inner and outer layers, and that structure creates both the opportunity and the problem.
The opportunity is that a jacket is an easy layer to take off. A bride in a gown cannot easily shed anything without a plan. A bride in a bridal suit can remove the jacket in seconds, and that single action changes how warm she is more than almost any other choice in the bridal suit outfit.
The problem is that the jacket is also the main visual statement. Take it off and the bridal suit outfit changes character. If the shirt or top underneath was chosen only as an afterthought, the jacket-off moment may look unfinished, or the layer may be see-through, damp or creased. So the base layer is not a hidden detail. It is a second outfit that must be good enough to be seen.
The three questions behind every layering choice
Before comparing any garments, answer three questions in writing. They keep the planning honest, because it is easy to get lost in products.
First, what is the lowest temperature I will be standing in, and for how long? A ten-minute photo session at the cool end of the day is different from a two-hour reception outside.
Second, what is the warmest, sunniest moment, and can I escape it? A ceremony in full sun with no shade is a bigger demand than a ceremony under a tree.
Third, who or what is available to help me adjust? A venue with a heated tent, a bridal suite and a coat check offers more options than an open field with a parking lot.
Those three answers shape everything that follows. If the answers are uncertain, the plan should lean toward more adjustable layers, not toward a single “perfect” thickness.
Why one comfortable fitting does not prove comfort outdoors
Many people try on a bridal suit in an air-conditioned shop, feel good, and assume the job is done. A fitting room tells you about fit, not about temperature. It has no wind, no direct sun, no ground cold coming up through your shoes, and no hour of standing still. Fitting is necessary, and a later section covers how to run it. But you also need a separate test of the layers in conditions that resemble the day. That is the purpose of the checklist in this guide.
Reading the temperature swing across the wedding day
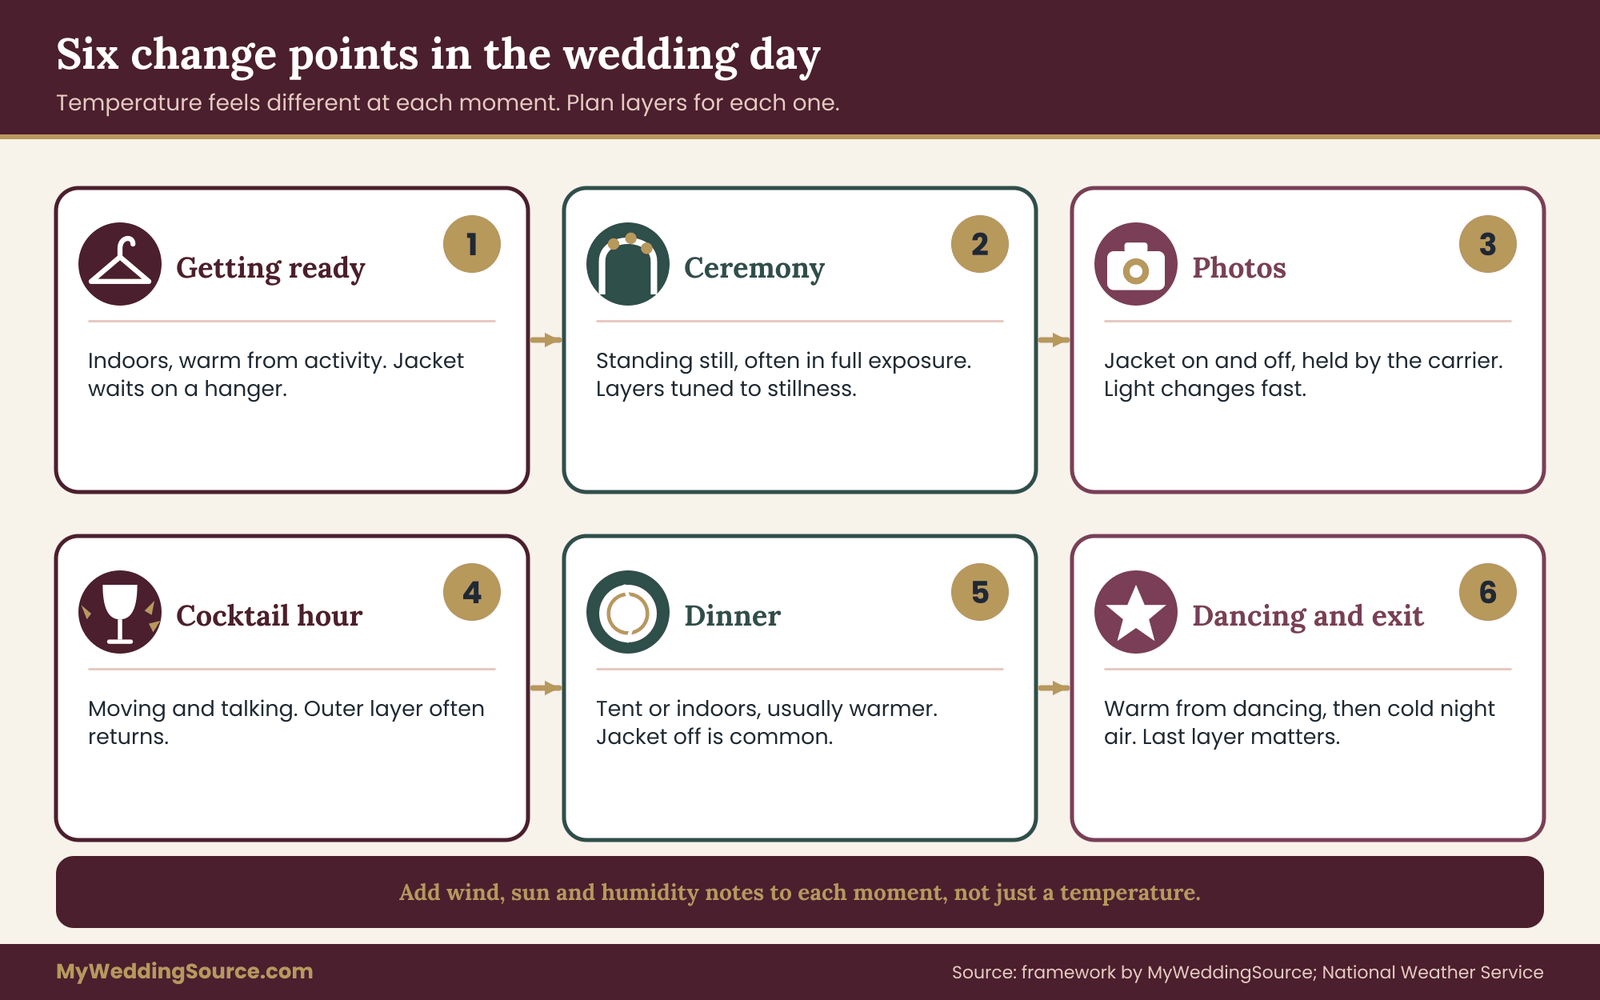
Outdoor weddings are rarely one temperature. They are a sequence. The simplest way to plan is to split the day into six change points and attach a likely temperature feeling to each. You do not need exact forecasts yet. You need a rough shape, which you will refine as the date approaches.
Getting ready. Usually indoors, usually controlled. You are warm from activity, hair dryers and a crowded room. This is where people overdress, because the bridal suit goes on early and the body is already warm.
The ceremony. You stand still, often in full exposure, for a period set by your officiant. Standing still is colder than walking and, in sun, hotter than shade. Your layers should be tuned to this stationary state.
Photos. Family and couple portraits often happen right after the ceremony, at the brightest or the coolest time of day, depending on the schedule. This is also when the jacket is most likely to be added, removed and held.
Cocktail hour. You are moving, talking and probably holding a drink, in whatever conditions the venue provides. The layer that suits standing at the altar is often wrong for walking among guests.
Dinner. Many dinners are indoors or under a tent, so temperature often rises again, with more people and heat from cooking. Jacket-off is common here.
Dancing and exit. Activity makes you warm, then the exit into night air makes you cold quickly. The final layer decision often matters most for the last photos and the departure, which are also among the most photographed moments.
Turning the day into a timeline
Ask your venue and your planner for the real schedule, then place the six change points on it. If the ceremony is at four in the afternoon in late autumn, the sun may set during the cocktail hour, and your coldest time arrives earlier than you expect. If the ceremony is at noon in midsummer, the heat peak is during the ceremony itself, and the evening may be pleasant.
Sunset time for your date and location is public information, and the National Weather Service publishes forecasts and hourly temperature outlooks for the days leading up to an event. Use those tools instead of a guess, and check them at fixed intervals: when you buy, a month before, one week before, and the morning of the wedding.
Allowing for the gap between air temperature and how you feel
A reported temperature is not the same as what your body experiences. Wind makes cool air feel colder, and the National Weather Service publishes a wind chill measure for cold conditions. Humidity makes hot air feel hotter, and the heat index is the equivalent for the warm side. Direct sun adds more heat than shade at the same air temperature, and a dark suit absorbs more than a light one.
So when you write down a temperature for each change point, add a short note about wind, sun and humidity. A line such as “ceremony: mild, sun on my back, light breeze” is more useful than “68 degrees.” The note tells you which layer problem to solve. In this case you might remove a heavy lining, but keep a light jacket for the breeze.
A final point on timing. Plan the first change point, getting ready, as if you were going to stay in the bridal suit until the end. People often put the jacket on too early, then spend an hour sweating in it before the photographer arrives. The jacket can wait. The trousers or skirt and the base layer go on first, and the jacket goes on at the last responsible moment, held by someone who will also be there to take it back. ## The three-layer stack for a bridal suit
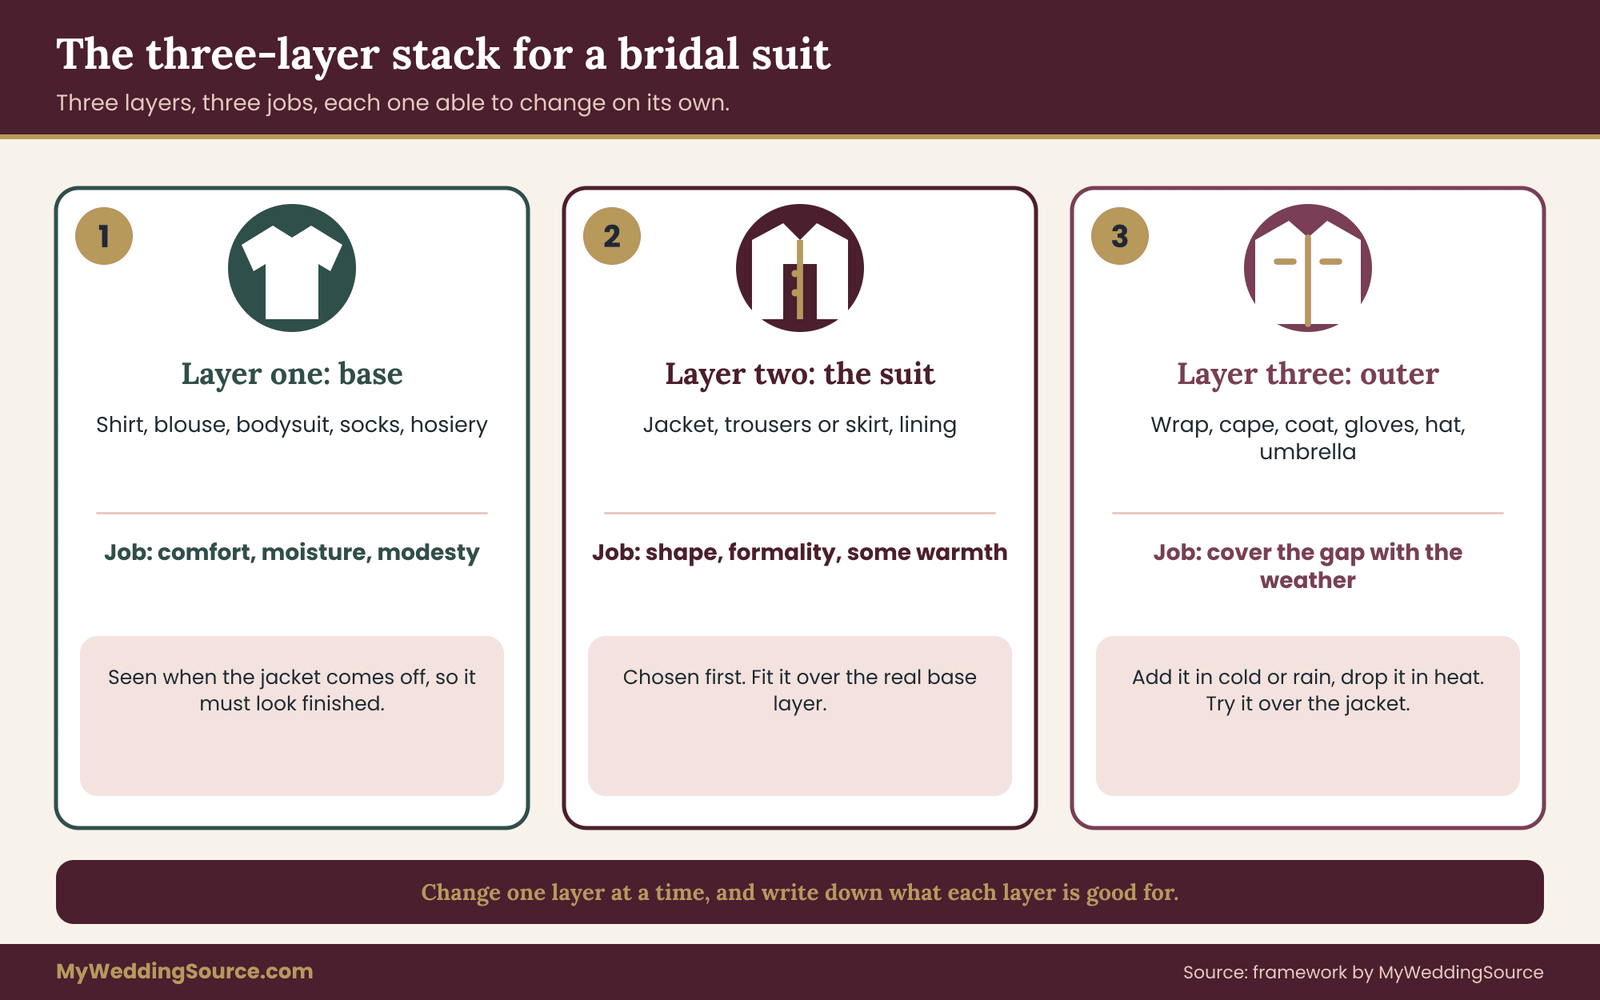
Think of the bridal suit outfit as three layers with three different jobs. Naming them keeps the planning simple, and it makes conversations with a tailor, a stylist or a friend much shorter.
Layer one is the base. This is whatever touches your skin: a shirt, blouse, bodysuit, camisole, thin knit top or bralette, plus undergarments, socks and hosiery. Its jobs are comfort, moisture handling and modesty. It is also the layer people see when the jacket comes off, so it must look intentional.
Layer two is the bridal suit. The jacket and trousers or skirt, with whatever lining they carry. Its jobs are shape, formality and moderate insulation. It is the layer you chose the wedding around.
Layer three is the outer layer. Anything you add on top or beside the bridal suit for weather: a wrap, a cape, a coat, a long cardigan, a shawl, gloves, a hat or a parasol. Its job is to cover the gap between the bridal suit’s comfort range and the day’s actual conditions.
The idea is that each layer can change independently. If it is cold, you add layer three. If it is hot, you drop layer three and then, if needed, layer two’s jacket. If it rains, layer three changes character and becomes a rain layer. Because the layers are separate, you are never forced to choose between sweating in everything and shivering in nothing.
Giving each layer a comfort band
A comfort band is a plain-language range, written by you, for the conditions where a layer works. It is not a lab number. For example, you might decide that your bridal suit with a light base layer feels right on a mild, still day, too warm in strong sun, and too thin in an evening breeze. That is your bridal suit’s band.
Write one band for each layer after you have worn it for at least an hour. A band can be as simple as “fine in shade, too warm in sun” or “good for the first hour after sunset only.” These notes become the heart of the checklist later in the guide. They are your own evidence, based on your own body, not a claim about any fabric in general.
Avoid the temptation to copy a band from a product page or a friend. Two people in the same jacket can feel different temperatures. Differences in body build, circulation and nerves are real, and nerves on the wedding day raise body temperature for many people.
How the layers interact
Layers are not independent in every way, so check the following interactions when you try them together.
Bulk is the first one. A thick base layer under a fitted jacket can pull the shoulders and make the sleeves ride up when you raise your arms. A thin base layer under a roomy jacket is fine, but a roomy jacket may not hold its shape without a layer of body underneath. The fitting section later in this guide shows how to test this.
Friction is the second. A slippery base layer under a slippery lining can make the jacket slide, or can make a shirt untuck. A slightly textured base layer holds better, and a tuck-in bodysuit removes the problem.
Moisture is the third. Cotton absorbs sweat and stays damp, which feels cold when the air cools. Some synthetic fibers move moisture but can hold odor. Merino wool and fine silk blends are often used for a base layer, and many people find them comfortable across a range of temperatures, but check the care label and test for itch before relying on any of them.
Color is the fourth. A pale blouse under a dark jacket looks crisp. A semi-sheer blouse in direct sun may show the outline of the layer beneath. Hold the base layer up to a window and, if you can see your hand through it, think about what that will mean in photographs.
The role of the accessories layer
Gloves, scarves, hats, hosiery and shoes are small layers that change how you feel more than their size suggests. The site has a full guide on planning wedding day accessories, which covers compatibility, movement and backups for those items. For temperature, the useful points are brief. Feet lose comfort first in cold grass, so warm socks or thicker hosiery matter.
A light hat or parasol reduces direct sun on the head and shoulders. Thin gloves protect hands in cool air and still allow a ring exchange, though you should practice that moment with the gloves on before the wedding.
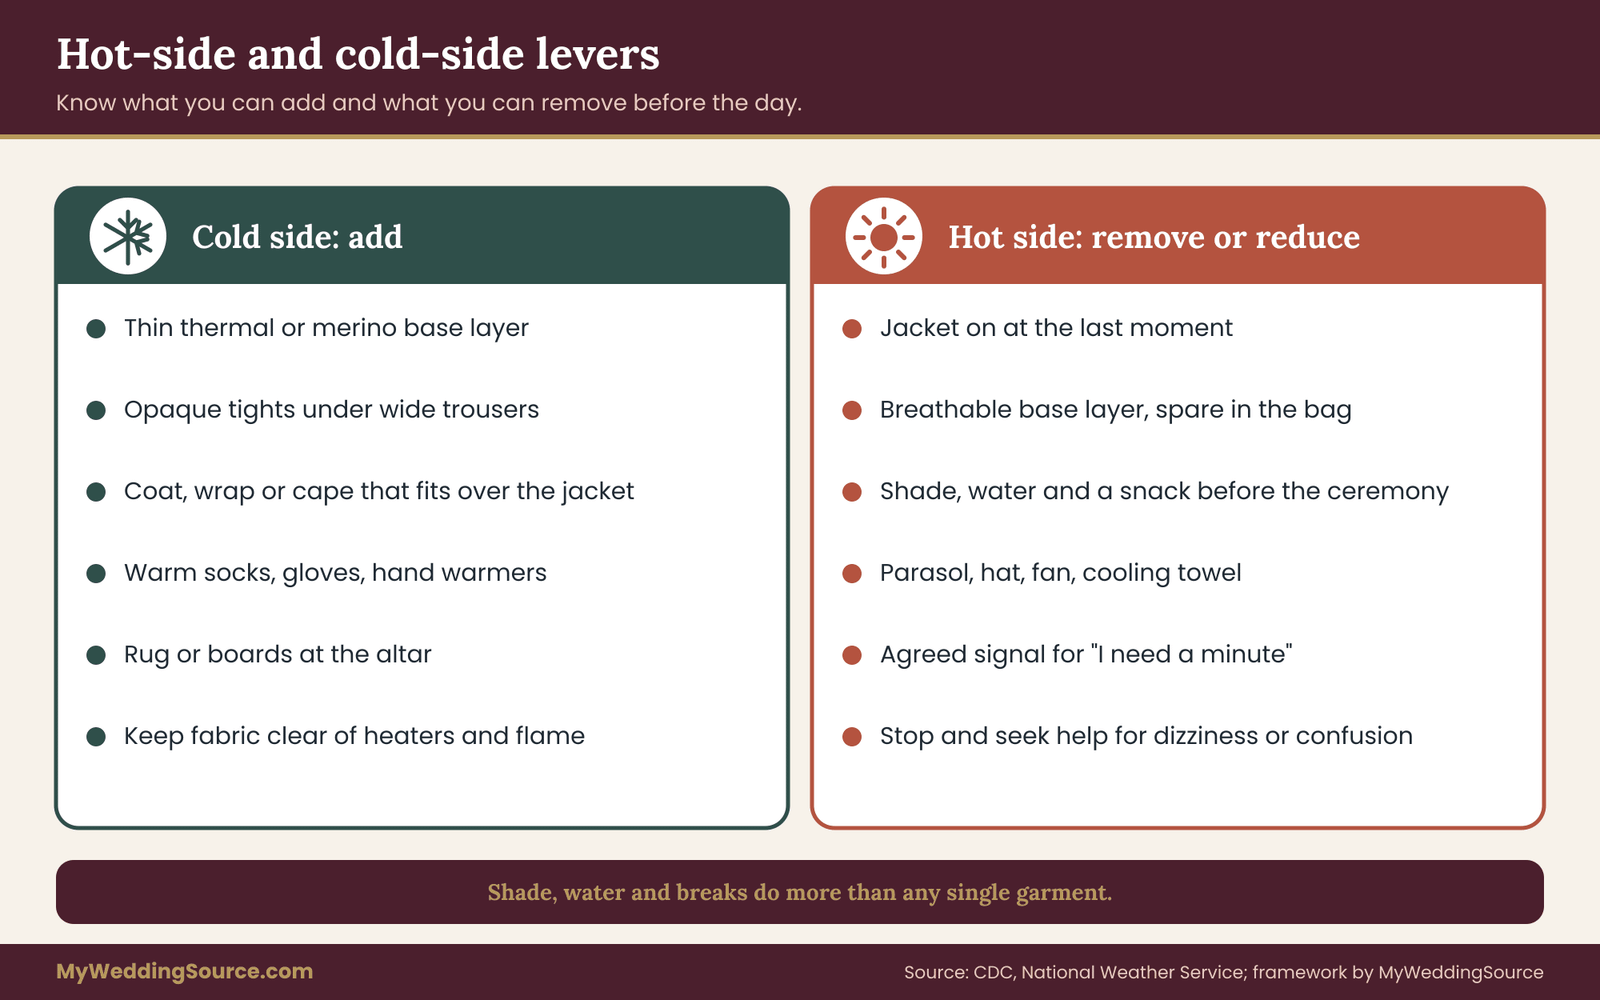
Cold-side layers: wraps, coats and warm basics
If your ceremony or evening is likely to be cool, the cold side of the plan matters most. The aim is to add warmth without wrecking the silhouette of the bridal suit, and without making the jacket-off moment look awkward.
Start with the base layer
The cheapest warmth is in the base layer. A thin thermal top or a fine merino camisole under a shirt adds comfort without adding visible bulk. Because the layer is thin, it usually does not change how the jacket fits, but test it, because even small additions can tighten a snug sleeve.
For the lower half, opaque tights or fine thermal leggings under trousers are an option when the trousers are cut wide enough. Check the break of the trouser leg and how the hem sits over the shoe once the leggings are on. A trouser that sat perfectly without leggings may pull or bunch with them. This is a fitting question, and you should settle it with your tailor before the last alteration is stitched.
Choose an outer layer that suits the bridal suit
The outer layer is a style decision as much as a warmth decision. Several types work with a bridal suit, and each has a trade-off.
A wrap or shawl is easy to add and remove, and it keeps the jacket visible. Its drawback is that it slips and needs a hand, which makes holding a bouquet awkward. Pin it only if you are certain a pin will not mark the fabric.
A cape or cloak can look dramatic over a bridal suit and moves with you. It leaves the arms free in some designs, but it can catch wind. If you are considering a cape, the main point for temperature is simple: try it outdoors in a breeze before buying.
A long coat in a complementary color gives real warmth for a cold-weather wedding. It must fit over the jacket, which means the shoulders and sleeves need extra room. Try the coat while wearing the bridal suit jacket, not instead of it. A coat sized for a bare shirt will not close properly over a lined jacket.
A long cardigan or knit layer is soft and comfortable, but it can look casual against a formal jacket. It may suit a relaxed outdoor venue better than a formal ceremony.
A faux or real fur stole or wrap, or any item made from material you have questions about, is a personal choice. Whatever you pick, check the care label, and keep it away from candles and heaters.
Heat sources, heaters and fire safety
If the venue offers patio heaters, fire pits or a heated tent, ask how they work and where they will be positioned. Fabric near a radiant heater or an open flame is a safety issue. The National Fire Protection Association and the Consumer Product Safety Commission both publish safety guidance for heaters and fire. A loose wrap or a long sleeve near a flame is a real hazard, so keep clearances the venue states and never stand with your back close to a hot unit.
Do not rely on a heater as your only plan. Wind moves warmth away, heaters may run out of fuel, and a heated tent only helps if you are inside it. Treat any heater as a bonus, and let your layers do the main work.
A realistic cold-weather sequence
Picture a ceremony in the cool part of the year, set outdoors in the late afternoon. A sensible sequence looks like this.
At getting ready, put on the thermal base layer, the trousers and the blouse. Keep the jacket and coat on a hanger. At the start of the processional, add the jacket and, if the air is cold, the coat or wrap, held by a helper until the last moment.
During the ceremony, keep the layer on and keep hands warm. After the ceremony, move to the portrait spot and, if the sun is gone, keep the outer layer on until the photographer is ready, then remove it for the photos that need a clean outline.
During cocktail hour, put the coat back on while you walk and talk. At dinner, take it off in the warm tent. For the dance, remove the jacket if needed, and put everything back on for the exit. Every one of those steps needs a person and a place, and the checklist section turns that into a form you can fill in.
What not to do
Do not stack so many layers that the jacket will not fasten. Do not rely on a single oversized coat bought “in case,” because it will be heavy and awkward to hold. Do not buy a layer that you have not worn outdoors, because it may fail in wind, rain or static. And do not forget that your hands, neck and feet decide how cold you feel, even when your torso is warm.
For the bridal suit’s own fit with those layers, the wedding dress fit and alterations guide is a useful companion, since many of its fitting checks apply to tailored garments of any kind. ## Hot-side planning for a bridal suit
Heat is the problem that most often surprises people in a bridal suit, because a lined jacket, a fitted waistband and long trousers or a long skirt leave little room for air. The hot-side plan has two goals: reduce the heat you generate and absorb, and know when to stop and cool down.
Reduce what the bridal suit traps
Start with the layers closest to the body. A breathable base layer matters more than the jacket’s cloth, because it controls moisture at the skin. Cotton lawn, fine linen, thin silk and some lightweight knits all let air move, and each has a downside. Cotton and linen can show sweat marks. Silk can show water spots.
Check which kind of mark is most visible in the color you chose, and pick a base layer color that hides it. Mid-tones usually hide moisture better than very light shades or very dark ones, though a quick test with a damp cloth on a swatch tells you more than any rule.
Consider whether the jacket needs a full lining. A half lining, or an unlined jacket with finished seams, removes a layer of trapped heat, but it changes how the jacket hangs and may show seam work inside. Your tailor can tell you what is possible for your particular garment. Do not cut or remove a lining yourself. It is part of how the jacket holds its shape.
Color affects heat. A dark bridal suit absorbs more sun than a pale one, and a pale one reflects more. If the ceremony is in full midday sun and the bridal suit is deep navy or black, plan for more shade, a shorter ceremony or an earlier jacket-off.
The jacket-off plan
A jacket that comes off in a planned moment looks relaxed. A jacket that comes off in a panic looks like a problem. So agree in advance when the jacket can come off and what the bridal suit outfit looks like without it.
Decide, with your partner and your photographer, which photos need the jacket on. Typically that means the ceremony, the formal couple portraits and any family portraits. Everything else can be jacket-off. Pass that list to the photographer so no one has to ask in the heat.
Then decide where the jacket goes. A sturdy hanger, a garment bag, a clean chair back in shade and a named helper are all better than a pile on a bench. Jackets left in the sun can become hot to the touch, and a jacket left on grass can pick up damp and stains.
Make sure the shirt or blouse underneath is a finished outfit. It should be pressed, well fitting, and still intact after a day of movement. Have a spare, in case the first one is soaked or marked. A second base layer is a small, light backup that is worth packing.
Cooling strategies that are safe and discreet
Small, quiet tools help. Cold water, shade and frequent breaks help more than any garment. The Centers for Disease Control and Prevention publishes guidance on heat and health, including the signs of heat-related illness, and the National Weather Service publishes heat safety information. The key points are familiar. Drink water regularly, take breaks in shade or air conditioning, and stop and seek help if you feel dizzy, confused, faint or unusually nauseated.
Wedding days put people at risk in a particular way. Nerves, skipped meals, alcohol, long standing and layers all add up. If you are in a bridal suit in warm weather, plan water, a snack and a shaded sitting spot before the ceremony, and agree on a signal with your partner or a helper that means “I need a minute.” Make sure the officiant and photographer know the signal does not mean anything is wrong with the relationship. It just means the bride needs shade.
Other discreet tools include a small clip-on or handheld fan, a cooling towel kept in a cooler, blotting papers for the face, a spare base layer, and a travel-size deodorant. Check that anything you wear on skin will not stain the jacket lining. A cooling towel is best used on the neck before and after the ceremony, then tucked away for photos.
Sun, skin and the jacket
Sun protection is part of the bridal suit outfit. The Environmental Protection Agency publishes sun safety guidance, and the Food and Drug Administration explains how to read sunscreen labels. Apply sunscreen early enough that it has absorbed before you dress, and keep it off the collar. Test any sunscreen or makeup on a swatch or inside seam of the base layer first, because some products leave marks on fabric. If your bridal suit is sleeveless or has a deep neckline, the exposed skin needs the same attention as any other.
A wide-brimmed hat or a parasol can lower the heat load considerably at an outdoor ceremony, and a parasol held by an attendant is also an elegant and photographable solution. If you plan to wear a hat, check it for hair and veil compatibility with the person doing your hair and makeup, and see the site’s guide on hair and makeup planning for how to schedule trials around the whole outfit.
Hot-day sequence in practice
Take a midday summer ceremony in an open garden. A sensible bridal suit plan has the bride dress in the base layer and trousers in an air-conditioned room, the jacket on a hanger with a helper, and a cold drink and shade waiting at the ceremony site. The jacket goes on just before the processional, the ceremony stays as short as the couple is comfortable with, and the jacket comes off right after the recessional for the first photos that do not need it.
At cocktail hour, the bride moves into shade or indoors, changes into the spare base layer if needed, and takes a few minutes to cool down. Later photos happen at golden hour, when heat is lower and the light is softer. This kind of sequencing does more than any fabric choice, and it costs nothing.
Wind, rain and damp air
Wind and rain are the conditions that disrupt a bridal suit in ways that people rarely test. Heat and cold are gradual. A gust or a shower is sudden, and it forces a decision in seconds.
Wind: movement, temperature and hair
Wind pulls at loose fabric, lifts veils and capes, and chills the body. A tailored jacket and trousers are comparatively wind-resistant, which is an advantage over many gowns. But wide-leg trousers can flap, a long jacket can lift, and a lightweight shirt can billow.
Test the bridal suit outfit outside in a breeze before the day. Stand still for several minutes. Walk. Turn into the wind. If something flaps, flaps loudly in a ceremony recording, or comes untucked, it needs adjustment. Often the fix is simple: a slightly heavier lining, a hem weight, a fitted base layer, or a trouser leg cut a little narrower.
Ask your hair and makeup artist how your style will behave in wind, and whether a hat or veil is practical. A bridal suit with a veil is possible, but veil weight and attachment matter in gusts. If you plan one, ask for a trial run outdoors.
Rain: the garment, the shoes and the plan B
For rain, plan three things: what covers you, what protects the bridal suit, and where you go.
For cover, a clear umbrella is photograph-friendly, and an assistant can carry it. A water-resistant coat in a matching or complementary color is a practical outer layer. A suit jacket itself is not a raincoat. Many suiting fabrics absorb water and get heavy or may spot. Ask the tailor or the fabric supplier whether the cloth is likely to water-spot, and do not spray any waterproofing product on a finished garment without a patch test and the maker’s approval, because sprays can leave marks.
For protection, think about the hems. Wet grass and mud reach trouser hems first. A shoe cover or a change of footwear for walking, with the formal shoes carried, can keep hems clean. The lesson from any shoe-on-grass problem is that the ground surface matters as much as the shoe.
For the plan B, find out from the venue what the rain plan actually is, and when the decision is made. A ceremony moved indoors changes your temperature plan completely, because indoor spaces can be cool or warm in ways the outdoor plan did not predict. A tent changes wind and rain exposure, but may trap heat. Write both versions of the plan, and share them with the helper who carries layers.
Damp air and cold ground
Damp air feels colder than dry air at the same temperature, and ground cold passes through thin soles. If the ceremony is on grass early in the morning, expect dew. Wool or thicker hosiery in the shoes, insoles that insulate, and a rug or boards at the altar can reduce chill. Ask the venue whether it provides flooring or a ceremony platform, and whether a rug can be added.
Humid weather can also wrinkle fabric and flatten hair. Steaming, hanging and careful transport help. If the bridal suit will travel, hang it in a garment bag, and check the care label before using any steamer on the lining.
A short wind and rain test you can run at home
On a breezy day, wear the full bridal suit including the outer layer, stand outside for ten minutes, and write down three things: what flapped, what slipped, and what felt cold. On a damp day, walk across wet grass in the shoes you plan to wear, and look at the hems afterward. Spray a hidden seam or a fabric offcut lightly with water and watch whether it marks. These small tests cost almost nothing and give you evidence, not guesses, for the changes you ask your tailor to make. ## Fabric and construction choices that carry layers
This guide does not repeat a full fabric comparison, because that is a separate decision. What matters here is how fabric and construction affect layering, meaning which choices give you more room to adjust and which ones lock you in.
Weight and structure decide how many layers you can add
A light, soft bridal suit leaves room underneath for a base layer and over the top for an outer layer. A heavy, stiff, closely fitted one leaves almost no room for either. If you expect to add layers for a cool evening, choose a bridal suit with a little ease in the sleeves and body, and leave your tailor room to let out seams later if the fitting shows you need it.
Ask the vendor or the tailor for the fabric weight, and ask which unit they use, since weights are quoted in different units and are not directly comparable. Then use the number only to compare garments from the same maker. Do not treat any figure as a promise of comfort. Your own wear test is the real measurement.
Stretch and recovery
A little stretch in the cloth, or in the lining, makes layers easier to wear. It lets a jacket close over a thermal top and lets you raise your arms without the sleeves riding up. Too much stretch can bag at the knees and elbows after hours of wear. Ask whether the cloth recovers after sitting, and check a swatch by crumpling it in your hand and seeing how fast it relaxes.
Linings
The lining is a layer too. A full lining adds warmth and makes the jacket slide on over a shirt. It also traps heat. A half lining or a breathable lining such as a viscose or cupro type is commonly used to reduce that effect, but ask the maker what the lining is actually made of and how it should be cleaned. If the plan includes a cold evening, a lining that adds a little insulation helps. If the plan is a hot afternoon, you want less.
Seams, vents and closures
Look at details that affect air and movement. A back vent or side vents let air move and allow sitting more comfortably. A jacket that buttons high holds warmth better than one that opens low. A waistband with hooks or a fixed waistband affects how you will feel after dinner.
Pockets that are sewn shut tend to stay neat, but a working pocket can hold a small item such as a handkerchief or a lip balm. Ask your tailor which pockets can be opened and which should stay closed so they do not pull the line of the garment.
Color, sheen and photography
Color affects heat, as noted earlier, and it also affects how a bridal suit looks in strong light. Some cloths look flat in full sun. Others pick up a shine that looks more formal in photographs. Take your swatch outdoors at the time of day of your ceremony, and photograph it with a phone.
Looking at the image tells you how the cloth will photograph in similar light. Your wedding palette also matters, and the site’s guide to choosing a wedding color palette can help you connect the bridal suit with the rest of the day.
Care and the label
Every fabric comes with care requirements, and a label may change what is possible. In the United States, the Federal Trade Commission’s Care Labeling Rule requires that most clothing carry care instructions, so look for the label and follow it. If the bridal suit is custom or made by a small maker, ask for written care instructions.
Do not use stain removers or sprays you have not tested on a hidden area. If you intend to wear layers that may soil the lining, such as a damp base layer, ask about cleaning before the day and after.
The temperature and layering change checklist
This is the framework of the guide. It converts the earlier sections into a short form you can fill in, share and use on the day. It has three parts: a baseline, a set of tests, and a change plan.
Part one: the baseline
Write these lines at the top of a page or a notes app.
- The date, the ceremony time, and the sunset time for the date and place.
- The venue exposure: full sun, partial shade, full shade, indoors, tented.
- Your forecast notes at each of the four check dates: purchase, one month, one week, and the morning of the wedding.
- The coldest and warmest moments you expect, with a line on wind, sun and humidity.
- The rain plan and the point at which it is decided.
These are not predictions. They are your reference sheet, and they will change. Writing them gives you a way to see how the plan should move when the forecast changes.
Part two: the six tests
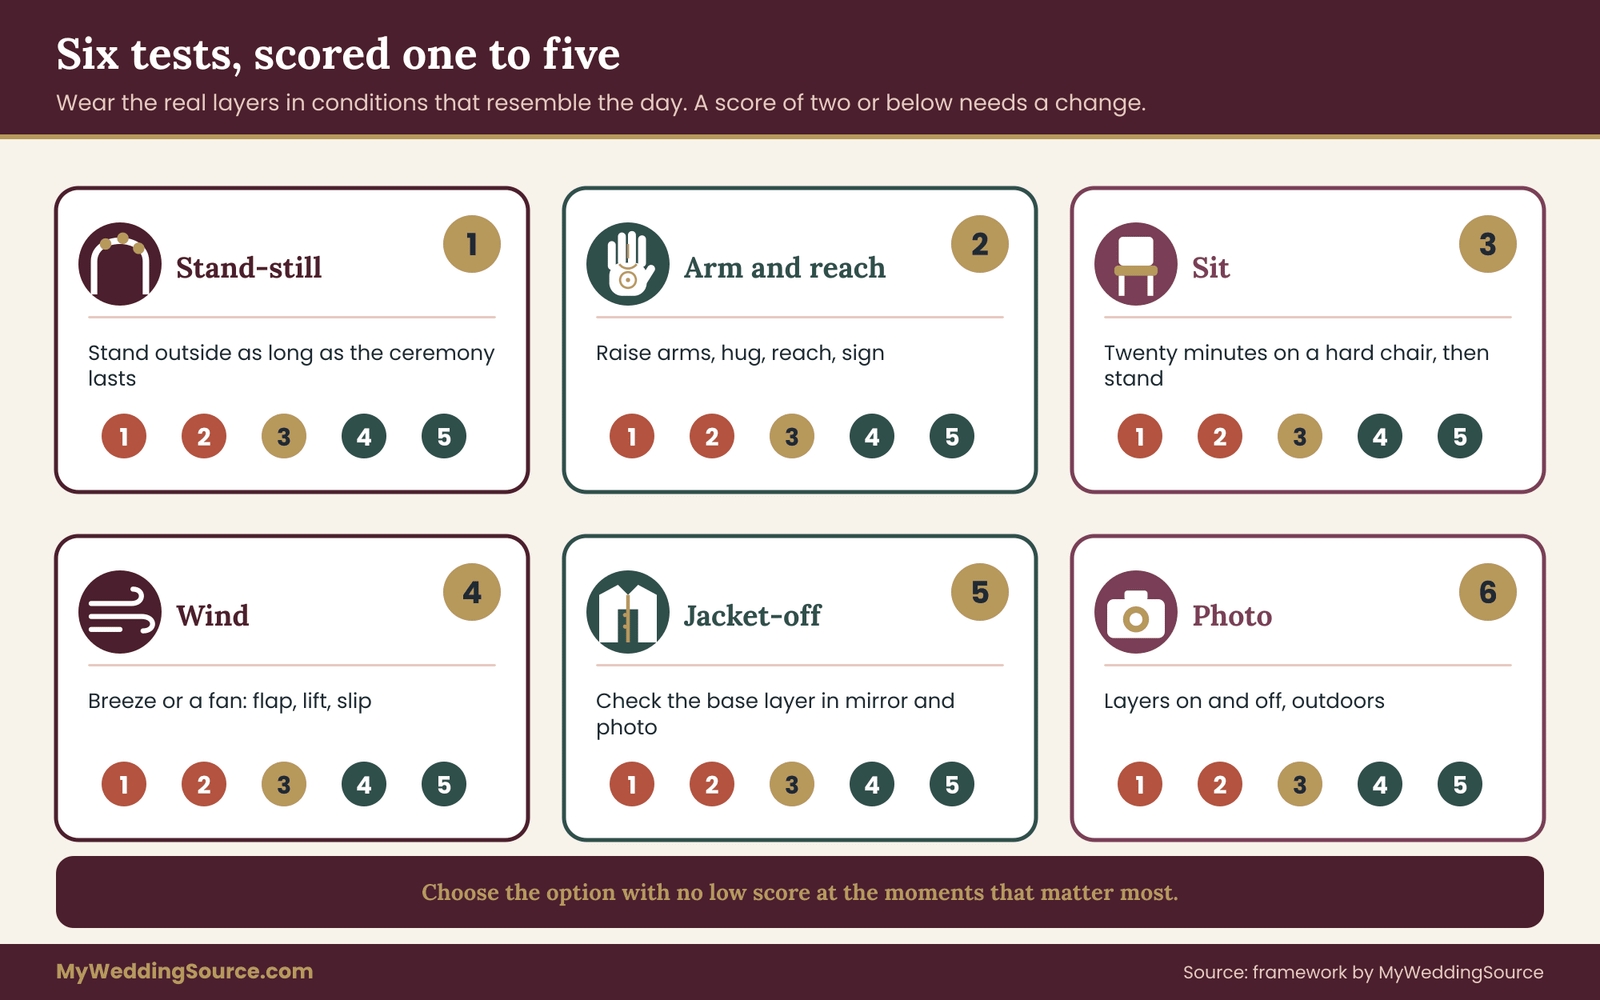
Run these with the real garments, in a setting that resembles the day, and score each one from one to five, where one means “I would be unhappy” and five means “I would forget I was wearing it.” Any score of two or below needs a change before the wedding.
The stand-still test. Stand outside, wearing the full bridal suit, for about as long as your ceremony is planned to last. Score comfort at the end. This reveals chill or heat that walking hides.
The arm and reach test. Raise your arms, hug someone, reach for a bouquet and sign an imaginary document with every layer on. Check whether sleeves ride, buttons strain or the shirt comes untucked.
The sit test. Sit for twenty minutes on a hard chair, then stand. Look at the jacket back, the trouser knees and the waistband.
The wind test. Stand in a breeze, or beside a fan if the day is calm. Note flapping, lifting and slipping.
The jacket-off test. Take the jacket off and look at yourself in a mirror and in a phone photograph. Check the base layer for transparency, creases, sweat marks and neckline. This is a test of the bridal suit outfit without its main layer.
The photo test. Ask someone to photograph you outdoors with the layers on and with them off. Look for bulk lines, shine, shadows and anything that reads strangely at a distance.
Part three: the change plan
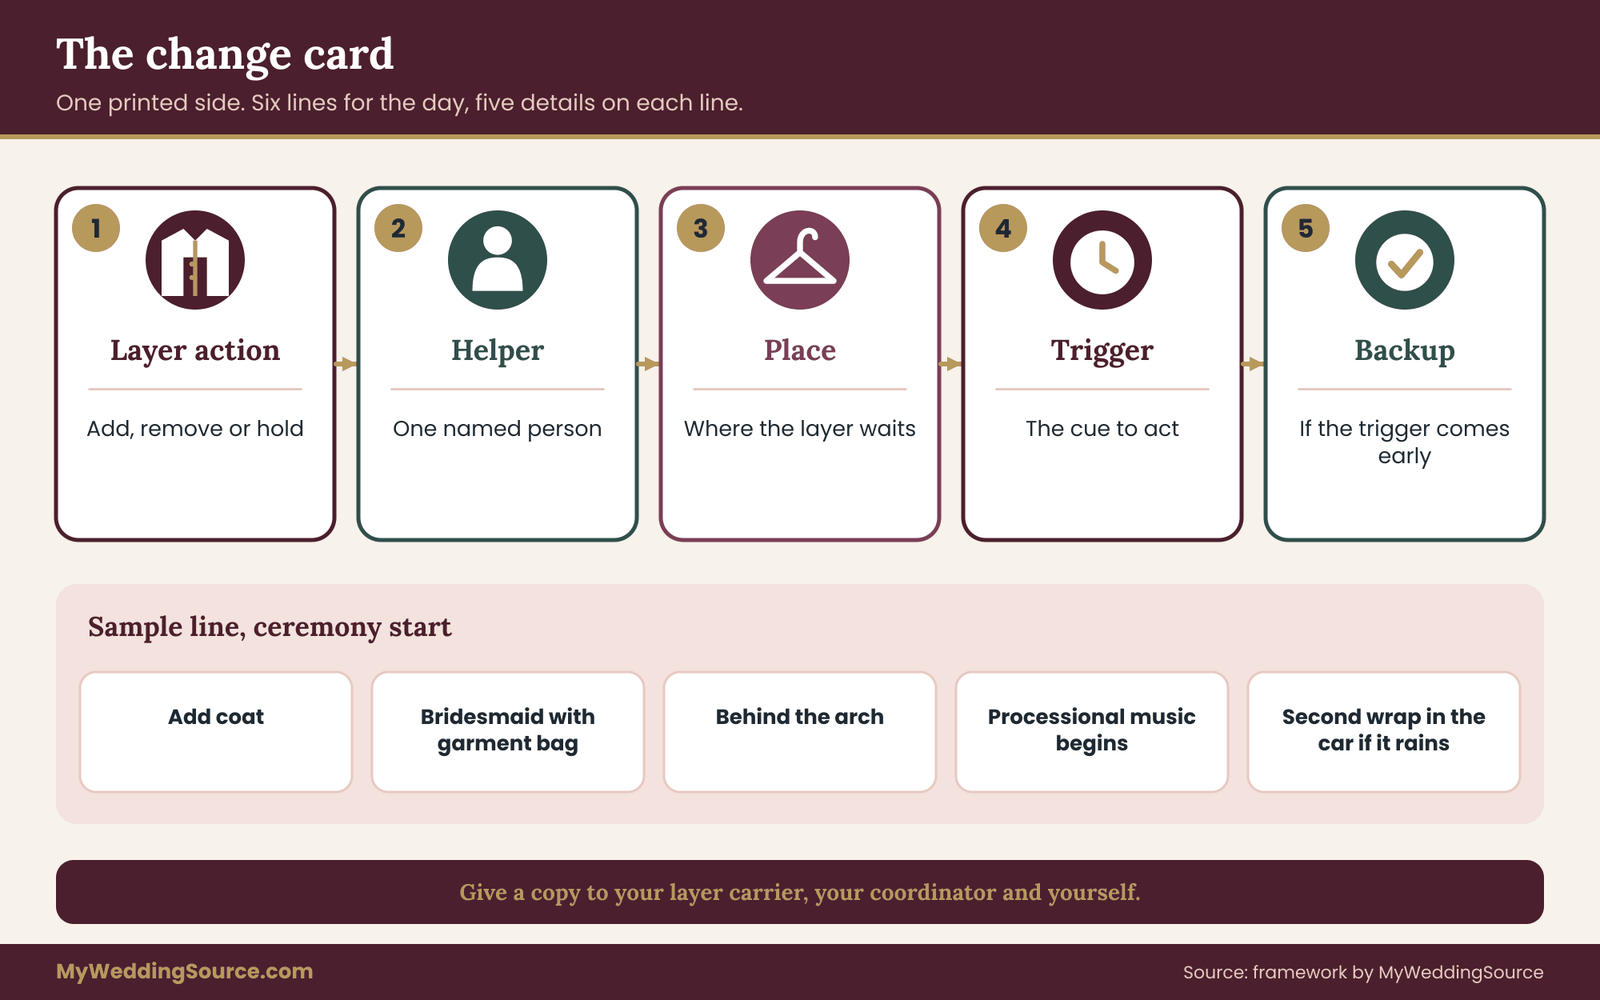
For each of the six change points in the day, fill in a line with five items: the layer action (add, remove or hold), the person who handles it, the place where the layer waits, the trigger that tells you to act, and the backup if the trigger arrives early.
For example, a line might read: ceremony start, add coat, bridesmaid with the garment bag, behind the arch, when the officiant begins the processional music, a second wrap in the car if it rains. You are not writing prose here. You are making a card you can hand to a helper.
Keeping the form short
A checklist that runs to several pages will not be used. Print one side, with six lines for the day and a small box for baseline notes. Give a copy to the person who carries layers, one to your planner or coordinator, and keep one for yourself. The site’s guide to the wedding vendor timeline shows how a day’s schedule can be shared with suppliers, and the same format works for a layers card.
Using the form to compare options
The form also helps you choose between options. Say you are weighing a wool-blend bridal suit against a lighter linen blend, with a wrap as the outer layer in both cases. Run the same six tests on both and compare the scores line by line. The winner is not the one with the highest total. It is the one with no score of two or below at the change points that matter to you, such as the ceremony and the exit.
If two options tie, prefer the one with the more adjustable layers, because adjustability handles the uncertainty of a forecast. A bridal suit that works within a narrow band is less forgiving than one that works across a wider band with a changeable layer on top.
When the tests contradict each other
Sometimes a garment scores high in the stand-still test and low in the sit test, or the reverse. In that case, decide which situation is longer or more important. If you will stand for a short ceremony and sit for a three-hour dinner, the sit test deserves more weight. If you will dance for hours, the arm and reach test may matter most. The aim is to match the test to the demands of your own day, not to reach a perfect score everywhere.
For the broader list of items that go with the bridal suit outfit, the guide to wedding day accessories walks through compatibility and backups, and it pairs well with this checklist when you assemble your emergency kit. ## Fitting a bridal suit with its layers
Fittings are where layering plans either work or fall apart. A tailor can only fit what you bring, and if you arrive in a thin shirt and no outer layer, the tailor fits a thin-shirt version of you. On the day, you will be wearing a different version.
Bring the real layers to every fitting
At each fitting, bring the base layer you intend to wear, the shoes and the hosiery or socks, any shapewear or undergarments, and the outer layer you are considering. If you are undecided about warm and cool options, bring both. Ask the tailor to fit over the thicker option, because it is easier to take in a little than to let out a seam that has no spare allowance.
Say plainly what the bridal suit outfit has to do. A short description helps: “This is for an outdoor ceremony in the late afternoon, and I expect to add a coat for photos and remove the jacket at dinner.” A tailor who hears that knows to check the jacket over a coat, the sleeve length with and without the coat, and the armholes for movement.
What a tailor can and cannot change
Tailoring has limits, and you should ask early which of your wishes are possible. Typical adjustments include hemming trousers, taking in or letting out seams where there is allowance, adjusting sleeve length, shortening or lengthening the jacket in some designs, and moving buttons. Changes that are harder or impossible include significantly altering shoulders, restructuring a lining, or fixing a cut that was never right for your build.
The guide to wedding dress fit and alterations covers the typical process, including timing and questions to ask, and it applies to suits in many respects.
Ask how many fittings the price covers, and when the last fitting happens. A final fitting a week or two before the wedding is a common plan, because it leaves time for a small correction but not for a big change. Then keep your weight and shape as steady as you reasonably can, because even a small change affects a fitted jacket. If you expect a change, say so early and ask the tailor what allowance to leave.
Fitting checks specific to layers
At the fitting, run through a short set of checks, with the layers on.
Closure. Does the jacket button without pulling? When you sit, does it still close without gaping at the buttons or collar?
Sleeves. With your arms down, how much shirt cuff shows? With arms raised, do the sleeves ride up more than a thumb’s width? Is there space for your outer layer’s sleeve?
Shoulders. Is the shoulder seam sitting at the edge of your shoulder? Do you feel the jacket pulling across your upper back when you reach forward?
Trousers or skirt. Is the waistband comfortable when seated, after a meal and with a base layer tucked in? Does the hem clear the ground in your actual shoes, and does it still clear when the shoes are warm-weather sandals or cold-weather boots, if you are considering both?
Outer layer. Does the coat or wrap close over the jacket? Can you put it on and take it off alone, or does it need help? Does it slide off the shoulders?
Movement. Walk up a step, sit, stand, hug and dance a few steps. Any pull, slip or pinch marks something to fix.
Photographing a fitting
Take a phone photograph at each fitting from the front, side and back, with layers on and with them off. Pictures show things mirrors hide, such as a collar gap or a hem that dips on one side. Share them with your tailor, who can often see a problem in an image and propose a fix. Keep them as records of what was agreed. For records of the work itself, keep receipts, appointment notes and any written agreement.
Alterations and the contract
If the tailoring is done by a small business, ask for a written estimate that lists each alteration, the fee, the deadline and the policy if the work is not right. Ask what happens if the final fitting reveals an issue. The site’s guide to wedding vendor contracts explains what clauses to look for, and the same questions apply to a tailor: scope, timing, payment, changes and remedies. Keep every message in writing, and do not pay the final balance until you have tried the finished garment and are satisfied.
Buying, renting or borrowing
If the bridal suit is bought off the rack, ask whether a return or exchange is allowed after alterations. If it is rented, ask whether alterations are permitted at all, because many rental shops limit what can be changed. If it is borrowed or vintage, ask the owner for care and alteration limits before you start. The outer layer, if separate, may be an inexpensive item you can return if it fails a test, so keep the receipt and tags until the tests are done.
The care of the bridal suit after the fitting
Once the bridal suit fits, protect it. Keep it in a garment bag on a proper hanger, away from sun and dampness, and away from pets. Avoid wearing it for extra practice sessions that could soil the lining or stretch the seams. If you want one full dress rehearsal, wear it once, hang it afterward and air it out.
The layer handoff: who carries what on the day
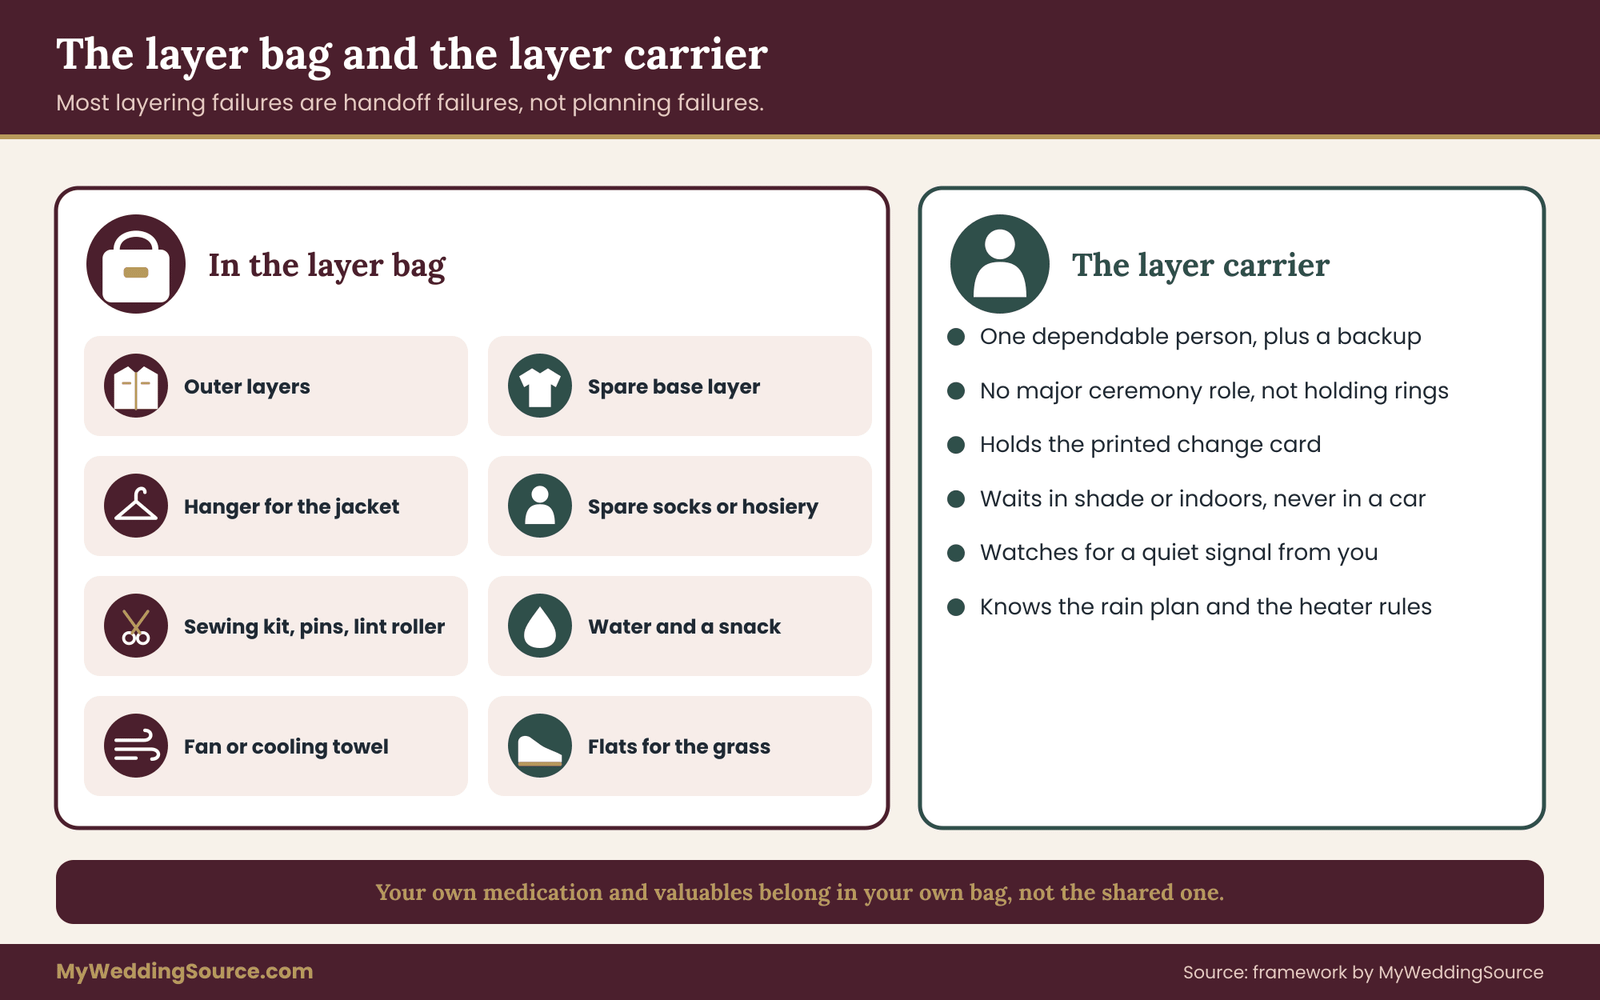
A layering plan is only as good as the person who carries the layers. Most failures are not planning failures. They are handoff failures: the coat is in the car, the helper is in the restroom, the wrap is on a chair that moved.
Choose one layer carrier
Pick one dependable person, and a backup, to be responsible for the extras. This should not be someone who has a major role in the ceremony or who will drink heavily, and it should not be the same person who is holding the bouquet and the rings. A friend, a sibling, a member of the wedding party with a lighter role, or a coordinator are all options. If you hire a planner or coordinator, ask whether handling garments is part of the service, and put the answer in writing.
Give the carrier a printed copy of the change plan, a phone number list for the key helpers, and a bag or box that holds the day’s extras. The bag should be easy to recognize, waterproof if possible, and kept in a known place.
What goes in the layer bag
A small list is enough. One outer layer for cold and one for rain, if your plan needs both. A spare base layer. A hanger for the jacket. Spare hosiery or socks. A small sewing kit and safety pins. A lint roller. Blotting papers, deodorant and a small towel. Water and a snack.
A fan or a cooling towel for hot days. Hand and foot warmers for cold days, if they are suitable for fabric contact. A spare pair of flats for walking on grass. Any item you must not forget, such as medication, should be in your own bag, not in the shared one.
Where the layers wait
Choose a station near the ceremony and one near the reception, both in shade or indoors. A garment rack or a clean, sheltered table works. If the venue has a bridal suite or a coat check, ask whether it can be used and who will stay with it. A coat check is not just for guests. A clearly labeled spot for the couple’s own layers reduces the chance of loss. Do not leave jackets in vehicles in the sun or the cold.
Communication cues
Agree a small set of signals with the carrier. For example, a hand to the shoulder means “I need my layer,” and a nod means “yes, bring it now.” Keep the signals discreet, and tell the photographer so that nobody waits for a pose while the bride is cold.
What to do if a layer goes missing
Have a fallback. A spare wrap, the partner’s jacket, or a venue blanket can fill in for a short time. The partner’s jacket is a classic wedding photograph, and it works well as a backup if both people agree beforehand. If a layer is lost or damaged, take a photo, tell the venue immediately, and keep the receipt for any replacement. Do not let the loss spoil the evening. A cold bride with a borrowed jacket is a perfectly good photo.
Timeline, budget and lead times for a layered bridal suit
Layering adds a few small purchases and a few more appointments, and it is easier to absorb them if you place them on a calendar early. This section gives a sequence and the cost logic behind it, without quoting prices, because prices vary by city, maker and season.
A sensible sequence
Four to six months before the wedding, choose the bridal suit and decide whether the outer layer will be separate. Custom and made-to-order garments can take longer than off-the-rack ones, so ask every maker for a delivery date in writing and add a buffer for a late arrival. Three months out, book the fittings and ask the tailor which dates leave room for a second round of adjustments.
Two months out, buy or reserve the outer layer, and try it over the real jacket. One month out, run the six tests and make your fix list. Two weeks out, hold the final fitting with every layer, and take photographs. One week out, assemble the layer bag, print the change card, and brief the carrier. In the final days, check the forecast and adjust the plan, not the garment.
Where the money goes
The main costs fall into four groups. The first is the bridal suit itself. The second is alterations, which may include several rounds, and which depend on the complexity of the garment. The third is the outer layer and any extras, such as a spare shirt, thermal basics, a rain cover or a parasol. The fourth is small supplies for the layer bag.
A useful way to think about cost is the cost of failure. A spare base layer is cheap compared with the stress of a ruined shirt on the day. A coat that fits properly costs more than one that does not, but a wrong coat is wasted money. Spend first on what you will wear for the longest and on the items that are hard to replace, and spend least on anything that can be borrowed or rented.
Ways to keep the layered bridal suit affordable
Borrow what you can. A friend’s long coat or a family wrap may do the job, provided you try it with the jacket and agree who pays if it is damaged. Rent an outer layer for a single day if the shop allows alterations. Choose a neutral color for the outer layer so it can be worn again. Buy one good base layer rather than several mediocre ones. Skip decorative extras until the tests show a real need.
Be cautious with anything described as a bargain that you have not tried. Return policies differ, and some items cannot be returned once altered. Ask before you buy, keep tags on until the tests are done, and keep receipts. If you receive a gift of a garment or an item, ask the giver about the return option, so nobody feels awkward later.
Reading the label before you buy
Any garment you buy for the plan should carry a care label, and sellers should describe fiber content accurately. The Federal Trade Commission publishes rules and guidance on textile labeling and advertising. If a seller makes a claim about a fabric that seems too good, such as promising a cooling effect or complete wrinkle resistance, ask what the claim is based on, and run your own tests. Claims are not a substitute for wearing the garment, and a good seller will welcome the question.
When the date is close and nothing is ready
If you are inside a month and the plan is not ready, narrow it. Choose one outer layer, not three. Use the six tests as a quick triage and fix only scores of two or below. Ask the tailor which changes can be done quickly, and accept that some details will not be perfect. A modest plan, rehearsed once, will serve you better than a complicated plan that nobody has tried. ## A worked example of a bridal suit temperature plan
The following example is invented. The people, the place and every number are illustrative, chosen to show how the checklist turns into decisions. They are not measurements from a real wedding and not a prediction for yours.
The setting
Dana is marrying in early October at a hillside garden venue. The ceremony starts at 4:30 in the afternoon, outdoors, with open sky and a row of trees on one side. Dinner follows in a tent. The venue closes the tent sides at dusk and has two patio heaters. Dana has chosen a two-piece bridal suit in a mid-weight wool blend, with trousers, a half-lined jacket, and a silk-blend shirt. Her partner, Marcus, is wearing a bridal suit as well.
The baseline
Dana writes her baseline. Sunset that evening, in her illustration, is a little after six. At purchase, the forecast notes say mild afternoons and cool evenings, with a chance of wind on the hill. The venue’s exposure is partial shade at the ceremony and full tent at dinner. The rain plan moves the ceremony into the tent, and the decision is made at noon.
Dana notes two risks. First, the ceremony sits in the last warm hour, and the sun will be low, so she may be hot in the jacket at the altar and cold by photos. Second, the hill gets wind, which will chill the cocktail hour.
The tests and what they showed
Dana runs the six tests two weeks before the wedding, in a garden near her home, at about the same hour. In this illustration, she records the following scores.
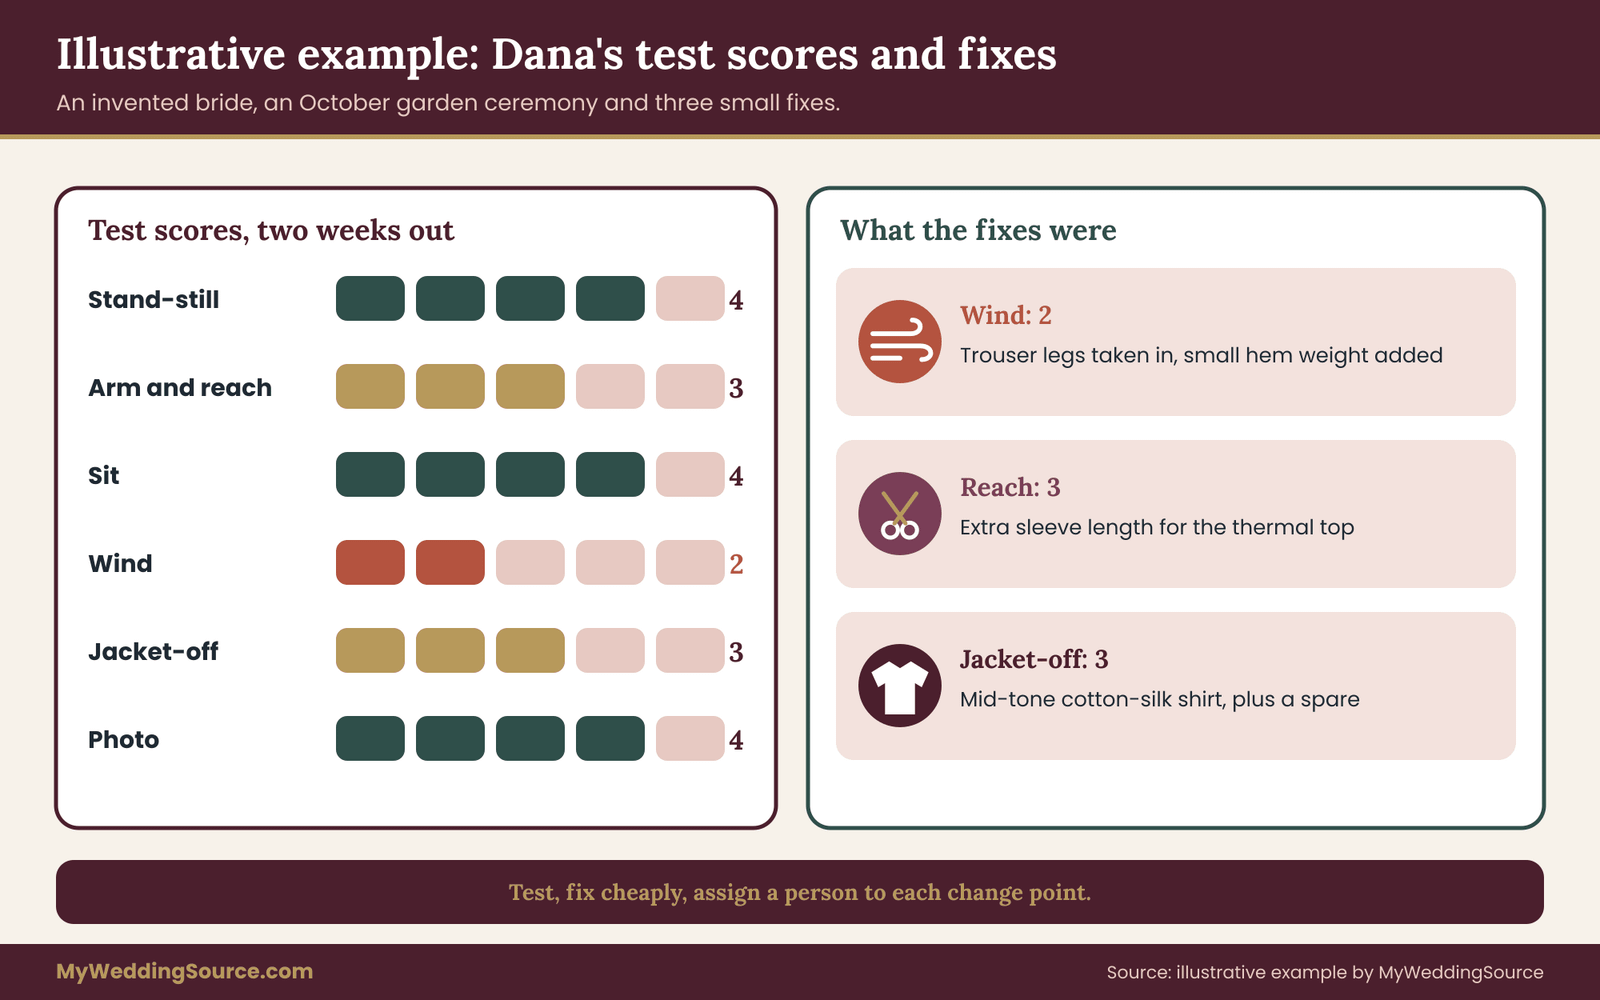
The stand-still test, with the jacket and a thin thermal top, scores four. She stood for the planned twenty minutes and felt comfortable in light shade. The arm and reach test scores three, because the sleeve rides a little with the thermal top on. The sit test scores four.
The wind test, with a light breeze, scores two: the wide trouser legs flap, and the shirt collar lifts. The jacket-off test scores three, because the silk-blend shirt shows a faint sweat mark under the arm after the stand-still test in sun. The photo test scores four.
Two scores need attention, the wind test and the arm and reach test, and the jacket-off test is borderline.
The changes
The tailor takes the trouser legs in slightly and adds a small weight to the hem. The sleeve gets a little extra length so it does not ride up with the thermal top. Dana swaps the silk-blend shirt for a cotton-silk shirt in a mid-tone that hides moisture better, and orders a second one as a spare.
She chooses a long camel coat as her outer layer, tries it over the jacket at the final fitting, and finds the shoulders pinch. The tailor lets out the coat seam a small amount and, because the coat is rented, checks the policy first. The rental shop allows minor adjustments.
The change plan
Dana fills in the card.
Getting ready: base layer and trousers on, jacket and coat on hangers, with her sister Priya as the layer carrier. Trigger: the photographer’s call for first look.
Ceremony: jacket on at the processional, coat held by Priya behind the arch. Trigger: if the wind rises, Priya brings the coat during the readings. Backup: Marcus’s jacket.
Photos: coat off for the formal portraits, then on between sessions. Trigger: the photographer’s call. Backup: the second shirt, if needed.
Cocktail hour: coat on, walking in the garden. Trigger: the sun dropping behind the trees.
Dinner: coat and jacket on a rack in the tent, with Priya. Trigger: the tent warms up.
Dancing and exit: jacket on for the grand exit, coat over it, thermal gloves in the pocket. Backup: a venue blanket.
What the example shows
Notice what did not change. Dana did not buy a different suit, and she did not give up the look she wanted. She found three problems by testing, fixed them cheaply, and assigned a person to each change point. The plan is short, specific and based on evidence she collected herself. Your numbers will differ, and your venue may be very different, but the method is portable.
Vendor questions, edge cases and alternatives
Questions for the venue
Venues know their own microclimate better than any forecast does. Ask these questions, and write the answers on the baseline sheet.
Where is the ceremony site in relation to the sun at the planned time, and where is shade? Is there wind on the site, and from which direction? What heating or cooling is available, and where? Are there flooring or platform options? What is the rain plan, who decides, and when? Is there a room for changing layers or storing garments, and is it supervised? What are the rules for heaters, candles and open flame near fabric? Are there time limits for photos on the grounds after the ceremony?
If you are considering a rustic setting, the site’s guide to barn wedding venues describes some of the temperature and weather questions that come with those spaces, such as uninsulated buildings and open doors.
Questions for the tailor or boutique
Ask about the lining, the cloth weight, whether the cloth water-spots, and whether the jacket can be adjusted to fit over a coat. Ask for care instructions in writing. Ask how many fittings are included, when the last fitting is, and what happens if the final result is not right. Ask about rush fees, in case you need a change late. Ask whether the garment can be cleaned before the wedding if it picks up a mark during fittings.
Questions for the photographer and planner
Ask the photographer which shots need the jacket and which can be taken without it, and when portraits are scheduled relative to sunset. Ask the planner or coordinator who handles garments, whether a layer card can be added to the run of show, and what the contingency is for weather. The wedding ceremony step-by-step guide is a handy reference for where in the ceremony the bride is standing, sitting or moving, and for how long.
Edge cases
A very short ceremony in extreme weather. If the ceremony lasts ten minutes, a heavier layer for the walk and a lighter one for the ceremony itself can work. Consider arriving late to the site rather than waiting there.
A long ceremony with readings, music and rituals. Everyone stands still for longer, so cold or heat builds. Ask your officiant whether the ceremony can be shortened, and ask whether you may sit for part of it.
A destination wedding. Climate, humidity and the luggage allowance all change the plan. Pack the bridal suit in carry-on if possible, and the outer layers in a separate bag. If you must steam or press on arrival, ask the hotel for a steamer or a tailor, and test it on a hidden seam first.
Pregnancy, medical conditions or medication. Some conditions or medicines change how a person handles heat or cold, or how sun affects the skin. Talk to your own doctor about outdoor conditions and what to avoid, and plan extra breaks. This guide cannot advise on a medical situation.
Disability or mobility needs. A coat or a cape may interfere with a mobility aid, and long layers can catch in wheels. Test with the aid, and ask for help with the layer card from someone who understands your routine.
A large difference between you and your partner’s comfort. Many couples run warm and cool in different ways. Plan each person’s layers separately, and do not assume that a plan that works for one will work for both.
Heavy beading or applique. If the bridal suit has embellishment, ask about snag risk, because wraps and rough coats can catch on beads. Compatibility between items matters here as much as anywhere.
Comparing the alternatives
Many people wearing something other than a gown ask whether the bridal suit, a pantsuit, a jumpsuit or separates is easiest in changing weather. There is no single winner, so compare them by how they let you adjust layers.
A matching suit has a built-in jacket that can come off, and the base layer shows when it does. It gives the clearest on-off control, though the lining and structure add heat.
A pantsuit is a similar idea and may be cut in a looser style, which gives more room for under-layers and more flapping in wind.
A jumpsuit with a jacket offers a single base layer and the jacket on top, but a one-piece garment is harder to adjust when you need the restroom or need to cool down, so plan that carefully.
Separates let you change one piece without the other, which gives the widest range of combinations but needs more tailoring care to look coordinated.
Pick the option that offers a layer you can change without help, a base layer you are proud to be seen in, and a way through the day that does not depend on perfect weather. ## Your next steps
You do not need to do everything at once. Work in this order, and stop when the plan for your bridal suit feels solid.
First, this week, write the baseline: date, ceremony time, sunset, venue exposure and the rain plan. Ask the venue the questions listed above and write down the answers. Second, at the next few fittings of the bridal suit, bring the real layers and ask your tailor to fit over them. Third, about a month before the wedding, run the six tests with the full bridal suit and score them.
Fix anything that scores two or below. Fourth, a week before the wedding, check the forecast again, fill in the change card, and hand a copy to your layer carrier and your coordinator. Fifth, on the morning of the wedding, check the forecast one last time, pack the layer bag, and decide which version of the plan applies.
If you only have time for one thing, make it the stand-still test with the full bridal suit, at the hour of your ceremony. It is the closest thing to a rehearsal that exists for temperature, and it costs nothing. A bridal suit that passes it, with a named person holding the extra layers, is ready for most outdoor weddings.
FAQ
What should I wear under a bridal suit for an outdoor wedding?
Choose a breathable base layer that suits the weather and looks finished on its own, because it will be seen when the jacket comes off. Fine cotton, silk blends and thin merino are common choices. Test the base layer with the jacket for fit, moisture and visibility in sunlight, and bring a spare to the venue.
How do I keep a bridal suit comfortable in hot weather?
Choose a breathable base layer, keep the jacket off until the last moment, and plan shade, water and a place to cool down. Agree which photos need the jacket, and set a signal for when you need a break. Heat can become a health problem, so take it seriously and follow guidance from the Centers for Disease Control and Prevention.
What outer layer works over a bridal suit in the cold?
A long coat, a wrap or a cape can all work, provided it fits over the jacket without pinching the shoulders. Try the outer layer while wearing the jacket, not instead of it. Test it outdoors for wind and movement, and keep it away from heaters and flames, following the venue’s safety rules.
Should the jacket stay on during the whole reception?
No. A jacket that is on for the ceremony and portraits can come off for dinner and dancing, as long as the base layer looks finished. Decide with your photographer which pictures need it, give it to a named person, and put it on a hanger so it keeps its shape.
How many fittings do I need for layered outfits?
There is no fixed number, so ask your tailor how many the price covers. Bring the real layers to each fitting, and schedule the final one a week or two before the wedding, so there is time for a small fix. Take photographs from three angles to record what was agreed.
Can I wear a bridal suit in the rain?
Yes, with a plan. A clear umbrella or a water-resistant outer layer in a complementary color helps, and a change of shoes protects the hems. Ask the tailor whether your cloth water-spots, avoid untested waterproofing sprays, and learn when the venue decides to move the ceremony under cover.
Who should carry my extra layers on the wedding day?
Choose one dependable person and a backup, with no major ceremony role. Give them a printed change card, a labeled bag and a clear place to wait in shade or indoors. A coordinator can do this if the contract includes it, so confirm that in writing with the vendor.
Does a bridal suit photograph well outdoors?
It can. Take a swatch or the finished garment outside at the hour of the ceremony and photograph it. Look for shine, shadow, creasing and bulk lines, with and without the jacket. Share the pictures with your tailor and photographer so any issue is fixed before the day.
Sources
- National Weather Service, NOAA
- Heat safety, National Weather Service
- Cold safety and wind chill, National Weather Service
- Heat and health, Centers for Disease Control and Prevention
- Sun safety, U.S. Environmental Protection Agency
- Heat exposure, Occupational Safety and Health Administration
- Clothing and textile care labeling, Federal Trade Commission
- Product safety guidance for heaters, U.S. Consumer Product Safety Commission
- Fire and heater safety, National Fire Protection Association
- Sunscreen and sun protection, U.S. Food and Drug Administration