
Exit routes decide how a wedding reception ends: how three hundred pairs of dress shoes, a few wheelchairs, one sleeping toddler and a lot of cake-filled goodwill get from the dance floor to the curb without a jam, and without anyone holding a lit flame in a crowd. This guide shows how to plan wedding exit routes with a guest exit staging diagram, a wave plan, and a venue safety signoff you can actually file.
Draw the room as the venue’s own staff would, then mark three kinds of exit routes on it: the posted emergency exits, the everyday guest paths, and the send-off lane you add for photos. Keep the send-off lane out of the posted exits. Release guests in waves instead of all at once, give each wave a staging spot and a person who calls it, and place any open flame only where the venue and the local fire authority have approved it in writing. When a rule is unclear, ask the venue for a signed line in the contract or an emailed confirmation. Do not rely on a verbal “should be fine.”
Most couples plan the entrance with care and the exit routes with a shrug. The entrance has a song, a cue, a photographer and a clear script. The exit has a DJ saying “that’s all, folks” and two hundred and fifty people standing up at once, finding their coats, looking for a ride and heading for the same pair of double doors.
Nothing dramatic needs to go wrong for this to be unpleasant. A line at the coat check, a shuttle that arrives eight minutes late, a narrow hallway with a sparkler line in it: any one of these turns the happiest hour into a bottleneck.
This article is about the part of the evening that is easy to ignore until it is crowded. It covers how to read a room’s exit routes, how to stage guests so they leave in a manageable flow, how to handle the send-off photo without putting fire near a dress, a drunk uncle or a door, and how to get a venue safety signoff that you and your planner can both stand behind.
Everything here is about planning and conversation, and it sits inside the wider wedding reception guest flow of entry, seating, food and exit. It does not replace the venue’s own rules or the judgment of the fire authority that covers the venue.
A note on scope. This is general planning information, not legal, safety-engineering or insurance advice. Fire codes, occupancy limits, permit rules and venue policies differ by city, county and building, and only the venue and the local fire authority can tell you what applies to your room. Where a rule matters, this guide tells you whom to ask and what to ask for in writing.
What wedding exit routes actually cover
People use the phrase loosely. At a reception it can mean at least four different things, and mixing them up is how planning goes wrong.
Emergency exits. These are the doors, stairs and corridors the building is legally required to provide and keep clear. They are marked, usually lit, and governed by the building and fire codes that apply to that venue. You do not design them, you do not decorate them and you do not move anything into them. Your job is to learn where they are and keep your own setup from blocking them.
Everyday guest paths. These exit routes are the paths people use all night: from the cocktail space to the dining room, from the dining room to the restroom, from the dance floor to the bar, from the building to the parking area. At the end of the night they become your main exit routes in practice, even though nobody planned them as exits.
Service and vendor paths. These exit routes for staff are separate from guest routes. Caterers, bartenders, the DJ and the rental crew move food, ice, speakers and crates through the building on their own routes. Guests who wander into these routes at the end of the night create the second kind of jam: people in a service corridor with a loaded cart.
The send-off lane. This is the photo route, the line of guests holding sparklers, bubbles, petals, ribbon wands or small lights that the couple walks through to a getaway car. It is the only one of the four that is entirely your design, which is exactly why it needs the most care.
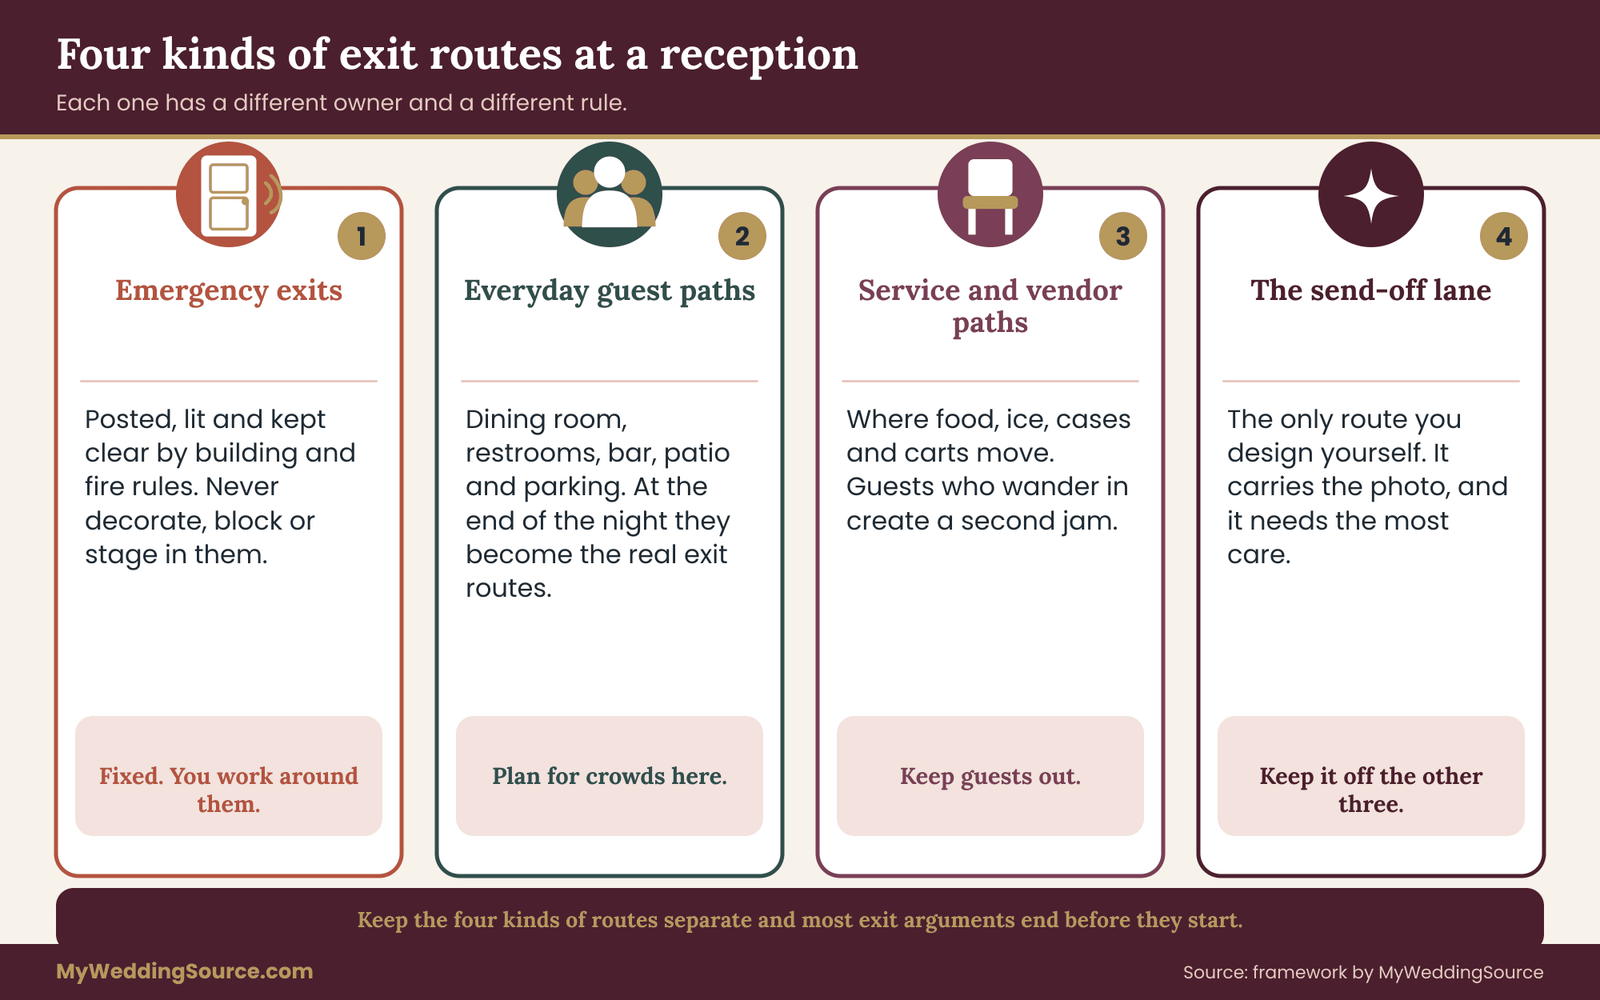
Keeping these four kinds of exit routes straight solves most arguments before they start. A photographer who wants the send-off in the main doorway is asking for the emergency exit to be a stage. A DJ who wants to run the last song until the doors open is asking everyone to funnel through one path at the same moment. A cousin who wants sparklers on the front steps is asking for an open flame next to a crowded, narrow exit. Each of these requests sounds small. Each can be answered once you know which of the four exit routes it touches.
Why the end of the night is different
The crowd at the start of a reception arrives over about an hour. The crowd at the end of a reception leaves over about ten minutes, because the last dance, the cake send-off and the announced getaway all signal the same moment. That is the core of the problem. A building that handles a slow arrival easily can struggle with a fast departure, because the whole guest count is now moving in one direction at the same time, many people are collecting belongings, and some are tired, some have been drinking, and some are carrying a sleeping child.
Three details make the evening exit unlike the evening entrance:
First, people are carrying more. Coats, gift bags, centerpieces they were told they could take, a plate wrapped in foil, a child, a phone held up to film the send-off. Hands are full and attention is split.
Second, the light is different. A room that felt bright at six o’clock may be dim at eleven, the parking area may have uneven light, and a path that felt obvious in daylight is less obvious in the dark.
Third, there is a rider waiting. Someone is calling a car, a shuttle driver is idling at the curb, a babysitter is watching the clock. People who are hurrying push into the same space.
None of this is a reason to worry. It is a reason to treat the exit as a designed part of the evening, with a diagram and a plan, rather than a thing that happens after the plan runs out.
What this guide does not promise
Several things are outside what any wedding article can give you. It cannot tell you a safe number of people for your room, because occupancy limits come from the local fire authority and are posted by the venue. It cannot tell you how long it takes to empty a particular building through its exit routes, because that depends on the doors, the stairs and the crowd.
And it cannot tell you whether a specific sparkler, candle or lantern is allowed at your venue. Only the venue and the local fire authority can say that, and the answer can change by season, by dryness of the grounds or by a burn ban.
What this guide can do is give you a repeatable process: map, stage, ask, record. If you follow the process and the answers you collect are clear, you will be better prepared than most couples. If an answer is vague, the process tells you to keep asking until it is not.
The four questions behind every exit decision
Every choice in this article comes back to four plain questions, and it helps to keep them in your head while you read.
Where do your exit routes end? Every path should lead somewhere safe and open: outside the building, to a rider, to a lit parking area. If it ends in a dead end, a locked door or a service dock, it is not an exit route for guests.
How many people will use it at once? You do not need a number from a code table. You need a rough picture: one narrow door and two hundred guests means waves, and a pair of wide doors and sixty guests means a short line. When in doubt, the venue’s staff will tell you how the room has emptied before.
What is in the way of your exit routes? Coat racks, gift tables, a photo backdrop, a floral arch, a cake stand, a speaker, a line of luggage. Decor tends to migrate toward doors because doors are where the light is and where guests pass.
Who is in charge when it gets crowded? A route without a person assigned to it is a hope, and exit routes are no exception. Someone should own each route: the planner, a venue captain, a trusted friend with a clear role and a name on the schedule.
With those four questions in hand, the next section starts with the room itself, because no staging plan for exit routes is better than the map it is built on.
Mapping your venue’s exit routes before you design anything
The first working tool is a floor plan. Ask the venue for the same drawing its staff uses for fire-safety and event setup. Many venues have one, because they have to show a layout to the fire authority for larger events or tented events. If there is no drawing, sketch one on a walk-through, and have the venue manager correct it. Your sketch does not need to be to scale. It needs to be right about doors, stairs, corridors and the places where guests will stand.
If you are still choosing a room, the questions about exit routes belong on your tour checklist next to parking, power and rain plans. Our guide to a technical walkthrough of the venue covers the broader list of things to see before you sign. This section covers only what matters for getting guests out, which means the exit routes.
Walk the building as a guest, then as staff
Do two walks of the exit routes, and do them at different times of day if you can.
On the first walk, move as a guest would at the end of a night. Start at the dance floor, pick up an imaginary coat, then head for the door you would use to leave, noting which exit routes look obvious. Count the doors you pass. Notice which ones are obviously exits and which look like ordinary doors.
Look for where a line would form if forty people did the same thing at once. Pay attention to floors, thresholds, steps, ramps, carpet edges and door weight. A heavy door with a slow closer is a natural bottleneck, because each person has to hold it for the next.
On the second walk, go with a venue manager or captain and ask them to show you what staff would use. This is where you learn which exits are emergency-only, which doors alarm when opened, where the service corridor leads, and which routes the venue prefers for a large departure. Staff know things no diagram shows: that the south door sticks in humid weather, that the loading dock gets used by the caterer until eleven, that the parking lot floods at the low end, or that the elevator is slow and shared.
Take photos of every door and corridor you discuss, since they show the exit routes better than notes do. They will be useful later when you describe the plan to your planner, your DJ and your photographer, and they become part of your record.
Mark the three layers of exit routes
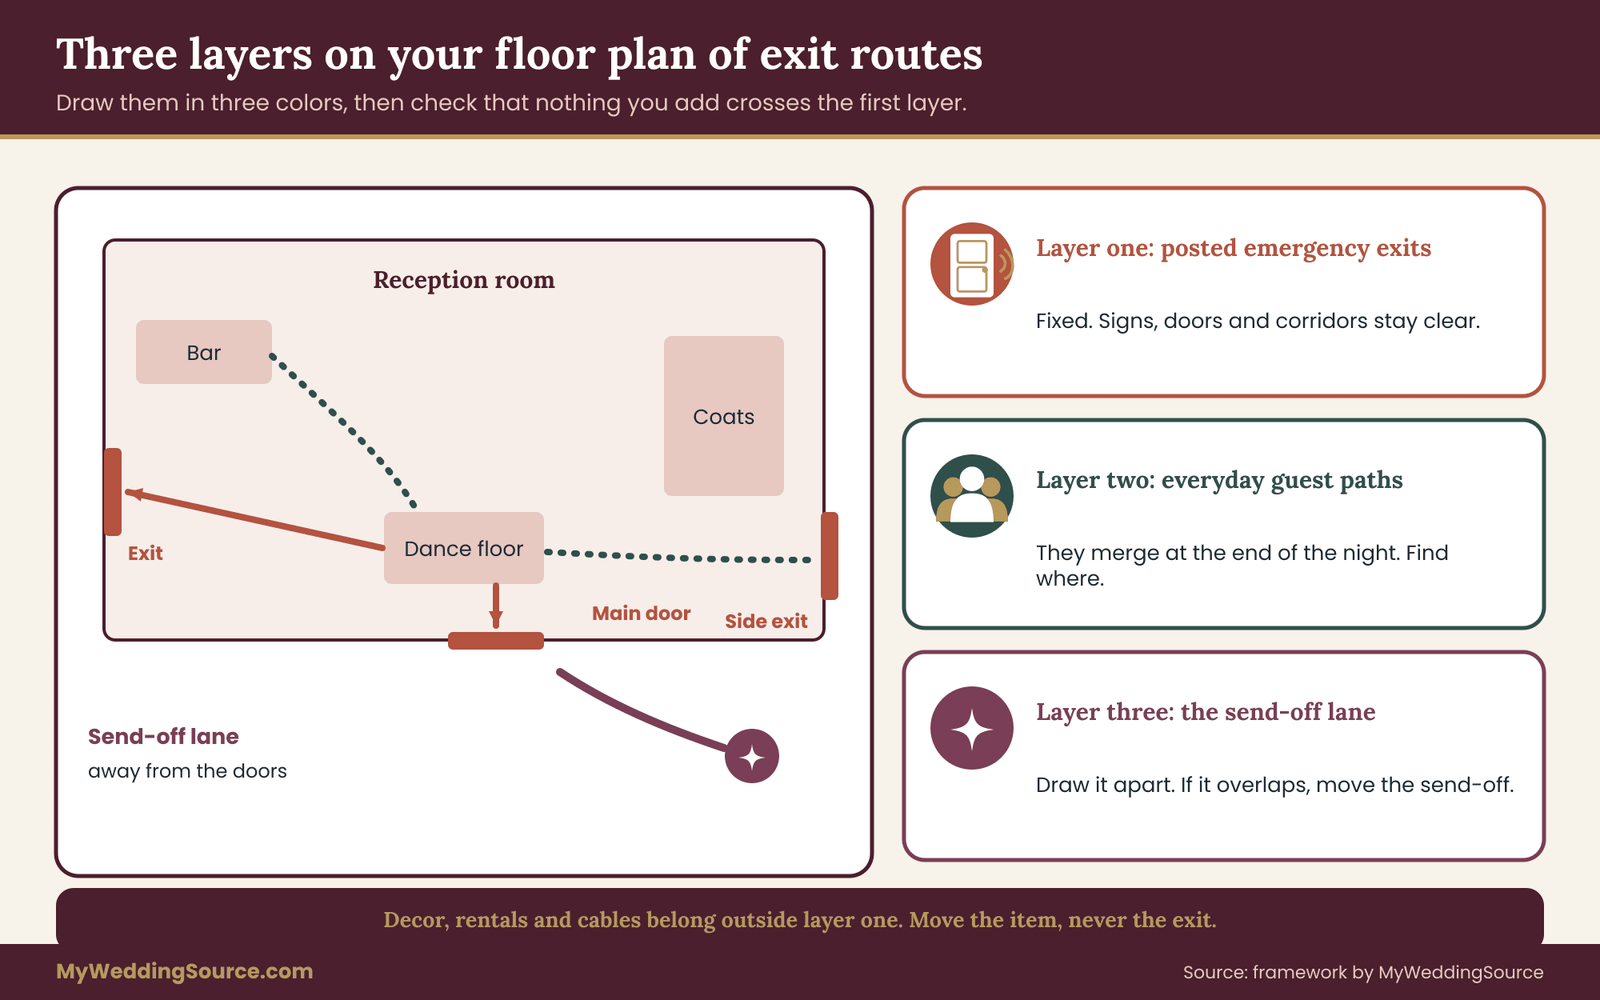
On your floor plan, use three colors or three line styles for the exit routes.
The first layer of exit routes is the posted emergency exits. Mark every exit sign, every exit door and every corridor that leads to one. Treat this layer of exit routes as fixed. Nothing you add may block it, partly cover its signs or make it hard to open. If your floral installation, photo wall, dessert table or lounge furniture is drawn over this layer, move the decor, not the exit.
The second layer of exit routes is your everyday guest paths. Draw the lines people will walk: dining room to restrooms, dining room to the dance floor, dance floor to bar, bar to outdoor space, outdoor space to parking. Then draw where they converge at the end of the night. That convergence is where your bottleneck will be, and it is rarely where you expect. It is often a corner by the coat check, a junction in a hallway, or the foot of a staircase.
The third layer is the send-off lane, if you plan one. Draw it separately and ask whether it shares any space with the first two layers. If it does, change the send-off, not the exit.
Find the narrowest point on each of your exit routes
Every one of the exit routes has a narrowest point. A wide ballroom may empty through one pair of doors, a beautiful garden may funnel through one gate, and a large tent may have a single sloped entry. Mark the narrowest point on each path and write one word next to it: door, stair, gate, ramp, corridor, curb. That narrowest point sets the speed of the whole path, so it sets the speed of your exit routes.
Then ask the venue three plain questions about each narrow point.
Is it staffed? A door with someone standing by it keeps traffic moving and keeps it from being propped open in a way that breaks the venue’s rules.
Is it lit? Evening exits need light at the threshold and on the first few steps outside. If the light is on a timer or controlled from a panel, ask who controls it and when it is set to change.
Is it accessible? Not every one of the exit routes is step-free. If it has steps, is there another way out for guests who cannot use steps? If it has a ramp, is it clear of equipment, and is the surface safe when wet? Guests with mobility needs should not be sent to a back door that no one has opened for them.
Ask what has gone wrong before
Venues that host weddings every weekend have seen the common problems. A good question to ask the manager is: “At the end of a reception here, where do people get stuck?” Most will answer honestly, and the answers are specific. The coat check is at the main door, and people collect coats while others try to leave. The rideshare pickup is out front, and the lot gets crowded when everyone calls cars at the same time.
The only restrooms are near the exit, so the line for them blocks the path. Write these answers on the plan. They are the best information about your exit routes you will get, and no article can supply them.
If the venue cannot name any trouble spots, that is not proof that there are none. Ask whether the venue has hosted weddings with your guest count and format, and ask to see the room set for a similar event, or photos of one.
Check the building’s posted rules, and ask for the file
Every venue should be able to tell you its posted occupancy for the room as you plan to use it, and any restrictions on tents, candles, open flame, pyrotechnics, drones, fog and special effects. Ask for those rules in writing, as part of the contract or in an attached policy. The occupancy figure is set by the local fire authority and depends on the room layout. It changes if you add a stage, a dessert wall or a dance floor that takes up seating space. If you change the layout, ask the venue whether the figure for your event changes.
This is also a good time to confirm who at the venue handles contact with the local fire authority. At many venues the event manager does this. At others, the venue’s operations or safety lead does. Get a name, and get it in an email.
If your venue is part of a hotel, a historic building or a rented estate, the answers may come from a different person for each part of the property. Ask for the one person who will be responsible for exit-related questions on the day, and put that name in your plan.
Mark where your own vendors add obstacles
Your own vendors change the map. The rental company brings chairs, tables and lounge furniture. The florist adds arches, tall arrangements and aisle markers. The DJ brings speakers and cable runs. The photographer adds a backdrop or a booth. The caterer sets up a station that the venue did not have. The bar team adds a second bar to cut lines.
Ask each vendor to send you a drawing or a description of where their equipment will sit. Compare those against your three layers of exit routes. Any vendor item that touches the emergency layer is a problem. Any vendor item that narrows one of the exit routes, such as a cable run across a doorway or a tall arrangement on a corner, is a problem to solve before the day. Our rental planning checklist covers how to get layouts from the rental company in time to check them.
Cables deserve special mention. A cable across a doorway is a trip hazard and a door obstruction. Ask the DJ and the lighting vendor to run cables along walls or use covers that are secured, and ask the venue whether it has its own rules for cable runs near exit routes.
Write the map down as a one-page plan
Once the walks are done, turn the findings into a single page. Include the floor plan with three layers of exit routes, the narrow points with notes, the names of the people who own each route, and the venue rules you have confirmed. This page is the start of your guest exit staging diagram, which the next sections build on. It is also the first document in the signoff file you will assemble later.
A good one-page plan does not need a long text. It needs the picture, a short list of facts, and a list of open questions that still need an answer. Open questions are normal at this stage. The mistake is leaving them open until the week of the wedding.
A final point on this step: do it early. The best time to ask a venue about exit routes is before you sign, because that is when changes are cheap. After the contract is signed, the venue may still help, but you have less leverage and fewer alternatives. If your venue is already booked, do the mapping as soon as you can, and bring the questions to your next planning meeting.
Where crowds bottleneck at a wedding and why
A bottleneck is any place where the rate of people arriving is higher than the rate at which they can pass. At a wedding, bottlenecks are rarely caused by the building alone. They come from the building meeting a schedule. A door that handles a steady trickle all night becomes a wall of people when the DJ announces the last song and every guest stands up.
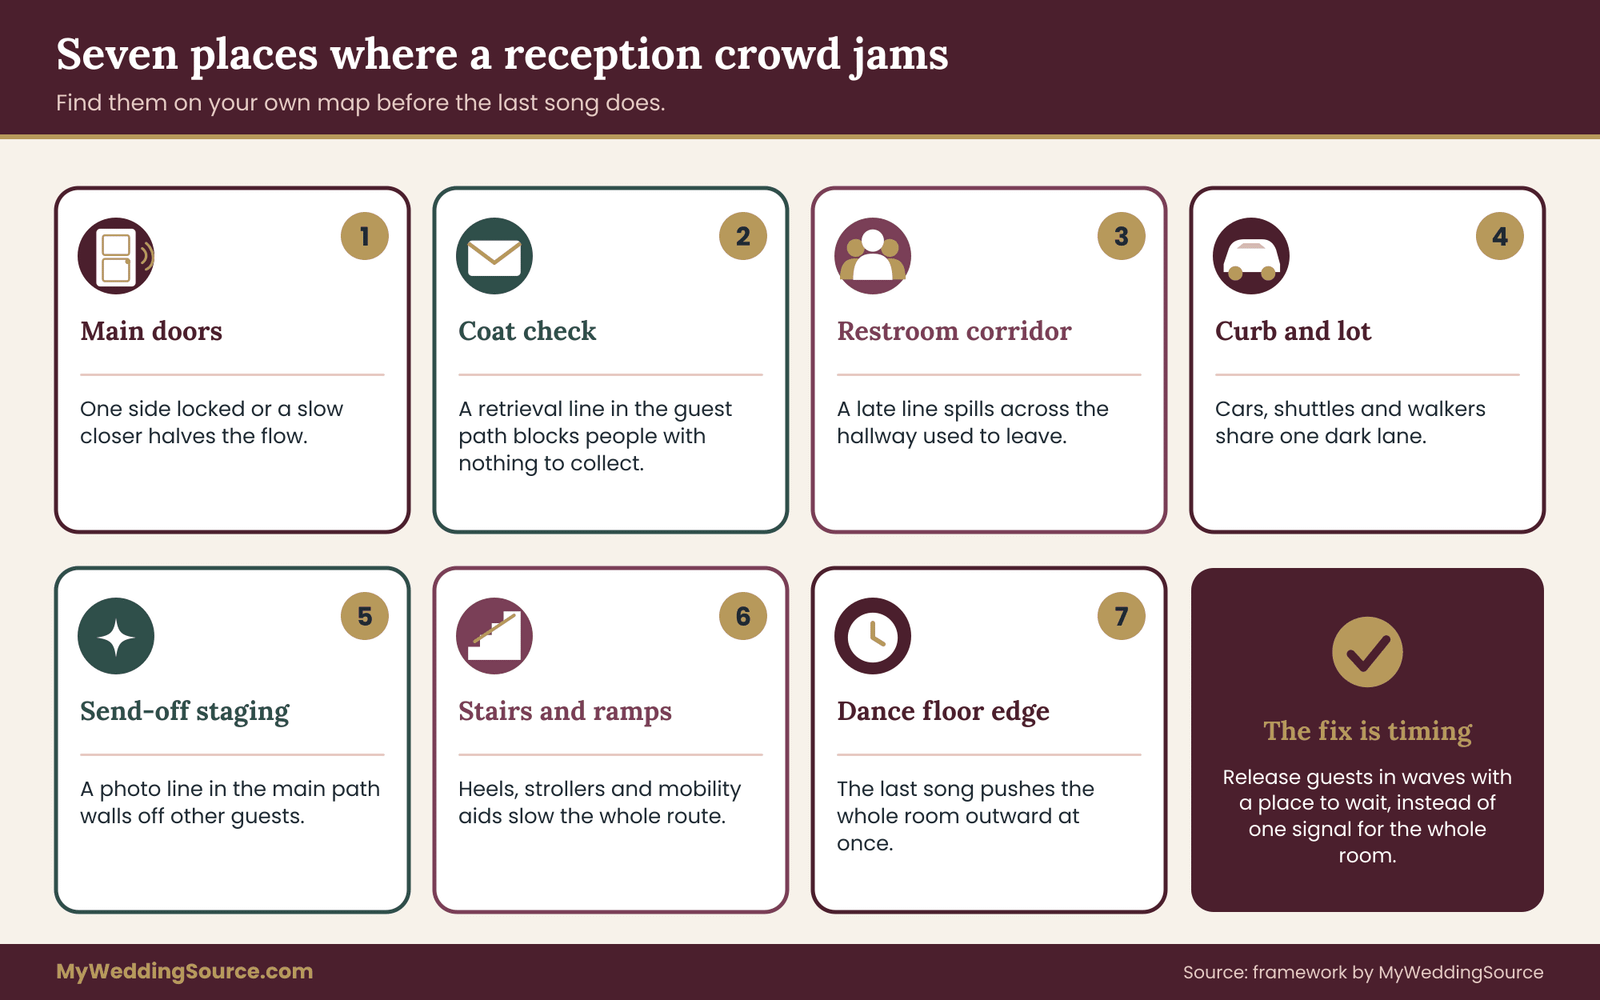
Seven spots cause most of the trouble on exit routes. Learn to recognize them on your own map, because each one has a different fix.
The main doors. Everyone eventually uses them, and they are often the narrowest point on all the exit routes. A pair of doors with one side locked, or a vestibule with a second set of doors, halves the flow.
The coat check or bag area. It combines a line, a retrieval delay and a counter that sits in the guest path. If the coat check is near the main doors, the line for coats blocks the people who have nothing to collect. Ask the venue’s staff how they usually handle it. In practice, the fix is to move coats away from the door, add a second retrieval point or let guests retrieve coats in waves.
The restroom corridor. At the end of a night, a line forms for restrooms because people are about to travel. If that line stretches across a hallway used by exit routes, the two flows collide, and a jam on one of the exit routes spreads to the others.
The parking and drop-off area. Cars, shuttles, rideshares and pedestrians share one lot, in the dark, when many guests have been drinking. A line of cars at the curb is a hazard in itself, and so is a group of guests standing in the driving lane waiting for a ride.
The send-off staging area. A photo line of fifty guests holding props takes up a lot of space. If it forms in the main path, the guests who want to leave must walk through it, and the couple’s departure becomes a wall that other guests cannot pass.
Stairs and ramps on exit routes. They slow movement, especially for guests carrying children, wearing high heels or using a mobility aid. A staircase at the end of a long hallway becomes the narrowest point of the entire route.
The dance floor edge. The last song pulls everyone toward the floor, so when it ends, the crowd moves outward from the center in every direction. If the edge of the floor is also the start of an exit route, the first people to leave push against the last to arrive.
Why timing matters as much as space on exit routes
You can have wide exit routes and still get a jam if everyone moves at once. The most common cause of a late-night crush is a single signal that tells every guest to go: the last-song announcement, the lights coming up, the DJ saying the couple is leaving, the bar closing. Each of these is a cue, and each one starts a stampede of shoes and handbags toward the nearest door.
The fix is to stop issuing one signal. Replace it with a sequence. A short, quiet cue to the first group, a pause, another cue to the next. This is the idea behind the wave plan in the next section: split the guest count into groups and release each group on a staggered schedule, so the doors and exit routes see a stream instead of a flood.
Four patterns worth recognizing
Here are four patterns, each drawn from the kind of situation that appears often in event planning. They are not case studies of real weddings, and they do not claim to describe typical rates. They are shapes to look for on your own map.
The first is the door that also hosts the photo. The couple wants the send-off in front of the main entrance because it looks best, and the photographer agrees. But that is also where guests leave. The result is a crowd on the front steps holding lights and props, with nowhere to go. The remedy is to move the send-off a short distance away, to a lane that does not touch the main doors, and to give guests a different path to their rides.
The second is the single shuttle stop. All guests staying at the hotel wait for the same shuttle at the same curb. When the shuttle arrives, forty people stand up at the same time. The remedy is to schedule two or three shuttle runs and tell guests which run to take, and print the run times on the hotel welcome note. Ask the shuttle company about a loop schedule with a driver who can call ahead.
The third is the late dessert. A dessert bar opens late, the line forms near the exit, and guests with plates stand in the path of people leaving. The remedy is to place late-night food away from the exit routes, with its own space for standing and eating.
The fourth is the open door in the cold. To avoid a jam, someone props the main door open. The room cools or heats, the venue’s alarm or policy objects, and a staff member closes it. The remedy is to ask in advance whether doors may be propped and to staff them instead.
Estimating the problem without inventing numbers
You do not need a formula to see whether you have a bottleneck. Use a simple count method. Count the doors on each of the exit routes and the people each route has to serve. Count how many of those people will be leaving in the same ten-minute window. If you cannot answer, ask the venue how long it usually takes for a crowd your size to clear the room at the end of a reception.
Venue staff often answer this question well from experience. Treat that answer as an estimate and a starting point, not as a safety rating. The actual capacity of a door or a corridor for emergency use is set by building and fire codes, which only the authority having jurisdiction applies. Never present your own estimate as an emergency egress time, and never use it to argue for a larger guest count or for removing a posted exit from use.
If you want a calm rule of thumb that does not pretend to be a code, here it is: if you can picture a line forming, give it somewhere to form that is not in the way. A line with a place to stand is a nuisance. A line without one is a bottleneck.
The role of the DJ, planner and band in exit routes
The people with the microphone control the crowd. A DJ who says “the couple is leaving, everyone head outside for the send-off” is releasing the whole room at once. A DJ who says “if you would like to join the send-off, please collect your things and gather at the garden door in ten minutes” is releasing a wave.
Give your DJ or bandleader a script for the exit routes. It should name the cue, the place and the time, and it should ask for one group at a time. If the evening has a planner or coordinator, give them the authority to adjust the sequence on the day if the crowd is moving faster or slower than expected. The more clearly you describe the plan beforehand, the easier it is for the people who run the evening to make good decisions in the moment.
This article covers the end of the evening in depth. Entry, seating and food belong to the wider flow of the night.
Do not forget the vendors leaving too
Every vendor also has to leave. The caterer needs the loading area, the DJ needs to move heavy cases, and the rental company may start collecting items while guests are still around. When vendors start breaking down during the send-off, trucks and carts mix with guests. Agree on a clear order in the vendor timeline: guests leave first, and heavy breakdown starts after the guest exit routes are clear. Our vendor timeline guide shows how to write this down.
The guest exit staging diagram: how to draw it and how to use it
A guest exit staging diagram is a one-page picture of how guests move from the last dance to the curb, in order. It is the core deliverable of this guide, and it shows your exit routes in time order. It is not an engineering drawing and does not need to look professional. It needs to be clear enough that a DJ, a planner, a photographer, a venue captain and a friend with an armband can each see their part of the evening on it.
Build it from the floor plan you made earlier. Keep the three layers of exit routes visible, then add four things: staging spots, wave groups, a signal for each wave and a person for each spot.
Step one: choose the staging spots
A staging spot is a place where a group of guests waits, gathers or collects belongings before the next move. Good staging spots sit beside the exit routes without blocking them. They are open, lit, away from posted exits and wide enough that people can stand without blocking a path. A lobby, a patio, a lawn near the building, a lounge area or the edge of a dance floor can all work.
You need at least three. The first is the pre-exit spot, where guests gather their things. The second is the send-off spot, where the photo happens, if there is one. The third is the ride spot, where guests wait for cars, shuttles or rideshares. If these three are the same place, the crowd will pile up, so separate them on the diagram.
For each spot, write down what it is, how many guests it can hold comfortably, and what is near it. You do not need a number from a code. You can estimate with the venue’s staff by asking: “If forty people stood here, would it feel crowded?” The point is to avoid asking one spot to do several jobs at once.
Step two: split guests into waves on the exit routes
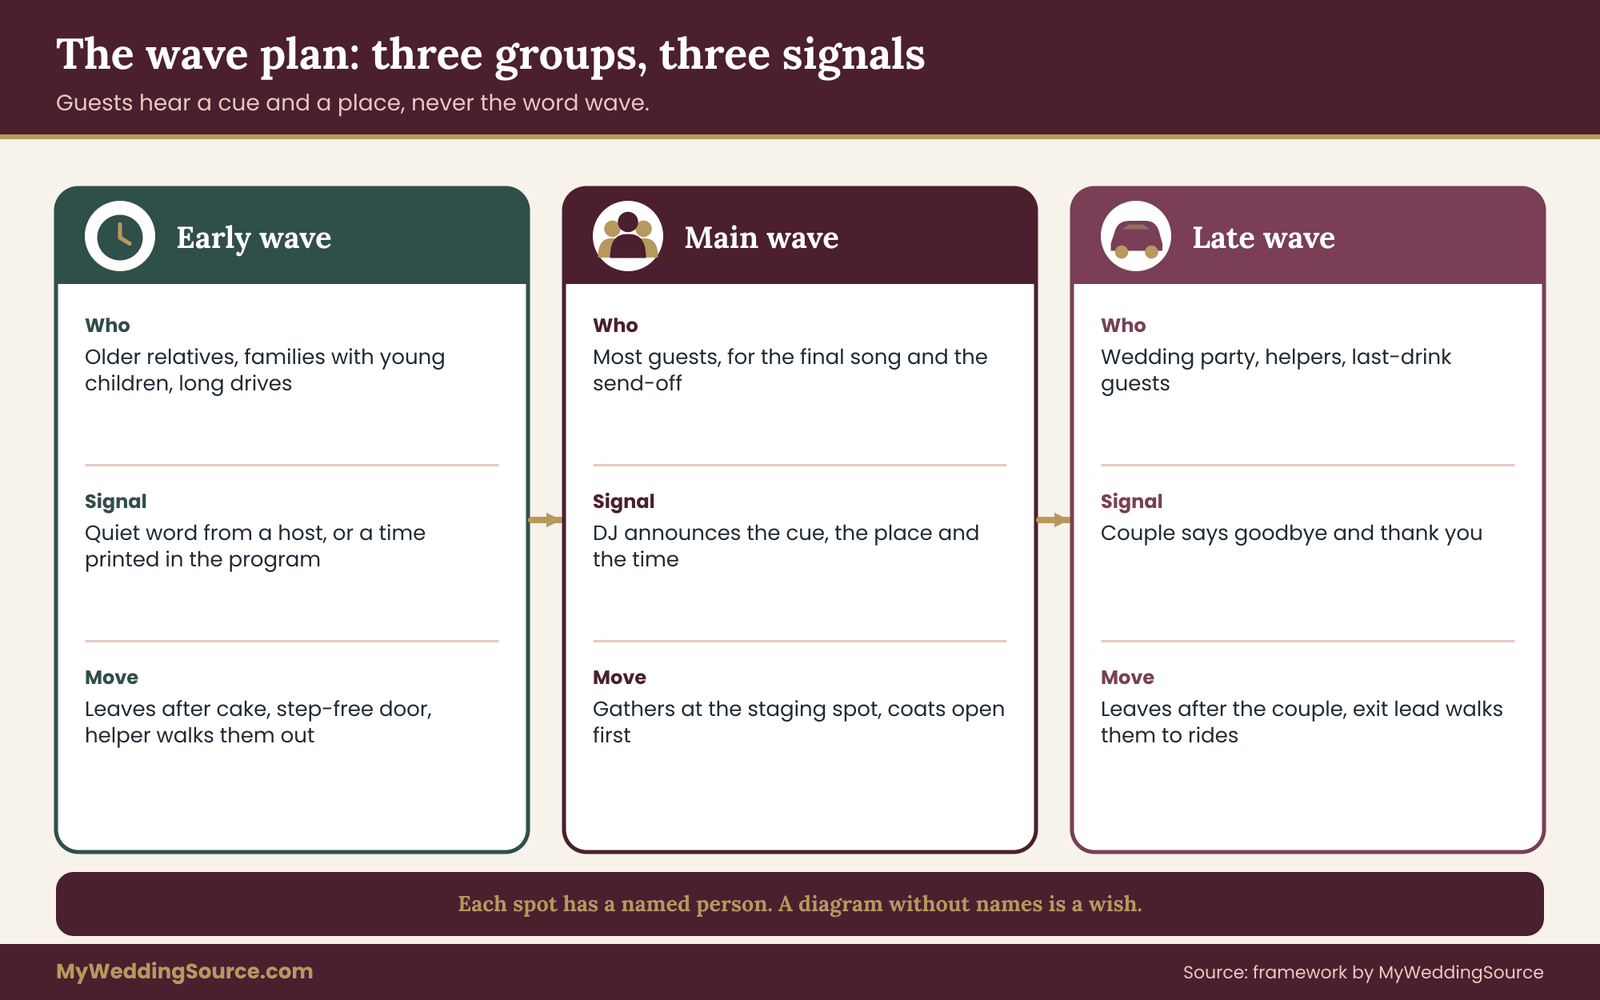
A wave is a group of guests released at the same time. The simplest plan has three waves, though a small wedding may need only two and a large one may need four.
The early wave includes guests who want to leave before the main event ends: families with young children, older relatives, guests with a long drive, people who are tired. This wave leaves quietly during a natural lull, such as after the cake or during the last slow song. Moving this group first clears the exit routes of the guests who need the most time and the most space.
The main wave includes most guests. It is released for the send-off or the final song, depending on your plan. This is the wave that creates the bottleneck, so it is the one you must stage carefully on your exit routes.
The late wave includes the wedding party, the family helping with cleanup, guests who stay for the last drink and people waiting for the couple to leave. This wave may leave after the couple, and it is the wave that most needs a clear path to a ride.
Waves should not be announced as groups. Guests do not need to hear “wave two.” They need a cue and a place. The DJ, planner or captain does the sorting, using short, friendly instructions.
Step three: give each wave a signal
A signal is something that tells a group to start moving. Use a different signal for each wave, and make each one clear without being loud.
For the early wave, a quiet word from a host or family member works well, or a note in the program or table cards that says the last bus leaves at a stated time. For the main wave, use a clear announcement from the DJ: the cue, the place and the time. For the late wave, use a simple “we’re leaving, thank you” from the couple.
Avoid ambiguous signals. “The party’s winding down” tells nobody what to do. “The send-off starts at the garden door in ten minutes, and coats are at the front desk” tells everyone what to do.
Step four: assign a person to each spot
A diagram without names is a wish. For each staging spot and each narrow point, write the name of the person who watches it. These do not need to be professionals. A venue captain, a planner, a bartender at the end of their shift, a groomsman, a trusted cousin or a friend of the family can all do the job if the job is simple and the instructions are clear.
Give each person a one-line role: “Garden door: keep it clear, direct guests to the lane.” “Curb: keep guests out of the driving lane, call out shuttle times.” “Coat area: open the second window at the start of the main wave.” Put it on a card, and share it ahead of time. An email with the diagram attached is better than a group text on the day.
If you have a planner, they should own the diagram and the exit routes. If you do not, assign one trusted person as the exit lead, and tell that person they have the authority to make small adjustments. The couple should not hold this role. They will be busy and in the middle of the photo.
Step five: test it against a slow guest
Once the diagram is drawn, test it by imagining a guest who is slow, tired or has a lot to carry. A woman in her eighties using a walker. A father carrying a sleeping child and a bag. A friend in a long dress and tall heels. A guest who has had too much to drink. Walk each of them through the diagram. Where do they wait? Where do they get stuck? Who helps? Then adjust.
This test reveals problems with exit routes that a simple count cannot. A staging spot may be fine for a crowd but have a step at its entrance. A ride spot may be wide enough but far from the door. A send-off lane may be clear but ends at a gravel path, which is a poor end to exit routes. Fix each of these on the diagram.
What the diagram of exit routes should show
A finished guest exit staging diagram has these elements, and no more:
The floor plan with the three layers of exit routes in different colors. The staging spots, numbered, with a short label for each. The wave groups, with the rough cue and time for each. The narrow points, marked with the name of the person who watches each one. The send-off lane, if any, drawn separately. The ride area, with the order in which cars, shuttles and walkers will use it. And the items that are deliberately kept out of the exit routes, such as decor, rental items and equipment.
Keep the text short. A diagram with a paragraph in each box is not a diagram. If a box needs a paragraph, move the paragraph to the notes and leave a keyword in the box.
How the diagram supports the venue conversation
The diagram turns a vague request into a concrete one. Compare two ways of asking.
The vague version: “We would like to do a sparkler send-off at the end of the night. Is that okay?”
The concrete version: “Here is our staging diagram. The send-off lane runs along the garden path, away from the main doors and away from the tent. Guests would form two lines about this long. Open flame would be used only in the lane, and a person from our team would hold the extinguishing bucket. Can you tell us whether the venue allows this, and what the local fire authority requires?”
The second version gives the venue something to react to. It shows that you have considered exit routes, ignition, staffing and extinguishing. It makes the exit routes concrete, and it makes it easier for the venue to say yes with conditions or no with a reason, and either answer is useful. A vague request gets a vague answer, and a vague answer is not something you can rely on.
Share the exit routes diagram, then confirm that people read it
Send the diagram of exit routes to every vendor who has a role at the end of the night: the DJ, the planner, the photographer, the caterer, the bartender, the shuttle driver and the venue captain. Ask each to reply with one sentence about what they will do at their spot. This step feels fussy, and it takes ten minutes. It is also the step that catches the DJ who has not read the email and the shuttle driver who did not know about the second run.
At the final walk-through or the final call before the wedding, go through the diagram aloud, in order, with the people who matter. Plan about fifteen minutes. If someone is confused, redraw that part. By the end, every person on the plan should be able to say, in their own words, what they do and when.
For help writing the full evening schedule that the diagram fits into, our guide to reception guest flow covers how entry, seating and food connect to the exit, and the vendor timeline you already wrote shows where the diagram fits.
Open flame at the send-off: sparklers, candles and lanterns
Open flame, near exit routes especially, is where a good photo idea meets the most serious risk in this article. The risk is not mysterious. A lit sparkler burns hot, throws sparks and stays hot after it stops glowing. A candle tips. A paper lantern is a small fire on a string. Dresses, veils, hair spray, tulle, paper programs, dry grass and tent fabric all burn. Add a crowd, low light and a few drinks, and you have the combination that fire-safety people worry about.
That does not mean no couple should ever use flame. It means flame belongs in a plan with clear permission, a controlled place and a way to put it out.
Start with permission, not with the product
Before you buy anything, ask two questions in this order. First, does the venue allow open flame, and in which places? Second, does the local fire authority, often the fire marshal’s office, place any rules on it? The venue may allow something the local rules restrict, or the reverse. Neither answer substitutes for the other.
Ask in writing, and ask specifically. “Do you allow sparklers?” is too vague, because the venue may mean handheld sparklers in a garden but not in a tent, and may bar them near a wooden deck. Ask: “May guests hold lit handheld sparklers in this specific area, for this length of time, with this number of people? What conditions apply? Does the venue or the local fire authority need to approve it in advance, and by when?”
Many venues prohibit sparklers outright. Some prohibit open flame indoors, in tents or within a certain distance of a structure. Some allow candles only in enclosed holders. Some allow flame only with a permit or with a fire watch present. All of these are normal. If your venue says no, treat that as the end of the question, and do not look for a workaround. A venue that has said no and later finds a sparkler in a guest’s hand has a reason to end the evening early, to bill for damage, or both.
Weather and ground conditions change the answer
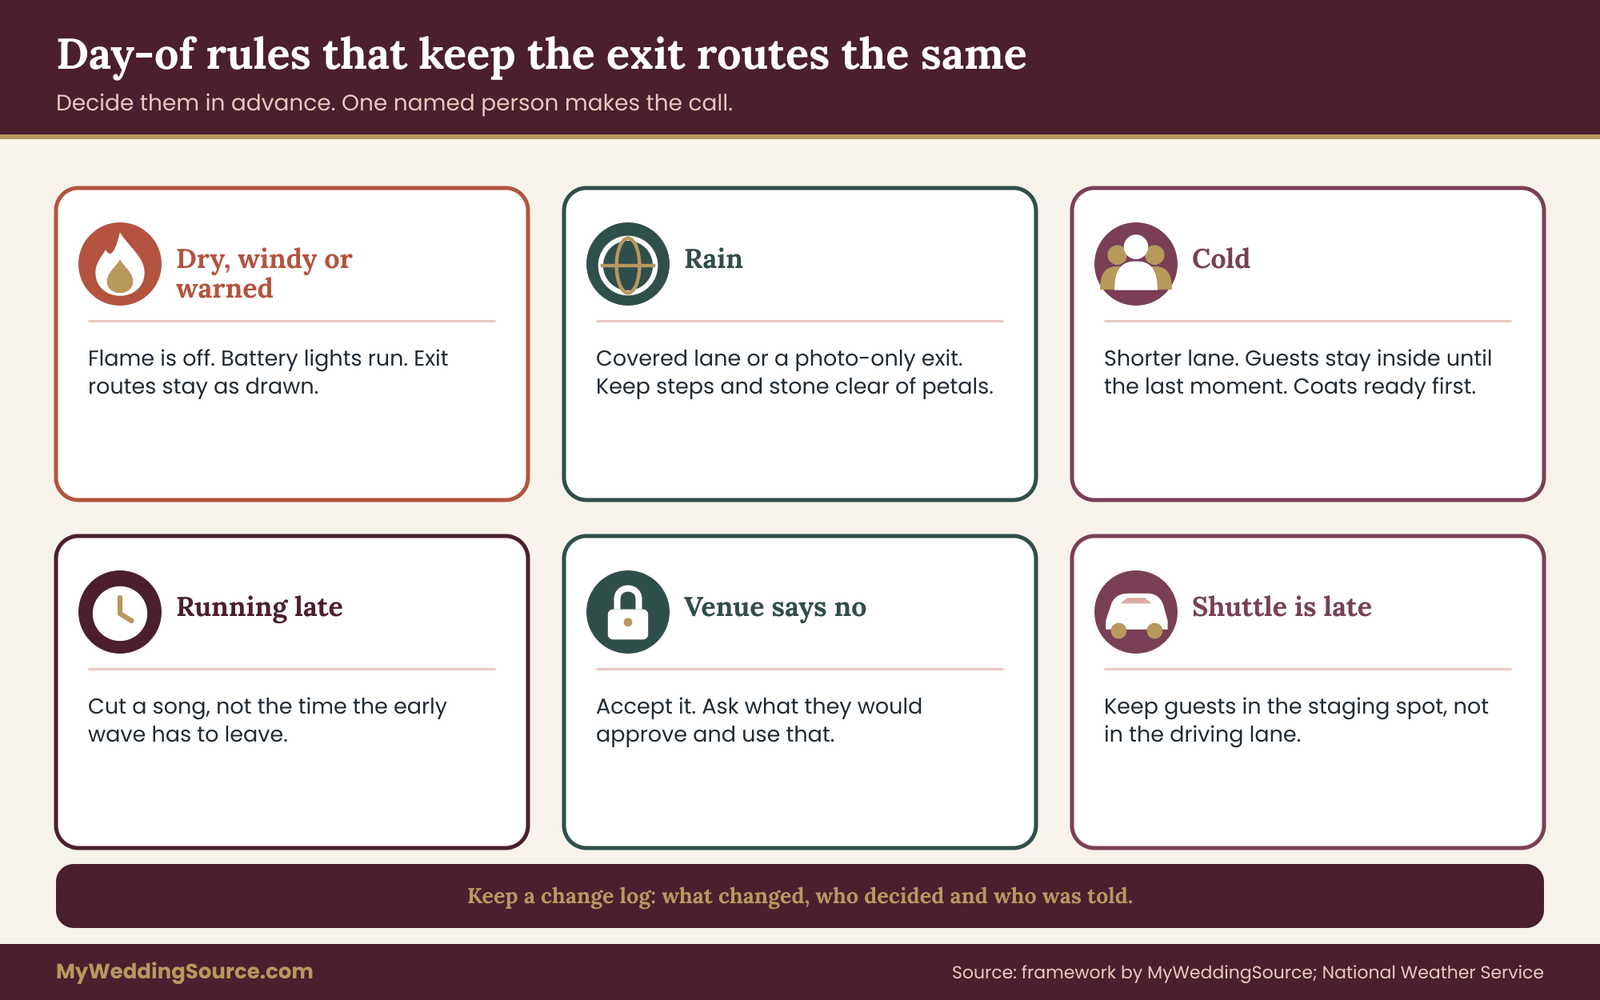
An approval given in March may not hold in August. Dry grass, wind, a burn ban or a red-flag warning can turn a permitted activity into a prohibited one on the day. The National Weather Service publishes fire weather information and safety guidance, and local authorities announce burn bans. Plan a check on the morning of the wedding and again in the late afternoon, and name the person who makes the call. Put the decision rule in your plan: if the venue or the authority withdraws permission, the flame-free alternative runs, and the exit routes stay as drawn, and no one argues about it.
If flame is approved, treat it as a procedure
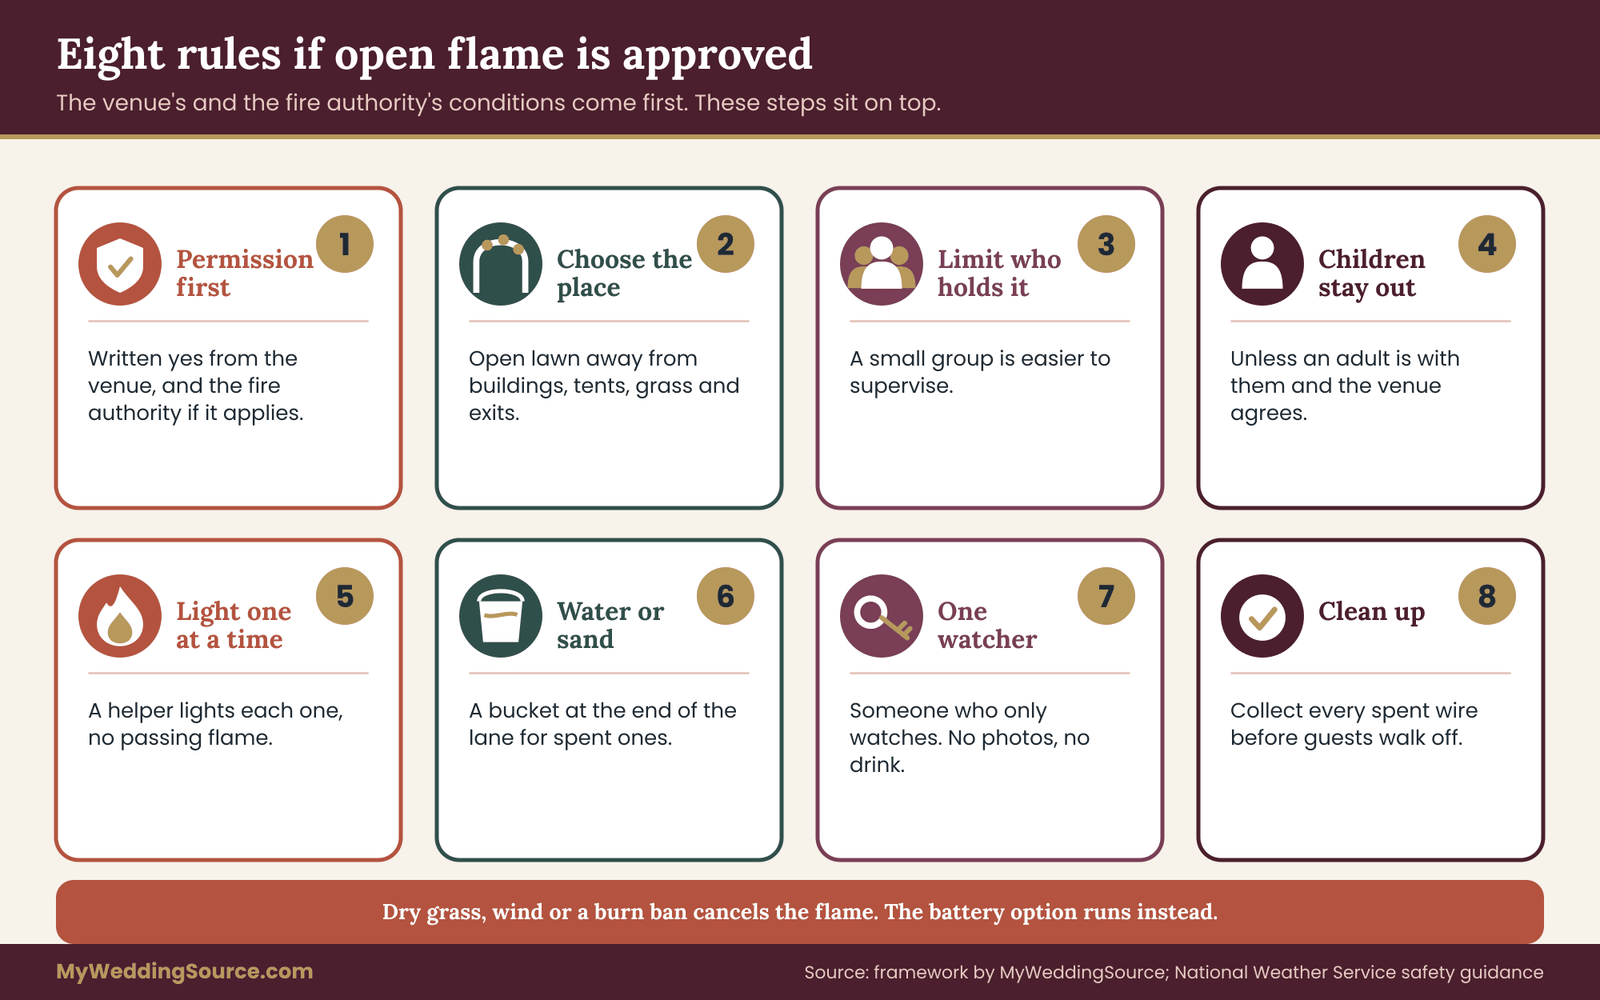
Suppose the venue and the local authority both say yes with conditions. Treat the conditions as the minimum, and add the practical steps that make a send-off calmer. The following list is general planning guidance, not a rulebook. The venue’s and the authority’s conditions come first, and take precedence over anything here.
Choose the place on purpose. Pick an open outdoor area away from the building, away from tents, away from dry grass, away from vehicles and away from the main exit routes. The lane must stay clear of exit routes and be wide enough that two lines of guests stand apart from each other, and from the couple walking between them.
Limit who holds flame. Some couples hand out sparklers only to a small group, such as the wedding party, instead of to every guest. A smaller group is easier to supervise and easier to keep sober and attentive.
Keep children out of the lane unless an adult is directly with them and the venue approves. Small children, loose clothing and open flame are a poor mix.
Light one at a time, not all at once. A helper lights each sparkler from a single source and hands it to the guest, so that guests are not passing flame among themselves. This also paces the line.
Put out flame in a safe container. A bucket of water or sand placed at the end of the lane gives guests a place to drop spent sparklers. Spent ones stay hot, so people should not drop them on the ground, pocket them, or leave them in a handbag.
Assign one person to watch the lane and nothing else. This person does not take photos and does not have a drink. Their only job is to keep the lane clear, handle the extinguishing container and stop the line if something goes wrong.
Ask the venue what must be present. Some require a fire extinguisher at the lane, a trained person on site or a written fire plan. Ask that question early, so you can arrange it.
Plan the clean-up. Spent sparklers are metal wire and need to be collected. A guest walking barefoot or a child on the lawn the next day should not meet them.
Ask your vendors about flame near exit routes, too
Other vendors may bring flame without telling you. A caterer may use chafing fuel or a flaming dessert. A florist may place candles in an arrangement. A rental company may supply candelabras. A bar may offer a flaming cocktail. Each of these has the same basic questions: does the venue allow it, where does it sit, who watches it and how is it extinguished?
Ask your vendors to tell you in advance about any open flame they plan to use. Our guide to wedding bar service planning covers the bar side of that question. For catering and décor, ask the venue’s event manager who is responsible for approving each flame source, and record the answers in your signoff file.
Candles on tables and near exit routes
Table candles are the other common flame. The same logic applies. Check the venue’s policy, and prefer candles in enclosed holders, such as glass hurricanes, that are stable and tall enough that a sleeve or a napkin is unlikely to touch the flame. Keep candles away from the exit routes, paper menus, dried flowers, greenery, tablecloth edges and hair. Ask the venue whether candles may be lit before guests arrive and who snuffs them at the end.
One point deserves repeating because it affects exit routes directly: do not place candles along aisles, in doorways, on stairs or in corridors that guests will walk at the end of the night. A flame near a walking path with a crowd of tired guests is the wrong place for it.
Lanterns and sky lights
Sky lanterns and similar floating flames are restricted or banned in many places because they travel and land unpredictably. Do not plan one without clear, written permission from the venue and the local authority, and expect that the answer will usually be no. A ground-based alternative gives you the same photo with none of the drift.
A word about alcohol
By the end of the night, a share of guests will have been drinking. That is not a moral point. It is a planning fact. People who have been drinking move more slowly, judge distances less well and are less likely to notice a hot ember. If you use flame, keep it off the exit routes, with a small, supervised group, and consider shifting it earlier in the evening, before the main drinking period is over. Many couples find that a send-off held earlier is calmer than one held at the very end.
Open flame in photos and film
Your photographer and videographer will care about the look of flame, because it photographs well. Be specific with them about the rules. Tell them where they may stand, tell them not to ask guests to hold flame closer or longer for a better shot and tell them that the person in charge of the lane has the final say. A good photographer will welcome the clarity.
If you are weighing a flame send-off against the alternatives in the next section, the honest comparison is this: the flame version needs permission, a place, a procedure, supervision and cleanup, and it can be cancelled on the day by weather or by the venue. The alternatives need less of all five.
Send-off ideas that keep the photo and lose the flame
A send-off has two jobs: it gives guests a way to say goodbye, and it gives you a photograph. Neither job requires fire. The options below each suit a different venue and budget, and each one fits inside a lane that stays clear of the main exit routes.
Before choosing, ask the venue about every item. Some venues restrict confetti, petals, rice, bubbles, glitter, balloons and even ribbon, because of cleanup, slipping and wildlife concerns. A flame-free item is not automatically permitted.
Light without flame
Battery-powered options give you the glow of a sparkler line. Small LED wands, glow sticks, flameless tea lights and battery string lights in guests’ hands all photograph well in low light. They are cool to the touch, safe around hair and dresses, and cannot start a fire. Some venues still restrict them if they flash or distract drivers, so ask.
Handheld lights have a practical benefit for exit routes. Because guests are carrying lights, the lane is lit, the exit routes are brighter, and the walk to the car is less dark. The lit path can double as wayfinding for the late wave.
Movement and sound
Bubbles, ribbon wands, bells and hand-held fans create motion in photos. Bubbles look best in backlit settings and are usually accepted by venues, though a wet floor can be slippery near steps and indoors. Ribbon wands are easy to distribute and easy to collect, and bells give a sound cue that tells the lane when to begin.
Dry petals and biodegradable confetti are popular, but many venues restrict them, or require them to be dry and free of dye. If petals fall on a smooth path, the surface can be slick, so keep them off ramps, steps and stone.
A photo-only exit
Some couples stage the send-off for the camera and leave in a smaller moment. In this version, the photographer arranges a short, directed walk through a small group, often thirty seconds long, and the couple then leaves quietly. The main crowd does not need to line up. This version keeps the staging area small, gives you full control of the lighting and takes almost no time.
A related idea is a “grand exit” earlier in the evening, such as after the first dance or the cake, followed by a return to the party. The photograph exists, the couple can enjoy the rest of the night, and the late-night crowd is not tied to a single leaving moment. This also avoids the bottleneck, because the exit and the crowd’s departure are no longer the same event.
A decision rule for choosing
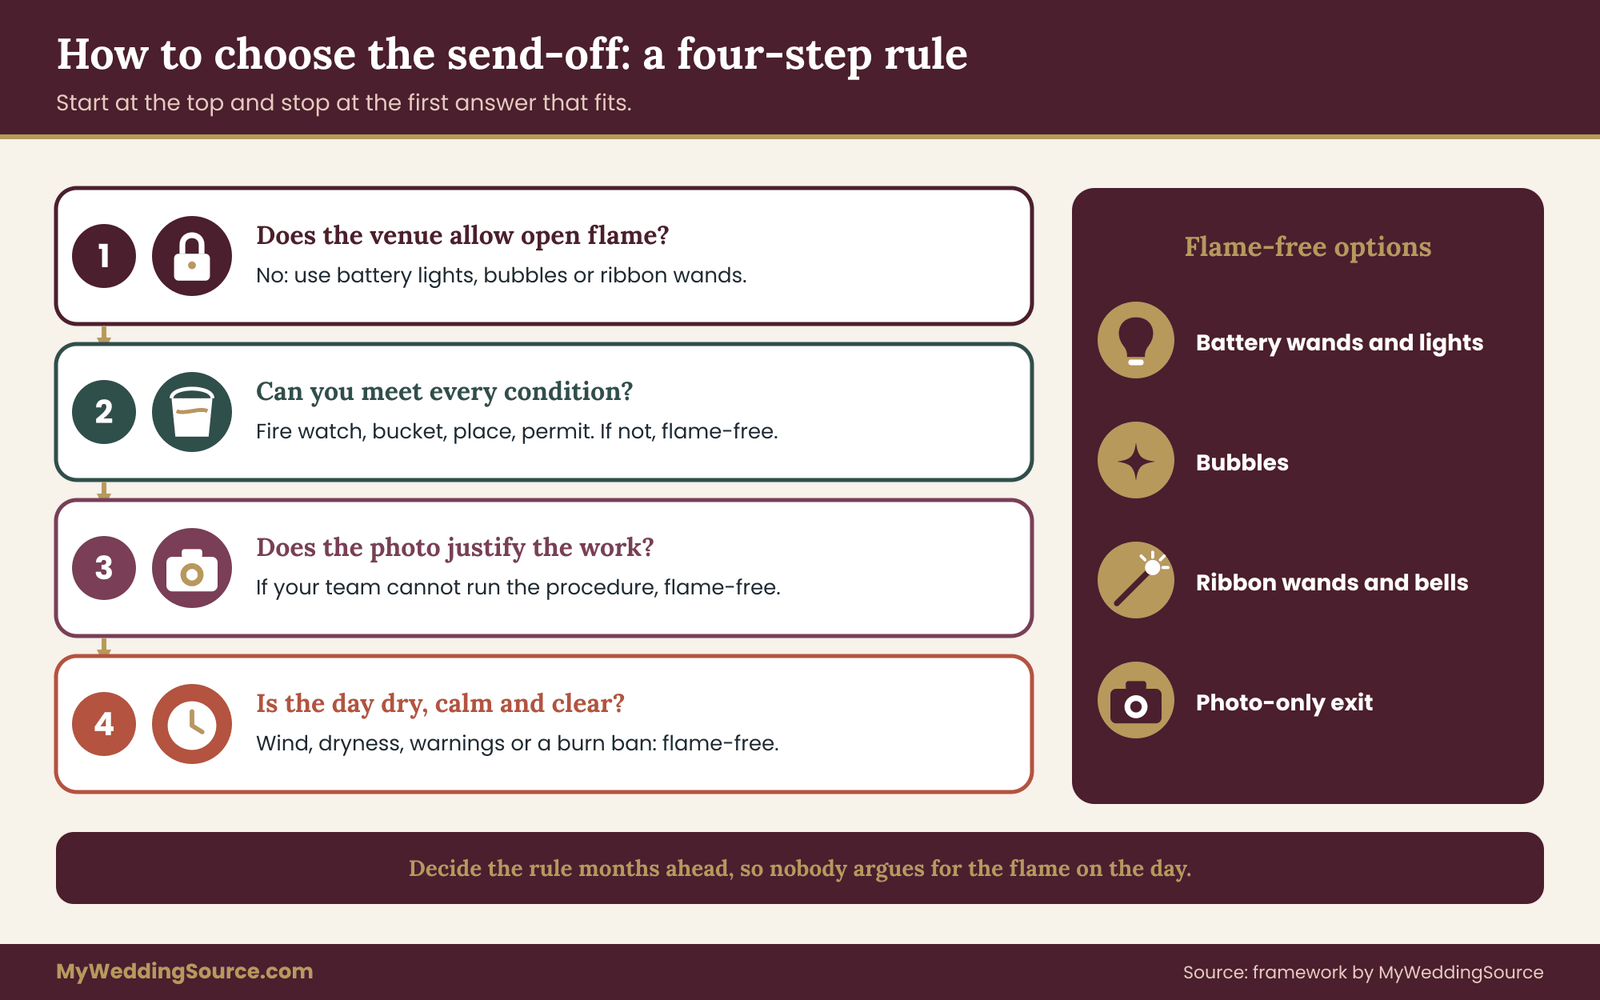
Use the order below. Start with the venue’s rules and move down until you find the first option that fits.
If the venue allows no open flame, choose battery lights or motion items.
If the venue allows flame only with conditions you cannot meet, such as a trained fire watch, choose battery lights or motion items.
If the venue allows flame with conditions you can meet, ask yourself whether the benefit justifies the work. If the photo matters and your team can run the procedure from the previous section, proceed. If not, choose a flame-free option.
If the weather is dry, windy or under any warning on the day, the flame-free option runs.
This rule is plain on purpose. It removes the temptation to argue for the flame version on the day, when everyone is excited and the photographer is ready. You have already decided.
Keep the send-off lane off the exit routes
Whatever the item, the lane itself follows the same rules. Place it in an open space with a clear start and finish. Keep it out of doorways, hallways, stairs and the posted emergency exits. Give guests a way to leave that does not go through the lane. Make sure the lane ends at the couple’s car or transport, so the couple is not stranded in a crowd.
A good test of your exit routes: could a guest who wants to leave without taking part walk to their ride without crossing the lane? If the answer is no, redraw the lane.
The getaway vehicle
The vehicle is part of the exit routes. A classic car, a limo, a golf cart or a horse-drawn carriage all raise their own questions. Where does it park? Who drives? Does it block a fire lane or a delivery path? Does the venue allow it on the grounds at that hour? Does the driver know the route and the timing?
Ask the venue where vehicles may stand and for how long. Ask the driver to arrive before the wave begins and to stay in position. A vehicle that arrives late forces the couple to stand on the lane while the crowd waits, which makes the whole crowd restless.
Be careful with decorated exits
Signs, streamers and balloons attached to the getaway vehicle are fine if they are secure and do not block the driver’s view. Anything that flaps loose or covers a window is a hazard. Cans on strings and similar traditions can scratch paint or make noise; ask the driver or the rental company first.
What guests need to hear
Guests do best with short, specific instructions. Put the plan in a small sign or in the program, such as “Send-off at the garden gate after the last dance. Coats at the front desk.” Share it with the DJ as well, so the announcement matches the sign. For more on writing signs that guests can read in low light, see our guide to a wedding signage system.
Cost logic without invented numbers
Flame-free options are usually the less expensive and the less labor-intensive choice, but the real comparison is not the price of the item. Add the cost of the extinguishing equipment, the supervision, any fire watch the venue requires, any permit and the cleanup. Then add the cost of a possible cancellation: if you buy sparklers and the venue forbids them on the day, you have paid for a product you cannot use. Battery lights, bubbles and ribbon wands rarely carry that risk.
Ask each seller about returns, and keep the receipt in your records. Whatever you buy, order it early enough that you can test it, and bring a backup option.
Exit routes for guests who need more time, space or help
A good plan for exit routes works for the guests who need the most from it. When it does, it works for everyone. This section is about people whose needs the end of the night is likely to overlook.
Guests with mobility needs
Check each of the exit routes. Start with the question the venue can answer: which exit is step-free, and is it open at the end of the night? Many venues have a ramp or an accessible entrance that is locked or used only for deliveries. If a guest using a wheelchair, walker or cane has to wait for someone to find a key, the plan has failed.
Ask the venue which exit routes are accessible, how far they are from the dance floor and where accessible parking and drop-off are. Walk the path yourself. Check surfaces, slopes, doors and curbs. If one of the exit routes crosses grass or gravel, ask whether a mat or a firm route can be added. Our guide to accessible wedding venue red flags lists what to look for.
Place an accessible staging spot near the accessible exit, one of the exit routes that must stay open, so guests can wait there out of the crowd. A chair, shade and light help. Assign a person to check on guests who are waiting.
Guests who leave early
Early leavers are the easiest to plan for and the easiest to forget. Offer them an early wave, and make it comfortable, so that they do not feel they are sneaking out. A host or family member can walk older guests to the door, and a shuttle schedule printed in the program helps those who rely on rides. This group often includes older relatives and families with young children, and removing them before the main wave takes pressure off the doors.
Families with small children
Children go to sleep at inconvenient times. A parent carrying a sleeping child, a diaper bag and a stroller needs more space and more time. Place a stroller parking area near the exit. Let families leave before the send-off or the late wave. If you have a childcare room or area, plan how children are returned to parents at the end of the night.
Guests with sensory needs
A send-off with flashing lights, loud bells and a crowd can be hard for some guests, including some people with sensory sensitivities and some older relatives. Offer a quiet path out, one of your exit routes, that skips the lane and the loudest area. Tell the DJ not to announce the send-off in a way that startles. A short, calm warning before any loud or bright moment helps.
Guests who have had too much to drink
No couple wants to think about this, but plan for it. Guests who are unsteady should not be left to find their own way. Give your team a calm script: “Let’s get you a ride.” Know where water is, and know where a quiet seat is. Make sure a trusted person can reach guests who need help getting home. The venue’s bar team, your planner or a designated friend may all have a role.
Staff and vendors with equipment
Vendors with equipment also need space. A band loading amplifiers, a caterer pulling racks and a rental crew collecting chairs need their own path, away from guests. Agree this ahead of time with the venue manager, and write it into the vendor timeline.
A short script for helpers
Helpers do better with scripts. Here are three lines to give them, in your own words: “Would you like me to walk you to your ride?” “The garden door is just ahead, and the lane is to the left.” “We are letting the first group go now, and I will find you in a few minutes.” Short, kind and specific beats long and vague.
Rides, parking and the last thirty minutes
The exit routes do not end at the door. They end when each guest is in a vehicle, in a hotel lobby or at their own front door. The curb is where many plans fall apart, because the venue’s control ends at the building and the guests’ control begins.
Separate the ride flows
Cars, shuttles, rideshares, taxis and walkers move differently, and mixing them in one space creates a jam. Where you can, give each its own spot on the diagram. Private cars use the lot. Shuttles use a marked stop that is easy to see and well lit. Rideshare drivers use a pickup point that is not the main door, and guests are told where it is. Walkers use a path that does not cross the driving lane.
Rideshare pickup deserves attention, because it is the least controlled flow. If two hundred guests call a car in the same five minutes, the app will not sort them out, and drivers will circle the lot. Spread the demand. Encourage guests to request a ride a few minutes before they plan to leave, and station a person at the pickup point to match guests with cars. A simple sign with the venue address, in large type, helps guests confirm the pickup location in the app.
Shuttles need a schedule, not a rumor
If you provide a shuttle, publish the run times in the program, on the website and on a small sign near the exit. Two or three scheduled runs spread the crowd better than one. Tell the driver the stop, the loop and the final departure time, and tell guests the last run is the last run. Ask the shuttle company about their policy on late runs and extra waiting time, and put the answer in the contract. Our guide to reading vendor contracts explains how to check clauses on time, overtime and cancellation.
Keep the fire lane clear of exit routes
The curb in front of a venue often has a fire lane or a loading zone. Cars waiting in it may block emergency access, and venues care about this. Ask the venue where vehicles may wait, and tell your transport vendors. A staff member at the curb who keeps cars moving is worth the effort.
Light the path
Walk the last stretch from the door to the parking area after dark. Ask whether the lights come on, whether the path is smooth and whether any step or curb is hard to see. If the lighting is poor, ask whether the venue can add lights, or consider a lit path of your own with battery lanterns, as long as the lanterns do not become a tripping hazard.
A last-thirty-minutes timeline
A calm set of exit routes usually follows a simple order. It is a pattern, not a schedule you should copy, so adjust it to your guest count, venue and last-call time.
About half an hour before the planned end, the DJ announces the final round at the bar and the coat area opens. Early-wave guests leave quietly. About twenty minutes before the end, the bar closes, and guests who want to take part in the send-off hear the cue and the location. About ten minutes before the end, the main wave gathers at the staging spot while the last song plays.
At the end of the song, the lane forms, the couple walks through and the vehicle leaves. The late wave then moves toward rides, helped by the exit lead. Staff then begin clearing, and breakdown that involves carts or trucks starts only after guests have left the area.
Notice what this pattern does. It spreads the moves across half an hour, so no single moment carries the whole crowd.
The venue safety signoff: what to ask for and how to record it
A safety signoff is a short, written confirmation from the venue that it has reviewed your plan for the end of the evening and agrees to specific terms. It is not an inspection, a certification or a guarantee of safety. It is a record that the right person looked at the right plan and said what is allowed.
The reason to get one for your exit routes is practical. People forget conversations, staff change and rules are applied differently by different managers. A signoff turns “I think they said it was fine” into a document you can show to your planner, your vendors and, if needed, your insurer.
What the signoff should cover
Ask the venue to confirm, in writing, the following points. If a point does not apply, write “not applicable” instead of leaving it blank.
The posted occupancy for the room in the layout you plan, as set by the local authority. Confirm that your guest count, vendors and staff fit within it, or ask who decides.
The emergency exit routes and how they will be kept clear, including which doors may not be used for send-off or staging.
The accessible exit routes and who will open it at the end of the night.
The rules for open flame, including candles, sparklers, lanterns, chafing fuel and any flaming food or drink. State what is allowed, where, who supervises and what equipment is required.
The send-off lane location and any conditions, including time of day, guest numbers and clean-up.
The rules for vehicles, parking, drop-off, fire lanes and shuttle stops.
The venue’s contact person on the day for exit-related decisions, with a phone number that will be answered.
The conditions under which the venue may change or cancel an approved item on the day, such as weather, a burn ban or a staffing change.
Whether the venue’s insurance or yours requires any special notice for these items. Insurance terms vary, so ask your insurance agent about it directly.
Make it easy for the venue to say yes
Send the diagram, a short description of each item and a list of questions. Keep the message short. A manager who receives a clear one-page packet is more likely to respond with specifics than one who receives a long email with no drawing. Ask for a reply by a date that leaves you time to change plans.
If the venue gives a verbal answer, send a follow-up: “Thank you for the call. To confirm, you said sparklers are not allowed indoors or on the deck but may be used on the north lawn with a bucket of water, and the fire marshal does not need to approve. Please reply if that is wrong.” A reply, even a short one, makes it a record.
Separate what you know from what you assume
Make two lists in your signoff file. The first is confirmed terms: items the venue has stated in writing. The second is assumptions: items you believe are true but no one has confirmed. Treat each assumption as a task. Either confirm it or change the plan so it does not rely on it.
This habit is the heart of the signoff. Many wedding problems come from assumptions that sat unexamined until the day: that the back door would be open, that the lot would be lit, that the venue would allow sparklers because the last couple used them. Move each one to the confirmed list or remove it.
Know what a signoff does not do
A venue’s reply does not replace the local fire authority. If the venue says the authority must approve something, then the venue’s yes is not the end. It also does not override building and fire codes, and it does not make an unsafe plan safe. If something about the plan worries you, say so and ask again. If the venue’s answer worries you, take that seriously, and consider whether a different send-off would solve the problem.
Also remember that the venue may be right to say no. A manager who declines a plan is protecting guests, staff and the property, and a no with a reason is useful information. Ask what they would approve instead, and work from there.
Verify with official sources
For general fire-safety guidance, the U.S. Fire Administration and the National Fire Protection Association publish public information, and the National Weather Service publishes weather safety guidance. Your local fire authority’s website will usually list its rules on open flame, tents and burn bans, and you can call its non-emergency line to ask. These sources do not replace the venue’s answers, but they help you ask better questions. Check them again close to the wedding, since rules and conditions change.
A worked example: the Hartwell and Mendez reception
The following example is invented to show how the pieces fit. The couple, the venue and the numbers are fictional and are not based on any real event or statistic.
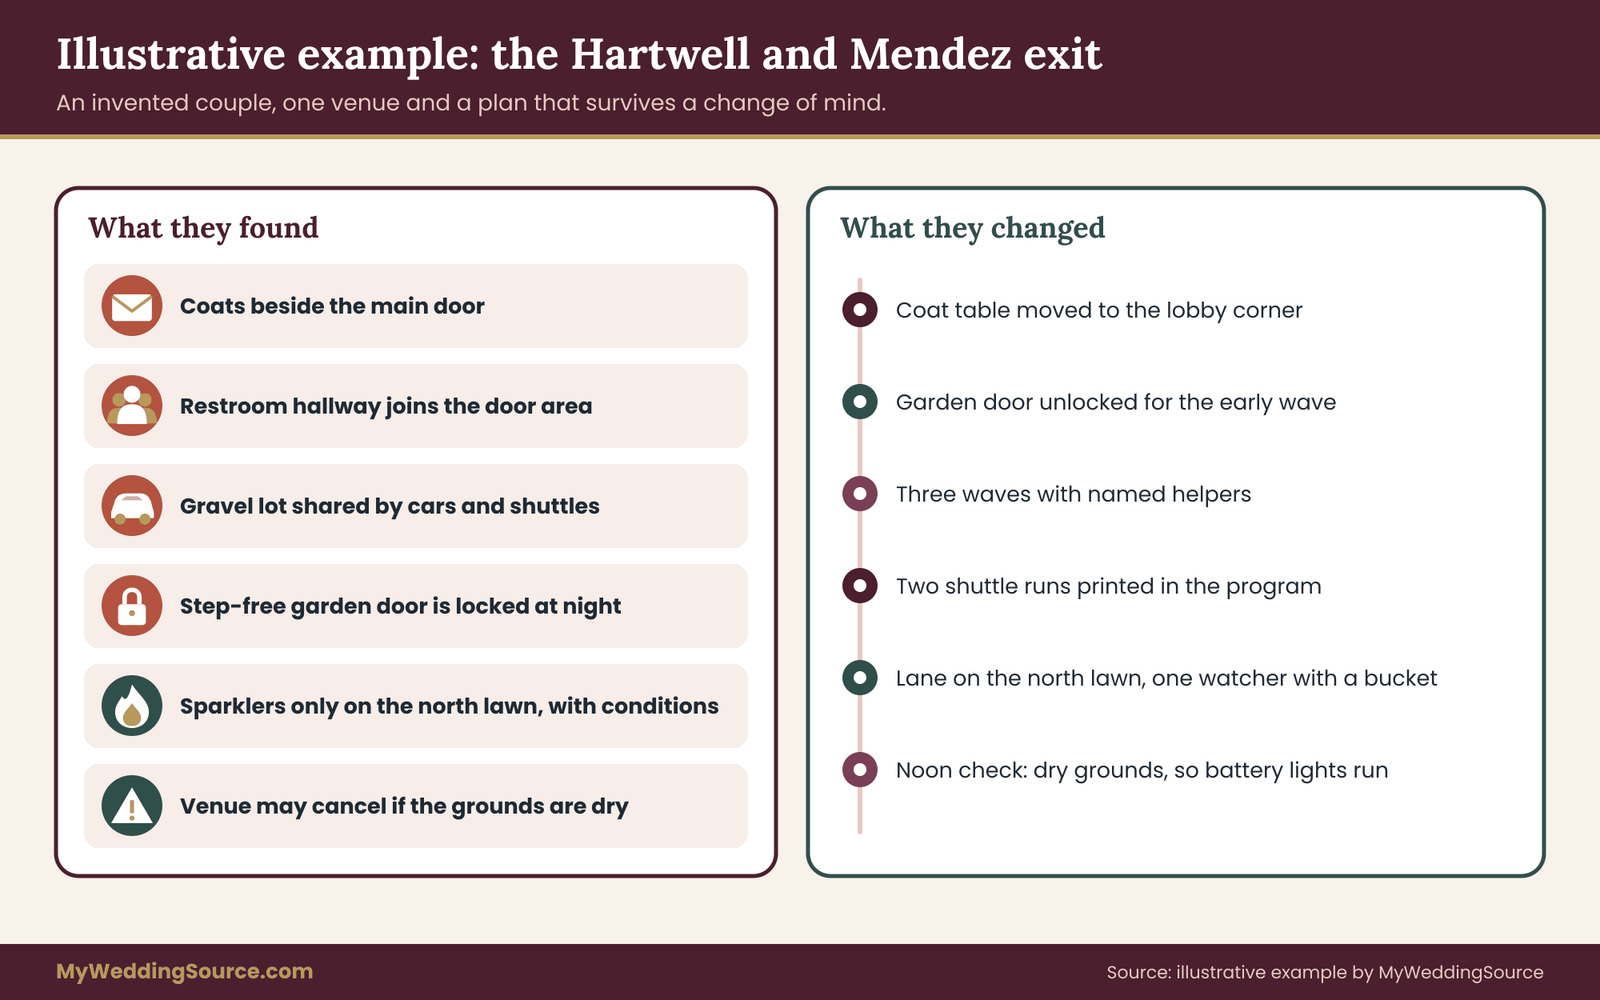
Dana Hartwell and Luis Mendez are planning a reception for a mid-sized guest list at a lakeside event barn with one main double door, a side garden door, a gravel lot and a paved drop-off circle. They hope for a sparkler send-off.
The map of exit routes. On the venue walk, the manager shows them two posted emergency exits besides the main door, one of which opens on a service corridor. The side garden door is step-free but is normally locked at night. The coat area is just inside the main door. The restrooms are down a hallway that joins the main door area. The manager tells them that at the end of most receptions, people bunch up between the coat area and the main door.
The bottlenecks. Dana and Luis mark three: the coat and door junction, the restroom hallway and the gravel lot where cars and shuttles share one lane. They also note that the garden door, which could relieve the main door, is locked.
The venue answers. The manager says sparklers are not permitted in the building or on the deck, and the venue will allow them on the north lawn only if the local fire authority has no objection that week, and only with a metal bucket of water and a venue staff member present. The manager promises to send this in writing. The reply arrives two days later and adds that the venue can cancel the item if the grounds are dry or a burn ban is in effect.
The plan. Dana and Luis create a staging diagram. They split guests into three waves. The early wave, mostly older relatives and families with young children, leaves after cake with help from two family hosts, using the garden door, which the venue agrees to unlock at that time. The main wave gathers on the lawn while the last song plays, then the lane forms on the north lawn, away from the building, with a friend assigned to the bucket and nothing else. The late wave leaves after the couple, led by the planner to the lot, where a staff member holds the shuttle stop.
They move the coat area to a table in the lobby corner and ask the venue to open a second window at the start of the main wave. They ask the DJ to announce the send-off ten minutes ahead, with the place and the coats reminder. They schedule two shuttle runs and print them in the program.
The fallback. The decision rule says that if the venue withdraws permission, or if the grounds are dry, the lane uses battery lights. They buy a box of battery wands and keep it with the planner as a backup. On the morning of the wedding, the planner checks the venue’s message and the local forecast, and tells the couple at noon that the grounds are dry. The battery lights are used. The photo works well, and the lane takes about the same time. No one argues, because the rule was set months earlier.
What the example shows. The couple’s exit routes worked, though they did not get the exact send-off they first pictured. They did get a clear exit, a calm crowd, a photograph and a venue that was glad to host them again. Their signoff file held the diagram, the venue’s written reply, the confirmed list, the assumptions that had been resolved and the fallback rule. None of this required special skill. It required asking early and writing the answers down.
When the weather or the day changes your exit routes
Even a well-drawn plan meets weather, delays and surprises. The aim is not to prevent change but to decide in advance how you will handle it.
Rain, wind and cold
Rain turns lawns slick and gravel muddy, and wet stone steps are slippery. If your exit routes cross open ground, ask whether mats, umbrellas or a covered walkway can be arranged. In heavy rain, move the send-off under cover or skip it, and make sure the cover is not a tent that bans flame. Wind affects bubbles, petals and flame, and strong wind is a reason to cancel any flame item. Cold changes how long guests will wait outside. In cold weather, shorten the lane, keep guests inside until the last moment and make sure the coat area is ready before the main wave.
The National Weather Service provides forecasts and safety guidance for severe weather. Check the forecast the day before and the morning of the wedding, and assign one person to make the call and tell the team. A call made by a committee at the last minute is slow.
Heat and dryness
Hot, dry conditions raise the fire risk of any flame, and they also make guests tired and thirsty at the end of the night. Keep water near the staging spots, and shorten the time guests wait outside. Check for burn bans and warnings, since a ban removes the flame option no matter what the venue said months ago.
Delays
A late dinner, a long toast or a slow cake service pushes everything back. When it does, the exit wave plan shifts with it. Ask the DJ or planner to cut a song or skip an item, instead of shortening the time the early wave has to leave. Keep a closing time that does not move, because the venue, the shuttle and the staff may all have a hard end.
A change-log for the day
Keep a short log on a clipboard or a phone note: what changed, who decided and what was told to whom. If a flame item is cancelled, write down the time and the reason. This log is useful for your records, and it is useful for your planner if the venue asks questions later.
Rehearse in your head one more time
The night before, read the diagram aloud, step by step. Imagine the early wave, the main wave and the late wave on each of the exit routes. Imagine rain. Imagine the venue saying no to flame. Imagine the shuttle ten minutes late. Fix whatever feels shaky. This takes about fifteen minutes, and it is often the most useful fifteen minutes of the week.
Your next steps
Start with the tasks that cost nothing and need only a phone call or an email.
First, ask the venue for its floor plan, its posted occupancy for your layout and its written rules on open flame, candles, sparklers, vehicles and cable runs. Second, walk the building twice to learn the exit routes, once as a guest and once with staff, and mark the posted emergency exits, the everyday paths and the narrow points. Third, draw the guest exit staging diagram for the exit routes with staging spots, three waves, a signal for each and a named person for each spot.
Fourth, decide on the send-off using the order of rules in this guide, and choose a flame-free backup either way. Fifth, send the venue a one-page packet and ask for a written reply with conditions, then sort every item into confirmed terms or assumptions. Sixth, share the diagram with your DJ, planner, photographer, caterer and shuttle driver, and ask each to confirm their part in one sentence. Seventh, check the weather and the exit routes and any burn ban the day before and the morning of the wedding. Finally, keep the signoff file where your planner and a trusted friend can reach it.
For the wider picture of how guests move through the evening, read our guide to wedding reception guest flow and the notes on the cocktail hour, which sets up the first impression of the same space.
FAQ
What are wedding exit routes?
Wedding exit routes are the paths guests use to leave the reception: the posted emergency exits, the everyday paths from the room to the curb, the vendor paths and any send-off lane you add. Treat the first as fixed and unblockable, plan the second for crowds, keep vendors off the guests’ path and design the lane so it never sits in a doorway.
How do I stop a crowd from jamming the doors at the end of the night?
Replace the single announcement with a sequence. Release an early wave quietly, give the main group a cue with a place and a time, and let the late wave leave after the couple. Add staging spots, move the coat area away from the main doors and assign a person to each narrow point so the doors see a steady stream.
Can I use sparklers at my wedding?
Only if the venue and the local fire authority both allow it for your specific place, time and guest numbers. Many venues forbid sparklers entirely. Ask in writing, accept a no, and plan a flame-free send-off with battery lights, bubbles or ribbon wands as a backup that runs without argument if conditions change on the day.
What is a venue safety signoff?
It is a written reply from the venue confirming the terms for your end-of-night plan: occupancy for your layout, which exits stay clear, rules on open flame, the send-off lane, vehicles and a contact for the day. It is a record, not an inspection or guarantee, and it does not replace the fire authority.
Who should be in charge of the exit on the wedding day?
Your planner or coordinator, or one trusted person called the exit lead if you have no planner. The couple should not hold the role because they will be in the photo. The lead owns the diagram, can adjust the sequence and works with the venue captain, the DJ and the person at each narrow point.
How do I plan exit routes for guests with mobility needs?
Ask the venue which exit is step-free, whether it is open at night and how far it is from the dance floor. Walk the exit routes, check surfaces and curbs, and add a seated staging spot near it. Offer an early wave, assign a helper and make sure no guest is sent to a door nobody has unlocked.
What if the weather changes my send-off plan?
Decide the rule in advance. Dry, windy or warned conditions, or a burn ban, mean the flame-free option runs. Rain means a covered lane or a photo-only exit. Name one person to check the forecast and venue messages the morning of the wedding, so the change is made calmly and nobody argues with it at night.
Do I need a professional to plan the exit?
Not for a typical reception. A planner or venue captain helps, but a clear diagram, written venue answers and named helpers cover most needs. Consider professional help for large guest counts, tents, complex sites or any plan involving open flame. Ask your venue who it recommends, and follow the local fire authority’s rules.