
Reception shoes are the second pair many brides, grooms and attendants plan to wear once the ceremony and portraits are done, and every second pair quietly changes how a hem sits on the floor. This guide shows how to measure the difference, record it, and settle it with your tailor before the wedding, so that switching to comfortable reception shoes never turns a carefully hemmed gown into a tripping hazard.
A hem is cut for the exact height of the shoes worn at the fitting. A different pair raises or lowers your body, and the hem moves with it. Measure the heel and the forefoot of both pairs, write the difference in a simple offset log, and take both pairs to every fitting after the hem is set. Small differences can be absorbed by the bustle or a heel lift. Large ones need a decision: hem for the pair you will wear longest, or choose reception shoes closer to the original height.
A floor-length gown looks effortless in photographs, and that look depends on a few quarter inches. The fabric has to clear the floor enough that you can walk and climb stairs without stepping on it, yet reach low enough that it hides your shoes and does not look short. A tailor sets that line while you stand on a platform wearing one specific pair. Change the pair and the line moves, even though nothing about the dress has changed.
Couples plan reception shoes for good reasons. Heels that are fine for a forty-minute ceremony and a walk through portraits are often painful by the time dinner ends. Flats, low block heels and cushioned sandals make dancing possible. The trouble is that the swap is usually decided late, bought online, and tried on at home with leggings rather than at a fitting with a tailor watching the hem. Nobody records the difference, so nobody plans for it.
This guide handles one narrow question: how to change shoes at the reception without changing hem safety. It does not repeat the whole alterations process, which the wedding dress fit and alterations guide covers, or the wider system of jewelry, veils and wraps that the wedding day accessories planning guide walks through. Here the focus stays on heel height, hem clearance, and a small log you can hand to a tailor.
A note on scope. This is general information, not legal, tax or financial advice. Where a decision depends on your gown’s fabric, construction or your own feet, the article tells you who to ask, so you can confirm the details with a professional who can see the garment.
Why reception shoes change hem length more than people expect
Start with how a hem works. When the tailor pins or marks it, they measure from the floor up to the fabric edge at several points around your body: front, sides and back. They are not measuring the dress alone. They are measuring the gap between the dress and the floor while you stand in a particular pair of shoes, in a particular posture, with your weight evenly placed. That gap is called hem clearance in this guide. It is the single number that decides whether a gown glides or catches.
Now swap the shoes. If the new pair raises your heel by an inch less than the fitting pair, your whole body sits an inch closer to the floor at the back. The hem has not moved, so the clearance at the back shrinks by roughly that inch. Where it was half an inch off the floor, it now rests on the floor and drags by half an inch. Where it hung a full inch clear, it now just brushes. The front changes by a different amount, because the forefoot of the reception shoes may be thicker or thinner than the first pair, and the two numbers rarely match.
Going the other way is not safer. If the reception shoes are taller than the fitting pair, the hem rises. A gown that covered your toes at the fitting may now show your shoes, or look short at the side, and the lace or beadwork at the edge may no longer line up with the floor the way the designer intended. For most people the lower-heel direction is far more common, which is why it gets most of the attention here.
It helps to name the three separate things that move when shoes change, because they are often lumped together.
Heel rise. The distance from the floor to the top of the heel cup inside the shoe, where your heel rests. This number controls the back and the sides of the hem.
Forefoot rise. The thickness under the ball of the foot, including platforms and cushioning. This number controls the front of the hem near your toes.
Footbed and stance. Soft, thick insoles compress, wedges tilt the foot, and a strap changes how you stand. These effects are small, but they stack, and they make a measured number a few millimeters different from a standing number.
Most of the problem lives in the first two, and both are easy to measure with a ruler. The point of an offset log, introduced in the next sections, is to turn “these shoes feel lower” into numbers a tailor can act on.
What changes at a glance
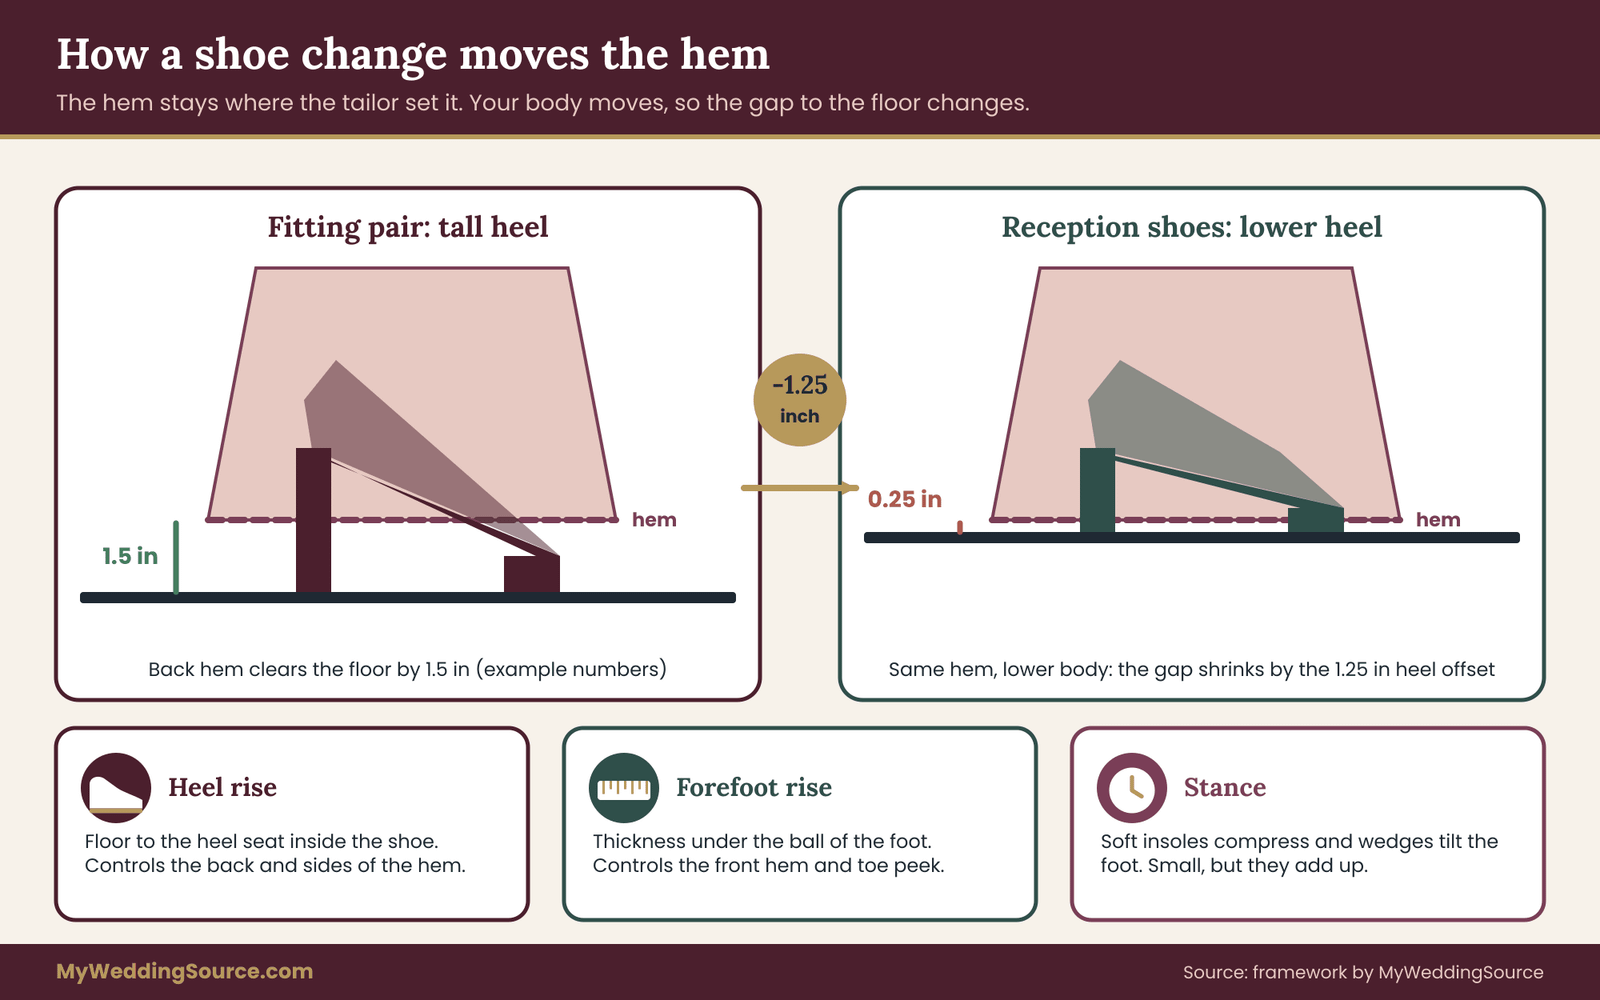
The illustration above shows the idea in one view: hem clearance equals the gap between fabric and floor, and reception shoes with a lower rise shrink that gap by the difference. Read it before the rest of the article, because every later step is a way to measure, record or compensate for that single change.
How a hem is set at your fittings, and why reception shoes make it hard to change late
Understanding how the hem was made explains why you cannot simply “fix it on the day.” Different constructions tolerate changes very differently.
On a simple skirt with a plain or lightly rolled hem, the tailor has a seam allowance to work with. Shortening is usually straightforward: fold the fabric up and stitch. Lengthening depends on how much extra fabric was left inside the hem, and on whether letting it down leaves a pressed crease or needle holes that show. A hem that was already cut close cannot be lengthened at all. That is why shortening is generally an easier request than lengthening, and why your tailor may ask you to choose the lower of two heights rather than the higher.
Layered skirts add another variable. A gown with a tulle underlayer, a satin lining and an outer layer of lace has three hems, and each might be set at a slightly different height so the layers fall naturally. Changing the clearance by an inch can mean adjusting all three, which is more labor and more risk of an uneven line.
Lace hems often use a scalloped edge cut from the lace itself. That edge is part of the design. A tailor cannot shorten it without cutting through the pattern, so they either fold the lace up and hide the fold in a layer behind it, or they remove the trim and reattach it higher. Either option costs time and is not something to ask for the week of the wedding.
Horsehair braid, a stiff narrow ribbon sewn into the hem edge to give it body, changes things too. It holds the hem away from the foot and keeps it from curling, which helps clearance, but it makes quick adjustments harder. Beaded or weighted hems behave differently from light ones, because weight pulls the hem down and the fabric can swing against your shoes as you step.
None of this means you must give up reception shoes and keep a single pair. It means the hem is a built object, and the cheapest time to adjust it is before it is finished, or when it is being finished, with both pairs of shoes in the room. The offset log exists so the tailor can plan that finishing with real numbers rather than guesses.
A tailor also thinks about three working states of the gown, and it helps to use the same words.
Standing state. You are still, weight even, in a specific pair. This is the state the hem is measured in.
Walking state. The hem lifts and swings. Clearance needs to be enough that the toe of the shoe never lands on the fabric while stepping forward.
Dancing and sitting state. You turn, kick, kneel, climb stairs and sit. A hem that survives the standing state can still fail here, which is why many tailors give a little extra clearance for gowns that will be danced in.
If you will wear the first pair for the ceremony and portraits, and reception shoes for dinner and dancing, you have two standing states and the walking and dancing states that go with each. A responsible plan covers all of them, and the next section shows the log that makes that possible.
The shoe-heel offset log for reception shoes
The offset log is a one-page record, kept in a notes app or on paper, that compares every pair of shoes you might wear against the pair the hem was set on. It has one row per pair and a handful of columns. It looks like a spreadsheet, but you do not need one; five lines of text per pair is enough.
The pair used at the hem fitting is called the reference pair. Every other pair, including your reception shoes and any emergency flats, is a comparison pair. The log records what each comparison pair does relative to the reference.
For each pair, write down:
- Name and purpose. “Ivory block heels, reception” or “white leather sneakers, last-resort dancing pair.” A plain label keeps rows from blurring together.
- Heel rise. Measured from a flat table to the top of the inside heel, with the insole in place. Use one unit, inches or millimeters, throughout.
- Forefoot rise. The thickness under the ball of the foot, again with the insole in.
- Heel offset. Reference heel rise minus this pair’s heel rise. A positive number means you sit lower in this pair.
- Forefoot offset. Reference forefoot rise minus this pair’s forefoot rise, with the same sign rule.
- Strap and closure notes. Buckles, hooks, Velcro, rhinestones or exposed stitching that could catch fabric.
- Tailor’s verdict. A short line written or confirmed by the tailor after seeing both pairs with the gown on.
The sign rule matters because the direction of the change decides the risk. A positive offset means the hem drags. A negative offset means the hem rises. Writing the sign down stops the conversation from sounding like “about an inch different” when nobody remembers which way.
Why two offsets and not one
Most online advice talks about “heel height” and stops. That works for a pair of ordinary pumps worn against another pair of ordinary pumps. It fails when one pair has a platform. A three-inch stiletto with a half-inch platform has a heel-to-ball drop of two and a half inches. A cushioned flat sandal may have a drop of almost nothing. The two pairs can have the same advertised heel height and still put your body at different heights over the toe.
The back of the hem responds to heel rise. The front hem, and the tips of your shoes peeking out, respond to forefoot rise. A gown with a short front and a long back, often called a high-low or sweeping hem, may depend on both numbers differently from one that is hemmed level all the way around. Two offsets give the tailor what is needed for any of those designs.
What the log is not
It is not a promise that a certain number is safe. The tolerance depends on the fabric, the length, how full the skirt is, how much you will move and what the floor is like. The log makes the difference visible; the tailor decides what to do about it. Think of it as the note you would hand a mechanic describing a noise: it does not repair anything, but it shortens the diagnosis.
A blank template to copy
Write this once for each pair and keep the pages together.
- Pair name and purpose: ______
- Worn when: ceremony / portraits / dinner / dancing / emergency
- Heel rise (back): ______
- Forefoot rise (ball): ______
- Heel offset against the reference pair: ______
- Forefoot offset: ______
- Closures and trim that could catch fabric: ______
- Photo of the pair on a flat surface, side view: yes / no
- Tailor saw this pair with the gown on, date: ______
- Tailor’s note on hem and bustle: ______
Eight lines, one pair per page, done in a few minutes per pair. The value is not in the form. It is that every pair gets measured against the same reference, by the same method, before anyone is paid to change anything.
How to measure reception shoes accurately at home
Accuracy at home is not hard, but a few habits separate a usable number from a misleading one.
Use a rigid ruler on a flat, hard surface. A kitchen table or a cutting mat works. A bed or a carpet changes the reading because the shoe sinks. Put the shoe on its side wall or sole down, so the ruler can sit against the back of the heel.
Measure where the foot actually rests. The advertised heel height printed on a box often measures the outside back of the heel from the ground to the top of the shoe’s back edge. It is a catalog number, not the same as the point where your heel sits. The foot rests inside, on the insole, which can be higher or lower than the outer edge. Measure to the inside heel seat if you can see it, or measure the outside and subtract the insole thickness you can feel.
Take the forefoot reading under the ball. The ball of the foot sits roughly where the sole begins to bend. Slide the ruler under the ball area and note the thickness including any platform, outsole tread and insole padding.
Press the insole. Memory foam and gel inserts compress under body weight. A rough way to account for it is to press the insole firmly with your thumb and measure again, then record the pressed number as the working figure. The difference between loose and pressed is not large for firm footbeds, but it can reach several millimeters on thick cushions.
Measure the reference pair the same way. This is the step people skip. They measure only the new reception shoes and compare it against the number they remember from the first pair’s label. Measure both with the same ruler, in the same place, in the same session.
Write the numbers, then take photos. A side photo of each pair standing on a table beside a ruler is more useful to a tailor than a number alone, because it also shows wedge shapes, platform slopes and cutouts.
Cross-checking the measurement with the gown on
At the next fitting, stand in each pair on the same platform, in the gown, and let the tailor measure the hem clearance at the front and the back. The difference in clearance between the two pairs should be close to the offset you recorded. If it is not, one of two things happened: the measurement was off, or the insole compressed differently, or the gown’s weight pulled the hem down in the lower reception shoes. Any of those is worth discovering now.
A tailor who works with bridal gowns will often do this check in a few minutes. It is a good moment to ask what offset they would be comfortable absorbing without alterations, and what offset would push them to change the hem.
Do not measure the wrong pair
Two details trip people up. First, the reference pair must be the pair that was on your feet at the hem fitting, not the pair you plan to wear at the ceremony. Sometimes those differ, because a couple bought ceremony shoes after the hem was already set. If so, the “ceremony pair” is also a comparison pair and belongs in the log with its own offset.
Second, people forget the pair they wore while shopping for the dress. If the dress consultant had you try on gowns in borrowed sample shoes at some other height, the size you ordered was based on the gown’s length in that pair, and the manufacturer’s length may need to be checked again. Mention it to your tailor, and ask whether the length of the unaltered gown matters for the hem plan.
Illustrated: reading the offset log
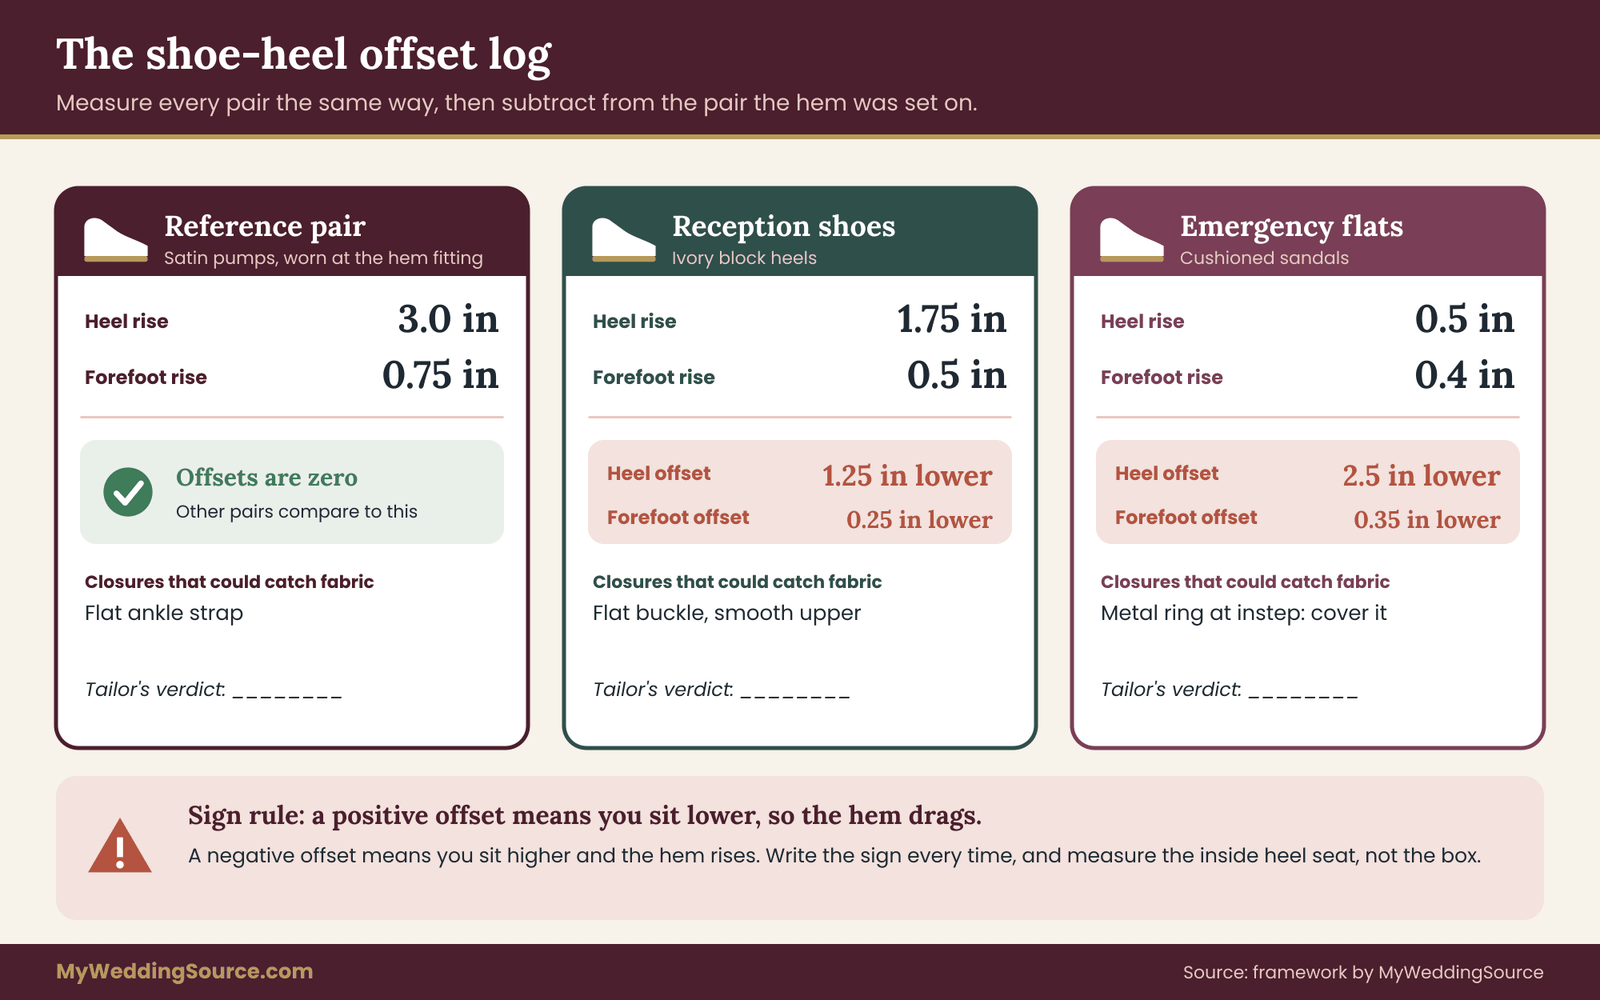
The graphic above shows how a reference pair and a comparison pair translate into back and front offsets, and how the hem clearance at each point follows. It is a good thing to show a tailor, a friend who will help you dress, or a parent who is paying for alterations and wants to understand what the extra fitting is for.
Why the log helps even when the offset looks small
A small offset is easy to wave away. “Half an inch, that’s nothing.”
The numbers do not live alone. They combine with the bustle, the posture, the floor and the speed at which you walk. A hem clearance of three quarters of an inch at the fitting can drop to a quarter inch with a half-inch offset, and a quarter inch is within the range where a toe can catch the fabric when stepping up a curb, a stair or the edge of a dance floor platform. The point is not to scare yourself. The point is that a small number is worth a small action: mention it to the tailor, test it, and record the result.
The log also protects you from a different mistake: assuming a big offset is a disaster. A three-inch drop might look dramatic, but a gown with a full bustle and a generous clearance may be perfectly fine in flats. Without the numbers you either panic or ignore. With them you can ask a specific question and get a specific answer.
Finally, the log carries information across people. The tailor who hems the gown, the seamstress who does the final press, the friend who bustles it at the reception and the planner who keeps the day-of kit are rarely the same person. A single page they can all read replaces three conversations and a lot of guessing.
Reading the offset: three zones and what each one means for reception shoes
Once the numbers are in the log, sort each comparison pair into a zone. The zones below are a starting vocabulary for the conversation, not rules. Your tailor will set the real limits for your gown, and they will differ for a narrow column dress and a full ball gown.
Zone one: small offset
The heel offset is small enough that the gown’s normal clearance absorbs it. In practice this usually means a fraction of an inch, and the hem still clears the floor in the standing state by a comfortable margin. The action is light: have the tailor confirm it with the gown on, note it in the log, and move on. Many reception shoes that are only slightly lower than the ceremony pair land here, such as a pair with a low block heel after a mid-height pump.
Zone one still deserves one test: walk up and down three stairs in the reception shoes, wearing the gown, with the bustle done. Stairs are where a small clearance error is most likely to show.
Zone two: medium offset
The offset is large enough that the back hem will touch the floor or the front will look noticeably longer, but still within the range a tailor can handle with a modest adjustment. Typical responses are:
- Choose the hem for the longer-worn pair. If you will spend most of the evening in reception shoes, a tailor may set the final hem for that pair and use the bustle, a hem-lift loop or a slightly higher ceremony pair to manage the earlier hours.
- Add a heel lift or insole. A removable heel pad can raise the heel rise in the reception shoes by a measured amount. It reduces the offset without changing the gown.
- Choose a middle hem. The tailor sets the hem so the clearance is acceptable for both pairs, a bit longer than ideal in the taller pair and a bit shorter than ideal in the lower one. This only works when the offset is not large and the fabric will tolerate it.
- Pick different reception shoes. If a similar comfort level exists at a slightly taller heel, the offset drops into zone one and no alteration is needed.
Zone three: large offset
The difference is big, usually from a tall heel to a flat. The hem will drag by a visible amount, or the gown looks like a different dress. Do not try to fix a zone three offset on the day. Options that work are structured and need planning:
- Hem for the flats and add a hem extension for the heels. Some tailors add a detachable hem layer, or leave extra length and mark a “ceremony height” pinning point. This takes planning and extra fitting time.
- Hem for the heels and add a longer bustle or a hem-lift system for the reception. Loops, ribbons or buttons inside the skirt gather the hem up so it clears the floor in the reception shoes. For some skirts that works well. For fitted, trained or heavily beaded styles it does not.
- Choose reception shoes in the middle. A modest wedge or block heel is often a better dancing shoe than a true flat because it keeps some of the gown’s line. Flats are comfortable but they are the biggest offset.
- Change the plan for the first pair. If the heels are the problem, a lower ceremony heel and a modest reception shoes may leave you in zone one for both.
The correct choice depends on how long you will stand in each pair, how steep the floor transitions are and how the gown is built. Ask the tailor to state it plainly: “Given these two pairs, which would you hem for, and why?”
A decision rule for every pair in the log
Here is a quick way to apply the zones without turning the fitting into a math lesson. Work through these questions in order for each comparison pair.
- Is the offset positive, negative or about zero? Positive means the hem drags and needs attention first. Negative means the hem rises, which is usually less risky but can look short.
- Is it larger than the tailor’s stated comfort limit? If the tailor has not given one, ask for it. If they decline to give a number, ask what they would do to the hem if they could set it for these reception shoes alone.
- How long will you wear this pair? A pair worn for twenty minutes during a first look earns less alteration effort than a pair worn for four hours of dancing.
- Can the gain be made without cutting? Bustle changes, heel lifts, a different shoe and a hem lift all leave the gown intact. Prefer them to cutting when the numbers are close.
- Can you test it before the wedding? Never accept a plan you have not seen on your own feet with the gown on, stairs included.
If the answers point to different pairs than you expected, adjust the reception shoes before you adjust the gown. Shoes are cheaper, returnable and replaceable. A hem alteration is none of those.
Choosing backup reception shoes that protect the hem
Many people shop for reception shoes as a comfort decision only. A better filter adds hem safety to comfort, so you do not buy a perfect pair that cannot be used with the gown. These choices matter, in roughly this order.
Heel height within reach of the reference pair. The smaller the offset, the fewer alterations. If your ceremony pair is a three-inch heel, a pair with a two-inch heel lands much closer than a flat. Comfort is often found in the stability of the heel shape rather than only its height: a block or wedge heel with a wider base is far steadier than a thin stiletto of the same height.
A stable base. Choose a pair that does not wobble under rotation, since dancing involves pivots that put side loads on the heel. Try it standing on one foot with a slight twist, not only walking in a straight line.
A closed, smooth profile where the hem passes. Open straps, buckles with exposed prongs, hook-and-loop closures and glittery trim all catch lace, tulle and chiffon. A smooth leather or fabric upper that sits close to the foot is less likely to snag. If a pair has hardware, check where it lands relative to the hem when you step, and cover it with tape or a small pad if needed.
Footbed and arch support. The pair has to be comfortable for the hours you intend to wear it, and wedding days include swelling, long standing and heat. A footbed with some structure is usually kinder than a thin flat. A podiatrist or a good shoe fitter can tell you what works for your feet, and professional foot-health organizations publish plain-language guidance on shoe fit.
Grip. Smooth leather soles on a polished dance floor can slide. A thin rubber patch, a sole guard or a textured outsole improves grip without changing the offset noticeably. Check the thickness it adds before you record the final measurement.
Width and half sizes. A half size larger often fits better late in the day after feet swell. But a loose heel slips, and the slipping can pull the hem down. Aim for a pair that holds the heel firmly. Break the pair in before the wedding with the same socks or hosiery.
Color and finish that stay quiet. If the reception shoes might show at the hem, matching them to the gown or choosing a neutral tone keeps the eye on the dress rather than on the swap. This is a style point and the lowest priority on the list, but it saves a decision.
Shoes that work harder against the hem than they look
Some pairs look harmless and cause trouble. Chunky platform sneakers add a forefoot rise that behaves like a heel. Sandals with flat footbeds but thick outsoles show a large forefoot offset. Pointed toes extend beyond the hem’s front line and catch fabric when you step forward. Boots with a heel-pull loop or a tall shaft can wedge in tulle. None of these is off the table; they are simply reasons to measure carefully and test them with the gown.
What to bring when you buy or borrow reception shoes
If possible, buy the reception shoes after the hem fitting but before the final fitting, so there is time to return the pair and still be measured. Ask the store about the return window and read its policy in full, since many exclude worn shoes. Bring the reference pair, a ruler and a phone for photos. If you buy online, order two sizes if the retailer allows free exchanges, and keep the box and tags until the final fitting confirms the pair.
If you are borrowing shoes, the same rules apply. Measure them, log them, and test them with the gown before the wedding. Borrowed pairs often have worn footbeds that compress differently from new ones, so the measurement from a new pair of reception shoes does not transfer.
An illustrated guide to matching reception shoes to the gown
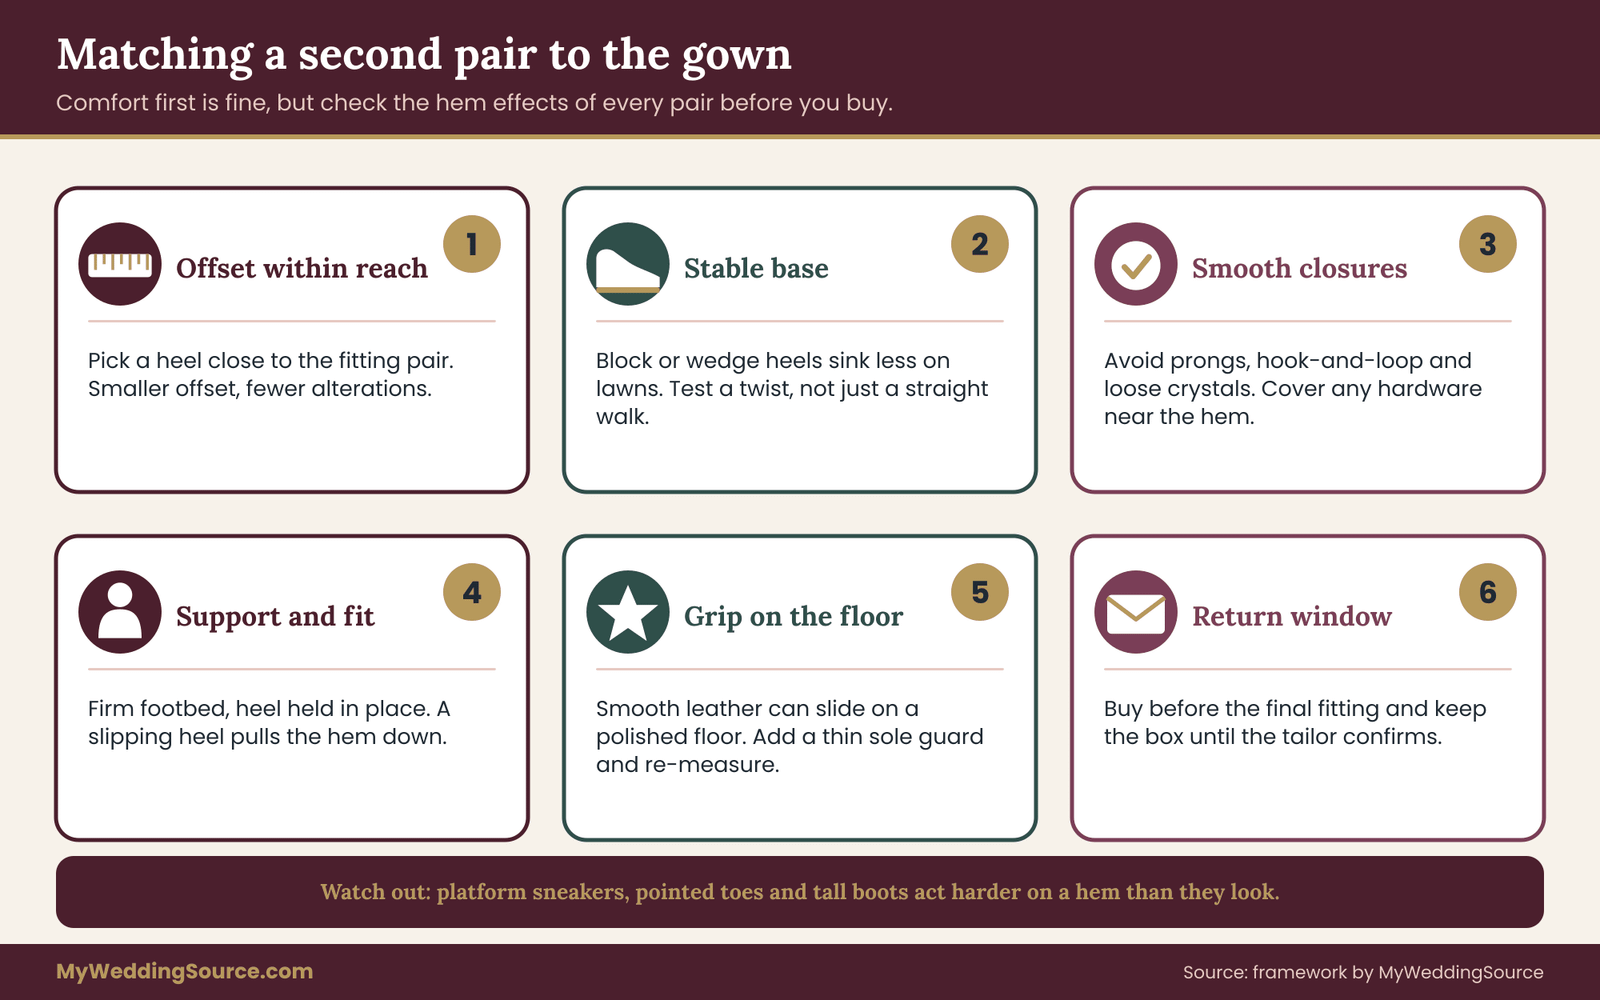
The illustration shows how heel shape, forefoot rise and closure type map to the three zones, so you can sort candidates quickly before you try anything on. It does not replace a fitting, but it keeps you from falling in love with a pair that will not work.
The alteration coordination plan for reception shoes
The log tells you what changed. The coordination plan tells you who needs to know, in what order and by when. It is a short sequence tied to the fitting schedule you already have. The wedding vendor timeline is a useful companion for placing these steps among the other deadlines, because the tailor’s calendar is often the tightest one in the final weeks.
Step one: decide on the reception shoes before the hem is finalized
Ideally the reception shoes are chosen before the tailor does the final hem. Say so at the first fitting. A sentence like this works: “I plan to change shoes at the reception, and I will bring that pair to the next fitting. Can we plan the hem with both in mind?” Tailors hear this often, and it lets them leave extra fabric, choose a hem construction or schedule a longer appointment.
If the reception shoes are not chosen yet, give the tailor a range: “It will be a flat or a heel up to about two inches.” A range is better than silence, because the tailor can leave the hem slightly flexible until you decide.
Step two: bring both pairs to every fitting after the hem is set
This includes the final fitting. Bring them in separate bags, with the log, and with the same hosiery or socks you plan to wear. Ask the tailor to measure the hem clearance at four points: center front, each side and center back, in each pair. Ask them to write those numbers in the log, or take a photo of the page and keep it.
If your tailor works from appointments of a fixed length, mention in advance that there will be two pairs and a bustle test, so the slot is long enough. Rushed fittings produce rushed notes.
Step three: test the bustle in the reception shoes
The bustle is the set of hooks, loops, buttons or ties that lift the train off the floor for the reception. It is set while you wear one pair. If the tailor sets it in your ceremony heels and you later change to flats, the bustled hem will sit lower than intended. The rule worth remembering is simple: set and test the bustle in the pair you will dance in. Part of the final fitting should be done in the reception shoes, with the bustle closed, walking across the room and up a few stairs.
Step four: confirm the hem adjustment in writing
Whatever the plan is, get the decision in a note you can find later: which pair the hem was set for, how much clearance there is in each pair, whether any heel lift or hem lift is part of the plan, and who is responsible for each piece on the wedding day. A text message from the tailor is enough. It also protects you if a misunderstanding comes up when the gown is picked up.
Step five: pick up the gown with both pairs and test one last time
At pickup, put on the gown and both pairs one more time, even if it is the day before the wedding. Walk, sit, climb stairs, spin once. If something is off, the shop still has a chance to adjust it. After you leave with the gown, the chance is gone.
Step six: hand the log to the person who will help you dress
Whoever is in the room at the reception swap needs to know what to do: which pair goes on, whether a heel lift goes in, how the bustle is closed, where the old pair goes. Hand them a copy of the log with a one-line instruction at the top.
What to ask and say to the tailor, with sample wording
Tailors are not mind readers, and a clear request saves time. These scripts can be adapted.
At the first hem fitting. “I will wear these shoes for the ceremony and a different pair at the reception. The reception shoes have a lower heel. Would you set the hem for the first pair and plan an adjustment for the second, or set it somewhere in between?”
When you have measured the reception shoes. “I measured both pairs. The reception shoes sit about [number] lower at the heel and [number] lower at the ball. Is that within what the gown can handle without altering the hem?”
When the tailor proposes a change. “What will this alteration cost, how many fittings does it add, and is it reversible? If I changed my mind about the reception shoes, could the hem be restored?”
When the schedule is tight. “If I only have time for one more fitting, which pair should I wear to it, and what should I bring so you can finish both?”
About the bustle. “Can you set the bustle with the reception shoes on, then show me how to close and open it, and mark where each loop goes?”
About limits. “If my feet swell on the day, or I change to another pair, what is the largest change in heel height you would still be comfortable with?”
If a tailor tells you the offset is not a problem, ask them to show you in the mirror. If they say it needs work, ask for the alternative that does not change the hem. A good tailor will give you options, with their costs and trade-offs, rather than one answer.
The cost logic of different fixes
Prices vary widely by region and by shop, so this article does not quote figures. What stays true everywhere is the order in which the options usually cost money, from lowest to highest.
Lowest cost: change the shoes. A returnable pair that lands in zone one costs only the price of the pair you were buying anyway, plus a few minutes of measuring. Many people overlook this because they have already fallen for a pair.
Low cost: heel lifts and insoles. A small removable pad can close part of the offset. It is cheap, reversible and you can test it at home.
Moderate cost: a bustle adjustment or an added hem-lift system. The tailor adds loops, ties or buttons. The cost depends on the number of points and the fabric. It adds a fitting for testing.
Higher cost: a hem change. Shortening a multi-layer or lace-edged hem takes more labor and adds risk of an uneven line. Lengthening may not be possible at all.
Highest cost: re-hemming after the final fitting. Any change made late tends to be rushed, may need paid rush service and removes the chance to test. It is also the most likely to be regretted.
A simple cost rule follows: spend where the change is reversible and testable, and spend as early as possible. A pair of shoes you can return is the best first move.
Who owns each task
Wedding plans fall apart at handoffs. Assign each task a name.
- You own measuring the shoes, filling out the log and bringing both pairs to the fittings.
- The tailor owns the hem clearance measurements, the written verdict and the bustle setup.
- A trusted helper owns the swap on the day, with the log in hand and the kit nearby.
- The planner or day-of coordinator, if you have one, owns the timing of the swap in the run of the day, so it does not collide with a toast or the first dance. The wedding reception guest flow guide covers how a reception moves from room to room, which is useful when choosing the moment and place for the change.
When a pair of shoes is on the list of things that might go wrong, a written owner turns it into a managed risk instead of a surprise.
A timeline for the coordination plan

The timeline above lays the steps against the weeks before the wedding. Your own calendar will vary with the tailor’s availability and shipping times, so treat the spacing as a guide. The unmovable point is that the final test happens with both pairs and the gown on, and that it happens early enough for the shop to act on what it finds.
Choosing between two plans: a short worked comparison
Suppose you are weighing two ways to handle a large offset. Plan A sets the hem for the ceremony heels and adds a hem-lift loop for the reception. Plan B sets the hem for the reception shoes and raises the ceremony shoes with a platform insert to match the clearance.
Plan A keeps the gown looking as the designer intended for the photographs. The reception relies on the loop. It adds a fitting and a small cost, and it works well on skirts with a lining that can hold loops without puckering.
Plan B lowers the risk at the reception, where the most movement happens, but may look shorter in ceremony photographs and requires the platform insert to feel stable. It suits a person who will be on their feet for many hours more in the second pair.
Neither plan is right in general. The choice depends on how long each pair is worn, how much photograph length matters to you and what the fabric can do. The log gives you the numbers to compare. The tailor tells you what each plan costs and risks. You decide which trade-off you prefer, and write it in the log so the person helping you on the day follows the same plan.
A worked example: from the first fitting to the dance floor
The following case is invented to show the method. The names and numbers are made up, and your own measurements will differ. Read it as a pattern, not as a standard.
Dana is wearing a floor-length crepe gown with a lined skirt and a short chapel train. She buys satin pumps with a three-inch heel for the ceremony and wants reception shoes with a lower heel because she has had foot pain at past events. The tailor hems the gown on the pumps.
Measuring the reference pair
Dana measures the pumps on a kitchen table. The heel seat sits at 3.0 inches. The forefoot, including a thin platform and a pad, is 0.75 inch. She writes both numbers on the first page of her log and marks the pumps as the reference pair.
At the hem fitting, in the pumps, the tailor measures hem clearance at four points and writes the numbers down: front 1.0 inch, sides about 0.75 inch, back 0.5 inch. The back is closer to the floor on purpose, because a little drape at the back makes the line look finished, and the train is going to be bustled later anyway.
Measuring the comparison pairs
Dana picks two backups. The first is an ivory block heel she plans to wear at the reception. Its heel seat is 1.75 inches and the forefoot is 0.5 inch. The second is a pair of cushioned flat sandals, held in reserve in case the block heels become too painful. They have a heel seat of 0.5 inch and a forefoot of 0.4 inch.
She does the subtraction against the reference pair.
For the block heels, the heel offset is 3.0 minus 1.75, or 1.25 inches lower. The forefoot offset is 0.75 minus 0.5, or 0.25 inch lower.
For the flats, the heel offset is 3.0 minus 0.5, or 2.5 inches lower, and the forefoot offset is 0.75 minus 0.4, or 0.35 inch lower.
Dana also adds the note about closures: the block heels have a plain ankle strap with a flat buckle, the flats have a small metal ring at the instep. She photographs both pairs beside a ruler.
Predicting what happens to the hem
She now sees what the offsets mean. In the block heels, the back would sit 1.25 inches lower than at the fitting. The back hem clearance of 0.5 inch becomes a negative 0.75 inch: the hem would lie on the floor and drag by about three quarters of an inch. At the front, clearance falls from 1.0 to 0.75 inch. At the sides, a rough midpoint puts the change near 0.75 inch, which brings the sides to about zero. In practice the tailor measures the side rather than estimating it, but the estimate tells Dana what to ask.
In the flats, the back would drop by 2.5 inches. The clearance becomes about negative 2 inches. That is a large drag, and she would be stepping on the hem. The front would go from 1.0 to about 0.65 inch. She puts this in zone three: not usable with the hem as it stands.
Bringing the plan to the tailor
At the next fitting, Dana brings both pairs, the photos and the log. She asks the tailor the question from the script: given these two pairs, which would you hem for, and why? She also asks what changes would let her use the block heels at the reception without the hem dragging.
The tailor tries the block heels on her with the gown. The estimates are close: the back drags and the sides touch. The tailor offers three options.
Option one is to raise the back and side hem by half an inch, tapering to nothing at the front. This helps in both pairs but leaves less clearance in the pumps than ideal, and the ceremony photos will show slightly more shoe at the back.
Option two is to leave the hem alone and add a hem-lift loop for the reception. It keeps the ceremony look, adds a fitting, and depends on the lining holding the loops.
Option three is to keep the hem and pick reception shoes with a taller heel, closer to two and a quarter inches.
Dana does not want a taller heel, since comfort was the reason for the reception shoes. She likes the idea of both a small heel lift in the block heels, which would raise the heel seat by half an inch, and a half-inch raise of the back and side hem. The two changes share the work and keep each small.
The numbers after the plan
With a 0.5-inch heel lift, the block heels have a heel seat of 2.25 inches. The heel offset against the pumps falls from 1.25 to 0.75 inch. The forefoot offset stays at 0.25 inch.
With the hem raised by 0.5 inch at the back and by about 0.25 inch at the sides, the clearance in the pumps becomes about 1.0 inch at the back, about 1.0 at the sides and 1.0 at the front. In the block heels with the lift, it becomes 1.0 minus 0.75, about 0.25 inch at the back; around 0.5 at the sides; and 0.75 at the front. Every point is positive.
The tailor also sets the bustle with the block heels on, and Dana walks across the shop, sits, and climbs the three steps at the entrance twice. The hem stays off the floor. The tailor writes the clearance figures in Dana’s log and signs the line.
For the flats, the plan is not to hem for them. Dana keeps them as an emergency pair for the last hour only. The tailor sews two small loops inside the skirt that Dana’s sister can use to lift the hem if the flats are needed, and shows the sister how to use them. Dana accepts that the gown will look different in the flats and that the loops are a compromise.
What Dana wrote at the top of the log
A single page for her helper: “Ceremony and portraits: satin pumps. After dinner: ivory block heels with the heel lifts in, bustle closed after the reception shoes. Emergency: flats and hem loops, sister knows how.” Underneath, the four clearance numbers per pair.
What this example does not show
Dana’s gown tolerated a small hem raise. A lace-edged hem might not have. A different gown might need the hem for the flats. And a gown of heavy beading might have rejected the loops. The example shows the order of the thinking: measure, compute, predict, ask, choose, test, write down. It does not claim that a particular offset is safe, because the tailor judged each number against the gown in front of them.
The same example as a picture

The illustration above follows Dana’s three pairs through the log and shows the clearance at the front, side and back in each. It is an invented example, included only so you can see how the arithmetic and the decisions line up.
Bustle, train and the swap: why the order matters for reception shoes
The swap itself is where good plans most often unravel, because it happens in a hurry, in a small room, with people waiting. A few ordering rules make it calm.
Shoes first, bustle second. Change into your reception shoes before the bustle is closed. The bustle’s tension, and the height of the hem above the floor once it is lifted, depends on the height of the wearer. If someone bustles the skirt while you stand in the ceremony heels and you then step into flatter reception shoes, the bustled hem sits lower and may touch the floor at the back or sides. Reverse the order and the problem does not arise.
Sit for the swap. Taking off a heel and putting on a different pair while standing, in a gown, is how people tip over. Use a firm chair with no arms, or the edge of a bench. Ask the helper to hold the skirt up and out of the way so no fabric lands under a heel.
Keep the hem off the floor. The helper should lift the hem with clean hands and drape it over a forearm or a chair back, so it does not drag across a dirty floor and does not catch on the shoes that are coming off. Before the swap, the helper can check that nothing is under the dress that might snag.
Put the first pair away at once. Shoes left near a gown on the floor become trip hazards and sources of scuffs. A tote bag or a shoe pouch, packed before the wedding, keeps them out of the way and protects the hem from stray heels.
Check the closure and the footbed. Make sure straps lie flat, buckles face away from the hem and the heel lift, if there is one, is seated in the shoe and not slipping.
Walk, then rotate. Before going back to the room, take ten steps, turn in place and step onto a stair or a small ledge if one is nearby. Any foot slip or hem catch shows up in that short test.
When to swap
Choose the time before the reception shoes are needed, not after the pain begins. Common moments include after formal portraits and before the grand entrance, between dinner and the first dance, or right after the cake cutting. The right moment depends on the room, the program and how the gown handles. The wedding cocktail hour page is a useful place to look when you are deciding whether the break between ceremony and dinner offers a natural window, and the bridal hair and makeup planning guide covers the other items a helper may need to refresh in the same private moment.
Hem safety in reception shoes on stairs, grass and dance floors
A hem that is fine in a fitting room meets harder conditions at the venue. Think of the venue as a set of surfaces and transitions, and check each one against the pair you will wear on it.
Stairs
Stairs are where most hem falls start. Going up, the front of the hem is closest to your toes and the most likely to catch. Going down, the back hem sits under your heel as you step. In either direction, the hem must clear the edge of each step. Hold the skirt in one hand and lift the front a few inches, as a tailor will show you, rather than relying on clearance alone. If the gown has a train, take stairs before the bustle is closed or ask a helper to carry the train. Practice at least three stairs in the actual pair, in the gown, before the wedding.
Grass, gravel and soft ground
Outdoor venues change the numbers in a way the log does not capture. On soft ground, a narrow heel sinks, which lowers your effective heel rise and increases the offset in the direction of dragging. A block heel or a wedge spreads the weight and sinks less, which is one reason many people choose them for lawns. Gravel adds roughness that scuffs hems and catches thin heels.
Wet grass soaks the hem edge, which darkens it and makes it heavier and longer. If your ceremony is on grass and your reception is on a hard floor, the reference pair’s offset will differ outdoors and indoors. Note it in the log and plan for the lower number outdoors.
A rain plan matters to the hem as well, so ask your tailor how the hem behaves when wet, and keep a towel for the helper to blot the edge before the swap.
Dance floors
Polished wood, laminate and portable parquet floors are slick for leather soles and sticky for some rubber ones. The hem should not drag on them, but a smooth floor adds another hazard: a heel can slide out from under you if the hem pulls on it. Check the sole of the pair, add grip if needed, and test the pair on a smooth floor at home before the wedding. A venue walkthrough, if you have one booked, is a good moment to step onto the actual floor, and the venue technical walkthrough guide explains how couples and vendors use those visits.
Thresholds, ramps and elevators
Door thresholds, ramps and elevator gaps catch heels and hems. Wheels on a ramp can roll over a train. If the venue has a freight or service route that the bridal party uses, ask about floor transitions on that route and carry the hem accordingly.
Seats and tables
Hems also catch on chair legs and table skirts, and on the heel of a shoe when the chair is pulled out. Practice sitting down in the reception shoes with the gown bustled, and ask your helper to watch where the hem lands. Tucking the skirt around you, rather than letting it spill behind the chair, prevents a lot of rips.
How gown shape changes what reception shoes can do
The same offset behaves differently on different silhouettes, so match your reception shoes to the shape of the skirt.
Column and sheath gowns hang close to the body and have little spare fabric. They show every change in clearance, and they limit stride, so lower reception shoes can make the hem touch the floor at the back with no room to absorb it. For these gowns, reception shoes within a small offset of the fitting pair are the safest plan, and a hem change is usually the fallback.
A-line gowns have more fabric swing and usually tolerate a medium offset better, especially if the skirt is lined and the hem is a plain finish. Reception shoes with a modest block heel are often workable here without altering anything.
Ball gowns and full skirts sit away from the legs on layers of tulle or a hoop. The hem is far from your feet, so small offsets matter less, but the layers catch on straps and buckles, and the sheer volume makes stairs a problem. Reception shoes with smooth uppers matter more than exact heel height.
Mermaid and trumpet gowns fit tightly to the knee and flare below it. The flare is hemmed for a specific height, and lower reception shoes make the flare drag at the back. Of all the silhouettes, these have the narrowest margin, and the reception shoes should be chosen with the tailor.
Tea-length and midi dresses end above the ankle, so the hem never touches the floor, and the issue becomes how the length looks. Reception shoes with a different heel can make a midi hem seem longer or shorter by the offset. Compare photographs of both pairs on your body in the mirror.
High-low hems are short at the front and long at the back. The back hem is the one at risk, and the heel offset is the number that matters most. Give the tailor the heel offset first and the forefoot offset second.
Jumpsuits and trousers follow the trouser rule described later in this guide: the break at the shoe changes with the sole thickness, and a wide leg can catch under a heel in lower reception shoes.
Materials, closures and care: what shoes do to a hem
The quality of the pair matters as much as its height. Several details of construction decide whether a pair is gentle or rough on fabric.
Heel material and finish. A heel with a rough or chipped edge can snag silk, satin and tulle. Run a fingertip along the heel’s edge and the inside of the straps. A pair that feels rough to a finger will catch threads.
Buckles, hooks and decorative hardware. Exposed metal prongs, hook-and-loop fasteners and embellished buckles are common causes of pulled threads. If the pair needs to stay, cover the hardware with moleskin or a small piece of fabric tape, and check that the covering does not change the fit.
Glitter and crystal. Loose crystals and glitter transfer to the hem, and rough crystals snag. A pair with a smooth top and a hidden decoration is less likely to mark the gown.
Sole and outsole. Dirt, wax or glue residue on the sole transfers to the hem during the swap. Wipe the sole of the reception shoes with a damp cloth before the wedding and keep it in a clean bag until it is time.
Footbed materials. Leather, vinyl and fabric footbeds behave differently on skin. This is a comfort matter, but it can also decide whether your foot slips in the shoe and pulls the hem.
Care and cleaning of the gown. The gown’s care label and the manufacturer’s instructions describe the fabric and how to clean it. In the United States, the Federal Trade Commission’s care labeling rule requires that clothing carry care instructions, and the label is the starting point for any cleaning question. For a stain at the hem, resist the urge to scrub. Blot gently, mention it to a professional cleaner, and tell them what fabrics and trims are present. If the hem is lace or beaded, handling it improperly can distort it.
Safe professional handling. Ask the tailor how they would prefer you treat the hem when you change shoes: whether they want it lifted by the lining, whether a stay-stitch exists and where it is. A short instruction from the person who made the alteration is worth more than general advice.
Fiber and lining notes to ask about
Gowns can combine silk, polyester, nylon tulle, cotton lace and synthetic linings, sometimes in the same hem. Each fiber reacts differently to friction, moisture and heat. Silk marks with water. Tulle runs and snags. Polyester generates static and clings to a stocking. Ask the shop for the fiber content, since it is on the label and in the order sheet, and ask which of the fibers sits at the hem. You will then know which shoe features to avoid.
Steaming, pressing and the hem
Steam and press the hem after the final fitting and before the wedding, rather than just before the swap. A hem that sits flat is easier to judge, and a hem pressed with the shoes on a flat surface shows creases from a pair that was too low. The safe way to remove wrinkles is to ask the shop or a professional what your gown’s fabric tolerates before applying any heat.
An illustrated check of venue surfaces
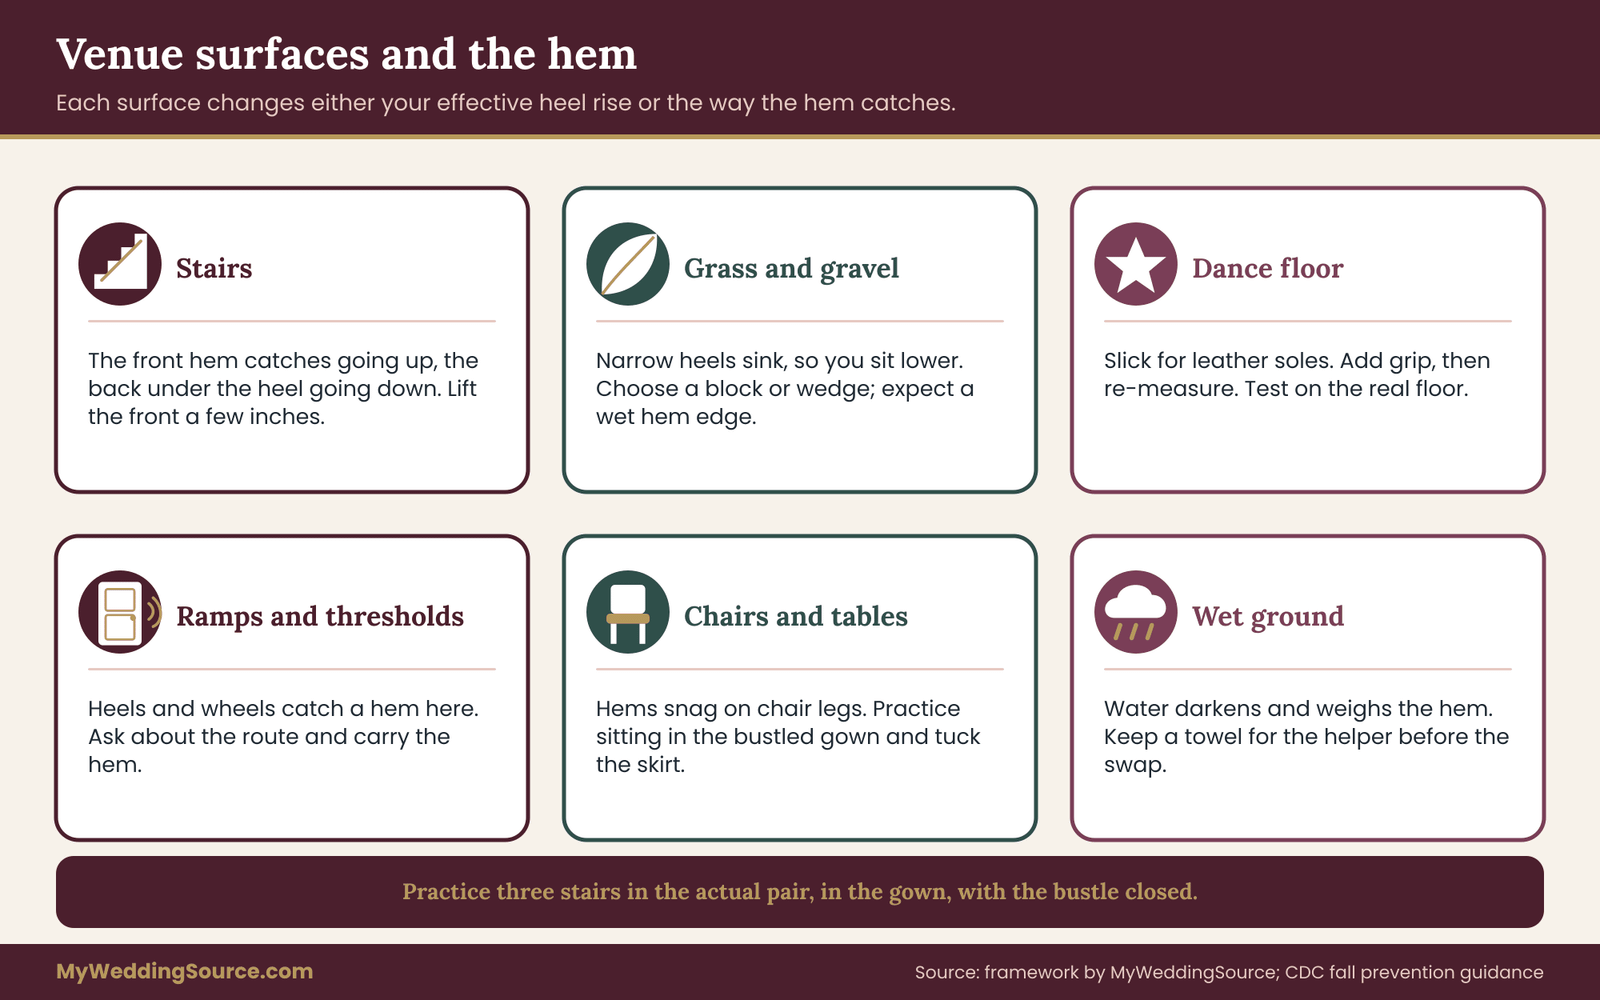
The picture shows common venue surfaces and what each does to the heel rise and the hem, so you can match them with the pair you will wear. It is a quick way to review the day’s route with your helper and the planner before the wedding.
The day-of kit for the shoe swap
Pack a small kit that stays near the person who helps you. The items are cheap and take little room. It belongs with the wider backup kit described in the guide to accessory backups, so one bag covers both.
- The log page with the tailor’s notes, printed or on a phone with a charged battery.
- A tape measure or a small ruler, for checking that a heel lift is the planned thickness.
- Heel lifts or insoles, in the sizes you tested, packed in a labeled bag.
- A bag for the first pair, so shoes do not scatter or scuff the gown.
- Safety pins and fabric tape, for a hem that comes loose, used only as the tailor advised.
- Blister pads and moleskin, for hotspots that start after a long day.
- A clean cloth, for wiping soles before the swap.
- A small card with the tailor’s contact details, in case the question can wait until a call is possible.
Pack the kit the day before and tell the helper where it is. A kit nobody can find is the same as no kit.
Who the swap is for: attendants, parents and grooms
Most of this article speaks to someone in a floor-length gown, but the same logic applies to anyone whose clothes were tailored for a particular pair. Bridesmaids in long dresses may swap to flats. Mothers of the couple may change out of heels at dinner. A groom with trousers hemmed to rest on a dress shoe has a similar issue: the break, the fold of fabric above the shoe, changes when the shoe changes.
For trousers, the effect is easy to see. A pair hemmed for a dress shoe with a thicker heel and sole will bunch and drag over a thin-soled sneaker or loafer. A tailor can set the trouser length for the shoe worn longest, and note how it looks in the other. The same offset log applies. Measure both pairs, write the difference, and ask the tailor for a verdict. Trousers also tolerate hem changes with less drama, which is a reason for a groom to decide early and avoid last-minute surprises.
Attendants can follow a short version of the plan: bring the reception shoes to the final fitting if the dress is being hemmed to it, tell the shop that two pairs will be used, and write the heel heights on the order. If the bridal party dresses are all hemmed to the same pair, the shop will also want to know about any outliers in height.
Edge cases and honest limits of the offset log
The offset log handles the common case well and the unusual cases less so. Knowing where it stops is part of using it.
Swelling and late-day feet
Feet swell over a long day, especially in heat and after hours of standing or travel. A pair that fits at the fitting can feel tight at ten at night, and a tight shoe is the reason many people want to change. If swelling is likely, a half-size-larger pair of reception shoes in the log is a legitimate backup. Measure it as its own row, because a larger size sometimes comes with a different footbed thickness.
Medical shoes, braces and orthotics
Some people wear orthopedic shoes, custom orthotics, braces or compression socks. These alter the rise, sometimes by a lot, and they are worth the effort of a precise measurement. Include the orthotic in the heel and forefoot readings, and discuss the plan with whoever prescribed it. A podiatrist or physician can say what the shoe must do for your feet; the tailor can say what the hem can do. This guide cannot judge your medical needs, and the log never overrides a clinician’s advice.
Mobility aids and uneven ground
A cane, a walker, a wheelchair or a handrail changes how the hem behaves. A wheel can roll over a skirt, and a cane tip can pin a hem against the ground. If a mobility aid is part of the day, bring it to a fitting, adjust the hem for it and ask the tailor to check the clearance while it is in use. The same applies to pregnancy, when balance, foot size and posture shift, sometimes between the fitting and the wedding.
Shoes that change after the final fitting
Delivery delays, a broken strap or a sudden change of mind happen. If new reception shoes appear after the final fitting, measure it, add it to the log and compare it with the reference pair before deciding. If the offset is in zone one, you may be fine. If it is not, contact the tailor promptly. A short message with the measurements and a photo is often enough for the tailor to say whether a quick check is worth a visit.
Bare feet and socks
Some couples change to bare feet or to plain socks for dancing. The offset is then the whole height of the reference pair, since the footwear contributes nothing. This is a zone three case almost by definition. A gown bustled for dancing in flats or bare feet can work well, but the hem must be set or lifted for it, and the floor must be safe and clean. Ask the venue about its rules for bare feet, and plan to hold the hem while walking in and out.
Boots and unusual footwear
Boots, platform sneakers, clogs and riding boots have thick soles and tall shafts. The forefoot offset can be large and the shaft can catch tulle. Measure with care, ask the tailor to see them, and test the gown while walking and sitting in them. For a winter ceremony, snow boots for the walk and a dress pair for the room are two more rows in the log.
Ceremony traditions and religious dress
Some ceremonies require bare feet, specific shoes or the removal of shoes at an entrance. Others involve kneeling, circling or crossing thresholds. Include those moments in the walking and dancing states and discuss them with the tailor and the officiant, so the hem is prepared for movements beyond the aisle.
What the log cannot do
It cannot predict how fabric behaves when it is wet, stretched or pulled by a crowd. It cannot decide what you find comfortable. It cannot replace a tailor’s eye, and it does not make an unsafe hem safe. It is a tool for conversation and a record for a helper. Its strength is that it asks you to compare two pairs with the same ruler, in writing, before the wedding. That is a small habit with outsized effects.
Common mistakes with reception shoes, and how to avoid them
Most hem problems at the reception come from a short list of repeated slips. Check your plan against it.
Buying the reception shoes last. When the pair arrives a week before the wedding, there is no time to measure, test or return it. Choose reception shoes before the final fitting.
Measuring the wrong pair. The offset is against the pair worn at the hem fitting. Using the ceremony pair bought later gives a number that looks right and is not.
Trusting the catalog heel height. Advertised numbers measure the outside of the heel. Measure the inside heel seat and the forefoot yourself, and log the pair as it is, with insoles in.
Skipping the bustle test. A bustle set in heels and worn in flats will sag. Test the bustle in your reception shoes, and do the swap before closing it.
Ignoring the venue surface. Soft lawns, slick floors and ramps change how reception shoes perform. Check the surfaces on your route before you finalize the pair.
Packing the log nowhere. A plan that lives in one person’s head fails when that person is busy at the reception. Put the log in the helper’s hands and the kit.
Leaving comfort for last. Reception shoes that hurt end up off your feet, which changes the offset to zero, then to the full height of the reference pair. Break the pair in beforehand.
Treating the tailor as a rescue service. A tailor can do a great deal with notice and little with none. Bring both pairs early, ask your questions in the first fitting and keep to the schedule you agree on.
A compact summary before your next steps

The last illustration gathers the main steps on one page: choose the reference pair, measure each comparison pair, compute the offsets, sort them into zones, brief the tailor, test with the gown on, and hand the log to your helper. You can screenshot it or print it for the fittings. The wedding planning checklist is a good place to add the fittings and the swap to your overall list of tasks, so they do not live only in your notes app.
Your next steps
- Write down which pair the hem was set on. If you do not know, ask the tailor at the next appointment.
- Measure the reference pair and every candidate pair with a rigid ruler on a flat table. Record heel rise and forefoot rise in the same units.
- Compute the heel offset and the forefoot offset for each comparison pair, and mark whether the hem drags or rises.
- Sort each pair into a zone and write what you plan to do about it.
- Book enough time at the next fitting for both pairs, a bustle test and a stair test, and tell the shop in advance.
- Ask for the tailor’s verdict in writing, including how much clearance each pair leaves.
- Test the swap once at home or at the shop, shoes first and bustle second, with the helper who will be there on the day.
- Pack the kit and hand over the log, and add the swap time to the day’s schedule. The wedding dress fit and alterations guide is the place to return to if the fitting schedule itself needs work.
FAQ
Do I really need to bring both pairs of shoes to a hem fitting?
Yes, if you intend to wear both. The hem is set for a specific height, and the tailor can only judge a different pair when it is on your feet with the gown. Bring the reference pair, the reception shoes and any emergency pair, along with the log. If one pair is not available yet, bring a measured photo and plan an extra short visit once it arrives.
How much lower can my reception shoes be before the hem is a problem?
There is no single number. It depends on the fabric, the fullness of the skirt, the clearance you started with and how much you move. A small offset may be absorbed, a medium one needs a plan, and a large one needs a structural fix. Ask your tailor for their limit with your gown, and have them write it in the log.
Is it better to hem for the heels or the flats?
Hem for the pair you will wear for the longest and most active part of the day, unless photographs matter more to you. If most of the day is spent in the reception shoes, setting the hem for it and managing the ceremony heels with a lift may be safer. If most of it is in heels, do the reverse. Your tailor can judge the trade.
Can a bustle fix a hem that drags in lower shoes?
Often partly. A bustle lifts the back and train, so it reduces dragging where the fabric is gathered, but it does not change the front or sides, and it must be set with the reception shoes on to work properly. Ask the tailor to test the bustle in both pairs and to say whether the front and sides still clear.
Are wedges safer than flats for the hem?
Not necessarily. Wedges keep more rise than flats, so the offset is smaller, which helps the hem. They also spread weight, which helps on soft ground. But some wedges have thick forefoot platforms that change the front clearance, and some are unstable on turns. Measure the heel and forefoot of any wedge and test it with the gown.
What if I change my mind about the reception shoes after the final fitting?
Measure the new pair, add it to the log and compare it with the reference. If the offset is small, check it with the gown on if you can. If it is larger, contact the tailor right away with the numbers and a photo, because late changes need time. Keep the receipt so the pair can be returned if it does not work.
Does the same advice apply to bridesmaids and grooms?
Yes. Any garment tailored to a specific pair of shoes is affected when the pair changes. Long dresses drag in lower shoes, and trousers bunch or lift. Measure both pairs, tell the tailor about the reception shoes and ask for a verdict. The cost of a short conversation is far lower than the cost of a hem that was cut for the wrong shoes.
Who should I ask about foot comfort and fit?
A podiatrist, physician or experienced shoe fitter can advise on comfort, support and fit for your feet, especially if you have pain, swelling or a medical condition. Your tailor can advise on the hem and the gown. The two questions are separate, so bring each to the right person and combine the answers in the log.
Sources
- Federal Trade Commission: care labeling and consumer protection guidance for clothing and textiles
- Consumer advice from the FTC: plain-language guidance on returns, refunds and purchases
- U.S. Consumer Product Safety Commission: product safety information for consumer goods
- CDC, Older Adult Fall Prevention: general information on preventing trips and falls
- NIOSH: workplace footwear and slip, trip and fall resources
- American Podiatric Medical Association: guidance on shoe fit and foot health
- OrthoInfo, American Academy of Orthopaedic Surgeons: patient information on foot and ankle care
- ASTM International: standards for textiles and footwear
- USA.gov: directory of federal consumer services