
First dance shoes are the one piece of your outfit that touches the floor, and the skirt or hem above them decides whether your feet can move at all. This guide gives you a five-pass rehearsal test for first dance shoes and the dress or suit that goes with them, so you find out in practice, not in front of your guests, whether the grip, the turns and the fabric clearance will hold.
Rehearse the first dance in the exact shoes, hem, undergarments and fabric you will wear, at performance tempo, on a floor that behaves like the venue floor. Run five passes in order: grip, pivot, clearance, hold and recovery. Count a pass only after three clean repeats in a row. Write the failure rule for each pass before you start, so a slip leads to a change (different sole, shorter step, altered hem, simpler turn) and not to a hopeful shrug. Confirm what the venue allows on its floor in writing.
Most couples practice the first dance in socks, sneakers or bare feet in a living room, then walk onto a polished floor in new shoes, a heavier skirt and an audience. Almost everything they rehearsed was real except the three things that cause trouble: what is under the feet, what is around the legs and what is on the floor. The steps were never the weak point. The conditions were.
This article is about closing that gap. It does not teach a style or a routine, and it does not compare lesson formats. If you are still choosing a style, start with the guide on wedding reception music planning for how the song and the room fit together, then come back here when you know roughly what you will dance.
The question in this guide is narrower: given the dance you chose, can you do it in the clothes you chose? It treats first dance shoes as equipment to be tested, not as an accessory to be admired.
A note on scope. This is general information, not legal, tax, financial or medical advice, and no test in this guide replaces the judgment of your instructor, your venue and your own body on the day.
What first dance shoes practice has to settle
Practicing in your first dance shoes sounds like a small detail, but it has to answer five separate questions. Mixing them together is why many rehearsals feel fine and the real dance does not.
The first question is grip. Does the sole hold the floor firmly enough that you do not slide when you step, and loosely enough that you can turn without the foot sticking? Those two demands pull against each other. A sole that grips like a sneaker feels safe in a straight line and can lock in a pivot. A sole that glides like a dress shoe turns easily and can slip out from under you on a step.
The second is pivot. Turns, spins and changes of direction load first dance shoes in ways that walking does not. The ball of the foot, the heel and the sole material all matter, and so does the floor finish.
The third is clearance. Your own feet, your partner’s feet, the hem, the train, the petticoat and the trouser break all share a small patch of floor. If a skirt reaches under the heel of your shoe, or a partner’s shoe lands on a hem, the dance stops being about music.
The fourth is hold. The way you stand close to each other, the length of your arms, the volume of a skirt and the cut of a jacket change what the dance frame looks like. A skirt wide enough to keep you at arm’s length makes a different dance than a slim gown.
The fifth is recovery. Every dance has a moment where something goes slightly wrong. What matters is whether the clothes and shoes let you recover, or turn a small wobble into a fall or a stall.
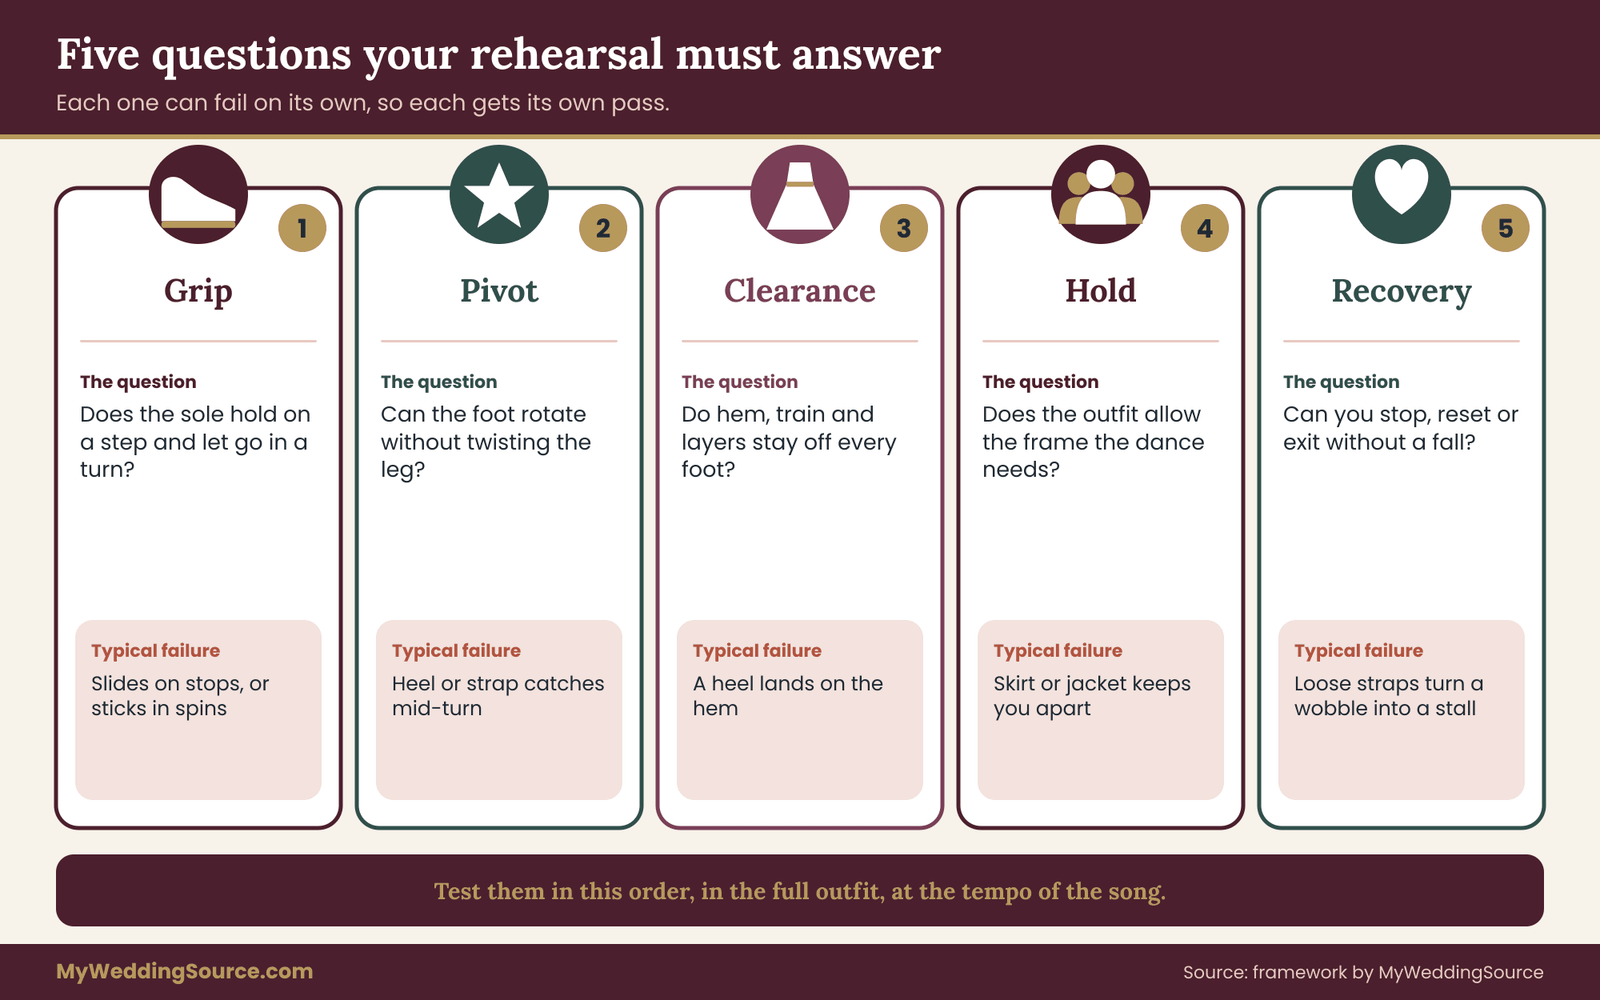
Each question can fail on its own, which is why the test later in this guide takes them one at a time. A rehearsal that treats them as one question tends to find the easy failures (a loose strap) and miss the quiet ones (a sole that grips fine until the third turn).
Who this applies to
The most visible case is a bride in a long skirt and heels, but the same questions apply to everyone on the floor. A groom in new leather-soled first dance shoes can slip as easily as anyone. A partner in a fitted suit with a long jacket may find that the jacket restricts a lift of the arm.
A couple in matching long dresses has two skirts to manage. A person using a mobility aid, a cane or supportive footwear has a different set of grip and clearance questions, which a qualified instructor can help adapt; nothing here requires any particular physical ability. For every one of them, first dance shoes are the first thing worth checking.
If your first dance includes parents, a wedding party or a surprise group number, each additional person adds a clothing and shoe check of their own. The five passes apply to them too, but you usually do not need to run each one for every guest. The section on failure rules covers what to ask of anyone who joins.
What this guide leaves out
This guide does not rank brands or products, and it makes no claims about how any particular sole or treatment performs, because performance depends on the floor, the shoe, the weight and the dance. It also does not tell you what to put on a venue floor. Many venues restrict powders, sprays and tape on their floors because of their own finish and liability rules, and some floors are rented or temporary. The right way to settle that is to ask the venue, and the section on practice floors gives you the wording.
For a broader view of backups and emergency items for the day, the planning guide on wedding day accessories covers compatibility and spare items. This article stays on the dance.
Why rehearsal footwear fails the real dance
Before the test makes sense, it helps to see how the usual practice setup misleads you. The failures follow a predictable pattern, and almost all of them come from one of four differences between practice and the day.
Difference one: the first dance shoes
Practice shoes are usually not the pair you will wear. Couples rehearse in flats, socks or old heels because the real first dance shoes are new, delicate or not yet delivered. That is sensible in the first weeks, since new shoes are hard to wear for long and easy to scuff.
But the change in sole material, heel height and strap design changes the whole dance. A heel two inches taller than the practice shoe shifts where your weight sits, how far you step and how stable a turn feels. A change that sounds small can break a routine that felt automatic.
Difference two: the hem and the skirt
A practice skirt is often leggings, a slip or nothing. The real skirt has weight, layers and a hem that falls differently when you move than when you stand. Fabric that looks tidy in the mirror can drift forward on a step and lie directly where the next foot lands. The layers under a gown, such as a petticoat, crinoline or hoop, change how the skirt swings and how far the hem travels when you turn.
Difference three: the floor
A living room carpet, a studio sprung floor and a polished ballroom do not feel alike underfoot. Carpet holds almost any sole and hides turning problems. A sealed hardwood floor or tile can be slick in a way that carpet never prepares you for. Outdoor surfaces, temporary panels and stage risers add their own variations. The grip question can only be answered on a surface that resembles the real one, which is why the test treats the practice floor as part of the equipment.
Difference four: the pressure
On the day you are watched, you are excited and you are wearing the outfit for the first time in a crowd. Rehearsal rarely recreates that. The test cannot copy an audience, but it can copy the pace, the length of the dance and the full outfit, and it can require repeated clean runs, because a movement that works once at half speed often fails on the third run at full speed.
The cost of finding out late
Nothing in this problem has to be expensive if it is found early. A different pair of soles, a hem shortened by a seamstress, a bustle adjustment, a simpler turn or a different spot on the dance floor are all inexpensive compared with the cost of a fall, a ruined hem or a flustered dance.
The cost grows as the date approaches, because alterations take time, new shoes need wearing in and some venue questions take days to answer. A realistic rule is to run the full test early enough that every fix you might need still fits in the calendar. The schedule section later in this guide gives a count-back.
Because the fix often sits with the person who altered the dress, keep that conversation connected to the rehearsal. The guide on dress fit and alterations explains how hem length, bustles and fittings fit together, which is useful background when a rehearsal shows the hem is a problem.
The five-pass test for first dance shoes
The test is a sequence of five short rehearsals, each aimed at one question from the last section. You run them in order because each pass builds on the one before. A shoe that fails the grip pass should not go on to the pivot pass, since the pivot result would tell you nothing useful.
The five passes are grip, pivot, clearance, hold and recovery. Each has a pass rule, a watch rule and a fail rule, and you write all three before you begin. This is the heart of the method. Most rehearsals fail not because the couple ignored a problem but because they never decided in advance what counted as a problem. After a wobble, everyone is tempted to call it fine.

How a pass is scored
Use the same three-level scale for every pass.
- Pass: three clean repeats in a row, at performance tempo, with no correction, no catch and no look down at the feet.
- Watch: one correction or one near miss in the three repeats. The pass is not failed, but you note exactly what happened and repeat the pass on another day.
- Fail: any slip where the foot leaves its intended spot without control, any step where the hem is caught by a foot, any moment you stop the music for safety, or any pass where either of you says you would not do it in front of guests.
Two details keep the scale honest. First, “three in a row” resets after any watch or fail. Second, the person who feels least sure decides. If one partner is confident and the other is not, the pass is a watch at best, because the dance fails on its weakest participant.
What counts as the full kit
The test only means something in the full kit. Before you start, put on exactly what you will wear on the day, from the ground up. Rehearsing in a different pair than your first dance shoes only answers part of the question.
- The shoes, with any heel tips, straps, insoles or cushions you plan to use.
- The undergarments that affect the skirt, such as a petticoat, crinoline, hoop or slip, and any shapewear that changes how you bend.
- The dress or suit at its final hem length. If alterations are not done, use a stand-in hem by pinning or by borrowing a garment of similar fabric and length, and mark the result as provisional.
- The train, overskirt or cape in its dance configuration. If you plan to bustle the train for the dance, bustle it. If the plan is to remove an overskirt, the test runs without it.
- Anything on the hands, wrists or shoulders that changes the hold, such as gloves, a bracelet, a wrap or a bouquet you might carry in.
- For the partner, the jacket buttoned as it will be, with a boutonniere, cufflinks and the actual first dance shoes.
Do not worry if the full kit is not available at the start. Run the earlier passes with whatever you have and mark them provisional. Then repeat each pass once the final pieces arrive. Provisional passes are useful for catching major problems early, but they do not count toward the final result.
The tempo rule
Run every pass at the tempo of the actual song, not a slowed version. Slow practice is the right way to learn steps, but it hides footwork problems, because slow movements load a sole less than fast ones. If your song has a slow opening and a faster ending, run the passes at both tempos. Where you intend to use an edited or shortened version of the song, rehearse to that version, so the turns land on the same beats they will on the day.
Where the passes are recorded
Keep a single sheet, a note on your phone or a page in a notebook with five lines, one for each pass. For each run, write the date, the first dance shoes and floor used, the result (pass, watch or fail) and one sentence about why. A rehearsal log is not busywork. It lets you compare runs, makes it easy to hand notes to an instructor or a seamstress, and removes the debate over whether the last practice felt better.
A caution about what this test does not prove
Passing all five passes tells you that, in the tested kit on the tested floor, the dance worked. It does not guarantee the day. The venue floor may be different from your practice floor, you may be wearing the outfit for hours before the dance, and nerves change movement. The test lowers the risk and shows you where it sits. It does not remove it, and the later sections explain what to do with the remaining risk through simplification and backup choices. The same first dance shoes can behave differently on a different floor.
Pass one: grip on the floor you will dance on
Grip is the first pass because every other movement depends on it. The aim is to learn how your specific sole behaves on a floor like the venue’s, and to find the narrow band between a shoe that slides and a shoe that sticks. The grip pass is also the quickest way to learn whether your first dance shoes are worth taking any further.
Setting up the grip pass
You need a clear area about the size of a modest dance floor, the first dance shoes, and a partner who can stand nearby. If you have access to the actual venue floor, even for ten minutes, use it. If not, the section on practice floors explains how to match a stand-in. Wear the first dance shoes for a few minutes beforehand, so the first steps are not also the first wear.
Start without music. The first minute is only about the sole.
- Stand and shift. Stand with your weight on one foot, then the other, and rock gently forward and back. You are feeling for a sole that holds still under load.
- Walk a straight line. Take a dozen ordinary steps, then a dozen larger ones, the size of the steps in your dance. A sole that slips even once on a large step is a warning.
- Stop and start. Take three steps and stop suddenly. Then start from standing with a firm push. Slipping on stopping or starting is the most common early failure.
- Step backward. Many dances include a backward step, and the sole often behaves differently when you push off the toe and land on the heel.
- Slide test. With the foot flat, push it slowly forward a short way, as you would in a gliding step. The sole should move when you want it to and hold when you do not.
Reading the result
For each step, you are asking one of three questions: did the foot go where I meant, did it hold when I stopped, and did it let go when I wanted it to? A “no” to any of these is a note for the log.
The most useful result is not a perfect score but a clear description. “Slides on the stop, fine on the turn” is much more helpful than “felt slippery.” It tells a shoemaker, an instructor or a venue manager what to look at. Either way, the log should name the floor and the first dance shoes, so the result can be compared later.
The two directions of failure
Grip fails in two opposite directions, and the fix for one makes the other worse.
Too slick. The foot slides on a step, a stop or a weight shift. Typical contributors are smooth leather or synthetic soles, a very polished floor, a slight film of dust, and a long stride. The remedies on the shoe side include asking a cobbler about a thin protective sole layer, trying a different pair or choosing a lower, wider heel. On the floor side, the remedy is a different spot or a different surface, because what you can do to a venue floor is the venue’s decision.
Too sticky. The foot grips so firmly it will not turn, and the turn twists the ankle or knee instead of the shoe. Rubber soles and some textured surfaces can do this, particularly on a clean, dry floor. If a turn feels like it is fighting you, stop. Soles that feel safe in a straight line can be a hazard in a spin, and the fix is usually a different sole, a shallower turn or a choreography change, not more effort.
Because this is about your body, a pain or a twinge is a reason to stop and, if it persists, to ask a qualified professional. The test never asks anyone to push through discomfort.
Heel shape matters as much as sole material
A heel with a thin tip concentrates weight into a small point. On a hard polished floor it can slip, and on grass, gaps or a floor seam it can sink or catch. A broader block heel spreads the weight and usually steadies the dance, but it changes the look of the shoe and sometimes the length of a step.
If you are choosing between two pairs, the grip pass with each is a more reliable comparison than a product description. For an outdoor lawn question the answer can be quite different, and the guide on venue technical walkthroughs is a good way to confirm what surface the dance floor actually sits on.
Heel protectors and other add-ons
Add-ons such as heel tips, protectors, clear sole stickers or traction pads are a common solution to grip, and they are also a common new failure. Anything stuck to a sole can peel, change thickness underfoot or alter the feel of a turn. The rule is simple: test the add-on in the kit, run the grip and pivot passes with it, and confirm it will stay put through a full evening. If it comes off during rehearsal, it will come off on the day. Any add-on changes how first dance shoes behave, so test the combination.
Do not use an add-on you have not worn through at least one full run of all five passes. An untested fix is a new variable.
Grip across the whole evening
Grip also changes with time. A floor gets slicker as dancing, spills and dust accumulate. Shoes wear in and soles polish. A first dance happens early in the reception, often on a clean floor, but it may follow a cocktail hour in which shoes picked up grass, water or a sticky spill.
The practical habit is to wipe the soles before the dance and confirm that the dance floor is clear. Ask your coordinator or a trusted friend to check the floor and your soles before you step out. Check the soles of your first dance shoes just before the dance, not an hour earlier. ## Pass two: pivot and turns in first dance shoes
Once the sole holds and lets go when it should, the second pass tests what happens under rotation. Turns are where first dance shoes and the floor interact most, because a turning foot has to twist a little on the floor, and a sole that cannot do that transfers the twist upward.
What a pivot asks of first dance shoes
In a turn, most of your weight sits on the ball of one foot while the body rotates over it. The sole needs to allow the ball of the foot to rotate smoothly without catching. The heel, if it touches at all, has to clear the floor or glide. Straps, platforms and thick soles can interfere.
There are three common turn types in wedding dances, and each stresses first dance shoes differently.
- A pivot turn in place, such as a slow quarter or half turn while holding hands. This is a gentle test and most first dance shoes handle it.
- A traveling turn, where you rotate while stepping across the floor. This adds forward momentum, so a sole that holds too hard or too loosely shows up quickly.
- An underarm turn or spin, where one partner turns under a raised arm. This is a fast rotation on one foot, and the grip and the skirt both matter at once.
Setting up the pivot pass
Run the same pass at three speeds and in both directions, because most people have a strong and a weak side.
- Slow, no music. Do each turn very slowly, feeling the foot rotate. Notice whether the sole turns or sticks.
- Half tempo with the music. This is where you check the turn against the beat.
- Full tempo. The performance speed and the version of the song you will use.
For each speed, do the turn in both directions and write down which direction feels easier. If a turn works in one direction and fails in the other, the usual fix is to choose the direction that works and plan the choreography around it.
Warning signs in a turn
These signals mean the pass is a watch or a fail, and each has a straightforward response.
- The foot sticks and the body keeps turning. The sole is gripping too hard. Reduce the turn, change the pivot to a smaller angle, or change the sole.
- The foot skates out in the middle of a turn. The sole is too slick for the speed. Slow the turn, shorten the step, or change the floor spot or sole.
- The heel catches during the turn. The heel is touching down and gripping. Lift the heel through the turn, change the step to stay on the ball of the foot, or try a heel with a smoother base.
- The strap or ankle band slips. Fasteners that hold in a walk can loosen in a spin. Adjust and retest, and consider a secure strap.
- You look at your feet. Looking down is a quiet sign that the dance depends on something you do not trust.
A difference between partners shows up here too. A partner who is comfortable in soft-soled shoes may find a hard-soled pair slick, and the partner in the wedding gown may need a smaller turn than the partner in trousers. The turn is a joint movement, so the pass is scored for both. The same pair of first dance shoes can feel secure for one partner and slick for the other.
Reducing the turn instead of changing first dance shoes
If the pass fails, the first fix does not have to involve buying anything. Dance instructors routinely reduce the angle of a turn, replace a full turn with a half turn, or slow a spin by a beat. A good instructor can often keep the same visual effect while lowering the load on the shoe. When you speak to the instructor, give specific information: the shoe, the floor, the exact turn and what happened. “The right foot sticks on the third turn on a laminate floor” can be fixed. “The shoes feel weird” cannot.
If your dance includes lifts or tricks, the standard of safety is higher, because a slip on a lift affects two people. For a plain version without those risks, the simplest choreography is the better starting point, and an instructor can help you keep the dance natural.
Pass three: dress clearance for skirt, hem and train
The third pass looks above the first dance shoes. Clearance means that nothing in the outfit catches a foot, restricts a step or changes the way you can stand together. It is about fabric, length and space, and it is the pass that most often needs a seamstress.
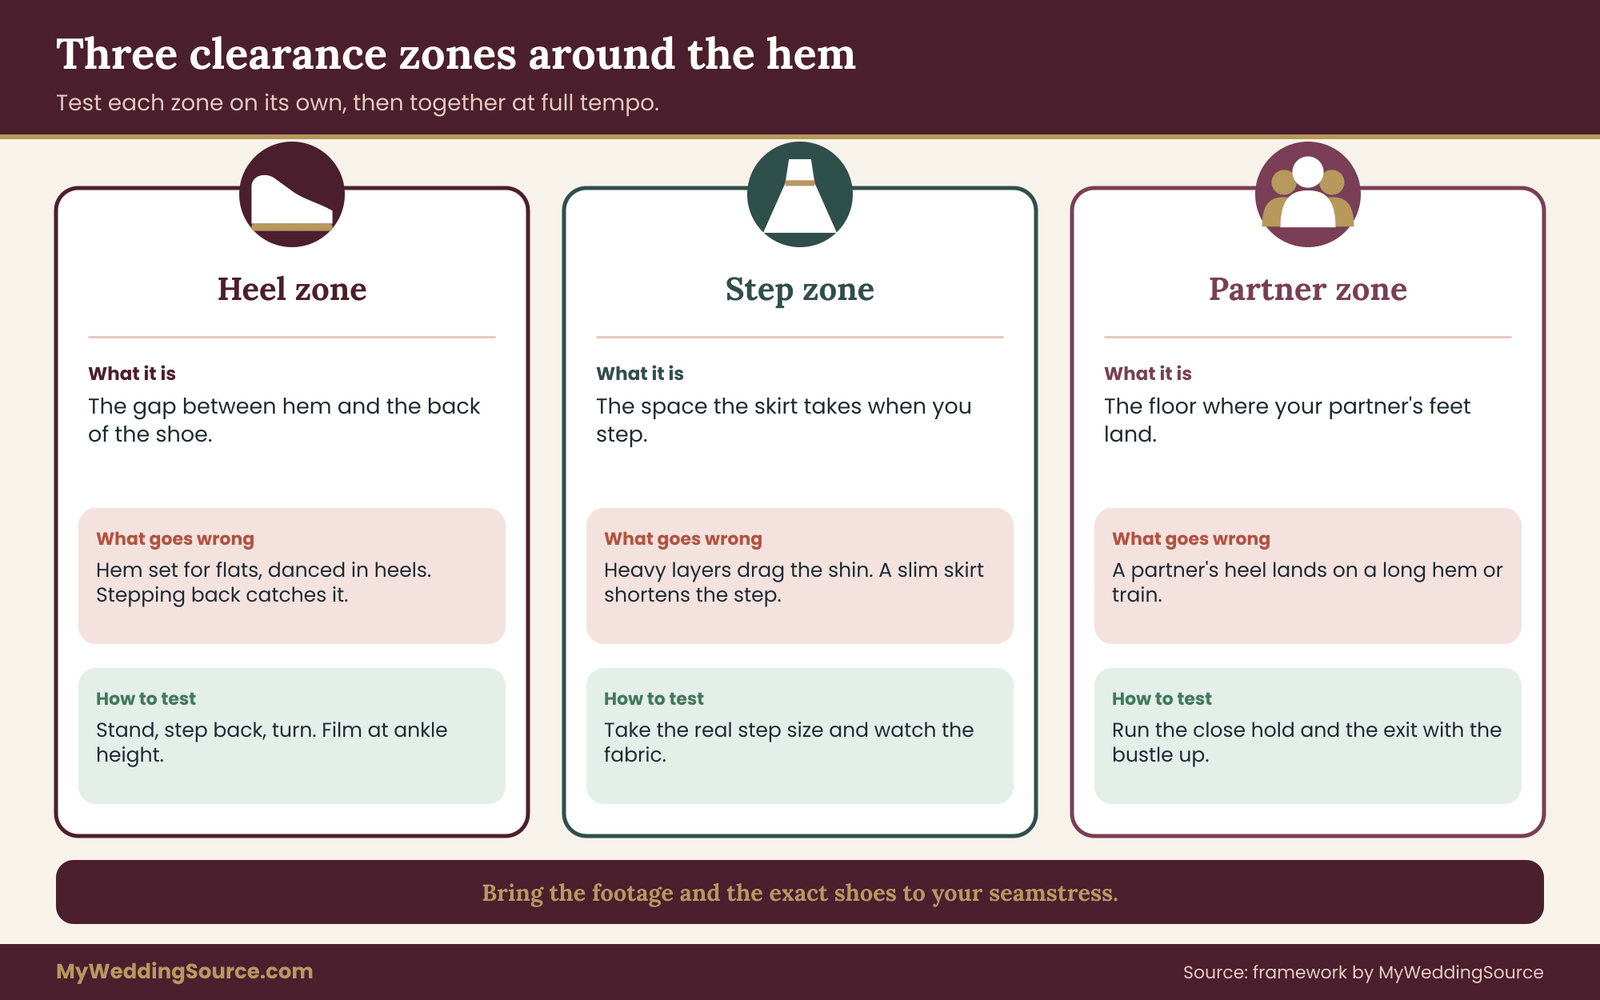
Three clearance zones
Think of the lower part of the outfit as three zones, and test each one separately.
The heel zone. This is the space between the hem and the back of the first dance shoes. A hem that touches the floor at the back can be stepped on by the wearer’s own heel, especially when walking backward or turning. A hem that sits well above the floor leaves the heel free. The right length depends on the shoe, which is why a hem set for flat shoes and then danced in heels is a common problem. If the dress was hemmed for a shoe other than the one you will dance in, the clearance pass will show it quickly.
The step zone. This is the space the skirt occupies when you take a step. In a full skirt, the front of the skirt moves ahead of the foot, and if the skirt is heavy or the layers are stiff, it may drag against the shin or the partner. In a slim skirt, the problem runs the other way: the fabric restricts the length of the step. Measure the step you need in the dance and see whether the skirt allows it.
The partner zone. This is the space where your partner’s feet land. When partners step close, a long skirt can sit under their shoes. A partner’s heel on your hem is the classic way for a pull to begin. This is where the shape of the choreography and the shape of the dress have to agree.
How to run the clearance pass
- Stand and look down. Check where the hem sits relative to the heel and the ground. Look for areas where it drags or bunches.
- Take the dance steps slowly. Do each of the basic steps at half speed while a helper watches the hem. A fixed phone camera on the floor at ankle height is a good second pair of eyes. Footage is easier to interpret than memory.
- Turn in both directions. The hem swings out in a turn. Look for where it lands when you stop.
- Do the exit. Walking on and off the floor is part of the dance. A train that catches during the walk-on is a failure even if the dance is fine.
- Do the full tempo run. This shows fabric behavior that slow movement hides.
Watch for three problems in particular: a foot landing on the hem, fabric swinging into a partner’s path, and a skirt that holds the wearer back from a step they planned to take.
Trains, overskirts and bustles
A train is beautiful on the aisle and a hazard on a dance floor. Most trains are designed to be bustled, which lifts the fabric up and back. The bustle’s quality matters: a bustle that sags during movement reintroduces the clearance problem. Run the pass with the bustle in place and check whether it stays up through a full-tempo run.
If it drifts down, tell the person who made it, because it may need another anchor point or a different style of bustle. Test the train in the first dance shoes you will actually dance in, because the heel changes how the fabric falls.
Detachable overskirts and capes change the dance profile. If you plan to remove an overskirt before the first dance, run the test without it. If you plan to keep it, run the test with it. Do not assume that “I’ll just hold it” works, since a hand that holds the fabric is a hand that is not in the dance.
Choosing between a bustled train, a removed overskirt and a short change of outfit is a bigger decision than a single rehearsal. The guide to fittings and hem feedback covers how to give a seamstress feedback, and you can bring your rehearsal footage to that conversation.
Layers and volume
A skirt with a petticoat or crinoline can stand out and act as a barrier. It keeps your partner at a distance and may be the right shape for a style where the partners stand apart. For a close hold, it may make the dance awkward. The clearance pass shows whether you can reach each other. If you cannot get as close as the choreography requires, either the hold changes or the skirt volume does.
In a dress with a hoop or a rigid structure, check how the skirt behaves when you sit down and stand up, which is part of the day even though it is not part of the dance. If you have a seat on the schedule before the dance, such as a dinner or toast, test the skirt’s recovery after sitting.
The partner’s clearance
The partner’s outfit counts. Trouser hems that are too long can catch under a heel. A long jacket can bunch at the arm. A tight sleeve can restrict raising an arm for a turn. Cufflinks and buttons can snag a veil, a lace overlay or beaded fabric. If the dress has beading or sharp embellishments, the contact points on the partner’s clothing matter. Beading, sequins and sharp trim on either outfit are worth a slow-motion look for the same reason.
Pass four: hold, frame and movement in the full outfit
By the fourth pass the first dance shoes and the hem have been tested separately. Now you test them together with the person you are dancing with. The question is whether the outfit lets the two of you hold each other the way the dance needs, from the first beat to the last.
Why the hold changes with the clothes
A dance hold is a shape: where the arms go, how far apart the bodies stand, how the weight is shared. Clothing changes that shape in ordinary ways. A full skirt sets the distance between partners. A fitted bodice limits how far an arm can lift or reach. A veil, cape or long sleeve changes what the arms can do. A jacket restricts the shoulder. Heels raise one partner relative to the other, which changes where the hands meet. Taller first dance shoes change that shape more than most people expect.
Height difference is the most overlooked change. If the person in heels is now as tall as, or taller than, their partner, the usual hand and shoulder positions shift. In a rehearsal in flat shoes, the frame felt right. In heels, an arm may be at a different angle, the eye line changes, and the lead may feel harder to give or follow. This is not a problem to be embarrassed about, but it is one to find in rehearsal. Check your hold again each time the heel height of the first dance shoes changes.
Running the hold pass
Run the hold pass from the opening position to the final pose, with music.
- Starting position. Walk onto the floor and take the opening hold in the real first dance shoes. Check how it feels in the first few seconds, because the opening sets the tone.
- Basic movement. Do the main step pattern for a full minute. Pay attention to the arms, the shoulders and the way the skirt or jacket moves.
- Close and open. If the dance moves between a close hold and an open one, test the transition. This is where a skirt can catch.
- The final pose. Ending in a dip, a lean, a kiss or a simple hold is common. Whatever you choose, test it in the first dance shoes. A pose that depends on balance is harder in heels.
- Looking and breathing. Check that you can breathe and look up. A bodice that feels fine standing can feel tight in a dance with a lot of movement. If something feels restrictive in a way that concerns you, stop and check with your seamstress, and with a professional if it is about your body.
The weak-link rule
The hold pass is scored by the person who feels the least comfortable. If the partner in the gown is worried about stepping on the hem, the pass is a watch, no matter how smoothly the other partner thinks it went. The same goes for the partner in a tight jacket. The same applies to the way the first dance shoes feel under each of you.
Hold problems tend to repeat, and each has a short list of sensible responses.
When the skirt keeps you too far apart, the choices are to lower the volume of the skirt, adjust the hold so one arm bridges the gap, or choose a dance style that does not depend on a close hold. A skilled instructor can rework the frame without losing the look.
When the bodice or sleeves limit your arms, the dance needs smaller arm movements or the garment needs a small alteration. A seamstress can often add ease at the underarm or release a seam, but only if you ask early.
When the height difference is awkward in heels, try a shorter heel for the dance, change where the hands meet or change the pose at the end. Do not try to solve it by gripping harder, since tension shows in a photograph and in a turn.
When a veil or cape catches, take it off for the dance or secure it differently. A veil that is lovely at the ceremony is often handed to a friend before the first dance, and nobody minds.
What the pass says about your style
Sometimes the hold pass reveals that the dance you planned suits the outfit poorly. A close ballroom hold in a ballgown with a full hoop can be a struggle. A wide, swaying dance in a slim sheath can feel cramped. This is not a failure of effort. It is information. The article about reception music planning helps you think through song choice and mood, and an instructor can help you choose a dance that suits the outfit you already love.
Pass five: recovery when something goes wrong
The last pass is the one most couples skip, because it feels like rehearsing a mistake. But recovery is the part of the dance that clothing and shoes affect most, and the easiest to prepare. It is also where well-fitted first dance shoes show their worth.
What recovery means here
Recovery covers any moment where the dance stops following the plan: a misstep, a foot on a hem, a loose strap, a missed turn or a sudden stop. A good recovery is quiet. The dancers laugh, reset and continue, or end the dance early without fuss. The outfit has to cooperate. If a loose shoe or a tangled hem takes both people out of the dance, there is nothing to recover to. Loose first dance shoes turn a small slip into a bigger one.
The recovery drills
Practice each of these a few times, at slow tempo, so the response becomes automatic.
- The stop. Practice stopping mid-step on a signal. This is the safe stop, and it uses your grip and your hold. Agree on a signal, such as a squeeze of the hand, that means “pause.”
- The hem catch. Deliberately let a heel land near the hem, then release it. Practice stepping back and lifting the fabric with one hand without losing the dance.
- The shoe slip. If a heel slides, the recovery is usually to shorten the step, bend the knees a little and keep the weight over the feet. Your instructor can show a version suited to your style.
- The restart. Choose a point in the song, usually the start of a musical phrase, where you can rejoin after a pause. Agree on the restart point in advance.
- The early exit. Agree on a point at which you can end the dance without embarrassment. Many first dances can end with a bow, a hug and a walk to the guests. The audience tends to love it.
Who gives the signal
Decide who calls the stop. It should be the person who feels the problem first, with no discussion required, and the other partner follows. A stop signal works only if both people accept in advance that it carries no judgment.
Recovery and the outfit
The outfit can make recovery easier or harder. First dance shoes with a secure strap are easier to recover from than a loose slip-on. A hem that clears the floor gives you a free foot. A bustle that holds is a better backup than a train you have to carry. An outfit that includes a quick-change option, such as a second pair of shoes under a chair, has a recovery built in. The guide on wedding day accessories covers backups and emergency items, and a second pair of shoes is one of the simplest.
When recovery fails
If you run the recovery drills and cannot make them work in the outfit, treat it as a fail. That is not a defeat. It tells you that the margin for error is too small, which means something needs to change: a shorter dance, a different shoe, a simpler pass across the floor or a hem adjustment. The sections on alternatives and failure rules explain how to decide.
Choosing a practice floor that stands in for the venue
The five passes only mean something if the floor under them resembles the floor you will dance on. The best practice floor is the venue’s own dance floor. The next best is a floor of the same material, finish and condition. The worst is a floor that is easier than the real one, because it gives you confidence you have not earned. Floor and first dance shoes are tested as a pair.
Find out what the floor actually is
Many couples assume the dance floor is the polished hardwood they saw on the tour, and learn later that a temporary panel floor will be laid over carpet, a lawn or a patio. Ask the venue or the rental company directly. You want to know the material, the finish, whether the dance floor is permanent or temporary, where it sits in the room and what size it is. If it is a rental, the rental company may be able to tell you the product name and the surface.
“Could you tell us what the dance floor is made of and whether it is permanent or brought in for the event? We are rehearsing our first dance in our first dance shoes and would like to practice on something similar.”
If you are walking the venue anyway, the planning guide on venue technical walkthroughs shows what to measure and ask, and the dance floor surface is a natural item to add to that list.
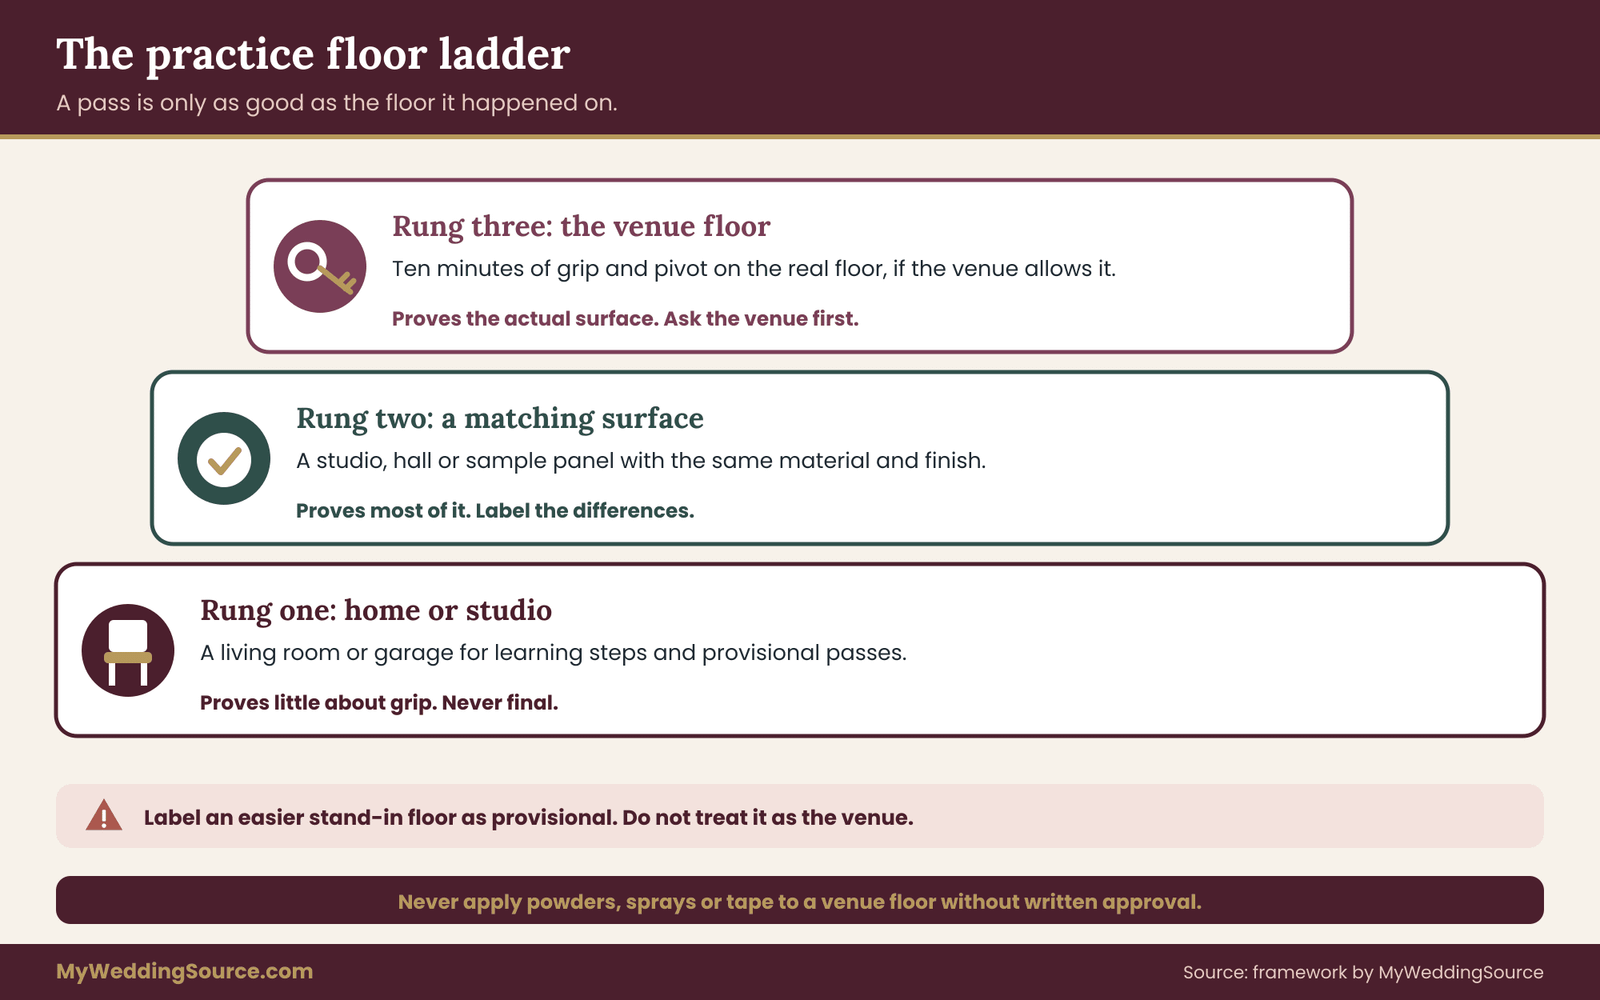
The practice floor ladder
Think of three rungs, and aim to climb them in order.
Rung one: home or studio. This is where you learn the dance and run provisional passes. A living room, a garage or a studio is fine. Use it for the first grip and pivot passes with the real first dance shoes, and be honest about the difference between this floor and the real one. A carpet tells you very little about grip.
Rung two: a matching surface. Find a floor with a similar material and finish. Many dance studios, community halls, school gyms and event spaces have hardwood or sealed floors. Ask whether you can rent a short block of time. A reputable instructor with their own studio can often tell you how it compares with a ballroom. If the real floor is a temporary panel floor, a rental company may let you try a sample panel, or a studio may have a similar surface.
Rung three: the venue. If the venue allows, rehearse on the actual floor. Even ten minutes is enough for the grip pass and the pivot pass, and you can do it during a walkthrough or at an earlier time. If the venue does not allow rehearsals, ask for a short supervised visit to stand and test the floor with your first dance shoes.
Treat unusual floors as separate cases
Some floors need their own attention.
- Polished or sealed hardwood and tile. These can be slick and need a careful grip pass. Smooth soles tend to glide and leather soles can feel hard to control.
- Marble, stone or terrazzo. These can be very slick and unforgiving to heels, and the venue may have rules about heels and floor protection.
- Carpet. This is the easiest on the grip, but a thick pile can catch a heel or a hem. It tells you little about the dance floor.
- Temporary panels. These vary by product, and there can be small gaps or edges between panels. Check how they sit, because a gap can catch a heel.
- Grass and soil. The surface can sink, stick or slope. A heel that works on a studio floor may not work on a lawn, and an outdoor dance floor panel may be laid over uneven ground. Ask your coordinator what the ground is and how level it will be.
- Decks, docks and stages. Gaps between boards and raised edges need attention. Heels can catch in gaps, and wet surfaces change grip.
Ask before you change the floor
A common temptation is to treat a slick floor with a powder, a spray or tape. Do not do this without the venue’s approval. Some products damage finishes, leave residue, create a slip hazard for guests or break rental terms. The venue is responsible for the floor and for the safety of everyone on it, so the decision is theirs. If the floor stays as it is, the first dance shoes and the steps have to do the work.
“We are concerned about grip in our shoes. Is there anything the venue recommends or allows for dance floor traction, and is there anything we should not use?”
Whatever they say, write it down and share it with your coordinator and your DJ. If the answer is “nothing,” your options are in the first dance shoes and the choreography, which this guide covers.
Make the stand-in honest
When you must practice on a stand-in floor, label it in the log. Write the floor type and what is different from the venue. If your stand-in is easier than the venue, treat a pass as provisional and plan to add the venue check. If the stand-in is harder, a pass is a good sign. The aim is to know how much weight your results can bear.
Lighting and the visual surface
Floors look different under different light, and a dance floor that is dark or reflective can be disorienting. A highly reflective floor can make it hard to judge where the hem sits, while a dark floor can hide a ridge or edge. If the venue has a lighting plan for the dance, ask the DJ or lighting vendor how the floor will look, and consider a short rehearsal under similar light. The guide on wedding vendor timelines helps you place that conversation in your schedule.
A count-back schedule for first dance shoes rehearsals
The test needs time, and the time is easy to lose because the most useful rehearsals depend on items that arrive late: shoes, the altered dress, the final song edit and the venue’s reply. A count-back schedule starts from the wedding date and shows what has to happen when. These ranges are a planning aid, not a rule, and your own timeline may be shorter or longer.
Ten to eight weeks before
Order the first dance shoes early enough to practice in them. If the first dance shoes are on a long delivery or custom order, check the return and exchange terms before the first wear, because wearing may affect returns. Confirm the style and the rough choreography with your instructor. Ask the venue about the floor.
Eight to six weeks before
Run provisional passes with the real first dance shoes, even if the dress is not ready. Use the grip and pivot passes on a stand-in floor. Write the first fail and watch rules into the log. Book a studio or a short venue visit for later.
Six to four weeks before
By now the dress should be hemmed or close. Run the clearance pass in the real hem or a pinned stand-in, and take the footage to your seamstress. If the passes show that the hem needs to change, this is the last comfortable time for an alteration. Confirm the song version with your DJ, because the tempo and turn timing depend on it.
Four to two weeks before
Run the full five-pass sequence in the full kit, ideally on the matching floor. Fix what failed. Practice the recovery drills. Decide on the backup plan: a second pair of shoes, a simplified turn, a different ending.
The last two weeks
Repeat the passes you changed and run the full dance a few times at tempo. Do not introduce new first dance shoes, new add-ons or new steps in the last two weeks unless a fail forces it. Final week, run the dance through once or twice, check the log, pack the backup shoes and give your coordinator a short note on the dance and the stop signal.
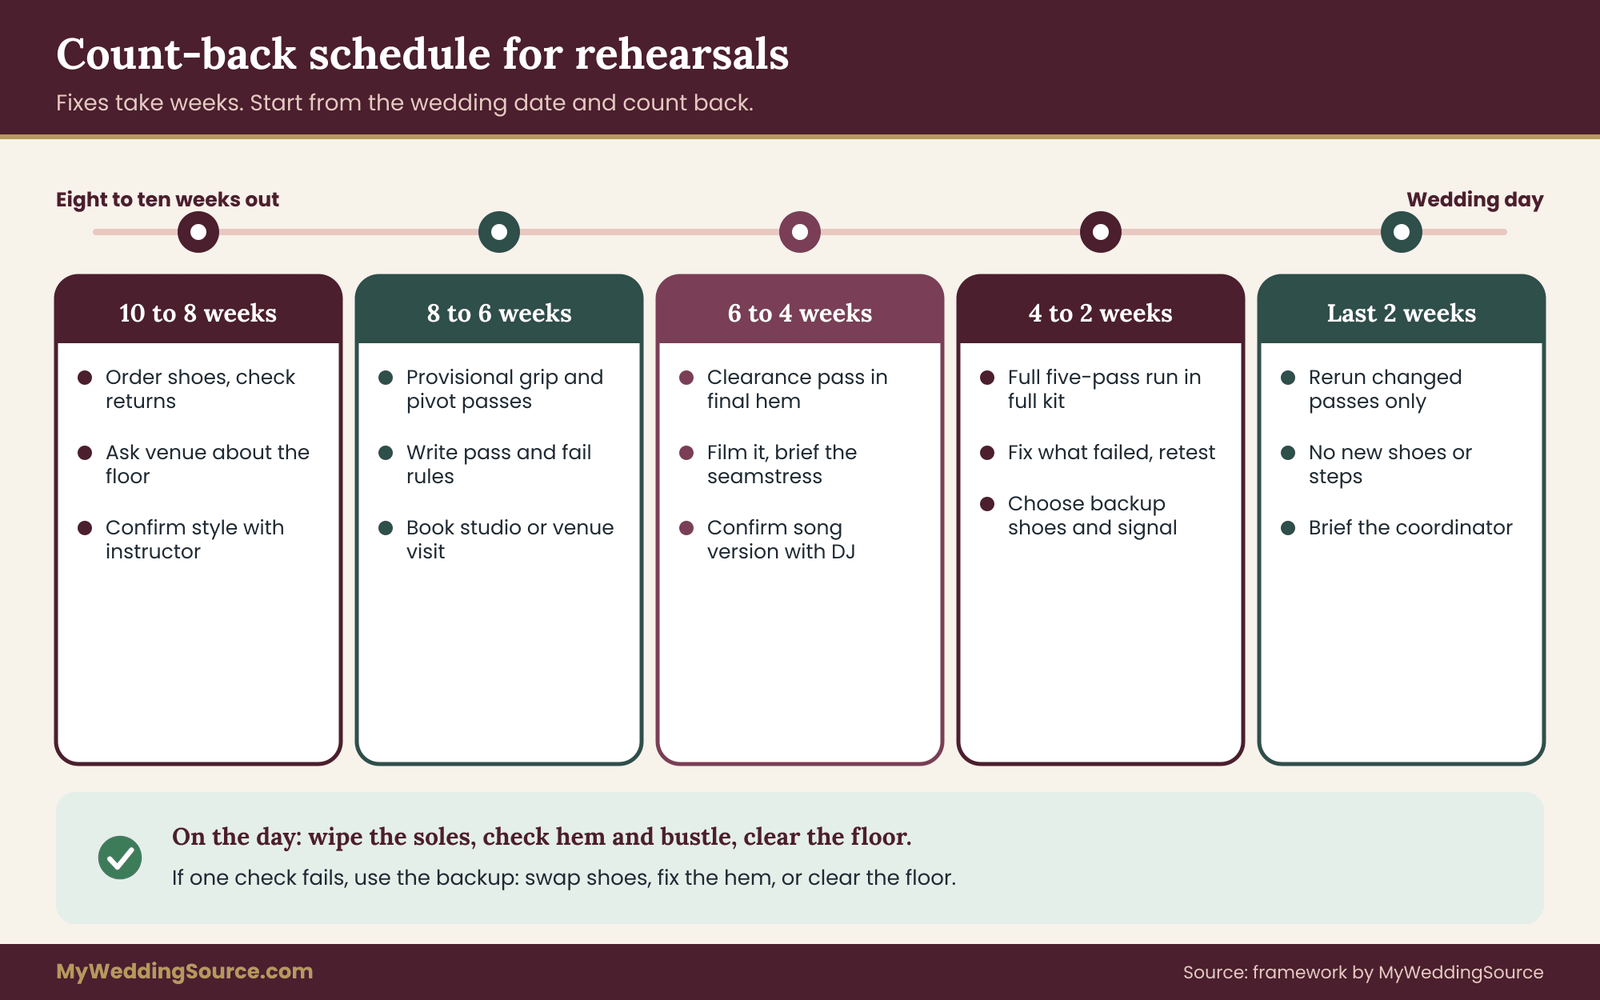
On the day
Wipe the soles before you step out, check the hem and the bustle, confirm the floor is clear and take one deep breath. A short warm-up with the instructor’s cues, a quick check of the shoe straps and a glance at the floor are enough. If anything feels wrong, the stop signal and the early exit are there for exactly this.
If the schedule is already tight
If you are reading this a few weeks before the wedding, do the passes in a compressed form. Grip and clearance first, because they are the ones most likely to need a physical fix, then hold and recovery. Skip no pass entirely, but accept provisional results and simplify the dance to match the margin. A simpler dance that works beats an elaborate dance you could not test. Put the first dance shoes on first.
A worked example: one ballgown, one wooden floor, five passes
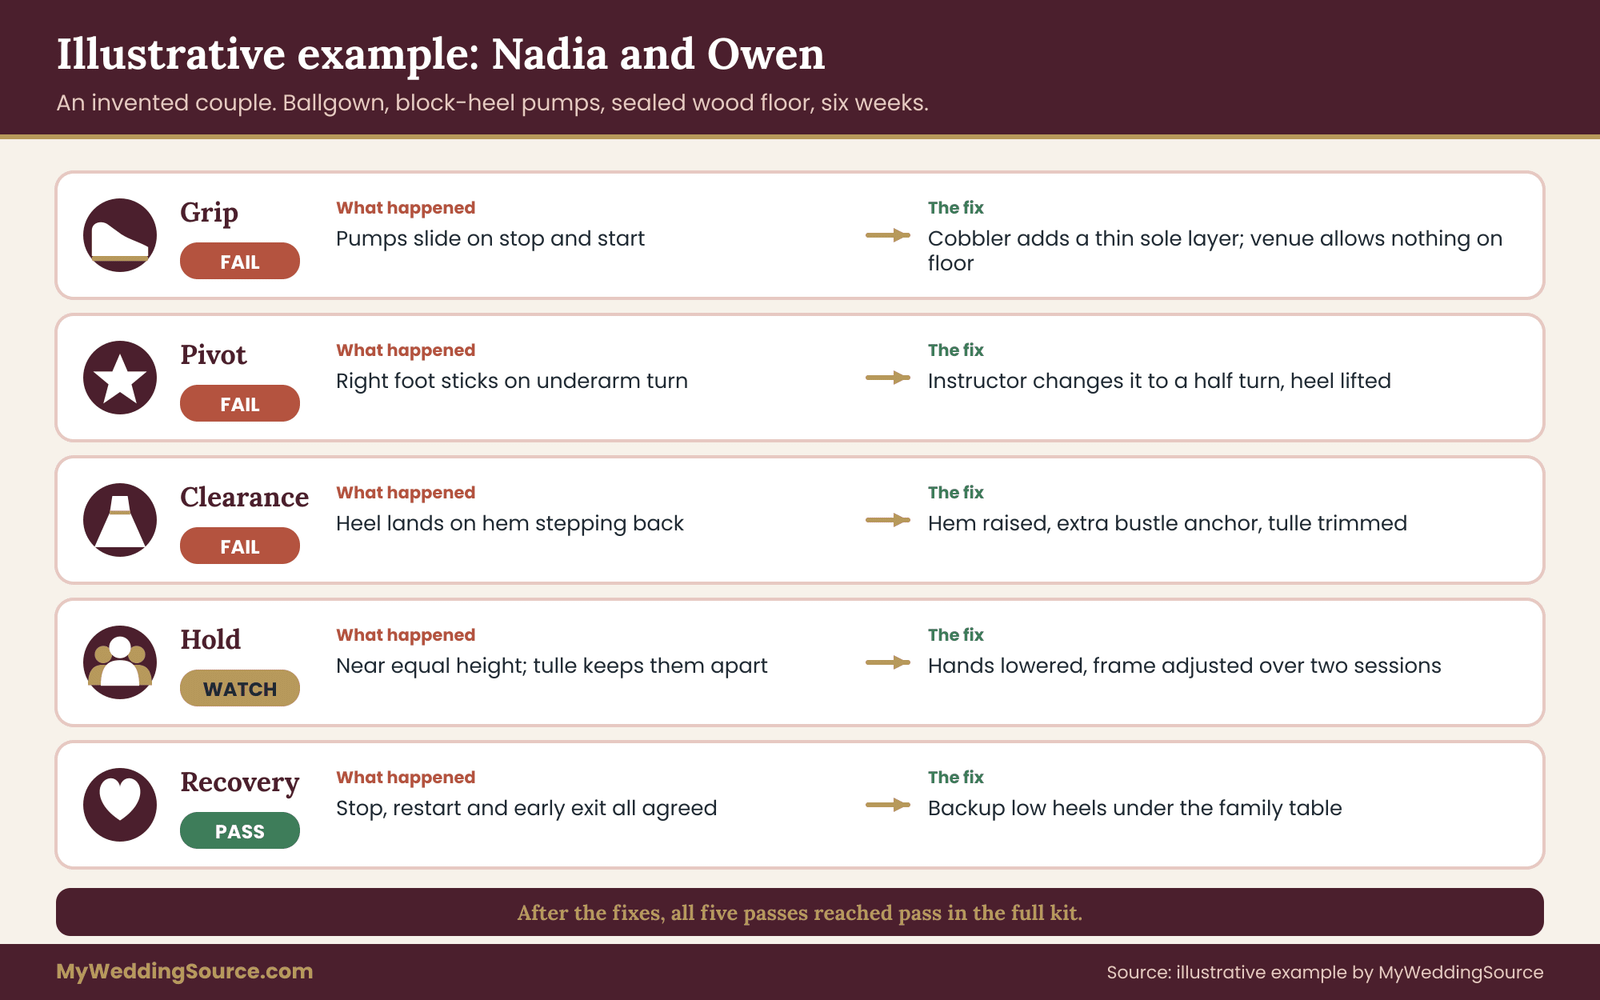
The example below is invented, and it is here only to show how the passes and the fix decisions fit together. The couple, the dress and the numbers of repeats are illustrative, and no real event or test result is described. It follows one pair of first dance shoes through all five passes.
The setup
Nadia and Owen are planning a slow waltz-style first dance of about three minutes. Nadia’s dress is an A-line gown with several tulle layers and a short chapel train that will be bustled after the ceremony. Her first dance shoes are satin pumps with a medium block heel and smooth leather soles. Owen will wear a fitted suit and new leather dress shoes. The reception is in a hall with a sealed wooden floor that the venue says is permanent. They have six weeks.
Their instructor suggests the five passes. They write their rules first. For each pass, “pass” means three clean repeats in a row at song tempo. They agree that Nadia calls the stop, and they set the restart point at the start of the second verse.
Pass one: grip
They book a short block in a community studio with a sealed wood floor, which is the closest match they can find. Nadia’s first dance shoes slide slightly on the stop-and-start drill. Owen’s shoes hold well but feel stiff. They mark Nadia’s grip a fail and Owen’s a pass.
Their next step is not to buy a product at random. They ask a cobbler whether a thin protective layer is suitable for the soles of the pumps and how it affects wear, and they ask the venue whether anything is allowed on the floor. The venue says nothing may be applied to the floor. After the cobbler adds the layer, Nadia repeats the grip pass and logs three clean repeats. The result is a pass, with a note to check the layer is still firmly attached each time.
Pass two: pivot
Their dance includes one slow traveling turn and one underarm turn. In the first run, Nadia’s right foot sticks slightly during the underarm turn, and she feels it in her knee. They log a fail without debate. They tell their instructor exactly what happened: a sticky right foot on the underarm turn, on a sealed wood floor.
The instructor changes the underarm turn into a half turn and moves it to a phrase where the music lets Nadia lift her heel through the turn. They run it three times, and each is clean. Moving the turn does not change the look of the dance for the guests, and it removes the stress from the shoe.
Pass three: clearance
Here the fail is dramatic. When Nadia steps backward in the opening phrase, her heel lands on the hem. The hem was set when she wore flat shoes at the first fitting, and the pumps with their block heel are slightly taller. They film the step with a phone at ankle height and send the clip to the seamstress.
The seamstress raises the hem by a small amount, adds a second anchor to the bustle and reminds them to bring the pumps to the final fitting. A new run shows the heel clearing the floor and the bustle holding. The pass is a watch at first, because a corner of the tulle still swings forward on a turn. After the seamstress trims the layer, the next three runs are clean.
Pass four: hold
Their hold has a problem that neither expected. In the pumps, Nadia is nearly Owen’s height, and the closed frame feels different. The tulle also keeps them slightly apart. With the instructor, they lower the hold of Nadia’s left hand and change the position of Owen’s right hand to sit slightly lower on her back, so the frame suits the new heights. The pass moves from watch to pass after two sessions.
Pass five: recovery
They run the drills. The stop signal works. The hem-catch drill reveals that Nadia lifts the skirt with her right hand, which is the hand Owen needs for the turn, so they decide that she lifts with her left. The restart at the second verse works. They also decide on a backup: a pair of low-heeled shoes under the family table and a signal to the coordinator to bring them if Nadia wants to swap after the dance begins.
The early exit is agreed too: if either of them calls a stop, they finish with a bow and the DJ fades the song. They run the recovery drills twice more, and all five passes now sit at pass in the full kit.
What the example shows
Three lessons stand out. First, the fixes came from different places: a sole layer, a choreography change, a hem adjustment, a hold change and a backup plan. None required changing the dance completely. Second, the venue’s answer (“nothing on the floor”) closed one door and made the shoe and choreography changes the whole answer.
Third, the log made each conversation specific. “The right foot sticks on the underarm turn” and “the heel lands on the hem on the first backward step” are details a professional can act on. Each change was tested again in the same first dance shoes before it counted.
If your own results are less tidy, that is normal. Some fixes take two rounds. Some passes stay at watch, and a watch with a simple backup can be a reasonable place to finish.
Alternatives when first dance shoes fail the test
A failed pass is not a reason to cancel the dance. It is a reason to choose the cheapest, most reliable change that makes the dance safe. The alternatives fall into five groups, and it helps to try them roughly in this order, from least to most disruptive. Most fixes cost far less than replacing first dance shoes.
Change the dance
The cheapest change is often to the choreography. Replace a spin with a half turn, shorten a step, remove a backward step, slow a turn by a beat or move a complex phrase to a moment where the music helps. A good instructor treats this as part of the job, and many couples end up preferring the simpler version. The dance stays yours, and the risk drops.
Change the way first dance shoes meet the floor
If your first dance shoes are nearly right, small changes may solve a grip problem: a different heel tip, a cobbler’s sole layer, a lower or wider heel, a strap that holds better or a different insole. Each of these is a new variable, so repeat the passes after any change. For anything glued, stuck or attached to the sole, confirm that it survives a full run and an evening of wear. Ask the shoemaker or a cobbler what works for your shoe, rather than relying on a general rule.
Change the first dance shoes
If first dance shoes fail repeatedly, change them. This is not a failure of planning. A different pair, a different sole or a different heel may be the best answer, and it is cheaper than a fall.
Check the return terms before you wear the shoe outdoors or on a hard floor, since some sellers do not accept returns on worn shoes, and custom pairs may not be returnable at all. Read the terms before you decide. For fashion questions such as color and hem pairing, the guides on this site about bridal shoes can help, but your rehearsal is the final test.
A common and practical option is to dance the first dance in a second pair. Many couples wear a pair for the ceremony and photographs and switch to a lower or more grippy pair for dancing. If you do this, rehearse in the second pair and check that the hem works with it, because a lower shoe means a longer visible hem or a hem that touches the floor.
Change the dress
If clearance fails, the fix may be in the garment. A hem adjustment, a bustle that holds higher, a shortened overskirt, a detachable train or a slip layer that reduces drag can all help. These fixes need a seamstress, so book them early, bring footage and bring the first dance shoes you will dance in. Give the seamstress your log, your footage and the exact shoes, and ask what can change in the time left.
If the outfit and the dance are fundamentally at odds, consider a planned change: a short dress for the reception, a removable overskirt or a different gown for the dance. These are bigger decisions that involve cost, so make them with a clear view of the results in your log.
Change the floor
The venue floor may not be changeable, but the spot often is. Dancing near the center of a permanent floor may be better than near an edge or a seam. A rented floor may be an option if the venue floor is poor, but that has its own cost and requirements, and the venue decides what goes on its floor. If the venue floor is wet or uneven at the planned time, move or delay the dance. Your coordinator can help with this.
Failure conditions and stop rules for first dance shoes
The most useful thing you can write before the first rehearsal is the list of things that will make you change the plan. A failure rule is a decision made while calm, so you do not have to make it while hoping. Write these on the same page as the log, and agree to them together.
Rules that apply to every pass
Some conditions are automatic fails, whatever else is going well.
- Any uncontrolled slip. If a foot leaves its intended spot and you could not stop it, the pass fails. A shaky recovery that looked fine on video still counts if it felt out of control.
- Any hem catch. A heel landing on the hem and pulling it, even once, fails the clearance pass, and you fix the cause before repeating.
- A part of the first dance shoes moves. A strap loosens, a heel tip shifts, a sole layer lifts or an insole slides during the run. Treat it as a fail until the fix is retested through a full evening of wear.
- Pain or a twinge. If a movement hurts, stop. Do not repeat it to see whether it goes away. If the problem persists, ask a qualified professional. No dance is worth an injury.
- Either partner says no. If one of you says you would not do this in front of guests, the pass is not a pass.
- The venue says no. If the venue refuses a rehearsal or a floor treatment you were counting on, the plan changes, and you work with what is allowed.
What to do after a fail
Use a simple escalation rule so a fail leads to a clear next step.
- First fail on a pass. Identify the cause, make the smallest change that addresses it, and repeat the pass. Log both the fail and the change.
- Second fail on the same pass after a change. The fix was not enough. Move one category up the alternatives list: if you changed the dance, now change how the first dance shoes meet the floor, and so on.
- Third fail, or a fail within two weeks of the wedding. Stop adding fixes. Simplify the dance, switch to the backup first dance shoes or shorten the piece, and rehearse the simplified version until it passes. A simple dance that passes is better than an ambitious dance that is still failing.
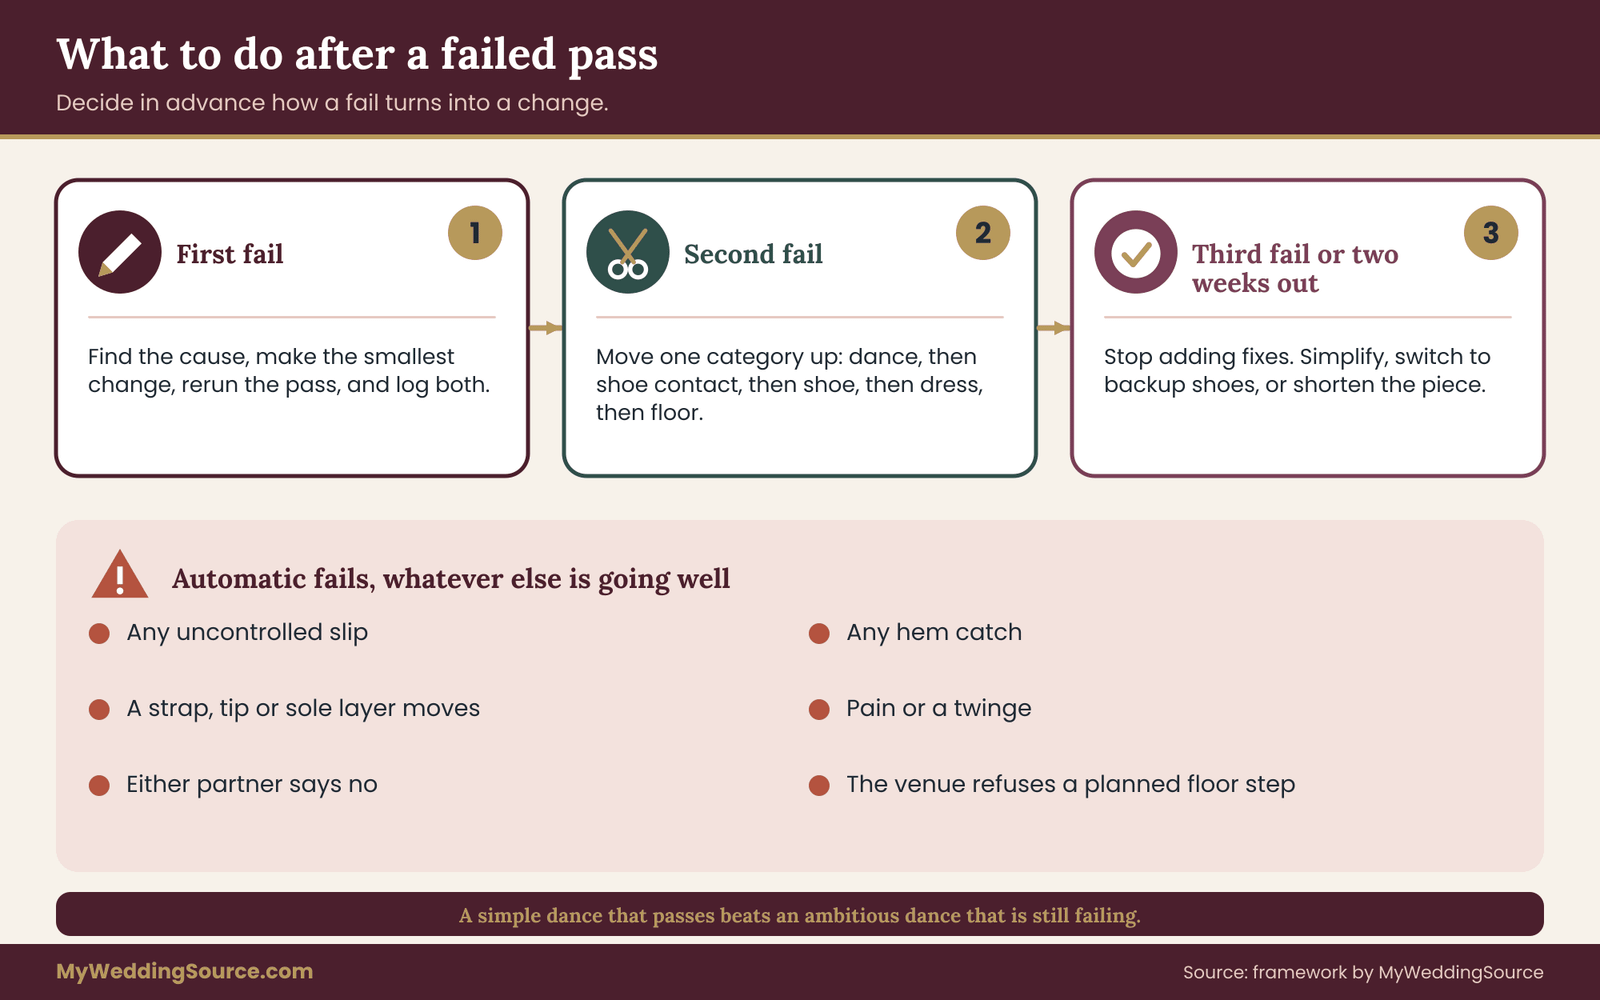
This rule prevents the most common trap, which is tinkering with one small fix after another while the date approaches.
The day-of version
On the wedding day, a short version of the test can run in minutes. Before the dance, check three things: the soles are clean and dry, the hem and bustle are secure, and the floor is clear. If any one fails, use the backup: swap shoes, ask your coordinator to fix the hem, or ask the venue to clear the floor. Say it plainly:
“Before we go out, can you check the floor in front of the DJ and bring our second pair of first dance shoes to the edge of the floor?”
A simple signal for the coordinator or the DJ is also worth agreeing in advance: if you stop and call for the early exit, the DJ fades the song and the room applauds.
Stop rules for the audience moment
Part of the pressure comes from being watched. The decision to stop is much easier if you have agreed that it is acceptable. A couple who pauses, laughs and restarts usually gets more warmth from guests than one who pushes through a bad moment. The only truly bad outcome is an injury or a damaged outfit, and the stop rule exists to prevent both.
When others join the dance
Parents, a wedding party or a group number add their own outfits and shoes. You do not need to run the five-pass test for every guest, but you can ask the following of anyone who joins:
- Wear shoes you can dance in, and tell the coordinator if you plan to dance in a different pair.
- Choose a hem that clears the floor, or hold it.
- Join only after the couple has finished their opening phrase, so the floor is not crowded when the first steps start.
- If you use a cane, walker or other aid, tell the couple and the coordinator in advance so the floor and the plan can include it.
For how people enter, cross and leave the floor, the planning guide on reception guest flow covers entry and exit paths, which matter when a skirt and a crowd share the same space.
Accessibility and adaptive choices
People have different bodies, shoes, mobility aids and comfort levels, and the dance can be adapted to all of them. A seated first dance, a slow sway, a shortened piece or a dance with a wheelchair or cane can all be as meaningful as a standard routine.
If your venue is subject to accessibility rules, the Americans with Disabilities Act pages at ada.gov explain the basics, and your venue can tell you how its floor, ramps and transitions work. A qualified instructor with adaptive experience can adjust the movement. Nothing in the five passes requires a particular kind of body, and the passes apply to any footwear, aid or movement style.
A final decision rule
If the dance passes all five passes in the full kit on a matching floor, you are ready. If a pass sits at watch, decide with your instructor whether a backup covers it. If a pass fails and the fix is not available in the time left, change the dance, not the odds. The goal is a first dance you enjoy and remember, with a safe margin underneath it.
Your next steps
- Write down your five pass rules and your three fail rules, and agree who calls the stop.
- Ask the venue what the dance floor is made of and what may be put on it, and ask for a short rehearsal if they allow one.
- Run the grip and pivot passes now in your real first dance shoes on the closest floor you can find, and log the results.
- Film the clearance pass at ankle height and take it to your seamstress while there is time to alter the hem or bustle.
- Choose your backup first dance shoes and your early-exit signal, and tell your coordinator.
- Repeat the full five-pass sequence in the full kit two to four weeks before the wedding, and simplify anything that still fails.
FAQ
Should I practice my first dance in my actual first dance shoes?
Yes, but in stages. Use flats or similar shoes while learning the steps, then switch to the real first dance shoes for the grip, pivot and clearance passes as soon as you can wear them without damaging them. Run the full test in the final shoes, hem and undergarments at least once, because a different heel height changes balance, step length and how far the hem travels.
How do I stop my first dance shoes from slipping on the dance floor?
Start by finding out what the floor is and what the venue allows, since you should not treat a venue floor without permission. Then test the sole in a grip pass. A cobbler or shoemaker can advise on a sole layer or a different heel tip. If nothing works, choose a different pair or simplify the steps that cause the slide.
Can my dress hem be too long for dancing?
Yes. A hem set for flat shoes can catch a heel once you wear heels, and a hem that touches the floor can be stepped on during backward steps and turns. Test clearance in the first dance shoes you will dance in, film the steps at ankle height and give the footage to your seamstress. A small adjustment or a better bustle often solves it.
How early should I start practicing in my first dance shoes?
Aim to have the real first dance shoes about two months before the wedding, so you can run provisional passes while changes are still possible. The dress hem and bustle usually need to be settled four to six weeks out. Plan the full five-pass run for the last two to four weeks, and avoid new add-ons or steps in the final fortnight.
Is it safe to use grip sprays or powders on the venue floor?
Do not apply anything to a venue floor without the venue’s approval. Some products damage finishes, leave residue or make the floor unsafe for other guests, and rental floors often come with terms about what is allowed. Ask what the venue recommends and what it forbids, and put your effort into the first dance shoes and the choreography if the answer is nothing.
What if I am dancing in a ballgown with a train?
Decide before rehearsing whether the train will be bustled, detached or carried, and test that version. A bustle that sags during movement brings back the clearance problem, so run it at full tempo and ask the maker to add support if it drifts. Hold and turn passes matter more with a large skirt, since it can keep partners apart.
Should I bring a second pair of first dance shoes?
For many couples, a second pair is the simplest backup. Rehearse in that pair too, because a lower heel changes the hem and the hold. Keep the pair somewhere your coordinator can fetch quickly, and agree on a signal. If you do not need them, you lose nothing, and if you do, the dance continues.
What if the venue will not let us rehearse on the dance floor?
Ask for a short supervised visit to test your first dance shoes on the surface, even without music. If that is not possible, ask for the floor’s material and finish, then rehearse on a similar surface, such as a studio with sealed hardwood. Label the result provisional, keep your fail rules and plan a simple dance with a backup pair of shoes.
Sources
- Americans with Disabilities Act information, U.S. Department of Justice: accessibility requirements and guidance for public venues and events.
- Occupational Safety and Health Administration: walking and working surface safety guidance, including slip and trip hazards.
- Centers for Disease Control and Prevention: general safety information on preventing falls.
- U.S. Consumer Product Safety Commission: consumer safety information on products, including footwear-related hazards and reporting.
- Federal Trade Commission: consumer protection guidance on return and refund practices for online purchases.
- National Floor Safety Institute: public information on floor surfaces and slip resistance.
- National Wood Flooring Association: guidance on wood floor finishes and care, useful when asking a venue about its floor.
- Health and Safety Executive, Great Britain: guidance on slips and trips on floor surfaces.
- USA Dance: the national organization for social and competitive ballroom dance, useful for finding instructors and studios.