
Bridal gloves look simple until the moment the officiant says “rings.” Then a tight satin cuff, a held bouquet and a ring finger that will not come free turn into thirty awkward seconds in front of everyone you love. This guide covers two things most glove advice skips: how to measure your hands so the bridal gloves actually fit, and how to plan the exact sequence in which a glove comes off for the ring exchange.
Measure five things on your dominant hand and your ring hand (knuckle width, hand length, middle finger length, wrist, and forearm if the glove goes past the wrist), then size to the larger hand. Decide the removal method before you buy: take the whole left glove off, open only the ring finger, or skip gloves during the ceremony. Write the sequence as six beats, hand off the bouquet first, and rehearse it twice with your real ring, in the real glove, at the temperature of the day.
A word on scope. This is general information about fit and ceremony logistics, not medical, legal or financial advice, and your seller, stylist or alterations professional knows your actual gloves better than any article does.
Most couples who wear bridal gloves choose them for the photograph. Long satin opera gloves with a strapless gown, short lace gloves with a vintage tea-length dress, a pair of fingerless lace mitts for a garden ceremony: all of these read beautifully from across a lawn. The trouble is that bridal gloves are a garment worn on the part of the body that does the most work in a ceremony. Hands hold the bouquet, take the ring, sign the license and wave to guests. Anything that interferes with those jobs will be noticed.
The good news is that the problems are predictable and the fixes are cheap. A glove that fits at the knuckle and the wrist rarely bunches. A glove with a planned removal sequence rarely causes a pause. The rest of this guide gives you a method for each, with worked numbers, a decision ladder for choosing how the glove comes off, and a list of questions to put to a seller or an alterations professional before you pay.
Why bridal gloves need a removal plan, not just a size
Shoppers usually treat bridal gloves as a sizing problem. Pick the length, match the ivory to the dress, order the size the chart suggests. That works for the walk down the aisle. It fails at the one moment of the ceremony where the left hand has to be bare, still, and quick.
Think about what the ring exchange asks of the glove. In many ceremonies, one partner holds the other partner’s left hand and slides a ring onto the ring finger. The finger has to be accessible. The hand has to be steady enough to be held. The glove has to be somewhere that is not the floor. And the whole thing has to happen in a space of perhaps a minute, with a bouquet, a train, a veil or a partner’s nervous hands in the way.
A removal plan answers four plain questions before the day arrives:
- Which glove comes off, and which stays on?
- At what point in the ceremony does it come off, and who is holding what at that moment?
- Where does the glove go once it is off?
- Does it go back on, and if so, when and how?
If you can answer all four in a sentence each, you have a plan. If you cannot, the bridal gloves are still a decision rather than a purchase. That is a perfectly good place to be three months out, and a poor place to be at the altar.
The sizing question and the removal question are connected, which is why this guide treats them together. A glove snug enough to look smooth from the back of the room is also a glove that resists being peeled off. A glove loose enough to slide off easily may wrinkle at the wrist and look unfinished in photographs. The right choice depends on the method you pick, and the method depends on the length, the fabric and the closure. You will see that chain again in the sections below.
What this guide leaves to other pages
Fit for the dress itself, including bodice, hem and sleeves, is a separate topic. The wedding dress fit and alterations guide covers fittings and timelines for the gown, and you will want its schedule in mind because gloves should be tried with the gown’s sleeve or strap finishing, not in isolation. Broader accessory choices, including how to avoid items that fight each other, sit in the wedding day accessories planning guide. Here the focus stays on the bridal gloves and the single minute where they matter most.
Who decides, and when
Gloves tend to arrive late in the process. The dress is chosen, the veil is chosen, and bridal gloves feel like a finishing touch added in the last two months. That timing causes most of the trouble.
Special-order gloves and bridal gloves that need a ring-finger modification can take weeks, and a glove you want to adjust may need a seamstress who is already busy with gowns. A reasonable target is to settle the glove length and removal method at about the same time you finalize the neckline or sleeve and the veil, then test the actual pair at a final dress fitting.
If two people are wearing gloves, the same logic applies to both. Some couples include a groom in formal white gloves for a military, ceremonial or period-themed wedding, and others have two brides in matching styles. Nothing in the sizing method changes. The removal sequence does, because the two people hold each other’s hands at once, and the plan needs to say whose glove comes off first.
Bridal gloves by length and what each does to the ring exchange
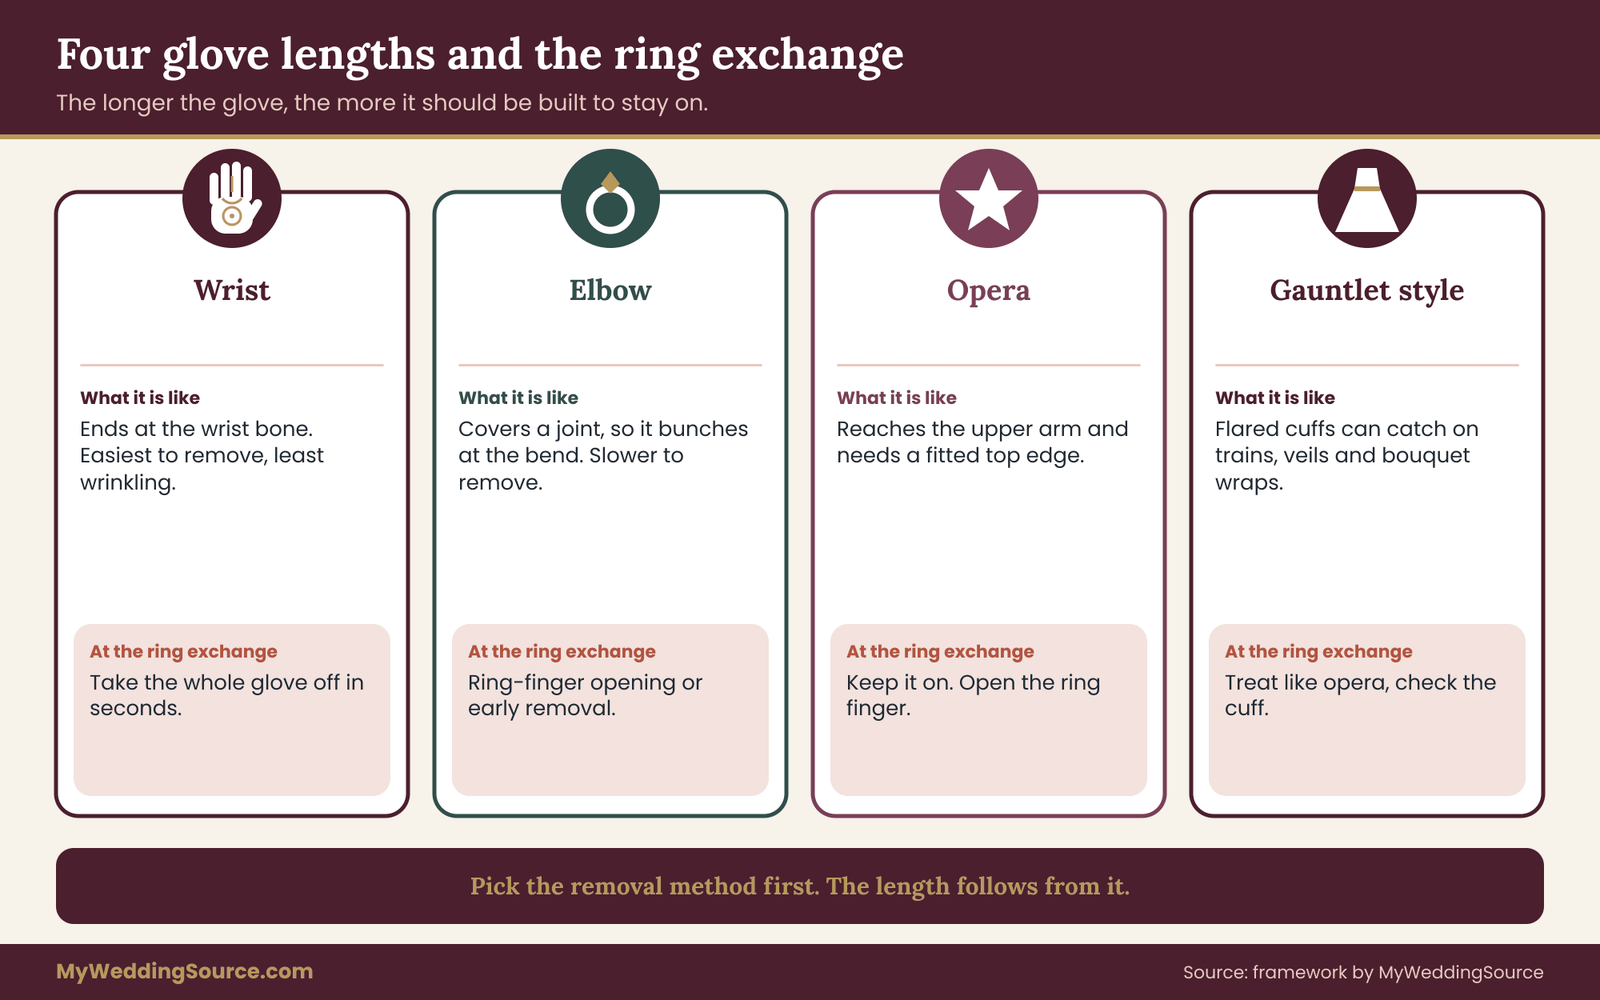
Length is the first design choice, and it carries most of the practical consequences. Retailers use somewhat different names, so check the actual measurement from the wrist crease or the finger base to the cuff opening rather than trusting a label. The four common lengths below behave quite differently when it is time to expose a ring finger.
Wrist length
A wrist-length glove, sometimes sold as a short or “bracelet” glove, ends near the wrist bone. It is the easiest length to remove and the least likely to wrinkle. The cuff stops before the forearm begins to widen, so there is little fabric to slide against. Many have a small button or snap opening at the inside of the wrist, which gives you a way to loosen the glove before peeling it.
For a ring exchange, wrist-length bridal gloves are the lowest-risk option. The glove can come off with a few seconds of work, and it can be tucked into a bouquet handle or a small pocket. The tradeoff is visual: a wrist-length glove can look like a lace mitten rather than a formal accessory, and it leaves the forearm bare, which suits some gowns and not others.
Elbow length
Elbow-length gloves end just below or at the bend of the arm. They are a popular middle path, and they are where most of the real difficulty begins. The glove now covers a joint, so the fabric has to stretch when the elbow bends and relax when it straightens. A glove that fits when your arm hangs straight can bunch badly at the inner elbow when you hold a bouquet at waist height.
Removing an elbow-length glove takes longer than removing a wrist-length one, because you have to unroll or draw down a longer tube of fabric, and the fabric tends to cling to skin. In a ceremony, this is the length where a ring-finger opening or a pull-through trick earns its place. We will compare these in the removal sections below.
Opera length
Opera gloves reach above the elbow, commonly to the mid-upper arm. They are the most dramatic option and the most demanding. They need a fitted upper edge that stays up without a tight band, which means the width at the top of the arm matters as much as the width at the knuckles. A glove that slips down the arm will pull the wrist section out of position and tug at the fingers.
Taking off a full opera glove during a ceremony is rarely a good idea. It can take longer than the whole exchange of rings, and it requires both hands. Couples who love the look usually keep the glove on and use a ring-finger opening, or they choose to remove the bridal gloves before the ceremony begins and wear them only for the processional and photographs.
Above-elbow and gauntlet styles
Some gloves extend higher or use a flared cuff, a gauntlet shape that widens above the wrist. These are mostly decorative. Treat them like opera gloves for planning purposes, and add one more check: a flared cuff is wider than the sleeve of many dresses and can catch on a train bustle, a bouquet wrapping or a veil comb.
How length shapes the decision
You can reduce the choice to one sentence of logic. The longer the glove, the more it should be designed to stay on, and the shorter the glove, the more it can be designed to come off. A couple who wants the full drama of long satin should plan on a ring-finger opening or a removal before the ceremony, and a couple who wants the ring exchange to feel unhurried should lean toward wrist length or fingerless styles.
There is also a quiet middle option that is easy to overlook.
It works like this: long bridal gloves for the processional and photographs only, removed during a short pause before the ring exchange while the officiant speaks, and put back on, or not, afterward. That pause can be as simple as the maid of honor holding the bouquet and a small pouch. It costs nothing but a line in the cue sheet, and the ceremony cue sheet guide shows how to give a moment like that a name and an owner so it does not get lost in the shuffle.
Fabric, closures and construction: what helps or hurts the ring finger
Two pairs of bridal gloves with the same listed length can behave in opposite ways. The difference is nearly always fabric and construction, and both are worth reading before you commit.
Stretch satin and stretch lace
Stretch satin is the common choice for long bridal gloves. The fibers give with the hand, so the glove can be cut closer to the arm. The cost is friction: smooth satin on skin that is slightly damp from nerves or warm air grips more than you expect. Stretch lace behaves differently. It has more open structure and breathes better, but the scalloped edges and appliqué can snag on a ring prong, a bracelet or a hairpin.
Whatever the fabric, check how much stretch there is at the cuff and at the finger bases. Gloves described as “stretch” can vary widely. A seller should be able to tell you whether the stretch runs across the glove, along its length, or both. If a seller cannot answer, treat that as information, and plan to test the pair in person or order from a shop that accepts returns on unworn gloves.
Leather, kid and non-stretch fabrics
Kid leather and other non-stretch materials are formal and durable, and they are the least forgiving. A non-stretch glove must be sized right at the knuckle and the finger length, because it will not adapt to a slightly larger hand on a warm day. Leather also holds a crease, which matters for photographs if you carry a bouquet for a long stretch. These are best for bridal gloves that stay on, or for short styles where removal is a quick tug, and they usually need a professional with leather experience for any alteration.
Closures at the wrist
Buttons, snaps, hooks or a zipper at the inner wrist change removal a great deal. A closure lets you open the cuff, which means the glove can come off without being dragged over the widest part of the hand. Look for these points:
- A button loop is easy to undo with one hand but can tangle in lace.
- A snap is quick but can pop open at the wrong time if the glove is stretched.
- A hidden zipper makes a smooth look and is fast to open, but a zipper pull can catch fine fabric.
- No closure at all means the glove has to be pulled off over the knuckles, so sizing at the knuckle is critical.
Fingerless gloves and mitts
Fingerless styles leave the fingers bare and cover the back of the hand and the wrist or forearm. They solve the ring exchange by construction, because the ring finger is already exposed. The usual issue is the thumb and finger loops, which can leave marks or pinch if cut too small. They also change the look: fingerless bridal gloves read as lace sleeves for the hand, not as the classic formal glove, and some people love that and some do not.
Ring-finger openings
A ring-finger opening is a small slit or an unpicked seam at the tip or the side of the ring finger. The finger slides out of the glove while the rest of the glove stays in place. Some commercial gloves are made with a stitched-closed opening that you open by hand, and some are modified by an alterations professional.
Do not cut a glove yourself on the morning of the wedding. A cut in stretch fabric can run, and a cut in lace can unravel. If you want this feature, ask an alterations professional to open and finish the edge, ideally with a small stitched binding. A short test pair or a spare glove is a smart place to try the idea first.
Elastic, latex and metal parts
Some gloves use elastic bands at the cuff, and some elastics contain natural rubber latex. The U.S. Food and Drug Administration explains latex allergy on its consumer pages, and the American Academy of Dermatology describes contact dermatitis, a skin reaction to an irritating or allergenic material.
If you or someone close to you has reacted to latex, nickel or dyes in the past, ask the seller what the cuff elastic is made from and what the snaps are plated with. Nothing here is a medical judgment. It is simply a reason to ask a question while you can still change the order.
Care labels and what they tell you
Bridal gloves are often delicate. In the United States, the Federal Trade Commission’s Care Labeling Rule requires manufacturers of most textile clothing to attach care instructions, and a glove sold as clothing should carry a label or tag you can read. Keep the label. If a seller’s listing says dry clean only, assume that a spill or a smear of foundation will cost you a cleaning bill, and plan a cover for the cuff during hair and makeup.
The five-point measurement method for bridal gloves
Size charts for bridal gloves come in two flavors: a letter or number tied to a brand, and a set of body measurements. The second is more useful, and it is what you will be matching against. Measure on a day when your hands are neither cold nor swollen, and measure both hands, because the ring hand is often slightly different from the other. Use a soft tape measure, or a strip of paper you can lay along a ruler afterward.
Point one: the knuckle width
Wrap the tape around the widest part of your palm, just below the four finger bases, with the thumb tucked out of the way. Do not pull the tape tight. This number, called the palm or knuckle circumference, drives most size charts. Make a note of it in both inches and centimeters if you can, because brands list it differently.
The tape should rest flat and slightly snug. If you press hard enough to indent the skin you will order a glove too small, and a too-small glove is the single most common cause of stuck fingers.
Point two: the hand length
Measure from the crease at the base of your palm, where the wrist meets the hand, to the tip of the middle finger. Hold the hand flat and fingers together. This is the length that determines whether the fingertips of the glove fall short, which looks like an empty tip, or sit too long, which looks like a flop of loose fabric. Many fits fail here more often than at the knuckle.
Point three: the middle finger length
Measure from the crotch between the middle and ring fingers to the tip of the middle finger. This number helps with brands that cut fingers separately, and it matters especially for the ring finger. The ring finger is not always the same length as the finger beside it, and the glove’s ring finger should end where your fingertip does, not past it.
Point four: the wrist circumference
Wrap the tape around the narrowest part of the wrist, just above the bone. For short bridal gloves, this number is often the deciding factor, because a snug wrist keeps the cuff in place. For gloves with a closure, you can choose a slightly smaller wrist and open the closure to get the hand through. For gloves without a closure, the wrist must be wide enough to pass the knuckles.
Point five: the forearm and upper-arm measurements
If your glove goes past the wrist, you need the circumference at the widest part of the forearm, usually a few inches below the elbow. For opera length, add the circumference at the point where the glove will end, and the length from the wrist crease to that point. Measure with the arm relaxed, and then once with the arm bent, because the bent measurement shows you how much the glove needs to stretch at the elbow.

Reading the chart without guessing
Once you have the five numbers, match them to the seller’s chart. A few plain rules help:
- Size to the larger of your two hands, since you can tighten a loose glove with a seamstress more easily than you can enlarge a small one.
- If you fall between sizes at the knuckle, choose the larger size when the glove has no closure, and the smaller when it does.
- If the chart lists only a single number for the whole glove, ask the seller for the underlying measurements. A good seller can supply them. A seller who cannot is selling by label, and you should have a return plan.
- Convert units carefully. The National Institute of Standards and Technology publishes conversion references for inches and centimeters, and a one-centimeter error at the knuckle is the difference between a glove that fits and one that does not.
Test the ring while you measure
The ring is part of the measurement. Put your actual wedding band or a stand-in of the same width on the ring finger and measure the knuckle of that finger again. The glove’s ring finger must pass over the ring when you put the glove on, or it must open away from the ring, and you need to know which one before the day. If the ring is not yet purchased, ask the jeweler for its width and approximate thickness and use a spare band of the same size for the glove tests.
Some couples also exchange rings that are heavier or wider than a plain band, such as a ring with raised stones. A glove that slides smoothly over a smooth band can catch on stones. If your ring has a raised setting, say so when you ask a seller or seamstress about the ring-finger plan.
Measuring at the right time of day
Hands vary across a day. They are often fuller in the evening, after heat or a salty meal, and slightly smaller after being cool. If your ceremony is at midday in summer, measure and test at midday in warm conditions. The measurement that matches your ceremony conditions is more useful than a precise number taken at a random hour. If you have any medical reason to expect swelling, such as a condition that affects your hands, ask your own clinician for guidance. This guide cannot give that.
One more habit is worth building here. Keep your measurements, the seller’s chart and a photograph of the tape on your hand in a single note. When bridal gloves arrive and feel wrong, that note tells you whether the problem is the size, the fabric or your own numbers, and it makes any exchange conversation with a seller short and factual. Bridal gloves that are returned with a clear note are exchanged more smoothly than ones returned with a vague complaint.
Matching bridal gloves to the sleeve, the bouquet and the hair
Gloves do not live alone. They meet a sleeve edge, a bouquet handle, a veil and a hairstyle, and each of those meetings can go well or badly. Check the three that cause the most trouble before you finalize.
Where the glove meets the dress
With a strapless or sleeveless gown, an opera glove can end at the upper arm with nothing to cover the join. The top edge shows, and a band that digs in will leave a line visible in photographs. With a short or three-quarter sleeve, a long glove tucks under the sleeve hem, and the question becomes whether the glove’s fabric slides against the sleeve’s inside. Lace on lace can catch.
Bring the glove to a fitting and put it on with the dress. Raise the arms. Hold a stand-in bouquet at waist height and at chest height. Watch whether the glove creeps down, whether the sleeve rides up, and whether a visible gap appears. If you are working with alterations for the gown, the wedding dress fit and alterations guide explains how fittings are usually scheduled, and a glove test belongs at the last of them, once hems and sleeves are final.
Where the glove meets the bouquet
A bouquet handle is a wet, wrapped bundle of stems, and a glove has a surface that can snag on ribbon, wire, pearl pins and rough stem ends. Satin gloves also pick up pollen, floral dye and water, which can leave a stain. Ask your florist what the handle is wrapped in, whether any pins are exposed, and whether the bouquet can be built with a smoother collar or a wrap that sits where your fingers will hold it.
Two practical habits help. First, hold the bouquet with the hand that will not be removed from its glove, which is usually the right hand if the ring goes on the left. Second, give the bouquet a clear place to go when the left hand has to be free. That can be the maid of honor, the other partner’s hand, or a stand beside the arch. The plan is not complicated, but it must be named, and the ceremony cue sheet guide is a good place to write it down with an owner.
Where the glove meets the veil and hair
A veil attached with a comb can catch on a glove’s scalloped edge when you lift your hand to adjust it. If you tend to touch your hair when nervous, practice not doing that, or pin the veil more firmly. Similarly, a hair accessory with wire or small teeth can pull at lace. Ask the hairstylist to do a trial with the bridal gloves on, so you can see how the hands move around the hair, and the bridal hair and makeup planning guide gives a schedule for trials that leaves room for this.
Makeup deserves a mention. Foundation, self-tanner and bronzer can transfer to satin. Ask your makeup artist to finish the arms and hands before you put the bridal gloves on, and keep a spare cuff cover or a clean tissue between the glove and the neckline for touch-ups.
The six-beat glove removal sequence for the ring exchange
This is the core of the article, and it is the part you can copy straight into your ceremony notes. The sequence is built from six beats. Each has a trigger, an owner and a place for the glove. Beats three and four are the ones that most often get skipped, and they are the ones that cause the pause.
Beat one: set the trigger
Pick a spoken or visible cue for beginning to remove the glove. Do not rely on the officiant saying “rings.” By then the moment has arrived. A better trigger is earlier: the end of the vows, the end of a reading, or the line right before the exchange. The trigger gives you ten to fifteen seconds of lead time, which is what even a wrist glove needs when your hands are nervous.
Tell the officiant what the trigger is. A short phrase such as “We will take a moment while the rings are prepared” gives you a graceful cover and costs the officiant nothing. Your officiant may have wording of their own, and the wedding officiant requirements page is a useful reference if you are still deciding who will lead the ceremony.
Beat two: hand off the bouquet
Before touching the glove, free the hands. The maid of honor, the flower girl’s parent, a bridesmaid or your partner takes the bouquet. If there is no one, a small stand or a bouquet holder hooked to the arch can do the job. This beat takes about three seconds, but without it every later beat takes twice as long.
Decide which hand hands the bouquet over and which hand takes it back. Many people hold the bouquet in the right hand and keep the left free for the ring. If your bridal gloves are removed from the left hand, that arrangement keeps the left hand empty.
Beat three: open the closure or loosen the cuff
Before pulling, release whatever holds the glove. Undo the wrist button, the snap or the hook, and roll the cuff back a short distance. If the glove has no closure, loosen the cuff by pulling a little fabric away from the wrist, so air gets under it. This beat is a reset, and it matters because the usual failure is tugging a glove that is still gripping the wrist.
For a ring-finger opening, this beat is where you open the slit, using your thumb and the pad of the middle finger to hold the edge. If the opening is stitched closed, you will need a stitch ripper or a designed pull tab, and that should be worked out in advance. Do not improvise a pair of scissors at the altar.
Beat four: free the fingers first, then the hand
The standard method is to take hold of the fingertips of the glove one at a time and ease each fingertip loose, finishing with the ring finger, and then to peel the glove down from the cuff and over the knuckles. This order is gentler on the fabric and on the fingers, because the fingers come out of their sleeves before the knuckle is dragged through the narrow part of the glove.
If you are using a ring-finger opening, only the ring finger comes out, and the rest of the glove stays on. This takes only a few seconds and leaves a clean look. If you are removing a full glove, expect fifteen to thirty seconds for an elbow length, and less for a wrist length, in a calm rehearsal. The times in a real ceremony will be longer, so build in room.
Beat five: park the glove
A glove that is off still needs a destination. Options include a small pouch held by the maid of honor, a pocket stitched inside the dress, a bouquet handle, or a pocket in your partner’s jacket. Do not let it fall to the floor, where a train or a heel can crush it, and do not stuff it into the bouquet where it may soak up water. A folded glove in a clean pouch is a small thing that nobody will notice and a very good habit.
Tell the person who receives the glove what they are receiving and what happens next. “You will get my left glove after the vows. It stays with you until the recessional” is a complete instruction.
Beat six: re-glove, or decide to stay bare
After the rings, you have two choices. You can put the glove back on, which takes time and fumbling, or you can leave the left hand bare for the signing and recessional. Many people pick the second option, since the ring now shows and the photographs of the ring are a reason in themselves. If you do put the glove on again, schedule the moment, and expect it to be slower than the removal because a glove goes on less easily over a ring.
If you choose to stay bare, check that the bare hand and the gloved hand look reasonable together in photographs. Some people prefer to remove both gloves at the same time after the ceremony. That is a style choice, and it should be a decided one, not an accident.

Adding the sequence to the cue sheet
Write each beat in one line, with a name beside it. A cue sheet entry might read: “After the second reading: Maya hands the bouquet to Priya, opens the left cuff, removes the left glove, hands it to Priya. Rings follow.” That is all it takes. Share it with the officiant, the person who holds the bouquet and the photographer, so that no one is surprised.
If you are not using a formal cue sheet, a card in the officiant’s folder with three bullet points does the same work. The point is that the sequence exists outside your head, because on the day your head will be busy.
In short, bridal gloves are easy to wear for ten minutes and hard to manage for one. The six beats exist to protect that one minute. If you remember only two of them, make them the handoff of the bouquet and the place for the glove, because bridal gloves that have nowhere to go cause more delay than any other detail.
A decision ladder for choosing how your bridal gloves come off
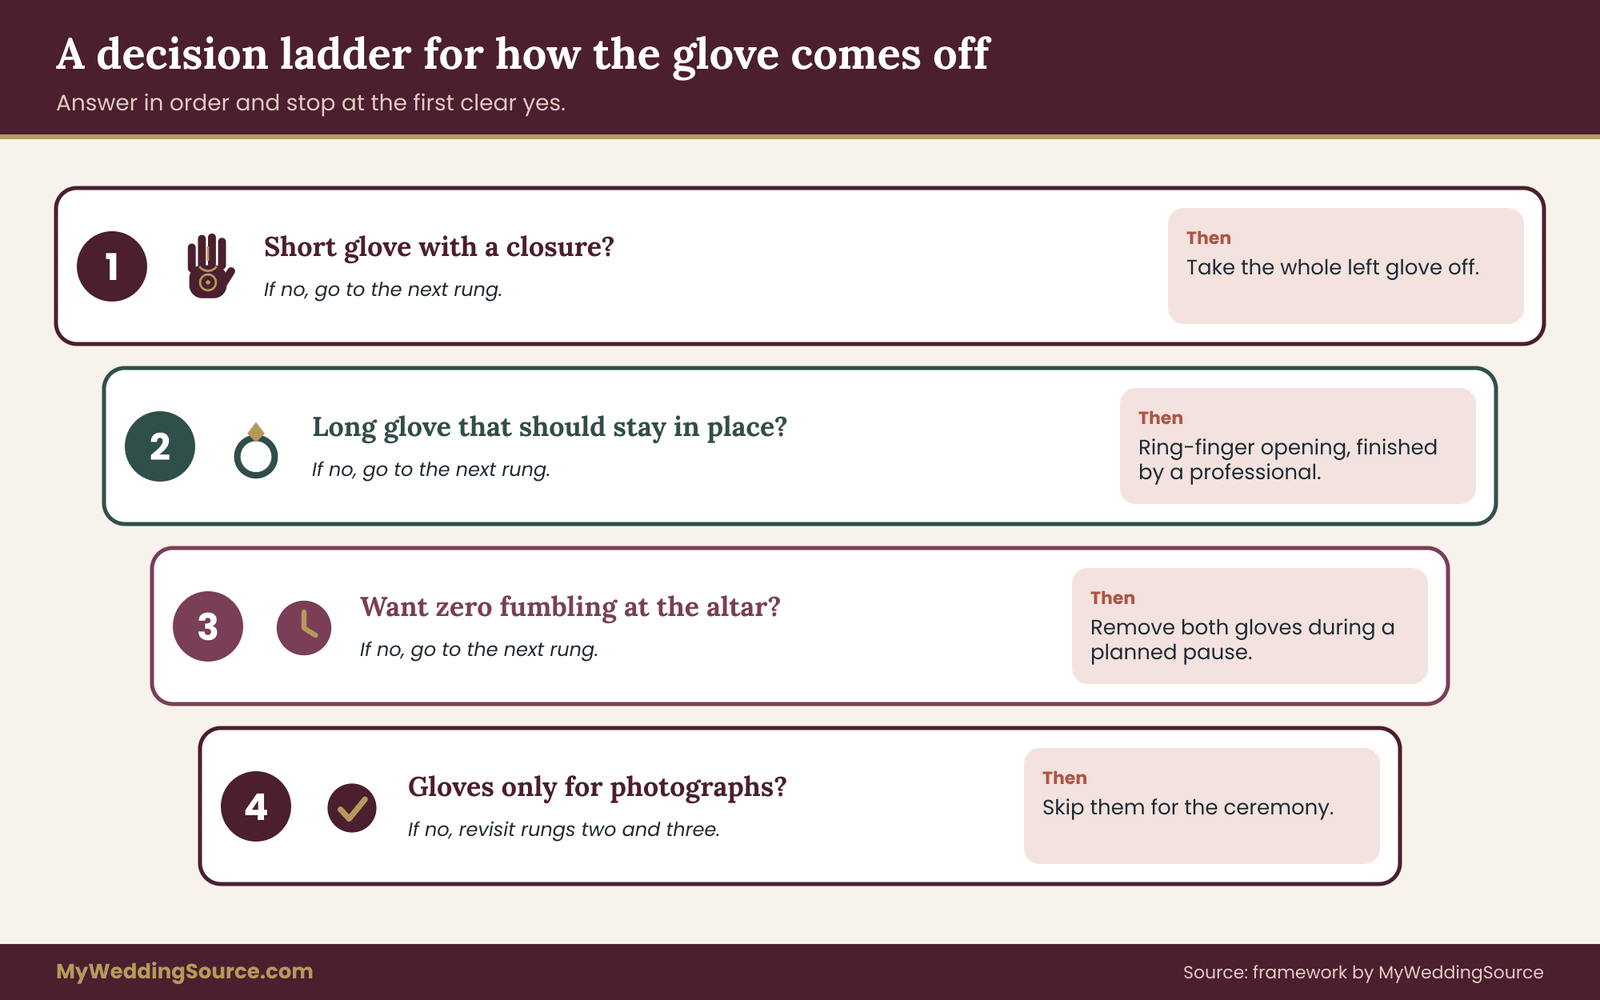
There are four workable methods, and the right one depends on length, fabric, closure and comfort. The ladder below asks four questions in order. Answer each honestly and stop at the first rung that gives you a clear answer.
Rung one: is the glove short, with a closure?
If your bridal gloves end at the wrist and have a button, snap or hook, take the whole left glove off. It is the quickest option, it leaves the hand fully bare, and the removal is easy to rehearse. A short glove with a closure needs the least planning of any style, and it is a good default when you are unsure. Stop here if both answers are yes.
Rung two: is the glove long, and does it need to stay in place?
If the glove is elbow length or longer and you want the look to stay intact, choose a ring-finger opening. The ring finger comes out, the rest of the glove stays, and the ring goes on a bare finger. This is also the best choice if your bridal gloves have no closure, because it avoids dragging a long tube of satin over the knuckle in front of a crowd.
The tradeoff is the finish. A neatly finished opening looks like a design feature, and a poorly finished one looks like damage. Ask an alterations professional to bind the edge, and test the opening with the actual ring while you are there.
Rung three: do you want to avoid any ceremony fumbling at all?
If you or your partner dislike the idea of a visible task during the ring exchange, choose a pre-ceremony removal. You wear the bridal gloves in the processional, perhaps for the first portion of the ceremony, and hand both to a helper during a planned pause, such as a reading or a song. By the time the rings come, your hands are bare and you are free to focus. The bridal gloves can return for photographs afterward.
This option shortens the visible glove time but gives the strongest peace of mind. It is also the best choice for anyone with sweaty hands, anxiety or a rehearsal that went badly.
Rung four: is the glove just for photographs?
If the bridal gloves are mainly a photographic accessory, you can skip them for the ceremony altogether. Wear them for the getting-ready photographs, the portraits before the ceremony, and the reception entrance. Take them off before the processional, or leave them in a bag with a helper. This is the lowest-risk plan, and it works well for hot venues and long ceremonies.
The cost is that you might not appear in ceremony photographs with the bridal gloves at all. If those photographs matter to you, tell your photographer your plan and discuss which moments will show the bridal gloves. The wedding family photo list is a useful reference for sorting which portraits happen where and whether the bridal gloves are in or out of each one.
Comparing the four methods in prose
Putting the four methods side by side clarifies the tradeoffs without a chart.
Whole-glove removal is the simplest, and it works best on short bridal gloves with a closure. It needs the bouquet handed off and a place to park the glove. The risk is the time it takes if the glove clings.
The ring-finger opening keeps the glove in place and looks the most polished when done well. It needs preparation by an alterations professional and a test with the ring. The risk is a visible or fraying edge and a glove that is slightly harder to put on afterward.
Pre-ceremony removal gives the calmest ring exchange. It needs a planned pause and a helper. The risk is that the bridal gloves do not appear in the ceremony photographs and the pause can feel awkward if it is not named in advance.
Photographs only is the lowest-risk plan, with no removal at all during the ceremony. The risk is purely aesthetic, since the bridal gloves are present for fewer moments.
None of these is the right answer for everyone. A couple holding a short outdoor ceremony in cool weather might prefer a long glove with an opening. A couple in a hot, humid venue might prefer a pre-ceremony removal. A couple holding a courthouse ceremony, where time is tight and the room is small, might skip the bridal gloves entirely.
Edge cases that change the answer
Several circumstances push the choice in one direction:
- A ring that is heavy, wide or raised. A ring with stones can catch on fabric, which favors a full removal or a pre-ceremony removal over a narrow opening.
- A bouquet that is large or hard to hand off. If the handoff is a problem, choose a method that needs less free hand time, such as a ring-finger opening, or simplify the bouquet.
- A tight schedule. If the ceremony is brief, the sixty seconds you spend on a glove may be a larger share of the whole. A pre-ceremony removal keeps the ceremony on pace.
- Anxiety or tremor. If your hands tend to shake, avoid options that require fine motor work in public. Ask a helper to assist, or remove the bridal gloves earlier. If you have a medical reason for tremor or reduced hand function, adapt the plan to what is comfortable for you.
- Two sets of bridal gloves. If both people wear gloves, decide whose comes off first, and keep each partner’s helper separate to avoid a tangle of pouches.
Worked example: Maya and Jordan plan one ceremony
The numbers below are invented for illustration. They show how the method works, and they are not averages or recommendations for any real hand.
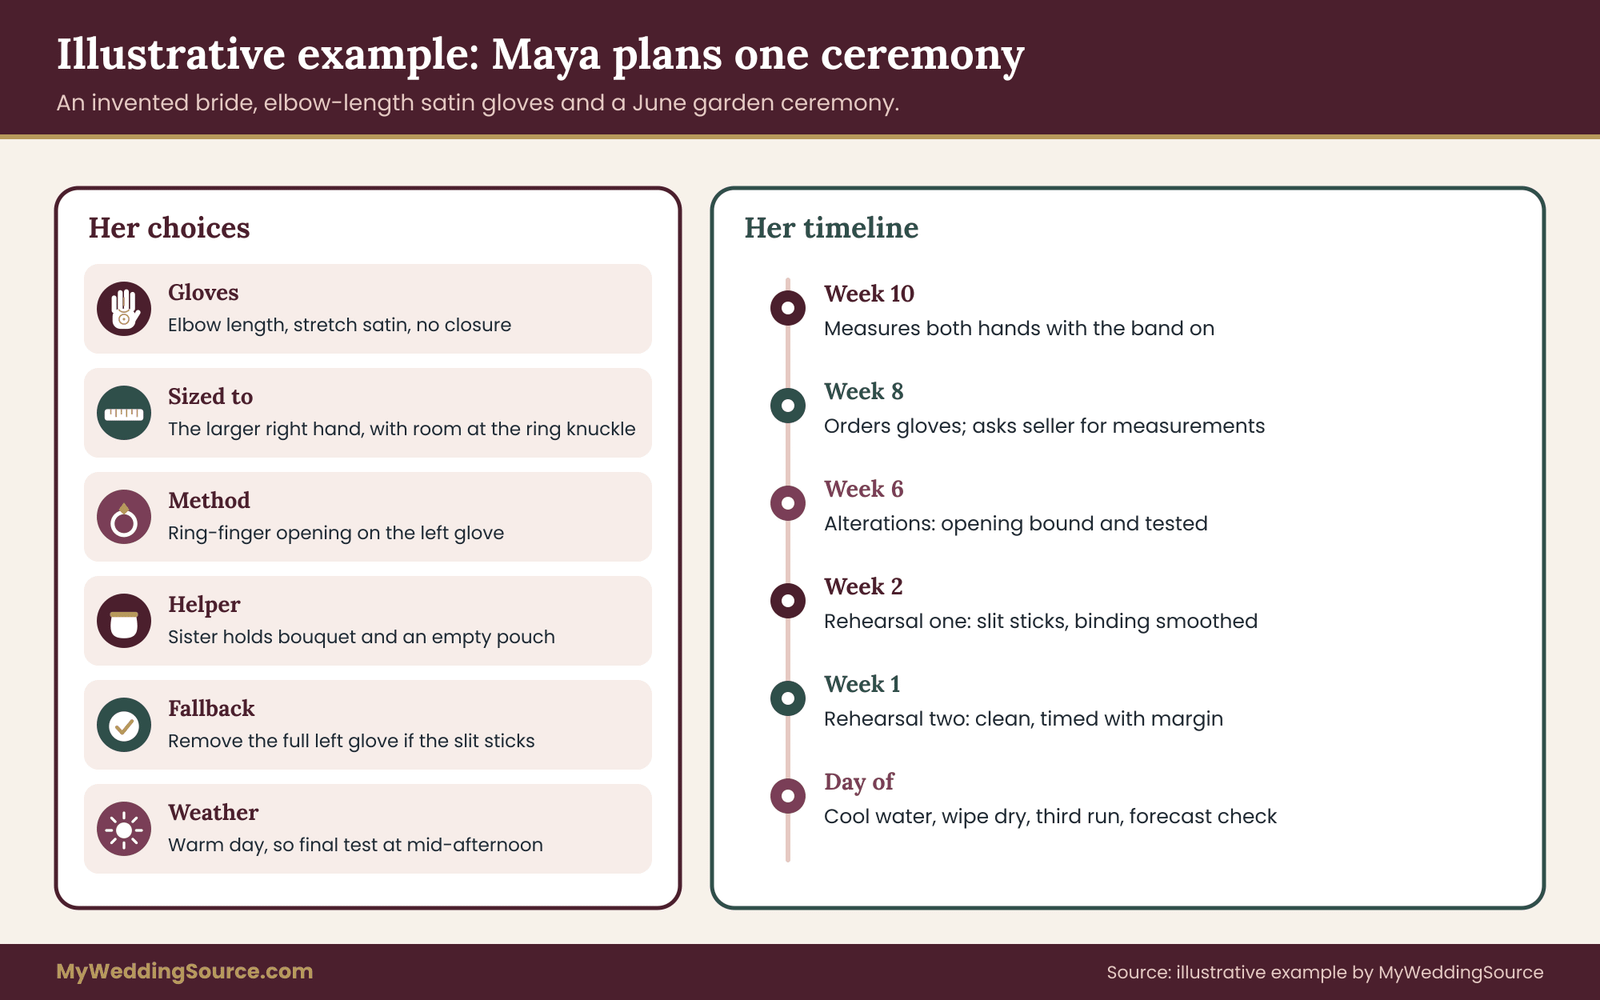
Maya is planning a late-afternoon ceremony in early June in a garden. She has chosen a strapless satin gown and elbow-length stretch satin bridal gloves with no closure. She plans to hold a medium bouquet in her right hand. Her partner, Jordan, will place a plain gold band on her left ring finger.
Step one: measurement
On a calm morning, Maya measures both hands. Her right hand is a little larger than her left, so she records both. Her knuckle circumference is a little larger on the right, her hand length is the same on both sides, and her wrist is slightly broader on the right. She notes the ring finger’s knuckle with the band on, and she finds that the band passes the knuckle easily but sits snug on a warm day.
She sizes to the right hand, the larger one, and adds a note: “Ring finger needs room at the knuckle.” She picks the size that matches the larger knuckle circumference and plans to ask the seller about the finger length.
Step two: choosing the method
Maya climbs the decision ladder. Her gloves are long, so rung one gives a no. Rung two applies because the glove is elbow length and she wants the look to stay intact. She asks an alterations professional to open and bind the ring finger of the left glove, and to test the opening with the band at the fitting.
Step three: writing the sequence
Maya writes six beats on a card. The trigger is the last line of the second reading. Her sister, Priya, takes the bouquet. Maya opens the ring-finger slit with her thumb, frees the ring finger, and Jordan places the band. Maya returns the finger to the glove, or leaves it out, depending on how she feels, and takes the bouquet back at the signing.
Priya holds a pouch that is empty because no glove is removed, which is a useful insurance policy: if the opening does not work, Maya can still remove the full left glove and place it in the pouch.
Step four: rehearsal and weather
At a rehearsal, Maya practices twice with the real band and the real glove. The first run takes longer than expected because the opening sticks. The alterations professional smooths the binding. The second run is clean. On the wedding day, the forecast is warm, so Maya moves her final glove test to mid-afternoon, and finds that the knuckle is snugger than in the morning. She holds her hands under cool water for a minute before the ceremony and confirms that the glove still opens.
What the example shows
The example is small on purpose. It shows that measuring, choosing a method and writing a sequence are three separate jobs, and that none takes more than an hour. The surprises, such as a sticky opening and a snug afternoon knuckle, appear only because Maya tested in conditions that matched the day. The plan stayed simple, and it had a fallback.
If you are still torn after the four rungs, pick the method that asks the least of your hands on the day and give up a little polish. Bridal gloves are an accessory, and the ring exchange is the event. A plan that protects the event is almost always the better plan for bridal gloves of any length.
Questions to ask the seller and the alterations professional about bridal gloves
Most glove problems can be caught with a handful of plain questions asked before payment. They fall into two groups: what the seller can tell you about the product, and what an alterations professional can promise about changes. Keep the answers in writing, even if only in an email thread, so that you can refer back to them.
Questions for the seller
Ask these before you order, and ask them again when the bridal gloves arrive:
- What are the exact measurements of this size: knuckle circumference, hand length, finger length, wrist and total length? A label such as “medium” is not enough.
- How much does the fabric stretch, and in which direction?
- What is the closure, if any, and what is it made of?
- What is the cuff elastic made from, and do any parts contain latex or nickel?
- Are the fingertips sewn, bonded or hand-finished, and can a finger be opened without unraveling?
- What are the care instructions on the label, and does the seller agree with them?
- What is the return or exchange policy for bridal gloves that have been tried on but not worn outside?
- How long does delivery take, and is there a date after which a special order cannot be changed?
The Federal Trade Commission publishes guidance on how return and refund promises should be presented to shoppers, and if a seller’s terms are vague, ask for them in writing. For an online order, save the product page and the policy page on the day you buy, since policies can change.
If the seller is a bridal salon rather than a general retailer, the questions are the same, but you may also be able to try the glove with the dress. Take the offer. A glove tested against the gown’s actual fabric tells you more than any chart.
Questions for the alterations professional
Alterations for bridal gloves are a niche skill. Not every seamstress will take them on, and some will only work with certain fabrics. Ask these before you commit:
- Have you opened and finished a ring finger on a glove of this material before?
- How will you finish the edge, and will it hold up to being opened and closed several times?
- Can I see a sample, or a photograph of similar work?
- How long will the work take, and when is the last date you can accept it before my wedding?
- What is the price, and does it change if the glove needs more than one adjustment?
- If the glove is damaged in the process, who is responsible, and can I buy a spare pair for testing?
A spare pair is worth considering for a glove that will be altered. A professional can practice on the spare and apply the best technique to the pair you will wear. Even if the spare costs more up front, it protects against a ruined glove close to the wedding. This is cost logic, not a prediction of damage, and whether it is worth it depends on the price of the bridal gloves.
Questions for the photographer and the officiant
Gloves affect two other people on the day. Your photographer needs to know whether the ring exchange will include a visible pause, since a glove being removed is often an appealing candid moment, and some couples would rather skip it. Tell the photographer which hand will be bare and when. If you want a photograph of the ring being placed, the photographer needs the left hand to be clear and well lit, and your plan should allow that.
The officiant needs the trigger, a line to cover the pause, and an understanding that the ring exchange may take a few extra seconds. If a family tradition or a religious custom shapes the ring exchange, confirm with the officiant how that fits with your glove plan, and ask your own community leader if there are customs about the hands or about covering them.
A short written agreement
When a seller or professional agrees to something specific, such as opening the ring finger by a given date or accepting a return of tried-on gloves, put it in a short email: “To confirm, you will open and bind the left ring finger of the ivory elbow-length bridal gloves by the fifth of May for a charge of the agreed amount.” The wedding vendor contract guide explains why written terms matter for any vendor, and the same habit applies to a small alterations job.
Rehearsing the glove sequence so it works on the day
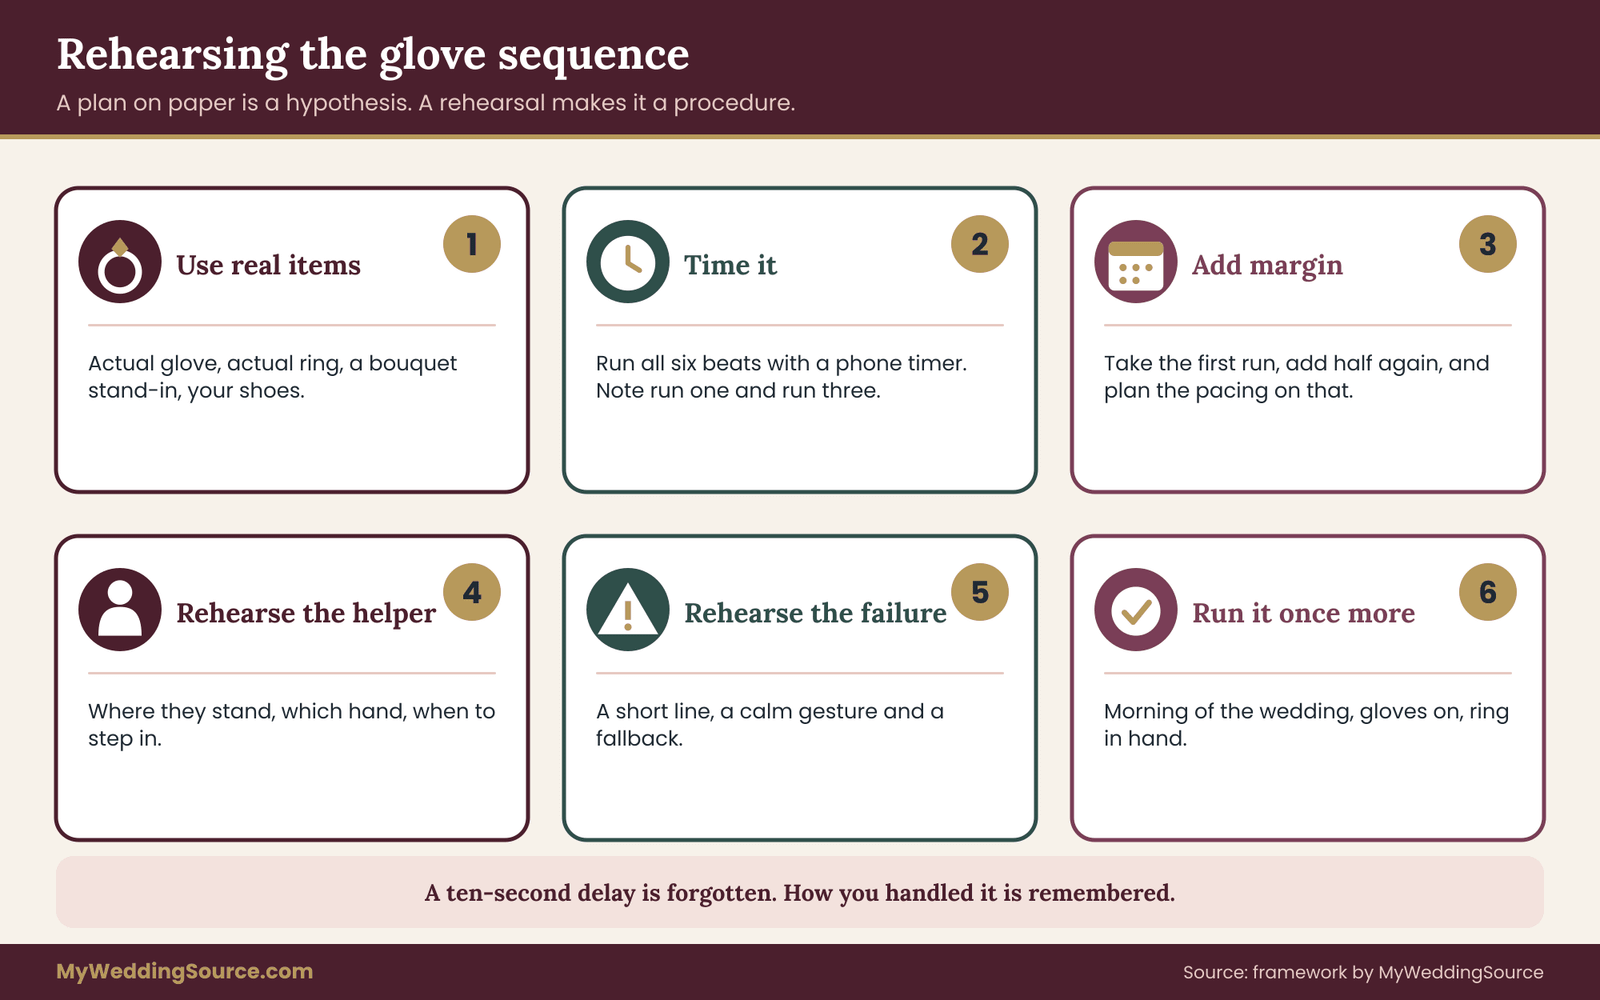
A plan on paper is a hypothesis. A rehearsal turns it into a procedure. The good news is that glove rehearsal is short and can be done at home, with a few ground rules.
Rehearse with the real items
Use the actual glove, the actual ring, and a stand-in for the bouquet that has the same weight and handle. A tote bag will not behave like a bouquet, but a bundle of silk flowers wrapped in ribbon is a fair substitute. Practice in the shoes you will wear, because standing on heels changes how you hold your arms and how easily you lean to hand things off.
If the real ring is not yet available, use a ring of the same width and similar thickness. A plain brass or steel band from a craft store is acceptable for fit tests, as long as you remove it and clean the glove afterward.
Time it, and add margin
Run the six beats from trigger to re-glove or bare hand, and time each one with a phone. Note the total time on the first run, and again on the third. Most people get faster, and the first run is a good picture of what happens under stress. Take the first run’s total, add half again, and treat that as the time the sequence will really take. If that number is too long for the ceremony’s pacing, simplify the method.
Rehearse the helper’s part too
The helper holds the bouquet and the pouch, and the helper needs to rehearse as well. Walk through the moment with them. Where do they stand? Which hand do they use? Do they know when to step forward and when to step back? A helper who is surprised will hesitate, and the hesitation will be seen.
If the person who holds the bouquet is also holding a baby, a train or a phone, simplify. A single, clear job is easiest to do well.
Rehearse the failure
Practice what happens if the glove sticks. The answer should be a short line and a calm hand gesture, such as “Give me a second” or a small laugh, and a fallback: the helper steps in, or the partner waits, or the officiant continues. Few guests will remember a ten-second delay. They will remember how you handled it. A couple who has agreed in advance that a stuck glove is a funny moment, not a crisis, will move through it easily.
The rehearsal checklist in sentences
Before you leave the rehearsal, you should be able to say: which hand, which beat, who holds what, where the glove goes, and what happens if it sticks. If any of those answers is vague, run the sequence once more with that gap in mind. A final run on the morning of the wedding, with the bridal gloves on and the ring in hand, costs two minutes and removes most of the day-of risk.
What the walk-through usually reveals
Rehearsals tend to expose a small number of recurring issues. The glove is tighter than expected because the hands were cold when measured. The opening catches on the ring’s setting. The helper does not know which hand to approach. The bouquet is heavier than the stand-in. The glove needs a button hook that no one packed.
Each of these is a ten-minute fix when you find it a week ahead, and a ten-second problem when you find it at the altar. Keep a short list of what you changed after each run, and share the revised plan with the people involved.
Keep a folder, paper or digital, with the seller’s answers, the alterations quote and your own written sequence. If anyone helps on the day, show them the folder. A short record of how your bridal gloves were measured, altered and rehearsed is also useful if you later want to resell or reuse them.
Heat, cold, nerves and other conditions that change how bridal gloves behave
A glove that works in a showroom can fail in the real world. The conditions that matter most are temperature, humidity, hand swelling and anxiety. None of them needs medical talk. They need a few honest tests and a few small supplies.
Warm and humid ceremonies
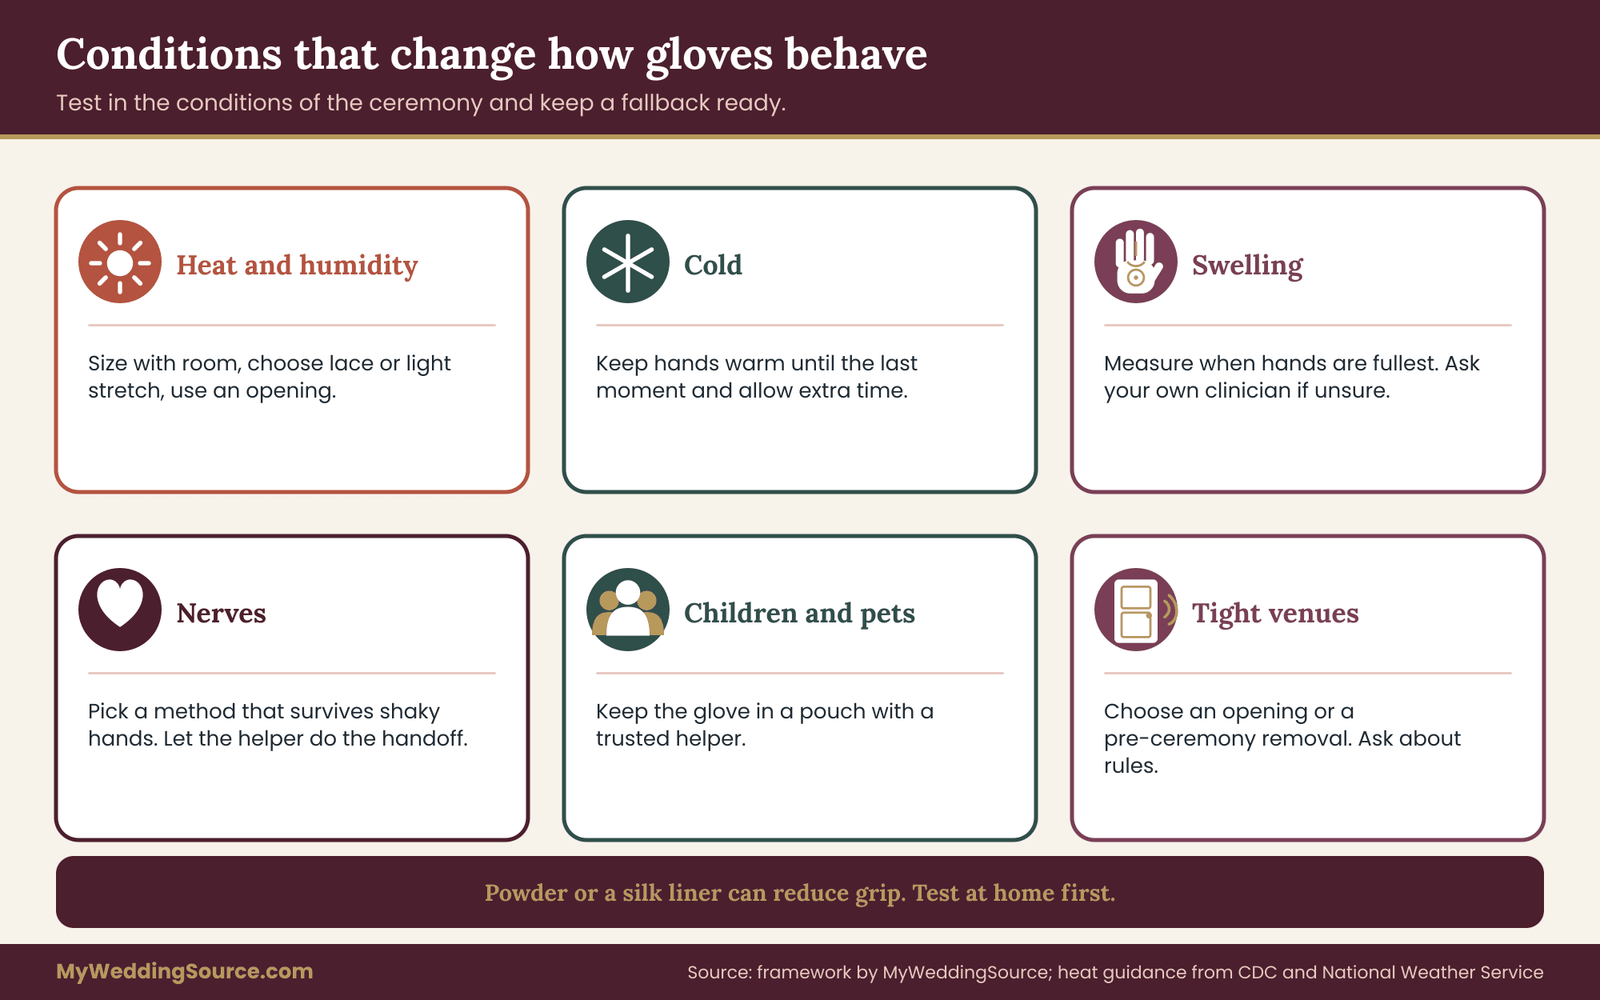
Heat makes hands fuller and a little damp, and damp skin grips fabric. A glove that slid on easily at the fitting may drag in July. The practical response is threefold. First, size for the warm conditions, with a little extra room at the knuckle. Second, choose a breathable fabric such as lace or a lightweight stretch, rather than heavy satin. Third, choose a method that does not depend on the glove sliding easily, such as a ring-finger opening or a pre-ceremony removal.
The National Weather Service at weather.gov publishes forecasts and heat advisories, and you can check the forecast for the ceremony site in the days before. If the day is going to be hot, adjust your plan early, and consider whether the bridal gloves are worth wearing for the full ceremony. Long bridal gloves also trap heat on the arms, and for an outdoor ceremony in full sun you may feel that more than you expect.
The Centers for Disease Control and Prevention publishes heat-safety guidance for people who will be outdoors in hot weather, and a long ceremony in the sun is a good time to read it.
A small supply helps. A little talc-free body powder or a thin silk liner can reduce grip, but test them at home first because powder can show on dark fabric and affect a ring’s finish. Wipe the hands with a clean, dry cloth just before the glove goes on, and keep hand cream away from the glove area until after the ceremony, since it can leave a film.
Cold ceremonies
Cold hands shrink slightly and may be stiff, which makes fine finger work harder. A cold-weather ceremony is a case where bridal gloves have a real job, because they keep the hands warm, but warm gloves are not the same as elegant bridal gloves, and a glove warm enough for a winter ceremony may be bulky. If the hands are cold when the ring exchange arrives, the ring may feel tight or may slip, and the glove may resist being removed.
Keep hands warm until the last moment. A hand warmer in a pocket, held in the free hand, can help, and a helper can carry a second pair of simple gloves to put on between photographs. Allow extra time for the sequence.
Swelling and changing hands
Hands change, and some people notice that their hands are fuller on some days. Some things that are common in weddings, such as salty food, a long day and heat, make that more likely. If you know you tend to get puffy hands, measure at the time of day when they are largest and choose a size with a little more room, or one with a closure.
If you have a medical condition that affects hand swelling or circulation, ask your own clinician what to expect and whether wearing gloves poses any concern. That is a question for a professional who knows you.
If a ring that fit in the morning is tight in the afternoon, a jeweler can suggest options such as a sizing bead or a temporary guard, and that is outside the scope of this article. What matters here is the glove: if it is already tight at the knuckle, it will be tighter on the same day.
Nerves and shaking hands
Almost everyone’s hands are less steady at a ceremony than at a rehearsal. Choose a method that survives shaky hands. A ring-finger opening that is already open, a glove with a wide wrist and a closure, or a pre-ceremony removal all lower the demand on fine motor skills. If you have a tremor or reduced dexterity from any cause, tell your helper and your partner early, plan on a slower pace and consider whether a simpler look suits you better. There is nothing wrong with deciding on comfort.
A couple of small habits help. Breathe out slowly before beat three. Let the helper do the handoff, not you. And remember that the officiant’s job includes filling a quiet moment. A short pause does not read as a problem to the people watching.
Left-handed, right-handed and other arrangements
In many ceremonies the ring goes on the left hand, and the glove on that hand is the one that needs the plan. If the ring will go on the right hand, because of a local custom or a personal choice, reverse the plan: the right hand is the one that needs to be bare, and the bouquet goes to the left. A left-handed person who holds the bouquet in the left hand should check which hand is more comfortable for the handoff and adapt.
When both partners wear gloves, the exchange is more complex. Each person’s bare hand is held by the other, and both partners need a helper. Decide who goes first, and let the second partner start their removal during the first partner’s ring placement.
Children, pets and crowds
If a child or pet is close by, such as a flower girl, a ring bearer or a dog, remember that a small hand may tug a glove, and that a glove put down on a chair may be picked up by an enthusiastic helper. Keep the glove in a pouch with a helper you trust, and tell children where not to touch. For ceremonies with small guests close to the front, a pre-ceremony removal removes the question.
Indoor venues, tight spaces and formal churches
A courthouse or a church can be cool and still, but they can also be crowded at the front with little room to move. A ring-finger opening or a pre-ceremony removal reduces the space you need. If the venue has strict rules about where you can stand and what can be placed on altars or rails, ask the coordinator. A small pouch or a purse placed beside the front row may not be allowed, and it is better to find out in advance.
Photographs, flash and the glove’s finish
Satin and lace respond differently to the camera. Satin can show glare, and lace can show fine detail that disappears at a distance. Tell your photographer which fabric you are wearing so they can adjust. If you plan to be photographed with the bridal gloves off, tell them which hand will be bare so that the ring is the focus of the image.
The pattern across all of these conditions is the same. Test bridal gloves in the conditions of the ceremony, choose the removal method that tolerates imperfect hands, and keep a fallback ready. Bridal gloves reward a little humility about how bodies behave on a big day.
After the ceremony: photographs, care, storage and common mistakes with bridal gloves
The ring exchange is the hard part, but gloves have a second life in the hours after it. They are photographed, handled, spilled on and eventually packed away. A few habits protect both the bridal gloves and the memory.
Gloves in the portraits and at the reception
Decide whether the bridal gloves stay on for portraits, come off for the reception, or go back on for a specific shot. Many people remove the bridal gloves before eating, since gloves and food do not mix, and satin stains easily. If you want a photograph with the bridal gloves on, schedule it before the meal.
Ask your helper to carry the pouch through the evening so the bridal gloves are not left on a table.
If you keep one glove off after the ring exchange, the bare hand is also the one that will show the ring in every congratulatory handshake and embrace. That is often a nice reason to leave it bare. If you wear the glove again, remember that a glove drawn over a ring can catch on the setting, so put it on slowly and make sure the ring stays in place.
Care and cleaning
Read the care label first. If it says dry clean only, take the bridal gloves to a cleaner who handles delicate or bridal items and show them the label. The Federal Trade Commission’s Care Labeling Rule is the source of the requirement that care instructions exist, and the textile testing organization AATCC publishes standards and care-symbol resources used across the industry. Neither will clean your bridal gloves for you, but both explain why the label matters and why ignoring it is a risk.
If a stain appears on the day, blot gently with a clean white cloth and avoid rubbing, because rubbing pushes foundation and food deeper into satin. Do not use a home stain remover on lace or satin without knowing what it does to the fabric and dye. Tell the cleaner what the stain is, and when it happened.
Storage
Clean the bridal gloves before long storage, since body oils and food residue age fabric. Store them flat or lightly rolled in acid-free tissue in a breathable box, away from direct light and heat. Avoid plastic bags that trap moisture. If you plan to pass the bridal gloves to a relative or sell them, a short note about the fabric and care instructions is a kindness. The wedding day accessories planning guide covers backup supplies, and a small repair kit for the day, with spare snaps, a few matching threads and a stitch ripper, belongs on that list.
Cost logic without invented numbers
Gloves range widely in price, and alterations vary by region and by shop, so this guide does not quote figures. Instead, reason about the tradeoffs:
- A modest pair of wrist gloves costs little and removal needs no alteration. It is the cheapest way to get a glove look with the least risk.
- A long pair costs more and may need an alteration to open a ring finger. The alteration is a service cost on top of the glove, and a spare pair for practice would double the glove cost.
- A pre-ceremony removal costs nothing beyond the planning time and the pouch.
- Skipping the bridal gloves for the ceremony costs the price of the bridal gloves if you do not wear them at all, so only buy if you will use them for photographs.
Compare the cost with how much the bridal gloves matter to you. A glove you will wear for four minutes and photograph for twenty is a smaller purchase than one that is part of your identity for the day. Either is a reasonable choice.
Common mistakes
A few errors show up again and again:
- Sizing to a label instead of measurements. A “medium” varies between brands.
- Measuring once, in cool conditions. Test at the time and temperature of the ceremony.
- Buying before choosing a removal method. The method decides the length, closure and fabric.
- Forgetting the ring. A glove that passes a bare finger may not pass a ring.
- Skipping the handoff. If nobody takes the bouquet, nothing else works.
- Cutting the glove on the day. Alterations belong with a professional, well before the date.
- No fallback. Always know what happens if the glove sticks.
- No place for the glove. A glove on the floor is a lost glove.
If you are still deciding whether bridal gloves belong in your wedding at all, it is fine to answer no. Many couples find that a sleeve, a bracelet or a bare hand does the same visual work with none of the logistics. If you decide yes, bridal gloves with a planned sequence are well within reach of any couple willing to spend an evening on measurements and one rehearsal.
Your next steps
Work through these in order, and give each a date on your calendar.
- Measure both hands at five points, with the ring on the ring finger, and record the numbers in inches and centimeters.
- Pick a length and a removal method using the decision ladder.
- Ask the seller the eight product questions, and save the answers.
- If the glove needs an opening, book an alterations professional and consider a spare pair for practice.
- Write the six-beat sequence on one card, and share it with the officiant, the helper and the photographer.
- Rehearse twice with the real glove and ring, then once more on the morning of the wedding.
- Check the forecast a week out, and adjust the plan for heat or cold.
- Pack a small repair kit, a pouch and a spare simple glove or hand warmer.
FAQ
What size should I order if I am between sizes?
Size to the larger hand and the warmer time of day. If the glove has a wrist closure, the smaller size can work because you can open the cuff to pass the knuckle. If it has no closure, choose the larger size and ask a seamstress to take it in at the wrist. Always check the seller’s actual measurements instead of relying on the size label.
Which hand should the glove come off?
The one that receives the ring, which in many ceremonies is the left hand. Plan the bouquet in the opposite hand so the ring hand stays free. If your ring goes on the right hand, reverse the plan. Whatever you choose, tell your helper and your officiant which hand it is so the handoff is smooth.
Is a ring-finger opening better than removing the whole glove?
It depends on length and comfort. For long bridal gloves, an opening is usually faster and keeps the look intact. For short bridal gloves with a closure, removing the whole glove is quicker and needs no alteration. An opening should be finished by a professional and tested with the real ring before the day.
How long does it take to remove a bridal glove at the altar?
It varies with length, fabric, closure and nerves, so time it yourself. A short glove with a closure is quick, and an elbow-length glove takes longer. In your rehearsal, time the whole sequence, add half again as much, and plan the ceremony pacing around the longer number.
Can I wear bridal gloves in hot weather?
Yes, with adjustments. Choose a breathable fabric, size with a little extra room, and test the removal at the temperature of the day. Consider a pre-ceremony removal or an opening to avoid dragging a damp glove over the knuckles. Check the forecast and follow public health guidance for heat if you will be outdoors in the sun.
What if the glove will not come off?
Stay calm and use your fallback. A short line such as “Give me a second” covers the pause, and your helper or partner can steady the hand. Practice this possibility at the rehearsal. A stuck glove is a brief delay, and most guests will remember how relaxed you were, not the glove.
Should my partner wear gloves too?
It is a style choice. Some formal and period-themed weddings include gloves for both people. If both wear them, decide whose comes off first, give each person a separate helper, and rehearse the ring exchange with both gloves in place. The measurement method is the same for both.
Can I alter bridal gloves myself?
Small changes such as sewing on a snap can be done at home if you are experienced, but opening a ring finger or taking in a seam on stretch fabric is best left to a professional. A cut in satin or lace can run or fray, and a mistake close to the date is hard to fix. Practice on a spare pair if you want to try.
Sources
- Federal Trade Commission: Care Labeling Rule and business guidance on clothing care instructions.
- FTC Consumer Advice: guidance for shoppers on refunds, returns and online orders.
- U.S. Food and Drug Administration: consumer information on natural rubber latex allergy.
- American Academy of Dermatology Association: patient information on contact dermatitis and skin reactions.
- Centers for Disease Control and Prevention: heat-safety guidance for outdoor events.
- National Weather Service: forecasts and heat advisories for the ceremony location.
- National Institute of Standards and Technology: unit conversion references for inches and centimeters.
- AATCC: textile testing standards and care-symbol resources.