
Pop up invitations are folded paper that rises into a three-dimensional shape when the card opens: a stepped platform, a standing arch, a small box or a floating layer. This guide treats them as an engineering problem, with fold geometry, paper weight, adhesive, opening effort for older guests and flat shipping, and it ends with a sample test you can run before you order the full run.
Judge pop up invitations in five gates, in this order. First, geometry: the mechanism must close flat with clearance inside the card. Second, material: the paper weight and grain must hold a crisp fold without cracking or sagging. Third, attachment: the glue must grab fast, stay put and never bleed out. Fourth, opening ease: a guest with stiff hands should open it with two fingers and no instructions. Fifth, shipping: the whole suite must lie flat, stay within the mailing thickness the post office allows, and survive the trip. Build a plain paper mock of your idea before you pay for any print.
Most advice about pop up invitations is about looks: which shape photographs well, which theme suits a garden or a ballroom. Looks matter, but they are the easy part. The hard part is that a pop up is a small machine made of paper, and machines fail in predictable places.
A fold lands a few millimeters off and the card will not close. A glue joint lets go in a hot mail truck. A tab is too small for a guest in her eighties to find.
An invitation that opens with a flourish for the couple at their kitchen table and jams for everyone else has failed at its only job, which is to deliver information to guests. Pop up invitations have to work for the whole list, not just for the people who designed them.
This guide is organized around those failure points. It does not cover die cut shapes or print finishes such as foil and letterpress, because the site already deals with them separately. It stays with the mechanism inside pop up invitations: how a flat sheet becomes a standing form, what keeps it standing, what it costs your guests to open it, and how it travels.
A note on scope. This is general information, not legal, tax or financial advice. Paper specifications, adhesives, equipment and postal rules differ by supplier and change over time, so where a number matters, this guide tells you whose document to check before you order. Etiquette for wording and sending is covered in the guide to wedding invitation etiquette, and this article does not repeat it.
What pop up invitations are and the five mechanisms
The phrase covers several different constructions, and a quote request that says only “pop up” will get you five different answers. Sort your idea into one of these five mechanisms first. Each one has different fold geometry, a different failure mode and a different cost of assembly.
The V fold. This is the simplest mechanism in pop up invitations. A single piece of paper is creased down its middle and glued to both pages so that its center line rises from the gutter when the card opens. A cut-out arch, a pair of birds or a skyline can ride on a V fold, and it closes flat when it is made correctly.
The parallel fold. Two parallel creases create a step or platform that sits level with the page, like a small stage. Things stand on the stage, such as a monogram or an illustration. The step lifts the object forward from the background and gives real depth with a small amount of paper.
The box. A parallel fold with a third dimension: two sets of folds create a rectangular block, closed on the sides. It looks substantial and holds a lot of text on its faces, but it is the heaviest mechanism and the most sensitive to measurement error.
The floating layer. A separate sheet is attached with tabs, slots or small folded spacers so that it hovers above the page when the card opens. It is common for vellum-like overlays and cut paper scenes. It adds depth without adding a hinge across the whole card.
The accordion or expanding form. Pleated or honeycomb paper that collapses flat and springs open into a fan, a ball or a column. It is the most dramatic and the hardest to ship, because the paper stores energy.
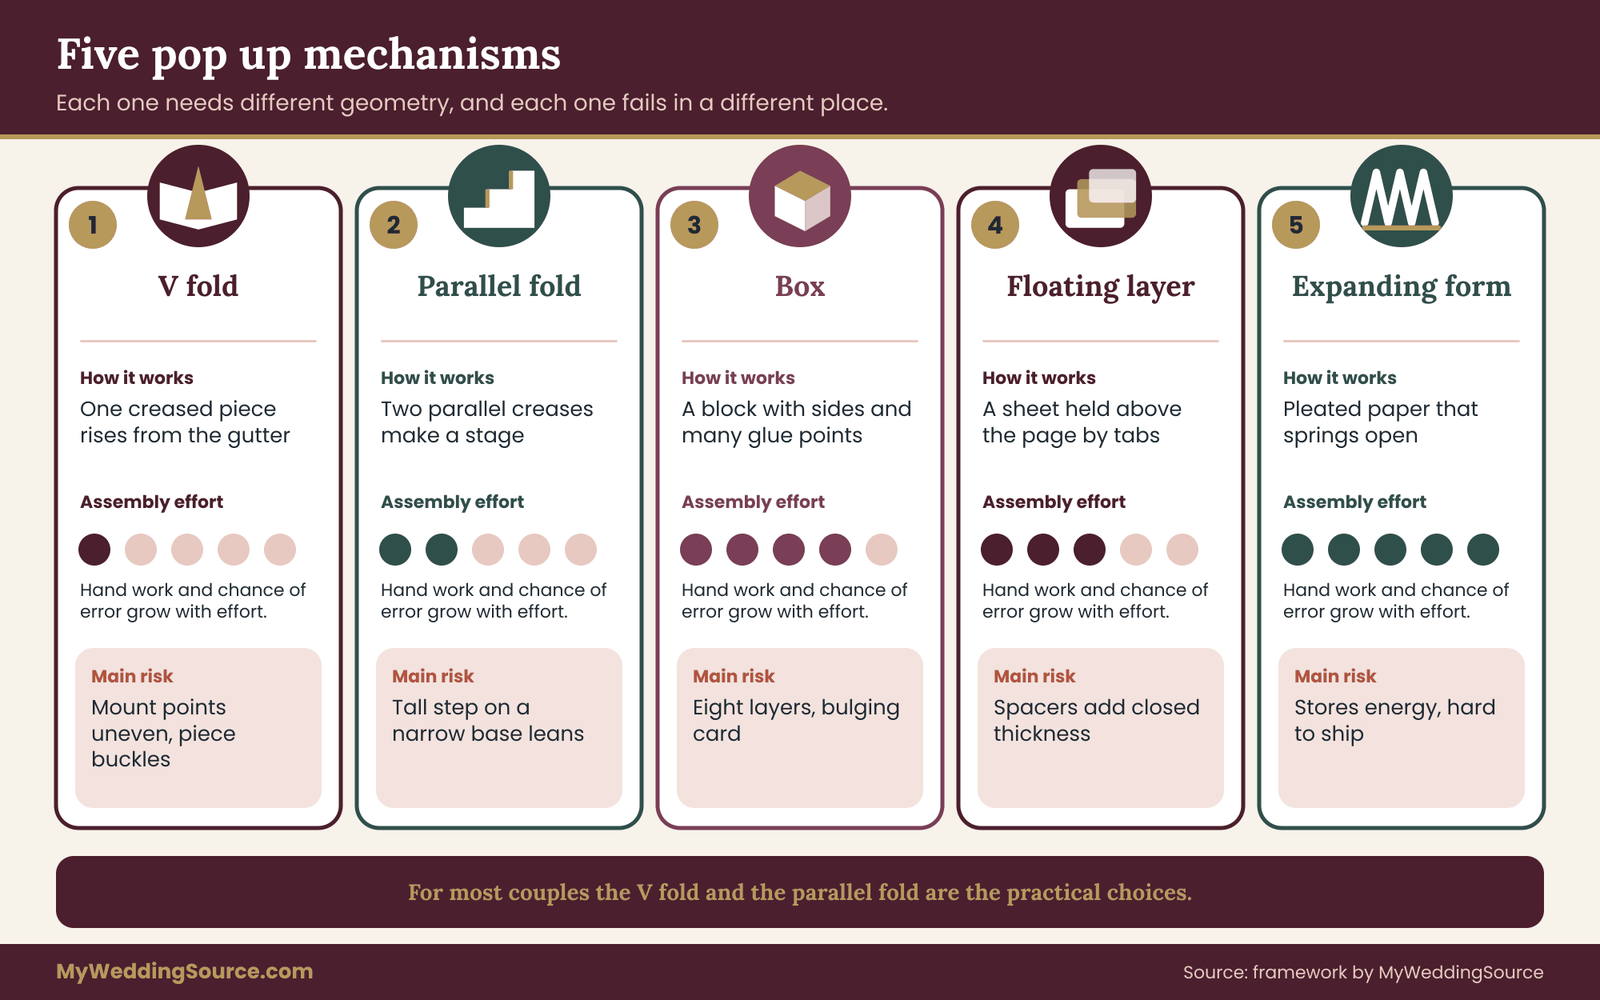
The first two are the practical choices for most couples planning pop up invitations. The box and the floating layer are possible, but each adds assembly steps and each needs a longer sample stage. The expanding form is a specialist build. If you want one, treat the rest of this guide as a checklist of questions for the maker rather than as something you can verify on your own.
Why pop up invitations are different from other paper choices
Foil, letterpress and embossing change a surface. A pop up changes the object, and that is why pop up invitations need their own tests. Once an invitation has moving parts, it has a duty cycle: pop up invitations are opened, closed, handled by several people, shown to a spouse, put on a mantel, and opened again. Surface decoration survives that treatment because it does not move. A hinge does not, unless it was designed to.
The second difference is that pop up invitations carry a hidden dimension, which is thickness when closed. A flat card has a measurable thickness in a stack of fifty. A card with a platform inside has the paper of the card plus the paper of the mechanism, plus the glue, and that total determines whether it fits in the envelope, whether it mails as a standard letter, and whether it arrives without a crushed corner.
The third difference is that the person who opens it is not the person who designed it. A couple who has spent weeks with a mock-up knows exactly where to press. A guest has three seconds and no instructions. Good pop up invitations are designed for that stranger, and the rest of this guide shows how.
When a pop up earns its place
A pop up earns its place when the dimension adds meaning. A ceremony beside a lighthouse, a stage-like step that lifts a monogram the way the venue’s arch frames the couple, or a family tradition tied to a house or a building can all justify it. A reason you can say in one sentence is a good sign: “the step lifts the arch the same way the real arch frames us” is a reason. “Pop ups are fun” is also an honest reason, but it is a taste, and taste can be satisfied with a smaller mechanism.
It does not earn its place when the main purpose is novelty and the guest list is large, the budget is tight, or the guest list includes many people who will open the invitation with difficulty. In those cases a flat card with a small three-dimensional detail on a separate keepsake piece may serve better. If the suite is large and costs are a concern for your pop up invitations, the general guidance in the wedding invitation print production guide on quantities, proofs and handoffs still applies to every mechanism described here.
The test that runs through this guide
Everything in the next sections feeds one deliverable for your pop up invitations: a short written test of a physical sample, with pass marks you set in advance. You will build a plain paper mock, then a printer’s pre-production sample, and you will put both through the same checks. Geometry, paper, glue, opening ease and shipping each get a pass mark. A design that fails a gate gets simplified, not rescued with more glue.
That order matters. It is far cheaper to discover on a sheet of ordinary cover paper that a box fold bulges than to discover it on two hundred printed and hand-assembled pieces. Throughout, the cheapest test comes first, and pop up invitations get tested in the same order every time.
Fold geometry for pop up invitations
Geometry is the first gate for pop up invitations, because nothing else matters if the mechanism does not fold. The good news is that the rules are few, and you can test them with printer paper and a ruler at your kitchen table.
A few terms worth knowing
The gutter is the center line of the card, where it hinges. A mountain fold points up toward you, like a roof ridge. A valley fold points down, like the bottom of a V. A score is a shallow groove pressed into the sheet so that it bends cleanly along a straight line. A crease is the fold that results. The mount points are the places where a mechanism is glued to the card, and they are where almost all geometry errors begin.
Ask your maker to use these words in the drawing of your pop up invitations. A fold diagram with every line labeled mountain or valley, and every glue area shaded, is a sign of a maker who has built the thing before. A diagram with only a cut line and “pop up here” is a sign that the real design will be decided during assembly.
The closing-flat rule
When the card is closed, everything inside pop up invitations must lie between the two pages with room to spare. That produces two measurable limits.
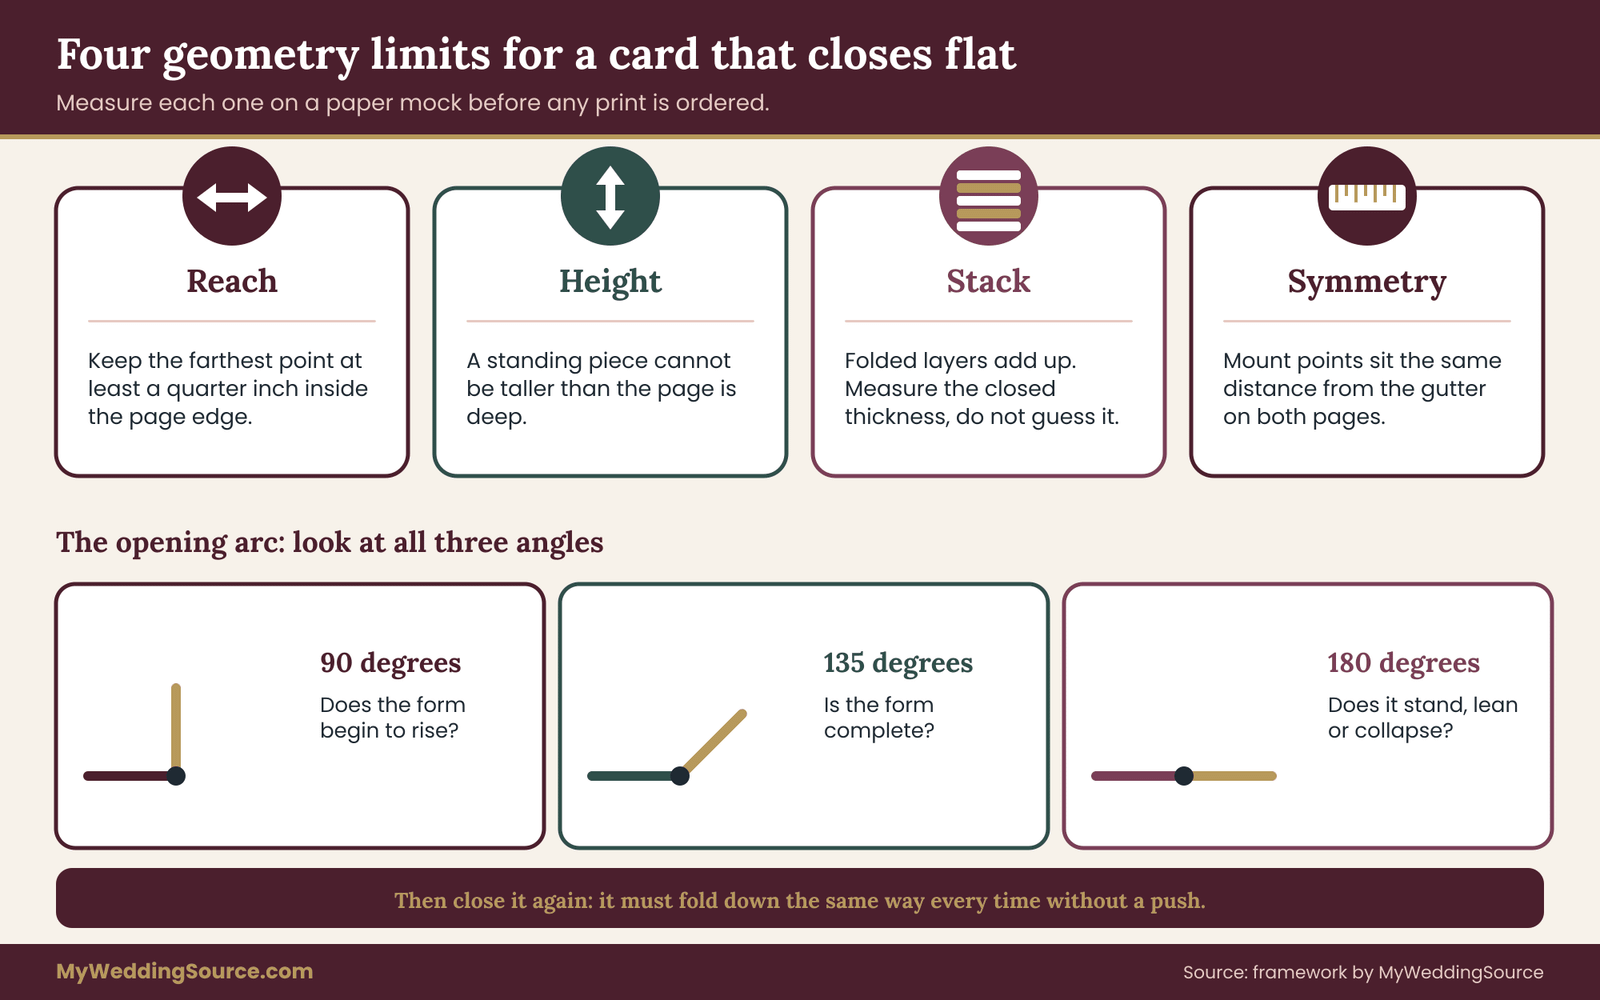
The first limit for pop up invitations is reach. Measured from the gutter, the farthest point of the mechanism must stay inside the page edge with a margin. A sensible starting rule is to keep it at least a quarter inch, about six millimeters, inside, and to confirm with the sample. If the tip reaches the page edge, it will curl against the outside fold, catch on the envelope flap and crack at the first handling.
The second limit is height. A standing piece rises from the gutter and, when the card closes, it must fold down toward the page. The piece cannot be taller than the page is deep, or its top will fold over onto itself and crease. For a card that is five inches tall when closed, a pop up piece that stands five and a half inches above the gutter cannot work, however it is cut.
Add a third, softer limit, stack. Paper has thickness, and folded layers add up. If your mechanism has six layers of paper and the stock is, for example, a third of a millimeter thick, the stack adds about two millimeters inside the card. That is an illustrative number, and the real caliper is on the paper maker’s specification sheet. The point is that a card with a platform will never close as flat as a plain card, and the extra thickness needs to be measured, not guessed.
V fold rules
The V fold used in pop up invitations is forgiving only when it is symmetric. Mark the mount points on each page at the same distance from the gutter, and glue the piece so its center crease sits exactly on the gutter line. If one mount point is even three millimeters farther from the gutter than the other, the piece is pulled sideways as the card closes and will buckle or tear at the glue.
A V fold also has an angle. A piece mounted nearly parallel to the gutter rises steeply and stands almost upright. A piece mounted at a sharper angle rises less and lies lower. Most guests open a card to something between ninety and a hundred and fifty degrees, not a full hundred and eighty. Check that the pop up looks intentional at ninety, one hundred and thirty-five and one hundred and eighty degrees, because guests will see all three.
Keep the cut-out shape on the V fold simple. Narrow stems and thin bridges snap. A rule borrowed from fine paper cutting works well: no feature narrower than about two or three times the thickness of the paper if it must carry weight, and a wider margin if it will be handled often.
Parallel fold rules
A parallel fold in pop up invitations has two parallel creases. The distance between them is the depth of the step, and the distance from the lower crease to the page is the height of the step. When the card closes, the step flattens into a small stack of folded layers, and the geometry must allow it.
The practical rule is that the two folds of a step must be set so that the step’s top and bottom travel symmetrically when the card opens. If you cut and fold a tiny sample, you can see it right away: a correctly laid out step rises evenly, with its top surface staying parallel to the page. A step with unequal fold distances tilts forward and cannot be glued flat.
Taller steps need wider bases. A narrow base under a tall step is a lever, and the card will push against the glue every time it is handled. If the step carries a cut-out figure, put the figure’s weight over the base, not out in front.
Box rules
A box fold is a parallel fold with sides, and in pop up invitations it multiplies every error. It also stacks more layers and doubles the number of glue areas. Before you choose a box, ask the maker how many glue points it has, how many fold lines meet at each corner, and how the corners are allowed to move when the card closes.
For most couples, the box is the point where the mechanism stops being a feature and becomes a manufacturing project. It can be beautiful. It is also the likeliest design to need a revised dieline after the first sample.
Check the opening arc, not only the open position
A common mistake with pop up invitations is to evaluate a design only when it is fully open and standing. Evaluate it along the whole arc.
At ninety degrees, does the mechanism begin to rise, or is it still hidden? A guest who opens only partway needs to see the effect begin, or she may think the card is flat and stop.
At one hundred and thirty-five degrees, is the form complete, without a fold that is still half collapsed? Many designs look unfinished here.
At one hundred and eighty degrees, when the card lies flat on a table, does the pop up lean, stay upright or collapse? Some mechanisms are designed to stand only up to a certain angle, and a guest who presses the card flat will flatten it.
Closing it is the fourth check. Does it fold down cleanly, in the same direction each time, without needing a push from a finger tucked inside? A mechanism that needs coaxing to close will be forced one day by a guest who is trying to get it back in the envelope.
Build a geometry mock in thirty minutes
You do not need a studio to prototype pop up invitations. Take an ordinary sheet of cover-weight paper, or even a sturdy sheet of printer paper if that is what you have, a ruler, a craft knife with a cutting mat, a bone folder or the back of a spoon for scoring, and double-sided tape.
Draw the card at its true size. Mark the gutter. Draw the mechanism with every fold labeled mountain or valley, and mark the mount points. Score along each fold before cutting, because scoring is much easier on a flat sheet. Cut, fold and attach with tape. Then run the four checks above and write down what you see.
Two cautions. A mock in thin paper will behave better than a mock in the real stock when closing and worse when standing, so treat it as a test of geometry only, not of paper. And if you cannot produce a mock that works, do not send the idea to a maker and hope. A competent maker can fix a rough drawing, but you will be paying for their time, and some will simply copy your drawing and charge for the failure.
How much tolerance to design in
Every cutting and folding process drifts a little, and pop up invitations feel that drift more than flat cards do. Dies move, sheets stretch, hand folding is a human act. A design that works only if every fold lands within a fraction of a millimeter will fail on some pieces, so the question for the maker is how much drift the design can absorb.
Ask for the tolerance the maker holds on fold placement and on mount-point placement, in the same units the dieline uses. Then ask what the design does when the tolerance is used up in the worst direction. A V fold with a generous clearance behind it will tolerate drift. A box with a three-millimeter gap at each side will not.
If the maker cannot give you a number, ask whether they will check ten finished pieces against the dieline and report the largest difference. That is a simple request, and a maker who works with this kind of piece will usually be happy to answer it. When the first sample is built, the same check applies: measure the mount points on the sample, compare them with the drawing, and note any difference larger than the clearance you designed in.
What to do when the geometry fails
When a mock of your pop up invitations fails, resist the urge to add glue, thicker paper or a ribbon to hold things in place. Those fixes treat symptoms and often create new ones. Instead, go back to the drawing and ask which of the limits it broke. Was it reach, height, stack or symmetry? Usually one of the four is the cause, and the fix is a shorter piece, a wider base, a lower height or a mount point moved a few millimeters.
If the fix makes the design look smaller than you hoped, accept it. Modest pop up invitations that work for two hundred guests are worth far more than dramatic ones that work only for the couple who built them.
Paper weight and grain for pop up invitations
Once the geometry works, the next gate is the paper. In pop up invitations, paper decides whether a fold is crisp or mushy, whether a standing piece stays upright or leans over by the time the invitation arrives, and how hard the card is to open. For pop up invitations the question is rarely “what is the heaviest paper available” and nearly always “what is the lightest paper that does each job.”
Reading the numbers: gsm and pounds
Paper weight is quoted two ways. Metric gsm, grams per square meter, is the same for every paper and is the honest basis for comparison. In North America, weights are often quoted in pounds, and the pound number depends on which sheet size the paper type uses as its basic size. That is why an eighty-pound text sheet is much lighter than an eighty-pound cover sheet. The International Organization for Standardization publishes the method for measuring grammage, ISO 536, and good paper makers print the gsm on the specification sheet.
For cover stock, multiply the pound number by about 2.7 to get gsm. A sixty-five-pound cover is about 176 gsm, an eighty-pound cover about 216, a hundred-pound cover about 270, a hundred-and-ten-pound cover about 300 and a hundred-and-thirty-pound cover about 350. For text paper the multiplier is about 1.5, so an eighty-pound text sheet is about 118 gsm and a hundred-pound text sheet about 148. Always ask for the gsm. Different mills round differently, and a pound number alone invites misunderstanding.
Two papers, not one
The most useful design decision in this section is to stop thinking of pop up invitations as having one paper. It has at least two jobs and usually benefits from two stocks.
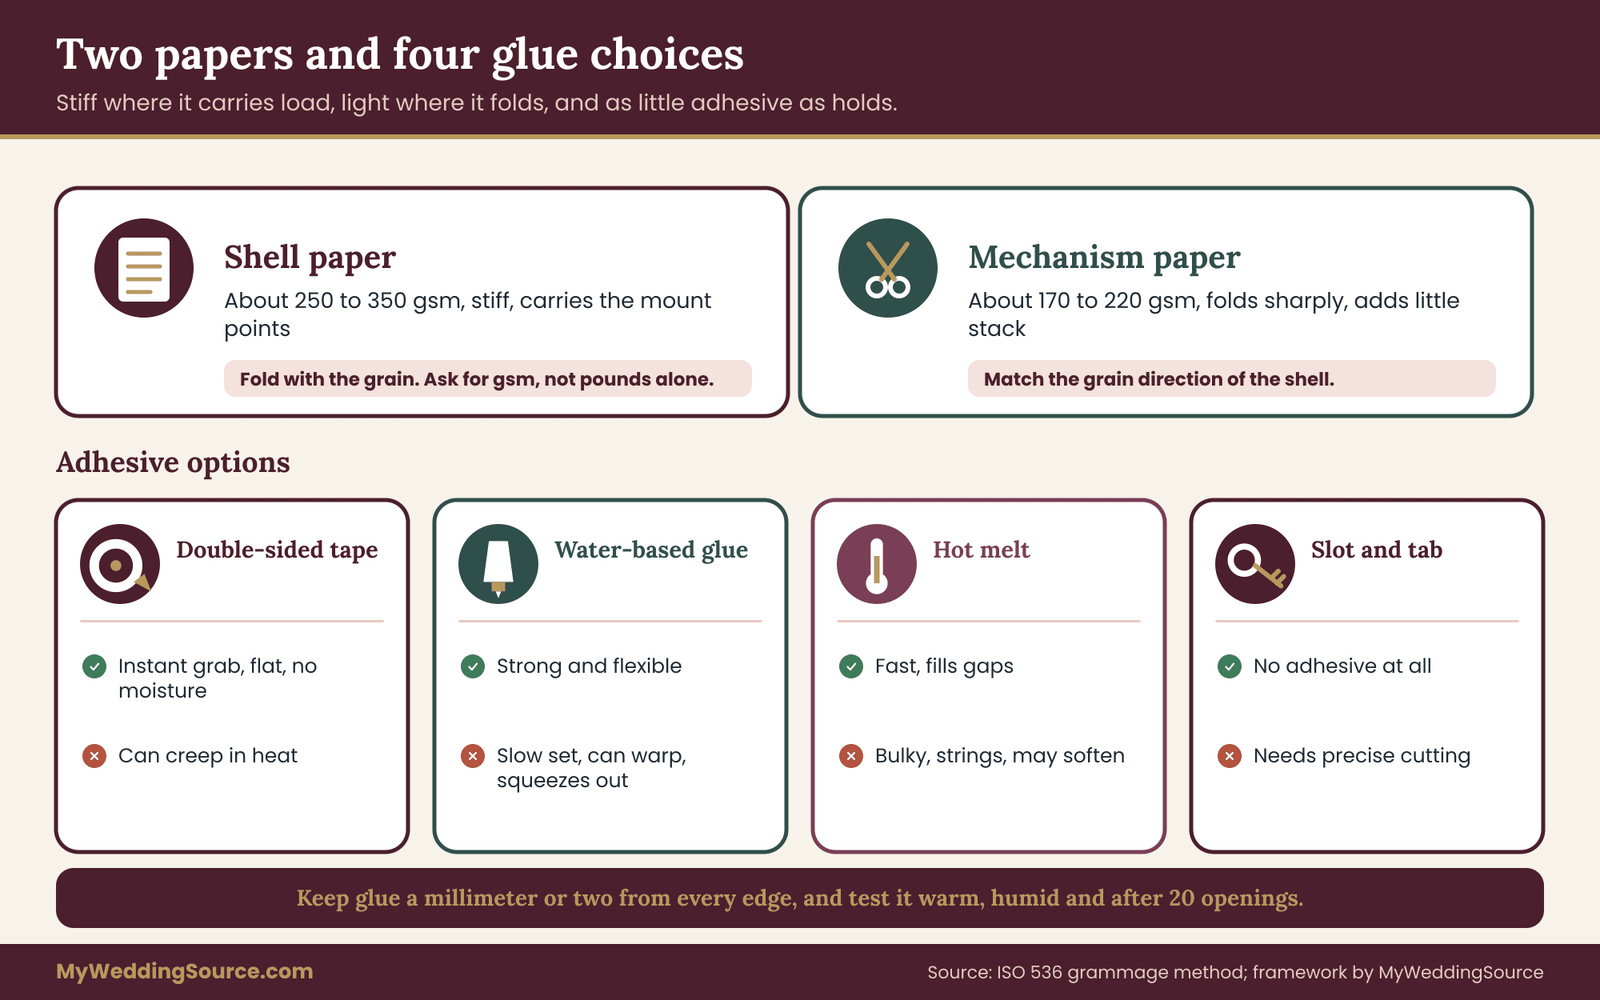
The shell, the card that holds the information and carries the mount points, needs stiffness. A heavier cover stock, often in the range of about 250 to 350 gsm, stands up to handling and resists the pull of the glued mechanism. Too light a shell will bow or tent where the mechanism is attached.
The mechanism, the piece that folds, needs the opposite: enough strength to stand and enough softness to fold sharply many times. A lighter cover stock, often around 170 to 220 gsm, folds more easily, adds less thickness to the stack and puts less strain on the glue. A mechanism cut from the same 350 gsm stock as the shell is stiff, thick and hard to push down, and it will fight the gutter.
These ranges are starting points for a conversation, not a recommendation for your design. The right pair for pop up invitations depends on the size of the mechanism, how many folds it has, and the paper itself. Ask the maker which stocks they recommend for each part and why, and ask to see the specification of both.
Grain direction
Paper in pop up invitations is made from fibers that mostly line up in one direction as the sheet is formed on the machine. That direction is the grain. A fold running parallel to the grain is smooth and clean. A fold running across the grain is more likely to crack along the outside of the crease, especially in heavy or coated stock.
For pop up invitations with a gutter, the fold should run with the grain. Ask the printer whether the sheets are cut long-grain or short-grain for your size and orientation. A card that opens from the side may have the gutter running against the grain if the sheet is cut the wrong way, and the resulting spine will feel stiff and may crack.
You can check grain at home. Cut two strips from a spare sheet, one along each direction, and bend each over the edge of a table. The strip that bends more easily and with less resistance is bending parallel to the grain. A maker who knows the stock will already have this information, but the test costs nothing and teaches you what to look for.
Scoring, creasing and fold cracking
Heavy paper in pop up invitations needs to be scored before it is folded, and the quality of the score decides the quality of the fold. A good score presses a groove that lets the paper hinge along a line without breaking fibers. A poor score either does not reach deep enough, so the fold wanders, or goes too deep and weakens the paper.
Fold cracking is a visible break in the surface along a crease. It shows up as a white line where ink or toner has split from the fiber. It is more likely when ink coverage is heavy at the fold, when the paper is coated, when the fold goes against the grain, and when the paper is very dry. It is a production issue, not a finish choice, and you should ask about it directly: “Will any dark solid color cross a fold line, and have you tested that stock with that ink at the fold?”
If a dark flood of color runs across a crease, the simplest fixes are to move the color so that it stops short of the fold, to choose a different stock or to ask for a test fold. A pale design on the fold line removes the problem entirely.
Texture, softness and stiffness
Textured and cotton papers are lovely choices for pop up invitations and often fold well, because their fibers are long and forgiving. They also vary more from sheet to sheet, which makes tolerance harder to hold. Smooth, dense papers fold with precision but are more prone to cracking. There is no universal winner, and this is another reason to test the actual stock rather than a similar one.
Stiffness matters in a second way. A stiff card feels expensive and resists dents, but it also resists opening. A guest with limited hand strength has to push against the paper’s own stiffness as well as against any friction from the mechanism. The next sections return to this point, because it is where engineering and kindness meet.
Humidity and the long afterlife of a card
Paper takes up and gives off moisture, and pop up invitations are sensitive to it, and as it does it swells and shrinks, mostly across the grain. A pop up has glued joints between papers that may be moving by different amounts, which can show up as warping, a lean in the standing piece or a card that no longer closes flat. Invitations are mailed weeks before a wedding, kept on a counter or a fridge for months, and sometimes kept for years.
You cannot control the guest’s kitchen, but you can reduce risk by choosing papers with the same grain direction for shell and mechanism, by keeping glue amounts small and by testing a sample after a few days in a humid room. If it moves, ask the maker whether a different adhesive or a different paper will calm it.
Glue and attachment in pop up invitations
The adhesive is the unglamorous part of pop up invitations and the most common cause of failure after mailing. A mechanism that held perfectly on the studio bench can let go in a hot mail truck or a cold porch box, and a glue line that was neat at assembly can have crept out and stuck the pages together.
The adhesive options for pop up invitations in plain terms
Double-sided tape or adhesive transfer film. A thin layer of adhesive on a liner, applied by hand or by machine. It grabs immediately, adds almost no thickness, introduces no moisture and keeps joints flat. It is the usual choice for hand assembly of pop up invitations. The trade-off is that pressure-sensitive adhesives can soften or creep slowly in heat, so the tape should be rated for paper and tested.
White glue and other water-based adhesives. Strong, flexible and inexpensive. They take time to set, they add moisture that can warp thin paper, and they can squeeze out at the edges. On a pop up they work well where the joint is small, clamped while it dries and spaced away from the edge.
Hot melt. Fast, strong and good for gaps, but it adds thickness, can leave strings, and may soften with heat. It is a reasonable choice for hidden structural points and a poor choice for visible flat joints.
Foam pads, glue dots and spacers. These create deliberate thickness, which is exactly what a floating layer needs. They also add thickness to the closed card, so count them in the stack.
Slot and tab construction. The cleanest answer to the question of adhesive is sometimes none. Tabs that pass through slots and fold behind a layer can hold a mechanism without any glue at all. They take more careful cutting and the design must be done well, but they remove a whole class of failures.
Four rules for glue joints
First, keep glue away from edges. A joint that reaches the edge of a flap will squeeze out under pressure and bond a page to something it should never touch. Recess adhesive from every edge by a millimeter or two and ask the maker to confirm.
Second, use as few joints as the design allows, and make each one large enough to carry its load. Two big, well-placed joints beat six small ones.
Third, join paper to paper where the grain matches. A joint between sheets that expand in different directions is a joint under constant, slow stress.
Fourth, use an adhesive suited to a keepsake if you expect the invitation to be kept. Ask whether the adhesive is described by the maker as suitable for long-term paper storage, and read the product sheet rather than the sales line. Archival claims are easy to make and hard to check, so ask what documentation sits behind them.
Hand assembly versus machine assembly
Many pop up invitations are assembled by hand, which affects cost and consistency. Hand assembly allows complex mechanisms but introduces variation: each piece is positioned by a person, and the hundredth piece is made at the end of a long afternoon. Machine gluing is more consistent but requires designs the machine can handle, and it is usually practical only for larger runs.
Ask three questions. How many minutes of hand work does each piece need? What is the quality check at the end of each batch? And what is the spare allowance, meaning how many extra pieces the maker builds to cover pieces that fail inspection? You are not asking for a discount. You are asking how the maker thinks about failure, which tells you how they will handle yours.
Testing a joint
A simple three-part test tells you most of what you need to know about your pop up invitations. Pull gently on the standing piece in the direction a guest might, and note whether any joint moves. Open and close the card twenty times and check the joints again. Then leave a sample for a day somewhere warm, such as a sunny windowsill, and for a day in a humid room, and check again.
Write down each result. A joint that survives all three has passed. A joint that fails any of them should be redesigned before you order.
Opening ease: designing pop up invitations for older guests
Every guest list has a few people for whom pop up invitations are not a delight but an obstacle. They include a grandparent with arthritic fingers, an uncle with a tremor, an aunt who needs reading glasses and has not put them on yet. They are often the guests who care most about the day. Pop up invitations that work for them work for everyone.
This section turns “easy to open” into things you can observe and measure. It does not require any special equipment, and it does not assume anything about any particular guest. It assumes only that hands, eyes and patience vary, and that pop up invitations should work across that range, and that the invitation should work across that range.
What actually makes a card hard to open
Four things combine to make pop up invitations hard to open. Grip: the card must be held while the cover is lifted, and a stiff or slick cover is harder to hold. Force: the cover and the mechanism both resist opening, and the sum of that resistance is the effort. Precision: tiny tabs, thin slits and ribbons that must be pinched take fine finger control. Cue: if the guest cannot tell where or how to open it, effort is wasted on guesswork.
The Centers for Disease Control and Prevention notes that arthritis is common among older adults and can affect the hands. Vision also changes: the National Eye Institute describes how contrast and lighting affect reading for people with low vision. You do not need to be an expert on either subject to design pop up invitations for them. You need to remove precision and force wherever the design allows, and make the cue obvious.
Design choices that help pop up invitations open easily
Make the opening gesture one familiar motion. A card that opens like a book, from one side, with a clear edge to lift, is easy to understand. A card that opens upward like a lid, outward like double doors or by pulling a ribbon asks the guest to learn something new.
Give the cover something to lift. A flat cover on a flat envelope insert can be hard to start. A small step, a thumb notch or a slight overhang on the opening edge gives a fingertip somewhere to go. Keep the notch wide, at least the width of a fingertip, so it works for a large hand or a numb one.
Avoid features that require pinching. Narrow pull tabs, tiny ribbons and small slits are charming and difficult. If you want a pull tab, make it wide and long enough to be grabbed with the side of a finger, not only with a pinch.
Keep the opening resistance low and even. The mechanism should rise as the cover opens, without a catch, a stick or a sudden release. A joint that grabs halfway or a fold that needs extra force at one angle feels like the card is stuck.
Do not rely on a magnet, a snap or a sealed flap to hold the card closed unless you have tested it with stiff hands. Closures that are meant to feel secure can be hard to defeat.
Print the cue. A small line on the closed cover, such as “Open like a book,” or a small arrow on the edge to lift, helps a guest who might otherwise hesitate. Use a size and contrast that a guest without reading glasses can see, and keep it short.
Keep the information independent of the mechanism
The most important design decision for pop up invitations and older guests is also the least visible one. Put the essential information, which is the names, date, time, place and how to reply, on a surface that does not depend on the pop up working. If the mechanism jams, tears or is flattened in the mail, the guest should still be able to read everything they need.
That means pop up invitations should let the mechanism carry atmosphere, and the flat card or insert carries facts. A monogram that stands on a step is wonderful. A date printed on the back of that same step, visible only when the card is fully open, is a risk. The guest who cannot open the card fully, and the guest who has crushed it in a mailbox, both lose the date.
The same applies to the reply method. A reply card or a website address should sit on a flat insert, not inside the mechanism. For guidance on reply wording, response windows and how to handle guests who do not respond, the RSVP etiquette guide covers the ground without repeating it here.
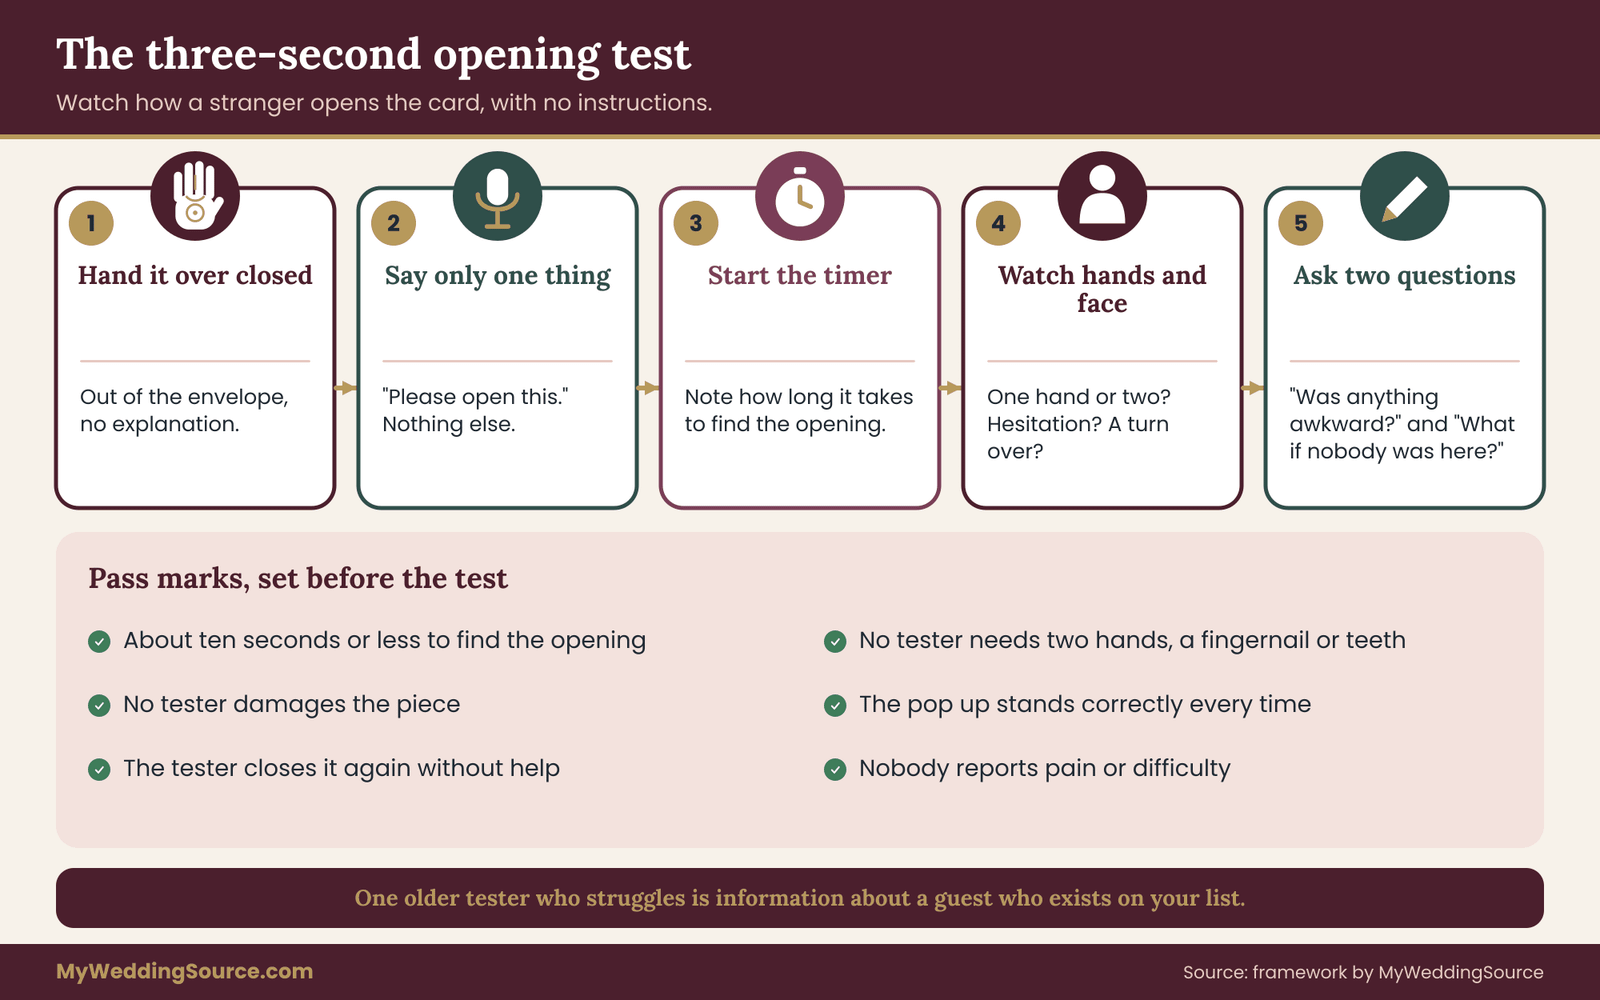
The three-second test
The simplest test of pop up invitations is also the most revealing. Take the invitation out of its envelope, hand it to a tester closed, and say nothing except “Please open this.” Start a timer. Watch the following and write it down.
How long does the tester take to find where to open? Do they use one hand or two? Do they hesitate, turn it over or look for a tab? Does the pop up stand correctly without being helped? Does the tester close it again easily? Does anything tear, bend or catch?
Then ask two questions: “Was anything awkward?” and “What would you have done if no one had been there to show you?” The second question catches the quiet failures, where a guest struggles privately and never says so.
Choosing and treating testers kindly
Test your pop up invitations with at least five people, and include several who are in the age groups you worry about. If you have a family member with arthritis or limited vision who is willing, their view is worth more than any guideline. Ask first, explain what you are testing, and make clear that the card is being tested and the person is not. Offer a different task if they would prefer not to take part.
Do not turn the test into a medical judgment. You are not assessing anyone’s health. You are observing how a piece of paper behaves in a range of hands. Thank the testers and tell them what you changed because of their help, which is both polite and persuasive.
For guests whose needs are broader than hand strength, the site’s guide to guest care operations for older relatives covers planning for comfort across the day, and invitation design is one small part of the same attitude.
Pass marks for pop up invitations you can set in advance
Decide the pass marks before the test, so you are not tempted to rationalize afterward. One reasonable set follows. These are suggestions to adapt, not standards, and you should change them to fit your guests.
No tester takes more than about ten seconds to understand how to open the card without instructions. No tester needs two hands, a fingernail or teeth. No tester damages the piece. The pop up stands correctly on every test. The tester can close the card again without help. And no tester reports pain or difficulty.
Notice what these marks do not say. They do not say that most testers pass. One failure by an older tester is information. It tells you something about a guest who will exist on your list, even if you cannot identify them yet.
What to do when pop up invitations fail the test
When a tester struggles, observe where. If the problem is finding the opening, add a cue or a notch. If it is force, lighten the mechanism paper, reduce the number of folds or move a mount point. If it is the closing, check the geometry limits from the earlier section. If it is the envelope, which is a surprisingly common source of trouble, simplify the closure.
Some failures in pop up invitations cannot be fixed without changing the concept. A box fold in heavy stock may simply be too stiff. In that case the design is telling you something, and the generous response is to simplify it, perhaps by keeping the dramatic pop up for the couple’s own copy or a small number of keepsake sets and using a flat card with a small standing detail for the rest.
Shipping flat: from the maker to the mailbox
Pop up invitations travel twice. It travels from the maker or printer to you, in cartons, and then from you to each guest, in an envelope that a postal machine and a postal worker will handle. Both trips apply pressure, and a mechanism that holds its shape on a desk may not do so under a stack of its neighbors.
What flat really means for pop up invitations
The word “flat” hides two requirements. The first is that the mechanism collapses completely when the card closes, which the geometry section covered. The second is that the card stays collapsed. Some designs have a little memory. The folded piece wants to spring partway up, and the cover bulges slightly instead of lying flat. A bulge is invisible on its own and obvious in an envelope, where it pushes against the flap and catches the sealing glue.
Check this in pop up invitations with a rest test. Close a sample, set it on a table with nothing on it, and look at it after a day. If the cover has lifted at the edges, the mechanism has memory. Then put a few ordinary books on it for a day, and check whether it lies flat and whether any fold has permanently changed. A mechanism that bulges at rest will bulge in the mail.
A simple paper band around the closed card can control a design that is slightly springy, and a stiff backing card in the envelope keeps the stack flat. But each extra piece adds cost, weight and one more thing for a guest to remove, so the better answer is a mechanism with little memory in the first place.
Thickness is the number that decides your postage
For standard-size letter mail, the United States Postal Service sets limits on height, length and thickness, and requires an envelope of uniform thickness to be mailed at the standard letter rate. As a guide, the Domestic Mail Manual describes a letter as a rectangular piece within stated height, length and thickness limits, with the maximum thickness being a quarter inch. A piece that is rigid, lumpy or unevenly thick can be treated as nonmachinable and priced higher, and a square envelope is also treated differently. Ask the postal service, not the printer, which category your finished suite will fall into.
Pop up invitations push on this limit more than flat cards do, because the mechanism adds paper in the middle of the card, and because the thick part is usually in the middle of the envelope rather than spread evenly. A suite that measures well under a quarter inch at the edge may measure much more at the center. Measure at the thickest point with the whole suite in the final envelope, including any insert, reply card and outer sleeve.
The site’s guide to nonmachinable postage for invitations walks through the machinability checks in detail, and the same checks apply here. Rates and rules change, so confirm them on the Postal Service’s own pages and with the post office before you commit to a design. Do not assume that a number from last year is current.
The full-suite mailing test
The best test of mailing pop up invitations is to mail them. Assemble three complete suites exactly as the guests will receive them, with the final envelope, all inserts, the final address format and the real postage. Take one to the post office counter first and ask the clerk to confirm the category and the price. Then mail two to friends or relatives in different parts of the country, and ask them to send them back unopened.
When they return, check them. Is the envelope intact? Is the card flat, and is the mechanism still collapsed? Has anything shifted, creased or torn? Are there marks from machinery? Is the postmark legible and the address undisturbed? If any suite shows damage, work out whether the cause was the mechanism, the envelope, the stuffing or the handling, and change that one thing.
Mailing two samples is not a statistical test, and one good result does not prove the design is safe. It does catch the problems that bite the first time, which are the ones most worth catching.
Packaging pop up invitations for the mail
Stuff the envelope so that the card sits flat and the mechanism side faces the same direction as the envelope’s back, not the front where machinery runs its rollers. Put any thicker element near the bottom edge of the envelope rather than the top, since machines and handlers tend to grip the top. Use a stiff, smooth insert on either side if the card has a lumpy center.
Choose an envelope that is both strong enough and large enough. A snug envelope that has to be forced shut presses the mechanism, and a loose envelope lets the card slide and flex. A generous but not baggy fit, with room to slide the card in and out with one hand, is also kinder to the guest at the other end.
Avoid adding seals, ribbons or hard embellishments to the outside of the mailing envelope. They add thickness and catch on equipment. The same logic applies to the card inside, which is why the postal handling of other decorative choices is covered in separate guides, such as the one on die cut invitations and postage.
Shipping pop up invitations from the maker
Before the pieces arrive, ask how they are packed. Pieces should lie flat, in bundles that do not compress the middle, in cartons that do not allow shifting. A bundle bound tightly with a band can crease the cover. A carton with space can let a stack slide and crush. Ask whether the maker places chipboard dividers between bundles, and whether the cartons have any weight limit marked.
On arrival, do not wait. Open the cartons the same day, count the pieces, and open and close at least ten, taken from different bundles and different cartons. Look for crushed corners, bowed covers, glue that has crept and mechanisms that no longer fold. If you find a problem, photograph it before moving anything and contact the maker and the carrier promptly. Carriers set their own time limits for damage claims, which are written in the carrier’s terms, so read them before the delivery rather than after.
Running the sample test for pop up invitations
By now you have a list of checks for pop up invitations. This section puts them in order and gives them pass marks, so that your test is one procedure rather than a pile of observations. The procedure has three stages, and each stage is cheaper than the next.
Stage one: the paper mock
Build the geometry mock of your pop up invitations from the earlier section in any convenient paper. Run the four geometry checks: reach, height, stack and the opening arc. Run the three-second test with two or three people, even though the paper is not the final stock. You are learning whether the idea is physically sound and whether the cue is clear.
Pass marks for stage one: the mechanism closes flat with the reach margin intact, stands correctly at the three angles, closes again without help, and two of three testers find the opening in under ten seconds.
If the mock fails, fix the design. Do not go to a maker with a failing mock unless you want them to charge for solving it.
Stage two: the pre-production sample of pop up invitations
Ask the maker for a sample made in the real paper, with the real adhesive and, ideally, the real print. Some makers will supply a blank sample, a “white sample,” which is perfectly good for testing geometry, paper and glue. Others will charge for a printed sample. Either way, get the sample in your hands before the run is approved. A quote built on a picture is not a quote built on a design that works.
Run the full test on the sample. This is where the paper, grain, glue and opening checks are made, and where the mailing test belongs. Take notes as you go and keep the sample afterward, labeled, as the reference for the rest of the job.
Pass marks for stage two: all pass marks from stage one, plus the joint test passed, the rest test passed, the mailing test passed, and a panel of at least five testers including older guests meeting the opening-ease marks.
Stage three: the first pieces of the run
Even a perfect sample does not guarantee a perfect run of pop up invitations. Ask to see the first finished pieces, or the first batch, before the maker assembles the rest. Compare ten pieces against the reference sample: mount points, fold quality, glue neatness and behavior on opening and closing. If the maker can send photographs, check them, but a physical comparison is better.
If the maker works to a delivery date that leaves no room for this check, tell them the date matters less than the result, and ask what they can offer. A wedding date is fixed, but an invitation date has some give, and a late delivery that works is better than a timely one that does not. The guide to wedding vendor timelines can help you work backward from mailing dates to approval dates.

Keep a one-page record
Write the results for your pop up invitations on a single sheet for each stage: the date, the sample, who tested, what they saw and which marks passed or failed. This is not bureaucracy. It is the document that lets you say to a maker, politely and specifically, what you approved and what you received, and it is the basis of any conversation about a remake.
A worked example: from a lighthouse box to a V fold
The following example is invented to show how the process behaves. The names, numbers and results are illustrative, not data from a real job.
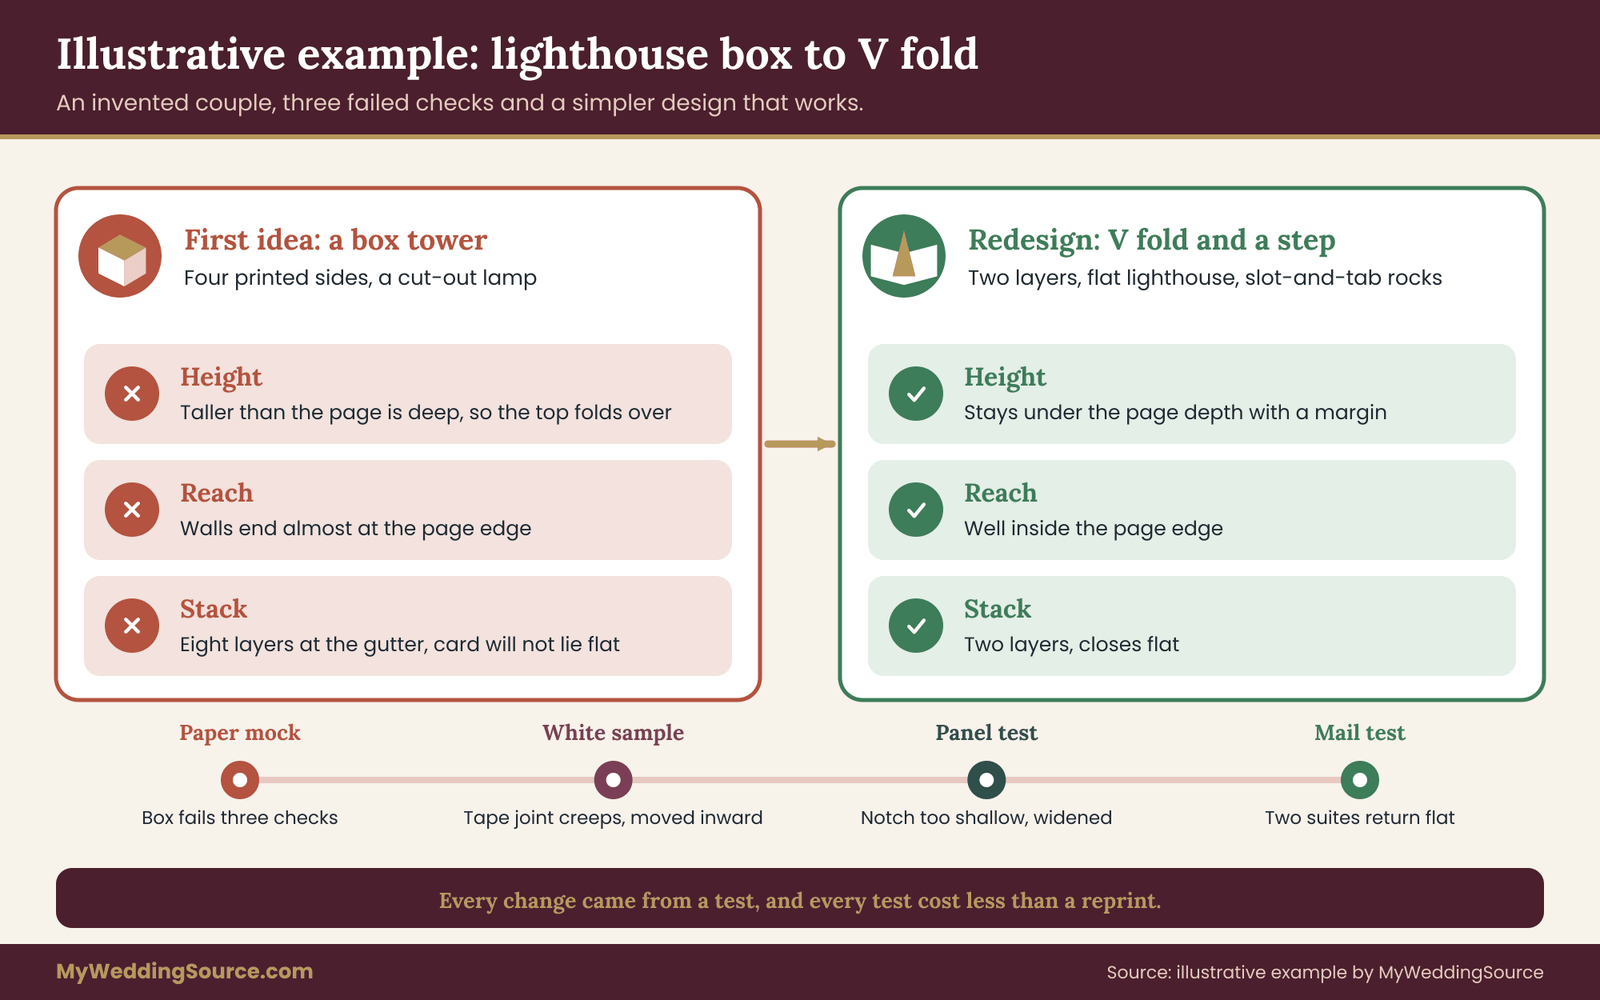
Maya and Tobias are marrying near a lighthouse, and they want pop up invitations that show it. They plan to invite about a hundred and twenty households. Maya sketches a box fold: a square tower with the lighthouse printed on four sides and a small lamp cut out at the top. It looks wonderful on paper.
Stage one: the mock fails, usefully
Maya builds the mock in ordinary cover paper. Three problems appear within twenty minutes. The tower is taller than the card is deep, so when the card closes the top folds over and creases (a height failure). The box walls reach almost to the outer edge, leaving no clearance (a reach failure). And the card will not lie flat, because eight layers of paper sit at the gutter (a stack failure).
She is tempted to fix this with a thicker shell. Instead she follows the rule from the geometry section and goes back to the drawing. The lighthouse does not need to be a box. A V fold can hold a flat lighthouse that stands up from the gutter, with a short parallel-fold step in front for a few cut-paper rocks. The V fold has two layers rather than eight. The height now stays under the page depth with a margin, and the reach is well inside the edge.
The redesign is less dramatic, but these pop up invitations now behave. It is also a design that closes flat, and that is the only kind that survives mail.
Stage two: paper, glue and the first panel
For the paper, the maker proposes a heavier cover stock for the shell and a lighter cover stock for the lighthouse, both cut with the fold running with the grain. Maya asks to see the specification of each and confirms the gsm. For the adhesive, the maker proposes double-sided tape applied by hand, recessed from the flap edges, with a slot-and-tab for the rocks so that they need no glue at all.
A white sample arrives in a week. Maya runs the joint test: pulling, twenty open-and-close cycles, a day on a sunny windowsill and a day in a humid bathroom. One tape joint has crept slightly at the edge after the warm day. The maker moves it a millimeter and a half inward and sends a second sample, which passes.
Five testers try the three-second test. Four open it in a few seconds. A seventy-eight-year-old family friend, whom Maya asks politely and thanks warmly, takes about fourteen seconds and uses both hands, because the notch on the cover is too shallow to find. Maya makes the notch wider and deeper and adds a small printed cue, “Open like a book.” The friend tries a new sample and opens it at once.
Stage three: mailing
Maya assembles three complete suites and measures them at the thickest point, in the final envelope. In this example the center measures about two hundred and ten thousandths of an inch, under the quarter-inch limit with room to spare, and the suite is uniform enough that the post office clerk confirms the standard letter category. Maya mails two to relatives and has them send them back. Both return flat, with no damage. The one thing she changes is the stuffing direction, after noticing a slight scuff where the lighthouse faced the envelope front.
The result is a set of pop up invitations that costs more than a flat card and less than the original box would have, works for the oldest guests on the list, and mails as a standard letter. The invented time savings and cost savings are not the point. The point is that every change came from a test, and every test cost far less than a reprint.
Costing pop up invitations without guesswork
Prices for pop up invitations change, vary by maker and depend on a dozen details, so this section gives you the structure of the cost, not figures. Ask every maker to quote against the same structure and you can compare them honestly.
The cost lines to ask for
Design and dieline work. Who draws the mechanism, who checks the geometry, and how many revisions are included? A dieline fee that looks high may include real engineering time.
Tooling. A cutting die costs money to make and can be reused for a run. Laser cutting avoids a die but charges by cutting time. Ask which method is used and whether the tooling is yours after the job.
Paper, print and adhesive. Two stocks, the printing for each, and the adhesive or tape.
Assembly labor. The number of minutes of hand work per piece, multiplied by the number of pieces. At six minutes per piece, a hundred and twenty pieces take twelve hours of labor, which is a useful sanity check against any quote. The six minutes here is an illustration to show the arithmetic, not a typical figure.
Spares and spoilage. How many extra pieces are built in to cover failures, and whether you pay for them.
Samples. What each sample stage costs, and whether sample cost is credited against the order.
Packaging and shipping. The cost of cartons, dividers and transport, and the carrier’s terms.
Postage. The mailed cost of the heaviest and thickest suite, including any nonmachinable surcharge, for the full list. Postage is often forgotten in the comparison and can change which design is cheapest.
Compare alternatives to pop up invitations on the same basis
When pop up invitations look too expensive or too fragile for the whole list, there are alternatives, and it is fair to compare them honestly.
A flat card with a small standing keepsake. The invitation mails flat, and a small punch-out or pop up piece is included for guests to keep. It adds an insert but removes risk from the main card.
A gatefold or z-fold with a dramatic reveal. Panels that open outward without any standing mechanism. They create surprise using only folds, which are easier to ship and easier to open.
Pop up invitations for a smaller group. A full mechanism for the wedding party, parents and close family, and a flat card for everyone else, with the same artwork. It concentrates the cost where it matters and reduces the number of hand-assembled pieces.
A flat card with a layered or raised look. Where a printed illustration suggests depth, the invitation has no mechanism to fail. The site’s guides on print techniques and die cuts cover these.
None of these is a downgrade. A guest who receives a handsome flat card that arrives intact has a better experience than one who receives a crushed pop up.
Questions to ask a maker of pop up invitations before you order
Makers of pop up invitations like clear questions because they show a client who will accept an honest answer. These are the ones that most often separate a reliable quote from a hopeful one.
Have you built this mechanism before, and may I see a finished one? A photograph is useful. A piece in your hand is better.
What is the tolerance on folds and mount points, and what happens to the design if it is used up? You are asking how close to failure the design runs.
What paper do you recommend for the shell and the mechanism, what are the gsm values, and which way does the grain run? A maker who answers all three has thought about it.
Which adhesive do you use, where is it applied, and how far is it from the edges? And, for keepsakes, what documentation exists for long-term suitability.
How many minutes of hand assembly does each piece need, and how do you check quality? Ask what a rejected piece looks like.
Will you build a sample in the real materials, and what does it cost? If the answer is no, ask why.
What is the finished thickness at the thickest point, and will you measure it with the final envelope? Do not rely on the maker’s estimate of postal category.
What happens if pieces arrive damaged or fail after delivery? Put the answer in writing, along with sample approval and the delivery date. The site’s guide to wedding vendor contracts explains the clauses worth checking and how to keep a record of approvals.
Red flags
A maker of pop up invitations who will not show a sample, will not discuss tolerance, cannot name the adhesive or quotes a price without seeing a drawing is guessing. A maker who says every design will mail as a standard letter without measuring is guessing in a more expensive way. A maker who promises that no piece will ever fail is promising something no one can deliver, and you should ask what the plan is for the pieces that do.
Equally, a maker who tells you that your favorite idea will not work, and shows you why with a sample, is giving you more value than one who says yes. The fix for a failing design is usually small, and an honest maker will often suggest it.
Edge cases and failure modes for pop up invitations
The earlier sections cover the common path for pop up invitations. These are the situations that surprise people, with a short decision rule for each.
Hot, cold and wet weather
Pop up invitations are mailed through summer heat, winter cold and rain, and sit in mailboxes that may be in the sun. Adhesives and papers respond to all of it. If your mailing falls in a hot season, run the warm test with extra care, and prefer joints that do not rely on a soft adhesive alone, such as slot-and-tab construction.
If your mailing falls in a damp season, keep glue amounts small and test the humid-room step. A plastic sleeve over the mailing envelope is not usually the answer, since it adds thickness and cost.
Guests who receive the card folded in an unexpected way
Occasionally a card arrives with the mechanism partly open, because the envelope was crushed or the card was bumped. A guest may press it flat, which can crease the standing piece. Design the mechanism to tolerate being flattened once without permanent damage, and make sure the information does not depend on it standing. That is the same rule as before, applied to the worst case.
Guest list size and pop up invitations
For a very small list, a custom mechanism for every household is affordable in labor, and even a complex design can be sample-tested thoroughly. For a very large list, hand assembly becomes the bottleneck, and a mixed approach, such as a full pop up for close family and a flat card for the rest, may be wiser. The break point depends on the maker and the design, so ask for the assembly minutes per piece and do the multiplication yourself.
Invitations that will travel abroad
International mail has different handling, different rules and often a longer journey. Postal rules and rates differ by country and by service. Confirm the rules with the postal service and the destination country’s postal information, and expect a bulky or irregular piece to be treated differently from a flat card. For overseas guests, a flat card with a small keepsake pop up delivered at the event may be the safer choice.
Invitations for guests with limited vision
A pop up adds a visual effect that some guests will not see, so pop up invitations need a plain fallback. Make sure the printed information has strong contrast and a readable size, and consider a plain-language flat version on request. The aim is not to give anyone a lesser invitation, but to make sure the practical content never depends on a visual flourish.
Replacements and late additions
Pop up invitations are harder to reprint than flat cards. If your list is likely to grow, ask the maker what the minimum reorder is and how long it takes, and whether the tooling and the paper are held. Order a modest number of extra sets at the start rather than a second run later, when the paper may have changed. The site’s guide to invitation print production discusses overage and reorder planning in general terms.
When a mechanism fails after mailing
If a guest tells you the pop up was crushed or stuck, respond kindly and simply. Send a flat replacement of the key information, or say that the details are also on your wedding website or by phone. Do not make the guest feel responsible for the paper. Then check whether the failure points to a design flaw, and if several guests report the same trouble, tell the maker immediately, with the sample and the record you kept.
The keepsake question for pop up invitations
Many couples assume that pop up invitations will be kept, framed or tucked in a memory box. Some will be. A mechanism that is kept for years has to survive years, which raises the questions about paper, adhesive and creep in a more demanding form. If long-term keeping matters to you, tell the maker, ask what they would change and test accordingly. If it does not matter, do not pay for it.
Your next steps
This week, sketch the mechanism you want and decide which of the five types it is. Build a paper mock and run the geometry checks: reach, height, stack and the three angles. If it fails, simplify it before you contact anyone.
Next, run the three-second test on your pop up invitations with at least five people, including older guests who agree to help.
Then ask two or three makers for quotes against the same cost lines, and ask each for a sample in real materials. Measure the finished suite in its final envelope, confirm the postal category at the post office and mail two complete suites to yourselves. Keep one page of results for each stage. Leave wording, timing and who should receive which invitation to the guidance on how to word and send formal invitations, and keep this process for the paper itself. When all five gates pass, approve the run with confidence that your pop up invitations will open the way you imagined for every guest on your list.
FAQ
What is the simplest pop up mechanism for wedding invitations?
The V fold is the simplest. One piece of paper, creased down the middle, is glued to both pages so that it rises from the gutter when the card opens. It has few layers, closes flat easily and ships well. A short parallel-fold step added in front gives extra depth without much complexity, and both are manageable for hand assembly on a hundred or more pieces.
What paper weight works best for pop up invitations?
There is no single best weight, because the shell and the mechanism have different jobs. A heavier cover stock keeps the shell stiff, while a lighter cover stock folds more easily for the mechanism. Ask the maker for the gsm of each, confirm the grain runs along the folds, and test the actual stocks, since two papers with the same weight can behave differently at a crease.
How do I know if a pop up will mail as a standard letter?
Measure the finished suite at its thickest point, inside the final envelope, with all inserts. The Postal Service sets limits on size and thickness and prices rigid or uneven pieces differently. Take a complete sample to the post office counter and ask for the category and price before you order. Do not rely on the printer’s estimate, and confirm current rules on the Postal Service’s own pages.
Which glue is safest for a pop up card?
It depends on the joint. Double-sided tape or transfer film is clean and flat and is common for hand assembly. Water-based glue is strong but can warp thin paper. Hot melt is bulky and may soften in heat. Slot-and-tab construction avoids adhesive altogether. Whatever is used, keep it away from the edges, and test it with pulling, repeated opening and warm and humid conditions.
How can I make pop up invitations easy for older guests to open?
Use one familiar opening motion, add a wide notch or overhang to lift, avoid tiny tabs and ribbons that need pinching, and keep resistance low and even. Print a short cue such as “Open like a book.” Put the essential details on a flat surface that does not depend on the mechanism, and test with older volunteers, with their consent, before you order.
How many samples of pop up invitations should I test before ordering?
Test at three stages. Build a paper mock yourself, then ask the maker for a pre-production sample in the real paper and adhesive, and finally compare the first finished pieces of the run against that sample. At each stage, run the same checks and write down the results. Mail at least two complete sample suites to confirm that the invitation survives the postal system.
Do pop up invitations cost much more than flat invitations?
Pop up invitations usually cost more, mainly because of design work, tooling, a second paper, hand assembly and sample stages, and sometimes extra postage. Because prices vary widely, ask each maker to quote the same cost lines, including assembly minutes per piece and spare pieces. Compare alternatives on the same basis, such as a flat card with a keepsake, or pop ups for close family only.
What if a pop up arrives damaged at a guest’s home?
Respond kindly and keep it simple. Send the key details another way, such as a flat card, a message or your wedding website, so the guest is never left without information. Then check whether the damage reflects a design problem, and if several guests report the same issue, contact the maker promptly with a sample and your written test records.
Sources
- United States Postal Service
- Postal Explorer, Domestic Mail Manual, United States Postal Service
- Postal FAQs, United States Postal Service
- Arthritis, Centers for Disease Control and Prevention
- National Eye Institute, National Institutes of Health
- ISO 536, Paper and board: determination of grammage, International Organization for Standardization
- TAPPI, the technical association for the pulp, paper and packaging industries
- Americans with Disabilities Act, U.S. Department of Justice
- U.S. Access Board
- Federal Trade Commission, Consumer advice