
Die cut invitations are cards, covers or inserts that a steel die, a laser or a cutting machine shapes beyond a plain rectangle: arches, scallops, windows, lace-like panels. This guide gives you a die line and envelope clearance worksheet, a plain look at production tolerances, and a way to estimate weight and postage before you commit to a shape.
Treat die cut invitations as a four-gate decision. Gate one is the shape itself: radii, narrow bridges and sharp points. Gate two is tolerance: die cut invitations will drift a little from the print, so design for that drift. Gate three is fit: the finished card must slide into the envelope with room to spare. Gate four is mail: aspect ratio, thickness, stiffness and weight decide whether a piece is machinable and what it costs to send. Ask for a blank cut sample and a fully assembled, weighed sample before you approve the run.
A die cut is one of the few invitation choices that changes the physical object rather than its surface. Ink, foil and texture sit on top of a rectangle. A cut changes the outline, and the outline interacts with everything around it: the envelope, the post office, the printer’s equipment and the hands of the person opening the mail.
That is why die cut invitations deserve their own worksheet. A beautiful arched card that jams in its envelope, snaps at a narrow neck, or pushes the mailed weight into the next postage tier is not a design success. It is a decision that was made at the sketch stage without the numbers that would have shown the problem.
A note on scope for die cut invitations. This is general information, not legal, tax or financial advice. Printer capabilities, postal rules and prices change, and they differ by supplier. Where a number matters, this guide tells you which office or document to check, so you can confirm the current version before you order. Wording, timing and who receives a suite are covered in the guide to invitation wording and timing etiquette, so this one stays on the physical object.
What die cut invitations are, and when the shape earns its place
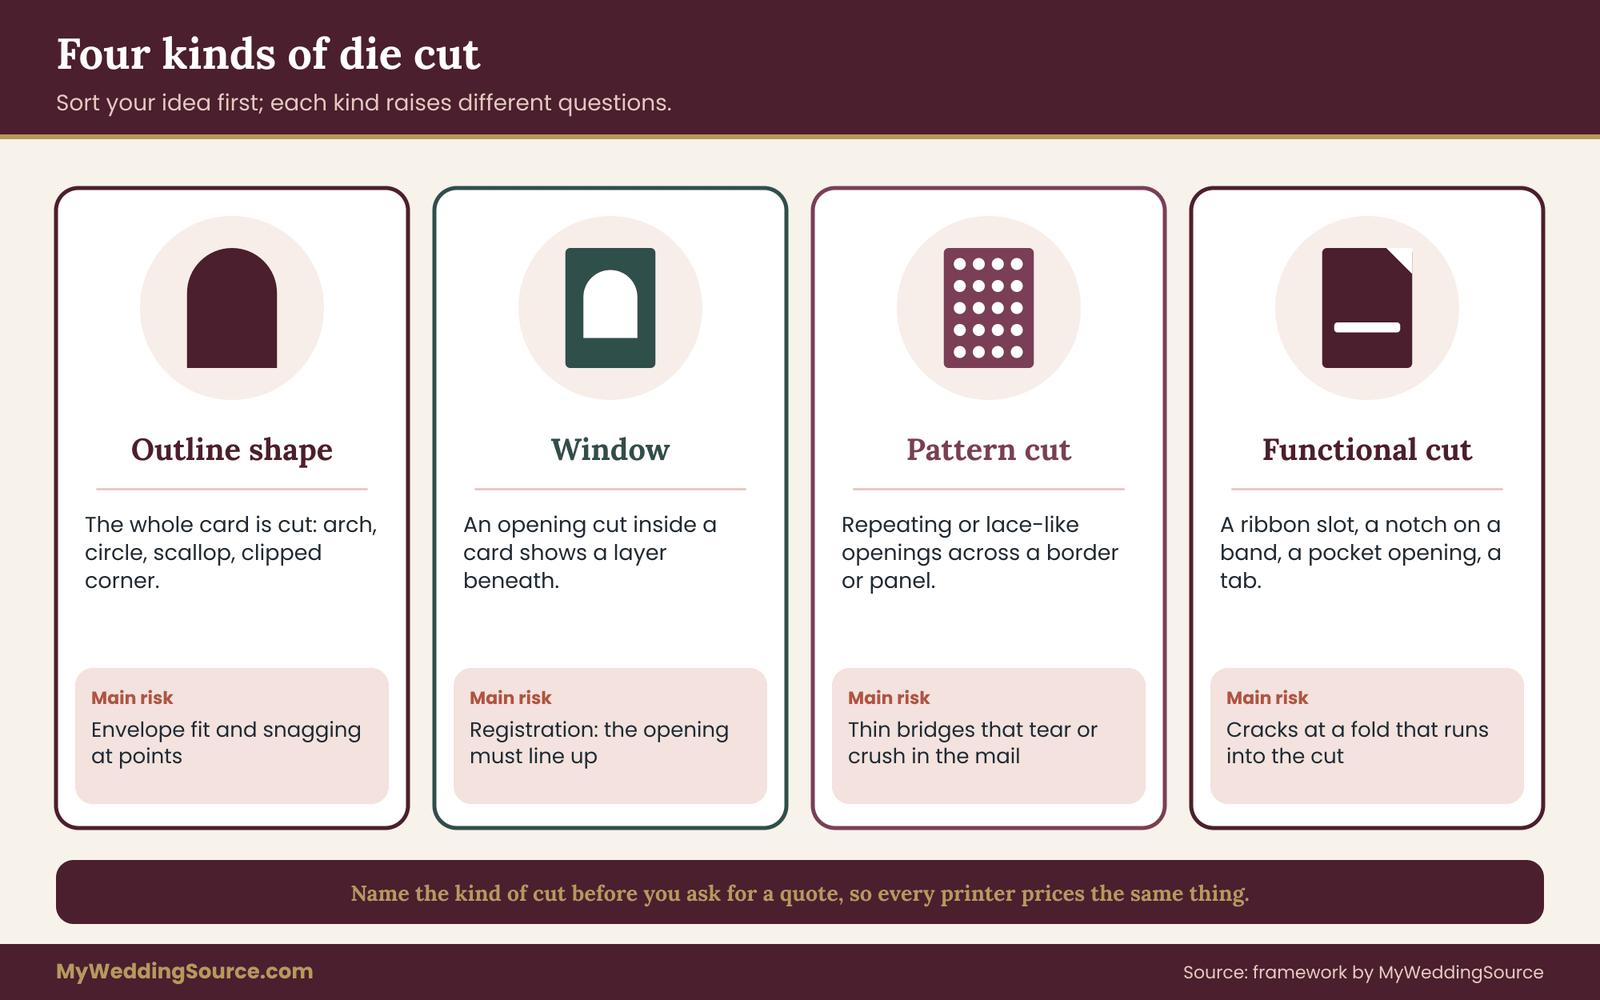
The term covers several different things, and mixing them up leads to confused quotes. Start by sorting your idea into one of four types.
Outline shapes. The whole card is cut into something other than a rectangle: an arch, a circle, a scalloped edge, a tag with a clipped corner. The cut runs around the outside only.
Windows and apertures. A shape is cut out of the interior, such as an arch-shaped opening on a cover that shows a second layer beneath. The outer edge stays rectangular.
Pattern cuts. Repeating or lace-like openings, often in a border or a full panel. These create many small bridges of paper and are the most fragile type.
Cut features on folds and wraps. A slot for a ribbon, a notch on a belly band, a pocket opening, a tab that tucks. The cut is functional, not only decorative.
Which type you choose sets nearly every later question. An outline shape mostly raises fit and mailing questions. A window raises registration questions, since the opening must line up with what shows through it. A pattern cut raises durability and handling questions.
The honest case for choosing die cut invitations
Die cut invitations earn their place when the shape carries meaning or atmosphere that no print finish can supply. A venue with a distinctive arched doorway, a ceremony under a real arch, a garden theme where a scalloped edge echoes the petals on the tables: these give the shape a reason to exist beyond looking different.
It does not earn its place when the shape is chosen because a photo online looked striking. Photos hide the details that matter, including the envelope the card must travel in, the weight of the full suite and the cost of the tooling. If the main appeal is that the card feels special, a heavier stock or a plain rounded corner may deliver most of the effect for a fraction of the risk.
A useful test is to say the reason out loud in one sentence. “The arch matches the arch at the ceremony site” is a reason. “It looks elegant” is a taste, and taste can be satisfied in cheaper ways. You can still choose die cut invitations on taste alone; just know that you are paying for it with extra checks, not with a guarantee of a better result.
How die cut invitations differ from other specialty choices
Letterpress, foil stamping and embossing change how ink or pressure looks on the surface. Those methods have their own trade-offs, and the site covers them elsewhere, so this guide stays on the outline. What matters here is that cutting interacts with those methods in specific ways.
A foil edge that runs right up to a cut line can be clipped. A deep impression near a thin bridge can weaken it. If your suite combines methods, ask the printer to describe the order of operations, because each step moves the sheet slightly.
The four-gate check for die cut invitations
The framework in this guide is a sequence you apply to any shape, in order. A shape has to pass each gate before you spend effort on the next one. The sequence matters, because the cheapest problems to fix are the earliest ones.
Gate one: shape. Is the geometry cuttable and durable? You check inside corners, narrow necks, thin bridges and any point that could snag or tear. This gate costs nothing to run because it happens on screen or on paper.
Gate two: tolerance. Will the shape still look right when the cut lands a fraction off the print? You check the distance between printed elements and the cut edge, and you decide whether a design that depends on perfect alignment is realistic.
Gate three: fit. Does the finished piece slide into its envelope without force, with room to spare on every side, and does it stay put once inside? You run this with the clearance worksheet in a later section.
Gate four: mail. Is the assembled piece a letter or a flat, is it machinable, how thick and stiff is it, and what does it weigh? You run this with a weighed, assembled sample.

Why the order protects your budget
Most of the money in a project for die cut invitations is spent at the tooling and printing stages. Changing a shape after a die has been made usually means paying for a new die. Changing it after printing means reprinting, because the artwork was positioned for the old outline. Discovering at the post office that the assembled suite costs more to mail means paying that difference on every envelope.
Running the gates in order moves each discovery to the cheapest possible moment. A bridge that is too thin is a pencil change on a sketch. An envelope that is too tight is a different envelope order before anything is printed. A weight problem is a lighter stock or a trimmed insert while the files are still editable. None of these are hard to fix early. All of them hurt later.
What you will need to run the gates
You do not need special software. You need a ruler that reads in sixteenths of an inch or in millimeters, a postal scale or a kitchen scale that reads in tenths of an ounce or in single grams, a few sample envelopes in the size you plan to use, and a printed copy of your die line at full size. Most printers can supply the die line as a PDF template. If yours cannot, that is useful information about how they handle custom work.
You will also need two or three answers from the printer, which later sections list as questions. The most important are the minimum feature size they can cut in your chosen stock, the cut tolerance they work to, and whether they will produce a blank cut sample before the full run. The wedding invitation printing guide covers the general proofing and handoff process; this guide adds the cut-specific checks on top of it. For the paperwork side, read how to set up agreements with your printer before you pay a deposit.
Reading a die line before you approve it
A die line is a thin outline on the artwork file that marks where the blade or laser will travel. It is usually drawn in a spot color on its own layer so it never prints. Many couples approve the printed artwork and barely look at the line, which is a mistake, because the line is the part that decides whether the object works.
When a proof arrives, look at the die line first and the artwork second. Ask four questions of the line itself. Does it match the shape you actually asked for, including the size of the radii? Is there a visible margin between the cut line and any text or important art? Are there any places where two parts of the cut come close together, leaving a narrow strip of paper between them? And is the overall outer dimension what you expect, measured on the proof rather than assumed?
The next section turns those questions into specific measurements for die cut invitations.
The anatomy of a die line on die cut invitations
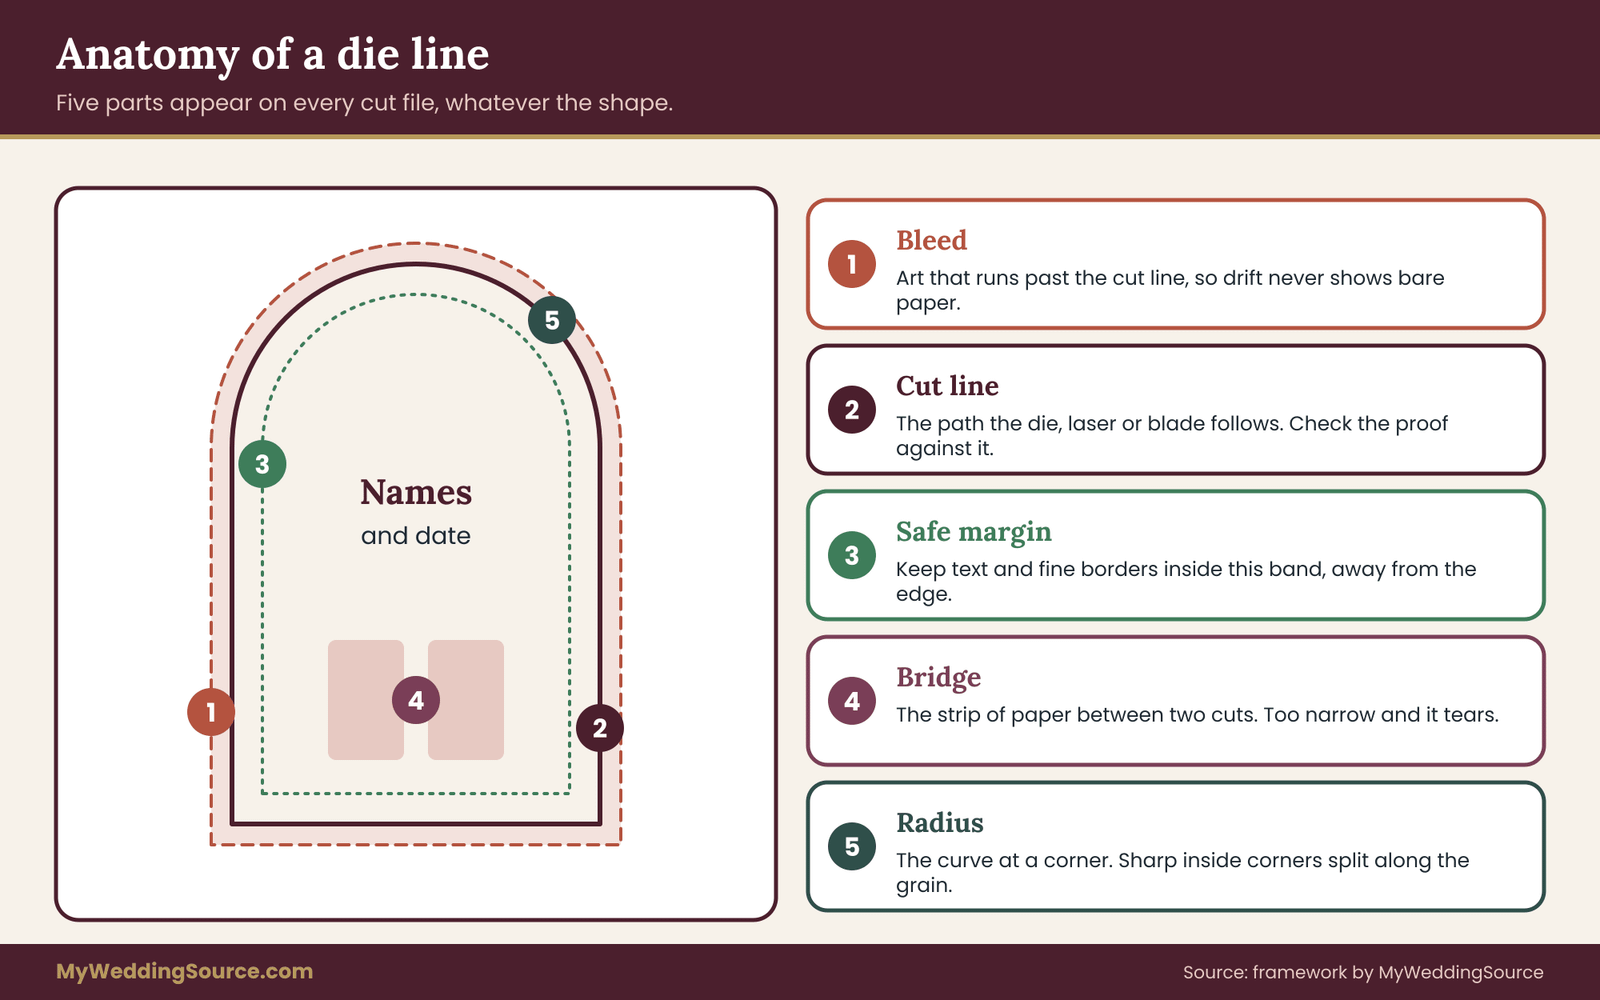
Every cut file for die cut invitations, whatever the shape, is built from the same handful of parts. Learning their names makes quotes and proofs far easier to read, and it gives you words to use when something looks wrong.
The cut line is the path the blade follows. Everything outside it is trimmed away as waste.
The bleed is artwork that extends past the cut line, usually by an eighth of an inch or about three millimeters. Bleed exists because no cut lands exactly where the file says. If the print stopped at the line, any drift would leave a sliver of unprinted paper along one edge. Printers publish their own bleed requirement, so use theirs.
The safe margin is the opposite buffer: a band inside the cut line where nothing important should sit. Text, monograms and fine borders stay inside it. A common working distance is at least an eighth of an inch from the edge, and more for text that would look awkward if the cut drifted toward it.
Bridges are the strips of paper left between two cuts, or between a cut and an edge. A lattice, a window frame and a scalloped border all create them.
Radii are the curves at inside and outside corners. A radius is not just style. It is the difference between a corner that holds and a corner that tears.
Bleed and safe margin on shaped pieces
On a rectangle, bleed and margin are easy to picture because the edge is straight. On a shape, they follow the curve, and many couples are surprised to see that the printed art extends past the visible edge on the proof. That extra art is meant to be trimmed away.
The practical rule is to check that background color or texture runs all the way past the cut line on every side, and that no thin printed border runs parallel to the cut. A thin border near a cut edge is the classic casualty of drift. If the cut lands slightly inward on one side, the border looks thicker there and thinner opposite, and the eye catches the imbalance at once. A wide border, a full-bleed color or no border at all hides the drift.
This is where the choice of design interacts with the choice of cut. A confident full-bleed color plus a generous inner margin makes die cut invitations forgiving. A fine gold keyline an eighth of an inch inside an arched edge looks perfect on screen and will show every tenth of an inch of drift in print.
Radii, bridges and the problem of narrow necks
The weak points of a shape are predictable. An inside corner that is perfectly sharp concentrates stress and invites a tear along the grain. A tab or a narrow neck connecting two larger areas is a hinge waiting to bend. A very thin bridge between two openings is where a card breaks in a mailbag.
For die cut invitations, most printers publish or can state a minimum feature size for their dies, often expressed as a minimum bridge width and a minimum radius, and it varies with the stock. Thicker stock needs wider bridges and larger radii because the blade has to push through more material and the paper has less give. Ask for the figures for your specific stock, not a general number, and ask what happens at that limit: a cut that is technically possible may still be fragile.
For the worksheet in this guide, the example values below are illustrative, meant to show the arithmetic, not to replace your printer’s numbers. Treat any bridge narrower than the printer’s stated minimum as a failed gate. Treat a bridge that only just meets the minimum as a gate to discuss, since it will be fragile in the mail even if it cuts cleanly. Where you can, widen it.
Stock thickness, grain and folds
Paper has a grain direction, set by the way fibers line up during manufacture. Paper folds and tears more cleanly along the grain and resists it across the grain. On a shaped card with a long narrow part, grain direction decides whether that part springs back flat or curls and cracks. Ask the printer which direction the grain runs relative to the long edge of your card, and whether they can orient the sheet to suit your shape.
Thickness, usually described as weight or caliper, matters in two ways. Thicker stock produces a more substantial piece and a cleaner, more shadowed cut edge, which can look striking. It also raises weight, widens the bridges you need and increases the chance that a window or lattice resists the die.
If you are choosing between two weights for a pattern cut, the lighter stock is often easier to cut finely, while the heavier stock is easier to handle once cut. This is a real trade-off, and a blank cut sample in each weight is the way to see it.
If the piece folds, add one more question: whether the fold will be scored first. A fold across thick stock without scoring can crack the surface, and a crack that runs into a cut is how a pocket or wrap fails. A score is a crease pressed in before folding, and it is cheap.
A shape-by-shape guide to what can go wrong
Not every shape carries the same risk for die cut invitations. This section compares the common ones in plain terms, so you can match your idea to the right level of caution.
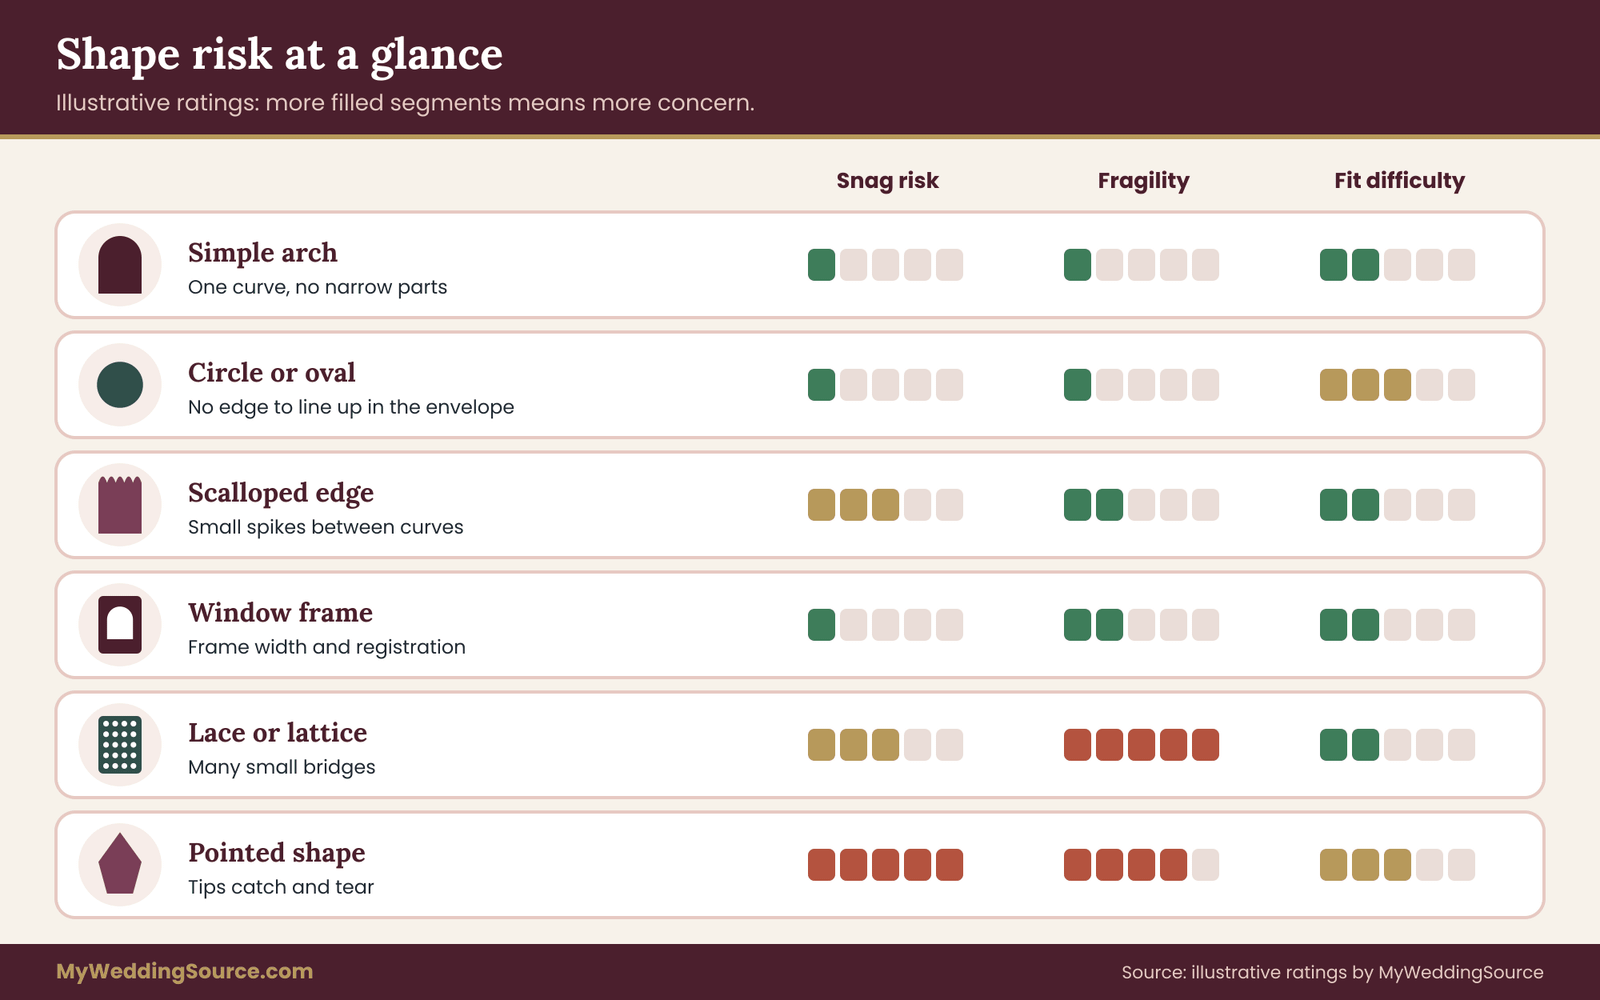
A simple arch or rounded top. One continuous curve, no inside corners, no narrow parts. This is the most forgiving outline cut. The main watch point is that the printed content must respect the curve at the top corners, where text can look cramped.
A circle or oval. No corners at all, which is good for durability. It is awkward for envelope fit, because a circle’s diameter equals its width and height, so it must clear the envelope’s narrower dimension. It is also harder to insert neatly, since it has no edge to align with the envelope’s corners.
A scalloped or wavy edge. A series of small curves along one or more sides. Every point between two scallops is a small spike that can snag or bend. The risk grows with the number and depth of the scallops.
A tag or clipped corner. One cut corner, sometimes with a hole punched for a ribbon. The clipped corner is stable. The hole is a separate feature with its own minimum distance from the edge, so check that bridge.
A window frame. An opening cut inside a larger card. Durability depends on the width of the frame on all sides, and registration depends on the layer beneath lining up with the opening.
A lace or lattice pattern. Many small cuts and many small bridges. It is the most demanding on stock, tooling and handling, and the one most likely to arrive damaged if it is not protected.
A pointed shape, such as a star, a leaf with a long tip or a banner end. Sharp points are a snag and tear risk and often a postal-handling concern. A slightly rounded point gives most of the look with much less fragility.
Turning a shape risk into a decision
The point of ranking shapes is not to talk you out of die cut invitations. It is to show you which checks to spend your effort on. A simple arch for die cut invitations can go through the gates with a quick review. A lattice deserves a blank cut sample, a handling test and a protective plan, such as a sleeve or a layer of tissue. A pointed shape deserves a conversation with the printer about rounding the tip.
When you are torn between two shapes, run both through the same questions: how wide is the narrowest bridge, how many places could snag, how much does the outline change the fit in the envelope, and does the shape suggest an orientation that a guest could get wrong? The shape with the shorter list of worries is the safer pick, and if the list is equal, choose the one you like more.
A word on orientation
Some shapes are the same upside down and some are not. An arch is clearly right side up. A circle or a symmetrical scallop is not, and a guest may read the card sideways. If the shape has no natural top, add a visible cue, such as a small printed mark, a line of text that sets the reading direction, or a single flat edge. This is cheap to add on the proof and awkward to explain after the fact.
Orientation also matters for the envelope. A card whose shape makes it feel unclear which end goes in first tends to be inserted at an angle, and an angled insertion is how corners get bent. A good design makes the correct way the obvious way.
When a shape needs a second layer
Many die cut invitations are really two pieces: a cut cover and a printed layer beneath. The cover supplies the shape and the inner layer supplies the content. This approach is common because it keeps the text on a plain rectangle, which is easy to print and proof, while the shape lives on the cover.
It also doubles the number of tolerance questions. The cover is cut and the inner sheet is trimmed, and the two must align where the opening shows the layer below. A generous margin around anything visible through the window gives the alignment room to vary. If the inner layer is attached with an adhesive dot or a fold, ask how much the attachment can shift, since that adds to the stack of small errors. The next section explains how those add up.
Production tolerances for die cut invitations, in plain terms
In the world of die cut invitations, a tolerance is the amount a finished piece is allowed to differ from the plan before it counts as a defect. It is not a flaw in the printer; it is a property of every physical process. Paper expands and shrinks with humidity, a stack of sheets shifts a hair under pressure, and a die wears. A printer who tells you they hold zero variation is describing something that does not exist, and that is a reason for caution, not comfort.
For die cut invitations, three separate tolerances matter, and each one is easy to confuse with the others.
Print-to-cut registration on die cut invitations is how closely the cut lands relative to the printed art. This is the one you see: a border looking uneven, a window that shows a sliver of the wrong color.
Cut dimension is how close the finished outline is to the nominal size. This is the one that matters for envelope fit: if every card in the run comes out slightly wider than planned, a tight envelope becomes a very tight envelope.
Stack variation is the cumulative effect when several pieces are assembled: an inner layer, a cover, a pocket, an insert. Each part has its own small variation, and they add.
Why a stack of small errors matters
Imagine three parts, each of which may be off by a small amount in either direction. In the best case the errors cancel. In the worst case they all lean the same way and add up. A designer who only considers the best case for die cut invitations produces a piece that looks perfect in the sample and loose or tight in a third of the run.
The way to handle this is to design die cut invitations with the worst case in mind, and to leave room where the errors would otherwise show. Margins and bleed are that room. A generous opening around a layer seen through a window is that room. A card that is a little smaller than the envelope’s inside is that room. None of these cost much. They simply give the process space to vary without anyone noticing.
Asking for numbers without sounding adversarial
Printers hear these questions often and good ones answer them easily. You are not accusing anyone; you are trying to design to their process. A script that works is: “What cut tolerance do you hold on this stock and shape, and what registration do you expect between the print and the cut? I’d like to size the margins and the envelope clearance to match.”
If the answer is a specific figure, write it down and use it in the worksheet. If the answer is a general reassurance with no figure, ask a follow-up: “Can you give me a number I can design to, even if it’s approximate?” A printer who cannot or will not give one is telling you that the cut is not tightly controlled, and you should design with extra room accordingly.
Ask, too, whether the tolerance is the same across the whole run or is typically tighter at the start. Some processes drift as a die wears or as a sheet stack changes, and it is reasonable to ask how often they check pieces during a run.
Designing around the drift
The practical rules are short. Keep important content inside a safe margin. Avoid thin borders and keylines near a cut edge, or make the border wide enough that drift is invisible. Use bleed on every edge that will be cut. Make windows slightly smaller than the layer beneath them, rather than exactly equal, so a small shift does not reveal an edge. And do not design two cuts to line up perfectly with each other across separate pieces.
A related habit is to keep alignment-critical elements on a single sheet. If a pattern has to line up between the cover and the inner page, the alignment is only as good as the weakest link in the stack. If the pattern only needs to look intentional on one sheet at a time, the stack matters far less.
How the cut is made: steel-rule dies, laser and digital cutters
Not all cutting is the same process, and the choice changes the cost curve, the edge quality and the tolerance. This section describes the three common routes in general terms. Capabilities vary by shop, so use it to ask better questions, not to predict what any one printer offers.
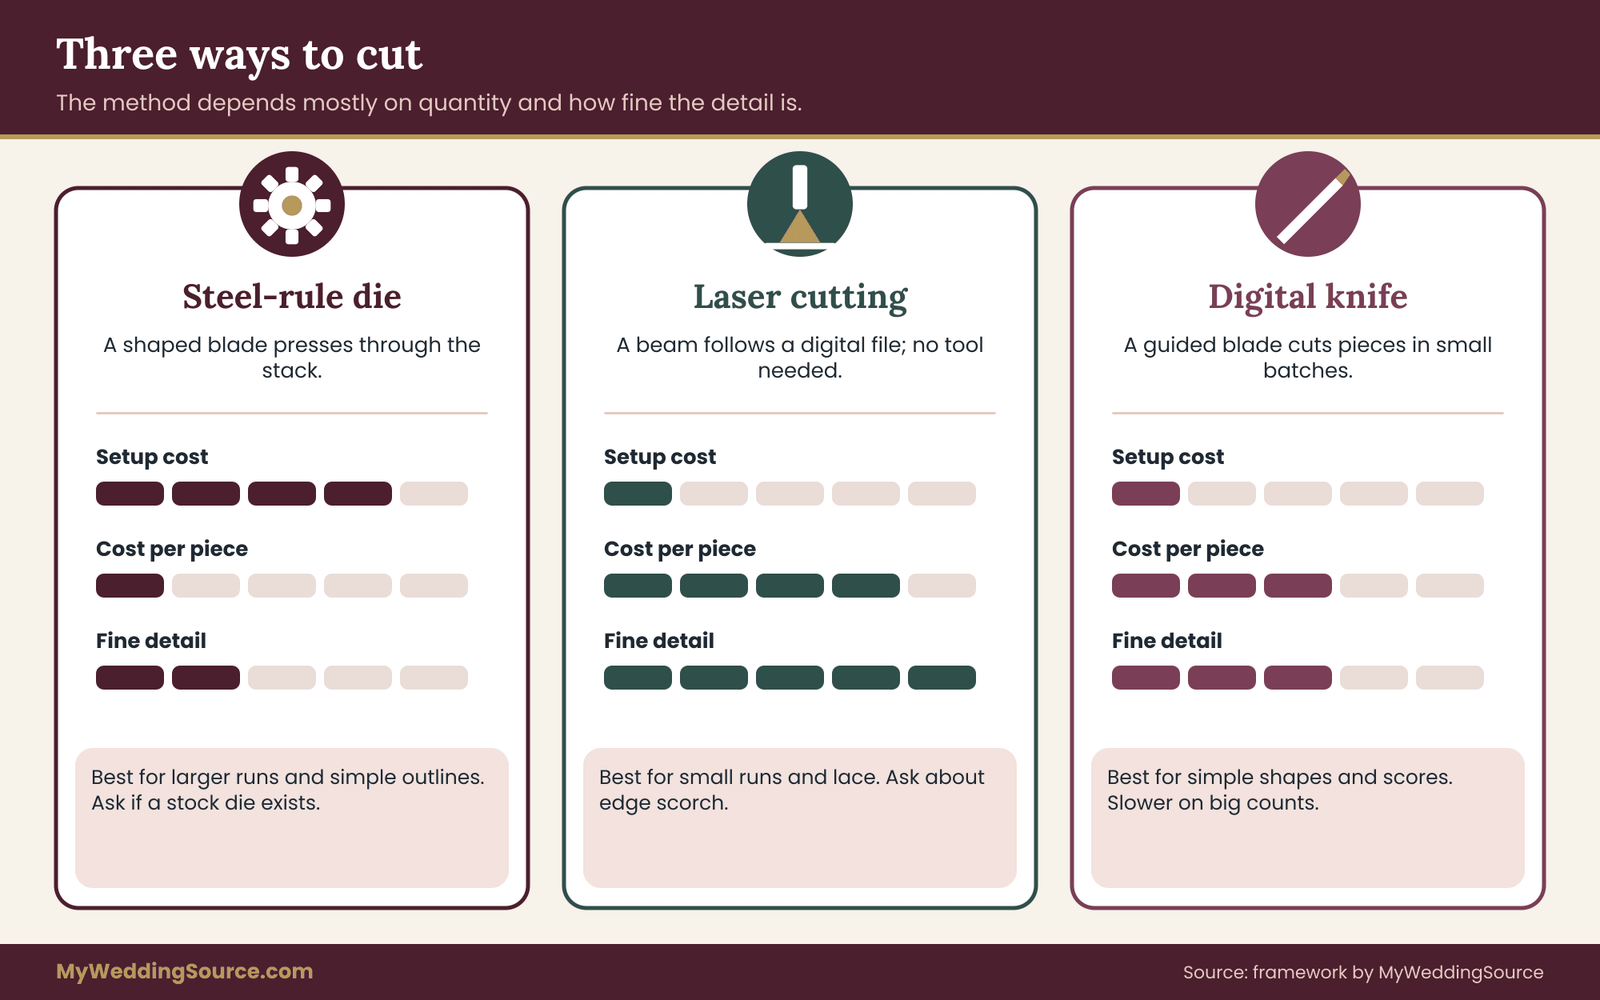
Steel-rule die cutting presses a shaped blade, mounted in a board, through a stack of paper. A custom die has an upfront cost for making the tool, and the per-piece cost is then low. It suits larger quantities and thicker stock. Printers often keep a library of dies they have already made, so a standard shape may avoid the tooling charge. Ask whether your shape, or something close, is already on the shelf.
Laser cutting uses a beam that follows a digital file. There is no physical die, so there is no tooling charge and intricate patterns are feasible. The trade-offs are that cutting is slower per piece, the edges can show a slight scorch or a smoky smell depending on the stock, and the per-piece price may be higher at larger quantities. It suits small runs and fine detail.
Digital knife cutting uses a blade guided by a file, such as a plotter-style cutter. It also needs no die and handles simple shapes and score lines well, but it works piece by piece or in small batches and is less suited to fine lattices or very large counts.
Matching the method to die cut invitations and quantity
The choice of method for die cut invitations usually comes down to quantity and detail. For a small guest list and a delicate pattern, laser cutting avoids a tooling fee that would be spread over only a few dozen pieces. For a larger list and a simple outline, a steel-rule die is typically more economical per piece. In between, the answer depends on the shop’s rates, and the only reliable way to learn it is to ask for quotes on the same specification.
When comparing quotes, make sure they describe the same thing: the same stock, the same shape, the same quantity, the same finishing and the same delivery date. The wedding vendor contract guide explains what to confirm in writing, and for cut work add three lines to the agreement: who owns or keeps the die after the job, what the tolerance is, and what happens if a batch of cut pieces falls outside it.
Who keeps the die
Custom dies are physical objects, and a printer may keep them, charge to store them or hand them over. For a one-time event there is usually little use for the tool afterward, though a couple might want it for a thank-you card or a reprint if the guest list grows. Ask the question before paying for tooling, and note the answer. If you want to reuse the shape later, make sure the arrangement allows it.
The cost logic of die cut invitations, without invented numbers
Pricing for die cut invitations varies too widely to quote a typical figure, so this section gives you the structure of the cost instead. Once you see the structure, any quote becomes easier to read.
A quote for die cut invitations is built from a few parts. There is a one-time setup, which for a steel-rule die is the tool and for any method is the file preparation and press setup. There is a per-piece charge for the cutting itself. There is the paper, including the extra sheets that are spoiled during setup and cutting. There is the printing, which depends on the method. And there are the finishing steps, such as scoring, folding or assembly.
The setup cost is fixed, so it is spread across the number of pieces: the larger the run, the smaller the share each piece carries. The per-piece charge scales with quantity. Spoilage is usually expressed as a percentage or as a number of extra sheets, so ask how many extra pieces are included and whether the quantity you order is the quantity you receive, or the quantity they start with.
The two costs people forget
The first is the cost of spares for die cut invitations. A wedding suite of die cut invitations always needs a few extra pieces for corrections, late additions and your own keepsakes. For ordinary invitations, a small overage is cheap. For a die cut, each extra requires cutting, so the overage is more expensive.
Decide the number you actually need rather than rounding up out of habit, and check with the guest-count guidance in the wedding guest list guide, since you mail one suite per household, not per person.
The second is the cost of mailing the finished suite, which is covered in its own section later. A cut that adds weight or pushes a piece into a different postage category can cost more over the whole guest list than the tooling did. The tooling is a visible line on a quote. The postage is spread over many small stamps and is easy to overlook until the envelopes are stuffed.
Questions worth asking the printer before you order
Bring this list to the first conversation. The answers shape every later decision.
What is the smallest bridge, narrowest neck and tightest radius you can cut in this stock, and what do you recommend for durability? What cut tolerance and registration do you work to? Which method will you use for this shape and quantity, and why? Is there a tooling or setup charge, and who keeps the die? How many extra pieces are included for spoilage, and what is the overage policy?
Will you produce a blank cut sample, and what does it cost? Can you supply the die line template at full size? What is the lead time for the sample, the proof and the run? And what is your policy if the cut falls outside the agreed tolerance?
These are ordinary, fair questions. A good vendor will answer most of them quickly. Slow or vague answers to several of them at once are information you can use when deciding who to hire.
The die line and envelope clearance worksheet
This is the core tool of the guide for die cut invitations. It takes about fifteen minutes with a ruler, and it answers the question that sinks more die cut invitations than any other: will the finished piece actually go into the envelope, every time, in the worst case rather than the best one?
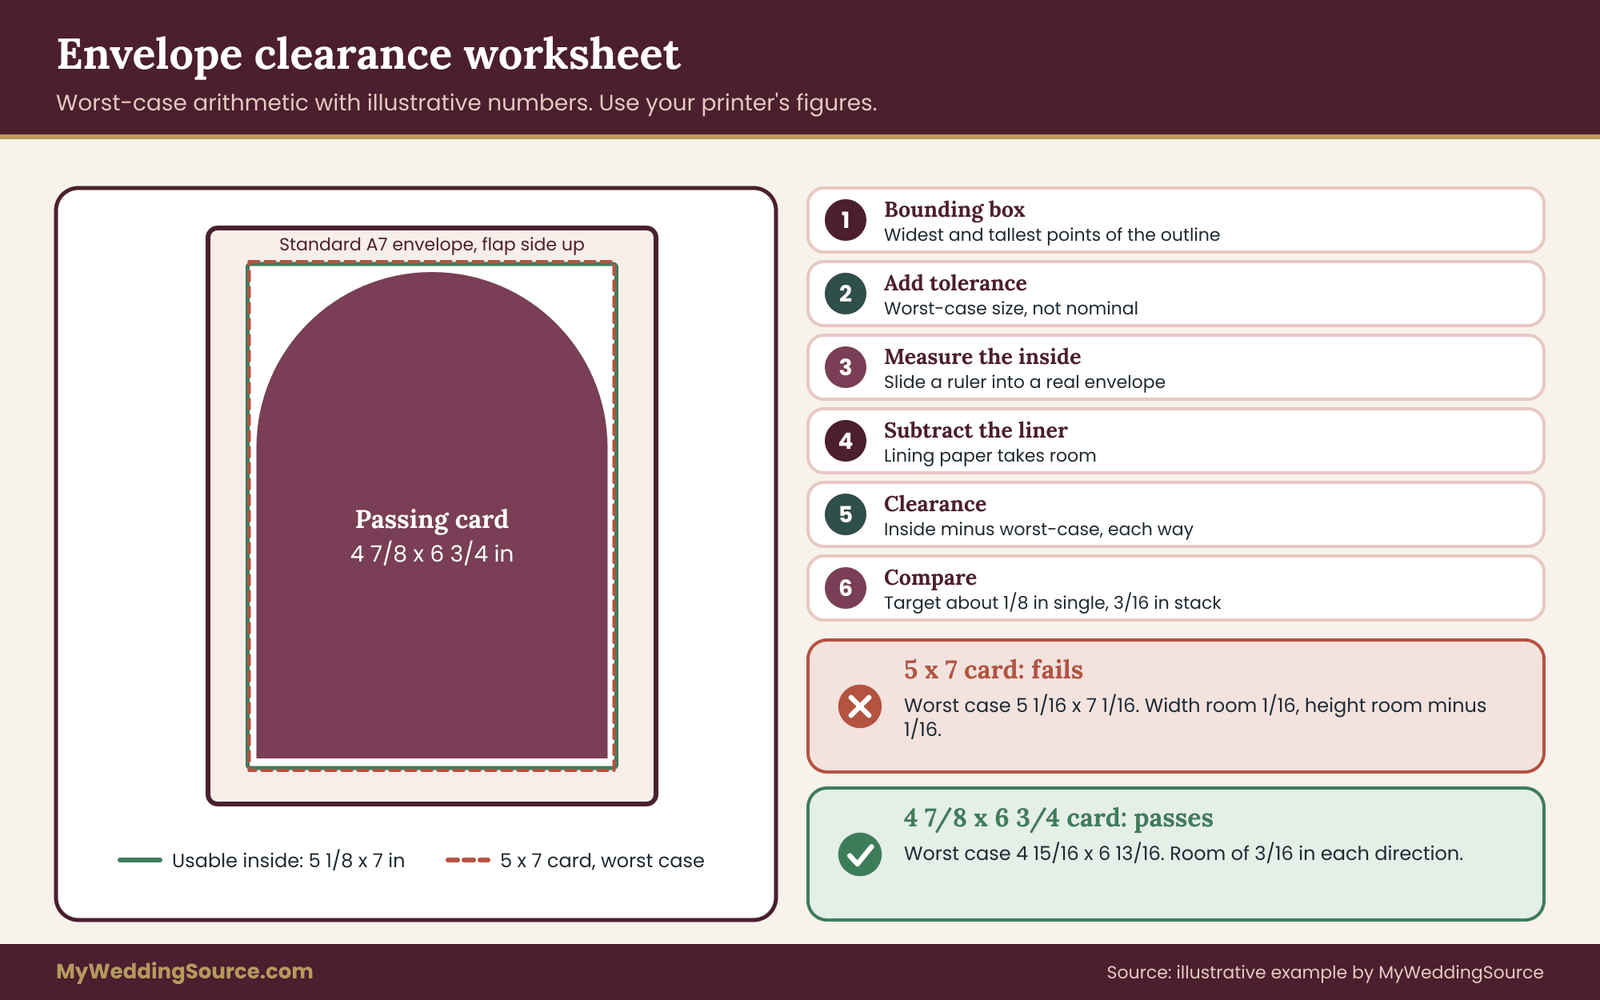
The worksheet for die cut invitations works on one dimension at a time, width first and height second, and it uses worst-case arithmetic. Every number in the example below is illustrative. It shows how the steps work. Your own numbers come from your printer’s stated tolerance and from envelopes you have measured.
Step one: find the bounding box. Take the widest point and the tallest point of the cut outline. For a rectangle that is simply its size. For an arch it is the full width and the full height to the top of the curve. For a scalloped card it is the distance to the outermost points, not to the valleys. Only the bounding box has to clear the envelope.
Step two: add the cut tolerance. Take the tolerance your printer gave you. If the cut may land larger than planned by a fraction on each edge, add that fraction to the width and to the height to get the worst-case size. In the example, the stated cut tolerance is plus or minus one thirty-second of an inch per edge, so the worst case adds one sixteenth of an inch to each dimension.
Step three: measure the usable inside of the envelope. Do not trust the nominal size printed on the box. Slide a ruler into a real envelope and measure how far it goes in both directions. The usable height is shorter than the outside height because of the seam and the fold line near the flap.
Step four: subtract the liner allowance. A liner or a thick lining paper takes up room. Subtract a small allowance for it from both dimensions. In the example, it is one sixteenth of an inch.
Step five: calculate the clearance. Usable inside minus worst-case piece, for width and for height separately.
Step six: compare with the target. In this worksheet the working target is at least one eighth of an inch of clearance in each dimension for a single flat piece, and at least three sixteenths for a stack of several pieces. These targets are working values for the worksheet, not industry standards. Confirm them with your envelope supplier.
A worked example with an invented couple
Suppose a couple, called Maya and Daniel here, want a five by seven inch arched invitation in a standard A7 envelope, which is nominally five and a quarter by seven and a quarter inches. This is an invented example, built to show the arithmetic.
They measure a sample envelope. The inside runs five and three sixteenths wide and seven and one sixteenth tall, and the envelope has a lining, so they subtract one sixteenth from each dimension. The usable inside is five and one eighth by seven inches.
Next, the worst-case card. At five by seven, adding the one sixteenth tolerance gives five and one sixteenth by seven and one sixteenth. Width clearance is one sixteenth, which is below the target. Height clearance is negative: the worst-case card is taller than the usable space. On paper the card fits. In the worst case it does not, and a stack of cards, each one slightly different, would produce some that jam.
Fixing a failed worksheet
A failed line on die cut invitations is not a disaster. It is the cheapest moment to learn about a problem. There are four fixes, and you can mix them.
Shrink the card. In the example, reducing it to four and seven eighths by six and three quarters gives a worst-case size of four and fifteen sixteenths by six and thirteen sixteenths, and clearances of three sixteenths in each direction. That meets the target for a single piece.
Change the envelope. A larger envelope, or the same envelope without a liner, adds clearance. The trade-off is weight and cost, and the envelope’s proportions affect mailing, which later sections cover.
Tighten the tolerance. If the printer can hold a smaller tolerance, the worst case shrinks. This usually costs more and is worth asking about only if the size cannot change.
Remove the thing that eats space. A liner, a thick insert or a belly band can be the difference between pass and fail, so check what each adds before cutting the card.
The lesson is not that the five by seven card was a bad idea for die cut invitations. It is that standard sizes assume a rectangle with a tight tolerance and an unlined envelope, and each deviation uses up some of the quarter inch that a standard pairing offers.
The slide test with real samples
Arithmetic is a prediction. A physical test is evidence. Print the die line at full size, check that your printer shows it at one hundred percent scale, cut it out with scissors, and slide the paper shape into the actual envelope. Then do the same with a real blank cut sample once you have one.
Run the test as a guest would. Hold the envelope by the sides, flap open, and slide the card in with one hand. It should travel with light pressure and settle without catching. Then pick the envelope up by the corner, shake it gently and see whether the card shifts to one side, which suggests too much room, or binds, which suggests too little. Repeat with several pieces from the sample, not just one. A single lucky piece proves nothing.
Stacks, pockets and multiple pieces
A real suite of die cut invitations is usually several pieces together: an invitation, a details card, a reply card and its envelope. Each one adds thickness, and a stack behaves differently from a single sheet. Pieces can catch on each other, and a cut edge can snag the paper next to it.
Run the width and height check for the largest piece of die cut invitations first. Then check the thickness: stack the pieces, measure the stack with a ruler on its edge, and compare it with the envelope’s ability to flex. Then check how the pieces nest. If a die cut piece sits on top, its cut edge will face the envelope’s flap when it goes in, so the sharpest point should not catch on the seam.
For a pocket or a wrap, which holds other pieces, test the whole assembly with every insert in place, and pay attention to the pocket opening. A pocket cut too wide lets pieces slip out. A pocket cut too narrow makes inserting them a chore.
Orientation and the reveal
Guests should see the front of the piece first when they open the envelope. The usual convention is to insert the stack so the front faces the back of the envelope, the flap side, which means the recipient sees the front as they lift the flap. A shape that is not symmetric makes this easier, since the correct way up is visible. A symmetric shape needs the cue described earlier.
For a window cut, think about the reveal. Whatever shows through the opening is the first thing a guest sees, so decide what that is. A plain color, a pattern or the names can all work, but the design should hold up if the layer beneath sits a little off center.
Reply cards, return envelopes and keeping them simple
The reply card travels back to you, and it travels through the mail as well. That is one reason to keep reply cards and their envelopes plain: a standard rectangular card in a standard envelope is the least likely to have problems on the return trip, and guests will not have to think about it.
If you want the shape to continue to the reply, consider repeating it as a printed motif rather than a cut. The wedding RSVP etiquette guide covers how reply cards, deadlines and return postage fit together.
Test the reply set with the same worksheet. A smaller card in a smaller envelope has the same arithmetic, and its tolerances are proportionally larger. A reply card that is hard to slip into its envelope is the kind of small irritation that guests remember.
A short checklist from the worksheet
Before you leave this stage with die cut invitations, you should have these on paper: the bounding box of each cut piece, the printer’s stated tolerance, the measured usable inside of each envelope, the worst-case clearance in width and height, the thickness of the full stack, and the result of a physical slide test with at least five samples. If any of those is missing, the fit gate has not been run. Running it now takes an hour. Running it after the cards are cut is not possible.
Mailing die cut invitations: letters, flats and machinability
Once the suite fits its envelope, the next question is how the sealed envelope travels. A shape inside an envelope rarely changes the postal category by itself, because the postal service sees the outside of the piece, not the shape of the card within. What changes it is everything the cut brings along: extra thickness, uneven bulk, stiffness, added weight and, in some designs, an unusual envelope.
The rules for mailing die cut invitations come from the postal service, not from printers, and they are published in the USPS Domestic Mail Manual and in the current price notice. They change from time to time, so treat the figures in this section as the ones that have long been described and confirm each against the current documents or with a post office clerk before you order. This guide does not quote prices for the same reason.
Letter or flat
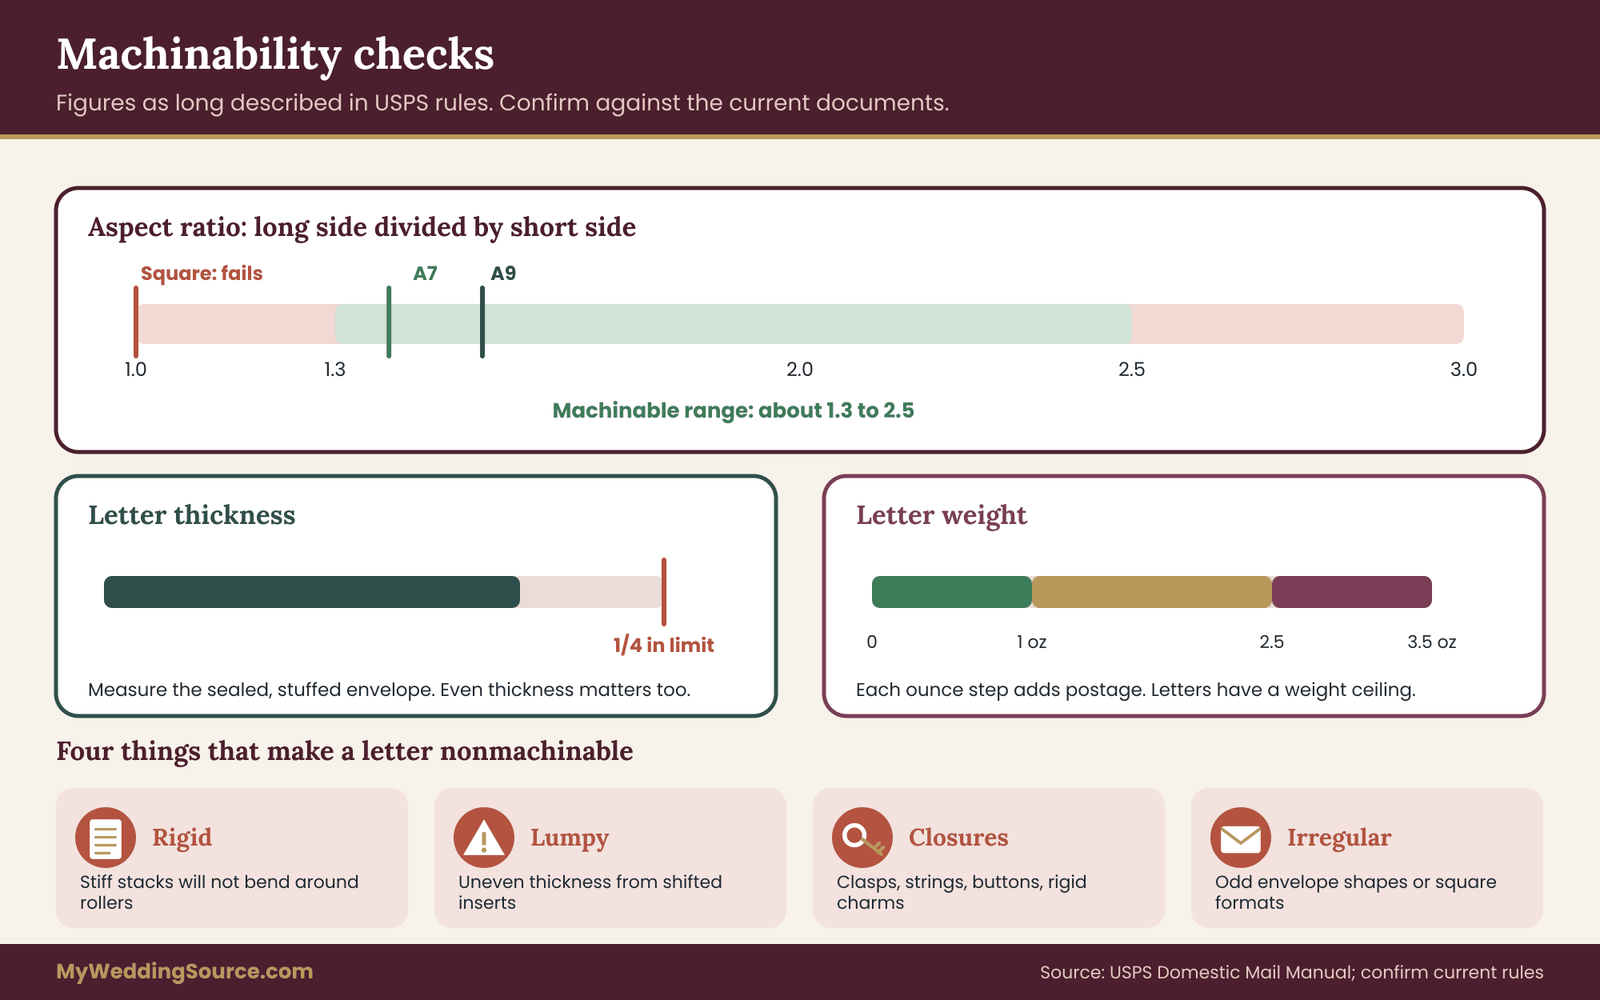
The mail service separates letter-size pieces from larger flats. A letter has to fall within a set range of height, length and thickness. As the manual has described it, the maximum is about six and an eighth inches high, eleven and a half inches long and a quarter inch thick, with minimums at the small end. A piece that exceeds any of those is a flat and is priced on a different basis.
Standard invitation envelopes, including the common A7, sit inside the letter range, which is why most die cut invitations mail as letters. Problems arise when a larger card, a bulky stack or an oversized envelope is chosen for visual impact. A suite that crosses a threshold changes category, and the price changes with it. Measure the sealed, stuffed envelope, not the empty one.
The machinability test
Within the letter category, a piece may be machinable, which means automated equipment can process it, or nonmachinable, which usually carries a surcharge. As the manual has described it, several things make a letter nonmachinable. The ratio of length to height falls outside a defined range. The piece is rigid. It has uneven thickness or lumps. It has clasps, strings, buttons or similar closures. Or it has an irregular shape.
Aspect ratio is the check for die cut invitations that most people can do in a moment. Divide the long side of the sealed envelope by the short side. As the manual has described it, a machinable letter falls between about one and three tenths and two and a half.
An A7 envelope, seven and a quarter inches by five and a quarter, comes out near one and four tenths and passes. A square envelope comes out at exactly one and fails, which is why square invitations draw a surcharge.
Where die cut invitations can trip the test
Thickness is the obvious risk for die cut invitations. A cut that leaves a lattice of small bridges can be fragile, so couples often add a stiffer backing or a layer of protective material, and that adds thickness and stiffness. A thick piece in a standard envelope may stay within the quarter-inch limit and still be uneven if the stack shifts to one end.
Unevenness is the sneakier risk with die cut invitations. A card with cut-outs may sit differently in the envelope than a solid card, since there is less paper to hold the shape. If a window frame is raised by foam or if a stack of inserts clusters in one corner, the sealed envelope can be noticeably thicker at one end. Equipment is designed to handle a reasonably uniform piece, and lumps are where it jams.
Stiffness is another. A thick, rigid cut card in an envelope is not flexible enough to bend around rollers. Machines depend on pieces bending slightly as they move, and a stiff stack can be treated as rigid. If a card is thick enough that it will not flex in your hands, ask the clerk about it.
Closures and embellishments, such as ribbons threaded through a cut slot, strings, buttons, beads or a rigid charm, are the classic nonmachinable items. If the design calls for a ribbon, check whether it can lie flat inside the envelope rather than being tied on the outside.
The envelope itself
Most of the postal risk for die cut invitations sits in the envelope, not in the cut. A custom envelope with an unusual shape, such as a pointed or curved flap, a square cut or a very wide format, can fail the aspect-ratio test or snag in equipment. A window or aperture on the envelope face needs the address to remain fully visible and legible, with a margin around it.
The address area and the strip along the bottom edge of the envelope are used by automated systems, and anything printed or attached there can interfere with reading. Dark ink on a light background is the safe choice. Metallic or pale ink, a busy pattern behind the address or a tinted envelope can reduce contrast and make the address hard to read. This is not a die cut problem as such, but die cut envelopes and liners are often paired with decorative treatments that raise it.
What the post office can and cannot tell you
The practical test for die cut invitations is to take one fully assembled, sealed, addressed sample to a retail postal counter and ask two questions. What postage does this need? And is it machinable, or will a surcharge apply? Bring the sample you actually plan to mail, not a similar one, since a slightly different insert changes the answer.
A clerk’s answer is helpful, but it is one person’s reading on one day. Treat it as a good indicator, write down what you were told and the date, and ask whether they would be willing to confirm by checking the manual. If a piece is borderline, a small design change that moves it clearly inside the limits is a better plan than relying on a favorable reading.
If your piece is fragile, ask about handling. Some post offices will hand-cancel on request, which keeps the envelope away from some automated processing. Availability varies by location and by volume, so ask early, ideally before the invitations are printed, and do not assume it is available.
Mailing a test piece
An old trick for die cut invitations that costs one stamp is to mail a complete sample to yourself, or to a friend in another city, a few weeks before you mail the rest. Address it exactly as the real ones will be addressed, including any calligraphy or special ink. When it arrives, examine it closely. Are the corners crushed? Has the card shifted? Did the cut survive? Is the address clean, or smudged?
A single test of die cut invitations is not a statistical proof, and one good result does not mean every piece will arrive perfectly. What it does show is whether a gross problem exists, such as a pointed corner that pierces the envelope, a window frame that crushes or an envelope that tears at the seam. It also lets you see what the sealed piece looks like after handling, which is far more informative than a photograph.
Protecting fragile pieces
If the test shows that a delicate cut on die cut invitations is vulnerable, there are a few ways to protect it without adding much weight. A sheet of tissue or glassine between the cut piece and the envelope can keep a lattice from catching.
A slightly smaller card leaves more room for the envelope to flex without squeezing the piece. A stiff backing board behind a fragile cover can stop it from bending, though it adds thickness and weight, so weigh the sealed sample again after any change.
Another option, if the guest list is small, is hand delivery to local guests. A piece that would be risky in the mail may be fine if it goes directly into someone’s hand. That only works for part of a list, so it does not remove the need to plan for the rest.
Guests who are far away
International mail has its own rules, categories and prices, and a die cut piece that is fine domestically may need a different check abroad. If a significant part of your list is overseas, ask the post office about those destinations separately. Do not assume that a domestic answer applies.
Weight and postage cost for die cut invitations
Weight is the quiet variable in any project with die cut invitations. A cut does not weigh more than a plain rectangle of the same stock, since cutting removes paper. But the choices that tend to travel with a cut do: heavier stock to support the shape, a second layer to carry the content, a liner so the cut edge does not scrape, a backing board for fragile parts. By the time the suite is assembled, it can sit right at a postage threshold without anyone having noticed.
The good news is that you can estimate the weight of die cut invitations with simple arithmetic long before anything is printed, and then confirm it with a real scale once a sample exists. The estimate is not a replacement for the scale. It tells you whether the design is likely to be comfortable or tight, so you know how much to worry.
A weight estimator for die cut invitations at the kitchen table
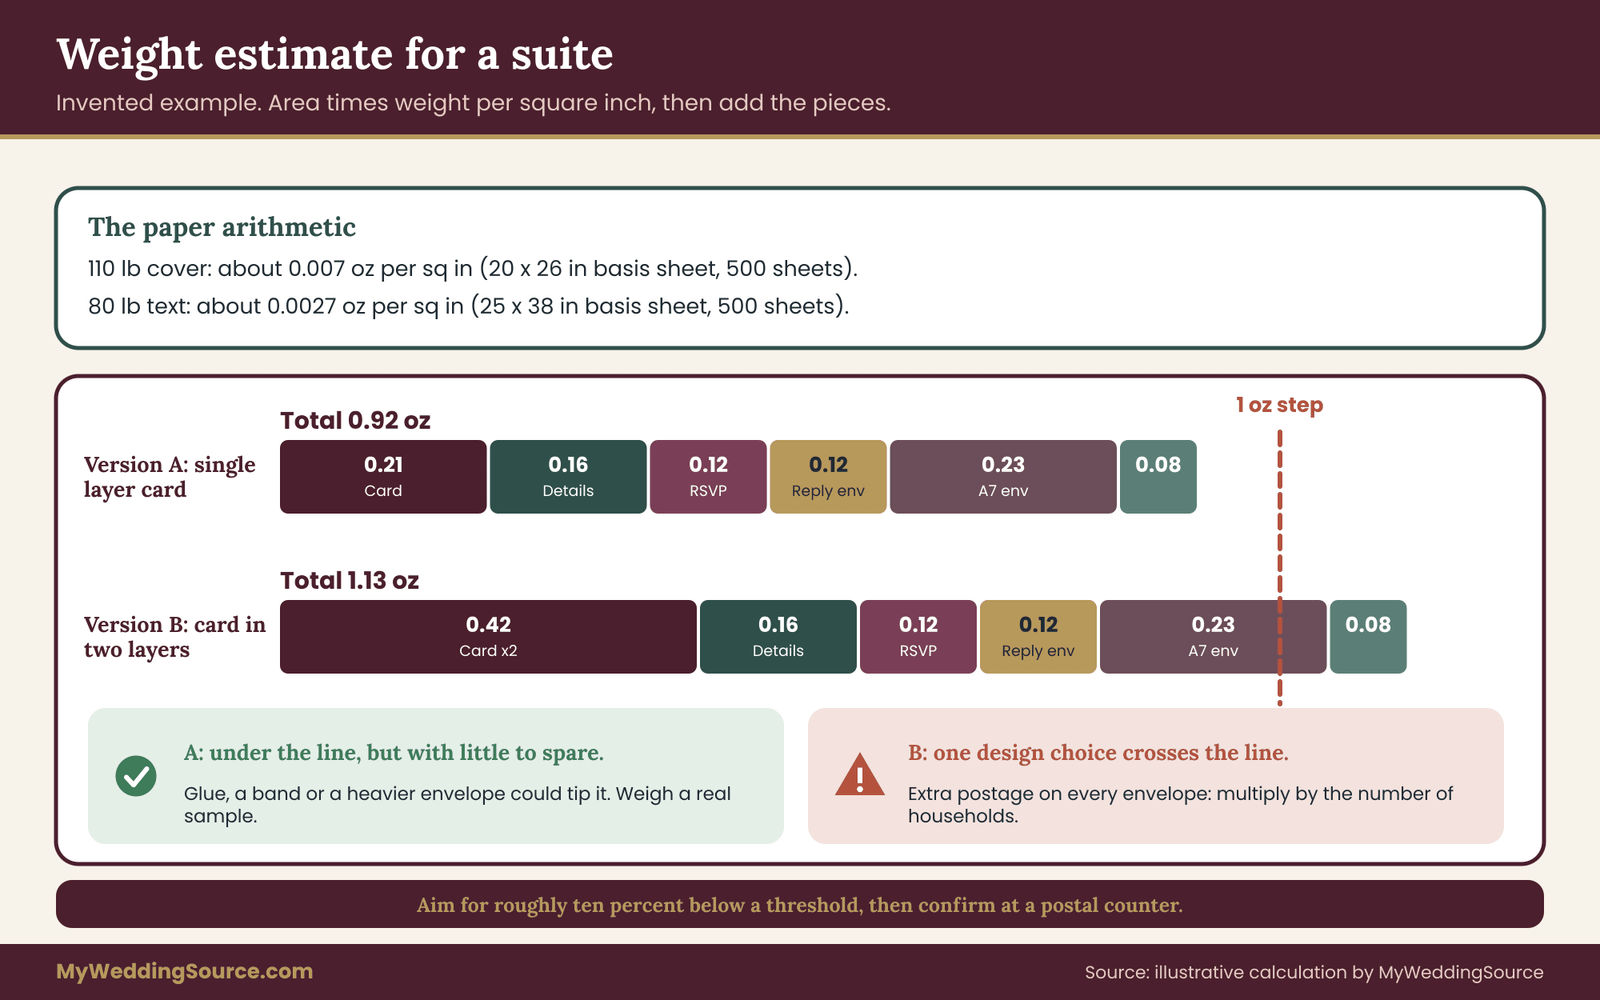
Paper is sold by basis weight, which is the weight of a stack of sheets of a standard size. Cover stock, the heavier paper used for invitations, uses a basis sheet of twenty by twenty-six inches, which is five hundred and twenty square inches, and the basis weight is the weight of five hundred of those sheets. Text-weight paper, used for many envelopes and lightweight inserts, uses a basis sheet of twenty-five by thirty-eight inches, or nine hundred and fifty square inches.
From that you can work out the weight per square inch. A sheet of one hundred and ten pound cover weighs a five hundredth of one hundred and ten pounds, which is about two tenths of a pound, or roughly three and a half ounces for five hundred and twenty square inches.
Divided across those five hundred and twenty square inches, that is about seven thousandths of an ounce per square inch. A sheet of eighty pound text works out to about twenty-seven ten-thousandths of an ounce per square inch.
Multiply the area of each piece by the weight per square inch of its stock, and add the pieces. The areas are easy: width times height for a rectangle, and a little less for a shape with corners removed. Envelopes have two faces plus a flap, so count both sides and a share of the flap. Your paper supplier or printer can confirm the basis weight of the actual stock, and real paper varies, so treat the result as an estimate.
A worked example for die cut invitations, continued
Return to the invented couple with their arched card in an A7 envelope. This is an illustrative calculation, not a measurement. The arched invitation, about thirty-one square inches after the arch removes some corner area, on one hundred and ten pound cover stock, comes to around two tenths of an ounce. A four by six details card, twenty-four square inches on the same stock, is about sixteen hundredths.
A reply card at three and a half by five inches, seventeen and a half square inches, is about twelve hundredths. The reply envelope, with both faces and a flap on text-weight paper, is also around twelve hundredths. The outer A7 envelope comes to roughly twenty-three hundredths, and a lining paper adds around eight hundredths.
Add them up and the whole suite is about nine tenths of an ounce. That is under an ounce, but with less than a tenth of an ounce to spare. Adhesive, a belly band, a slightly heavier envelope than assumed or a scale that reads a touch high could push it over.
Now change one thing. Suppose the couple decides the arched card needs a second layer for strength, doubling its stock. The card goes from about two tenths to about four tenths of an ounce, and the suite totals about one and a tenth ounces. It now sits in the next weight step. One design decision, made without checking the weight, added a cost to every envelope.
The safety margin
Because scales, paper and glue all vary, aim to keep die cut invitations comfortably below a weight threshold rather than just under it. A margin of about ten percent of the threshold is a reasonable working target, though this is a rule of thumb and not an official figure. If the estimate says nine tenths of an ounce, treat the piece as being at risk and weigh a real one.
Use a scale that reads in tenths of an ounce or in single grams, weigh the complete, sealed, addressed sample, and weigh at least three samples, because pieces within a run differ slightly. If the weight is close to a threshold, take the heaviest result as the one that counts. Postal scales at the counter are the final authority, so a retail counter visit remains the confirming step.
What extra weight costs die cut invitations across a guest list
Postage is charged per piece, so for die cut invitations a small difference per envelope grows with the number you mail. The calculation is the difference in postage between the two weight steps, multiplied by the number of envelopes. You mail one suite per household, not per guest, so the relevant count is the number of households on the list, which your guest list work establishes.
As a purely hypothetical illustration, if a heavier suite cost an extra thirty cents per envelope and the list had one hundred and ten households, the added postage would be thirty-three dollars. If the list had two hundred, it would be sixty dollars. Neither number is large next to a wedding budget, but both are avoidable, and the avoidable amount can often be saved by trimming a layer or lightening a stock.
Look up the current rates in the postal service’s price notice, since they change, and plug the real difference into the same arithmetic.
There is a second weight cost that is easy to overlook: the return envelopes. If you pre-stamp reply envelopes, you are paying postage on every one you send, whether or not the guest replies. Keeping the reply set light and standard is a way to control that.
Some couples use a reply postcard, which the postal service prices separately and which has its own size and thickness limits. If you consider it, check the current limits first, and note that a shaped postcard may not qualify for the postcard category at all.
Where weight hides in die cut invitations
The obvious heavy items are thick stock and extra layers. Less obvious ones are worth listing. Liners add weight across the whole inside face of the envelope. Vellum wraps and belly bands add small amounts that sum quickly. Ribbon or twine, apart from raising machinability questions, has weight. Heavy ink coverage, laminated or foil surfaces and thick adhesives add a little. Even the envelope can be a factor: a lined, heavier-weight A7 can weigh noticeably more than a plain one.
The way to find the culprits is to weigh the parts separately, if you can get samples, and rank them. Usually two or three items account for most of the weight, and trimming one of them, such as a lighter details card or a thinner liner, is enough to restore the margin.
Where die cut invitations can save weight without losing the shape
A few approaches keep the shape and lose some weight. Cut the shape from a single layer rather than two, as long as the single layer is strong enough for the design. Use a lighter stock for the pieces guests do not handle as much, such as the details card. Choose a lighter envelope or skip the liner if the fit allows it.
Combine two inserts into one. Or keep the cut on a small element, such as a belly band or a tag, and leave the main card as a plain rectangle. In that case the shape is still present, but the piece that sets the postage is conventional.
Whatever you change, return to the worksheet. A change to stock or layers changes thickness, which changes fit and machinability, so the gates are connected. Re-weigh after every change and re-run the slide test, because each fix can disturb a different gate.
Putting postage for die cut invitations into the budget
List postage as its own line in the budget instead of letting it hide inside the printing bill. The same applies to the tooling or setup charge, the cut sample, the spares and any extra envelope upgrades. The wedding budget guide explains how to structure those categories, and die cut invitations are a good case for a dedicated stationery line with sub-items. Seeing the full cost of the shape, not just the per-piece price, is what lets you decide whether it is worth it.
Buy postage after you know the final weight, not before. Postage bought in advance for the wrong weight can be awkward to use, and mixing stamps at the counter on mailing day is a way to waste a morning. Weigh the finished sample, confirm the postage with a clerk and buy the right amount, with a few extra for mistakes and late additions.
Proofs, samples and a timeline for die cut invitations
A project with die cut invitations has more checkpoints than a plain print job, and each one exists because something different can go wrong. The sequence below is the order that catches problems at the lowest cost. The dates are yours to set, since lead times differ by shop. Work backward from the mailing date and ask the printer for each stage’s turnaround, then check the result against the wedding vendor timeline so printing does not collide with other deadlines.
Stage one: shape and shortlist. Choose the type of cut and the two or three shapes you are considering. Run each through gate one on paper. Shortlist printers who actually offer the method you need and who will answer the tolerance questions.
Stage two: specification and quote. Send each printer the same specification: shape, size, stock, quantity, finishing, envelope, delivery date. Ask for the setup charge, the per-piece price, the spoilage policy and the sample cost in writing.
Stage three: the die line and the worksheet. Get the die line template, run the clearance worksheet with real envelopes, and settle the card size.
Stage four: the blank cut sample. Ask for a few pieces cut from the actual stock, without print. This is the single most useful object in the project. You can bend it, slide it into the envelope, weigh it and show it to the post office.
Stage five: the assembled sample. Once you have a printed proof or a close stand-in, assemble a complete suite, seal it, address it and weigh it. Take it to the post office. Mail a test piece.
Stage six: proof approval. Approve the artwork only after you have checked the die line on the proof, the margins, the bleed and the registration points.
Stage seven: production and inspection. When the run arrives, inspect it before you assemble anything.
Proofing a die line for die cut invitations
A proof for die cut invitations should show two things: the artwork and the cut line, ideally overlaid. Check the shape against what you expect, then check the distance from the cut to the nearest text or art on every side. Check that bleed extends past the line. Check windows against the layer behind them. And check the overall size by measuring the proof with a ruler instead of reading the number in the file.
Ask whether the proof is made on the real stock or only displayed on a screen. A digital proof shows the layout but cannot show how the cut paper behaves. A physical sample or a sample of the stock is a stronger check, and it is worth the cost for a pattern cut or a thick stock.
Inspecting the delivery of die cut invitations
When the boxes of die cut invitations arrive, open them the same day and do a spot check before anything else. Count the pieces against the order. Pull ten pieces from different parts of the stack and different boxes, since variation tends to show up between boxes. Measure the width and height of each against the nominal size and the tolerance you were given.
Run the slide test with at least five. Look for fuzzy or rough cut edges, cracked scores, chips at narrow bridges and any printing that sits too close to a cut edge.
Take photos of any problems with a ruler in the frame. Contact the printer promptly, since your agreement probably sets a window for reporting defects, and this guide to reading a vendor agreement explains why that clause is worth reading before you sign, not after. A calm message that states the order number, the measurements, the tolerance you were told and the photos is far more effective than a general complaint.
A script for reporting a problem
Something like this works: “We received the order today and checked ten pieces from three boxes. The width measures between X and Y, which is outside the tolerance you gave us. Here are the photos with a ruler. Could you tell us how you would like to handle it, and whether the remaining pieces can be checked before we assemble?” It is specific, it is factual and it asks for a plan. It does not accuse anyone.
Alternatives, edge cases and a final example
Not every idea for die cut invitations needs a full cut. Before committing, consider whether a lighter option delivers the effect you want.
Rounded corners. A corner punch or a simple radius cut softens a rectangle at low cost and low risk, and it keeps the piece a standard shape for the envelope and the mail.
Printed shapes. An arch or a scallop can be printed as a color block or a border on a rectangular card. It reads as a shape in photographs and on the table, and it has none of the cutting risk. The difference shows only when someone holds the card against a background.
Cut accents. Cut a belly band, a tag or an envelope liner instead of the main card. The main piece stays a plain rectangle that sets the postage, while the accent carries the shape.
A window overlay. A rectangular cover with one clean opening is less fragile than a lattice and is easy to register if the margins are generous.
Scoring and folding. A fold, a gate or a pocket gives a three-dimensional feel without cutting a complex outline.
A useful decision rule for die cut invitations is to ask who will hold the piece. If the shape matters mainly when cards are photographed, laid out or displayed, print it. If guests will hold and handle it, and the outline is part of the experience, die cut invitations become worth the extra gates.
Edge cases for die cut invitations worth a minute
Late additions. If you add guests after a run of die cut invitations, a second batch of cut pieces may differ slightly from the first, because stock lots and die wear change. Order a small overage in the first run, and when a reorder is unavoidable, ask the printer to match the stock and to check fit against the first batch.
Humidity and storage. Paper changes size with humidity. Store the delivered cards flat, away from damp, and keep them in their wrapping until assembly. A card that warms and curls can fail the slide test it passed earlier.
Guests with limited dexterity or vision. Delicate lattices are difficult to handle, and small windows can interfere with text. Keep essential information, such as names, date and place, on a plain, high-contrast area away from cut edges, and consider whether any guests are likely to struggle with a fragile piece.
Damaged pieces in the mail. Guests who receive a damaged invitation may not say so. Information that matters, such as the date and venue, should also appear on a website or a second piece so that no one depends on a single fragile card. The wedding invitation etiquette guide covers timing and wording, which is a good companion to this checklist when you work out when the suite needs to be in the mail.
Environmental claims. If the offcuts from a die cut matter to you, ask the printer what happens to the waste paper and whether it is recycled. Avoid assuming any claim about material until the printer states it.
The invented couple, from start to finish
To pull the pieces together, here is the whole path for die cut invitations for the invented couple, with the same illustrative numbers.
They begin with a five by seven arch to match the arched doorway at their ceremony site. Gate one passes: a single curve, no narrow necks. Gate two raises the printed gold border, which the printer says could drift by about a thirty-second of an inch, so they widen the border and run the background color to full bleed.
At gate three, the worksheet shows that five by seven fails in the worst case in a lined A7 envelope. They reduce the card to four and seven eighths by six and three quarters and confirm with a slide test on five paper samples.
At gate four, the aspect ratio of the A7 is comfortably in range, the stack is even and the sealed piece is flexible. The weight estimate is nine tenths of an ounce, which is too close to a threshold. They weigh a real sample and find it slightly heavier than the estimate.
They lighten the details card and drop the liner for a smoother lining paper, re-weigh and re-test. At the post office, the clerk confirms the postage and the machinability for the final assembled sample, and they note the date and the answer.
They mail a test piece to a friend, receive a report that it arrived flat and undamaged, then approve the proof and order the run with a small overage. The process took several short evenings, and every problem it found cost a few minutes, not a reprint.
Your next steps
Start your die cut invitations with the two measurements that cost nothing. Print or draw your shape at full size and cut it out of ordinary paper, then slide it into an envelope you actually plan to use and look at the fit. Then write down the bounding box, the stack of pieces you plan to include and a rough weight estimate with the paper arithmetic from this guide.
Next, send the printer the question list: minimum feature size, tolerance, method, setup charge, spoilage, sample cost and die ownership. Ask for a blank cut sample, and plan to weigh an assembled suite and show it to a postal clerk before you approve anything. If a number is tight, change the design while the files are still editable. Once the checks pass, die cut invitations become a routine order instead of a gamble.
FAQ
Do die cut invitations cost more to mail than ordinary invitations?
Not automatically. The postal service prices the sealed envelope by size, shape, thickness, stiffness and weight, not by what is cut inside. The cost rises when the design adds weight, uneven thickness, rigidity or an unusual envelope. A plain A7 envelope holding a light cut card typically mails like any other letter. Weigh a finished sample and confirm the current rate with a postal clerk.
What is a die line, and do I need to check it myself?
A die line is the outline on the artwork file that marks where the cut will go, usually on its own layer so it does not print. Yes, check it yourself. Look at the shape, the margin between the line and any text, the bleed, any narrow strips between cuts and the overall size. A proof can look right while the line is wrong.
How much room should a cut card have inside its envelope?
There is no single standard, so use worst-case arithmetic: the card’s bounding box plus the printer’s cut tolerance, compared against the measured usable inside of the envelope. The worksheet in this guide uses a working target of about an eighth of an inch for a single piece and three sixteenths for a stack. Confirm the figures with your envelope supplier and a slide test.
What cut tolerance should I expect from a printer?
It varies by method, stock and shop, so ask for a figure instead of assuming one. Cutting tolerance and print-to-cut registration are separate numbers, and both matter. If a printer cannot give a figure, design with generous margins and extra envelope room. Write the stated tolerance into your agreement so it can be checked when the run arrives.
Are lace or lattice cut-outs safe to mail?
They can be, but they are the most fragile type. Many small bridges of paper can catch, tear or crush in handling. Ask the printer for a minimum bridge width in your stock, protect the piece with tissue or a stiffer backing if needed, and mail a test sample. For a small guest list, hand delivery to nearby guests is another option.
Can a clasp, ribbon or button stay on the envelope?
These are the classic causes of nonmachinable letters. As the postal rules have described them, closures such as clasps, strings and buttons, along with rigid or lumpy items, can lead to a surcharge or handling problems. A flat ribbon inside the envelope is usually less of an issue than a bow on the outside. Check the actual piece with a postal clerk.
Should the reply card also be die cut?
It is usually wiser to keep reply cards and their envelopes plain and rectangular. They travel back through the mail, they are handled by guests who may be in a hurry, and any extra weight on a pre-stamped reply is a cost you pay for every envelope. If you want the shape to continue, repeat it as a printed motif.
How many samples should I ask for before ordering?
At minimum, a blank cut sample in the real stock and one fully assembled, sealed and weighed suite. For a pattern cut or a thick stock, ask for a few of each, since pieces vary. Test the slide fit with five or more, weigh the heaviest, take one to a postal counter and mail one to yourself before approving the run.
Sources
- United States Postal Service
- Domestic Mail Manual, letter-size mail standards, USPS Postal Explorer
- Postal Explorer, USPS mailing standards and price notices
- Notice 123, Price List, USPS Postal Explorer
- USPS Frequently Asked Questions
- USPS PostalPro, mailing industry resources
- International Organization for Standardization, paper and envelope size standards
- National Institute of Standards and Technology, Office of Weights and Measures
- PRINTING United Alliance, print industry resources
- Federal Trade Commission, consumer advice on shopping and disputes