
A photo style brief is a short, visual document that tells your wedding photographer what your pictures should look like, in terms they can actually see and repeat. This guide shows how to turn words like “timeless” and “candid” into observable examples, build a shot-style board around them, and use it to match, brief and review your photographer.
Write down the three or four adjectives you keep using for your photos. For each one, name what a viewer could point to in a finished frame: the kind of light, the color range, how close the camera stands, whether people are posed or unaware, and how heavily the image is edited. Pair every adjective with one reference frame you like and one you do not. Put the result on a single board with a one-page photo style brief beside it, send it before you sign, and use it again when the gallery arrives.
Most couples can tell you in a second whether they like a photograph. Very few can tell you why. That gap is where wedding photography briefs go wrong. A couple says “light and airy, but also moody, and mostly candid,” the photographer nods, and both sides leave the call believing they agree. They may not. “Airy” can mean bright overexposed windows to one person and soft pastel color to another. “Candid” can mean never asking anyone to pose, or only that the posing looks relaxed.
A good photo style brief closes that gap with evidence instead of vocabulary. It does not tell a professional how to do the job. It tells them what you already respond to, in a form they can check against their own work in a few minutes.
A note on scope. This is general planning information, not legal, tax or financial advice, and photo rights, privacy rules and contract terms differ by state, country and vendor. Where a point turns on the law or a signed agreement, the guide names the office or document to check so you can confirm the current version yourself.
What a photo style brief is, and what it is not
A photo style brief is a working document of one to three pages, plus a board of images. Its job is narrow. It describes the look and feel of the photographs you want, ranks what matters most when something has to give, and lists a few things to avoid. It is written for one reader, your photographer, and for one later task, reviewing the gallery.
It is not a shot list. A shot list names the pictures that must exist: the ring exchange, the grandparents together, the first look. The family photo list on this site covers that job. A photo style brief says how those pictures should look once they exist. You need both, and they should not be merged into one overlong file, because they are read at different moments. The shot list is used on the day. The style brief is used before booking and after delivery.
It is not a consent plan either. Who may be photographed, which guests opt out, what happens to pictures of children and who may post them is covered in the guide to wedding photography consent. The style brief can point to that plan, but it should not try to replace it.
And it is not a copy order. You are not asking a photographer to reproduce another professional’s pictures. You are using examples to calibrate taste, the way a person brings a paint chip to a hardware store rather than describing a color from memory.
The three jobs a brief does
First, it helps you choose. Before you sign, you compare your board against each photographer’s real portfolio. A mismatch you notice at that stage costs you an hour. The same mismatch noticed in a delivered gallery costs you a wedding.
Second, it helps your photographer work. Photographers who shoot a mix of styles, as many do, often ask clients to clarify before the day. A brief answers questions they would otherwise guess at: whether to wait for a moment or ask for it, whether to shoot into the window light or avoid it, whether you want faces large in the frame or people small inside a place.
Third, it gives you a fair way to review. If the photo style brief says “natural skin tones, no heavy filters” and the gallery has strongly tinted faces, you have something specific to raise. If the photo style brief only said “pretty,” you have an opinion and nothing else.
Who should write it
Both partners, separately first. Each of you collects images and writes adjectives without seeing the other’s choices. Then you compare. Differences are normal and useful. One of you may lean toward bold color and the other toward quiet neutrals, and it is far better to find that out over coffee than in front of a photographer who must pick one. The later sections show how to settle those splits using a priority score, so that the final photo style brief reflects an agreement rather than whoever spoke last.
If a parent, a planner or a wedding party member has strong views, listen to them, but keep them out of the first draft. A family member’s taste can go in a short section called “things our families will care about,” which is also where family portrait expectations belong.
Why adjectives fail without a photo style brief
Words about images are slippery because each word compresses several visual choices into one label. When you say “romantic,” you may be thinking of soft backlight, muted warm color, close framing and slow, quiet moments. Your photographer may hear flowers, candlelight and a lot of couple portraits. Both readings are reasonable, and neither is wrong. They are just different.
The same word, three different photographs
Take “candid.” Here are three honest readings.
In the first, candid means unposed and unprompted. The photographer stays back, uses a longer lens and shoots only what happens. Nobody is asked to look at the camera. The result is a quiet record of the day, with some frames missed because the moment turned away from the lens.
In the second, candid means relaxed. The photographer gives light direction, such as “walk toward the window and talk about your day,” and then shoots what follows. Faces look natural, but the situation was arranged.
In the third, candid means anything that is not a stiff lineup. The photographer still poses the formal groups, but sets them in conversational stances and shoots between the poses.
All three photographers would say they shoot candid. If you wanted the first and received the third, you would feel misled, and they would feel they had done what was asked. A photo style brief makes the difference visible by attaching examples and a plain description of who is doing what in the frame.

Why mood boards alone do not fix it
Many couples already know about mood boards, and many have built one. A typical board is thirty or forty saved images from social media, a mix of weddings, editorials, travel photos and interiors, with no notes. It tells a photographer you like pretty things. It does not say which part of each image you are pointing at.
Was it the soft light? The sandy color range? The shallow depth that makes the background melt? The fact that the couple is laughing and not looking at the camera? One image can contain all of those and a dozen more, and without annotation the photographer has to guess which ones carry the weight. The shot-style board in this guide fixes that by limiting the number of images, tying each one to a specific trait and adding a counter-example.
The cost of getting it wrong is mostly emotional
A mismatch in photo style rarely means technically bad pictures. Professionals in this field generally deliver competent exposure and focus. The real cost is a gallery that is correct and does not feel like you. You may be unable to name what is off, which makes the conversation with the photographer awkward and the refund discussion unlikely to go anywhere, since the contract probably promised a set number of edited images, not a particular feeling.
That is why the work belongs before the contract. A signed agreement usually describes deliverables such as hours of coverage, number of images and delivery date. It rarely describes taste. Your photo style brief is the part of the arrangement that records taste, and you can ask to have it referenced in the agreement or attached to it. The wedding vendor contract guide explains how to read the rest of an agreement, and the later section on verification in this guide covers what to ask in writing.
What a brief cannot do
It cannot make a photographer shoot outside their skill. If your board is full of film-grain frames shot at dusk and the photographer you like works only with flash and bright daylight, a brief will not close that distance. It will tell you quickly, which is its real value. It also cannot override the venue, the weather or the schedule. A ceremony in a windowless hall at noon will not look like a ceremony in an orchard at sunset, however clear your document is. The section on limits later in the guide deals with how to hold your ideals loosely against what the day allows.
With that in mind, the next step is to collect the raw material: the images and the adjectives you will convert.
Gathering references for your photo style brief
Start with collecting, but collect with rules. The goal of a photo style brief is not a big pile of pictures. It is a small set of images, each of which teaches the photographer one thing.
Where to look
The most useful references come from places where you can see a whole body of work, not isolated favorites. Photographers’ own portfolios and full wedding galleries are the best source, because a single wedding shows how a professional handles the morning, the ceremony, the portraits and the party, not just the one frame that went viral. Published wedding features, film stills, editorial photography, documentary photojournalism and even travel photography can all help you pin down light, color and distance.
Your own photographs count too. Look through your phone for pictures of the two of you that you actually love, including ones taken by a friend. Ask what they have in common. Often it is not what you expected. Many people discover that their favorite pictures are close, a little messy and shot in ordinary indoor light, which points away from the grand landscape portraits they had assumed they wanted.
Avoid collecting from a single feed. A social media algorithm shows you more of what you already clicked, so a board built that way tends to narrow into one trend. Mix sources, and notice what you keep returning to across them.
Respect the rights in what you save
Images belong to the people who made them. Saving a picture for private planning is a different thing from reproducing it, publishing it or handing it to a vendor as something to duplicate. Copyright in a photograph generally belongs to its creator unless an agreement says otherwise, and the U.S. Copyright Office explains the basics on its public site. For a private board, keep these habits.
Keep the board private or shared only with your photographer. Do not post it publicly as if it were your own work. Keep a note of where each image came from, such as a photographer’s name or website, so you can credit it if you ever share the board, and so you can ask your photographer to look at that person’s full work. Do not ask a photographer to recreate another professional’s exact composition of a recognizable person or private event. Use examples to describe qualities of light, color and moment, and let the photographer interpret them in their own way.
If any of your reference images show other people’s private events, children or identifiable guests, treat them with care. You are not publishing them, but you are circulating them. When in doubt, choose frames where faces are turned away or the setting is a public gallery, and let the portfolio links do the talking.
How many images and how to cut them
A usable first pass is about thirty to forty saved images. A usable final board is far smaller: roughly twelve to eighteen images, grouped under your three or four adjectives. The cut is where the real work happens, and it follows one simple test. For every image you keep, finish this sentence aloud: “I chose this one because of its ___.” If you cannot fill the blank with something visible, such as “the low warm sun on their faces” or “the way the camera is far enough away to show the whole room,” drop the image or rewrite your reason.
Do the cut in two passes, a week apart. The first pass removes duplicates and anything you saved because it was fashionable. The second removes anything you cannot explain. You will usually lose half. What survives is the actual core of your taste.
Collect counter-examples on purpose
Most people only save things they like. Add a second small set of five to eight images you dislike, and write the reason beside each. They may be the most useful frames on the board. A photographer who sees “no hard flash on the dance floor” or “not heavily orange skin” illustrated gets more information than a photographer who only sees what you want.
Be fair when choosing counter-examples. The point is not to insult any professional’s work. It is to mark one visible trait. A good counter-example is clear about what it is rejecting: “too much retouching on faces,” not “ugly.” Frame your notes the same way. “Skin looks smoothed and plastic to us” is something a photographer can act on. “Cheesy” is not.
A word on mood and meaning
Some images mean something to you that no camera setting can carry. A photograph may remind you of your grandmother’s kitchen or of a summer you spent together. Keep those, but label them as meaning, not style, so the photo style brief stays honest about which is which.
A separate short list headed “pictures that matter for personal reasons” belongs in the photo style brief, because it tells your photographer what to look for even when it is not in the shot list. A worn picnic bench, a family heirloom or a particular song playing at a particular moment are details a thoughtful professional can notice if told in advance.
The six dials: turning adjectives into observable traits
Here is the core of the photo style brief method. Instead of describing a style with a single word, break it into six things a viewer can see. Think of them as dials. For each of your adjectives, set each dial to a position and write it down. The photographer then reads a photo style brief made of dials, not poetry.
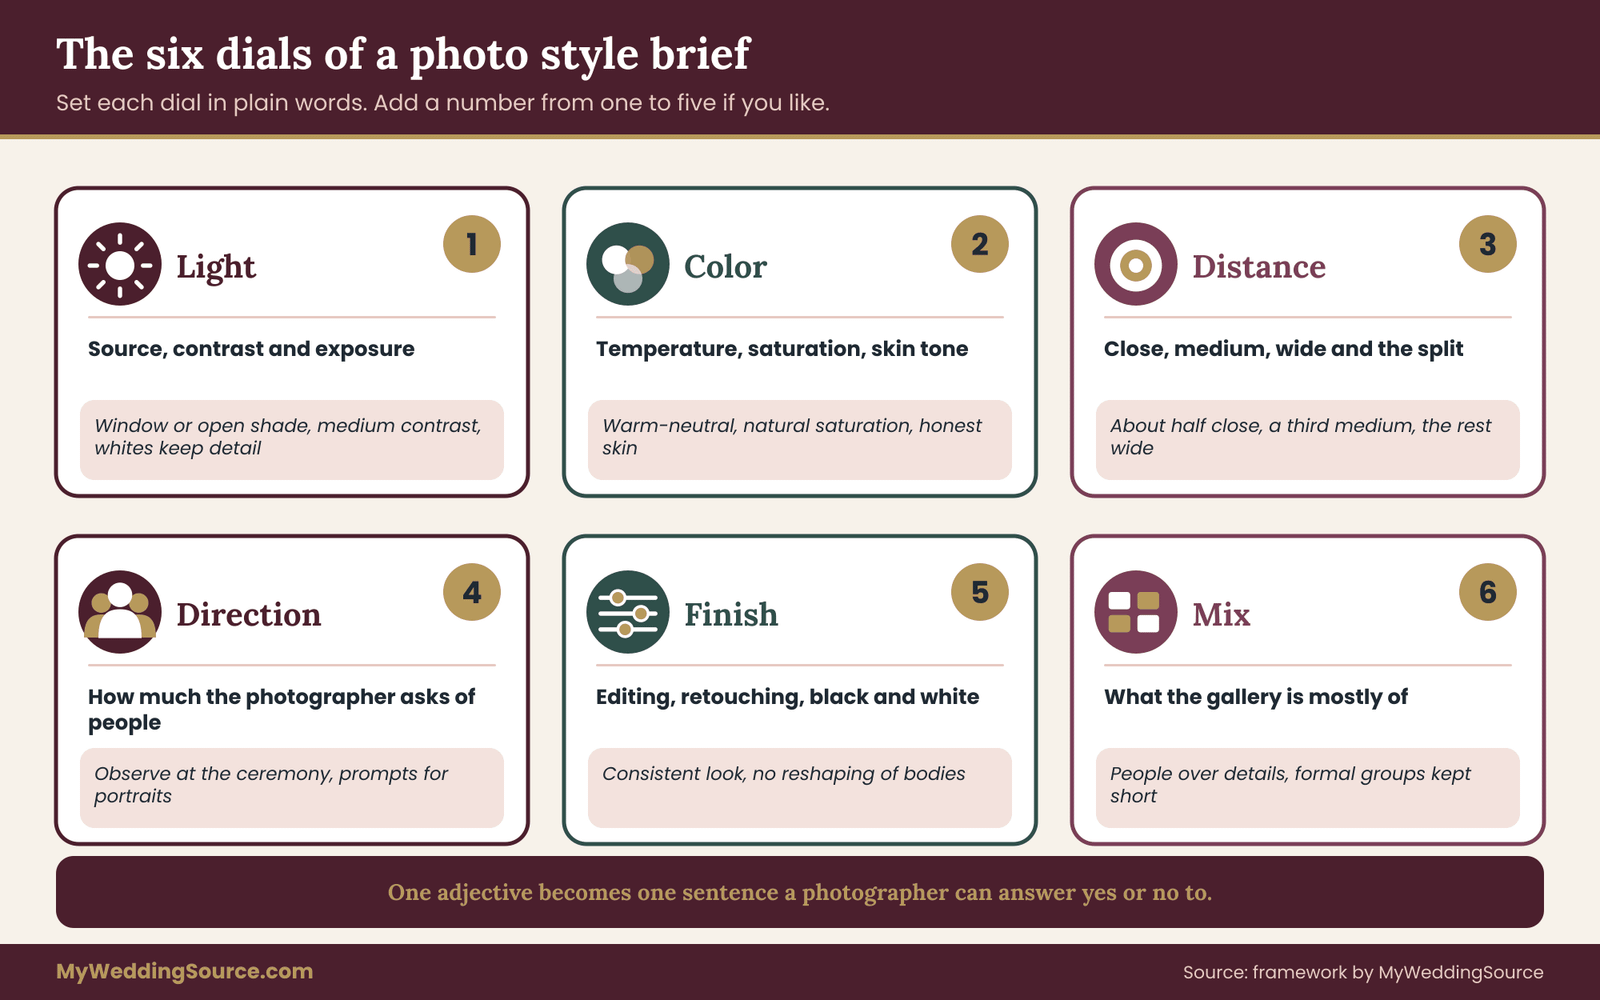
The six dials are light, color, distance, direction, finish and mix. The first two are covered below. The rest follow in the next part.
Dial one: light
Light is the most visible and the most misunderstood trait. When couples say “bright and airy,” they usually mean one of a small number of things, and each can be described.
Describe the source. Is the light from a large window, open shade outdoors, direct sun, golden hour sun low and behind the subject, candles, string lights or a flash? A photographer can usually see this in a reference at a glance, and so can you, once you look. Soft light from a big window gives gentle shadows and an even face. Direct midday sun gives hard shadows and bright highlights. Low backlight gives a glow around hair and a darker face unless the photographer adds fill. Flash gives crisp, evenly lit faces and darker backgrounds, and can look clinical or lively depending on use.
Describe the contrast. Do you want deep shadows and strong highlights, or a flat, even tone where nothing gets very dark? Contrast separates “moody” from “airy” more reliably than any color choice. A moody frame has dark areas that are allowed to stay dark. An airy frame lifts the shadows until nothing is very dark.
Describe the exposure. “Bright” can mean the picture is deliberately lighter than reality, with whites pushed toward a clean white. If that is what you like, say so. Some people love it. Others find that bright pushes can wash out detail in a white dress or a pale sky, and want some texture left in the whites. Writing “white dress should still show lace and fold detail” is an observable instruction.
For each adjective on your board, record three short notes: source, contrast, exposure. For example, “timeless: window or open-shade light, medium contrast, exposure close to what the eye sees.” That one line is something a photographer can check against their last ten weddings.
Dial two: color
Color is where a lot of misunderstanding hides, because couples use color words for two different things: the colors of the scene and the colors the photographer creates in editing.
Scene color is what was there: your palette, the flowers, the venue, the clothing. If you are still choosing, the wedding color palette guide helps you decide, and your photo style brief can simply list the final choices so the photographer knows what to expect.
Edited color is how the photographer renders it. Some professionals keep colors close to life. Others shift toward warm tones, cool tones, faded blacks, muted greens or a filmic cast. None of this is wrong, but it should match what you pictured.
Describe color with three observable features. First, the overall temperature: warm, neutral or cool, judged by how white clothing and walls look. Second, the saturation: strong and vivid, natural, or muted.
Third, the skin tone treatment: your own skin, and your guests’ skin, should look like people. This matters especially for couples and families with a range of skin tones, because some editing styles and some lighting situations can render deeper skin tones too dark or too orange, or lighter skin tones too pale. If this concerns you, write it directly into the photo style brief: “skin tones must look natural and consistent from the ceremony through the reception,” and ask the photographer to show you full galleries that include a range of faces under different lights.
A useful trick is to pick one neutral reference for each color note. Put a plain frame with a white wall and a person beside it, and say “walls and white clothing should look about this white.” A single anchor does more than a paragraph of adjectives.
Write the position, not the label
For each dial in your photo style brief, write a position in plain words and add a number if you like, such as one for the low end and five for the high end. Your notes might read: “Light: soft window light, contrast three of five, exposure four of five.” The numbers are not science. They are a quick way to see where you and your partner differ, and a quick way for a photographer to answer honestly: “I shoot a three or four of five, but a five is not my work.” That one sentence is worth the effort of the whole exercise.
Dial three: distance
Distance is how far the camera stands from the people. It decides whether pictures read as portraits, as scenes or as a mix. It is easy to see and easy to compare, which makes it one of the most reliable dials in a photo style brief.
Close frames fill the picture with faces, hands and small gestures. They feel intimate and emotional, and they leave little room for the venue. Medium frames show people from about the waist or knees up, with some of the setting. Wide frames show full bodies inside a place, with architecture, landscape or a whole dance floor. Very wide frames make people small, and the setting becomes the subject.
Couples are often surprised to find they are more drawn to one distance than they realized. Someone who says “I want to feel the emotion” tends to like close frames. Someone who says “I want to remember the place” tends to like wide ones. Both are fine, and the real question is the mix. A useful way to record it is as a rough split: “about half close, a third medium, the rest wide.” A photographer can tell you whether that matches how they work, and the ratio gives you a clear way to review the gallery later.
Distance also affects how people feel on the day. A photographer who works close, with a short lens, is physically near you and guests. A photographer who works far, with a long lens, is less intrusive and more likely to catch unguarded moments, but may miss moments that happen at your side. If you or your family are uncomfortable with a camera in the face, this dial tells you something about the person you should hire.
Dial four: direction
Direction is how much the photographer asks people to do, and it is the dial a photo style brief most often leaves unspoken. It is the dial where “candid” lives, and where most mismatches occur.
At one end is pure observation: the photographer never speaks, never poses and shoots what happens. At the other end is full direction: every portrait is arranged, with hands, chin and gaze managed, and the photographer calls out each pose. In between is guided natural moment, where the photographer provides a simple prompt and lets the interaction do the rest.
To put your own position into words, think about the three times a photographer will meet you during the day. During getting ready, do you want to be left alone, or do you want the photographer to move things to a window and ask you to hold a detail? During portraits, do you want instruction on where to stand and what to do with your hands, or do you want to be told “just walk and talk”? During the reception, do you want the photographer to stay out of the way, or to step in and gather groups?
You do not have to choose one answer for the whole day. Many people want observation during the ceremony, light guidance for portraits and none at all on the dance floor. That is a perfectly clear brief. Write it down as a short list by part of the day. “Ceremony: observe only. Portraits: gentle direction with simple prompts. Family groups: efficient and organized. Reception: observe, step in only for toasts and cake.”
A final point on direction concerns people who do not enjoy being photographed. If one of you freezes in front of a lens, say so in the photo style brief, along with what helps: a few minutes of practice shooting before the day, being told what to do with your hands, or having the photographer start with the other partner. A professional who knows in advance can plan around it. One who finds out on the day has to improvise.
Dial five: finish
Finish is what happens after the shutter: editing, retouching, cropping, converting to black and white and applying a consistent look. It is the least visible dial in a portfolio unless you know how to look for it, and the one most likely to surprise a couple.
There are four things worth specifying.
The first is the consistency of the look. Some photographers apply the same color treatment to every frame, so the gallery feels like one piece. Others adjust each frame individually to match what was there. Neither is better, but a couple who wanted a uniform filmic feel will be unhappy with frame-by-frame realism, and the reverse is also true.
The second is retouching. Standard editing corrects exposure, color balance and crop. Further retouching might remove a stray object, soften a blemish or change shape. Say plainly what you want. “No reshaping of bodies or faces” is a reasonable thing to put in writing. So is “please remove obvious distractions such as exit signs where possible, but do not alter the people.”
The third is black and white. Some photographers convert a set of frames, others only on request, and some never do. If you love black and white, say how many you expect and for which moments.
The fourth is crop and format. Photographers working for an album or print may compose with margins in mind, while those who deliver mainly for screens may crop tighter. If you plan to print large or make an album, say so now. The wedding vendor timeline can help you work out when album and print decisions fall, so you do not find out about format after the fact.
Dial six: mix
The last dial is the mix of what gets photographed. Two photographers with identical taste can deliver very different galleries if one spends the day on portraits and the other on people and details.
Break the mix into categories you care about: couple portraits, family groups, wedding party, guests and candid reactions, details such as rings and place settings, venue and scene, and the dance floor. Then give each a rough weight. This is not about counting frames. It is about preventing the situation where a photographer produces two hundred pictures of the flowers because they were beautiful and only a few of your grandfather.
The mix is also where the shot list and the photo style brief meet. The family photo list names the formal groups you need. The mix dial says how much of the gallery those groups should occupy and how they should look relative to the rest. “Formal groups should be quick, bright and clean, about five percent of the gallery. Most of the gallery should be unposed people at the reception.”
Putting the dials into one line
When all six dials are set, a single adjective can be written as a sentence anyone can test. Here is a short example.
“Timeless: window or open-shade light, medium contrast, exposure true to life; neutral color, natural skin tones; mostly medium and wide frames with some close; light direction for portraits, observation otherwise; consistent but not heavy edit, no body reshaping; weighted toward people over details.”
That sentence replaces one vague word with something a professional can say yes or no to. It is also easy to compare with the way a photographer already works. If they say “that is my work almost exactly,” you have a good match. If they say “I shoot more contrast and more color than that,” you have learned something important in two minutes.
Building the shot-style board
Now put the pieces of your photo style brief together. The shot-style board is the visual core of the photo style brief. It is one page, readable on a phone and printable on paper, built around your adjectives.
The layout
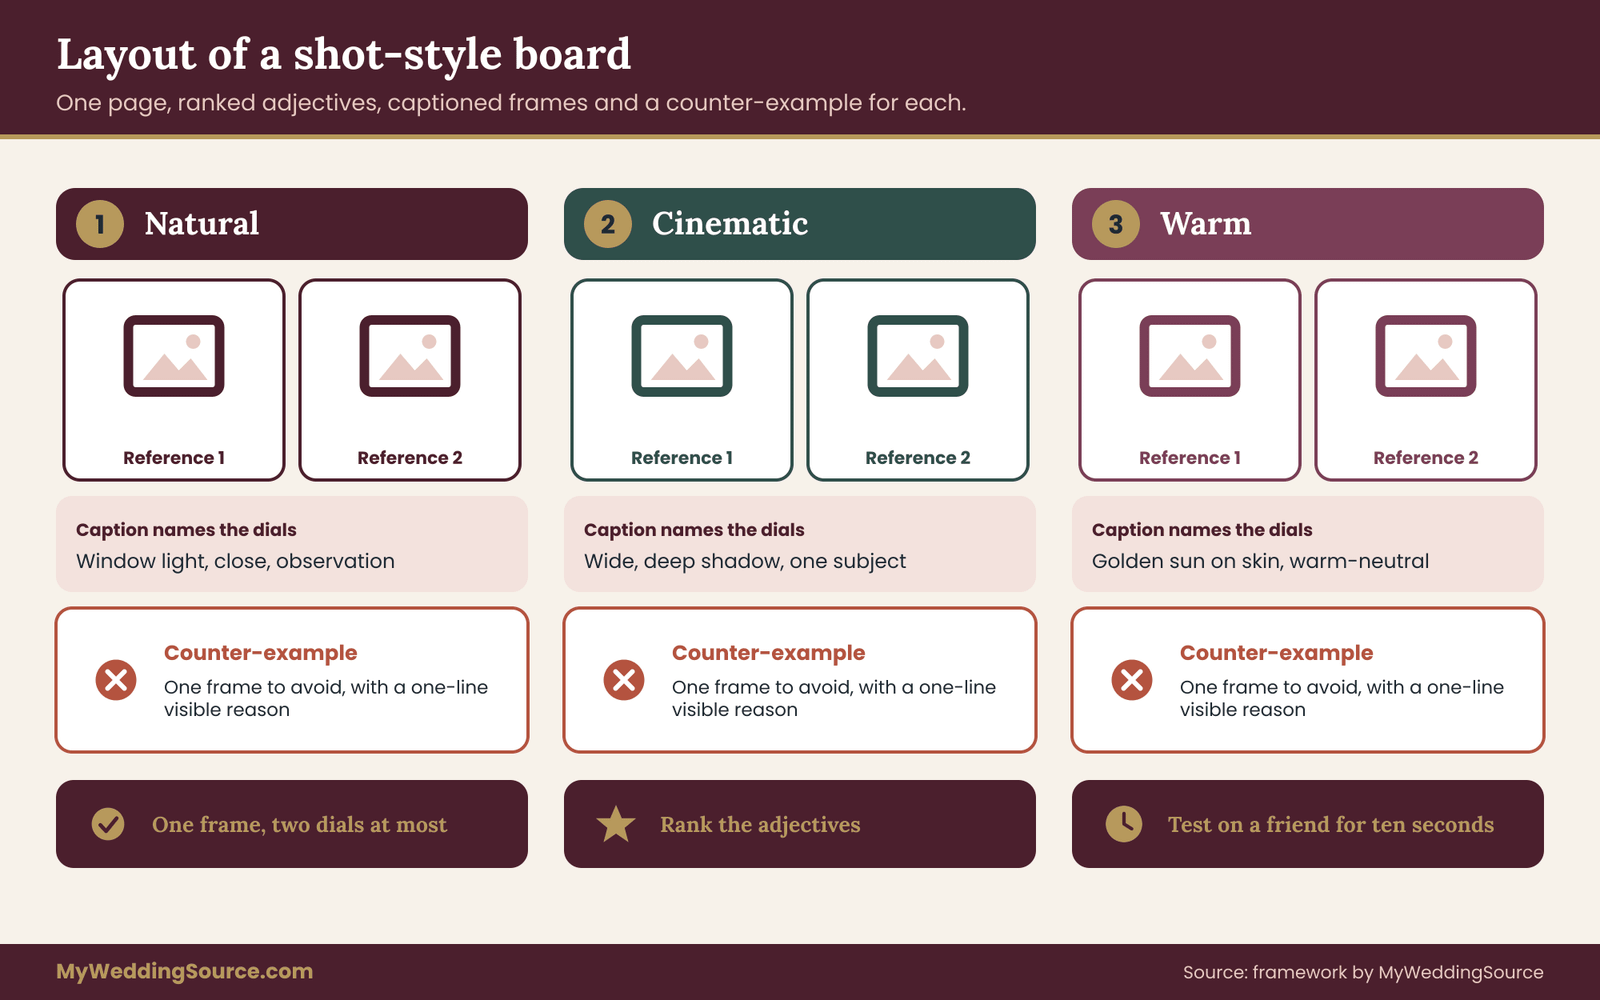
Use a simple structure. Across the top, write your three or four adjectives. Under each adjective, place two to four reference frames you chose earlier. Below those, place one counter-example, marked clearly, with a one-line reason. Beside each reference frame, add a short caption that names the dials it shows, such as “soft window light; close; observation.”
If you prefer a document to a design tool, a plain page with a heading for each adjective, small images and captions is enough. A board with clear captions beats a beautiful board without them. Many couples find they spend an hour making the board look good and five minutes on the captions, which is the wrong ratio. The captions do the actual job.
The one-frame rule
Each reference frame should point at no more than two dials. If an image shows soft light, a sandy palette, a close crop and a laughing couple all at once, you are asking the reader to guess which one you care about. Either choose a different image or circle the part you mean, with a note such as “the light, not the location.”
This rule makes the board shorter and the photo style brief clearer, and it protects you from the most common failure: handing over a mass of images and expecting the photographer to read your mind.
Order the board by importance
Place your adjectives in order of priority, since a photo style brief without a ranking leaves every conflict to guesswork. If you feel “natural” matters more than “romantic,” put natural first. A photographer who understands the order can resolve small conflicts without calling you. When the sun is behind clouds and the choice is between a posed portrait that looks romantic and an unposed moment that looks natural, your ranking tells them which way to lean.
If you and your partner disagree about order, do the following. Each of you scores every adjective from one to five for how much it matters to you. Add the scores. The highest total goes first. If two adjectives tie, ask which one you would regret losing more, and let that answer decide. It takes five minutes and prevents a long argument.
Test the board on someone who has not seen it
Before sending the board, show it to a friend for ten seconds and ask them to describe the pictures in their own words. If their words match your adjectives, the board works. If they say “kind of beachy, with a lot of hugging,” and that is not what you intended, you have an image or a caption that points the wrong way. Fix it before the photographer sees it.
This test is the cheapest quality check in the whole photo style brief process, and it often catches the one image that drags the whole board off course.
Writing the photo style brief page by page
The board is the picture. The written photo style brief is the explanation. Keep it to one to three pages. A photographer who receives ten pages will skim, and a skimmed brief is worse than a short one because the parts that matter get lost.
Page one: who you are and what you want
Begin with a short paragraph, no more than five or six sentences, about the day itself: the date, the setting, the number of guests, the kind of event and the feeling you want guests to leave with. This is context, not style. Then list your adjectives in priority order, each followed by its one-line dial sentence from the previous section.
Here is how an entry might read: “Natural: observe more than direct. Light from windows or open shade where possible. Medium distance, some close. Neutral color, honest skin tones. A light edit with no reshaping.” It is a sentence a professional can read in ten seconds.
Close page one with a short section called “what matters most.” Three bullets at most. Something like: expressions and reactions of close family, calm and unhurried portraits, and a gallery that feels consistent from the first hour to the last. This section is your priority score written out in plain words.
Page two: the board and the counter-examples
Place the shot-style board here, or link to it with a note on where it lives. Under the board, write a short list called “please avoid,” with no more than five entries, each tied to something visible. For example: “heavy orange tinting on skin,” “flash aimed straight at faces during the ceremony,” “every portrait posed with the same hand-on-chest gesture.” These are easier to follow than “no cheesy shots.”
Add a short list called “personal pictures.” These are not style, but specific, meaningful frames: a grandparent’s hands, the family dog at the end of the aisle, a handwritten note in a pocket, a song that starts at a certain moment. A photographer cannot find these without your help.
Page three: practical notes and open questions
The last page holds practical constraints and questions. Constraints might include a guest who prefers not to be photographed, a venue rule about flash or movement during the ceremony, or a mobility issue that affects where people can stand. If your plan includes photo restrictions for guests or children, link to your approach rather than repeating it; the guide to wedding photography consent explains how to set boundaries and how to share them with a photographer.
Then add three to five open questions for the photographer. These might include how they handle low light without flash, how they decide when to step in, what their editing process looks like and how many frames they typically deliver from a day of this length. A brief that ends with questions invites a conversation instead of an order.
A short script for sending it
Keep the covering message plain and friendly. Something along these lines works for most situations.
“Hi, thank you for your time earlier. We put together a short photo style brief and a one-page board so we can describe the look we like in a way we can both check. Could you look it over and tell us where your work matches and where it does not? We are happy to adjust our expectations, and we would rather know now.”
This message does three things. It frames the document as a tool, not a demand. It invites honest disagreement. And it gives the photographer permission to say the style is not a good fit, which is the answer you most want to hear early.
Length, tone and format
Write in plain sentences. Avoid jargon from cameras unless you know it well, because misused technical terms create more confusion than they solve. “Soft light from a big window” works better than a guess at an aperture number.
Send the photo style brief as a document and a link to the board, not a long email, and keep both in a folder you can share with a planner or second shooter. If you work with a planner or coordinator, give them a copy and ask how they would add the schedule so the photographer has both side by side.
Keep a version history
Date the photo style brief. Over several months, your taste may move, and the photographer may offer new samples that change your view. If you revise it, mark the changes and send the new version. That way, when you review the gallery, you are comparing it against the version the photographer actually had, not one you quietly edited later.
Priorities, trade-offs and what to protect
Every photographer works within limits, and so do you. The photo style brief is more useful if it says what to protect when conditions force a choice.
The three-question priority test
On the day, conflicts are small but real. The best light is behind the ceremony arch while the family waits. The schedule runs ten minutes late, and portraits compete with cocktail hour. A guest wants a group picture just as the sun drops. In moments like these, a photographer needs a rule. The three-question test gives them one.
Question one: does this moment happen only once? A ceremony kiss, a parent’s face during vows and a toast cannot be repeated. A portrait can be done again at another time. Unrepeatable moments win.
Question two: which choice protects the top adjective on the board? If “natural” is first and “romantic” is second, the photographer leans toward the less staged option when time is tight.
Question three: which choice protects the people? A tired grandparent, a child nearing nap time or someone uncomfortable in front of a camera should not be asked to wait for a better light. Comfort wins over polish.
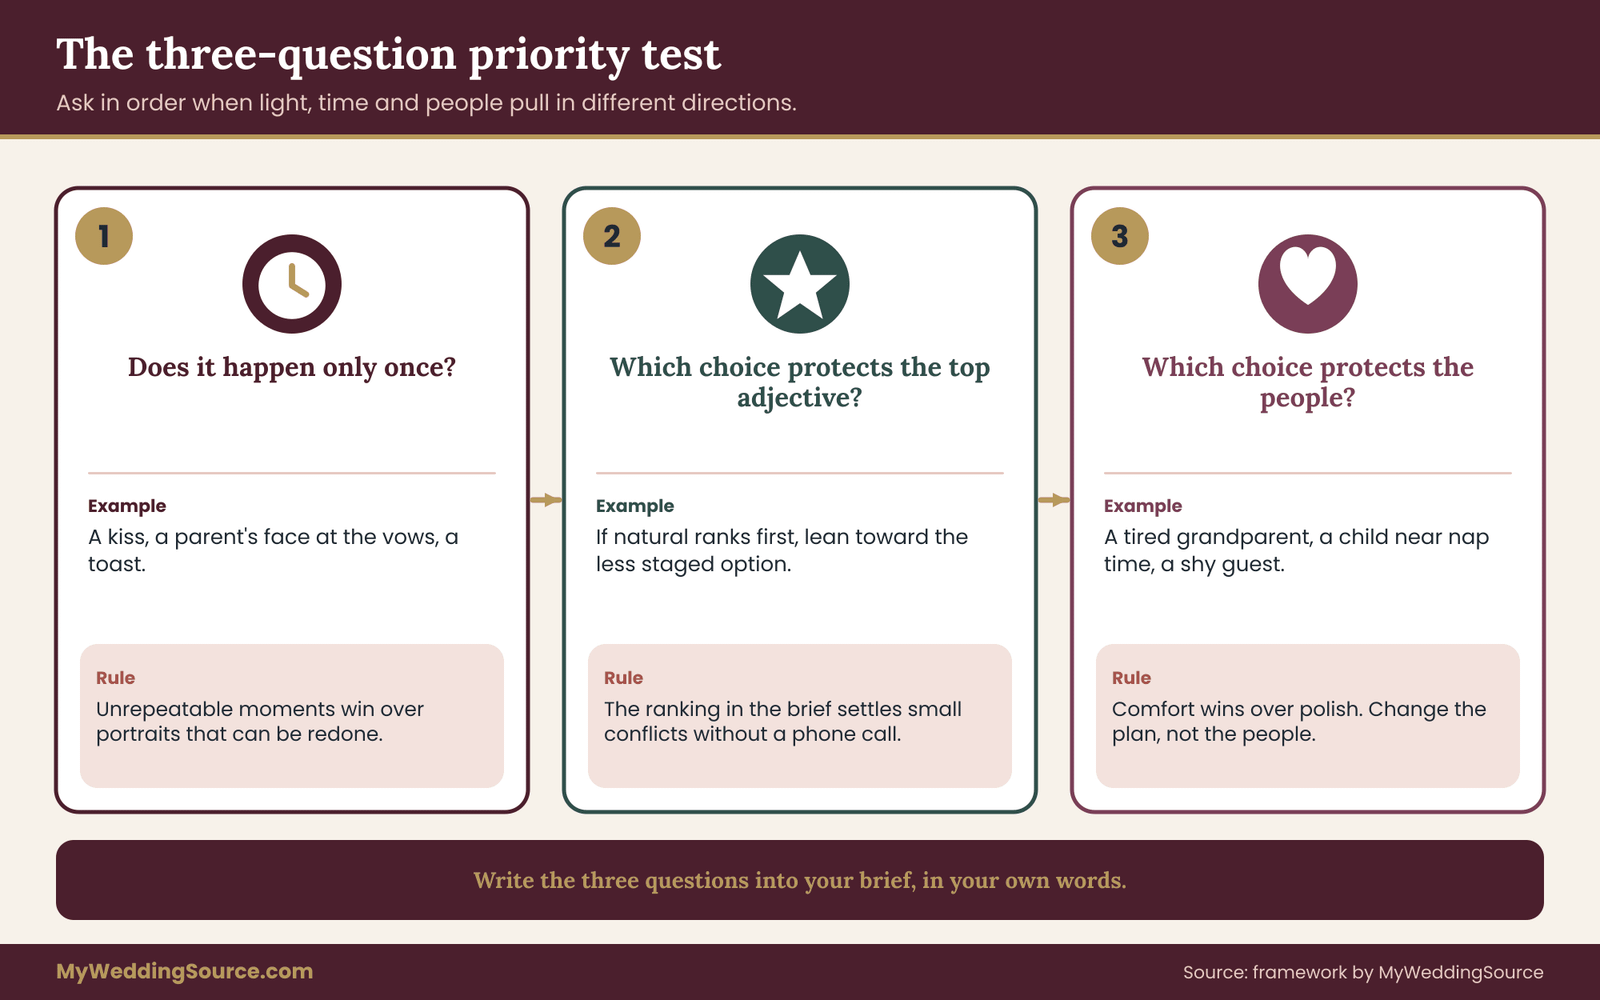
Put the three questions on the photo style brief in your own words. A photographer who has them in mind can make quick decisions without checking with you, and you will know why a given choice was made.
Decide where you would rather lose a little
Perfect results are not available. Something has to give, and you can choose in advance what that will be. Consider these common tensions.
Light versus schedule. If your ceremony is at noon and you love golden hour, you cannot have both without moving something. You may decide to hold couple portraits for a short window before sunset, even if guests are at dinner. That choice costs time in the party and gains light. Write down which side you favor.
Formality versus candor. Large family groups take time and feel stiff. A list of eight carefully chosen groups takes about fifteen minutes. A list of twenty takes much longer and costs you cocktail hour. The family photo list guide shows how to keep that part efficient, and your style brief can note that formal groups should be quick and bright, not elaborate.
Coverage versus attention. Longer coverage means more moments and more tired people. A shorter plan with a clear priority list often yields a better gallery than all-day coverage with no direction. Describe which parts of the day you want most covered and which you are willing to see only briefly.
Handle disagreement between partners
When you and your partner want different things, resist the urge to average. A gallery that is half moody and half airy often feels like neither. Use these steps.
First, find the dial where you actually differ. Often it is only one, such as contrast or distance, not the whole style. Second, look at your reference frames and find a middle position you both recognize, perhaps a frame you both marked. Third, if no middle exists, assign each of you a part of the day. One partner’s preference may lead for portraits and the other’s for the reception. Photographers can shift looks within a day, and the photo style brief can say which is which.
If you cannot settle it, ask your photographer to show you two or three of their galleries in different looks and choose together. This is a respectful way to let evidence replace argument.
What to protect when budget is tight
Budget limits coverage, and coverage limits what the photo style brief can achieve. A shorter day, a single photographer and a smaller delivered gallery are all common compromises. If you cannot have everything, protect the items that carry the most emotional weight: the ceremony, the first minutes with family and a short, calm portrait session. Details and dance-floor coverage are easier to cut or to supplement with guests’ phone pictures.
When cost is the issue, the useful question is not “what can we add” but “what is the smallest plan that delivers the top three items on our photo style brief.” The answer is usually shorter than couples expect, and it keeps your priorities visible.
Leave room for the photographer’s judgment
A brief that tries to control every frame produces stiff results and unhappy professionals. Your photographer has seen hundreds of weddings, and they know where light falls in different seasons and how groups behave. The best use of your document is to set the target and the limits, then trust them to find good frames inside those limits. You will probably get pictures you did not think to ask for, and some of them may be your favorites.
Matching your photo style brief to a photographer’s real work
A brief only helps if you test it against evidence. This is the stage where you use it as a screening tool, and where the board earns its place.
Compare against full galleries, not highlight reels
A portfolio page shows a photographer’s best frames. A full gallery from one wedding shows their typical output across a day. Ask for two or three complete galleries from weddings similar to yours in venue type, season and time of day, and go through them with the photo style brief open beside you.
Check the dials one by one. Does the light match what you described, and does it hold up indoors and in shade, not just at golden hour? Is the color consistent from the morning to the reception? Are skin tones natural across different people? How many frames are close, medium and wide? How much of the day is observed and how much is directed? Is the mix weighted the way you want?
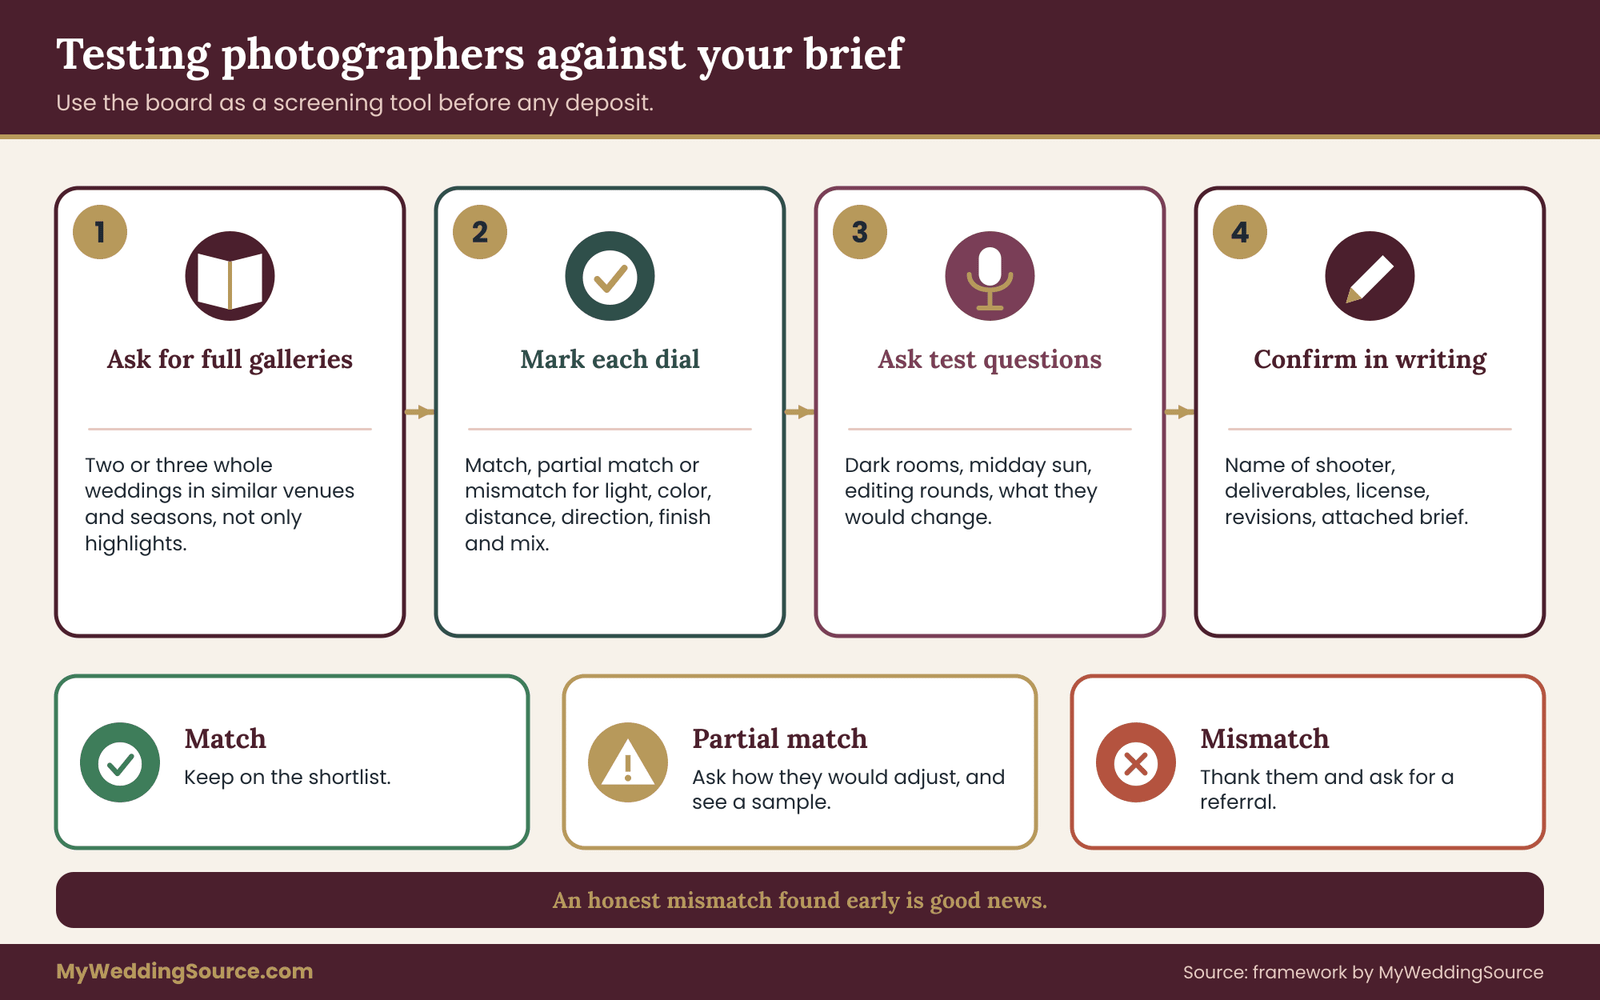
Mark each dial as a match, a partial match or a mismatch. This sounds fussy, but it takes about twenty minutes per photographer and it replaces a vague good feeling with a pattern you can see. Sometimes the pattern shows that a photographer you loved in the highlights is a partial match in the full gallery. That is helpful to know before a deposit.
Ask questions that test the match
Beyond the gallery review, a short conversation is useful. Ask these in your own words.
Ask how they would describe their style without using the words you used. If their answer lines up with your dials, the match is real. If they use the same adjectives but describe different things, keep asking until you see examples.
Ask how they handle the situations your board worries about, such as dark receptions, midday ceremonies or a couple who dislikes posing. Ask to see an example of each from their own work.
Ask how editing works. Do they apply a set look, adjust individually or offer choices? Do they retouch faces or bodies, and under what conditions? How many rounds of changes are possible after delivery?
Ask what they would do differently from your board and why. A professional who says “I would change this one because of how the venue handles light” is giving you real information. One who says “yes, anything is possible” is not.
Treat honest mismatch as good news
Sometimes a photographer will tell you your board is not their style. They may say that they shoot with strong flash, and your references are all natural light. They may say they could try but would not be at their best. This is a useful result, not a failure. A photographer who tells you the truth now is worth more than one who says yes to everything and delivers something else.
When you hear it, thank them, and ask if they know a colleague whose work fits better. Many professionals know others in their area, and a referral from someone who has read your photo style brief is a head start.
Vendor verification and what to confirm in writing
The photo style brief is not a contract, but it should be connected to one. After you choose, confirm in writing the points that decide whether the photo style brief will be honored. These are matters of agreement, not taste, so use the written terms of the vendor and your own signed document.
Confirm who will actually shoot. If the person you met is not the person who will be there, ask for the portfolio and the photo style brief to go to the assigned photographer, and ask for the name in writing.
Confirm what is delivered and when: the number of edited images, the format and the timeframe. The wedding vendor contract guide walks through the common clauses. Ask how revisions are handled if the gallery does not match the photo style brief, and whether there is any provision for reshoots of portrait sessions, which is rarely offered but sometimes possible.
Confirm usage and ownership. By default, a photographer usually holds copyright in the photographs, and clients receive a license for personal use, but terms vary. The U.S. Copyright Office explains the basic rules, and your contract will say what you can print, share and post. If you plan to publish pictures or give them to vendors, read the license before you sign. The photographer may also want to use your pictures for promotion, and your consent plan should state whether you agree.
Confirm vendor credentials. Reasonable checks include liability insurance, a backup plan if the photographer falls ill, and the policy on backup copies of files. The vendor due diligence checklist lists these and other checks in one place.
Attach the photo style brief
Once you have agreed on the approach, ask whether the photo style brief can be referenced in your agreement as a statement of intent, such as “The photographer has reviewed the client’s style brief dated ___ and will make reasonable efforts to shoot and edit in accordance with it.” Photographers differ on how binding they will make this, and many will not accept a promise about artistic outcome. That is understandable, because taste is subjective. A reference still has value: it shows that both sides read the same document, and it gives you a documented basis for a conversation if delivery goes wrong.
Do not expect the photo style brief to function as a guarantee of satisfaction. It is evidence of shared understanding, not a warranty.
Venue, schedule and light: the limits of any photo style brief
Even the best-written photo style brief cannot move the sun or lengthen a ceremony. This section deals with the physical limits so you can set realistic expectations and still get what you want.
Walk the light before the day
If you can visit the venue at the same time of day as your ceremony, do it. Look at where the light comes from, where shade falls and how bright the interior is. Take a few phone pictures at the time you will be there. These are far more informative than any description, and you can send them to your photographer to ask how they would handle the space.
If you cannot visit, ask the venue or a recent couple for photos from the same hours and season. A good photographer will also scout, but your notes help them decide where to stand.
Build the timeline around the light
Light changes through the day and through the year. In many locations, the most flattering outdoor light is in the hour after sunrise and the hour before sunset, though the exact times shift by season and latitude. If your photo style brief says “golden hour portraits,” check the actual sunset time for your date and location and plan backward from it. A schedule that has your ceremony ending only a few minutes before sunset leaves no margin for delays.
Add buffer. A schedule with no slack makes every moment rushed, which tends to show in faces. If the portrait window matters, build ten or fifteen minutes of cushion and tell your photographer that it exists. The wedding vendor timeline guide explains how to sequence vendors so that one late arrival does not eat the portrait slot.
Indoor, low-light and mixed-light settings
Dark halls, candlelit dinners and venues with colored lighting are common sources of disappointment. Professionals may use flash, bounce it off the ceiling or raise the camera’s sensitivity, each of which changes the look. Your photo style brief should say how you feel about these. “Flash is acceptable at the reception, but not during the ceremony” is clear and fair. So is “we prefer the real feel of candlelight, even if images are darker and grainier.”
Check venue rules too. Some venues and officiants restrict flash or movement during a ceremony, or limit where a photographer may stand. Ask for the rules early and pass them to the photographer, who may adjust the approach. The reception guest flow guide is useful for understanding how room layout affects what a photographer can reach.
Weather and backup plans
Plan for rain, heat and wind. A couple who wanted open-sky portraits may end up under a tent or in a doorway. Decide ahead which dials still matter in that case. Perhaps the quality of light matters less than the expressions, or perhaps the location matters less than the calm. Write one sentence about it: “If weather moves us inside, we care most about close, natural moments and less about the location.” That sentence saves a hard decision on a stressful morning.
The people limit
People are not props. Children get tired, older relatives need to sit, and some guests do not want to be photographed at all. Respect those limits in the photo style brief itself. If a plan depends on twenty minutes of everyone standing in direct sun, adjust the plan, not the people. If certain guests opt out, record it and tell the photographer, using the approach in your consent plan.
Hold ideals loosely
A good photo style brief produces a target. It does not produce certainty. On the day, some frames will look exactly like your board and others will not, because real life does not repeat a reference. Think of the photo style brief as a direction of travel. The aim is for most of the gallery to feel like you, not for every frame to match an example.
A worked example of a photo style brief
The following example is invented to show the process from start to finish. The couple, the venue and the pictures are made up, and the choices are illustrations of how to reason, not recommendations of a particular look.
The couple and their starting point
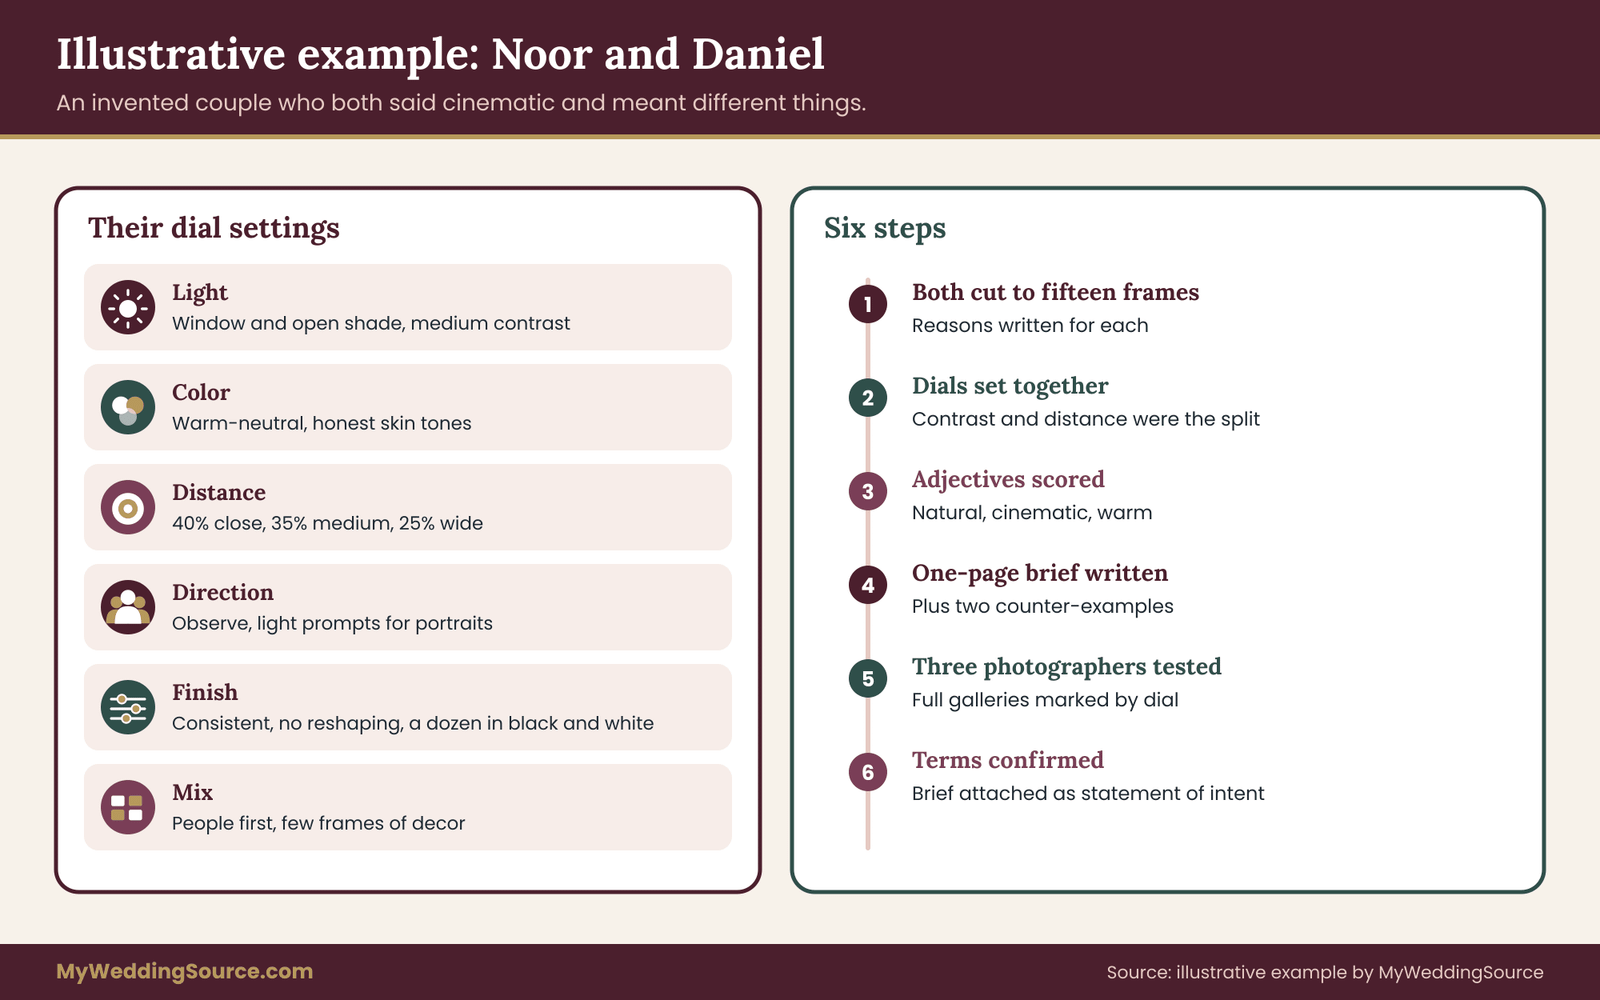
Imagine two people, Noor and Daniel, planning a late-afternoon wedding for about eighty guests at a restored brick warehouse with tall windows. They have booked six hours of photography coverage. Both say they want pictures that feel “natural,” “warm” and “a bit cinematic.” They have saved around fifty images each.
When they compare, they find that their picks only partly overlap. Noor’s images are bright, soft and close, mostly faces and hands. Daniel’s are darker and wider, with strong shadows and a lot of the room. Both would say “cinematic.” Both are right. This is exactly the problem the six dials are meant to solve.
Step one: separate collecting from judging
Each of them cuts their set to fifteen images, finishing the sentence “I chose this because of its ___.” Noor’s reasons: window light, close faces, soft color, people laughing. Daniel’s: deep shadow, a wide view of a room, a long lens at a distance, a quiet moment between two people.
They find that “natural” and “warm” share dial positions. Both like unposed moments, honest skin tones and a warm temperature. The split is on contrast and distance. Noor leans toward low contrast and close. Daniel leans toward higher contrast and wide.
Step two: set the dials
They set each dial together and write short positions.
Light: window light for most of the day, open shade outdoors, flash only if needed at the reception. Contrast: medium, as a compromise, with room for deeper shadow in the evening. Exposure: true to life, with whites that keep fabric detail.
Color: warm-neutral, natural saturation, skin tones consistent across the day.
Distance: roughly forty percent close, thirty-five percent medium, twenty-five percent wide. In the warehouse, they want some wide frames that show the windows and brick.
Direction: observation during the ceremony and reception, light prompts for portraits, quick organized direction for family groups.
Finish: consistent look, no reshaping, restrained retouching, about a dozen black and white frames chosen by the photographer.
Mix: mostly people and reactions, some details, only a few frames of décor.
Step three: the board and the ranked adjectives
Their three adjectives, in order: natural, warm, cinematic. They score each from one to five. Noor gives natural five, warm four, cinematic three. Daniel gives natural four, warm three, cinematic five. Totals are nine, seven and eight, so the order is natural first, cinematic second, warm third.
Under “natural,” they place three frames: a laugh between two people in window light, a parent adjusting a tie, a group of friends talking, none looking at the camera. Under “cinematic,” they place three frames: a wide shot of a couple in a long hall, a silhouette in a doorway, a close shot with deep shadow. Under “warm,” two frames with golden sun on skin. Each caption names the dials: “window light, close, observation”; “wide, high contrast, one subject.”
They add two counter-examples. One shows heavily orange skin, with the note “skin should look like skin.” The other shows a flash-lit dance floor with flat white faces, with the note “we like reception light that still looks like a party.”
Step four: the one-page brief
The written brief opens with a short paragraph about the day, then lists the adjectives with their dial sentences. Under “what matters most,” Noor and Daniel write three bullets: genuine expressions from close family, unhurried portraits at the end of the afternoon, and a gallery that looks consistent from morning to night.
Under “please avoid,” they write four items: orange skin tones, flash during the ceremony, a repeated hand-on-chest pose and long group sessions that cut into cocktail hour.
Under “personal pictures,” they add Daniel’s grandmother’s hands during the ring exchange and the dog in the aisle.
Step five: test it on photographers
They send the photo style brief to three photographers with their board. Photographer one replies that their work is bright, airy and close and that cinematic dark frames are not their strength. Photographer two says they shoot a strong, high-contrast documentary style and rarely direct anyone, which fits Daniel but not Noor’s portrait comfort. Photographer three shares two full galleries from brick venues. One looks very close to the board. The other is more heavily edited than the couple wants.
Noor and Daniel mark each gallery by dial. Photographer three is a match on light, distance and direction, and a partial match on finish. They ask about editing, and the photographer explains that they can deliver a lighter edit and show a sample. That answer settles the choice.
Step six: confirm in writing
Before signing, the couple confirms the photographer’s name, hours, number of delivered images, revision policy and the license for printing and sharing. They ask to reference the photo style brief in the agreement as a statement of intent. The photographer agrees to attach it with a note that artistic results cannot be warranted. That is acceptable to Noor and Daniel, who keep a dated copy.
What this example shows
The example shows four useful points. First, partners who both say “cinematic” can mean different things, and the dials expose it. Second, a priority order can be set with a quick scoring exercise. Third, the photographer’s honest comments on fit, including partial matches, drive the decision. And fourth, the paperwork around the photo style brief is simple and takes little time. The couple did not need a design degree or a long document. They needed clear sentences, a small board and a few direct questions.
Sharing the photo style brief with family, guests and the wider team
Once the photo style brief is settled, decide who else should see it. It is tempting to send it to everyone. In practice, different people need different parts.
The photographer and any second shooter
Both should have the full document and the board. If a second shooter will work a different part of the day, give them the dial sentences and the “please avoid” list so they match the main photographer’s look. Ask the lead to confirm that they have talked.
Planner, coordinator and key vendors
Give your planner or day-of coordinator a copy so they can protect the portrait window, tell people when to be where and manage the schedule around light. Share only the relevant pages with others. A florist does not need your editing preferences. A videographer may want the board, since their work will be edited alongside the photographs, and consistency between the two makes both look better.
Family and the wedding party
Most family members do not need the board. They need to know three things: when the formal photographs will happen, how long they will take and who should be there. A short message that explains the plan, built from your shot list and schedule, is enough. The family photo list helps you decide which groups to include and how to keep the session short.
If a relative has strong opinions about how pictures should look, invite them to add a few items to a “family priorities” section, such as a particular group or a framed heirloom, and make clear that the final decisions rest with you and the photographer.
Guests, children and privacy
Pictures involve people who did not choose to be in your gallery. Your photo style brief should not override anyone’s boundaries. If some guests prefer not to be photographed, if children are present or if cultural or personal reasons limit pictures, those points come from your consent plan, not from your style choices. State them plainly in the photo style brief’s practical section and link to the consent document or attach it. If you are not sure how to set that up, the guide to consent and guest boundaries for wedding photography lays out a process.
Be especially careful with reference images that include other people’s children or private events. Keep them in the private board shared with your photographer. Do not post or forward them widely.
What to say to guests who ask to take photos
Many guests will have phones. Your style brief may care about this if you want an unplugged ceremony so faces are visible in your photographer’s frames. If that matters, say so in the invitation, on a sign and through the officiant, and explain the reason kindly.
A short line works: “We have a photographer for the ceremony, and we would love for you to be fully present. Please enjoy it with us, and feel free to take photographs at the reception.” The photo style brief itself does not need to repeat it, but a note that the ceremony will be unplugged tells the photographer what to expect.
Keep one source of truth
Store the latest version of the photo style brief and board in a shared folder, and tell everyone which one is current. If you change something after sending, notify the people who received the old version. Small version mismatches can turn into real confusion on the day, especially when a second shooter or assistant is working from an older copy.
Reviewing your gallery against the photo style brief
When the gallery arrives, you will be tempted to scroll once, feel happy or disappointed and stop there. A slower, structured review helps you separate what is wrong from what is simply new to you.
Wait, then look twice
Give yourself a day before judging. Early reactions are strong and often focus on one frame, a bad blink or an unflattering angle, that does not represent the gallery. Look once for feeling, with no notes. Then look a second time with the photo style brief open and a short list of questions.
Do not start by counting flaws. Start by looking for the pictures you hoped for, the ones in your priority list and personal pictures. Check that they exist and that they are good. Missing a single critical frame is a different problem from a general style mismatch, and the remedies differ.
Review by dial
Walk through the six dials again, this time on the finished gallery.
Light: does the gallery match your description? Are shadows and highlights near the contrast you chose? Do white dresses and shirts keep detail?
Color: is the temperature consistent from morning to night? Do skin tones look like the people you know, across all guests? A strong shift between the getting-ready photographs and the reception is a sign of inconsistent editing.
Distance: count roughly. Pick fifty frames at random and sort them into close, medium and wide. Does that split resemble the one in your photo style brief?
Direction: do the unposed frames look unposed and the portraits look relaxed? Does the mix of observation and direction match what you wrote?
Finish: are faces and bodies left alone? Is the look consistent? Are black and white frames what you expected?
Mix: how are the frames weighted between portraits, family, guests, details and venue? Is the gallery tilted toward what you said mattered?
Separate three kinds of problems
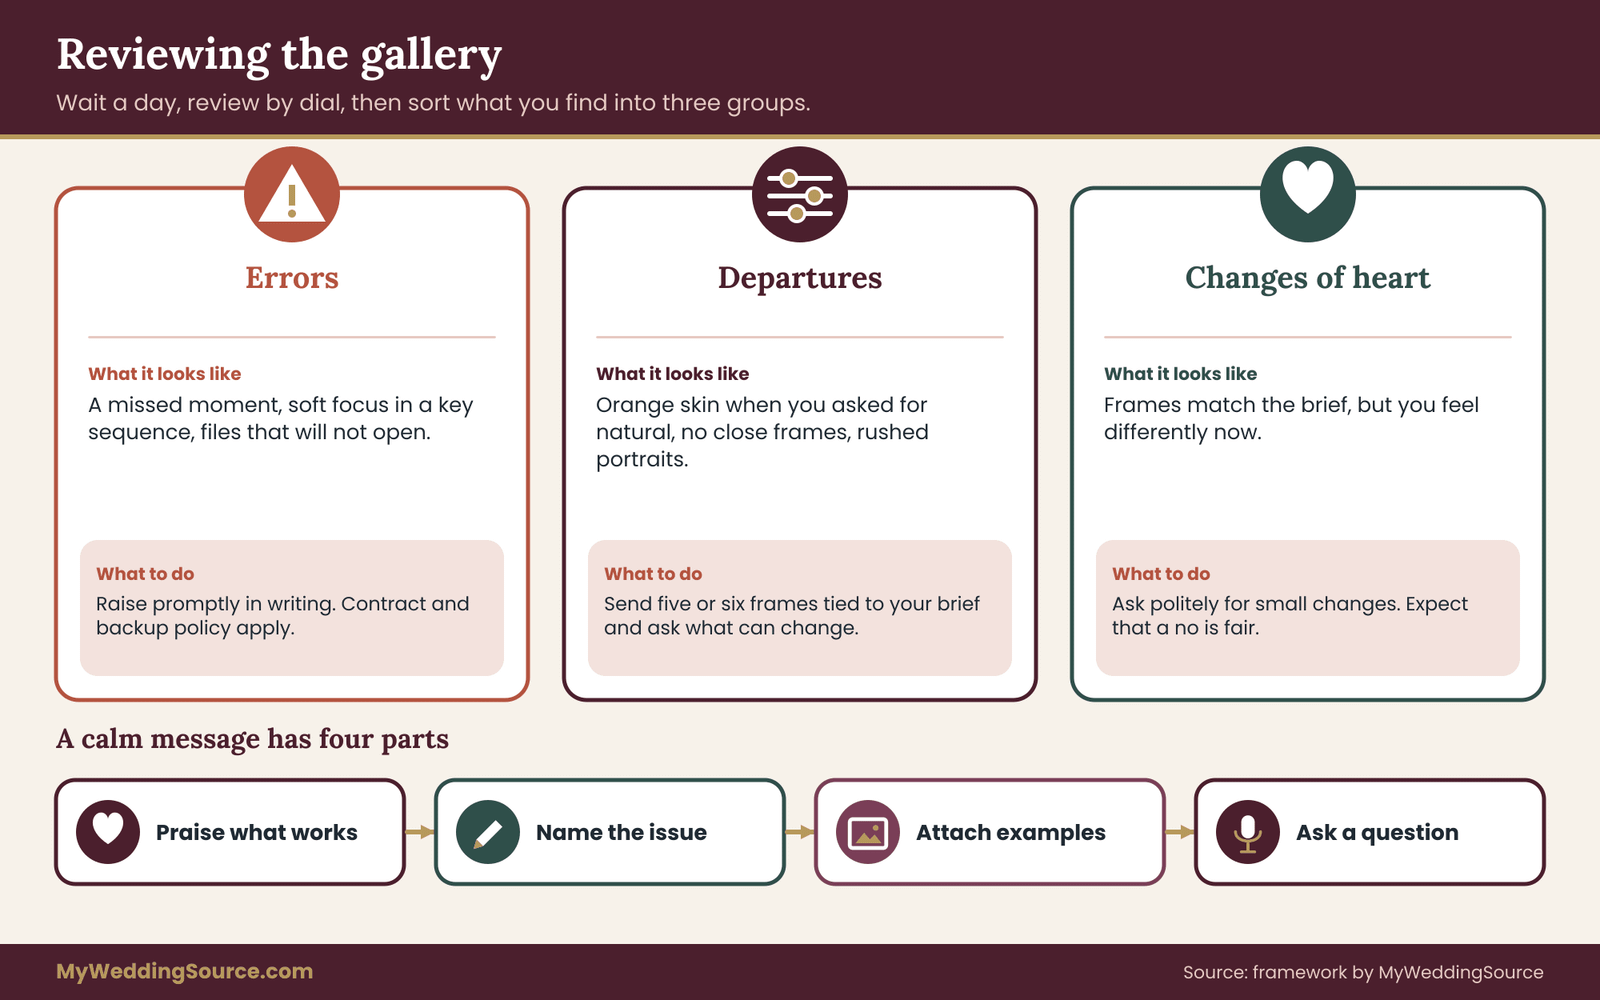
Not every issue is a brief problem. Sorting issues into three groups helps you decide what to say.
The first group is errors: a missed ceremony moment, out-of-focus frames in a key sequence, a lost memory card, files that will not open. These are about the deliverables, and your contract and the photographer’s backup policy govern them. Raise them promptly and in writing.
The second group is departures from the photo style brief: heavy orange skin when you asked for natural, no close frames when you asked for many, a portrait session that was rushed or skipped. These call for a specific conversation based on your document.
The third group is changes of heart: pictures that match the photo style brief but that you now feel differently about. It is normal to discover that you like something else after seeing the real thing. These are the hardest to resolve, and the photographer may reasonably decline changes beyond the agreed scope. You can still ask for small adjustments, but be prepared for a no.
How to raise a concern
Use specific, calm language. A message that works might say: “We went through the gallery with our photo style brief. Overall we are very happy. In the reception frames, skin tones look much warmer and more orange than in the morning, which is something we asked to avoid. Could we look at a few examples together and talk about whether a color adjustment is possible?” This names the issue, ties it to the photo style brief, gives a sample and asks a question.
Avoid long emotional emails sent at midnight. Wait, collect five or six frames that show the issue, and send those. A short list of examples is more persuasive and more likely to get a useful reply.
Ask for the right remedy
Often the fix is small. A different edit setting, a re-export or a selection of alternate frames can solve a color issue. A photographer may also have unused frames that fit your photo style brief better than the ones they picked. Ask whether they would be willing to re-review the full set with the photo style brief in hand.
If the gallery differs from the photo style brief in ways that matter and the photographer is unable to fix it, read your agreement for provisions on revisions or refunds, and think carefully before assuming you are entitled to either. Contracts differ, and many treat style as subjective. If you believe you have a legitimate dispute, the consumer protection office in your state or a local small-claims process may be relevant, and a lawyer can advise on your own contract. For ordinary disagreement, a calm conversation is far more likely to help.
Keep the records
After delivery, download the full gallery promptly, because online galleries often expire. Store copies in more than one place. The wedding records guide explains how to organize and back up photos and the paperwork that goes with them. Save the dated brief, the signed agreement and your messages in the same folder. If a question arises years later, those documents are the record.
What to learn for next time
Whether the gallery matched perfectly or not, the experience is worth capturing. A few notes written within a month of delivery will help if you ever hire a photographer again, for an anniversary session, a family portrait or a baby. Write down which dials the photographer hit, which ones they missed and which parts of the photo style brief proved unhelpful. You may find that your taste had a pattern you did not see at first.
Also note what the photographer did well that you did not ask for. Often the best pictures are the ones nobody planned, and noticing them tells you something about what you actually like.
When a photo style brief is not the right tool
A photo style brief suits most weddings, but not all. If your photographer has a very distinctive, well-defined style and you are hiring them for exactly that, a long brief may be unnecessary. A short note about your priorities and any personal pictures may be enough, and a heavy document can feel like micromanaging.
If your wedding is small, such as a courthouse ceremony with a handful of people, the photo style brief can be a few lines. The method still helps, but you can run it in an evening.
If you are relying on a friend or relative to take pictures, a lighter version helps too. Keep the board to a few frames, set two or three dials and add a short shot list. Be kind about expectations, because a volunteer is not a professional, and give them permission to enjoy the day.
And if you have no strong visual preferences, that is fine. Some couples want only to have good coverage of the day and let the professional decide. In that case, the most useful brief is a shot list, a consent plan and a single line: “We trust your eye.” You can still use the dials afterward to understand what you received.
Your next steps
Start with an evening. Each of you saves thirty images and writes three adjectives, separately. The next day, cut to fifteen and finish the sentence “I chose this because of its ___” for each. Compare, score the adjectives from one to five and settle the order.
Over the following week, set the six dials for each adjective, build the one-page board with captions and one counter-example per adjective, and write a one-to-three page photo style brief. Show the board to a friend for ten seconds to test it. Then send it to the photographers on your shortlist, ask for full galleries and mark each one by dial.
Before you sign, confirm the photographer’s name, delivery terms, license and revision policy in writing, and ask whether the photo style brief can be attached. After the wedding, review the gallery with the photo style brief open, sort problems into errors, departures and changes of heart, and raise concerns with specific examples. Keep the photo style brief in your records alongside the contract.
FAQ
What is a photo style brief?
A photo style brief is a short document, usually one to three pages plus a board of images, that describes the look you want in your wedding photographs. It turns adjectives into observable traits such as light, color, distance, direction and editing, ranks your priorities and lists things to avoid. Your photographer uses it to check fit before booking and to shoot and edit with your taste in mind.
How many reference images should I include?
Aim for about twelve to eighteen on the final board, grouped under three or four adjectives, plus five to eight counter-examples showing what you dislike. Start with thirty to forty saved images and cut anything you cannot explain with a visible reason. A smaller, well-captioned set communicates more clearly than a large unlabelled collection, and it is easier for a photographer to review quickly.
Can I ask my photographer to copy another photographer’s pictures?
You can use other work to describe qualities such as light, color and distance, but you should not ask a photographer to reproduce another professional’s pictures exactly. Photographs are generally protected by copyright, and a good photographer will interpret your references in their own way. Keep your board private, credit sources, and point to qualities rather than specific compositions.
What if my partner and I like different styles?
Find the dials where you actually differ, which is often just contrast or distance. Score your adjectives separately from one to five, add the totals and let the highest lead. If a true gap remains, assign each style to a different part of the day, such as portraits and reception, or ask your photographer to show galleries in both looks so you can choose together.
Should the photo style brief be part of my photography contract?
You can ask to attach it or reference it as a statement of intent. Many photographers will agree to that but will not promise an artistic outcome, because taste is subjective. Even a non-binding reference shows that both sides read the same document, and it gives you a clear basis for a conversation if the gallery differs. Read your agreement for revision and refund terms separately.
How is a photo style brief different from a shot list?
A shot list names the pictures that must exist, such as the ring exchange or a specific family group. A photo style brief describes how pictures should look: light, color, distance, direction, editing and the mix of moments. You need both, because they are used at different times. The shot list works on the day. The photo style brief helps you choose a photographer and review the gallery.
What if the gallery does not match our photo style brief?
Wait a day, then review by dial and sort issues into errors, departures from the photo style brief and changes of heart. Send a calm message with five or six example frames, tie each to your photo style brief and ask what adjustments are possible, such as re-editing or alternate selects. Check your contract for revision terms, and keep your expectations realistic about subjective style.
How do I protect guests and children in the pictures?
Your style choices should never override anyone’s boundaries. Record guest opt-outs, rules for children and any restrictions on posting in a separate consent plan, and share it with the photographer along with the photo style brief. Keep reference images that show other people’s private events or children within your private board, and check local rules and venue policies for photography.
Sources
- U.S. Copyright Office, copyright basics
- U.S. Copyright Office, Copyright in general
- Federal Trade Commission, consumer advice on contracts and disputes
- Consumer Financial Protection Bureau, disputing charges
- Library of Congress, personal digital archiving
- National Oceanic and Atmospheric Administration, sunrise and sunset calculator
- USAGov, consumer complaints and state consumer protection offices
- Professional Photographers of America, official industry association