
Vendor payment tracking is the habit of proving that every dollar you send to a wedding vendor matches something you agreed to in writing. This guide gives you a plain method: a three-way match between the signed contract, the invoice and the proof of payment, plus an approval trail and a worked example you can copy.
For vendor payment tracking that holds up, build a one-page baseline for every vendor from the signed contract and its amendments. Match each invoice line by line to that baseline, give every difference a type and a written reason, and have a second person approve the payment. Pay by a method that leaves a record, match it to your statement, and ask for a paid-in-full note. If a line cannot be tied to the contract or a written change, ask before you pay.
Most couples keep a budget spreadsheet and assume that is enough for vendor payment tracking. A budget tells you what you planned to spend. It does not tell you whether the final invoice from the venue says what the contract says, whether the second deposit was credited, or whether the charge on your card last March was the florist’s balance or something else. Those are different questions, and they need a different kind of record.
That difference is the reason vendor payment tracking deserves its own system. Good vendor payment tracking has to cope with a lot, because a wedding can involve fifteen or twenty payees, each with a deposit, a balance and sometimes a change order. The money moves over a year, through different people and different payment methods, and the paperwork arrives in whatever format each vendor happens to use.
Small gaps open easily: a missing credit, a fee that was never in the agreement, a guest count that changed in a text message instead of an email. Each gap is minor on its own. Together they can add up to real money, and they are far easier to settle in the week an invoice arrives than six months later.
This article is about that narrow job of vendor payment tracking, which professionals call reconciliation. It does not teach you how to set a budget or how to schedule deposits; the wedding cash-flow planning guide covers the timing of money, and the wedding budget pages cover how much to allocate. Here the question is simpler and stricter. For each payment, can you show the contract that justified it, the invoice that requested it and the record that it was paid?
A note on scope. This is general information, not legal, tax or financial advice, and contract and payment rules differ by state, by vendor and by payment method.
What wedding vendor payment tracking covers, and where it breaks
Start with a clear definition, because people use “tracking” to mean three different things.
The first meaning is a list of payments: who you paid, when and how much. Nearly everyone keeps some version of this, even if it lives in a banking app. The second is a payment calendar: what you will owe and when, so cash is available on the due date. That is cash-flow planning, and it looks forward. The third is reconciliation: confirming that each payment you made, or are about to make, is correct, authorized and complete. That one looks backward at documents, and it is where most expensive mistakes get caught or missed.
Good vendor payment tracking includes all three, but the third is the one this guide spends its time on, because it is the one most couples skip. A list of payments can be perfectly accurate and still be wrong in substance. You can faithfully record that you paid a balance of a certain amount, and the amount can still include a fee nobody told you about.
The seven stages every obligation passes through
It helps to give each obligation a status, so your vendor payment tracking can show you at a glance what stage it has reached. Every payment you owe to a vendor passes through the same seven stages, in the same order.
Contracted. The obligation exists because you signed something. The amount, the due date and the conditions are fixed by the contract or an amendment.
Invoiced. The vendor has asked for money. Sometimes the invoice is a formal document; sometimes it is a payment link or an email line that says “balance due.”
Matched. You have compared the invoice to the contract and explained every difference.
Approved. A person other than the one who did the matching has agreed that the payment is correct. For a small household budget that second person can simply be your partner.
Paid. The money has left your account by a method you chose on purpose.
Proven. The payment appears on a statement, and you hold a receipt or confirmation that names the vendor, the amount and the purpose.
Closed. The vendor has confirmed in writing that nothing further is owed, or the relevant deadline has passed with nothing outstanding.
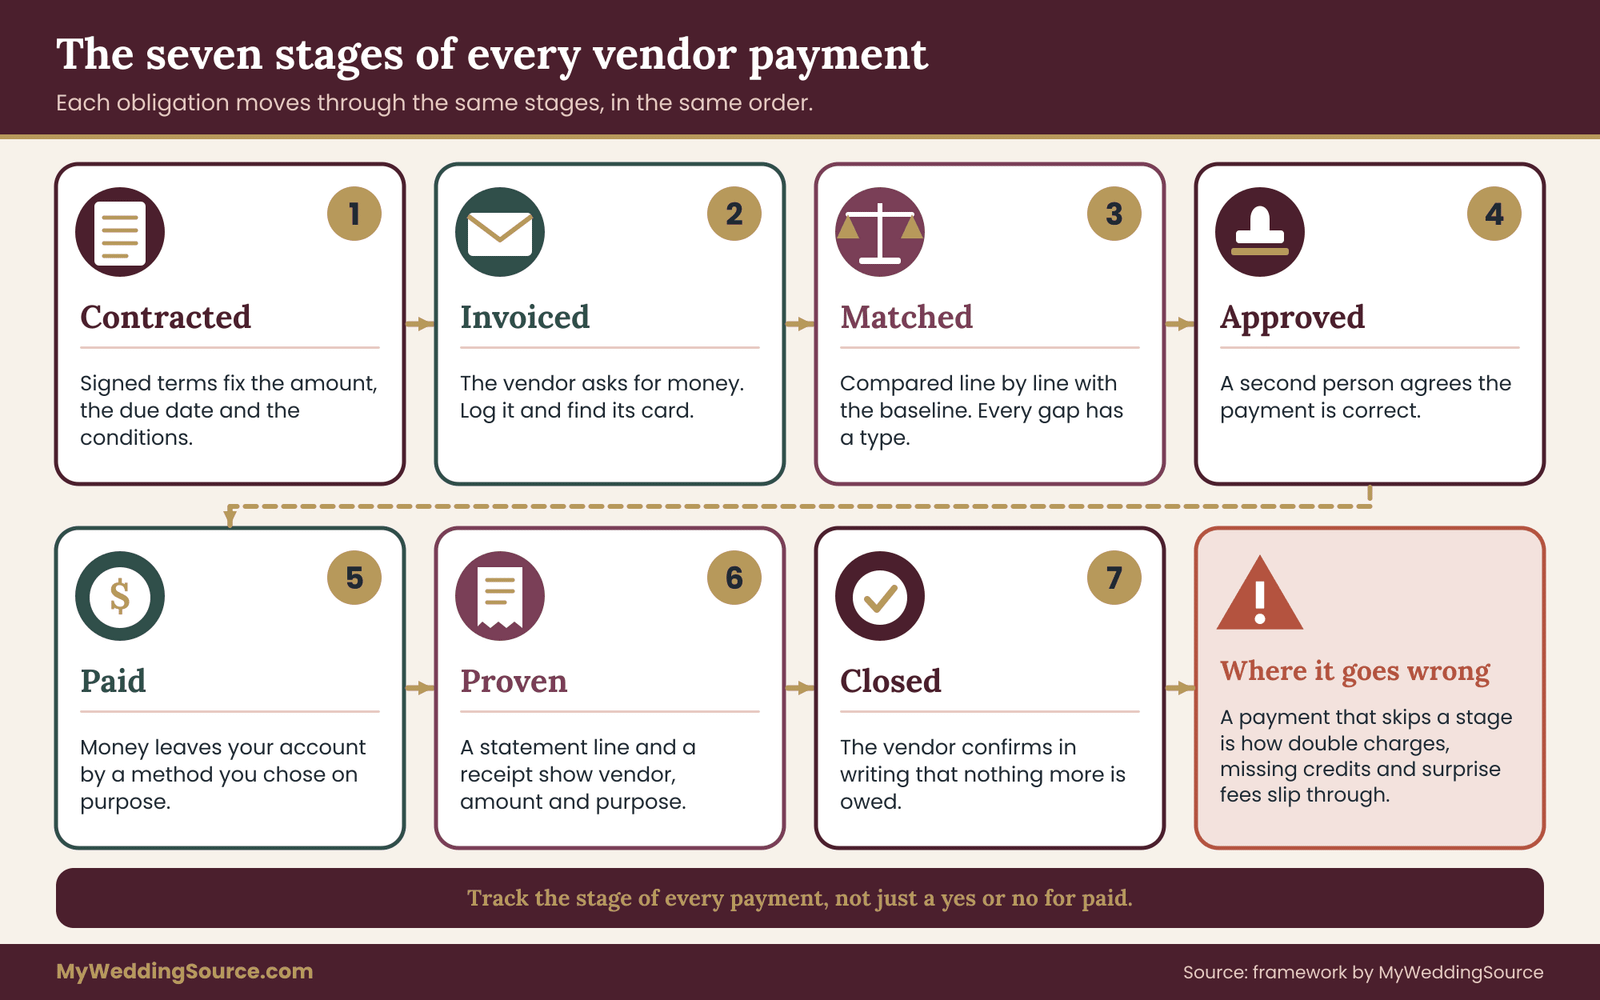
Most vendor payment tracking mistakes happen when a payment jumps a stage. A deposit goes from invoiced straight to paid because the vendor’s email looked routine. A final balance goes from paid straight to forgotten because nobody checked that it was proven and closed. If your vendor payment tracking sheet has one column called “paid” with a yes or no, it cannot show you either problem.
Where invoices and contracts drift apart
Before building a vendor payment tracking routine, it is worth understanding why the drift happens, because the causes tell you where to look first. None of them requires bad faith on anyone’s part.
Contracts are written once and invoices are generated many times, often by different systems. A venue’s sales manager writes the agreement; its accounting team issues the invoice from a template. The template may add a standard service charge or administrative fee that the sales manager’s version described differently, or described in a separate schedule you did not reread.
Quantities change after signing. Guest counts move, hours of coverage are extended, an extra rental item is added. Each change might be agreed by text, on a phone call or in person at a walkthrough, and the invoice then reflects the final state while the contract still shows the original. Whether that change was properly agreed is exactly the question reconciliation exists to answer.
Credits get lost. A deposit paid by one partner on a personal card, another paid by a parent’s check, a retainer paid through a different platform: any of these can fail to appear on the final statement of account, especially if the payer’s name differs from the name on the contract.
Taxes and fees are calculated on different bases. One vendor taxes the service charge and another does not. One adds a card processing fee to the balance and another builds it into the price. Rules on what can be taxed or surcharged vary by state, and a vendor can apply them correctly and still produce a total you did not anticipate.
Finally, people rely on memory. A planner or a family member may have told a vendor something helpful, and the vendor wrote it down in a way you never saw. By the time the invoice arrives, nobody remembers the exact words.
What this approach to vendor payment tracking does not try to do
It helps to set the limits at the start. Reconciliation does not negotiate prices, evaluate whether a vendor is good value, or interpret contract law. It will not tell you whether a clause is enforceable or whether a fee is legal in your state. What it does is turn a vague feeling that “the number looks high” into a specific, documented question: this line is X, the contract says Y, and I would like to understand the difference.
For choosing vendors and judging comparable quotes, the vendor due diligence checklist is the better starting point. This guide begins where the signature ends.
There is a practical reason to keep the scope narrow. Vendor payment tracking that tries to do everything gets abandoned by the third vendor. A version that takes ten minutes per invoice and answers one question gets used through the final balance. The sections that follow keep each step of vendor payment tracking small enough to survive a busy engagement.
The three-way match behind vendor payment tracking
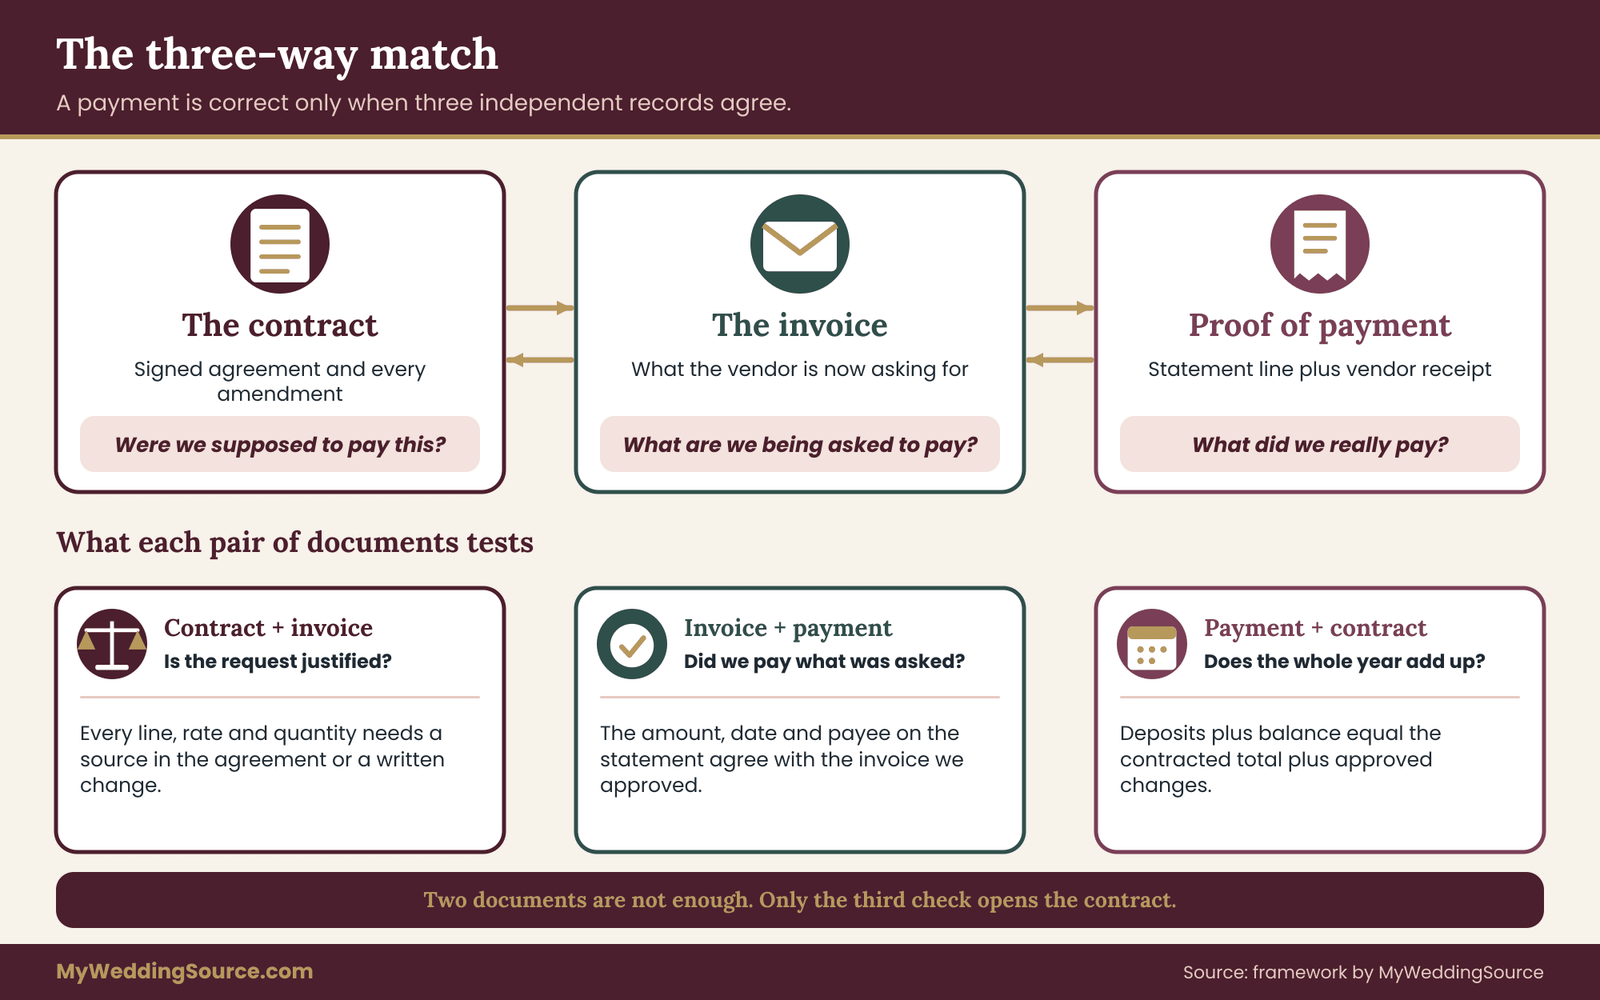
The core of vendor payment tracking is a comparison of three documents. Accountants call it a three-way match, and the idea is old and sturdy: no payment is correct unless three independent records agree with each other.
The contract (and every amendment) says what you agreed to buy, at what price, under which conditions. It answers the question, “Were we supposed to pay this?”
The invoice says what the vendor is now asking for. It answers, “What are we being asked to pay?”
The proof of payment says what actually left your account, on what date, to whom. It answers, “What did we really pay?”
Each pair of documents in vendor payment tracking tests something different. Comparing the contract to the invoice tests whether the request is justified. Comparing the invoice to the proof of payment tests whether you paid what was asked, no more and no less. Comparing the proof of payment back to the contract tests the whole chain: did the total you paid over the year add up to the total you agreed to?
Why two documents are not enough
Couples often do a two-way version of vendor payment tracking without noticing. They glance at the invoice, decide it looks reasonable, and pay it. Or they compare their bank statement to the invoice and confirm the amount matches. Both are useful, and both miss the same thing: neither one looks at the contract.
An invoice can match your bank statement perfectly and still be wrong, because the payment faithfully repeated the error. An invoice can look reasonable because the total is close to what you expected, while a missing credit and an added fee quietly offset each other. Only the three-way match in vendor payment tracking forces you to open the original agreement.
What counts as a contract document
In vendor payment tracking, be generous about what belongs in the first column of the match. Your contract baseline for a single vendor may include several kinds of record:
- The signed agreement itself, with any schedules, riders and attached terms.
- Written amendments or change orders, signed or acknowledged by both sides.
- A proposal or quote that the contract explicitly incorporates.
- Email confirmations that change quantities, dates or prices, where the contract allows changes in writing.
- A banquet event order or production schedule, which some venues and caterers treat as the operative detail.
What does not belong there is anything that exists only in somebody’s memory. A conversation at a tasting can inform a question to the vendor. It cannot, on its own, justify a charge or excuse a missing credit. If a change matters, convert it to writing and file it before the invoice arrives. The wedding vendor contract guide explains what to look for in the agreement itself, so this article focuses on how to use one once it is signed.
What counts as proof of payment
On the other side of the match, proof of payment is whatever independently confirms that money moved. The strongest proof comes from a third party, such as your bank or card issuer: a statement line, a posted transaction or an image of a cashed check. The vendor’s receipt is useful but secondary, because it comes from the party that stands to be paid. A vendor can write “paid” on a document and still not have recorded your money. A statement line cannot be argued with in the same way.
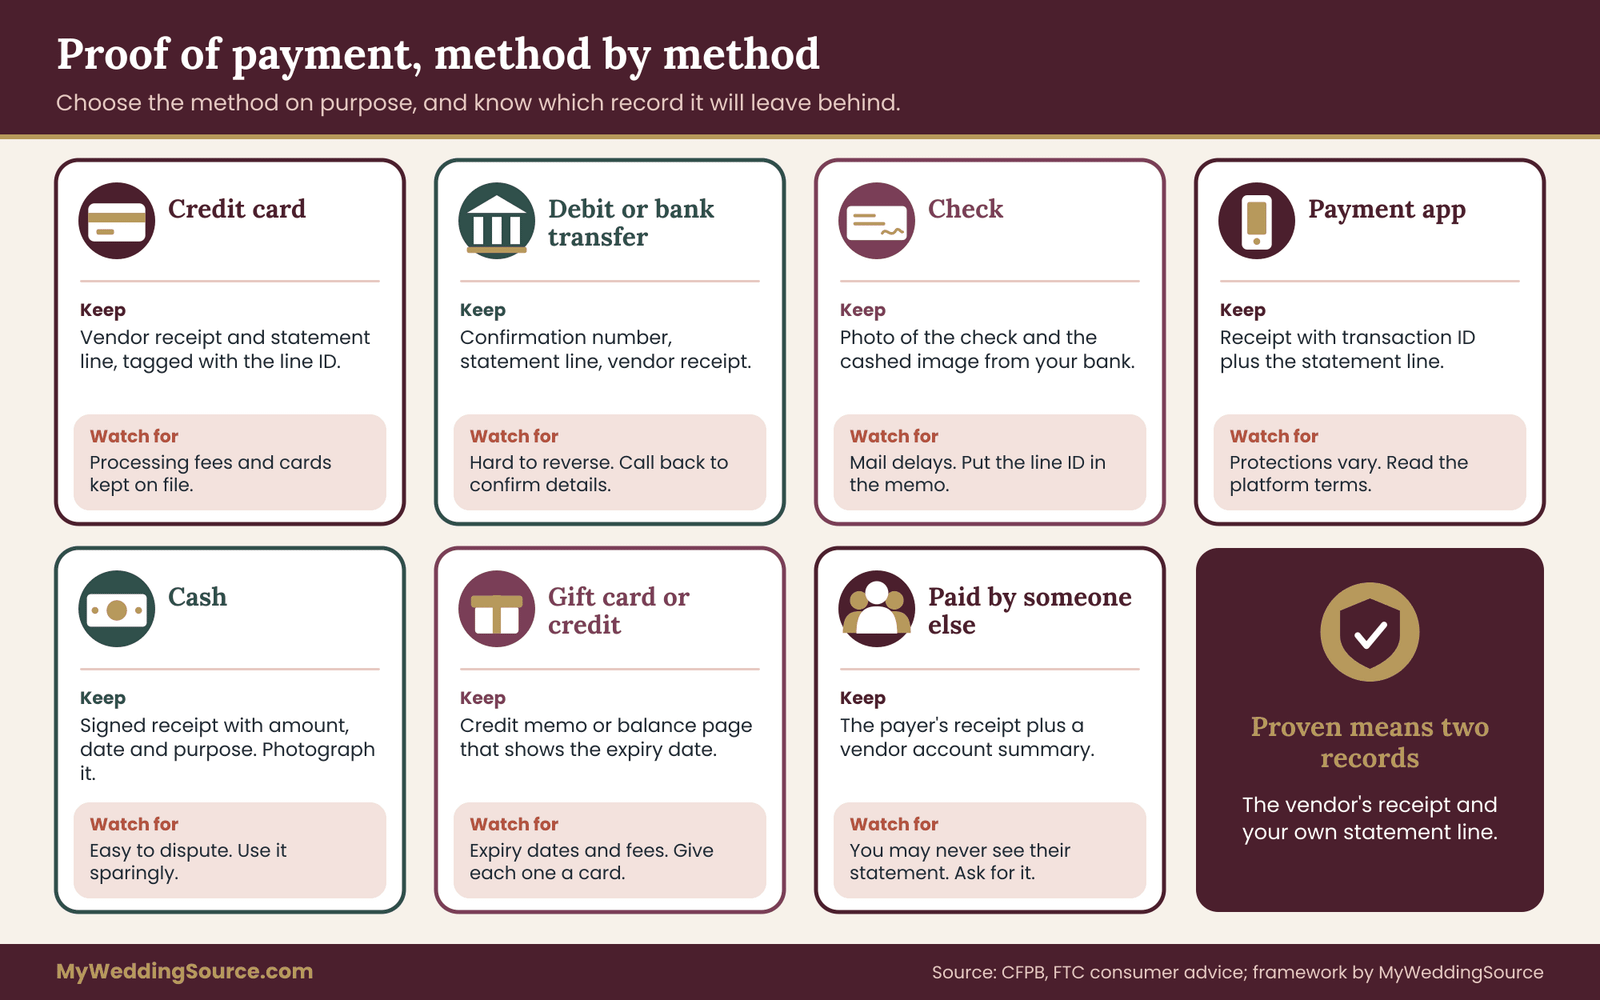
For that reason, the standard for a proven payment in vendor payment tracking is two records: the vendor’s receipt or confirmation, and your own statement line. If you have only one, the payment is paid but not yet proven.
A plain example of each pair
Here is vendor payment tracking applied to a florist. Suppose a florist’s contract lists a design fee, an arrangement count, a delivery fee and a setup charge, with a deposit due at signing and the balance due two weeks before the wedding.
When the balance invoice arrives, the first pair is contract against invoice. You check that the design fee and delivery fee match, that the number of arrangements matches the contract or a signed change, that no new labor charge has appeared, and that the deposit is credited at the right amount.
The second pair is invoice against payment. You pay the balance, and your card statement shows the same amount, on the expected date, to the florist’s business name.
The third pair is the whole chain. You add the deposit and the balance, compare them with the total the contract promised plus any approved changes, and confirm there is no gap. If there is a gap, you now know exactly which document disagrees with which.
When the match fails
Failure is the point of vendor payment tracking, not an embarrassment. A match fails when two documents disagree and the difference has no written explanation. At that moment the correct response is neither to pay silently nor to argue. It is to classify the difference, write down what you know, and ask the vendor a specific question. The next sections give you the tools for that, starting with the baseline you build from the contract.
Build the contract baseline before the first invoice arrives
The match is only as good as the first document, so the first real task in vendor payment tracking happens early, soon after you sign. You read each contract once, carefully, and extract the numbers and conditions into a short baseline. After that, you compare invoices to your baseline rather than rereading thirty pages every time.
This step of vendor payment tracking is tedious for about twenty minutes per vendor and saves hours later. It also forces you to notice anything unclear while you still have leverage to ask about it.
What to extract from each agreement
Read the contract with a pen and pull out nine items. Not every vendor will have all of them, and a blank is useful information.
Payee and legal name. The exact business name on the contract, which is also the name that should appear on invoices and statements. Mismatches here cause lost credits.
What is being bought. The services or goods in plain words, with quantities: hours of coverage, number of guests, count of arrangements, number of chairs.
The price structure. A flat fee, a per-person rate, an hourly rate, a minimum spend, or a mix. Note which parts are fixed and which move with quantity.
Add-ons the contract names. Service charges, administrative fees, delivery, setup and breakdown, travel, overtime rates, damage waivers, parking, and equipment. Write down each one and its stated rate.
Taxes. Whether the contract says taxes are included or added, and what they apply to. If the contract is silent, note that as a question.
Payment schedule. Each installment with its amount or percentage, its due date and what triggers it.
Refundability. Which payments are refundable, partly refundable or not, and under what conditions. Some contracts call a payment a retainer, and the label can change how the vendor treats it.
Change rules. How quantities and details can change after signing, who can authorize a change, and by which deadline. This is the clause that most often decides a disputed line.
Fine print that costs money. Late payment fees, cancellation terms, card processing fees, minimum guest counts, and any clause about final counts or guarantees.
Turn the extract into a baseline sheet
For vendor payment tracking, put these nine items on one page per vendor, not in a giant combined spreadsheet. A page per vendor travels well: you can send it to a parent who is paying part of the bill, hand it to a planner, or print it for a walkthrough. It also makes it obvious when a vendor’s invoice arrives and you have nothing to compare it with.
Write the baseline in your own words and cite the clause. “Service charge: 22 percent of food and beverage, section 4” is far more useful than copying a paragraph of legal language. When you later discover a discrepancy, you will want to point to the section number in your message to the vendor.
Add one more line at the top: the contracted total, calculated from the quantities and rates in the agreement, with any tax and added charges you can compute. If the contract does not allow you to compute a total, write “total cannot be computed from the contract” and list what is missing. That sentence is a request for clarification waiting to be sent.
Capture the amendments as they happen
A baseline that never changes is a stale baseline, and a stale baseline weakens vendor payment tracking. Whenever you sign or accept a change, add it to the vendor’s page with the date, the new quantity or price, the clause that allowed it, and a link or filename for the written confirmation. Treat each amendment as a mini contract.
A useful rule is that no change is real until it is written down on both sides. When a vendor offers an adjustment on the phone, say so politely:
“Thanks for offering to add the extra hour. Could you send a short email confirming the hour, the rate and the new total, so I can attach it to our agreement?”
This takes thirty seconds and protects both of you. A vendor who is acting in good faith will usually be glad to send it.
Mind the timeline of the baseline
In vendor payment tracking, the baseline gets a first pass at signing, a second at each amendment, and a final review about thirty days before the wedding, when most quantities are settled. At that last review, update the contracted total to reflect the final guest count, hours and add-ons, so the final invoice has a clean target. The wedding vendor timeline shows when most final counts and deadlines fall, which helps you place those review dates.
A quick check for contracts that are hard to read
Some agreements are written in a way that makes extraction hard: terms spread across a proposal, a terms-and-conditions page and a separate pricing schedule. Vendor payment tracking needs a clear target total. If you cannot say with confidence what the total will be, do not wait for the invoice to find out. Send a short message asking the vendor to confirm the projected total in writing, including taxes and any automatic fees. A vendor who cannot or will not do this has told you something worth knowing while you may still have options.
The payment line card: one record for every obligation
Once the baseline exists, you need a place to track each payment against it. The unit that works best is not the vendor and not the invoice. It is the obligation: one deposit, one balance, one change order, one deposit refund. Each gets its own card, and the cards stack into your ledger.
Why does vendor payment tracking use obligations rather than vendors? Because a vendor with one contract can have four separate payments, each at a different stage. If you track only “the photographer” with a single status, you cannot say whether the retainer is closed while the balance is still unmatched. The photographer’s file is a folder of cards, and each card knows exactly where it stands. That level of detail is what makes vendor payment tracking useful in the weeks before the wedding, when you may have eight or nine cards open at once.
The eight fields of a payment line card
A vendor payment tracking card needs only eight fields. Anything more tends to go unfilled.
One: line ID. A short code that never changes, such as VEN-02 for the second venue obligation or PHO-01 for the photographer’s retainer. It lets you refer to a payment in messages, file names and statements without describing it each time.
Two: payee. The exact legal or business name from the contract. If the statement will show a different name, such as a payment processor’s descriptor, add it in parentheses so you can find the transaction later.
Three: obligation and source. What the payment is for and where the contract says so: “Balance after retainer, section 3” or “Amendment 1, extra hour of coverage.”
Four: expected amount. The number you calculated from the baseline, not the number on the invoice. This field is the anchor of the whole method. If you fill it in from the invoice, you have lost the independent check.
Five: due date. From the contract or amendment, with the trigger. “Fourteen days before the event” is a more useful note than a calendar date alone, because the event date can move.
Six: status. One of the seven stages from the first section: contracted, invoiced, matched, approved, paid, proven, closed.
Seven: payer and method. Who sent the money and how, such as “Partner A, credit card ending in the last four digits” or “Parent, check number.” Never record a full card or account number.
Eight: proof. The file name or reference for the receipt and the statement line that confirm the payment. Blank until the payment is proven.
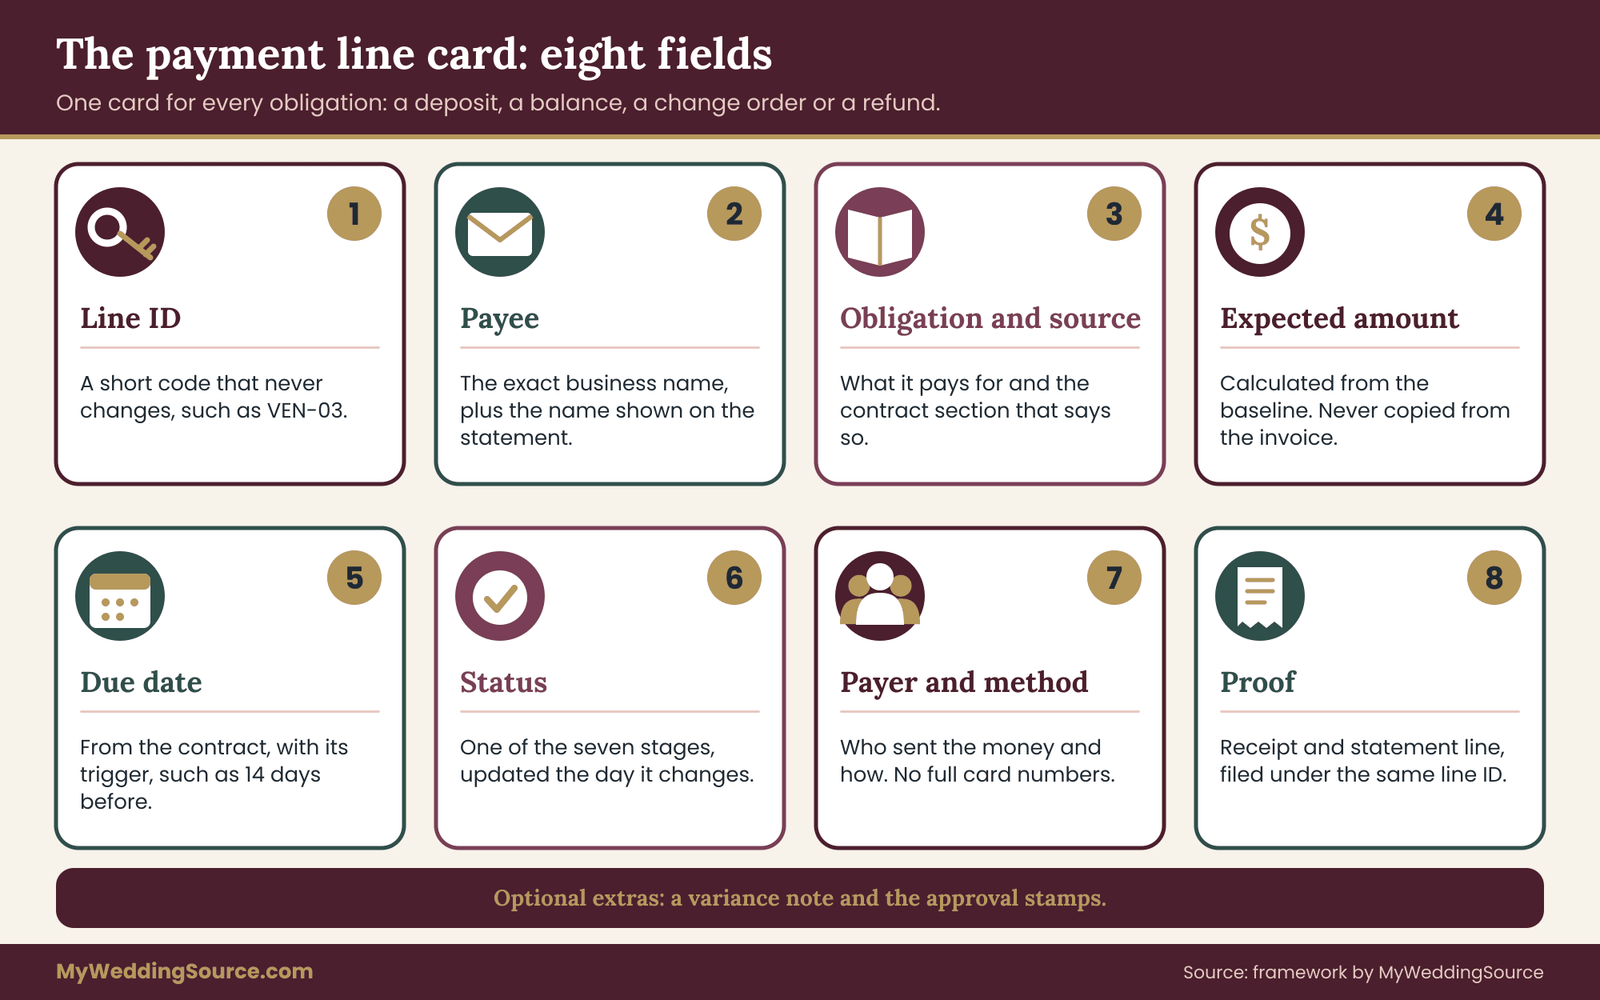
Two more optional fields are worth adding once the system feels comfortable: variance note, for the type and explanation of any difference, and approval stamps, for the initials and dates of those who matched and approved. The approval trail has its own section below.
Where the cards live
The tool matters less than the discipline behind vendor payment tracking. A spreadsheet with one row per card works for most couples, as long as each row links to the vendor’s folder. A shared document or a simple notes app can also work. What the system needs is the ability to filter by status and sort by due date, so that on any given Sunday you can see which cards are invoiced but not matched and which are paid but not proven.
Pair your vendor payment tracking ledger with one folder per vendor, using a naming pattern that sorts well. A pattern such as vendor code, document type, date and line ID keeps files in order: “PHO_invoice_2026-09-14_PHO-02.pdf” tells you everything before you open it. The Library of Congress publishes plain-language guidance on organizing and naming personal digital files, which is a good reference if you want more detail. Keep the original document untouched and put annotated copies in a separate subfolder, so you never lose the version the vendor sent.
Seed the cards from the baseline
Start vendor payment tracking by creating all the cards you know about as soon as the contracts are signed. A typical vendor will produce two to four cards: a retainer or deposit, an interim installment if there is one, a final balance, and sometimes a refundable deposit that the vendor holds against damage or overtime. Fill in the payee, the source, the expected amount and the due date immediately. Their status is “contracted.”
Your vendor payment tracking ledger now holds a forward-looking list of everything you owe, which is also the input to your payment calendar. That is a convenient overlap: the deposit and final-balance calendar in the cash-flow guide turns these same obligations into a funding plan, and the two systems feed each other. The ledger tells the plan what is due; the plan tells the ledger when money will be available.
Handling card edge cases
Some obligations do not fit neatly into vendor payment tracking, and it is better to decide in advance how to record them.
Percentage payments. If the contract says “fifty percent at signing,” the expected amount is a calculation. Show the calculation in the source note so you can recheck it if the total changes.
Payments in a foreign currency. For a destination wedding, record the contract currency and the amount you expect to be billed, then record the actual amount that left your account separately. Exchange rates and card conversion fees can create a difference that is neither the vendor’s error nor yours, and the card should explain it rather than hide it.
Gratuities and tips. Record them as their own obligations with their own cards, even when handed over in cash. A tip that disappears into the main balance is hard to audit and easy to double count.
Vendor-held deposits. A damage deposit or a deposit held against overtime is not a cost until the vendor keeps it. Track it as a card whose expected outcome is a refund, with a date by which the refund should arrive. Many couples forget to follow these up.
Bundled payments. If one invoice covers several contracts, such as a venue invoice that includes the rental, catering and a linen subcontractor, split it into one card per original obligation. Otherwise you cannot match the lines to their sources.
Keep the card honest
A line card is only valuable if people trust it, and vendor payment tracking depends on that trust. Update statuses on the same day something changes, even if the change is small. Mark a payment “paid” only after the money has left your account, not when you schedule it. Mark it “proven” only after you see the statement line. A card that says paid when the payment is still pending will fail you at exactly the moment you need it, so resist the urge to be optimistic.
Receiving an invoice and matching it line by line
The card tells you what you expect. The invoice tells you what the vendor is asking for. The work of vendor payment tracking happens in the gap between them, and a steady routine makes that gap small. The routine below takes about ten to twenty minutes for a typical invoice and rarely needs improvising.
The first 48 hours after an invoice arrives
Do three things quickly, before you even read the amounts.
Log it. Record the invoice number, the date received, the date issued, the due date it states and the file name. Save the original in the vendor folder without editing it. If a vendor sends a revised invoice later, keep both and label them by version. You will want the earlier one if the two disagree.
Find the card. Identify which obligation this invoice is meant to satisfy. If you cannot, that is already a finding. An invoice that fits no card is either an unexpected charge or a sign that your baseline is incomplete, and both deserve attention before any payment.
Acknowledge it. Send a short reply that confirms receipt and says you will review it. This starts a written record and prevents the quiet pressure that sometimes builds when a due date approaches and nothing has been said.
“Thanks, we received invoice number 1042 today. We are checking it against our agreement and will reply by Friday.”
Check the header before the lines
Before you compare any amounts, confirm the facts at the top of the document.
- The payee name is the one in the contract.
- The billed party is correct. If a parent is paying part of the bill, the invoice should still name the contracting couple unless the contract says otherwise.
- The event date, location and guest count match your records.
- The invoice number and date are new, not a duplicate of one you have already handled.
- The currency is the one you expect.
Headers catch more problems than people expect: a wrong event date, a duplicated invoice, a different legal entity. Each one deserves a question before payment.
Compare each line to the baseline
Now work down the invoice line by line, against the card and the baseline, which is the center of vendor payment tracking. For every line, ask three questions in order.
Is it in the contract? The line should match an item, rate or fee in the agreement or in an amendment. If the line names something you do not recognize, mark it as unmatched and move on without guessing.
Is the quantity right? Multiply the rate by the quantity you expect. If you are billed for 124 guests and your final count was 122, the line may be wrong, or the contract may allow billing on a different basis. Mark it and note which.
Is the arithmetic right? Recalculate every extension and every subtotal, and then the tax base and the tax. Rounding differences of a cent or two are normal. Bigger differences are not.
Then check what should be on the invoice but is not. This is the part people skip. Look for the deposit credit, any retainer credit, any promotional discount or concession mentioned in the contract, and any prepayment you made through a different channel. A missing credit is a variance just like an added fee, and it is usually in the vendor’s favor, so the vendor has little reason to notice it.
Recompute the balance yourself
At the bottom of the invoice, ignore the vendor’s total and calculate your own. Start from the contracted total on the baseline, add approved changes, subtract everything you have paid and proven, and compare the result to the balance the vendor requests. The difference is your variance. If it is zero, the card moves to “matched.” If it is not, the next section helps you classify it.
Estimates, proformas and “final” invoices
Be careful about what kind of document you have received. A quote or estimate is a prediction and does not request payment. A proforma invoice often exists to trigger a deposit before final details are known. A final invoice states a closing amount. Some vendors send a “final” invoice a month early and then add post-event charges, such as overtime or damage, in a separate document. Record the type of document on the card, because it determines whether the amount is a settled obligation or a projection.
Verify before you change where money goes
One warning belongs in any vendor payment tracking routine for handling invoices. Fraudsters sometimes send messages that imitate a vendor and ask you to send payment to a new account. The Federal Trade Commission publishes consumer guidance on payment scams, and the pattern is consistent: a sudden change of payment details, urgency, and a request for a method that is hard to reverse.
If an invoice arrives with different bank details, a different payee or a new payment link, do not reply to that message. Call the vendor using the telephone number printed on your signed contract and ask them to confirm the change. Do this every time, including when the message looks entirely familiar. It adds two minutes and avoids the worst kind of mistake.
Close the review with a short note
When you finish, write one or two sentences on the card: “Matched except guest count; asked venue for written confirmation of 124.” That note is the beginning of the approval trail, and it saves you from reconstructing your reasoning two weeks later. A good routine, repeated for each invoice, is the heart of dependable vendor payment tracking.
Five kinds of variance and the first response to each
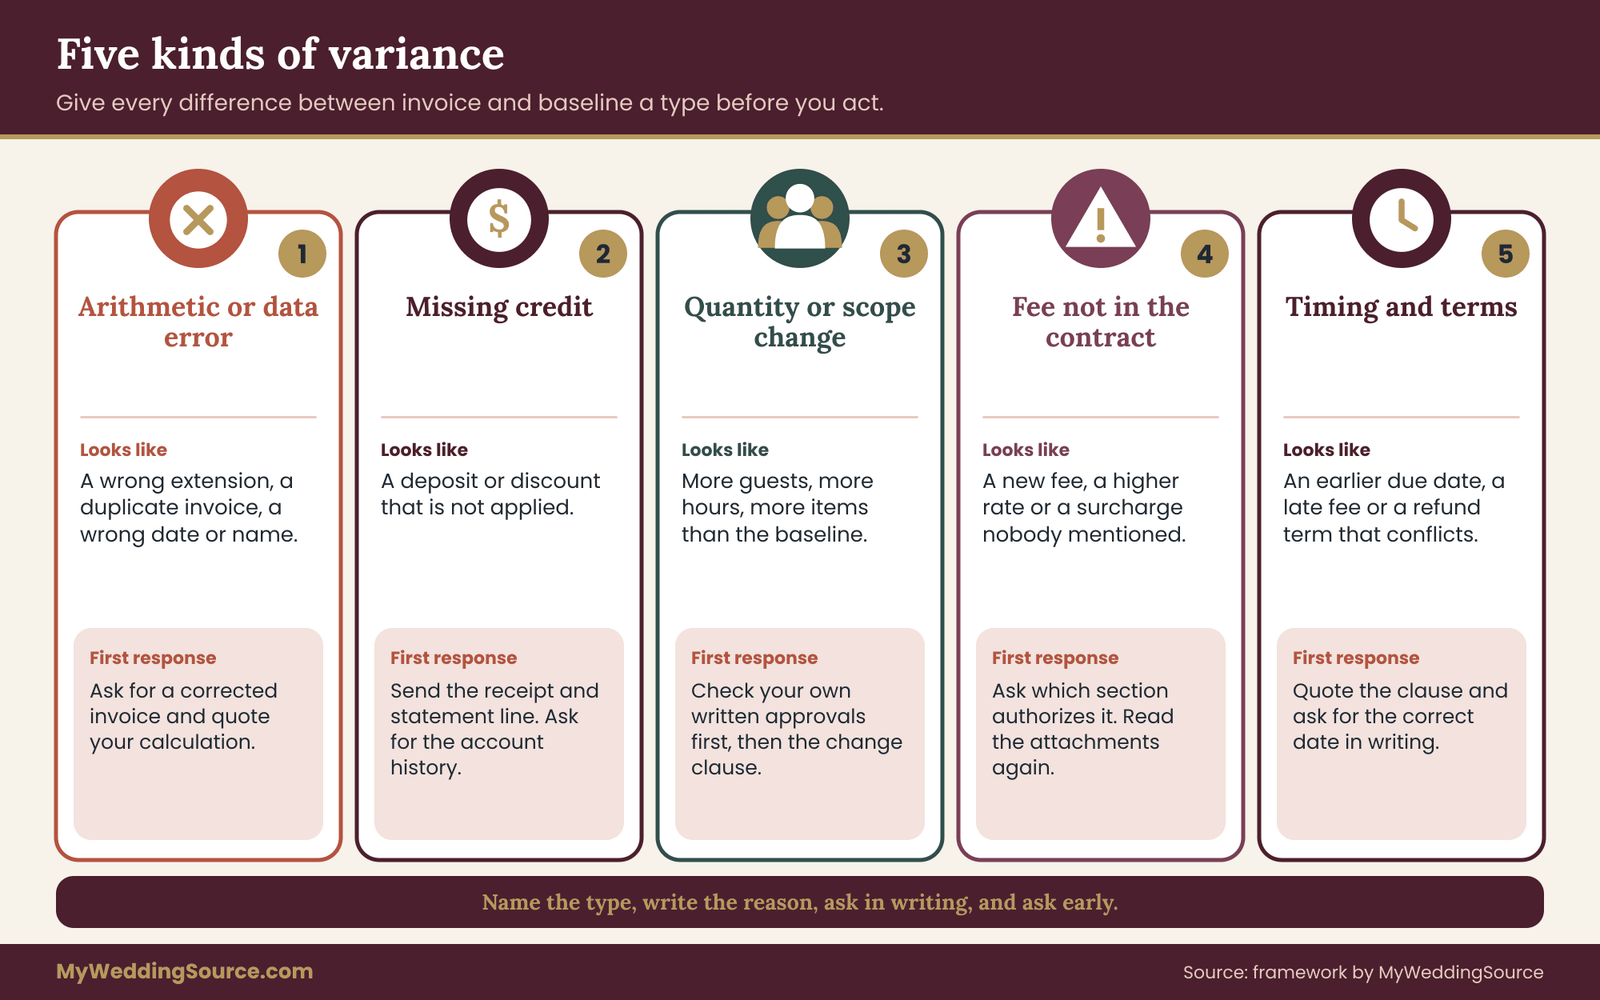
A variance is any difference between what the baseline says you owe and what the invoice asks. The most useful habit in vendor payment tracking is giving every variance a type, because the type tells you what to do next. Without a type, differences blur into a general unease, and general unease tends to end in either a silent payment or an angry email.
In vendor payment tracking, nearly every difference on a wedding invoice falls into one of five types. The labels below are shorthand for your own notes.
Type one: arithmetic and data errors
These are the plainest. A line is multiplied incorrectly, a subtotal is off, an invoice is duplicated, the event date is wrong or your name is misspelled. Nobody intended anything; a template or a keystroke went wrong.
First response. Ask for a corrected invoice, quoting the line and your calculation. “Line three shows 118 guests at 95 per person, which comes to 11,210, but the invoice shows 11,780. Could you check?” Keep the tone as neutral as the problem is.
What resolution looks like. A revised invoice with a new number. Keep both versions, mark the first as superseded, and pay only against the corrected one. The card moves to matched once the corrected version agrees with your baseline.
Type two: missing credits
A deposit you paid does not appear, or appears at the wrong amount. A promised discount is absent. A refundable deposit was counted as a fee. This type is common when several people paid, when payment went through a different platform, or when the deposit was paid under a name other than the contracting party’s.
First response. Attach your proof: the receipt and the statement line showing the date and the amount. Ask the vendor to show the account history and apply the credit. Because you recorded each payment with its proof, this takes one message.
What resolution looks like. A corrected balance and, ideally, an account statement from the vendor listing every payment received. This is also where the habit of recording who paid and how matters most. If a parent paid a deposit by check, you want the check number and the cleared date ready.
Type three: quantity or scope changes
The invoice reflects more guests, more hours, more items or fewer items than the baseline. The difference might be legitimate, because things do change, or it might not have been agreed.
First response. Look first at your own records, not the vendor’s. Did you approve a change in writing? Is there an amendment, an email or a text? Then check what the contract says about changes and final counts: some agreements bill on the guarantee number even if fewer attend, others on the higher of the guarantee and the actual count, and many set a deadline after which numbers freeze.
If the change was agreed, update the baseline and mark the variance explained. If you cannot find an approval, ask the vendor for the source of the change and the date it was requested.
What resolution looks like. One of three outcomes: the change was agreed and the baseline is corrected; the change was not agreed and the vendor adjusts; or the facts are mixed and both sides compromise in writing. Record whichever outcome occurred, with the document that supports it.
Type four: charges and rates that are not in the contract
A new line appears: an administrative fee, a fuel surcharge, a cleaning charge, a higher hourly rate, a card processing fee that your contract never mentioned. This is the type that feels most like a surprise and often has an ordinary explanation, such as a fee schedule in a separate document that the contract references.
First response. Ask which section of the agreement or which signed document authorizes the charge. Phrase it as a request to be shown the source rather than as an accusation: “Could you point us to where this fee appears in our agreement?” Then read the contract again, including linked terms and attachments, before assuming the vendor is wrong. If the fee is in the document, mark the variance explained and update the baseline. If it is not, ask for it to be removed or explained.
What resolution looks like. The vendor either shows the clause or removes the charge. If they say the charge is a new policy, that is a change to the agreement, and a change needs your agreement in writing.
Type five: timing and terms
The invoice states a due date earlier than the contract allows, demands full payment before a milestone, claims a late fee you do not believe is owed, or conflicts with the refund terms.
First response. Compare the invoice’s due date with the contract’s trigger. If the contract says the balance is due fourteen days before the event, an invoice due twenty-one days before is a variance. Quote the clause and ask the vendor to confirm the correct date in writing.
What resolution looks like. A corrected due date, or a written explanation of why an earlier date applies. If you have already been charged a late fee, ask for the basis in writing before paying it.
Two rules for any variance
The five types are only useful if your vendor payment tracking follows a few steady rules about how to respond.
Write it down, then ask. Record the variance type and your understanding on the card first, then contact the vendor. This keeps your question specific and gives you a date-stamped record that you raised it.
Ask in writing and ask early. Raise the question as soon as you see it, long before the due date, so that nobody is working under a deadline. A written message also creates a record in a way that a phone call does not. If you do call, follow up with a short email summarizing what was said.
What to do when the due date arrives and the question is still open
Sometimes a vendor needs time to answer, and the due date comes first. Do not simply withhold the whole payment without reading the contract, because late fees, service interruptions or lost dates can be written into it. A calmer path is to separate the undisputed amount from the disputed one. Ask the vendor in writing whether they will accept the undisputed portion by the due date while the question about the disputed line is resolved.
“We would like to pay the amount we agree on by the due date. Could you confirm in writing that you will accept it as an on-time payment while we sort out line four?”
If the vendor agrees, you protect your standing and keep the dispute narrow. If they refuse, you are better informed about how they treat disagreements, and you may need advice about your options. For disputes about legal rights, a contract attorney or your state’s consumer protection office is the right source, not this guide.
Escalation, in order
Keep the steps proportionate in any vendor payment tracking dispute. First, the vendor’s regular contact. Second, a manager or owner, with a clean summary of the facts. Third, if you paid by credit card and the issue is a billing error or a charge you did not authorize, your card issuer’s dispute process, which has its own written deadlines; the Consumer Financial Protection Bureau explains the general sixty-day window for billing errors and how to submit one.
Fourth, your state attorney general’s consumer protection division or a local small claims process, which varies by place. Most wedding variances in vendor payment tracking end at step one or two. Keeping your records tidy is what keeps the process short.
The approval trail for vendor payment tracking
In vendor payment tracking, a match tells you whether an invoice is right. An approval tells you who decided. The approval trail is the short record of the people and dates attached to every payment, and it matters because wedding money tends to move through several hands.
Consider how a typical wedding works, because vendor payment tracking has to fit it. One partner handles the vendor emails. The other has the bank account. A parent covers the florist. A planner coordinates timings. When everybody can see the invoices and anybody can pay them, it becomes surprisingly easy to pay twice, to pay the wrong amount, or to find that nobody checked at all because each person assumed someone else had.
The four stamps
Every payment line card carries four stamps. Each stamp is a name and a date.
Matched by. The person who compared the invoice to the baseline and wrote the variance notes.
Approved by. A different person who reviewed the match and agreed the payment should be made.
Paid by. The person who actually sent the money.
Proven by. The person who found the statement line and confirmed the receipt.

The stamps in vendor payment tracking do not have to be elaborate. Initials and a date typed into the card or a short text message that quotes the line ID are enough. What matters is that the stamps exist and that they come from more than one person wherever possible.
The two-key rule
The principle behind the four stamps of vendor payment tracking is old and practical: the person who prepares a payment should not be the only person who approves it. Banks and businesses use it because mistakes and fraud both hide best when one person does everything. A wedding is not a bank, but the logic holds.
In vendor payment tracking, the two-key rule looks like this for a couple handling their own money. One partner does the matching and the other approves and pays, or the reverse. If one partner has done all the planning and the other does not want to review documents, a lighter version works: the approver only looks at the one-page summary, which shows the expected amount, the invoice amount, any variance types and the notes. Ninety seconds of review is still a second pair of eyes.
When a planner or a trusted relative helps, assign roles explicitly. A planner may match, because that is their expertise, while the couple approves, because the money is theirs. A parent who contributes toward a vendor should approve the payments that come from them, and should receive the same summary the couple sees.
What approval should actually mean
An approval that means “I trust you” is not much of a control. A useful approval confirms five things:
- The invoice has been compared with the baseline.
- Every variance has a type and a written reason.
- No unresolved variance is hidden in the total.
- The payee details match the contract, or a change of details was confirmed by phone with the number on the contract.
- The payment method and date are right for this obligation.
If the approver cannot answer yes to all five, the card goes back to matched-with-questions rather than forward to approved. This is not bureaucracy; it is the point where a quick glance saves a costly correction.
A cooling-off pause for larger payments
For the largest payments, such as the venue balance, add a short pause between approval and payment. Twenty-four hours is plenty. The pause lets a mistake that nobody noticed at the table surface in the morning, and it prevents the kind of rushed payment that happens at the end of a long day. Choose your own threshold for which payments get the pause, and write it down once so you do not have to debate it each time.
Day-of and last-minute payments
The approval trail is most likely to break down in the final week, when vendors ask for cash tips, extra hours or last-minute add-ons on the day itself. Decide in advance who may authorize payments on the wedding day and up to what amount, and give that person a small envelope or a card with a known limit. Ask them to take a photo of each receipt or write a note of each payment and send it to the records keeper that evening.
Treat it the way vendor payment tracking treats every other obligation: a card for each payment, even a small one, with an amount, a payee and a proof. A short list kept in a phone note is enough. Without it, wedding-day money disappears into a general sense that “it all went fine” and cannot be reconciled afterward. A wedding records archive is the natural home for those day-of receipts, alongside everything else you keep.
Keep the trail where you can find it
Store the trail on the card itself rather than in a separate document. A trail that lives in text messages is hard to search and easy to lose. If approvals do arrive by message, copy the date and the line ID onto the card at once. Each approval takes seconds to record, and the habit makes vendor payment tracking reliable when you are tired, busy and three weeks from the wedding.
Proof of payment, method by method
The third document in the match is the record that money moved. What counts as good proof depends on how you paid, and the method also affects what you can do if something goes wrong. The rule for vendor payment tracking is simple: choose the method on purpose, and know in advance which proof it produces.
Credit cards
A credit card produces the cleanest paper trail for vendor payment tracking: a transaction with a date, an amount and a merchant name on every statement, plus a card issuer that has its own dispute process. The Consumer Financial Protection Bureau explains that a billing error on a credit card generally has to be reported in writing within sixty days of the statement that first showed it, and the card agreement and issuer describe the steps.
What to keep. The vendor’s receipt or the invoice marked paid, and the statement line. Add the line ID to the transaction in your ledger.
Watch for. Some vendors add a processing fee for card payments, and some contracts mention it while others do not. A merchant descriptor that differs from the business name, because a payment processor is used, can make the transaction hard to find; record the descriptor on the card once you see it. Vendors that keep a card on file may charge it automatically on a due date. Know whether yours do, and put a reminder ahead of that date so the match is finished first.
Debit cards and bank transfers
Debit cards and bank transfers move money directly from your account. Protections and deadlines for errors differ from credit cards and depend on the type of transfer, so read your bank’s account terms and its published guidance. The Federal Reserve and the FDIC both publish consumer resources that describe how electronic transfers and errors are generally handled.
What to keep. The bank confirmation page, a posted statement line and the vendor’s receipt. For a transfer, record the confirmation number and the exact payee details you used.
Watch for. Transfers, and wire transfers in particular, are difficult to reverse once sent. That is the reason the call-back rule from the earlier section matters: confirm account details by telephone using the number printed on your signed contract before sending the first transfer to a new payee.
Checks
Checks are slower but leave a durable record for vendor payment tracking.
What to keep. A photo of the check before you send it, the check number, and the image of the cashed check from your bank, which shows who deposited it and when. The cashed image is the real proof, since it shows the check was processed.
Watch for. Mailed checks can be delayed or lost. For a deadline payment, allow extra time, and note the mailing date on the card. Write the invoice number or line ID in the memo line so the vendor can apply it correctly.
Payment apps and online platforms
Many small vendors accept payments through apps and online invoicing platforms. These are convenient, and the proof they produce varies: some give a clear receipt and a transaction ID, others only a confirmation message.
What to keep. A screenshot or saved receipt with the transaction ID, the date and the recipient name, plus the matching line on your bank or card statement. If the app pays from a linked account, the statement line may show only the app’s name, so note the actual vendor on the card.
Watch for. Protections differ by provider and often depend on how the payment was categorized and what it was for. The FTC consumer advice site discusses how payment methods vary in recourse and which kinds are favored by scammers. Read the platform’s terms before relying on it for a large balance, and consider a credit card for the final balance if the vendor accepts one.
Cash
Cash leaves no automatic record, so vendor payment tracking must create one.
What to keep. A written receipt signed by the vendor, showing the amount, the date, the payer and what the payment covers. Photograph it immediately. Record the withdrawal from your account as well, so the money has a clear starting point.
Watch for. Cash is easy to lose and easy to dispute. Use it sparingly, for small items and customary gratuities, and avoid paying large balances in cash. For tips, a single log on one page, listing recipients and amounts, is enough.
Gift cards, store credit and vendor credits
Gift cards and credits are payments too, and vendor payment tracking should list them, but they behave differently. A vendor credit from a cancelled order may have an expiry date, and some gift cards carry fees or conditions.
What to keep. The credit memo or gift card balance confirmation, with its expiry date. Create a card for it with a due date equal to the expiry, so it does not lapse unnoticed.
Payments made by someone else
When a parent, a relative or an employer’s benefit pays a vendor directly, the proof comes from them, and you may never see their statement. Ask the payer to forward the receipt and the confirmation, and ask the vendor to send an account summary showing the credit. Record the payer’s name in the payer field so that the vendor’s account history can be reconciled with it.
The monthly statement sweep
Proof of payment is only useful to vendor payment tracking if you check that it exists. Once a month, spend twenty minutes on a statement sweep. Pull the statements for every account used for the wedding, including any parent’s account that paid a vendor. Go line by line and tag each wedding-related transaction with its line ID. Then look at two lists.
First, transactions that look wedding-related but have no card. These are unexpected charges, duplicates or charges for something you forgot. Second, cards marked paid that have no transaction. These are payments that are pending, failed or never sent.
Both lists are short most months, and the second list matters most in the week of a due date. A payment that failed silently is a common cause of late fees. The sweep also puts the sixty-day billing window in your own hands, since you will see any problem charge within a month of its statement. Make the sweep a calendar event, because vendor payment tracking that depends on remembering will not survive a busy season.
Where vendor payment tracking catches the most: traps by vendor type
Every vendor type has its own favorite places where an invoice drifts from a contract, so vendor payment tracking works best when you know them. Knowing them in advance makes matching faster, because you can look at the likely trouble spots first. The list below is not a claim that any vendor behaves badly; it is a map of where honest differences tend to appear.
Venue and catering
This is usually the largest invoice in vendor payment tracking and has the most moving parts. Check the guest count that the food charge is based on, and read what the contract says about the guarantee and increases. Check whether a service charge is calculated on food and drinks only or on other items too, and whether an administrative fee is a separate item. Look at whether taxes apply to the service charge, which varies by state; a state revenue department can answer what applies in your location.
Look for room fees, minimum spend shortfalls, overtime for an extended reception, cleaning or security charges, and any deposit the venue holds against damage. If the bar is priced by consumption, ask for the itemized final count; if by package, check the number of hours and the number of guests it covers.
Photography and video
The common drift is in hours and overtime. Compare the coverage hours on the contract with the hours actually worked, and check the hourly rate for any extra time. Look for travel charges, second photographer fees, album and print credits that the contract promised, and usage or delivery fees. Photographers often retain a non-refundable retainer, so make sure the retainer is credited in full on the final invoice. Also check the gallery delivery date promised in the contract, and treat a missed delivery as an open item rather than a settled one.
Florist and décor
Look at the design fee, the delivery and setup charge, and any line for breakdown and pickup after the event. Floral contracts sometimes allow price adjustments when market prices change, so check for that clause. Rental items such as vases, arches and candle holders may carry a return deposit. Create a card for the refundable portion with a due date, and ask for the refund in writing if it does not arrive.
Music: DJ and band
Check overtime rates, load-in and sound-check time, travel and meal charges, and equipment rentals added for the venue. Contracts often give an hourly rate beyond the booked time. If the reception ran later than expected, check whether the extra time was requested by someone authorized, and whether a day-of approval note exists.
Rentals, tents and linens
Rental invoices are heavy on quantities, so compare the count of every item with the final order. Check delivery windows, setup and strike charges, damage waivers, and replacement fees for missing or damaged pieces. Compare the pickup receipt with the delivery receipt, because replacement charges are far easier to challenge if you counted items when they arrived and when they left.
Hair, makeup and beauty
These contracts commonly depend on the number of people served and the time of day. Look at trial fees, early-morning start charges, travel to the location, and what happens when the number of people changes. Tips are customary for many beauty vendors, so record them on their own cards.
Transportation
Check the minimum hours, wait time, fuel and mileage charges, and any gratuity added to the invoice. Compare the booked route and times with the contract. Transport vendors often add an automatic gratuity, so ask whether the amount is included before you add a separate tip.
Cake and dessert
Compare the final servings with the contract, then look at delivery, setup, stand or display rentals, and any cake-cutting or dessert service fee charged by the venue. The two invoices are linked: the baker may bill for the cake while the venue bills separately for cutting and serving it.
Stationery, attire and smaller vendors
Printed invitations often pick up charges after proofs change: new rounds of proofing, rush production, extra envelopes, shipping. Attire usually involves a balance due at pickup, plus charges for fittings and rush alterations. For smaller vendors, an invoice may be a text message with a number in it. Treat it the same way, and ask for a written summary, because vendor payment tracking works regardless of the vendor’s size.
Before you commit to any vendor, the wedding vendor purchase order checklist can help you confirm that quantities and terms are written down in the first place, which makes vendor payment tracking easier from the very first invoice.
Multiple payers, credits, refunds and tips
A wedding is rarely paid for by one person from one account, which is why vendor payment tracking records the payer. Contributions from parents, a joint savings account, a credit card chosen for rewards, a vendor credit from a cancelled order and a pocketful of tip envelopes all feed into the same event. Vendor payment tracking handles this well as long as you record who paid, not just what was paid.
Keep contributions and payments separate
Vendor payment tracking involves two different questions, and mixing them causes confusion. One is who is funding the wedding: how much each person has promised or given. The other is who paid which vendor: the actual transactions. Track the first in a short contributions note and the second on the payment cards.
When a parent says they will cover the florist, decide how it works and write it down. A parent can pay the florist directly, in which case the florist’s account shows a payment from someone who is not the contracting party, and you need that payment proven. Or the parent can give money to the couple, who then pay, in which case the couple’s own statement carries the proof. Direct payment is tidy for the parent but harder for you to confirm. If it happens, ask the parent for the receipt and ask the vendor for a statement of account.
Also decide in advance where a refund goes. If a parent paid a deposit and the vendor later refunds part of it, the refund should go to whoever paid. Vendors often return money to the contracting party’s card or account, which may not be the original payer. Settling that expectation early prevents an awkward conversation later. If you want to see how families can share input on spending without losing track of who decided what, the wedding decision-making guide deals with that side of the problem.
Consider a dedicated payment source
One practical way to make the monthly statement sweep of your vendor payment tracking fast is to funnel vendor payments through a single card or account that is used for nothing else. When every transaction on the statement is a wedding payment, the sweep takes minutes. When wedding payments mix with groceries and rent, it becomes a chore, and chores get skipped. If you cannot use a dedicated account, use a tag or a category in your banking app and apply the line ID in the notes field.
A caution applies to credit cards. Using one card for a large balance can produce a spending total your credit limit does not allow, or a surcharge from the vendor, so check the vendor’s accepted methods and your limit well before the due date. These are cash-flow questions that belong in your payment calendar rather than your ledger.
Credits: money you are owed but have not yet been paid
A credit is a promise to apply value later: a deposit credited toward the balance, a store credit after a cancelled item, a discount tied to a referral, a credit toward an album or a print package. Credits are easy to lose in vendor payment tracking because they do not appear as a negative charge anywhere until the vendor applies them.
Give each credit its own card. Record the amount, the source (which document promised it), the date it must be used by, and what it applies to. Then, on every future invoice from that vendor, look for the credit. If it is absent, you already know what to ask.
Refunds: money the vendor owes you
Vendor payment tracking should treat a refund as an obligation in the other direction, with its own card. Write the amount, the reason, the date the vendor promised to send it and the method it will arrive by. Common refunds include returned damage deposits, overpayments, refunds for cancelled add-ons and refunds for rentals returned unused.
Set a date to check. If the promised date passes and nothing arrives, follow up politely and in writing, quoting the original message. Because the card holds the facts, the message is short.
“Our records show a refund of the damage deposit was promised within fourteen days of the event, which was last Saturday. Could you confirm when it was sent?”
Be patient with the first request and organized with the second. Many missing refunds are simply in a queue; a few are forgotten without anyone noticing. A tidy record is the same in both cases.
Reimbursements to friends and family
Wedding parties and relatives often buy small items out of pocket: signage supplies, a last-minute extension cord, a case of water. If you plan to reimburse them, ask for the receipt at the time and make a short card with the amount, the payee and the date reimbursed. A shoebox of unlabeled receipts a month later is far harder to resolve, and a reimbursement owed to a friend who is too polite to ask can quietly damage a relationship.
Tips and gratuities
Gratuities deserve their own place in vendor payment tracking because they are paid in cash or added to invoices, and they can double count. Some vendors add a gratuity or service charge automatically, while others leave it to you. Check each contract and each invoice for any amount already included before deciding on a separate tip.
Prepare the tip envelopes in advance with the recipient’s name on each, and assign one person to hand them out. Write a one-page log with the vendor, the amount, who gave it and the time. That log becomes a set of cards, one per tip, marked paid and proven by the log itself. It also protects the person who handed out the envelopes from questions later.
One caution on terms. A service charge and a gratuity are not always the same thing, and some contracts use the words loosely. If you are unsure whether a line is a tip that goes to staff, ask the vendor to explain what it covers. Tax treatment of these amounts can vary, so ask a tax professional or your state’s revenue agency if it matters to you.
A worked example of vendor payment tracking: one venue invoice, reconciled
The following example is invented to show vendor payment tracking from start to finish. The names, amounts and clauses are illustrative and do not describe any real venue. Your own contract will differ, so use the structure, not the numbers.
Nora and Sam signed a venue agreement for a reception. Their baseline page, built right after signing, lists these terms:
- A site rental fee of 6,000 dollars.
- Catering at 95 dollars per guest, with a guest guarantee of 120 due ten days before the event and increases accepted at the same rate.
- A service charge of 22 percent of catering.
- Sales tax of 7 percent on catering and the service charge, with the rental fee not taxed.
- A retainer of 3,000 dollars at signing and a second payment of 5,000 dollars six months before.
- The balance due fourteen days before the event, based on the final count.
They created three cards: VEN-01 (retainer), VEN-02 (second payment) and VEN-03 (final balance). Both early payments went through and were proven with statement lines.
Step one: set the expected balance
A month before the wedding, Nora updated the baseline with the final count. She had emailed the venue 122 guests on the guarantee deadline. Her expected figures, calculated from the contract, were:
- Catering: 122 times 95, which is 11,590.00.
- Service charge: 22 percent of 11,590, which is 2,549.80.
- Tax: 7 percent of the sum of those two amounts (14,139.80), which is 989.79.
- Rental fee: 6,000.00.
- Contracted total: 21,129.59.
- Less payments already proven: 8,000.00.
- Expected balance: 13,129.59.
She wrote that number on card VEN-03 before the invoice existed.
Step two: the invoice arrives
The venue sent an invoice asking for 16,755.75. Nora logged it, replied that she was reviewing it, and checked the header. The payee, the event date and the location were right. The invoice number was new.
She then compared the lines to the baseline.
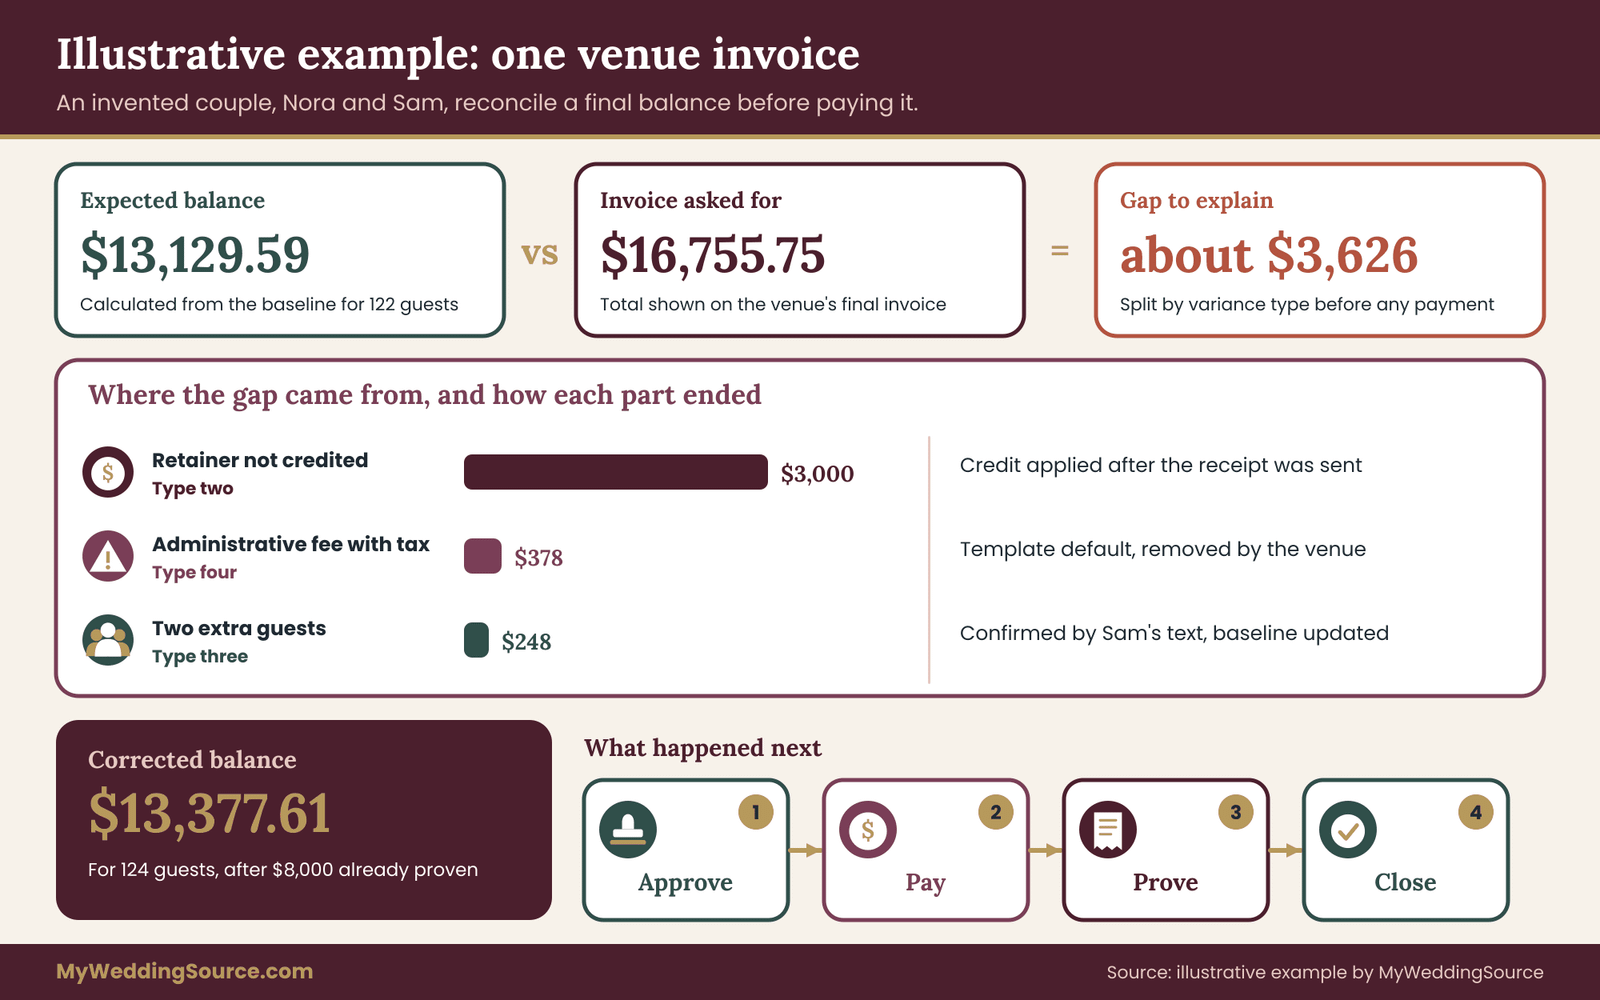
The rental fee matched. Catering showed 124 guests, not 122, a difference of 190 dollars before the service charge and tax. The service charge was 22 percent of the higher figure. A new line, an administrative fee of 3 percent, appeared, which neither the contract nor any amendment mentioned. The tax was calculated on a larger base than her baseline. And only the 5,000 dollar payment was credited; the 3,000 dollar retainer was missing.
Her own balance came to 13,129.59, against the invoice’s 16,755.75: a variance of about 3,626 dollars. She split it by type. The missing retainer credit was type two, worth 3,000. The administrative fee, with tax on it, was type four, worth about 378. The two extra guests, with service charge and tax, were type three, worth about 248. The three amounts add to the total difference, apart from a cent of rounding.
Step three: ask specific questions
Nora wrote one message, quoting the card and the sections. She attached the proof of the retainer payment, asked the venue to apply the credit, asked where the administrative fee was authorized, and asked when the extra two guests had been added and by whom.
“Thanks for the invoice. We compared it to our agreement and have three questions. The 3,000 dollar retainer paid at signing is not credited. The 3 percent administrative fee is not in our agreement that we can find; could you point us to it? And the invoice shows 124 guests while our final count was 122; could you tell us when the change was requested?”
Before sending it, she asked Sam to review the one-page summary. He approved the message and noted that nothing would be paid until the venue replied.
Step four: the answers
The venue responded within two days. They agreed the retainer had been entered under the wrong client number and applied the credit. They explained the administrative fee was a template default and removed it. On the guest count, the venue’s coordinator had a note of a phone call in which two guests were added. Nora checked her own messages and found a text from Sam to the coordinator confirming two additional guests, sent after the guarantee email. Because the contract accepted increases at the same rate, the two extra guests were legitimate.
So the variances resolved in three different ways: one credit applied, one fee removed, one change confirmed. Nora updated the baseline for 124 guests, attached the text message to the card, and recalculated. Catering became 11,780.00, the service charge 2,591.60, tax 1,006.01, and the contracted total 21,377.61. After the 8,000 dollars already paid, the corrected balance was 13,377.61.
Step five: approve, pay, prove, close
The venue issued a corrected invoice for 13,377.61, and Nora marked the earlier one superseded. Nora and Sam followed their approval routine: she stamped the card matched, Sam stamped it approved the next morning after the pause they use for large payments, and Sam paid. Because the corrected invoice asked for payment by bank transfer, he called the number printed in the contract to confirm the receiving account before sending anything.
That afternoon the card moved to paid. When the transfer posted, Sam attached the statement line and the venue’s emailed receipt, and the card moved to proven. After the wedding, once the venue confirmed no post-event charges, Nora asked for a short note that nothing further was owed. The note arrived ten days later, and the card closed.
A smaller example: photography overtime
The same vendor payment tracking works on a small scale. A photographer’s contract covers eight hours at a flat price, with overtime at 450 dollars per additional hour. The final invoice shows one and a half hours of overtime, totaling 675 dollars. The couple’s records show that the wedding coordinator authorized thirty more minutes, in a message the evening of the event.
Thirty minutes at the contract rate is 225 dollars. The variance is 450 dollars, type three. The couple sent the coordinator’s message to the photographer, who checked the timeline and corrected the invoice to 225 dollars. The whole exchange took two emails because the evidence was ready.
What the example shows
Notice what made vendor payment tracking quick here. Nora calculated the expected balance before she saw the invoice, so the comparison was independent. She had the retainer’s proof on file, so the credit was a single attachment. She asked about a fee instead of accusing anyone, and she checked her own records before assuming the venue was wrong on the guest count. And no payment was made until the match was complete and a second person approved it. None of this vendor payment tracking required legal knowledge, only a baseline, a routine and records that could be found quickly.
Closing files, the monthly review and the limits of vendor payment tracking
A vendor file is finished when every promise has been delivered and every payment has been proven. The last stretch of vendor payment tracking is short, but it is where the work either gets sealed or quietly decays.
The paid-in-full note
When the final balance is proven and the event is over, ask each vendor for a brief written confirmation that nothing further is owed. It costs the vendor a minute. Many will send it without being asked twice.
“Thank you again for your work. For our records, could you confirm that our account is paid in full and that no further charges are expected?”
A confirmation like this does two things. It closes the card with the vendor’s own words, and it reduces the chance of a surprise charge for overtime, damage or an administrative adjustment after the wedding. Some vendors send post-event invoices, so leave cards open until the note arrives or a reasonable period has passed with no further billing. If a vendor says they cannot send confirmations, a final account statement showing a zero balance does the same job.
The final reconciliation
Once every card is closed, do one last pass on the whole picture of your vendor payment tracking. For each vendor, add up what you paid, including approved changes, and compare it to the contracted total plus the amendments. The totals should agree, apart from taxes or conversion differences you already explained. Anything left over is an open question or a lesson.
Write a half-page summary of the points where invoices differed from contracts, what type each variance was and how it ended. It is not for anyone else. It is a record that makes your own wedding finances understandable later, and it is a useful note for any future event that involves contracts, such as a family celebration or a move. Store it with the ledger and the vendor folders. The wedding records guide explains how long to keep each kind of document and how to organize the archive afterward.
How long to keep the proof
Keep your vendor payment tracking ledger, each baseline page, the invoices, the receipts and the paid-in-full notes at least until every card is closed and your open windows have passed, such as the card dispute window and any refund date. After that, how long to keep them depends on your situation. The IRS publishes general guidance on how long to keep records, and wedding costs are usually personal expenses, but if any part of your event touches a business or a tax question, ask a tax professional what to retain.
A rhythm that keeps the work small
Vendor payment tracking is lightweight when it runs on a steady rhythm instead of in bursts. A workable pattern looks like this.
At signing. Build the baseline page and create the cards. Add the due dates to your calendar.
At each amendment. Update the baseline the same day, with the written confirmation attached.
Monthly. Do the statement sweep. Twenty minutes, one sitting.
Thirty days before the wedding. Review every baseline against the final counts and hours, and update each contracted total.
When each invoice arrives. Run the intake routine, classify variances, send questions and collect approvals.
The week after the wedding. Gather day-of receipts and tip logs into cards, and ask for paid-in-full notes.
Thirty to sixty days after the wedding. Do a final statement sweep, chase outstanding refunds, close the cards and write the half-page summary.
If you keep to this rhythm, vendor payment tracking takes a couple of hours a month during the busiest stretch and almost no time the rest of the year.
What this method cannot do
Be honest about the limits of vendor payment tracking. Vendor payment tracking checks that payments are consistent with documents. It does not check that a vendor performed well, and a perfectly matched invoice can still belong to a disappointing service. Performance problems are a separate matter, handled by the contract’s terms and by conversations with the vendor.
It also cannot settle questions of law. Whether a fee is allowed, whether a deposit is refundable, whether a clause is enforceable and what rights you have as a consumer all depend on your contract, your state and the facts. Fees, payment rights and deposit obligations vary by contract and jurisdiction. For a dispute that involves a significant amount, a threat to withhold services, a vendor that has closed, or a contract term you do not understand, talk to a contract attorney or your state attorney general’s consumer protection office.
The National Association of Attorneys General maintains a directory that helps you find yours.
Finally, vendor payment tracking depends on the other side being willing to answer. Most vendors respond reasonably to specific, documented questions, but some will not. If a vendor does not engage, your records are what make your next step possible, whether that is a card dispute inside its deadline, a complaint to a consumer agency or a claim in small claims court. Keep your tone professional in every message. A calm, dated record of reasonable questions is the strongest position any customer can be in.
Rules, fees and timelines change, and this guide was written in November 2026. For current requirements, check the issuing agency or your own card and account agreements, rather than relying on any general article, including this one.
Your next steps
Pick the vendor with the largest balance and start there. First, read the contract and build a one-page baseline with the nine items, including a contracted total. Second, create a card for each payment you owe and each credit or refund you expect, and fill in the expected amounts from the baseline rather than from any invoice. Third, agree with your partner or planner who matches, who approves and who pays, so no payment depends on one person.
Then add three dates to your calendar: the monthly statement sweep, the baseline review thirty days before the wedding, and the post-event check for paid-in-full notes. When the next invoice arrives, you will have a short routine instead of a guess, and your vendor payment tracking will be ready to catch the first difference between the contract and the bill.
FAQ
What is wedding vendor payment tracking?
It is the practice of recording every payment to every wedding vendor and proving each one matches a signed contract and an invoice. A simple list of payments is part of it, but the key step is reconciliation: comparing the contract, the invoice and the proof of payment, and writing down any difference with its reason. It turns a budget into a verified record.
How is vendor payment tracking different from keeping a wedding budget?
A budget says what you planned to spend and how much is left. Reconciliation checks whether each specific payment is correct. A budget can look healthy while an invoice contains a missing credit or an added fee, and only a line-by-line comparison with the contract will catch it. Most couples benefit from both, since they answer different questions.
What should I do if an invoice does not match the contract?
Give the difference a type, such as an arithmetic error, a missing credit, a change in quantity, a fee not in the contract or a timing issue. Write your understanding on the payment record, then ask the vendor a specific question in writing, quoting the contract section. Ask early, before the due date, and attach any proof you have. Avoid paying a questioned line silently.
Should I pay the undisputed part while a line is in question?
Often that is a sensible way to keep a dispute narrow, but read the contract first, because late fees or service conditions may apply. Ask the vendor in writing whether they will accept the undisputed amount as an on-time payment while the other line is resolved. If the amount is large or the vendor refuses, consider advice from a contract attorney.
Can I dispute a wedding vendor charge on a credit card?
Possibly. The Consumer Financial Protection Bureau explains that billing errors on credit cards generally need to be reported to the issuer in writing within sixty days of the statement that shows them. Contact the vendor first, then follow your issuer’s dispute steps and check your card agreement for current rules. Other payment methods have different protections, so confirm with your bank.
Who should approve vendor payments if we have a planner?
A common split is that the planner or one partner matches the invoice to the contract, and the couple, or the person whose money is being spent, approves it. The principle is that the person who prepares a payment should not be the only person who approves it. A parent paying toward a vendor should see the same summary the couple sees.
How long should I keep invoices and proof of payment?
Keep them at least until every payment is closed and any refund or dispute windows have passed. After that, how long depends on your situation. The IRS publishes general guidance on record retention, and wedding costs are usually personal expenses, but ask a tax professional if any part of your event involves a business or a tax question. Store the originals in a single archive.
When should I ask a vendor for a paid-in-full note?
Ask once the final balance is paid and the event is over, and again if a vendor tends to send post-event invoices for overtime or damage. A short written confirmation that nothing further is owed closes your record. If the vendor will not send one, request a final account statement showing a zero balance, and keep it with the other proof.
Sources
- Consumer Financial Protection Bureau
- Consumer advice, Federal Trade Commission
- Federal Trade Commission
- How long should I keep records?, Internal Revenue Service
- USAGov: consumer protection and complaints
- Federal Deposit Insurance Corporation, consumer resources
- Board of Governors of the Federal Reserve System, consumer resources
- Personal archiving: preserving your digital memories, Library of Congress
- National Association of Attorneys General, directory of state attorneys general