
Winter Engagement Photos: Timing, Outfits, Weather, and Location Planning
The photographs that make people want a winter session were mostly taken in a narrow set of conditions: soft overcast light or a low sun, fresh snow rather than old snow, and two people who had been outside for about eleven minutes. What you do not see is the car idling forty feet away, the second pair of shoes, the hand warmers, or the fact that the whole thing was over by 4:20 because the light was gone.
None of that is a reason to avoid it. Winter engagement photos are among the best you can take — bare trees give clean backgrounds, snow acts as a giant reflector, city lights come on early, and there is genuine intimacy in two people in coats. But the season removes almost all of your margin. In June you can shoot for three hours and reschedule twice. In January you have perhaps ninety usable minutes, a comfort window measured in tens of minutes, and a sunset that arrives while you are still parking.
The practical difficulty is that the two biggest constraints pull against each other. The best light is late in the day, and late in the day is also the coldest and darkest part of it. Add holiday crowds at the photogenic locations, permit rules at the indoor alternatives, and a photographer whose December calendar filled in October, and the session needs a plan rather than a date.
Getting it wrong is rarely dramatic. It looks like this: arriving at 3:45 for a 4:00 session and losing the light at 4:35; a gallery where both of you look tense because you were genuinely cold; footwear that ruined an outfit; a location that turned out to be unplowed; or images that arrive three weeks after you needed them for save-the-dates.
This guide covers the daylight math and how to schedule around it, fourteen clearly different location and styling directions, how to choose a spot and check whether you need a permit, weather thresholds and cold-safety limits, outfits and footwear that survive the conditions, how snow affects exposure across different skin tones, warming logistics, pets, and delivery timelines if these images are going on your save-the-dates. There is a checklist at the end you can take to the session.
Why a Winter Session Needs More Planning Than the Photos Suggest
The daylight math
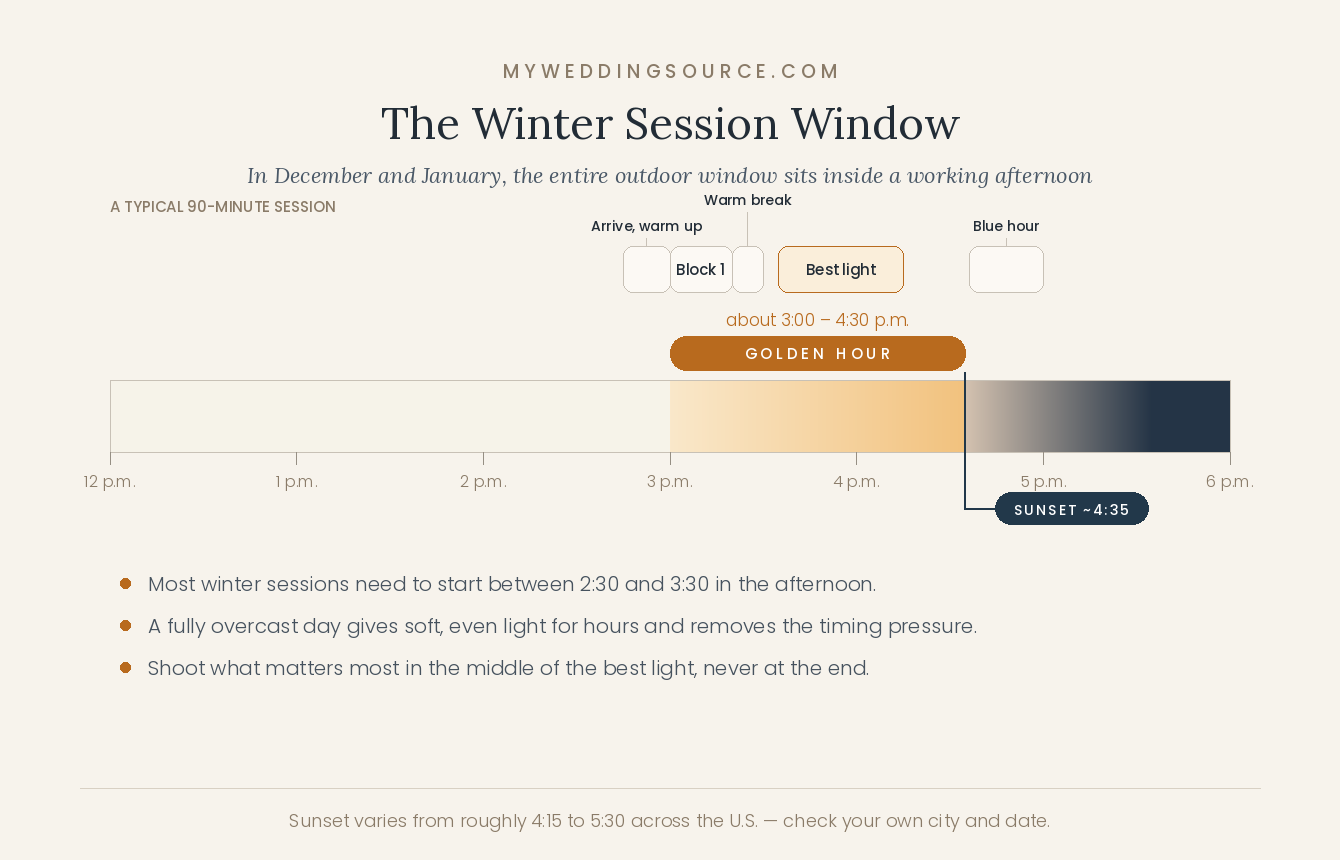
Across most of the United States, sunset in December and January falls between roughly 4:15 and 5:30 p.m. depending on where you are. The flattering window — the soft, low, warm light photographers call golden hour — is roughly the hour before that, which puts it somewhere around 3:00 to 4:30 in the afternoon.
That is the entire outdoor window, and it lands in the middle of a working day. A 5:00 p.m. session in January is a session in the dark. Practically, most winter engagement sessions need to start between 2:30 and 3:30, which means taking an afternoon off or shooting on a weekend.
The alternative, which many photographers actually prefer, is a fully overcast day. Cloud acts as a softbox: the light is even, there are no harsh shadows, nobody squints, and the usable window stretches across several hours rather than one. Grey days photograph considerably better than their reputation suggests.
Cold changes how people look, not just how they feel
This is the part reference photos never show. After ten or fifteen minutes in real cold, faces flush, noses and fingertips redden, shoulders rise toward the ears, and both of you start holding a slightly braced posture that reads in photographs as tension. Hands stiffen, which changes how you touch each other.
None of that is fixable in editing, and all of it is preventable with structure. Plan the session in ten to fifteen minute outdoor bursts with a warm car, café, or building between them, and you will get relaxed images for the whole ninety minutes instead of good images for the first twelve.
The gap between the reference photo and your conditions
Two specifics worth knowing when you send your photographer inspiration images. Fresh snow and week-old snow look nothing alike; the second is grey, tracked, and piled at the edges of everything. And a great deal of “snowy” imagery is shot during snowfall, which is a different and much harder situation involving wet equipment and limited visibility.
Send the references anyway — they tell your photographer what you like. Just have the conversation about which parts are achievable in your city, in your month, on a Tuesday.
Timing: Choosing the Hour
Golden hour, overcast, and blue hour
Golden hour gives warm, directional light and long shadows. It is the most flattering option and the most fragile: in winter it is short, it disappears entirely behind cloud, and it is coldest at the exact moment it is best.
Overcast gives soft, even light for hours. If your schedule is inflexible or you are nervous about timing, a grey day is the safer choice and produces a cohesive gallery.
Blue hour — the twenty to forty minutes after sunset — is genuinely beautiful in winter, particularly in a city with lit windows and street lamps, or against snow, which turns a deep even blue. It requires a photographer comfortable with low light and usually some added light. It is also the coldest part of the session.
Snow days
Falling snow photographs wonderfully and complicates everything: equipment needs protection, autofocus struggles, and visibility drops. If snow is what you want, tell your photographer well in advance so they can plan for it, and accept that the session may be shorter.
Fresh snow on the ground with clear or lightly overcast sky is the ideal and the least predictable. If you have flexibility, ask whether your photographer offers a short-notice “snow day” session — some do, and it produces the images everyone is actually picturing.
How long a session realistically runs
Most engagement sessions are booked for sixty to ninety minutes. In winter, plan the same length but structure it differently:
| Time | Golden hour plan (sunset 4:35) | Overcast day plan |
|---|---|---|
| Start | 2:45 — arrive, park, warm up, first look at the location | 1:00 — no rush, light is stable all afternoon |
| First block | 3:00–3:20 — walking, relaxed, coats on | 1:15–1:35 — same |
| Warm break | 3:20–3:30 — car or café, hands and faces recover | 1:35–1:50 |
| Best light | 3:35–4:15 — the images you will actually use | 1:50–2:30 — second outfit or second location |
| Optional | 4:35–5:00 — blue hour with city lights, if you have the stamina | 2:30–3:00 — indoor location nearby |
One rule inside both plans: schedule the images that matter most for the middle of your best light, not the end. Whatever you leave until last is the thing you will be doing while the light dies and both of you stop being able to feel your hands.
Fourteen Winter Engagement Photo Directions
Each includes what it needs, when the light works, an outfit note, and where it tends to go wrong. Costs are noted only where a location charges.
Snow and open landscape
1. Fresh snow in an open field
The look: clean white negative space, two figures, almost nothing else. The most graphic option on this list and the one that most rewards strong outfit color.
Needs: access after snowfall and untracked snow, which means arriving before anyone else walks through it. Boots, always.
Light: overcast is excellent here; bright sun on snow creates strong contrast and squinting. Outfits: deep or saturated tones — camel, oxblood, forest, black. Pale coats disappear.
Works less well when: the snow is old. Tracked grey snow reads as slush rather than winter.
2. Snowfall, mid-storm
The look: flakes suspended in the air, soft everything, high atmosphere. The images people save and the hardest to plan.
Needs: a photographer willing to shoot on short notice, equipment protection, and flexibility on your side. Ask about a snow-day arrangement when you book.
Light: flat and dim; flakes read best with backlight or a flash. Outfits: dark coats show falling snow; hats and hoods are your friend.
Works less well when: the wind is up. Sideways snow is uncomfortable and reads as chaos rather than romance.
3. Snowy evergreens or a tree farm
The look: dark green structure against white, with depth and a natural frame. Very seasonal without any props.
Needs: permission. Many tree farms welcome sessions but require booking, and some charge or restrict dates in December.
Light: late afternoon between the rows. Outfits: cream, camel, and rust separate from the green; avoid dark green head to toe.
Works less well when: it is peak tree-buying weekend. Go on a weekday or in January.
Bare landscape, coast, and desert
4. Bare winter forest
The look: vertical lines, muted browns and greys, low sun raking through trunks. Works in every part of the country without needing snow.
Needs: a trail you have walked, and enough daylight to get in and out safely.
Light: golden hour is transformative here. Outfits: warm tones — rust, camel, cream — against grey-brown trees.
Works less well when: the ground is muddy rather than frozen. Check after a thaw.
5. Winter coastline
The look: empty beach, grey-blue water, big sky, wind in everything. Dramatic and unmistakably not a summer session.
Needs: genuine wind planning — hair, hats, and the fact that coastal wind chill is significantly colder than the forecast temperature.
Light: overcast or sunset; the horizon gives you both. Outfits: heavy knits, long coats that move, nothing that flies up.
Works less well when: wind exceeds about fifteen miles per hour. It stops being atmospheric and becomes unpleasant quickly.
6. Desert or high plains in winter
The look: warm earth tones, enormous sky, sharp winter light. Winter is the best season for desert sessions and the temperature swing is the catch.
Needs: layers, because a sunny 55°F afternoon becomes a 30°F evening within an hour of sunset.
Light: the last ninety minutes. Outfits: tonal neutrals, or one strong color against the landscape.
Works less well when: you plan it like a summer shoot. The drop after sunset is fast.
Urban winter
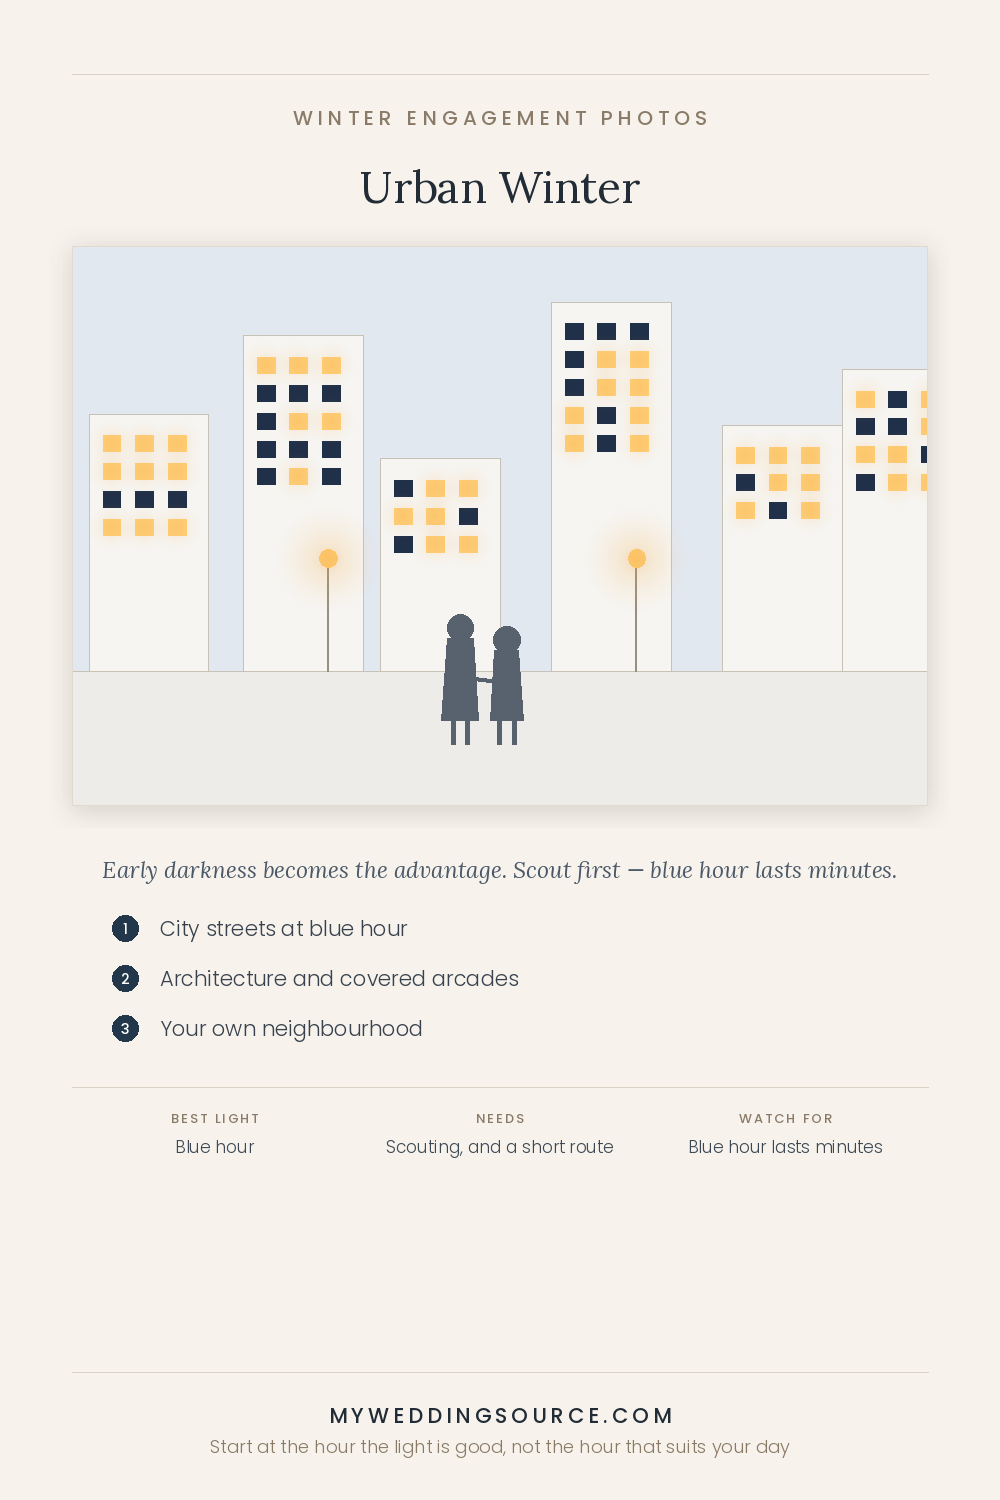
7. City streets at blue hour
The look: deep blue sky, warm shop windows, street lights, motion. The strongest argument for winter’s early darkness.
Needs: a photographer comfortable in low light, and a route with several looks within a few blocks so you are not walking far in the cold.
Light: the twenty to forty minutes after sunset. Outfits: dressier than daytime; a good coat is the whole outfit.
Works less well when: you have not scouted. Blue hour lasts minutes, and finding the spot is not part of it.
8. Architecture and covered arcades
The look: clean geometry, columns, glass, and shelter from wind. Underrated because it works in rain, snow, and cold alike.
Needs: a check on whether the space is private property. Many plazas and lobbies prohibit sessions or require permission.
Light: any time of day; overcast is fine. Outfits: tailored and simple; busy patterns fight the lines.
Works less well when: security asks you to leave mid-session. Ask first; it is usually granted.
9. Your own neighborhood
The look: the corner shop, your stoop, the walk you do every day. Meaningful in a way a landscape is not, and warm coffee is thirty seconds away.
Needs: almost nothing, which is its advantage.
Light: late afternoon. Outfits: what you actually wear, elevated slightly.
Works less well when: you wanted the session to feel like an event. This one is intentionally ordinary.
Indoors and warm
10. At home
The look: coffee, blankets, your own kitchen, no coats. The most relaxed session type and frequently the one couples end up loving most.
Needs: tidy surfaces near the windows, and lamps you can switch on. That is genuinely all.
Light: whatever comes through the windows; midday is fine indoors. Outfits: soft, tonal, no shoes.
Works less well when: your home has no window light. Ask your photographer to look at photos of the space beforehand.
11. A café, bar, or bookshop
The look: warm interior light, other people’s noise, real activity around you. Excellent as the warm half of a two-part session.
Needs: permission from the owner, ideally arranged in advance and at a quiet hour. Buy something; it is not optional.
Light: window seats. Outfits: layered, coats off, texture close to the camera.
Works less well when: you turn up unannounced at a busy time with lighting equipment.
12. Conservatory, greenhouse, or museum
The look: greenery and daylight in the middle of winter. A genuinely different gallery from everything else in this list.
Needs: almost always a permit and a fee. Botanical gardens and museums commonly charge for photography sessions and restrict tripods, flash, and December dates.
Light: diffused daylight through glass, best at midday. Outfits: anything; green backgrounds suit warm neutrals and jewel tones.
Works less well when: you assume it is free. Ask about photo policy, cost, and available dates weeks ahead.
Seasonal, without the costume
13. Holiday market or lit street
The look: bokeh from string lights, mulled wine, crowds softened into color. Very seasonal, very atmospheric.
Needs: tolerance for crowds and, at many light trails, a timed ticket bought weeks in advance. Weeknights are far quieter than weekends.
Light: just after sunset, while there is still some sky. Outfits: simple and dark, so the lights carry the color.
Works less well when: the venue prohibits professional photography, which some ticketed light displays do. Check the terms.
14. Ice rink, sledding hill, or something you actually do
The look: movement, laughing, genuinely unposed. The best antidote to stiff cold-weather posture.
Needs: a photographer comfortable shooting action in low light, and a rink or hill that permits sessions — many public rinks require permission.
Light: whenever the activity happens. Outfits: what you can move in; this is not the tailored-coat session.
Works less well when: neither of you can skate and you wanted elegant images. Choose the activity for the pictures you want, honestly.
Choosing a Location, and the Permit Question
Five criteria that decide it
- Access in winter. Is the road plowed, is the parking lot cleared, is the trail passable, is the park even open? Seasonal closures are common and rarely obvious online.
- Distance from a warm place. The single most useful criterion. A location with a café or your car within two minutes changes the entire session.
- Wind exposure. Open water, ridgelines, and plazas are dramatically colder than sheltered woods or streets at the same temperature.
- Crowds. The picturesque spots are picturesque to everyone. Weekday afternoons are a different world from weekend ones in December.
- A backup within ten minutes. Somewhere covered or indoors, agreed in advance, that you can move to without rescheduling.
Permits and permission
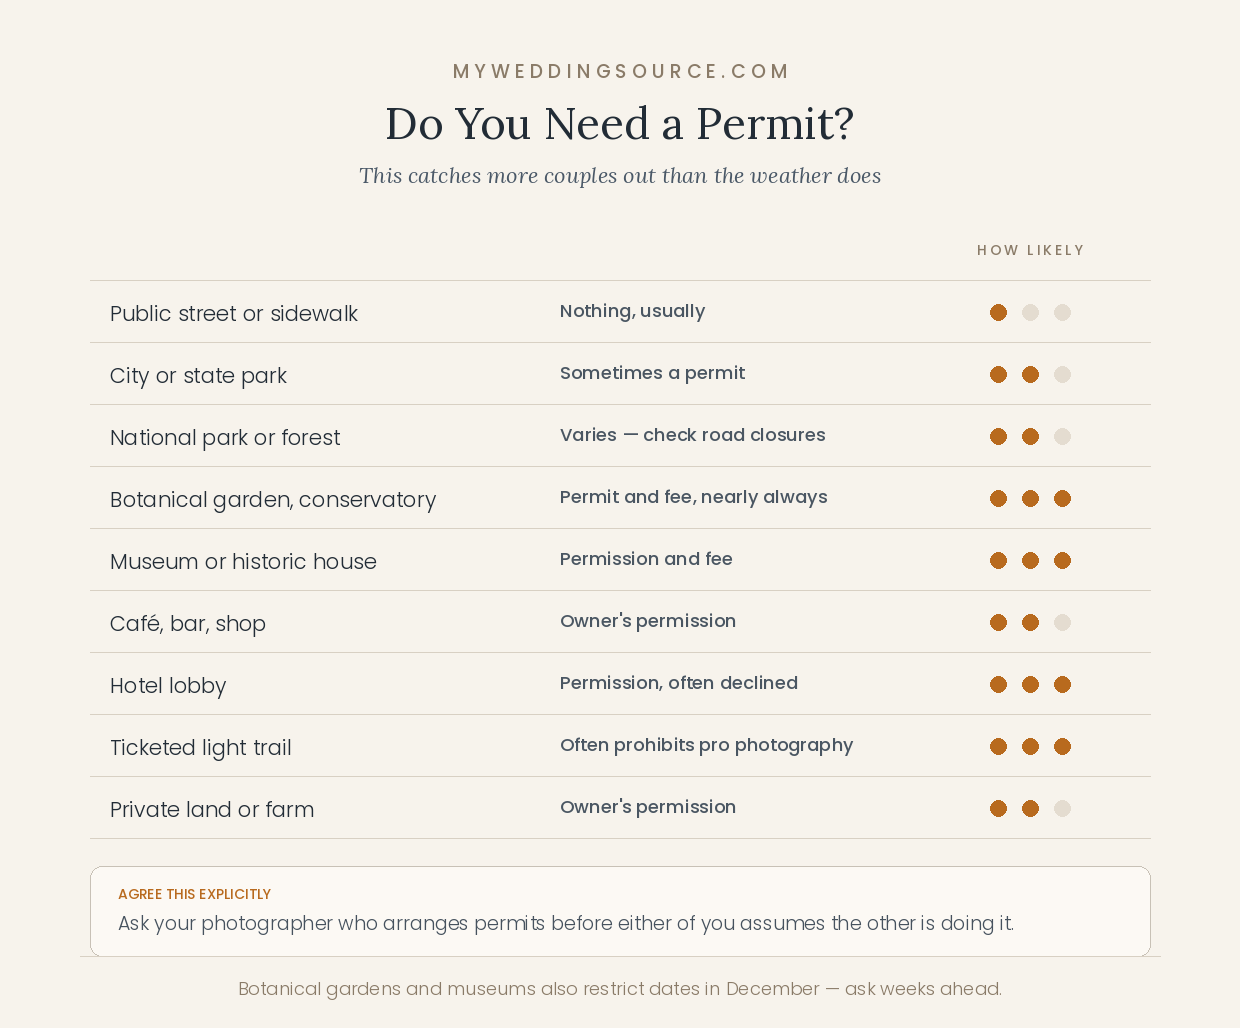
This catches couples out more than weather does. A rough guide to what typically requires asking:
| Location | Usually needed | Ask about |
|---|---|---|
| Public street or sidewalk | Nothing, usually | Blocking foot traffic; lighting equipment rules |
| City or state park | Sometimes a permit | Winter hours, plowing, entry fee |
| National park or forest | Varies; often fine for small personal sessions | Road closures, which are extensive in winter |
| Botanical garden or conservatory | Permit and fee, nearly always | Blackout dates in December; tripod and flash rules |
| Museum or historic house | Permission and fee | Whether sessions are allowed at all |
| Café, bar, shop | Owner’s permission | Quiet hours; buying something is expected |
| Hotel lobby | Permission, often declined | Whether being a guest changes the answer |
| Ticketed light trail | Tickets, and check the terms | Many prohibit professional photography outright |
| Private land or a farm | Owner’s permission | Fee, dates, parking |
Ask your photographer who handles permits before you assume either of you is doing it. Experienced photographers usually know the local rules and often hold permits already, but the responsibility should be explicit rather than assumed.
Weather: Thresholds, Backups, and Cold Safety
Decide your thresholds in advance
Agree with your photographer, in writing, what conditions move the session. Vague plans get decided at 1:00 p.m. on the day by whoever is least willing to reschedule.
- Wind: sustained above roughly fifteen miles per hour makes outdoor sessions unpleasant and hair unmanageable. Coastal and open sites feel much worse.
- Precipitation: light snow is a feature; rain is not. Freezing rain cancels.
- Ice underfoot: a safety question rather than a comfort one, particularly at any location involving steps, rocks, or a slope.
- Temperature plus wind chill: pick a number where you would rather move indoors, and decide it while you are warm and unromantic about it.
Cold safety, honestly
Winter sessions are usually just uncomfortable, but the risk is real at the edges. Wind chill lowers the effective temperature substantially, and exposed skin can be at risk of frostbite far faster than most people expect in strongly negative wind chills. Fingers, ears, and noses go first, and the danger is highest exactly when you are standing still in a field for photographs.
The National Weather Service’s guidance on cold and winter hazards is the practical reference for wind chill and exposure times, and it is worth a two-minute look before a session in genuinely cold conditions. If there is a wind chill advisory in effect, move the session indoors rather than shortening it.
Also worth knowing: alcohol before or during a cold session is a poor idea, both for how it looks and because it impairs your ability to notice how cold you are.
The reschedule policy
Before you book, ask three questions and get the answers in writing: what conditions trigger a reschedule, who makes the call and by when, and whether there is a fee. Also ask how quickly they could fit you in again, because in December the honest answer may be January.
If your images are needed for save-the-dates, build one spare weekend into the plan rather than booking the last possible date.
Outfits, Footwear, and How Winter Light Reads on Skin
Coordinate, do not match
The approach that consistently works: choose a palette of three to four colors and pick pieces within it, rather than choosing identical items. Two people in the same shade of navy reads as a uniform; two people in navy, cream, and camel reads as considered.
In winter specifically, texture does the work that color does in summer. Cable knit, wool, corduroy, shearling, leather, and boucle all photograph with depth even in flat light, and a tonal outfit in mixed textures looks far richer than a flat one in a bold color.
The outerwear is the outfit
This is the mistake most people make. You will be wearing a coat in nearly every frame, so the coat matters more than what is under it. A well-cut coat in a good color is worth more to your gallery than the sweater it covers.
Bring two if you can: one long and tailored, one softer or more casual. Changing the coat changes the look of the entire session without anyone getting undressed in a parking lot.
Footwear, and the two-pair rule
Wear boots you can walk in, and bring the shoes you actually want photographed. Change for a few frames, then change back. Ruined shoes and cold feet end more winter sessions early than anything except darkness.
If snow is involved, assume anything below the ankle gets wet. If the location involves rocks, steps, or a slope, prioritize grip over elegance and shoot the shoes you like from the waist up.
What to avoid
- Anything sleeveless or strappy for outdoor frames. It reads as cold rather than glamorous, and it will look how it felt.
- Fine, clingy fabrics under a coat, which crease and cling with static in dry winter air.
- Neon and very bright white, which pull the eye and, in the case of white, disappear entirely into snow.
- Busy small patterns, which turn to noise at distance.
- Brand-new boots. Blisters at minute twenty are a real risk.
How snow affects exposure, and what to ask about skin tones
A technical point with a practical consequence. Camera meters read a bright snowy scene as much brighter than middle grey and compensate by darkening the image, which underexposes faces. Photographers correct for this deliberately, but the correction is a choice, and it matters more for some people than others.
If either of you has deeper skin, exposure in snow is a skill question worth asking about directly rather than hoping for. A reasonable, straightforward way to ask: “Could you show me galleries with a range of skin tones, ideally in snow or bright conditions?” A good photographer will have them and will be entirely comfortable with the question — it is a normal professional conversation, not an awkward one.
Two related notes. Snow bounces light upward, which is generally flattering. And overcast light is the most forgiving option for everyone, which is another argument for a grey day.
Hair, makeup, and cold
Wind undoes most hairstyles, so plan one that improves as it loosens rather than one that depends on staying put. If you are having hair done professionally, tell the stylist it is an outdoor winter session.
Cold dries skin and lips, and cold-flushed cheeks are real. A hydrating base, a lip balm in your pocket, and blotting papers handle most of it. Dark lipstick photographs well against snow. And bring a small brush — hat hair is the most common between-frames repair.
The bag to pack
Boots for walking · the shoes you want photographed · a second coat · hand warmers · gloves that come off easily · a hat you like in pictures · lip balm · a brush · blotting papers · a thermos · a towel for wet ground · a blanket · phone chargers · snacks · a bag for wet things
Comfort Logistics That Change the Pictures
Warming breaks are part of the session, not an interruption
Build them into the schedule from the start, roughly one every fifteen to twenty minutes outdoors. A car with the heat running, a café, a lobby, or a shop. Tell your photographer you want this structure so they plan the shot list around it rather than treating it as lost time.
Hands
Hands appear in engagement photos more than in almost any other kind, usually holding each other or displaying a ring, and they are the first thing to go red and stiff. Keep gloves on between frames, use hand warmers in pockets, and ask your photographer to shoot ring and hand detail early in the session while your hands still look and move the way you want.
Where you change and where you wait
Sort this before the day. A parking lot is not a changing room in January. If the plan involves an outfit change, arrange a café, a friend’s apartment, or a location with facilities, and know where you are waiting between blocks.
Arrive already warm
Turn the car heat up on the way, keep your coat on until the moment you are shooting, and do not stand around outside while the photographer sets up. Starting cold means you never really recover during a ninety-minute session.
Pets, Children, and Anyone Else Joining
Dogs make wonderful engagement photos and shorten the session, so plan them into the first twenty minutes rather than the last. Three practical points: bring a person whose only job is the dog, so they can be handed off between frames; check whether the location allows dogs, since many botanical gardens and some parks do not; and watch paws in extreme cold, on ice, and on salted paths, which is a genuine issue for many dogs.
If children are joining, take their photographs first while everyone is fresh, then let them go somewhere warm with another adult. In cold conditions, small bodies lose heat faster than adults do, so shorten their portion further than feels necessary.
Delivery Deadlines and Save-the-Dates
If these images are going on save-the-dates or a wedding website, work backwards from that deadline rather than forwards from the session.
Realistic turnaround
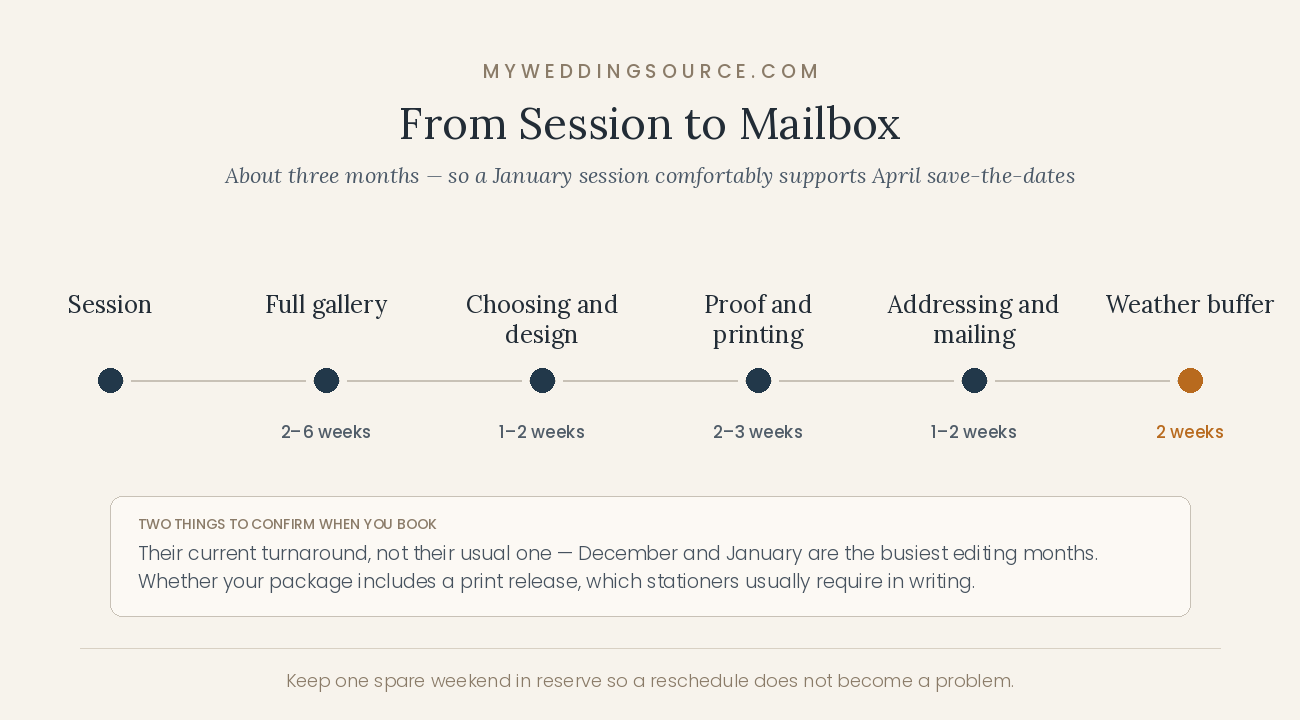
Engagement galleries commonly take two to six weeks, and December and January are among the busiest editing months of the year because of holiday sessions. Ask your photographer for their current turnaround in writing, not their usual one.
Most will send a handful of previews within a few days, which is often enough to start a stationery design while the full gallery is edited.
Work backwards
| Step | Allow |
|---|---|
| Session to full gallery | 2–6 weeks, longer in peak season |
| Choosing images and design | 1–2 weeks |
| Proof and printing | 2–3 weeks |
| Addressing and mailing | 1–2 weeks |
| Buffer for a weather reschedule | 2 weeks |
That is roughly three months from session to mailbox, which means a session in January comfortably supports save-the-dates in April. Also ask what your print release covers, since stationers frequently ask for written permission to print professional images.
Questions to Ask Your Photographer
- Have you shot in winter conditions here, and can I see a full winter gallery rather than a highlight reel?
- Could you show me galleries with a range of skin tones, ideally in bright or snowy conditions?
- What time would you start for the light, and how long do you recommend?
- What conditions would make you move or reschedule, who decides, and by when?
- Is there a reschedule fee, and how soon could we go again?
- Do you offer a short-notice snow-day session?
- Who is responsible for permits at the locations we are considering?
- Do you shoot in low light and blue hour, and do you bring additional lighting?
- What is your current turnaround, and can we get a few previews sooner?
- Does my package include a print release for stationery?
- How do you like to structure warming breaks?
Common Mistakes
Booking a 5 p.m. session in January
The most common scheduling error, and it comes from booking the way you would in summer. In December and January, the light is gone by five in most of the country. Ask for the start time your photographer wants for the light, then work your day around it rather than the reverse.
Treating the coat as an afterthought
You are wearing it in nearly every frame. Choose it first, and bring a second one.
Planning no warming breaks
Cold shows in posture, hands, and faces within fifteen minutes, and it cannot be edited out. Build breaks into the schedule rather than hoping you will be fine.
Choosing a location you have never seen in winter
Roads close, lots go unplowed, trails ice over, and a spot that was lovely in October can be inaccessible in January. Drive it, or at least call the park.
Assuming the pretty indoor location is free
Conservatories, museums, and historic houses commonly charge for sessions and restrict December dates. Ask about the photo policy weeks before, not the day before.
Wearing the good shoes for the walk
Two pairs. Boots to get there, the ones you want photographed for a few frames, then back into the boots.
Leaving the ring shots for the end
Hands stiffen and redden first. Shoot ring and hand details in the first twenty minutes.
Not agreeing what triggers a reschedule
Without a threshold, the decision gets made at midday by whoever is least willing to move it. Write it down when you book.
Booking the last possible date before a stationery deadline
Winter sessions get moved. Build in one spare weekend and a two-week buffer before the print deadline.
Session-Planning Checklist
When you book
- ☐ Start time chosen for the light, not for convenience
- ☐ Reschedule conditions, decision maker, deadline and fee agreed in writing
- ☐ Turnaround time confirmed against any stationery deadline
- ☐ Print release confirmed if images are going on save-the-dates
- ☐ Winter galleries reviewed, including a range of skin tones
- ☐ Snow-day option discussed
Two weeks before
- ☐ Location visited or called; winter access and parking confirmed
- ☐ Permit or permission arranged, and responsibility for it agreed
- ☐ Backup location within ten minutes chosen
- ☐ Outfits chosen as a palette, both coats decided
- ☐ Shoes worn in; walking boots identified
- ☐ Hair and makeup booked, with the stylist told it is outdoors in winter
- ☐ Somewhere to change and wait arranged
The week of
- ☐ Forecast checked against agreed thresholds, including wind chill
- ☐ Any advisory checked; indoor plan ready if one is in effect
- ☐ Shot priorities agreed — what must exist if the light goes early
- ☐ Dog handler or childcare arranged if either is joining
- ☐ Bag packed: hand warmers, second shoes, thermos, blanket, lip balm, brush
On the day
- ☐ Arrive already warm, coat on until the camera is up
- ☐ Ring and hand details shot in the first twenty minutes
- ☐ Warming break every fifteen to twenty minutes
- ☐ Most important images shot in the middle of the best light
- ☐ Decide together when to stop rather than pushing through the cold
Frequently Asked Questions
What time of day should we book a winter engagement session?
Ask your photographer to choose the start time for the light and build your day around it. In December and January that usually means starting between 2:30 and 3:30 in the afternoon, because sunset falls somewhere between roughly 4:15 and 5:30 depending on your location and the best light is the hour before it. If your schedule cannot accommodate that, an overcast day is the better option: cloud gives soft, even light for several hours and removes the timing pressure entirely.
How cold is too cold?
There is no single number, because wind matters more than temperature. A still 25°F afternoon is manageable in good layers for a structured ninety minutes; 35°F with a strong wind on an exposed coastline is not. Decide a threshold with your photographer while you are warm, include wind chill in it, and move indoors rather than shortening the session if there is an advisory in effect. Exposed skin can be at real risk in strongly negative wind chills, and the danger is highest when you are standing still for photographs.
What should we wear?
Choose a palette of three or four colors rather than matching, and let texture do the work — knits, wool, shearling, corduroy, and leather all photograph with depth in flat winter light. Treat the coat as the outfit, because it appears in nearly every frame, and bring a second one to change the whole look. Avoid sleeveless pieces outdoors, very bright white against snow, and busy small patterns. Bring two pairs of shoes: boots to walk in and the ones you actually want photographed.
Do we need snow?
No, and planning around it is usually a mistake. Bare winter forest, coastline, city streets at blue hour, and indoor sessions all produce excellent galleries without a flake in sight. If snow matters to you, ask whether your photographer offers a short-notice snow-day session, and be aware that fresh snow and week-old snow look completely different — the second is grey and tracked and rarely resembles the reference images.
How do we handle photographs in snow with different skin tones?
Ask about it directly when you book, because it is a technical skill rather than an accident. Camera meters read bright snow as much lighter than neutral and compensate by darkening the frame, which underexposes faces; photographers correct for this deliberately, and the correction matters more for deeper skin tones. A straightforward way to ask is to request galleries showing a range of skin tones, ideally in bright or snowy conditions. A good photographer will have them and will be entirely comfortable with the question. Overcast light is the most forgiving option for everyone.
Do we need a permit?
It depends entirely on the location, and it catches more couples out than the weather does. Public streets generally need nothing; botanical gardens, conservatories, museums, and historic houses almost always require a permit and a fee, and many restrict dates in December; parks vary; ticketed light displays frequently prohibit professional photography altogether. Ask about the photo policy weeks in advance, and agree explicitly with your photographer who is responsible for arranging it.
How long should the session be?
Sixty to ninety minutes is standard, and in winter that time should be structured rather than continuous. Plan outdoor blocks of fifteen to twenty minutes with a warm car, café, or lobby between them. Cold shows up in posture, hands, and faces within about fifteen minutes and cannot be edited out, so a broken-up ninety minutes produces far more usable images than an unbroken forty-five.
Can we bring our dog?
Usually, and it is worth planning properly. Check the location allows dogs, since many botanical gardens and some parks do not, and bring a person whose only job is the dog so they can be handed off between frames. Shoot the dog’s portion in the first twenty minutes while everyone is fresh. Watch paws on ice, salted paths, and in extreme cold, which is a genuine issue rather than a precaution.
When will we get the photos, and will they be ready for save-the-dates?
Engagement galleries commonly take two to six weeks, and December and January are among the busiest editing months because of holiday sessions, so ask for your photographer’s current turnaround rather than their usual one. Working backwards from a mailing date, allow two to six weeks for the gallery, one to two for choosing and design, two to three for printing, one to two for addressing, and a two-week buffer for a weather reschedule. That is roughly three months, so a January session comfortably supports save-the-dates in April.
What if the weather is bad on the day?
Use the thresholds you agreed when booking, and make the call early rather than at the location. Light snow is usually a bonus; rain, freezing rain, high wind, and ice underfoot are reasons to move. Have a backup within ten minutes — a café, a conservatory, an arcade, or your own home — so a bad forecast becomes a different session rather than a cancelled one. If the images have a deadline, keep one spare weekend in reserve so a reschedule does not become a problem.
Plan for the Light and the Cold, Then Enjoy It
A winter session succeeds on two decisions made before the day: starting at the hour the light is good, and structuring the session so neither of you is genuinely cold for more than about fifteen minutes at a time. Everything else — the location, the coats, the snow you may or may not get — is preference, and preference is easy once those two are right.
The practical sequence: ask your photographer what time to start and build the day around it, choose a location with somewhere warm within two minutes and a backup within ten, check whether it needs a permit, agree what weather moves the session and who decides, choose the coats before anything else, bring two pairs of shoes, and shoot the ring and hand details early.
And if the forecast turns, move it. The images from a comfortable session on a grey Saturday in February will be better than the ones from a beautiful location where you were both too cold to look at each other properly.
Your next step
Send your photographer one message with three questions: what time would you start for the light on our date, what conditions would make you move the session and who decides, and what is your current turnaround. Those three answers set your schedule, your backup plan, and your stationery timeline in a single reply — before you have chosen a single outfit.
