
A wedding design handoff is the moment your finished artwork leaves your hands and lands with a printer, a sign maker, a florist, a rental company or a venue coordinator. This guide shows how to make that wedding design handoff clean: one master asset folder that holds everything, and one print specification index that tells each vendor exactly what to make, at what size, in what color and by when.
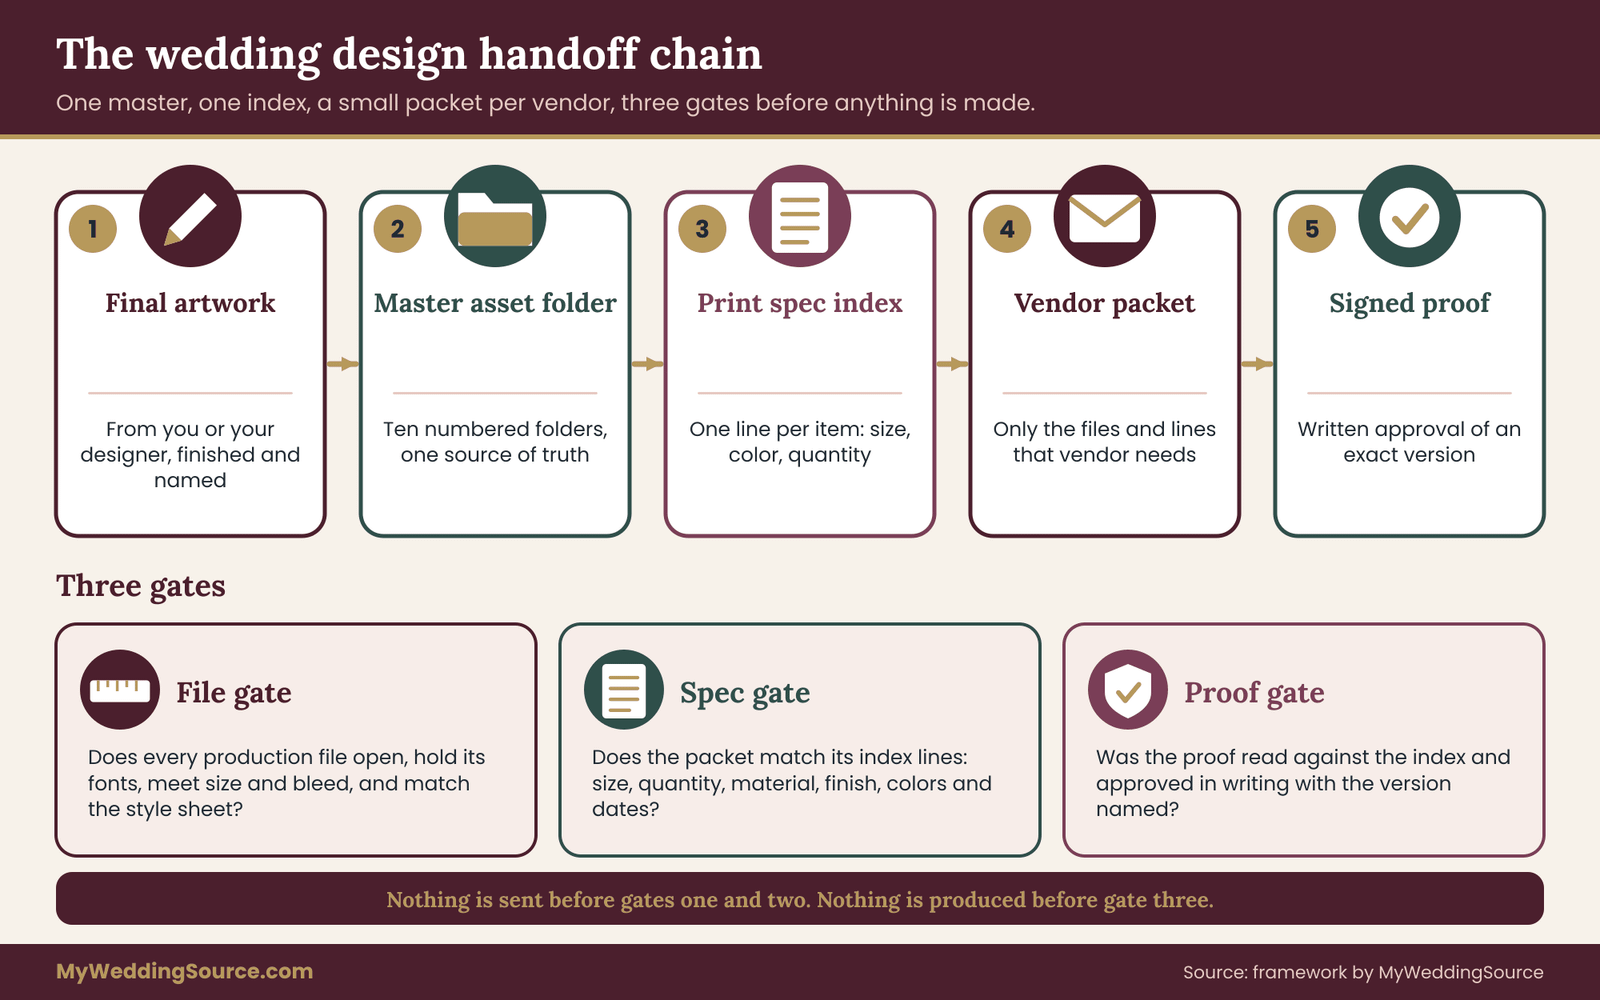
Before any vendor receives a file, build a master asset folder with ten numbered sub-folders and a one-page print specification index with one line per item. Then cut a small handoff packet for each vendor from that master, never the whole folder. Run three gates on every packet: a file check, a spec check against the index, and a signed proof. Keep the signed proof, the exact files sent and the date in the folder, so a wedding design handoff can be repeated or defended later.
Most wedding artwork is finished weeks before anyone prints it. A monogram, a color palette, a welcome sign layout and a set of table numbers all exist as pretty pictures on a screen. Then the work moves to people who run machines, cut vinyl, mix ink and fold paper, and the pretty picture has to become a set of instructions. That crossing is where mistakes enter: the wrong size, a color that shifts, a font that swaps itself for a default, a logo that arrives as a blurry screenshot.
A wedding design handoff does not need a studio workflow or special software. It needs a habit of preparing files once, in one place, and sending each vendor only what that vendor needs. This article gives you the structure for that habit, and it gives you the checks that tell you the wedding design handoff is actually finished rather than merely sent.
A note on scope. This is general information, not legal, tax or financial advice. Copyright, license terms, printing practices and vendor policies differ, so confirm anything that affects a contract with the vendor and with the person who made the artwork. The sources at the end point to the agencies and standards bodies that publish the rules. This is the kind of detail that makes a wedding design handoff smooth instead of stressful.
What a wedding design handoff covers
In practice, a wedding design handoff is four things bundled together. The first is the files: the artwork in formats that machines can use. The second is the specifications: sizes, quantities, colors, materials and finishes. The third is the permission: whether the vendor is allowed to use the artwork and for what. The fourth is the approval: a record that someone looked at the result before it was produced in bulk.
Couples often think only of the first. They email a PDF and assume the rest will sort itself out. Printers, in turn, assume the PDF is final and correct, because that is how most customers behave. When the two assumptions meet, the printer prints what it received and the couple pays for what it printed, even when the file was never meant to be final. Each of these small habits makes the next wedding design handoff faster.
This guide is narrower than a general guide to invitation production. If you want the full picture of proofing, quantities and print timelines for paper goods, the wedding invitation printing guide covers it. Here the focus is the packaging and delivery of artwork across every vendor type, including the ones that do not print on paper at all.
Who is on the receiving end
It helps to list the kinds of recipients, because each reads files differently. Commercial printers want press-ready PDFs with defined bleed. Sign shops and banner printers want large-format files that scale without blur. Engravers and laser cutters want clean vector outlines and a clear statement of what is cut and what is etched. Decor and rental vendors want dimensions, mounting information and often a single-color version. A venue coordinator wants to know what is being installed, where and by whom, more than they want the artwork itself.
A baker who prints edible images, a florist who builds a sign from flowers and a friend who stitches napkins all fit into the same picture. They are all makers who need a simplified, accurate brief, and none of them needs your whole design folder. A well-prepared wedding design handoff leaves the vendor with fewer questions.
What this guide leaves to other articles
This guide does not teach you to choose colors, fonts or a visual style. If you are still deciding on a palette, start with the wedding color palette guide and come back once the choices are made. It also does not walk through hiring a designer or negotiating a contract. Where the contract matters, the wedding vendor contract guide explains the clauses to look for. What remains here is the physical and digital act of handing work over.
Why the wedding design handoff goes wrong
Understanding the failure modes makes the system below feel less like paperwork. Almost every wedding design handoff problem falls into one of six groups.
The wrong file. Someone sends a preview image, a screenshot or a compressed copy instead of the working file. The vendor has nothing better to work with, so they enlarge it, and the edges go soft. The fix is a rule that previews and production files live in different folders and are named differently.
The missing detail. The artwork is fine, but nobody wrote down that the sign needs to be 24 inches wide, or that eighty place cards are needed, or that the foil only applies to the names. The vendor guesses, and a guess is rarely your preference. The fix is a written specification that travels with every file.
The silent substitution. A font is not installed on the vendor’s computer, so software swaps it for another one without warning. Letters shift, lines wrap in new places, and a name breaks across two lines. The fix is to send files with text converted to shapes or fonts embedded, plus a flattened preview that shows what the result should look like.
The color surprise. Screens and presses create color in different ways. A soft blush on your laptop becomes a muddy pink on cardstock, or a deep green looks almost black on a banner. The fix is to compare against a physical sample, not another screen, and to record the color values in the specification.
The version mix-up. There are three files named “final”, and the vendor opened the wrong one. This is the most common problem, and the cheapest to prevent with a naming rule.
The rights gap. The vendor cannot legally reproduce a font, an illustration or a photograph that was licensed for a different use, and finds out only when the job is already in the queue. The fix is to check permissions before files are sent.
The cost of getting it wrong is mostly time
A reprint is the obvious cost, and it is often avoidable with a proof. The quieter cost is time. A missed deadline for custom signage can push delivery past the wedding date, and a rush reprint usually costs more than the first run. Because every vendor has their own lead time, a single weak wedding design handoff can push a chain of other tasks later. The wedding vendor timeline guide is a good companion if you are unsure when each vendor needs files.
None of this means you should fear the wedding design handoff. It means a few small habits protect you from nearly all of it, and the habits are the subject of the rest of this guide.
A simple promise to keep
Make one promise to yourself before starting: no vendor receives anything that is not in the master folder, and nothing in the master folder is changed without a note. That single rule gives you a source of truth. When two vendors disagree about a color or a spelling, you can check the master and say which one is right.
It also keeps the work fair to the person who made the design. If you hired a designer, the master folder is where their final deliverables live, in the form they delivered them. If you made the design yourself, the folder is where you finally stop tinkering and declare a version finished. Think of it as part of the wedding design handoff, not an extra chore.
The three pieces of the system
The method has three pieces, and each does a separate job.
The master asset folder is the single home for every final file, organized in ten numbered sub-folders. It answers the question: where is the right version of this?
The print specification index is a one-page list with one line per item to be produced. It answers: what exactly are we making, and what must be true of it?
The handoff packet is a small, vendor-specific bundle cut from the master, with its own cover note. It answers: what does this particular vendor need from us, and nothing more? Skipping it is the most common reason a wedding design handoff turns into a string of emails.
Around these three pieces sit three gates: a file check, a spec check and a proof check. A packet is not sent until it passes the first two, and an order is not released for bulk production until it passes the third. The next sections build each piece in turn, then compare ways to deliver the packet, and finish with a worked example and a list of edge cases.
How much effort this takes
For a typical wedding with a handful of printed items and a few decor pieces, building the master folder and the index takes a few evenings, and cutting a packet for one vendor takes under an hour once the pieces exist. Larger weddings with many vendors will spend more, but the effort scales gently, because the master is built once and every packet reuses it. Vendors notice the difference, and a tidy wedding design handoff earns goodwill.
If that sounds like more work than you wanted, compare it with the alternative: answering the same questions by email with each vendor separately, resending files, and hunting for the right version at midnight before a deadline. The system front-loads the effort and takes most of the stress out of the weeks that follow. Write it down once, and every later wedding design handoff can reuse it.
The master asset folder behind every wedding design handoff
The master asset folder is a plain folder on a computer or a cloud drive, with ten sub-folders whose names start with two-digit numbers. The numbers keep the order stable on any system, and the order follows the journey of a file from raw ingredient to approved product. You do not need special software to make it. You need discipline about what goes where.
Create one top-level folder, named with the couple’s names and the year, and place these ten folders inside it.
00 Read me. A single plain-text or PDF note describing the folder: who owns it, who may edit it, the current version date and a one-line description of each sub-folder. This is the page someone opens first if you are unavailable.
01 Brand and color. Your palette values, the names you gave each color, and a one-page style sheet. This is the reference that settles disputes about shade, and it connects to the choices you made in your color palette planning.
02 Logos and marks. Final monogram, crest, illustration or wordmark files, in vector and raster forms, in every color version you will need.
03 Fonts and licenses. The font files you hold the right to share, plus the license text or receipt for each. If you cannot share a font, this folder holds a note saying so and naming the alternative.
04 Photos and illustrations. Any image used in the designs, each with its source and permission recorded. Keep originals here and never send these directly.
05 Layouts, editable. The working files in the design program, with their linked images and fonts collected. These are for you and your designer, and they rarely go to vendors.
06 Production files. The press-ready or cut-ready exports, one set per item, named by the index code. This is the folder vendors actually draw from.
07 Previews and proofs. Flattened images that show what each item should look like, plus every proof a vendor returns, signed or marked up.
08 Vendor packets. One sub-folder per vendor, holding exactly the copies that were sent, the cover note and the date.
09 Archive. Superseded versions, rejected options and old drafts. Nothing is deleted from the project until it is safely here.

Why numbered folders instead of tags or search
Search is useful, but it cannot tell you which of five similar files is correct. Folders can, because a file in “06 Production files” has already been through a decision, and a file in “09 Archive” has been retired. The structure carries the meaning, and anyone who opens the folder can read it. It costs minutes now and protects the whole wedding design handoff later.
The folder also protects you from your own good intentions. When you are tempted to “just fix” a file on the way to a deadline, the structure reminds you to save the change in the editable layout, re-export to production, update the preview and add a line to the read-me note. That is slower by a few minutes and avoids the classic error of a vendor holding a different version from the one you approved.
What goes in the read-me note
The read-me note should be short enough to read in a minute. It states the name of the project, the owner, a second person who has access, the date of the last change and a short list of what each folder holds. It also lists the single naming convention in use, which the next section covers in detail. That single habit does most of the work in a wedding design handoff.
Add two more lines that people forget. The first says where a backup of the whole master lives, and the second says who to ask if something seems wrong. If you are using a cloud drive, note the account that owns the folder, since a folder owned by a vendor-facing email address can disappear when the account is closed. The wedding records guide explains how to keep the finished folder as part of your long-term archive after the wedding.
Keeping previews and production files apart
This separation deserves a sentence of its own because it prevents the most common mistake. A preview is a picture meant for human eyes. It is often small, compressed and flattened, and it is fine for approving a layout or sending to a friend. A production file is meant for a machine. It is large, exact and complete.
If previews and production files sit in the same folder, someone will attach the wrong one. If they sit in separate numbered folders, with different file name endings, the error becomes unlikely. Use the word “preview” in every preview file name and never in a production file name. If you remember one thing about a wedding design handoff, remember this step.
Who may edit the master
Decide before the work grows who can change the master. For most couples, the answer is one person. A second person may view the folder, but only one person moves files in and out. This sounds strict for a wedding, but many versions come from two well-meaning people each fixing the same file on the same evening.
If a designer is delivering the files, ask them to hand over a clean set once, in the structure above, and treat anything they send later as a new version that you add on purpose. If you are working with a stationer who produces both design and print, ask for the same files in the same structure even though they will print them themselves. You may need them for other vendors, and getting them later is harder than getting them at delivery.
Minimum viable version for a small wedding
Not every wedding needs all ten folders full. If your project is a single invitation suite and a few signs, you can combine folders 04 and 05, leave 03 as a one-line note and skip 09 until something is superseded. What you should not skip is the numbering of the production folder, the separate preview folder and the vendor packet folder, because those three carry most of the protection. Keep this in mind whenever you plan a wedding design handoff for a new vendor.
A good test is whether a stranger could find the correct sign file in under a minute. If so, the structure is working at the size you need.
Cloud drive or local drive
Both work. A local folder with a regular backup is simple and keeps control in your hands. A cloud drive makes sharing easy and keeps a version history, which helps when someone overwrites a file. The weakness of the cloud is access: links shared with the wrong settings can expose files to people you did not intend, and links shared with the right settings can still expire or be changed. In a calm wedding design handoff, nothing here is a surprise to either side.
Whatever you choose, keep a second copy somewhere different, in line with the guidance on personal archiving from the Library of Congress. A master folder that exists in only one place is a single failure away from being gone. The wedding day digital contingency guide goes further into keeping files and permissions available when something fails on the day itself.
A quick review of the master before the first handoff
Before you build any packet, spend twenty minutes walking through the master as if you were a vendor seeing it for the first time. Open the read-me note. Open one file from each folder. Check that the color names in the style sheet match the names used in the layout files. Check that every font in the layouts has a license note in folder 03. Check that no folder holds a file whose name contains “final”, “final2” or “new”. If any of those checks fail, fix them now, while nobody is waiting.
This review turns the folder from a pile into an asset. The effort is small and the payoff arrives every time you cut a packet, since each packet is a selection from something you have already trusted. This is where a wedding design handoff most often slips, so give it real attention.
What to do when work arrives from several designers
Some weddings have more than one maker: a friend who drew the illustration, a paid designer who set the type, and a print shop that adjusted the layout. Resist the urge to merge their folders. Instead, create a sub-folder inside the relevant numbered folder for each contributor, name it with their name and keep their delivery exactly as they sent it. Then place your selected final file in the production folder with a note pointing to its source.
This record keeps credit straight and answers rights questions later. If someone asks who drew the border, the answer is one folder away.
The print specification index: one line per item
The print specification index is the second piece, and it is the part most couples have never seen. It is a single page, or a single sheet in a spreadsheet, with one line for every item you are producing. Each line holds the same fields. The idea is simple: if a vendor, a helper or a future you reads only that line, they can make or check the item without asking a question.
A line in the index uses these fields, written in this order.
Code. A short unique label such as INV-01 for the invitation or SGN-03 for the third sign. The code appears in file names, in proofs and in emails, so nobody has to describe an item in words.
Item and use. What it is and where it will be. “Welcome sign, easel, ceremony entrance” tells the vendor more than “welcome sign”.
Finished size. The final trimmed or installed size, in inches, with orientation. Write width first, then height.
Quantity and overage. How many you need, how many extra you want, and whether the vendor is allowed to ship fewer.
Material and finish. Paper weight and type, board, vinyl, acrylic, fabric, or whatever applies. Name the finish: matte, gloss, foil, emboss, laminate.
Colors. The named colors from your style sheet, with the values the vendor will use. Note whether the item is full color, spot color or one color.
File and version. The production file name, the version date and the master folder location.
Vendor and contact. Who is making it and who on their side owns the job.
Proof type and approver. What kind of proof you will receive and who signs it.
Dates. File due date, proof date, approval deadline, production finish and delivery to the venue.
Status. A simple word: draft, sent, proofed, approved, produced, delivered, installed.

Why one line per item
A line forces a decision. You cannot fill in the size field with “medium”. You cannot leave the color field blank when you have a one-color vendor. Each empty box is a question you have not answered yet, and it is much cheaper to find that out on your own than when a vendor emails on the due date. A written answer here makes the wedding design handoff easy to verify afterward.
One line per item also gives you a count. When you see forty lines, you know the scale of the job. When you see six lines still marked “draft” two weeks before the first deadline, you know where the pressure is. The index becomes a tracker as well as a specification.
Sorting the index by vendor, not by date
Keep the full index in the master folder in order of code. When you create a packet, filter it to the lines for that vendor and export that slice. The vendor sees a clean list of their own items, and you keep the full view for yourself. The point of the wedding design handoff is to leave nothing to guesswork.
This matters when two vendors work on related items. A sign shop making the seating chart and a stationer making the place cards both need the same guest-name spellings and the same color values, and the index is how those details stay identical. If you handled these through separate email threads, they would drift. The wedding signage system guide explains how signs relate to each other as a set, and the index is a good place to reflect that set in practice.
A sample line, written out
To make the fields concrete, here is an invented example. The line reads in a single flow, and in the index it would sit across a row of a spreadsheet.
Code SGN-02. Item and use: ceremony welcome sign, painted look, on a tall easel at the garden entrance. Finished size: 24 inches wide by 36 inches high, portrait. Quantity: one, no overage. Material: rigid board with a matte finish. Colors: Deep Fern and Cream from the style sheet, plus one accent in Dusty Rose, printed in full color. File: SGN-02_welcome-sign_print_v3_2026-11-04.pdf, in the production folder.
Vendor: a local sign shop, with the shop owner as contact. Proof: digital proof, approved by the couple, with a physical color swatch requested. Dates: file due the first of December, proof within three days, pickup the week before the wedding. Status: proofed.
This example is invented to show structure, not to suggest sizes or dates. Your sizes depend on the venue, the easel and the vendor’s equipment, and your dates depend on their schedule. Couples who do this tend to find that a wedding design handoff takes far less time.
Fields that look optional and are not
Three fields tend to be skipped, and each one causes a story.
Overage. Printing a few extra of a small item is cheap compared with reprinting a handful later. An invitation suite almost always needs spares for errors, late additions and keepsakes. Check with the printer how overage is counted, since some count it as part of the order and some as additional.
Approver. If two people can approve and neither knows which, a proof can sit unapproved while the clock runs. Name one person per item, and name a backup in the read-me note.
Delivery destination. A sign shipped to your home when it was meant for the venue loading dock adds a day. A decor item delivered to a venue that does not accept deliveries on that date can be turned away. Put the exact destination in the index, and check venue rules in the wedding rental planning checklist.
Using measurable fields instead of adjectives
The best fields are the ones that cannot be argued about. “Large” can mean anything, while “24 by 36 inches” is checkable with a tape measure. “Pale” is an opinion, while a named color with a recorded value is a reference. When you catch yourself writing an adjective, replace it with a number, a name from the style sheet or a physical sample. Add it to your checklist for every wedding design handoff.
Measurable fields also protect the vendor. A vendor who delivers exactly what the index says has done the job, and the index is the evidence. This is fairer to everyone than a dispute about what “classic” meant.
How the index connects to money
Because the index lists quantity, size, material and finish, it is also a clean basis for quotes. When you ask three vendors to price the same list, you can compare their answers honestly. If you later change an item, update the line and the version date, and ask the vendor to confirm the change in writing before you pay for it. The wedding vendor purchase order checklist describes how scope and acceptance fit together on the money side, and the index supplies the scope.
Keeping the index honest
The index is only useful if it is true. Each time a vendor tells you something that changes a field, such as a new finished size because a die did not fit, update the line the same day and note the date. Each time you receive a proof, update the status. Once a week, scan for lines that have not changed status in two weeks and ask why. It also gives you evidence if a wedding design handoff is ever questioned.
If the index is kept this way, the final week before the wedding is a read-through instead of a scramble. Every line says what was made, who approved it and where it should be.
Naming files and versions so nothing gets mixed up
A file name is a tiny specification. Good names let a vendor sort files without opening them, and let you spot a wrong file in seconds. Pick one pattern for the whole project and use it for every production file. Reviewing this before each wedding design handoff takes only a few minutes.
A workable pattern has five parts, separated by underscores or hyphens: the index code, a short item name, the purpose, a version marker and a date. For example, INV-01_invitation_print_v2_2026-10-12.pdf. The code ties the file to its line in the index. The purpose word says whether it is for print, for web, for a preview or for editing. The version and date together say how new it is.
Three rules keep the pattern useful.
Never use the word final. There is always another change. Use a version number, and mark the approved one in the index status instead of in the name.
Never reuse a name for a different file. If you change a file, change the version. A vendor who downloaded v2 yesterday should not find a different v2 today.
Keep names plain. Avoid spaces, accents and symbols that some systems mishandle. Lowercase letters, numbers, hyphens and underscores travel everywhere.
A version log that takes two minutes
Add a small text file or a sheet in the master called the change log. Each time a production file changes, add one line: date, code, new version, what changed and who asked. That is all. When a vendor says “the file you sent has a typo”, you can open the log and see exactly which version they hold and whether the typo was already fixed. The same rule applies to every wedding design handoff, large or small.
The log is also how you answer “what did we change since the proof?” It turns a worried feeling into a short list. If you are using a cloud drive with version history, the log still helps, since it records the reason for a change, which version history does not.
Names that carry people and places
Proper names are the easiest place for errors. A misspelled guest name on a seating sign or a place card is hard to unsee. Keep a single approved list of names in the master, in the exact spelling and order you want printed, and have every item that uses names draw from that list. The name spelling audit approach is part of the signage system, and the same principle applies to every printed piece: one list, many outputs.
When names change, update the list first, then regenerate every item that uses it. Do not patch individual files, because a patched file and a regenerated file will not match, and one of them will be wrong. It is a simple step, and it keeps a wedding design handoff honest.
Resolution, bleed, color and fonts: measurable checks for a wedding design handoff
This section is the file gate. It turns “does this look right” into a set of checks you can run in a few minutes on each production file. The numbers below are common starting points, and printers differ, so always ask the vendor for their own specification and use theirs when it differs.
Resolution and size
A printed image needs enough pixels for the size it will be printed. Many commercial printers ask for roughly 300 pixels per inch at finished size for photographs and raster artwork. That is a rule of thumb to check against the vendor’s own requirement, not a law. Without it, a wedding design handoff relies on memory and luck.
You can check it with simple arithmetic. Multiply the finished size in inches by 300. A card that is 5 inches wide and 7 inches high needs about 1,500 by 2,100 pixels. A sign that is 24 by 36 inches would need 7,200 by 10,800 pixels if it contained a photograph, which is why signs are usually made from vector artwork, where size does not matter, with any photographs placed at a size that still holds up when viewed from a distance.
Large signs viewed from several feet away often use lower resolution than small cards held in the hand. Ask the sign vendor what they need, since they know their viewing distance and equipment. Use the same wording each time, so every wedding design handoff looks familiar to the vendor.
Vector and raster, and which to send
Vector artwork is built from shapes and lines and scales to any size without loss. Logos, monograms, line illustrations and text belong in vector form. Raster artwork is built from pixels and is fixed in size. Photographs and painted textures are raster.
Send vendors vector files for anything that can be vector. Send raster files at full resolution for anything that cannot. If the only copy of your monogram is a raster image, ask the designer for a vector version before ordering, because enlarging a raster logo for a banner is the quickest way to get a soft, jagged edge. The SVG format is published by the World Wide Web Consortium as an open standard, and PDF files can also hold vector artwork.
Bleed, trim and safe area
Printers rarely print exactly to the edge of a sheet. They print larger sheets, then cut them down. Artwork that runs to the edge of the finished piece must extend past the cut line, so that a small cutting shift does not leave a white sliver. That extension is called bleed. Many printers ask for around an eighth of an inch of bleed, but the amount varies, so check the vendor’s template. This is why the wedding design handoff works best as a routine.
The opposite concern is the safe area. Text and important artwork should sit a small distance inside the cut line, so a cutting shift does not clip a letter. A safe margin of about an eighth to a quarter of an inch is common. Again, use the vendor’s number.
So every print-ready file has three boundaries: the bleed edge outside, the trim line at the finished size and the safe area inside. A quick check is to turn on guides in the viewing program and look at where the important parts of the design sit. Small teams and solo couples can follow it just as easily in a wedding design handoff.

Color mode and named colors
Screens mix red, green and blue light. Printing presses typically work with cyan, magenta, yellow and black ink, and some jobs use specific mixed inks, called spot colors. The same shade can look different between modes, and some bright screen colors fall outside what ink can reproduce.
For a wedding design handoff, record each named color in your style sheet with a screen value and a print value, and say which one each vendor should use. Ask the printer whether they want artwork in their preferred color mode or will convert it themselves. If color matters a great deal, ask for a printed sample or a press proof, and compare it to a physical swatch under daylight rather than to a screen.
If you picked colors using the thinking in the wedding color palette guide, that palette is the source for the values in your style sheet. A named palette with recorded values is also a quiet gift to every vendor, since each of them then starts from the same reference. Notice how little of this needs special skills; any wedding design handoff can use it.
Fonts: embed, outline or supply
Fonts are the most common silent substitution. Three safe ways exist to deal with them. You can embed the fonts in a PDF, so the file carries its letter shapes. You can convert text to outlines, which turns letters into shapes and removes the need for the font, at the cost of making the text uneditable. Or you can supply the font files together with the license that allows the vendor to use them.
Outlining is safest for final production files, and you should keep an editable version in the layouts folder. Embedding is usually fine for standard print PDFs. Supplying fonts is only an option when the license allows sharing, which many do not. If a font license does not permit the vendor to use it, either the vendor buys their own license or you choose another font, and it is better to learn that before the proof than after.
File format by recipient
A print-ready PDF is the default for commercial printers, and many ask for a specific standardized variant. The International Organization for Standardization publishes the PDF/X family for print exchange, and printers often name a version they prefer. Sign shops and cutters often prefer vector formats such as PDF, SVG or EPS. Web-based photo printers accept JPEG or PNG. Decor makers who use laser cutters want a vector outline with clear line colors for cut and engrave.
When in doubt, ask one question: “Which file type do you want, and can you send a template?” A vendor who sends a template has already told you the bleed, safe margin and color mode, which saves you from guessing. Plan for it early, since a late wedding design handoff leaves no room to fix anything.
A short file gate to run every time
Before a packet goes out, run the same checks on each production file. Does it open without warnings? Is the page size the finished size plus bleed? Does it show text where the preview shows text, with no missing fonts? Are the placed images the correct resolution at their final size? Are the colors the named ones in the style sheet? Is the file name in the pattern and does the version match the index? Is there a flattened preview to compare against?
Write the result as a short line in the change log: “INV-01 v2 passed file gate, 2026-10-12”. The line takes seconds and tells you later that the check happened.
Rights and permissions before a wedding design handoff
Artwork is someone’s creative work, and sending it to a vendor is a form of copying. In most cases the copying is exactly what everyone intends, but the permission needs to exist. Spending a few minutes on rights before files leave your hands avoids awkward calls later. It belongs in the folder beside the rest of the wedding design handoff records.
In the United States, copyright generally belongs to the person who created a work, unless it was made as an employee’s job or the creator transferred it in writing. The U.S. Copyright Office explains these basics, including how works made for hire and transfers work, on its website.
If you hired a designer, the contract determines what you own and what you may do with the files. Some designers keep the copyright and give you a license for specific uses, and others assign it fully. Neither is wrong, but a license for invitations may not cover a large banner or merchandise.
This is general information, not legal advice. If a rights question could cost you real money or affect a contract, ask a qualified professional or the Copyright Office’s published guidance.
Five rights questions to answer in writing
Who made each piece of artwork? A designer, a friend, a stock source, a venue, a font foundry, or you. Write the answer next to each asset in folders 02, 03 and 04.
What does the permission cover? Printing for your wedding only, printing and sharing online, resale or display by a vendor, or all uses. Read the wording, not the summary.
May the vendor use it? A printer needs permission to reproduce the artwork to fulfill your order. In most cases that is implied by the job itself, and a vendor’s own terms often say so. A decor maker who intends to show your sign in a portfolio needs a different kind of permission. If you do not want it shared, say so.
Can the file be changed? Some licenses forbid modification. A vendor who resizes or recolors a licensed illustration may be breaching it. Decide who may adjust the artwork and record it.
Does it contain anyone else’s work? A logo in the background of a photo, a venue crest, a brand name or a lyric on a sign belongs to someone else. Using these in a personal context is usually modest, but putting a company’s trademark in a printed piece can raise questions. The United States Patent and Trademark Office explains what trademarks protect.
Fonts and stock images deserve special attention
Font licenses are the most overlooked. Many are written for desktop use by one person, and they may not cover embedding in a document sent to a printer, or use on large signs, or use on items you sell. Read each font’s license and record the result in folder 03. If the license is unclear, contact the foundry for a written answer, or choose another font. That keeps the wedding design handoff fair to the vendor and to you.
Stock images and illustrations come with their own terms. Some limit print runs, some forbid use on merchandise, and some require credit. Keep the license receipt or terms page in folder 04 beside the asset.
Never copy protected artwork
Do not copy artwork you found online, from another couple’s wedding, or from a brand, and hand it to a vendor to reproduce. Inspiration is fine. A direct copy is a problem for you and for the vendor, and reputable vendors will decline it. The Copyright Office explains that copyright protection arises automatically when a work is created, so a lack of a visible notice does not make something free to use. Treat each of these as a checkpoint in the wedding design handoff.
If you love a design, describe what you like about it and ask a designer to create something new in that spirit. Treat inspiration as a reason to write a brief, not as a reason to hand over screenshots.
What to put in a vendor cover note about rights
Every packet should carry a short cover note. On rights, it can say who created the artwork, which uses are permitted and that the vendor is asked to use the files only to fulfill this order. It can also say whether the vendor may show the finished work in their own marketing, and if you prefer not, a polite statement that you would like to approve that first. It is cheap to do and valuable when a wedding design handoff gets complicated.
If a vendor’s terms say something different, read them. Many vendors state in their contracts that they may show completed work unless you object, and that can be negotiated before signing. The wedding vendor contract guide explains the clauses to look for. When you quote a vendor’s terms in your index or your cover note, quote the current wording from their contract or website, and note the date you checked.
Printers versus decor vendors: what each needs in the handoff
A printer and a decor vendor both want your artwork, but they want different parts of it, and a packet that suits one can confuse the other. Think of the master as a pantry and each packet as a meal order. A clear note here lets any helper carry on the wedding design handoff if you are away.

Commercial printers and stationers
Printers want press-ready files, a clear specification and a plan for proofs. Their questions are about paper, quantity, finish, color and timing. Give them the print-ready PDFs for the items in their lines, the relevant lines from the index, the color values, and any special instructions about foil, emboss or die cuts. Ask whether they need guides or a template, and whether they prefer to set the text themselves from your approved copy. This is a good moment to pause the wedding design handoff and check the index.
The printer’s proof is your most valuable tool. Ask what kinds exist: a digital proof, a printed proof on the real stock, and a press check in the room. They differ in cost and in how closely they predict the result, and you should decide before ordering which one matters for each item. The invitation printing guide describes how proofing and quantities fit together for paper suites.
Sign shops and large-format printers
Sign vendors need dimensions, mounting method, indoor or outdoor use and the viewing distance. Give them vector artwork, a color list and a flat preview. Ask whether the sign will be printed on the substrate or cut from vinyl, because the file needs differ. For outdoor use, ask about weather and sunlight, since inks and materials respond differently. Ask yourself whether a stranger could continue the wedding design handoff from this point.
If the sign will stand on an easel or hang from a stand, ask who supplies it and who sets it up. Those details belong in the index, along with delivery to the venue.
Laser cutters, engravers and makers of small objects
These makers need vector outlines in which each line has a clear job: cut, score or engrave. Provide one file per material when more than one material is involved, with a preview that shows the intended result. State the material and thickness, and ask about test pieces, since small objects such as acrylic place cards or wooden tags show errors easily. That habit is what separates a casual wedding design handoff from a dependable one.
Florists, rental companies and venue teams
These vendors rarely use your files directly. They use the design to build something physical. A florist needs the palette values, the sizes of any frames or structures, and a photograph or flat preview of the signage they will decorate around. A rental company needs sizes, counts and color names. A venue coordinator needs a list of what will arrive, who will install it and how long the installation takes.
For these recipients, send a short visual brief and the relevant index lines, not production files. Include a one-color version of any mark, because many decor materials, such as vinyl, etched glass or chalk, work in one color. The result is a wedding design handoff that anyone can audit later.
One-way and two-way handoffs
Some wedding design handoffs are one-way: you send a file, the vendor produces, and nothing comes back. Many are two-way: the vendor returns a proof, a mockup or a template filled in with your artwork. Treat every vendor as two-way, even if they do not say so, and plan to review whatever they return. A vendor who never returns a proof is a risk worth pricing into your timeline, and you may choose a different vendor, ask for a proof as a paid extra, or accept the risk with open eyes.
Ways to deliver the packet, compared
Once a packet is ready, you have to get it into the vendor’s hands. The method matters more than people expect, because each has its own failure mode. Five options cover nearly every case.
Email attachments
Email is familiar and leaves a dated record. It works well for a small packet of a few light files. Its weakness is size limits, since large print files are often too heavy, and its tendency to scatter versions across threads. Files also get recompressed or blocked by some mail systems. Use email for cover notes, proofs and short files, and keep a copy of the exact attachments in the vendor packet folder. It is the quiet part of a wedding design handoff that prevents loud problems.
A shared cloud link to a single packet folder
A link to one packet folder, set to view or download only, is usually the cleanest method. The vendor can fetch large files, you can see whether they were opened if the service shows it, and you can update a file in place if you add a note in the change log. The risks are access and permanence. Anyone with a public link may open it, so choose settings that match the sensitivity of the files, and avoid linking to your whole master.
A link may also be changed or removed, so confirm that the vendor has downloaded what they need and copy the downloaded set into your packet folder.
A vendor’s own upload portal
Many printers and sign shops have a portal that accepts files and attaches them to an order. The advantage is that the vendor’s system records the file against the job, and it often checks the file for common problems. The drawback is that you rely on their record. Download or screenshot the confirmation, and keep a copy of what you uploaded in the packet folder.
A physical drive handed over in person
A USB drive works when files are huge or a local vendor prefers it. It carries no internet risk, but it has its own: drives get lost, files get copied to a computer you cannot see, and nobody can tell which version was on the drive later. If you use a drive, put only the packet on it, include the cover note and a read-me, and record the date and the person who received it. Do not give out a drive that contains your master.
Designer-managed handoff
Some designers or stationers offer to deliver files to vendors themselves. This can be the least work for you, and the designer knows how their files should be prepared. The risk is that you lose visibility. Ask for a copy of what they sent, and the date, and ask that any vendor proof be forwarded to you as well. Treat it as a two-way wedding design handoff and keep the folder current.

Choosing among them
No method wins in every case. A useful rule is to match the method to three things: the size of the files, the importance of a record and the number of people who will touch it. A single small invitation file for a local printer can go by email. A full suite for a large printer is better handled through a portal or a shared packet folder. A custom sign for a distant sign shop usually needs a cloud link or the vendor’s portal, since large vector files and previews are heavy.
Whatever you choose, do the same three things after sending: confirm receipt in writing, ask the vendor to say which files they will use, and copy what you sent into the packet folder with the date. A wedding design handoff without a receipt is only half done.
Writing the cover note
The cover note is the human part of the packet. Keep it short and in the same order every time. Start with who you are and the order or job reference. List the items in the packet by index code and give the finished size and quantity for each. Say which files are production files and which are previews. Name the colors and where to find the values. State what you need back and by when, usually a proof by a date. Close with who approves and how to reach them.
A good note fits on one screen. If you find yourself writing paragraphs, the content probably belongs in the index lines, where it can be checked instead of read.
Here is a sample opening in plain wording: “Attached are production files for three items, listed below by code with finished size and quantity. Colors use the named values in the attached style sheet. Please confirm receipt and send a digital proof for approval by the date shown.” It does not need more than that to start. Do this before the wedding design handoff, not after.
Proofs, sign-off and change control
The proof gate is the last of the three, and the one that saves the most money. A proof is the vendor’s statement of what they are about to make. It exists so you can say yes, or say what must change, before the job runs. Make the effort proportionate: a small wedding design handoff needs a light version.
Types of proof and what each can tell you
A digital proof is an image or PDF that shows the layout, text and placement. It is cheap and quick, and it is good for catching typos, spacing and placement errors. It cannot tell you how color will look on the real material.
A printed proof on real stock shows color, texture and finish, and it is the best check for color-critical items. It costs more and takes time, so it is worth requesting for the key items and skipping for the rest. A larger wedding design handoff simply repeats this step for each vendor.
A press check or sample lets you see the real result before the full run begins. It is rare for small orders, but some vendors offer a sample or a small test piece for a fee.
A mockup shows the item in context, such as a sign on an easel, and helps with scale. It is usually a digital image, so it checks proportion and placement but not color. Done once and kept current, it carries through every wedding design handoff on the project.
Match the proof to the risk. A table number card with simple text may need only a digital proof. A foil-stamped invitation with a pale color may deserve a printed one.
A proof checklist that anyone can run
When a proof arrives, check against the index line, not against your memory. Confirm the finished size. Read every word aloud, including addresses and dates, and read names from the approved list. Check the order of lines and the line breaks. Look at the margins and the edges, to be sure nothing is clipped. Compare colors with the named values, and with a physical swatch if you have one. Confirm the quantity, material and finish on the proof or the order. Then confirm the delivery date and place.
It helps to have a second person do the read-aloud step. People tend to see what they expect, and a fresh reader spots errors that the author has stopped seeing. Many vendors state that the customer’s approval transfers responsibility for errors on approved proofs, so a signed proof carries real weight. Few steps in a wedding design handoff repay the effort so reliably.
Sign-off that leaves a trail
Approve in writing, in a way that records the file or proof version. An email that says “approved” without saying what is not enough. Write: “We approve proof SGN-02 v3 dated the fourth, for quantity one at 24 by 36 inches, to be delivered by the date in the order.” Save the email or form in folder 07, and update the index status to “approved”.
If the vendor’s system uses a button or an e-signature, take a screenshot or download the confirmation. If an approval happens by phone, follow up with a short written summary and ask them to confirm it. A verbal approval without a record is an argument waiting to happen. That is a fair trade for a wedding design handoff you can trust.
Change control after approval
Changes after approval are possible, and they are sometimes necessary. They should be slow on purpose. A short rule works: after a proof is approved, any change needs a new version number, an updated index line, a change log entry and a written acknowledgment from the vendor, with the cost and the new date if either changes. Whether the vendor prints or builds, the wedding design handoff follows the same logic.
This is how you avoid the worst version of a late edit, where one person changes a name on the file while another person has already approved a printed proof. The vendor ends up printing a mix. With a written change process, the vendor knows which version governs and when.
What to do when a proof is wrong
Check first whether the error is yours or theirs. Compare the proof against your production file and your index line. If your file was correct and the proof is wrong, say so and ask for a corrected proof at no charge, citing the file version and the index line. If your file was wrong, thank them for the catch, fix the file, update the version and ask for a new proof, with a note of any cost.
Keep the tone calm. Vendors respond well to a clear message that says what was sent, what came back and what is expected. The wedding vendor contract guide explains how to handle changes and errors in a signed agreement, so you know your options before you need them. The vendor sees only what the wedding design handoff needs them to see.
When the vendor offers no proof
Some vendors skip proofs for small or fast jobs. You then have two choices. Ask for a simple digital proof anyway, since it takes them minutes. Or reduce your risk by ordering a single test piece before the full run, if the price allows, or by choosing a larger safe area and simpler artwork. If neither is possible, record in the index that the item had no proof, so you know where the risk sits when you review the plan.
Closing a handoff
A wedding design handoff is closed when the item is produced, delivered and checked against the index line, and the signed proof, the files sent and the delivery date are all in the master. Check the count, the sizes, the spelling and the color the day it arrives, while the vendor can still fix a problem. Mark the index status “delivered”, then “installed” if the item is set up at the venue.
Closing is easy to forget in the rush before the wedding, and it is the step that lets you stop thinking about the item. After the wedding, the whole folder becomes part of your archive, as described in the wedding records guide.
A worked example of a wedding design handoff
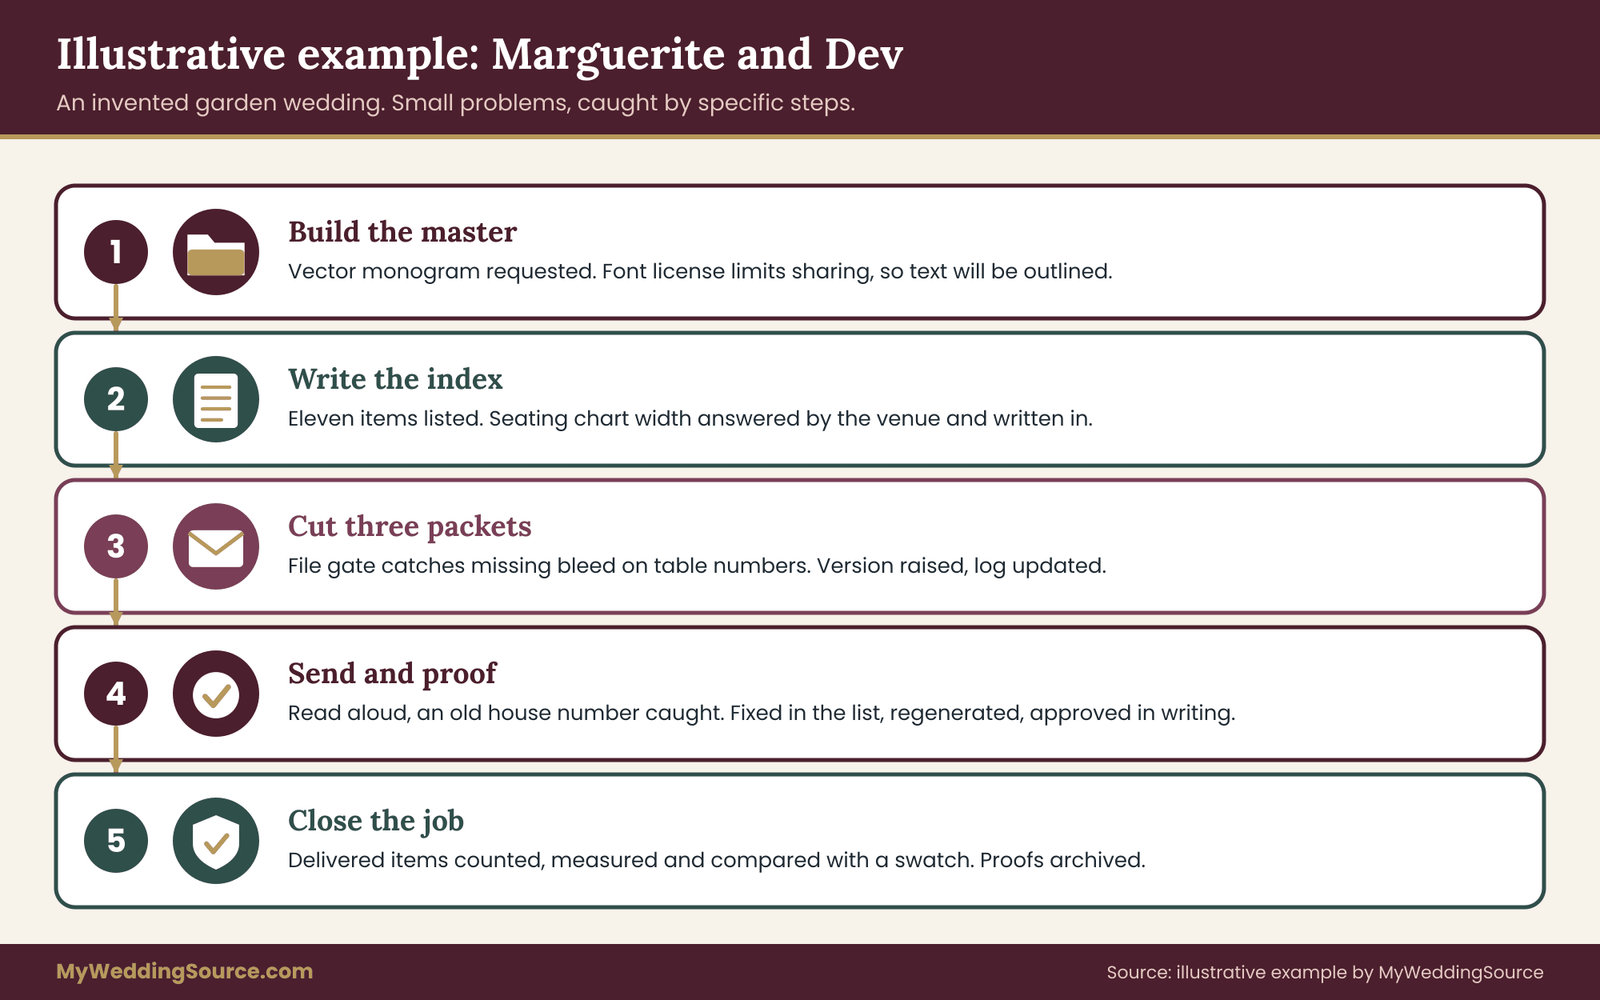
This example is invented to show how the pieces fit. The couple, vendors and numbers are illustrative, not data from a real wedding, and your sizes and dates will differ. It keeps the wedding design handoff focused on what each vendor must deliver.
Marguerite and Dev are planning a garden wedding with eighty-five guests. Their designer, a friend of Marguerite’s cousin, has delivered a monogram, a palette called Deep Fern, Cream and Dusty Rose, an invitation suite layout, a welcome sign, table numbers, a seating chart and a bar menu. Four weeks before the first printing deadline, they sit down to prepare the wedding design handoff.
Step one: building the master
Dev creates the ten numbered folders on a cloud drive and shares it with Marguerite only. He moves the designer’s delivery into folders 02, 05 and 06, and notices that the designer sent only a PNG of the monogram. He asks for a vector version and receives one the next day. In folder 03 he finds that the script font on the invitation has a license that allows printing but not embedding in documents handed to third parties, so he records that and plans to outline the text in the production files.
In folder 01, Marguerite writes the style sheet: three named colors with a screen value and a print value, and a note that the dusty rose should be checked on paper because it shifts. The two of them save everything under a pattern that starts with the index code.
Step two: writing the index
They list eleven items. The invitation suite has three lines (invitation, details card, response card) plus an envelope liner. The welcome sign, seating chart and bar menu each have a line. Table numbers have one line with a quantity of twelve and an overage of two. Place cards have one line with ninety and an overage of five. A custom napkin print has one line, since a family friend will stamp them. Over time this turns the wedding design handoff into a habit rather than a project.
For each line, they fill every field. The seating chart is the line they struggle with, because the final size depends on the venue’s easel. Dev emails the venue coordinator, and the answer is a maximum width. He writes that number into the line with the date of the answer. This is the value of the index: a blank field turned into a question.
Step three: cutting three packets
The printer packet holds the invitation lines, place cards and table numbers. The sign shop packet holds the welcome sign, seating chart and bar menu. The family friend’s packet is a one-color vector of the monogram, a swatch description and a size. Each packet includes only the relevant index lines, the production files, a flat preview of each item and a cover note. It makes the wedding design handoff something you can repeat when plans change.
They run the file gate on every production file. The check catches one problem: the table number file was exported at the finished size without bleed, though the card has a color background. Dev re-exports it with the printer’s bleed, increments the version and adds a change log line. Even a quick wedding design handoff benefits from this check.
Step four: delivery and proofs
The printer has a portal, so the invitation packet goes there, and Dev saves the confirmation. The sign shop is local and wants a cloud link, so Dev shares the packet folder with download-only access and confirms receipt by email. The friend gets a short message with the vector file and the size.
The printer returns a digital proof for the invitation, and Marguerite and her sister read every word aloud. They find that a house number differs from the address list, because an older version of the list had been used in a layout. They correct it in the list first, regenerate the files, send version 3 and approve in writing. The sign shop offers a printed color sample of the dusty rose for a small fee, and the couple accept, because the color shifted on their laptop screen.
Step five: closing
Boxes arrive. The couple count items against the index, measure two signs, read the names again and compare the color to their swatch. The seating chart is one inch narrower than the number in the index, because the vendor trimmed to fit a standard frame. Since the coordinator’s maximum was larger, it still fits, and they note the difference. All lines are marked delivered, and the signed proofs, the packets and the change log go into the archive.
What this example shows
The example is dull on purpose. Nothing dramatic goes wrong, and the few small problems are caught early: a missing vector file, a font license, a missing bleed, an old address, a color shift. Each was caught by a specific step of the system, not by luck. That is what a good wedding design handoff looks like: a series of small catches that never become a crisis.
Edge cases and how to handle them
Real weddings bring awkward situations. These come up often enough to plan for.
The vendor wants to change your design. Some printers adjust artwork to fit their process, such as moving text away from an edge. Allow it only if they send a proof and you approve it. Record the change in the log. If they insist on a different file type, ask them to explain why, and follow the instruction if it is reasonable.
The designer is unavailable. If the designer is out of reach just as you need a file, check whether your contract gives you the production files or only the right to ask for them. If you hold the files, you can proceed carefully. If not, wait or ask them for a short window. Do not edit the artwork yourself in ways the license forbids, and the reason to ask for the full set early is to avoid this.
The vendor loses the file or loses the job. If you keep every packet in folder 08, you can resend the exact same files in minutes. Add a line to the log and ask them to confirm. Mistakes at this stage are rarely malicious, and calm paperwork is the quickest fix.
Two vendors need the same file in different forms. A florist’s sign and the printer’s sign are the same artwork but different jobs. Make two separate packets from the same master item, with different specs, and give each their own line in the index.
A friend or family member is making something. Treat them like any other vendor, including a cover note, the spec and a proof. Informality is where most hidden errors live. They may not have professional software, so ask what they can open and prepare something simple, such as a PDF and a color description.
The wedding is abroad or in another country. Paper sizes, color standards and file conventions differ across regions, and a vendor may use millimeters and different paper formats. Ask the local vendor for their templates and size standard, and convert sizes in the index with both units. If items ship across borders, allow for customs delays and check the carrier’s current rules.
You change a name or date after printing began. Stop and talk to the vendor immediately. Ask what has been produced, what can still be changed and what it costs. Use the change process in the index. For invitations already mailed, the wedding invitation printing guide covers corrections at the printer.
The vendor wants the whole folder. Politely decline and send the packet. A vendor does not need your editable layouts, other vendors’ files or your personal photos. If they say they must have the working file, ask why and decide whether the reason is real. It sometimes is, such as when a stationer adjusts a layout, and in that case send the editable layout for that item only.
You need accessibility changes. Larger type, higher contrast or a plain-text version of a sign may be needed. Add a field note to the index line and make a second production file if necessary, so both versions are tracked.
A file is corrupted or will not open. Keep copies in two places and check them before sending. If a vendor cannot open a file, ask for the exact error and resend from the master, not from a download copy that may have been damaged.
Your next steps
Start small this week. Create the ten folders and the read-me note, even if most are empty. List every item you plan to have produced, and write the first eight fields for each line of the index. Gather the font and image licenses into folders 03 and 04, and note any gaps. Hold to it, and the wedding design handoff stays predictable.
Then pick the vendor with the earliest deadline, ask for their file specification and template, cut their packet, run the file gate and send it with a cover note. When the proof returns, check it against the index line, approve in writing and save everything. Repeat for the next vendor. After a few rounds, a wedding design handoff becomes routine, and the folder becomes a record you will be glad to have.
FAQ
What is a wedding design handoff?
A wedding design handoff is the transfer of finished artwork and instructions from you or your designer to a vendor who will produce it. It covers the files, the specifications such as size, quantity and color, the permission to reproduce the artwork and a record of approval. A clear wedding design handoff reduces errors, reprints and arguments about what was agreed.
What files should I give a printer?
Give the printer print-ready production files for their items only, usually press-ready PDFs at the finished size plus the bleed they request. Add a flat preview, the color values and the relevant index lines. Ask what they prefer and whether they provide a template. Do not send editable layouts or your whole master folder unless they need a specific file.
What is a print specification index?
It is a one-page list with one line per item you are producing. Each line records a code, the item and its use, the finished size, quantity, material, finish, colors, file name, vendor, proof type, dates and status. It lets any vendor or helper make or check an item without guessing, and it gives you a tracker for the whole project. Skip it, and the wedding design handoff depends on goodwill alone.
How much bleed and resolution do printers need?
It varies, so use the vendor’s own specification. A common starting point is about an eighth of an inch of bleed and roughly 300 pixels per inch at finished size for raster images. Large signs viewed from a distance often need less resolution, and vector artwork scales freely. Ask for a template, since it states the exact numbers.
Can a vendor use my designer’s artwork?
It depends on your agreement with the designer and the vendor’s terms. Copyright generally belongs to the creator unless it was transferred in writing or made as work for hire, as the U.S. Copyright Office explains. Check what your license covers, tell the vendor which uses are allowed, and say whether they may show finished work in their portfolio. When in doubt, add the detail to the wedding design handoff in writing.
Should I send fonts to the vendor?
Only if the font license allows it. Many licenses do not permit sharing font files. Safer options are embedding fonts in a PDF or converting text to outlines for final production files, while keeping an editable copy for yourself. If a font cannot be used by the vendor, choose a licensed alternative before the proof stage.
What should a proof approval say?
It should identify the exact item and version, so it cannot be misread. For example, name the index code, the proof version and date, the quantity, the size and the delivery date, then state that you approve it. Save the message or form in your proofs folder, and update the index status. A vague approval leaves room for a dispute. Keep the wording plain so the wedding design handoff is easy to follow.
How do I hand off files to decor vendors who do not print?
Send a short visual brief and the relevant index lines instead of production files. Include sizes, counts, color names and values, a flat preview and a one-color version of any mark, since many decor materials work in one color. Add installation details, such as who sets it up and when, and confirm the venue accepts the delivery.
Sources
- U.S. Copyright Office
- Works Made for Hire, Circular 30, U.S. Copyright Office
- Copyright FAQs, U.S. Copyright Office
- Trademarks, United States Patent and Trademark Office
- Scalable Vector Graphics (SVG) 2, World Wide Web Consortium
- International Organization for Standardization, PDF/X print exchange standards
- Personal archiving: preserving your digital memories, Library of Congress
- Back up business data, Cybersecurity and Infrastructure Security Agency
- Postal Explorer, United States Postal Service
- Advertising and marketing guidance, Federal Trade Commission