

Wax seals on wedding invitations look wonderful on a desk and fail in surprising ways in a mail stream. This guide gives you an original mailing stress test and a layered envelope protection plan, so you can decide whether to mail wax seals, change them, move them or hand-deliver them, and prove your choice with a few cheap tests before you order two hundred of anything.
Treat wax seals as a mailing decision, not only a design decision. Make six finished test envelopes, run them through five passes (bench, flex, stack, counter, live mail), and score each one against written pass marks. Protect the survivors in four layers: a flatter seal, a backing card, an inside liner, and an outer plan such as hand delivery for the most fragile pieces. Confirm postage and handling rules with your local post office using a fully assembled sample.
A wax seal is a small, hard, slightly brittle dome stuck to a piece of paper that will be squeezed, flipped, stacked, scanned and dropped by machines and people who have never heard of your wedding. Most of the time the invitation arrives fine, and many couples mail wax seals without a problem. The trouble is that “most of the time” is not a standard you can plan around when you have a guest list of real people, some of whom will open the envelope and see a cracked lump of wax and a corner of torn paper.
This article is deliberately narrow. It is about what happens to wax seals between your table and a guest’s mailbox, and how to test and prevent damage. It does not repeat the full rules on surcharges, which are covered in other guides on this site, and it does not try to teach you wax seal artistry. If you want the broader production picture first, the wedding invitation printing guide covers proofing, quantities and printer handoffs.
A note on scope. This is general information, not legal, tax or financial advice, and postal rules, prices and equipment change. Where a rule matters, the article points to the issuing agency so you can confirm the current version yourself, and it labels every worked example as invented for illustration.
What wax seals do to a mailed wedding invitation
Start with what a wax seal physically is. Traditional sealing wax is a blend of resin and wax, melted and pressed into a shape, then left to harden. Once cool it is firm, with a smooth or slightly glossy surface and a raised edge. It is stuck to the envelope by its own tackiness plus whatever it grabbed while still warm. It is not flexible in the way paper is, and that mismatch is the root of nearly every failure.
Paper bends. Wax, in most formulations, mostly does not. When an envelope flexes, the paper moves and the wax stays rigid, so the stress lands at the edge where the two meet. That edge is where cracks start, where the wax lifts, and where a corner of the envelope tears when the seal catches on something.
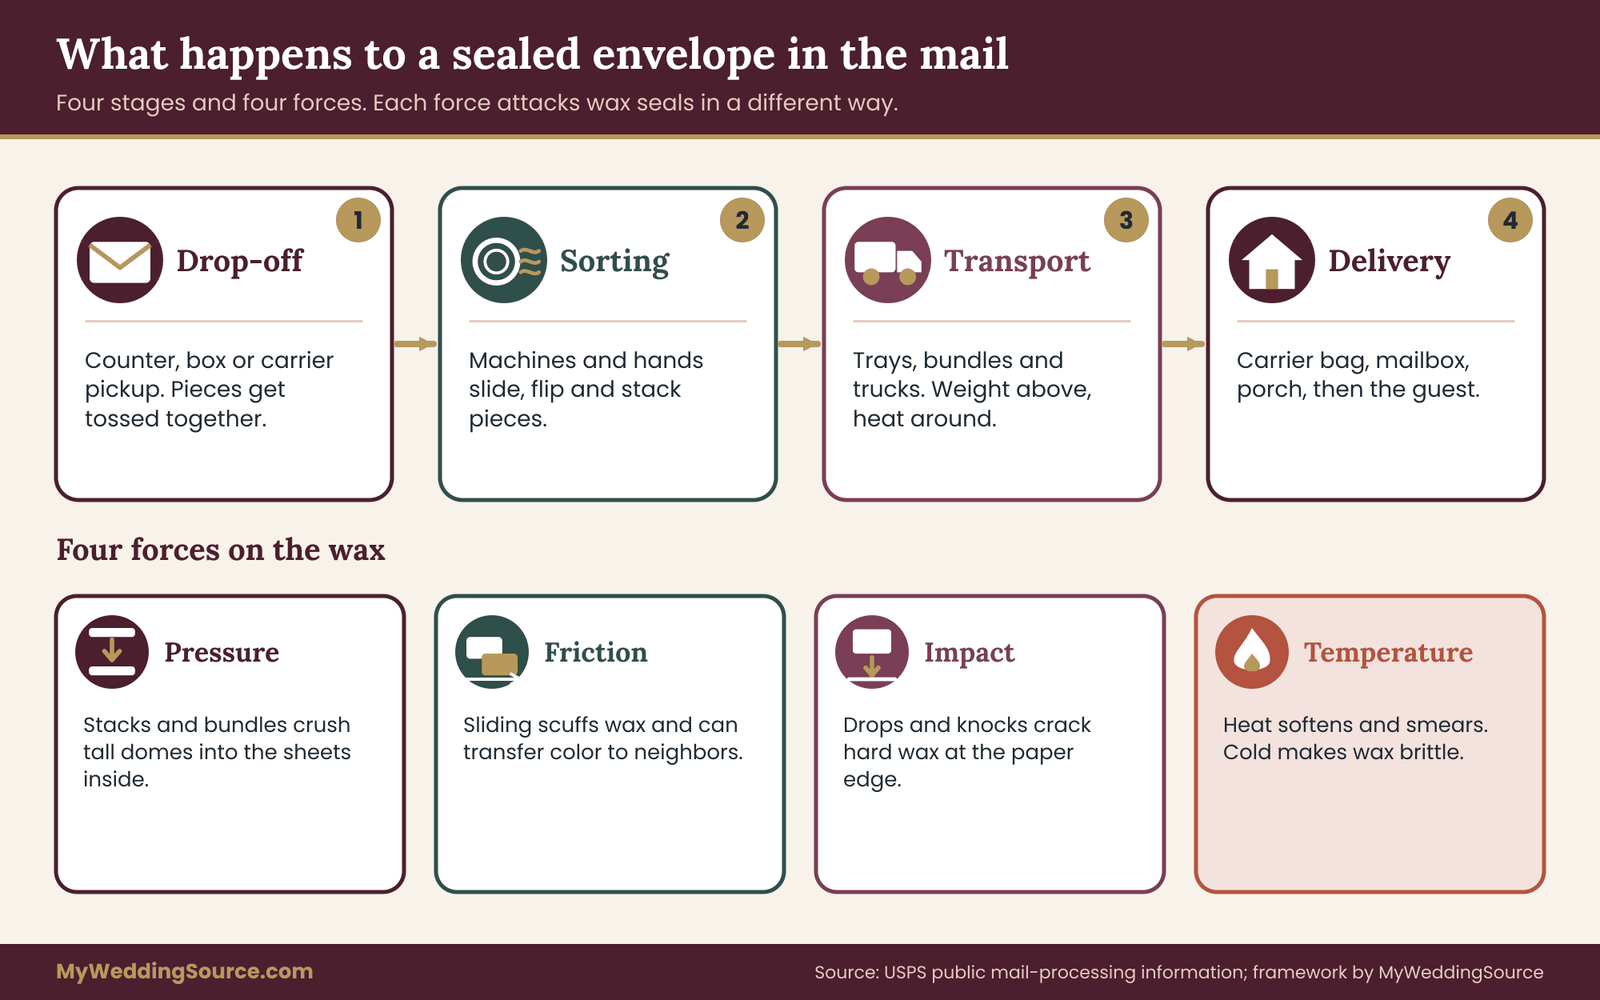
Four forces act on a sealed envelope in the mail. The first is pressure: envelopes are stacked in trays, pushed into bundles and compressed by the weight above them. The second is friction: envelopes slide across each other and across belts and guides. The third is impact: pieces get dropped or knocked when trays are handled. The fourth is temperature: a truck or a porch in summer can soften wax, and a cold dock in winter can make it more brittle.
Each force attacks a different weakness. Pressure tends to crush a tall dome or push it through a thin envelope. Friction tends to scuff the surface, smear a colored seal onto a neighbor, or catch an edge. Impact cracks. Temperature changes the behavior of the material itself.
The four things a guest actually sees
Technical failure matters less than visible failure. When you inspect a damaged envelope, a guest sees one of four outcomes.
A cracked seal. A fine hairline crack is cosmetic and most guests will not care. A crack that splits the seal in two, or lets a piece fall off, looks damaged and may leave the flap unfastened.
A lost seal. If the wax detaches, the envelope may arrive open with the invitation partly out, or closed but with a bare, sticky patch. The seal itself may be in the bottom of the mail carrier’s tray, or in a neighboring envelope.
A smear or transfer. Colored wax and metallic powders can rub onto other paper. Your gold seal may end up as a gold streak across someone’s electric bill, and the envelope may carry a streak from somebody else’s mail in return.
A torn or dented envelope. A tall seal on thin paper can dent the sheets inside the envelope, tear the envelope when pressed, or leave an impression on the invitation card that you spent months proofing.
You can see these outcomes coming only by testing. The stress test later in this guide is built around exactly these four outcomes, because they are what a guest will notice.
Why wax seals differ from other fragile embellishments
Ribbons can snag, vellum wraps can slip and foil can scuff, but those are mostly flat or flexible. A wax seal is one of the few common embellishments that is rigid, raised and breakable at the same time. That combination makes it a good candidate for a dedicated test rather than a general rule of thumb.
It is also one of the embellishments that can change how a postal clerk treats the piece. Whether wax seals trigger any extra handling or cost depends on their size, their height and their placement, and the Postal Service is the authority on that. Surcharge categories are a separate subject, and this article stays focused on damage and your own testing.
What this guide will and will not do
The aim is practical. By the end you should be able to do five things. Choose a seal type for a specific envelope. Choose a placement that suits the mail. Run a small, honest test with materials you already have. Set pass marks before you see the results, so you are not tempted to excuse a bad result. And write down a protection plan that a helper can carry out without you.
What it will not do is promise a result for your wax seals. No guide can tell you that your wax seals will survive, because the outcome depends on your wax, your paper, your envelope, your route and your luck. What the guide can do is shrink the unknowns. Testing six envelopes will not catch everything, but it will catch the common failures at almost no cost, and it will tell you which design decisions are worth defending and which are not.
The decision before the test: do wax seals need to travel at all?
Before you test anything, ask a simpler question. Do your wax seals need to survive the mail? The answer is not always yes, and being honest about it can save the whole exercise.
There are four ways wax seals can relate to the mail, and each leads to a different plan.
Seals on the outer envelope, mailed. This is the most demanding case. The seal is exposed to everything described above. Most of this article is written for it.
Seals on an inner envelope or inside a wrap. The outer envelope shields the seal. This is a much gentler case. The seal still has to survive being pressed inside the outer envelope, but it avoids friction and direct impact.
Seals on invitations that are hand-delivered. Close family, the wedding party and local guests can receive their invitations in person, in a box or a flat folder. The wax seals never meet a sorting machine at all.
Seals on a different piece. You can keep wax seals on a belly band, an RSVP envelope, a ribbon closure inside the suite or a thank-you note. The mailed envelope uses a flatter closure, and the wax appears where it will be protected.
Think of these as four lanes. Any invitation list can be split across lanes, and that is often the smartest plan: wax for hand-delivered pieces and for inner envelopes, a flatter closure on the outer envelope that goes to the post office.
A quick way to choose a lane
Count the invitations that will be mailed and consider how many guests will receive them by hand. If fewer than a fifth of the list is local, the hand-delivery lane will not cover enough pieces, and your plan has to rely on testing and protection. If a third or more is local, hand delivery may cover your fragile cases and leave only a manageable number to mail.
Next, consider how much each guest’s invitation matters to you beyond information. Some couples want the unboxing moment for everyone. Others are comfortable with a simpler mailed piece plus a more elaborate piece for the wedding party. Either is a fair decision. The point is to decide on purpose, so a cracked seal is a known tradeoff and not a surprise.
Finally, think about the guests who will notice damage most. An older relative who has not seen the couple in years, or a guest traveling from far away, may form an impression from the envelope. These guests are good candidates for the sturdiest version of the invitation or for hand delivery if it is possible.
The cost of changing your mind late
Changing a seal after printing is not free, which is why the test comes before the full order. If you discover at the post office, with the whole batch finished, that the wax seals are too tall, your options narrow quickly: re-do every seal, accept the risk, or change the delivery plan. Each option costs time, money or both. If you run the test while you still have blank envelopes and a few spare invitations, the same discovery costs a Saturday.
The usual order of work is: choose a candidate design, make a few test envelopes, run the passes, adjust, then commit to the full batch. The rest of this guide follows that order.
Wax seals compared: five materials and what each one risks
“Wax seal” covers a surprisingly wide range of products. When you talk to a stationer or buy supplies, the first job is to find out which of five common types you are actually getting. They behave differently in the mail, and a test of one type tells you little about another.
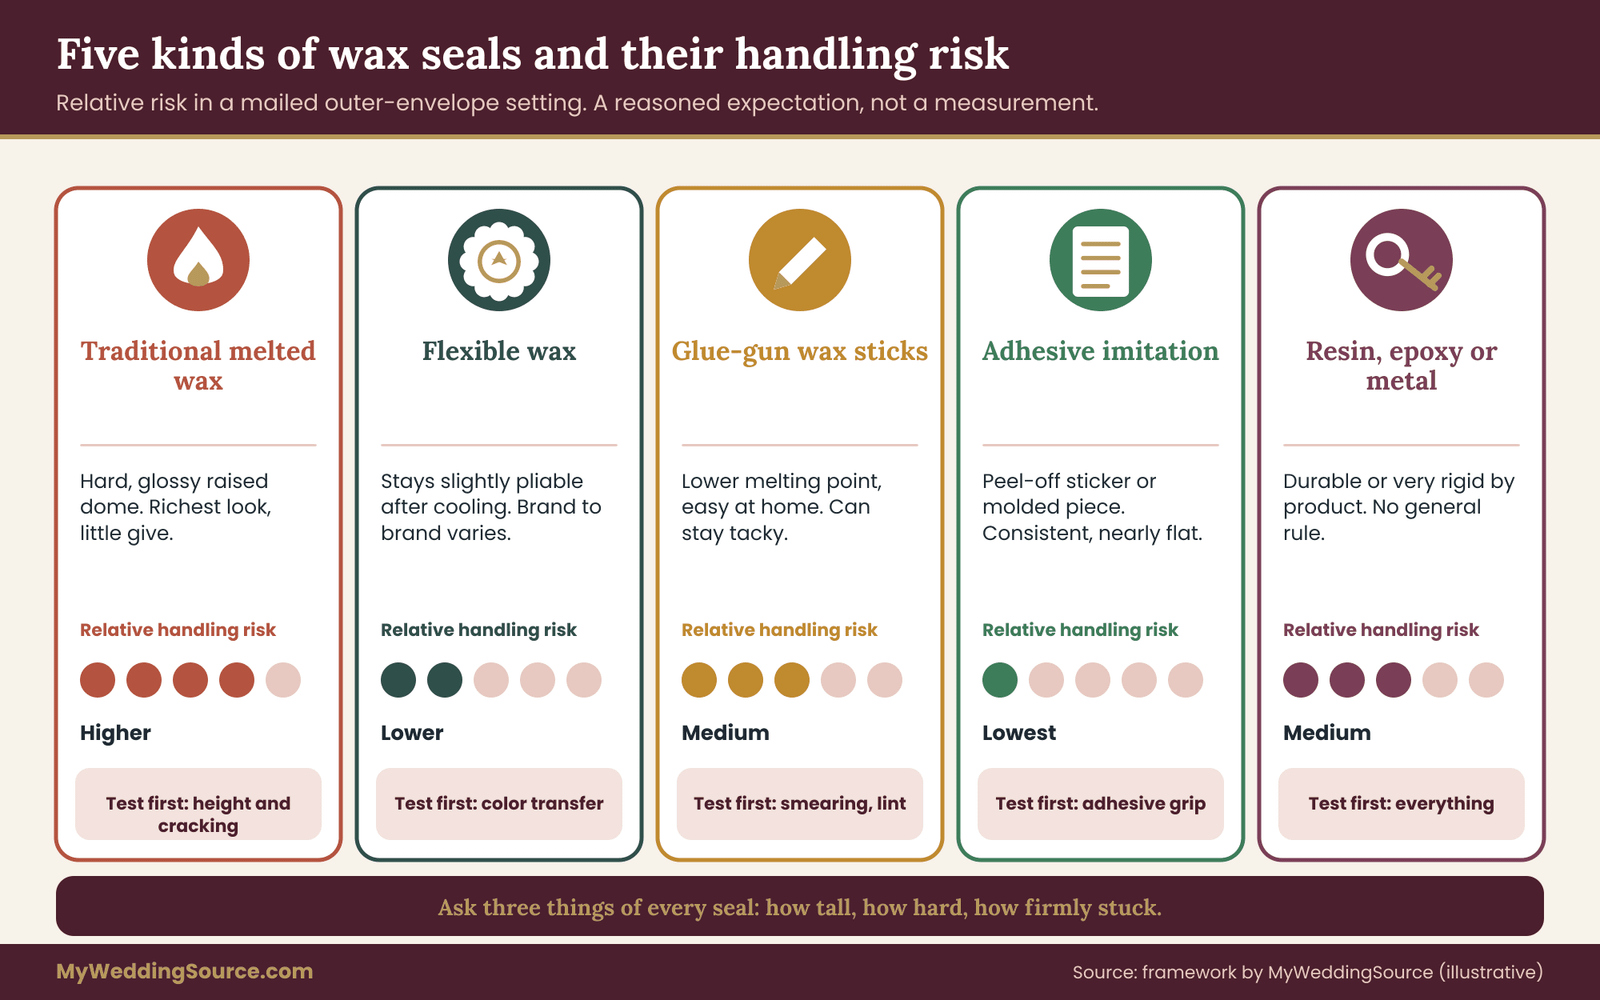
Traditional sealing wax, melted from sticks or beads. This is the classic kind: resin-rich, firm when cool, usually a raised dome with an impressed design. It can be glossy and quite hard. It gives the richest look and generally the highest risk of chipping, because the material has little give. Height varies with how much wax you pour.
Flexible or “bendable” sealing wax. Some formulations include additives that keep the seal slightly pliable after cooling. They are marketed for exactly this problem: mail. They can handle a gentle bend without cracking, though they are not indestructible and different brands behave differently. Ask for a sample and test it, rather than trusting a label.
Glue-gun style wax sticks. These melt at lower temperatures and are easy to use in a small home setup. They are convenient, but depending on the formulation they can stay softer and tackier, which makes them more prone to smearing and to picking up lint. Treat them as their own category in your test.
Adhesive seals that imitate wax. These are pre-made stickers or small molded pieces with a peel-off backing. A thin printed or embossed sticker is nearly flat. A molded one can be domed but is often made of a material with more give than real wax. They are consistent from piece to piece, which is a big advantage when you have to make a lot.
Seals made of other materials. Resin, epoxy and polymer domes, as well as metal or card seals, sit here. They can be very durable or very rigid, depending on the product. Treat each one as a new material and test it, because there is no general rule.
How to read the wax seals comparison honestly
The figure above ranks each type by relative handling risk in a mailed outer-envelope setting. The ranking is a reasoned expectation, not a measurement, and it is meant to help you pick samples to test. It is not a promise that a flexible wax will never crack or that a sticker will never peel. Two products of the same type can differ a lot, and your envelope paper matters as much as the seal.
A useful habit is to separate three questions. How tall is it? How hard is it? How firmly does it stick? A tall, hard, loosely stuck seal is the worst combination. A flat, slightly flexible, firmly stuck seal is the best. Many real products sit somewhere in between, and your test results will show where.
Height, hardness and grip
Height drives pressure damage and any postal question. Even a modest dome can press into the sheets of a stacked batch. Measure the height of your seal at its tallest point, and record it. A simple way is to lay a ruler on the envelope across the seal and slide a thin strip of card underneath at the edge to measure the gap, or to use a caliper if you own one.
Hardness drives cracking and chipping. A quick check: press a fingernail into the cooled seal at its edge. If it leaves no mark and nothing flakes, it is hard. If it dents slightly, it has some give. A test seal that flakes under a fingernail will flake in a tray.
Grip drives loss. Slide a fingernail under the edge of the seal after it has cooled for a full day. If it pops free with little effort, it will not survive friction. If you have to work at it, and it takes some of the paper surface with it, the grip is good, though you may be trading loss for torn paper. That tradeoff is worth knowing before the mail does the experiment for you.
Colors, metallics and finishes on wax seals
Color is not only cosmetic. Deep metallic powders and glitter finishes can shed or transfer. A matte finish may hold up to rubbing better than a high-gloss one, though a glossy seal shows scuffs less on a dark color. Pale wax seals show dirt and smears more than dark seals. Test the color you actually plan to order, not a stand-in, because pigments change how a seal behaves.
Scented or heavily glittered wax can also affect other mail and may not be appropriate where it could rub onto strangers’ items. If a seal leaves residue on a clean white envelope when rubbed, count that as a failure on the rub pass, even if the seal itself looks fine.
Safety and handling of the materials themselves
Melted wax is hot enough to burn skin, and some sealing methods use an open flame. The Consumer Product Safety Commission and the National Fire Protection Association publish candle and open-flame safety guidance, and the same sensible rules apply to melting sealing wax: keep flames away from paper, never leave a flame unattended, work on a heat-safe surface, and keep children and pets away. If you hire someone to seal your invitations at an event or in a studio, ask what method they use.
Glue-gun style sticks run hot as well. Use the stand the tool comes with, keep cords out of walking paths and let seals cool fully before you stack or box anything.
Where wax seals sit: placement changes the risk
The same seal can be a minor concern or a major one depending on where it sits. Placement is the cheapest variable you can change, so it deserves its own comparison.
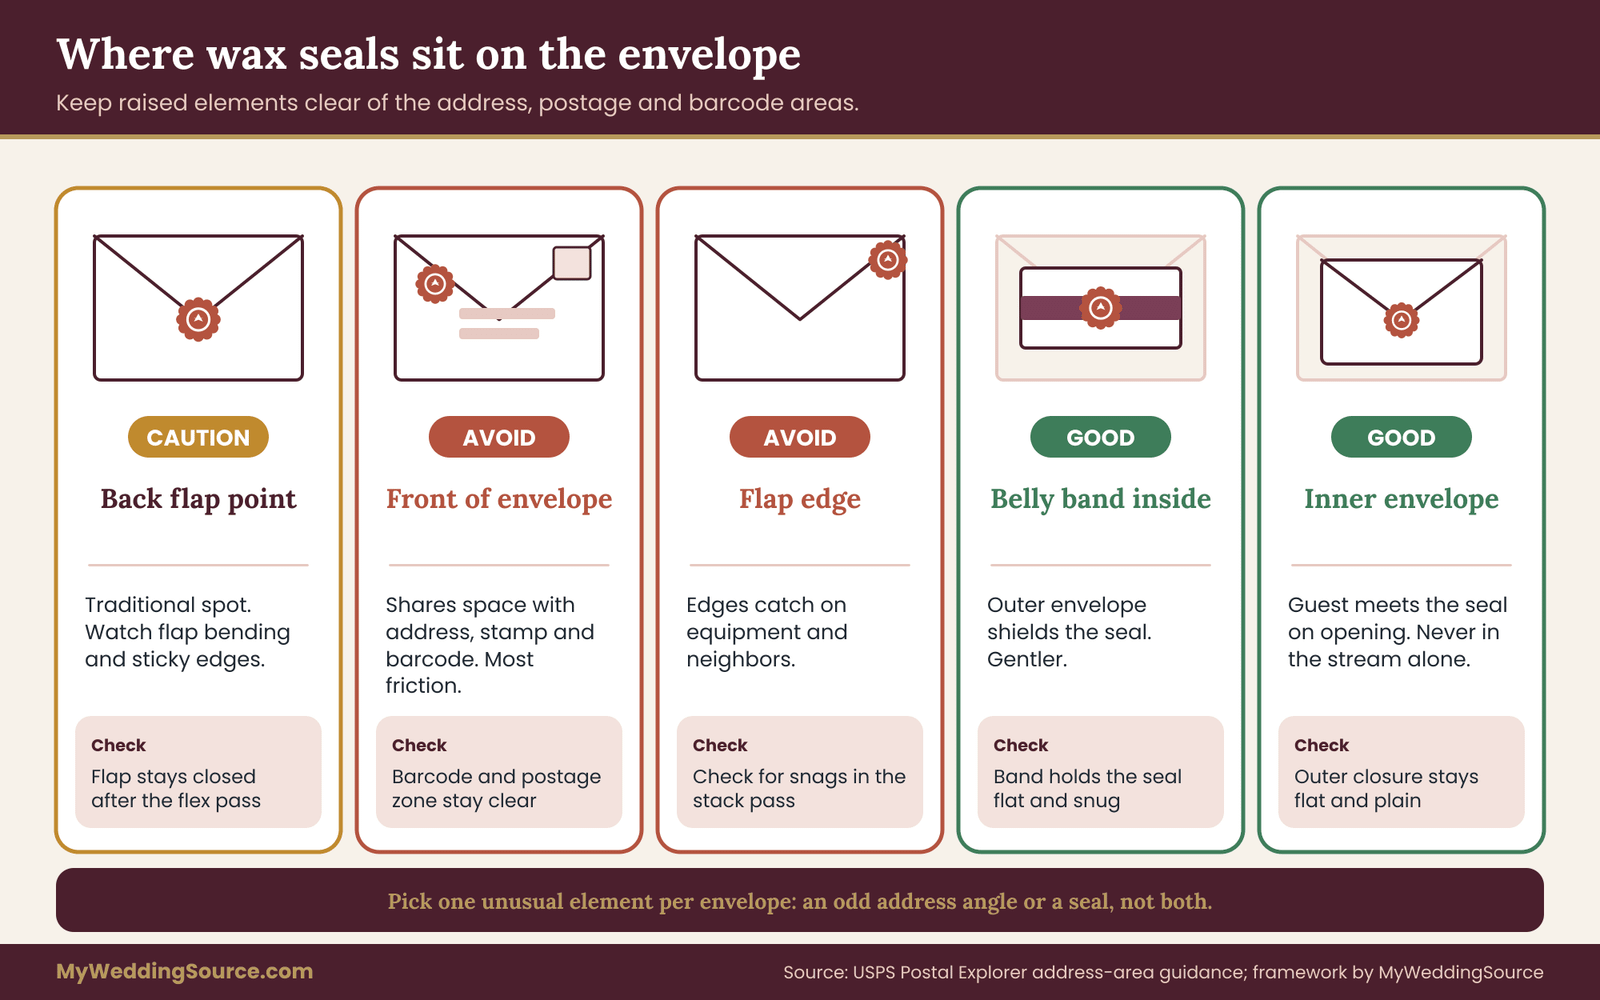
Center of the back flap, on the point. This is the traditional spot. The seal sits where the flap tip closes. It faces the sorting equipment’s back side during many passes, so it takes less direct friction against belts, but it is also exactly where the flap is most likely to be bent and where a sticky seal can grab the neighboring envelope.
Front of the envelope. A front seal is highly visible, but it sits on the same surface as the address and the stamp. It can interfere with barcode printing areas and with the cancellation mark, and it takes the most direct friction. Many designers avoid it for mailed pieces for exactly those reasons.
Top or side edge of the flap. A seal near the edge tends to catch on other envelopes and on equipment. Edges get the most wear.
On a belly band or wrap. A seal on a band around the invitation suite, inside the outer envelope, avoids exposure. The band holds the seal flat against the suite and the outer envelope protects it.
On the inner envelope or RSVP envelope. Similar benefit: the piece the guest holds first is the sealed one, and it was never in the sorting stream by itself.
The address and barcode zone
Keep any raised element clear of the address block, the stamp or postage area and the lower edge of the envelope where the Postal Service may print a barcode. The Postal Service publishes rules for the placement of address and barcode areas, and equipment reads from specific zones. A front seal that falls on or near those zones risks misreads and handling by hand. Postal Explorer, the Postal Service’s online standards library, is where the current requirements live, and your local post office can look at a sample for you.
A related decision is the direction of the address. Invitations often use hand-lettered addresses in unusual orientations. A seal and an unusual address orientation are two choices that each carry risk. Stacking them on the same envelope compounds the possibility of trouble, so give yourself room by choosing one, not both, for the most unusual pieces.
Size and weight of the seal relative to the envelope
A large seal on a small envelope is under more stress than a small seal on a large one. As a working rule for your own testing, not a postal rule, keep the seal clearly smaller than the flap point it sits on, with visible paper margin around it. A seal that reaches to the edges of the flap has no paper cushion and will catch.
Weight also matters at the counter and in the mail stream. A seal adds a small weight, but a set of heavy wax seals plus thick paper, an enclosure suite and a vellum wrap can push a piece across a weight step. That is a pricing matter and belongs in your postage check, not your damage test, but it is a good reason to weigh the finished sample, seal included.
The mailing stress test for wax seals: five passes
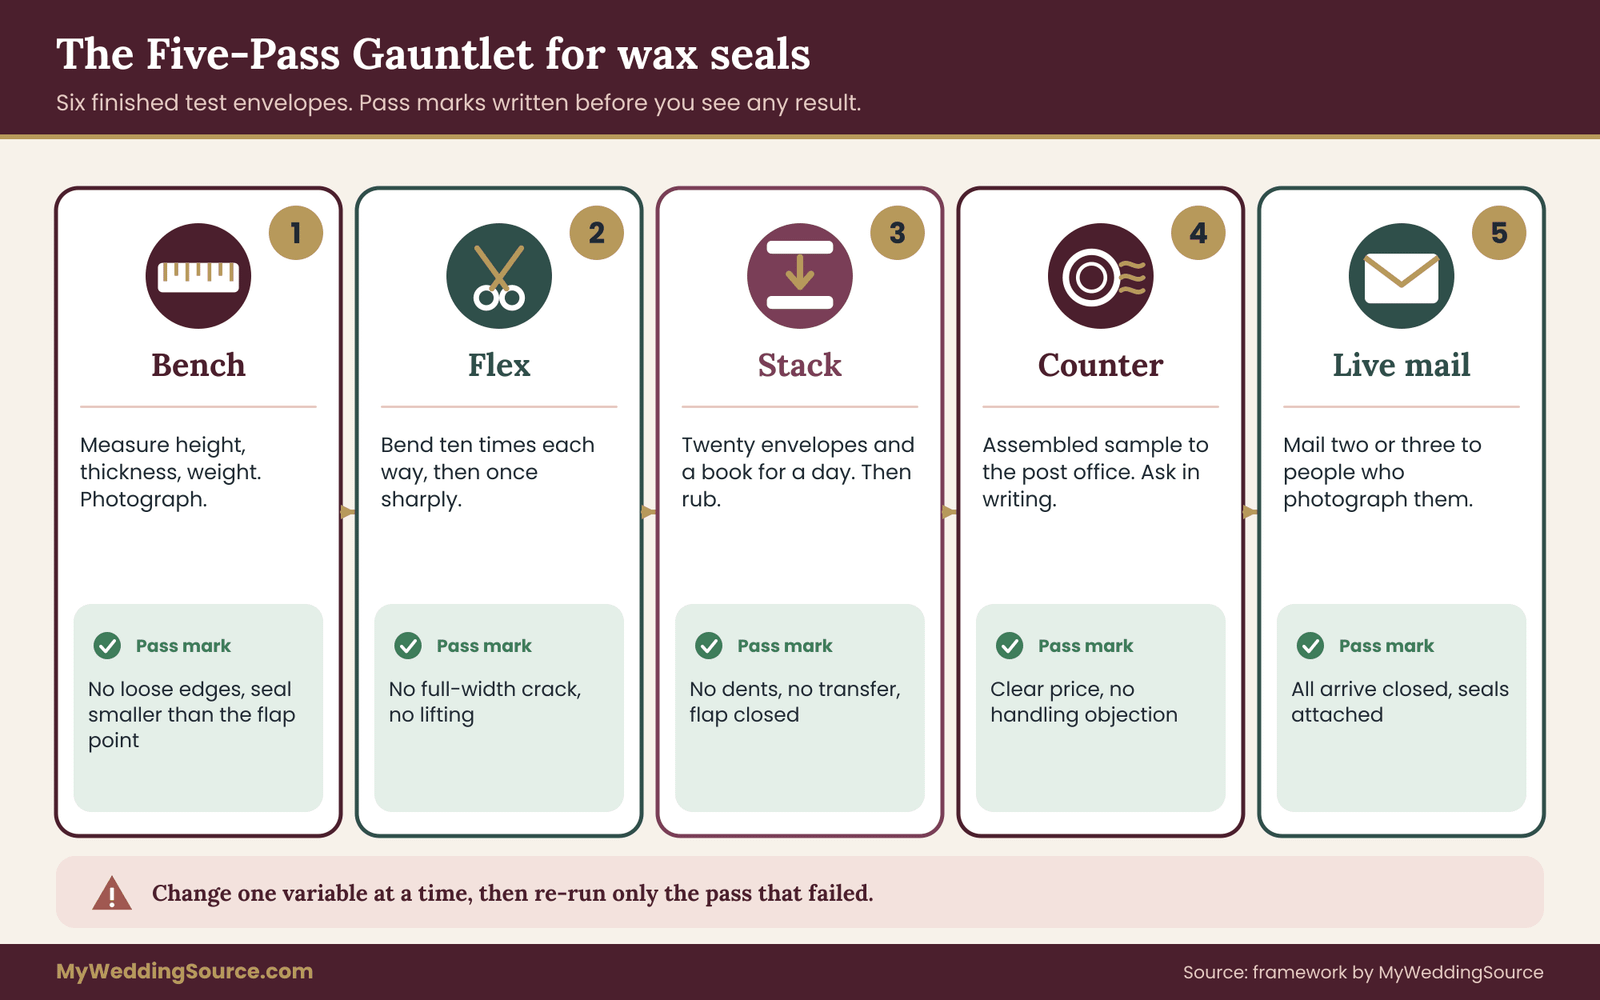
This is the core of the guide, built for testing wax seals: an original test you can run at a kitchen table. It is called the Five-Pass Gauntlet. Each pass attacks one of the forces described earlier, and each has a written pass mark, so a nice-looking seal cannot talk you into ignoring a bad result. The test uses six finished envelopes, which is enough to see patterns without wasting much.
Here is the plan in outline. Pass one is the bench, where you measure and inspect. Pass two is the flex, where you bend the envelope the way a sorter would. Pass three is the stack, where you apply pressure and friction. Pass four is the counter, where you show a finished sample to the post office. Pass five is live mail, where you send test pieces through the actual system and see what returns.
Build the six test envelopes
Use real materials, not stand-ins. Real envelopes from the batch, the same paper and the same liner, and a real suite inside: the invitation card, the details card, the response card and its envelope, plus any tissue or wrap. A test envelope with a light inside behaves differently from a full one. Stuff it the way the real one will be stuffed.
Make six: two with your first-choice seal in your first-choice position, two with a second candidate seal or position, and two as your control. The control is the flat alternative you would use if wax seals fail, for example an adhesive sticker or a plain closure. Label each in pencil, lightly, on the inside flap, so you can tell them apart without changing the front.
Let every wax seal cool and cure for at least a day before testing. A seal that looks hard after an hour may still be settling. Write down the date and the room temperature if you can.
Pass one: the bench
On the bench you measure and look. Record, for each envelope: seal diameter, seal height at the tallest point, the overall thickness of the sealed envelope at the seal and at a spot away from it, and the weight of the finished piece on a kitchen or postal scale.
Then run the fingernail checks from the previous section: a light press at the edge for hardness and a gentle lift at the edge for grip. Photograph each envelope from the front, back and side against a plain background, with a ruler in view. These photos are your baseline. Without them you will not remember what “before” looked like.
Pass mark for the bench: no loose edges, no visible bubbles that open when pressed, no wax overhanging the flap’s edge, and a seal clearly smaller than the flap point. Record the height and thickness difference even if you have no benchmark yet, because pass four will give you a postal opinion to compare it with.
Pass two: the flex
Sorting equipment and hands bend envelopes. For the flex pass, hold the sealed envelope by its short edges and bend it gently into a shallow curve, flap side out, then flap side in, ten times each. Use light pressure, the kind that bends a stiff envelope without creasing it. Then bend the envelope sharply once, to roughly the angle you would get from sliding it into a snug pocket, and release it.
Inspect after each set. Hairline cracks count as a note, not a failure. Any crack through the full width of the seal counts as a fail, and so does any lifting at the edge, any gap between seal and paper, or any flaking.
Pass mark for the flex: no full-width cracks, no lifting, no flakes on the table afterwards. Lay the envelope on a sheet of dark paper to check for dust and fragments after each round. Wax debris is easy to miss on a busy table.
Pass three: the stack
Mail is stacked, bundled and slid. Build a stack of twenty ordinary envelopes or similar pieces, put your test envelope in the middle with the seal facing up, and put the rest on top. Add a heavy book on the stack. Leave it for twenty-four hours in a normal room, then check.
Next, the rub. Take one test envelope and slide it face to face against a clean white envelope, with moderate pressure and the seal in contact, twenty times along the length of the envelope. Inspect both surfaces. Any wax or pigment on the white envelope is a transfer fail. Any scuffing that exposes bare paper beneath the seal is a note.
Finally, if you can do so safely, repeat the stack on a second envelope in a warm spot, such as a sunny windowsill or a closed room in summer, to see whether the seal softens. Do not use ovens, heaters or hot vehicles in a way that creates a fire or burn risk. Warm is enough.
Pass mark for the stack: no crushing or dents in the sheets inside, no transfer onto neighbors, the flap still closed, and the seal still attached after the rub.
Pass four: the counter
Take your finished samples to your local post office retail counter. Bring one fully assembled sample of each candidate, not a loose seal. Ask the clerk to look at it, weigh it and tell you the price class and any handling concerns, in writing if they will give you anything written. If the clerk is unsure, ask whether there is a supervisor or a mailpiece design resource who can answer. Postal staff vary in how much time they can give, so go at a quiet hour.
Ask these questions plainly. Does this piece qualify for the standard letter price at this size and weight? Does the seal change how it will be handled? Would you prefer the seal on the back, the front or elsewhere? Is there anything about the address layout you would change? Record the answers with the date and the clerk’s name or the location.
Rules, prices and machinery change, and a clerk’s answer at one counter is an opinion, not a guarantee. That is why the live mail pass follows. For the written rules, see the Postal Service’s standards library at Postal Explorer and the Domestic Mail Manual, which is linked in the sources.
Pass mark for the counter: a clear price answer and no objection to the seal, or a specific change they ask for. If you hear “this may be nonmachinable,” treat the piece as higher priced for planning until you have it in writing.
Pass five: live mail
Mail two or three test envelopes to real addresses you can inspect: your own home, a relative or a friend who will photograph them unopened and send them back. Use the same postage you plan to use. Choose addresses in different delivery areas if you can, because a local route and a longer route are different tests. Do not mail to anyone who would be annoyed by a cracked seal; tell the recipients it is a test.
Ask the recipients to report: the date it arrived, the condition of the envelope and seal in the first photo before opening, and whether the flap was still closed. Keep any postmarks, stickers or marks the Postal Service added. They tell you where the piece traveled and sometimes how it was handled.
Pass mark for live mail: all test pieces arrive closed, with wax seals attached and no more than hairline cracks. One failure in three is enough to change the plan, because you are about to send many pieces, not three.
Allow time. A live test needs the post office’s normal delivery window plus a few days for photographs and a second round if you change anything. That is why the test belongs early in the printing and assembly schedule, well before you order the full set of seals.
What to do with the wax seals results
Create one page that lists each envelope, each pass and the result. A pass, a note or a fail. If a design fails any pass, change one thing at a time: a smaller seal, a flatter material, a different position, a backing card. Re-test only the changed variable. Changing three things at once tells you something worked but not what.
When a design passes all five passes, you have a defensible choice, and a record to show a printer, a stationer or a helper. When none passes, you have found that the wax seals need to live on a hand-delivered or inner piece, which is also a useful result.
Measurable checks and pass marks for wax seals
A test is only as honest as its pass marks. Write them down before you start, and keep them short. The set below uses measurements you can take with a ruler, a scale and your eyes. The numbers you assign are your own working thresholds, not postal standards, and you should replace them with whatever your post office and printer confirm.
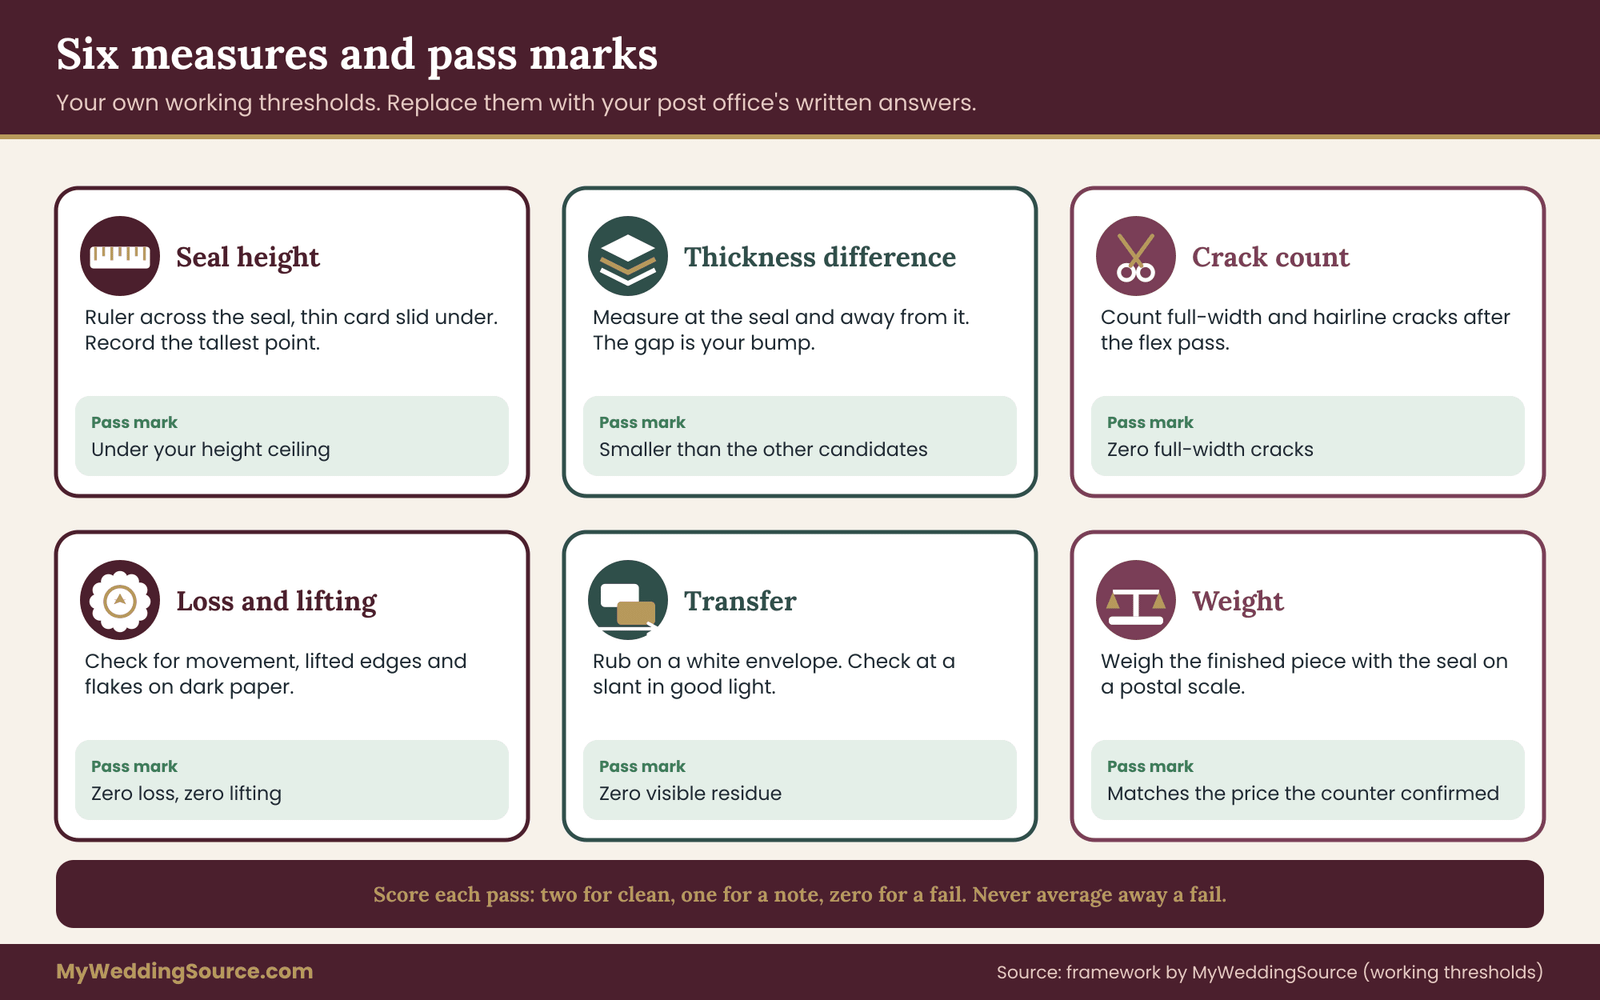
Five measures that cover most failures
Seal height. Measure at the tallest point. Set a ceiling before you test. A reasonable starting ceiling for a mailed outer envelope is a few millimeters, noticeably lower than the thickness of the invitation suite itself, so the seal does not dominate the profile of the piece. If your first candidate is taller than your ceiling, you already know what to change.
Thickness difference. Measure the sealed envelope at the seal and at a point on the same envelope away from the seal. The gap between them is the bump your seal creates. A smaller bump is better for stacking and for machines. Compare this number across candidates, and compare it again with whatever your post office says is acceptable.
Crack count. After the flex pass, count full-width cracks and hairline cracks separately. Your pass mark might be zero full-width cracks, with hairlines allowed. Photograph the worst one.
Loss and lifting. After the flex and stack passes, check whether any seal moved, lifted or lost material. Your pass mark is zero loss. A seal that has moved even slightly will not survive a longer route.
Transfer. After the rub, inspect the white test envelope under good light, at an angle, because faint residue shows best on a slant. Your pass mark is zero visible transfer.
Add a sixth if you want one: weight. Record the weight of each finished piece. If your sample sits close to a weight step, a small change, such as thicker paper or an extra card, may push it over. The postage check is the place to settle that, but a recorded weight prevents surprises.
A simple scoring habit for wax seals
Give each envelope a score on each pass: two points for a clean pass, one for a note, zero for a fail. Add them. The numbers are not scientific. They are a way to compare two candidates quickly and to see where a design is weak. A candidate that scores well overall but zero on the stack pass has a specific problem, and you can fix that problem rather than abandoning the design.
Resist the urge to average away a fail. A seal that survives four passes and loses itself in the mail has failed the one test that matters. Treat any fail on live mail as a fail overall, even if everything else was fine.
What a “good enough” result looks like
Good enough does not mean flawless. It means that, across the six envelopes and the five passes, the failures that remain are cosmetic and rare, and that you have a plan for the ones that happen. Hairline cracks may be acceptable if you tell guests nothing and replace nothing. A single lost seal in a batch of a hundred and twenty is something you can plan for with spare wax seals and a few replacement envelopes. A pattern of lost wax seals is a design problem.
This is where decision rules help. A short rule: if the live mail pass loses a seal, change the seal or the placement and run it again. A second rule: if the stack pass crushes the sheets inside, lower the seal or add backing. A third: if the rub pass transfers color, change the finish or the material. A fourth: if the counter pass raises any handling concern, ask for it in writing and plan for the higher price class until you have clarity.
The envelope protection plan for wax seals: four layers
Testing tells you where the weak points are. Protection reduces them. The plan below has four layers, from the seal itself outward. Most couples will use two or three, and none requires special equipment.
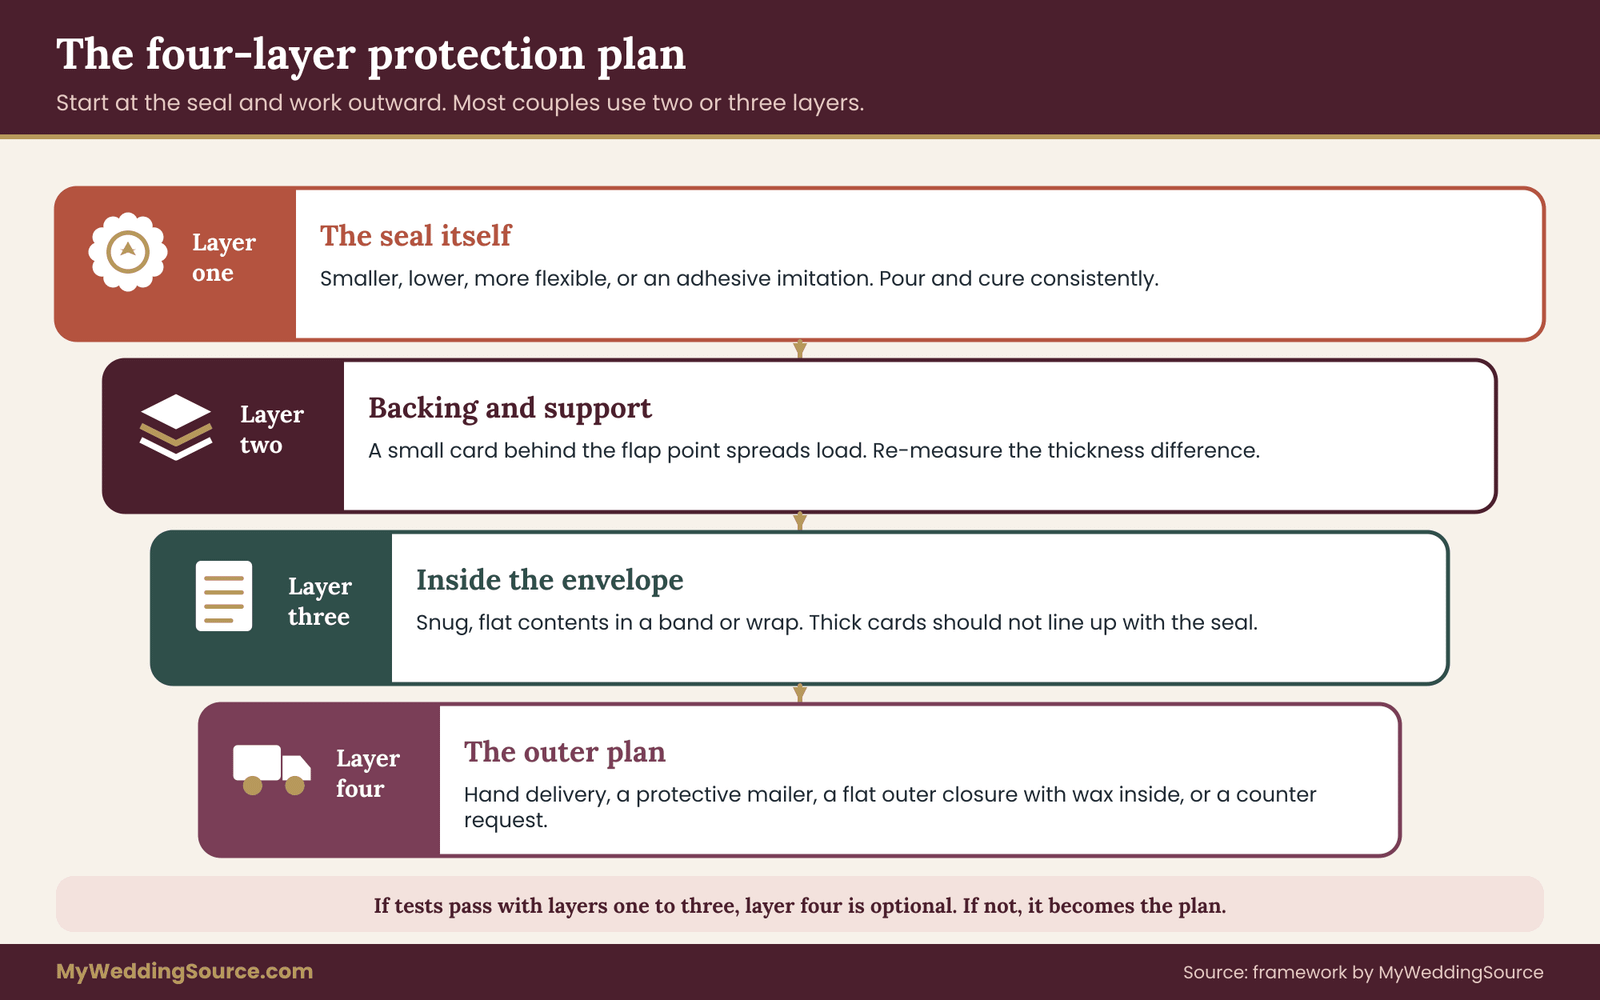
Layer one: the seal itself
Start with the cheapest change, which is the seal. Options, in rough order of effect: a smaller seal, a lower dome, a more flexible formulation, a molded adhesive seal in place of melted wax, or a thinner pour. Each reduces height or hardness, which are the drivers of the most common failures.
If you are melting wax yourself, consistency matters. Pour the same amount each time, press the stamp for the same length of time and let each seal cool fully before moving it. A batch with a wide spread of heights is harder to protect, because the tallest ones set the weakest points.
Layer two: backing and support
A seal is stressed at its edge, where the paper meets the wax. Backing spreads the load. Inside the flap, behind the seal, you can add a small piece of card or an extra layer of paper to stiffen the area. Some stationers use a stiffer envelope liner or a flap reinforcement for the same reason.
Be careful with anything that thickens the envelope or changes its stiffness at one spot, because that is exactly what makes a piece uneven. Test a backing before you adopt it, and measure the thickness difference again. A good backing makes the seal area behave like the rest of the envelope, not like a hard patch.
Layer three: the inside of the envelope
What is inside the envelope affects what the seal feels. A suite that rattles will flex the envelope more. A suite that is held flat in a wrap or a band transmits less bending. A layer of tissue or glassine can protect the printed pieces from the back of the seal if it presses inward, and it can protect the seal from the corners of stiff cards pressing out.
Keep the contents snug and flat. Slide the response card and envelope behind the invitation, not on top of the seal side, so the thickest items do not line up with the seal. Test the real arrangement, because the order of the pieces changes where the pressure falls.
Layer four: the outer plan
The outer layer decides how the finished envelope travels. There are four options.
Hand delivery for the most fragile pieces, as discussed earlier. It is the only option that guarantees no handling by equipment.
A protective mailer such as a rigid mailer or a small box for a few special pieces. It changes the postage and the look, so it fits wedding party invitations better than a full guest list.
A different closure on the outer envelope, with wax seals on an inner envelope, a belly band or an RSVP envelope. The guest gets the wax moment when they open the suite.
A request at the counter. Ask your post office whether it can accept a sample or a batch for hand cancellation, and whether there is anything about the batch that would help it be handled gently. Policies vary and the answer may be no, but asking costs nothing, and a counter clerk is often glad to explain what they see go wrong.
How the layers combine
You do not need all four. A common combination is a smaller, lower seal (layer one) with a stiff backing (layer two) and a snug flat suite (layer three), mailed in the regular stream. A more cautious combination keeps wax seals on an inner envelope and uses a plain, flat closure outside. The most cautious plan hand-delivers everything with wax seals and mails a flatter version to everyone else.
Choose the combination with your test results in hand. If your test envelopes pass with layers one to three, you may not need the fourth. If they fail even with all three, layer four becomes the plan, and you have a good reason for the decision when someone asks why Aunt Carol got the plain envelope.
Spare stock and replacement wax seals
Whatever you decide, plan for losses. Keep a small set of spare wax seals, spare envelopes and spare suites. If a guest tells you their seal arrived cracked, it is easy to be kind and replace it, but only if you kept the materials. Decide in advance how many spares you will hold and where you will store them, so they are still intact in six weeks. The cost logic in the budget section later in this guide shows how to size that reserve.
Write down the protection plan in one page, with the layers you chose, the seal type and placement, the maximum height and the person responsible for each step. If you are handing the assembly to a helper, this page is what keeps the batch consistent. Consistency is half of protection: ten identical envelopes behave predictably, and ten different ones do not.
Alternatives to wax seals on a mailed envelope
If your tests show that wax seals are a poor fit for the mail, you still have many ways to keep the look. The point is not to defend wax seals at any cost. It is to give the guest an envelope that arrives intact and still feels considered.
A flat adhesive seal. A thin sticker with a wax-like print or a light emboss gives the visual cue with very little height. It is the closest substitute, and it is consistent from piece to piece. Check that the adhesive is strong enough to keep the flap closed through the flex pass, because a sticker that peels is no better than a seal that cracks.
A wax seal on a belly band or inner piece. The wax stays in the suite, and the guest finds it on opening. This keeps the ceremony of breaking a seal without risking it in the mail stream.
A foil or blind-embossed closure. A stamp pressed into the flap, with no added height, gives a raised pattern with minimal bulk. Ask your printer how it behaves on the envelope paper you chose.
A thin ribbon or a paper tab. A ribbon can snag, and some ribbons and strings can raise postal questions, so test any closure that sits proud of the paper. A simple paper tab or a die-cut closure may be flatter. Be aware that each of these has its own handling traits, and none is automatically safer than wax.
Hand-applied seals at delivery. For local guests or a wedding party, you can seal and deliver the envelopes in person, so the wax never sees the mail at all.
A decision rule for choosing between them
Use a short ladder. First, if the seal passed all five passes with layers one to three, keep it. Second, if it failed only on height or crushing, try a smaller or lower version of the same material. Third, if it failed on cracking or loss, move to a flexible formulation or an adhesive imitation. Fourth, if it failed on transfer, change the finish or the color. Fifth, if nothing passes, move the wax seals inside the suite and mail a flat closure.
Each step changes only one variable, which keeps the testing honest. It also gives you a clear answer when your stationer asks what you want to change and why.
Matching the choice to the guest
Not every guest needs the same envelope, and not every guest needs wax seals. Some couples use the same outer closure for everyone and add the most elaborate wax seals to the pieces handed to parents, grandparents and the wedding party. Others use wax seals for guests who are traveling and flat closures for local ones. The right split depends on the list, the budget and your comfort with a bit of visible variation.
If you are weighing how formal the envelope should look, the wedding invitation etiquette guide covers wording, inner and outer envelopes and addressing conventions, which affect where a seal can sit and what it must not cover. The response card side has its own norms; the RSVP etiquette guide explains how guests are expected to reply, and why a return envelope that arrives clean matters for getting answers back.
A worked example: an invented test for one hundred twenty invitations
The example below is invented for illustration. The couple, the numbers and the results are made up to show how the method works, and they are not data about any real product, region or post office. Use it as a pattern, not a prediction.
Priya and Daniel plan to mail one hundred twenty invitations. They have a dusty rose melted wax seal in mind, placed on the back flap point, on a cream envelope with a matching liner. A friend who makes wax seals is offering to produce them by hand at a small, fair rate.
Step one: choose the candidates. They decide to test three: their first-choice traditional melted wax on the flap point; a flexible wax of the same color on the flap point; and an adhesive wax-style sticker as the control. They make two of each, six envelopes in all, using real envelopes and real suites with a vellum band and a response card set.
Step two: bench. They measure heights. The traditional wax seals are the tallest, the flexible wax seals a little lower, the sticker nearly flat. They record thickness at and away from the seal, and the weight of each piece. All six pass the visual check.
Step three: flex. Both traditional wax seals show hairline cracks, and one has a crack running across the full width of the seal after the sharp bend. The flexible wax seals show one hairline each. The stickers show nothing.
Step four: stack and rub. After a day under books, one traditional seal has pressed a faint ring into the vellum band. A rub against a white envelope leaves a faint pink mark from one flexible seal. The stickers are clean.
Step five: counter. They bring all three types to the post office. The clerk weighs each piece, confirms that the finished weight fits their planned postage, and says the traditional seal is taller than they would like but is not sure about handling, and suggests checking with a supervisor. The clerk agrees to write the weight and the price on a note. The couple records the date and the location.
Step six: live mail. They mail one of each type to a friend two towns away and one to a relative in another state. The traditional seal arrives with a chip off the edge. The flexible seal and the sticker arrive intact.
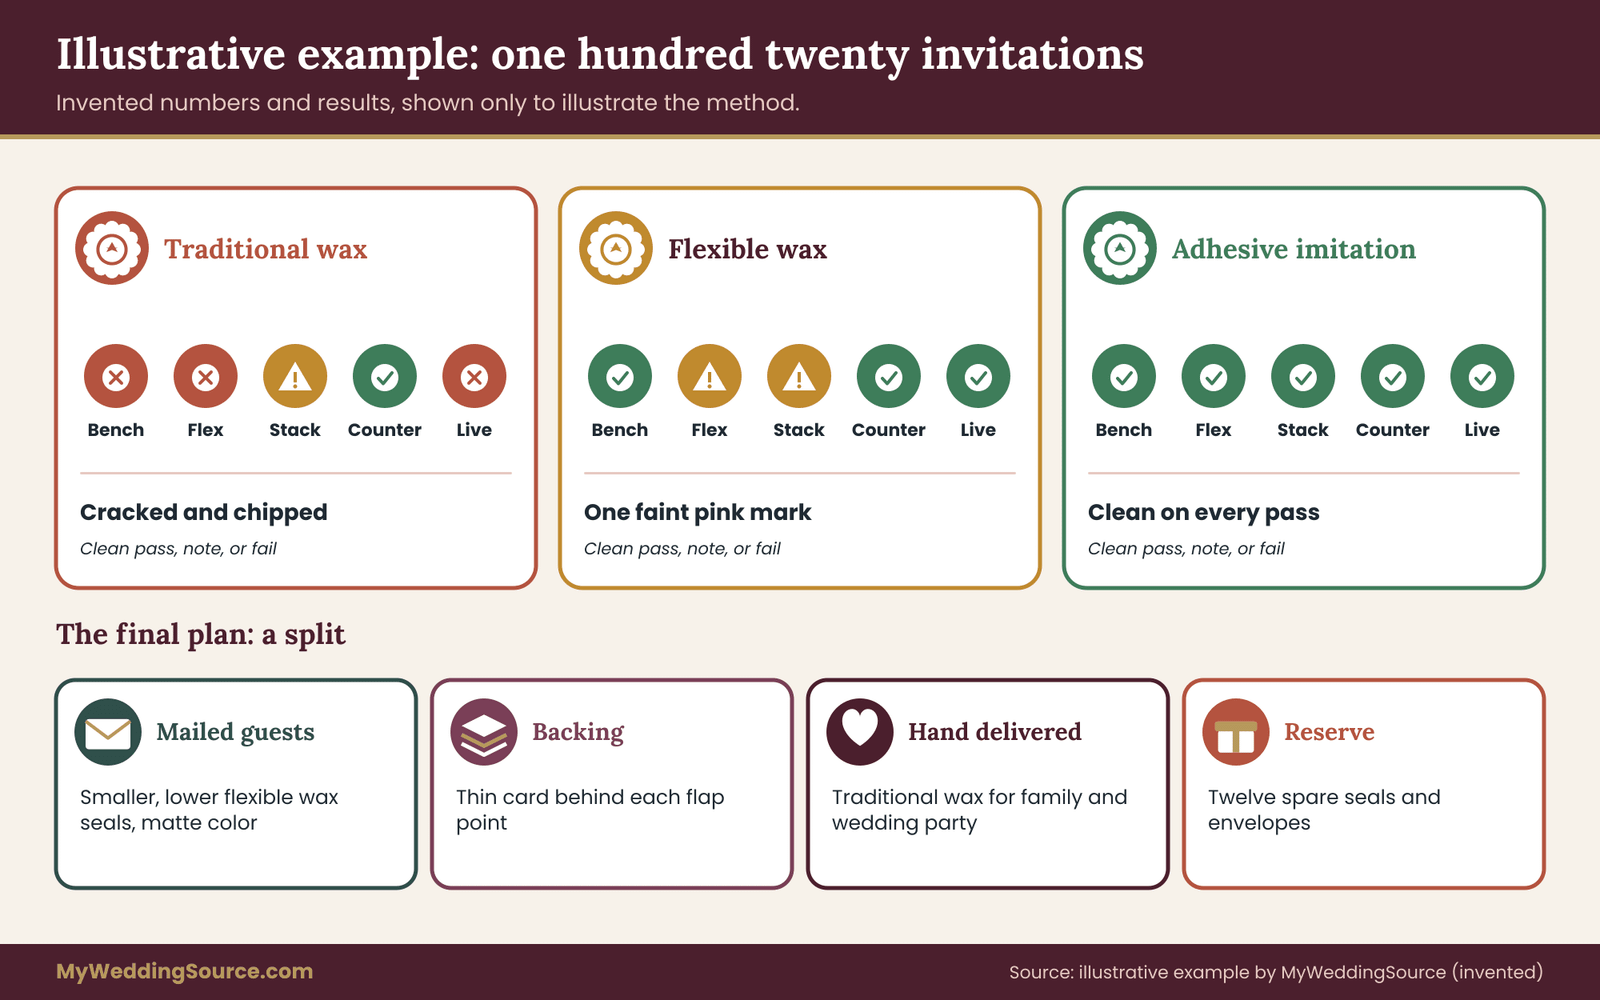
What they decide
Priya and Daniel decide against the traditional wax on the outer envelope. They keep flexible wax seals, but make them smaller and lower, and they add a thin backing card behind the flap point. They re-test two envelopes through the flex, stack and live mail passes, and both pass. The pink transfer from the flexible seal bothers them, so they switch to a slightly more matte pink and re-run the rub pass, which now shows no mark.
Their final plan has four parts. Flexible wax seals, smaller and lower, on the outer flap of the mailed envelopes. A backing card behind each seal. Traditional wax seals, as originally dreamed, on the thirty envelopes hand-delivered to family and the wedding party. And a reserve of twelve extra wax seals and envelopes for replacements.
What the example teaches about wax seals
Three lessons carry over. First, the first-choice design failed, and nothing terrible happened, because they found out on a Saturday and not at the post office with the full batch. Second, they changed one variable at a time, so they knew which change fixed which problem. Third, they ended with a split plan that kept the original idea alive where it was safe.
Notice also what the example does not claim. It does not say flexible wax is always better, or that traditional wax always cracks. It says that for this couple, with this paper and this route, the results pointed in one direction. Yours may point in another, which is exactly why you test.
Questions to ask about wax seals before you order
Whoever supplies your wax seals, whether a stationer, a printer, a maker you found online or a friend with a hobby, can answer a few plain questions that tell you more than a glossy sample does. Ask them before you pay a deposit, and write down the answers.
About the material. What is the seal made of? Is it traditional wax, a flexible formulation, an adhesive imitation or something else? Is there a safety or ingredient sheet? Does it contain glitter or metallic powder that can shed? How does it behave in heat and in cold?
About the dimensions. What is the diameter and the height of the finished seal, as a typical range and not only a best case? Can the height be lowered? What is the largest size you would recommend on this envelope?
About mailing experience. Have you supplied wax seals for mailed invitations before? What did you change after problems? You are looking for specific, concrete answers. “They always arrive fine” is not an answer. “We lowered the dome after a customer reported crushing” is.
About samples. Can I get three sample wax seals on my actual envelope paper, in my actual color? What is the charge, and does it apply to the order? A maker who refuses samples on your paper is asking you to guess.
About consistency. How will you keep height and color consistent over the full batch? How are the wax seals cured and stored before delivery? A batch that varies is harder to test and harder to protect.
About spares and replacement. How many extra wax seals are included, and what is the cost of more? Will you remake a seal that cracked in transit if I hold the pieces? What is the policy for color match on a reorder?
About safety and handling. If the wax seals are applied on site, what heat or flame is used, and how is it controlled around paper and guests?
A short script helps if you are not sure how to start the conversation:
“We plan to mail about one hundred twenty invitations with your wax seals on the back flap. Before we order, could you tell us the height and hardness of the seal, and send three samples on our envelope paper so we can run a mailing test?”
That one message covers the material, the size and the sample, and it signals that you take mailing seriously. Good makers welcome it.
Put the answers in writing
Verbal assurances do not survive a dispute. Ask for the key points in an email or on the order form: the seal type, the size range, the quantity including spares, the delivery date, the color, and the sample approval step. If something goes wrong with the batch, a written specification is the thing you compare the delivered seals against.
The same principle applies to the whole supplier relationship. The wedding vendor contract guide explains what a good agreement covers, including deposits, change policies and what happens when a deliverable is not what you approved. If your wax seals come from a small maker, a short written agreement protects both sides.
Disclose your own arrangements honestly as well. If a stationer offers you a discount or free samples in exchange for a mention, or if a maker pays a commission on a referral, a fair guide to your decision is how you would feel if the guest knew. Prefer sources whose recommendations do not depend on a sale.
Timing and lead time for wax seals
Handmade wax seals take time, and a test adds another round. Treat sample time, test time and production time as separate items on the calendar, and add buffer. The wedding vendor timeline is a useful reference for placing these steps against the rest of your vendor work. As a general order: request samples early, run the passes when they arrive, decide, order the batch, and receive it with enough time to assemble and mail before your invitation date.
If you are making seals yourself, add practice time. A wax seal looks simple and takes a few tries to get consistent, and the first ten will not look like the last ten. Set aside an evening just for practice, with spare envelopes, before you make any that count.
Edge cases for wax seals in the mail
Some situations fall outside the standard test. Read these before you commit, because several of them are the ones that surprise couples.
Hot weather and cold weather for wax seals
Wax softens in heat. In summer, mail can sit in vehicles, on porches and in uncooled buildings. A seal that was firm on your table may become tacky, bend slightly and stick to a neighbor. If your invitations go out in a hot season, the warm-spot stack test matters more, and a flexible or adhesive seal gets more attractive. In cold weather, wax becomes more brittle, and cracking is more likely. If the mailing window crosses seasons, test for the harsher one.
Do not use dangerous methods to simulate heat. A sunny windowsill, a warm room or a car parked indoors in summer is enough to see the trend. Never use an oven, a hot vehicle left unattended or anything that poses a fire or burn risk to children or pets.
Humidity and moisture
Humid air and rain can affect paper more than wax. Damp envelopes may curl, flaps may loosen and adhesive seals may lift. If you live in a humid region, test an adhesive seal on a flap that has been stored in humid conditions for a day. A seal that adheres to dry paper may not hold on damp paper.
Long routes and international mail
A piece that travels farther passes through more hands and more equipment. International routes add customs handling and different postal systems with their own rules about size, rigidity and embellishments. If any guests live abroad, check the rules of the sending postal service for international mail and ask your post office what the destination country accepts. A seal that suits a domestic route may not suit an international one. For those guests, a flat closure or a hand-carried invitation is often the simplest solution.
Very large or very small batches
A batch of thirty is easy to protect and inspect piece by piece. A batch of three hundred is not. For large batches, consistency becomes the main risk: some wax seals will be thicker, some thinner, and you will not examine them all. Sample at intervals, say every tenth piece, and run the flex and stack passes on those. If a sampled piece fails, inspect its neighbors.
For very small batches, you can afford extras. A stationer who handles the whole batch may be able to apply wax seals on delivery day or hand-assemble each piece. That makes the hand-delivery lane more practical.
Envelopes that are already unusual
If your envelope is square, oversized, dark, metallic, textured or lined with a heavy liner, the base envelope has its own handling profile. A seal on top of it adds to the profile and does not reset it. Check the envelope’s rules first, then the seal. A seal on a perfectly standard envelope is simpler than a seal on a hard-to-handle one. If you are still choosing envelopes, resolve those questions before testing seals.
Guests with limited dexterity or sensory needs
A seal that is hard to break can be a barrier. Older guests, guests with arthritis or limited hand strength, and guests who use assistive tools may struggle with a firmly bonded seal. A sticker or a flap that opens with a gentle pull is more accessible. If you want to keep a traditional seal, consider an easy-open version for certain guests, with a small tab or a seal that is only lightly attached to the flap. Ask yourself whether the moment of opening will be a pleasure or a chore for the person holding it.
Returned or undeliverable mail
If an invitation is undeliverable, it may come back with marks, with its seal damaged and the address printed over the front. Keep a few spares to re-seal and re-send, and keep your address log up to date, so you know which guests need a replacement and a correction. A returned piece is a signal that the address needs checking before the seal is a topic.
Damage after delivery
Not all damage happens in the mail. Guests may put the invitation in a bag, a drawer or a stack of other mail, and the seal may crack there. You cannot prevent that, and you do not need to. If a guest mentions a cracked seal, a warm reply and a small replacement from your reserve is plenty. A cracked seal is not an insult, and most guests will see it as part of the charm.
Environmental and waste considerations
Wax and resin seals are small, but a batch of several hundred adds up, and some materials are not easily recycled. If waste matters to you, ask about the materials, choose seals made from simpler components, and avoid shed-prone glitter. A broader plan for reducing waste across the whole wedding is covered in the wedding waste reduction planning guide, and the same questions about what actually ends up in the trash apply to stationery.
Insurance, claims and the limits of the system
Standard mail does not guarantee condition on arrival, and a postal service is not likely to compensate for a cracked decorative seal on a letter. Do not plan on claims. Plan on prevention and on spare stock. If a particular piece is irreplaceable, such as a handmade invitation for a grandparent, hand-deliver it. The cost of an extra trip is lower than the cost of a damaged keepsake.
Budget and timeline for wax seals
Cost logic for wax seals is mostly about two things: how many pieces you have to make and how many you have to remake. Unit price matters, but the price of a failure matters more, because a failure that is found late can multiply the cost.
Write the budget as a short formula. Total seal cost equals the number of mailed pieces plus spares, times the cost per seal, plus the cost of samples and testing, plus the cost of any backing or protective supplies, plus the cost of any change in postage. Each term is something you can quote or measure. Do not use a rule of thumb from someone else’s wedding for the spare quantity. Set it by the failure pattern in your own test.
Sizing the spare stock from your test
Your six-envelope test will not produce a reliable failure rate, but it will give a rough signal. If none of your test pieces lost a seal or cracked beyond hairline, a small reserve, enough to replace a handful of surprises, is reasonable. If one in six had trouble, you have a design problem, and a bigger reserve is a bandage, not a plan. Fix the design, then size the reserve for the remaining unknowns.
A practical reserve covers three needs: wax seals you ruin during assembly, seals that fail in the mail, and wax seals for late additions to the guest list. Late additions are almost certain. Count them separately from damage, and keep those spares sealed away in a labeled box.
The price of testing wax seals
The test is cheap. Six envelopes, six seals, a few stamps and some postage for live mail. Compared with the cost of the full batch, it is a small fraction. Think of it as insurance that you control. If you pay a stationer for sample wax seals, treat that cost as part of the order and ask whether it is credited if you proceed.
The broader budget for stationery sits inside your overall plan. If you are tracking the whole picture, the wedding budget guide shows how to place line items like this one, and why small embellishment costs can add up across a full guest list.
Postage and the cost of being wrong
Postage is the cost that can change the most after a decision. A piece that crosses a weight step or a handling category costs more per piece, and that cost applies to every piece in the batch. Settle the postage with a finished, weighed sample at the counter, and check the current rates with the Postal Service, because prices change. Do not buy all your stamps until you have the answer. Buying a few for the live test is enough.
If the counter says your design would cost more to mail, you have a clean choice. Pay the difference, change the design, or deliver some pieces by hand. Each is reasonable. The mistake is to discover the answer after buying the stamps and printing the invitations.
Working backward on the calendar
Place the test early. A workable order, counting back from your mailing date, is: mailing day, then final assembly, then the delivery of the full seal order, then the order itself, then the test results, then the live mail test, then the counter visit, then the arrival of samples, then the first request for samples. Notice that the test and its decisions all come before the order. Many couples do it in the reverse order, and the order is the part that is hard to undo.
Give each step real time. Samples can take days or weeks. Live mail takes the normal delivery window plus time for photographs and a second round. Allow an extra week for a re-test if anything changes. If your mailing date is fixed by the guest calendar, for example a destination wedding that needs early notice, run the test even earlier and have the fallback plan ready.
A good sign your wax seals plan is on schedule is that you could still switch to a flat closure on the outer envelope without panic. If switching would now be a crisis, the test is overdue.
Counting your local guests
Hand delivery of wax seals only works if you know who is local. Use your working guest list to mark who can receive an invitation in person within a few weeks, and who will have to receive it by mail. The wedding guest list guide covers how to build and manage that list, and a simple column for “hand-delivery possible” turns it into a delivery plan. Count the total, and compare it with your seal capacity and your protection plan.
Documenting your wax seals test and handing it off
A test that lives only in your head disappears when you are busy or when a helper takes over. Documentation does not need to be long. One page can hold it all.
The page should state: the date and the room conditions at the time of the test; the seal types tested, with supplier names and sizes; the envelope and the contents used; the pass marks you set in advance; the result of each pass for each envelope; the photos, with file names; the postal counter answers, with date and location; the live mail results; the decision, with the reason; and the protection plan, with the maximum seal height, the placement, the backing and the outer plan.
Add one line at the bottom for open questions, such as a pending written answer from the post office. An open question is not a failure. It is a reminder.
Handing the plan to a helper
If friends or family will assemble the invitations, give them the page and one finished example. Show them the placement, the order of the contents and the height of the seal. Ask them to check every tenth piece against the example. Then ask them to set aside any piece that looks different and to tell you instead of fixing it themselves.
Keep a short list of what to do when something unexpected happens: a seal falls off during assembly, a batch of envelopes arrives in a different shade, a seal sticks to a neighbor. Having the answer written down keeps the work calm and the batch consistent.
After the invitations are out
Keep your photographs and notes. If a guest reports damage, you can compare it to your test. If you plan to mail thank-you notes with the same wax seals, you have the groundwork done. If you used your own wax seals and anything went wrong, you now know what to change next time, which may be useful to a friend planning a wedding of their own. If you want the broader production background, the print production and proofing guide is a good companion to this page.
Your next steps
Work through these in order. Each takes an evening or less.
- Decide which lane each group of guests belongs to: mailed with wax seals, mailed with a flat closure, or hand-delivered.
- Request three samples of your top seal type on your actual envelope paper, and one adhesive or flat control.
- Write your pass marks before the samples arrive: seal height, crack count, loss, transfer and weight.
- Build six finished test envelopes with real contents and let the wax seals cure for at least a day.
- Run the bench, flex and stack passes and record each result with photos.
- Take assembled samples to your local post office and ask the questions in this guide. Write down the answers.
- Mail two or three test pieces to people who can photograph them unopened.
- Change one variable at a time, re-test, and then place the full seal order.
- Write a one-page protection plan, set aside spares and hand it to anyone helping with assembly.
If you want to check wording and envelope conventions before you finalize, the guide to invitation etiquette covers the formal choices that affect where a seal can go.
FAQ
Can you mail wax seals on wedding invitations?
Yes, many couples do, and many arrive fine. The risk is cracking, loss, crushing and transfer, which depend on the seal type, height and placement. Run a small test with finished envelopes, confirm postage and handling with your post office using an assembled sample, and plan spare wax seals. If your tests fail, move the wax seals to an inner piece or hand-deliver those invitations.
Do wax seals cost extra postage?
It depends on the finished piece, not on the seal alone. Size, weight, thickness, rigidity and shape all matter, and rules and prices change. Take a fully assembled, weighed sample to a retail counter and ask for the price and any handling concern. Do not buy all your stamps until you have that answer, and check the Postal Service’s current standards.
Which wax seals survive mailing best?
Lower, smaller and more flexible wax seals generally handle bending and stacking better than tall, hard domes, and thin adhesive imitations are flatter still. Products differ, so treat that as a reason to choose samples, not a promise. Test the exact seal on your envelope paper, and score it for cracking, loss, crushing and transfer before you order.
Where should the wax seal go on the envelope?
For mailed pieces, many designers prefer the back flap or an inner piece, because the front carries the address, barcode areas and postage. Keep wax seals clear of those zones, and leave paper margin around the seal. Ask your post office about your specific layout, and consider one unusual element per envelope, not several stacked together.
How many test envelopes do I need?
Six is a practical start: two with your first-choice seal, two with a second candidate and two as a flat control. It will not give a failure rate, but it will reveal common problems cheaply. Mail two or three through the real system. If any piece fails live mail, change the design and test again.
What is the cheapest way to protect wax seals?
Change the seal before adding anything else: make it smaller, lower or more flexible, or use an adhesive imitation. After that, a small backing behind the flap point and a flat, snug suite inside help. Hand delivery for the most fragile pieces costs only your time. Always re-test after a change, because backing can create new bumps.
Is it safe to melt sealing wax at home?
It can be, with care. Hot wax can burn skin, and flames near paper are a fire risk. Follow candle and open-flame safety guidance from the Consumer Product Safety Commission and the National Fire Protection Association, work on a heat-safe surface, never leave a flame unattended and keep children and pets away. A glue-gun style tool also gets hot, so use its stand.
What should I do if a guest’s wax seal arrives cracked?
Stay relaxed. A cracked seal is common and usually cosmetic. If the flap came open or a piece is missing, offer a small replacement seal or a fresh envelope from your reserve. Do not argue with the mail system. Note what happened, add it to your test record, and adjust the plan for any remaining mailings.
Sources
Confirm current rules, prices and policies with each issuing organization before you rely on them.
- United States Postal Service
- USPS Postal Explorer, Domestic Mail Manual and standards
- USPS Frequently Asked Questions
- USPS About: mailing and shipping information
- USPS Office of Inspector General
- Federal Trade Commission, consumer protection and mail order rules
- U.S. Consumer Product Safety Commission, candle and fire safety
- National Fire Protection Association, open flame and candle safety
- National Institute of Standards and Technology, measurement guidance