
A double breasted suit changes how a groom stands, sits, kneels and hugs, and it asks for more care at the fitting than a single-breasted jacket does. This guide covers buttoning, movement through the ceremony, lapels and tailoring points, so you can judge one on your own body before you buy, rent or alter it.
Test a double breasted suit in five postures: standing, walking, sitting, kneeling and arms raised for a hug. In each posture check four points: the closure at the chest, the lapels, the shoulders and sleeves, and the hem over the hips. Fasten the working button when you stand, open it before you sit, and keep the inner anchor button fastened so the overlap stays flat. Photograph every posture from the front and side, then take the photographs to the tailor.
A double breasted suit looks decisive. Two rows of buttons, a wide overlap across the chest and a lapel that points up toward the shoulder give a groom a strong, formal outline. In photographs of a couple at the altar, that outline reads as deliberate. It also looks good on a wide range of builds when it is cut well, because the overlap can balance a narrow chest or give a straight torso more shape.
The trouble is that the same overlap is also a second layer of cloth across the front of the body. A single-breasted jacket has a small closure and a lot of give. A double breasted suit has a deep closure, a lot of structure and very little give, and everything the groom does on the day pulls on that closure.
He will stand at the front for a ceremony, walk back down an aisle, sit for a signing or a dinner, hug thirty people and probably lift someone. If the jacket only looks right on a hanger or in a mirror while he stands still, the photographs of the rest of the day will show it.
This guide is deliberately narrow. It is about the double breasted suit as a ceremony garment: which buttons to fasten and when, what happens to the cloth in each posture, how to read a lapel, which fit problems can be fixed and which cannot, and how to compare buying, renting and made-to-measure before you commit. It does not repeat the case for linen as a warm-weather cloth or for velvet as a winter one, because those are separate decisions with their own tradeoffs.
A note on scope. This is general information, not legal, tax or financial advice, and it cannot replace the written terms of your seller or the judgment of a tailor who can see the garment on you. Where a policy or a rule matters, the text points you to the written terms or to the agency that issues the rule.
For the broader question of how formal the day should be, the dress code sections of the wedding etiquette guide set the frame. The fitting process that every formal garment goes through is covered in the wedding dress fit and alterations guide, and much of its advice on lead times and final fittings applies to a suit as well.
What makes a double breasted suit different at a ceremony
Most men have worn a single-breasted jacket for years. They know how it behaves when they sit down, and they do not think about it. A double breasted suit breaks those habits in three ways, and it helps to name them before you test anything.
The closure is part of the structure. On a single-breasted jacket the front edges meet or overlap by a small amount, and the button is a small point of tension. On a double breasted suit the right front crosses well over the left and is held by at least one working button on the outside and an inner button, often hidden, that anchors the underlap. The closed jacket is a wrapped garment. That makes it warm, stable and smooth when it fits, and stiff and strained when it does not.
The lapels are larger and more visible. Peak lapels are the usual choice on a double breasted suit, and they run from the gorge, where collar meets lapel, out toward the shoulder point. When the jacket is closed, the lapels frame the face and chest. When the jacket moves, the lapel edge can lift, roll or gape. Because the lapel is such a prominent line in a photograph, small problems show.
The cut leaves less room for error. A well-cut double breasted jacket usually sits a little shorter and closer through the waist than a single-breasted one, because the overlap adds visual length across the chest. A jacket that is too long, too wide or too loose looks like a coat. One that is too tight pulls across the closure and cannot be fixed by letting out a seam, because there is rarely enough cloth in the overlap to release.
What the ceremony asks of the jacket
Think about the groom’s day as a series of postures, not as an outfit. He stands and waits, often longer than expected. He walks, sometimes in a procession that sets the pace. He turns to face his partner, which twists the torso. He may sit during a reading, a song or a signing. He may kneel in a ceremony that includes a blessing. He hugs relatives afterward. At the reception he sits for dinner, stands for toasts, dances and eventually takes the double breasted suit off.
Each posture loads the double breasted suit differently. Standing tests the closure and the hang. Walking tests the sleeves and the hem. Sitting tests the overlap, the waist and the lapel. Kneeling tests the back length and the shoulders. A hug tests the armholes and the collar. The rest of this guide goes through those loads in turn, and it gives a way of checking each one with a phone camera and a tape measure before the garment is final.
Who this guide is for
It is written for a groom, or any partner in a suit, who is considering a double breasted suit for the ceremony or for the whole day. It also helps a groomsman who has been asked to wear one, a parent buying a suit for the occasion, and a couple whose tailor has suggested the style and who want to understand the tradeoffs.
If you have already chosen a different cut, the posture checks still work on any jacket, and you can skip the sections that are specific to the double breasted style.
The five-posture audit for a double breasted suit
The method in this guide is a five-posture audit. It is simple enough to do in a fitting room or a living room, and it produces something concrete: a short set of photographs and notes that you can show a tailor or a seller. The idea is to replace “it feels fine” with a record of what the cloth does in each position.
The five postures are standing, walking, sitting, kneeling and arms raised. For each, you look at four checkpoints. The first is the closure: the buttons, the overlap and the cloth around them. The second is the lapel: its edge, its roll and its relationship to the chest. The third is the shoulder and sleeve: where the shoulder seam sits, how far the sleeve rides up and how much shirt cuff shows.
The fourth is the hem and hips: how the skirt of the double breasted suit hangs and whether it kicks out, rides up or hides the trouser seat.
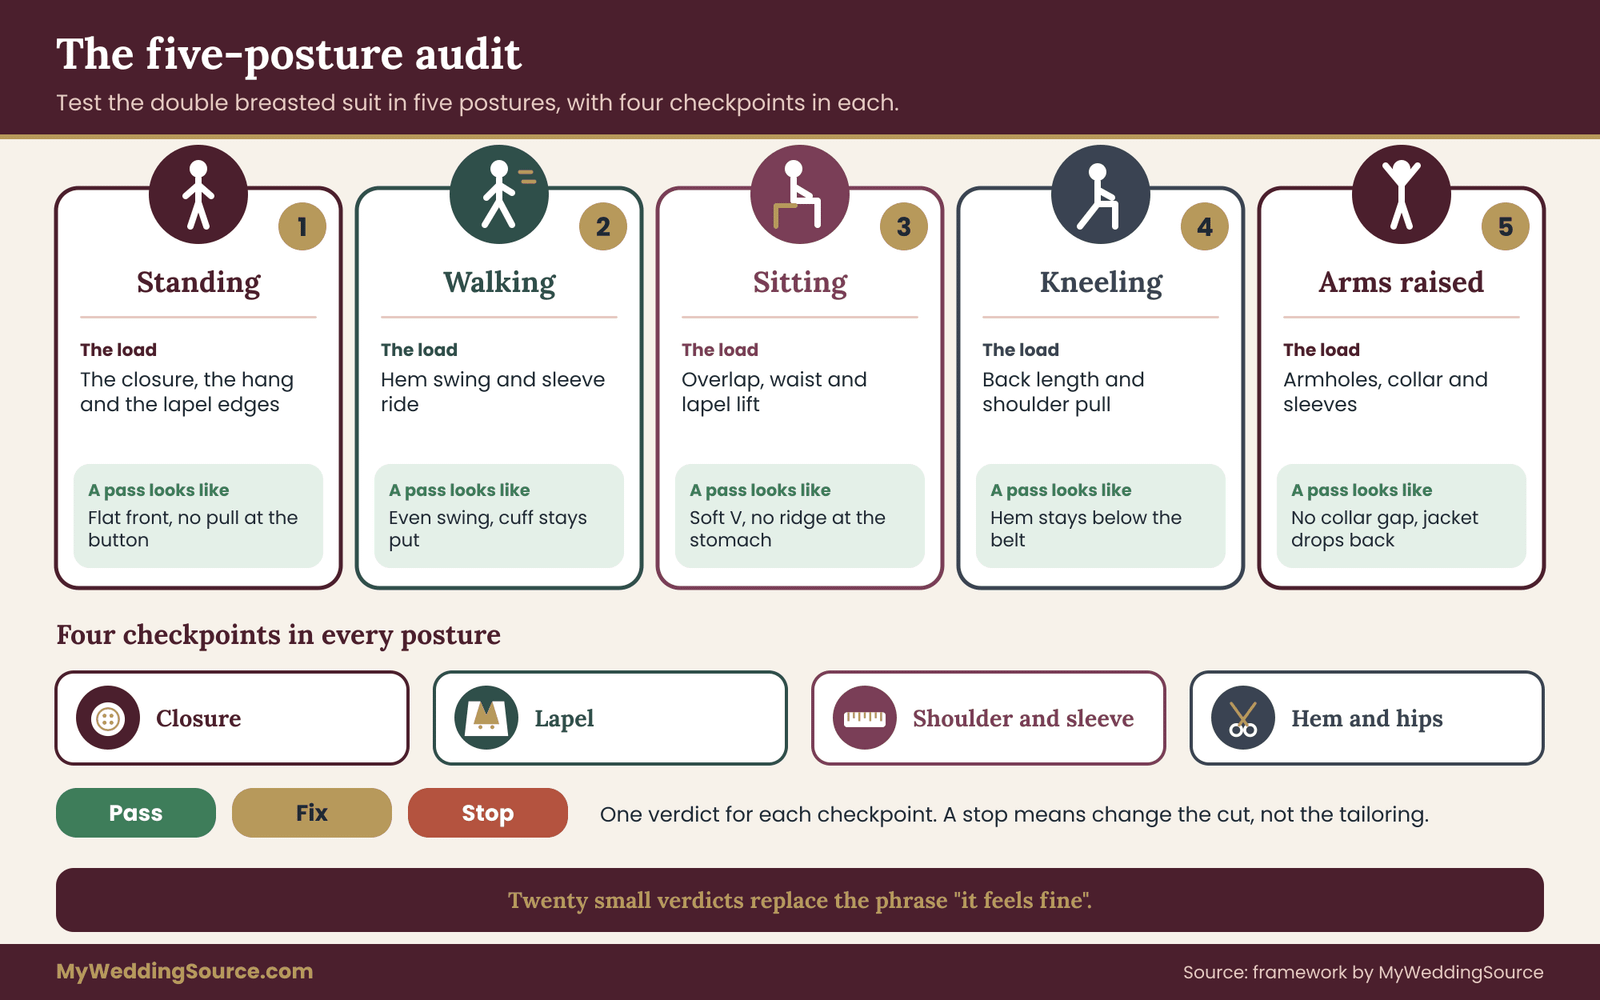
That gives twenty small observations. You will not write all twenty as essays. For each one you give a simple verdict: pass, fix or stop. A pass means the cloth behaves well in that posture. A fix means there is a problem that a tailor can usually address, such as a sleeve that rides up or a hem that needs a small change.
A stop means the problem is structural, such as a closure that pulls hard when you sit, and it is better to try a different size or cut than to alter this one.
Setting up the audit
You need a phone, a way to prop it at chest height, a full-length mirror if you have one, a tape measure, a notebook and a helper if possible. Wear the shirt, the belt or braces, and the shoes you plan to wear on the day, because they change the way the trousers and jacket sit. If the double breasted suit is a sample or a rental, put on the same size and cut you intend to order. Take photographs from the front and from the side for each posture.
Do the audit in decent light and in front of a plain wall. Wrinkles and pull lines are easier to read when the background is calm. If you are working with a tailor or a rental shop, tell them in advance that you want to take photographs, since some shops have a policy about it. Most will agree if you explain that the photographs are for fit notes.
How to score without fooling yourself
The risk with any self-audit is that you see what you want to see. Two habits help. First, take the photograph before you look at it, so that you do not adjust your posture to the camera. Second, score the pictures a day later, ideally with someone else, and score each checkpoint on its own. A jacket that looks sharp in the mirror and creases badly in the side photograph of the seated posture is still a creased jacket in the seated photograph.
Keep the scoring plain. Write the posture, the checkpoint, the verdict and one sentence about what you saw. “Seated, closure, stop: the working button pulls into an X and the lapel lifts off the chest.” That is enough for a tailor to understand and for you to remember. The next sections explain what to look for in each posture, starting with the buttons themselves.
Buttoning a double breasted suit: the parts and the rules
Buttoning is where most people feel unsure, and the confusion has a simple cause. A double breasted suit has more buttons than it needs, and only some of them do any work. Before you learn any rule, find out which buttons on your jacket are functional and which are decoration.
Stand in front of a mirror and look at the front. The outer row on each side carries buttons. On most styles the right front, the side that crosses over, has working buttonholes, and the left front carries matching buttons that only complete the pattern. Inside the double breasted suit, on the left front, there is usually a small inner button, sometimes called the anchor or jigger button, and a matching loop or buttonhole on the underlap of the right front.
That inner fastening holds the overlap in place so it does not hang loose.
Reading the button notation
Double breasted suits are described by two numbers: the count of buttons on the front and the number that fasten. A “six by two” has six buttons and two of them fasten, a “four by one” has four and one fastens, and “six by one” and “four by two” also exist.
Makers differ on which buttons are working in each pattern, and the placement changes the shape of the jacket. A single fastening button set high gives a long, open front with a deep lapel line. Two fastening buttons set lower give a closer, more traditional line.
Do not rely on a rule you read online about “which button to leave open.” Look at your own jacket and ask the tailor or seller to mark the working buttons with a small piece of tape. Then run the buttoning checks below. The specifics differ from one cut to another, so what follows is the general convention and the reasons behind it.
The general convention
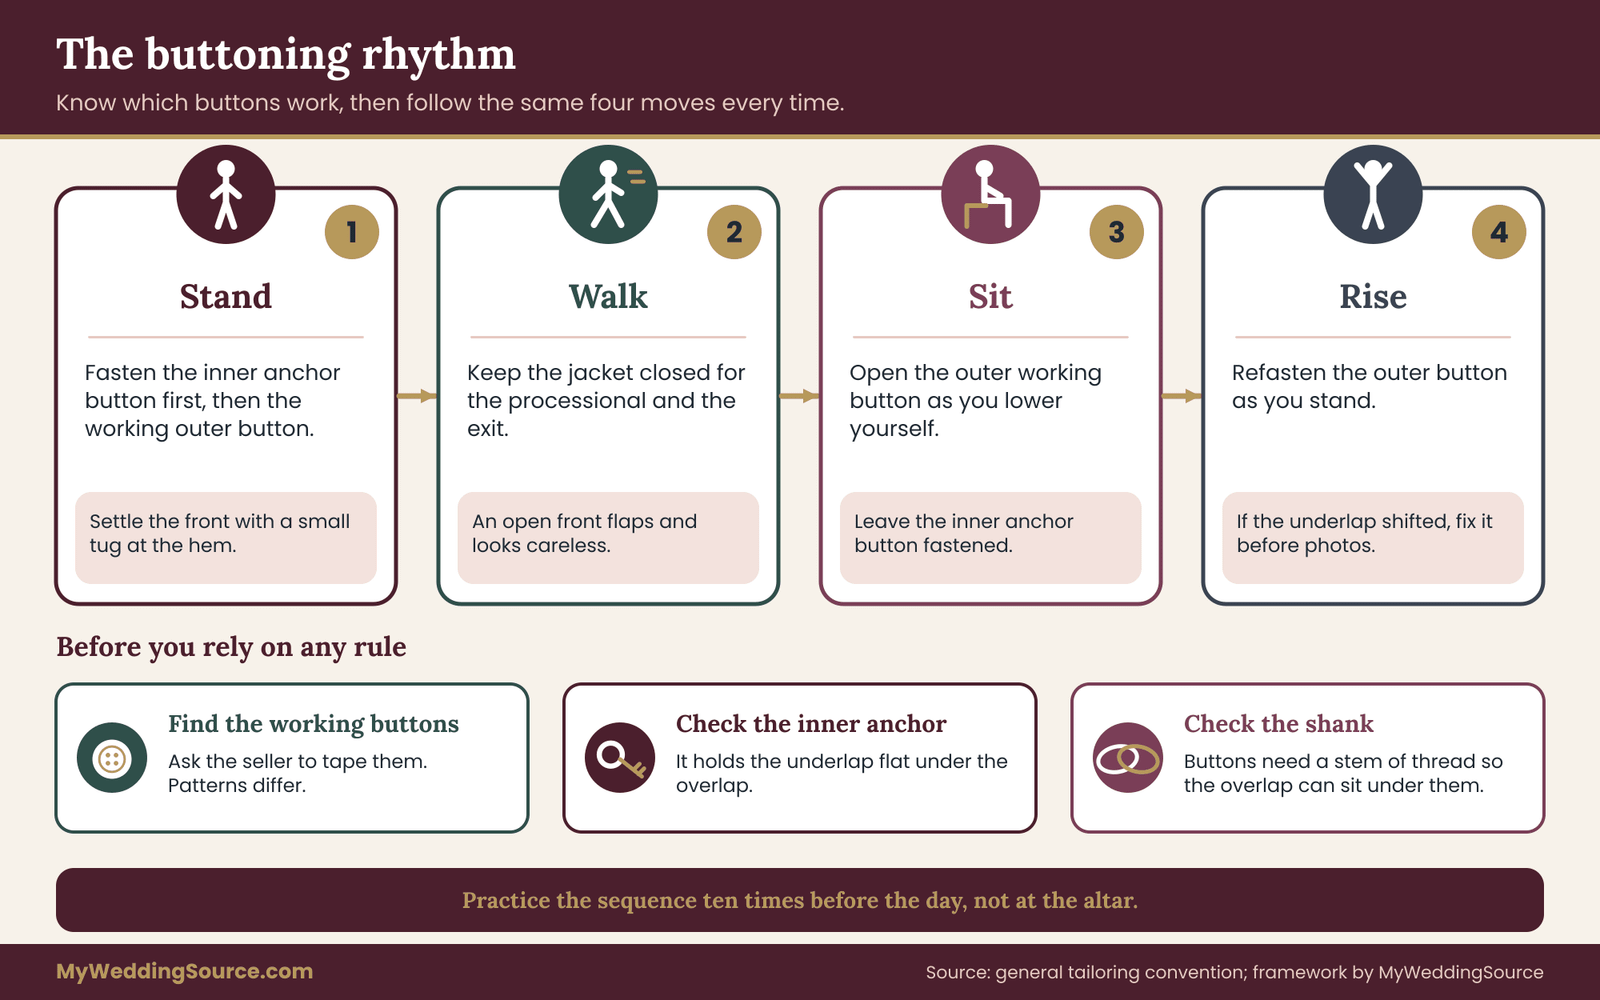
When standing, fasten the working button or buttons and the inner anchor button. A double breasted jacket is designed to be worn closed, and an open one hangs wide like a coat left unzipped. On a pattern with two fastening buttons, some wearers leave the lower one open to sit more comfortably across the hips, but many makers intend both to be fastened. Follow the cut and the tailor’s advice for your jacket.
When sitting, open the outer working button or buttons. Sitting with the double breasted suit fastened pulls the overlap against the stomach and ribs, creates an X-shaped crease around the button and lifts the lapel off the chest. Leave the inner anchor button fastened, because it keeps the underlap in place so that when you stand and refasten, the front lies flat. Most men find this easy to remember as a three-step rhythm: unfasten to sit, keep the inner button fastened, refasten when you rise.
When walking, keep the jacket closed. A double breasted suit left open flaps with each step and looks careless in a processional photograph. If the weather is hot and you plan to take it off, take it off completely instead of leaving it open.
Why the rule exists
The convention is not an arbitrary piece of etiquette. It follows from how the garment is built. When a man sits, the distance from his shoulder to his lap shortens, his stomach and thighs push forward and the front of the double breasted suit has to ride up and out.
A closed overlap cannot do that without strain. The strain shows up as the crease, as lapel lift and sometimes as a loosened button. Opening the button gives the cloth room to move. Fastening the inner button keeps it from sliding out of place.
If you remember the reason, you can make a good decision when the convention does not quite fit. A groom who is very slim might find the double breasted suit looks fine seated and closed. A groom with a broader stomach might find that opening the button is not enough and that the jacket needs a different cut. The audit in this guide is a way of finding out which describes you.
Practice the sequence
Practice the buttoning sequence before the day, not on it. It sounds trivial, but a groom who has not done it repeatedly fumbles at the altar, especially if his hands are cold or shaking. Stand, fasten the inner button first, then the outer working button, and settle the front with a small downward tug at the hem.
Sit, unfasten the outer button with one hand as you lower yourself, and leave the inner button alone. Rise, and as you stand, refasten the outer button. Run through it ten times, and then do it again with someone watching.
Watch for two habits that undo the effect. The first is fastening the outer button before the inner one, which leaves the underlap loose and creates a bulge under the overlap. The second is standing up with the outer button still fastened from sitting, which strains the thread. Both are easy to avoid once you know about them.
The button check in the audit
In the standing posture, the closure checkpoint has three parts. Fasten the buttons and look at the front. Does the cloth lie flat from the lapel to the hem, with no horizontal pull lines around the working button? Is the overlap even from top to bottom, or does it curl at the bottom? When you place your hand flat against your chest, can you slide it between the double breasted suit and the shirt with a little resistance, or is it tight?
A common tailor’s check is the fist test. With the double breasted suit fastened, make a loose fist and push it between the buttoned front and your stomach. If it fits with slight resistance, the jacket has the room it needs for sitting and breathing. If you cannot get a fist in, the jacket is too tight at the waist. If your whole forearm fits in easily, the jacket is probably too loose and will bag. Treat the fist test as a starting point and confirm with the tailor.
Button quality and spare buttons
Check how the buttons are sewn. On a well-made double breasted suit the working buttons are sewn on with a shank, a short stem of thread that lifts the button off the cloth so the overlap can sit under it. A button sewn tight against the cloth pulls the front into a pucker. Ask whether the buttons are shanked, and ask the tailor to check that the thread is strong. A button that comes off in the middle of a ceremony is a small disaster that is easy to prevent.
Ask for a spare button, or buy one that matches, and keep it with the day’s emergency kit. The wedding day accessories planning guide lists the kind of small backups that make sense to carry, and a needle, matching thread and a spare button belong on that list. If you rent, ask the shop whether replacement buttons are included and what they charge if a button is lost.
Buttoning and the boutonniere
The groom’s boutonniere sits on the left lapel, and on a double breasted suit the lapel is larger and sits at a different angle, so the placement is not the same as on a single-breasted jacket. Most double breasted lapels have a buttonhole on the left side for the flower. Make sure that buttonhole is open, not sewn shut, and that the stem will fit through it.
Fasten the jacket and check that the flower sits comfortably when the cloth is closed, not just when the jacket is open on a hanger. A boutonniere that faces the wrong way or is pushed down by the overlap looks off in photographs.
A note on the vest and tie
A double breasted jacket is normally worn without a vest, because the overlap already covers the waist area, and a vest adds bulk under a closed front. If you want a vest, ask the tailor how it will affect the fit and the buttoning, and try it on during the audit. The tie should sit under the lapel opening without poking out and should be the right length so that the tip falls at the belt line or just above the trouser waistband.
A tie that hangs below the waistband is more noticeable on a double breasted suit, because the closure draws the eye to the center of the body.
Standing, turning and walking in a double breasted suit
Standing is the posture the double breasted suit is designed for, and it is also where the photographers will spend most of their frames. A groom at the front of a ceremony space often stands for ten minutes or more before the processional ends, and then for the length of the vows, readings and ring exchange. The ceremony step-by-step guide lays out how long each part usually takes, and it is worth reading before you decide how much movement the suit needs to allow.
In the standing posture, check four things. First, the front: with the buttons fastened, the cloth should lie flat from the lapel down. A horizontal crease at the working button means the double breasted suit is too tight at the waist. A vertical drape that looks loose and wavy means it is too wide.
Second, the lapel edges: they should lie against the chest without lifting. Third, the shoulder: the seam should end where the arm begins, not hang over it or sit inside it. Fourth, the hem: it should hang straight without kicking forward or sweeping back.
Posture and the cut of the jacket
How a man stands changes how the suit looks. A groom who leans back with his weight on his heels pulls the front hem up and exposes the trouser waistband. One who leans forward lets the front of the double breasted suit hang open and bunches the back. Most people stand slightly differently when nervous, so photograph yourself standing the way you normally do, and again standing the way you intend to stand at the front of the room.
A tailor can adjust the balance of a jacket for a particular posture. If you have a forward-leaning stance, the back may need to be lengthened or the collar lowered. If your shoulders are uneven, one sleeve may need a different pitch. These are standard alterations, and a tailor who sees your standing photographs will understand them quickly. The point of the photographs is to give the tailor evidence of how you actually stand, not how you stand when you remember to be careful.
Turning toward your partner
At the moment of the vows, most couples turn to face each other and hold hands. That turn twists the torso and pulls on the front of the jacket. The overlap, which is stable when you face forward, drags across the chest as the shoulders rotate. Check this in the audit: stand and rotate your upper body about a quarter turn each way, as if facing a partner, and watch the lapel and the closure. Does the lapel lift on the side you are turning toward? Does the closure shift off center?
A small shift is normal. A large lift, where the lapel stands away from the chest, tells you the jacket is cut too tight across the upper back or the chest, or that the armholes are too low. Low armholes are a quiet cause of trouble in a double breasted suit, because lifting the arm drags the whole body of the jacket up with it. Ask the tailor whether the armholes can be raised, and whether the sleeve can be re-pitched, or the jacket should be recut.
Walking and the processional
A double breasted suit stays closed when you walk, so the thing to check is the hem and the sleeves. Walk across the room at a normal pace, then at the slower pace of a processional, with your arms swinging naturally. Have a helper film you from the front and the side. Does the hem swing evenly, or does it kick up behind you? Do the sleeves ride up your forearms, exposing more cuff than before? Does the lapel flutter?
A modest swing is fine. A hem that lifts at the back suggests the double breasted suit is too short for your seat, or that the back is cut too tight. A sleeve that rides up with each step suggests the sleeve is too narrow or the armhole is cut too small.
Walk with a small step forward and a pause, as processionals often go, since that start-and-stop motion shows how the cloth settles. If the ceremony has a cue sheet, the ceremony cue sheet guide explains how timing and pauses are usually planned, and it helps to know where your own pauses fall.
Wind and outdoor ceremonies
An outdoor ceremony adds wind, and a double breasted suit handles it differently from a single-breasted one. The overlap is a large area of cloth, and a strong gust can catch it like a sail. If the jacket is closed and fits well, it stays put. If it is loose, the lapel and the lower front flap. Test the suit outdoors if you can, even for a few minutes, and note whether the front stays flat. If it does not, ask the tailor whether the waist needs a small adjustment.
Wind also affects the boutonniere and the tie. A tie flung over the shoulder in a breeze is a photographer’s frustration, and a tie clip or a small hidden tack helps. Mention these to the tailor or to the person who handles your accessories, and put them on the day’s list so they are not forgotten.
Sitting in a double breasted suit
Sitting is where a double breasted suit is most likely to fail, and where the audit reveals the most. A groom may sit during a ceremony reading, at a signing table, in a car, at the cocktail hour and for the whole of dinner. If the jacket only works standing, it will be in a bunched, creased state in a large share of the day’s photographs.
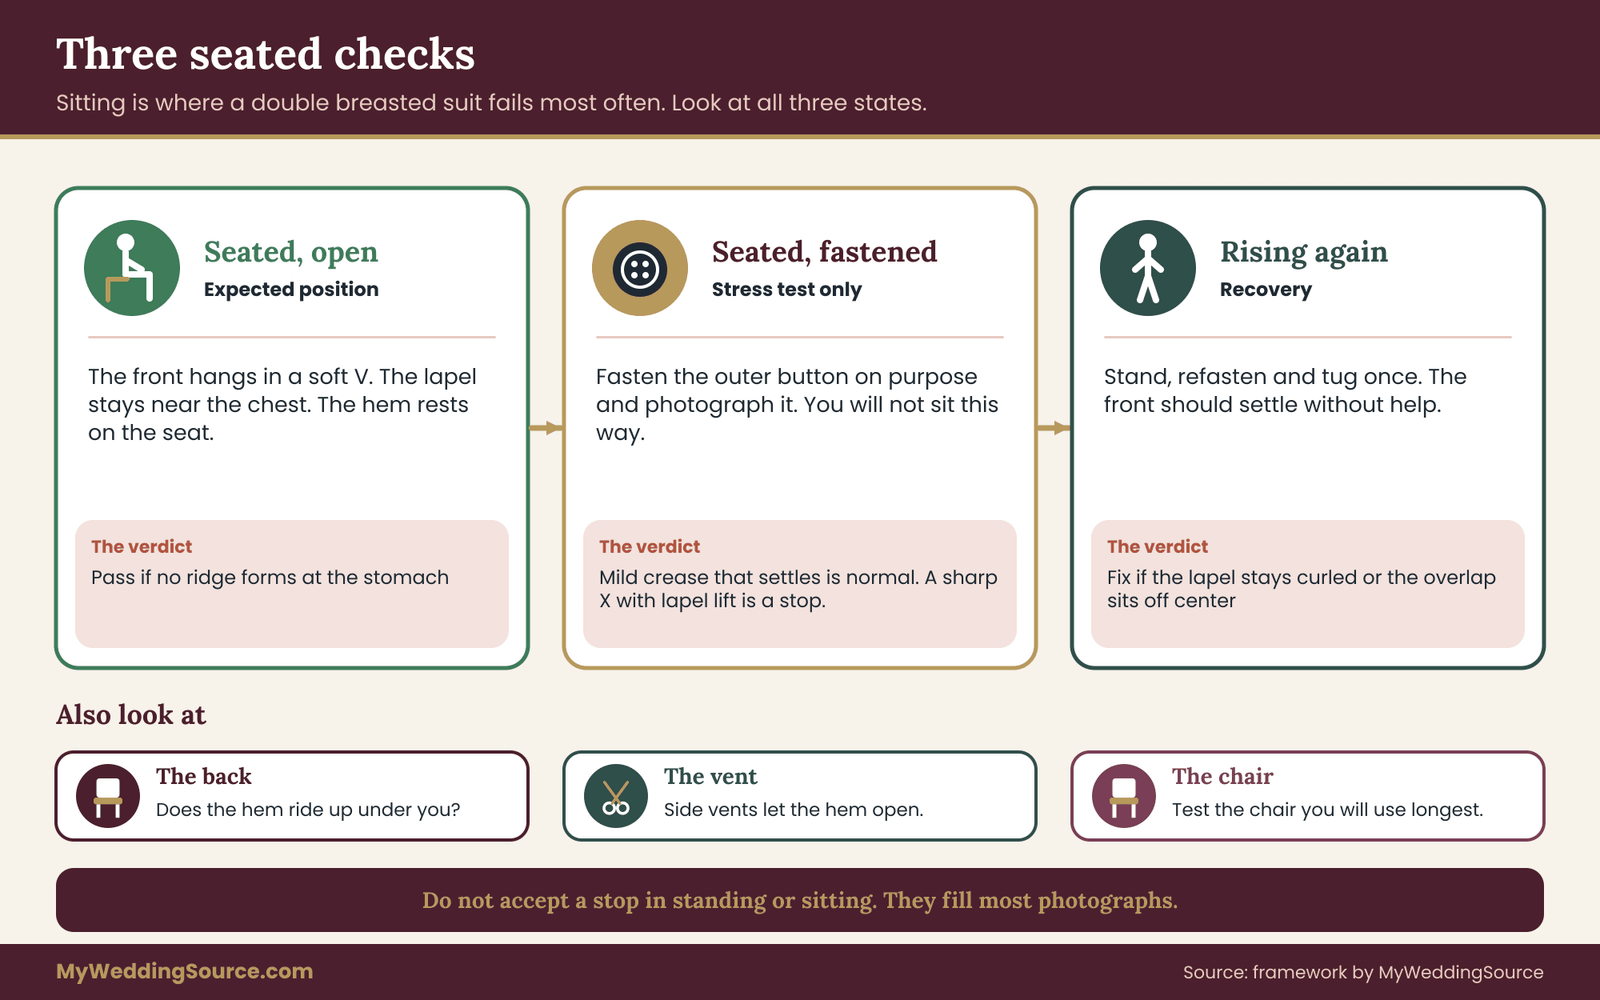
The sequence is the one from the buttoning section. Open the outer working button or buttons, leave the inner anchor button fastened, sit down, and let the front of the double breasted suit fall naturally across your lap. Then run four checks. Does the lapel stay on the chest or lift away?
Does the overlap bunch at the stomach, forming a ridge or a fold? Does the jacket hem rest on the seat of the chair or ride up behind you? Do the shoulders stay where they are, or does the jacket shift forward?
The seated closure check
Seated and unbuttoned, the front of a double breasted jacket should hang open in a soft V. The right front should drape across the left without gaping at the chest, and the inner anchor button should hold the underlap in place. If the front falls open far enough that the shirt and tie show widely, the overlap may be too narrow for your frame, or the inner button may be set too far from the edge.
If the front gapes at the stomach, the double breasted suit may be cut too slim through the waist.
Now fasten the outer button while seated, on purpose, and photograph it. This is the stress test. You are not planning to sit this way, but you will see how the cloth responds. A jacket that forms a mild crease and settles when you release the button is within normal range. One that forms a sharp X, lifts the lapel and pulls the sleeves back is telling you the garment is tight in the torso. If it is also uncomfortable to breathe in, mark it as a stop.
The seat and the back
The back of the double breasted suit matters when you sit, and it is often overlooked. Sit on a hard chair with your back against the backrest and look at the side photograph. Does the jacket ride up under you, bunching at the lower back? A short jacket pulls up and exposes the trouser seat, while a long one folds under you.
Because double breasted jackets often run a little shorter, check that there is enough length to cover the seat when you stand but not so much that it bunches when you sit.
Check the vent, the slit at the back of the jacket. Double breasted suits are often made with side vents, two slits, one on each side, which allow the hem to open when you sit or put your hands in your pockets. A jacket with no vent holds its shape on a standing figure but tends to pull across the hips when seated.
Ask the seller which vent style the suit has, and look at how it behaves in the seated photograph. If it is ventless and pulls, a tailor can sometimes add side vents, but this is a larger alteration and depends on the cloth and the lining.
Sitting on stage, in a car and at the table
Different seats put different loads on the jacket. A low sofa or a car seat pushes the knees higher and tucks the hips under, which gathers the front. A hard chair at a signing table keeps the back upright. A banquet chair with arms limits how far the double breasted suit can spread.
Try at least two of these in the audit if you can, and certainly the one you expect to use longest. For most grooms that is the reception dinner chair, so find a chair of similar height and sit through a full imagined course in it.
Standing up again
Rising is part of the audit. A well-fitted jacket should settle back into place after you stand and refasten, with little more than a quick tug at the front. If the lapel stays curled, or the overlap has shifted off center, or the hem has caught on the chair, mark it in your notes.
Some of this is habit: sliding forward in the chair and standing with the legs, not pushing up on the jacket. But a jacket that will not recover is a jacket that has been cut with too little room.
Kneeling, hugging and raising your arms in a double breasted suit
Two postures are easy to forget in a fitting room because they happen rarely: kneeling and raising the arms. A ceremony may include a kneeling blessing, a kneeler at an altar, a moment on one knee to help a child or a flower girl, or a ritual that asks the couple to bow. And almost every wedding includes a long run of hugs, a few of them with people who are much taller or shorter, and often a moment of lifting, dancing or celebrating with the arms up.
Kneeling
Kneeling is a test of the back length and the shoulders. When you drop to one knee or both, your torso folds slightly at the hips, the seat of the trousers tightens and the double breasted suit rides up at the back. A short jacket lifts above the waistband and shows the shirt and belt. A jacket with a high waist button pulls across the chest as the shoulders round forward.
Try it in the audit. Kneel on both knees on a soft surface, as at a kneeler, and photograph yourself from the side and the back. Then kneel on one knee, as in a proposal pose, and photograph that too. Check three things. Does the back of the double breasted suit stay below the belt line? Does the closure pull into a crease? Do the sleeves slide up the forearms? If the ceremony includes kneeling, tell the tailor, since small changes to the back length or the waist suppression can help.
For couples who are planning a religious ceremony with kneeling, it helps to ask the officiant what the movement will be. The officiant requirements guide is a starting point for the questions to ask. Ask how long the kneeling lasts, whether there is a kneeler or the floor, and whether the double breasted suit may stay on. Some ceremonies expect certain garments or a covered head or shoulders, and you want to know before the fitting, not after.
The fastened or unfastened question when kneeling
Most men kneel with the double breasted suit open, because the closed front restricts the bend. If you kneel for more than a moment, open the outer button first, and leave the inner button fastened. When you rise, refasten. This is the same rhythm as sitting, and it is worth practicing as a single smooth movement, since a groom who fumbles with a button at the altar rail looks harried.
If the double breasted suit cannot be unbuttoned conveniently, for instance because the buttonhole is tight or the button is stiff, tell the tailor. A new buttonhole or a looser thread on the button can make a difference. A button that is hard to open under stress is a pitfall, because a groom will tug at it and strain the front.
Hugging and lifting
Hugs put the arms forward and up, and they pull the back of the jacket across the shoulder blades. A double breasted suit, with its structured front and set sleeves, can feel confining. Test this by crossing your arms in front of you as if hugging someone, and by reaching both arms forward at shoulder height. The back should have enough room that the jacket does not pull tight between the shoulders, and the sleeves should not lift far above the wrist.
Then raise your arms overhead, as in a celebration or a cheer. This is where the collar and the armholes show their faults. The collar should stay against the neck and not leave a gap. The jacket should rise slightly but come back down when you lower your arms, and the hem should not lift above the belt.
If you lift a child or a partner, or are lifted yourself, the double breasted suit will be tested more severely, so decide in advance whether you want to take it off for these moments.
Arms raised and the sleeve
The sleeve is the key to the raised-arm test. A sleeve cut too narrow in the upper arm and set too high in the armhole lifts the whole jacket when you raise your arm. A sleeve with enough room and a low-enough pitch lets the arm move without taking the body of the double breasted suit with it. In photographs of a wedding party, you can often see the difference: the groom whose jacket rides up on every hug is wearing sleeves that are too tight.
Check the shirt cuff too. When you raise your arms, the double breasted suit sleeve should not slide far up the forearm and expose a lot of cuff. A quarter to half an inch of cuff showing when you stand is a common tailor’s target, and it will increase a little when you reach.
If the cuff disappears when you stand and appears fully when you reach, the sleeve is probably a good length. If it shows more than that when you stand, the sleeve is probably too short, and a tailor can sometimes let it down if there is hem allowance inside.
Dancing
At the reception, the groom may dance, spin a partner and move in ways he does not at the ceremony. Test a couple of simple movements in the audit: a side-to-side sway, a spin and a dip. Do not expect the suit to be as flexible as a knit jacket. But it should not bind. If you plan on a lot of dancing, consider taking the double breasted suit off after the first dance, and ask the tailor to check that the shirt and trousers are comfortable on their own.
Lapels, peaks and boutonnieres on a double breasted suit
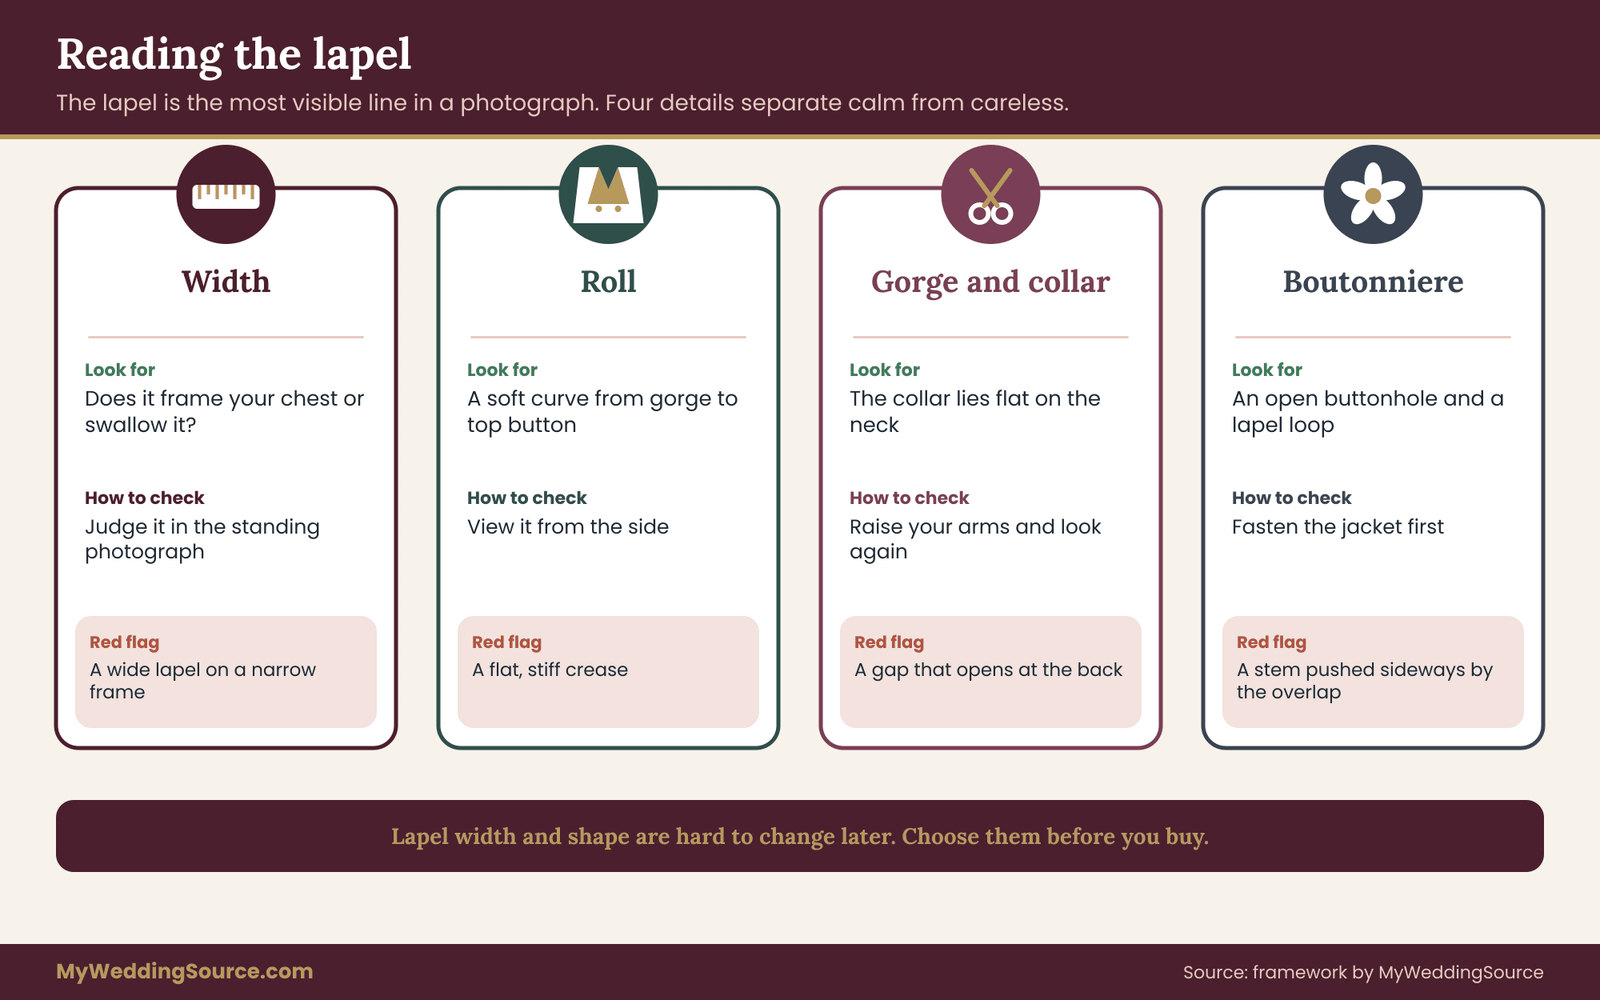
The lapel is the most visible feature of a double breasted suit in a photograph, and a few small details separate a lapel that looks deliberate from one that looks like an accident. The double breasted style is almost always cut with peak lapels, whose points sweep upward and outward, though shawl lapels and notch lapels exist on some versions.
Width and the chest
Lapel width should relate to the width of your chest and shoulders. A wide lapel on a narrow man swallows him, and a narrow lapel on a broad man looks pinched. There is no single correct width, and trends change, but a lapel that reaches roughly to the middle of the distance between the neck and the shoulder point is a starting guide.
Look at the photographs from the standing posture and ask whether the lapels frame you or overwhelm you. A tailor can show you swatches or sample jackets and talk about proportion, but changing the lapel width on an existing jacket is a major alteration, and is rarely worth doing, so choose the cut before you buy.
The roll
A good lapel has a roll, a soft curve from the gorge down to the top working button, instead of a hard flat crease. The roll is created by the canvas inside the double breasted suit and the pressing, and it is one of the things that distinguishes a well-made jacket from a cheap one. On a double breasted jacket, the roll is closer to the chest and tends to be longer. Look at the lapel from the side: does it curve gently outward, or does it lie flat and stiff?
When the double breasted suit is unbuttoned for sitting, the roll relaxes and the lapel may fall away from the chest slightly. That is normal. What is not normal is a lapel that stays curled and refuses to lie flat when you rise and refasten. That points to a canvas or pressing problem, and it is worth a conversation with the seller.
The gorge and the collar
The gorge is the seam where the lapel meets the collar, and its height affects how the double breasted suit frames the face. A high gorge makes a longer, more vertical lapel line, a low gorge a wider, flatter one. Check that the collar lies flat against the back of your neck and that there is no gap between the jacket collar and your shirt collar.
A gap means the jacket is sliding backward, which happens when the shoulders are too wide or the front is too long. In the raised-arm test, the collar gap tends to open wider.
The boutonniere and the lapel pin
The groom’s boutonniere traditionally goes on the left lapel, with the stem through the buttonhole and a pin behind it to hold it. On the double breasted suit, the buttonhole sits in the upper part of the lapel where it is large enough to hold a flower comfortably. Check the position with the jacket fastened, since the overlap can push the flower sideways.
Ask the florist to make the stem a little longer than you think, so it can be adjusted, and ask the tailor to check the lapel loop on the back of the lapel, a small thread loop that holds the stem.
If the wedding party wears matching boutonnieres, the groom’s is often a little different in size or color. The wedding color palette guide is useful for choosing the flower and trim colors to go with the suit. A pocket square should be folded so that it does not compete with the boutonniere, as two items on the left side of the chest make it busy.
Pins, badges and heirlooms
Some grooms wear a family pin, a military badge or a memorial ribbon on the lapel. A pin through the lapel of a double breasted suit leaves a hole, which matters on a rental and is permanent on a purchase. If you want to wear one, ask the tailor where it should sit and whether it will pull the cloth.
Heavy pins can drag the lapel down, so a lighter option or a small magnetic backing can help. If the suit is rented, ask the shop whether pins are allowed and what happens if the cloth is marked.
Fit pitfalls and tailoring points for a double breasted suit
The five postures show how the cloth behaves. This section explains why it behaves that way and what a tailor can do about it. The important idea is the difference between a fixable fit problem and a structural one. Tailors can shorten sleeves, take in a waist and adjust trousers all day. They cannot give a jacket a wider overlap, a different shoulder or a longer front that was not cut in.
The eight fit points
There are eight points worth checking on any double breasted suit, and the audit photographs cover all of them.
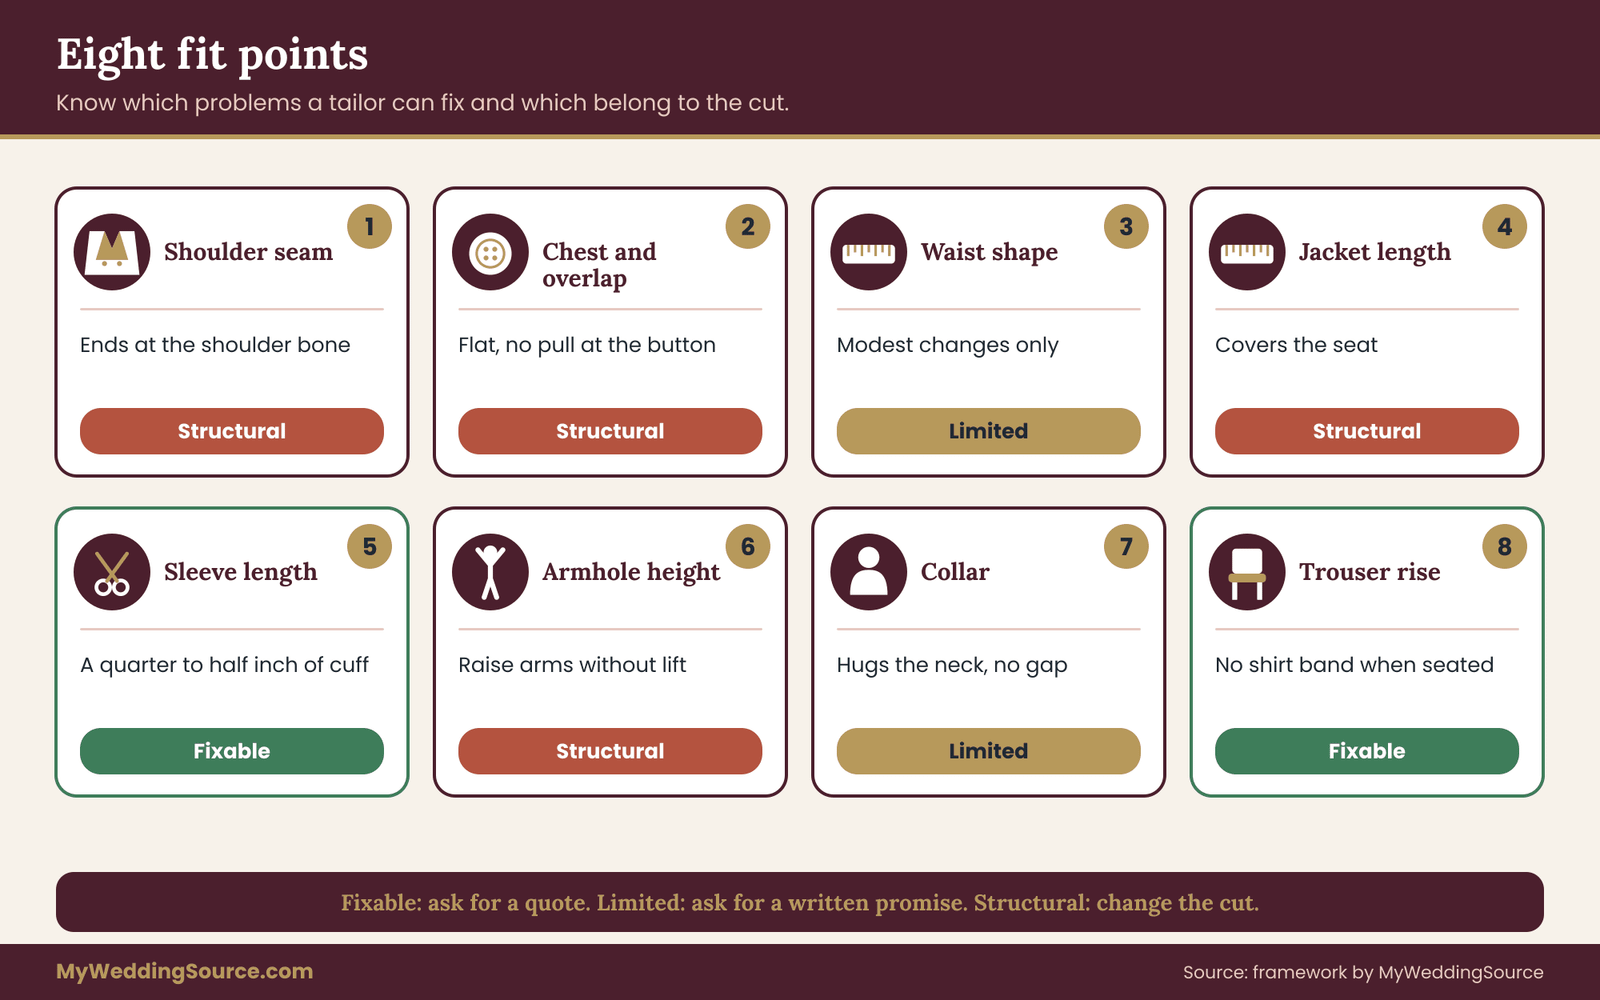
Shoulder seam. The seam should end at the edge of the shoulder bone. If it hangs over the arm, the double breasted suit is too wide and will collapse at the top of the sleeve. If it sits inside the bone, the jacket is too narrow and will pull across the back when you reach. Shoulders are the hardest part of a jacket to alter, because the whole upper structure depends on them. If the shoulders are wrong, change the size or the cut.
Chest and overlap. The closed front should lie flat with no horizontal pulling at the working button. The overlap should be deep enough to look intentional, with the outer edge of the right front reaching close to the line of the left lapel point. If the overlap is shallow, the double breasted suit looks like a single-breasted one with extra buttons. If it is too deep, the jacket looks bulky. Neither can be fixed easily.
Waist suppression. A double breasted jacket usually has some waist shaping to avoid a boxy look. A jacket that is too suppressed pulls at the button, and one that is too straight looks shapeless. A tailor can take in the waist moderately through the side seams and the back seam, though the closure sets a limit.
Jacket length. The hem should cover the seat and end around the point where the thumb meets the hand when the arm hangs relaxed, as a rough guide. A double breasted jacket that is too long looks like a coat and cuts the leg line. One that is too short exposes the seat and breaks the structure. Length alterations on a double breasted suit are difficult because they change the position of the buttons and the proportion of the overlap, so a good tailor will often decline.
Sleeve length and pitch. The sleeve should end so that a quarter to half an inch of shirt cuff shows, and it should hang straight without twisting. Sleeve length is usually easy to alter if there is enough hem allowance inside the cuff, though working buttonholes on the cuff can limit how much a tailor can shorten. Pitch, the angle at which the sleeve is set into the armhole, is harder, and a twisted sleeve points to a mismatch of pattern and posture.
Armhole height. A high armhole lets you raise your arm without lifting the jacket, but it can feel tight. A low one is comfortable but drags the body of the double breasted suit up whenever you move. This is part of the construction and cannot be changed after the fact.
Collar. The collar should hug the neck without gaping and without choking. A tailor can often correct a gap with a small adjustment at the back of the collar, within limits.
Trouser rise and break. A double breasted jacket is usually paired with trousers that sit higher on the waist, so the double breasted suit and trousers appear as one line when the jacket is open. A low-rise trouser leaves a band of shirt visible below the closure when you sit. Ask for a mid or higher rise, and make sure the waistband fits comfortably when seated.
What a tailor can usually fix
In general, these changes are routine on a double breasted suit: shortening the sleeves, taking in the waist modestly, taking in or letting out the trousers, adjusting the trouser hem, reattaching or moving buttons slightly, adding or adjusting a lining repair and refining the collar fit. Ask for a quote for each change before you begin, and ask how many fittings are included.
What is usually not fixable
These are structural, and a tailor will tell you to change the garment instead: widening the shoulders, changing the lapel width or shape, lengthening the double breasted suit body, deepening the overlap, moving the working button position significantly and changing the armhole height. If your audit shows a stop in any of these areas, the efficient answer is a different size, a different cut or a made-to-measure suit that is built to your measurements.
Fabric and the structure of the jacket
A double breasted suit holds its shape through its canvas and padding, and the cloth matters. A medium-weight wool with a bit of body drapes cleanly and holds the roll of the lapel. A very soft or lightweight cloth tends to collapse under the weight of the overlap, and a very stiff one resists the movements in the audit. Ask about the weight of the cloth, the type of interlining and whether the jacket is fully canvassed, half canvassed or fused.
A fused jacket is made with glued interlining, and it can bubble over time, while a canvassed jacket molds to the body. Those are quality indicators, not guarantees, and prices rise with canvassing. Compare them honestly against how many times you will wear the suit.
The FTC’s rules on fiber content labeling mean the label must name the fibers in the garment and their percentages, and the care label must say how to clean it. Read both on any suit you consider. They tell you whether it is wool, a blend or a synthetic, and how it should be cleaned, which affects how it will behave in the audit and afterward.
Pitfalls grooms report most often
A short list of recurring problems is worth knowing. A groom buys a size that fits his chest and finds the waist too loose, and he asks for it to be taken in so far that the closure pulls. A groom chooses a style because it looked good on a model with a different build, and it does not suit his proportions.
A groom orders online without a fitting and discovers that the sleeves ride up. A groom gains or loses weight between the first fitting and the day, and the closure no longer sits flat. A groom wears a different shirt, belt or shoes on the day than at the fitting, which shifts the lines.
Each of these has a simple defense. Fit the double breasted suit with the actual shirt and shoes. Book the final fitting as close to the day as the tailor allows, and, if the groom is changing weight on purpose, say so. Take photographs at each fitting so you can compare. The wedding dress fit and alterations guide explains the timing of fittings in a way that carries over to a suit, including why the last fitting should leave a few days for any final changes.
Questions to ask the tailor
Bring a short list. Which parts of this jacket can you alter, and which are fixed by the cut? What is the total cost of the changes, and how many fittings does it include? How long will the work take, and what is the deadline for the final fitting relative to the wedding? Have you altered double breasted jackets before? If a change does not work, what happens? Write the answers down. If the tailor will not commit to a timeline in writing, that tells you something.
Buying, renting or ordering a double breasted suit: cost logic and vendor questions
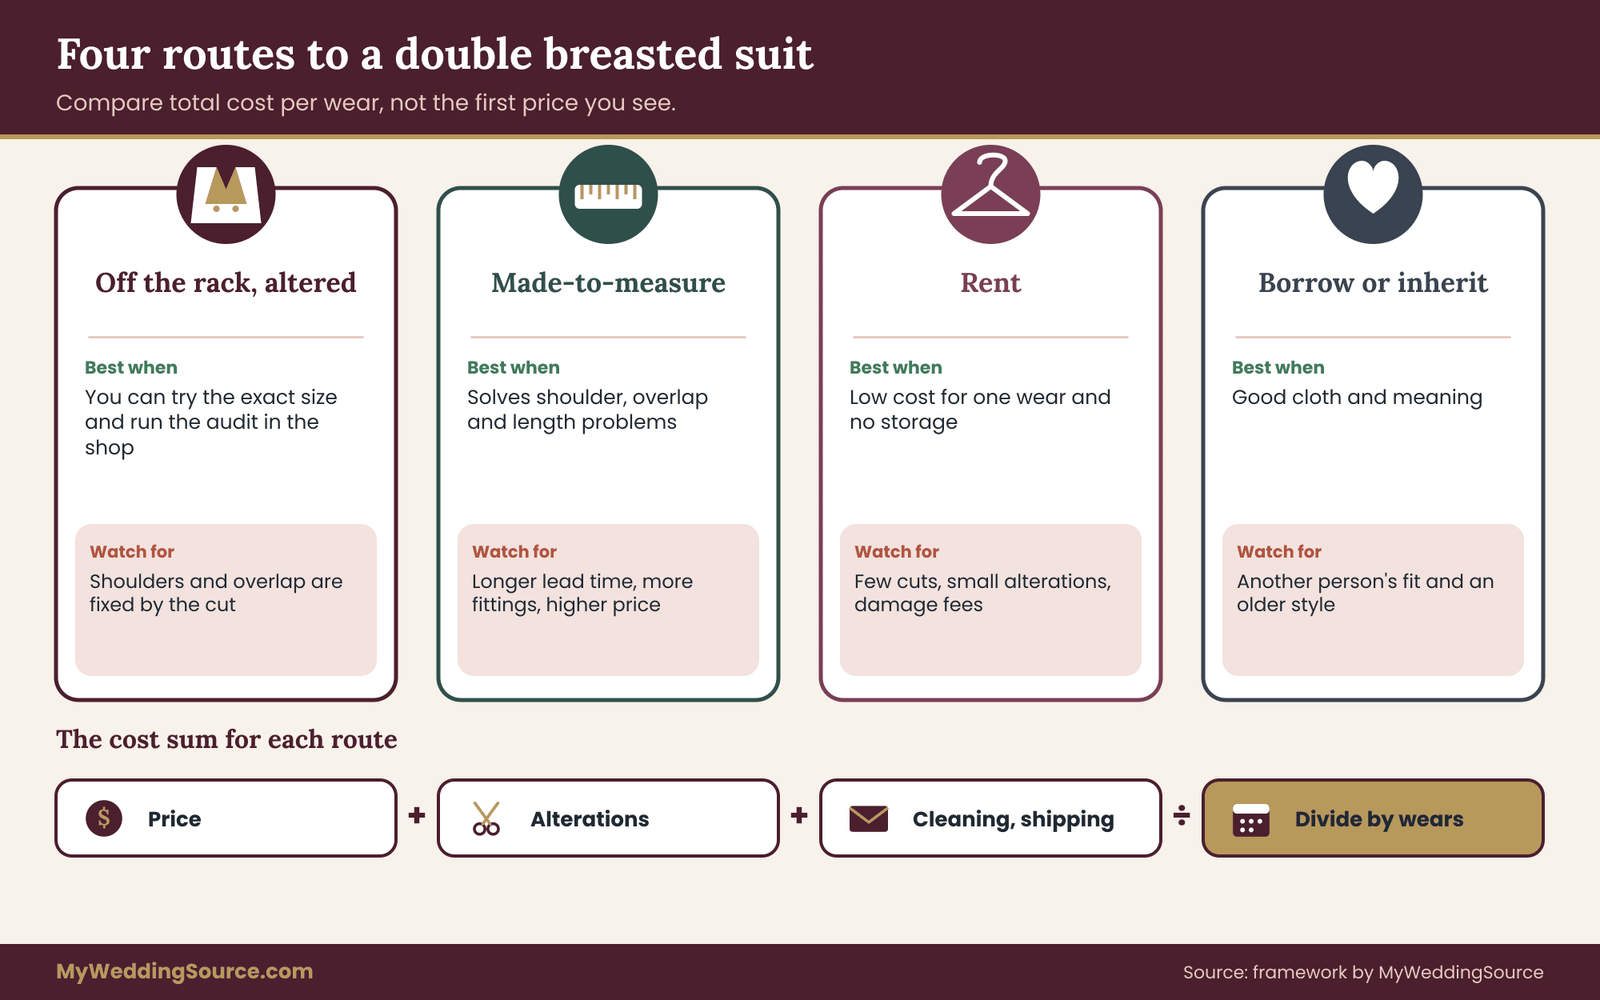
Once you know what a good fit looks like, the question is how to get one. There are four routes: buy off the rack and alter, buy made-to-measure, rent, or borrow. Each has a different relationship with the audit, and each has costs that do not show up in the first quote.
Off the rack and altered
Buying a ready-made double breasted suit and altering it is the most common route. The advantage is that you can try it on, run the audit in the shop and walk out with it. The risk is that ready-made double breasted jackets come in fewer cuts than single-breasted ones, so your body may land between sizes.
Because shoulders, overlap and armholes are fixed, the audit matters most here. Run it in the shop before you pay, and decide whether the stops are acceptable. Add the cost of alterations to the sticker price before you compare it with other routes.
Made-to-measure and bespoke
Made-to-measure means the double breasted suit is cut from a pattern adjusted to your measurements, and it can solve the shoulder, overlap and length problems that a ready-made jacket cannot. It costs more and takes longer, usually with at least one fitting between the first measurements and the finished suit. Ask how many fittings are included, what the remake policy is if the first fitting shows a problem, and what the delivery date is relative to your wedding.
Bespoke, a fully handmade suit cut from a personal pattern, is further along the same road and is rarely needed for one occasion.
With made-to-measure, you still run the audit on the first fitting garment. Many makers send a trial jacket in your size, and you can test the postures in it. Take your photographs to the maker and say which postures bothered you. A good maker will adjust the pattern.
Renting
Rental double breasted suits exist, though the choice is narrower than for single-breasted tuxedos and suits. A rental is fitted from standard sizes with basic alterations, and the shop usually gives you less room to change the shoulders or the overlap. The audit is still useful. Ask to try the exact size you will receive, run the five postures in the shop and photograph them if the shop allows it.
Ask about alteration limits, the return date, the damage policy, any fee for a missing button or a pin hole and the cleaning terms. Read the rental agreement before you sign, and keep a copy.
Borrowing and inheriting
A double breasted suit from a relative has sentimental value and often good cloth, but it comes with the fit of another person, and the style of an earlier decade. Older double breasted jackets can have wide lapels, low button stances and deep overlaps that read as vintage. Run the audit on it. If the shoulders fit and the cloth is sound, a tailor can often update the trousers and sleeves while leaving the main structure alone.
If the shoulders do not fit, the sentimental value may be better served by wearing a small piece of the suit, such as a pocket square cut from the lining, than by forcing the fit.
Cost per wear
Compare the routes by the total cost per wear, not by price tag. Add the purchase or rental price, the alterations, any shipping, the cleaning, a steaming or pressing before the day and the storage afterward. Divide by the number of times you realistically expect to wear it. A suit you will wear to several formal events over several years has a different cost per wear than one you wear once.
Be honest about the number of wears. The wedding vendor contract guide covers how to read terms for deposits, remakes and cancellations, and those questions apply to a tailor or a rental shop just as they do to other vendors.
Do not assume that renting is always cheaper or that buying is always better. Renting wins when you wear it once, do not want to store it and the available sizes fit well. Buying wins when you will reuse it or when fit is difficult. Made-to-measure wins when fit is the main problem, and it is often the better value when ready-made routes require large structural changes. Write the total for each route on the same sheet and compare them side by side in plain numbers from real quotes.
Questions to ask any seller
Ask in writing and keep the answers. Which buttons are working buttons, and is the inner anchor button present? Which vent style does the jacket have? What is the fabric, the weight and the interlining? What alterations can be done, and which cannot? What is the return or remake policy if the fit is wrong? What is the delivery date, and what happens if it is late? Can I photograph the fitting? If the seller will not answer in writing, it is a sign to look elsewhere.
Running the photo audit step by step
Here is the audit as a sequence, so you can do it in an evening. The goal is a folder of about twenty photographs and a page of notes.
Step one: set up
Prop your phone at chest height, three to six feet away, and mark the spot on the floor. Wear the shirt, shoes, belt or braces and trousers you plan to wear. Fasten the jacket properly, using the inner button first. Make sure the pockets are empty, because phones and wallets distort the lines. Ask a friend to hold the phone for the side views if you cannot prop it.
Step two: take the photographs
Take the five postures, front and side each. Standing relaxed. Standing turned a quarter turn toward an imaginary partner. Walking, filmed for a few seconds. Sitting with the outer button open. Sitting with the outer button fastened, as a stress test. Kneeling on one knee. Arms forward in a hug. Arms raised overhead. That is more than five shots, but they all belong to the five postures. Do each twice, so you can pick the better of the two.
Step three: measure
Use the tape for what the camera cannot show. Measure the shirt cuff showing below the sleeve, the distance from the collar of the shirt to the collar of the jacket in the raised-arm posture, the width of the overlap at the working button and the length of the jacket from the base of the collar to the hem. Write the numbers down. They are not targets but baselines: after the tailor’s work you measure again and see what changed.
Step four: score
A day later, look at each photograph and give each checkpoint a verdict of pass, fix or stop. Use one line of note for each fix or stop. Count the results. A suit with no stops and a handful of fixes is a good candidate. One with one or two stops in postures you will be in for a long time, such as standing and sitting, needs rethinking. One with stops in the closure in every posture is the wrong suit for you.
Step five: share and revise
Take the photographs and notes to the tailor or the seller. Ask for each fix to be quoted and each stop to be explained. After the changes, repeat the audit and compare. Do the final audit with the shirt, shoes and accessories of the day, and with the boutonniere pinned on. The photographs also help the photographer, who will know which angles flatter the suit, and the family photo list guide is a good place to think about which group poses will put the jacket under the most strain.
How strict should you be?
There is no perfect jacket, and an obsessive score sheet can paralyze a decision. A sensible rule: do not accept a stop in standing or sitting, because those are the postures that fill most photographs. Accept a fix in any posture if a tailor will commit to it in writing. Tolerate a stop in kneeling, hugging or raised arms if you will not be doing those things much, or if you can take the jacket off for them.
A worked example: one invented couple audits a double breasted suit
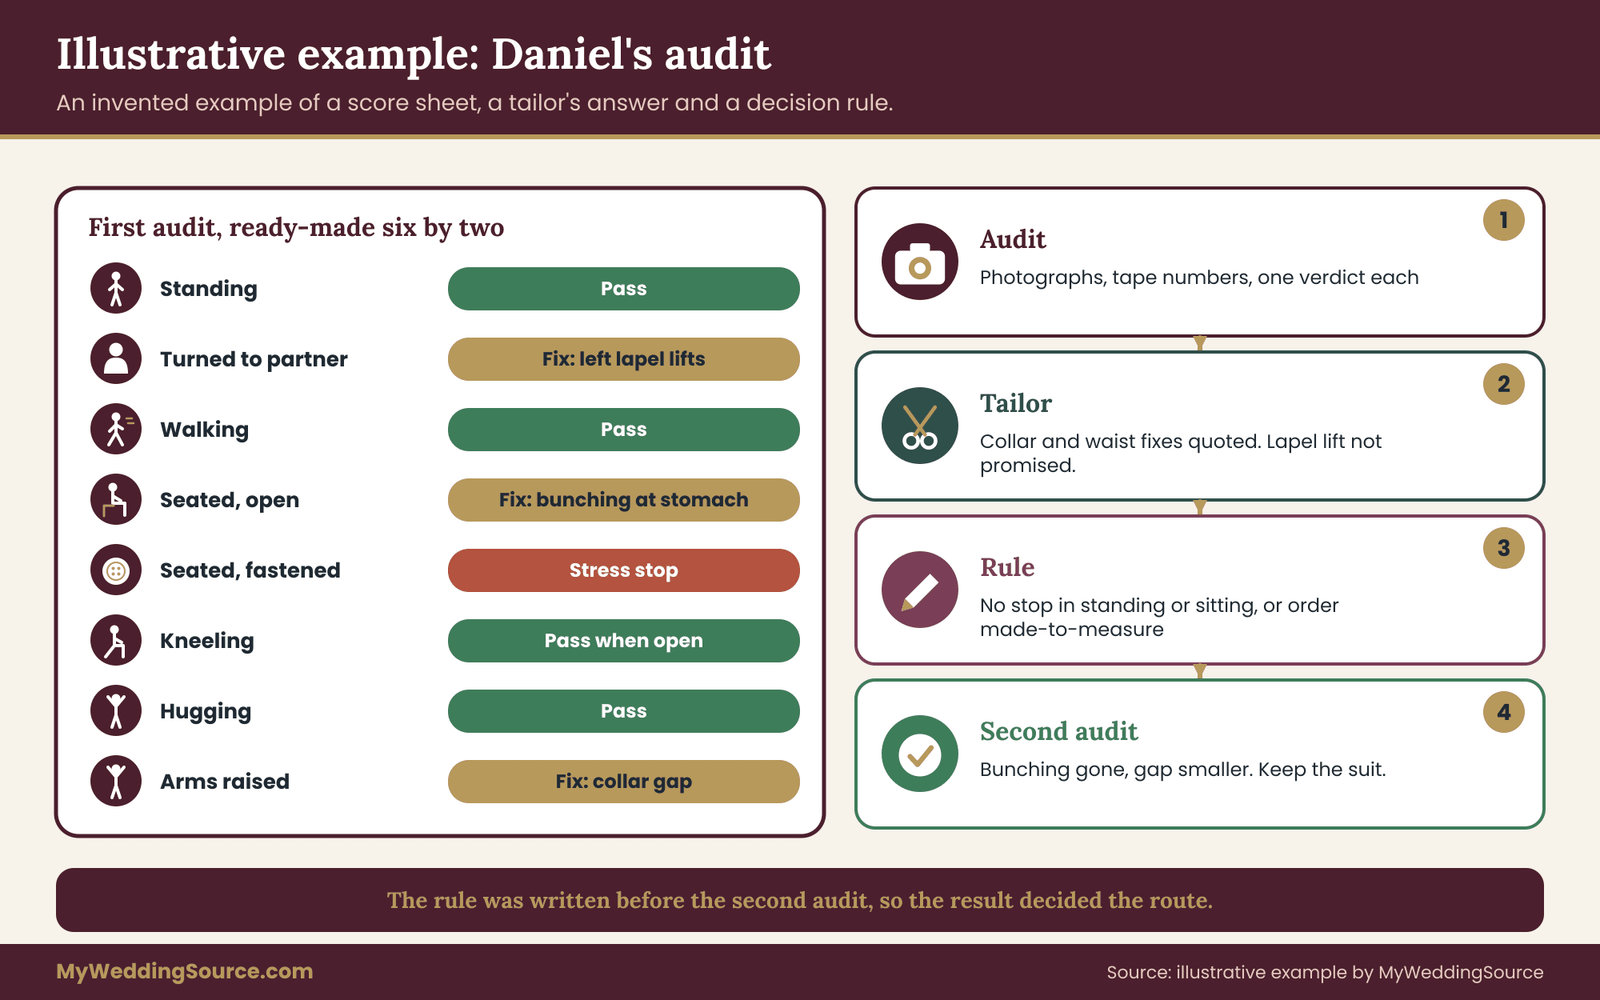
The example below is invented to show the method. The names, dates and measurements are not real, and the numbers are the kind you would write on your own sheet, not measurements of any real garment.
Daniel and Priya are planning a late-October wedding with a church ceremony at two in the afternoon and a dinner at a restaurant nearby. The invitation says formal. Daniel likes the look of a charcoal double breasted suit with peak lapels. He is of medium height, with broad shoulders and a stomach that he describes as soft. He has found two candidates: a ready-made six by two in a medium-weight wool, and a made-to-measure option from a local tailor.
The first audit
Daniel tries the ready-made suit in his usual size, with the shirt and shoes he plans to wear, and runs the five postures. Standing, the closure passes: the front lies flat, and the lapels sit against his chest. Turned toward his partner, the left lapel lifts slightly, which he scores as a fix. Walking, the hem swings evenly and the sleeves hold, a pass.
Seated with the outer button open, the overlap bunches a little at his stomach, a fix. Seated with the outer button fastened as a stress test, a sharp X forms and the lapel lifts well off the chest. That is a stop, though he never plans to sit that way.
Kneeling, the back of the jacket stays just below his belt, a pass, but the closure pulls when he kneels with it fastened. Hugging passes. Arms raised, the collar gaps by about half an inch, a fix. The tape shows a quarter inch of cuff when he stands, and about three quarters when he reaches.
Reading the result
Daniel has no stops in the postures that matter most for his day: standing and sitting with the button open. The stress-test stop tells him the waist is snug, so he must remember to unfasten before sitting, and he should plan for that during the church service. The fixes are the lapel lift when turning, the bunching at the stomach and the collar gap. He takes the photographs to a tailor and asks which can be changed.
The tailor says the collar gap can be reduced with a small adjustment, and that the bunching at the stomach is likely caused by a waist that is taken in slightly too far. She suggests letting the waist out a little through the back seam, which the cloth allows.
The lapel lift on turning is harder to address, and she says it comes from the armhole and the chest, which are fixed. She will not promise to eliminate it. In writing, she quotes the changes, two fittings and a date ten days before the wedding.
The comparison
Daniel then gets a quote from the made-to-measure tailor. It costs substantially more than the ready-made suit plus alterations, and it takes longer, with two fittings and a six-week lead time. He lists the totals, divides by the number of times he expects to wear the suit, and finds that the made-to-measure suit costs more per wear unless he wears it often. He expects to wear it to three or four formal events a year for a few years, so he considers it.
The decision
Daniel writes down his rule. He will choose the ready-made suit if the second audit, after alterations, shows no stops in standing and sitting, and the lapel lift is no worse than a fix. If it shows a stop, he orders the made-to-measure suit with the audit photographs as a brief. At the second audit, the bunching is gone, the collar gap is smaller and the lapel lift remains small. He keeps the ready-made suit, rehearses the button sequence ten times and packs a spare button and a needle in the kit.
The example is not a recommendation to buy a ready-made suit. It shows how a decision is made from evidence: five postures, four checkpoints, a verdict for each, a tailor’s written answer and a rule decided before the second audit.
Edge cases for a double breasted suit
Most grooms fit the general method. A few situations need extra thought.
A fuller stomach. A double breasted jacket can be flattering on a fuller figure when the overlap is deep and the buttons sit at the right height, because the vertical line of the closure draws the eye up and down. But the cloth must close without strain. A jacket cut for a flatter stomach pulls and forms a visible crease when seated. Ask for a larger size in the body and have the shoulders and sleeves taken in, or order made-to-measure. Be careful with a lightweight cloth, which may cling.
A short torso or a short stature. A double breasted jacket can overwhelm a short frame if the lapels are wide and the buttons are low. Look for a higher button stance, narrower lapels and a shorter jacket length. Because length changes are hard, choose the right cut instead of trying to alter a long one.
A tall and slim frame. A tall slim groom can carry a long jacket and wide lapels, but the shoulders need to be right, and the sleeves are often too short on ready-made jackets. Check the cuff measurement in the raised-arm posture.
Broad shoulders and a narrow waist. This is the build double breasted jackets suit best, but the waist suppression and chest balance need a tailor’s eye. Check for pulling at the closure when turning.
Hot weather. A double breasted suit has an extra layer across the chest, so it runs warmer than a single-breasted jacket. For a summer wedding, ask about cloth weight and lining, and plan when the jacket comes off. The National Weather Service publishes wind and heat safety information that is useful for outdoor planning.
Microphones and pocket items. A wireless microphone pack sits in a pocket or at the waist, and it changes the shape of the jacket. If the officiant or the groom wears one, run the audit with the pack in place. Also keep the pockets empty. The inside pocket of a double breasted jacket sits near the closure, and a full one pulls the overlap off line. The rings belong with the best person, not in the jacket.
A change of plans. If the venue changes from indoor to outdoor, the weather turns or the ceremony adds kneeling, run the audit again for the new conditions. A suit that passed under one set of assumptions may not pass under another.
A groomsman or a guest. Anyone wearing a double breasted suit can use the same audit. The standard is lower, but the postures are the same, and the buttoning rule is the same.
Weight change. If you expect to gain or lose weight before the wedding, tell the tailor, and book the final fitting as late as possible. A closure that is borderline today may fail in a month.
Your next steps
Follow these in order. Each step is short, and together they take a double breasted suit from idea to ready.
- Identify the working buttons. Ask the seller to mark them, and confirm the inner anchor button is present.
- Learn the sequence. Fasten the inner button, then the outer. Open the outer to sit, and refasten when you rise. Practice it ten times.
- Run the five-posture audit. Standing, walking, sitting, kneeling and arms raised, front and side, with the shirt and shoes of the day.
- Score each checkpoint. Pass, fix or stop, with one line of note, a day after the photographs.
- Take the photographs to the tailor. Ask which fixes are possible, what each costs and how many fittings are included.
- Compare the routes. Write the total cost of buying, made-to-measure, renting and borrowing on one sheet, and divide by realistic wears.
- Repeat the audit after alterations. Use the same shirt, shoes and boutonniere, and compare with the first set.
- Pack a small kit. A spare button, needle and thread, and a plan for taking the jacket off at the reception.
FAQ
Which button do you leave undone on a double breasted suit?
It depends on the cut, so check your jacket. Fasten the working button or buttons and the inner anchor button when standing. On some patterns with two fastening buttons, the lower one can be left open, but many makers intend both to be fastened. Ask the seller to mark the working buttons, and follow their advice for your jacket.
Should a double breasted suit be buttoned when sitting?
No. Open the outer working button before you sit, and keep the inner anchor button fastened. A fastened overlap pulls against the stomach, creates an X-shaped crease and lifts the lapel. Refasten when you stand. Practice the movement before the wedding so it feels automatic when you are nervous and the room is watching.
Is a double breasted suit appropriate for a wedding?
Yes, for most formal and semi-formal weddings. It suits daytime and evening events, and it reads as formal when cut well in a dark wool. Check the dress code on the invitation, and ask the hosts if it says black tie. A double breasted suit is usually a suit, not a tuxedo, unless it is made in tuxedo cloth with satin trim.
Can a tailor alter a double breasted suit?
Yes, for some changes. Sleeve length, trouser hems, modest waist changes and small collar adjustments are routine. Shoulders, lapel width, overlap depth, jacket length and armhole height are structural and are rarely worth changing. Ask which parts of your jacket can be altered, get a written quote and confirm the number of fittings before you start.
Does a double breasted suit suit every body type?
It can suit many builds when cut well, but not every cut suits every body. A deep overlap and a good waist shape can flatter a broad or fuller figure. A short frame needs narrower lapels and a higher button stance. Use the five-posture audit to test your own body, and consider made-to-measure if ready-made cuts give you stops.
What should a groom wear under a double breasted suit?
A dress shirt with a collar that sits cleanly under the jacket collar, and a tie or bow tie that stays within the lapel opening. A vest is usually skipped, because it adds bulk under the closed front. Wear the exact shirt to every fitting, since the collar and cuff change how the jacket sits.
How long does it take to alter or order a double breasted suit?
It varies by tailor and by season, so ask for dates in writing. Simple alterations may take a couple of weeks and one or two fittings, while made-to-measure often takes several weeks or more. Work backward from the wedding date, and leave room for a final fitting and a second round of changes before the day.
Should a groom rent or buy a double breasted suit?
Compare cost per wear. Renting can cost less if you wear it once and do not want to store it, but choice and alterations are limited and damage fees can apply. Buying or ordering made-to-measure is better if you will wear it again or if fit is difficult. Add alterations, cleaning and shipping to each total.
Sources
- Clothes Captioning: Complying with the Care Labeling Rule, Federal Trade Commission
- Threading Your Way Through the Labeling Requirements Under the Textile and Wool Acts, Federal Trade Commission
- Care Labeling of Textile Wearing Apparel, 16 CFR Part 423, Electronic Code of Federal Regulations
- Federal Trade Commission
- Wind Safety, National Weather Service
- Heat Index Safety, National Weather Service
- How do I dispute a charge on my credit card bill?, Consumer Financial Protection Bureau
- ASTM International, standards for textiles
- International Organization for Standardization
- USA.gov, the U.S. government’s official web portal