
Dress measurements are the only numbers that reliably predict whether a secondhand wedding gown will fit, because the size on the label describes a pattern from a particular year and maker, not the garment hanging in the listing. This guide shows how to take your own dress measurements, read a seller’s, compare the two line by line, and decide before you pay.
Ignore the tag size until the end. Take five body measurements (bust, waist, hip, hollow-to-hem, and back width or torso length), ask the seller for flat dress measurements at the same points, double the flat ones where needed, and subtract. Mark each line green, amber or red, using the gap rules in this guide. Anything red at the bust, shoulders or hip is a reason to walk away. Anything amber needs a quote from an alterations specialist before you commit.
A listing says “size 8, never altered, great condition.” It sounds like a fact. It is closer to a guess. A size 8 from one maker in the early 1990s, a size 8 from a different maker last year, and a size 8 that a previous owner had taken in at the waist and let out at the hem are three different garments.
Two women who both wear a size 8 in street clothes can need very different dresses, and a seller who has only ever looked at the tag cannot tell you which one you are.
That is why careful buyers of secondhand gowns work from dress measurements and treat the label as a rough hint at most. Dress measurements are physical. A tape measure does not care what year the dress was made, what the maker called a “ten,” or whether the seller wishes the dress were a size smaller. Numbers can be compared. Labels can only be argued about.
This article is built around one practical tool: a body-to-garment worksheet that you can fill in at a kitchen table with a soft tape, a notepad and a few messages to the seller. It covers where to measure, what to ask for, how to read the replies, how to convert between flat and around-the-body figures, how much room a gown can realistically give, and what to document so you have something to point to if the dress arrives and does not match.
Dress measurements, taken the same way on both sides, keep this part simple.
A note on scope. This is general information, not legal, tax or financial advice. Return rights, buyer protections and fees depend on the platform, the seller and your state, so check the current terms yourself and confirm anything important with the issuing agency or the seller in writing.
Why dress measurements beat the size on the label
Retail clothing sizes were never a precise language, and wedding dresses are the least precise corner of it. Bridal sizing in the United States has long run on its own scale, separate from street sizes, and many bridal makers cut samples and production gowns to a chart that does not match the dress measurements you wear every day.
A woman who wears a street size 6 is often told she will order a bridal size 10 or 12. Whether that is true for a given maker depends on that maker’s chart, which is exactly the kind of fact a secondhand seller may no longer have.
Now add time. A gown that is fifteen years old was cut to a chart that the maker may have changed twice since. A gown from a small studio may have been made to measure, so its label reflects the first client’s order, not a standard size at all.
A gown that was bought online from an overseas workshop may carry a label that was assigned for convenience. In each of these cases the tag tells you something about the original sale and almost nothing about the object you are about to buy.
Dress measurements cut through all of that. The bust circumference of the bodice, the waist seam, the hip at the fullest point and the length from the neckline to the hem are the same no matter what anyone calls the dress. If you hold the garment’s numbers beside your own, the question “will this fit?” becomes arithmetic plus a judgment about how much a seamstress can change.
There is a second reason, and it has to do with disputes. If you buy on the basis of a label and the dress is too small, you have a weak argument: the seller said size 8, you are an 8, and the dress does not fit, so who is right? If you buy on the basis of dress measurements the seller supplied in writing, and the dress arrives eleven inches narrower at the waist than the listing said, you have a concrete mismatch to point to.
The Federal Trade Commission’s consumer guidance on online shopping and returns is a reasonable place to start reading about how misrepresentation is treated, and it is listed in the sources at the end.
What a size label really tells you
It helps to be specific about what is missing from a label, because the gaps are where fit problems come from.
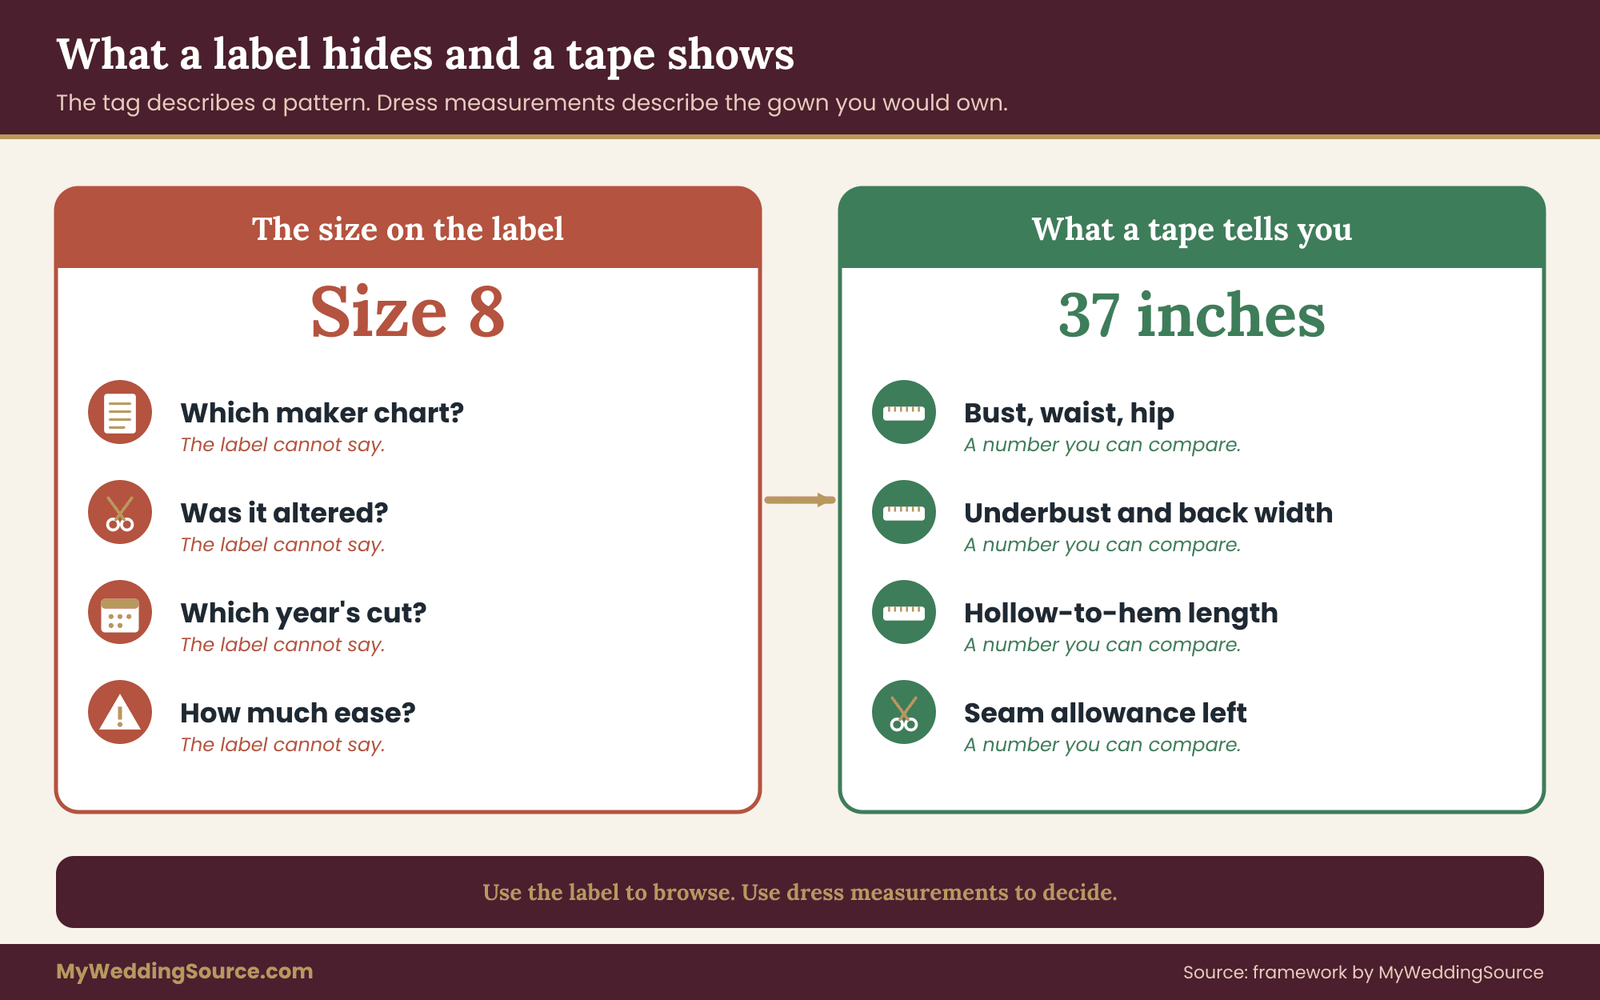
It does not say which chart was used. Bridal makers publish size charts, and those charts are not interchangeable. One maker might list a bust of 36 inches for a size 8, another 37 or 38. A label of “8” without a maker’s chart attached gives no usable number. Write the dress measurements down at once, with the unit.
It does not say whether the dress has been altered. A previous owner may have shortened the hem, taken in the side seams, replaced a zipper with a corset back, or removed a layer from the skirt. Every one of those changes shifts the dress measurements while the tag stays put. Even a careful seller may not know what a prior alterations shop did, especially if the dress was bought secondhand and resold.
It does not say which year or season. Silhouettes change the geometry of a gown. A mid-1980s dress with structured shoulders, a 1990s dress with a long-line corset bodice and a modern dress with a stretch-lace bodice carry their size in completely different places. The size number is the same kind of number, but it measures something different.
It does not describe the build the pattern assumed. Pattern makers draft for a model body: a certain bust-to-waist drop, shoulder width, torso length. If your torso is longer than the pattern assumed, a dress that matches your bust and waist numbers can still sit wrong, with the waist seam resting on your ribs. Only length and position measurements, not the tag, show that. Good dress measurements are specific about where the tape went.
It does not capture ease. Ease is the extra room built into a garment beyond the body measurement so a person can breathe, sit and lift their arms. Bridal gowns are often cut tight on purpose, with boning and corsetry doing some of the structural work, and the amount of ease differs between a stretch crepe sheath and a boned satin ball gown of the same label size.
None of this means labels are useless. A label can narrow your search, and it can help you spot a listing that is badly mismatched to your build. It just cannot carry the decision. The decision needs numbers measured in inches or centimeters, taken the same way on both sides of the comparison.
What this method cannot do
A measurement comparison is a screening tool, not a fitting. It can tell you that a dress is plausibly workable or clearly not, and it can raise the questions to ask a seller or an alterations specialist. It cannot tell you how a fabric drapes, whether the boning will dig into your ribs or whether a vintage seam will hold under tension.
The condition side of buying a gown, including seam stress and fabric breakdown, is covered in the wider wedding dress fit and alterations guide on this site, so this article stays on the dress measurements.
What the method does well is stop expensive mistakes early. If the garment’s bodice circumference at the bust is two inches smaller than your own bust, the conversation is over before it costs you shipping, an alterations deposit or an argument. If the dress measurements line up, you move on to the harder questions with a much better idea of what you are asking about.
The sections that follow walk through the whole sequence in order. You will see how to take dress measurements that a stranger could repeat, which extra numbers to collect beyond the familiar three, how to read a listing’s figures (including the very common confusion between flat and doubled), how to ask for what is missing without sounding suspicious, and how to run the comparison.
After that come a worked example with invented numbers, a close look at why older gowns drift from their original dimensions, a way to estimate how much alteration room a garment actually offers, and the situations where the standard method needs adjusting: plus sizes, very tall or petite builds, pregnancy, and weight changes between purchase and wedding day. Vague dress measurements are a reason to ask another question.
Who gets the most from a measurement-first approach
Some buyers feel the pull of a measurement-first approach more than others. If you are buying from a seller you cannot visit, the method is close to essential. If you are buying from a consignment shop that allows try-ons, the dress measurements still help you pick which gowns are worth trying, but the try-on will carry more of the weight.
If you are buying a gown from a relative or friend, you can fold their memory of how the dress felt into the comparison, though their numbers will still be more reliable than their recollection.
It is also useful if you are choosing between several listings. Putting three dresses side by side on one page, each with the same measurement points, turns a vague preference (“I like the second one’s lace”) into a ranked list of fit risk. You can still choose the one you love most. You will just do so knowing which ones will take a seamstress an afternoon and which ones will take a miracle.
One last framing point. A good outcome here is not only “the dress fits.” A good outcome includes “I knew in advance what the dress would need, I budgeted for it, and I had the seller’s dress measurements in writing.” That is a lower-stress way to buy, and it also keeps the total cost honest. The budget side is covered in the guide to setting a wedding budget, which is a useful place to carry the alterations estimate you will produce.
Taking your own dress measurements the right way
Your own numbers come first, and they need to be good, because every later step depends on them. A sloppy bust figure makes the whole comparison meaningless. Take them yourself only if you must; a second person holding the tape produces better results, since reaching around your own back bends the tape and shifts your posture. Keep the dress measurements in one place so you can compare listings later.
Use a soft cloth or fiberglass tape, not a metal builder’s tape. Stand straight, relaxed, with your weight even on both feet and your arms loose at your sides. Wear what you intend to wear under the gown: the bra or bustier you will actually use, and shapewear if you plan to wear it. Measuring in bare skin and then wearing a structured foundation can change your bust and waist by an inch or more, and the dress will be cut around the clothed version of you.
Keep the tape snug but not pressing into the skin. A good test is that you can slip one finger under it. Read the number at the point where the tape overlaps, and write it down immediately, with the unit, rather than trusting memory.
Bust. Measure around the fullest part of the chest, with the tape level across the back, passing under the arms. Check the tape in a mirror. A tape that rides up in the back will give a low number.
Natural waist. This is the narrowest part of the torso, usually an inch or two above the navel. Bend sideways and the crease that forms is a decent guide. Bridal gowns do not always sit at the natural waist, so you also need the next number. Dress measurements stay the same when the label changes.
Hip. Measure around the fullest part of the hips and seat, tape level all the way around. Many buyers forget that the fullest point can sit several inches below the waist, and that it matters most for fitted skirts, sheath and mermaid shapes.
Hollow-to-hem. This is the length from the hollow at the base of your throat, between the collarbones, straight down the front of your body to the floor. Measure it while standing in the shoes, or the heel height, you plan to wear. A dress that clears the floor by an inch in flats can pool two inches onto it in the same dress with lower heels, and can drag in the opposite direction in high ones. A second look at the dress measurements often catches a slip.
Write each figure to the nearest quarter inch. If you prefer centimeters, use them throughout; mixing units in a worksheet is how errors creep in.

The extra numbers that decide fit
Bust, waist and hip are the three numbers sellers and charts talk about, but they describe only the circumferences. Two bodies with identical circumferences can have different shoulder widths, torso lengths and arm sizes, and the garment cares about all of them. Collect these extra numbers once, and you will be able to reuse them for every listing.
Back width. Measure straight across the upper back, from one shoulder seam point to the other, about four to five inches below the base of the neck. This matters most for dresses with sleeves, high necklines or a structured back, where too little width pulls the seams and the fabric tears or the sleeves bind. If the dress measurements disagree with the photos, trust neither until you ask.
Torso length, or neck-to-waist. Measure from the bump at the back of your neck down your spine to your natural waist. Compare it to the garment’s back length from the same start point. A mismatch here changes where the waist seam lands and is often the reason a “right size” dress looks wrong on the body.
Shoulder to bust point and bust point to waist. These two numbers say where the dart or the corset cup should sit. They are hard to measure alone, but they are the difference between a bodice that supports and one that gapes. If your shoulder-to-bust-point is longer than the garment’s, the cup will sit high.
Upper arm and armhole. Measure around the fullest part of your upper arm, and around the base of the arm where a sleeve or strap would sit. Vintage dresses in particular often have very small armholes by modern expectations. If the dress has sleeves, ask for the bicep circumference in the garment as well. Round the dress measurements to the nearest quarter inch, not the nearest inch.
Underbust. The circumference under the bust, snug against the ribs. Corset bodices and boned strapless dresses lean heavily on this, because the boning grips there. A gown that matches your bust but is two inches smaller at the underbust will not close, or will close and make breathing a negotiation.
Floor length and train. If you want the dress to touch or just skim the floor, hollow-to-floor is the base. If you want a train, add a separate note for how much train you accept. Seller listings often give “length” with no start point, so your own start point (hollow of the throat) is a fixed reference. Say which dress measurements you need, and in which state the garment should be.
You do not need every one of these numbers for every dress. A simple strapless A-line needs the circumferences, the underbust and the hollow-to-hem. A long-sleeved lace dress adds the upper arm and back width. A structured vintage dress adds nearly all of them. Collect them all once while you have the tape out, and the list will be there when you need it.
Measure twice, on two different days
Bodies change over a day. Many people are a little larger in the evening than the morning, and your hip and waist can shift with hydration, food and hormones. Measure on two different mornings and compare. If a figure differs by half an inch, record the larger one for the bust and hip, and the smaller one for the waist, so you protect yourself from a garment that is too tight.
If a figure differs by more than an inch, retake it, and check that you are holding the tape the same way each time.
Record the date, and note anything that could affect the next set: a planned diet, a medication change, a pregnancy, an athletic training block. If your body is likely to change between the day you buy and the day you wear the dress, the worksheet gets one more column, which is covered in the section on edge cases later on.
Measurements for fit versus measurements for the dress
There is a distinction worth keeping in mind from the start. The dress measurements above are body measurements. The seller’s numbers are garment measurements, and the two are not the same kind of figure. The garment’s waist, for instance, is the circumference of the finished fabric at its waist seam, with whatever ease the maker built in. A body waist of 31 inches does not fit a garment waist of 31 inches: it probably fits a garment waist of 32 or more, depending on the style and the fabric.
This is why you do not compare your numbers to the seller’s directly and call the dress good if they match. You compare them and then look at the gap, the garment number minus your number. The gap is where the decision lives. The next two sections explain how to get the garment’s dress measurements and how to interpret the gap.
Keep a body-numbers card
Put your finished body measurements on a single card or note on your phone. Include the date, the shoes or heel height used for hollow-to-hem, the underwear you wore, and your starting-point descriptions (for example, “hip measured seven inches below natural waist”). When you message sellers, paste the relevant lines. You will find that sellers are more willing to measure carefully when they can see the kind of precision you are asking about. You also protect yourself from your own memory when you come back to a listing a week later.
If you are working with an alterations specialist, bring the card to the first appointment. A professional will re-measure you, and any difference between their dress measurements and yours is useful information about how you take measurements, which you can correct for in later comparisons.
Reading a seller’s dress measurements without being misled
Seller-supplied dress measurements come in many shapes, and most confusion comes from not knowing which shape you are looking at. Before you compare a single number, work out what the seller actually measured, how, and where. Four questions sort most listings.
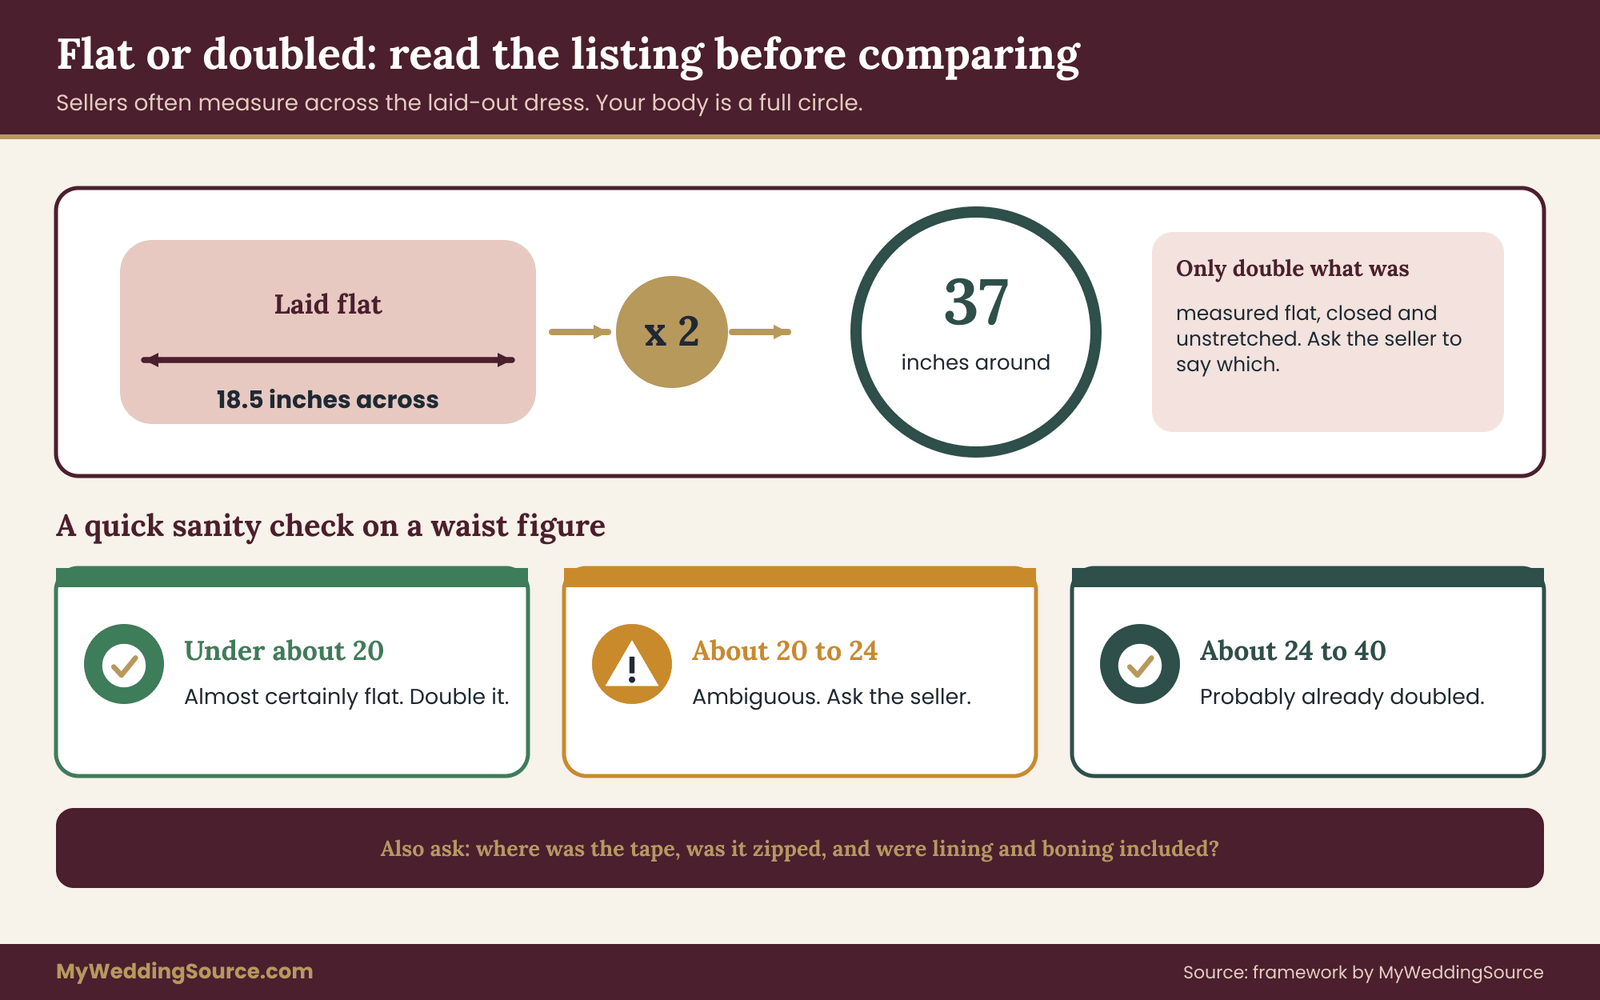
Is the figure flat or around the body? A flat measurement is taken with the garment laid on a table, zipped or fastened, smoothed out, and measured straight across from one side seam to the other. It is half the circumference. A garment laid flat that measures 18 inches across the bust is about 36 inches around, and 18 is the number a seller will often quote because it is the one the tape shows.
Some sellers double it before posting. Some do not and do not say so. If a listing says “bust 18” for a bridal gown, it is flat, because no adult has an 18-inch bust. The trouble starts when a listing says “bust 36” and you cannot tell whether that is flat (and the dress is enormous) or already doubled (and the dress is ordinary).
A simple sanity rule helps. If the waist figure is under about 20, it is almost certainly flat. If it is between roughly 24 and 40, it is almost certainly already doubled. The in-between zone, around 20 to 24, is ambiguous and deserves a question. Dress measurements that come with a photo of the tape are easier to trust.
Where was the tape placed? “Waist” on a garment is the waist seam or the narrowest point of the bodice, depending on the seller. If the dress has an empire seam under the bust, the seller’s waist and your natural waist are in different places. Ask what the seller treated as the waist, and compare to the same location on your body.
Was the garment fastened, and was it relaxed or stretched? A dress measured with the zipper open and the sides pulled out gives a bigger number than the same dress zipped and unstretched. For stretch lace and jersey this can be an inch or more. Ask for the measurement taken closed, unstretched. Ask for the dress measurements again if the first reply looks copied from a chart.
Does the figure include lining, underlayers and boning? A bodice with a built-in corset has a different structure from the outer fabric alone. Measure the structure, not the loose shell. A seller who has only measured the outer layer may be handing you a number that does not describe how the dress hangs.
The measurements a good listing includes
A well-prepared listing tends to provide the following, and the more of them you see, the more reliable the dress measurements are likely to be:
Bust, waist and hip, stated as “flat” or “around.” If only flat figures are given, you double them yourself, but you should confirm with the seller that they were truly measured flat and truly closed.
Underbust or ribcage measurement for boned and corset styles. This is one of the most telling numbers on a structured bodice and one of the most often left out.
Length from the highest point of the strap or neckline to the hem, and the length from the waist seam to the hem. If the seller states “length 58,” ask what it starts from. Ask whether the figure was taken with the hem on the floor or pulled straight. Treat missing dress measurements as a gap in the evidence, not as a bad sign about the seller.
Skirt hem circumference, or at least a description of the skirt shape. It tells you whether you can walk, whether you can sit, and whether the dress will work with a slip.
Shoulder-to-shoulder width and sleeve length, where there are sleeves. Sleeve length is measured from the shoulder seam, not the neck, and the seller should say so.
The amount of seam allowance at the side seams and center back, if the seller has looked. This number is gold. It tells you whether the dress can be let out. Many sellers will not know, but a seller who has already looked, and says so, is probably someone who has paid attention to the dress.
What the dress was worn with. The petticoat, the bustier, the crinoline. A dress that is listed with its petticoat changes shape when you take the petticoat away.
Signs a listing’s numbers cannot be trusted
Some listings carry their own warning labels. You do not need to accuse anyone of anything. Treat these as signals to ask for more detail, or to move on.
The dress measurements are all round numbers: bust 36, waist 28, hip 38, length 60. Real garments rarely land on whole numbers at every point, and a list of tidy figures often means the seller is copying a label, a tag chart or an estimate.
The figures match a size chart exactly. If the listing says size 10 and the dress measurements are the maker’s published size 10 chart, the seller probably copied the chart. That does not mean the dress is wrong, but it does mean nobody put a tape on the actual gown, and the actual gown may have been altered or may have stretched.
There is only a “bust to waist” description, such as “fits sizes 6 to 10.” That is a claim about people, not a measurement of a garment.
The photos show the dress on a mannequin or a person with visible pins, clips or bunching in the back. This is not a problem in itself. It is a hint that the dress may not close on the mannequin, which says something about the actual closed measurements.
Measurements are taken “with ease” or “approximate” with no further detail. Ask what “approximate” means. A half inch is approximate. Three inches is a different dress.
What to do with figures in a mixed unit or with unclear labels
Some sellers post measurements in centimeters, some in inches, and some mix. Convert everything to one unit before comparing, using 2.54 centimeters to the inch, and write both units on the worksheet if you want to check your own conversion. The National Institute of Standards and Technology publishes the conversion factors for those who want a primary reference, and it is listed in the sources. Compare dress measurements line by line, not as a total.
If a seller uses terms you do not recognize, such as “pit to pit,” that term is a flat measurement from armpit to armpit, and doubling it gives a chest circumference that sits slightly higher than a true bust measurement. It is a useful cross-check, and ordinary in secondhand garment listings, but it is not the same figure as your bust. Ask for a measurement across the fullest part of the bodice if you can.
Asking a seller for better numbers
Most sellers of secondhand gowns are private individuals, consignment staff or small resale shops, and most are happy to help if you make the request easy. The more specific your message, the more useful the reply. A long, vague question (“can you tell me about the fit?”) gets a vague answer. A short, numbered list gets numbers. One line of dress measurements can sink a dress even when the rest look fine.
Keep requests friendly and brief. You are not auditing anyone. You are asking for facts a thoughtful seller would want to know anyway.
A message that works for most listings. Say hello, say which dress you are asking about, and ask for specific figures. For example:
“Hi, I’m interested in the ivory A-line gown from your listing. Could you measure it laid flat, zipped, without stretching, and tell me the following? Bust across at the fullest point, waist across at the narrowest point of the bodice, hip across at about eight inches below the waist seam, and length from the top of the neckline or strap to the hem. If you can also tell me the waist-seam position and how much seam allowance is left at the side seams, that would help a lot. Thank you.”
Notice what that does. It names the garment state (flat, zipped, unstretched). It names the measurement points. It asks for seam allowance, which is the number most sellers never think to give, and it is polite enough to get an answer.
A follow-up to confirm the dress measurements are flat or doubled. If the first reply gives a bust of 18 or 36 and you cannot tell which, ask a one-line question: “Just to be sure, is that measurement across the dress (half), or the full circumference?” Keep it neutral. Sellers often say “oh, across, sorry” and fix it right away.
A request for a photo of the tape. For a higher-priced gown, ask for a photo of the tape laid across the bodice at the bust or waist. It takes the seller a minute and it shows the number in context. You are not asking for proof of honesty; you are asking for a picture that makes the figure easy to read.
A request for photos of the interior. Ask for photos of the inside side seams and the center back, with the lining visible, so you can see how much extra fabric is tucked in. If the seller is uncomfortable, that is information too. Dress measurements are most useful when you decide what counts as a pass before you look.
A question about alterations. “Has the dress been altered or repaired in any way, such as hem, bust, waist or straps? If so, what was done and who did it?” This one matters, because prior alterations may have used up the seam allowance you are counting on.
How to handle a seller who cannot or will not measure
Some sellers do not own a tape, do not have time or have already sold the dress and are measuring from memory. Do not push. Try a lower-effort alternative first.
Offer to accept measurements from a consignment shop’s tag or from a try-on by the seller, and then ask for the figure the dress closes to when worn. A statement such as “I wore it at a bust of 36 and it was snug” is a body measurement attached to a garment, and it is useful, though it does not replace a flat figure. Put the dress measurements beside your body numbers on the same page.
If the seller declines to measure at all, treat the listing as unverifiable and compare its risk to its price. A very low price on a dress with no listed dress measurements may still be a sensible gamble if you can afford to lose it, and a poor one if you cannot. Write down your reasoning before you buy so you are making the choice on purpose.
Keep every reply in writing
Move the conversation to the platform’s message system, or save screenshots of the exchange with dates visible. If a seller sends dress measurements, save the message and the listing as it appeared when you bought. Listings can change after a sale, and the written figures are what you will point to if the gown arrives with the bust two inches smaller than promised.
The reasoning behind this habit is set out in the guide to vetting wedding vendors before you pay a deposit, which applies just as well to a private seller as to a shop, and in the broader consumer-protection material from the Federal Trade Commission listed in the sources.
The body-to-garment worksheet for dress measurements
This is the working part of the guide. The worksheet turns two sets of numbers, yours and the dress’s, into a short list of verdicts. You can build it on paper, in a notes app or in a spreadsheet; nothing about it needs special software. Each dress gets its own copy, so you can set several side by side. Share your dress measurements with a specialist before you pay, not after.
Think of the worksheet as six rows and five columns, written in plain lines rather than a grid. The rows are bust, underbust (for boned or corset bodices), waist, hip, back or torso length, and the length from a fixed starting point on your body to the hem. The five things you note for each row are:
- Your body measurement, in the clothed state you will wear on the day.
- The garment measurement, converted to a full circumference if the seller gave a flat number.
- The gap: garment minus body. A positive gap means the garment is larger than you are at that point; a negative gap means it is smaller.
- The reserve: how much fabric the seller says is tucked into the seams at that point, if anyone has looked.
- A verdict: green, amber or red.

Step one: fill in your column
Copy the dress measurements from your body-numbers card. For length, use a starting point that the seller can also find on the garment. For a dress with a neckline or straps, that is the hollow of the throat or the top of the strap. For a strapless dress there is no strap to start from, so use the top edge of the bodice at center front, and on your own body, measure from the spot where that edge will sit (usually across the upper chest or just above the bust) straight down to the floor in your wedding shoes.
Ask the seller for the length from the top edge at center front to the hem, measured with the hem hanging free.
Step two: fill in the garment column and convert
Take the seller’s dress measurements and convert them to full circumferences. A flat figure is doubled. A “pit to pit” figure is doubled and treated as a chest check, not as the bust. If the garment has two bodice layers, as with a lined corset, use the structured layer. Note beside each figure whether it is closed, unstretched and measured at the point you specified.
Step three: calculate the gap and apply the gap rules
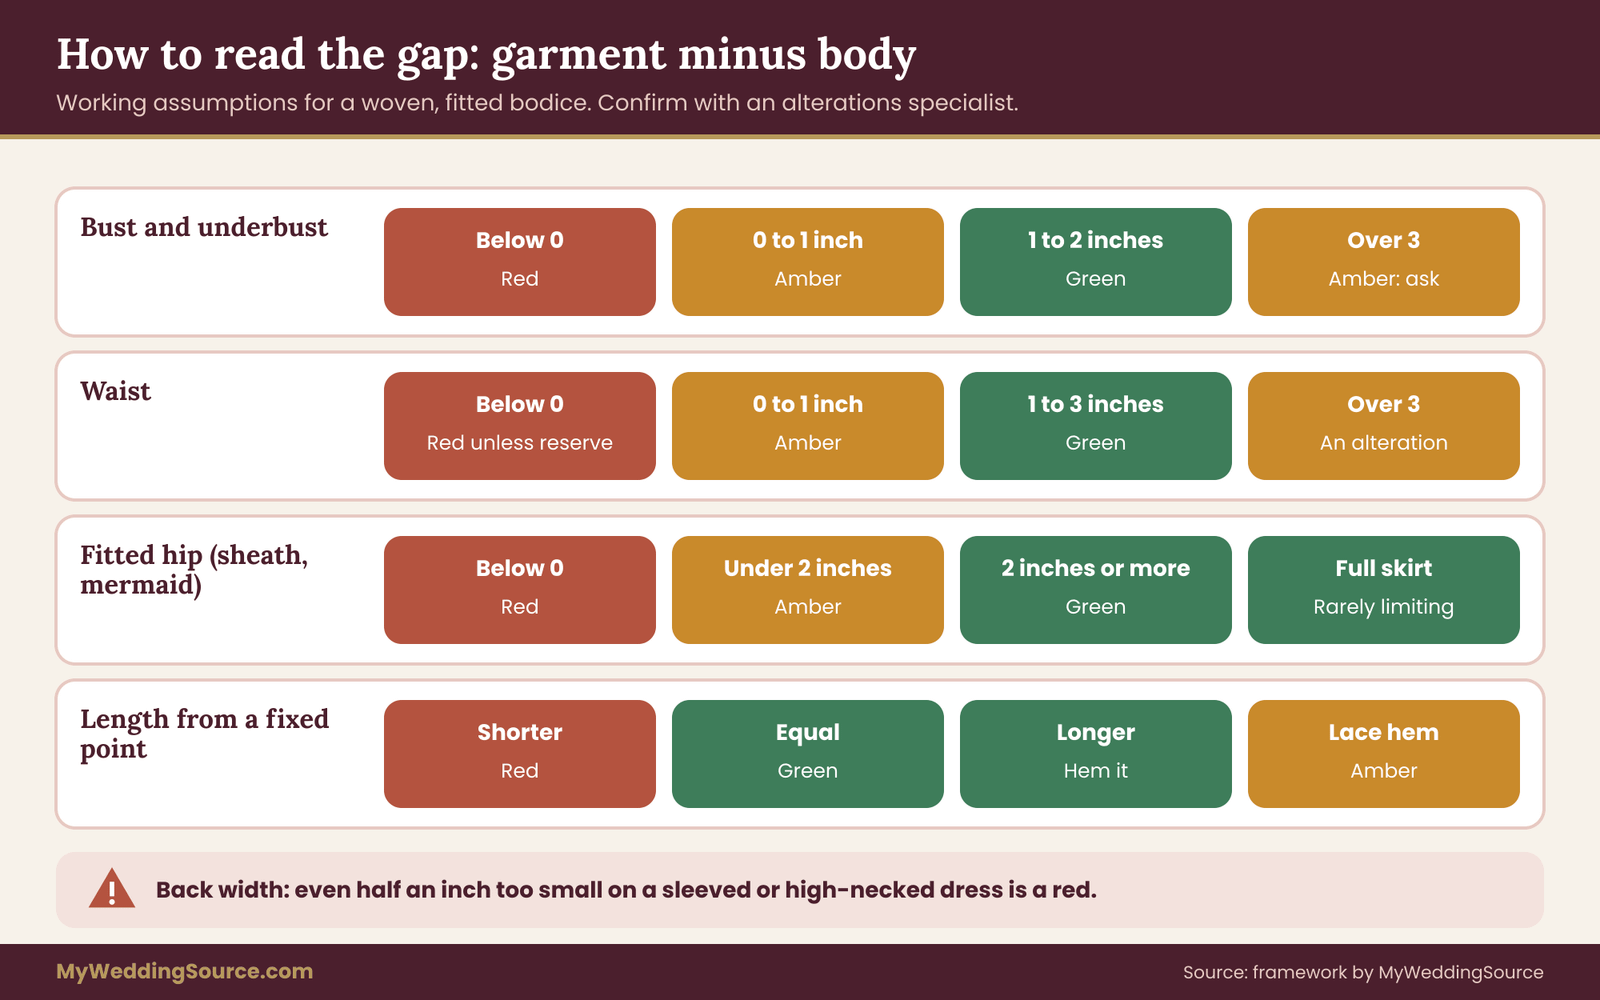
For every circumference row, subtract your body number from the garment number. Then apply the rules below. These rules are working assumptions drawn from common sewing practice, not an industry standard, and a bridal alterations specialist may adjust them for a particular fabric or construction. Treat them as a way to organize the question, and take any amber or red row to a professional.
Bust and underbust. A negative gap is red. A gap from zero up to about one inch is amber for a woven, structured bodice, because there is no room to breathe or move. A gap of roughly one to two inches is green for woven fabrics. For stretch lace or knit bodices, a smaller positive gap can be acceptable, but ask the seller how far the fabric stretches.
A gap larger than three inches is not a fitting problem, but it adds a taking-in task, so mark it amber and ask how the bodice is constructed.
Waist. The waist is the most forgiving line on most gowns, because side seams and a back closure can be adjusted in either direction when the seam allowance is generous. A negative gap is red unless the reserve is enough to let it out to your size with a margin. A gap of zero to one inch is amber. A gap of one to three inches is green. Larger gaps are an alteration, not a failure. Dress measurements for a fitted bodice are less forgiving than for a full skirt.
Hip. The hip row depends heavily on the silhouette. For a sheath, trumpet or mermaid, the hip is a hard line: a negative gap is red, and a gap under about two inches is amber, because you need room to walk, sit and get in. For an A-line or ball gown with a full skirt, the hip is rarely the limiting number, and a very large positive gap is normal. Check that the seller’s hip figure was taken at the same distance below the waist seam as your own.
Back width and torso length. These are position checks. If the garment’s back width is smaller than yours by even half an inch at a sleeved or high-necked dress, mark red, because moving fabric across a shoulder blade is very hard to fix. A torso-length mismatch of more than about an inch changes where the waist seam sits and earns an amber, whether positive or negative.
Length. Compare the garment’s length to your length from the same starting point, in your shoes. A garment that is longer than you need is normally fine, because a hem can be shortened, unless the hem carries lace appliqué, a border or a trim that would be cut away. A garment that is shorter than you need is red unless you are happy to add a hem band, a longer slip or higher shoes. Check the unit before you compare dress measurements.
Reserve. If the reserve is known, it can rescue an amber. A rough upper limit on how much a side seam can be let out is about twice the seam allowance left on that seam, and a careful specialist will rarely use all of it. If the reserve is unknown, treat any let-out plan as unconfirmed.
Step four: score the whole dress
Once every row has a color, apply three simple decision rules.
First, any red at the bust, underbust, back width or hip (for a fitted skirt) ends the comparison. Move on, or negotiate a price that reflects a major rebuild and get a quote before agreeing.
Second, two or more ambers means you need a written estimate from an alterations specialist before you pay. An amber is a question, and two questions can add up to a very different dress.
Third, if every row is green or has one amber with a confirmed reserve, the dress passes the screening. That is not a promise it will fit, only that it is worth paying for the next stage, which is a condition check and a conversation about returns.
Step five: write down the cost of each amber
Each amber becomes a line in your budget. Do not guess at prices here; ask a specialist near you for an estimate per task, such as taking in the sides, shortening the hem or adding a corset back. Put the estimates beside the purchase price and add them up. A cheap dress with four ambers can cost more than a pricier gown with none. The wedding budget guide shows where alterations sit among other costs. Dress measurements from a try-on carry extra weight, because you can see how the garment behaves.
A worked example with invented numbers
The example that follows is illustrative. The numbers are made up to show the process, and they do not describe any real dress or person.
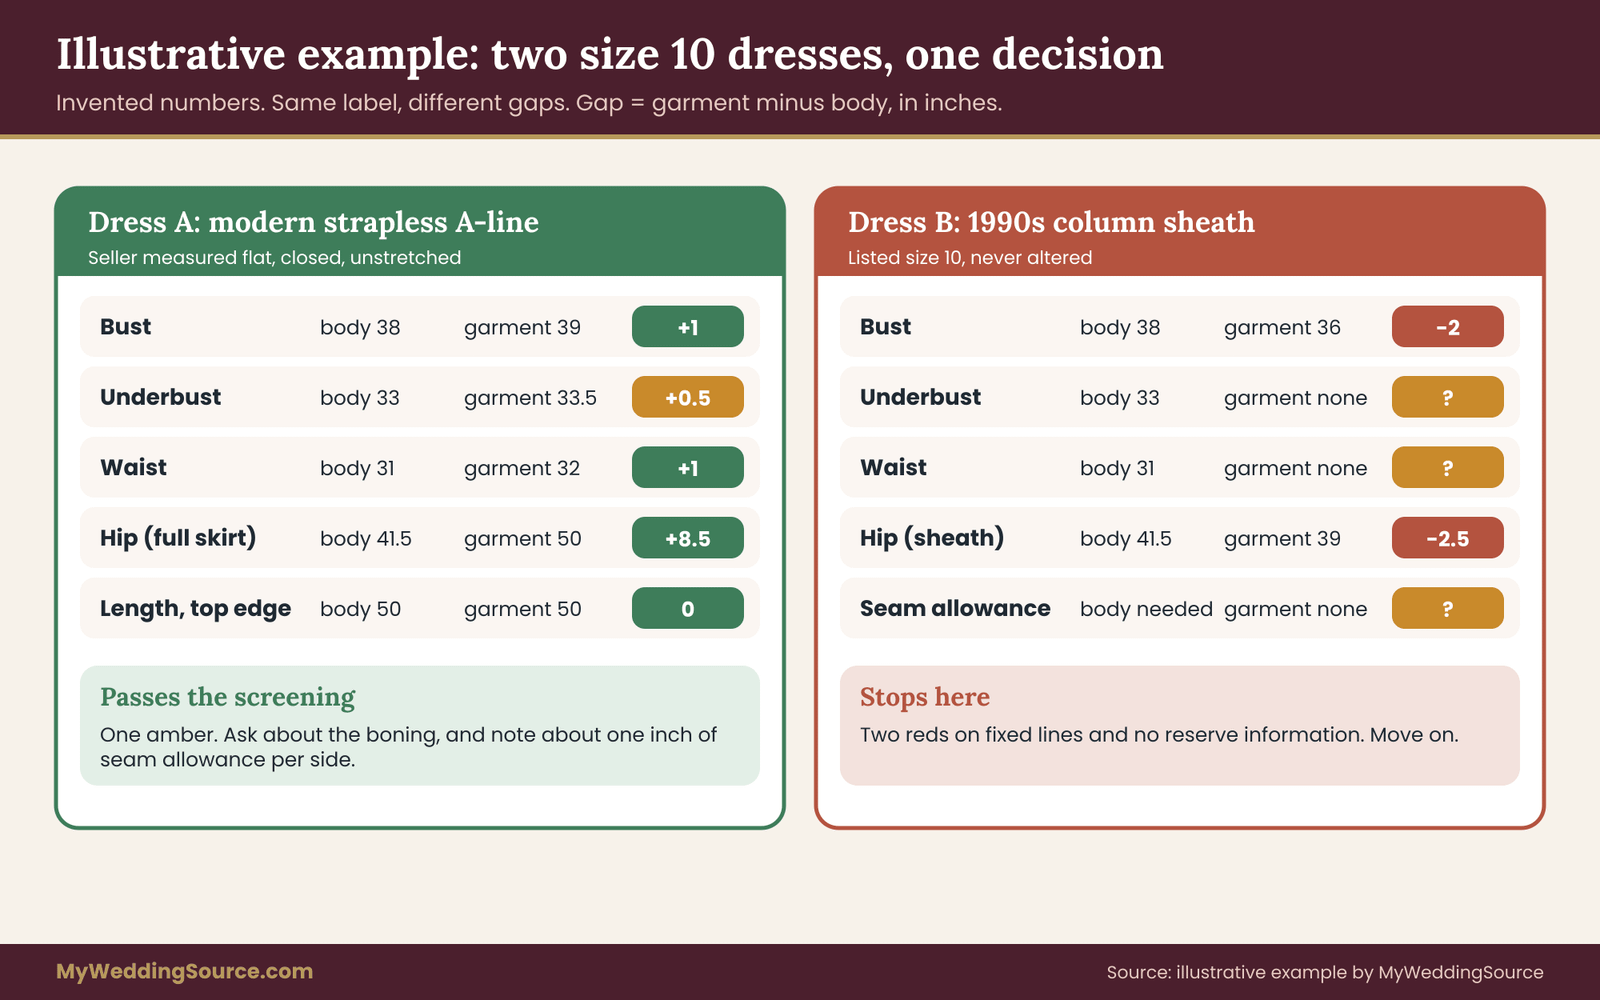
Maya is shopping for a secondhand gown. Her body card reads: bust 38, underbust 33, waist 31, hip 41.5, back width 14, torso length 16.5, and from the top edge of a strapless bodice to the floor in her planned shoes, 50 inches, all measured while wearing her intended bustier. She has found two listings, both labeled size 10.
Dress A is a modern strapless A-line. After a polite message, the seller reports flat figures: bust across 19.5, underbust across 16.75, waist across 16, and the skirt across at eight inches below the waist seam, 25. The seller also reports that the top edge to hem is 50 inches, and that the side seams have about one inch of allowance.
Doubled, the garment reads: bust 39, underbust 33.5, waist 32, skirt at eight inches below the waist 50. Dress measurements are only as good as the tape and the care behind them.
Maya subtracts. Bust gap is plus 1, green. Underbust gap is plus 0.5, amber, because the bodice is boned and has almost no breathing room. Waist gap is plus 1, green. The skirt figure is far larger than her hip, which is expected for an A-line, so the hip row is green. The length gap is zero, which means the hem will just clear the floor in her shoes, so she marks it green but notes that a hem is easy to lift later and impossible to extend.
The reserve is about one inch per side seam. One amber, with a confirmed reserve of about one inch per seam. Dress A passes the screening, and Maya adds a line to her worksheet: ask whether the boning can be released slightly at the underbust.
Dress B is a 1990s column sheath, listed “size 10, never altered.” The seller reports flat bust across 18 and hip across 19.5, with no seam information. Doubled, the garment reads bust 36 and hip 39. Maya’s gaps are minus 2 at the bust and minus 2.5 at the hip. Both are red. A sheath has no skirt fullness to rescue the hip, and the bust is two inches smaller than she is. There is no reserve information to appeal to. Dress B ends the comparison.
Notice what happened. Both dresses wore the same label, and the label gave Maya no way to tell them apart. The dress measurements separated them in about ten minutes of arithmetic, and without anyone having to be dishonest.
What Maya does next
With Dress A, she asks the seller two more questions: whether the dress closes with a zipper or lacing, and whether she can return it if her specialist finds a problem. She asks her alterations specialist to look at the photos and the dress measurements before she buys, and she asks the seller to confirm the figures in a message she can save. The dress measurements and the message become her record of what the seller said.
She does not rush. She has a worksheet with a verdict, a cost line and a document trail. That is a calmer place to buy from than a tag that says 10.
Why older dress measurements drift from the original
A gown that has hung in a closet or lain in a box for decades is not the same object it was on the day it was sold. When a seller lists a vintage or heavily worn dress, the numbers you are given describe its present state, and the present state can differ from the maker’s original dimensions in several ways. None of them is unusual, and each one changes how you read the dress measurements.
Fabric relaxes or shrinks. Silk and other natural fibers can lose tension, and a bodice that was cut firm may now measure slightly more than it did. Some rayon and acetate fabrics shrink with cleaning, moisture or heat. A dress that has been cleaned a few times may sit a little smaller than the garment first sold. This is one reason to ask whether the figure was taken before or after cleaning, and to ask for the date of the last cleaning.
Seams distort. Weight in a heavy skirt pulls on the waist seam over years of hanging. If a dress was stored on a hanger by the shoulders, the bodice may have stretched downward. A dress stored flat in a box with tissue and no folds across the bodice tends to keep its shape better. Ask how it was stored; the answer is a small clue about how much to trust the measurements. Save the dress measurements together with the listing and the date.
Prior alterations used up the reserve. This is the most important of the drift factors for buyers. Every time a gown has been taken in, the fabric beyond the seam was either cut off or folded inside. A dress that has been taken in is more likely to have a lot of reserve left, if the excess was folded and not cut.
A dress that was let out has little left. A dress that has been both taken in and let out may have visible needle holes and weakened fabric along the seam lines.
Boning and corsetry change. Plastic boning can crack; metal can rust, and a corset’s lacing may have been replaced. A new back panel can change the closed measurement of the bodice by several inches, even if the front is untouched. Ask whether the boning is original and what the closed back measurement is.
Padding is added or removed. Built-in bust cups, hip pads and petticoats shape the garment. If the cups have been removed, the bust measurement may read the same while the shape changes entirely.
The label no longer matches the maker’s chart. Older dresses were often made in different size schemes from today’s. Vintage patterns, in particular, ran on charts that assumed different underwear and body proportions. A label from the middle of the last century does not map onto a modern size, and you should not try.
How to read a vintage figure
When a listing for an older gown gives dress measurements, treat the numbers as the best available description of the dress as it is now, and treat the dates and storage history as a reliability guide. A figure from a seller who has laid the dress flat, measured it closed and photographed the tape is stronger than the same figure from someone who is repeating the old label.
For deeper checks on fabric condition, including how to tell sound silk from weakened silk, the guide to what the fit and alterations process involves is a better companion than this article, and the American Institute for Conservation publishes general care information for textiles, which is listed in the sources. Fabric that is weak cannot be let out, taken in or hemmed without risk, so the condition question comes before the alteration question. If the dress measurements change after a question, note both versions.
A caution about “fits like” claims
Listings sometimes say a dress “fits like a modern 6” or “runs small, order up two sizes.” These are impressions rather than measurements, and they come from one person’s experience of one gown. You can use them as a prompt to ask for numbers, but not as a replacement for them. If the seller truly knows the dress runs small, they can tell you by how many inches, and a seller who cannot translate “runs small” into a number may not know.
How much alteration room dress measurements can show
Once a dress passes the first screening, the question becomes: how much can it change, and in which direction? Reading the reserve is the part of the process where a seller’s attention to detail pays off, and where your questions can change the outcome. Dress measurements can show a problem long before shipping costs do.
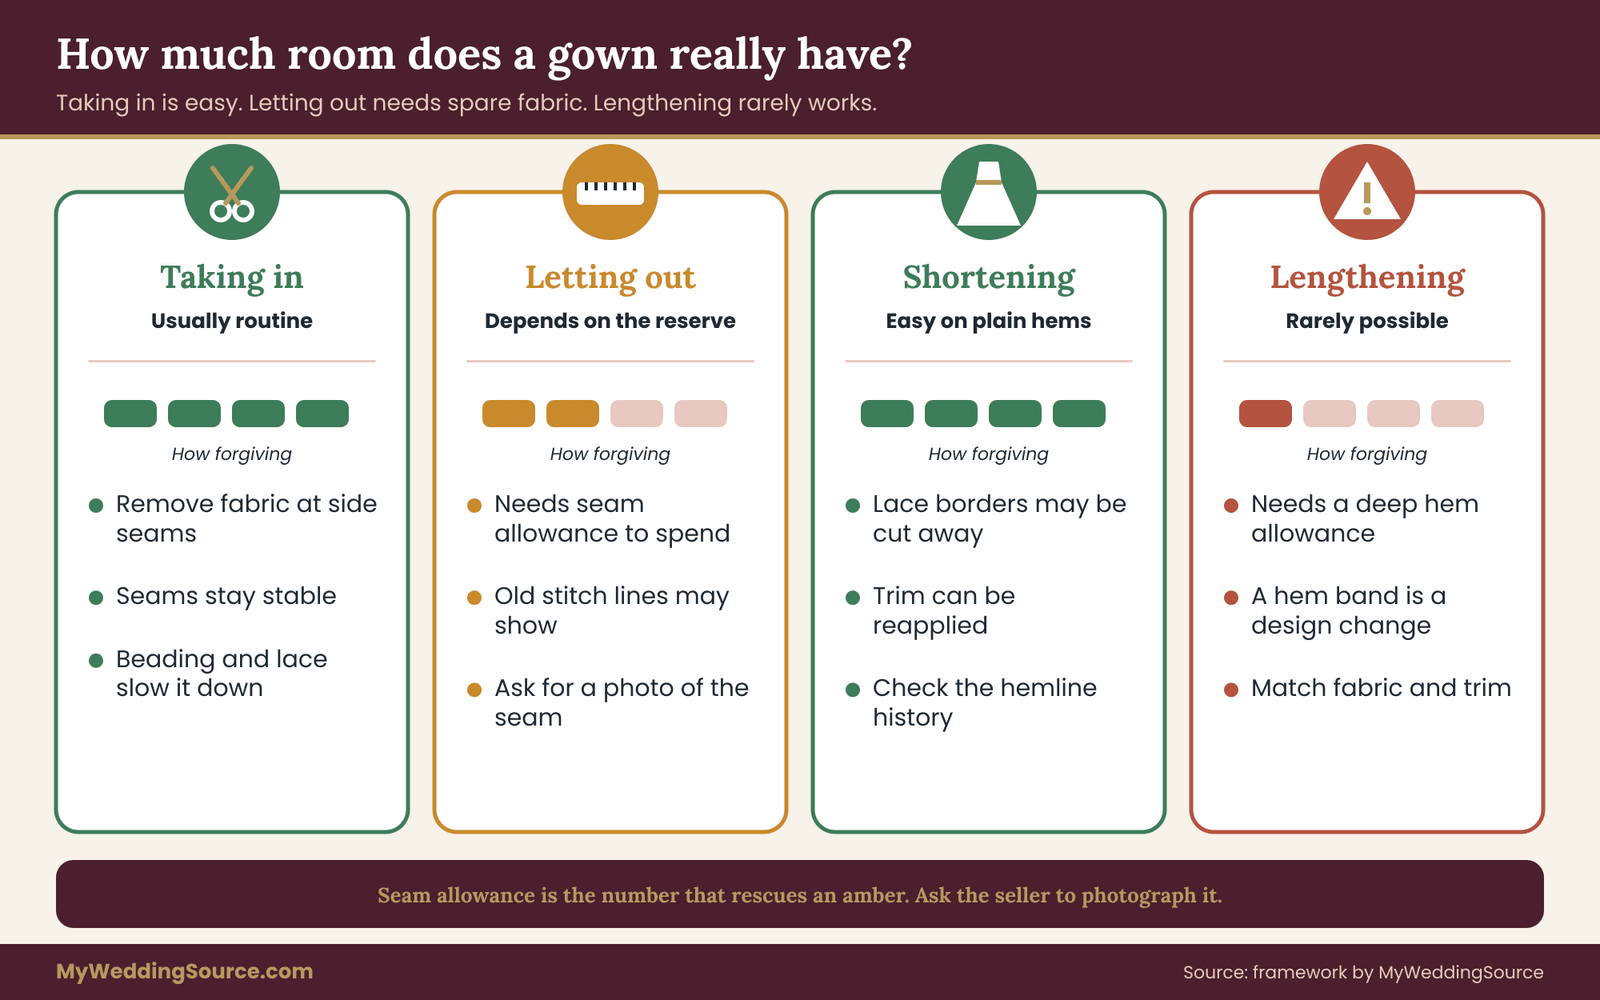
The general principle is simple. Taking a garment in is easy and usually safe, because you remove fabric and the remaining seams are stable. Letting it out is harder, because you need spare fabric to use, and the old seam lines may leave marks. Lengthening a skirt is hard, because there is rarely extra fabric at the hem. Shortening is easy unless trim is in the way.
That asymmetry should shape which gaps you accept. A dress that is two inches too large at the waist is a modest job. A dress that is two inches too small at the waist is a gamble that depends on reserve and fabric.
Where the extra fabric lives
If the dress has a zipper and side seams, ask the seller to open the lining at the side seam and photograph the allowance, with a ruler or tape in the frame. If the dress has a center-back seam, ask the same. Many gowns carry reserve in the center back as well, because that is where most adjustments are made.
A corset back, in contrast, adjusts by lacing and often has a gap that can be widened or narrowed, so ask about the closed measurement and the open measurement and find out how far apart the back panels sit when laced as you will wear it.
Bodice seams with lace or beaded appliqué over them are harder to alter, because the decoration crosses the seam and has to be taken apart and reapplied. If the lace crosses the side seam, take the reserve with a grain of salt, because the work involved is a different job than the number suggests. Dress measurements also shape the budget, since each gap can become a task.
Skirts have their own reserve. A hem with a deep turned-up allowance, sometimes several inches, can be let down for a taller wearer. Lace borders and scalloped hems do not lengthen without losing their design. Ask if the hem has been shortened before, and where the original hemline was.
What you can reasonably expect, and what you should confirm
A specialist can tell you what a particular garment can handle, and you should treat any statement in this article as a starting point. A few patterns are common enough to be worth knowing.
Dress measurements that are larger than yours by three or four inches at the waist or bust are a routine take-in on most gowns, though structured and beaded bodices take more time. Dress measurements that are smaller than yours are workable only when the reserve is known and sound. Length and hem changes are straightforward on plain hems and complicated on decorated ones. Shoulder and sleeve changes are the most expensive and least reliable, which is why back width and sleeve numbers carry a lower tolerance than the waist.
None of that replaces a fitting. If you are choosing between a dress that needs only a hem and a dress that needs a rebuilt bodice, you do not need an expert to tell you which is the safer buy. Seen this way, dress measurements are a record as much as a calculation.
Put the reserve in the listing conversation
When you message a seller, ask for the reserve as a question about the dress, not about the price. “Can you tell me how much seam allowance is left in the side seams?” is a neutral question and a seller who has looked will answer it. If the seller has not looked, ask if they are willing to. The answer might come back as “about one inch each side” or “none, it was taken in.” Either way, you now know something you did not.
If a seller refuses to check or cannot, include that in your risk assessment. A dress with a pass on the first screening and an unknown reserve is a moderately risky buy, and your price tolerance should reflect that. Keep the dress measurements for dresses you pass on, too.
A note on custom and made-to-measure gowns
Some secondhand gowns began as custom orders. These are tricky for two reasons: the label is meaningless, and the dress was cut to a specific body. A made-to-measure gown may carry a tight fit that was right for its first wearer and wrong for almost anyone else, with no generous reserve, because the seamstress cut close. When a seller says the dress was custom, ask for the original body measurements, if they exist, and compare them to yours.
A gown made for someone whose proportions were close to yours is a very good find; a gown made for someone who was quite different is likely to be more work than it is worth.
Comparing secondhand dress measurements against a maker’s chart
Sometimes a seller can give you the maker’s name and the original size but cannot measure the dress, or measures it in a way you do not trust. In that case a manufacturer’s published chart is a second source. It is a weaker source than a tape on the actual garment, but it can help you decide whether a listing is worth a follow-up message.
The method is the same as the worksheet, with one difference: you are comparing your body to a chart, and the chart describes a body, not a garment. A bridal chart usually lists the body measurements a size is designed for, such as a bust of 36 and a waist of 29. Compare each of your body numbers to the chart’s body numbers, and size by the largest of them, because a bodice that fits the bust and not the hip is a bodice that does not fit.
There are three common traps.
The chart may belong to a later year. Makers revise charts. The chart on the maker’s website today may differ from the one in force when your dress was made. If the maker still lists archived charts, use the one from the right year. If not, treat the chart as a hint only.
A chart describes the sample, not the dress in front of you. Even when the chart is the right one, individual gowns can differ from the chart because of handwork, fabric choices, previous alterations and cleaning. The chart tells you what the maker intended. The tape on the garment tells you what exists. Dress measurements in a sensible order make the decision feel smaller.
A chart size is not a fit promise. Many bridal makers tell buyers to order by the largest measurement, and then rely on alterations to bring the gown in. A dress ordered that way may carry a label several sizes above the wearer’s street size. That is normal for bridal, and it is another reason to bring your own numbers and not your own tag.
What to do when no numbers are available
If no figures are available from the seller and no chart is available from the maker, you are buying blind. That can still be a reasonable choice for a low-cost dress, a dress you can try on locally, or one with a clear return policy. For an expensive dress, a blind purchase is a poor risk, and the reasonable answer is to wait for a better-documented listing. Dress measurements from the seller and from you should use the same starting points.
If you are working with a local consignment shop, ask whether you can try the dress and take photos. A try-on gives you information a listing cannot: how the fabric sits, how the closure behaves, whether you can sit down. Take your body numbers with you and write the garment numbers down in the shop, using the same method as above.
Use two dresses to calibrate your eye
If you have access to a dress that fits you well, even a bridesmaid dress or a formal gown, measure it flat with the same method you ask sellers to use. Compare its numbers to your body numbers, and you will learn what a comfortable gap looks like for you. This is a very useful calibration. A formal dress that fits well with a bust gap of one and a half inches tells you more about your tolerance than any rule in this article.
Keep the figures on your card and use them as a personal baseline. When a listing gives you a gap that is far from your baseline, you will notice.
Edge cases that change how you use dress measurements
The worksheet works for most buyers and most dresses. Several situations need adjustments, and in a few of them the best move is to slow down and ask for professional help.
Plus sizes and larger bodies. Many secondhand listings are written with small sizes in mind, and the measurement points may be hard to take on a larger garment. Ask sellers to measure with a long tape and to confirm the figure at the fullest point of the bust and hip. Bridal gowns in larger sizes are often cut differently, with more fabric in the sides and back, so a gown that was made in a larger chart may offer more reserve than a smaller one.
Check the reserve at every seam, and confirm whether the garment was cut or altered from a smaller pattern.
Tall and petite builds. Length numbers are the main difference. If you are tall, check hollow-to-hem and torso length with extra care, because a dress that is short in the torso can place the waist seam well above your waist, and that cannot be moved without rebuilding the bodice.
If you are petite, an overlong dress is more workable than it seems, but lace and beaded hems complicate it. In both cases, the worksheet’s position checks matter more than the circumferences. When dress measurements are close, ask about ease, closures and boning next.
Different top and bottom sizes. Many people measure in one size on the bust and a different size on the hip. A dress with a fixed bodice and a fixed skirt will fit one half and not the other. Look for gowns with adjustable bodices, such as lacing or buttons, or for styles with a full skirt that sits independently of the hip.
A big difference between bust and underbust. A person with a large bust and a small ribcage needs a dress whose cups and underbust are designed for it. A gown that matches the bust but is tight at the underbust will not close. Ask specifically about the underbust and the cup structure. A calm review of the dress measurements is better than a late-night guess.
Pregnancy and postpartum bodies. Bodies change quickly. Do not buy a fitted gown on current measurements if the timing is uncertain. Choose styles with adjustable closures and empire waists, and plan the final fitting as close to the wedding as the alterations specialist allows. This is also a place where the worksheet gets a second column: the measurements you expect on the wedding day.
Weight changes between purchase and wedding. If you expect your body to change, whether for health, training, medication or any other reason, avoid buying a gown that needs to be let out unless the reserve is large and confirmed. Buying a slightly large dress and taking it in is a safer path than buying a snug one and hoping. Keep the plan flexible, and do not set a body goal on the basis of a garment. Dress measurements give you something concrete to bring to a fitting.
Shapewear and foundation garments. The clothed state matters. If you intend to wear shapewear or a particular bra, measure in it, and also measure without it so you know the range. If the foundation changes your dress measurements by an inch or two, the dress should fit comfortably across the range or you should commit to the foundation and tell the specialist.
Dresses with built-in structure that cannot be seen. Boned bodices, built-in bras and sewn-in petticoats are part of the garment’s fit. When a seller lists a dress “with petticoat,” ask for the measurements both with and without it, because the petticoat can change the hem height and the skirt width.
Mobility and comfort needs. If you use a mobility aid, plan to sit for long periods or need to bend and reach, add movement checks to the worksheet. Measure your seated hip and your sitting hollow-to-lap length, and ask the seller for the skirt’s width at the knee. A fitted skirt that works standing may not work seated.
When to stop and get help
If your worksheet produces several reds and ambers, or if a dress is expensive enough that a wrong choice would be painful, take the dress measurements to a bridal alterations specialist before you pay. Many offer pre-purchase consultations. Bring the listing, the seller’s messages and your card, and ask for an honest opinion about how much work the dress needs and whether the fabric can take it.
The same approach is described, in the context of the larger decision, in the guide to making wedding decisions with a clear process, which treats a purchase like this as a decision with criteria and a deadline, not a hunch. Return to the dress measurements whenever a new detail appears in the listing.
Protecting yourself when the numbers turn out wrong
Even with a careful process, a dress can arrive that does not match what you were told. How well you can respond depends largely on what you did before you paid. The worksheet is a decision tool, but it is also a record, and the record is what carries weight with a seller or a payment platform.
Before you pay, save the listing and the numbers. Take screenshots of the full listing, including the dress measurements, the description and the photos, with the date visible. Save the seller’s message replies. If the seller sent photos of the tape or the seams, save those as well. This is the evidence of what was promised.
Ask for return terms in writing. Many private sellers say “all sales final.” Some will agree to a return if the dress does not match the dress measurements stated, especially if you ask before you buy. A consignment shop or resale site will have its own terms, and you should read them. Ask whether the return window starts on delivery or on shipment, who pays for return shipping and whether the dress must be unaltered and unworn. These are the questions that turn a vague promise into a rule.
Pay in a way that gives you recourse. Payment platforms and card issuers set their own rules for disputes and buyer protection, and those rules change. The Consumer Financial Protection Bureau publishes plain-language information on disputing card charges, and the Federal Trade Commission covers online shopping rights. Check the current terms on the platform you use before you pay, and avoid payment methods that offer no protection if the item is not as described. Dress measurements will not settle taste, but they settle most fit questions.
Check on arrival, and do it the same day. Unpack the dress carefully and take photos before you touch it. Lay it flat, close it and measure the same points the seller measured, with the same tape technique. Write the figures on the worksheet next to the seller’s dress measurements. A mismatch of half an inch is normal; a mismatch of two inches is a reason to write to the seller within hours.
Write to the seller with the dress measurements. A message that says “the bust measures 36 inches closed and flat doubled, and your listing said 39” is much stronger than “it does not fit.” Attach photos of the tape and the garment, quote the original message and ask what the seller proposes. Keep the tone factual. Most disputes resolve at this stage if you are specific and calm.
Do not alter the dress before the dispute is settled. Taking a dress to a seamstress, or even trying it on with pins, can weaken a return claim. If you need a professional opinion, ask the specialist to examine and measure the dress without altering it, and get the opinion in writing.
Insurance, shipping and the chain of custody
A dress that is lost or damaged in the mail is a separate question from a dress that is the wrong size. If you are buying across a distance, ask how the dress will be shipped, whether it is insured and who bears the risk in transit. The United States Postal Service publishes its own insurance and tracking terms, and other carriers have theirs. Keep the tracking record and photograph the package on arrival, including any damage to the box, before opening it.
Keep one folder for each dress you seriously consider
Even the dresses you do not buy produce information. Keep the worksheet, the messages and the dress measurements in one folder for each, so that when the next listing comes along you can compare it to the previous ones. Over a few weeks you will build up a clear picture of what the market near you looks like, which gaps you can live with and which sellers give good information.
If you later hire vendors or buy other items secondhand, the same habits carry over, and the wedding vendor contract guide explains how to read written terms before you sign.
Decide your walk-away rule in advance
Before you start looking at listings, write down the conditions under which you will not buy. For example: no gown with a red at the bust or hip, no gown without dress measurements in writing, no gown without a return window you can accept. Decisions made while looking at a beautiful photograph tend to bend. Decisions made in advance, on a calm evening, tend to hold.
Your next steps
Work through these in order, and stop when you have what you need.
- Take your body measurements twice, on two mornings, in the clothes you plan to wear, and put them on a card with the date.
- Add the extra numbers: back width, torso length, underbust, upper arm and hollow-to-hem in your planned shoes.
- Build one worksheet per dress, with the gap, reserve and verdict for each row.
- Send each seller the same short message asking for flat, closed, unstretched figures, the waist-seam position and the seam allowance.
- Double any flat numbers, calculate the gaps and mark each row green, amber or red.
- Drop any dress with a red at the bust, underbust, back width or a fitted hip. Get a written estimate for any dress with two or more ambers.
- Save the listing, the messages and the return terms before you pay.
- Measure the dress on arrival and compare it to the seller’s dress measurements the same day.
For where this fits in the larger timeline, see the wedding planning checklist, and the wedding vendor timeline for when to book an alterations specialist.
FAQ
Do I need to know my exact size to buy a secondhand wedding gown?
No. You need your measurements, not a size. A label tells you which chart a maker used at the time, and that chart may not be available. Your bust, waist, hip, underbust and length in inches or centimeters let you compare any garment to your body, whatever it says on the tag.
Should I double the seller’s measurements?
Only if they are flat. A flat measurement is taken straight across the garment laid on a table, so doubling gives the circumference. If a bridal bust figure is near eighteen, it is almost certainly flat. If it is near thirty-six, it may already be doubled. Ask the seller to say which, in writing.
How much bigger than my body should the dress be?
It depends on the style and the fabric. A woven, boned bodice usually needs a little room beyond your body number so you can breathe and move, while stretch fabrics need less. Treat any figure as a starting point and confirm it with an alterations specialist who can see the gown.
Is a dress that is too big easier to fix than one that is too small?
Usually, yes. Taking fabric in removes material and leaves stable seams, while letting a dress out needs spare fabric and may leave marks. Length and hem work is easy on plain hems and hard on lace borders. Ask the seller how much seam allowance remains before you count on letting anything out.
What if the seller will not measure the dress?
Try asking for a smaller set of figures, such as the bust, waist and length, or a photo of the tape. If the seller still declines, treat the listing as unverified and weigh the price against the risk. For an expensive gown, waiting for a better-documented listing is usually the safer choice.
Can I trust the size chart on the maker’s website?
Treat it as a hint. Charts describe a body the maker designed for, not the garment you are buying, and makers revise them over time. Alterations, cleaning and age can also change a particular gown. A tape measure on the actual dress is the stronger evidence, and a chart is the fallback.
What should I do if the dress arrives and does not match the listing?
Measure it the same day, using the same points as the seller, and photograph the tape. Write to the seller with the listing figures and your figures side by side, keep the dress unaltered, and check the return terms and the platform’s current dispute rules. Calm, specific numbers are the strongest starting point.
Do the same dress measurements work for vintage gowns?
The method does, but the numbers deserve more caution. Older fabric can stretch, shrink or weaken, and past alterations may have used up the seam allowance. Ask about storage, cleaning and earlier changes, and have a conservator or specialist assess fragile fabric before you plan any alterations.