
Shoe embellishments are the beads, pearls, crystals, bows, appliqués and buckles added to wedding shoes, and each one is a small decision about weight, attachment and what it might catch on. This guide gives you a snag simulation you can run at home, a weight check, a comparison of attachment methods and a repair kit checklist, so you can keep the sparkle without gambling with your gown.
Before you commit to any shoe embellishments, test them against a scrap of your actual dress fabric. Drag the swatch across the shoe, step over a hem, rub the inner sides together, sit and stand, and turn on a dance floor. Score each test from zero to three, add the numbers, and use the total to decide whether to keep, modify, cover or swap the pair. Weigh both shoes, ask the seller how each piece is attached, and pack a small repair kit for the day.
Most advice about wedding shoes is about comfort, and that matters. But a pair of shoes can be comfortable and still do quiet damage. A single raised crystal prong can pull a thread in tulle. A loose pearl can slide into a hem and travel across the floor all evening. A stiff bow can dig into the opposite ankle every time you walk. None of that shows up in a product photo, and almost none of it shows up when you try the shoes on in a shop with no dress on.
This article is about that gap. It treats shoe embellishments as a risk you can measure rather than a feeling you hope will turn out fine. You will not need special equipment. A scrap of fabric, a kitchen scale, a notebook and a free afternoon are enough.
A note on scope. This is general information, not legal, tax or financial advice. Foot comfort is individual, so nothing here is medical guidance, and anyone with a foot condition should ask a podiatrist or a qualified footwear fitter before choosing a pair. The tests below are home checks, not laboratory results, and they cannot promise that nothing will ever snag.
What shoe embellishments are and why they deserve a test
Shoe embellishments cover anything that is added to the surface of a shoe after the basic shape is made. That includes beaded and pearl trim, crystal or rhinestone clusters, sequins, lace appliqué, fabric or ribbon bows, brooches, buckles, ankle chains, charms, tassels and feathers. Some are sewn in the factory. Some are glued. Some are clipped on and come off. A few are part of the shoe’s structure, such as a jeweled strap that also holds the foot in place.
The reason to test them is simple. Your gown is almost always made of something delicate, and your shoes spend the whole day within a few inches of the hem. Every step brings the fabric and the shoe closer together. When you lift a foot to climb stairs, step into a car or turn on a dance floor, the hem swings across the shoe. If anything on the shoe has a hook, an edge or a rough surface, the fabric has a chance to catch.
Three things go wrong most often with shoe embellishments.
Snagging. A thread in the gown is pulled or caught. This is most likely with tulle, chiffon, fine lace, organza, silk charmeuse and anything loosely woven. Beaded fabric can also catch, because beads on the dress can hook onto beads on the shoe.
Shedding. A bead, pearl, crystal or sequin comes loose and falls off. The loss is usually small, but a gap in a pattern looks odd in photographs, and a loose piece on a hard floor is a slipping hazard for you and for guests.
Weight and drag. Heavy trim at the toe or on the ankle changes how the foot swings. You may feel it as tired calves after an hour of dancing, or as a slight dragging toe that catches the hem when you step forward.
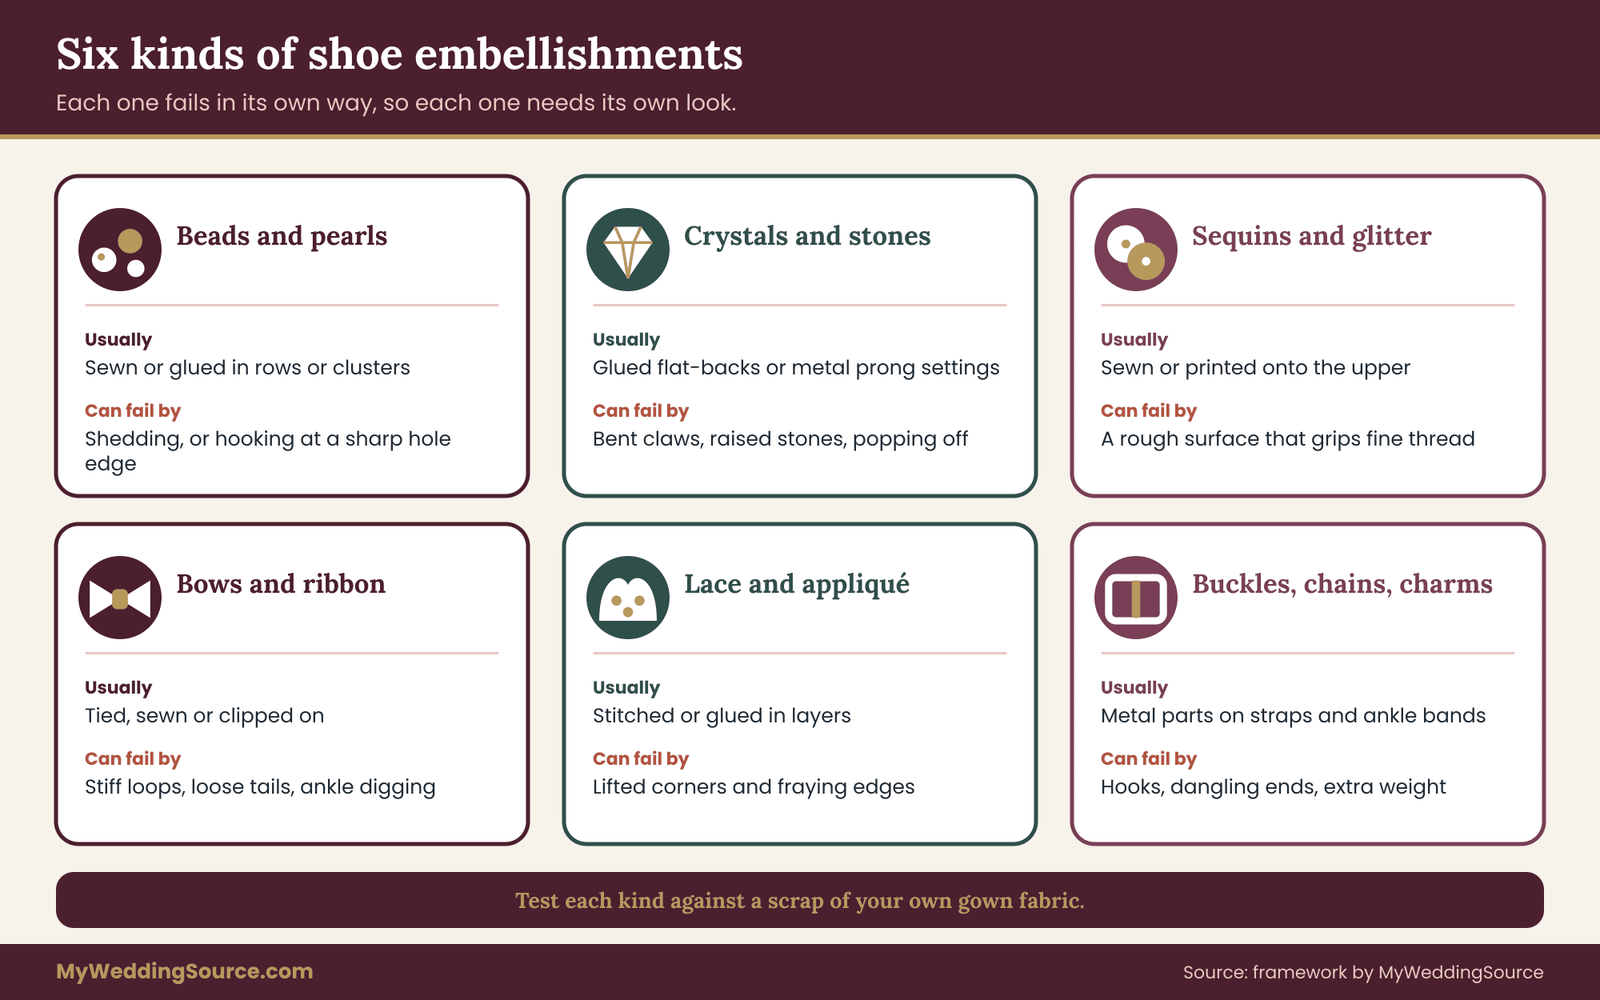
None of these problems means you should avoid shoe embellishments. Many couples want a bit of sparkle and a pair that matches the dress, and plenty of embellished pairs are perfectly safe with the right gown. The point is to know which pair you have, rather than learning on the day. Good shoe embellishments should survive a ten-minute test at a kitchen table.
What this guide leaves to other articles
Shoe choice has many layers, and this site covers them in separate guides. If you are still deciding on heel shape, hem clearance and the surface you will walk on, the bridal shoe selection walk test is the place to start. If your main worry is blisters, the shoe break-in schedule covers wear sessions and hotspot logs. Flats and heel protectors have their own guides too.
Shoes are only one part of what you carry and wear, which the wedding-day accessories guide lays out as a whole. Here the question is narrower: what happens when decorative parts on the shoe meet the fabric of your gown, and what you can do about it.
If you have a beaded gown, the dress itself also needs care, and the guide to beaded dress care, snags and repairs covers triage and professional repair. This guide focuses on prevention at the shoe.
Who should test shoe embellishments
Anyone buying or already owning shoes with raised or loose shoe embellishments should run them. That includes people choosing a plain gown with a very decorated shoe as the statement piece, and people choosing a heavily beaded gown who want a discreet shoe. It also includes guests in formal dress and wedding party members, though the stakes are highest for the person in the most delicate fabric.
If your shoes are completely smooth, such as plain satin or leather with no trim, you can skip most of the simulation. A quick drag test takes a minute and is still worth doing, because buckles, heel details and stitching can surprise you.
How snagging actually happens at the shoe
It helps to picture the mechanics before you test anything. A snag is not a mysterious event. It is a thread, or a loop of yarn, that gets caught on something and pulled out of its place in the weave. Once you know what does the catching, you can look at a shoe and make a fair guess about where the risk sits.
The four catching features
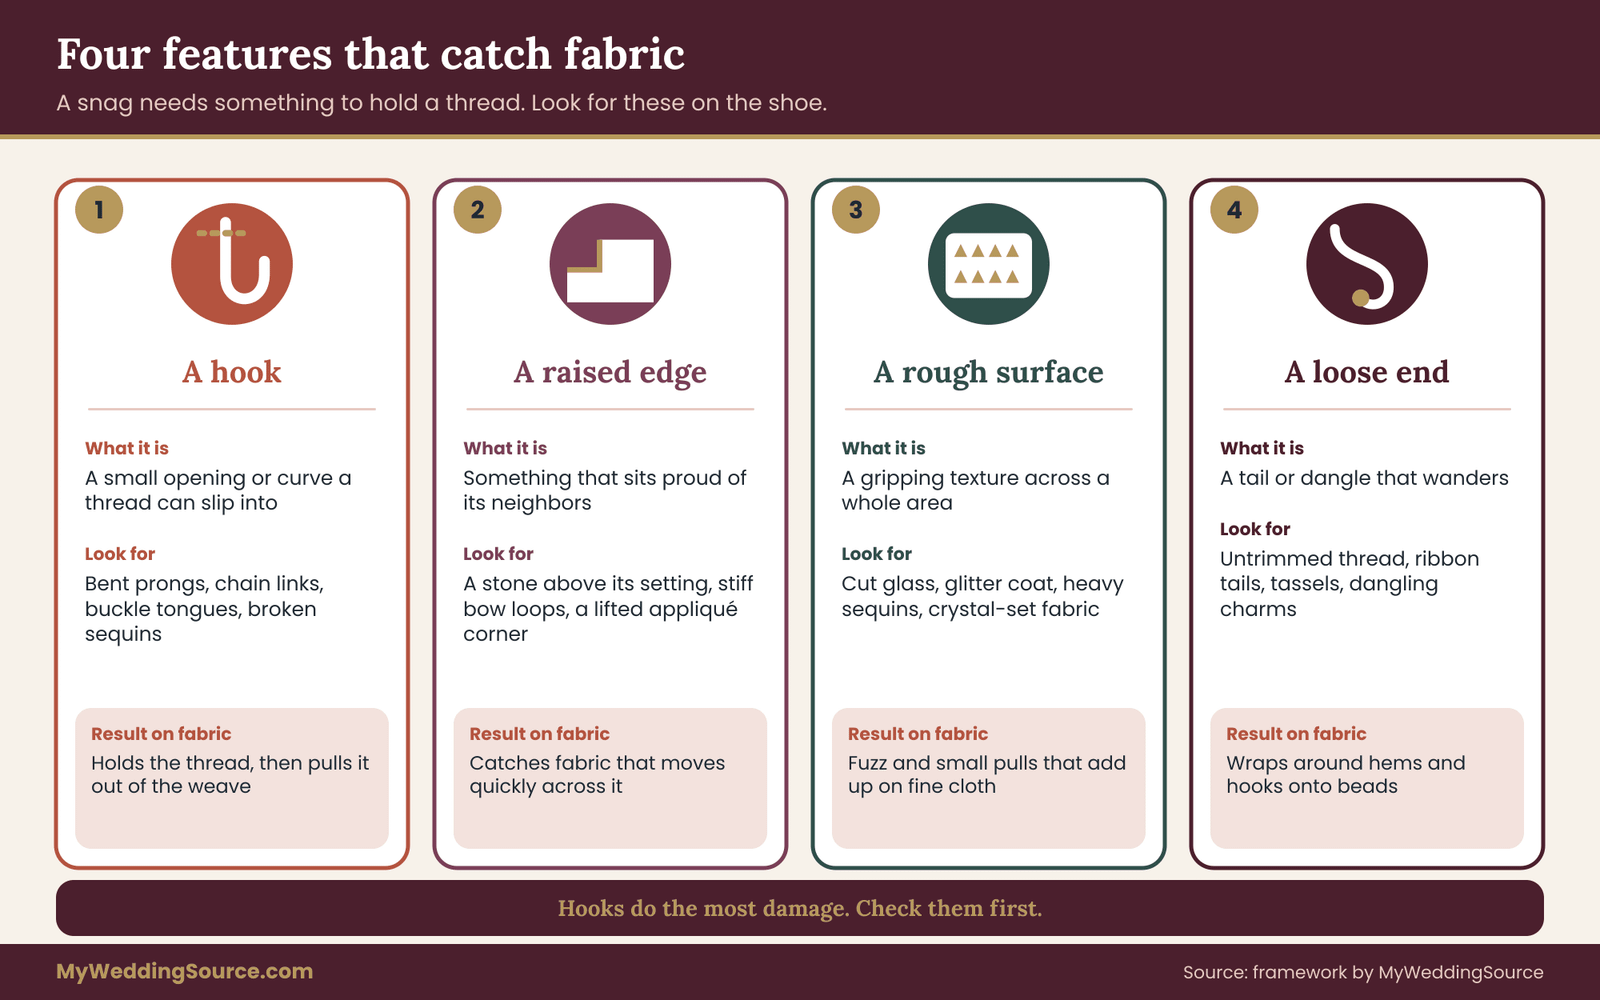
Almost every snag on a shoe comes from one of four features.
A hook. Anything with a small opening or curve that a thread can slip into. A prong that has bent outward, a bead with a sharp hole edge, a chain link, a buckle tongue and a broken sequin all count. Hooks are the worst offenders because they hold a thread rather than just touching it.
A raised edge. A crystal that sits proud of its setting, a stiff bow loop, a layered appliqué with a lifted corner or the rim of a metal plate. Fabric dragging across an edge can catch at the edge, especially when it moves quickly.
A rough surface. Cut glass, glitter coating, crystal-set fabric and heavy sequins create a surface that grips lightly across a whole area. This kind of snagging tends to produce fuzz and small pulls rather than one big hole, but on fine fabric it adds up.
A loose end. An untrimmed thread, a loose ribbon tail, a dangling chain or a tassel. Loose ends wander, and they wrap around hem details and beads.
The fabric side of the equation
The same shoe will behave differently against different fabrics. A tightly woven mikado or heavy satin is hard to snag, because the threads are packed close and the surface is smooth and stiff. Crepe is similar. Loosely woven or open fabrics catch much more easily: tulle, chiffon, organza, fine knits and any lace with open areas.
Beaded and sequined fabric behaves in its own way. Here the gown rarely loses threads to the shoe, but the beads on the dress and the shoe embellishments on the pair can lock together. Pearls on a hem can hook around a crystal prong. A sequin edge can slide under a bow loop. The result is a tug on the gown that rips the stitches holding the beads, not a pulled thread.
For this reason your test fabric should always be a real offcut or hem allowance from your own gown. Ask your seamstress or dress shop whether you can have a palm-sized swatch from inside a seam allowance. The wedding dress fit and alterations guide explains how fittings work and when to bring the shoes, and that conversation is a natural moment to ask for a scrap.
When the shoe is not the snagging culprit
Be careful about blaming the shoe too fast. Zippers, hook-and-eye closures, exposed boning, a bracelet clasp, a ring setting and the edge of a heel can all catch a gown. After a snag, check the other sources before you decide the shoe is at fault. This matters because a shoe that has been blamed wrongly may get rejected or covered, while the real cause stays on your wrist.
A simple way to check is to run the drag test with the shoe alone, then with the shoe and the rest of your accessories on, and compare results. Where possible, look at the damage itself. A pull near the hem at ankle height suggests the shoe. A pull at hip level suggests something else.
Mapping where shoe embellishments sit on the foot
Where a piece sits on the shoe matters as much as what it is. A flat pearl on the outside of the heel counter might never touch the dress. The same pearl on the inner edge of the vamp will brush the opposite shoe on every step. Think of the shoe as a map with six zones, each with its own contact pattern.
Zone one, the toe box. The front of the shoe is the part that leads the foot forward. In a long gown, the hem often rests on or just above the toe. Embellishments here face the hem on every step, and they face stairs and car doors too. Bows and crystal clusters at the toe are common, and they are the most likely to be stepped on by a bridesmaid or the groom as well.
Zone two, the vamp and instep. The top of the foot, where the strap or throat of the shoe sits. This zone sees hem fabric lifting and falling as you walk, and it is where the fabric lies when you stand still. Shoe embellishments here are visible in photos, but they also take much of the contact.
Zone three, the inner side. The side of each shoe that faces the other shoe. This is the most overlooked zone. Because your feet pass within an inch or two of each other, anything raised on the inner side contacts the opposite shoe, your tights and the gown’s lining. Hooks here can catch the hem from underneath.
Zone four, the outer side. Less contact with the other shoe but more with chairs, car doors and other guests. Raised shoe embellishments on the outer side often catch on upholstery rather than on the dress.
Zone five, the ankle and strap. Buckles, chains, charms and bow ties around the ankle sit just under the hem. They are the main source of hem hooks, because they stay at the height where fabric falls when you stand.
Zone six, the heel. Heel details such as crystals on the back stem, wrapped fabric or a decorative cap. Contact is mostly with the hem at the back, when you step back, sit down or climb into a car.
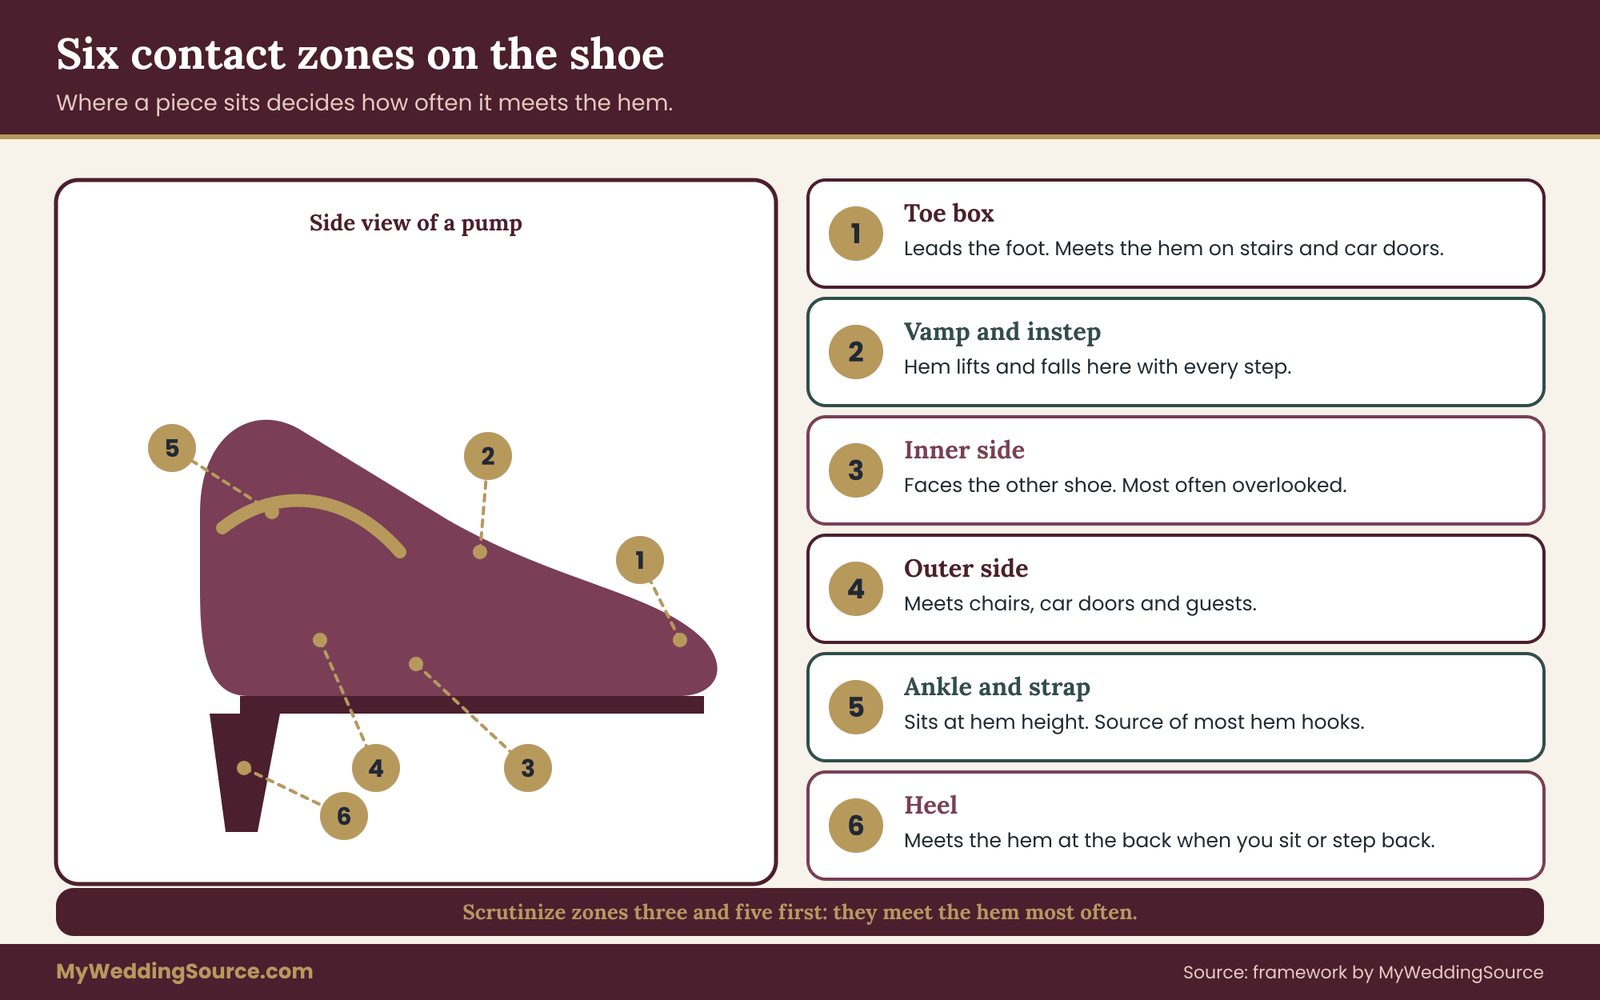
Use the six zones to draw a quick note for your pair: list each of the shoe embellishments, giving its zone, its type from the four catching features, and whether you can feel anything rough with a fingertip. A bow at the toe, a crystal at the ankle strap and a bead cluster on the inner side are three very different risks, and the map helps you spend your testing time where it counts. Shoe embellishments in zones three and five deserve the most scrutiny, because those zones meet the hem most often.
Setting up a snag simulation for shoe embellishments
A snag simulation is a short, repeatable set of tests that mimics what your gown and your shoes will do to each other. It is not a laboratory method, and it will not produce a number that means anything outside your own notebook. Its value is comparison: one pair against another, or one fix against none, using the same fabric and the same motions each time. That is the right way to judge shoe embellishments: by comparison, not by one dramatic result.
What you need on the table
Gather a short list before you begin.
- A palm-sized swatch of your actual gown fabric, ideally cut from a seam or hem allowance by a seamstress. If the gown is not made yet, ask the shop for a fabric sample of the same type, and repeat the test after delivery.
- Both shoes of the pair, unworn if you still want to return them. If the return policy forbids wear, the simulation can be done by hand without putting the shoes on, as described below.
- A kitchen or postal scale that reads in grams or tenths of an ounce.
- A flashlight or phone light, to look along the surface of the fabric after each test.
- A notebook or a printed score sheet with one row for each of the shoe embellishments.
- A magnifier or the zoom on a phone camera, for checking pulled threads.
- Clean, dry hands and a clean tabletop. Skincare lotion and food oils on your hands can mark satin and silk.
If you cannot get a swatch, a sheer scarf, a scrap of tulle from a craft store or an old chiffon blouse hem makes a reasonable stand-in for the most delicate case. A stand-in tells you whether the shoe is a risk for fine fabric. It does not tell you how your particular gown will behave, so treat a pass as a yellow light rather than a green one.
Photograph the pair first
Before any testing, photograph each shoe from the side, the inside, the top and the back. Take one close picture of each cluster or bow. These pictures are your baseline. If a bead later loosens or a crystal tilts, you can see whether it was already crooked, and if you return the pair you have a record of its condition. The photos also help when you ask the seller or a repairer a question, because you can point to a specific zone.
Decide what counts as a snag from shoe embellishments
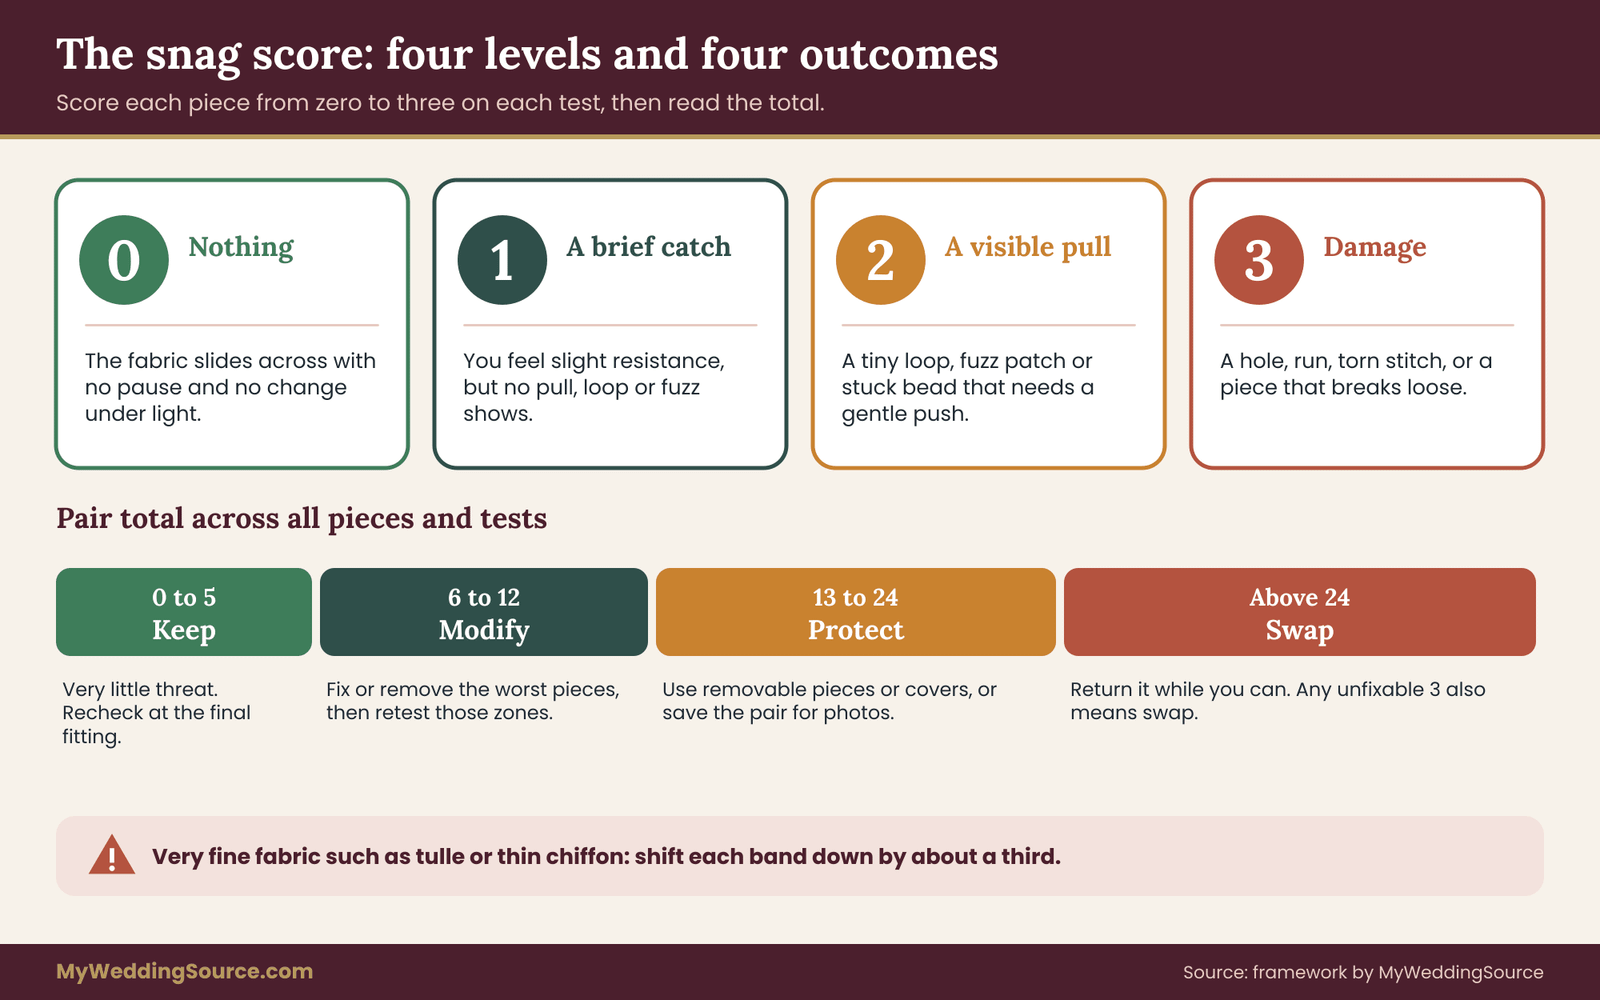
A scoring system is only useful if you apply it the same way every time. For this guide, use four levels of what you find on the swatch after a test.
Level zero. Nothing. The fabric slides across without a pause and shows no change under light.
Level one. A brief catch you can feel as a slight resistance, but no pulled thread, loop or fuzz is visible when you hold the fabric under a light.
Level two. A visible tiny pull, a raised loop of thread, a patch of fuzz or a stuck bead that needs a gentle push to free.
Level three. A hole, a run, a torn stitch, a thread pulled out of place across more than a fingernail width, or any piece of the shoe that breaks loose and stays on the fabric.
Write these four levels on your score sheet, so you do not argue with yourself later about whether a catch was a one or a two. When in doubt between two levels, record the higher one. The simulation is meant to err on the side of caution.
Testing without wearing the shoes
If you are within a return window that excludes worn shoes, you can still run most of the simulation.
Hold the shoe in your hand with the sole facing away from you, and use the other hand to drag, brush or swing the swatch over the surface in the way the dress would. The tests where your body matters, such as the dance turn, can be approximated by holding the shoe at the angle it would sit on the foot and moving the swatch past it at about walking speed. This is less realistic than testing on the foot, but it catches most hooks and rough edges.
Check the seller’s policy before you wear anything. Wear on a clean, soft carpet for a few minutes is often allowed, but rules vary. For general consumer guidance on returns and refunds, the Federal Trade Commission’s consumer pages are a reasonable starting point, and the seller’s written policy is what decides your case.
Running the five snag tests
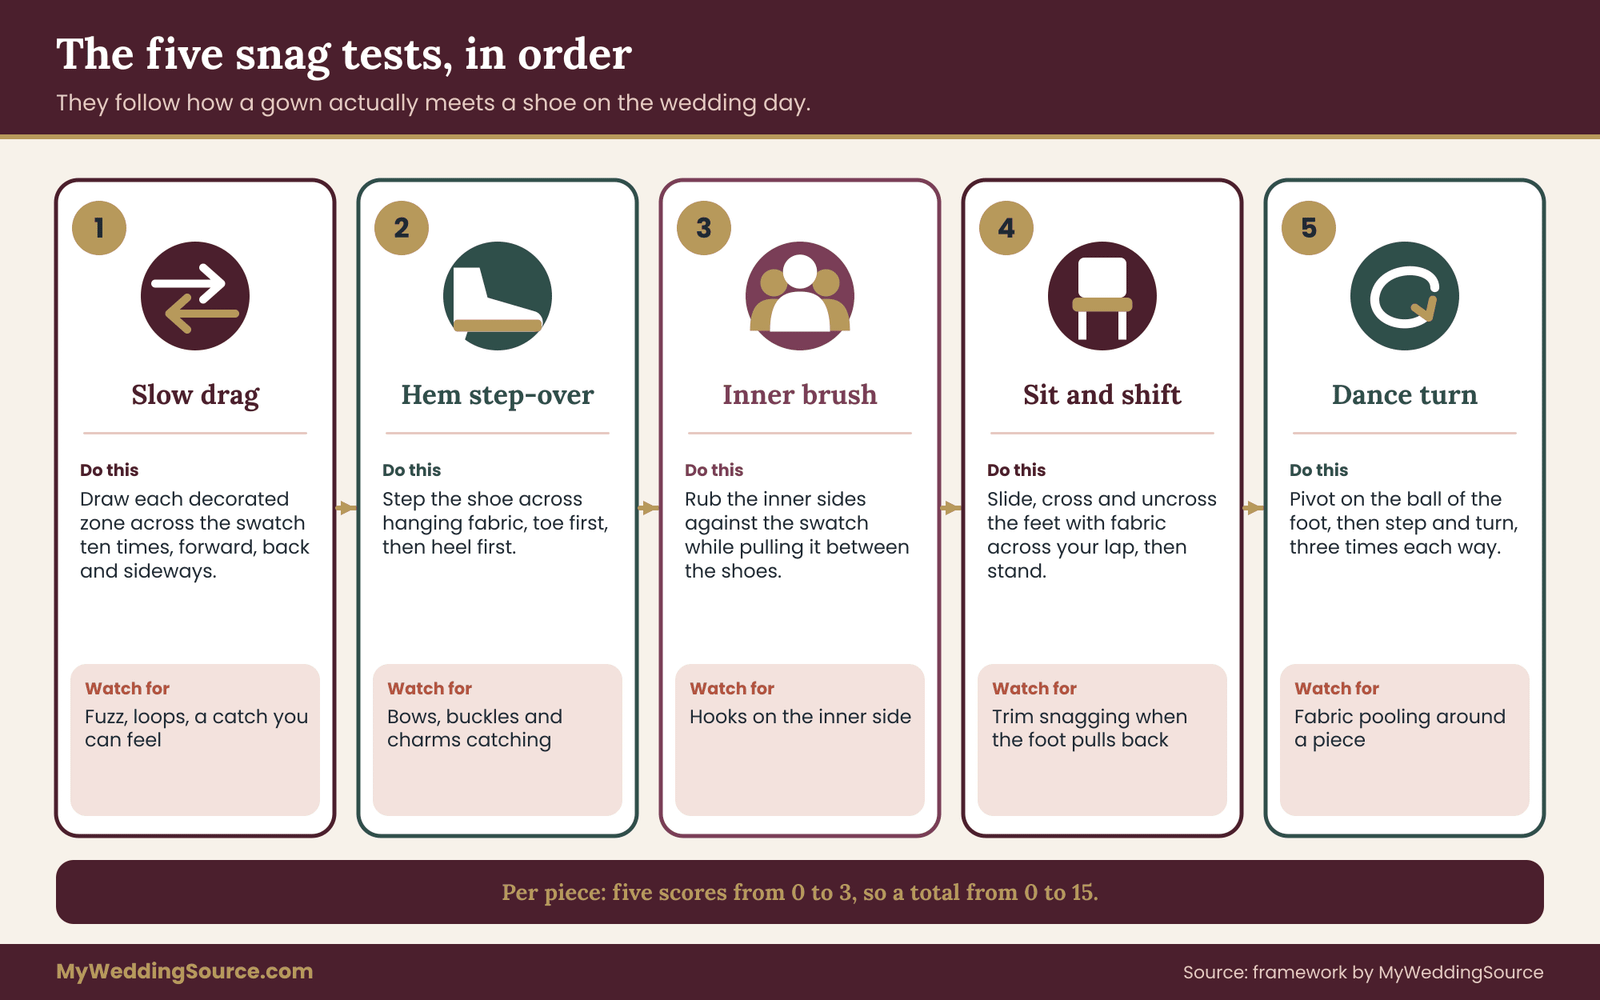
The five tests below follow the way a gown actually meets a shoe during a wedding day: moving past it, stepping over it, brushing it, sitting around it and turning on it. Run them in order and record a score from zero to three for each of the shoe embellishments on each test. A beaded bow with four crystals might get five rows. That is fine. A short list of rows, scored honestly, is far more useful than a long list scored in a hurry.
Test one: the slow drag
Lay the swatch flat on the table. Hold the shoe by the heel and the toe, and draw the decorated surface slowly across the fabric, in the direction the hem would move when you walk forward, then backward, then sideways. Do it ten times for each zone that carries shoe embellishments. Use a light touch, about the pressure of dragging a hand across a bedspread, not pressing the shoe into the cloth.
Then lift the swatch and look along its surface with the flashlight held low. Pulled threads catch the light. Run a fingertip gently across the area. A tiny loop will feel like a small bump.
This test is the baseline. A shoe that scores two or three here is almost certainly a problem, and you can stop and decide about modification before running the rest.
Test two: the hem step-over
Drape the swatch over one knee or a chair arm with a few centimeters hanging free. Lift the shoe and step it across the hanging fabric as if you were stepping over your own hem, with the toe first. Then step back, heel first. This copies the most common real movement: going up a stair, getting out of a car or stepping from a platform onto the floor.
Pay attention to the toe box and the ankle zone. Bows, buckles and charms are the most likely to catch here. Repeat ten times and score.
Test three: the inner brush
Hold both shoes together as they would be when you stand with your feet close. Place the swatch between them, and gently rub the inner sides against the fabric while pulling the fabric through. This mimics a hem sweeping between your ankles when you walk. It is the test most people skip, and it tends to find hooks on the inner side that the first test misses.
If the pair is not both decorated, test the decorated shoe against the plain one directly, with no fabric. Raised shoe embellishments on one shoe that scratch the other shoe will also scratch tights and may pick up thread from the lining of your gown.
Test four: the sit and shift
Sit on a chair with the swatch laid across your lap, hanging to the floor on one side. With the shoes on if allowed, slide your foot forward and back, cross your ankles, uncross them, and stand up while the fabric falls. This simulates sitting at the ceremony, at dinner and in a car. Beadwork on the shoe often catches when the foot is pulled back under a chair.
If you cannot wear the shoes, hold them and use the swatch to run the motion by hand. Add a second pass where the swatch is pinched between the shoe and the chair leg. You are looking for any hook that grabs fabric under pressure rather than in free movement.
Test five: the dance turn
Stand with the swatch pinned to a seam on a skirt, a scrap of a long fabric or a bedsheet tucked into a belt so that it hangs to the floor. Wearing the shoes, do a slow pivot on the ball of the foot, then a small step-and-turn. Do three turns each way. If you are in a hard-soled pair, do this on a surface similar to your venue floor.
A long panel of loose fabric tends to swing out and wrap, which is also what a dress does when you spin. Look at where the fabric gathers after each turn. If it pools around a bow or a charm, note the zone.
Recording scores for each of the shoe embellishments
For every one of the shoe embellishments, write the zone, the type and five numbers between zero and three. Add the numbers to get a snag total from zero to fifteen. A shoe with ten decorated pieces needs ten rows. A pair with one bow needs one row. Keep the score sheet next to the shoes, and photograph it. A dated sheet also shows how your shoe embellishments changed after each fix.
The next section covers what the totals mean. Before that, a short reminder about the limits of the test. The swatch cannot reproduce the drape and weight of a full skirt, and a shoe that passes the table test can still catch on the actual dress if the hem hangs differently. Treat the result as a likelihood, and always repeat the drag test with the finished gown at the final fitting. No snag simulation can clear shoe embellishments for good; it only lowers the odds.
Reading the snag score for shoe embellishments
A set of numbers is only useful if it leads to a decision. This section turns the five test scores into four outcomes: keep, modify, protect or swap. The thresholds are a planning aid, not a standard, and you can tighten them if your gown is very delicate.
Per-piece rules for shoe embellishments
Look at each row first. Any single piece that scores three on any test needs action, whatever its total. A three means the piece broke something or came loose, and it will probably do it again. The action may be to remove the piece, to secure it, or to cover it, and those options are covered in later sections.
A piece that scores two on any test and has a total of six or more across the five tests is a repeat offender. Treat it as needing a fix before the wedding.
A piece with a total of three or fewer, and no score above one, is a low risk. Leave it alone.
Pair rules
Add up the totals of all pieces and look at the pair as a whole.
Total of zero to five across the pair: keep. The shoe embellishments on this pair pose very little threat to your fabric. Repeat the drag test at the final fitting and move on.
Total of six to twelve: modify. There are a few weak spots. Fix or remove the worst pieces, then retest those zones only.
Total of thirteen to twenty-four: protect or modify heavily. The pair is a real risk to delicate fabric. Consider removable shoe embellishments, covers, or a different pair for the long walk, and keep the decorated pair for photos.
Total above twenty-four, or any row at three that you cannot fix: swap. The pair is not suited to your gown. Return it while you can, and look for a design with fewer or smoother shoe embellishments.
If the fabric is very fine, such as silk tulle or a thin chiffon, drop each band by about a third. A pair that is acceptable against satin may not be acceptable against tulle, and the swatch is why you tested.
What the score does not capture
Scores do not capture weight, and they do not capture how well pieces are attached. A pair can score zero and still lose beads, because a bead that has not yet touched anything will not have broken free. That is why the next sections look at weight and at attachment separately, and why the pull check there matters.
Weight, balance and pull checks for shoe embellishments
Snagging gets the attention, but weight is the quieter problem. A foot carries each shoe forward thousands of times in a long wedding day, and shoe embellishments that add noticeable weight at the toe or ankle changes how the leg swings. Most people will not notice an extra few grams. Some will notice heavy shoe embellishments by the end of the evening, particularly in the calf and in the front of the shin.
The weigh-in
You do not need a lab for this. Place each shoe on a kitchen scale with the scale set to grams, and write the number down. If you can find a plain version of the same shoe, such as a sample pair in a store or a listing that gives the weight of the undecorated style, compare the two. If you cannot, the number alone still helps, because you can compare one candidate pair with another.
Two checks are useful.
The pair match. Weigh both shoes. If one is noticeably heavier than the other because the shoe embellishments are asymmetrical, such as a single large bow on one shoe, you will feel the imbalance more than the total. A difference that looks small on the scale can feel large on the foot.
The share of weight in the shoe embellishments. If you can feel that the trim is the heaviest part of the shoe, you can test it with a simple experiment. Cover the shoe embellishments with your hand and pick the shoe up by the heel. Then hold the shoe by the toe and let the front hang. If the toe drops quickly, the weight sits forward, and the foot will have to lift it on every step.
There is no official limit on how heavy a shoe may be. A shoe with a lot of metal, glass or thick ribbon feels heavier than one with light satin bows of the same size, and a block heel feels different from a stiletto. What matters is how the shoe feels to you on a two-hour walk, which is a question for the wear tests described in the break-in guide, and a question for a footwear fitter if you have pain.
Where weight hurts most
Weight from shoe embellishments matters most in three places.
The toe box. Anything heavy at the front swings the foot forward and downward, and the toe is more likely to drag. This also increases the chance of catching the hem as the foot passes.
The ankle strap. A chain or a heavy buckle can slide as the foot moves. If it is loose, it clicks against the heel and slips into the gap behind the ankle. A strap loaded with shoe embellishments is also more likely to rub.
The back of the heel. Crystals or ribbon at the back of the stem add weight to the part of the shoe that leaves the ground last. This is less noticeable but can change how the foot rolls through each step.
Balance in the hand and on the foot
Put the shoe on a flat surface and give it a gentle push on the toe. A well-balanced shoe will rock back to rest on its sole. A very front-heavy shoe may tip forward. This is a crude test, but it picks out pairs with unusual weight distribution. If the shoe tips, wear it for ten minutes at home and note how your leg feels.
If weight turns out to be a problem, the options are to remove some of the shoe embellishments, switch to a lighter material, such as satin ribbon in place of a glass cluster, or to wear the heavy pair only for photographs and the first dance. Many couples bring a second, plainer pair for the party, as discussed in the guide to reception shoes and hem length.
How shoe embellishments are attached, and what each method risks
How each of the shoe embellishments is held to the shoe determines how it fails. Two crystals can look identical and behave very differently if one is glued and the other is set in a metal prong. The attachment method also determines what you can repair with a small kit and what needs a professional.
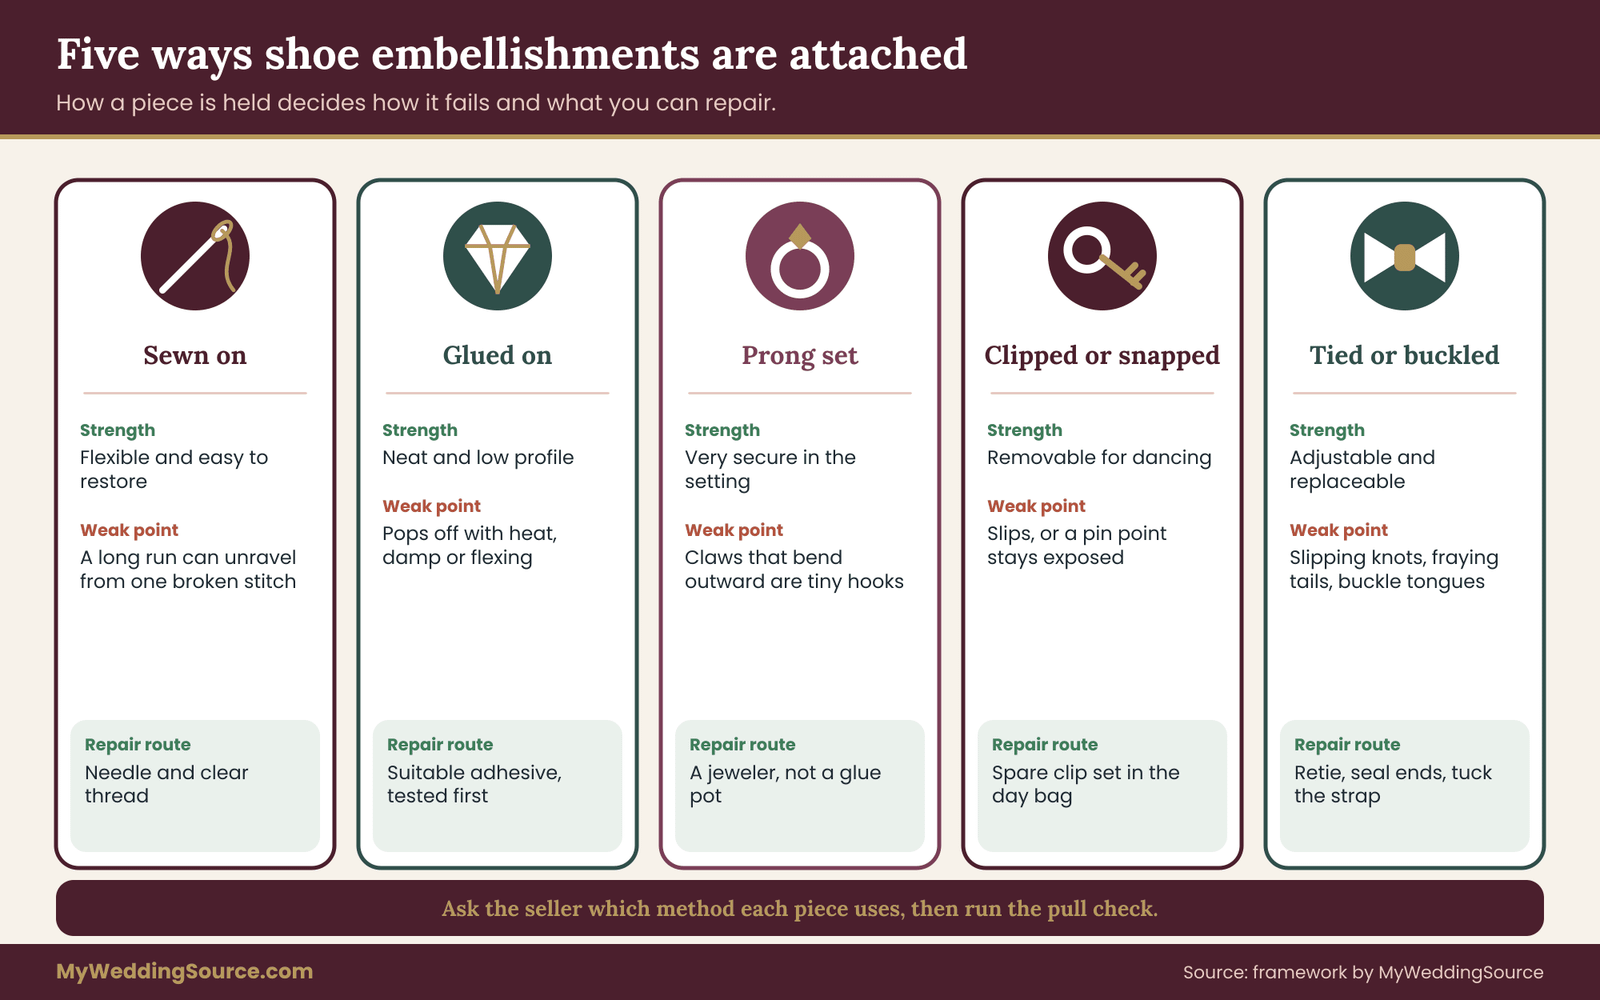
Most shoe embellishments use one of five methods, and many shoes combine them.
Sewn on
A bead, pearl or sequin is stitched to the shoe with thread through the upper. This is common on fabric shoes and on trims like lace appliqué or beaded bands.
The strength depends on the thread, the number of stitches and the knot. A trim sewn on with a continuous thread can unravel along its whole length if one stitch breaks, which is why a single snag can pull out a row. A trim sewn with individual knots at each bead will lose only that bead.
Sewn trim is the easiest to repair with a needle and clear thread, if you can see how it was done. Ask a seamstress to check the knots if the shoes are high value or sentimental.
Glued on
Crystals, flat-backed stones and many bows are stuck on with adhesive. Glue is common in factory production because it is quick, and it can be very strong when the surfaces are clean and the right adhesive is used. It can also fail in heat, in damp conditions or when the shoe flexes, because the shoe bends and the stone does not.
A glued crystal usually fails by popping off whole. The gap is clean and the stone is often intact, so repair is possible. A glued stone that is only partly lifted will catch fabric on its edge, which is a worse state than missing altogether.
Prong or claw set
Some crystal shoe embellishments use a metal setting with small claws that grip the stone, as in jewelry. These can be very secure, but the claws are tiny hooks. If a claw bends outward, it will catch thread.
Run a fingertip over every prong set piece, and look for any claw that stands away from the stone. A good jeweler can bend claws back, but most shoe repairers do not do this work, and the metal can break if forced.
Clipped or snapped on
Detachable pieces, such as shoe clips, brooches on a clip frame, and removable bows, fix to the shoe with a spring clip, a pin or a snap. They are popular because they can be removed for the first dance or replaced with a plain version.
Their risks are different. A clip can pop off, a pin can scratch the shoe or work through a fabric hem, and a spring clip may leave a mark on delicate satin. A clip should grip securely enough that it does not slide when you tug it with the pressure of two fingers.
Pins are a particular concern near a gown. A loose pin with an exposed point is a hazard to fabric and to skin. Check that any pin has a secure closure, and consider using a clip with a covered back instead.
Tied or buckled
Bows tied from ribbon, and straps with buckles, are held by a knot or a tongue. They can be loosened and retied, and they can be changed. Knots slip, especially in slippery satin ribbon. Ribbon ends fray unless they are sealed, and a loose tail is a common source of snags.
A buckle is a hard, shaped metal part with a tongue that can catch thread if the strap is not fully tucked in. The loose end of a strap, called the keeper end, should lie flat and be held in a loop.
Choosing between attachment methods for shoe embellishments
Sewn trim is flexible and easiest to restore, but a long run can unravel. Glued stones are neat and low profile but pop off with flexing or heat. Prong settings are secure but have hooks. Clips and snaps give you control but can slip. Tied and buckled parts are adjustable but have loose ends.
For a gown in fragile fabric, smooth glued flat-backs and tightly sewn trims with knotted ends are usually the lowest snag risk. For very active wear, such as a long dance night, removable clips are useful if they fit the shoe well and have been tested. Whatever the method, run the pull check in the next part, and ask the seller how your shoe embellishments are attached.
The pull and wobble checks
A snag test shows whether shoe embellishments catch fabric. A pull check shows whether it stays put. Together they give a more complete picture, because a piece that holds firmly cannot be pulled off by a snag, and a piece that is loose can shed on its own.
How to do the pull check
Take each of the shoe embellishments between a fingertip and a thumb, or use a pair of tweezers wrapped in a scrap of cloth to avoid scratching. Pull gently, about as hard as you would pull a loose shirt button to see if it is secure. Do not yank. You are looking for movement, not trying to break the piece.
Then do a wobble check. Press the piece sideways and see whether it shifts in its setting. Any visible movement, any clicking, or any gap that opens where the piece meets the shoe counts as a fail.
Record the result as secure, slight movement or loose. Any loose piece should be fixed before you wear the shoes.
What a fail means
A single loose bead on a trim is usually easy to secure with a stitch. A glued crystal that lifts at one edge needs a dab of fabric-and-leather safe adhesive, and the label should say it is suitable for the materials. Check the shoe’s surface before you glue; some satin dyes run and some leather finishes react to solvents. Test on a hidden spot first.
If many pieces in a cluster move, the problem is the attachment, not the pieces. When several shoe embellishments loosen together, treat it as a construction fault. In that case contact the seller. This is the sort of defect that return policies and warranties are designed for, and a record of your tests, with photographs, will help.
When to stop testing
Do not keep pulling at a piece that is secure. Testing the same piece repeatedly can weaken it. One firm pull and one wobble per piece is enough. If you find several weak points on a pair you are about to return, stop, photograph, and send the evidence to the seller rather than trying to repair a pair you want to give back.
Questions to ask the seller before buying shoe embellishments
Snag testing works best when you already have the shoes in your hands. Before that point, the seller’s answers do much of the sorting. Whether you are buying from a bridal salon, a department store, a boutique maker or an online shop, a few direct questions will tell you how much you can trust a pair with elaborate shoe embellishments.
Ask in writing when you can, because written answers are easier to use if something goes wrong later. Keep the replies with your records. Written answers about shoe embellishments are especially useful when a claim such as securely attached is later disputed. Quote only what the seller actually says, and do not assume that a general policy on the website covers a specific style.
Questions about construction
- How are the shoe embellishments attached: sewn, glued, set in prongs, clipped or tied?
- Are the pieces attached individually, or is a whole row sewn on one continuous thread?
- Are the ends of ribbons and trims sealed or hemmed?
- Is there any exposed metal, such as pin backs, claws, chain links or buckle tongues?
- Does the lining cover the stitching inside the shoe, or can threads rub against the foot?
Questions about replacement and repair
- Does the seller or maker keep spare beads, crystals or bows for this style, and will they supply a few with the shoes?
- Can the maker reattach lost pieces, and is there a charge?
- How long does a repair take, and is there a rush option before a date you name?
- If the shoes are made to order, can you see a photograph of your exact pair before they ship?
A spare set of the small parts costs very little and solves many problems. If the seller will not give you spares, ask for the product code or the name of the crystal or bead supplier, so a craft shop can match them.
Questions about returns and custom work
- What is the return window, and does wear on a clean indoor surface count as use?
- Are embellished shoes returnable at all? Some policies exclude shoes that were dyed, adjusted or made to order.
- Who pays for return shipping?
- Is a refund issued to the original payment method, or is it store credit?
For shoes, a short written confirmation of the return policy is usually enough. The Federal Trade Commission and USAGov both publish consumer guidance on returns and refunds, and neither replaces the seller’s written terms.
Questions about the wedding day
- Does the seller offer a protective cover or a spare clip set?
- Can the shoes be steamed or cleaned, and what products are unsafe for the materials?
- Will the seller recommend a repairer in your area?
Do not expect every seller to know every detail of their shoe embellishments. A knowledgeable one will answer plainly. If the answers are vague, treat that as information about how the pair will be supported after the sale.
When to bring in a fitter or stylist
A bridal stylist can tell you quickly whether a shoe suits a gown’s fabric, and a footwear fitter can tell you whether the weight and shape suit your foot. If you are paying for a stylist, bring the shoes to the fitting along with your swatch scores. If you are buying in a salon, ask whether you can try the shoes with the gown, even over the hem of a sample dress. Sample gowns are often worn and may not match your fabric, but they show where the hem falls.
Alternatives to heavy shoe embellishments
Sometimes the right move is not to fix a pair but to choose differently. Many people want the look of shoe embellishments without all of their risks, and there are several routes to it. Here is how they compare in practice.
Smooth surface detail. Embroidery, tone-on-tone stitching, flat printed patterns and satin piping give visual interest with no raised parts. These almost never snag, and they are lighter than beaded shoe embellishments. The effect is quieter, and some people find it less dramatic.
Flat-back crystals in tight clusters. A shoe with stones set low and close together, with no gaps for threads to enter, is far less likely to catch fabric than a spread of single stones with raised settings. The cluster should be even. A stone that sits above its neighbors is the one that catches.
Shoe embellishments on the sole or the heel. Many people place the sparkle where the dress does not touch it, such as the inside of a heel, the arch, or the underside of the sole where a “something blue” detail can sit. This keeps the effect for the photograph of the shoes and removes contact risk.
Removable clips. A pair of plain shoes with a detachable clip lets you change the look and remove the clip if the fabric or the venue changes. It also lets you attach it for portraits and remove it for dancing. The trade-off is that clips can slip, and a poorly fitting clip may mark the shoe.
Ankle accessories that stay under the hem. A fine ankle chain or a ribbon tied above the foot sits where the hem rests rather than where it moves. These have loose ends and need testing like any other piece.
Covers and protection. For a gown in very delicate fabric, you can use a thin fabric guard on the hem, or a hem lining that is smoother, in consultation with your seamstress. Raising the hem by a small amount at the final fitting can also reduce contact. The dress fit and alterations guide explains how hem decisions are made, and any change belongs to the person doing the alterations.
How to choose among them
A simple rule helps with shoe embellishments. Rank the shoe embellishments you like by two things: how much you want them, and how much risk they carry according to your snag score. Keep the high-want, low-risk pieces. Fix the high-want, medium-risk pieces. Drop the low-want, high-risk pieces without regret. Be honest about the middle category, which is where most people hesitate. If a piece has a score you cannot fix, it is not worth the worry on the day.
The repair kit checklist for shoe embellishments
Even a well-tested pair can lose a bead, bend a prong or loosen a bow during a long day. A small repair kit means a minor failure stays minor. Keep it small, label it and give it to one person who will be near you all day. Pack it around the specific shoe embellishments on your pair, not from a generic list. This is the part of the plan that most people leave out, and it is the one that turns a problem into a thirty-second fix.
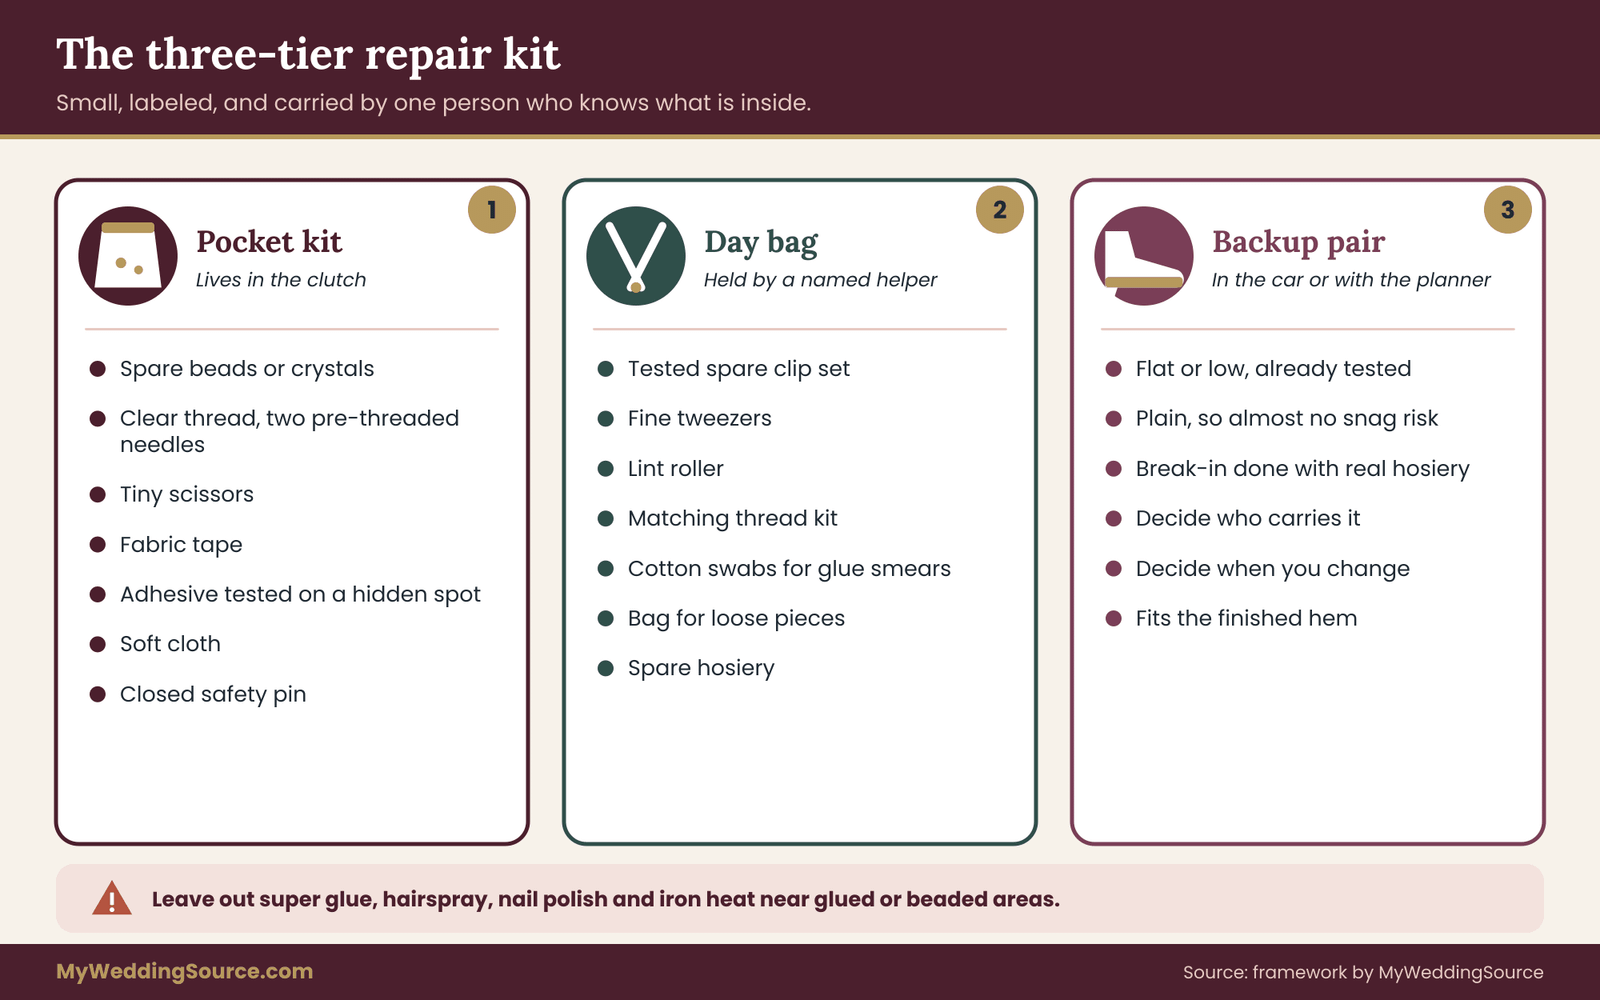
Tier one: the pocket kit
This tier fits in a clutch or a pocket and covers the most common problems.
- A small zip bag or a tin to keep the kit together.
- A few spare beads, pearls or crystals from the shoe seller, or matched ones from a craft shop.
- A short length of clear nylon beading thread, wound on a card, and two fine needles. Thread the needles before the day, so you do not fiddle with a needle hole in poor light.
- Tiny scissors or a thread snipper.
- Fashion tape or double-sided tape made for fabric, to hold a flap of trim down for a few hours.
- A few clear adhesive dots or a small bottle of fabric-and-leather adhesive that is labeled for the materials. Test it on a hidden spot beforehand.
- A small piece of soft cloth to wipe fingerprints and dust.
- A safety pin, with the point closed.
Tier two: the day bag
This tier stays with a bridesmaid, a planner or a family member, and handles the bigger problems.
- A spare set of clip-on shoe embellishments that you have tested and that match the shoes.
- Fine-nose tweezers and small pliers for straightening a bent claw, if a jeweler has shown you how. Do not force a prong. A bent claw that does not move easily should be left alone.
- A lint roller for sequin fragments and threads.
- A second needle and thread kit in a color that matches the shoe, not just the dress.
- Adhesive remover or a damp cotton swab for glue smears, tested on the hidden spot.
- A small bag for any loose pieces. Collect them and bring them to a repairer rather than throwing them away.
- Spare ribbon in the matching color and a lighter or sealing product for cut ends, only if a seamstress has told you the fabric is safe to seal.
Tier three: the backup pair
The strongest repair is a second pair. As covered in the guide to bridal flats, a flat or low shoe that you have tested with the dress is a sound plan B, and a plain pair removes most of the snag risk for dancing hours. Decide who carries it and when you will change.
Do not put these in the kit
Some items cause more harm than they fix. Avoid super glues that bond skin and may stain satin. Avoid hairspray and nail polish on fabric shoes, because both can leave marks. Do not use heat from an iron on glued or beaded areas, and do not use hot glue on satin. If you are unsure, ask the seller or a repairer before the day.
Who carries what
A kit is only helpful if someone knows where it is. Write a one-line note: the pocket kit is in the clutch, the day bag is with a named person, and the backup pair is in the car or with the planner. Tell that person what to do first, which is almost always to collect any loose piece and set it aside rather than lose it in the grass or on the dance floor.
Handling shoe embellishments on the wedding day
A tested pair and a packed kit are most of the work. The rest is habit: a few small practices that keep shoe embellishments from meeting the dress at the wrong moment. None of them needs to be dramatic, and all of them make shoe embellishments easier to live with. They are the sort of thing a helper can do quietly, if you tell them in advance.
Dressing: shoes last, hem aware
Put the shoes on after the gown, if the dress allows, with the skirt lifted well clear. A helper should hold the hem up and away while you slide your foot in and fasten any strap. Many snags happen in this one minute, because the hem is low, the fabric is loose and the person fastening a buckle is looking at the buckle, not the skirt.
If the strap has a buckle with a tongue, fasten it with the dress held high and check that the loose end lies flat in its keeper. If a bow is tied, tie it before the dress goes on and check that the loops sit away from the ankle seam. A quick run of a fingertip over each piece before the hem drops down takes five seconds.
Moving: stairs, cars and doorways
The risky moments are stairs, car seats, doors and any place where you must lift your foot with the hem hanging. A helper who gathers the front of the skirt in both hands, a few inches above the floor, removes most of the risk. In a car, swing both legs in together with the hem held in your lap, and bring the fabric in after you, rather than letting it trail over the door sill.
At the venue, ask about the route. Gravel, grass and wooden stage edges are hard on shoe embellishments in a different way, because the shoe collects debris and flexes more. The guide to heel protectors for grass deals with the heel side of that problem.
Photographs: when sparkle is useful
The photographer will want a close shot of the shoes. This is the best moment to use any detachable shoe embellishments. Clip it on for the portrait and put it in the kit afterward if you plan to dance. A small agreement with the photographer in advance, such as “shoe details before the ceremony and again at the first dance”, avoids repeated hem handling.
If you will use a stand or a surface for the shoe photograph, check that it is clean and smooth. A rough tabletop can scratch crystals and catch trim. Ask the photographer to place the shoes on soft fabric.
Dancing: lower the risk, not the fun
Dancing is the hardest test, because the movement is quick and the fabric swings. Shoe embellishments that scored well on the dance turn are the ones to trust here. If you tested the shoes in the dance turn, you know what to expect. Some people change to the backup pair before the dance floor opens. Others keep the pair and rely on a short check halfway through the night.
A helpful habit is a mid-evening shoe check. A helper or a bridesmaid takes a minute to look over each piece, collect any loose beads and re-secure a bow. A single missing piece is easier to deal with at nine o’clock than at midnight, and it is better to catch it before a guest steps on it.
The end of the night
Shoes come off and the dress must be handled with care too. Check the hem for pulled threads before you take it off, and put any loose shoe pieces in the small bag from the kit. Do not store damp shoes in a bag. Let them air before packing, and keep them away from sunlight and heat. If a piece is missing, make a note of where you last saw it, and tell the venue so staff can look when they clear the room.
After the wedding
If you plan to keep the shoes, treat them as a keepsake. Wipe them gently with a soft dry cloth, check the glue joints and stitching, and store them in a box with acid-free tissue. The American Institute for Conservation publishes general guidance on caring for personal treasures, and a textile conservator can advise on valuable pieces. If you plan to resell or donate the shoes, repair loose pieces first and photograph the pair in good light.
A worked example: one pair, five tests, one decision
The example below is invented, and it uses invented numbers to show the method. It is not a record of a real test, and your own scores will differ. Its purpose is to show how the scoring leads to a decision and a kit list.
The setting. A bride is planning a ceremony in a garden followed by an indoor reception. Her gown is a lightweight chiffon over a satin slip, with a hem that falls about an inch above the floor in heels. She has chosen a pair of satin pumps with three kinds of shoe embellishments: a cluster of glued crystals on the toe, a tied bow of tulle at the back of the heel, and a thin pearl strap with a small buckle at the ankle.
The swatch. Her seamstress gave her a palm-sized piece of the chiffon from the hem allowance. She photographed the shoes on a table, then weighed them. One shoe weighed a little more than the other because the buckle sat on that side, and she noted the difference.
The tests. She ran the five tests and scored each piece from zero to three.
- The crystal cluster scored zero on the drag, one on the step-over, one on the inner brush, zero on the sit and shift, and one on the dance turn. Total three. Low risk. One crystal wobbled slightly in the pull check, so she marked it for a dab of adhesive.
- The tulle bow scored one on the drag, one on the step-over, zero on the inner brush, two on the sit and shift because the loop caught the chair leg and tugged the chiffon, and one on the turn. Total five. A two on one test meant it needed a fix.
- The pearl strap scored two on the drag because the buckle tongue caught a thread, two on the step-over, two on the inner brush, one on the sit and shift, and two on the turn. Total nine. It was a repeat offender.
The pair total. Adding the pieces gives seventeen, which falls in the protect or modify heavily band. The chiffon is a fine fabric, so she dropped the bands by about a third, which pushed the pair toward swap unless the strap could be fixed.
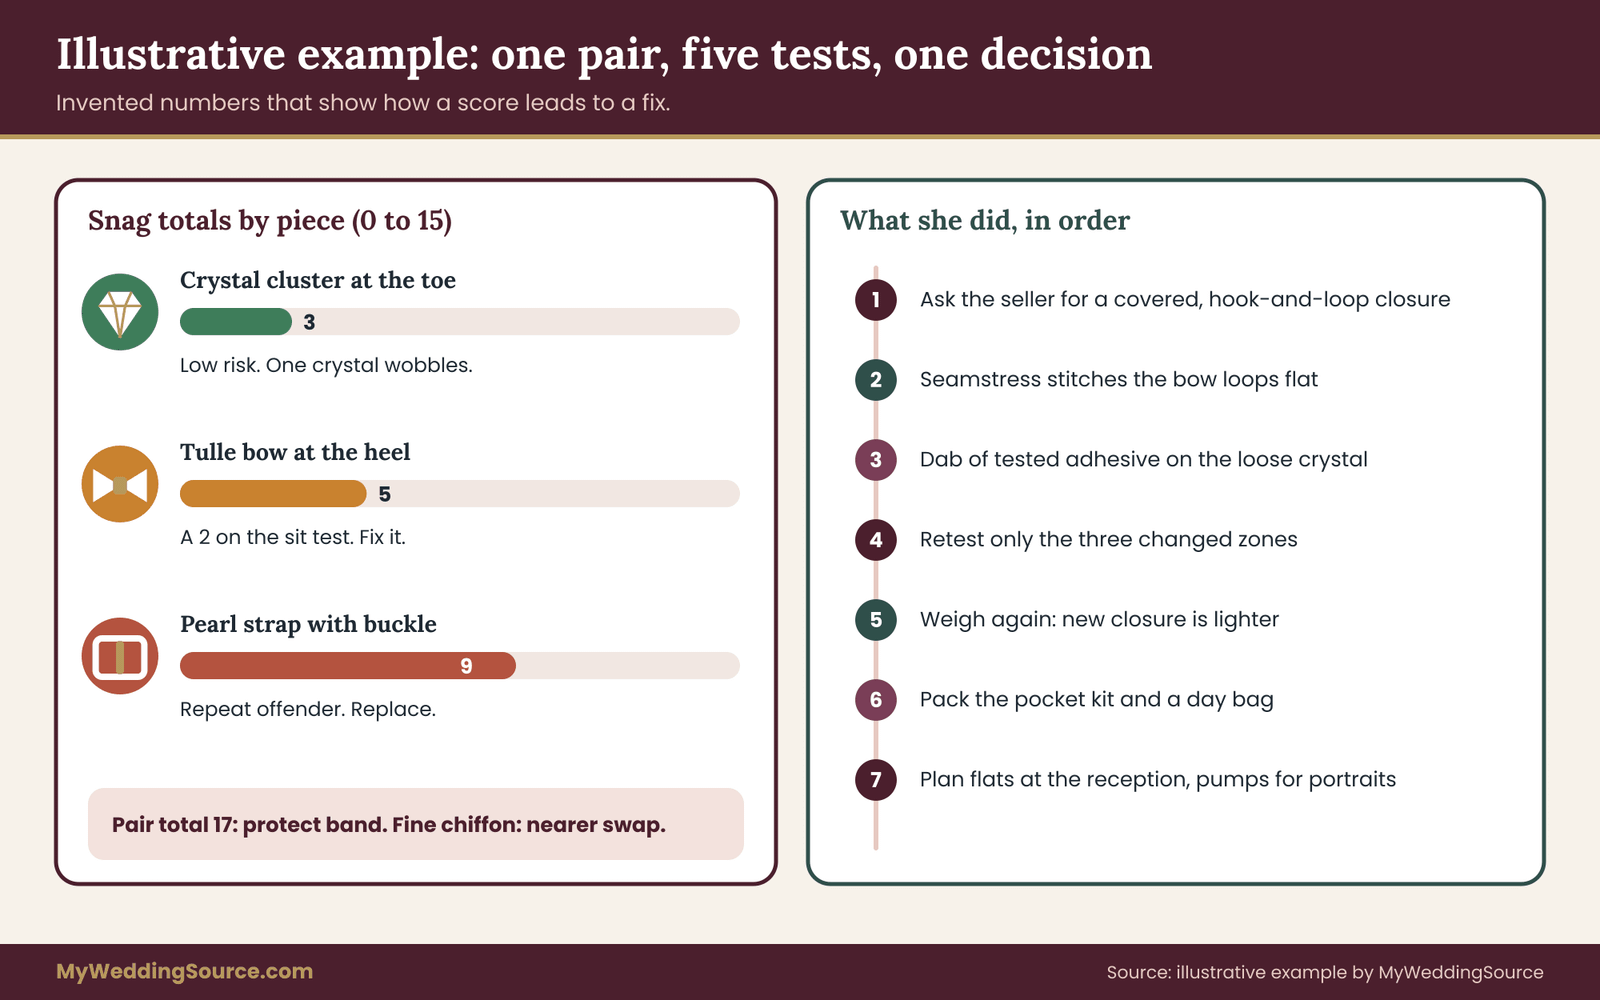
The decisions. She did the following, in order.
- Asked the seller whether the buckle could be replaced with a covered or hidden fastening. The seller offered a version with a hook-and-loop closure under a fabric flap, with a few days of lead time.
- Had a seamstress shorten the tulle bow’s loops and stitch them flat against the heel, so that nothing stood out at chair height.
- Added a dab of fabric-and-leather adhesive to the wobbly crystal, after testing it on the inside of the shoe.
- Reran the three failed tests on the changed zones. The strap now scored zero or one, the bow scored one on the sit and shift, and the pair total fell into the modify band.
- Weighed the shoes again. The new closure was lighter, and the difference between shoes was smaller.
- Packed a pocket kit with spare crystals, clear thread and a fine needle, and gave a day bag with a spare clip set to her sister.
- Planned to change to the backup flats at the reception, when the dance floor opened, and to keep the decorated pumps for the ceremony and portraits.
The example is simple on purpose, and it shows shoe embellishments being judged one piece at a time. The method does not depend on the specific numbers, and it works with whatever the fabric and shoes happen to be. What matters is that each decision was tied to a recorded result, and that each fix was followed by a retest of the zone that changed.
Edge cases that change the plan for shoe embellishments
The method above covers the usual situation for shoe embellishments: one bride or guest, one gown, one pair of shoes with visible shoe embellishments. Real weddings are messier. These edge cases show where the plan needs a different answer, and where a simple rule breaks down.
A beaded or sequined gown
When the dress itself carries hard decoration, the main risk is lock-up between two sets of beads. Pearls or sequins on the hem can hook onto a crystal prong or a bow loop, and a hard tug can rip the stitching on the dress rather than pulling a thread. For this case, choose smooth shoes with minimal shoe embellishments, and test with a swatch that includes beadwork from a hem allowance. If the dress was made with extra beads in the order, ask for a few of those too, since they help with matching repairs.
The risk is highest on a mermaid or trumpet skirt that sits close to the ankle, and lower on a full ballgown skirt that stands away from the feet. The dress-side guide to repair thresholds is worth reading ahead of time if a snag does happen.
A gown in tulle or lace
Fine tulle and open lace tear rather than pull. A run in tulle spreads in a line, and a small hole in lace cannot always be hidden. Treat any level-two result on these fabrics as a fail. Consider adding a smooth lining layer or choosing a pair where the shoe embellishments sit on the sole, the inner heel or the very top of the vamp. Ask your seamstress whether a sheer overlay can be made slightly shorter at the front, so the toe box sees less contact.
Hosiery and tights
Tights and stockings snag far more easily than a gown. A single raised crystal can run a pair in seconds. If you plan to wear hosiery, include a pair in the test and drag them across the shoe. If you are wearing bare legs or sandals, the shoe’s inner edge and ankle strap may rub skin, and that is a comfort question for the wear tests rather than a snag question.
Carry a spare pair of hosiery in the kit. This is cheap and makes the difference between a small fix and a long walk back to the dressing room.
Shoes worn under a long hem
If the hem sits on the floor and the shoe is almost hidden, snagging may be less visible, but contact is higher, because the shoe sits under the fabric and brushes it constantly. The test results matter more here, not less. A heavy shoe that is mostly hidden still drags on the fabric from below, and a crystal that catches the lining will pull the whole skirt.
Outdoor, grass and wet ground
Wet ground can loosen glue and darken satin. Mud collects in crevices around crystals and bows, and grass seeds attach to rough shoe embellishments. A piece that is secure on a dry table may shed in damp conditions. If you expect an outdoor ceremony, test the pull check again after the shoes have been out in dew, and plan to wipe the pair at the transition from the lawn to the indoor space. Keep a soft cloth in the pocket kit for this.
Heirloom, borrowed or secondhand shoes
A pair with sentimental value may have old glue, brittle thread or worn setting. The pull check will often reveal weak points. In that case, a cobbler or a seamstress can reinforce the attachment before the wedding, and the work should be done weeks ahead. If the pair is borrowed, confirm with the owner what repairs are acceptable, and photograph the pair before you start. A borrowed pair with shoe embellishments you do not trust is better kept for a photograph.
DIY shoe embellishments
Adding your own shoe embellishments, such as a clip, a ribbon or stones from a craft shop, is a popular approach, and it gives you control over the weight and the attachment. The same tests apply. Keep it flat and small. Seal cut ribbon ends. Use stitching in preference to adhesive on fabric, and test any adhesive on a hidden area. A tidy DIY addition often scores better than a mass-produced piece, because you can place it where it will not meet the dress.
Sandals, open toes and bare feet
Shoe embellishments on an open shoe sit against skin, and loose pieces or rough backs can irritate or scratch. Check the inside of every strap with your fingertip. A rough bead edge on the inside of a thong strap is worth fixing.
Guests, bridesmaids and the groom
The same logic applies to anyone in a long or delicate dress, and to groomsmen in dress shoes with buckles or metal trims. Ask your bridal party about shoes in advance, and suggest a quick check if they have heavily decorated pairs. A short message works: “If your shoes have beads, crystals or buckles, could you drag a scrap of your dress fabric across them before the day?” You are not policing anyone’s style. You are preventing a snagged hem in a photograph.
Timing and cost logic for shoe embellishments
Most of the cost of a snag problem is the cost of finding out late. A problem found at the shop is a return. A problem found a month before the wedding is a repair or a replacement order. A problem found on the day is a thirty-minute interruption, a damaged hem or a change of plan. This section gives a simple timeline and a way to think about cost without quoting any price that varies by seller and city.
A simple timeline
When you choose the shoes: ask the construction questions, request spare pieces and confirm the return terms in writing.
When the shoes arrive: photograph them, run the weigh-in, the pull check and the five tests with a swatch. Do this before wearing them outside, so the return option remains open.
Six to eight weeks before: fix or swap anything that scored badly. Order spare parts. Book any repair with a cobbler or seamstress, since busy periods fill their calendars.
At the final fitting: bring the shoes and repeat the drag test with the finished gown at its final hem length. Ask the seamstress to look at any contact point.
One week before: assemble the three-tier repair kit and brief the person who carries it. Pack the backup pair.
The day before: quick pull check, a final look under good light and a photograph.
The day itself: follow the handling routine in the previous section.
Thinking about cost
Without inventing figures, the logic runs like this. A repair kit is a small expense compared to a shoe, and a shoe is a small expense compared to a gown alteration or a repair to a beaded hem. The most expensive item in the picture is the one that cannot be replaced, which is the gown itself. This is why the test is worth a free afternoon, and why a second plain pair may be a reasonable purchase rather than an indulgence.
If you are deciding between two pairs of similar price, one with raised crystals and one with flat shoe embellishments, the cost is not only the price tag. It includes the repair risk, the weight and the time spent worrying. If the flat pair gives you most of what you want, it often wins on total cost.
If you are weighing a made-to-order pair, ask the seller for the production lead time and the rules on changes and returns, and read them carefully. Custom shoes are often final sale, and a pair with a design flaw may be yours to keep. Check dates before you commit, and do not rely on a verbal promise.
When to stop fixing
There is a point at which another repair is not worth the effort. If a pair needs more than two fixes to its shoe embellishments, if the fixes do not hold, or if the test scores are still in the protect band after changes, it is time to swap. Keep the decorated pair for portraits if you love it, and wear a different pair when you move. This is a perfectly sensible outcome, and it is often the most relaxed one.
Your next steps
Start small and do the work in the order that protects your return options. First, list all of the shoe embellishments on your shoes and mark its zone and attachment method. Second, ask the seller the construction and return questions, and keep the answers. Third, get a swatch of your gown fabric and run the five tests, then add up the scores and read the band. Fourth, weigh the pair and do a single pull check on each piece.
Then act on what you found: fix, cover, swap or keep. Build the three-tier repair kit and name the person who will carry it. Treat shoe embellishments that fail twice as a reason to swap, not a reason to try a third glue. Repeat the drag test with the finished gown at the final fitting. For the wider picture of what to carry and wear on the day, the wedding-day accessories planning guide shows how shoes fit alongside jewelry, wraps and other items, and your seamstress can look at hem contact points at the final fitting.
FAQ
Do shoe embellishments really snag wedding dresses?
They can. The risk depends on the shoe and the fabric. Hooks, raised edges, rough surfaces and loose ends can catch thread, and fine fabrics such as tulle, chiffon and open lace catch most easily. Many embellished pairs are safe with sturdier fabrics. The only reliable way to know is to drag a swatch of your own fabric across the pair and score what happens.
What is the safest kind of shoe embellishment for a delicate gown?
Smooth, flat detail is usually the safest: embroidery, tone-on-tone stitching, satin piping and flat-back crystals set low and close together. Sewn trim with knotted ends tends to be less risky than raised prong settings, chains or stiff bow loops. Shoe embellishments placed on the inner heel, arch or sole avoid contact with the hem. Test any pair, because construction varies.
How do I test shoe embellishments without wearing the shoes?
Hold the shoe by hand at the angle it would sit on the foot, and move a swatch of your gown fabric across each decorated zone at walking pace. Do a slow drag, a step-over, an inner brush and a sit-and-shift motion. Look at the fabric under a low light afterward. This catches most hooks and rough edges, although the dance turn is harder to copy.
Are removable shoe clips a good option?
They can be, because you can attach them for portraits and take them off for dancing. A clip must grip firmly and not slide when tugged lightly. Check that any pin has a closed point and that the clip does not mark delicate satin. Test the clip against your swatch like any other of the shoe embellishments, and bring a spare in the day bag.
What should I put in a repair kit for embellished shoes?
A small zip bag with spare beads or crystals, clear thread and two pre-threaded needles, tiny scissors, fabric tape, a closed safety pin and a soft cloth covers most problems. Add a spare set of clips, tweezers, a lint roller and spare hosiery in a larger bag. Test any adhesive on a hidden spot first, and check the label for the materials.
How much weight is too much on a wedding shoe?
There is no official limit. Weigh each shoe, compare the two, and notice whether the trim is concentrated at the toe or ankle, since front-heavy shoes swing the foot and may drag the hem. The practical test is how your leg feels after a long wear session. If you have pain or a foot condition, ask a podiatrist or a qualified footwear fitter.
What if a bead or crystal comes off during the wedding?
Collect the piece and put it in a small bag so it is not lost or stepped on. If it can be reattached quickly with a stitch or a dab of suitable adhesive, a helper can do it. If not, tape the area flat or switch to the backup pair. After the wedding, take the pair and the loose pieces to a repairer.
Should I return embellished shoes if they score badly?
If the score is high and the problem cannot be fixed with a simple change, returning them is often the calmest choice, provided the return policy allows it. Photograph the pair, keep your score sheet and message the seller before you wear them outdoors. If returns are not possible, wear them only for portraits and choose a plainer pair for walking and dancing.
Sources
- Foot health information and Find a Podiatrist, American Podiatric Medical Association
- Foot and ankle conditions, OrthoInfo, American Academy of Orthopaedic Surgeons
- Consumer advice on returns, refunds and shopping, Federal Trade Commission
- Care labeling and textile rules, Federal Trade Commission
- Shopping and consumer rights guidance, USAGov
- Textile standards and test methods, ASTM International
- Textile testing and research, American Association of Textile Chemists and Colorists
- Caring for your treasures, American Institute for Conservation
- Product safety and recalls, U.S. Consumer Product Safety Commission