
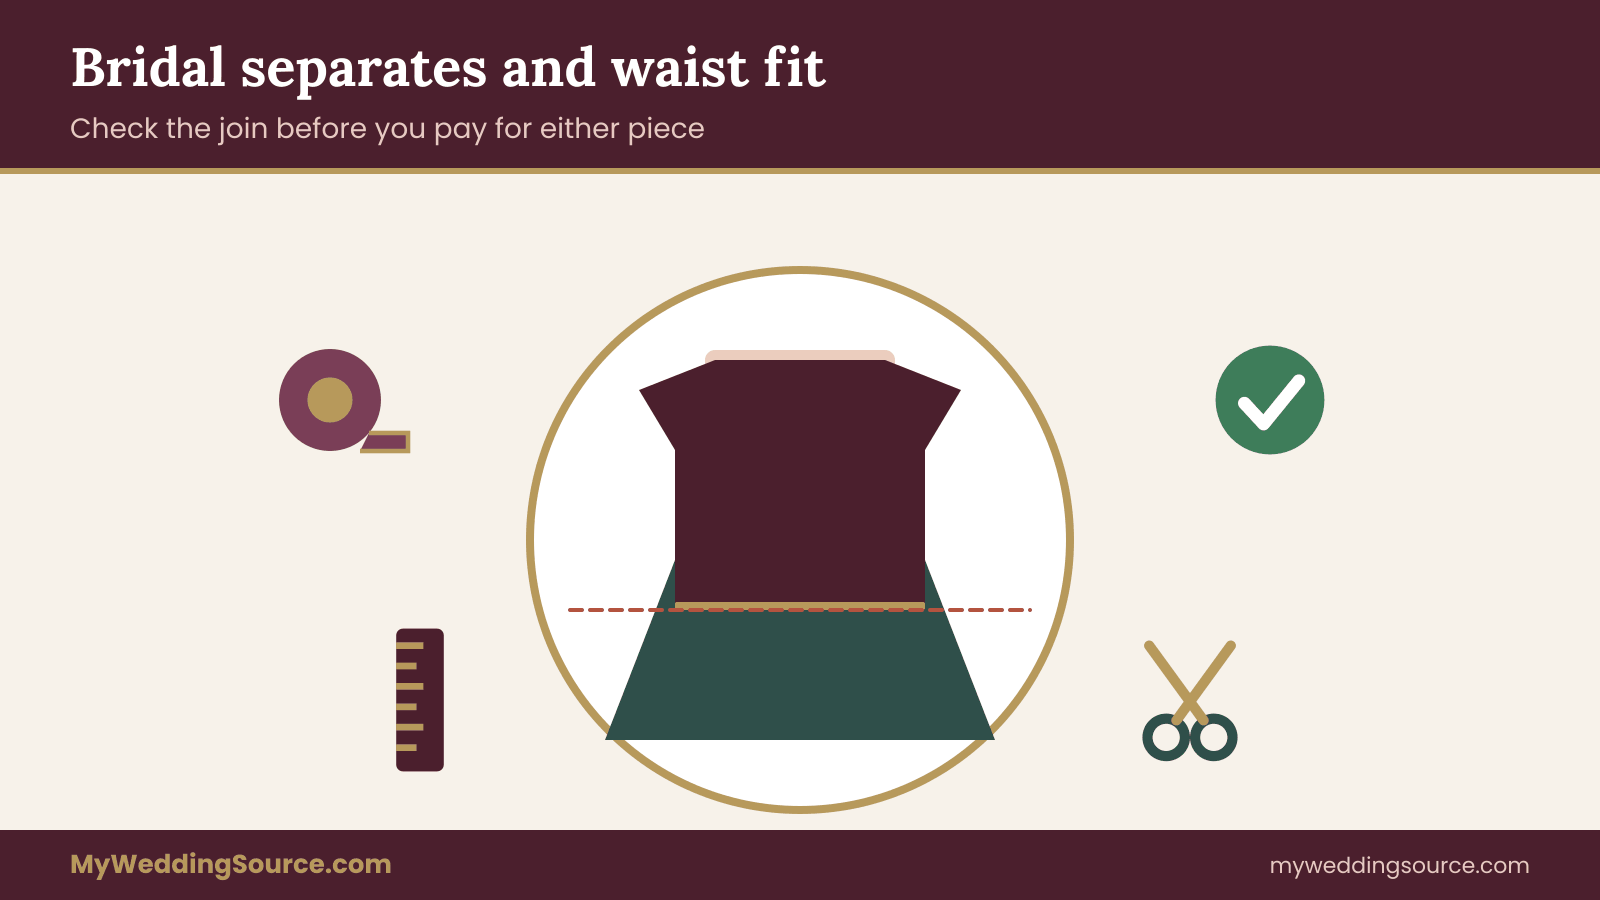
Bridal separates are a top and a skirt (or a top and a different bottom) that you buy, fit and wear as two garments instead of one gown. This guide focuses on the one place where they most often fail, the waist, and gives you a measurable way to check whether a top and a skirt will actually work together before you pay for either one.
Treat the waist as a zone, not a line. Measure your natural waist, then record where the top hem will land and where the skirt waistband will sit, both as inches above or below the natural waist. If the top hem sits higher than the waistband, you get a gap. If they meet at the same height, you get a seam collision. If the top hem sits lower, you get an overlap. Pick one outcome on purpose, then test it standing, seated and with arms raised before you approve the pair.
Most people shopping for bridal separates start with a picture: a fitted bodice with a full tulle skirt, a satin skirt with a beaded camisole, a lace top over a column skirt. The picture is always one image. In real life, bridal separates are two garments with two sets of measurements, often from two makers, and the place where they meet has to hold still for ten or twelve hours while you walk, sit, hug, eat and dance.
That meeting point causes more fit trouble than any other feature of this style. A one-piece gown has a waist seam built by one pattern maker, while bridal separates have two who planned how the bodice and skirt relate. With bridal separates, nobody planned that relationship unless you do. A skirt waistband that looked perfect in the fitting room can slide under a top that ends half an inch too high.
A top that fits at the bust can ride up each time you lift your arms. Two pieces in the same nominal size can have waist measurements that do not match.
This article walks through the problem in order. It starts with what the two pieces are and how the waist behaves, then gives you the measurements to take, a compatibility check for any top and skirt pairing, the pitfalls of mixing pieces from different sources, what an alterations professional can and cannot change, how to buy from two sellers without getting stuck, an invented worked example, and the edge cases that change the rules.
A note on scope. This is general information, not legal, tax or financial advice. Fit and construction vary by designer and by body, so the only true test is a fitting in the actual pieces. Where this guide mentions consumer rules, it points to the agency that publishes them, so you can read the current version yourself.
What bridal separates are, and why the waist is where they fail
Bridal separates cover a wide range of outfits. A tailored bridal top with a ball skirt, a lace bodysuit under a satin wrap skirt, a corset top over a slip skirt, and a long jacket-style top over a fitted skirt all belong here. What they share is that the upper half and the lower half are separate garments with their own seams, closures, linings and sizes. In bridal separates the pieces are joined only by your body, and sometimes by a hook or a button.
This guide is about the two-piece combination of a top and a skirt, because that is where the waist problem is clearest. Outfits that put the legs in trousers are a different fit problem, with rise, inseam and crotch depth to consider, and they are covered elsewhere on the site. Here the question is narrower: how do two pieces meet at the waist, and what has to be true for that meeting to look and feel right?
Why a gown hides this problem and bridal separates expose it
A traditional gown is built around a single waist seam, or has no waist seam at all. The maker draws the bodice and the skirt on the same pattern block. The seam allowance, the lining, the boning and the zipper are all planned together. Even when the seam is a few inches off your natural waist, it is consistent.
Separates reverse that. Each piece is drafted on its own. The top is built to a specific length. The skirt is built to a specific waist measurement and a specific rise at the waistband, meaning how high above or below the natural waist the top edge of the band sits. Neither maker knows what the other piece looks like. Even two pieces from one designer’s collection may have been designed for styling photos rather than for your torso length.
The practical result is that you become the pattern maker for the join. The rest of this guide gives you the tools for that job, starting with a plain description of the waist itself.
The waist is not one number
When someone says “my waist is thirty inches,” they usually mean one measurement taken once. For bridal separates that single figure is not enough, for three reasons.
First, the waist has a location. For bridal separates, your natural waist is the narrowest part of your torso, generally above the navel and below the ribs, though the exact spot differs between bodies. A skirt may be designed to sit at that point, above it, or below it. A skirt that sits two inches below your natural waist does not need the same circumference as one that sits at it, because the torso is wider lower down.
Second, the waist has a range. Your waist circumference changes when you stand, sit, breathe in, breathe out and eat a meal. A skirt that closes comfortably in a quiet fitting at ten in the morning may feel different at the end of a long dinner. This is not a flaw in the garment. It is a fact about bodies, and the fit check needs to account for it.
Third, the waist has a height relationship with the top. The top hem and the skirt waistband are two edges that either meet, overlap or leave a gap. That vertical relationship, not just the circumference, is what you are evaluating.
The three outcomes at the join of bridal separates
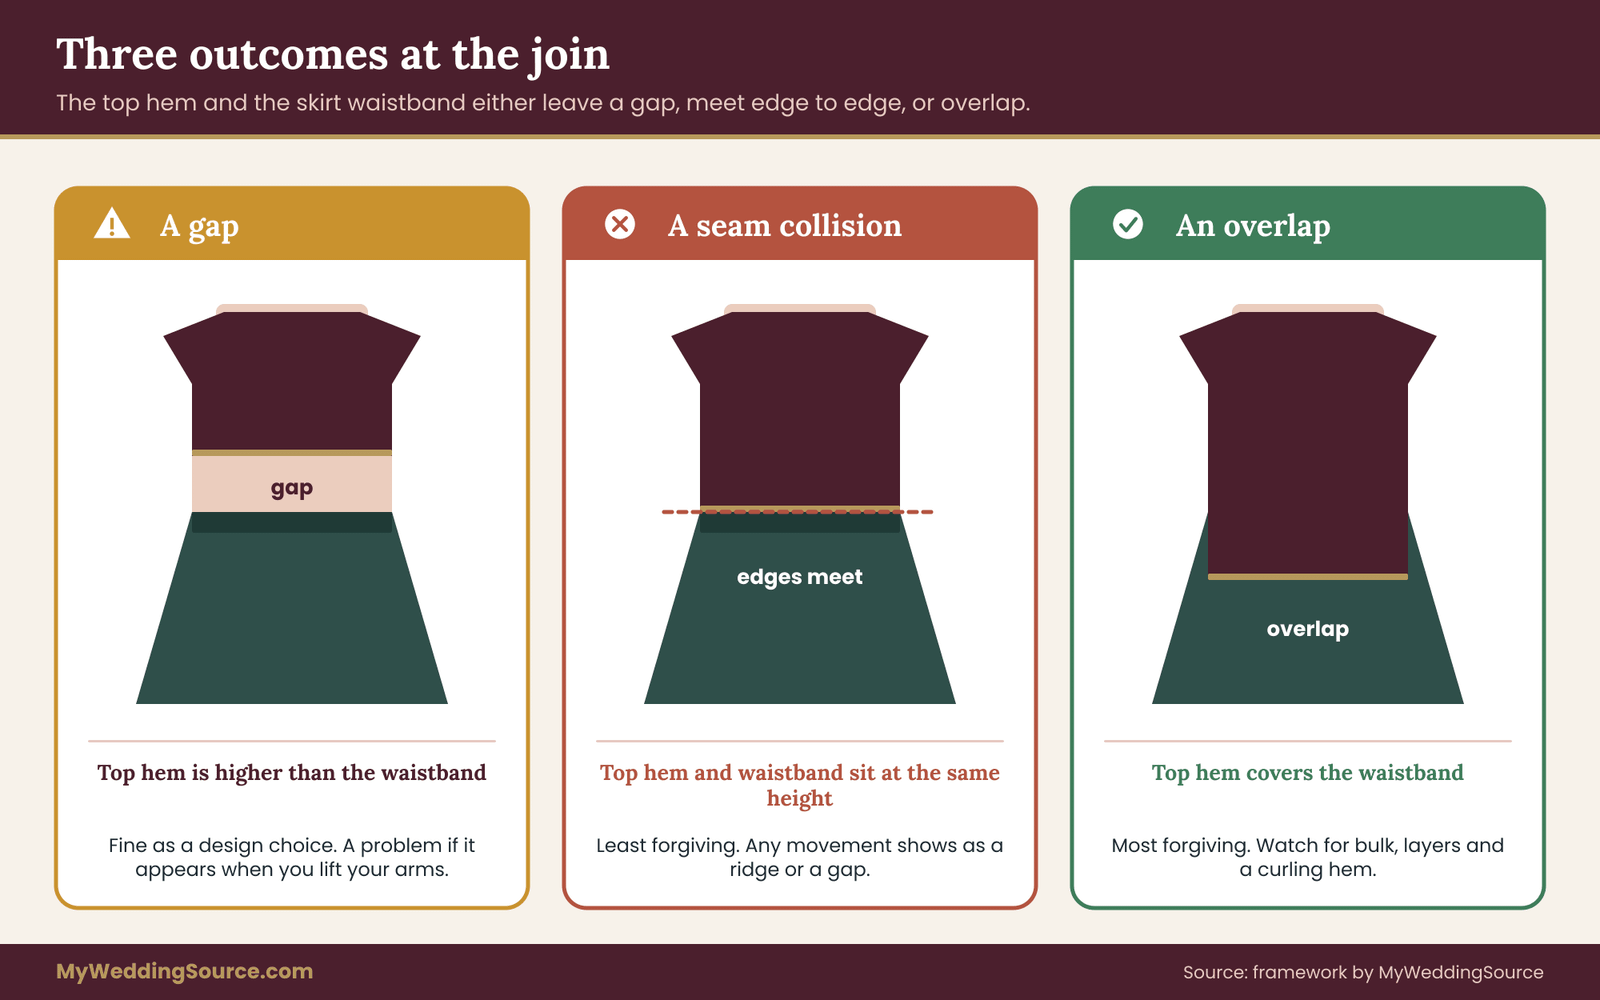
Every pairing of a top and a skirt ends in one of three outcomes at the waist. Naming them helps because most fit conversations muddle them together.
A gap. The top hem ends above the skirt waistband, so a band of skin, lining, an underlayer or a slip shows between the two pieces. A gap can be a deliberate design choice, as in a cropped top over a high-waisted skirt with a visible midriff. It becomes a problem when it appears accidentally, for example when the top rides up as you lift your arms.
A seam collision. The top hem and the skirt waistband sit at nearly the same height, so the two edges meet and neither covers the other. This tends to look like a ridge. It is the least forgiving outcome, because any small movement shows as a gap on one side or a bulge on the other.
An overlap. The top hem extends below the top edge of the skirt waistband, so the top covers the join. This is the most forgiving outcome visually, but it creates its own concerns: bulk at the waist, fabric layers that can print through, and a hem that may flare or curl over the skirt.
None of these is wrong. What matters is that you pick one deliberately, confirm that it survives movement, and know what you will do if it does not. The next sections give you the numbers to do that.
The waist points every pair of bridal separates must agree on
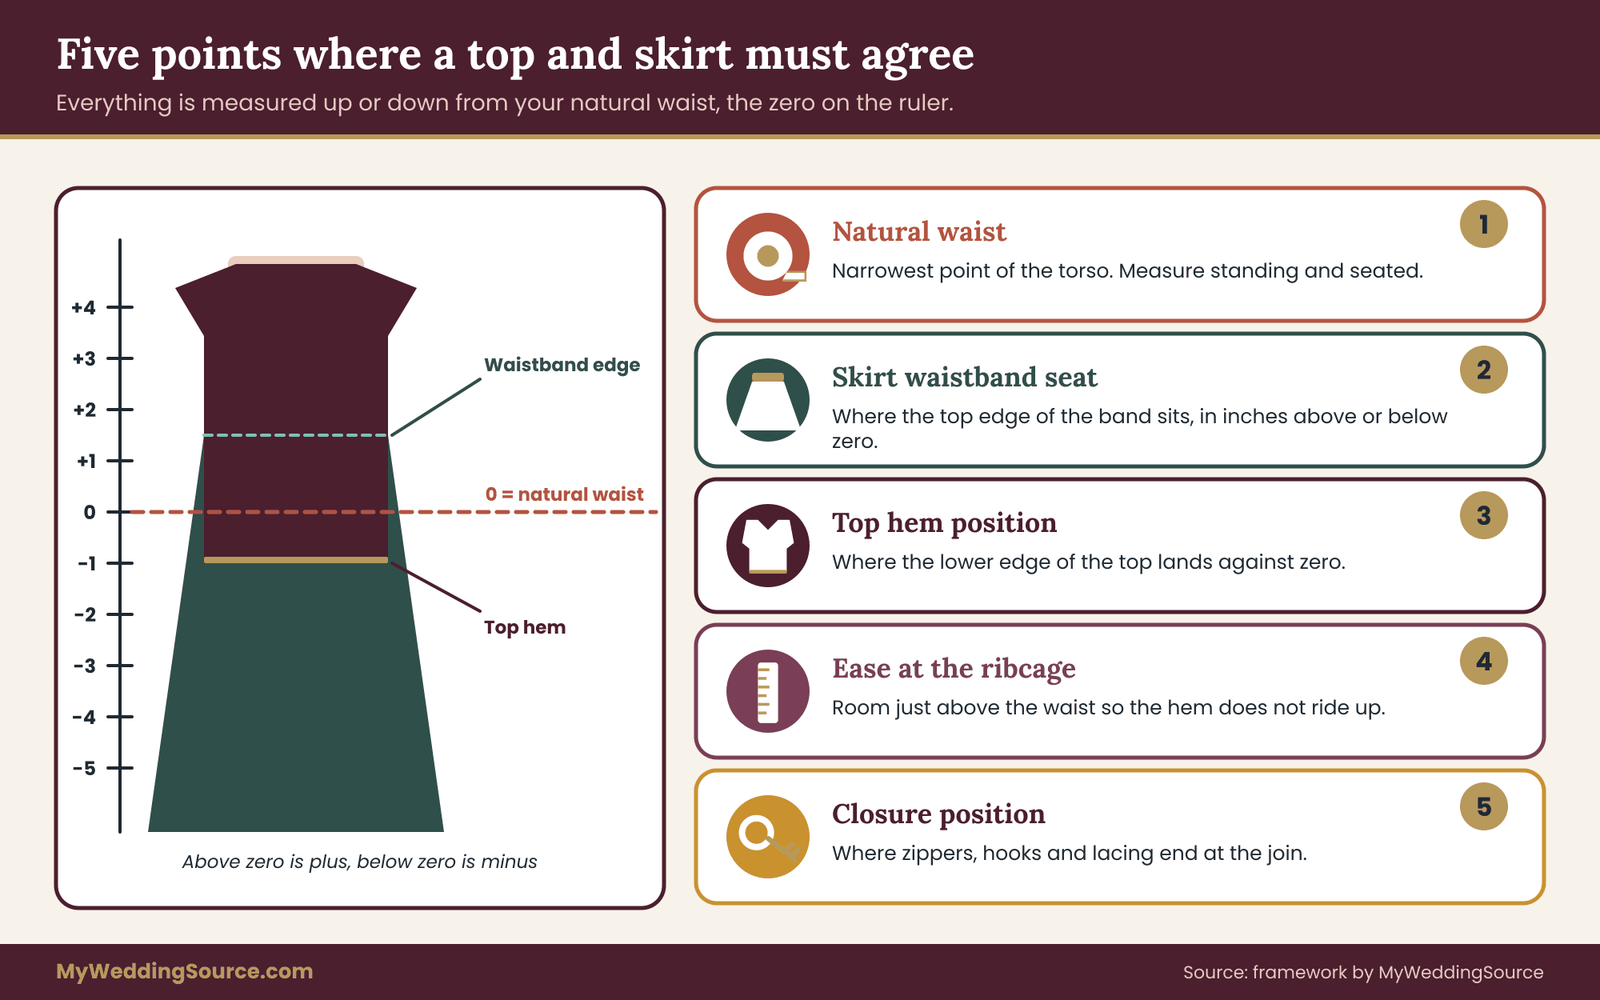
Before you try on anything, it helps to know the handful of points that decide whether a top and a skirt will work together. There are five. Each is a number you can write down, and each can be checked at a fitting with a soft tape measure and a mirror.
The first point is your natural waist height. Take a thin piece of elastic or a ribbon, tie it loosely around your torso, bend sideways and let it settle. It will roll to your natural waist. Measure the circumference there and, equally useful, measure the distance from the top of your shoulder down to that spot. Write both numbers down. This vertical distance is your waist height, and it is the reference point for every other number.
The second point is the skirt waistband seat. This is where the top edge of the skirt’s waistband sits, measured as inches above or below the natural waist. A skirt with a high waistband sits above the natural waist, perhaps near the ribs. A skirt with a natural waistband sits at it.
A skirt with a low or dropped waistband sits on the hip bones or below. Designers describe this with words like “high rise” or “natural rise,” which are not standardized, so ask for the actual measurement of the waistband height and where it is meant to sit.
The third point is the top hem position. This is where the lower edge of the top lands on your body, again measured against the natural waist. A cropped top ends above the waist. A waist-length top ends at it. A hip-length top ends below it. A tunic or jacket-style top ends well below. If a top is made for tucking, its hem position becomes the tuck line rather than the cut edge, which brings its own bulk questions covered later.
The fourth point is the ease at the ribcage. This is how much room the top leaves around the lower ribs, just above the waist. A top fitted close at the bust but tight at the ribcage will ride upward when you breathe or raise your arms, which pulls the hem away from the skirt. A bit of ease here keeps the hem where you placed it.
The fifth point is the closure position. Both pieces will have zippers, hooks, buttons or lacing. Where those closures fall matters, because a back zipper that ends at the same height as the skirt waistband creates a stiff spot, and hooks that sit under the top hem can catch on lining. Note where each closure ends, and whether it opens from the top down or the bottom up.
How the five points interact
These five numbers are not independent. The height difference between the top hem and the skirt waistband is the join. Your ease at the ribcage decides whether that difference stays constant as you move. Your closure positions decide whether you can adjust the join or fix it in an emergency. And your natural waist is the zero point against which everything is measured.
Here is a simple way to hold it in mind. Imagine a vertical ruler running down the front of your torso with zero at the natural waist. Anything above zero is a positive number and anything below is negative. The top hem gets a number. The skirt waistband top edge gets a number. The difference between them is the join. If the top hem number is larger, you have a gap.
If the numbers match, you have a collision. If the skirt number is larger, you have an overlap. This is the core of the method developed in the sections below, and it makes the conversation with a stylist or a seamstress much easier, because you are comparing measurements instead of describing impressions.
Why recorded numbers beat memory when you choose bridal separates
A fitting room is a distracting place. The light is flattering, a stylist is talking, and you are looking at the whole outfit rather than one inch of fabric. Photographs help, but they flatten depth. Writing down the five points for each piece you try, even in a notes app, gives you something you can compare across shops and across weeks.
It also protects you if you are ordering from different sellers. A top that arrives in six weeks has to work with a skirt that arrived in four. If you recorded the skirt’s waistband seat and your natural waist height, you can specify the top hem you need before the top is cut or chosen. The wedding dress fit and alterations guide covers the general fitting calendar for any wedding garment, and the wedding planning checklist is useful for placing fitting dates against the rest of your schedule.
How to measure for bridal separates at home and at a fitting
Good measurements for bridal separates take about twenty minutes and cost nothing. You need a soft tape measure, a mirror, a piece of thin elastic or ribbon, a pencil and paper, and ideally a helper. Wear the underlayers you plan to wear on the day, or the closest match you have, because a different bra, slip or shapewear changes the numbers more than people expect.
Set up the conditions
Take the measurements in the same conditions you will wear the outfit. If the ceremony is at four in the afternoon and dinner follows, measure in the late afternoon after you have eaten a normal meal, not first thing in the morning on an empty stomach. Wear the shoes you plan to wear, or shoes with a similar heel height, because heel height changes your posture and the apparent height of the waist from the floor. Stand naturally, with your weight even, and breathe normally. Do not hold your breath or pull the tape tight.
Record each figure twice, once standing and once seated. Many people discover that their waist circumference and the distance from the waist to the hip change when they sit. A skirt that fits perfectly standing can feel tight seated, and a top that ends exactly at the waistband standing can slide upward when you sit on a low chair.
The measurements to take
Work in this order for bridal separates and write each one down with a label.
Natural waist circumference. Find your natural waist with the ribbon, then measure around that point, snug but not compressing. Do this standing, then repeat seated.
Waist height. Measure from the top of your shoulder, beside the neck, down the front of your body to the ribbon. Then measure from the ribbon down to the floor, barefoot and in the shoes. These two figures tell a seamstress where your waist falls relative to your torso and your total height.
Ribcage circumference. Measure around the body just above the natural waist, at the lower edge of the ribs. This is the place where a close top has to stretch or ease when you breathe.
High hip and full hip. Measure at the top of the hip bones and at the fullest part of the hips. A skirt that sits at the natural waist has to pass over the hips on its way up, which is why a zipper may close at the waist but still resist at the hip.
Bust and underbust. Measure these as you normally would, wearing the intended bra. These measurements are for the top, but they affect the top hem because a top that is tight under the bust tends to rise.
Torso length, front and back. The distance from the base of the neck to the waist, measured down the back, and from the shoulder point to the waist down the front. Torso proportions vary a great deal, and a top that is correct for a long torso will land higher on a short one. Torso length is one of the main reasons a top that looks balanced in a catalog photo sits differently on you.
Measuring a garment, not just yourself
Once a piece of your bridal separates is in your hands, measure it too. For a skirt, lay it flat and measure across the waistband, double the figure to get the circumference, and record the waistband height from the top edge to the bottom edge. Also measure the zipper length, the distance from the top edge of the waistband to where the zipper ends.
For a top, lay it flat and measure across the bottom hem, double it, and record the length from the highest point of the shoulder seam to the hem on the front and the back. A top with a curved or dipped hem may be longer at the center back than at the sides, which affects the join.
Compare these garment measurements with your body measurements, remembering that fabric stretch, lining and boning change how a number translates to fit. A rigid satin skirt measured at thirty inches across the waistband closes on a thirty-inch waist with no room to breathe. A stretch crepe with the same label may give a couple of inches. The only reliable guide with bridal separates is trying the pieces on, which is why measurements are for planning and screening rather than for ordering blind.
If a seller gives you garment measurements, ask for them in writing, as part of the written vendor agreement or order confirmation, so you can hold the finished piece against them.
Using a marker point at the fitting
At a fitting, ask the stylist or seamstress to place a small safety pin or removable tape marker on the front of the skirt waistband at its top edge, and another on the top at the hem. Stand in front of a mirror and measure the vertical distance between the two markers with your tape.
Then raise your arms to shoulder height, sit, and measure again. The change in distance is the movement allowance, and it is the single most informative number in the fitting. A join that moves a quarter inch is stable. A join that opens or closes by an inch or more is going to show.
If you cannot place markers on a garment you do not own, take photographs from the front, the side and the back, in the same three poses, with a tape measure or ruler held visibly in frame. Later you can compare the photographs with your recorded numbers.
A compatibility check for bridal separates: the overlap-zone method
This is the central framework of the guide for choosing bridal separates. It takes the five points from the previous sections and turns them into a repeatable check you can run on any top and skirt pairing, whether you are in a salon, ordering online or comparing two options from different sellers. It produces a plain decision, not a score.
The method for checking bridal separates has four steps. You assign each piece a position on the vertical ruler. You compute the join. You test the join under three poses. And you match the result against an intention you set in advance.
Step one: place each piece on the vertical ruler
Using your natural waist as zero, give the top hem a number and the skirt waistband top edge a number. Above the waist is positive, below is negative. A cropped top that ends two inches above the natural waist is plus two. A hip-length top that ends four inches below is minus four. A skirt whose waistband top edge sits one inch above the natural waist is plus one. A skirt whose waistband sits three inches below is minus three.
You do not need to be exact to the millimeter. A half inch is a reasonable level of precision, and the point is to see the relationship, not to produce a technical drawing. Use the fitting markers described above, or measure on yourself with the garment on and a tape against the front.
Step two: compute the join
Subtract the skirt waistband number from the top hem number. A positive result means a gap of that many inches. A result near zero means a seam collision. A negative result means an overlap of that many inches.
For example, suppose a top hem is at plus two and the skirt waistband is at plus one. The result is plus one, a gap of one inch. If the top hem is at minus three and the skirt waistband at plus one, the result is minus four, an overlap of four inches. If both are at zero, you have a collision.
Step three: test the join in three poses
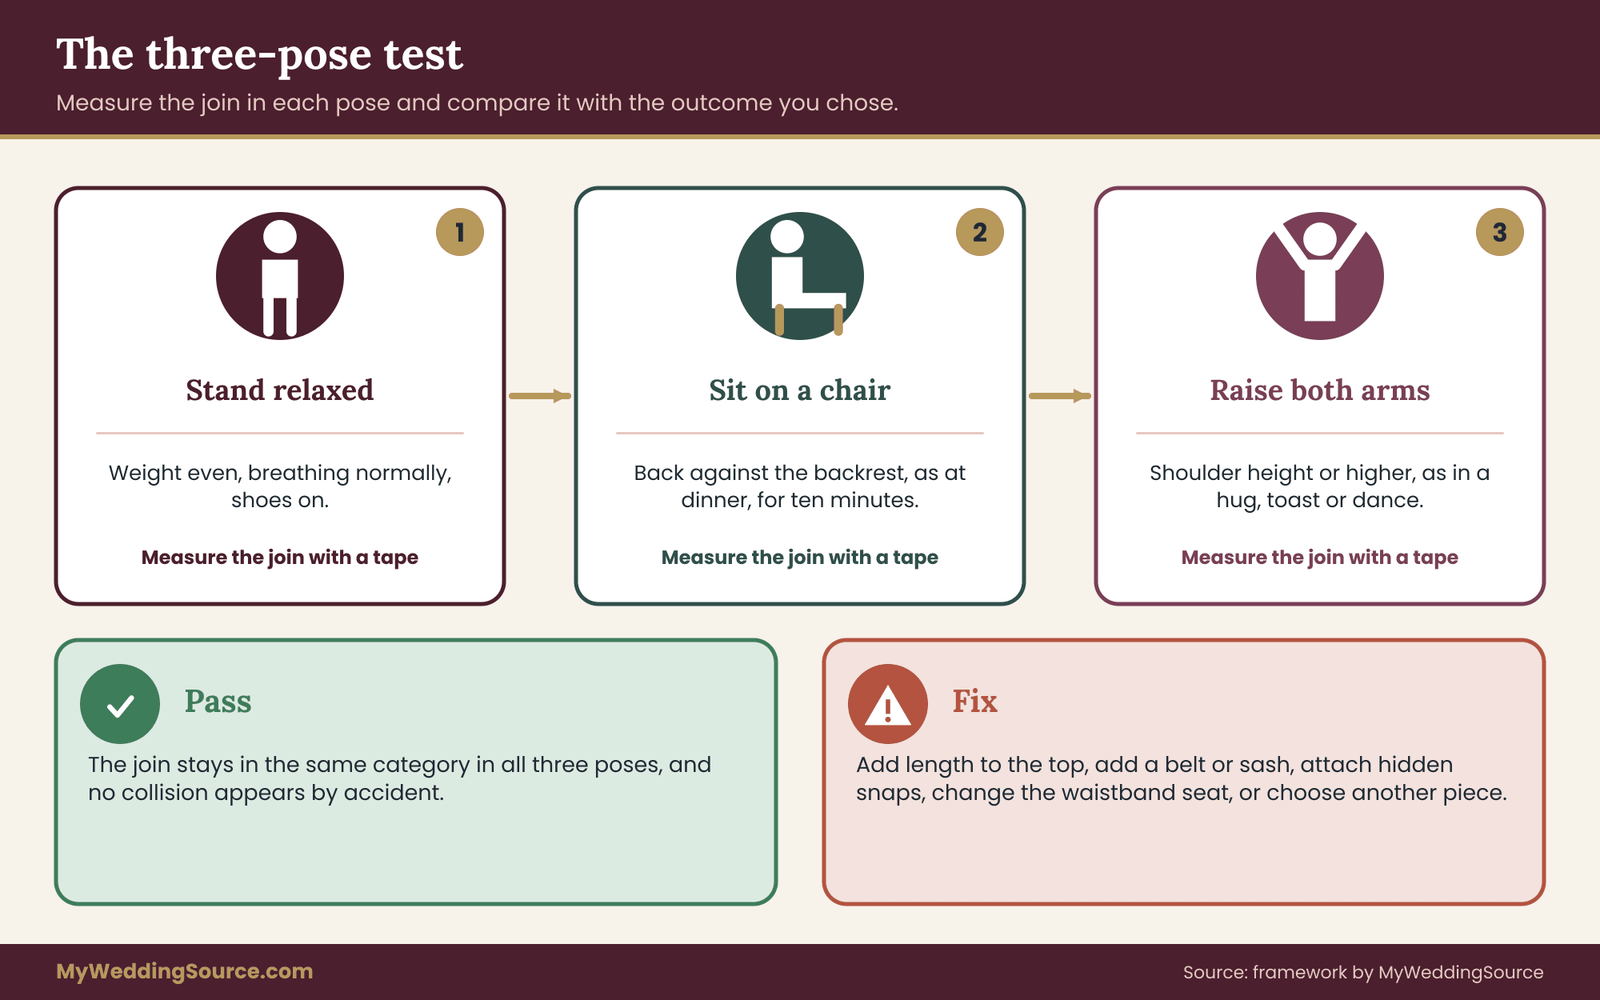
Static numbers hide movement in bridal separates, so repeat the measurement in the three poses that matter. First, stand relaxed. Second, sit on a standard chair with your back against the backrest, the way you will sit at dinner. Third, raise both arms to shoulder height or higher, the way you will when you hug someone, toast, dance or hold a bouquet overhead for a photo.
Write down the join in each pose. Most pairings will show a small difference between the poses. What you are looking for is a pairing where the join stays in the same category, a stable gap stays a gap, a stable overlap stays an overlap, and a collision never occurs in a pose where you do not intend it.
A common result is that the top rises when you lift your arms by an inch or more. A pairing that shows a one-inch overlap standing will show a collision or a gap in that pose. This is why designers who create tops for tucking or layering tend to add length, and why an overlap with room to spare is more forgiving than an overlap at the edge of what is needed.
Step four: match the result to your intention
Before the fitting, decide which of the three outcomes you want from your bridal separates. Do not decide by looking at the pairing and rationalizing what you see.
If you want a deliberate gap, the gap must remain a gap in all three poses and should not increase beyond what you want to show. Check that the skin or underlayer visible in the gap is something you are comfortable displaying, and that the top will not ride up in a hug and expose more. Also check the lower edge of the gap, because a waistband sitting at the natural waist will show its upper edge and any hook or lining that sits there.
If you want a clean overlap, make sure the overlap stays at least a couple of inches in the pose where it is smallest, which is usually arms raised. Overlap in a static pose that disappears when you move is not a stable overlap. Then check the bulk: two layers at the waist, plus lining and any boning in the skirt waistband, can create a ridge visible under a close-fitting top.
If you want to avoid a seam collision, do not rely on avoiding it by luck. If the static numbers show a join within about half an inch of zero, plan to change one number. Options include adding length to the top, adding a belt or sash that covers the join, or choosing a different waistband seat for the skirt.
What the method does not tell you
The overlap-zone method does not predict how a pairing will look in photographs, and it does not replace the judgment of a stylist. It also does not account for how the fabrics of bridal separates behave once worn for several hours. What it does is give you a vocabulary and a set of numbers, so that when you say “this top is too short” the response can be “by how much, and in which pose?” That precision is valuable when you are working with a seamstress, because it turns a feeling into a task.
It is also useful when you are comparing options. If two skirts both appeal to you, one at plus one and one at minus two, the method shows right away that the same top will create different joins with each. The comparison is no longer about which skirt is prettier. It is about which skirt gives you the join you intended with a top you already have.
A grid for pairing top lengths and waistband seats
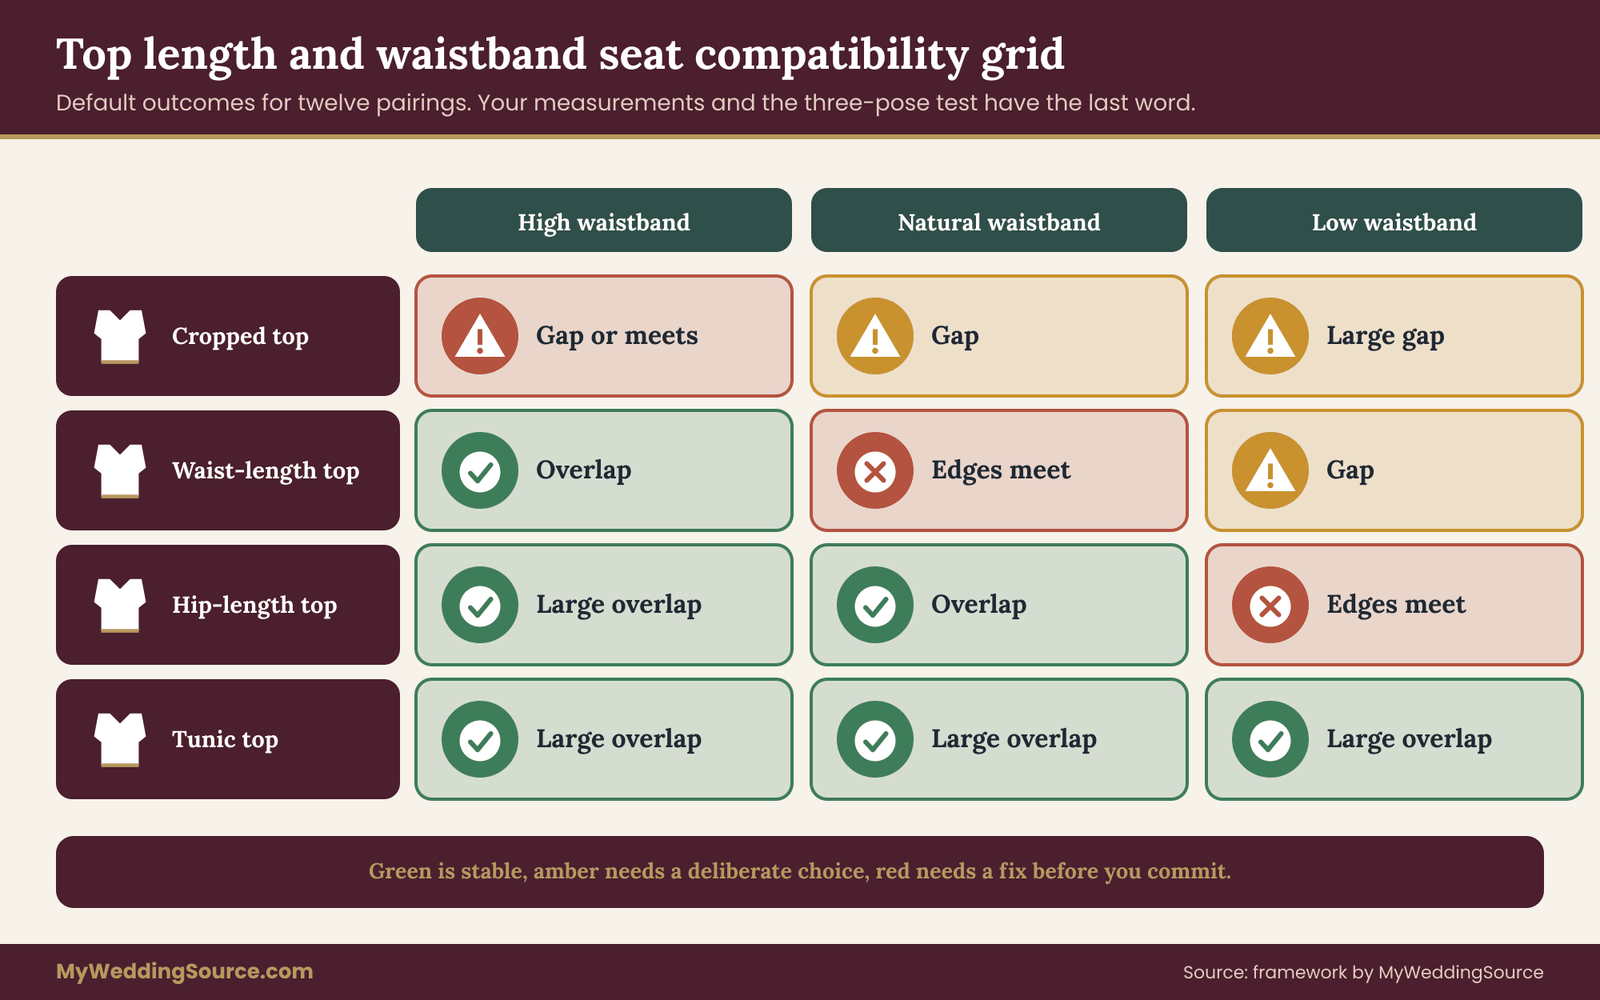
To pull the method together, think of a grid with four top lengths across the top and three waistband seats down the side. The top lengths are cropped, waist-length, hip-length and tunic. The waistband seats are high, natural and low. That gives twelve combinations, and each one has a predictable default outcome that you can then adjust.
A cropped top with a high waistband tends to produce either a small deliberate gap or a collision, so it needs the closest checking. A cropped top with a natural waistband produces a clear gap, which suits a midriff style and little else. A cropped top with a low waistband produces a large gap that most people do not intend.
A waist-length top with a high waistband creates an overlap by default, a stable one. With a natural waistband it creates a collision. With a low waistband it creates a gap.
A hip-length top with a high waistband gives a generous overlap with some bulk. With a natural waistband it gives a moderate overlap. With a low waistband it gives a slight overlap or collision.
A tunic with any waistband gives a large overlap, which is forgiving at the join but changes the whole proportion of the outfit, and it works best with a slim skirt.
The infographic below shows the same grid visually, so you can see at a glance which pairings are stable, which need checking and which need a deliberate decision.
Mix-and-match pitfalls with bridal separates from different makers
The appeal of bridal separates is freedom. You can pair a top you love with a skirt you love, even when they come from different designers, and each piece can be sized separately to fit a body that does not match one standard gown size. That freedom is real, and so are the ways it goes wrong with bridal separates. Most of the pitfalls of bridal separates come from the same root: nobody coordinated the two pieces, so you have to.
Size labels on bridal separates do not travel between brands
A size label is a brand’s own code. Two makers can both print a size on the tag and mean different waist measurements, and a bridal designer’s sizing is often different again from everyday retail sizing. Bridal sizes are frequently cut larger than street sizes, so people sometimes order a size or two above what they wear in regular clothes.
That habit is common advice, but the specific correction depends on the maker. Use the maker’s own size chart, compare it with your measurements, and ask what the garment measurements are, not just the body measurements the chart is based on.
This matters most for the skirt. A skirt waistband has no stretch in many woven fabrics, and a one-size difference between two makers can be the entire reason a skirt closes or does not. The top is more forgiving because a bodice can be taken in. But if the top is size-matched to the skirt by label rather than by measurement, the two can end up with different waist circumferences at the join. If one is smaller, the larger piece will either bunch or have to be taken in, which changes its shape.
Waistband seat claims are not standardized
“High rise,” “natural waist” and “fitted at the waist” are marketing terms. A seller’s product page may call a waistband natural when it sits an inch or two above your natural waist, because it sits at the natural waist of the model in the photograph. Ask for the waistband height and for the distance from the top of the waistband to the hem. Compare that figure with your own waist-to-floor measurement and your heel height, and you can estimate where the waistband will sit on you.
If a seller of bridal separates cannot or will not provide garment measurements, treat that as information. A page that shows only a size chart based on body measurements tells you what the maker aimed for, not what the garment actually measures.
Fabric and weight mismatch at the join
Two bridal separates that look compatible on a hanger can behave very differently when they touch. A heavy satin skirt pulls down on a light chiffon top tucked into it, because the skirt’s weight drags on the waistband while the top has no structure to resist. A stiff organza skirt pushes outward and creates a shelf under a soft knit top. A beaded top is heavy at the hem and can bounce against a light skirt in a way that shows through the fabric.
Fabric weight also affects how a join holds under motion. A light top over a heavy skirt tends to creep upward as the skirt tugs downward. A heavy top over a light skirt tends to sag at the waist. When the weights are close, the join is easier to stabilize. When they differ, plan for a fix such as a waist stay, which is a narrow band of firm tape sewn inside a waistband to hold it in place, or a hook-and-bar connection between the pieces. The next part of this guide covers those fixes.
Color and whites that do not match
White is not one color. Pure white, soft white, diamond white, ivory, champagne and cream differ, and fabrics take dye differently. A top in silk satin and a skirt in polyester satin can both be labeled ivory and still read as two different shades, especially under photography lighting or under outdoor light. The problem becomes visible at the join, where the two sit side by side.
The safe approach is to compare the two pieces together in the same light, ideally daylight, before you commit to the purchase. If one piece is on order, request a fabric swatch from the maker and hold it against the other piece. Swatch color can differ slightly from the finished fabric, so it narrows the risk rather than ending it. When you buy from two sellers, ask each one for the dye lot, if they track it, or whether a reorder could vary in shade.
Sewn-in cups, boning and built-in structure
Some tops have built-in cups, boning or a corset-style foundation. Some skirts have a built-in petticoat, a crinoline, hooks for a bustle or pockets. Those internal features have positions. A top with boning that extends to its hem has a stiff lower edge, and that edge will press against a skirt waistband and may dig. A skirt with an internal waist stay and a stiff waistband adds more structure at the very place the top hem will land.
This is why the overlap-zone check includes the closure positions. A stiff lower hem and a stiff waistband in the same zone make a collision uncomfortable as well as visible, and they limit how much an alterations professional can adjust either piece.
Different closures, different adjustments
A top that closes with a back zipper and a skirt that closes with a side zipper mean two different openings that your helper must handle on the day. A corset-style lace-up top has adjustment built in, but its waist measurement has to be coordinated with the skirt, because as the lacing tightens or loosens, the top’s circumference changes while the skirt’s does not. A skirt with an adjustable hook-and-bar closure gives you some range, but a fixed zipper does not.
When pieces arrive from different sources, ask which of the two has the adjustment. If the top has lacing and the skirt does not, you may choose to fit the skirt precisely and let the top absorb changes. If both are fixed, any change in your measurements between the fitting and the wedding has to be handled by a seamstress.
Hem length is a separate decision
The skirt hem length is independent of the top, yet people often talk about “the dress length” as if it were one thing. Hem length depends on the skirt’s waistband seat, because a skirt that sits higher on the body lands higher at the hem for the same total length. When you change the waistband seat, say by taking the skirt in at a lower point, the hem rises or falls.
The same is true of train length, which is measured from the waistband. If you intend to wear heels, do your hem measurement in them, and keep the heel height consistent between the fitting and the wedding.
The responsibility gap when bridal separates come from two sellers
With bridal separates, this one has less to do with fabric and more to do with who is responsible. When you buy a gown from one seller, one seller owns the fit. When you buy a top from one seller and a skirt from another, nobody owns the join.
If the top is too short, the top’s seller will say the skirt sits too low. The skirt’s seller will say the top is cut for a different waistband seat. Neither is wrong, and with bridal separates you carry the cost of finding out which piece to alter.
The practical response, with bridal separates, is to decide early who will be the decision maker for the join, which is usually you and a single alterations professional, and to route all changes through that person. It also helps to get each seller’s return and alteration policies in writing before you pay, which is covered in the section on buying from two sources. A written agreement with any wedding vendor should also say how changes after purchase are handled.
Fabric, weight and hang: choosing materials that sit well in bridal separates
The previous section raised the matter of fabric weight at the join. This section goes further into how common bridal materials behave together, because the fabric pairing decides how much of the waist problem you can solve by choice and how much you have to fix after purchase.
Structured skirts and soft tops
A structured skirt in bridal separates, such as a satin ball skirt, a mikado skirt or a heavily gathered tulle skirt, holds its own shape. It does not need much support from the waistband, and its waistband tends to be firm. Pairing it with a soft top, such as a crepe, chiffon or knit, means the top will drape over the firm band.
This is usually a flattering combination, because the top softens the line of the skirt. The risk is that the top tends to ride and wrinkle where it meets the stiff band, and the band may show through lightweight fabric.
If you choose this pairing, look for a top with enough length to overlap the band by at least a couple of inches in all three poses, and consider a lining or a thin underlayer that smooths the band’s outline. Test it by sitting and raising your arms, and ask the seamstress whether the top hem can be weighted or finished with a narrow band to help it hang.
Soft skirts and structured tops
A soft skirt, such as a crepe column skirt, a bias-cut satin skirt or a chiffon A-line, depends on your body and on the waistband for its shape. Pairing it with a structured top, such as a corset-style bodice or a boned lace top, concentrates the structure above the waist while leaving the lower half to drape. This can be striking, but the soft skirt follows every curve, including whatever sits under it. Bias-cut and clingy fabrics reveal seams, slip lines and the edge of the top.
For this pairing the join is the whole story. Choose a skirt with a smooth, flat waistband and a lining or slip that reaches the waist. Confirm that the top’s lower edge sits flat against the skirt and does not flare. A corset top that ends at the waist with a stiff hem can create a visible edge under a clingy skirt, so a top that ends slightly lower and curves outward may suit better, or a design that lets the corset sit over the skirt rather than tuck in.
Matching structure on both sides
Two structured bridal separates, say a boned corset top and a mikado ball skirt, give the most stable join in terms of movement, because neither piece drapes or creeps. The risk is rigidity. Neither piece gives with your body, so the circumference match must be precise, and a small change in your measurements shows up as pressure or a gap.
This pairing relies heavily on accurate fitting and on a clear plan for adjustments, such as lacing or a hook-and-bar at the join. It also needs a decision about comfort during a long day, because stiff pieces limit the way you sit and breathe.
Matching softness on both sides
Two soft bridal separates, say a crepe top and a satin slip skirt, show every undergarment line and every fold at the waist. This look relies on good underlayers and often on a smoothing slip. It is comfortable and moves well, but the join is least forgiving of imprecise fit. Small differences in tension create wrinkles, and a top that is a little too short will ride up and reveal a gap without anything to hold it down.
For this pairing, consider a slightly longer top and a skirt with a waistband that has some structure, such as an inner stay, so that the pieces are not both free to move. Test the pairing by walking, sitting and hugging, and look at the join from behind as well as from the front.
Lace, beading and surface texture
Lace and beadwork add weight and texture. A beaded hem on a top catches on a skirt’s fabric and can snag fine fabrics such as silk or chiffon, which makes a careful layering order necessary. If the skirt is delicate, ask the seamstress to line the inside of the top hem or choose a skirt fabric that tolerates friction. Scalloped lace edges at the top hem can show through a thin skirt waistband, especially in photographs taken with flash.
The reverse also applies. A beaded or heavily embellished skirt waistband can scratch a delicate top. Pay attention to the inside of each piece, not just the surface you will see, and ask whether the inside edges are finished smoothly.
Underlayers are part of the fabric decision
Whatever fabrics you choose, your underlayers sit in the same zone. A slip, a bodysuit, shapewear or a waist cincher adds its own layer, its own hem and sometimes its own waist edge. Two pieces that join perfectly alone can create a ridge once an underlayer is added. Decide on the underlayers before the final fitting, and bring them.
If you use a waist-shaping undergarment, its top edge may fall right at your natural waist, which is exactly where the join is. The wedding day accessories planning guide covers belts, undergarments and the other pieces that need to be tested with an outfit before the day.
Closures, bulk and waist stays: keeping bridal separates in place
A fit that works in a mirror but not in motion is the standard complaint about bridal separates. The fix is usually a small piece of construction that nobody mentioned during shopping. This section covers the parts that keep the pieces where you put them.
Where the zipper ends and why it matters
On most skirts, the zipper runs from the top edge of the waistband down the side or back. How long that zipper is, and where it ends, determines how easily the skirt gets over your hips. A short zipper on a fitted skirt means you step in and pull up with effort, and the zipper takes the strain at its base. If a zipper ends right where the top hem lands, the end of the zipper creates a hard spot at the join, and a small hook-and-eye above it can poke through a thin top.
Ask for the zipper length on any skirt you are considering and compare it with your high hip and full hip measurements. A seamstress can sometimes replace a zipper with a longer one, but this depends on the seam allowance and the fabric. It is a better question to ask before you buy bridal separates than after.
Hooks, bars and the waist stay
A waist stay is a strip of firm tape or grosgrain ribbon sewn into the inside of the waistband. It takes tension off the zipper and keeps the waistband from stretching or sliding. Many bridal skirts include one. Some do not, and a skirt without one can droop or turn as you move.
A hook-and-bar closure at the waistband is a related feature. It sits above the zipper and holds the band closed so the zipper is not doing all the work. If your pieces have both a stay and a hook-and-bar, you have more control over the circumference. If they have neither, the fit relies entirely on the zipper and the fabric, and your fitting should include checking whether the band shifts as you sit and stand.
Connecting the two pieces
Some people choose to attach the top to the skirt with small hooks, snaps or concealed tape, so that the pieces stay together and the join cannot gap. Others rely on friction and the weight of the skirt. Neither approach is universally right. Attaching the pieces makes the join more stable but also less flexible, which means you must be sure of the fit, and it requires that the connection points be accessible for dressing and for bathroom breaks.
If you plan to attach the pieces, ask the seamstress how the connection will be made and how you will undo it. The connection should be strong enough to hold under motion and gentle enough not to damage a delicate fabric. A small number of well-placed attachments are usually better than many. They should be placed where the pieces overlap and where they will be hidden, not at the visible edge.
Bulk at the join
Layers add up in bridal separates. A top with a lining, a skirt with a waistband and a facing, a slip with a waist elastic, and perhaps a belt can add up to five or six layers of fabric around the waist. That creates a ridge, and the ridge shows under a close-fitting top and in photographs.
To reduce bulk, look at each layer and ask whether it is needed. A top with a lining may not need a slip underneath. A skirt with a built-in petticoat may not need a separate underskirt. If the top is tucked rather than overlapped, a seamstress can sometimes trim the seam allowances or replace a thick lining with a thinner one. When the join is a deliberate overlap, a gentle taper from the top hem into the skirt, rather than a hard edge, is usually the smoother result.
What happens when you sit
Seated, your torso compresses and your abdomen moves outward and forward. A waistband that sits at the natural waist presses on your stomach. A waistband that sits higher presses on the lower ribs. A waistband that sits lower presses on the hip bones. Each of these feels different over several hours.
If you will be seated for a long ceremony, a dinner and a series of toasts, test the waistband in a seated position for at least ten or fifteen minutes during a fitting, not just a few seconds. Ask yourself whether you could eat a full meal and still breathe comfortably. If you cannot, the waistband may need more ease, which is one of the alterations discussed next.
Restrooms and getting dressed
Bridal separates have a practical advantage in restrooms because you can lift a skirt without undoing a bodice, but only if the skirt’s closure and layers cooperate. A full skirt with a crinoline is awkward in a small stall. A fitted skirt with a long zipper is easier to adjust. Think through the logistics of who will help you, and what happens if a hook fails. Pack a small repair kit, covered in the next section, and keep it with a trusted helper.
Alterations for bridal separates: what can change and what cannot
Alterations are where the overlap-zone numbers for bridal separates become real. A skilled alterations professional can change much of what this guide measures, but not everything, and they work on each piece differently. Knowing what is realistic helps you decide what to buy and what to ask for.
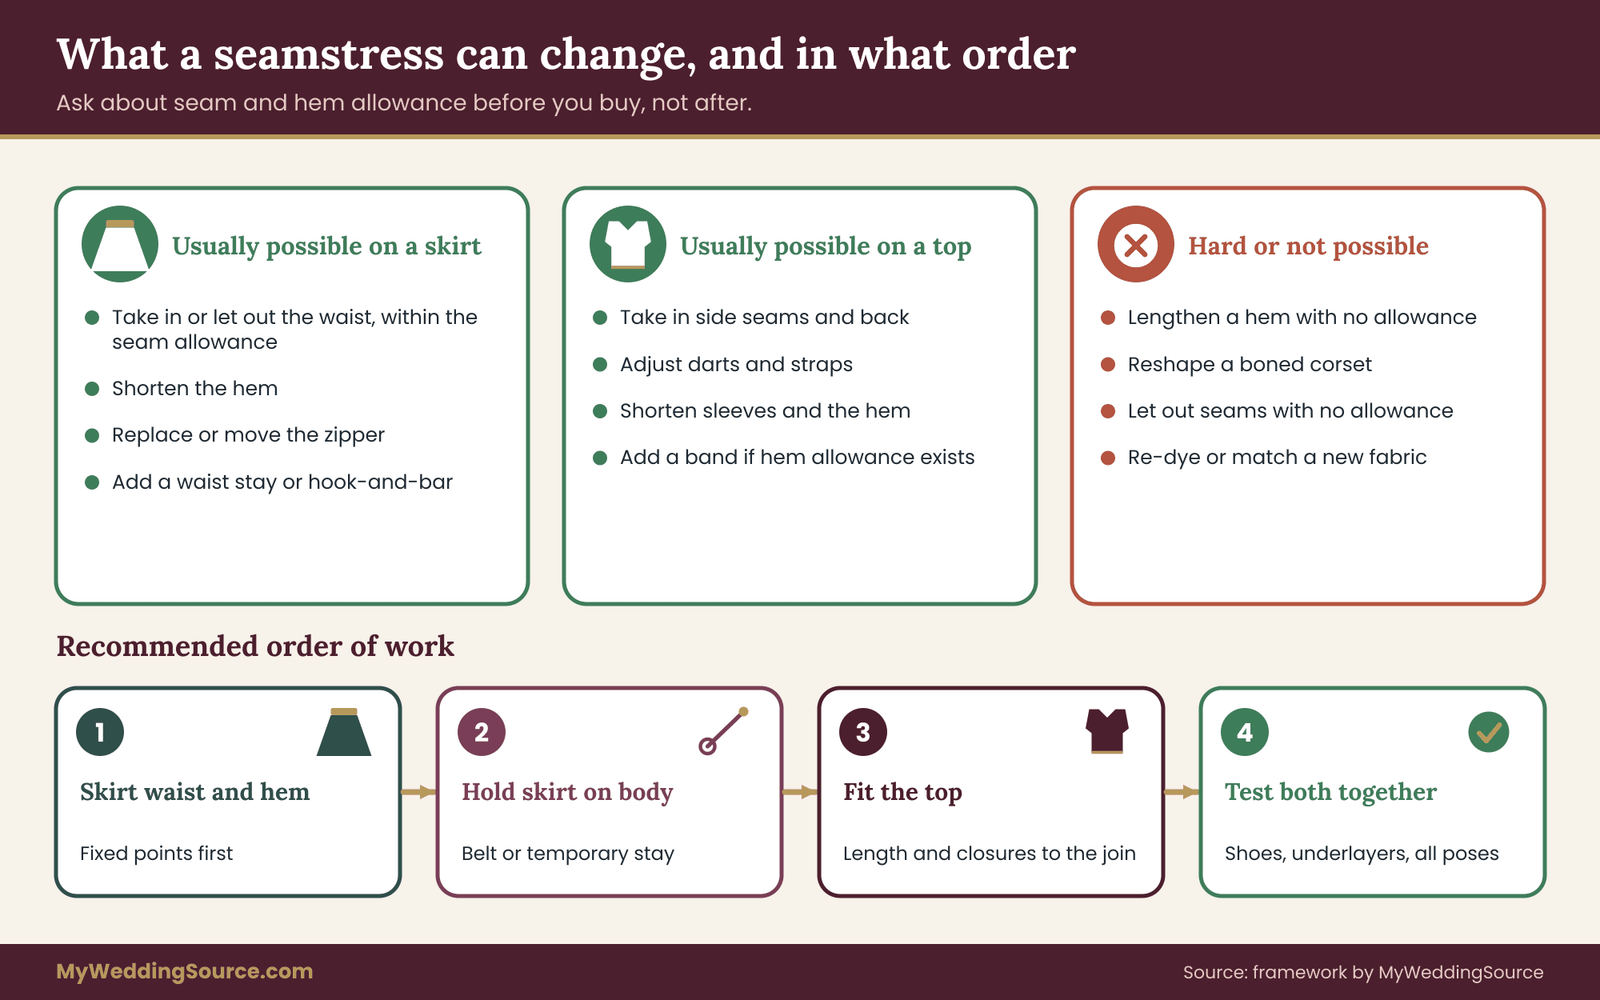
What can usually be changed on a skirt in bridal separates
A skirt’s waistband can often be taken in or let out within the limits of the seam allowance. The amount depends on how much fabric is in the seams, and that varies by garment. A skirt with generous seam allowances gives you more room. A skirt that was cut close gives you very little. Ask the seamstress to check the seam allowance before you buy if you think you might need to resize.
The hem can be shortened, and in some cases lengthened if there is hem allowance. A skirt with a lace or beaded hem is harder to alter than one with a plain hem. The waistband seat can sometimes be adjusted by moving the waistband up or down, although this changes the shape of the skirt and affects the hem, so it is a substantial job.
A zipper can be replaced or moved. Hooks and bars can be reset to change the closure position. A waist stay can be added. Linings can be adjusted. A seamstress can add a hook to the waistband for attaching a top.
What can usually be changed on a top
A top can often be taken in at the side seams and the back, within the available seam allowance. Darts can be adjusted for a better bust fit. Straps can be shortened or moved. Sleeves can be shortened or adjusted at the cuff.
The hem is more complicated. A top can usually be shortened. Lengthening depends on hem allowance, and many tops do not have one. If you need a top to extend lower to create an overlap and the top does not have extra fabric, a seamstress may have to add a band or a trim, or you may need to choose a different top. This is why the top hem position is the first thing to check, not the last.
What is hard or impossible to change
Some changes cost more than the garment is worth, or cannot be done without damaging the piece. Changing the overall length of a top with heavy beading or lace across the hem is often impractical, because the decoration has to be removed and reapplied. Changing the shape of a structured corset or a boned bodice is a major rebuild.
Letting out a garment with no seam allowance cannot be done. Changing a fabric’s color or dye cannot be done reliably. Matching a replacement piece to an existing one after the fact depends on the maker still having the fabric.
If your plan depends on one of these changes, ask the seamstress before you commit. A candid answer such as “I can take in an inch on each side, but I cannot add length to this hem” saves you from buying a piece you cannot fix.
The order of alterations
When two pieces have to work together, the order of alterations matters. A sensible order is to finalize the skirt first, because its waistband seat and hem are the fixed points, then fit the top to it. If you alter the top first and later change the skirt, the join you set may move.
A typical sequence is to alter the skirt’s waist and hem, hold the finished skirt on your body with a belt or a temporary stay, then fit the top’s length and closure to the join, and finally check both pieces together with all underlayers and shoes. Allow time for at least two fittings, because the first fitting reveals the problems and the second confirms the corrections. The wedding vendor timeline is a helpful reference for placing fitting dates among other vendor deadlines.
Finding the right alterations professional for bridal separates
Not every tailor has bridal experience. A garment with lace, beading, boning or fine fabrics needs hands that have worked on them. Ask how many bridal garments the person alters, whether they work with bridal separates, and whether you can see examples. Ask whether they will fit both pieces together and whether they charge by the piece, by the job or by the hour. Ask what happens if the join needs further adjustment after the final fitting, and whether that is included.
The wedding vendor due diligence checklist lays out general steps for checking any vendor before you pay, which applies to an alterations professional as much as to a caterer. Get the scope, the price and the deadline in writing. Cost depends on the work, and prices vary by region and shop, so ask for an estimate for the specific changes you plan rather than relying on a general figure.
Timing
Alterations to bridal separates are rarely instant. Complex work on lace, beading or a rebuilt waistband can take several weeks, and wedding season can be busy. Ask the seamstress for their lead time and plan for the possibility that the second fitting leads to more work. Build in a buffer between the final fitting and the wedding, long enough that you can fix a surprise without panic.
A small repair kit for the day
Even with careful alterations, small failures happen with bridal separates. Keep a simple kit with a trusted person. It should hold a few safety pins, a spare hook-and-eye set, a needle and thread in the right color, a small pair of scissors, fashion tape, and a clip for gathering extra fabric at the waist. These items can fix a popped hook, a gapped join or a fallen hem in minutes. They are not substitutes for proper alterations, but they are insurance.
Buying bridal separates from two sellers without losing control of the fit
Buying bridal separates from one shop is simpler. A single seller handles sizing, orders both pieces and often coordinates alterations. But many couples and individuals want pieces from different places, either because the look they want does not exist in one collection or because budget and availability steer them. That is a reasonable choice. It just needs a few extra guardrails.
Settle the join before you buy the second piece
If you already own or have ordered one of your bridal separates, record its numbers before choosing the other. For a skirt you have in hand, you know the waistband seat, the waistband height and the closure. That tells you what top hem position you need for the join you want. For a top you have chosen, you know the hem position and the ease, which tells you what waistband seat will work.
This sequence reverses the usual shopping instinct, which is to look at a photo of a possible match. A photo shows one body and one styling. Your numbers show your body. If a seller offers a virtual try-on or a styling consultation, treat it as a suggestion and check it against your recorded numbers.
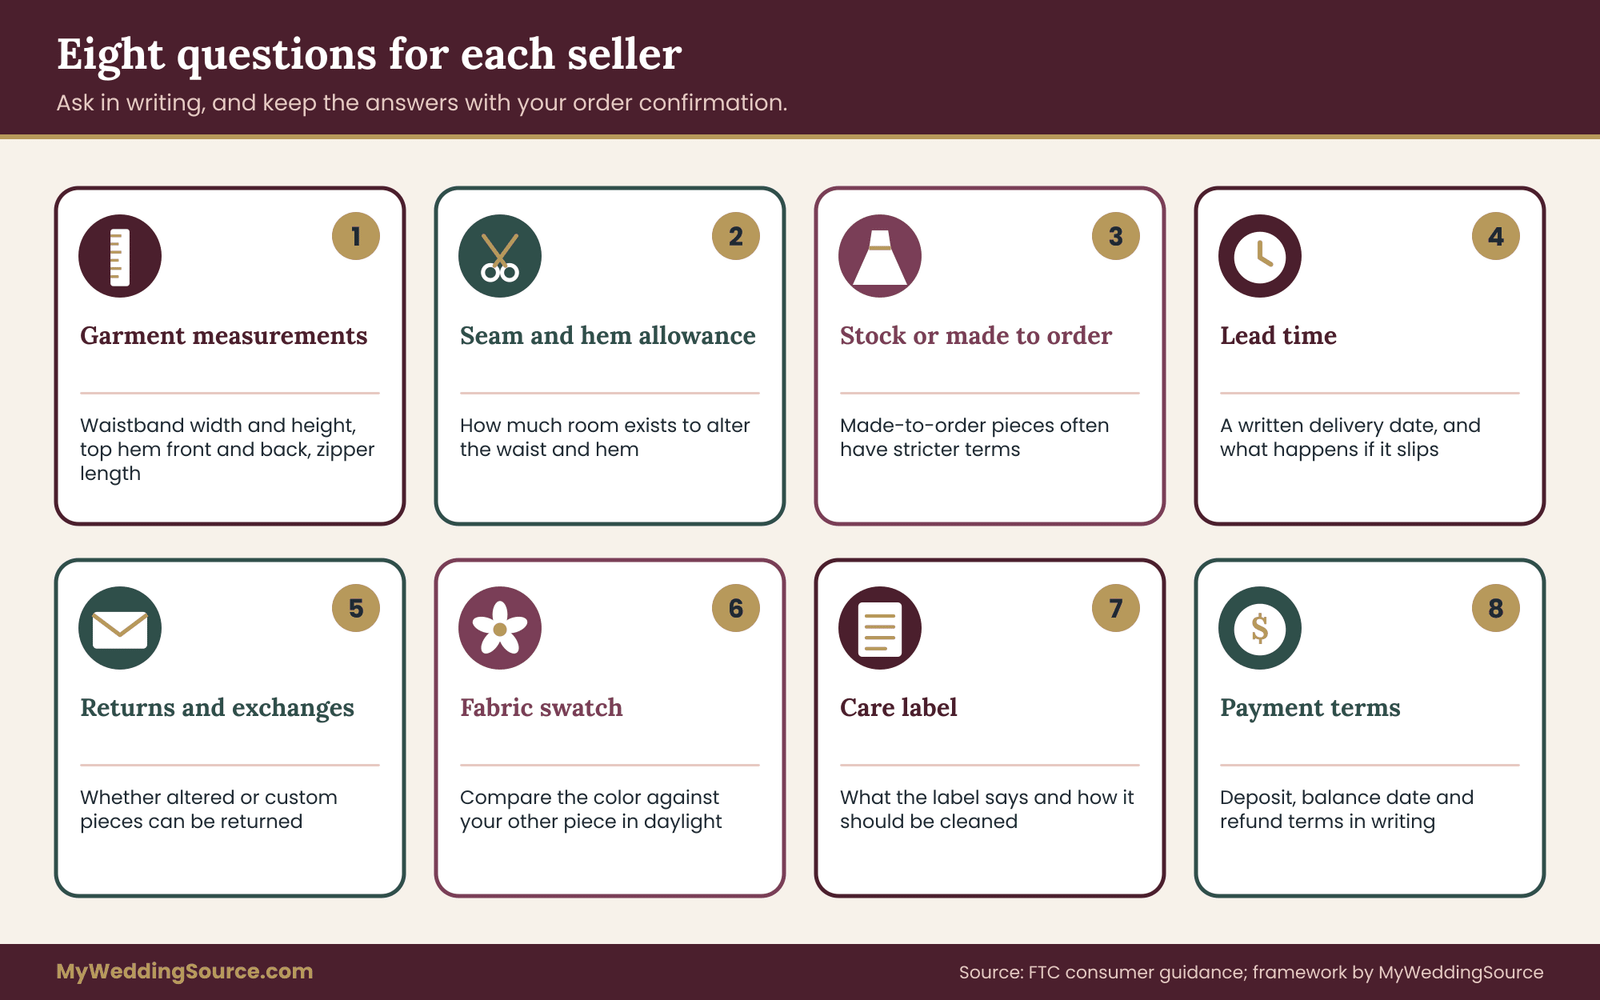
Questions worth asking each seller of bridal separates
Ask these questions in writing, by email or message, so you have a record. Ask them before you pay anything beyond a small amount.
What are the garment measurements, not just the size chart? Specifically, the waistband circumference and height of the skirt, the top hem length at front and back, and the zipper length.
What is the seam allowance at the waist and side seams, and the hem allowance? This tells you how much alteration room exists.
Is the piece made to order or taken from stock? Made-to-order pieces may have longer lead times and stricter return terms.
What is the lead time, and what happens if the piece arrives late? A missed date for a wedding garment is serious, and the answer should be specific.
What is the return, exchange and cancellation policy, and does it apply to altered or custom-sized pieces? Many sellers do not accept returns on custom work.
Can you provide a fabric swatch, and does the finished color match it? For color matching across two sources, a swatch is the best tool.
Does the piece come with a care label, and what does it say? Care instructions tell you how the garment should be cleaned, and the care label is also something the seller has to supply under federal labeling rules. The FTC publishes the details of its care labeling rule, so check the agency for the current text.
What are the payment terms? Is the payment a deposit with a balance due later, or full payment up front? What does the seller say about refunds if the piece does not arrive or is not as described?
Shipping promises and consumer rules
If you order online, the Federal Trade Commission has a rule about mail, internet and telephone orders. In general terms, it requires sellers to ship within the time they state and to give notice and options if they cannot. The rule has specific conditions and exceptions, so read the FTC’s current guidance rather than relying on a summary. What it means in practice is that a delivery date in writing matters. Save the confirmation page, the order email and any message that states a ship date.
If a seller is slow or the piece does not arrive, contact them in writing, state the date promised and ask for a firm new date or a refund. If that does not resolve it, you can consider a dispute with the card issuer or a complaint to the FTC or to your state consumer protection office. The Consumer Financial Protection Bureau explains how billing disputes work, including that written notice generally has to be sent within a set period of the statement date. The window is short, so know the date.
Deposits, balances and the money trail
Deposits are normal for custom or made-to-order bridal separates. A deposit is not a substitute for a contract. Get a written order that lists the item, size, color, fabric, price, deposit paid, balance due, due date and delivery date. Paying by credit card gives you dispute rights that cash or a direct bank transfer may not. Keep receipts and screenshots in one folder, and note the dates.
If you are working to a set budget, add the cost of alterations and any second-source purchases to the same sheet. Alterations on two pieces can cost as much as a modest garment, and the cost depends on the work. The wedding budget guide is useful for placing garment costs alongside other categories so the total does not surprise you.
Delivery timing and the fitting window
Bridal separates ordered from two sellers will rarely arrive on the same day. Plan the delivery window so that both pieces are in hand with enough time for two fittings and for any return or reorder. If one piece turns out to be wrong, you need time to fix it. A late delivery that arrives a week before the wedding leaves no room for correction.
A practical rule is to place the order for the piece with the longest lead time first, since it constrains everything else, and then choose the second piece to fit it. Tell each seller the date by which you need the piece, and ask them to confirm it in writing. If a date cannot be met, learn that early enough to change plans.
When the pieces do not work together
Sometimes you receive both bridal separates and the join does not work. At that point you have options. You can alter one piece, add a belt or sash to cover the join, change one piece for a different style, or return one piece if the policy allows. Each has costs. Alteration costs money and time. A belt changes the look. Exchange depends on the seller’s policy and the timeline. Return depends on whether the piece was worn, altered or custom ordered.
That is why the return policy and the seam allowance matter before purchase, not afterward. If you know you cannot return a custom piece, you will check measurements more carefully. If you know a piece has little seam allowance, you will choose the size more carefully. These questions are the cheapest form of insurance.
A worked example of bridal separates: the Alvarez fitting
The example below is invented to show how the method works on bridal separates. The people, shops and numbers are illustrative, not drawn from a real fitting, and the figures are chosen for clarity, not to represent a typical body or garment. Your own measurements will differ, and so will the numbers you get.
The setup
Dana Alvarez is planning a late afternoon garden ceremony and a seated dinner, and she wants to wear bridal separates. She has chosen a structured ivory satin ball skirt from one maker and a soft lace camisole-style top from another. She loves both. She has the skirt in hand and has ordered the top.
Dana measures herself in the late afternoon, standing and seated, wearing the shoes she plans to wear. Her natural waist circumference is thirty inches standing and thirty and a half seated. Her waist height from the shoulder is fifteen and a half inches. She notes that her torso is a little shorter than average for her height.
She then measures the skirt flat. The waistband is thirty and a quarter inches around and two inches tall. The zipper is eight inches. The seller’s page called it a natural waist skirt. Dana ties her ribbon at her natural waist, puts on the skirt and finds that the top edge of the waistband sits one and a half inches above the ribbon. In the vertical ruler language, the skirt waistband is plus one and a half.
The top arrives
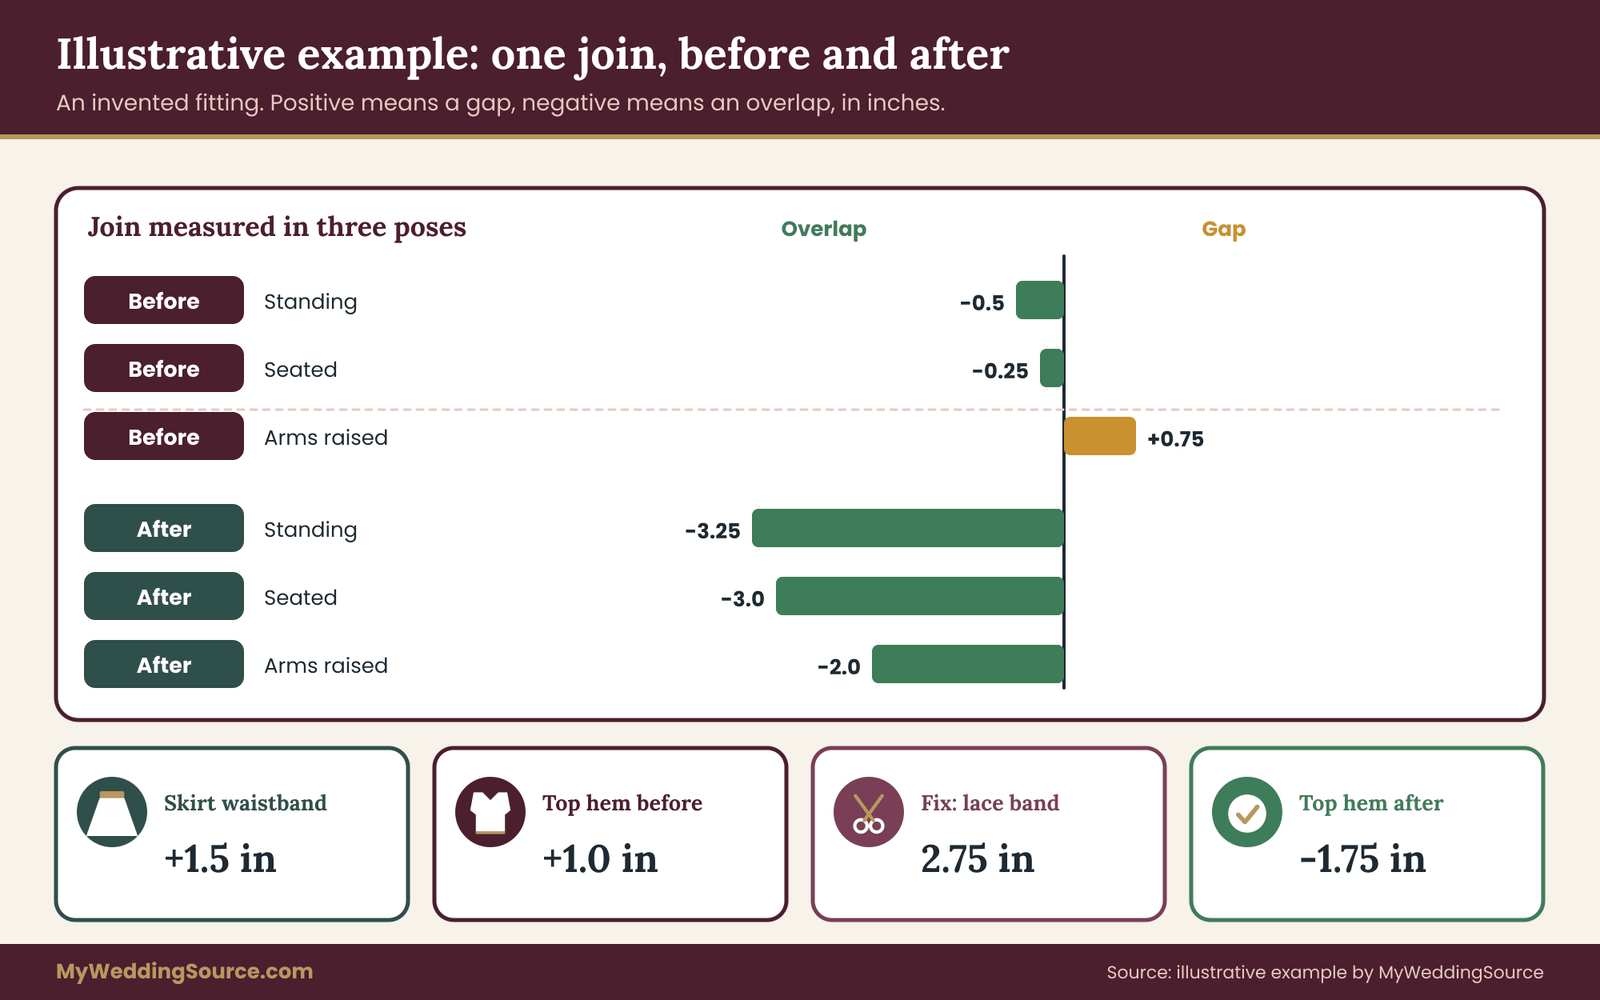
The lace top has a hem that, on Dana, lands one inch above her natural waist, so the top hem is plus one. The join is the top hem number minus the skirt waistband number, which is one minus one and a half, minus half an inch. That is a half-inch overlap. It is close to a seam collision, and it is a small margin.
Dana tests the poses with a helper holding a tape. Standing, the overlap is half an inch. Seated, it drops to a quarter inch because her torso compresses. With arms raised to shoulder height, the top rises an inch and a quarter, and the join becomes a three-quarter-inch gap. In that pose, a band of her satin underlayer and the skirt’s waistband top edge show.
What the check tells her
The pairing fails her intention. She wanted a clean overlap, with the top covering the waistband in every pose. Instead she has a near collision standing and a visible gap during a hug. The skirt’s waistband is higher than she expected, and the top is short for her torso, so the join falls in the unstable zone.
She has several options. She can ask the seamstress to add length to the top. She can choose a different top. She can raise the join with a belt. Or she can change the skirt’s waistband seat, though that is a major alteration on a structured satin skirt with limited seam allowance.
The fix she chooses
Dana asks her seamstress about adding a lace band to the top hem. The seamstress says the top has a narrow hem allowance, so a band is feasible, and she can match the lace from the top’s own scalloped edge. Dana decides she wants a clear overlap of at least two inches in the tightest pose, which is the arms-up pose.
To reach that, the top hem needs to land at least two and three-quarter inches lower than it does now, to cover the three-quarter-inch gap and give two inches of margin. The seamstress adds a band of just under three inches.
The new hem position on Dana is minus one and three-quarters, because the top hem is plus one minus two and three-quarters. The skirt waistband is plus one and a half. The standing join is minus one and three-quarters minus one and a half, which is minus three and a quarter, an overlap of three and a quarter inches. Seated it is about three inches. With arms raised, the top rises an inch and a quarter, and the overlap is two inches. That matches her intention.
The second round of checks
The new overlap raises a bulk question. Two layers of lace over a satin waistband and a stay create a visible ridge under the lace in one photograph she takes with a flash. The seamstress trims the seam allowances of the new band and replaces a thick facing with a lighter one. She also adds two small hidden snaps connecting the top to the skirt at the sides, so the top cannot ride up further. Dana tests sitting for fifteen minutes and finds the waistband comfortable.
At the second fitting, she brings her shoes, her slip and her intended undergarments. The numbers hold. The join stays in the overlap category in all three poses, with the smallest overlap at two inches. She writes down the final measurements and photographs the join in each pose.
What the example shows about bridal separates
The example is invented, but the sequence is general. Dana did not rely on the label “natural waist.” She measured where the waistband really sat. She tested three poses rather than one. She decided on her intention before the fitting. And she changed the piece that was easiest to change, the top hem, rather than the one that was hardest, the skirt. At each stage a number, not an impression, drove the decision. If you adopt just one habit from this guide, it can be that one.
Wearing bridal separates for a whole day: movement, photos and timing
A fitting of bridal separates lasts an hour. A wedding day lasts ten or more. The waist behaves differently over that longer period, and a few habits during the day can protect the fit you worked to create.
The three-pose test as a day-of routine for bridal separates
The three poses from the compatibility check, standing, seated and arms raised, are also the poses of the day. You stand for the ceremony, sit for dinner, and raise your arms to hug, toast and dance. If you have tested the join in those poses, you know what to expect. Do a short version of the test in the morning, before photographs, with your helper watching the join. If something has shifted, fix it before the first photograph rather than after.
Getting dressed in the right order
Bridal separates go on in a particular order, and the order matters. Put on the underlayers first. Step into the skirt and close it, including the hook-and-bar and any waist stay, before you put on the top. Fasten the skirt at the waist and smooth the waistband flat. Put on the top, check that the hem sits where you intended, and then attach any connecting snaps or hooks. Finish with a belt, sash or jacket.
Reverse the order for the restroom. Release the connecting points first, lift the skirt as needed, then re-fasten. Practice this once at home so it is not a first-time experience on the day. A helper should know where the connection points are and how they open.
Photographs and the join in bridal separates
Photographs show the waist more than most people expect, especially photographs from behind, from the side and from slightly above. A join that looks stable standing can show a ridge or a gap from another angle. Ask your photographer to take a few test frames in the first hour, and look at the join in them. If you see a problem, a quick adjustment of a snap or a safety pin takes seconds.
Flash and bright sun can make a top’s fabric translucent and show the waistband underneath. If you have a layered join, ask whether the lace or tulle on top will show the edge of a satin waistband in strong light, and consider wearing a slip or a smoothing layer to hide it. Also watch for shadows. A top hem that casts a shadow on a flat skirt can look like a dark line, which is nothing to worry about but is worth knowing before you see the photographs.
If the ceremony is outdoors, wind affects bridal separates differently from a gown. A light top lifts and exposes the join, and a light skirt moves around the waistband. Weighted hems, a heavier fabric or attachments at the join help. If you plan to wear a veil, cape or jacket, confirm that it does not drag the top upward or snag at the waist. The site has a separate guide on wedding day accessories planning that covers how wraps and layers work with outfits.
Eating, drinking and the late-evening waist
Bridal separates that fit in the afternoon can feel different at the end of a long meal. If your skirt fits snugly, plan for that. Some people choose a skirt with a waistband that has a little give or an adjustable closure, and some choose to loosen a hook-and-bar for the meal. Keep a small safety pin or an extra hook-and-eye available for an adjustment. Ask whether your seamstress can make the waist closure adjustable by adding a second hook position.
Heat adds to the effect. In a warm room or outdoors in summer, fabric can feel tighter, and the body swells slightly. A lining that breathes, such as cotton or silk, helps, and synthetic linings that trap heat do not. Ask about the lining fabric when you shop.
Dancing and the join
Dancing in bridal separates involves arms overhead, twisting and bending, all of which test the join. If you plan to dance, do a short trial at home in the full outfit, with your shoes, to see how it behaves. Turn side to side, bend forward, lift your arms and move as you will on the dance floor. Notice whether the top rides, whether the skirt turns on the waistband, and whether a snap or hook comes loose.
Some people who wear bridal separates keep a second outfit or a changed element for the reception, which changes the waist question. A different skirt or top means a new join to check. If you plan to change, run the overlap-zone check for the second pairing too, with the same three poses.
Keeping the fit between the final fitting and the day
Your body can change between the final fitting of bridal separates and the wedding, and the change does not need to be large to affect a waistband. Small shifts in weight, bloating, a different time of day or a change in undergarments can alter the fit. Avoid making large changes to your routine in the final weeks if you can, and keep your final fitting as close to the wedding as the seamstress allows.
If you will be traveling for a destination wedding, bring the repair kit and make arrangements for steaming or pressing, because travel creases form at the join.
Edge cases that change the rules for bridal separates
The method in this guide for bridal separates assumes a body that is relatively stable during the day and a pair of garments that can be altered. Many people do not fit that assumption, and many situations change the answer. The following cases are worth thinking about before you buy.
Pregnancy and expected body changes with bridal separates
If you are pregnant, or may be, the waist is the least predictable measurement. A waistband that fits at one fitting may not fit by the wedding date. Bridal separates have an advantage here, because the top and skirt can be sized differently and the skirt can be chosen with an adjustable or stretch waistband, an elastic panel or a lace-up back.
If a size change is expected, ask the seamstress about construction that can be adjusted later, and schedule the final fitting as close to the date as possible. A seller’s return and alteration terms matter more in this situation, so ask early.
Weight change, medical treatment and recovery
A planned change in weight, a course of treatment or surgical recovery can alter your waist and your comfort. If this applies to you, tell the seamstress, and choose pieces that have generous seam allowances and adjustable closures. Tell the seller of any custom piece about the possibility of a change before you place the order, so that you understand what is possible. If you are recovering from a procedure, ask your clinician about what is comfortable to wear around the waist. That is a medical question and outside the scope of a bridal guide.
Very short or very long torsos
Torso length changes where the waist sits and how far apart the top hem and the skirt waistband land. With a short torso, a standard top hem tends to sit low, and a high-waisted skirt may collide with the bust. With a long torso, a cropped top may not reach a high waistband, leaving a gap you did not plan. In both cases the recorded measurements matter more than the labels, and the seamstress can adjust the top hem and sometimes the waistband seat. Choose pieces with enough hem allowance in whichever direction you need.
A seated waist and wheelchair use
For people who spend the day seated, including wheelchair users, the seated waist is the working waist. Measure everything seated, and test the pieces seated for an extended period. A skirt waistband that sits at the natural waist can press on the abdomen when seated, and a hem that is perfect standing can bunch. Skirt length should be considered with respect to wheels and footrests, and the back of the top should be considered in relation to the chair back, because a bulky closure or boning at the back can be uncomfortable against a chair.
A seamstress experienced in adaptive clothing can help, and you may ask a shop about accessible fitting rooms. The Americans with Disabilities Act sets accessibility rules for many businesses, and the ADA website explains how they apply.
Curves, fuller figures and the difference between waist and hip
When the hip measurement is much larger than the waist in bridal separates, a skirt chosen to fit the hip may be loose at the waist, and one chosen to fit the waist may not close over the hip. Many skirts handle this through a pronounced hip allowance, an A-line shape or a wide zipper opening. The solution is usually to size to the larger measurement and have the waist taken in, because taking in is easier than letting out. This is another reason to check seam allowance and zipper length before purchase.
The reverse can apply. A straight figure with little difference between waist and hip may find that a skirt with a built-in hip shape sits oddly. A seamstress can adjust the shaping, but a plainer skirt may be simpler.
Plus-size availability and mixed sizes
Some makers offer a limited range of sizes in bridal separates, and the top and skirt may come in different ranges. If the top size and the skirt size you need are different, as is common, buy each in its own size, not a matched pair. That is one of the main strengths of bridal separates. Check the measurements of each piece, and be careful not to let a label push you toward the wrong size. If a seller’s range is limited, ask whether they offer made-to-measure.
Tall and petite proportions
A very tall person may find that tops end too high and skirts too short at the standard length. A petite person may find that a standard skirt sits too low on the body and a standard top ends too low. These issues interact with the join. For a tall body, ask about extra-length options. For a petite body, ask about shortening both pieces and the effect on the waistband seat. The ruler method gives you a language for these requests.
Second-hand and sample bridal separates
Sample sales and pre-owned bridal separates can offer value, but they have limits. A sample may have been tried on many times and may have wear at the waistband. A pre-owned piece has no return option in many cases. Check seam allowance, zipper function, hook-and-bar strength and stains at the waistband, and ask whether a seamstress can alter it.
Check the garment’s care label and the seller’s description, and consider the cost of cleaning and alterations before you decide the piece is a bargain. The site has a separate article on buying a pre-owned wedding dress that covers condition checks in more detail.
When the answer is a one-piece gown
Occasionally the check shows that the bridal separates pairing you want cannot be made reliable without costly changes. If the top is rigid, the skirt is rigid, the seam allowances are small and the join fails in all three poses, you may be better served by a different pairing or by a one-piece gown with a similar look. Some gowns are designed to look like bridal separates, with the join built into a single garment. That is not a failure. It is a choice, and the measurements help you make it with information rather than disappointment.
Your next steps with bridal separates
Work through these steps for bridal separates in order. Each step is small, and together they take you from a shortlist to a pair that you have tested.
First, record your own numbers: natural waist standing and seated, waist height, ribcage, high hip, full hip, torso length and shoe height. Keep them in one note you can open in any shop.
Second, decide your intention for the join before you look at pairings. Write one sentence: a deliberate gap, a clean overlap of a stated size, or a belted join. Every later decision is tested against that sentence.
Third, for each candidate among your bridal separates, collect the garment measurements, seam allowances and closure details from the seller in writing. Place each piece on the vertical ruler and compute the join.
Fourth, run the three-pose test at every try-on, using markers and a tape, and write down the join in each pose. Photograph it from the front, side and back.
Fifth, choose an alterations professional with bridal experience, and ask for the scope, the price and the deadline in writing. The wedding dress fit and alterations resource lists general fitting questions you can bring to that first appointment. Fit the skirt first, then the top.
Sixth, read each written order or agreement before paying, and keep payment proof. If you want a reminder of what a sound written agreement covers, the vendor contract checklist lays it out.
Finally, book your final fitting as close to the wedding as the seamstress allows, and bring your shoes, underlayers and any belt. Pack the repair kit and give it to a helper who knows where the connection points are. If the pair works in all three poses at that final fitting, you have done what can be done in advance. The rest is wearing it.
FAQ
What are two piece bridal separates?
They are a top and a skirt that are made, sized and altered as two garments rather than one gown. The pieces may come from the same designer or from different ones. Because nobody drafts the two together, the waist join is the main fit risk, and it needs its own measurements and its own check at the fitting.
How much should a top overlap a skirt waistband?
There is no universal figure. The overlap needs to stay a real overlap in your smallest case, usually arms raised, so measure it in standing, seated and arms-up poses. Many people choose a margin of a couple of inches in that tightest pose, but the right amount depends on fabric, bulk and how much the top rises on you.
Can I mix a top and a skirt from two different designers?
Yes. The risk is that the sizes, waistband seats and fabric weights were never coordinated. Get garment measurements from each seller, record where each piece sits relative to your natural waist, and confirm return and alteration terms in writing before paying. Plan for two fittings and decide early who coordinates the join.
What if the skirt waistband and the top hem meet at the same height?
That is a seam collision, and it is the least forgiving outcome because any movement shows a ridge or a gap. You can add length to the top, add a belt or sash, or choose a different waistband seat. Check which change the seamstress can make within the seam allowance and hem allowance available.
Should I alter the top or the skirt first?
Generally the skirt first, because its waistband seat and hem are the fixed points that the top has to match. Once the skirt sits right on your body, fit the top length and closures to it. Then check both together with your shoes and underlayers. Allow at least two fittings, since the second one confirms the changes.
How do I measure my waist for separates?
Tie a thin ribbon loosely around your torso, bend sideways and let it settle at your natural waist. Measure around it standing and seated, then measure from your shoulder to the ribbon. Wear the underlayers and shoes you plan to use, and measure at the time of day when you will be wearing the outfit.
Do bridal separates need to be attached at the waist?
Not always. Some people rely on the skirt’s weight and a clean overlap. Others add hidden snaps or hooks to keep the top from riding up. Attaching improves stability but reduces flexibility, so make sure you can still get dressed, use the restroom and adjust the join. Ask the seamstress to place any connections where they stay hidden.
When should I order bridal separates?
Order early enough for both pieces to arrive with time for two fittings and a possible correction. Pieces made to order often have longer lead times than stock items, so place that order first and choose the second piece to match it. Ask each seller for a written delivery date, and confirm the alteration lead time with your seamstress.
Sources
- Federal Trade Commission: consumer protection rules, including the Mail, Internet, or Telephone Order Merchandise Rule and the Care Labeling Rule
- FTC Consumer Advice: guidance on online orders, refunds and complaints
- Electronic Code of Federal Regulations: the text of federal rules, including the textile care labeling rule
- Consumer Financial Protection Bureau: how credit card billing disputes work
- USA.gov consumer protection: where to find federal and state consumer protection offices
- ASTM International: published standards for body measurement tables and garment sizing
- Better Business Bureau: business profiles and complaint resources
- ADA.gov: accessibility rules and guidance for businesses open to the public
- U.S. Postal Service: shipping, tracking and insurance information for garments sent by mail