
Shoe break-in is the stretch of weeks when you wear your wedding shoes in small, planned doses, record what rubs, and decide early whether to fix, keep or replace them. This guide gives you an eight-week schedule, a ten-zone hotspot map and a simple wear-session log, so the first long walk in your wedding shoes is not on your wedding day.
Start your wedding shoe break-in about eight weeks out. Wear the shoes indoors in short sessions on a clean rug, add time and hard floors in stages, then do one dress rehearsal with the real hosiery and insoles. After every session, score ten foot zones from zero to three in a log. Move to the next stage only when every zone stays at one or lower for two sessions in a row. A zone that hits three means stop and fix, and a zone stuck at two means change something before you add more time.
Most advice about shoe break-in is one sentence long: wear them around the house. That is a fair start, and it is also where most people stop. They wear the shoes for twenty minutes while watching television, feel nothing, and assume the problem is solved. Then the ceremony runs late, the photographer wants a walk across a gravel drive, and the heel blister the television never revealed arrives at the cocktail hour.
The trouble is that a short, easy session answers a different question than a long, busy day does. A shoe can feel perfect for twenty minutes and still fail at hour four, when feet have swelled a little, the floor is harder than your carpet, and you have been turning, dancing and standing in line. Good wedding shoe break-in is mostly about asking the right question at the right time, and writing down the answer.
A short note on scope. This is general information about comfort and planning, not medical, legal, tax or financial advice. If you have a foot condition, diabetes, poor circulation, numbness or a history of foot injury, talk to a podiatrist or your doctor before you start any plan like this one. Where a fact matters, the sources at the end point to the organizations that publish it. A shoe break-in plan is only as good as the honesty of the person keeping the log.
What wedding shoe break-in can and cannot do
Shoe break-in is not magic, and it helps to be clear about what it actually changes. Leather and some fabrics soften and flex with wear. Straps and linings settle against your skin. You learn where the shoe touches you and which of those spots can be managed. Your skin, in some places, adapts to repeated gentle pressure.
What shoe break-in cannot do is change the basic shape of the shoe. If the toe box is too narrow for the width of your forefoot, no number of evenings in the living room turns it into a wider shoe. If the heel is a half size too large and your foot slides, softening the leather will make the slide worse, not better. If the pitch of the heel is steeper than your calves and arches tolerate, the shoe will still tilt your weight onto the ball of your foot on day sixty.
So the real job of a shoe break-in schedule is sorting. In the first two weeks it should tell you whether this pair is fixable, meaning the problems are small, local and responsive to padding, stretching or an insole, or whether it is the wrong pair and you should switch while a switch is still cheap. The rest of the shoe break-in schedule then builds the stamina and the evidence that the pair you keep will last the whole day.
Why a schedule beats “wear them around”
Three things make a staged schedule more reliable than an informal one.
First, it separates variables. If you change the shoe, the insole, the hosiery and the surface all at once, you cannot tell which change helped. A staged plan changes one thing per stage, so the shoe break-in log tells you what worked. That is the quiet strength of a staged shoe break-in.
Second, it protects your skin. Friction injuries build from repeated rubbing in the same spot. Short sessions with rest days between them let you catch a hot spot at stage one, when the fix is a small piece of padding, instead of at stage four, when the skin has already broken.
Third, it creates a deadline. Retailers set return windows, cobblers need a week or two, and alteration shops get busy. A schedule with named decision points tells you when each of those doors closes. The broader question of timing your wardrobe appointments sits inside the larger twelve-month wedding checklist, and the shoe plan here is one small piece of it. A shoe break-in without a deadline tends to drift until it is too late to act.
What this guide assumes
The guide assumes you already own the pair, or have narrowed to one or two pairs. It does not cover how to pick the style, heel shape or height for your dress and venue. That decision comes first, and it is covered on the site in the bridal shoe selection guide. Here we start from the moment the box arrives, and we treat the shoes as a thing to be tested rather than a thing to admire.
It also assumes a heeled or structured shoe, since those need the most work. If you chose a flat sandal or a soft sneaker, the same schedule applies in a shorter form: halve the number of weeks and skip the stairs stage unless your venue has stairs.
The eight-week shoe break-in schedule at a glance
The schedule below counts backward from the wedding. Eight weeks is a comfortable runway. Six weeks works if you start right away and the shoes are already close to fitting. Anything under four weeks is a compressed version, covered in the edge cases later.
Each stage has a purpose, a set of conditions and a gate. The gate is the rule that decides whether you advance, repeat the stage or change something. Treat the gates as the heart of the shoe break-in plan.
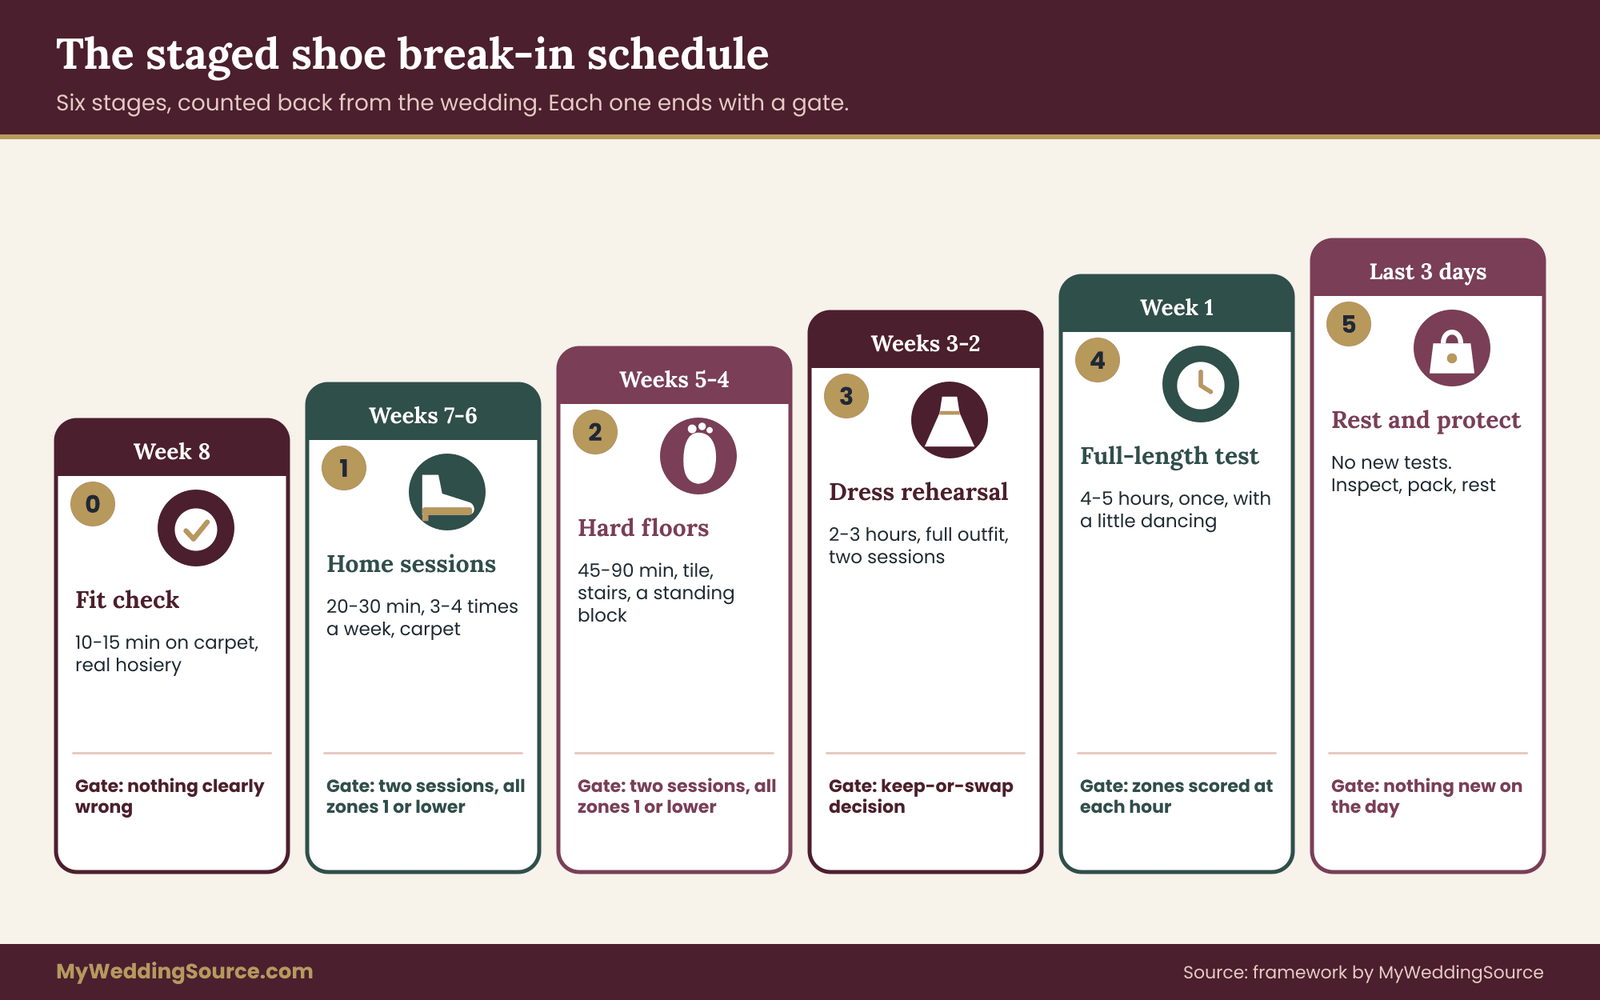
Stage zero, week eight: the fit check. Before any real wear, you confirm the pair deserves a schedule. Ten to fifteen minutes on a clean, carpeted floor, standing and walking slowly, in the hosiery you plan to wear. The question is only whether anything is clearly wrong: toes jammed, heel slipping, a strap cutting across the instep. A clear failure here means you return or exchange the shoes now.
Stage one, weeks seven and six: short home sessions. Twenty to thirty minutes, three or four times a week, on carpet or a rug. You are learning where the shoe touches you. The log starts here. Shoe break-in begins in earnest here.
Stage two, weeks five and four: hard floors and movement. Forty-five to ninety minutes on a hard floor, with a few flights of stairs and some turning, as you might do while cooking or tidying. This is where hotspots that carpet hid will show up.
Stage three, weeks three and two: the dress rehearsal. Two sessions in the full outfit, with the real hosiery or socks, the final insoles or pads, and the dress hem length. Two to three hours each. Your first decision deadline falls here.
Stage four, week one: the full-length rehearsal. One session, once, that mimics the length and rhythm of your actual wedding day. Four to five hours, with sitting, standing and a few songs of dancing.
Stage five, the last three days: rest. No new tests. You inspect, pack and protect. The point is to arrive at the wedding with feet that are calm, not feet that are recovering from a heroic final rehearsal.
Every one of these stages ends with the same few minutes: take the shoes off, look at your feet in good light, fill in the log. The next sections explain what to prepare, how the map and the shoe break-in log work, and what to do with the numbers. ## Before the first wear: setting up your shoe break-in
A little preparation in week eight makes every later session more useful, and it protects your options. Most of this takes one evening. Good shoe break-in is mostly preparation.
Protect the return window first
The single most expensive mistake in wedding shoe break-in is scuffing a pair you could still have returned. Before you wear anything, read the retailer’s return policy and write down three facts: how many days you have, whether the shoes must be unworn or only free of outdoor wear, and who pays for return shipping. Policies differ widely, and bridal salons and custom makers often have stricter terms than large retailers. Do not assume.
Then keep the pair clean in the way the policy requires. If the rule is “no outdoor wear,” that usually means no pavement, grass or dirt on the soles, which is why stage one and two happen on clean indoor floors. Some people put a thin layer of clear protective film on the sole, but check with the seller first, because an altered sole can void a return. If you are unsure, send a short message and keep the reply.
“Hello, I would like to try these shoes on carpet at home before the wedding. Can you confirm what counts as worn for return purposes, and how many days I have?”
Put the return deadline in your calendar with a reminder a week earlier. That reminder is your real stage-three deadline, because after it passes, the only way to fix a bad pair is through repairs.
Gather the same gear you will wear on the day
A shoe break-in that uses the wrong hosiery or the wrong insole tells you very little. Collect these early.
The hosiery or socks you plan to wear. Sheer stockings, tights, no-show liners and bare feet all create different friction. If you plan to go bare, treat it as its own condition and test it separately, because skin on leather behaves differently than nylon on leather.
The insoles or pads you may use. Cushioned forefoot pads, heel grips and arch supports each change the fit by a measurable amount, sometimes enough to alter whether the shoe fits at all. Decide whether you are testing with or without them, and write it in the log.
A foot-measuring habit. Measure both feet in the evening, standing, at the start. Feet differ in size, and many people have one foot slightly larger than the other. Note the larger foot, since it decides whether the shoe fits. You do not need a clinical measurement; a printed foot outline on paper, with the longest toe and the widest point marked, is enough to compare against the shoe’s footbed later.
A simple pharmacy kit. Blister cushions, moleskin or soft adhesive padding, a roll of medical tape, small scissors, an anti-friction balm stick, and a few plasters. Keep them in one pouch, because the same pouch becomes your day-of kit later.
Pick a hard, honest surface for later
You will need a place for stage two that resembles your venue’s floor. Tile, hardwood, concrete in a garage or a stairwell all work. If your venue is a lawn, a barn or a beach, do not take the shoes outside yet. A later section covers uneven surfaces and how to handle outdoor venues without voiding the return.
Set a standing time
Shoe break-in works best at the same time of day as the wedding. Feet swell through the day, and an evening session shows a different fit than a morning one. If your ceremony is at four in the afternoon, schedule most sessions in the late afternoon or early evening. This one choice improves the accuracy of the whole log.
The hotspot map: ten zones to watch in every shoe break-in
Vague notes like “my foot hurt” are hard to act on. A map turns a vague complaint into a location, and location points to a cause and a fix. The map divides the foot into ten zones, labeled with letters so they stay neutral and easy to scribble in a log.
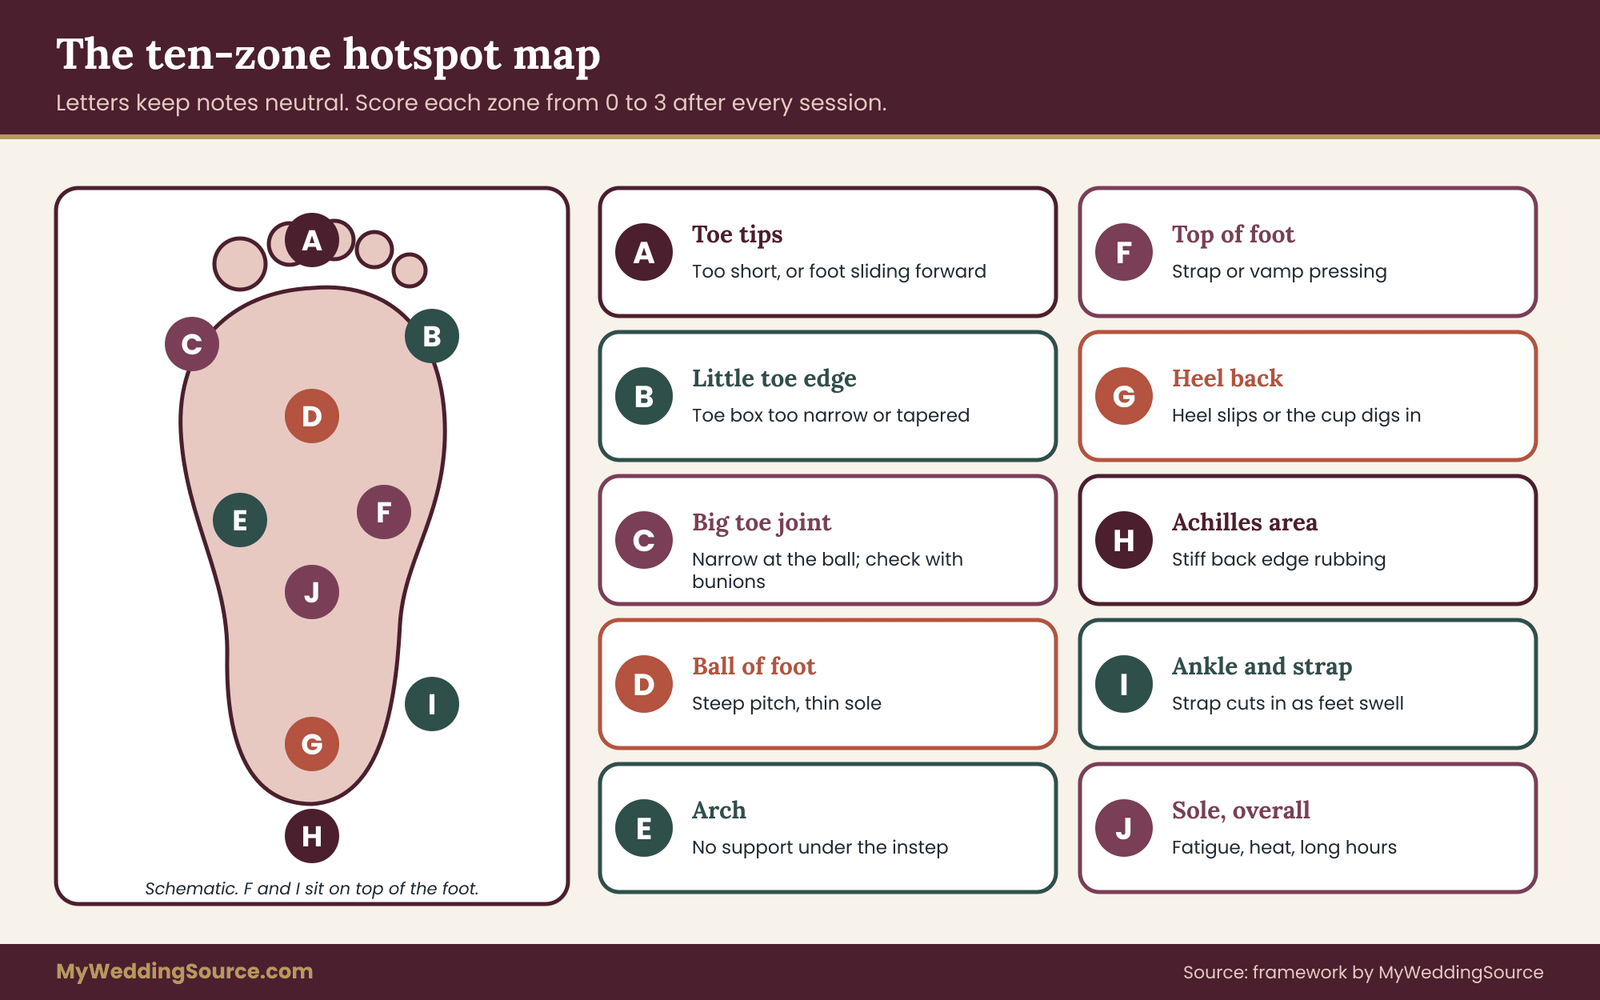
Zone A, tips of the toes. Pressure here usually means the shoe is too short, or that the foot slides forward in a steep heel and jams. Check whether the toes touch the front when you stand, not just when you sit.
Zone B, the little toe and its outer edge. The most common rubbing spot in pointed shoes. It points to a toe box that is too narrow or too tapered for your forefoot.
Zone C, the big toe joint. The inner bump at the base of the big toe. Pressure here suggests the shoe is narrow at the ball, or that the cut squeezes the joint sideways. If you already have a bunion, this zone deserves extra attention, and a podiatrist’s view.
Zone D, the ball of the foot. Burning or soreness under the forefoot. In heels, it usually means too much weight is being thrown forward by a steep pitch or a thin sole, and cushioning may help, but a lower heel helps more.
Zone E, the arch. Aching or cramping in the arch can mean a shoe with no support under the instep, or a footbed that sits in the wrong place for your arch.
Zone F, the top of the foot. Straps, vamps and buckles press here. Rubbing across the instep is a fit-adjustment problem, often solved by moving a strap or adding a tongue pad.
Zone G, the back of the heel. Where most blisters happen. The heel cup either slides, which creates friction, or is stiff enough to dig in at the edge.
Zone H, the Achilles area. The back of the ankle just above the heel. Stiff counters and low-cut backs rub here, and leather often softens with wear, which makes it a good candidate for patience and padding.
Zone I, the ankle and strap area. Ankle straps and T-bars cut in here, especially once the foot swells during the day.
Zone J, the sole and overall fatigue. A general zone for tiredness, tingling or a hot feeling under the whole foot. It is less about one spot and more about how many hours the shoe supports you.
How to read the map
You do not need to memorize ten zones. Keep a printed copy with the shoe break-in log, and tick zones as you take the shoes off. Over a few sessions the pattern will be obvious. A pair that keeps flagging Zone G and Zone H, for example, is telling you about the heel cup. A pair that flags Zone B and Zone C is telling you about width. A pair that flags Zone D and Zone J is telling you about heel height and cushioning. The map is the part of shoe break-in that most people never write down.
That pattern is the useful output. It decides whether to fix, which kind of fix and when to give up. Reading the pattern is the real skill in shoe break-in.
A quick note on pain versus pressure
Mild pressure that fades within a few minutes of removing the shoes is normal in a new pair. Pain that sharpens during a session, numbness, tingling that does not go away, a blister that has formed, or skin that stays red and hot well after the shoes are off are different. Stop the session, treat the area, and give yourself a rest day before the next one. If symptoms persist, see a clinician. The American Podiatric Medical Association and the American Academy of Orthopaedic Surgeons both publish plain-language foot health information, and the sources list at the end includes them.
Setting up the wear-session log
The log is the center of this shoe break-in plan. It takes two minutes per session and it produces the evidence you will rely on when you decide to keep or swap the shoes. A paper notebook works. So does a notes app.
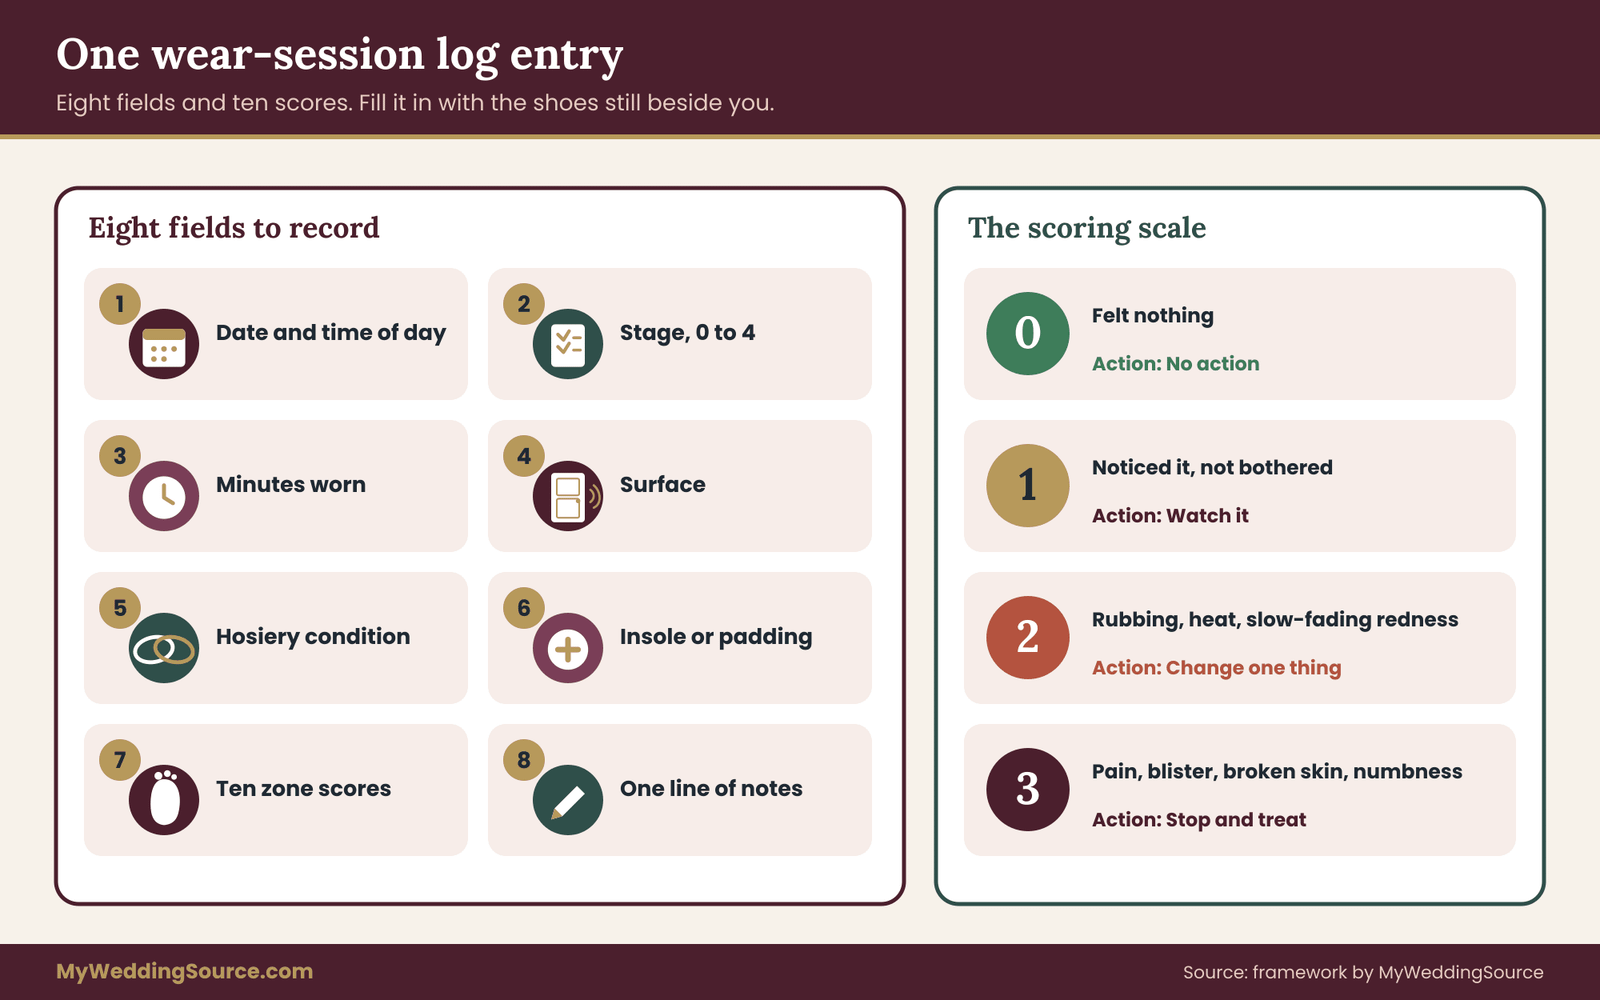
A session entry has eight fields, and each one earns its place.
The date and the time of day. You want to see whether the evening sessions are consistently worse than the morning ones.
The stage, from zero to four. This keeps the log honest about the difficulty of the session.
The minutes worn, counted from putting the shoes on to taking them off.
The surface: carpet, hard floor, stairs, outdoor path. Name it plainly.
The hosiery, from the list you set up earlier. Write the exact condition: sheer stockings, no-show liner, bare foot.
The insole or padding, if any, including where you placed it.
The ten zone scores, each from zero to three.
A single line of notes, such as “left heel slid on stairs” or “ate dinner standing, feet swelled.”
The scoring scale
Use the same scale every time. A score of zero means you felt nothing. One means you noticed the shoe there but it did not bother you. Two means rubbing, pressure or heat that you would want to fix, and visible redness that fades slowly. Three means pain, a blister, broken skin, numbness or anything that made you stop early. Consistency matters more than precision in a shoe break-in log.
Score what your foot shows and feels after the shoes come off, not what you remember from an hour earlier. Look at your feet in good light. Redness at a zone that is gone within a few minutes is closer to a one. Redness that is still there after ten minutes is closer to a two.
Why a simple scale works better than a detailed one
It might be tempting to rate things from one to ten. Resist it. Foot sensation is not that precise, and a ten-point scale invites you to agonize over the difference between a five and a six. A four-level scale is fast, repeatable and matches the actions you will take: do nothing, watch, change something, stop. Each level corresponds to a different response, which is exactly what a scale in a plan should do. Simple scales keep a shoe break-in log quick enough that you will actually keep it.
Fill in the shoe break-in log as soon as possible after the session, ideally with the shoes still beside you. Memory shrinks small discomforts quickly, and you will undercount unless you write it down on the spot. ## Decision rules that turn the log into a shoe break-in verdict
A log is only useful if it changes what you do. The rules below are the decision framework for the whole plan. They are deliberately few, so you can remember them without looking.
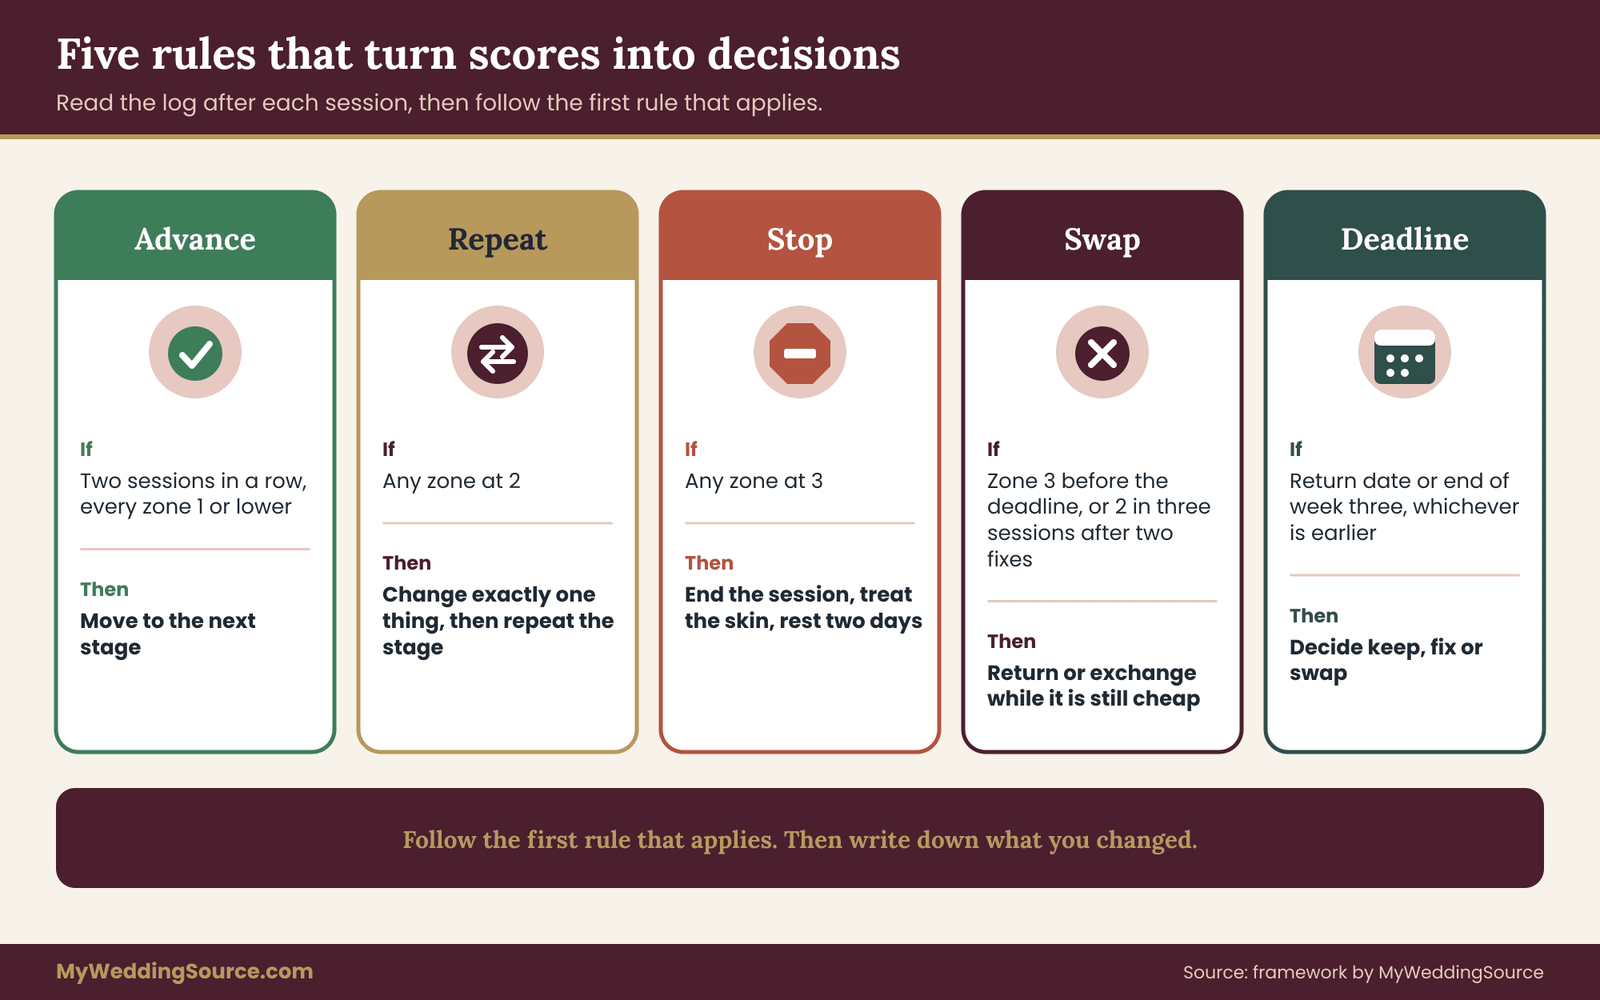
The advance rule. Move to the next stage only after two sessions in a row at the current stage in which every zone scored one or lower. Two sessions, not one, because a single good session can be luck, a cooler day or a shorter walk than you thought. This rule keeps your shoe break-in from moving faster than your feet.
The repeat rule. If any zone scores two, stay at the same stage and change exactly one thing before the next session: a pad, a strap position, a different sock, a heel grip. Change only one, so the shoe break-in log shows what helped. If the same zone scores two again after your change, make a second change and repeat. If the zone still scores two after two different fixes, treat the zone as unresolved and use the swap rule below.
The stop rule. Any zone at three ends the session on the spot. Treat the skin, rest at least two days and look at the cause before you wear the shoes again. A three that appears in stage one or two, in a zone that padding did not fix, is a strong sign of a poor fit.
The swap rule. Swap the shoes, meaning return or exchange them, if a zone reaches three at any point before your return deadline, if a zone scores two in three sessions despite two different fixes, or if the log shows a width or length problem that padding cannot address. Zones A, B and C are the usual width and length warning signs. Padding changes how a shoe feels, but it rarely makes a pair fit. A swap decided inside the shoe break-in schedule costs far less than one made in the final week.
The deadline rule. Whatever the shoe break-in log says, make a keep-or-swap decision by the earlier of two dates: your return deadline, or the end of week three before the wedding. That date should fall after the dress rehearsal sessions start giving data, and before the point where a replacement would no longer arrive with time to break it in. If you have a custom or made-to-order pair, ask the maker how long a remake or a width change would take.
Reading patterns rather than single numbers
One score tells you little. A run of scores tells you a lot. Look for these patterns. The shoe break-in log earns its keep through patterns.
A zone that is improving. A two in session one, a one in session three and a zero in session five is a shoe softening. Leave it alone.
A zone that is steady at one. This is fine, and it is common. A tiny, stable bit of awareness at the heel or toe is not a problem unless it climbs with longer sessions.
A zone that climbs with time. A zero at thirty minutes, a one at an hour and a two at two hours says the shoe holds up for a short time and then fails. That tells you the stamina problem is real, and you should not shorten the later stages hoping it fixes itself.
A zone that jumps with the surface. A zero on carpet and a two on tile usually means the carpet was padding the problem. Hard floors show the truth.
A cluster. Several zones rising together, especially D and J, often point to the pitch of the heel rather than any one spot. Padding the zones one by one will not fix a cluster, and a lower or wider-based heel might.
Be fair to the shoe and to yourself
Two bias traps appear in almost every shoe break-in. The first is loyalty to the shoe you love. If you chose this pair because it is perfect with the dress, you will be tempted to excuse a three. The log protects you from that. The second is the opposite: panic after one bad session on a hot day, a long walk or a new sock. Look at the pattern before you abandon the pair. A decision based on a run of entries is calmer than one made at the end of a rough evening.
If you are torn, ask a partner, a friend or a stylist to look at the pattern with you. The question is not whether the shoe is pretty. It is whether, on the evidence, your feet will manage the day.
Shoe break-in stages one and two: short sessions, then hard floors
These two stages do most of the real work. They take four weeks, and in them the log fills up with the information that decides the whole plan. For most pairs, the shoe break-in is won or lost here.
Stage one: weeks seven and six
The goal of stage one is simple. Learn where the shoe touches you, and learn it gently. Stage one is the gentlest part of the shoe break-in.
Wear the shoes for twenty to thirty minutes, three or four times a week, with a rest day at least every other day. Keep to carpet or a rug. Do small, ordinary tasks. Stand while you cook or wait for a kettle, walk to another room, sit, stand up again. Standing up from sitting is a surprisingly good test, because it loads the forefoot and the heel in a way that standing still does not.
Pay attention to the first ten minutes. A shoe that feels wrong in the first ten minutes will not feel better at sixty. A shoe that feels fine at ten minutes and worse at twenty is more promising, because the stamina part can be built.
Use stage one to experiment with fit adjustments, one at a time. Try a strap in a different hole. Try a heel grip on one session and leave it off on the next, and see which scores lower. If a shoe slips at the heel, that is a fit signal, and a grip is a reasonable first test. If a shoe pinches the toes, note it and do not try to stretch it yet. That belongs to a later decision.
The advance gate for stage one is the advance rule: two sessions in a row with every zone at one or lower. Most pairs that fit will reach this within a week or so. A pair that cannot get through stage one without a three should be returned at once.
What a good stage one looks like
By the end of stage one, you should know three things. Which zones, if any, are consistently flagged at one. Whether any single change has measurably helped. And whether you still love the shoe after a few evenings, because that matters too. Comfort and confidence both count on the day.
Stage two: weeks five and four
Stage two moves to hard floors and adds movement. This is where the plan starts to look like a real wedding day. A shoe break-in that never leaves carpet is incomplete.
Sessions run forty-five to ninety minutes, three times a week. Use tile, hardwood or concrete, and include stairs. Walk up and down a full flight at a normal pace, then down slowly, because descending loads the toes and the ball of the foot more than climbing does. Take small turns and pivots, since dancing and posing both involve twisting on the forefoot.
Add a standing block. Stand in one place for ten to fifteen minutes during each session, as you would in a receiving line or during photographs. Many people find that standing, not walking, is what exposes a shoe, because the foot has nowhere to shift.
Now, introduce your actual hosiery or socks if you have not already. If the shoe break-in plan is to wear sheer stockings, wear them. If a new fit issue appears, it is a result of the change, and that is exactly what you want to learn this early.
Surface notes for stage two
A hard floor that is slippery is a different test than one that has grip. Note whether the sole slides, because a sole that slips forces your toes to grip, which can show up as fatigue in zone J and soreness in zones A and D. If the sole is slick, a small non-slip sole pad is a standard fix. Check the return policy before applying anything to the sole, since adhesive pads may count as alteration.
Also note the temperature of the room. A warm room swells your feet sooner than a cool one. If your wedding is warm, aim your hardest sessions for a warm room, or after a walk or a warm shower, so the shoe break-in log reflects the realistic worst case.
The gate for stage two
The same advance rule applies. Two sessions at the stage with every zone at one or lower, including the stair and standing blocks. A stage two that never clears is information. It means the pair is not comfortable at the lengths your wedding needs, and the next section’s decision point is where you act on it.
Stage two is also where it is worth putting the shoes on the left and right feet and looking at the soles after each session. Uneven wear marks or one foot sliding more than the other tell you which foot sets the fit. Most people see one foot score higher than the other, and that is normal, since the larger foot decides whether the shoe works. ## Shoe break-in stages three and four: the dress rehearsal and the full-length test
Stages one and two tested the shoe. Stages three and four test the shoe, the outfit and the day together. They are shorter in number and longer in hours, and they are where the final keep-or-swap call is made. A shoe break-in that stops here would miss the hardest questions.
Stage three: weeks three and two
Stage three has two sessions, each two to three hours, and each in the full outfit. That means the dress or a garment with the same hem length and weight, the real hosiery, the final insoles or pads, and any undergarments that affect how you stand. If your dress will not be ready until the fitting, borrow something similar. Hem length matters to your gait: a long skirt changes how you step, and if you are worried about tripping, you will walk more stiffly, which changes where the shoe loads your foot.
It is worth pairing this stage with your final dress fitting if you can. Dress alterations are set for the heel height you will actually wear, and the wedding dress fit and alterations guide explains why bringing the finished shoes to every fitting avoids a hem that is wrong by an inch. Two or three fittings with the real shoes can double as break-in sessions, as long as you log them like any other.
During a stage three session, do what the day will ask. Walk a long hallway or a loop around the house. Go up and down stairs in the dress. Sit for twenty minutes, then stand and walk, since sitting lets the feet swell and the first steps after sitting expose a tight strap. Stand for a stretch, as in a receiving line. Try a few songs of dancing in the living room, including at least one fast one and one slow one.
If you can, include a short outdoor test, but only if the return window has closed or the seller allows it. If the shoes can no longer be returned, a few minutes on a path or driveway tells you how the soles grip, how the heels behave on pavement and whether the shoes need sole protection. If you can still return the shoes, skip this and use a pair of old shoes with a similar heel for any outdoor walking tests.
The week-three decision point
By the end of week three, you should have enough data to make the keep-or-swap decision. Open the log and apply the rules. The shoe break-in log makes this a calm call rather than a panicked one.
If every zone is at one or lower and you have cleared stages one to three, keep the shoes and move on.
If one or two zones sit at two, and your changes have not cleared them, you have three practical choices. You can try a specific fix from the fix guide in the next section. You can take the shoes to a cobbler or a shoe-repair shop for a professional stretch or adjustment. Or you can swap the pair. The decision depends on how much time remains and how serious the problem is.
If any zone has reached three, or a cluster of zones is stuck at two, swap.
When swapping, remember the clock. A replacement pair needs its own mini shoe break-in. If you are within three weeks of the wedding, the compressed schedule later in this guide shows how to do it in less time, and the wedding day accessories planning guide covers backup footwear so you are not relying on one pair alone.
Stage four: week one, the full-length rehearsal
Stage four is a single session, and it is the one most people skip. Skipping it is understandable, since it takes an evening and feels like effort. It is also the only test that shows how the shoes behave at hour four, which is when most wedding-day foot problems arrive. It is the most informative single hour of the whole shoe break-in.
Build a simple timeline from your actual day. Look at your wedding timeline for the hours between the ceremony and the end of the reception. A typical pattern includes a stretch of standing and photographs, a seated meal, a period of mingling, some dancing, and a final period of standing or walking. Reproduce that in your living room with the shoes on.
You do not need to match the exact duration. Aim for four to five hours, and include a mix of standing, walking, sitting and dancing. If your day will be longer than that, such as a ceremony in the morning and a reception that runs late, plan a shorter version of the real thing and keep a second pair ready, or divide the test into two blocks with a half-hour of shoe-off time in between, mimicking the shoe change you plan to make.
You can build the timeline from the schedule you already keep. The wedding vendor timeline is a good place to find the real hours for photographs, the ceremony and the first dance, and you can lift those straight into your rehearsal.
Stage four has one important rule. Do it once. If it goes well, do not repeat it. If it goes badly, you will need a fix or a plan B, and a second full-length test a few days later is not a good idea, because tired, irritated feet need rest, not another round.
Scoring stage four honestly
Score at the hour marks as well as at the end. Jot down zone scores at the first hour, the third hour and when you take the shoes off. This gives you something more useful than a single end score. It tells you when the shoes begin to fail, and that tells you how to schedule the day.
For instance, if the shoes score one at hour one and two at hour three, you now know that the safe window is about three hours. A plan can be built on that: wear the shoes for the ceremony and photographs, and change into a second pair before the dancing begins. A pair that is fine for four hours is a pair that can run a normal wedding day, and a pair that fails at three can still be used for a short portion of it.
The rest of week one
After the full-length rehearsal, take a rest day. Look at your feet, treat any hot spots, and finish the shoe break-in log. Resist the urge to tinker. Changing a strap or a pad on the night before the wedding is how a manageable shoe becomes an unknown shoe. If the rehearsal showed a problem, fix it in the first half of the week and give yourself at least one short session afterward to confirm the fix worked. The shoe break-in is finished once the log says the shoes can carry the day.
Stage five and the final days of your shoe break-in
The last three days belong to protection, not testing. Your feet are the only part of this shoe break-in plan you cannot replace, and the aim now is to bring them to the wedding in good condition. The shoe break-in is essentially over, and your feet need calm.
On the day before the wedding, do a calm inspection. Look at the shoes for loose straps, worn heel tips, cracked finishes or anything that could fail. If a heel tip is worn through, a cobbler can often replace it within a day, but it is better to catch this a week out. Look at your feet for any areas of broken or irritated skin, and treat them with a clean dressing.
Do not try a new product on the day. A new blister cushion, a new type of tape or a new anti-friction balm is a new variable. If you want to use it, use it in a session before then. Anything on the wedding day should have been in your log at least once.
Trim and care for your toenails a few days ahead, so that nothing presses or catches inside the toe box. Keep your feet moisturized in the days before, but not on the day itself, since slippery skin makes shoes slide. Avoid new foot treatments, strong peels or anything that might leave the skin tender.
Prepare the shoes themselves
Wipe the soles, check the heel tips and make sure the insoles are firmly in place. If you are using adhesive padding, apply it the night before, so the adhesive has set, and test it by pressing and walking a few steps. Pack the shoes with their hosiery and the kit described later in this guide.
If you plan to change shoes at the reception, pack that pair too, and put them where someone you trust can bring them at the right time. A plan B pair that sits in a car trunk across town is not a plan B.
What to do about swelling
Feet swell during a long day, particularly in heat, after long periods of sitting or standing, and with salty food or alcohol. Some swelling is normal. The point of an evening session in your log is to measure how much it matters for your shoes. If a pair is comfortable in the morning and tight by evening, you know your shoes need a little room, and you may prefer a half-size up or adjustable straps.
Staying hydrated, taking short breaks to put your feet up, and taking the shoes off during the cocktail hour or the meal are practical measures. If swelling is sudden, one-sided or painful, or if it comes with other symptoms, it is not a shoe problem, and you should speak to a clinician.
Rest as a rule
In the final seventy-two hours, avoid long walks in other shoes, new sports and anything that could injure your feet. Wear comfortable, supportive shoes for errands. The goal is to keep the feet rested and the skin intact. A wedding-day foot problem is much more likely to come from a last-minute surprise than from a shoe that was tested for eight weeks. ## Fixes by hotspot: what to try during shoe break-in
When a zone scores two, you change one thing. This section lists sensible first moves for each zone, in roughly the order of cost and risk. The logic is to try the reversible, cheap fixes first, and to leave anything permanent for the end. This is the part of shoe break-in where patience pays off.
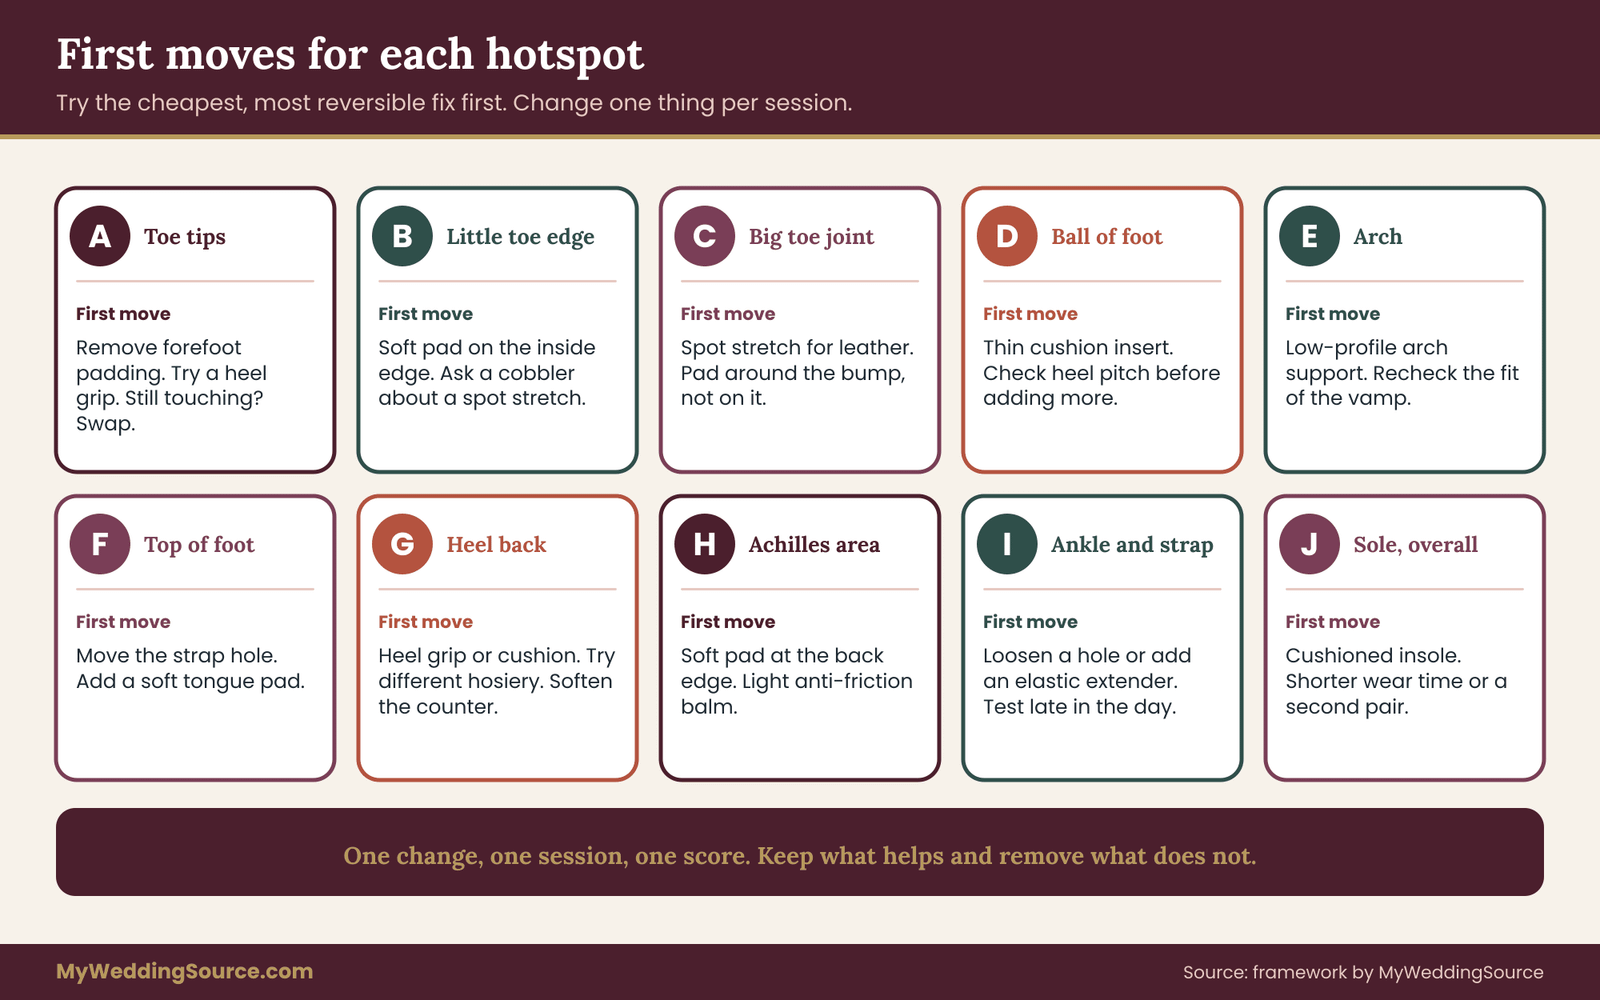
Zone A, toe tips. First check that the insole is not pushing your foot forward. Remove any added forefoot padding, which can reduce toe room. A heel grip can stop forward sliding in a steep shoe. If your longest toe still touches the front when you stand, the shoe is too short, and no fix will change that. That one is a swap.
Zone B, little toe edge. A small piece of soft padding on the shoe’s inside edge, or a thin toe sleeve on the foot, can reduce friction. A cobbler can stretch leather along a specific spot, which works on genuine leather and rarely on synthetic materials. If the whole toe box is narrow, you are looking at a swap or a wide fit.
Zone C, big toe joint. A spot stretch is the standard fix for leather. A cobbler can use a heated or mechanical stretcher at the ball. A soft pad sited carefully around, not on, the bump can also help. If you have a bunion, ask a podiatrist what is suitable, since the wrong padding can add pressure.
Zone D, ball of the foot. A thin cushioned forefoot insert can reduce burning. Be careful, because added thickness takes room from the toe box and can push you up in the shoe. Consider whether a lower heel or a platform at the front would spread the load. If the heel pitch is the source, no pad will fully solve it.
Zone E, arch. A low-profile arch support or a three-quarter insole may help. Choose a thin one, and recheck the fit afterward, because a thick support can raise the foot and tighten the vamp.
Zone F, top of the foot. For straps, try a different hole, or ask a cobbler to add a hole. For a vamp that presses, a soft tongue pad can distribute pressure. A strap that cuts across the instep usually responds well to a small change in position.
Zone G, back of the heel. Try a heel grip or a heel cushion. Reduce slip with a sock-free test or a different hosiery, since slick nylon can add slide. A stiff heel counter can be softened by a cobbler, and leather often softens naturally with a few more sessions.
Zone H, Achilles area. A soft pad on the edge of the shoe back, or a thin gel strip, will reduce rubbing. Anti-friction balm may help for a short time. If the shoe’s back edge is cut too high, it is a design issue.
Zone I, ankle and strap. Loosen the strap by a hole, or add an elastic extender, if the shoe permits. If swelling is the cause, test the strap at the end of the day, when your ankle is largest.
Zone J, general fatigue. Look at the heel height, the thickness of the sole and the quality of the footbed. A cushioned insole can help. More often, the fix is a shorter time in these shoes, or a second pair for part of the day.
The one-change habit
It is tempting to apply three fixes at once. Don’t. A pad, a grip and a different sock might together cure a problem, but you will not know which one did it, and you may have added a problem somewhere else. Change one thing, log it, run one session, and score. If it helped, keep it. If it did not, remove it and try the next idea. This slows the early stages by a day or two and saves weeks of confusion. The one-change habit is what makes a shoe break-in log readable.
Stretching, padding and cobblers: what is worth it
A cobbler or shoe-repair shop can do a lot, but not everything. They can stretch leather at a spot, add a strap hole, replace heel tips, add non-slip soles and adjust a stiff counter. They generally cannot make a shoe longer in a meaningful way, widen a rigid synthetic or reshape a heel. Ask before you pay, and ask what the shop will do if the stretch does not work.
Timing is important. A stretch takes a day or several, and a repaired shoe needs wear afterward to settle. Plan for the week of the repair plus another week of sessions to check it. That is why the swap-or-fix decision has to happen by the end of week three, and ideally earlier.
If you have a custom or bridal-salon pair, ask the salon before taking the shoes anywhere else. Altering a pair without permission may void a warranty or a return. In many cases the salon can arrange the stretch or has a preferred cobbler.
Fixes you should treat with caution
Not every popular trick is a good idea. Wearing thick socks with heels to stretch them can warp the shape or damage delicate materials. Freezing water in bags inside shoes is a folk method that can stain or crack some materials, and it is not suitable for satin or dyed fabric. Heat from a hair dryer can dry out glue and leather. Applying alcohol or other solvents can strip finishes. If a trick can damage the shoe, you may lose both the shoe and the return, so lean on a professional or on gentle, reversible fixes.
Also take care with anything that numbs. Numbing sprays or pain relievers taken to get through a long day may mask the signals that tell you to stop. If you are tempted to rely on those, the shoes are not working, and your plan B should come out earlier.
A worked example of a shoe break-in log
The example below is invented to show the method. It is not a study and does not represent typical results. The names and numbers are made up so you can see how the rules and the log fit together. It follows one imaginary shoe break-in from the first rug session to the last rehearsal.
Dana is getting married in eight weeks. She chose a satin block-heel pump with a three-inch heel and a rounded toe, and wears a size seven. The wedding is at an indoor venue with a tile floor, and the reception has dancing. She starts the plan the day the shoes arrive.
Weeks eight to six
At week eight, Dana does the fit check on her living room rug. She notices the left shoe feels a bit loose at the heel, but nothing is painful. Her log shows zeros apart from a one at zone G, the back of the heel. She notes the return deadline, thirty days from delivery, and puts a reminder in her calendar for day twenty-three.
In stage one, she wears the shoes for twenty-five minutes, three times in the first week. Sessions one and two are clean, with a one at zone G. In session three, the left heel scores a two after a long stretch of standing at the kitchen counter, and a faint red patch shows. Following the repeat rule, she changes one thing and adds a small heel grip to the left shoe.
Session four, with the grip, scores zero at zone G. Session five also scores zero. She has met the advance rule and moves on to stage two.
Weeks five and four
Stage two puts Dana on her kitchen tile and a flight of stairs. In session one, forty-five minutes, zone D, the ball of the foot, scores a two. She had not noticed this on carpet. She changes one thing, adding a thin forefoot cushion. Session two, with the cushion, scores a one at zone D but now a one at zone A, the toe tips, because the cushion pushes her foot forward a little. She decides to swap the thick cushion for a thinner one.
Session three, sixty minutes with the thinner cushion, scores one at zone D and zero at zone A. Session four, ninety minutes with a ten-minute standing block, scores the same. Two sessions at one or lower. She advances.
Weeks three and two
Stage three is the dress rehearsal. Dana wears the shoes at her final fitting, then at home with the dress, for two hours and ten minutes, including a few songs of dancing. At the end, zone D scores a two again after the dancing, and zone J, general fatigue, scores a one.
She applies the repeat rule again. The cobbler cannot lower the heel, but Dana has another option in her plan, a lower two-inch pair of similar shoes she can wear for dancing. She makes the decision at the end of week three: keep the three-inch pair for the ceremony and photographs, and plan to change into the two-inch pair before the dancing. That is the keep-and-limit outcome, and it falls inside the return window, so no return is needed.
Week one
For stage four, Dana runs a four-hour rehearsal built from her wedding timeline. She wears the three-inch pair for the first two hours of the simulated ceremony and photographs, scores everything at one or lower, then changes to the two-inch pair for the dancing block, and scores all zeros and ones. She rests the next day, packs her kit and goes into the last three days without trying anything new.
What the example shows is not that Dana’s shoes were perfect. They were not. It shows that the shoe break-in log turned small problems into small decisions, early, instead of a single larger problem on the day. A tidy shoe break-in log made the decisions easy.
{{INFOGRAPHIC:6}} ## Edge cases that change your shoe break-in plan
Not every wedding fits the standard eight weeks. These are the situations that come up most, with a practical adjustment for each. Each one reshapes the shoe break-in without breaking its rules.
The shoes arrive late
Special-order shoes, custom dyeing and shipping delays can leave you with only three or four weeks. Compress the shoe break-in schedule rather than skipping stages. Combine stage zero and stage one into the first four days, with two short sessions a day on carpet separated by several hours. Run stage two as three sessions in the next week and stage three as two sessions in the following one. Keep the full-length rehearsal in the final week. A late pair does not cancel the shoe break-in; it compresses it.
The risk of a compressed shoe break-in is that skin has less time to adapt, so be stricter with the stop rule and more generous with padding. Also have a backup pair ready from the start, since you may not have time to swap. If a three appears, you have no room to wait, and the backup pair becomes the shoe break-in plan.
You are changing shoes during the day
Many people plan two pairs: a formal pair for the ceremony and photographs, and a comfortable pair for the reception. That is a practical plan, and each pair needs its own log. The formal pair gets the full schedule but may only need the stage four rehearsal for the first half of the day. The comfortable pair, if it is a flat, a low block heel or a soft sandal, needs a shorter version.
The risk with the second pair is neglect, since people assume it is fine because it is comfortable. Wear it with the real hosiery at least twice, and check that it works with the hem length. A second pair deserves its own small shoe break-in.
If you plan to change shoes, think about where and when. A change in a private room is easy. A change at the table, mid-reception, takes a few minutes and a person who has the shoes. Put that in the timeline, and consider who is responsible. The wedding reception guest flow guide covers the movement between moments of a reception, which helps you find a natural window for the swap.
The venue is outdoors or uneven
Grass, gravel, sand, cobblestones and wooden decks all behave differently from a living room floor. Thin heels sink into lawn and catch in gaps. Soft soles slide on wet stone. Sand drags on straps. If the aisle or the photograph spots are outdoors, a break-in on carpet and tile leaves the key question unanswered. Venue surface is the piece of shoe break-in that indoor sessions cannot answer.
Test the surface with an old pair of shoes with a similar heel shape and height, or, if you have passed the return window, with the real pair for a short, supervised test. Note which zones suffer. For heeled shoes on grass, the answer is often a different heel shape, such as a block or wedge, rather than a break-in fix. Barn and farm venues often combine stone, wood and grass in a single day, and the guide to barn wedding venues describes what those floors tend to be like, so you can choose test surfaces accordingly.
Also ask the venue what the surface will be on the day. Rain plans change surfaces, and a venue that moves the ceremony inside is no longer a lawn. The wedding venues guide covers the questions to ask a venue, including floors and access.
You have a foot condition
Bunions, hammertoes, plantar fasciitis, neuromas, flat or high arches, past injuries, diabetes and circulation problems all affect shoe choice and shoe break-in. If you have any of these, check with a podiatrist or a foot and ankle clinician before choosing a heel height, and share the log with them. They can often suggest an insole or an adjustment you would not have found. The American Podiatric Medical Association has a public directory and consumer information on its website.
For some conditions, a wear-test plan is still useful but the stop rule should be stricter. For diabetes or reduced sensation, in particular, skin damage may not be felt, so look at your feet after every session and do not rely on pain as a signal. Ask your clinician about the right monitoring.
Your feet swell during the day or in warm weather
Evening sessions and warm-room sessions give you a realistic worst case. If your feet swell, test the shoes in the late afternoon, and choose adjustable straps or a slightly roomier fit. A shoe that fits only first thing in the morning is a shoe that will not last a wedding day.
The shoes are bare-foot or you will skip hosiery
Skin on leather or satin can blister faster than hosiery on leather, since the skin takes the friction. Test bare-foot sessions on their own, with anti-friction balm if you plan to use it, and apply the balm in the same way each time. Also consider the hygiene side. Lining, insoles and sweat can build up, and a light wipe-down after each session keeps the shoes fresher.
Two feet, two sizes
If one foot is larger, fit to the larger foot and fix the other with insoles or heel grips. A common pattern in the shoe break-in log is one foot scoring consistently higher than the other. That is no failure of the plan. It is the shoe break-in plan doing its job, by showing you where to add the padding.
Comparing your options when the shoes do not settle
When the log says the shoes are not settling, you face a choice among four real options. Each has a cost in money, time and risk, and the best choice depends on how many weeks remain. Choosing well is part of shoe break-in, not a failure of it.
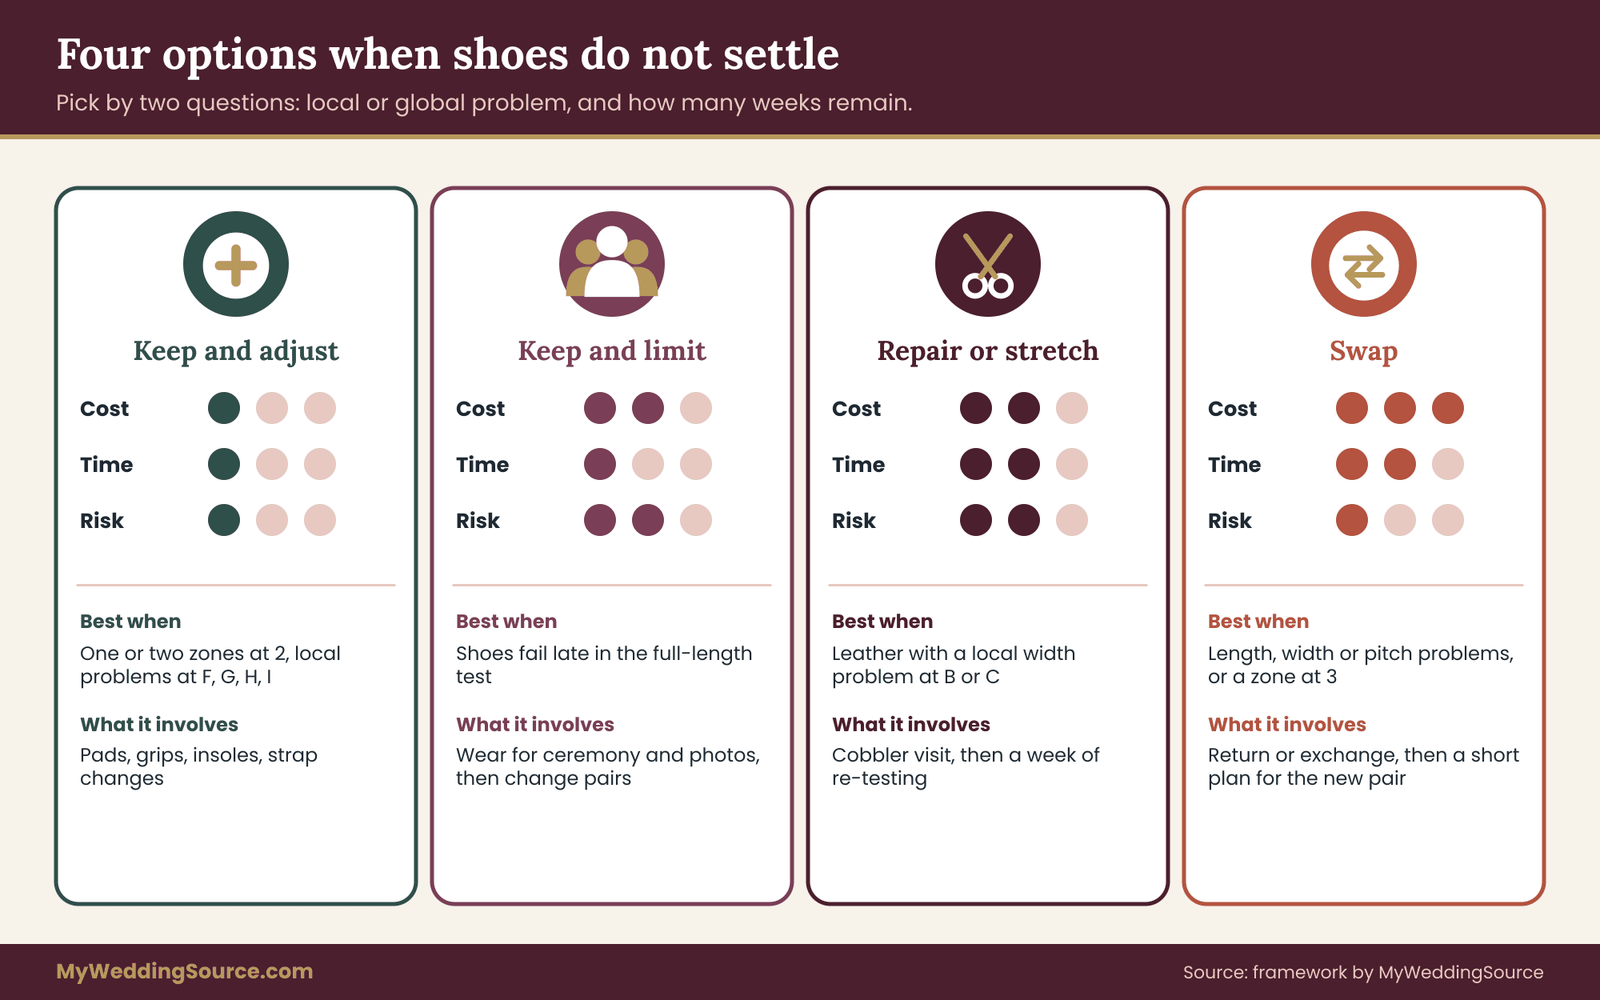
Keep and adjust. Use pads, grips, insoles and strap changes. It costs the least, is reversible and works for small, local problems at zones F, G, H and I. It does not work for width and length problems. Use it when only one or two zones sit at two and a change has already made a difference.
Keep and limit. Wear the pair for a defined part of the day, such as the ceremony and photographs, and change into a second pair. It costs a second pair and some logistics, and it carries a moderate risk if the swap is badly planned. Use it when the shoes fail late in the stage four rehearsal rather than early.
Repair or stretch. A cobbler adjusts the shoes. It costs a modest fee and about a week or two, and it is only partly reversible. It suits leather shoes with a local width problem at zones B or C or a stiff counter at G or H. Do not use it near the deadline, because there is little time to check the result.
Swap. Return or exchange the shoes, and start a short plan for the new pair. It costs shipping, a possible restocking fee and a restart, and it is the cleanest answer to a length, width or pitch problem. It is also much better done in week three than in week one.
A decision rule for choosing among them
Use two questions. First, is the problem local or global? A local problem, such as a rubbing strap or a stiff heel back, can be fixed. A global problem, such as a toe box that is too narrow, a heel that is too steep or a shoe that is too short, cannot. Second, how many weeks remain? With four or more weeks, you can try a fix and re-test. With two or fewer, choose the option that needs the least testing, which often means keep and limit, with a backup pair. These two questions keep a shoe break-in decision simple.
If the answer is global and time is short, swap and go to a proven, comfortable style, even if it is less dramatic than your first choice. Few guests will remember the shoes. Many will remember a bride or groom who left the dance floor early. The accessories planning guide also covers emergency backups in a broader sense, which is useful if the shoes are only one of several items you want to protect.
When a second opinion helps
A stylist, a tailor, a footwear fitter or a salon fitter can look at your shoes on your feet and often spot a fit issue in a minute. Bring the shoe break-in log. A log full of dates, scores and notes lets the fitter see the pattern in seconds, and you leave with a specific recommendation instead of a general one. If you have a bridal stylist, share the log with them, since they also know the dress and how your hem and heel interact. ## Your wedding-day shoe break-in kit and plan B
A well-tested pair still deserves a kit. The kit is small, fits in a pouch and holds only things you have already used during the plan. It is the end of the shoe break-in, not a replacement for it. Packing it is the last step of the shoe break-in.
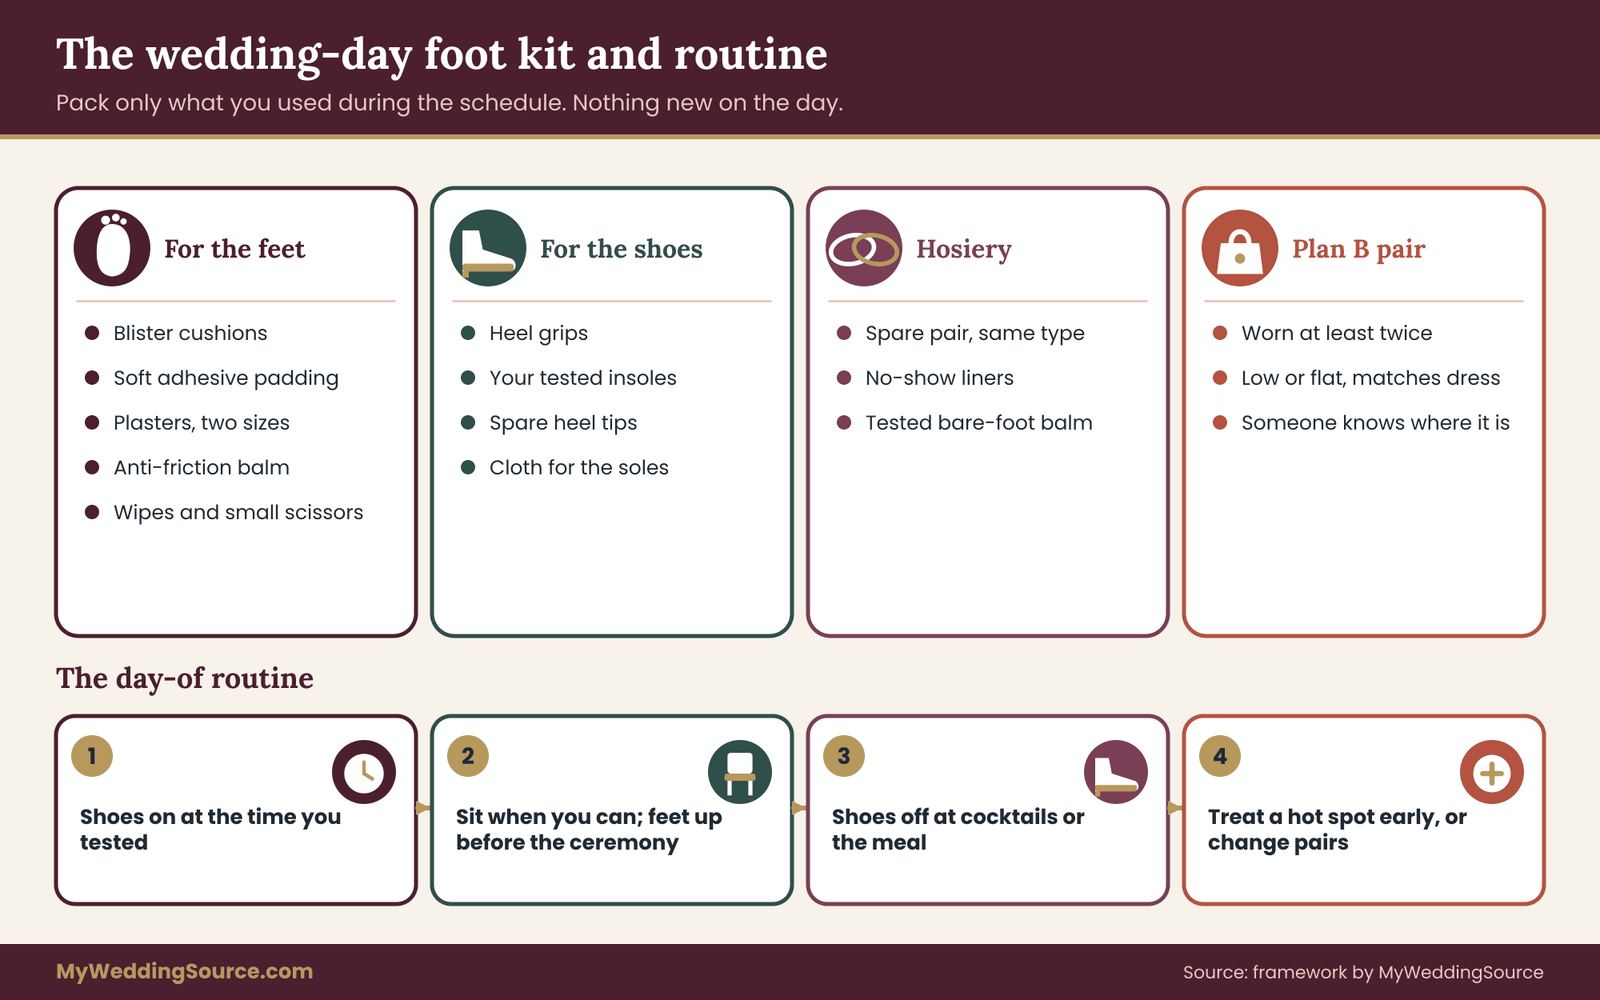
For the feet. Blister cushions and a few plasters in two sizes. A roll of soft adhesive padding or moleskin, and small scissors. Anti-friction balm, if you tested it. A small pack of wipes, so skin is clean before you apply anything, since adhesive does not stick to damp or oily skin.
For the shoes. Heel grips and the insoles or pads you used in stage three and four. A spare set of heel tips if you have heels with replaceable tips. A small cloth to wipe the soles before you enter the venue.
For the hosiery. A spare pair of the hosiery you tested, in case of a run. A pair of no-show liners if you plan to change to another pair of shoes.
For plan B. A second pair of shoes that you have worn at least twice. Flat or low, comfortable, in a color that works with the dress. Decide who is carrying them and where they will be, and tell that person the moment when you want them.
The day-of routine
Put the shoes on at the time you tested, not earlier. If you tend to swell, apply any padding after your feet are at their day-of size, and keep your feet up for a few minutes before the ceremony. Sit when you can. Take the shoes off for the cocktail hour or a quiet moment, and put them back for the dancing or switch to the second pair as planned. The routine is simply the shoe break-in repeated once more.
If a hot spot starts to form, do not wait for it to become a blister. Excuse yourself and apply a cushion or tape, or change shoes. Skin damage is cheap to prevent early and slow to heal later. Most people can find two minutes between photographs and the next moment, and a photographer will happily wait.
Tell someone the shoe break-in plan
Give your planner, a bridesmaid or a family member a short note explaining where the kit is and when the shoe change happens. A coordinator who knows about plan B can clear a few minutes in the timeline. The wedding planning checklist is a handy place to add the shoe items, and the kit becomes one more line next to the emergency items you already pack.
Questions to ask the seller, the cobbler and your fitter
Good questions save time, and the answers belong in your records. Ask them early, ideally before you buy or at stage zero. Treat these as the front door of any shoe break-in.
For the seller. How long is the return window, and when does it start, on the order date or the delivery date? Does the shoe have to be unworn, or only free of outdoor wear? Who pays for return shipping? Is there a restocking fee? Do you offer half sizes and widths, and how long does an exchange take? Do you allow adding a non-slip sole pad? Get the answers in writing, such as in an email thread, and keep the thread with your wedding records.
For the cobbler. Can you stretch this material, and where? What does it cost, and how long will it take? What if the stretch does not work? Can you replace the heel tips or add a strap hole? Will you work on shoes that are still under a return policy, or do you need the seller’s permission?
For the fitter or stylist. Looking at my log, which zones concern you? Is the problem local or global? Would a different width, length or heel height help? What would you try first? How much time do you think I need?
For the dress fitter. What heel height should I bring to my fittings? Will the hem need to change if I change shoes? Can the final fitting be done in the pair I plan to wear for the ceremony? If you swap the shoes after hemming, the hem will be wrong, and a conversation with the tailor before you change shoes can save a trip back.
Keep a small record
Create one folder, paper or digital, with the order confirmation, the return policy, the reply from the seller, the shoe break-in log and any cobbler receipts. If something goes wrong, you have what you need to ask for a refund or an exchange. It is also a good way to see, a year later, what worked, in case you buy shoes for another event. The folder is the paper trail of your shoe break-in.
Your next steps
Choose the date for stage zero this week, and count backward to your wedding to see how many weeks you really have. Read the return policy, write down the deadline and set a reminder a week before it. Print or sketch the hotspot map, set up the log with the eight fields, and gather your hosiery, insoles and a pharmacy kit. Starting the shoe break-in this week is the single most useful move.
Then work the stages in order, one session at a time. Apply the rules as written. Make the keep-or-swap decision by the end of week three, run the full-length rehearsal once in week one and spend the last three days resting. If a step slips, shorten the plan instead of skipping stages, and have a backup pair ready. A tested pair with a log behind it is a quiet advantage on a busy day, and it lets you stop thinking about your feet and start enjoying the party.
FAQ
How long does a wedding shoe break-in take?
Eight weeks is a comfortable runway for a heeled or structured shoe. Six weeks works if the shoes already fit well, and a compressed plan of three to four weeks is possible with stricter rules and a backup pair. Flat, soft shoes need less time. The right length depends on the shoe, your feet and the result in your log.
Can I break in wedding shoes without wearing them outside?
Yes, and often you should. Wearing the shoes on clean indoor floors keeps most return policies intact. Carpet, tile, hardwood and stairs cover most of what you need to learn. If the venue is outdoors, test the surface with an old pair of similar shoes, or wait until the return window has closed. Check the seller’s exact wording first.
What if the shoes hurt from the very first session?
Stop and look at where. Pressure that fades quickly is common in new shoes. Sharp pain, numbness, or a zone that scores three in the shoe break-in log is a warning sign. If it is a width, length or heel pitch problem, padding rarely solves it, so return or exchange the pair while you still can.
Should I use thick socks or stretching sprays to speed things up?
Treat these with caution. Thick socks can warp delicate shoes, and sprays or heat can damage satin, dyed fabric, glue and some leathers. A cobbler can stretch leather at a spot with proper equipment. Ask the seller before using any product, since damage can void a return, and test any fix on a single zone with one change at a time.
How do I stop heel blisters in new wedding shoes?
Heel blisters come from friction, so the fix is to reduce slip and rubbing. Try a heel grip, a soft heel cushion or different hosiery. Check that the heel cup is not too large. If the problem remains after two different changes, the fit is probably wrong. Treat any broken skin properly and rest it before the next session.
How many minutes should I wear the shoes each time?
Start with twenty to thirty minutes in the first stage, then build to forty-five to ninety minutes on hard floors, and two to three hours in the dress rehearsal. Do one four-to-five-hour rehearsal in the final week. Always add time only after two sessions at one or lower in the log.
Is it worth bringing a second pair for the reception?
For most people, yes. A second pair that you have tested, in flat or low shape and in a color that suits the dress, protects you if the formal pair fails late in the day. Decide who carries them and when you will change. The pair needs a short wear test of its own with the real hosiery.
When should I give up on a pair and swap them?
Swap if a zone reaches three at any point, if a zone stays at two after two different fixes, or if the shoe break-in log points to a width or length problem. Decide by your return deadline or the end of week three, whichever is earlier. A swap in week three still leaves time for a short break-in of the new pair.
Sources
- Foot health information and Find a Podiatrist, American Podiatric Medical Association
- Foot and ankle conditions, OrthoInfo, American Academy of Orthopaedic Surgeons
- Skin care and blister information, American Academy of Dermatology Association
- Foot care and foot health topics, MedlinePlus, National Library of Medicine
- Blisters overview and treatment, NHS
- Foot and ankle health information for patients, American College of Foot and Ankle Surgeons
- Consumer advice on returns and refunds, Federal Trade Commission
- Diabetes and foot care, Centers for Disease Control and Prevention
- Shopping and consumer rights guidance, USAGov