
A second outfit at a wedding is a small second wedding-day project: another garment, another set of shoes and accessories, another time slot, and several people who each assume someone else has it. This guide shows how to decide who stores the second outfit, who carries it, who checks it, and how to label every bag so nothing depends on memory.
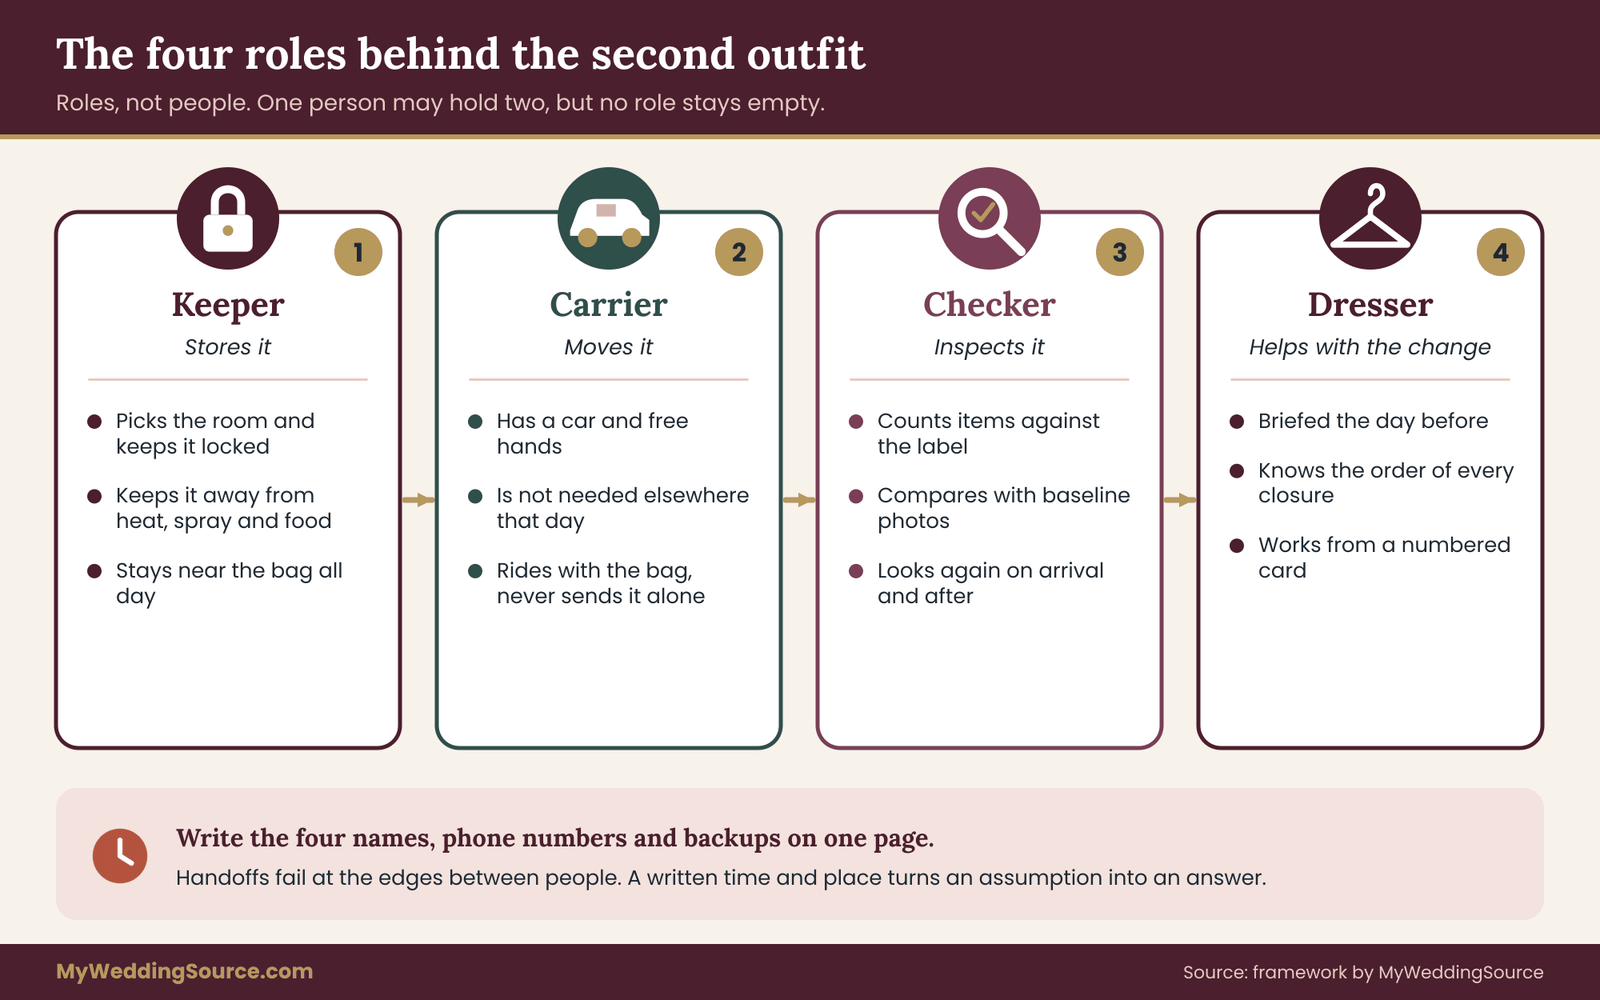
Give the second outfit four owners instead of one: a keeper who stores it, a carrier who moves it, a checker who inspects it before and after, and a dresser who helps with the change. Put every item in a labeled garment bag with the same six fields: whose it is, what is inside, where it waits, when it is needed, who hands it over and where it goes afterward. Check the garment’s care label and material before the wedding, not on the day. Then rehearse the change once with a clock.
Most couples who plan a second outfit spend their effort on the shopping. A reception dress, a shorter skirt, a lighter jacket, a sherwani for the evening, a jumpsuit for the dance floor: the choice is fun and visible. What gets little attention is everything that happens to that garment between the fitting room and the moment someone zips it up at nine o’clock at night. The second outfit has to be stored somewhere, moved through a building full of other people’s luggage, kept clean while the first outfit takes the abuse of a ceremony, and handed over at a precise time.
None of this is hard. It is just easy to leave undefined. A bag that sits in the wrong room, shoes that never left the trunk, a steamer nobody brought, or a garment that was packed wet from a rainy ceremony can turn a planned change into a twenty-minute scramble during the part of the evening you wanted to enjoy.
This guide treats the second outfit as a logistics problem with a small set of decisions. It gives you a handoff chart, a garment bag label with six fields, rules for choosing a storage location, a carry plan for cars and airports, a pre-wedding check that takes about an hour, and a worked example with an invented couple. It also covers the edge cases: two people changing, a change in a different building, bustles and buttons that need help, and what to do when the plan slips.
A note on scope. This is general planning information, not legal, tax or financial advice, and it is not a substitute for the care instructions that come with your garments or the advice of a bridal tailor. Where a rule matters, such as an airline carry-on policy or a venue’s storage policy, the article points you to the organization that issues it so you can confirm the current version.
For the wider picture of shoes, jewelry, veils and emergency kits, the site’s guide to wedding day accessories planning covers compatibility and backups. This article stays narrower. It is only about the garment that appears later in the day and the people who make that appearance possible.
Why a second outfit needs its own plan
A single wedding outfit has an obvious owner. The person wearing it is dressed by a small group at a known place, and everything that goes with it travels in the same car. A second outfit breaks that pattern in three ways.
First, it is absent for most of the day. A garment that is not being worn is not being watched. It hangs on a door, sits in a trunk, or lies across a chair in a room that other people use. Nobody is protecting it from heat, spills, perfume, makeup, rain or a curious toddler.
Second, it has a deadline. The first outfit can run late and the whole day shifts a little. The second outfit has a window: after dinner, before the first dance, between the cake and the send-off. If the garment is not in the right place at the right time, the change either happens late, happens in a hallway, or does not happen.
Third, it has more parts than people count. A second outfit is rarely just a dress. It is the garment, undergarments suited to it, shoes, a belt or sash, jewelry, a hair accessory, a wrap or jacket, and sometimes a change of makeup or a bag. Each of those pieces can be left behind independently.
The cost of getting it wrong
The costs are mostly small, which is why the problem hides. The change takes longer, so dinner or dancing runs late. The garment arrives creased or stained, so someone spends the cocktail hour with a steamer or a damp cloth. A shoe or belt is missing, so the look is compromised. In the worst cases the garment is damaged or lost, which can mean a replacement bill and a stressful hour.
None of these are likely if the plan is clear. The point of the handoff chart is to make the plan clear enough that a helper who has never seen your garment can still move it correctly.
The second outfit handoff chart in one view
The core of this guide is a chain of four roles. They are roles, not people: one person can hold two roles, but no role should be empty. Write the names next to the roles on a single page before the wedding week.
The keeper stores the second outfit from the moment it leaves your home until the moment it is needed. The keeper decides where it hangs, makes sure the room is locked or watched, and keeps it away from heat, moisture and food. The keeper is usually someone who will be in one place for much of the day, such as a person staying with the bridal suite or the hotel room.
The carrier moves the second outfit between locations: from your home to the getting-ready room, from the getting-ready room to the venue, from the venue’s storage to the change room. The carrier has a car, a free pair of hands and a calm temperament. Someone who is also the best man, the officiant or the mother of the couple is a poor carrier because those people are needed elsewhere.
The checker inspects the garment before it is packed, when it arrives, and when it comes back off. The checker is looking for wrinkles, loose threads, missing buttons, stains, missing accessories and signs that something has been moved or opened. A checker who has seen the garment in the fitting room is ideal.
The dresser is the person who physically helps with the change. This is the most visible role, and often the only one couples plan for. The dresser needs to know how the garment fastens, how a bustle or sash works, and what order the pieces go on.
One page, four names, one clock
The chart is a single page. Down the left side list the roles. Across the top list four moments: packed, stored, staged, changed. Under each moment write the name, the place and the time. You do not need a spreadsheet and you should not make it a table of text; a hand-written grid on one sheet of paper that goes in the garment bag pocket is enough.
The reason to put it on paper is that handoffs fail at the edges between people. The keeper assumes the carrier will arrive at six. The carrier assumes the bag will already be in the lobby. A written time and place for each handoff turns both assumptions into a question you answer ahead of time.
Who should not hold a role
Some people are poor fits even if they offer. A groomsman who is also giving a toast should not be the carrier for an item needed during his own speech. A parent who is hosting guests at the hotel should not be the checker, because they will be interrupted. A vendor is a poor keeper unless the vendor has agreed in writing, since a photographer or a planner owes you specific services, and storing clothing is usually not among them.
If you are working with a planner or coordinator, ask whether handling the second outfit is part of their scope. Some will happily hang a bag in the right room. Others have policies about handling personal property. The planning guide for a wedding vendor timeline is a good place to see where those conversations fit into the months before the date.
Two kinds of second outfit, and why the difference matters
Not every second outfit is the same logistics problem. Before you assign roles, decide which of these you are dealing with, because the answers to storage and timing change.
The full change is a different garment from the first outfit: a ceremony gown to a reception dress, a formal suit to a lighter jacket, a traditional ceremony outfit to a modern reception one. This requires privacy, time and a dresser, and it carries the full list of pieces.
The partial change keeps the main garment and swaps part of the look: removing a train, switching to flat shoes, adding a jacket, changing a veil for a headpiece, bustling a skirt, or trading a heavy cape for a light wrap. This takes minutes and needs fewer people, but it often creates the biggest confusion because nobody thinks of a pair of flats as a second outfit.
Treat the partial change with the same chart. A small bag with one pair of shoes and a wrap still needs a keeper, a carrier, a checker and a clock. It just needs less of each.
Who is changing
Many couples assume the second outfit belongs to one partner. In practice, both partners may change, a parent may change, and the wedding party may be asked to change for a dance or a cultural event. Each person who changes needs their own bag and their own label. Do not combine two people’s pieces in one bag to save space; it creates exactly the sort of mix-up the labels are meant to prevent.
Who stores the second outfit: choosing a home base
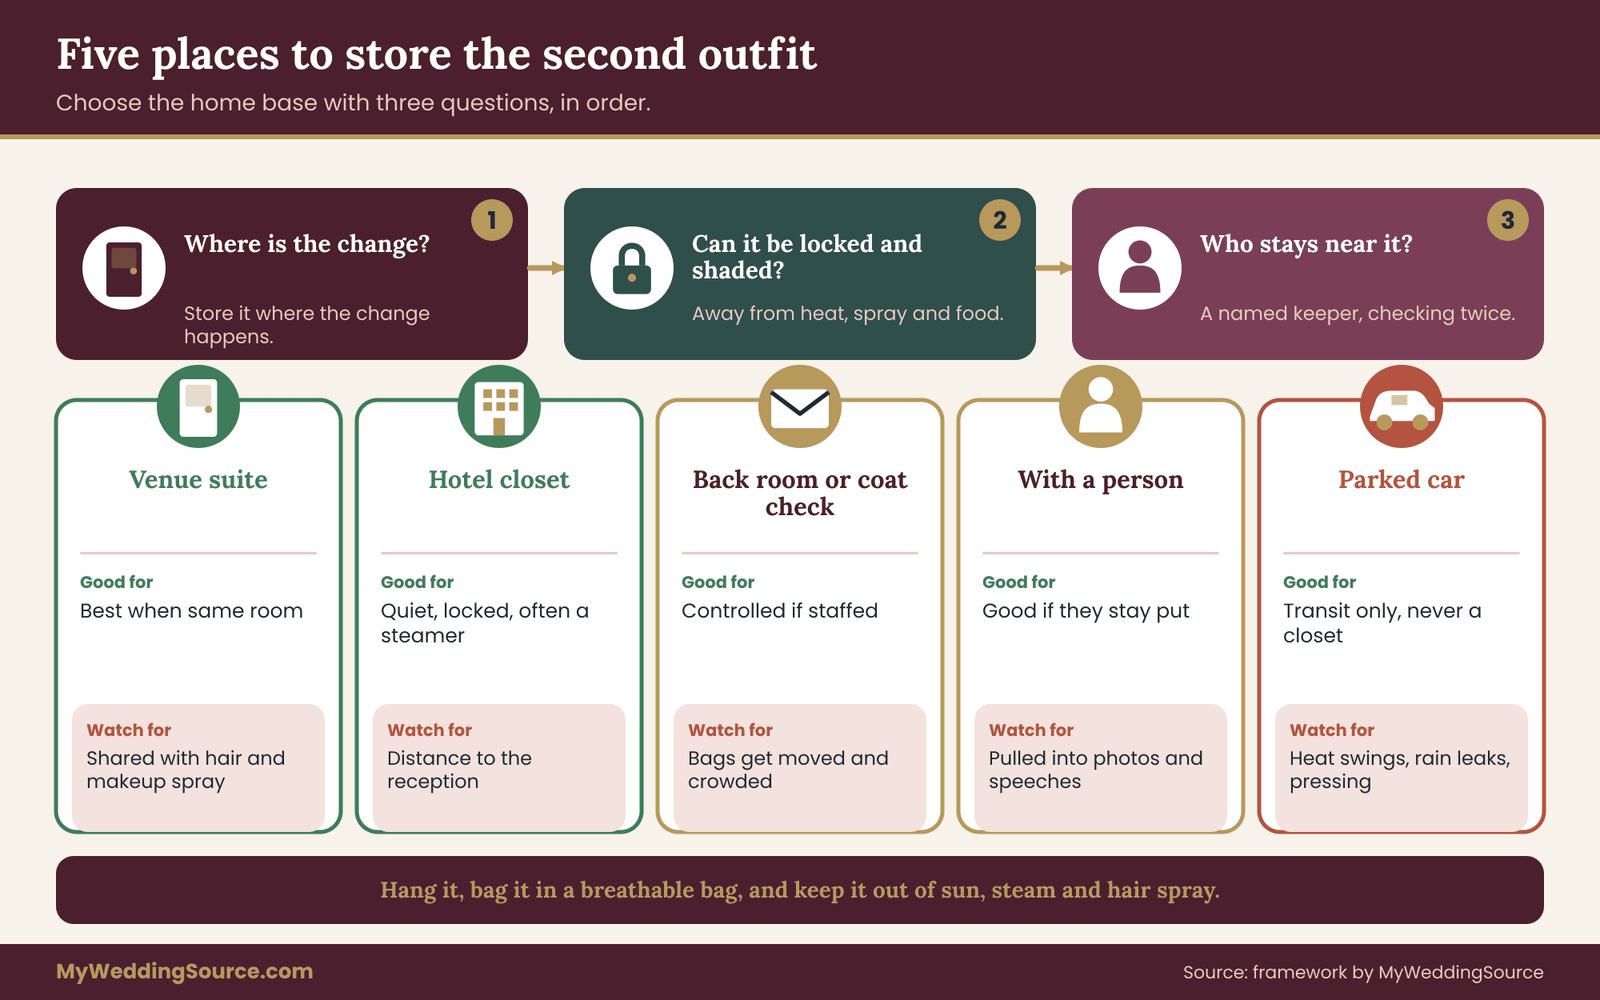
Storage is the first real decision, because every other choice follows from where the garment waits. There are five common places a second outfit ends up, and each has a different risk profile. The right answer depends on how far the change room is from the ceremony, how long the garment waits, and who controls the room.
The bridal suite or getting-ready room at the venue. This is the most convenient option when the venue has one and the same room is available later in the day. The garment hangs near the person who will change, a dresser is close by, and nothing needs to move. The risks are shared use (hair and makeup teams spray product in these rooms), warm lighting and a door that is propped open while vendors come and go.
A hotel room. If the couple or the wedding party has a room at a nearby hotel, the garment can wait in a closet with the door closed. A hotel room is quiet, has a steamer or iron in many cases, and has a lock. The risk is distance: if the change room is the hotel and the reception is a ten-minute drive away, someone has to carry the finished look back, and the person changing needs a safe ride in a garment that may be fragile.
A vehicle. A parked car is the weakest storage option and a common one. Trunk and cabin temperatures can swing widely, and a garment bag lying across a back seat gets pressed, sun-faded or soaked by a rain leak. If the car must be used, treat it as transit, not storage.
The venue’s coat check or a back-of-house room. Some venues offer a staffed coat check or a locked storage room. This is a good option when the room is controlled, but staff may be busy, bags can be moved, and your garment may be hung beside forty guest coats. The wedding coat check planning guide on the site is a better source for how coat rooms work; here, the question is whether the venue will accept a clearly labeled personal garment and who can retrieve it.
With a person. Sometimes the best storage is a trusted person who stays near the garment all day. This works if that person is not also needed elsewhere. It fails if the person is pulled into photos, a speech or a family conversation.
A decision rule for the home base
Use three questions in order. Stop at the first one that gives you a clear answer.
Question one: where will the change happen? The best storage location is the change location. If the change happens in the venue’s bridal suite, store the second outfit there from the start. Moving a garment once is cheaper than moving it twice.
Question two: can that room be locked, shaded and kept away from food and spray? If yes, use it. If no, store the bag in a quieter place and move it to the change room an hour before it is needed.
Question three: who will be near it? A garment in a room with no one near it is a garment nobody is checking. Assign the keeper to a person who will be in or beside that room at least twice before the change.
If all three answers are yes, you are done. If two are no, look for a different location. A modest closet that is locked and has a person nearby beats a beautiful suite that is open to everyone.
Questions to ask the venue about storage
Venues differ widely. Some have a dedicated suite with a mirror, a steamer and a private bathroom. Some have a closet. Some have a corridor and a folding chair. Ask each of these in writing and keep the answers with your contract documents:
- Which room will we have for getting ready, and for how many hours?
- Can the second outfit stay in that room all day, or is it reassigned after the ceremony?
- Is the room locked, and who holds a key?
- Is there a hanging rail, a hook with enough height, and a mirror?
- Is there an outlet for a steamer, and is a steamer allowed?
- Can we drop off bags early, and who accepts them?
- What time must the room be cleared at the end of the night?
The answer to the early drop-off question matters more than it seems. If bags can be dropped off the day before, the keeper does not have to carry them on the wedding morning, and the checker can inspect them in a calm moment. If drop-off is not allowed until the day of, the carrier must be on the road earlier than planned.
If the venue answers vaguely, assume the weaker answer and plan around it. The guide to the wedding planning checklist is a useful place to record these questions beside the other venue details.
Heat, humidity and the long wait
The second outfit may hang for eight hours before it is worn, so the environment matters. Heat is the main enemy of a second outfit: a room beside a kitchen, a sunlit window or a car trunk can be warm enough to cause problems for synthetic fabrics, adhesives and beaded trims. Humidity affects natural fibers and can make satin and silk look limp and creased. Smoke and strong perfume cling to fabric.
The practical rules are simple. Hang the second outfit rather than folding it. Keep it in a breathable garment bag rather than a sealed plastic sleeve for any long wait; plastic traps moisture and can cause problems over time. Keep it away from windows, radiators, steam from a shower, hair-spray zones and food. Museum conservators who care for historic textiles publish plain guidance on these basics, and the National Park Service’s conservation notes are a good primary reference for why heat, light and moisture damage fabric.
The same guidance applies on a hot day. The National Weather Service and the Centers for Disease Control and Prevention both publish heat safety information for people, and it is worth remembering that a hot room is also hard on the person who has to change in it. Plan the change room as a place where a person can cool down, not just a place where a garment can wait.
Overnight and multi-day storage
If the wedding spans more than one day, as with a welcome event, a ceremony, a reception and a farewell brunch, the second outfit may belong to a different day than the first. Decide which bag belongs to which event and label accordingly. A garment for Saturday night should not hang beside a Sunday brunch outfit without a clear tag.
Overnight storage should be treated like first-day storage: hanging, bagged, shaded and away from heat. If a second outfit is stored overnight in a hotel room before the wedding, check it again in the morning. Hotel closets have narrow rails, and garments bunched together crease.
When there is no good storage
Sometimes the venue has no suite, the hotel is far away, and the car is the only option. This is a legitimate plan if you treat the vehicle as a short-term shelf rather than a closet. Park in shade, keep the garment hung from a hook or a hanger bar and not laid flat, crack a window if the car is in sun and it is safe to do so, and place the shoes and accessories in a box that stays closed.
Assign the keeper to check the car at a set time, for example once an hour. This is an uncomfortable job, which is why it needs a name next to it.
A better alternative for a second outfit, where possible, is a nearby friend’s home or a local business that will hold the bag for a few hours. Ask in advance, and be clear about the time you will collect it.
Garment bag labels that work for the second outfit
If the handoff chart is the logic of the plan, the garment bag label is its memory. A label turns an anonymous bag into a set of instructions. It also lets a stranger, for example a venue staff member or a vendor, do the right thing without calling you.
The six fields
Every bag gets a luggage-style tag or a sturdy paper label attached at the hanger. It carries six fields, in this order, and nothing else.
One: Whose. The name of the person who will wear the outfit. Use a first name and a role word if there is any chance of confusion, for example “Priya, reception”. If two people share a surname or a first name, add a letter.
Two: What is inside. A short list of the pieces: dress, slip, belt, shoes, wrap, jewelry pouch, hair pins. Numbers help: “6 items”. The checker counts against this list.
Three: Where it waits. The room or location where the bag is stored, and the key holder. “Venue suite, door key with Dani.”
Four: When it is needed. A clock time and a cue: “8:45 pm, after cake cutting.” A time alone can slip; a cue pairs it with an event the dresser will see.
Five: Who hands it over. The name of the carrier or keeper who delivers the bag to the dresser. Include a phone number.
Six: Where it goes afterward. The first outfit is not the only garment that needs a plan. After the change, the bag holds the first outfit, and it goes somewhere: the hotel, a car, a relative’s home, a cleaner. Write the destination and the name of the person who owns that handoff.

Why six, and not more
It is tempting to add fields: allergies, fabric type, care instructions, emergency contact. Resist it. A label with nine fields is not read. The six fields are the ones that a stranger must know to move the bag. Everything else belongs on the single page that stays with the keeper.
Fabric and care information deserve a place, but not on the outside. Attach a small card inside the bag with the care label wording and the fiber content copied from the garment, so a cleaner or a steamer operator can read it. We return to this in the section on checking.
Phone numbers and privacy
Do not write home addresses on a luggage tag that will hang in a public corridor. A first name, a role and a mobile number belonging to the keeper is enough. If you are uneasy about leaving a number on a tag, use a coded number: “Bag B” with a matching line on the one-page chart. The chart holds the real names.
Never put an email address on a bag or in a shared document. A phone number on a tag is easy to cross out afterward; an email address tends to stay in circulation.
Labeling the pieces inside the bag
Label the bag and also the loose items inside. Shoes in a cloth bag get a tag. A jewelry pouch gets a tag. Belts, sashes and hair pins live in a zip pouch with a tag. The reason is practical: a bag opened by a dresser in a hurry spills its contents, and small pieces without a tag get mixed with the first outfit’s items, a bridesmaid’s belongings, or the vendor’s supplies.
Use a color system if you have more than one bag. A strip of colored ribbon tied to the hanger of each bag, matched to the one-page chart, lets a helper spot the right bag from across the room. Keep the colors simple and do not rely on color alone for people who cannot tell them apart; the written name on the tag is the final authority.
Packing the second outfit, piece by piece
Packing is where the second outfit either becomes a complete look or a puzzle with missing pieces. The checker should be present for it, ideally the day before, with the garment and the full list of accessories laid out on a clean bed.
Build the list from the body outward
Start with what touches skin and work outward. People forget the layers closest to the body because they are not photographed.
- Undergarments suited to the second outfit. A strapless garment, a low back or a fitted skirt may need a different foundation from the first outfit. If the first outfit’s undergarments are not suitable, pack the right pair and a backup.
- The garment itself, on its own hanger, with the hanger type that suits it. Heavy beaded or lined garments often need a padded or wide hanger and, in some cases, loops sewn inside so the weight is carried by the seams that were built for it. A bridal tailor can tell you which applies.
- Anything that changes the shape: a petticoat, a bustle hook, a slip, shapewear.
- Shoes, in a cloth bag. Include a second pair if the floor, grass or dance floor makes it worth it.
- Belt, sash, brooch or fastening hardware.
- Jewelry in a labeled pouch, with the clasp closed.
- Hair accessories, pins and a small comb, in a separate pouch.
- A wrap, jacket or shawl, so the person is covered while moving between rooms.
- A small repair kit: safety pins, a few spare buttons, thread in matching colors, a lint roller, double-sided tape, a small pair of scissors, stain remover pen. Check the venue’s rule on scissors if you plan to put the kit in a carry-on bag.
The list is a checklist, not a requirement. A partial change may need only three of these. The discipline is the same: write the list on the label, count it twice, and count it again when it comes back.
Shoes get their own thinking
Shoes are the piece of a second outfit most often left behind, because they live on the floor of a car, not on a hanger. Pack them in a drawstring bag and tie the bag to the hanger so they travel with the garment. If the second outfit calls for flatter shoes for dancing, test them with the hem length before the wedding day. A garment hemmed for heels can drag when the wearer changes to flats; the guide on wedding dress fit and alterations explains how hem length and shoe height interact, and a tailor can take up a hem or add a hook for a second length.
Wear new shoes at home for an hour before the wedding. A blister on a dance floor is a logistics problem too, and a blister kit belongs in the repair bag.
Jewelry and metal claims
Jewelry for the second look should be checked as carefully as the garment. If you have bought pieces labeled as gold, silver or plated, the Federal Trade Commission publishes its Jewelry Guides, which explain how sellers may describe the metal content, plating and gemstones. They are a reasonable reference if a description on a product page is unclear, and the guides are written for sellers and consumers alike. If you or a guest have sensitive skin, confirm the metal composition before wearing a new piece for hours; the seller’s page should state it, and a question to the seller is free.
Pack fine jewelry in a lockable pouch and give it a named handler. Valuable pieces should not be left in a room with open access. If a piece is on loan from a family member, record that in the one-page chart, so that everyone knows it has to go back.
Hair, veil and headpiece compatibility
A second outfit often brings a second hair or headpiece plan: veil removed, hair let down, a different clip added, a hat for a daytime event. Decide ahead whether the stylist will be present for the change. If not, practice the change with whoever is helping. The bridal hair and makeup planning guide covers trial runs and touch-up kits, and the same logic applies here: a change you have never rehearsed will take twice as long.
Weighing and bagging
Garment bags have a weight limit in practice. A heavy gown in a thin bag can tear through the bottom of the bag or distort the shoulders of the hanger. Use a sturdy bag with a full-length zipper and a gusset, and keep the second outfit away from zippers and sharp pins in other items. Put a sheet of acid-free tissue or a clean cotton sheet inside folds if the garment has trims that could snag.
Do not seal a garment in an airtight vinyl bag for more than a short trip. If the garment arrives in such a bag from a shop or cleaner, move it to a breathable bag as soon as you can.
Who carries the second outfit, and how
The carrier role sounds trivial until you map the actual journey. Draw it. Most second outfits make between two and four moves: home to getting-ready location, getting-ready location to venue, venue storage to change room, and change room to the exit or the hotel at the end of the night. Each move is a place where a bag can be left on a curb or placed on a hot floor.
Choose the carrier by schedule, not by affection
The best carrier for a second outfit is the person with the least competing duty during the move. The parent of the couple, who loves the garment, is not necessarily a good carrier if they are also greeting guests. A cousin who arrives early and has a reliable car is a better choice. Where a rideshare or a shuttle is part of the plan, the carrier should ride with the garment instead of sending it alone.
Name a backup carrier for the second outfit. A single point of failure is the most common reason a second outfit ends up in the wrong place. The backup does not need to do anything on the day unless the first carrier is delayed, in which case a phone call hands the job over.
By car
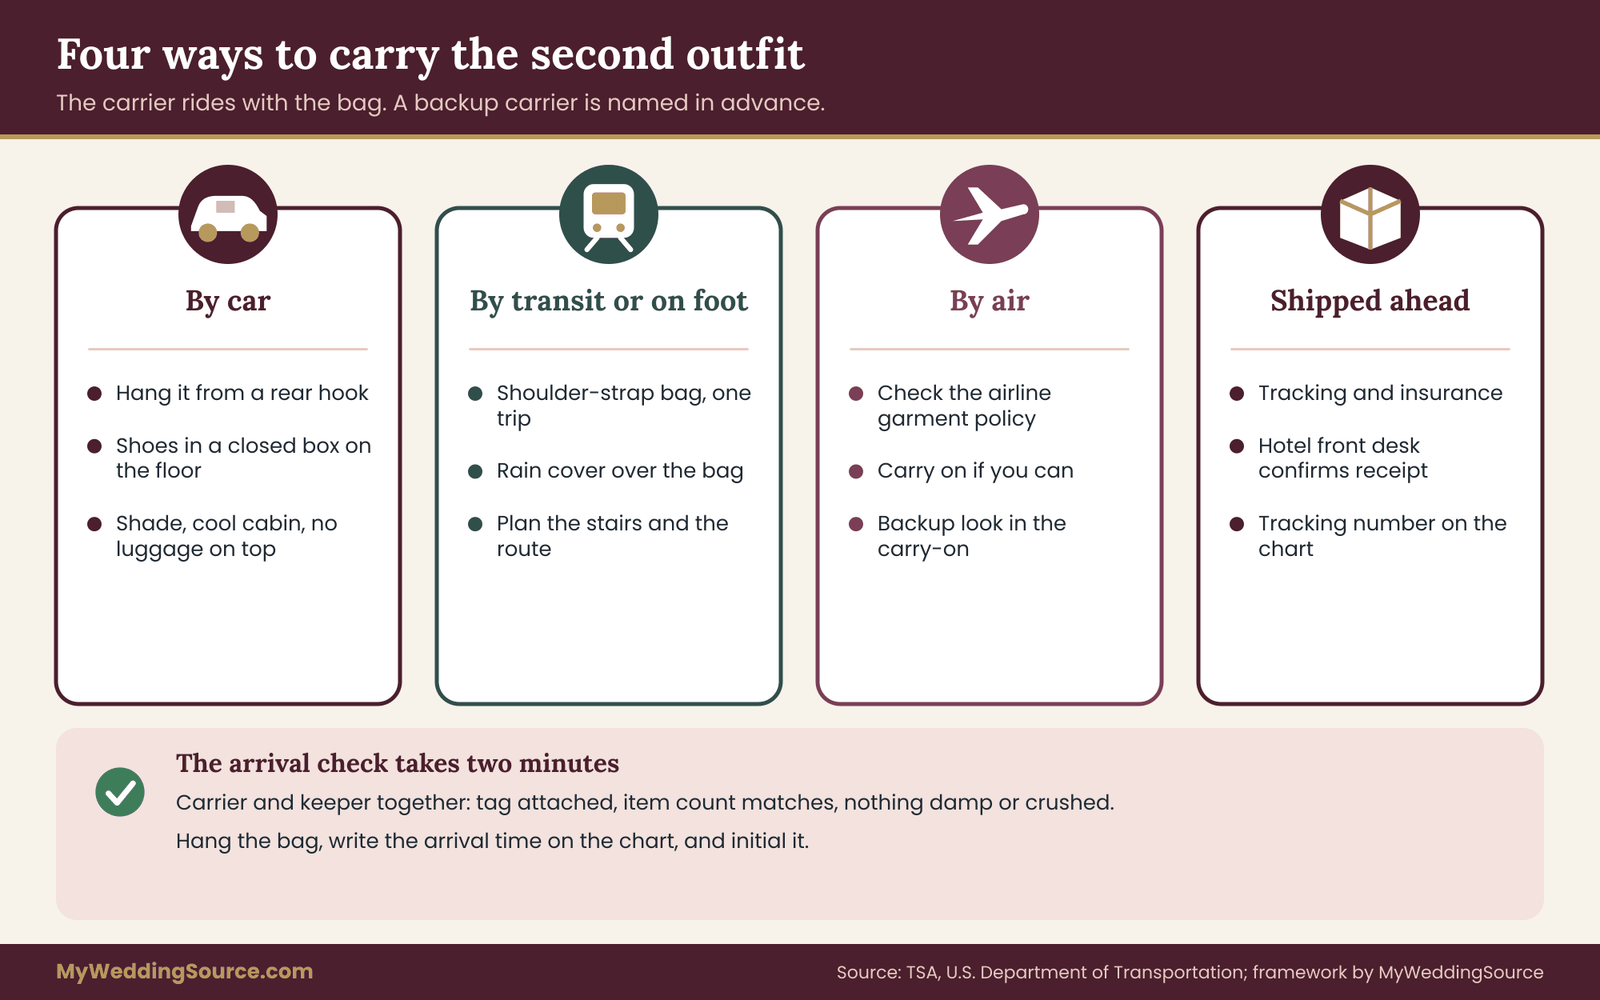
A car carries a second outfit well if it is loaded with care. Hang the garment from a hook above a rear door, if the car has one, so it hangs straight and does not press against seats. Lay it flat only if the garment is not heavily structured and only on a clean surface. Put shoes and accessories in a closed box on the floor behind the front seats, not loose in the trunk. Do not stack luggage on top.
Keep the cabin cool on a hot day, and do not leave the garment in a parked car in sun. In rain, wrap the garment bag in a second protective cover or large clean bag, and keep the umbrella with the carrier. The site’s guide on wedding dress transport in rain is a related reference for rain, though the principle for the second outfit is simply to keep it dry and hanging.
If the carrier drives, give them a route and a parking plan. Venues have loading zones and rules; many specify where vehicles may stop to unload. Ask where the carrier can park for ten minutes, and tell the carrier which door to use.
By train, rideshare or foot
If the second outfit must travel by transit or on foot, the carrier needs a bag that can be carried comfortably, a way to protect the garment from rain and a clear path. Garment bags with a shoulder strap are easier than a heavy hanger gripped in one hand. If the route involves stairs, the carrier should do it in one trip, not two, because a second trip means leaving the garment unattended.
By air
If the second outfit travels by plane, the rules that matter come from the airline and the security agency. The Transportation Security Administration publishes its screening rules for carry-on items, including what may go in carry-on and checked luggage, and the U.S. Department of Transportation publishes consumer guidance on air travel. Airlines set their own carry-on size and garment bag policies, so check the policy for the airline and ticket class you are using, and do it before you buy a garment bag.
Do not check a second outfit if you can carry it. Delayed baggage is rare but real, and a garment is not easily replaced. If you must check it, pack a backup look in the carry-on, and keep the receipts and photos of the garment in case a claim is needed. Ask the airline about the claims process in advance if you are checking the garment, and confirm what its liability limits are for valuables.
Hanging garment bags may be stowed in an overhead bin, a closet on the aircraft or with the crew, depending on the plane and the airline’s practice. Ask at the gate, and expect that the answer can differ by flight. A fold-over bag that preserves the garment’s shape for a short flight is often a safer plan than a hanging bag that may be crushed.
Some travelers ship the second outfit ahead to the hotel or venue. This can work if you have tracking, insurance and a confirmed recipient, and it adds a handoff to the chart: the hotel’s front desk becomes a keeper. Call the hotel to confirm that it accepts packages, and ask when they must arrive. Keep the tracking number on the one-page chart.
The arrival check
When the second outfit arrives at its home base, the carrier does not just drop it. The carrier and the keeper perform a two-minute check together: bag intact, tag attached, item count matches, nothing damp, nothing visibly crushed. They hang it up, write the arrival time on the chart and initial it. That initial is the proof of the handoff. If a problem appears later, you will know when the bag was last checked.
Checking the second outfit before the day
The checker role is the quality-control step, and it is the one most often skipped, because a garment that looked perfect at the last fitting seems to need no more attention. Garments change between the fitting and the wedding. They get moved, steamed, hung beside other fabrics, and sometimes altered at the last minute. A short check protects you from surprises.
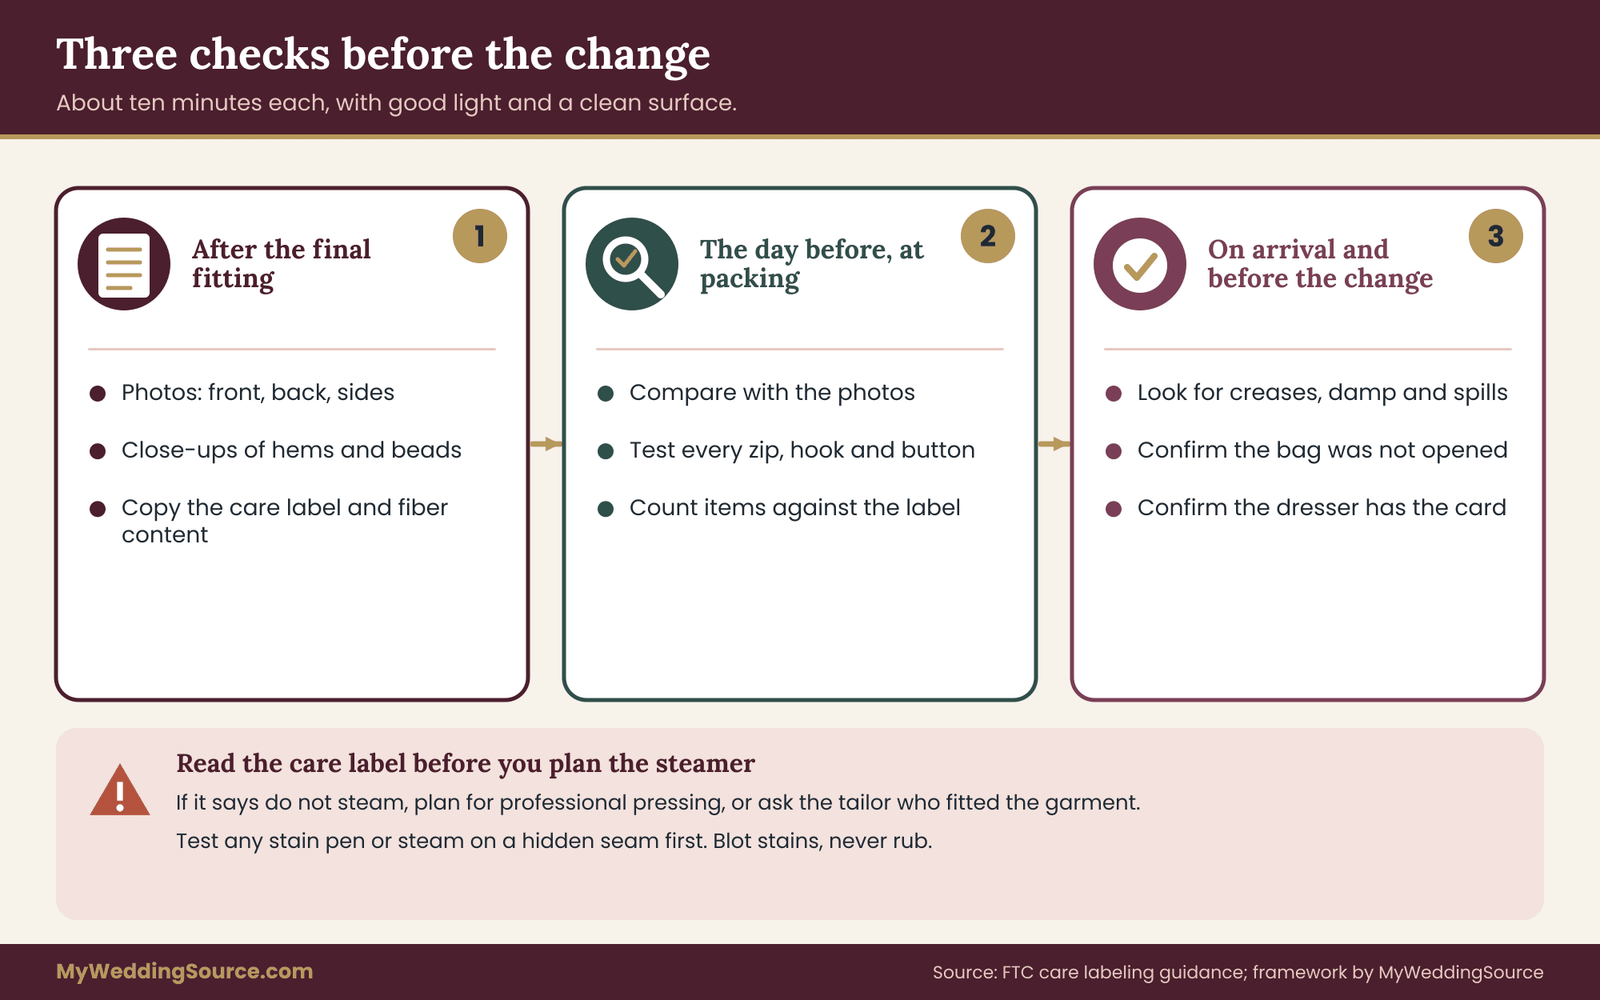
Three checks, three moments
Run the same short inspection at three moments. It takes about ten minutes each time with a good light and a clean surface.
Check one: after the final fitting. The garment is as finished as it will be. Take photos from the front, back and sides, and a close-up of fastenings, hems and any beadwork. These photos are your baseline. They also help a steamer, a cleaner or an insurer understand what the garment looked like.
Check two: the day before, at packing. Compare the garment to the baseline photos. Look for loose threads, missing beads, snagged tulle, stains, creases in places where creases will show, and anything that could be stressed by a long wait. Try every zipper, hook and button once. Confirm the accessory list against the label.
Check three: on arrival at the venue and just before the change. Look for new creases, damp spots, spills, marks from other garments, and signs that the bag was opened. The checker also confirms that the garment is where the chart says it is and that the dresser has what they need.
Reading the care label and the fiber content
Every garment sold in the United States should carry a permanent care label, and apparel sold in the country must also carry a fiber content label. The Federal Trade Commission explains the care labeling requirements for businesses on its website, and the label is the manufacturer’s statement of the safe way to clean the item. Before the wedding, copy the fiber content and the care wording into your notes. If the garment is custom made, ask the maker for written care instructions, since a custom item may not carry a standard label.
The reason to do this early is practical. A label that says “dry clean only” or “do not steam” changes your plan. A steamer is a common recommendation for a wrinkled second outfit, but not every fabric tolerates direct steam, and trims, glue and beads can be damaged by heat or moisture.
If a label says not to steam, plan for hanging in a steamy bathroom at a distance, a handheld steamer used from a few inches away on a test spot, or a tailor’s or cleaner’s pressing before the wedding. If you are unsure, ask the bridal tailor who fitted the garment.
This is one of the two review points the plan for this topic depends on: a bridal tailor can tell you what the fabric will tolerate, and a wardrobe stylist can tell you how it behaves on a long day.
Treat any general steaming advice as a starting point, and confirm it against the label and the person who made or altered the garment.
Fabric families and what the second outfit asks of you
Fabrics behave differently while they wait. Use this as a rough guide to ask better questions, not as instructions.
Satin and silk show creases, water spots and fingerprints. They like clean hands, a padded hanger and gentle, indirect steaming where the label allows it. Water can leave rings on some silks, so a test spot matters.
Chiffon, georgette and tulle are light, snag easily and tangle in zippers. Keep them away from rough surfaces and sharp jewelry. They often recover from creasing with hanging alone, but tulle can be crushed flat by a heavy bag on top.
Lace and beaded fabrics are delicate and heavy. Beads can catch on other garments and on a bag’s lining. Hang them by sewn loops where provided and keep them from rubbing. How much care they need depends on the garment, so ask the maker.
Crepe, jersey and many polyesters are forgiving and travel well, but they hold heat marks and can show shine under a hot iron. Always check the label before pressing.
Wool, wool blends and structured suiting hold their shape if hung on a proper hanger and can be refreshed with light steam. A suit jacket stored folded will have a crease across the back that takes a while to relax.
Where you are unsure, ask the tailor. Their answer is specific to the garment you bought and the lining and interfacing inside it, which a general guide cannot know.
Stains and spills
Plan for a stain. A second outfit is usually put on late in the evening, so it will pass through the day beside makeup, perfume, food and drinks. Pack a stain pen suited to the fabric, a clean white cloth, and a small bottle of water. Do not apply a product to the garment that you have not tested on a hidden seam, and never rub a stain on delicate fabric; blot from the outside edge inward.
If a stain appears on a garment you do not own, such as a rental, stop and call the rental company. Many rental agreements specify how stains must be handled and whether you are responsible for cleaning. Read the agreement for the second outfit as carefully as the one for the first.
Rentals, borrowed items and responsibility
If any part of the second outfit is rented or borrowed, add a fifth field to the one-page chart: the owner and the return plan. A rental company usually sets a return deadline and may charge for late return, damage or missing pieces. A borrowed garment from a relative has no contract but carries a heavier obligation. Name who returns it, when, and in what condition, and photograph it before and after wear.
Take pictures of the rental at pickup, with the tags visible. If a rental garment is picked up days before the wedding, check every closure and fit. Do not discover a problem on the day.
Safe professional handling
Some tasks are better left to professionals. If a garment needs pressing, repair or cleaning, take it to a tailor, a bridal specialist or a reputable dry cleaner, and tell them the date it is needed. If a bustle or hem needs adjusting, ask the tailor who did the first alteration. Do not take a seam ripper to a garment on the morning of the wedding unless you know the construction.
The same caution applies to steamers and irons in a crowded room. A steamer holds very hot water, and the U.S. Consumer Product Safety Commission publishes safety information for household products. Keep steamers and irons away from children, keep cords out of walkways, never leave them on and unattended, and let them cool before storing. A burn is not a small problem on a wedding day.
The second outfit change itself: timing and the dresser’s job
All the work above leads to a ten-to-thirty-minute window. The change is where the chart pays off. A calm change has three characteristics: the garment is in the room before the person arrives, the dresser has been briefed, and the clock has slack.
Choosing the moment
The best moment for the change is the one that costs the schedule the least and the person the least stress. Common choices are between dinner and dancing, after the cake cutting, after the formal photos or at the start of the cocktail hour. Each has a trade-off.
After formal photos, before the reception. The change is clean and nobody has been eating. The risk is that it delays the guests’ view of the couple. It works if the change happens during cocktail hour and the couple arrive to the reception as a new look.
Between dinner and dancing. This is the most popular slot. It gives time to digest, fits a natural break, and builds anticipation for the first dance. The risk is that dinner runs late. Build a buffer by placing the dessert or a toast right before the change.
After the cake cutting. The cake cutting is a visible moment and often one where a garment is at its most stained or crumpled. A change afterward means a fresh second outfit for the dance floor. The risk is that guests drift away before the change is complete.
Right before the send-off. A change into a going-away outfit is the most common last change. It is short, and the clock is flexible. The risk is fatigue and a rush.
Whichever you choose, set the time in the run-of-show and share it with the DJ, the band, the planner and the photographer. The guide to wedding ceremony cue sheets shows how to build a cue sheet, and a change cue belongs in the reception version of the same document. Mention that the second outfit change is a cue with a start and an end, and say who will announce the next event.
How long to allow
Allow longer than you think. For a full change, a calm pace is often about twenty to thirty minutes for a garment with many fastenings or a bustle, and ten to fifteen minutes for a simple one. These are planning numbers, not measurements. Your own rehearsal gives you a better one.
Rehearse the second outfit change once, at home or in the fitting room, with the real dresser and the real garment. Time it with a phone. Add ten minutes as a cushion. Write the number on the chart, and share it with the band or the DJ so they know how long to fill.
The dresser’s briefing
The dresser needs a two-minute briefing the day before. Show them the garment, how each closure works, what order the pieces go on, how the bustle or sash is done, and where the first outfit goes afterward. If possible, let them practice on the garment while someone watches. Give them a photo of the finished look from the front and back, so they know what the final result should be.
A good dresser for a second outfit is calm, quick and discreet. They do not need to be a professional, but they need to be unhurried and comfortable with the person changing. Choose someone who has already seen the person’s fitting, if there is one.
If the garment has a complex closure, such as a corset back, a row of covered buttons, a lace-up or a sash tied in a specific way, consider asking the tailor to join the briefing or provide a short written sequence. A card of five numbered steps tucked in the bag pocket is worth more than a verbal explanation.
Where the change happens
The change room for a second outfit should be private, lit, clean and close. A single mirror, a chair, a hook or rail and a table are enough. Check that the room has a door that locks or that someone will stand outside. Avoid a bathroom stall, a corridor or a coat room unless there is no alternative, since a garment that touches a damp floor is already a problem.
If the change room is in a different building than the reception, add a transit leg to the chart. A short walk across a parking lot in a long skirt in the dark is not a trivial move. Assign an escort with a light, bring an umbrella, and make sure the person changing has a wrap and sturdy shoes for the journey. A golf cart, a shuttle or a car should be arranged in advance, and the venue should know about it.
The change as a sequence
Write the sequence as numbered steps in the order they happen. A typical sequence is short.
- The dresser arrives and confirms the room is ready and the bag is open.
- The person changing removes jewelry, hair accessories and the first outfit’s shoes, handing each piece to the dresser, who places it in the first-outfit bag.
- The first outfit comes off. If it has a bustle or a train, the dresser un-bustles carefully, and the person steps out rather than pulling over the head if the garment has beads or a delicate neckline.
- The second outfit goes on, closures first, then belt or sash, then shoes.
- Jewelry and hair accessories go on last, with a mirror check.
- The dresser does a final walk-around, checking hems, zips, labels sticking out and anything left unfastened.
- The first outfit is hung or folded as instructed, bagged, tagged and handed to the keeper or carrier for the return trip.
This sequence takes up less room than it looks. It is also the document that the dresser reads in the briefing. The pieces never leave the dresser’s hands until they are in the right bag.
The photographer and the change
Tell the photographer whether the change is private. Some couples want a photo of the new look straight after the change, with a portrait and a few quiet minutes. Others want no photos of the process. Say which, and tell the photographer where to wait. The guide to the wedding family photo list is a good place to see how a second look may fit into the portrait schedule, since a new outfit can mean a second round of family or couple portraits.
If the second outfit is meant for a dance-floor entrance, tell the band or DJ the exact cue and the number of minutes. If the change runs late, the DJ should know what to play and how to bring the couple in without an awkward silence.
After the second outfit change: where the first outfit goes
The second outfit logistics do not end when the new garment is on. The first outfit has to be undressed, packed, protected and moved. This is the half of the handoff that most couples forget, and the half where a lost first outfit is most costly, since it may be the most expensive garment of the day.
The return bag
The first outfit goes into a second bag. It has its own label with the same six fields, and the sixth field matters most: where it goes next. Decide this before the wedding. Options include a hotel room, a vehicle for the drive home, a trusted relative who will take it home, a cleaner who collects it the next day, or a preservation service.
A garment that has been worn all day often has hem dirt, sweat, makeup, perfume and food on it. Do not seal it into an airtight plastic bag for days; moisture and soil in a sealed bag can cause staining and mildew. Hang it up as soon as possible. If it will wait for more than a day before cleaning, let a cleaner or the maker advise.
Who returns the first outfit
The carrier role reverses. Name the person who takes the first outfit away at the end of the night, and check that they are not drinking and not tired. This person should also take the shoes, jewelry and hair accessories from the first look, which are often left behind on a chair. Assign the checker to count the pieces against the first label before the bag leaves.
For a rental, the return handoff should include the rental company’s deadline and drop-off method. If a rental must be returned the next morning, assign a named person and a time, and write both on the label.
Cleaning and preservation
Plan the cleaning of the first look, and the care of the second outfit, before the wedding. Ask a specialist cleaner about their process, their timeline and what they will do about stains. Some couples choose preservation boxing; others prefer to hang the garment after cleaning. Either choice is personal. What matters for logistics is that the garment goes to a professional promptly, and that you have a record of who has it.
For a second outfit that you intend to wear again, the same care applies, with less urgency. For a short, inexpensive garment, a home care routine in line with the label is usually enough.
What goes in the end-of-night bag
On the way out, small items need a home too. A bag for the jewelry, a bag for the shoes, a bag for the hair accessories, a bag for the repair kit and the label. Put them in one tote, labeled with a name and a phone number. At the end of the night, a tired person will put things into a tote far more easily than they will track six small pouches.
Edge cases that change the plan
The chart works for most weddings. Here are situations that need small adjustments.
When both partners have a second outfit
Run two charts, one for each person, with two keepers if possible. Do not rely on a single dresser for both changes at the same time; stagger them by fifteen minutes or assign two dressers. If both changes happen in the same room, use two hanging rails and two clearly colored labels.
More than one change
Some celebrations include three, four or more outfits across a weekend, as is common in several traditions. Number the bags and map each to an event. The chart expands to one row per outfit, with a clock for each. Do not let a single bag hold two outfits to save space. The more outfits, the more likely a piece migrates, so the item count on each label becomes more important.
A garment that cannot be sat in or reached
Some outfits restrict movement. A structured skirt, a long train, a very fitted bodice or a heavy headpiece changes how the person gets in and out of a car, how they use a bathroom and whether they can sit. Test these with the garment on, before the wedding. Add time to the schedule, and assign a person to manage the train or skirt during transitions. The wedding reception guest flow guide helps you map the paths the couple will walk, so you can check for stairs, narrow doors and long distances.
Cold, hot and wet days
Weather changes the second outfit. A light second outfit in a cold evening needs a wrap, tights or a jacket. A heavy one in a hot room needs a cooling plan. Rain needs an umbrella, a protective bag and a dry route. The National Weather Service publishes forecasts and heat and cold safety guidance; check the forecast for the day, and again for the evening. If an outdoor change is planned, always have an indoor alternative.
Accessibility and comfort
If the person changing uses a mobility aid, has limited balance, or needs help with fine motor tasks such as small buttons, plan the change room for that. A room with step-free access, a chair and extra space is not a luxury. Choose closures that the person can manage, or add a helper who is comfortable with the task. Ask the person what they would like; do not assume.
Children, pets and crowds
A child who wanders into a change room, a pet that jumps onto a garment, and a guest who wants a peek can all derail the plan. Assign someone to keep the door. Keep garments out of reach of children. If an animal is part of the day, keep the garments in closed bags until needed.
When the change room is shared
If other people use the room during the change, such as a bridal party getting ready or a vendor setting up, have a rule: the person changing has the room for the time on the chart. A simple notice on the door, with a time, is sufficient, and the keeper enforces it.
A worked example: two outfits, four helpers, one evening
The following example is invented. The couple, the names and the venue are made up to show how the handoff chart and the labels work together. Adapt the logic, not the details.
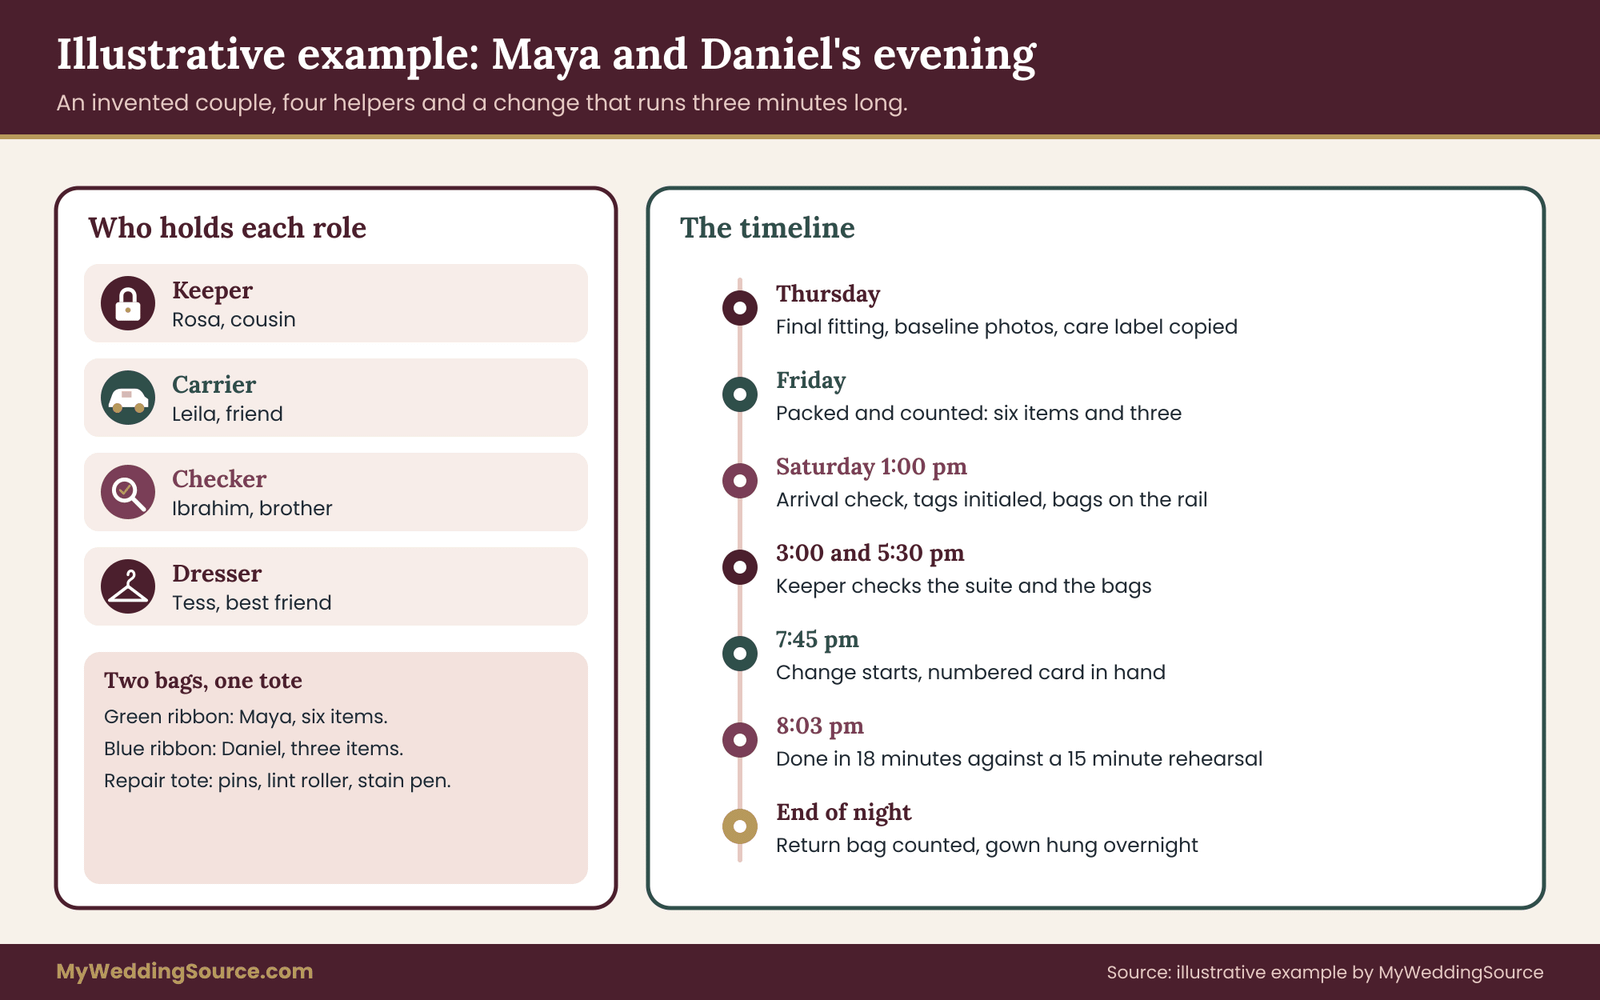
Maya and Daniel are marrying on a Saturday in October at a restored warehouse venue with a ceremony at four o’clock and dinner at six. Maya will wear a structured satin ceremony gown with a cathedral train and covered buttons. At the reception she plans a shorter crepe dress with a low back, flat shoes and a hair clip in place of the veil. Daniel wears a wool suit for the ceremony and removes the jacket and tie later, so his second outfit is a partial change: a lighter jacket, a different tie and loafers for dancing.
Step one: the roles
Maya’s older cousin Rosa will be the keeper for Maya’s second outfit, since she is staying in the bridal suite all afternoon and has no speaking role. Maya’s friend Leila, who is arriving by car with a clear schedule, is the carrier. Daniel’s brother Ibrahim is the checker for both bags, because he is calm and has helped with the earlier fittings. Maya’s best friend Tess is the dresser for Maya. Daniel’s partial change is handled by Ibrahim, with Rosa as the backup keeper.
The planner at the venue has agreed in writing to unlock the suite for the bags at one o’clock and to leave it available until the end of the night. Nobody asks the planner to handle the garments.
Step two: the bags and labels
Maya’s second outfit goes in one garment bag with a label that reads: “Maya, reception. Six items: dress, slip, flats, clip, earrings, wrap. Wait in venue suite, Rosa holds key. Needed 7:45 pm after toasts. Hand over by Rosa to Tess. Return: first outfit to Leila’s car, then home.” The label has Rosa’s phone number. A strip of green ribbon marks the hanger.
Daniel’s partial change goes in a smaller bag, with a blue ribbon. The label reads: “Daniel, reception. Three items: jacket, tie, loafers. Wait in venue suite, Rosa holds key. Needed 7:45 pm. Hand over by Ibrahim. Return: ceremony suit to Ibrahim’s car.”
A third, small tote contains the end-of-night items, a repair kit, a lint roller and a small stain pen, labeled “Repairs”.
Step three: the check
Ibrahim checks Maya’s second outfit on Thursday after the final fitting, taking photos of the front, back and low back detail. He copies the care label: “dry clean only”, and a fiber content that is mostly polyester crepe. Maya asks the tailor if the dress can be steamed, and the tailor says to test a hidden hem first and to use low steam from a distance. Ibrahim writes the steps on a card and places it in the bag.
On Friday evening Ibrahim and Maya pack both bags. They count: six items and three items. Ibrahim takes a photo of the packed contents, and Maya texts it to Rosa. Leila picks up both bags on Saturday morning at eleven, and drives to the venue, hanging the bags from the rear door hooks.
Step four: the handoffs on the day
At one o’clock Leila and Rosa meet at the suite door. They do the arrival check, which takes two minutes: tags attached, counts correct, nothing damp. They hang the bags on the rail, and Rosa initials the one-page chart with the time. At three o’clock Ibrahim checks the bags once, confirms the suite is cool and that the hair stylist is working at the other end of the room, and moves the bags to the far wall, away from the hair spray.
At five-thirty, during cocktail hour, Rosa checks the bags again. At seven-thirty, after dinner, Tess and Rosa move the bags to the private change room next to the main ballroom, with a sign on the door saying “Back at 8:05.” The change starts at 7:45. Tess uses a card with five steps. Maya steps out of the ceremony gown, and Tess undoes the bustle and hangs the gown on a padded hanger inside the return bag. The change takes eighteen minutes, three more than in the rehearsal. The clock in the run-of-show has a ten-minute cushion, so nothing is late.
Step five: the return
At the end of the night, Leila and Ibrahim collect the return bags. Ibrahim counts the first-outfit pieces against the first label: gown, slip, veil, shoes, earrings, hair pins. All six are there. Leila hangs the gown in her car and drives to Maya’s home, where it hangs in a spare closet overnight. On Monday a cleaner collects it.
What the example shows
Three things stand out. First, the plan depended on roles, not on heroics: nobody worked longer than their window. Second, the labels meant that Rosa, who did not know the garment, could still move it correctly. Third, the rehearsal of the second outfit gave an honest time, and the cushion absorbed the extra three minutes without a problem.
Notice what the couple did not do. They did not store the second outfit in a car. They did not ask the photographer to hold it. They did not rely on a verbal plan. They did not assume the steamer would be there; they asked.
Adapting the example
A smaller wedding with fewer people can combine roles. For a courthouse ceremony followed by a dinner, one person can be keeper, carrier and checker if the garment travels with them, and the dresser can be a friend at the restaurant. A destination wedding with a second outfit needs the air-travel rules above and a hotel front desk as a keeper. A multi-day event needs one chart per outfit. The logic is the same each time: for each handoff, name a person, a place and a time.
When the second outfit plan slips
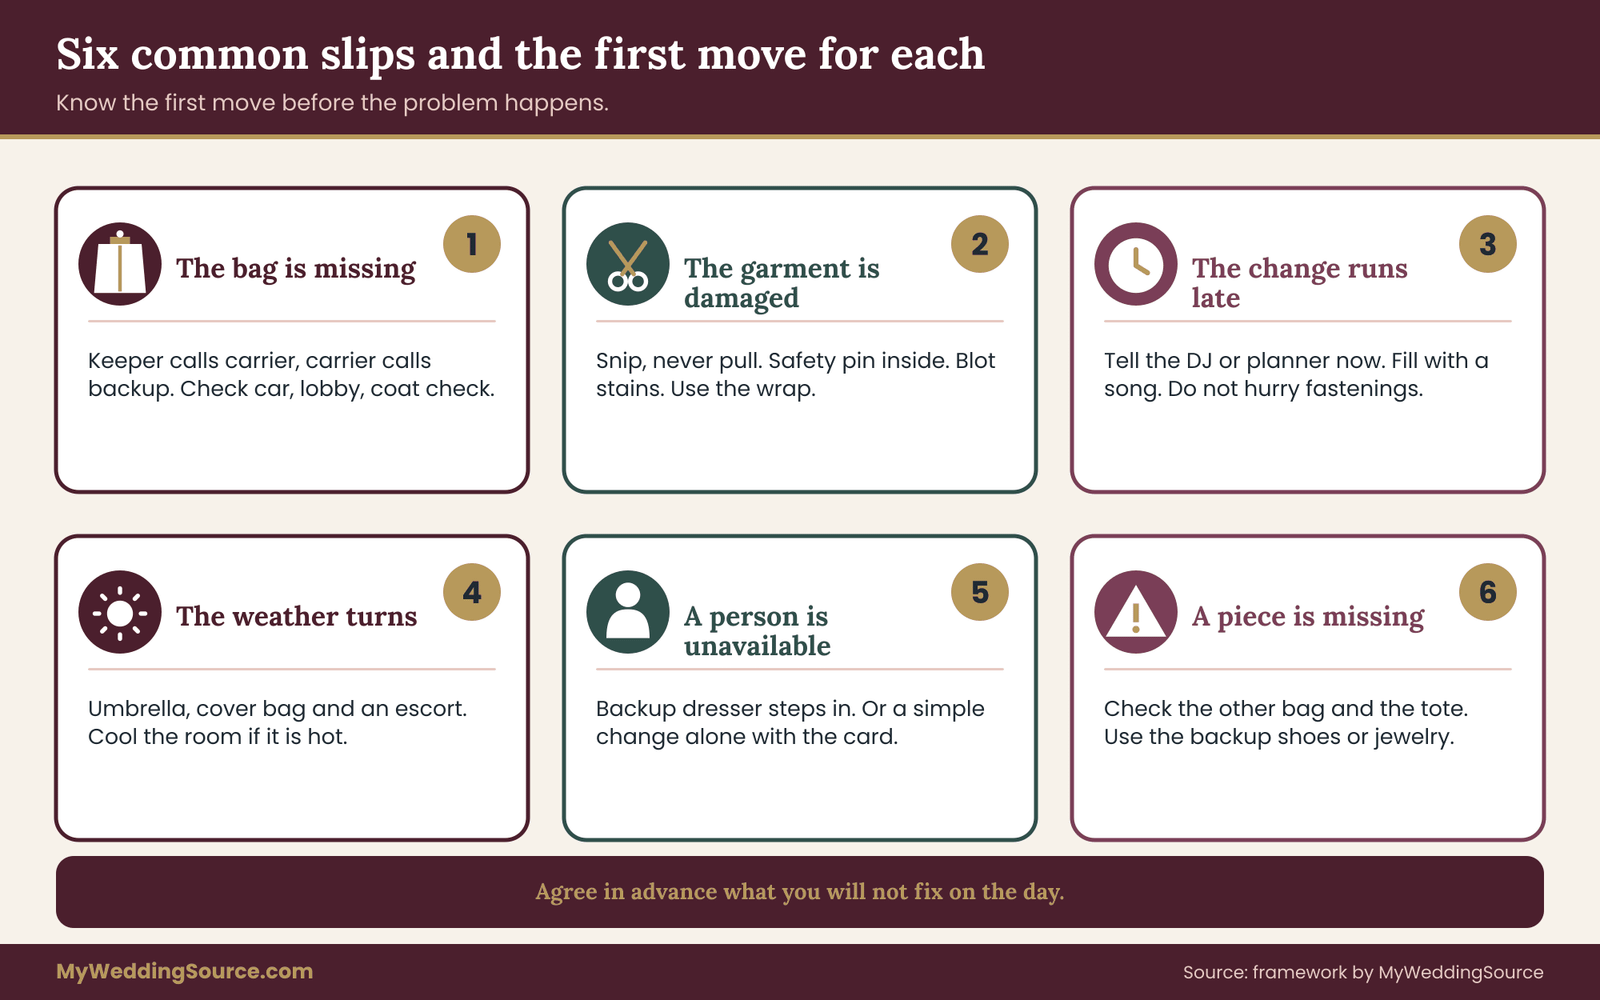
Even a clear plan meets a late car, a locked door or a spill. The aim is not to avoid every problem. It is to know the first move for each common failure before it happens.
The bag is not where it should be
If the second outfit is not in the room at the time the chart says, the keeper calls the carrier, and the carrier calls the backup. Spend two minutes on phone calls before anyone starts a search. Check the obvious places first: the car, the lobby, the coat check and the room of the first dresser. If the bag is in a car that has left, the backup carrier drives to meet it. Decide in advance who has authority to ask the venue manager to open a room.
The garment is damaged
For a loose thread, snip it carefully with small scissors, never pull it. For a missing button, replace it with a spare or a safety pin on the inside.
For a small tear on a seam, use a few discreet stitches or fabric tape as a temporary fix, and take the garment to a tailor later. For a stain, blot, do not rub, and use the stain pen only if the fabric allows. For a major failure, such as a split zipper in the middle of the back, have a backup plan: a shawl, a jacket or the first outfit. This is why the plan includes a wrap in each bag.
The change runs late
If the change takes longer than the cushion, tell the DJ or the planner right away, so they can adjust the schedule. A short delay is better handled by filling the time with a song, a speech or a gallery slideshow than by hurrying the change. Hurrying creates mistakes in fastenings, and mistakes create more delay.
The weather changes the second outfit plan
If rain arrives and the change room is across a courtyard, the carrier brings a large umbrella and a protective bag, and an escort walks with the person changing. If heat is the problem, move the garments into the coolest room, and give the person changing water and a few minutes to cool before dressing. The National Weather Service and the Centers for Disease Control and Prevention both publish heat safety information that is worth reading before an outdoor summer date.
A person is unavailable
If the dresser is delayed or unwell, the backup dresser takes over. This is why the briefing includes more than one person, if possible. If no dresser is available, the person changing can often manage a simple change alone, with a mirror and a card of steps. Do not wait for a late person if the schedule is slipping; start with what you have.
Something is missing
If a shoe, belt or accessory is missing, check the first-outfit bag and the repair tote. If the piece cannot be found, use the backup, which is why the list includes alternates for shoes and jewelry. A missing accessory rarely stops the change. The look may not be exactly as planned, but a calm change in the right garment is better than a late change in the perfect one.
Decide what you will not fix on the day
Make a short list of things that you agree not to solve on the wedding day. A small stain on the hem, a crease that will drop out during the evening, or a hair clip that sits a little differently are examples. Agreeing in advance is a relief and keeps the dresser from spending ten minutes on something nobody will notice. The point of the second outfit is to enjoy the party, and the plan should protect that goal.
Verifying the second outfit plan with vendors and venues
A handoff chart only works if the people and places it names have agreed to it. Verification is a short round of questions, asked in writing, to the venue, the planner and any vendor whose work touches the second outfit. Keep the replies with your contracts.
Questions for the venue
Ask whether a private change room is included, what hours it is available, and whether it is the same room used for getting ready. Ask about storage hours, early drop-off, key control and any rule about steamers, irons or hot tools. Ask whether staff will move or handle personal garments, and if so, what the policy is on liability. Ask where a vehicle may stop to unload, and which door a carrier should use. If the venue has a coat check, ask whether it accepts garment bags and whether bags are numbered.
Venues often have a standard answer to each of these in their policies. Read the policies as well as asking, since a verbal answer from a sales contact may not match the written rule. If the answer matters, ask for it in an email reply. The wedding vendor contract guide explains what to look for in written terms, and the same habit applies to storage and access.
Questions for the planner or coordinator
Ask whether the second outfit change is on the run-of-show, who will cue it, and who will watch the room. Ask whether they will unlock the room, hold a key, or accept bags, and what they will not do. A planner who declines to handle garments is giving you information, not a refusal: it tells you the keeper role has to be a person on your side.
Share the one-page second outfit chart with the planner, along with the names and phone numbers of the keeper, the carrier, the checker and the dresser. Ask them to confirm that nothing in the chart conflicts with the venue’s schedule.
Questions for the photographer, DJ and band
Tell the photographer when and where the second outfit change happens, whether to take portraits afterward and where to wait. Tell the DJ or band the cue, the planned length, the buffer and the song or announcement that follows. Ask the DJ what they will do if the change runs ten minutes over. This matters more than it seems: a band that knows how to extend a set gracefully turns a late change into a non-event.
Questions for the tailor, cleaner or rental shop
Ask the tailor for written care and steaming instructions, a sequence for any complicated closure and a recommendation for the right hanger. Ask whether the tailor can attend the dresser’s briefing or provide a short video of the closure sequence. Ask the cleaner what turnaround they offer after the wedding and whether they can collect from a hotel. Ask the rental shop for the return deadline, the late fee, the damage policy and what counts as damage.
Official sources to check
Some facts are best confirmed with the issuing organization, not a blog post. The Federal Trade Commission publishes guidance on care labeling for apparel and its Jewelry Guides for descriptions of metals and stones.
The Transportation Security Administration and the U.S. Department of Transportation publish rules and consumer guidance for air travel with luggage. The Consumer Product Safety Commission publishes household product safety information, including for items such as steamers and irons. The National Weather Service and the Centers for Disease Control and Prevention publish heat safety information. For fabric care and storage in general, the National Park Service and the Smithsonian publish conservation guidance written for museum collections. These are listed with their pages at the end of this article, and the rules on each may change, so check the current version.
Limits of this approach
The handoff chart is a planning tool, not a guarantee, and it sits inside the wider checklists in the guide to accessories planning and emergency backups. It reduces the chance of a lost bag or a late second outfit change. It does not replace the advice of a tailor about your garment, the terms of a rental contract, the policy of an airline or the safety rules of a venue.
It also assumes a certain scale. A very large celebration with many outfit changes, or a multi-day event with several venues, may need a professional wardrobe stylist or a dedicated assistant. If you reach that level of complexity, hire someone with experience, and give them the chart as a starting point.
The chart assumes that you have enough people. If you do not, combine roles with care. A keeper who is also the carrier works if the garment travels with them. A checker who is also the dresser works if they have a clear head. The failure mode to avoid is combining a role with someone who will be too busy, such as a parent hosting guests.
Finally, the plan cannot control weather, traffic or illness. What it can do is give you a first move for each of them, so the surprise is smaller.
Your next steps
Choose one evening this week. Write the four roles on a sheet of paper, with a name, a phone number and a backup for each. Decide where the second outfit will be stored, and send the venue the storage questions. Make the six-field labels and attach them to the bags, even if the bags are not packed yet. Then add the change cue to the run-of-show.
Over the following weeks, run the three checks, brief the dresser, and rehearse the change once with a clock. Confirm the return plan for the first outfit. When the day comes, the second outfit should be a quiet part of the evening: a bag where it belongs, a person who knows what to do and a few minutes that go as planned.
FAQ
Who should store the second outfit on the wedding day?
The person who stays closest to the change room for most of the day and is not needed elsewhere. That might be a relative staying in the bridal suite or a friend with no speaking role. Avoid giving the job to a vendor unless they have agreed in writing, because storing personal clothing is usually outside a vendor’s scope. Always name a backup keeper.
Where is the safest place to keep a second outfit?
A locked, shaded room near the change location, away from heat, hair spray and food. A venue suite or a hotel closet usually works. A parked car is the weakest option, because temperatures swing and a garment can be pressed or soaked. If a car is the only choice, park in shade, keep the garment hanging, and assign someone to check it on a set schedule.
What should be written on a garment bag label?
Six fields: whose outfit it is, what is inside with an item count, where the bag waits, when it is needed with a cue, who hands it over with a phone number, and where it goes afterward. Keep home addresses and email addresses off the tag. Detailed care notes belong on a card inside the bag, not on the outside label.
How long should the second outfit change take?
Plan for ten to fifteen minutes for a simple change and twenty to thirty for a garment with a bustle, many buttons or a corset back, then add a cushion. These are planning numbers only. Rehearse once with the real garment and dresser, time it with a phone, and share the result with the DJ or band so they can fill the gap.
Can I carry the second outfit on a plane?
Usually yes, but airline policies differ on garment bags, overhead bins and crew closets, so check the carrier’s policy for your ticket class before you travel. The Transportation Security Administration and the Department of Transportation publish air travel rules. Carry the garment on if you can, and if you must check it, pack a backup look in your carry-on.
Who checks the second outfit, and when?
A checker who has seen the garment fitted, ideally someone calm and detail-minded. Run three checks: after the final fitting with photos, the day before at packing against the label, and on arrival and just before the change. Each takes about ten minutes. Compare against the baseline photos, test the closures and count the accessories against the bag label.
Can I steam the second outfit at the venue?
Only if the care label and your tailor say the fabric tolerates it, and the venue allows steamers and has a safe outlet. Test on a hidden spot first, keep the steamer a few inches away, and never leave it unattended. If the label says not to steam, have the garment pressed professionally before the wedding. A hot steamer is also a burn risk.
What if the second outfit is rented or borrowed?
Add the owner and the return plan to your chart, and read the rental agreement for stain, damage and late-return rules. Photograph the garment with tags visible at pickup and again after wear. Name the person who returns it, the deadline and the drop-off method. For a borrowed item, agree in advance who cleans it and who delivers it back.
Sources
- Jewelry Guides, Federal Trade Commission
- Federal Trade Commission, business guidance on textile and apparel labeling
- Security screening, Transportation Security Administration
- Aviation consumer protection, U.S. Department of Transportation
- Heat safety, National Weather Service
- Heat and health, Centers for Disease Control and Prevention
- Household product safety, U.S. Consumer Product Safety Commission
- Conserve O Gram series, National Park Service Museum Management Program
- Museum Conservation Institute, Smithsonian Institution