
Microphone technique is the small set of habits that decides whether a wedding speech is understood or just heard, and in a large echoey room those habits matter more than the words themselves. This guide gives you a room check, a distance ladder, a pacing rule tied to the echo, and a failure list, so you can walk to the microphone knowing what to do.
Test the room before the speech, not during it. Clap once and listen to how long the sound lingers. Count aloud at three distances from the microphone. Then match your delivery to what you heard: a long echo means shorter sentences, longer pauses and a microphone held closer and steadier. Keep the microphone about a fist from your chin, aimed at your mouth, and never wave it toward the speakers. Agree on a backup, such as a second microphone or a signal to the DJ, before the toast begins.
Anyone who has sat at the back of a big hall during a toast knows why microphone technique matters. The speaker is clearly saying something touching, the people near the front laugh, and the rest of the room hears a soft blur with the occasional word floating out of it. The speaker usually does not know. From the front, with a speaker cabinet pointed at the room, the voice sounds fine.
Good microphone technique for a wedding speech is mostly about closing that gap between what you hear at the front and what a guest hears at table twelve. Microphone technique is a skill that can be learned in an afternoon, and it does not require any equipment beyond what the venue, the DJ or the band already brings.
A note on scope. This is general information about public speaking and sound, not legal, tax or financial advice. Every room, sound system and vendor is different, so use this as a way to ask better questions and to test the actual setup you will be standing in front of.
What microphone technique means for a wedding speech
In the simplest terms, microphone technique is how you hold, position and speak into a microphone so that the sound system receives a clean, steady version of your voice. It has four parts, and each one is a decision you can make in advance.
Distance. How far the microphone sits from your mouth. Too far and the system has to turn the volume up to hear you, which also turns up the room. Too close and every breath and hard consonant explodes into the speakers.
Angle. Where the microphone points. Most wedding microphones are directional, which means they favor sound coming from one direction and reject sound from behind. Point them at your mouth and they do their job. Point them at the ceiling, or hold your hand around the top, and they stop doing it.
Placement in the room. Where you stand relative to the speakers. Standing in front of a loudspeaker with a live microphone is the classic cause of the squeal known as feedback. Standing a few steps off to one side of the speaker line is often enough to prevent it.
Delivery. How fast you talk, how long you pause, and how you shape your sentences. In a room with a long echo this is as much part of microphone technique as the hardware, because the room mixes each word with the echoes of the words before it.
Who this microphone technique guide is for
This guide is written for people giving a speech or toast at a reception or a rehearsal dinner: the best man, the maid of honor, a parent, a sibling, a friend, or the couple themselves. It also helps the person who introduces speakers, because the introducer holds the same microphone and sets the pace for the evening.
This article stays focused on sound and delivery, not on what to write about. For where the speeches sit in the evening, the wedding vendor timeline shows how reception segments are usually sequenced, and the sections below show how to ask for a short soundcheck inside that schedule.
What counts as a large echoey room
There is no strict definition, but you can recognize one. It usually has hard surfaces and not much to absorb sound: stone or concrete floors, glass walls, high ceilings, bare brick, a large open ballroom with few draperies, a converted warehouse or barn with a metal roof, a museum hall, a church-style nave. Rooms with carpet, heavy curtains, a low ceiling and a full crowd tend to sound drier and more forgiving.
Echo is also not constant. An empty room before guests arrive sounds much livelier than the same room full of people in wool suits and upholstered chairs. A room that feels fine at the cocktail hour may feel different at a quiet moment late in the evening, when the crowd has thinned and the music has stopped. That is why the guide asks you to test at the time and in the conditions that match your speech, not just whenever you happen to walk through.
How an echoey room changes what guests hear
To manage an echo you only need a plain picture of what it does. When you speak, three things travel from your mouth to a listener.
The first is the direct sound: your voice going straight to the ear. The second is the amplified sound: your voice through the microphone, then the speakers, then the air. The third is the reflected sound: every version of the first two that bounces off walls, the ceiling and the floor and arrives a fraction of a second late.
In a dry room the reflections are weak and arrive so close behind the direct sound that the ear folds them in. In a large reverberant room the reflections are strong and arrive late enough to overlap the next syllable. Speech is made of quick consonants such as t, k, p and s, and those are the first sounds to get smeared. The listener hears the vowels and loses the edges of the words. That is the muddy sound people describe as “I could hear him but couldn’t understand him.”

Why more volume works against good microphone technique
The instinct when a room sounds unclear is to ask for more volume. In an echoey room that backfires. More amplification sends more energy into the walls and ceiling, which produces more reflections, which smear the consonants further. The speaker is louder, but the speech is no clearer. It can also push the system closer to feedback, because the microphone picks up more of what the speakers are putting out.
Clarity in a reverberant room comes from a different kind of change. You want a stronger ratio of direct voice to room sound. In practical terms that means speaking closer to the microphone, so the signal is mostly you rather than the room; speaking at a measured pace, so each syllable clears before the next arrives; and, if the sound provider can do it, placing speakers so they cover the guests and not the walls.
Where the echo shows up in a typical reception
Think about the places in a reception where a speech actually happens, because each has its own acoustic behavior.
At the head table or a sweetheart table, you are often close to a wall or a backdrop. Reflections from behind you return quickly. At a center-floor microphone, you stand in the middle of the room and the sound can bounce from every side. At a podium with a fixed microphone, the microphone does not move but you can, and moving away from it is the most common way speakers vanish halfway through a sentence.
At the dance floor, if the DJ hands you a handheld, you are probably standing beside a main speaker, which raises the risk of feedback.
None of these positions is wrong. They simply call for different adjustments, and the five-point room check in the next section tells you which ones you need.
What guests with hearing differences experience
An unclear room is tiring for everyone and can be exhausting for guests who are hard of hearing, older guests, and anyone listening in a second language. Reverberation hurts speech understanding for these listeners more than it does for others. If your guest list includes people who rely on lip reading, captions or an assistive listening device, a speaker who faces the room and keeps a steady pace is doing them a real favor.
The section on special situations returns to this with specific steps. For the nuts and bolts of how a venue’s sound footprint is measured and documented, the venue technical walkthrough guide is a useful companion.
The five-point room check for better microphone technique
Here is the original process this guide is built around. It has five steps, and you can do all of them in about fifteen minutes with one helper and the actual microphone. They run in a fixed order, because each step produces a number or a note that the next one uses. Call it Walk, Clap, Count, Read, Pause.
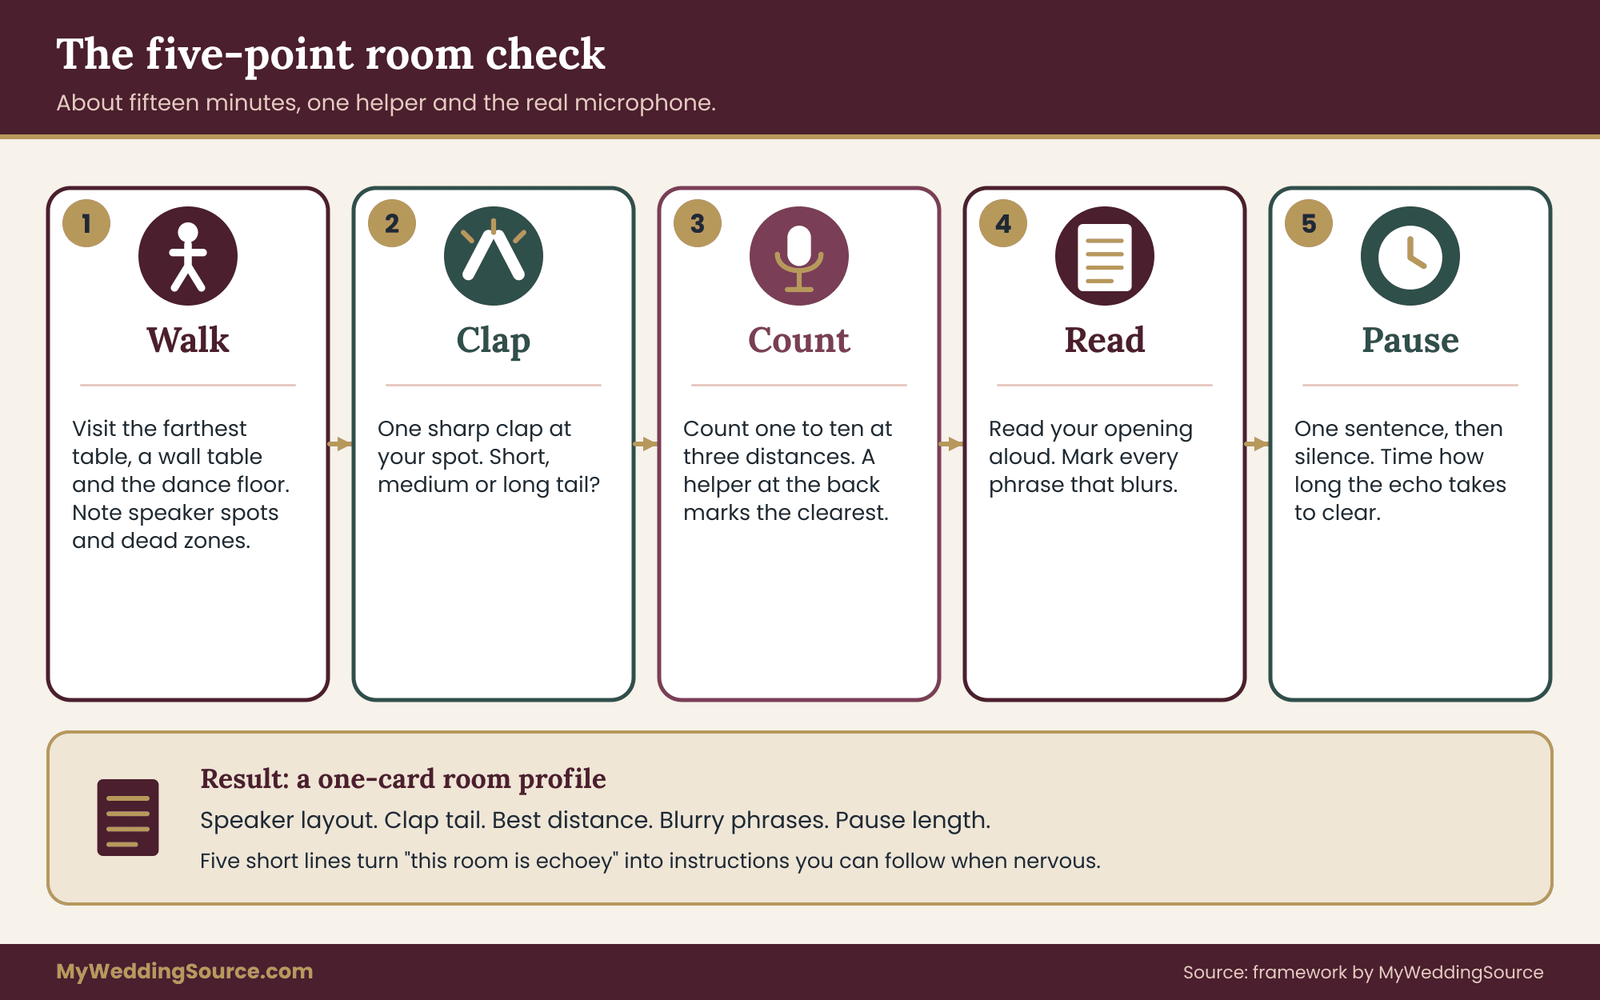
The goal is not a technical measurement. It is a set of notes on one card that tells you how to adjust your microphone technique for this particular room, and the same card works for every speaker. If you can write down one line per step, you are done.
Step one of the microphone technique check: walk the room
Before you touch the microphone, walk the room the way a guest would. Start at your seat, then walk to the farthest table from the speaker position, then to a table near a wall, then to the middle of the dance floor. At each spot stop for ten seconds and just listen, with the room quiet or with only background music.
You are listening for three things that will shape your microphone technique. First, where the speakers are and which way they face. Second, whether any spot sounds unusually boomy or harsh. Third, whether there are areas where the sound drops off, sometimes called dead spots. Guests seated in those areas will have the hardest time with your speech, and you can adjust for them by speaking more slowly and by asking the sound provider to check coverage there.
Write one line on your card: “Speakers at the front corners, farthest tables are the back left.” That single line is useful later when you decide where to aim your attention.
Step two: Clap
Stand where you will speak. Clap your hands once, sharply, and listen to the tail. Do not clap rhythmically; a single clap is easier to judge. Then count how long you can hear the sound fade.
Roughly, a short tail that disappears almost at once means a dry room. A tail you can still hear for about a second or longer means the room is reverberant. A tail that lingers and seems to wander through the space is the pattern that makes speech muddy.
Acousticians measure this with a quantity called reverberation time, which is the time a sound takes to fade by a set amount. You do not need the number. You need your own sense of “short, medium or long,” and you can get it with one clap.
Do the clap twice, once with the room empty and once, if possible, after guests are seated. A full room almost always sounds shorter. If you can only test beforehand, assume the room will sound a bit drier on the night, and plan for the longer tail anyway.
Write one line: “Clap tail: long, about a second and a half, then a flutter.” Use your own words.
Step three: count to test microphone technique at three distances
This is the core of the check and the step most speakers skip. Ask a helper to stand at the back of the room with a notepad. Pick up the microphone and count from one to ten at a steady pace, three times.
The first time, hold the microphone about a fist from your chin, pointed at your mouth. The second time, hold it at arm’s length from your chest, the way many people hold it when they are nervous. The third time, hold it very close, nearly touching your lips. Say the numbers at the same volume each time. Do not shout, and do not change your speed.
Your helper listens from the back and marks which version was clearest. In an echoey room, the first or the third will almost always win over the second. The arm’s length version is the one that sounds weakest and most washed out, because the microphone is hearing more room than voice. The very close version is often clear but may bring out breath noise and hard consonants. Your helper’s notes tell you the sweet spot for this microphone and this room.
If the helper cannot stand at the back, ask the DJ, the band’s sound engineer or the venue coordinator. Many are happy to listen and comment for a minute.
Step four: Read your opening aloud
Numbers are a good test, but a speech uses real sentences. Read the first thirty seconds of your speech into the microphone, at the pace you plan to use on the night. Let your helper stay at the back.
Ask them two questions about your microphone technique. Could you hear every word? And where did the words start to run together? The second question is the more useful. People can usually point to specific phrases. Often the trouble is a run of short unstressed words, a long list, or a sentence that ends in a trailing murmur.
Mark those phrases on your script. Later sections show how to rewrite them, but for now just mark them with a pencil. This one step is where you learn that the line you thought was clear is not.
Step five: Pause test
The last step measures how long the room needs to clear. To test pause length in your microphone technique, say one sentence into the microphone, then stop and stay silent. Your helper holds a hand up while they can still hear the echo of that sentence, and lowers it when the room is quiet.
The time between your last word and the hand dropping is your clearing time. In a dry room it is almost nothing. In a very live room it can feel long. Whatever it is, that is the pause you should build into your microphone technique and your delivery. If a sentence rings for a second, then starting the next sentence half a second later means you speak into your own echo.
Write one line: “Pause about a second between sentences, about two before a joke or a name.”
Putting the five lines of microphone technique on one card
At the end of the check you should have five short notes: the speaker layout, the clap tail, the best distance, the phrases that blur, and the pause length. Copy them onto an index card or the top of your script. This is the original deliverable of the guide: a one-card room profile.
The card turns a vague worry (“this room is echoey”) into instructions (“hold a fist away, pause a full second, cut the list in paragraph three”). When you are nervous, instructions are far easier to follow than worries.
How to ask for the time
The room check only works if you can get into the room with the microphone. In most venues that means asking the person who controls the sound. It might be the DJ, a band’s engineer, an audio-visual technician hired by the venue, or the venue’s event manager.
You can say something like this: “I’m giving a toast after dinner. Could I have ten minutes with the microphone in the room before guests arrive, so I can check my distance and where the speakers are? I’ll keep it short.” That is specific, brief and easy to say yes to.
If the couple has a day-of coordinator, ask them to place the soundcheck on the run sheet, so the request has a time and an owner. The ceremony cue sheet guide shows the format coordinators use for assigning times and owners to short tasks, and the same format works for the reception.
If the DJ or band does not have time before the event, ask for a quick check at the cocktail hour, when guests are moving around but the main sound system is already live. It is not ideal, because the room is noisier, but a rough check is far better than none.
Who should join the check
Bring one listener and, if possible, one other speaker. A second speaker uses the same microphone and the same card, so doing the check together saves time and gives you a comparison: if the best man and the maid of honor have different voices, the best distance may differ. A short check is also a good moment for the couple to confirm which microphone is the main one and which is the spare, a detail that matters in the failure section later.
Microphone technique on a handheld: the distance ladder
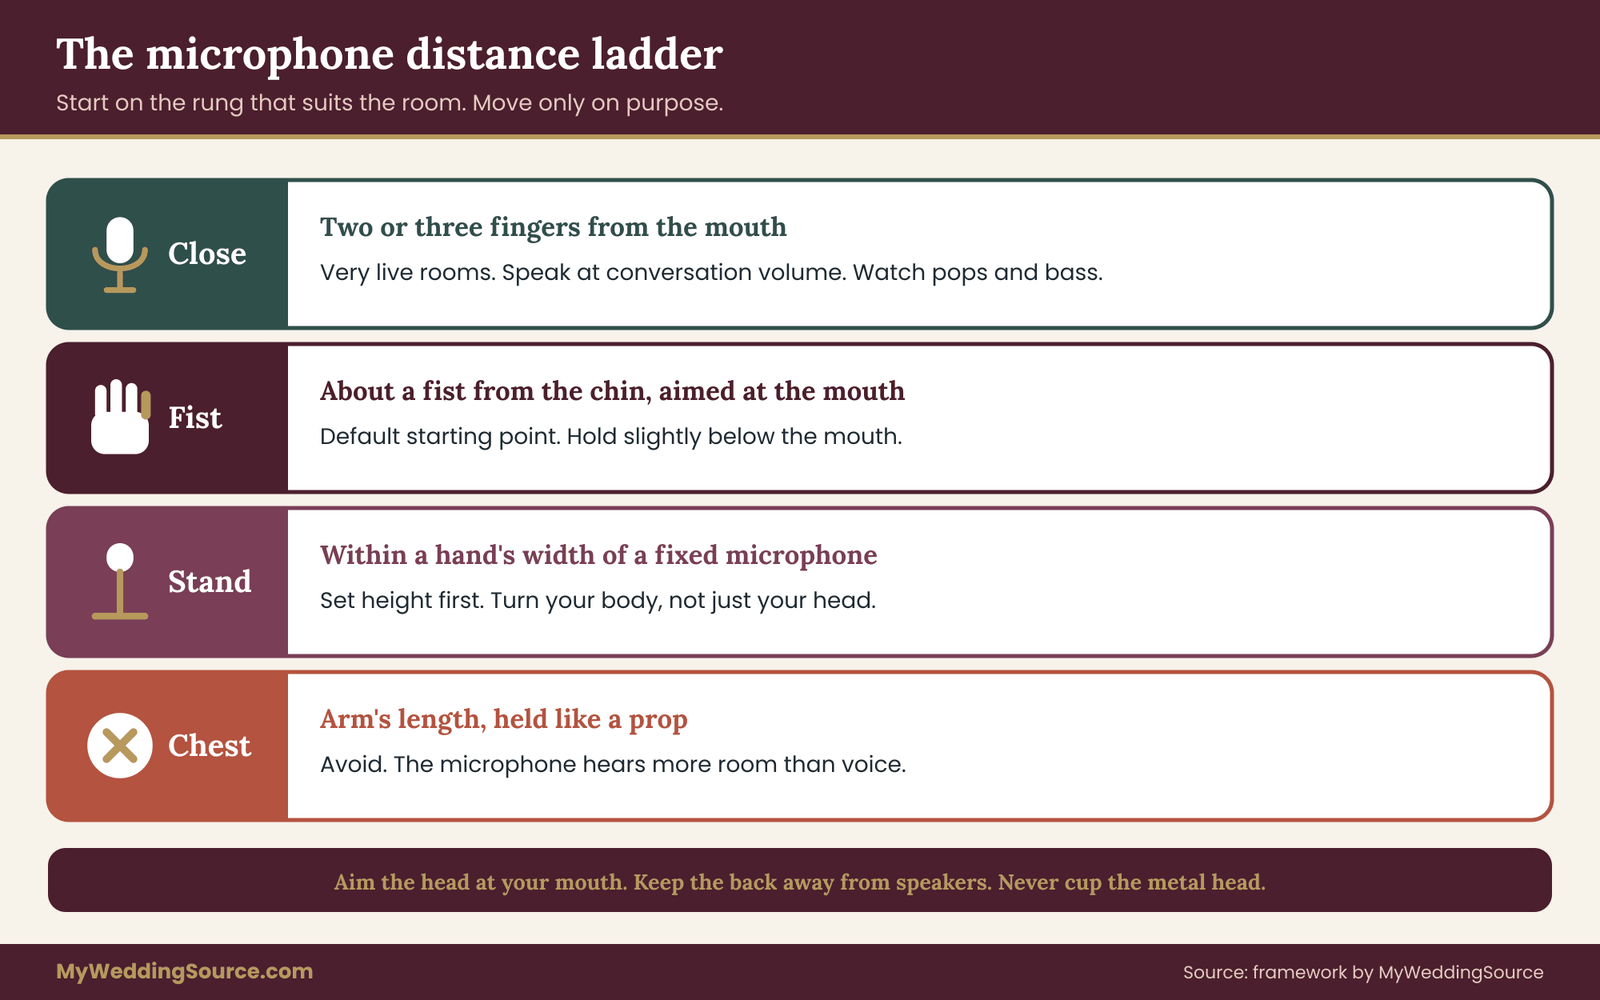
Once you know how the room behaves, the next decision is physical. Where does the microphone go, and how do you keep it there for three minutes while your hands are shaking a little and a hundred people are looking at you? Think of it as a ladder with four rungs. You start on the rung that suits the room, and you move up or down it only on purpose.
Rung one: the fist rule for microphone technique
The most common coaching starting point for a handheld microphone is about a fist’s width between the microphone and your chin, angled so it points at your mouth rather than your forehead. Treat the fist rule as a starting point for your microphone technique and test it with the count step from the room check. Most people find this basic microphone technique gives a strong, natural voice without much breath noise.
Hold the microphone below the mouth, not directly in front of it. That keeps the airstream from hitting the capsule head-on and lessens the popping sound on words that start with p or b. Many speakers also adjust their microphone technique by holding it slightly off to one side, which has the same effect and keeps the face visible to the audience, a real benefit when guests are lip reading or simply want to see your expression.
Rung two: close microphone technique for very live rooms
If your count test says the room is very reverberant, move to a tighter distance, about two or three fingers from the mouth. Closer means the voice dominates the signal, and the microphone has less room to pick up. This microphone technique is the single most effective change available to a speaker in a big echoey space.
The cost is that the microphone becomes less forgiving. Move even slightly and the level changes. Breaths and the sound of a dry mouth become audible. A tight position needs a steadier grip and a quieter delivery, because you can speak at conversation volume and still be loud in the speakers. Many nervous speakers raise their voice to match the occasion, and at this distance that makes things worse. In this position, microphone technique means speaking the way you would speak to the person across a small table.
This tighter microphone technique also has a known side effect called the proximity effect: many directional microphones boost low frequencies as the source gets nearer. It makes a voice warmer and fuller up close, and a bit boomy if you push it too far. If your helper says your voice sounds bassy, back off by a finger or two.
Rung three: the arm’s length habit to avoid
Many speakers hold the microphone at the level of their chest, as if it were a prop. It looks relaxed, but poor microphone technique like this is easy to fall into, because the microphone then hears the room nearly as well as it hears you. The sound system raises the gain to compensate, and what reaches guests is thin, echoey and close to feedback. If you remember only one thing about microphone technique, remember that the chest position is the one that fails in echoey rooms.
If you notice yourself drifting down, use a physical cue. Some speakers rest the elbow of the microphone arm against their ribs, so the forearm stays at a fixed angle and the microphone stays near the chin. Others hold the microphone with both hands, which also steadies a shaky grip.
Rung four: the stand and podium rung
Microphone technique at a fixed stand or podium takes the holding problem away and replaces it with a positioning problem. The microphone no longer moves with you, so you must move with it. Stand close enough that your mouth is within a hand’s width or so, adjust the height before you start and not in the middle of your first sentence, and keep your head facing the microphone.
The common failure at a podium is turning your head to look at different tables. Every time you turn away, the voice drops out for a moment and the room fills with echo. Instead, turn your whole body slightly, or pause while you look around and speak when you face forward again. Looking up from your notes is natural, and it is best done in the pauses you are building in anyway.
Angle and aim in microphone technique
Most wedding microphones are cardioid, a pickup pattern that is most sensitive in front and least sensitive at the back. That helps in two ways. It favors your voice, and it rejects sound coming from behind the microphone, which in a handheld is where you want the speakers to be.
So the rule for aim is simple. The head of the microphone points at your mouth, and the back of the microphone points toward the floor in front of you and not toward a speaker. If you swing the microphone toward the loudspeakers, even for a laugh, you may hear the start of a ring or squeal.
If that happens, lower the microphone and step slightly away from the speaker. Do not cover the metal head with your hand, which spoils the pickup pattern and invites the ring that you were trying to avoid.
Standing position relative to the speakers
Speakers are usually placed at the front of the room, pointing outward. The area directly in front of them is the riskiest place for a live microphone. In the room check, you identified where the speakers are, which is the first step of safe microphone technique. Choose a spot to the side of the speaker line, or just behind it, and stand there when you speak. Many sound providers will also mark a spot on the floor or tell you where to stand.
If you must stand in front of a speaker, such as on a dance floor with a speaker at each corner, ask the sound provider to lower the level of those speakers for your speech. They can do that in seconds from the mixing desk.
Handling the cable and the switch
Some handheld microphones have an on and off switch. Ask the provider to leave it on or to tape it open, so you cannot turn the microphone off by accident. If the microphone has a cable, learn where it runs so you do not trip, and keep the slack out of your way by looping it in your free hand.
If it is wireless, check that the antenna end is free and not wrapped in your fingers, because a hand wrapped around the lower body of some wireless handhelds can weaken the radio signal.
Choosing the right microphone, and who controls it
The distance ladder assumes a handheld microphone, which is the most common type at weddings. In a large echoey room it is not always the best one, and you may have a choice. This section helps you ask for the right equipment without sounding like an audio engineer.
Handheld microphones and microphone technique
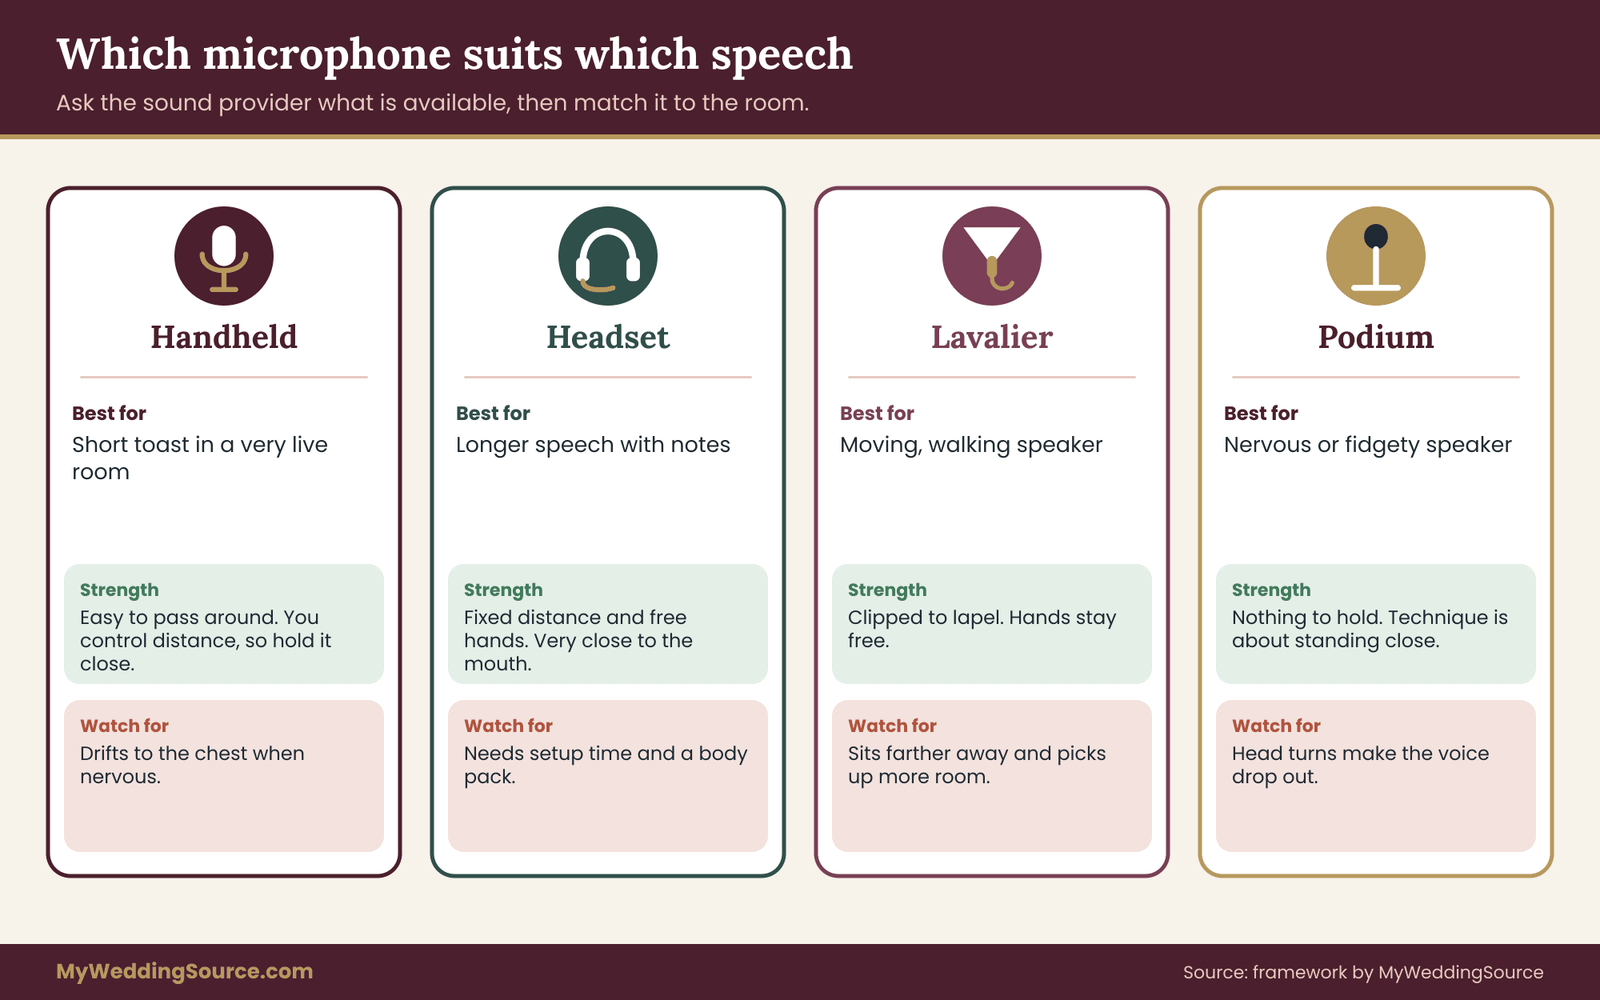
A handheld is the default because it is simple and familiar. It lets you control the distance directly, and it is easy to pass between speakers. In an echoey room, its strength is that you can put it close to your mouth. Its weakness is that people hold it badly, and its use depends on your nerves. Good handheld microphone technique is within reach of anyone, and that is what the ladder above covers.
Lavalier and headset microphones: less microphone technique to manage
A lavalier is a small microphone clipped to a lapel or collar, and a headset microphone sits on a thin arm near the mouth. Both keep the distance fixed, which removes the main variable. They free your hands for notes, a glass, or a hug. A headset keeps the microphone very close to the mouth, which is good for reverberant rooms. A lavalier sits farther away, at the chest, which makes it pick up more room, and it can rustle against jackets and ties.
For a wedding speech these are less common because they take setup time, need a transmitter pack worn on the body, and require someone to adjust them. If you are leading a longer toast or performing a short reading, ask the sound provider whether one is available. It is a fair question (a broader site walkthrough checklist can help you frame it), and a straight answer such as “we only bring handhelds” is useful too.
Podium and gooseneck microphones
A gooseneck is a flexible stalk on a podium, often found in churches, event halls and conference rooms. It stays in one place, so the technique is about positioning yourself. Because the stalk is often thin and set at a distance, it can pick up more of the room than a handheld, so stay close and avoid leaning back. If you have a choice between the fixed microphone and a handheld in a very echoey room, many speakers do better with the handheld because they can control the distance.
Which microphone suits which room
Rather than ranking by price or brand, decide by the room, the speech and the microphone technique you can realistically hold for the whole toast.
For a short toast, three minutes or under, in a very live room: a handheld at the close position. For a longer speech with notes or a prop, in a moderately live room: a headset or a podium microphone, if available. For a speech delivered while moving, such as a walk from table to table: a handheld or a headset, with a check for dead spots. For a speech by someone who is very nervous and fidgety: a podium microphone or a headset, because both remove the habit of drifting.
None of this requires buying equipment. It requires asking what the venue or vendor has, and choosing among the available options.
Who controls the sound
On the night, the microphone is controlled by someone: the DJ, the band’s engineer, a venue audio technician, or sometimes a friend who offered to help. Find out who it is when you do the room check. That person controls the level, can turn down speakers near you, can fix a dropout, and can swap a faulty microphone.
Be polite and specific. Ask “Who will be at the mixer during the toasts?” rather than assuming. If the answer is “nobody, it’s a plug-in system,” that changes your preparation: you will need a more careful check, a steady distance and a plan for a failure. The wedding vendor contract guide explains how to confirm in writing what an audio vendor is responsible for, so the sound role is not left to chance.
Wireless frequencies and venues
Wireless microphones use radio, and radio can be crowded. In the United States, the Federal Communications Commission publishes guidance on wireless microphone use. For a speaker this is background, not homework. What matters is that the audio provider checks for interference and brings a backup microphone. Ask them if they do. A provider who says yes and explains how, is a good sign.
A short script for the sound provider
Here is a plain way to put the key questions into one call or message: “I’m giving a toast on Saturday. What type of microphone will I use? Who will be at the mixer? Can I try it in the room for five to ten minutes? Where should I stand relative to the speakers? Is there a spare microphone ready if this one fails?” Five questions, each answerable in a sentence. Write the answers on your card.
Writing a speech that survives an echo
Microphone technique covers your hands and your mouth, but the script also needs to cooperate, and good microphone technique cannot rescue a sentence that is already too tangled to follow. Some sentences travel through a reverberant room well and some do not. You can tell the difference with the read-aloud step from the room check, and you can rewrite the weak ones with a few simple rules.
Good microphone technique and a good script work as a pair. The goal is not to dumb the speech down. It is to arrange the same ideas so that each one lands before the echo of the last has finished.
Keep sentences short, but not choppy
A long sentence that runs for forty words asks the listener to hold a thread while echoes pile onto it. By the time you reach the verb, the beginning has been smeared. Aim for sentences that mostly fit in one breath, and let a few longer ones appear when you want a rolling effect. Read each one aloud. If you run out of air before the end, split it.
A short sentence is not the same as a choppy one. A paragraph of identical five-word sentences sounds robotic. Vary them, with the short ones carrying the key moments. For instance, a long, winding setup that describes how you met the groom in a dormitory kitchen, followed by a short punch: “He burned the pasta.” The short line has room to ring.
Put the important word at the end
In a room with reflections, the last word of a sentence is the one you have the best chance of getting heard, because it is followed by a pause and the echo has time to fade. The first word of the next sentence has to compete with the tail of the last. So build sentences that end on the name, the number, the punchline or the key noun.
Compare “Dana, who I have known since second grade, is the kindest person I know” with “The kindest person I know is someone I have known since second grade, and her name is Dana.” The second puts the name at the end, where it will arrive clearly. Both are fine; the second is better in a hall.
Name people slowly and give them space
Names are the part of a speech that listeners most want to catch and are least able to guess from context. In an echoey room, a name spoken quickly, especially a long or unfamiliar one, may not be understood. Say it a little slower than the words around it, and leave an extra beat after it. If a name is hard to pronounce, ask the DJ or emcee to help.
A written phonetic spelling on your card or a short note to the DJ works well, and the reception music planning guide covers what to share with the person running the sound. If you are thanking a long list of people, consider spreading them across the speech rather than reading them in a block.
Avoid lists of similar-sounding words
A run of words that begin or end with the same sound is hard to follow even in a quiet room. In an echo it becomes mush. If your script has “Sam, Stan and Sal,” or “the fun, the funny and the fabulous,” consider whether you need all of them. Trim to two, or separate them with something different in between.
Use signposts
A signpost is a short phrase that tells the listener where you are. “First,” “Here’s the story,” “One more thing,” “To finish.” When some of the words in a sentence are lost to echo, signposts help the listener keep their place. They also give you a natural spot to pause. Do not overuse them; two or three in a three-minute speech is plenty.
Cut the tricky jokes
Jokes that depend on a precise phrase or a fast aside are the first to fail in a reverberant room. If the listener misses a word, the whole joke is lost, and the silence afterward is awkward. Keep your humor in stories that are funny even if a few words are missed: a situation, a mishap, a contrast. Save the delicate wordplay for a quiet moment, or cut it. The same goes for sarcasm and deadpan lines, which rely on tone that gets blurred.
If a joke is essential, test it in the read-aloud step. If your helper at the back laughs in the right place, keep it. If they ask “what was that?” simplify it.
Quotes, numbers and dates
Short quotations are fine, and a few words from a poem, a song or a movie can anchor a moment. Remember that anything longer than a short line from a published work may be protected by copyright, so check with the owner or the U.S. Copyright Office before reading a long passage aloud or printing it in a program. When you can, paraphrase, or speak in your own words.
For numbers and dates, repeat them or say them in a way that makes them hard to mistake. “Thirty years, three decades” is clearer than a number said once and fast.
Write for the ear to support microphone technique
A speech that reads well on paper may be awkward in a hall. Use contractions. Use “you” and “we.” Avoid long relative clauses and stacked adjectives. If you write the speech by speaking it into a voice memo first, the natural rhythm tends to appear on its own. Then transcribe and tidy.
Rewrite one paragraph as a worked example
Here is an invented before and after. Before: “Having known Jordan since the summer we both worked at the lake, where he was responsible for, among other things, the kayaks, the canoes, and the very unreliable paddleboards, I can say with confidence that his patience, humor, and kindness are matched only by his remarkable stubbornness.” After: “I met Jordan one summer at a lake.
He ran the boats. The kayaks, the canoes and the paddleboards that never worked. And he never lost his patience. He was kind. He was funny. And, I will say it, he was stubborn.” The second version has more pauses, more endings that land, and is easier to follow when the room is returning each phrase a second late.
Pace and pause: microphone technique matched to the echo
If the room check tells you how long the room takes to clear, delivery is where you use that number. This is the part of microphone technique that most speaking advice leaves out, and the part that makes the biggest difference in a hall. Speak at a pace that gives each phrase time to travel, land and fade.

The speak-pause rule of microphone technique
Use your clearing time from step five as your pause. If the room needs a second to clear, then end each sentence, wait a full second, and begin the next one. This pause is the timing half of microphone technique. It will feel like a long silence to you. It will not feel long to the audience, who hear it as confident timing. It also gives you a moment to breathe and glance at your notes.
A rough way to use the rule is to match the three clap results. For a short clap tail, speak at a normal conversational pace with a short pause. For a medium tail, slow down by about a fifth and pause a little longer between sentences. For a long tail, slow down more and put in a deliberate pause at the end of every sentence and a longer one between ideas. You can calibrate with your helper: ask them to tell you when you sound slow and when you sound rushed.
Slower is not the same as louder
The fix for a muddy room is not volume. Speak at the level of a warm, clear conversation, and let the microphone and the system do the amplifying. Raising your voice makes consonants harder and brings the microphone closer to distortion. Many speakers also tighten their throats when they push, which hurts the sound and tires the voice.
If you feel the urge to raise your voice, take a breath and slow down instead. Slower and steadier is the better answer to the same worry.
Breathing and the start of each sentence
Take your breath in the pause, not in the middle of a sentence. Breath control belongs to microphone technique, because a breath taken close to a sensitive microphone can be audible in the speakers, so a quiet, low breath through the nose or the corner of the mouth at the end of a thought is better than a gasp. If you tend to run out of air, shorten the sentence.
The first sentence sets the room
Open with something short and clear, and say it slower than the rest. The first sentence is when the sound team can still adjust the level, and a calm start is part of good microphone technique. It is also when guests decide whether to lean in. A common mistake is to start with a long greeting, such as thanking everyone by name.
Instead, begin with a short line that shows off steady microphone technique, something like “Good evening. For those who don’t know me, I’m Chris, and I’ve known Alex for twenty years.” Then settle into the pace.
Eye contact and microphone technique together
Looking up matters, and so does keeping the microphone steady. The two work together: lift your eyes during a pause, then bring them back to your notes while you speak. If you turn your head, hold the microphone to your mouth and turn with it, or pause until you face forward. The habit takes a couple of rehearsals to build, and it is worth rehearsing in the room.
What to do with laughter and applause
A big laugh or a burst of applause is a moment to stop and wait. The room, already echoey, becomes louder and more reverberant. If you speak into it, you will not be heard. Let it fade, then continue. If you feel awkward waiting, smile, take a sip of water, or look at the couple. The silence is less noticeable than you think, and your next line will be heard.
A pace card for the speaker
On your index card, add a line for pace: “Slow by a fifth. Full pause after each sentence. Two seconds before the toast line.” These lines mean you do not have to decide on the spot. Add a start cue too: begin when the room has settled, and finish before the dinner service cools.
Rehearsing your microphone technique in the room
You now have a room card, a distance, a pace and a script. The remaining task is to practice them together, in the room if you can and in a copy of it if you cannot. Rehearsal is where microphone technique becomes a habit instead of a list of instructions, and habits are what survive nerves.
What to do if you can be in the room
If the venue or the sound provider can give you the room with the microphone before the event, treat it as a short rehearsal and use the time in this order.
First, five minutes for the room check, steps one to three. Second, five minutes to read your full opening and your final line aloud at the pace on your card. Third, five minutes to walk to the microphone from your seat and back, so the route, the stand and the first sentence feel familiar. Fourth, a few minutes to stand at the farthest table and listen to your helper do a short passage in your voice, so you know what the far end sounds like.
You do not need to run the whole speech. The opening and closing carry the highest risk, because the first sentence sets the level and the last sentence is the one people remember.
What to do if you cannot be in the room
Many speakers will only see the venue at the rehearsal dinner or the cocktail hour. If that is you, use these substitutes.
Arrive early on the day and ask for two minutes with the microphone while the room is still empty and the staff are setting tables. Even a short test tells you the clap tail and the distance.
If that is not possible, use the first few minutes of your speech as the test. Open slowly, listen for the feel of the sound in your own ears, and ask a friend at the back to give you a hand signal: thumbs up if all is clear, a hand to the ear if you should come closer, a hand pushed downward if you should slow down.
Agree on the signals before you start.
If you cannot test at all, rehearse at home in the most echoey space you have: a tiled bathroom, an empty hallway or a stairwell. Speak into a phone voice recorder from different distances, then play it back. You will hear how distance and pace change clarity. It is not the same as the venue, but it trains your ear.
Rehearsing the walk, the handoff and microphone technique
A surprising number of problems occur in the few seconds before and after the speech. Practice the whole movement, because microphone technique includes the walk to the spot and the way you hand the microphone back: standing up, walking to the spot, receiving the microphone, checking the grip, starting, finishing, and handing the microphone back.
When you receive the microphone, look at how it is turned on, since microphone technique starts before the first word. Hold it at the fist distance. Say one short test phrase, something like “Good evening,” and listen for how it sounds in the room before you begin the real speech. A one-word test is quick and gives the sound provider a signal to adjust.
When you finish, wait for the applause to settle, say thank you, lower the microphone away from your mouth and then hand it off. Do not drop your hand while the microphone is still live near a speaker, because the movement can produce a thump or a squeal.
Rehearsing with the other speakers
If there are several speakers, it helps to sequence them so that the microphone setting does not change from person to person. A good sound provider will adjust the level for each, but a short note to the provider helps: “The first two speakers are soft-spoken; the third is loud.” A tall speaker and a short one need different stand heights, so ask the provider to be ready.
If the microphone is passed from hand to hand, shared microphone technique helps, so agree who takes it and who gives it back. A thirty-second handoff in the middle of a toast, with the microphone dangling near a speaker, is a common cause of squeals. A person who introduces the speakers can also hold the microphone and pass it. The wedding reception guest flow guide is useful for planning where the speakers and the microphone sit as the dinner moves along.
A rehearsal card for the sound provider
Give the sound provider a one-page note ahead of time. It should say who is speaking, in what order, how long each speech is expected to last, whether anyone is using notes or a device, and who will hand the microphone to whom. If one speaker is particularly quiet or has an accent that guests might find harder to follow, say so politely. The provider can then adjust the mix, and the speakers can decide on distance.
The note should not be long. One paragraph is enough, and it demonstrates that the speakers are organized, which tends to earn the same from the provider.
When microphone technique meets failure: feedback and dropouts
Even with good preparation, the equipment may misbehave. The difference between a minor hiccup and a ruined toast is mostly the speaker’s reaction. This section lists the common problems, what causes each one, and a short, calm response.
Feedback: the ring or squeal, and what microphone technique can do
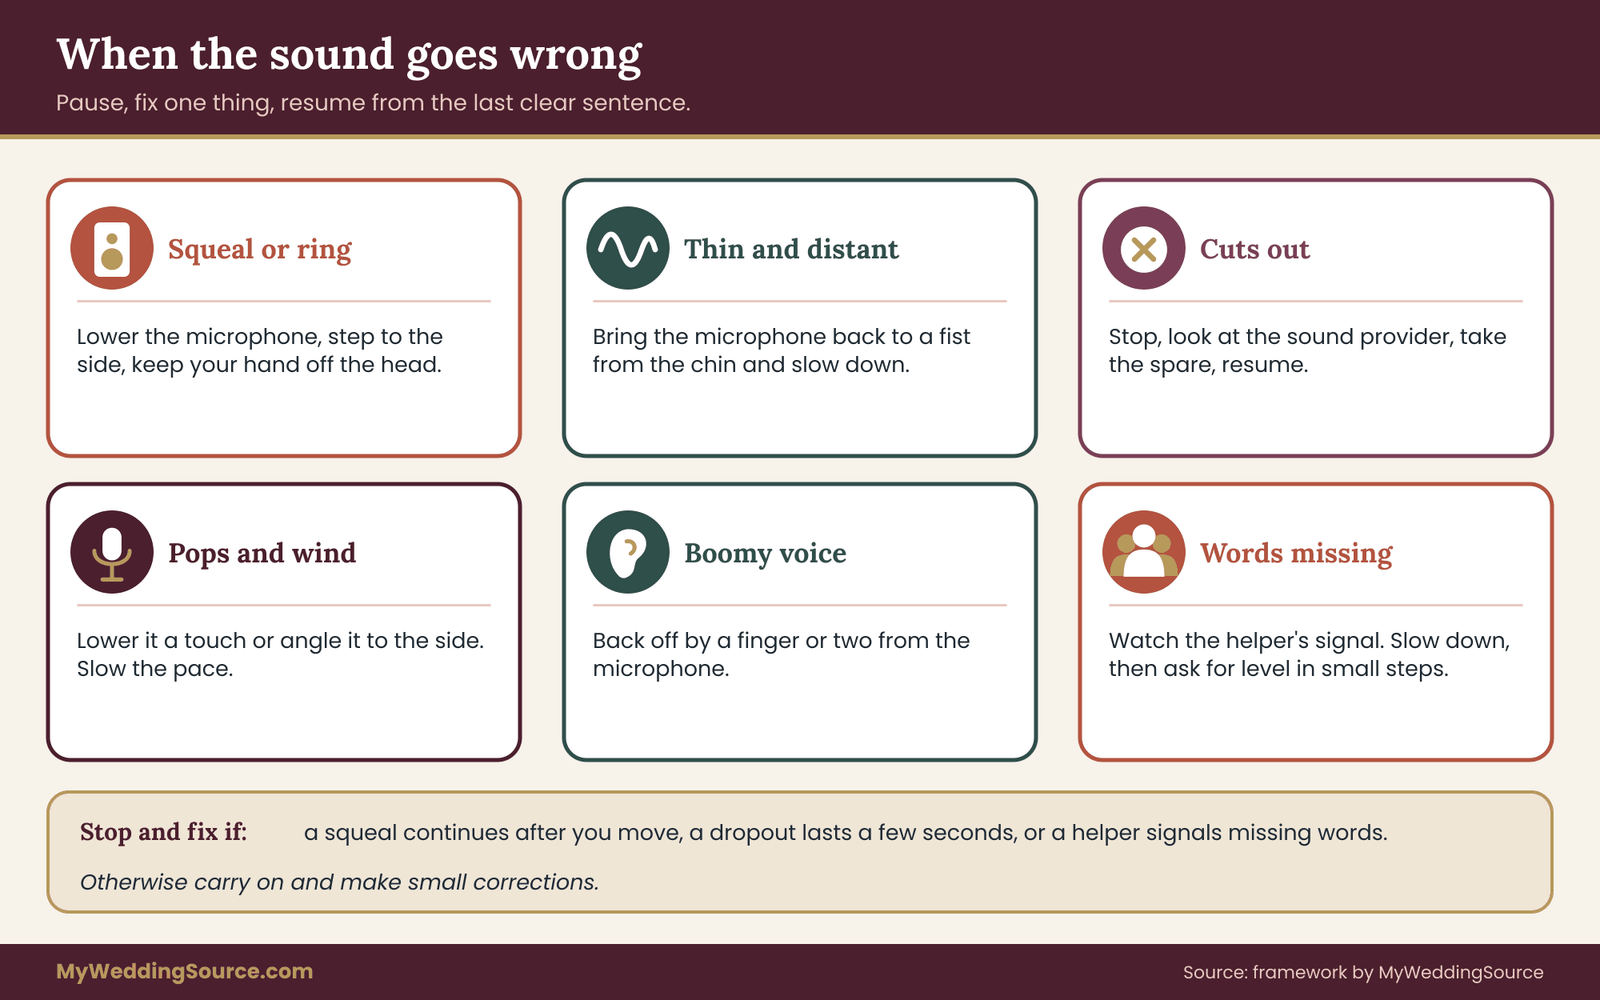
Feedback happens when the microphone picks up the sound from the speakers and sends it back in a loop. The usual causes are standing in front of a speaker, pointing the microphone at a speaker, holding the microphone by the metal head, or the system being set too loud for the room.
The response is simple, and it is mostly microphone technique. Lower the microphone away from the speakers, step to the side and, if you can, step back from the speakers. Do not wave the microphone around or tap it. If the squeal continues, the sound provider will lower the level. You can also say, with a smile, “Let me move over here,” which gives them a moment to fix it and makes the pause seem deliberate.
The sound is thin or distant
If your helper or the guests signal that the sound is weak, check your microphone technique first, starting with distance. The most common cause is the microphone has drifted down to the chest. Bring it back to the fist position, point it at your mouth, and speak a little slower. If that does not help, make a small signal to the sound provider.
The microphone cuts out
Cuts happen with wireless equipment and with loose cables. If the voice disappears, good microphone technique includes stopping for a moment and looking at the sound provider. If a spare microphone is ready, they will hand it over. If not, you can deliver the next section at a stronger voice, projecting from the diaphragm and slowing down, so that people near you can hear.
The trick is to have a plan before it happens. Agree with the sound provider that if the microphone fails, you will wait and they will swap it. Having that agreement removes the panic, and calm recovery is part of microphone technique too.
Popping and breath noise
For popping, adjust microphone technique. Loud pops on p and b sounds, or a sound like a gust of wind, mean the microphone is too close or directly in the airstream. Lower it a touch or turn it slightly to the side. Slowing down also helps, as hurried speech causes bursts of breath.
Boomy or bassy voice
If the voice sounds heavy, microphone technique is usually the cause: it is often the proximity effect from holding the microphone too close. Move back by a finger or two. If the room itself is boomy, the sound provider may adjust the bass setting for your speech.
Too quiet
If guests near the back cannot hear, review microphone technique before raising anything else. Speaking louder is not always the answer. First check distance and pace. Then ask the sound provider whether the level for your microphone can go up. Be aware that raising the level too far leads to feedback, so do it in small steps, not all at once.
When to stop and fix, and when to carry on
Not every problem needs a stop, and knowing which ones do is part of microphone technique. Use a simple rule. If guests can follow the words, carry on and make small corrections. If you hear feedback, a dropout or a repeated pattern of missing words, pause, fix the one thing that is wrong, and begin again from the last full sentence. A thirty-second pause to fix a problem is much better than three minutes of an audience straining.
The failure conditions are worth writing on your card: a squeal that does not stop after you move; a dropout of more than a few seconds; a helper’s signal at the back that words are missing; a microphone that will not stay on. In each case the plan is the same: pause, signal the sound provider, use the backup, and resume from the last clear point.
A plan for when there is no sound provider
Some weddings have no DJ and no engineer. The venue may supply a plug-in system, or a friend may run a small speaker from a phone. In that case the room check and your own microphone technique matter even more. Test the actual equipment, confirm that you know how to turn it on and off, set the level yourself with the help of a listener at the back, and keep the volume moderate to avoid feedback.
Consider whether you need amplification at all. In a small enough room a firm, slow voice from a central spot may serve better than a weak system. The wedding day digital contingency plan covers backup thinking for the technology side of the day more broadly, and a spare microphone or fresh batteries belong in the same spirit.
Special situations: head tables, accessibility and unplanned toasts
The standard microphone technique in this guide covers most speeches. A few situations need a small change in microphone technique or in the plan, and it is better to think about them before the night.
Microphone technique at the head table or a seat
Some toasts are given from a seat at a long head table, with a microphone passed along the table. The risk is that the sound comes from a position near a wall or a backdrop, which sends reflections back at once. For microphone technique at the head table, stand if you can, because standing lifts your voice above the table and keeps the microphone away from plates and glasses.
If you must sit, lean slightly toward the microphone, hold it at the fist position, and keep your elbow supported on the table so the distance stays steady.
Watch for table clatter. A microphone held near a table picks up the sound of cutlery, glasses and chairs. Ask nearby guests to pause for a moment, or ask the emcee to quiet the room before you begin.
Toasts from the floor and roaming microphone technique
Some weddings invite guests to speak from their tables. Without a microphone, a small voice in a big echoey room will not carry. Ask the couple or the emcee how they would like to handle this. A common solution is a roaming microphone passed to the speaker, which means the room check should include a test of the guests’ tables for dead spots and feedback. Another solution is to invite guests who wish to speak to come to a central microphone in order, so the sound provider can set the level once.
For the person holding the roaming microphone, the same microphone technique applies: fist distance, aim at the mouth, step away from speakers.
The couple’s own speech
When the couple speak, they often stand together with one microphone between them. That halves the quality for each. Decide who holds it, because shared microphone technique needs agreement. Hold it between you at a distance that suits the quieter voice, or take turns with a handoff. If both are nervous, a stand with two microphones, or two handhelds, is easier. The couple’s speech is often unplanned in length, so a pace card is especially useful here.
An introducer or emcee
The person who introduces the speakers sets the tone for sound as well. They hold the microphone first, and they can tell the room to quiet down, announce a short pause for the toasts and make sure everyone has a glass in hand. If you are the emcee, a short, clear start and a calm pace help every speaker after you. Keep introductions brief, and give each speaker a moment to settle before beginning.
If there is no emcee and speakers are introducing themselves, agree beforehand who stands first, who calls the room to order and who holds the microphone between speeches.
Guests who are hard of hearing or use a second language
A speech with unclear sound is hardest for people who rely on clear speech to follow. If you know that guests need extra support, the couple can arrange simple measures. Seat those guests near the front, but not in front of a speaker cabinet where the sound may be harsh. Provide a printed program or the text of toasts in a place guests can read.
Some venues have assistive listening systems, and in the United States the Americans with Disabilities Act and the Access Board’s guidelines cover such systems in certain assembly spaces, so it is fair to ask the venue what is available.
For the speaker, the useful microphone technique adjustments are the ones already described: face the room, keep the microphone below the mouth so the lips are visible, slow down, and avoid fast asides. If a guest uses a sign language interpreter, ask the interpreter how they would like you to pace the speech, and leave small gaps so they can keep up.
Speaking to a very large crowd
At a reception with a large guest list, the farthest tables can be far from the speakers. A speaker’s pace and pause matter more, because the delay between the direct sound and the sound from the far speakers grows with distance. Slow down more than feels natural, because microphone technique in a large crowd depends on timing. Finish with a clear final line that tells guests the toast is ending, so that they can raise their glasses together and not in a ragged wave.
Outdoor and tent receptions: wind and microphone technique
Outdoors, there are few walls to cause an echo, but wind, traffic and the open space reduce the sound. A tent can behave like a room with a thin, loud ceiling. The five-point room check and your microphone technique still apply: walk, clap, count, read, pause. Wind is a particular enemy of a close microphone, so ask the provider whether a foam cover is available, and hold the microphone slightly to the side of your mouth.
Speeches delivered by video or call
If a speaker is joining by video, the echo of the room affects the call too. A laptop speaker in a big hall will not reach the guests. Plan for the sound system to carry the remote voice, and check that the remote speaker’s microphone does not feed back through the room speakers. A short rehearsal of the microphone technique and the actual connection is a safer plan than hoping it works.
A worked example: one room, one speaker
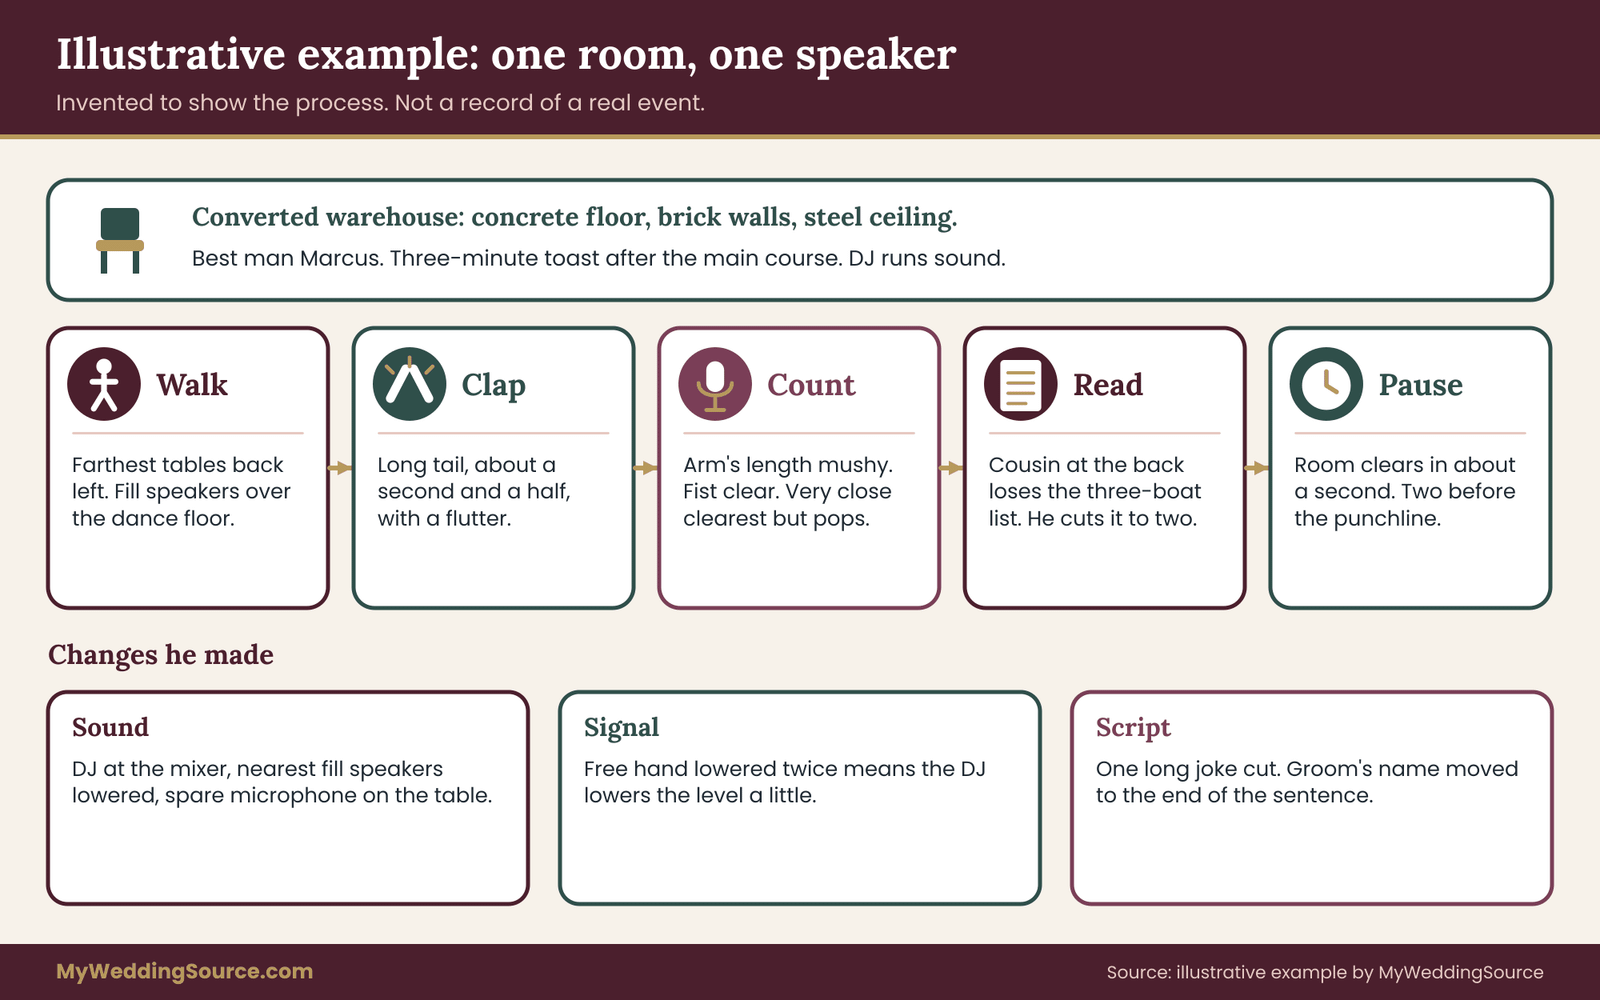
The example below is invented to show the process. It is not a record of a real event, and the numbers are illustrative.
Imagine a reception in a converted warehouse with a concrete floor, brick walls and a high steel ceiling. The best man, call him Marcus, will give a three-minute toast after the main course. The guest list is large, the DJ is running sound, and there are two speakers at the front and two small fill speakers halfway down the room.
The check
Marcus arrives at the cocktail hour and asks the DJ for ten minutes. He walks the room: the farthest tables are by the back left wall, and the fill speakers are over the dance floor. His clap tail is long, about a second and a half, with a flutter, and his helper, a cousin, notes it in her phone.
He counts from one to ten at three distances while she stands at the back. The arm’s length version is mushy. The fist version is clear. The very close version is the clearest but a little popping. He settles his microphone technique on the fist distance and drop to two fingers if the room fills with noise.
He reads the first thirty seconds. His cousin says the line “the kayaks, the canoes and the paddleboards” turned to mush. He cuts it to two items.
The pause test shows that the room takes about a second to clear after a sentence. He writes: “Pause one second. Two before the punchline.”
The adjustments
He asks the DJ to stand at the mixer during his toast and to lower the fill speakers closest to the spot where he will stand. He agrees to a hand signal: if Marcus lowers his free hand twice, the DJ lowers the level slightly. He asks for a spare microphone to sit on the DJ table.
He cuts one long joke that relied on a quick aside. He moves the groom’s name to the end of the sentence. He writes the pace line on his card.
On the night
When the time comes, Marcus waits until the room settles. He says “Good evening,” listens, then begins slowly. About a minute in, he notices his microphone technique slipping, because the microphone has dropped toward his chest. He lifts it back to the fist position and slows down. At the big laugh he waits and smiles, then continues. He ends with a short line and the toast, waits for the room to respond and hands the microphone back, lowering it away from his mouth first.
What the example shows about microphone technique
Nothing about Marcus’s microphone technique in the example is expensive or technical. Every step is a question asked, a thing tested or a habit rehearsed. The result is a speech that guests at the back could follow, which is the only real measure of success.
Where this approach fails
It is worth being honest about limits. The five-point check does not fix a badly set-up sound system, a broken microphone or a room with a very poor speaker layout. If the room is so reverberant that a helper at the back cannot understand you even at the close position and a slow pace, then the best solution may be to shorten the speech, move guests nearer, or ask the venue for a change in the speaker setup.
The check tells you that early, which is its value, and no microphone technique can beat a room that fights you. It also depends on the willingness of the sound provider and the people around you to help. Where they are not available, the plan falls back on your own steady distance and pace.
Your next steps
Pick the steps that match how much time you have; each one improves your microphone technique. None of them takes more than a few minutes, and the first two matter most.
- Ask who runs the sound. Send one short message to the DJ, band or venue contact, using the five questions in the script above.
- Book ten minutes in the room. Ask for a slot before guests arrive, or during the cocktail hour, and have it written on the run sheet. The reception timeline guide shows where such a slot usually fits.
- Run the five-point room check. Walk, clap, count, read, pause. Bring one helper and write one line per step.
- Make the room card. Copy the speaker layout, clap tail, best distance, blurry phrases and pause length onto an index card.
- Rewrite the blurry lines. Shorten sentences, move key words to the end and cut any joke that depends on a fast aside.
- Set a signal and a backup. Agree on a hand signal with your helper and the sound provider, and confirm that a spare microphone is ready.
- Rehearse the walk. Practice standing, walking, taking the microphone, the one-word test, the opening and the handoff.
- Hold your own distance on the night. Fist from the chin, aimed at the mouth, off to the side of the speakers, and a full pause after each sentence.
If you are the couple, share this list with every speaker and put the soundcheck time on the day-of schedule. If you are the speaker, you can practice all of this microphone technique without anyone’s permission except the sound provider’s, and most of them are glad to be asked.
FAQ
How far should I hold the microphone from my mouth at a wedding?
A common starting point is about a fist’s width from your chin, angled toward your mouth and held slightly below it. In a very echoey room, moving closer to two or three fingers often gives a clearer sound. Test it with a helper at the back of the room, because the right distance depends on the microphone, the system and your voice.
Why does my voice sound muddy in a big hall even when the volume is loud?
Reflections from hard walls and ceilings arrive late and overlap the next syllable, which smears consonants. More volume adds more reflections, so it often makes the problem worse. Clarity comes from speaking closer to the microphone, pausing between sentences and keeping the sound system aimed at the guests instead of the walls.
Can I check the sound before my speech if I arrive late?
Yes, in a shorter form. Ask the sound provider for two minutes with the microphone before guests sit down, or use a one-word test such as “Good evening” when you pick it up. Agree on a hand signal with someone at the back, and open slowly so you can hear the room before you reach your main points.
What should I do if the microphone squeals?
Lower the microphone away from the speakers, step to the side and do not cover the metal head with your hand. Pause for a moment and let the sound provider reduce the level. Squeals usually come from standing in front of a loudspeaker or pointing the microphone at one, so the fix is almost always a change of position.
Is a lapel or headset microphone better for a long toast?
They keep the distance steady and free your hands, and a headset sits very close to the mouth, which helps in an echoey room. They take more setup time and need a transmitter worn on the body. Ask the sound provider what they bring. For a short toast, a handheld held close is usually enough.
How long should I pause between sentences in an echoey room?
Use the clearing time you measured: say one sentence, stay silent, and have a helper signal when the echo has faded. In many large rooms that is about a second. Longer pauses before names and punchlines help too. If you feel you are too slow, ask your helper at the back, because the audience usually hears it as confident timing.
Should I ask the DJ to turn the volume up for my toast?
Start with distance and pace instead. Turning the volume up in a reverberant room adds echo and can lead to feedback. If guests at the back still cannot hear you, ask the sound provider to raise your level in small steps, or to lower the speakers nearest to you, and check again with your helper.
What if the venue has no sound system at all?
Test the room with your own voice and a helper at the back. In a smaller space, a steady, slow voice from a central spot can work. For a larger room, ask whether a portable speaker and microphone can be rented or borrowed, then run the same five-point check with that equipment before the guests arrive.
Sources
- Federal Communications Commission: wireless microphones
- U.S. Copyright Office
- ADA.gov: Americans with Disabilities Act information
- U.S. Access Board
- Acoustical Society of America
- National Institute on Deafness and Other Communication Disorders
- American Speech-Language-Hearing Association
- CDC NIOSH: noise and hearing loss prevention