
Bridal shoe selection is the decision that most often gets made last and tested least, even though a pair of shoes has to carry you across the ceremony site, up the steps, through portraits and onto the dance floor. This guide gives you a two-surface walk test and a hem clearance worksheet, so heel shape, dress length and venue surface are checked against each other before you buy.
Good shoe selection means three things fit together: the heel shape suits the surfaces you will actually stand on, the hem clears the floor in that exact pair, and your feet can last the whole day. Learn the ground at every stop. Walk the shoes on one hard and one soft surface at home. Measure the heel rise and hem gap, and take the shoes to every fitting. If a pair fails, change the heel, add a protector, or choose another.
Most advice about bridal shoe selection is about style: satin or leather, pointed or round, pearls or plain. Style matters in shoe selection, and you should love what you wear. But style is the last filter, not the first. A shoe that looks perfect in the box can sink into a lawn, catch in a deck board, slide on polished stone, or pull a hem a full inch off the floor. Those are physical problems with physical causes, and you can find them out in an evening.
The approach in this guide is deliberately narrow. It treats bridal shoe selection as a small engineering question with three inputs. The first is the heel and sole, which decide how a shoe behaves on different ground. The second is the dress length, which decides how much room the hem needs and how much of the shoe anyone will see. The third is the venue surface, which decides what the ground will do to a heel. Put the three together and most of the decision makes itself.
A note on scope. This is general information, not legal, tax or financial advice, and it is not medical advice either. Comfort is individual. Where a foot condition, an injury or a pain pattern is involved, the guide points you to a foot and ankle professional who can examine you.
What bridal shoe selection has to solve
Think about the route a bride, groom or attendant actually takes on the day. Many couples picture a single floor. In reality the route usually crosses four or five different surfaces in a few hours, and each one asks something different of a shoe.
Getting ready often happens on carpet or hardwood in a hotel room or family home. The walk to the car or the venue entrance may cross a driveway, a parking lot or a gravel path. The ceremony might be on a lawn, a beach, a terrace, a church aisle or a courthouse corridor. Portraits can go anywhere the light is good, including fields, stairs and rocks. The reception may be on tile, carpet, a temporary dance floor laid over grass, or a barn floor with gaps between boards.
Every transition is a small test. A heel that is steady on a tiled lobby may be unstable one minute later on a brick path. A flat that is fine on grass may slip on a polished marble step. The task of bridal shoe selection is to pick one pair, or a deliberate pair of pairs, that handles the whole route without a visible struggle.
The three inputs of shoe selection, in plain terms
Heel and sole. The shape of the heel, the area that touches the ground, the pitch of the foot, and the material of the outsole. A narrow heel concentrates your weight on a very small patch. A wide block spreads it. A smooth leather sole slides on polished floors. A rubber patch grips, sometimes too well.
Dress length and shape. A floor-length gown needs a small, deliberate gap between the hem and the ground. A ballgown with layers needs more room for the toe to move forward. A tea-length or ankle-length dress puts the shoe on display and changes what you can get away with. A train adds drag.
Venue surface. The ground at each stop, including steps, ramps, grates, thresholds and the transition between indoors and outdoors. This is the input people know least, because it requires a question to the venue or a visit.
Why one dimension never settles shoe selection
It is tempting to choose by one criterion. “I want a block heel because it is stable” is a start, but a block heel on a thick-pile carpet can still tilt, and a block heel changes the heel rise that your hem was cut for. “I want flats because I will be on grass” is also a start, but flats under a gown cut for a two-inch heel will leave you stepping on fabric. The two-surface walk test and the hem clearance worksheet exist to hold all three inputs in view at once.
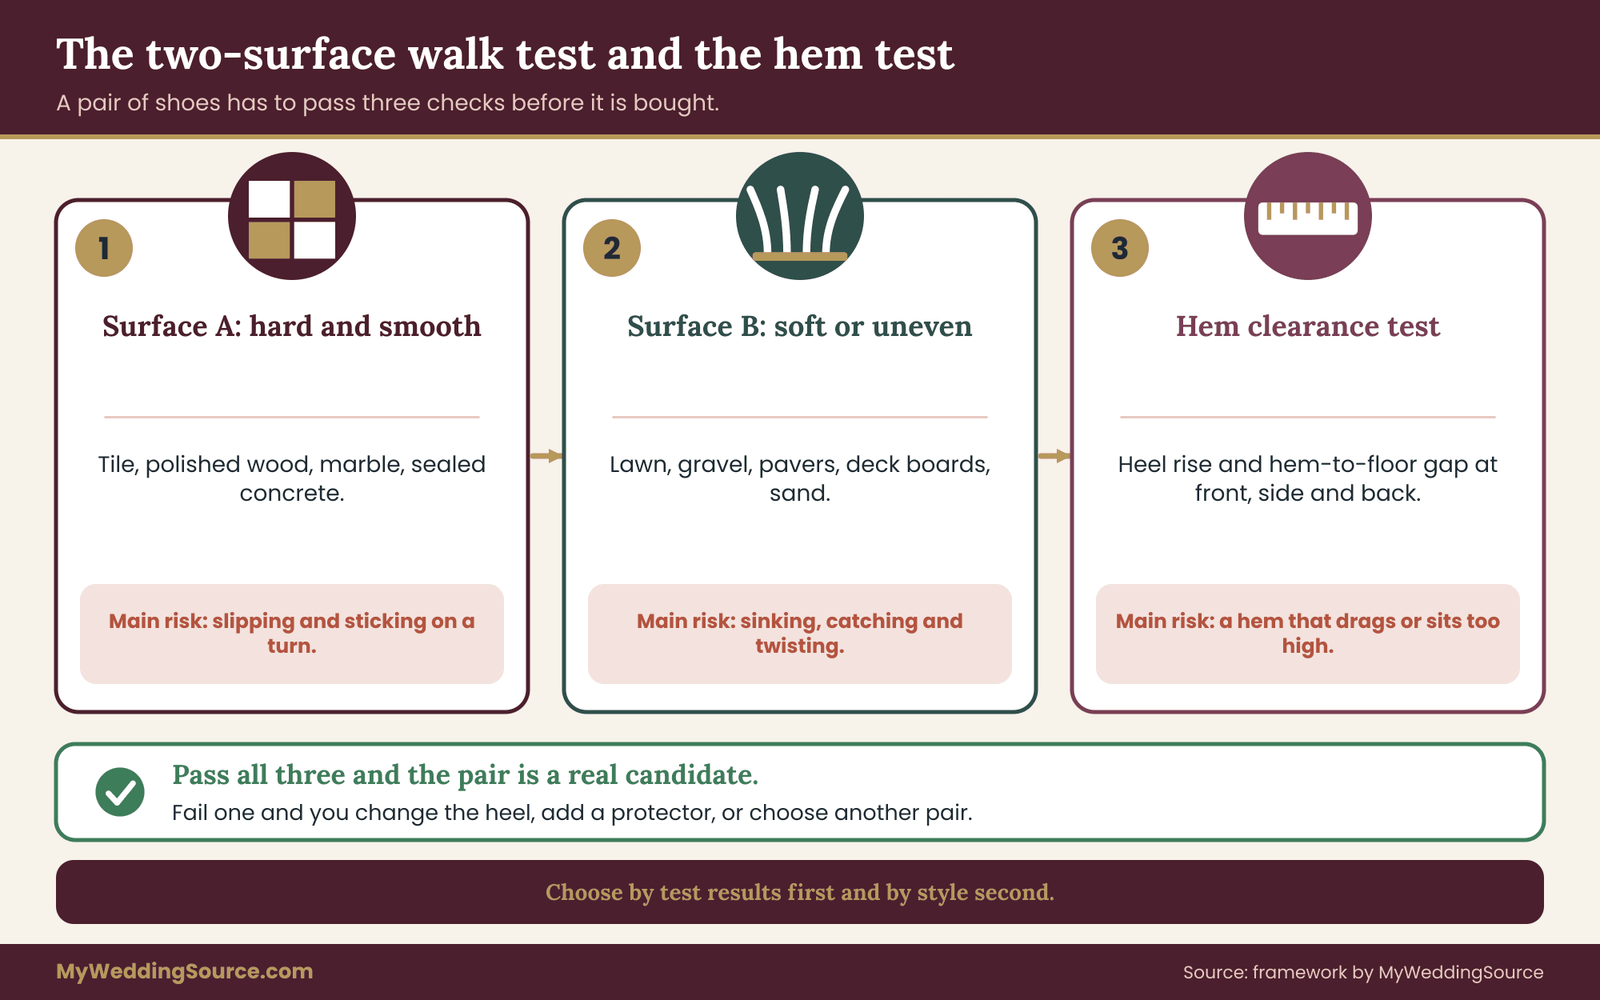
The picture shows the idea of shoe selection in one view. Shoes pass through two surface tests and one hem test. If any one of the three fails, the pair is adjusted or replaced before it is bought, not after.
Why shoe selection fails: the usual patterns
Before the method, it helps to know how shoe selection goes wrong. These patterns are common enough that a tailor or a venue manager will recognize every one.
The late purchase. Shoe selection happens after the final fitting, so the hem was cut for a different pair. The gap is discovered at the venue, when it is too late to change anything but the shoes.
The single-surface test. Shoe selection by living-room trial: the bride walks around the living room in the new pair and declares them fine. The living room is the easiest surface she will meet all day.
The photo choice. Shoe selection is done from an image online because they match the lace, and nobody checks the heel pitch, the strap, or the sole until they arrive.
The surprise venue. Nobody checked how the ground affects shoe selection. Nobody asked whether the ceremony lawn is irrigated, whether the terrace has gaps between pavers, or whether the dance floor sits on grass. The answers shape the heel decision more than any fashion rule does.
The unrehearsed backup. A flat or sneaker pair is packed as an escape, but it was never measured against the hem, so changing into it leaves the dress dragging by an inch or more. The change itself is covered in the separate guide on swapping pairs at the reception; here the focus is the first, main pair.
What this guide will and will not do for your shoe selection
It will give you a repeatable shoe selection test, a worksheet, decision rules and scripts. It will help you describe your needs to a tailor, a venue and a footwear fitter in terms they can act on. It will not tell you which brand to buy, rank products, or promise that a given shoe will be comfortable for your feet. Comfort depends on your anatomy, and only a trial and a professional can settle it.
If you are still choosing your gown or planning the alterations that your shoe selection depends on, the wedding dress fit and alterations guide covers the fittings that shoe decisions plug into. If you are building the full set of jewelry, veils, wraps and emergency items, the wedding day accessories planning guide covers that wider system. This article stays with the shoes.
The two-surface walk test at a glance
The core method of shoe selection is simple enough to remember without notes. You test each candidate pair on two kinds of ground, a hard smooth surface and a soft or uneven surface, using the same five checks on each. Then you add a hem measurement. If a pair passes both surfaces and the hem measurement, it is a real candidate.
Surface A: hard and smooth. Think tile, polished wood, laminate, marble, a sealed concrete floor, or a stage floor. The danger on this surface is slipping, sliding, and noise. The question is whether the shoe grips enough to be safe and not so much that the foot sticks during a turn.
Surface B: soft or uneven. Think lawn, sand, gravel, brick pavers, deck boards, cobblestones or a ramp. The danger on this surface is sinking, catching, twisting and tilting. The question is whether the heel and sole stay level and the foot stays steady.
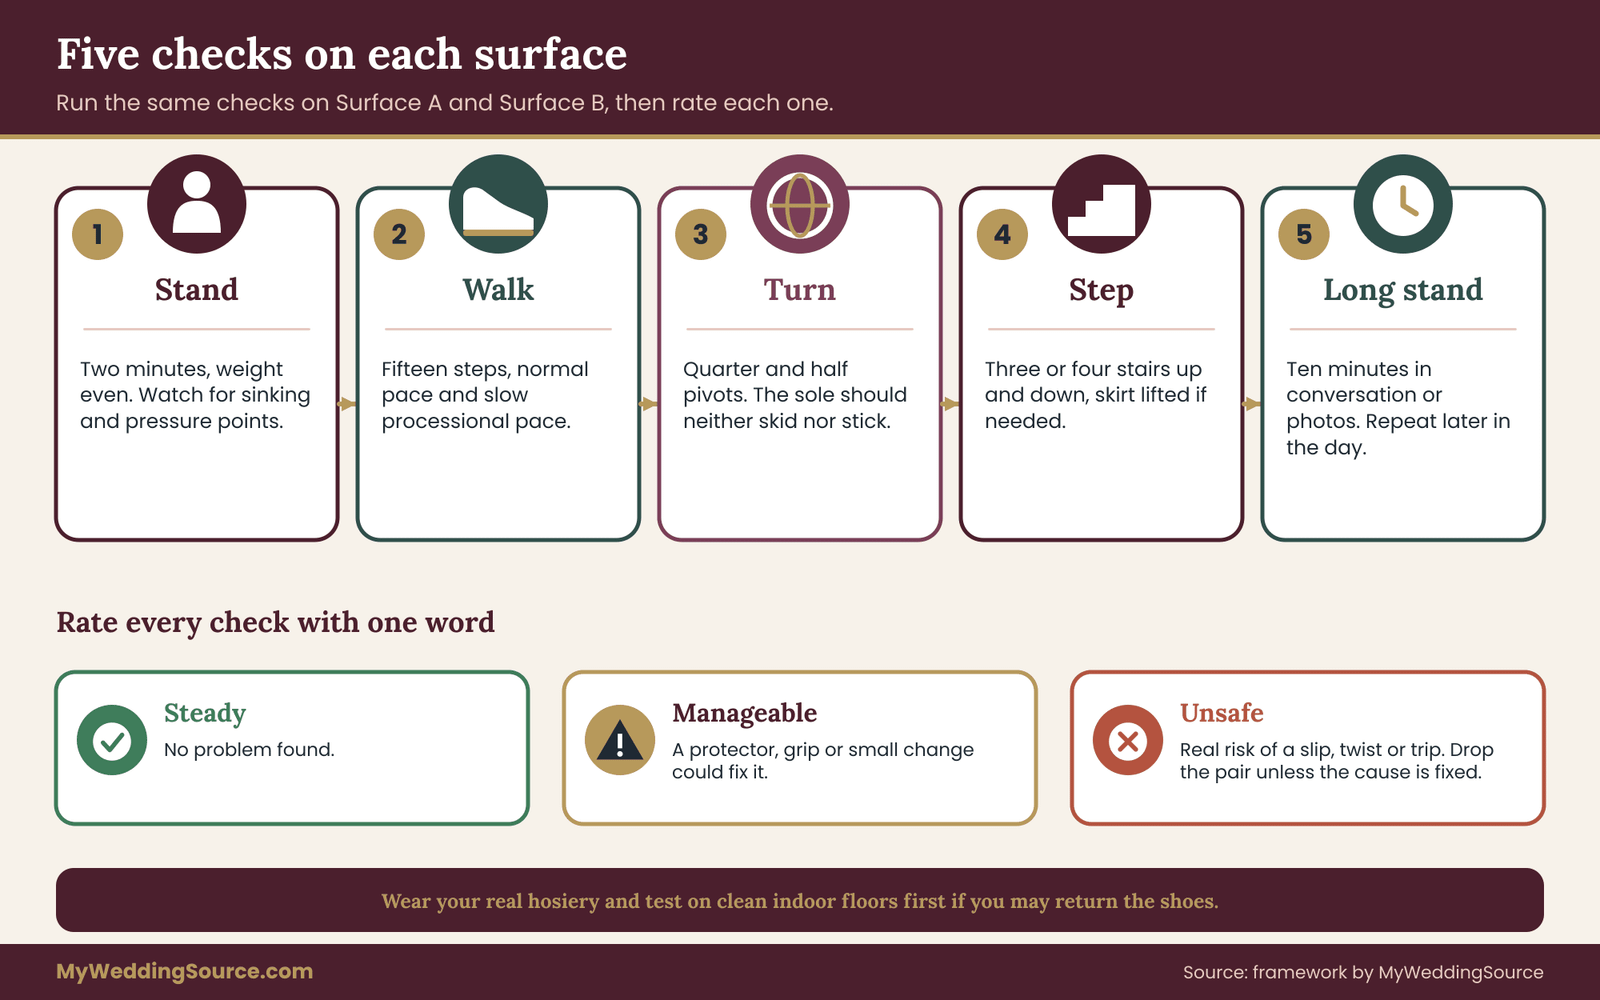
The five checks. On each surface you run the same short set of actions: stand still, walk a straight line, turn and pivot, take steps, and stand again at the end. The details come in a later section. What matters now is that every shoe gets the identical test, so you compare like with like.
Why two surfaces anchor the shoe selection test
One surface hides the problem that matters. Five surfaces turn a simple test into a project that nobody finishes. Two surfaces, chosen to sit at opposite ends, cover most of what a shoe will meet. A shoe that is safe on slick, hard ground and on soft, uneven ground is very likely to handle everything in between. The method asks you to pick the extremes that match your own venue, not a generic pair.
For example, a couple with an outdoor lawn ceremony and a ballroom reception would test a hard floor and a lawn. A couple with a courthouse ceremony and a restaurant dinner might test a stone staircase and a carpeted room. The choice of surfaces is personal. The discipline of using two is the point of this shoe selection method.
The hem test that rides alongside
The second half of the method is the hem clearance worksheet. It records the heel rise of each shoe and the hem-to-floor gap at the front, sides and back. The worksheet turns a feeling, “the dress seems a bit long”, into a number a tailor can use. It is introduced fully after the sections on heel shape, surfaces and dress length.
Heel shape and bridal shoe selection: what each heel does
Heels are described by height, but height is only half the story of shoe selection. Two shoes with the same heel height behave very differently if one ends in a narrow tip and the other in a broad block. For bridal shoe selection, it helps to describe a heel by four things: its height, its base area, its position under the foot, and the way the sole meets the ground.
Height is the distance from the floor to the inside of the heel cup, measured where your heel actually rests. It controls how far your body is lifted and therefore how the hem sits. Brand size labels such as “mid heel” are loose, so measure the real shoe with a ruler.
Base area is the size of the patch that touches the ground. A pencil-thin heel might touch a very small circle. A block heel might touch a square several times larger. Weight divided by area is pressure, and pressure decides what happens on lawn, sand, grates and soft wood.
Position is where the heel sits under the foot. A heel set far back leaves more of the shoe forward and can feel less stable. A heel set closer to the center of the foot, as on many block and wedge shapes, shares the load more evenly.
Contact with the ground includes the sole material, the tread, and whether the forefoot has any platform. A thin leather sole is quiet and elegant and also slick. A rubber patch on the sole grips and may feel sticky on a turn.
The main heel shapes for shoe selection, one at a time
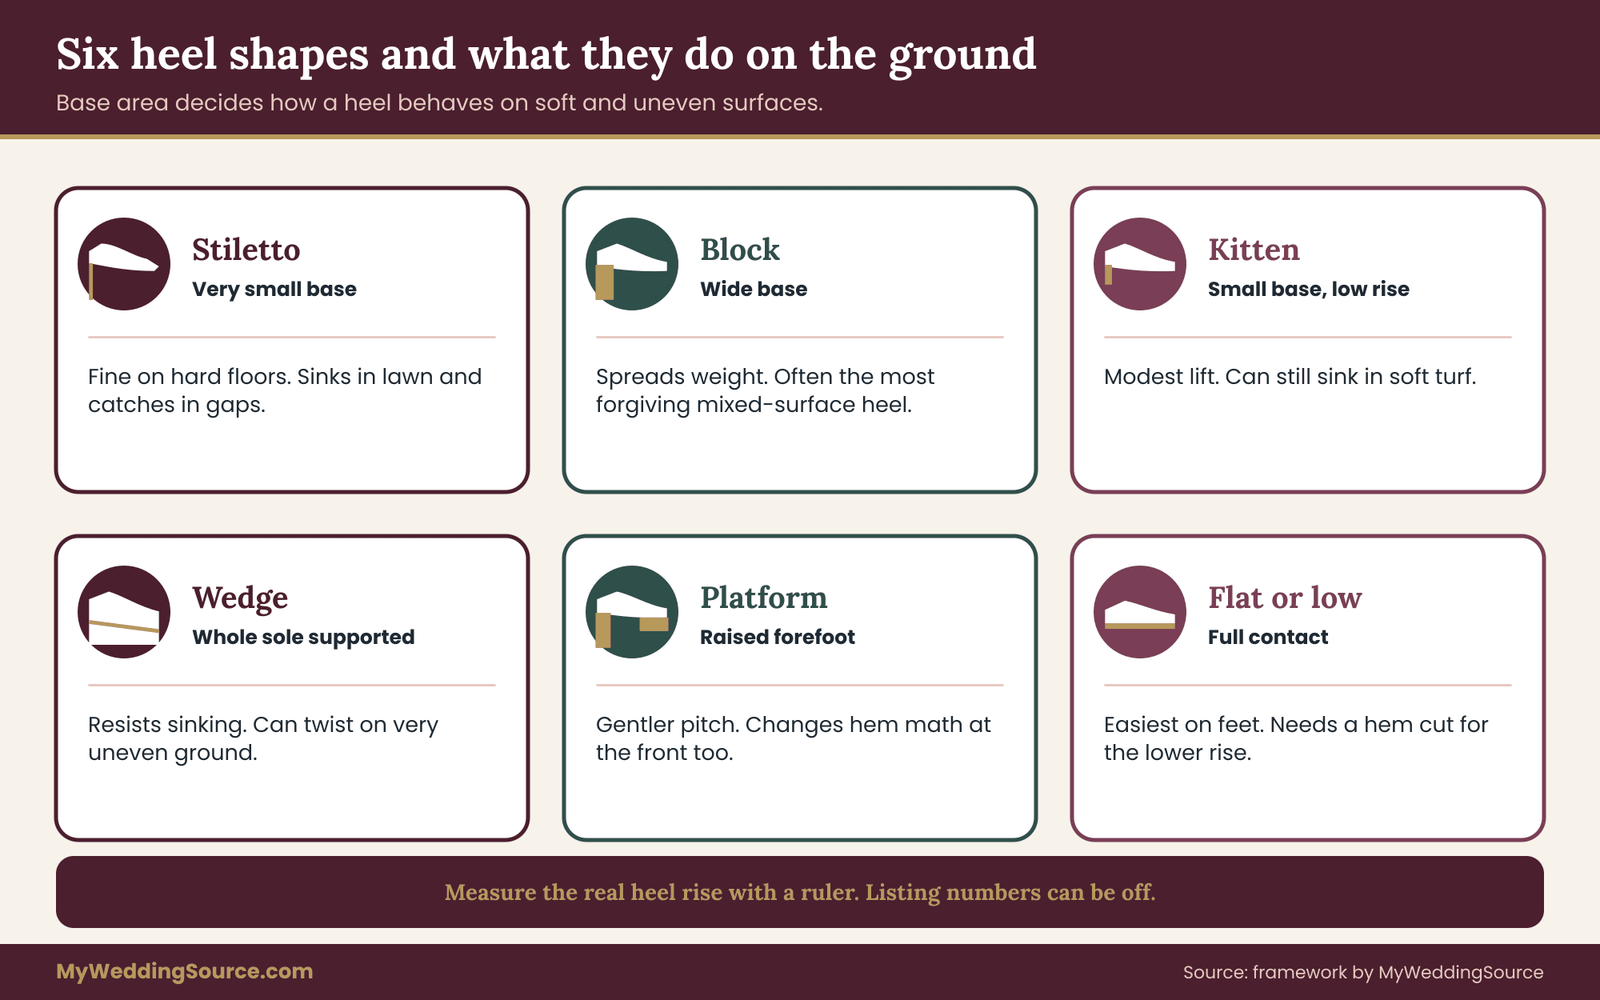
Stiletto or pencil heel. Narrow tip, high pressure. On a hard floor it can feel fine, and it gives a long, narrow line under a gown. On lawn, sand, soft wood or pavers with gaps it sinks or catches. A stiletto is a surface-specific shoe selection, not a general one. If your whole route is indoors, it can work. If any stop is soft or gapped, plan a protector or a different pair.
Block heel. Wide, square or rectangular base. It spreads weight and reduces sinking, which is why it features in so much bridal shoe selection advice. It is often the most forgiving choice across mixed surfaces. The trade-off is that a thick block can look heavier, and a very wide heel on a wet or sloped surface still slides if the sole is smooth.
Kitten heel. Low and slim. It gives a modest lift and a gentle line. It still has a small base, so it can sink in lawn, but the lower height reduces tipping. It suits mostly indoor routes and short outdoor stretches on firm ground.
Cone or flared heel. Narrow at the top, broader at the bottom, or the reverse. Cone heels widen toward the ground and behave like a mid-way option. Reverse-flared heels narrow at the ground and behave like a stiletto. Look at the tip, not the silhouette.
Wedge. The heel and sole are one continuous piece. Because the whole length of the foot is supported, a wedge spreads load across a large area and resists sinking. A wedge can still twist on very uneven ground, and the material of the wedge matters: cork and rope grip differently from smooth resin.
Platform. A thick forefoot sole raises the toe as well as the heel. Platforms reduce the effective pitch of the foot, which can feel more comfortable at the same heel height. They also change the hem math at the front, and a rigid platform can make stairs awkward.
Flat or low heel. Ballet flats, sandals and low block shapes. Easy on the feet, safe on most surfaces if the sole has traction, and the most visible under a short dress. Under a long gown cut for a heel, they require a hem change.
Sneaker or athletic shoe. A fully legitimate choice for comfort and mobility, and often worn under a floor-length gown where the shoe is hidden. The hem has to be cut for it. The sole is usually grippy, which helps on slick floors and helps less on the quick pivots of a first dance.
Pitch: the part of shoe selection nobody mentions
Pitch is the angle your foot sits at, from heel to ball. A high heel with no platform tilts the foot steeply and pushes more weight onto the ball of the foot. A platform of the same overall heel height has a gentler angle. Pitch is a large part of why two shoes in your shoe selection shortlist with the same stated height feel so different after an hour.
You do not need to measure pitch in degrees. You need to compare it. Stand in each candidate pair and notice where your weight sits. If you feel your toes jamming forward or your arch straining, that pair has a steep pitch for your foot. A professional fitter can tell you more, and the American Podiatric Medical Association publishes general foot-health guidance worth reading before you commit to a high heel.
Straps, closures and what holds the foot
A heel shape is only as good as the way the shoe holds your foot. A pump with no strap depends on the shape of the shoe and your foot to stay on. A strap across the instep or around the ankle holds the heel in place and reduces the sliding that causes blisters and slips. A T-strap or Mary Jane style shares the load across more of the foot.
Ankle straps deserve one caution. They hold the shoe firmly, which helps stability, but they can cut across the ankle and are visible against a short skirt. Thin straps can also dig into skin over many hours. Try each strap with the socks or hosiery you plan to wear, because a strap that is comfortable on a bare foot may rub over a seam.
Outsole and traction
The outsole is the part you see least and feel most. Smooth leather is quiet and elegant, and it slides on polished marble, waxed wood and wet stone. Rubber patches or a thin rubber layer add grip. Some shoemakers sell sole protectors or adhesive grips that add traction without changing the look from above.
Be careful about adding grip to a hard-floor shoe if you plan to dance. A sticky sole can catch during a pivot and push stress into the knee or ankle. The goal is controlled grip, enough to avoid sliding and not so much that the foot cannot turn. This is another reason the walk test includes a turn.
How to think about heel height for your own body
There is no correct heel height in shoe selection. There is a height your feet, calves and balance can manage for several hours, and a height your dress was altered for. Heel shoe selection is a negotiation between the two.
Start from what you already wear. If you spend most days in flats and sneakers, a three-inch heel is a leap, and a wedding day is a poor time to make it. If you wear a mid heel comfortably to work, that is a more reliable guide than any rule. Use your habits as the baseline and change by small steps, not large ones.
Then think about the day’s length. A ceremony and portraits might take two to three hours on your feet. A reception may add four or more. The question is not whether you can stand in the shoes for ten minutes. It is how the shoes feel after a long period of standing, walking, and being photographed. That is why the walk test ends with a long stand, and why some couples plan a second pair for later in the evening.
Height relative to your partner and the photos
Some people choose a heel to change how they stand beside a partner in photographs. That is a reasonable goal, and it is also a source of discomfort if the height is beyond what you can wear. A small lift can be handled with a platform or a wedge, which feel less steep. If the goal is a few inches, consider a small raised step or a pose that handles it, not a heel you cannot walk in.
What not to do in shoe selection
Do not choose a heel based on how a model looks in a photograph, because the photograph hides how the shoe is held, how long she stood, and whether the shoe was clipped or padded behind the scenes. Do not choose a heel taller than you have worn comfortably in the last year without a long, honest trial. And do not assume that a pair labeled comfortable by a seller will be comfortable for your foot, because that label is a marketing statement, not a measurement.
A quick decision rule for heel shape and shoe selection
If every stop on your route is a hard indoor floor, any heel shape can work, and you can choose by comfort and style. If any stop is lawn, gravel, sand, pavers, deck boards or cobblestone, favor a block, wedge or low heel, or add a protector to a thinner heel and test it. If your route crosses many surfaces, choose the most forgiving shape you like and rely on the walk test to confirm it. The next section explains how to read each surface so this rule has real facts behind it.
Reading venue surfaces before shoe selection
Venue surfaces are the least visible input to shoe selection, and the one you can learn about for free. Most couples ask about the guest count, the power supply and the rain plan. Few ask what the ground is made of at each point on the route. A single phone call or a short visit answers it.
Ask the venue to describe the surface at each stop, not just the main room. A simple list is enough: where you will get ready, the path to the ceremony, the ceremony ground, the portrait spots, the route to the reception, the reception floor, and the exit. If the venue has a sales brochure, the photos often show the ground, but a photo cannot show whether a lawn is firm or spongy, so ask.
Surface by surface
Lawn and grass. The most common outdoor ceremony ground, and the one that surprises people. Dry, firm turf can be easy to walk on. Irrigated or recently rained-on turf is soft, and a narrow heel sinks until it stops. Aerated lawns, with small plugs removed, have holes that catch a heel tip. Ask whether the lawn is watered the morning of an event and when it was last aerated.
Sand. A beach or dune setting. Heels sink, flats fill with sand, and bare feet are often the practical answer. If you want shoes, consider a wedge or a barefoot-style sandal, and plan how the hem will be held up, because dry sand is abrasive on fabric and wet sand is heavy.
Gravel and crushed stone. Common on farm and winery driveways. Loose stone shifts under a heel, and a pointed tip slips between stones. A block heel is steadier, but any heel can turn an ankle if the gravel is deep. Ask how long the stretch is. A twenty-foot path can be handled with an arm to hold. A long approach calls for a different plan.
Brick, pavers and cobblestone. Uneven by design, with gaps between units. A thin heel can drop into a gap and stop the step. Old brick can also be slick when wet or mossy. Flat shoes with some traction and block heels cope best.
Deck boards and boardwalks. Wood planks with narrow gaps. A stiletto tip fits into the gap precisely. Even a modest heel can catch. Ask the board spacing and whether the deck is wet in the morning from dew.
Stone, tile and polished concrete. Smooth, hard and often elegant. The danger is slipping, especially on polished marble, wet tile or waxed concrete. Leather soles are risky. A rubber patch or a thin grip layer makes a real difference.
Hardwood and dance floors. Usually safe, with a moderate slip risk that depends on wax and dust. A temporary dance floor laid over grass can have seams and can flex slightly. Ask whether the floor is portable and how it is anchored.
Carpet. Soft and forgiving in one way, grabby in another. A thick pile can catch a heel tip or a toe and trip the step. Deep carpet can also tilt a narrow heel. Short, firm commercial carpet is easier.
Stairs, ramps and thresholds. Steps, small level changes, metal door thresholds and ramps. These are where a hem and a heel interact the most, because you may need to lift the skirt and see your feet. Count the steps and ask whether they have railings.

The two surfaces for your walk test
After you have the list, pick the two surfaces that matter most for shoe selection. Choose the hardest, slickest surface on your route as Surface A. Choose the softest, most uneven surface as Surface B. These are the two extremes the shoe has to survive. If you will be on polished marble and a lawn, that is your pair. If you will be on a carpeted hotel corridor and a gravel path, that is your pair.
You do not need to recreate the venue exactly. You need two things in your own home or yard that behave similarly. A tiled bathroom or hallway can stand in for polished stone. A patch of lawn, a gravel driveway or a sandy playground can stand in for the soft side. Ask a friend with a deck or paved patio if you lack one.
Questions to put to the venue
Short, specific questions get useful answers.
“Could you describe the ground at each point a guest would walk: parking, entrance, ceremony, photos, reception and exit?”
“Is the ceremony lawn irrigated, and is it watered the morning of an event? Has it been aerated this season?”
“If it rains, what surface will the ceremony move to, and how long is the walk between the two?”
“Is there a temporary floor over grass or sand, and are the edges taped or ramped?”
Write the answers down in one place. If the venue is vague, ask to visit during a time you can walk the route. If you cannot visit, ask for photos of each surface taken at ground level, because a photo from standing height hides how the surface looks under a heel.
Weather changes the surface and your shoe selection
A surface is not fixed, and shoe selection has to allow for that. Dew softens grass at dawn. A shower turns clay into slick mud. Strong sun heats a deck. A cold morning leaves a thin film on stone. When you plan, imagine the surface in the worst realistic condition for the season, and test against that. The wedding venues guide explains the general questions to ask about rain plans, and the barn wedding venues page is useful if your route includes gravel, wood floors and uneven barn thresholds.
Dress length, hem clearance and shoe selection
Dress length decides how much of the shoe anyone will see, and how much room the hem needs to move, so it shapes shoe selection directly. It is the second input to bridal shoe selection, and it interacts with the first. A short dress puts the shoe on show and tolerates little fuss. A long dress hides the shoe and demands a precise gap.
The common lengths
Floor-length. The hem is close to the ground, usually with a small gap at the front so the toe does not catch. In most floor-length gowns the shoe is hidden, apart from the toe at times. This is the most heel-sensitive length, because the hem is cut for the heel rise of the fitting shoe.
Ballgown and full skirts. A large skirt with layers of tulle or crinoline stands away from the body. The hem may rest a little higher or lower at the edge than at the body, and the layers need room to move. The foot swings under a lot of fabric, so a toe that catches a layer can pull the whole skirt.
Trumpet and mermaid. Fitted through the hip and flaring at the knee or below. The narrow section limits stride length. Steps are short, and a heel that is too high shortens the step even more. Check that you can climb stairs in the fitted section.
Tea-length and midi. Ends between knee and ankle. The shoe is fully visible, so the style carries more weight. The hem does not touch the ground, so clearance is not an issue, and the shoe can be as low or high as you like.
Ankle-length. The hem ends at the ankle bone or just above. The shoe and the ankle are both visible, and any strap that crosses the ankle changes how the line looks. Heel height changes where the hem hits the ankle.
High-low. Shorter in front, longer in back. The front shows the shoe, the back follows a floor-length rule. Both ends need a clearance check.
Train and bustle. A train adds fabric behind you that follows your steps. A bustle lifts it for the reception. The shoe has to work with the train on the ceremony ground and with the bustle on the dance floor. A narrow heel can snag a train. A broader heel is easier to manage.
Why the shoe has to exist before the hem is set
A tailor sets the hem by measuring the gap between fabric and floor while you stand in a specific pair of shoes. That pair becomes the reference. If you change the pair afterward, the gap changes by the difference in heel rise, and the hem can end up dragging or short. This is the single most common avoidable problem in the two topics combined, and it is why the order of decisions matters: choose the shoes before the final fitting, and take them to every fitting after that.
If your ceremony is on a lawn and your dress is cut for a three-inch heel, a switch to flat shoes at the last minute will drop your body by about three inches at the back, and the hem will rest on the grass. The fix is at the tailor, not at the venue. The next section turns this part of shoe selection into a worksheet you can fill in.
The hem clearance worksheet for shoe selection, step by step
The hem clearance worksheet is the written half of the shoe selection method. It is a one-page record of the numbers that connect your shoes to your hem. You can keep it in a notes app, on paper, or in a shared document with your tailor. Its purpose is to replace “the dress looks long in these” with figures that anyone can act on.
For this part of shoe selection, use a ruler or tape measure, a flat floor, a friend to help, and a camera. Each pair of shoes you are seriously considering gets its own column of numbers. Do not mix measurements from different days or different socks.
Step one: measure the heel rise
Heel rise is the vertical distance from the floor to the inside of the shoe where your heel rests. Measure it on the shoe standing on a flat surface, not by guessing from the outside. Stand the shoe on a table or floor, hold a ruler vertical against the back, and read the height at the point where the footbed meets the heel cup. Write it down to the nearest eighth of an inch or the nearest millimeter, and note the unit you used.
Do not rely on the number printed in a product listing. A listed heel height may measure the outside of the back, which differs from the inside rise, and thick insoles change the real figure.
Step two: measure the forefoot rise
Forefoot rise is the thickness under the ball of the foot, including a platform, the sole and any cushioning. Measure it at the widest part of the forefoot. A flat has a small number. A platform has a larger one. The difference between heel rise and forefoot rise gives you the pitch, which is a useful comparison for comfort even without degrees.
Step three: record the fitting-day hem gap
At a fitting, with the fitting shoes on, have the tailor or a helper measure the gap between the hem and the floor at three points: the center front, the side, and the center back. Write the three numbers down. These are your reference clearances. If the dress has a train or several layers, measure the outermost layer and the lining separately.
Do not rely on memory or a general description. Photograph the ruler at each point with the shoe visible. A date-stamped photograph is more reliable than a remembered number.
Step four: compute the new clearance for any other pair
For a different pair, the new clearance at the back is the old clearance plus the difference between the new heel rise and the fitting heel rise. If the new pair is taller by half an inch, the hem gap grows by about half an inch. If it is shorter by an inch, the gap shrinks by about an inch.
Here is an illustrative example, with invented numbers, not a standard. The fitting shoes have a heel rise of 2.5 inches, and the back gap measured one inch. A candidate pair has a heel rise of 1.5 inches. The difference is one inch, so the back gap would shrink to about zero. The hem would rest on the floor and drag. That pair fails the hem test unless the tailor changes the hem.
The reverse case is just as real. A candidate with a heel rise of 3.5 inches adds an inch of height, and the back gap grows to about two inches. The hem would look short, and a lace edge might no longer line up with the floor. The front gap needs the same check using forefoot rise.
Step five: set the clearance target with your tailor
In shoe selection, tailors differ on how much clearance they like, and the right figure depends on the fabric, the dress shape, the floor and whether you will dance. Ask your tailor to name a target at the front and back, and write it on the worksheet. Do not copy a number from this article or from a forum. Use the number your tailor sets for your dress.
Then compare each candidate pair against that target. A pair passes if the computed clearance stays within the tailor’s range at all three points. A pair fails if it is outside. A pair is borderline if it is close, and borderline pairs need a real fitting with the shoes on.

Step six: check movement, not just standing
Standing clearance is the easiest to measure and the least revealing. In motion, the hem lifts, the foot swings forward, and the toe of the shoe must clear the fabric on every step. Ask the tailor to watch you walk, turn and climb a few stairs in the candidate pair. The hem should not catch under the toe, and you should not need to hold the skirt up with both hands on a flat floor.
If you will wear a bustle for the reception, repeat the check with the bustle in place. A bustle raises the back of the hem, which can help clearance, but it can also bunch fabric near the heel.
What the worksheet should contain
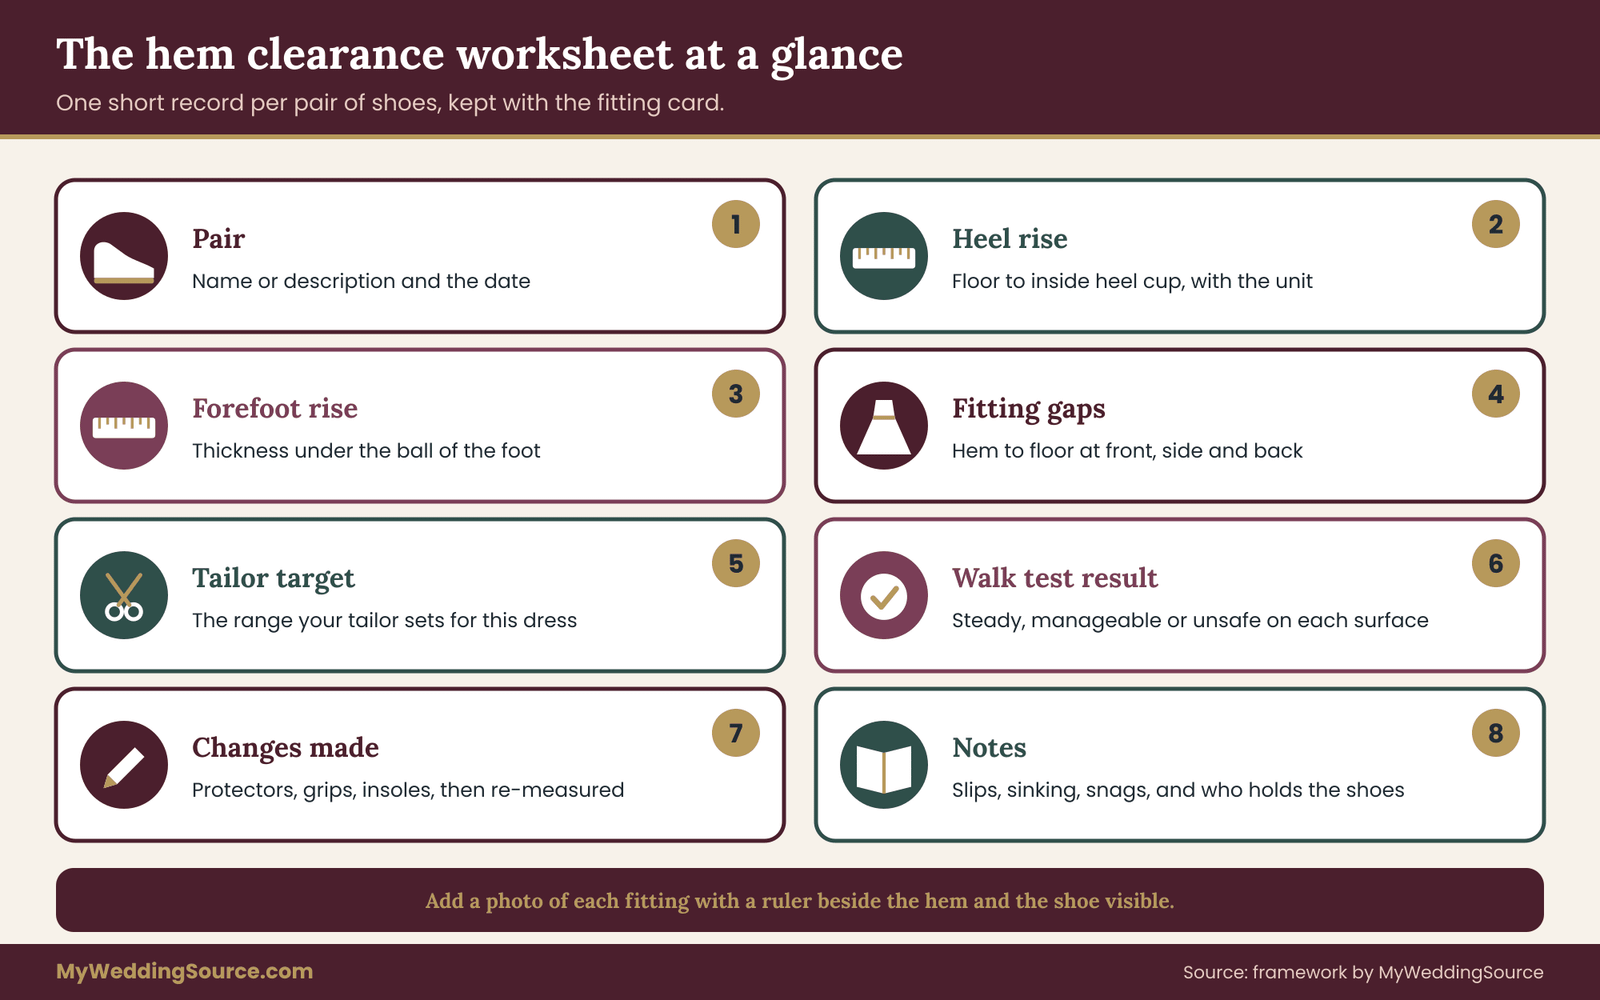
Keep it short. One row per pair is enough, with the following entries written next to each other. The pair’s name or description. The heel rise and forefoot rise with the unit. The fitting clearances at front, side and back. The computed clearances for any other pair. The tailor’s target range. The result of the walk test on Surface A and Surface B. And a line for notes, such as “slipped on the tile” or “heel sank two inches on lawn”.
Common mistakes with the worksheet
Measuring with different socks or hosiery. A thick sock or a thin stocking changes how your foot sits in the shoe by a few millimeters, and that adds up across the measurement. Use what you will wear on the day.
Forgetting the insole. If you add a cushioned insole after the fitting, you have changed the heel rise. Add it before the measurement, or measure again afterward.
Measuring the dress without the underlayers. A petticoat or crinoline changes how the hem hangs. Wear it at the fitting and the check.
Changing shoes after the final fitting. If you must, repeat the fitting. The wedding vendor timeline can help you work out when the last practical date for a hem change falls, since tailors and seamstresses need lead time.
How the worksheet connects to the alteration schedule
Your shoe selection should be locked early enough for the hem to be set against it. In most alteration schedules, the final fittings come several weeks before the wedding, and the hem is usually among the last items completed. That sets your deadline. Ask your tailor how many weeks they need after the last fitting, and work backward. The alterations guide on this site describes what fittings usually involve and how hem work is scheduled.
If you are still undecided, narrow the choice to two finalists and bring both to the next fitting. The tailor can pin the hem for the one you are most likely to wear and tell you what a swap to the other would cost. That conversation is easier before the hem is stitched than after.
What to say to your tailor
“I am choosing between these two pairs. Could you measure the hem gap in each and tell me which one the dress is better suited to?”
“If I wear the lower pair, how much would you need to take up, and how many days would that need?”
“Could you note the shoe I was wearing on the fitting card, with the heel rise?”
Notes on the fitting card prevent the most common failure, which is a later fitter assuming the first fitting was done in different shoes. A short written note that says which pair, what heel rise and which date does a great deal of work for little effort.
Using photos as a backup
Take a photo of each fitting, from the front, side and back, with the shoes visible and the hem on the floor. These photos let you compare shoes later without scheduling another appointment, and they help a tailor remember what they saw. Save them with the worksheet.
When no fitting is possible
If you are buying a ready-to-wear dress or a short dress and cannot get a hem fitting, measure the hem-to-floor distance yourself in the candidate shoe with a friend’s help, standing straight with weight evenly distributed. A phone propped at floor level and a ruler beside the hem give a usable record. You will not have a tailor’s judgment, so choose a more conservative shoe, one closer in height to what the dress was designed around.
Running the two-surface walk test for shoe selection at home
The walk test is the practical core of bridal shoe selection, and the rest of the method supports it. It takes about forty minutes per pair once you have your two surfaces, and it can be done in a hallway and a yard. The goal is not to prove the shoes are perfect. It is to find out early which problems they have, so you can fix them or choose again.
Before you start, set up the conditions. Wear the hosiery or socks you plan to wear on the day.
Wear a slip, petticoat or something with similar weight if your dress has one. If you can, hold a length of fabric or wear a long skirt so you feel how a hem behaves around the shoe. Have a friend nearby to watch, take photos and steady you. Keep the shoes clean and, if you plan to return them, wear them only on clean indoor floors for the first test, because many sellers will not accept shoes with outdoor wear.
The five checks
Run the same five checks on each surface, in the same order, and write down what you feel.
Check one, the stand. Stand still for two minutes with your weight even. Notice where the pressure sits: ball of the foot, toes, arch, heel. Notice whether the heel stays level or sinks, and whether you need to shift your weight to stay balanced. On Surface B, watch the heel for sinking, and note how far.
Check two, the walk. Walk a straight line of about fifteen steps, at your normal pace, then at a slow processional pace. Watch the heel strike, the toe-off and the swing. On Surface A, listen for slapping and notice any slide. On Surface B, notice catches, tilts and the effort needed to lift the heel out of soft ground.
Check three, the turn. Pivot a quarter turn, then a half turn, as you would on a dance floor or when turning to face a guest. On Surface A, check that the sole turns without sticking or skidding. On Surface B, check that the heel does not twist into the ground.
Check four, the step. Climb three or four steps and come back down, carrying the skirt if it needs lifting. Look at the heel’s edge landing on the tread and whether the toe clears the next riser. Steps are where many falls happen, so do not skip this one.
Check five, the long stand. After the other four, stand for ten minutes, in conversation or with a photo session, and notice how the feet feel at the end. If you can, repeat the whole test again after a break, because feet swell and shoes feel different later.
How to score what you find in shoe selection
You do not need numbers, but a simple three-level rating keeps results comparable between pairs. For each check on each surface, write one of three words. “Steady” means no problem. “Manageable” means there is a problem, but a protector, a different heel cap or a small change could solve it. “Unsafe” means you felt a real risk of a slip, a fall, a twist or a trip.
Any “unsafe” mark on either surface removes the pair from the running unless you can change the cause and retest. Several “manageable” marks on the same check suggest the pair is working against you, even if none is dramatic. In bridal shoe selection, a pair with all “steady” on Surface A and “manageable” on Surface B for sinking is a good candidate if a protector solves the sinking.
What fixes which problem
Heel sinking on soft ground. Add a wide heel protector that spreads the contact area, or choose a block or wedge. This is the single most common soft-surface problem, and a protector is often enough for short outdoor stretches.
Heel catching in gaps. Gaps in decks, grates and pavers catch narrow heels. A protector with a broad base helps, as does choosing a block heel. Some couples simply walk with a partner’s arm and place each step deliberately.
Slipping on smooth floors. Rough the sole slightly with a gentle abrasive pad, add a thin rubber sole layer, or choose a pair with a rubber patch. Keep in mind the earlier caution about a sticky sole on turns.
Heel slipping out of the shoe. Add heel grips, a strap or a smaller size, and check the fit with a fitter. Slipping heels cause blisters and unsteady steps.
Toes jamming forward. Change the pitch with a platform or a flatter shoe, or add a forefoot pad, or choose a wider toe box.
Pain in the arch or ball of the foot. Try a different pitch or insole. If pain persists, ask a foot and ankle professional rather than pushing through. The American Orthopaedic Foot & Ankle Society publishes patient information on foot problems and when to seek care.
What to record
Write the date, the surfaces, the weather if outdoors, and the result for each check in a line or two. Note anything you changed and whether it worked. Photograph the shoes from the side, with a ruler in the frame, on both surfaces. A short log means you do not rely on memory when you compare three pairs, which is exactly when memory fails.
A word about breaking in during shoe selection
Many people break in shoes by wearing them around the house. That is reasonable, with one caution: do it on clean, indoor floors if you may return the shoes. A separate step, covered in the section on buying and returns, is to confirm the seller’s return policy before any wear. Breaking in is not the same as the walk test. Breaking in softens leather and shows rubbing. The walk test checks safety and stability on different ground.
Matching shoe selection to the venue type
With the test in hand, you can apply shoe selection to common venue types. These are starting points. The walk test and the venue’s real answers should overrule any general rule.
Garden and lawn ceremonies. The ground is the concern. Favor block heels, wedges or flats, or add protectors. Ask about irrigation and aeration. Think about a plan for the walk from the car, since many guests and the wedding party cross turf in good shoes.
Beach ceremonies. Sand defeats heels and fills flats. Many people go barefoot, wear sandals with a firm sole, or use a wedge. The dress hem matters more here, because sand and salt water damage fabric. Plan the hem with the actual footwear or lack of it in mind.
Barn and farm venues. Barn floors have gaps, thresholds and sometimes dirt or gravel. A block heel or wedge is more forgiving, and a protector can help a narrow heel. See the barn wedding venues guide for questions about floors and rain plans at this kind of site.
Hotel ballrooms and banquet halls. Usually carpeted or hard-floored and flat. The main risks are slick transitions at doorways and a polished dance floor. Almost any shoe style can work. Check the lobby and any stone steps for slip.
Historic and church venues. Stone steps, uneven flooring, old thresholds and sometimes narrow aisles. Smooth leather soles can be slick on polished stone. Check for a rubber patch or a grip layer. Ask about steps and railings.
Courthouses and city halls. Typically polished stone or tile, with security lines and stairs. Plan for a slick floor and for waiting in line. Comfort over a long wait matters more than for a short ceremony.
Rooftops and terraces. Pavers with gaps, metal grates, wind and sometimes a slope. Narrow heels catch easily. A flat or block heel is safer, and a long skirt can catch wind.
Vineyards and orchards. Gravel lanes, uneven grass and soft ground after watering. A block heel or wedge with a protector is a common solution.
Mixed venues. If the ceremony and reception are in different places, test the hardest of each, and plan to carry a second pair if the two ask for very different shoes. That second pair is a topic of its own, because the hem changes with it.
Worked cases: shoe selection in five invented scenarios
The cases below are illustrations, not real clients and not statistics. The names and numbers are invented to show the reasoning. Your own numbers will differ, and your tailor’s targets matter more than any figure here.
Case one: Maya, lawn ceremony and ballroom reception
Maya has a floor-length crepe gown, an outdoor lawn ceremony, and a hotel ballroom reception. She loves a slim heel and has one pair in mind. Her two surfaces are the hotel’s polished lobby floor as Surface A and the ceremony lawn as Surface B.
On the lobby floor the slim heel passes every check, with a mark of “steady”. On the lawn, the stand check shows the heel sinking nearly an inch after two minutes, and the walk check shows effort lifting each step. She marks sinking as “manageable” and the turn as “unsafe”, because the heel twisted in the turf.
She has two options. One is to add a wide protector disc and retest. The other is to move to a block heel of similar rise. She tries the protector first. The retest is steadier, but the disc is visible from the side, so she compares it with a block-heeled pair. She picks the block heel, brings it to the next fitting, and the tailor sets the hem against it. Her worksheet records the heel rise, the three gaps and the date.
The lesson is that a failed test is information, not a verdict. Maya kept the look she wanted by changing the heel shape, and she did it before the hem was set.
Case two: Priya, ballgown and a gravel drive
Priya wears a layered ballgown with a full skirt, at a vineyard with a long gravel entrance and a lawn ceremony. She wants a low heel for comfort. Surface A is her kitchen’s tile, and Surface B is her driveway gravel.
The low block heel passes both surfaces with only a “manageable” mark for the gravel, where the heel shifted slightly. She keeps it. The bigger problem turns up in the step check. On three stairs in her home, the toe of the shoe caught the tulle layer twice. The ballgown needs more clearance at the front than a standing measurement suggests.
She takes the shoes to the tailor and asks for a movement check, not just a standing check. The tailor raises the front of the hem a little and adjusts the underlayer. A standing measurement alone would have missed it. The case shows why the walk and the step checks matter for full skirts.
Case three: Jo, a short dress and a beach
Jo wears a tea-length dress for a beach ceremony and a seaside restaurant. Because the hem does not touch the ground, the hem worksheet is brief. The shoe is fully visible, and the main questions are sand and the restaurant’s wooden deck.
Heels are out. A wedge sinks less than a pump but still fills with sand. Jo goes barefoot on the beach, and then slips on a flat sandal with a rubber sole for the restaurant deck, where the boards have gaps. The two surfaces are sand and wood, and the shoe decision splits accordingly, with a plan for where to put the shoes during the ceremony and who carries them.
Jo’s hem clearance numbers are not critical here, but the clean-feet step, a quick rinse and dry before putting on the sandals, is. The case shows that sometimes the answer to bridal shoe selection is two shoes, or no shoes, for different parts of the day, and that the plan for the switch is part of the plan.
Case four: Lena, a trumpet gown and mobility
Lena wears a fitted trumpet gown and has a past ankle injury. She wants a modest heel and worries about stairs at a historic venue with stone steps and no railing on one flight. Her two surfaces are polished stone and a brick path.
She runs the test with a mid block heel with an ankle strap. The polished stone gives a “manageable” slip on a smooth leather sole, which a rubber patch fixes. The brick path is “steady”. The step check shows that the fitted skirt shortens her stride, and she needs a hand rail.
She asks the venue about steps and railings, and they offer to place a temporary rail. She also checks with a foot and ankle professional about the strap and the heel height given her injury, since her past injury is a personal matter that a general guide cannot judge. Her decision is shaped by that advice, not by a rule of thumb.
Case five: Sam, a groom and an outdoor reception
Sam wears a suit with leather dress shoes for a barn reception with a dirt floor in part of the room. The two surfaces are a polished office floor and a gravel yard. Sam’s leather soles are slick on the polished surface and fine on gravel, and the dirt floor makes them dusty.
A thin rubber sole layer fixes the slip. The hem worksheet for trousers is simpler: the break of the trouser leg over the shoe depends on the shoe, and a tailor sets it in the shoes Sam will wear. The same logic applies, with a different garment. Shoe selection for a groom or an attendant follows the same two-surface test and a trouser break check in place of a hem gap.

What the five cases have in common
In each case of shoe selection, the first pair failed or nearly failed one surface. In each case, a small change fixed it: a different heel, a protector, a sole patch or a hem adjustment. In none of them did a failure surface on the wedding day, because the test came first. That is the whole value of the method, a cheap early failure in place of an expensive late one.
Fit, comfort and when to ask a professional
Stability and hem clearance are only two of the things shoe selection has to cover. It also has to fit. A shoe that passes both surfaces and still hurts is not a good candidate, and a shoe that fits well may let you focus on the day instead of your feet.
Fit basics for shoe selection
Try shoes on in the afternoon or evening, when feet are at their largest. Try both feet, since feet often differ in size. Stand and walk in them, not just sit. Leave a little room at the toe, but not so much that the heel slides. The shoe should hold the heel without rubbing and should not squeeze the sides of the foot.
Check width as well as length. Many people buy the right length in the wrong width and then feel pressure on the sides of the foot. A fitter can measure both feet, and many shoe stores offer this free of charge.
Signs that call for a professional
General guides cannot examine your feet. If you have pain, numbness, a known foot or ankle condition, a past injury, bunions, swelling, or balance problems, speak to a podiatrist or another foot and ankle professional before you commit to a heel for a long day. The American Podiatric Medical Association lists general foot-health information and a way to find a podiatrist. Nothing in this guide is a medical recommendation, and no shoe can be promised to be comfortable.
Comfort aids
Many couples use small additions: cushioned insoles, gel pads for the ball of the foot, heel grips, toe separators and blister protection. Each of them changes the fit of the shoe and the heel rise, so test them in the walk test and measure the shoe again after adding them. Do not add a new aid on the wedding morning. A new insole can change how the shoe sits and push the foot into a different position.
A second pair is a plan, not a failure
Many people decide on a second pair for later in the evening. That is a sensible plan, and the hem worksheet is how it stays safe. Treat the second pair as its own candidate: test it on the two surfaces, measure its heel rise, and give it a row on the worksheet. The backup kit guide on this site covers how shoes fit alongside other accessories, and the separate guide on swapping pairs at a reception covers the hem side in more depth.
Cost logic for shoe selection without invented numbers
Shoe selection is a small line in the budget compared with the dress or the venue, and the cost of a shoe that fails is large.
The cost of a failed pair includes the purchase price, return shipping or restocking, and in some cases a second hem alteration. A hem change can cost more than the shoes themselves, because it is labor. For that reason, many couples spend a little more on a first fitting with the real shoes than on a repair later. Get the tailor’s quote before you decide, because rates differ widely by region. The wedding budget page explains how to set aside a small contingency for exactly this kind of late change.
Buying, returns and the timeline for shoe selection
Timing is where shoe selection often goes wrong, so build a simple schedule before you shop. The aim is to have a tested pair in hand before the final dress fitting, with enough slack for a return or a second try.
A sensible order of steps for shoe selection
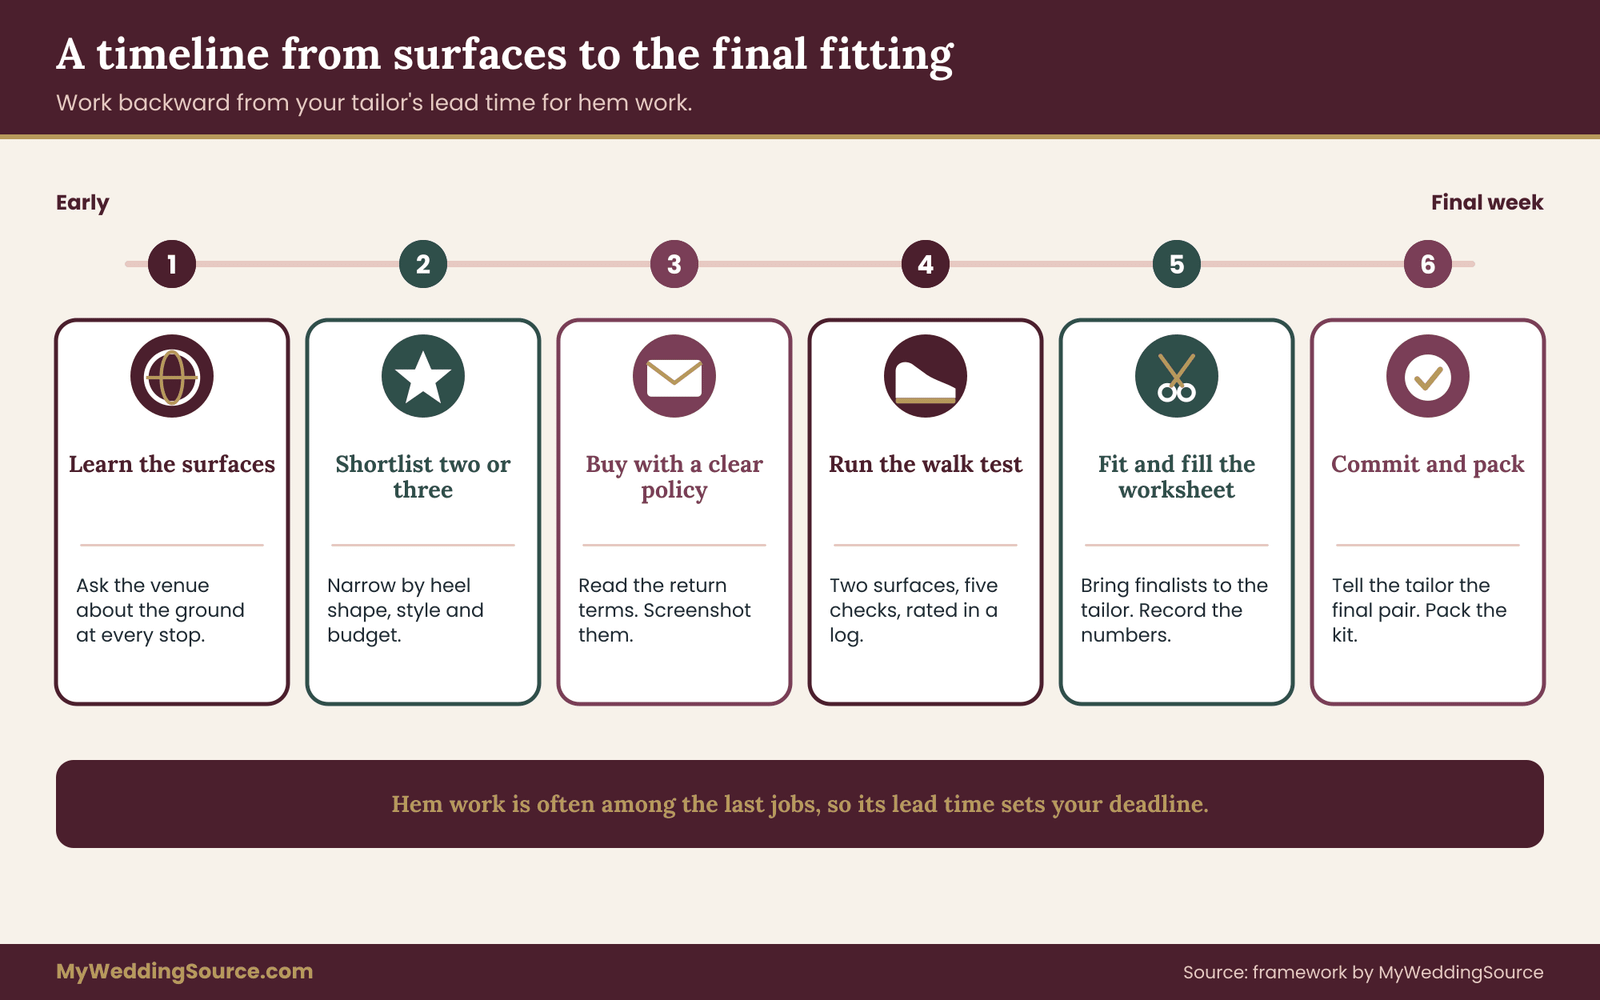
First, learn the surfaces. Ask the venue for the ground at each stop and choose your two test surfaces. Second, narrow to two or three candidates by style, heel shape and budget. Third, order or buy them with a clear return policy. Fourth, run the walk test on clean indoor floors first, then the soft surface if the seller allows it. Fifth, bring the finalists to a fitting and fill in the worksheet. Sixth, commit, and tell the tailor which pair is final.
Work backward from the wedding. Hem work is usually among the last items, so the tailor’s lead time sets your deadline. If you do not yet know it, ask. The twelve month wedding checklist places shopping and fittings on a general timeline, and your own tailor’s calendar overrides it.
Reading a return policy before shoe selection
Before you order, read the seller’s return policy line by line. Look for the return window, whether the shoes must be unworn, whether indoor trial is allowed, who pays shipping, whether sale items are final, and whether custom or dyed shoes are excluded. Take a screenshot of the policy on the day you buy, since returns decide how risky your shoe selection is, because pages change.
Dyed-to-match and custom shoes are often final sale, which raises the stakes of the walk test. If you must order custom shoes, test a stock pair in the same style first, if you can. The Federal Trade Commission publishes general consumer guidance on shopping and refunds, and it is a good starting point if you have a dispute. Ask the seller for current terms in writing.
Online and in-store
Buying in a store lets you try the shoe on, stand and walk. A fitter can measure your feet and suggest a size. Buying online gives more choice but moves the fit risk to you. If you buy online, order your usual size and perhaps one adjacent size, if returns are free, and compare. Do not rely on size charts alone, since sizing varies by maker.
Protecting the shoes before the test
Keep the soles clean until you are sure. Some sellers will not take back shoes with scuffs on the outsole. A strip of painter’s tape on a leather sole is a common way to protect it during indoor tests, although tape can also make the sole slippery, so use it only to protect, not to judge grip. When you test grip, remove it.
The week before the wedding
In the last week, do three things. Wear the final pair for a short time at home, with the dress hem or a similar skirt, and check for rubbing. Put the shoes, protectors, grips and blister supplies in one bag, and pack it with the dress. Give the shoes to someone who will bring them to the venue, and write down who. Do not buy a new shoe, a new insole or a new protector in the last week without testing it.
Edge cases and honest limits of the walk test
No test of shoe selection covers everything. This section lists the situations where the method needs care, and the points where you should go beyond it.
Weather you cannot predict. The walk test uses ordinary conditions. A storm, a heat wave or a surprise frost changes the surface. Keep a wet-weather plan: a pair of rain-ready shoes, a towel and a plan for where the dress is lifted. The test cannot cover every case, but it shows how forgiving a shoe is.
Venues you cannot visit. If you are marrying far from home, you may never touch the surface before the day. Ask for photos at ground level and a description of the firmness. Choose the more forgiving shoe, since you cannot correct a surprise.
Swelling and long days. Feet often swell as the day goes on, especially in warm weather and with a lot of standing. A shoe that fits at noon may pinch at ten. Test late in the day, and consider a size or a strap that adjusts.
Existing foot, ankle or balance conditions. The test is not a diagnosis. If you have a condition, an injury, or pain, a professional should guide the choice, as in Lena’s case.
Mobility aids and accessible routes. If you, a parent or a guest uses a cane, walker or wheelchair, the surface matters even more, and lawn or gravel may be a barrier. The U.S. Access Board and the ADA site publish accessibility guidance, and the venue should be able to describe an accessible route. Plan the wedding party’s shoes and the route together.
Very wide or narrow feet. Standard bridal shoes come in a limited range of widths. A fitter or a maker that offers wide and narrow fits can help. A pair that squeezes the sides of the foot will not pass the long stand.
Pregnancy and recent changes. Foot size and balance can change. This guide does not cover that situation, and a clinician can advise.
Hem fabric and construction. Heavy beaded hems, horsehair braid, lace trims and multiple layers behave differently from a plain hem. The tailor’s judgment outranks any number on a worksheet.
Different shoes for different people. The same method works for attendants, parents and grooms. The surface and the length of the garment differ, but the two-surface test is the same.
What the shoe selection method cannot promise
It cannot guarantee that your feet will be comfortable at midnight, that you will not slip, or that the weather will behave. It reduces the chance of avoidable problems and gives you early warning. It also gives you a record you can show a tailor or a fitter, so a conversation starts from numbers and not impressions. If a result worries you, trust the result and slow down.
Your next steps
This week, start your shoe selection by asking your venue for a description of the ground at each stop, and choose your Surface A and Surface B. Then pick two or three candidate pairs and check each return policy before you buy. When the shoes arrive, set up the worksheet and measure the heel rise and forefoot rise of each pair.
Next, run the five checks on both surfaces for each pair, record the results, and fix or drop any pair that is unsafe. Bring the finalists to your next fitting, have the tailor set the hem against your final choice, and ask for a note about it on your fitting card. In the final week, pack the shoes and your small kit in one place. With these steps done, your bridal shoe selection rests on facts you collected, not on hope.
FAQ
How early should I finish my shoe selection?
Aim to finish shoe selection before your final dress fitting, and ideally before the hem is set. Hem work often comes near the end of the alteration schedule, and the tailor needs the final shoes to set it. Ask your tailor for their lead time, then work backward so you have room for a return or a second try if the first pair fails.
Which heel is best for shoe selection on a lawn?
A block heel or a wedge usually sinks less than a narrow heel because it spreads weight over a larger area. Flats also work. If you love a slim heel, a wide protector can help, but test it on real grass first. Ask the venue whether the lawn is watered and aerated, since both change how soft the ground is.
Can I choose shoes after my dress is hemmed?
You can, but it is risky. The hem was set for the heel rise of the shoes you wore at the fitting. A different pair shifts the gap by the difference in heel rise. If you must change, bring the new pair to the tailor, measure again, and ask what an adjustment would involve and how long it would take.
How do I test shoes without ruining a return?
Wear them only on clean indoor floors first, protect the soles, and check the seller’s return policy before wearing them anywhere else. Many sellers refuse shoes with outdoor wear. If you need a soft-surface test, ask the seller whether a short, careful trial on clean grass is acceptable, and get the answer in writing.
Should shoe selection include heels at all?
That is a personal and sometimes medical question. A heel is a choice, not a requirement. Many people marry in flats, wedges or sneakers, and a floor-length dress can hide them. If you have pain, a past injury or balance concerns, ask a podiatrist or another foot and ankle professional before choosing a heel for a long day.
What if the venue surface changes with the weather?
Plan for the worst realistic condition. Ask about the rain plan and which surface it uses. Test your shoes on both a hard surface and a soft one, and keep a backup pair or protectors in your bag. If the weather turns, the walk test already told you how forgiving the shoes are.
Do protectors and grips change my hem?
They can. A thick sole layer or heel cap adds a little height, and a thin one adds less. Add them before you measure, or measure again afterward, and tell your tailor. A small change in heel rise changes the hem gap by about the same amount, so record it on the worksheet.
How does shoe selection differ for a groom or attendant?
The two-surface test is the same for shoe selection, and the garment check changes. Instead of a hem gap, a tailor checks the trouser break over the shoe. Leather soles can be slick on polished floors, so test them. Ask the tailor to set the trouser length with the pair that will actually be worn.
Sources
- American Podiatric Medical Association
- American Orthopaedic Foot & Ankle Society, FootCareMD
- U.S. Access Board
- Americans with Disabilities Act, ADA.gov
- Federal Trade Commission, consumer advice
- Occupational Safety and Health Administration, walking-working surfaces
- Centers for Disease Control and Prevention, fall prevention
- National Weather Service
- USAGov, consumer protection