
Heel protectors for a grass wedding solve one narrow problem: a slim heel tip that sinks into a lawn, twists an ankle or comes up with a plug of turf. This guide gives you a four-stage method for measuring your heel tip, matching a protector to the ground, and testing the whole setup before the wedding day.
Measure four things on each pair of shoes: the width of the tip face, the depth of the top lift, the taper of the heel just above it, and the total heel height. Match the heel protectors to the lawn: a wide flat disc for soft ground, a snug flared sleeve for firm ground, a full heel cover when you want more coverage. Then run a trial on real grass in the shoes and the gown hem you will wear. Pass or fail each check, and bring a backup pair.
A lawn looks like the easiest floor in the world until you walk across it in four-inch heels. Grass hides soft spots, sprinkler heads, root ridges and holes left by aeration. A stiletto concentrates the weight of a whole person onto a circle smaller than a pencil eraser. The result is a wobble at the worst possible moment, usually during the walk down an aisle that everyone is watching.
Heel protectors are the small, inexpensive accessories sold to fix this. They come as flat discs that widen the tip, as flared caps that slip over the tip, and as sleeves or covers that wrap more of the heel. They are easy to buy and surprisingly easy to buy wrong. A cap that is a few millimeters too wide will not seat. A disc that is too thin lets the heel punch through. A sleeve that grips well on a dry patio can slide off on wet turf.
This guide is about getting that choice right with a few measurements and a short trial, instead of by guessing from a product photo. It focuses on the heel itself. For the wider question of which shoe suits your dress and venue, the guide to wedding day accessories planning covers compatibility, movement and backups, and the wedding dress fit and alterations guide explains how heel height changes the hem.
A note on scope. This is general information, not legal, tax, financial or medical advice. Comfort and fit are individual, so test everything on your own feet, and ask a podiatrist or a qualified footwear fitter if you have a foot, ankle or balance condition.
What heel protectors do on grass, and what they do not
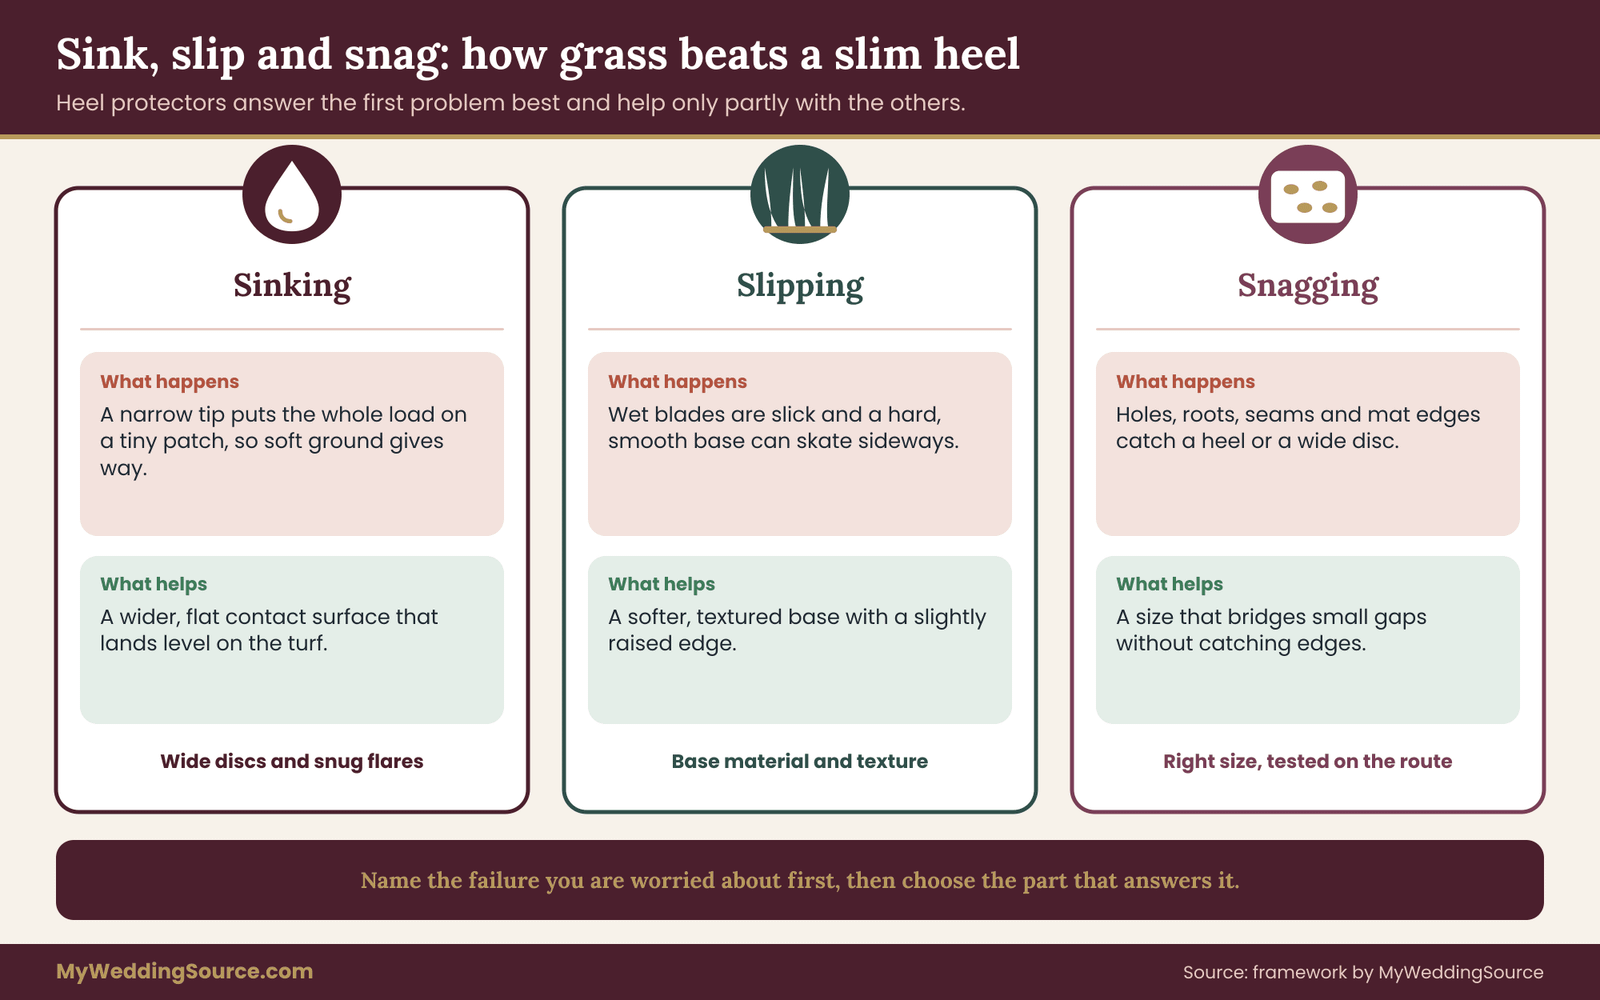
Before you compare products, it helps to be clear about the job. On grass, a slim heel can fail in three different ways, and heel protectors address some of them better than others.
Sinking. A narrow tip puts the same load on a very small area, so the pressure on the ground is high. Soft or damp soil gives way and the heel goes down until something stops it. A wider contact surface spreads the same load over more area and sinks less. This is the problem that heel protectors solve most directly.
Slipping. Wet blades of grass are slick, and some heel protectors make little difference to that. A hard plastic tip on a damp lawn can skate sideways, and a wide disc does not fix that on its own. Grip depends on the protector’s edge, its surface texture and how much of it actually touches the ground when you step.
Snagging. The heel catches in a gap, a root, a hose, the edge of an aisle runner or a hole in the turf. A flat disc can reduce the chance of dropping into a small hole, but a wide disc can also catch on the edge of a mat or a seam. The right size avoids one problem without creating the other.
Heel protectors do not change how stable you feel in the shoe itself. They cannot repair a heel that is too high for you, a strap that is too loose or a sole that is too slick inside. They also do not make a lawn safe if the ground is unsafe. If a venue has standing water, loose gravel over soft soil or steep slopes, the protector is a small piece of a larger decision about footwear, route and surface.
Where the physics helps and where it stops
The idea behind a wider heel protector is simple geometry. If you double the width of a circular contact patch, its area grows by four times, so the same load is spread across four times the area. That is why a modest increase in diameter makes a noticeable difference on soft ground. It is also why a tiny tip, such as the bare metal pin on a very slim stiletto, is the hardest case.
The geometry has a limit. A wide disc only works when it lands flat. Your heel tilts through each step, and on a slope or uneven ground the disc can land at an angle and act like a narrow edge. Heel protectors work best on ground that is firm enough to give the disc something level to land on, and they help most when the ground is only moderately soft.
Who tends to need them
Almost anyone wearing a heel with a narrow tip on a lawn can benefit. The cases where they matter most are a ceremony on grass, a reception tent set directly on turf, outdoor photo sessions and cocktail hours on a lawn. Guests and members of the wedding party face the same risk as the couple. Mothers of the couple, bridesmaids and guests in dress heels often arrive to find a field and no plan.
People who wear block heels, wedges or flats usually do not need heel protectors. A wide block heel already spreads the load, and a wedge has a large footprint. The question of heel protectors belongs mainly to stilettos, cone heels and other narrow tips.
The tip-and-turf method in four stages
The method in this guide has four stages. It is simple on purpose, because the aim is a decision you can repeat for each pair of shoes and each venue.
Stage one is measure. You take four readings from each heel. They take a few minutes with a ruler and good light, and they tell you what size and shape of heel protectors can fit at all.
Stage two is match. You read the venue’s ground and the weather, then match a type and size of heel protectors to the readings. This is where most online advice goes wrong, because it picks a product before it checks whether the product can physically fit the heel and the ground.
Stage three is trial. You test the shoe and heel protectors together on real grass, using a short list of pass-or-fail checks. A protector that looks fine on a hard floor can behave very differently on turf.
Stage four is backup. You decide in advance what you will do if a protector fails, and you pack the pieces to do it.
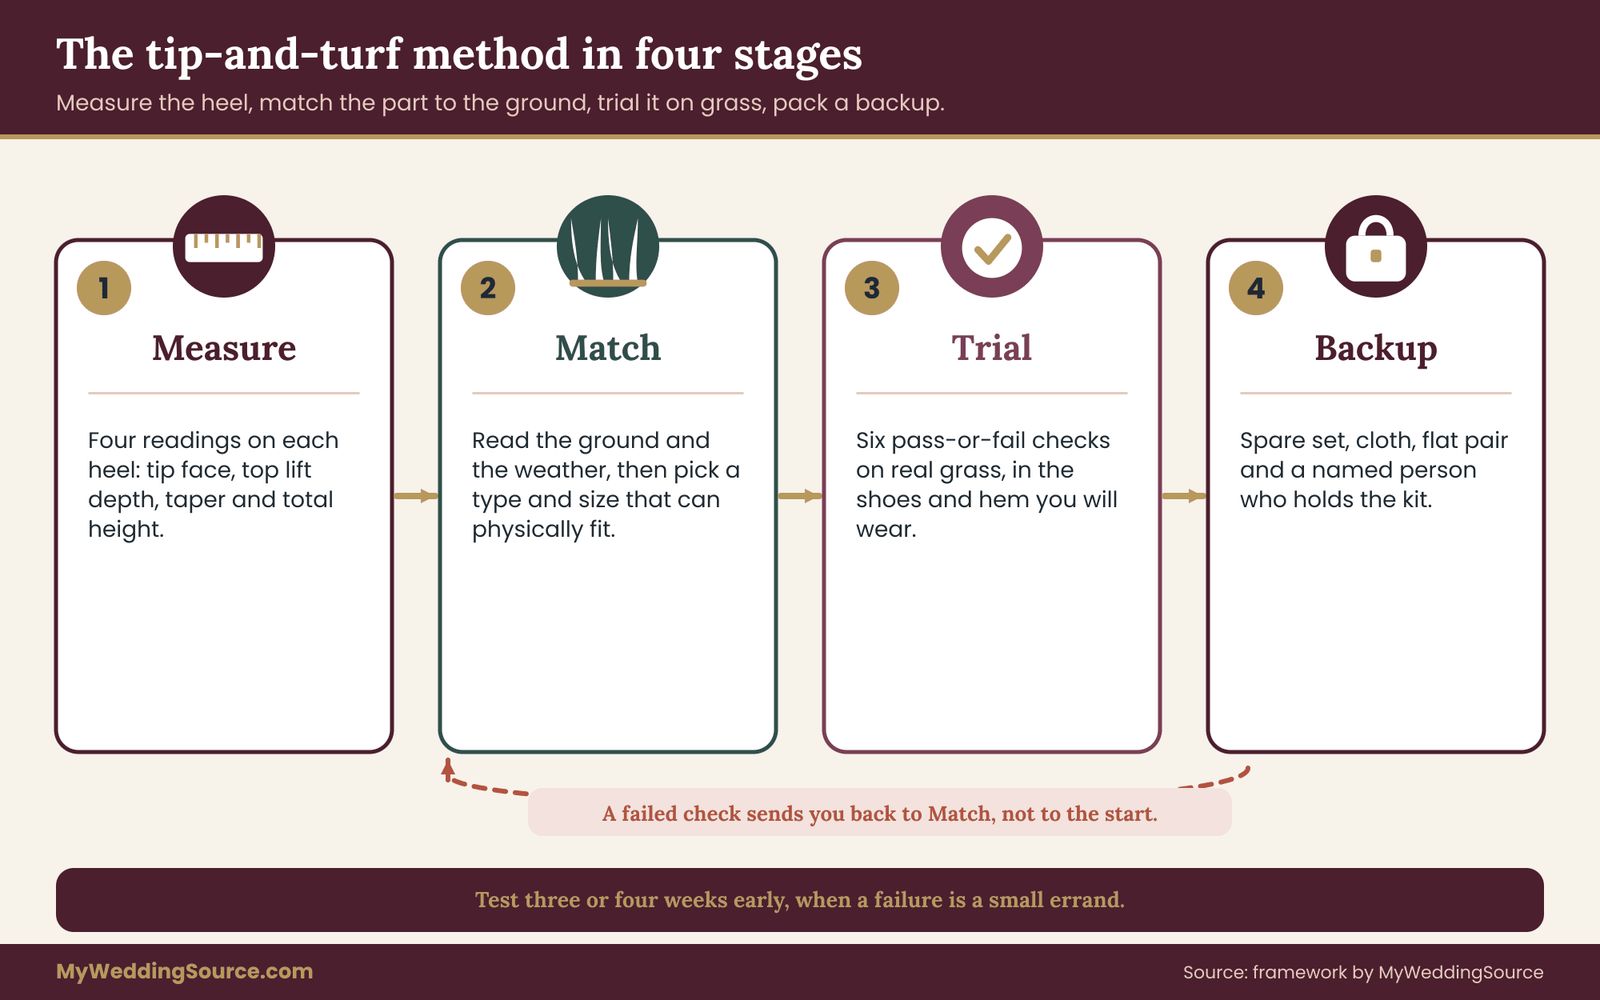
The stages run in order, but the trial can send you back. If heel protectors fail the trial, you do not give up. You go back to the match stage with what the failure taught you. A disc that sank may need to be larger. A sleeve that slid off may need a snugger fit or a different shape. This loop is the main reason to test early, because a failure three weeks before the wedding is a small errand, while the same failure at the ceremony is a problem with an audience.
What the method asks of you
You will need a metric ruler, ideally with millimeter marks, a pencil and paper, and optionally a digital caliper. You will need the exact shoes you plan to wear, or a pair with the same heel. You will need a patch of grass that resembles the venue, which can be a park, a yard or the venue itself if you have a visit planned. And you will need a few minutes of someone else’s help for one of the checks, since watching a walk is easier than feeling one.
The checks use your own wording of pass and fail instead of an industry standard, because no standard covers wedding heels on lawns. The thresholds in this guide are practical rules of thumb. Treat them as a way to be consistent, and adjust them if a fitter or podiatrist gives you better advice for your feet.
Measuring the heel tip: four readings
The measurements are the foundation of the whole process. Product listings often describe heel protectors by a single size, such as a stated diameter or a vague small, medium or large. Those numbers only help if you know your own heel’s numbers.
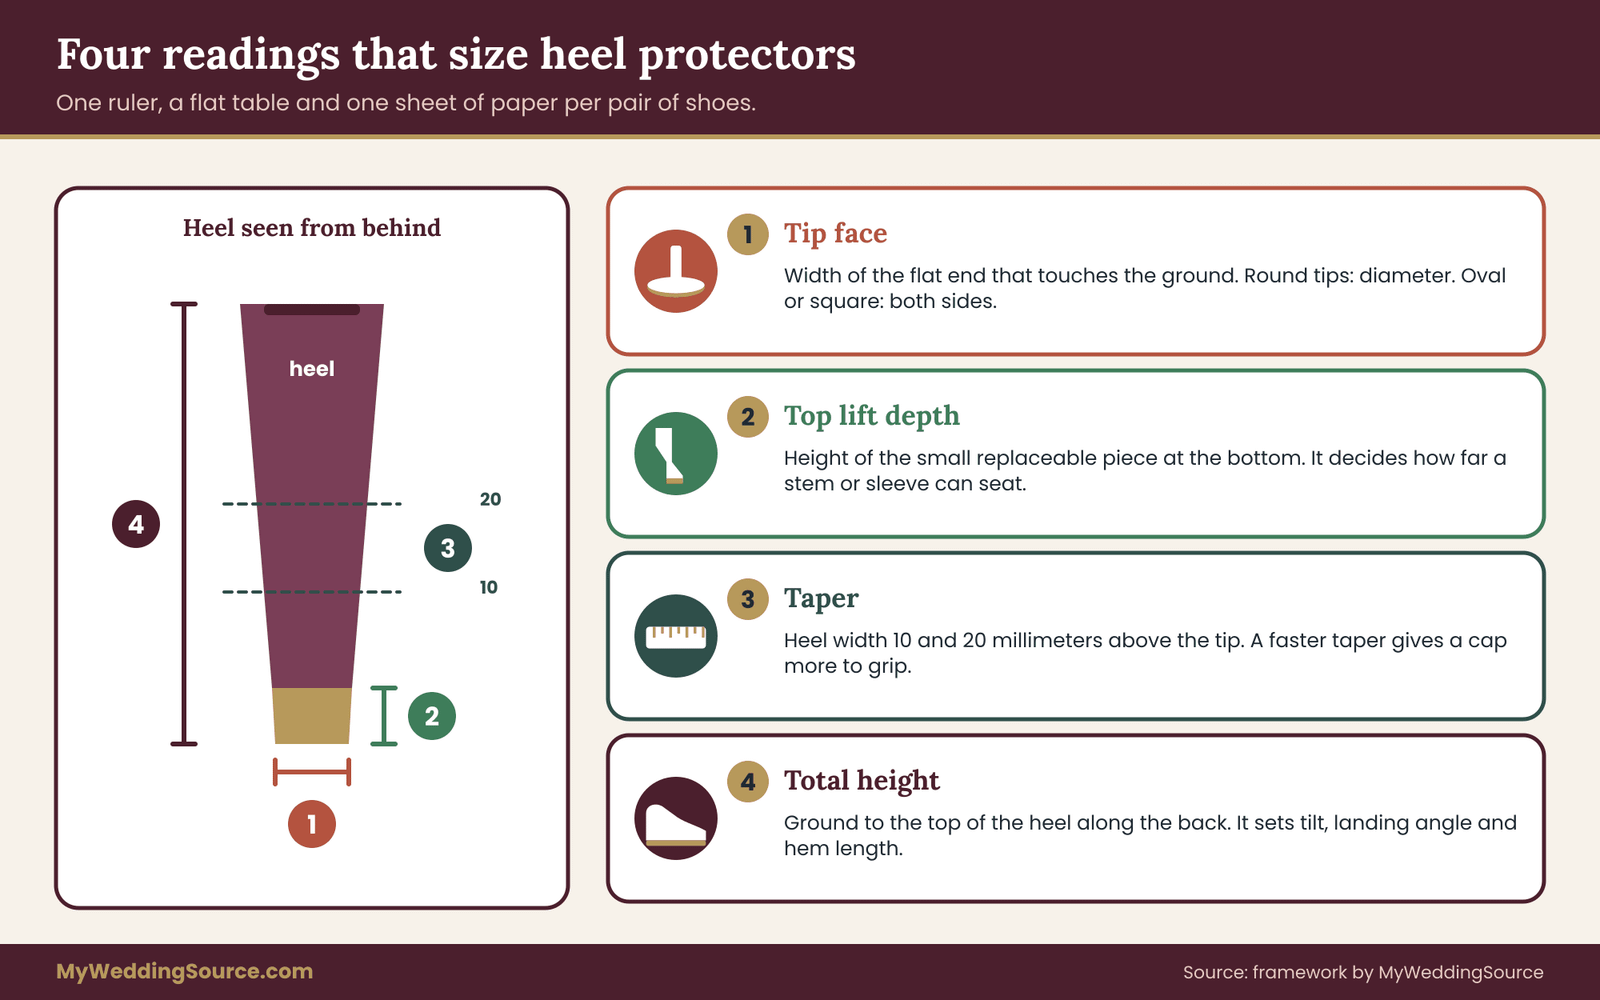
Take each reading on each pair of shoes you might wear, and write the numbers on one sheet of paper with the shoe name above them. Measure with the shoe on a flat table, heel facing you, and look straight on so the angle does not distort the reading.
Reading one is the tip face. This is the width of the flat surface at the very bottom of the heel, the part that touches the ground. Measure across its widest point. On a round tip, this is the diameter. On a square or oval tip, take both the longer and shorter sides. If the tip is a bare metal pin with no plastic cap, measure the pin and note that it is bare.
Reading two is the top lift depth. The top lift is the small replaceable piece at the very bottom of the heel. Measure how tall that piece is, from the ground up to where the heel body begins. A deep top lift gives a sleeve something to grip. A shallow one gives it almost nothing.
Reading three is the taper. Heels narrow toward the ground. Measure the width of the heel at ten millimeters above the tip face and again at twenty. The difference shows how fast the heel tapers. A sleeve grips by friction against that taper, so a fast taper helps hold a cap on, and a nearly straight heel gives the cap less to grip.
Reading four is the total heel height. Measure from the ground to the top of the heel where it meets the shoe, along the back. Taller heels tilt the foot more, which changes how flat the protector lands.
Writing the readings down
A one-line record per shoe is enough. For example, you might write the shoe name, tip face in millimeters, top lift depth, taper at ten and twenty, and heel height, followed by whether the tip is plastic or bare metal. Keep the sheet with your fitting notes. It will also help your tailor, because heel height is the number that decides hem length.
If you do not own a caliper, a printed ruler held close to the heel works for the face and the taper. Round to the nearest half millimeter. Most protector fit problems come from errors of two millimeters or more, so extreme precision is not necessary. The goal is to avoid a clearly wrong size.
Sizing heel protectors against the readings
With the numbers written down, a shopper can compare them with a listing’s stated inner and outer measurements. A cap or sleeve has an inner diameter that must fit over the tip and a depth that decides how far it slides up. If the inner diameter is smaller than your tip face, it will not go on. If it is larger by a lot, it will be loose. For a push-on cap, a snug fit that needs a firm press is normal. For a flared sleeve, the fit at the top of the sleeve matters as much as the fit at the tip.
A disc style works differently. It usually attaches by a screw, a pin or a stem that fits into the heel, or it clips on. For those, the key readings are the tip face, which decides whether the stem fits, and the top lift depth, which decides whether the stem can seat fully.
Reading the lawn before you pick heel protectors
The second stage starts with the ground, because the right heel protectors for a dry, mown lawn are not always the right ones for a damp field. You do not need a soil test. You need five questions answered, ideally by the venue and then confirmed by your own eyes.
How firm is the ground on a normal day? A well-kept lawn on compacted soil is firm. A field with deep roots, a sandy base or recent rain is soft. Press the heel of your hand into the turf. If your palm sinks easily, a narrow heel will sink too.
How wet will it be on the day? Grass that was watered the night before, or by an automatic sprinkler in the early morning, behaves differently from grass that has been dry for a week. Ask whether the sprinklers will be switched off before the event, and for how long.
Has the lawn been aerated or reseeded recently? Aeration leaves small holes. Reseeding leaves soft patches. Both are trouble for a slim tip, and a flat disc can bridge small holes in a way a bare tip cannot.
Is the route grass the whole way? Many venues have a paved path to a lawn, then a runner or a set of mats over part of it. Heel protectors that are right for the turf may be unnecessary on the pavement and slightly awkward when you transition from one to the other.
What does the venue allow? A few venues restrict what can be attached to or placed on their turf, such as stakes, anchors and aisle materials, and some protect their lawns from point loads. Ask directly instead of guessing.
Questions that belong in the venue visit
If you are touring the venue anyway, add a few lawn questions to your list. Where will the ceremony chairs and aisle go, and will they sit on grass or on a platform? Is there any slope along the route? Where are the sprinkler heads and irrigation lines, and are they flush with the surface? Are there tree roots, drainage covers or utility boxes in the walking zone? What is the fallback surface if the ground is too wet?
The venue technical walkthrough guide explains how to measure and photograph a site and what access information to collect from a venue manager, and the same visit can answer these footing questions. If the setting is a farm or a field, the guide to barn wedding venues describes the ground conditions that come with rural sites, from gravel parking areas to uneven pastures.
Four ground types and what each asks of a protector
It helps to sort the ground into four rough types. These are not scientific categories, only a practical way to decide what to test.
Firm and dry. A mown lawn that has been dry for days. The risk is mostly a heel that catches in a thatch of old grass or a small dip. A modest flared cap or a small disc is usually enough, and a tight sleeve is not necessary.
Soft or damp. Recently watered or after rain. The risk is sinking. A wider, flatter contact surface matters most here, and heel protectors need to resist being pulled off when the heel lifts out of wet soil. A suction effect from mud can pull a loose cap off with every step.
Aerated, patchy or lumpy. Holes, ridges and bare soil. A wide disc bridges small holes but can tilt on ridges. In this case you may decide that heel protectors are not enough on their own and plan a firmer route or alternative shoes.
Mixed surface. A path of stone, gravel or pavers that crosses turf. Heel protectors have to cope with both. Hard discs can slip on smooth pavers and click on stone, and gravel can lodge in the gap between a cap and the heel.

Notice that the same protector can pass on one ground type and fail on another. That is why the match stage asks for the ground first. A bride who tests heel protectors on a dry driveway has learned about driveways.
Looking after the venue’s turf
Wide heel protectors are kind to the grass as well as to you, because they spread your weight, but you should still respect the lawn. Do not bring anything that scratches or punctures the turf without asking, such as stakes for signs or anchors for an arch. Replace any divot you lift. If a mat or aisle covering will sit on the grass for more than a day, ask the venue how long it can stay down, since turf under a cover can yellow without light. These are small courtesies, and they are the sort of detail that keeps a venue relationship friendly.
Weather you cannot control
Weather changes the answer on the day itself, which is why you should plan for a range. A wedding scheduled for an afternoon on dry grass can end up on wet grass if a shower arrives, and wet grass changes the grip. The National Weather Service at weather.gov is the place to check the forecast, and it is worth checking again the evening before and the morning of.
If rain is likely, decide before you leave home whether the ceremony route stays on grass, whether the venue has a rain plan, and whether you will carry a second pair of shoes. Reading this decision ahead of time removes a stressful choice from the wedding morning. If the plan involves renting flooring, mats or a tent, arrange them early, because those items change the footing.
The main types of heel protectors compared
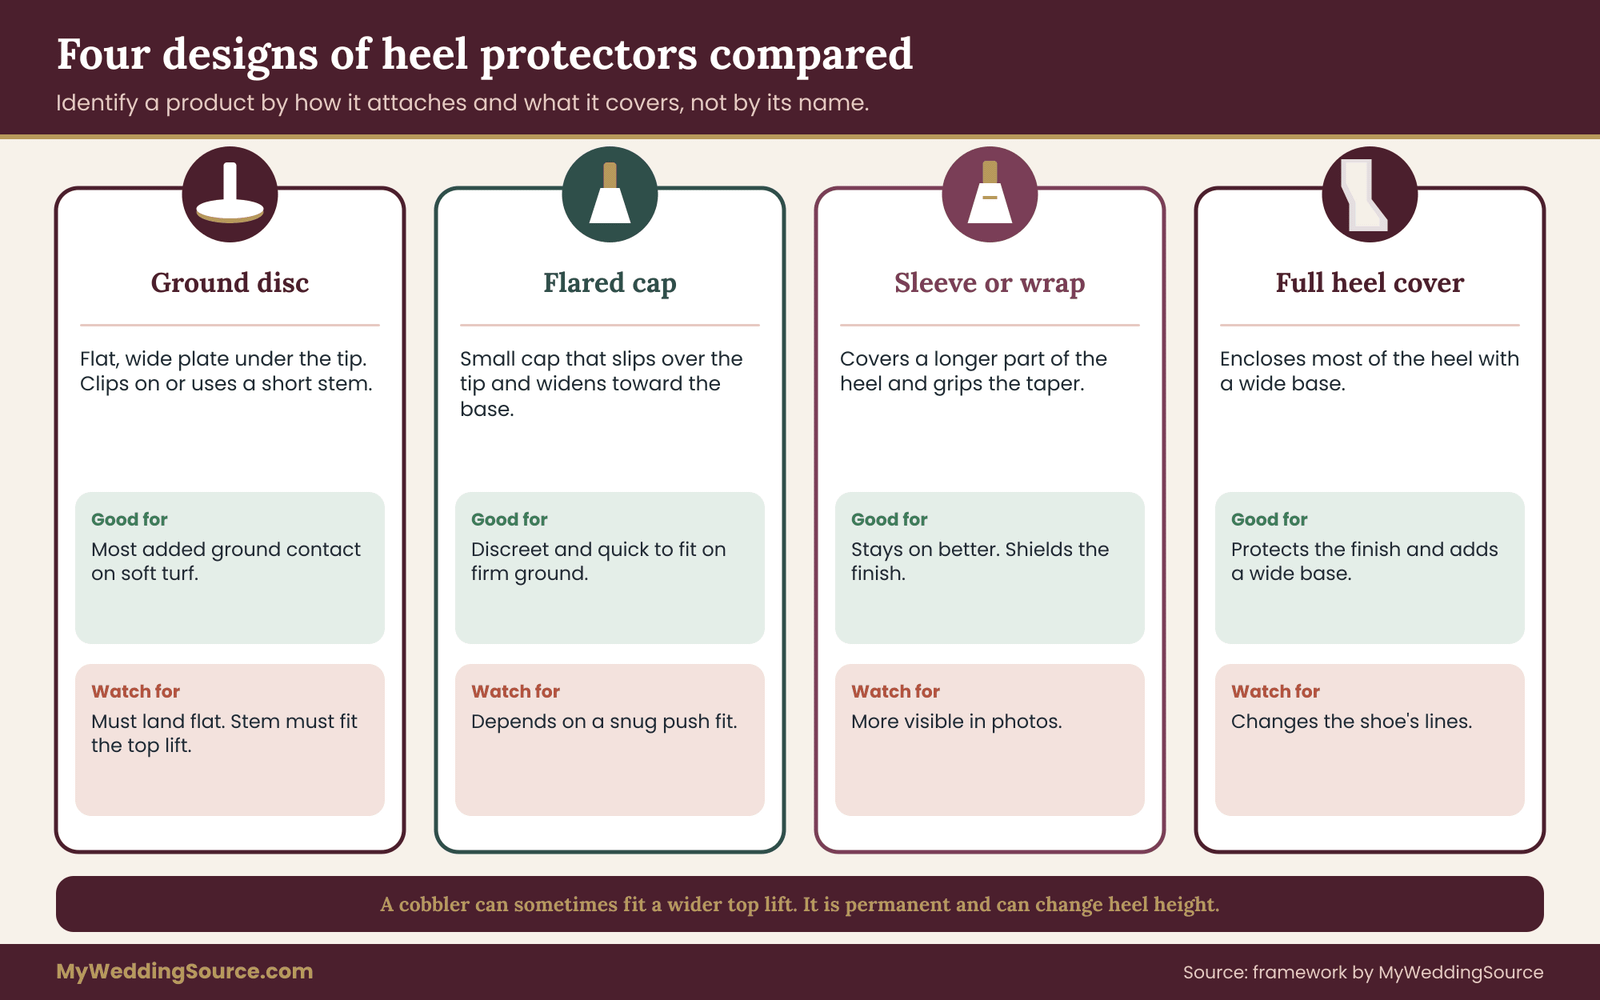
Heel protectors for grass come in a handful of designs. Names vary by seller, so it is more reliable to identify a product by how it attaches and what it covers. Here are the four common designs and how each behaves on a lawn.
Ground discs. A flat, wide plate that sits at the bottom of the heel and increases the contact area. Some clip over the tip, some have a stem that replaces or sits inside the top lift. They give the biggest increase in ground contact. Their weakness is that they need to land flat, and some designs are noticeable from the side.
Flared caps. A small cap that slips over the tip and widens toward the bottom, like a tiny skirt. They add less area than a disc, but they are discreet and quick to fit. They work best on firm to moderately soft ground and depend on a snug fit to stay on.
Sleeves and wraps. These cover a longer section of the heel, sometimes a third or more of its height. The extra coverage adds grip against the taper, so they are less likely to slip off, and some include a wide base. They can change the look of the heel noticeably, which matters for photos.
Full heel covers. A cover that encloses most or all of the heel, often made of a stretchy material or a soft plastic. They protect the heel finish and add a wide base. They are often the most visible option and can interfere with the shoe’s lines.
What each design is good for
The best design depends on what you are protecting against. If sinking is your main concern, a ground disc is the most direct answer. If the main worry is a heel that gets scuffed or marked by grass stains, a sleeve or cover helps more than a disc does. If you want the least visible solution, a flared cap with a color that matches the heel is usually the quietest.
Mixed designs exist, such as a disc with a flared cap attached. Their performance depends on the details, and the trial later in this guide is how you find out.
Replacing the top lift as an alternative
One option sits outside the accessory aisle: a cobbler can sometimes replace the top lift with a wider or softer one. This changes the shoe itself instead of adding a part on top. It can be an elegant solution for a pair that you love and will wear for years, since it removes the risk of a protector falling off. It also has costs. It is a permanent change, it may alter the heel height by a millimeter or two, and not every heel can take a wider lift.
If you are considering it, show the cobbler your four readings and ask what is possible on that heel. Heel height changes matter because they affect hem length, so tell your tailor about any change. It is also a reason to do this early, well before the final fitting.
Reading a product listing without guessing
Listings are written to sell, so read them the way you would read a contract: look for the specific claims. Look for stated measurements, such as inner diameter, outer diameter and depth. Look for the material, since soft rubber and rigid plastic behave differently on wet grass. Look for the attachment method and whether it needs tools. Look for the return policy, since a trial only works if you can send back a part that does not fit.
Be wary of listings that offer a single size for every heel, show only a photo on a hard floor, or make broad promises about never sinking. A statement like that cannot be true of every heel on every lawn. Use the readings you took to decide whether a listing’s numbers can fit your shoe, and treat everything else as marketing.
If a seller has a reasonable customer service channel, send a short, factual message. A good message names your tip face width and top lift depth, states that you will use the heel protectors on grass, and asks whether the product is likely to fit and what the return terms are. A clear answer is a good sign, and a vague one tells you something too.
Choosing the size and grip: decision rules for heel protectors
With four readings and a ground type in hand, you can narrow the choice to a size and a design. The rules below are practical shortcuts. They will not replace the trial, but they will keep you from buying parts that cannot possibly work.
Rule one: the protector must fit the tip before it does anything else. Compare your tip face and top lift depth with the listing’s inner measurements. If a cap’s inner diameter is smaller than your tip face, reject it. If a disc needs a stem longer than your top lift is deep, reject it. There is no point testing a part that cannot seat.
Rule two: widen as the ground softens. On firm ground a small flare is enough. On soft ground, choose the widest contact surface that still looks acceptable with the shoe and still lands flat. A useful way to think about it is area, not diameter. A disc with a face about two and a half times the width of your tip has roughly six times the contact area, because area grows with the square of the width.
Rule three: the protector should be no deeper than it needs to be. A deep sleeve adds grip but also adds height, and any added height changes the heel’s total height. If your heel protectors add a few millimeters, the hem and the way you stand change a little. Account for it when you measure for the hem.
Rule four: prefer a design that stays on when the heel lifts out of damp turf. Every step on soft ground pulls the heel upward against suction. The attachment, whether it is friction, a clip or a screw, has to resist that. If a design relies only on a loose push fit, test it on wet ground in particular.
Rule five: choose the quietest design that passes. Heel protectors that work but draw every eye are a poor trade if a discreet option also passes. Photos last far longer than the walk across the lawn.
Grip: what actually creates it
Grip on grass comes from three places. The first is the material of the protector’s base, since a softer, textured rubber generally holds better on a wet blade than a hard, smooth plastic does. The second is the edge, because a slightly raised rim or small ridges can bite into turf and dirt, while a perfectly flat, hard base can skate. The third is the contact area, since a larger area spreads the load and resists sinking.
There is a trade-off between grip and release. A base that grips turf well can also hold on when you want to lift your foot, which can be awkward. A trial reveals that quickly. If lifting your heel from the grass feels like pulling out of mud, the grip is too aggressive for the way you walk, or the ground is too soft for the approach.
Material and edge: what to look for
When two designs fit, the material can decide between them. Soft rubber and soft thermoplastic bases tend to grip wet grass better than hard, smooth plastic, but they also wear faster on pavement and can pick up dirt. A hard base lasts longer and slides more easily on wet blades. A slightly textured or ridged underside helps on turf, while a perfectly polished one tends to skate.
Check the edge too. A sharp edge on a disc can cut into turf and catch at a pivot, while a rounded edge releases more smoothly. If you cannot see the product in person, ask the seller for a close photo of the underside and the edge, and read reviews for mentions of wet grass specifically instead of general praise.
Fitting a protector correctly
A good part can still fail if it is fitted badly. Clean the tip first, since dust and wax reduce friction. Press a push-on cap straight onto the tip, not at an angle, until it stops. If a screw or stem is involved, seat it fully and check that nothing protrudes beyond the face. Look at the shoe from behind and check that the heel is vertical and the protector is square to the ground. Then press the heel against a hard floor and rock your weight forward and back. Any click or shift means the fit is loose.
A trial log you can copy
You do not need software for the log. A few lines per test are enough: the date, the shoe, the protector, the ground and its moisture, and a pass or fail for each of the six checks, with a note on anything odd. Write down the sink depth in millimeters. When you repeat the trial on a different day, add a new block instead of overwriting the old one, so you can see what changed.
Heel height and pitch change what works
A very high, thin heel tilts the foot steeply and puts a large share of the load on the tip. It is the hardest case for any heel protectors. A shorter heel or a thicker one is more forgiving. If you are still choosing shoes, the heel itself is part of the answer, and the guide to wedding day accessories planning is a good place to compare compatibility and backup options before you commit to a pair.
If you already own the shoes, do not abandon them yet. Run the readings, choose a design that matches, and test. A pair that passes the trial is a good pair for that lawn.
When two choices pass
Sometimes two designs pass every check. In that case, choose by three tiebreakers. Pick the one that is quicker to put on, since it will be put on in a hurry. Pick the one that looks better in profile. And pick the one that you can buy in a spare, because a second set is the cheapest backup there is.
The trial: testing heel protectors on real grass
The third stage is the trial. Its purpose is to find problems while they are still cheap to fix. A trial that takes forty minutes three or four weeks before the wedding can save you from a failure at the ceremony.
Run it with the exact shoes, the heel protectors fitted, the undergarments and hem you plan to wear if possible, and on grass that resembles the venue. A dry yard is a useful first test. If you can, repeat it on damp grass after watering or after rain, because that is where many failures hide. Ask a friend to watch and to record a short video. A video shows ankle wobble and heel slip that you will not feel.
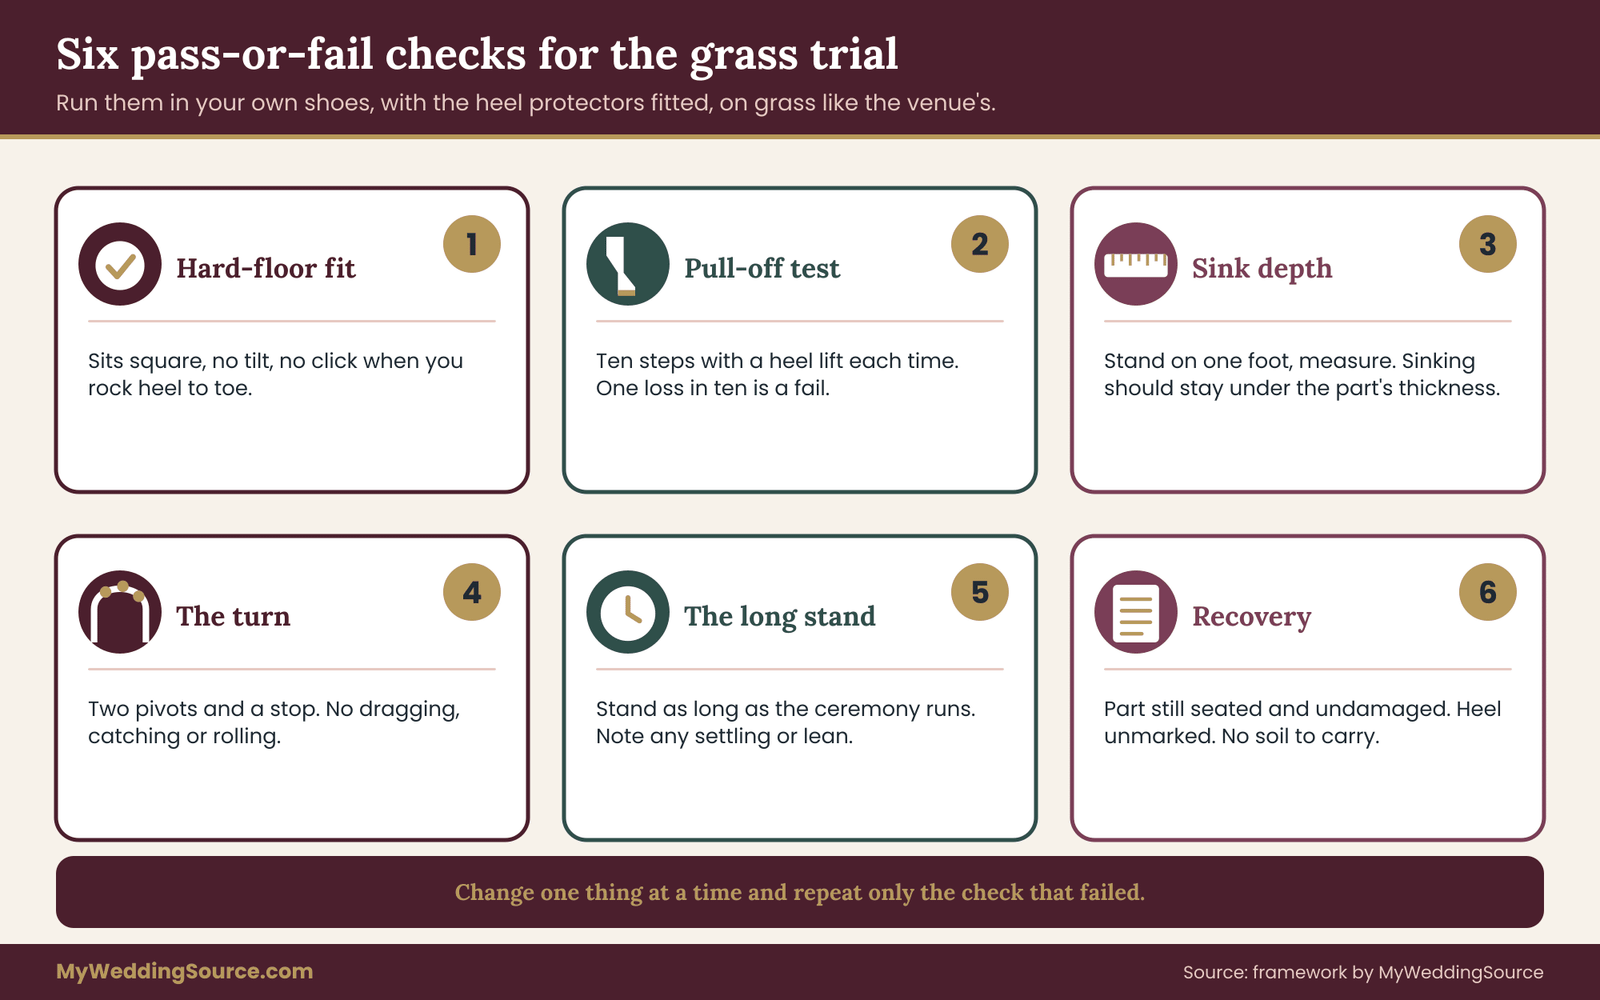
There are six checks. Each one is pass or fail, and a fail sends you back to the match stage.
Check one is the fit on a hard floor. Fit the heel protectors and stand on a hard surface. They should sit square, with no gap and no tilt, and it should not wobble when you rock your weight from heel to toe. If it wobbles on a hard floor, it will do worse on grass.
Check two is the pull-off test. Walk ten steps on grass and lift your heel each time. Both heel protectors should stay on every time. If one comes off even once in ten steps, reject it or change the fit. A part that stays on nine times in ten will leave on the tenth step, and that step will be during the processional.
Check three is the sink depth. Stand still on the lawn with your full weight on one foot, then step off and measure how far the heel sank, using the ruler. A rule of thumb for this guide is that the heel should not sink deeper than the thickness of the protector. If the protector’s rim is below the surface of the turf, the disc is too small or the ground too soft for it.
Check four is the turn. Walk a short path that includes two turns and a stop, as you would at an altar or for a photo. Pivoting is where a heel catches. Watch for the heel dragging, the disc catching on a blade, or the foot rolling.
Check five is the long stand. Stand in place for the length of a ceremony, which for many couples is a few minutes to half an hour. Sinking is slow, and a heel that seems fine at ten seconds can have settled by three minutes. Note any lean or discomfort.
Check six is the recovery. Remove the shoe, check the heel protectors for damage, and look at the heel. Is the protector still seated, scuffed or cracked? Did it pick up soil or grass that will transfer to the dress hem or a carpet?
Recording the trial
Write down the result of each check in a line or two. Note the date, the ground conditions, the shoe and the heel protectors. A short log has two uses. It lets you compare two heel protectors fairly, and it gives you the evidence to return a product that failed with a clear explanation.
What to do with a failed check
The failed check tells you what to change. A fit failure means a different size or a different fit method. A pull-off failure means more grip, a snugger sleeve or a screw attachment. A sink failure means a wider disc, firmer ground or a different shoe. A turn failure often means a part that is too wide or too sticky for pivoting, so try a smaller, smoother design. A long-stand failure suggests the ground is too soft for any protector, and the plan should change.
Change one thing at a time and repeat only the failed check. That keeps the log clear and the trial short. If you have changed three things and a check passes, you will not know which change fixed it.
A worked example: two pairs of shoes and one lawn
This example is invented, and the numbers are illustrative so you can see the method in motion. It is not a test of any product, and the measurements are not averages of anything. Imagine a bride named Dana who is marrying on a private lawn in early autumn. She owns two pairs of shoes she likes: a slim stiletto for the ceremony and photos, and a block-heeled sandal for dancing.
Stage one, measure. Dana measures the stiletto. The tip face is nine millimeters across, a round plastic cap. The top lift is eight millimeters deep. The heel is twelve millimeters wide ten millimeters above the tip and fourteen at twenty, so it tapers slowly. The total height is ninety millimeters. The block heel has a tip face of thirty millimeters, a flat rubber pad.
Stage two, match. The venue manager says the lawn is mown turf over compacted soil and the sprinklers will be off the night before. She expects dry to slightly damp ground. The block heel’s thirty-millimeter pad already spreads the load, so Dana decides it needs no heel protectors. The stiletto is the case that needs heel protectors.
Dana looks for heel protectors that can work on a nine millimeter tip. She compares it with a disc listing that gives a twenty-five millimeter face. Since area grows with the square of the width, that is a bit under eight times the area of her tip: twenty-five over nine is about two point eight, and squared is about seven point seven. She also notes the stem on the disc is ten millimeters long and her top lift is only eight deep. Rule one fails for that disc, so she looks for another.
She finds a second disc with a six-millimeter stem and a twenty-two millimeter face, which is about six times the area. It passes the fit rule. She also buys a flared cap rated for her tip as a second option.
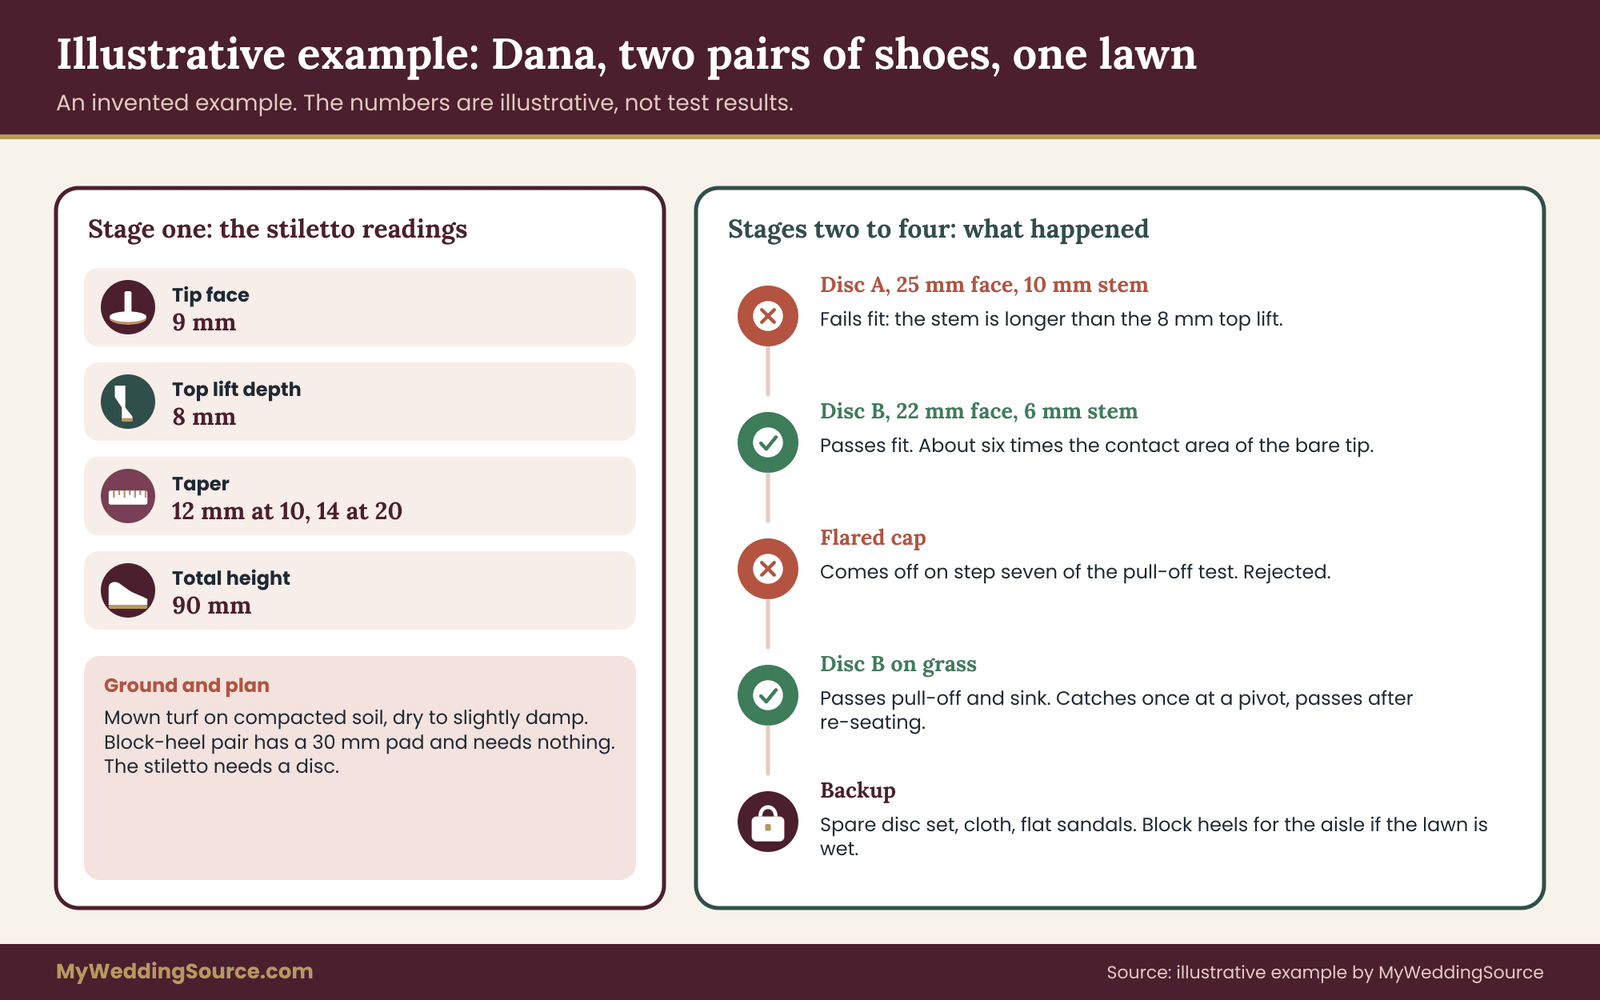
Stage three, trial. She runs the six checks on a neighbor’s lawn. On a hard floor, both heel protectors sit square. In the pull-off test, the flared cap comes off on the seventh step. She rejects it. The disc stays on for all ten steps. In the sink test, the bare stiletto sinks well past the cap’s thickness, which tells her why she is doing this. With the disc, the heel sinks only slightly, less than the disc’s thickness, so it passes.
The turn check shows a small problem. At a pivot, the edge of the disc catches in a blade and her foot twists a little. She does not alter the disc. She re-seats it in the other orientation that the instructions allow, and repeats the turn. It passes the second time. The long stand passes. At recovery, the disc is intact, but it has picked up some soil, so she plans to wipe it before putting on the shoes at the venue.
Stage four, backup. Dana packs a second disc set in her emergency kit, plus a small cloth and a pair of flat sandals. She decides in advance that if the ground is wet enough to fail the sink check on arrival, she will walk the aisle in the block-heeled pair and keep the stiletto for the photos on the paved terrace.
A second case: bridesmaids in three different heels
Now imagine Dana’s bridesmaids. One wears a thin stiletto, one a cone heel and one a chunky block. Dana does not need to test all of them. She asks each to measure the tip face and top lift on a phone photo next to a ruler and send the two numbers. That takes a minute each.
The stiletto and the cone heel are the two at risk. The cone heel has a tip face of fourteen millimeters and a shallow top lift, so a stem disc may not seat but a flared cap might. The block heel has a wide base and needs nothing. Dana offers two sizes of heel protectors to the two bridesmaids who need them and asks them to try the pull-off test at home. Nobody is told what to wear, and nobody has to guess. The cost is a short message and a small purchase.
This second case shows how the method scales. The four readings are quick to take, and the sorting rule is simple: wide base, no protector; narrow tip, test one.
What the example shows
The example makes three points. First, the numbers decided more than the product photos did, since the first disc could not seat on her top lift. Second, the trial caught a failure that the product description would never have revealed. Third, the backup plan was a decision made in advance, so on the wedding day she would not have to invent one while stressed.
The example also shows the limits. Dana did not test on very wet grass. If rain arrives, the answer might change. That is the reason the plan includes a second pair of shoes. A trial tells you how a setup behaves on the ground you tested.
Questions to ask sellers, venues and your tailor
The people around you hold information you need, and good questions get specific answers. Here are scripts you can adapt. Keep them short and factual, and write the answers in your log.
For the seller of heel protectors. Ask what the inner diameter and depth are, what material the base is made of, how the product attaches, and what the return policy is if it does not fit. A message could read: “My heel tip is nine millimeters wide with an eight millimeter top lift. Will this fit, and can I return it if it does not?” Read the return terms yourself on the seller’s page, because terms differ and change.
For the venue manager. Ask what the ceremony surface is, whether there are sprinklers or recent aeration, whether there is a rain plan, and whether there are rules about mats or aisle materials on the turf. A message could read: “Will the ceremony be on grass? Are the sprinklers off before the event, and is the lawn aerated or reseeded this season?”
For the planner or coordinator. Ask who will handle a footing problem on the day, such as laying a mat, repositioning chairs or finding a firmer path. Ask whether the route from the car or dressing room to the ceremony can use a paved path.
For your tailor. Ask how much a protector changes the effective heel height and whether the hem should be set with the protector on. If heel protectors add a few millimeters, the hem sits slightly higher off the ground, and the guide to dress alterations explains why you should always fit the hem with your final shoes.
For the photographer. Ask whether the heel and the ground will appear in photos. If so, pick a color that blends, and ask whether they will want you to stand in specific spots, since long photo sessions on soft ground are where heels sink.
Putting the answers to work
Each answer feeds a stage of the method. Dimensions and return terms feed the match stage. The ground information feeds the ground read. The planner’s plan feeds the backup stage, and the tailor’s advice feeds the hem. If an answer is missing, make a note and ask again. A vague answer is information in itself.
Reading the seller’s terms
Return terms matter because a trial depends on being able to return a product that fails. Read the page for the window, who pays shipping and whether used items are accepted. If the product must be unused to be returned, a trial that scuffs it could void the return. In that case, consider testing cheaper heel protectors first, or ask the seller whether trial use is allowed.
The Federal Trade Commission at ftc.gov publishes consumer guidance on shopping and returns, and it is a good place to read about shopping and returns. If a seller makes a specific claim about performance that turns out to be false, you can keep your trial log and messages as a record. Keep the claim and the date, and keep them with your other purchase records.
Edge cases: when standard heel protectors are not enough
The method handles the ordinary case well. Several less ordinary situations deserve their own thinking, because the standard answer does not always hold.
Aisle runners, mats and ceremony flooring
Many couples lay a runner or a set of mats down the aisle. This helps a lot with footing but adds its own risks. A fabric runner over soft turf can bunch and trap a wide disc. A rubber or plastic grid mat has openings that can catch a narrow heel, and a wide disc may bridge them better. A plywood or interlocking panel gives a firm surface where heel protectors are often unnecessary and a hard disc can even slip.
If an aisle covering is planned, run the trial on that material as well as on bare turf. Ask the vendor or venue for a sample piece, or test on a similar product. Pay attention to the edges, where the material meets the grass, since a small step down is easy to trip over in a long gown. The step-by-step ceremony guide walks through the processional, and the footing you choose should work for the slowest, most formal part of it.
The wedding party and guests
The couple is not the only group walking on the lawn. Bridesmaids, groomsmen, parents and guests all cross it, many in heels. You can handle this in a light, friendly way without telling anyone what to wear. Put a line in the wedding details, such as a short note that the ceremony is on grass, so guests can choose footwear that suits it. A basket of spare heel protectors at the ceremony entrance is a kind gesture, but it can also be a source of its own problems if sizes do not match.
For the wedding party, ask early what shoes each person plans to wear, and share the venue surface. If you want everyone in matching style, consider a block heel or wedge for the grass portion. Keep the request practical, not stylistic, and let each person decide.
Long photo sessions on soft ground
Sinking is gradual, so the long stand check matters most for photos. Family photos can take a while when the group is large, and everyone stands in place on the same soft patch. Ask the photographer to choose firm spots, and to keep the longest poses off the softest ground. The family photo list guide helps you keep the session short and organized, which is the best protection for both your feet and your patience.
If the photos must happen on the lawn, rotate your weight between feet, take a few steps between shots, and let the group step onto firm ground between poses. A heel that has sunk a little can be eased out with a gentle lift, and a quick wipe of the protector keeps it clean for the next set.
Mobility, balance and medical conditions
For people who use a cane, a walker or a wheelchair, or who have balance or foot conditions, heel protectors are not a primary solution. A firm, level route matters far more, and the Americans with Disabilities Act information at ada.gov explains accessibility standards for routes and surfaces. Ask the venue about an accessible path to the ceremony that does not cross soft turf.
For a bride or groom with a foot or ankle condition, a podiatrist or qualified fitter should guide the choice of heel and heel protectors. The American Podiatric Medical Association at apma.org is a starting point for information on foot health and finding a professional. Nothing in this guide is a medical recommendation, and the trial checks are about footing, not about the health of your feet.
Gravel, sand and mixed paths
Gravel can lodge between a cap and the heel and chew soft heel protectors. Sand behaves like very soft ground, and discs sink in it as much as bare tips do, only more slowly. If a path crosses gravel or sand, plan a separate route or a change of shoes for that part. Carrying your shoes and wearing flat sandals for the path is a perfectly good solution, and it protects the protector from damage.
Dancing on grass
A tent floor on grass is a different surface from the lawn. A dance floor laid over turf is usually flat, but the edges are trip points, and heel protectors that gripped well on grass may drag on a smooth floor. If you plan to dance, decide whether to remove the heel protectors for the dance floor or change to a second pair. Wide discs and flared sleeves can scratch a laminate or wood floor, so check the rules of the flooring rental and whether the heel protectors you chose are allowed on it.
Rain, dew and early morning
Early morning ceremonies bring dew, which is enough water to slicken the grass and soften the top layer. Late-day events can follow a day of watering. In both cases, run at least one trial check on damp grass. If you cannot reproduce damp conditions, lightly dampen a section of lawn and repeat the sink and pull-off checks.
If heavy rain falls before the wedding, the venue’s rain plan matters more than any heel protectors. Soft, saturated ground can defeat every design. The decision to move the ceremony to a firm surface is a safety decision, and it is better made early.
Heels that cannot take a protector
A few heels cannot take one, such as very slim bare-metal pins, rounded cone tips with no top lift, or decorative heels with glued-on crystals. If the tip face is a bare pin, a disc with a stem may not seat. A sleeve may slip off a smooth, straight heel. In those cases, the best advice is to choose a different pair for the grass portion, or ask a cobbler whether the heel can be fitted with a top lift.
The wedding day plan for heel protectors
The final stage is the backup, and it comes down to a short, practical plan. The plan has three parts: what you carry, when you fit the heel protectors and how you recover.
What you carry. Bring a small kit with a spare set of heel protectors in your measured size, a cloth to wipe soil from the heel protectors, a second pair of comfortable shoes for the grass, and any tool needed for fitting, such as the small screwdriver a disc may require. Keep the kit with someone reliable, such as a maid of honor, a sibling or the coordinator, and tell them where it is.
When you fit them. Fit the heel protectors at home or in the dressing room, not at the edge of the lawn. Heel protectors put on in a hurry are more likely to be seated wrong. Do the hard-floor fit check first, then walk a few steps. If you can, walk on a short stretch of the actual lawn before the ceremony, with a person who can check the ground for soft patches.
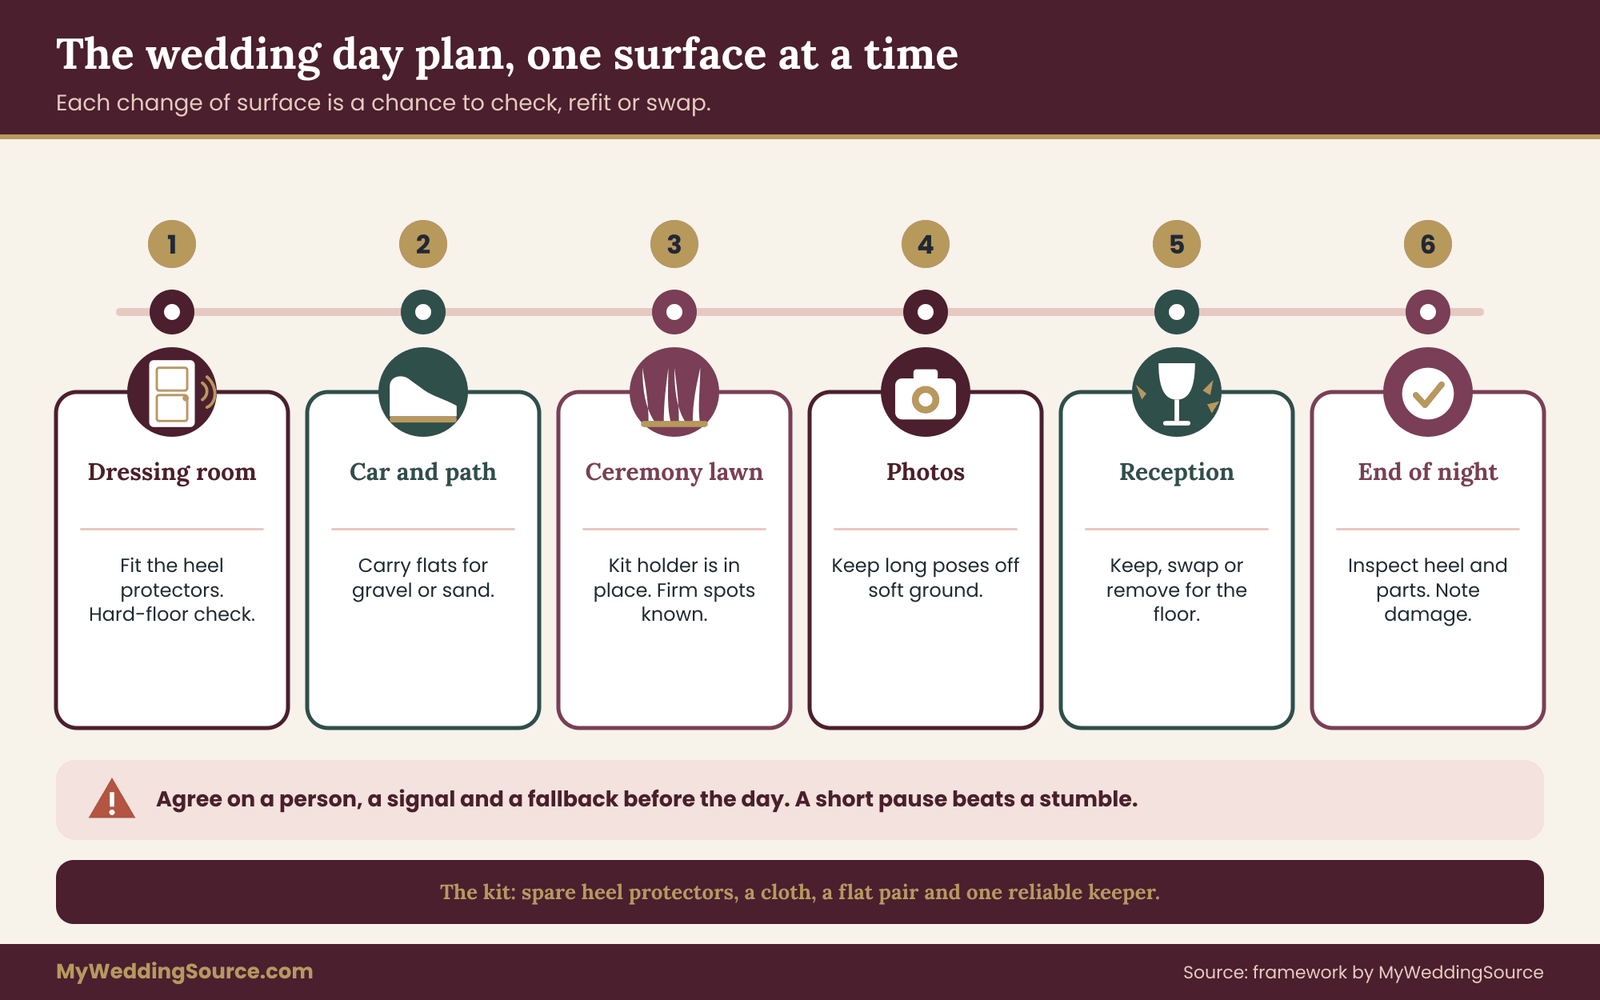
How you recover. Decide ahead of time what you will do if heel protectors fall off or fail. Choose a person and a signal. Have a flat pair within reach. Agree on a fallback, such as a short pause to refit, or a change of shoes before the photos.
A timeline for the day
Think about the day as a sequence of surfaces. You start in a dressing room or hotel, on hard flooring. You move to a car, then to a path, then to the lawn. After the ceremony, you may stand for photos, walk to a reception, dance and leave. Each change of surface is a chance to adjust.
In the dressing room, fit the heel protectors and run the hard-floor check. Before the ceremony, walk the route if you can. After the ceremony, check the heel protectors before photos, because soil and grass can pack around them and loosen the fit. Before the reception, decide whether to keep them on, switch to a second pair or go without. At the end of the night, remove them and check the heel for damage, so you can tell a cobbler about any issue.
Who should know the plan
Share the plan with the people who will act on it. The coordinator should know where the kit is and what the fallback surface is. The photographer should know when you will pause for a fix. Your partner should know that you may swap shoes. A short written note with the key points is enough, and it removes the need for a conversation in the middle of the day.
The plan is not rigid. If the ground is drier than expected, you can relax. If it is wetter, you can switch to the fallback. What matters is that you decided in advance.
Alternatives to heel protectors and the trade-offs
Heel protectors are one answer to a lawn, and they are not always the best one. A fair comparison puts them beside the alternatives and weighs cost, risk and appearance. The comparison below is in prose on purpose, because the right answer depends on your shoes, your ground and your tolerance for risk.
Change the shoe for the grass portion
The most reliable answer to soft ground is a different heel. A block heel, a wedge or a flat sandal spreads the load over a larger area than any accessory can on a stiletto. Many people walk the ceremony in comfortable shoes and change for the reception, and a long dress hides most shoes during the processional.
The cost is practical, not financial. You need a second pair, and you need a plan for the hem, since the two pairs have different heights. Your tailor can set the hem for the taller pair and plan a bustle or a hem adjustment for the lower one. If you want one pair for everything, a block heel with a wide base is often the simplest answer.
Choose firmer ground
If you can change the route, you can sidestep the problem. A paved path to the ceremony, an aisle laid on plywood panels, a platform or a ceremony on a terrace all remove the need for heel protectors. This may cost more in rentals or labor, and it may change the look of the ceremony, but it addresses the cause instead of the symptom.
If the lawn is the reason you chose the venue, consider a compromise. Keep the ceremony on grass and ask for a short, firm walkway across the softest portion. Rental companies sell and lay flooring and mats. The rental planning checklist covers what to ask them, from delivery access to surface compatibility.
Aisle mats and flooring panels
Mats and panels reduce sinking and snagging. Interlocking panels are firmer and flatter than a fabric runner. Grid mats can catch narrow heels, so they pair better with a disc than with a bare tip. Whatever you choose, test it with your own shoes, since a surface that suits sneakers may not suit a heel. The extra cost of a mat is usually small relative to the cost of a fall or a ruined processional, but it depends on length, material and delivery, so get a written quote, and read the vendor contract guide before you sign for any rental.
How heel protectors change height and hem
A protector adds a little thickness under the heel, and a disc may add more than a flared cap. Even two or three millimeters can matter for a gown that skims the floor, because the hem sits closer to the ground when you wear a lower pair and further when you wear a higher one. A thick disc effectively makes the heel taller, though the foot may not feel it.
The practical rule is to fit the hem with the shoes and heel protectors you plan to wear for the ceremony. If you will switch pairs, ask the tailor how to handle the difference, for example with a bustle or a second hem check. Write down the final heel height with the protector on, since it is the number the tailor needs. Measuring the wrong number is a common reason a hem drags on the day.
Do nothing and accept the risk
For some couples, the ground is firm, the heel is thick and the walk is short. In that case, heel protectors may be unnecessary, and the trial will say so. If a bare heel passes the six checks, there is no reason to add anything. The method does not assume you need heel protectors. It assumes you want to know.
Thinking about cost without inventing numbers
Prices change by seller and season, so this guide does not quote any. Instead, think in categories. Heel protectors are generally a small purchase compared with shoes, a dress or a mat rental. A second pair of shoes is a larger purchase, and a flooring rental is larger again. A cobbler’s work on a top lift sits in between and depends on the shop.
A useful way to compare is cost per failure avoided. Heel protectors cost little and prevent a small number of failure modes. A second pair costs more and prevents more. A firm route costs the most and prevents the most. If your ground is soft, the stronger measures may be worth their cost. If it is firm, heel protectors or nothing are probably enough. Check current prices and return terms with sellers directly before you decide.
Common mistakes with heel protectors
Most problems come from a small set of mistakes. Knowing them in advance saves time and money.
Buying by photo. A listing photo shows a clean product on a clean floor. It says nothing about your tip, your ground or your shoe. Buy against your measurements.
Testing only on a hard floor. A hard floor shows whether the product fits, not whether it works on grass. The trial must include turf.
Testing once. A single dry test on one lawn gives a single data point. Repeat on damp grass if the venue might be damp, and repeat after you change anything.
Ignoring the hem. A protector adds height. A hem set without it may sit a little differently with it. Fit your hem with the final shoes and heel protectors on.
Fitting at the last minute. A hurried fit is a loose fit. Do it in the dressing room with time to check.
Forgetting the guests. A bride who has solved her own footing and left a grandmother in thin heels on a wet field has solved half the problem. A line in the invitation details costs nothing.
Overlooking the dance floor. A protector that grips well on turf can catch on a smooth floor or scratch it. Plan the swap.
Skipping the backup. A protector can fail. A kit and a second pair make that a small event.
When to skip heel protectors altogether
There are good reasons not to use them. The ground may be firm enough that the bare heel passes every check. The shoe may have a wide heel that spreads the load. Heel protectors may fail the trial and no alternative passes. Or the ceremony may be on a platform or terrace and the grass is only for photos. Skipping is a legitimate result of the method.
If you skip, keep the trial log anyway. If conditions change, you can repeat the checks quickly. The log also helps you explain your choice to anyone who asks, such as a mother who wonders why you did not buy “those little discs.”
What a good outcome looks like
A good outcome is not a perfect product. It is a decision that you tested. You know the four numbers for each heel, the ground type, the design you chose and why, the checks it passed, the backup you packed and the person who holds it. On the day, you walk across the lawn without thinking about your feet, which is the whole point.
If something does go wrong, a calm plan beats panic. Pause, refit or swap, and continue. A photographer would rather wait ninety seconds than photograph a stumble, and your guests will not remember a short pause.
A short script for the day
If a protector comes off during the lead-up, you can say something simple to the person holding your kit: “I need to refit my heel. Can you hold my bouquet for a minute?” If the ground is wetter than planned, say to the coordinator: “Let’s use the fallback surface. I’ll switch shoes for the lawn part.” Decisions like this are easy when they were made in advance and hard when they are made in the moment.
The aim of all of this is to take the lawn from a source of worry to a minor detail. With four measurements, a tested design and a backup, heel protectors do what they are meant to do, which is to let you stand and walk on grass while paying attention to the wedding.
Your next steps
Start with a short list you can finish in an evening. Measure the four readings on each pair of shoes you might wear, and write them on one sheet. Ask the venue three questions: what the ceremony surface is, whether sprinklers or aeration are planned, and what the rain plan is. Then choose one or two designs of heel protectors whose inner measurements can fit your tip.
Over the following weeks, run the six checks on real grass, record the results, and change one thing at a time. Fit the hem with your final shoes and heel protectors on. Pack a kit with a spare set, a cloth and a second pair, and give it to someone who will have it at the ceremony. If your ground is soft or the route is long, think again about a firmer path or a different shoe. A calm plan made three weeks early is worth more than any product bought the night before.
FAQ
Do I need heel protectors for a grass wedding?
It depends on your heel and the ground. A wide block heel on firm, dry turf may not need one. A slim stiletto on soft or damp turf usually benefits. Run the six checks in this guide with and without a protector, and let the results decide. If the bare heel sinks more than the protector would, or turns badly at a pivot, add one.
What size heel protectors should I buy?
Match the size to your own measurements, not to a general label. Measure the tip face and the top lift depth, then compare them with the inner diameter and depth in the listing. A cap should fit snugly and need a firm press. A disc stem should be no longer than your top lift is deep. When in doubt, buy from a seller with clear return terms.
Will heel protectors stop me slipping on wet grass?
Not by themselves. A wider contact area reduces sinking, but grip depends on the base material, the edge and the texture. A hard, smooth protector can slide on wet blades. Test on damp grass, and prefer a softer, textured base. If the lawn is very wet, a firmer route or a flatter shoe is safer than any accessory.
Can I just use clear nail polish or tape on my heel instead?
Those tricks do not widen the contact area, so they will not stop a narrow heel from sinking. They might protect a finish or add slight friction, but they are not a substitute for a wider base. Test any improvised fix with the same checks. Also avoid anything that could leave residue on a rental floor or damage the shoe.
Do heel protectors change my dress hem length?
Yes, slightly. A protector adds thickness under the heel, and a disc may add more than a cap. Even a few millimeters can change how a floor-length hem sits. Fit your hem with the final shoes and heel protectors on, and give your tailor the heel height measured with the protector fitted.
Should my bridesmaids and guests use them too?
Anyone in a narrow heel on a lawn can benefit, but it is their choice. Share the surface in the wedding details so people can pick suitable shoes. You can offer a spare set in a few sizes, though sizes may not match. For the wedding party, ask each person to measure two numbers and try the pull-off test.
Can I wear heel protectors on the dance floor?
Check the flooring first. Some discs and sleeves can scratch wood or laminate, and a protector that grips turf may drag on a smooth floor. Ask the venue or the rental company about heel rules. Many people remove the heel protectors or switch to a second pair for dancing. Decide before the day so it is not a last-minute scramble.
What if my heel protector falls off during the ceremony?
Pause calmly, and ask the person holding your kit to help you refit it or swap shoes. Plan this in advance by choosing the person, packing a spare set and a flat pair, and agreeing on a signal. A short pause is not noticeable to guests. If it keeps happening, move to a firmer route or a different pair.
Sources
- American Podiatric Medical Association
- OrthoInfo, American Academy of Orthopaedic Surgeons
- Preventing falls, Centers for Disease Control and Prevention
- Information and technical assistance on the Americans with Disabilities Act, U.S. Department of Justice
- Walking-working surfaces, Occupational Safety and Health Administration
- National Weather Service, NOAA
- Consumer advice, Federal Trade Commission
- Consumer Product Safety Commission
- Sprinkler and irrigation efficiency, EPA WaterSense
- Plain language and consumer guidance, USA.gov