
A vintage gown inspection is a short, ordered look at a used wedding dress that is decades old: light, seams, stress points and fabric strength, in that order, before any money moves. This guide gives you a three-pass method, a photo checklist for sellers and a simple scoring rule, so a lovely vintage gown does not turn out to be a fragile one.
Inspect a vintage gown in three passes. First, look at it in daylight for yellowing, stains, odor and uneven color. Second, check every seam and stress point (underarms, waist, zipper, hooks, hem, bustline, straps, train attachment, lining edges) for thread strain, fabric splits and old repairs. Third, test fabric strength gently, and only with the seller’s permission. Ask for a fixed set of photos, score each zone green, amber or red, and walk away from any gown with a red result you cannot price in writing.
Vintage gowns are appealing for good reasons. The cuts are different, the lace is often finer, the construction can be better than anything at a similar price today, and the dress has a story. The trouble is that age does things to fabric that a listing photo rarely shows. Silk can split without warning. Seams that look intact can be held by thread that has lost its strength. A cream that photographs beautifully under shop lights may be yellow in the sun.
This article is about one narrow job: finding hidden fabric damage before you commit to a vintage gown. It does not try to cover every step of buying a used dress, and it does not teach restoration. It assumes you have a candidate gown in mind, either on a hanger in a shop or in a set of seller photos, and want a repeatable way to decide.
If you are still choosing a silhouette, the wedding dress fit and alterations guide covers fittings and timing, and this article picks up from the point where a specific old dress is in front of you.
A note on scope. This is general information, not legal or financial advice. Return rights, payment protections and consumer rules vary by seller and by state, so confirm the current terms with the seller and with the agencies listed in the sources.
Why a vintage gown needs its own inspection
A modern sample or preowned dress is usually judged for fit, stains and missing pieces. Those checks still matter. A vintage gown adds a second question: is the material itself still sound? That question changes what you look for and how much weight you give to a flaw.
Consider the difference between a stain and a weak point. A stain on a modern polyester satin is often a cleaning problem, and cleaning is a known cost. A weak point in a sixty-year-old silk is a structural problem. Cleaning can make it worse, alterations can tear it, and wearing it for eight hours of hugging, dancing and sitting can finish the job.
Age also hides damage in places buyers do not think to look. The inside of a skirt hem collects dust and moisture. The seam allowance under the arm holds old perspiration. Elastic, adhesives and foam in later vintage pieces break down inside the garment where nobody sees. Metal hooks and snaps rust, and rust spreads into fabric.
What “vintage” means for your inspection
Sellers use the word loosely. For inspection purposes, three loose groups are useful, and they behave differently.
The first group is early pieces, roughly before the middle of the twentieth century. Natural fibers such as silk, cotton and linen dominate, and some silk was treated in ways that weaken it over time. These gowns reward the most careful handling.
The second group is mid-century pieces. Rayon, acetate and early nylon appear alongside silk, and so do metal zippers and structured foundations. Several of these fibers age differently from silk and from each other.
The third group is later vintage pieces, from the late twentieth century. Polyester and nylon are common, and so are foam shoulder pads, elastic, hot-melt adhesives and plastic boning. The fabric may be tough while the inner parts have failed.
You do not need to place a dress exactly. You only need to know which group it is closest to, because the groups point you to different pass-three tests, covered later in this guide.
What this inspection can and cannot tell you
A careful look can find most of what matters for a buying decision. It can show whether the fabric is evenly aged or patchy, whether seams are holding by strong thread or by habit, and whether earlier repairs were done neatly. It can also show which problems a cleaner or a seamstress can plausibly address.
It cannot prove a date, a maker or a provenance. A label can be moved, and a story can be wrong. Nothing in this method asks you to trust or verify authenticity, and a seller who offers an authenticity guarantee in a listing is making a claim you should still treat as a claim. Your decision should rest on condition, price and return terms, all of which you can check.
It also cannot replace a textile conservator. If you are considering an expensive or historically important gown, a conservator’s condition report is a separate service worth its cost. For most weddings, a careful buyer with a good checklist and a seamstress’s opinion is enough.
The three-pass method for a vintage gown inspection
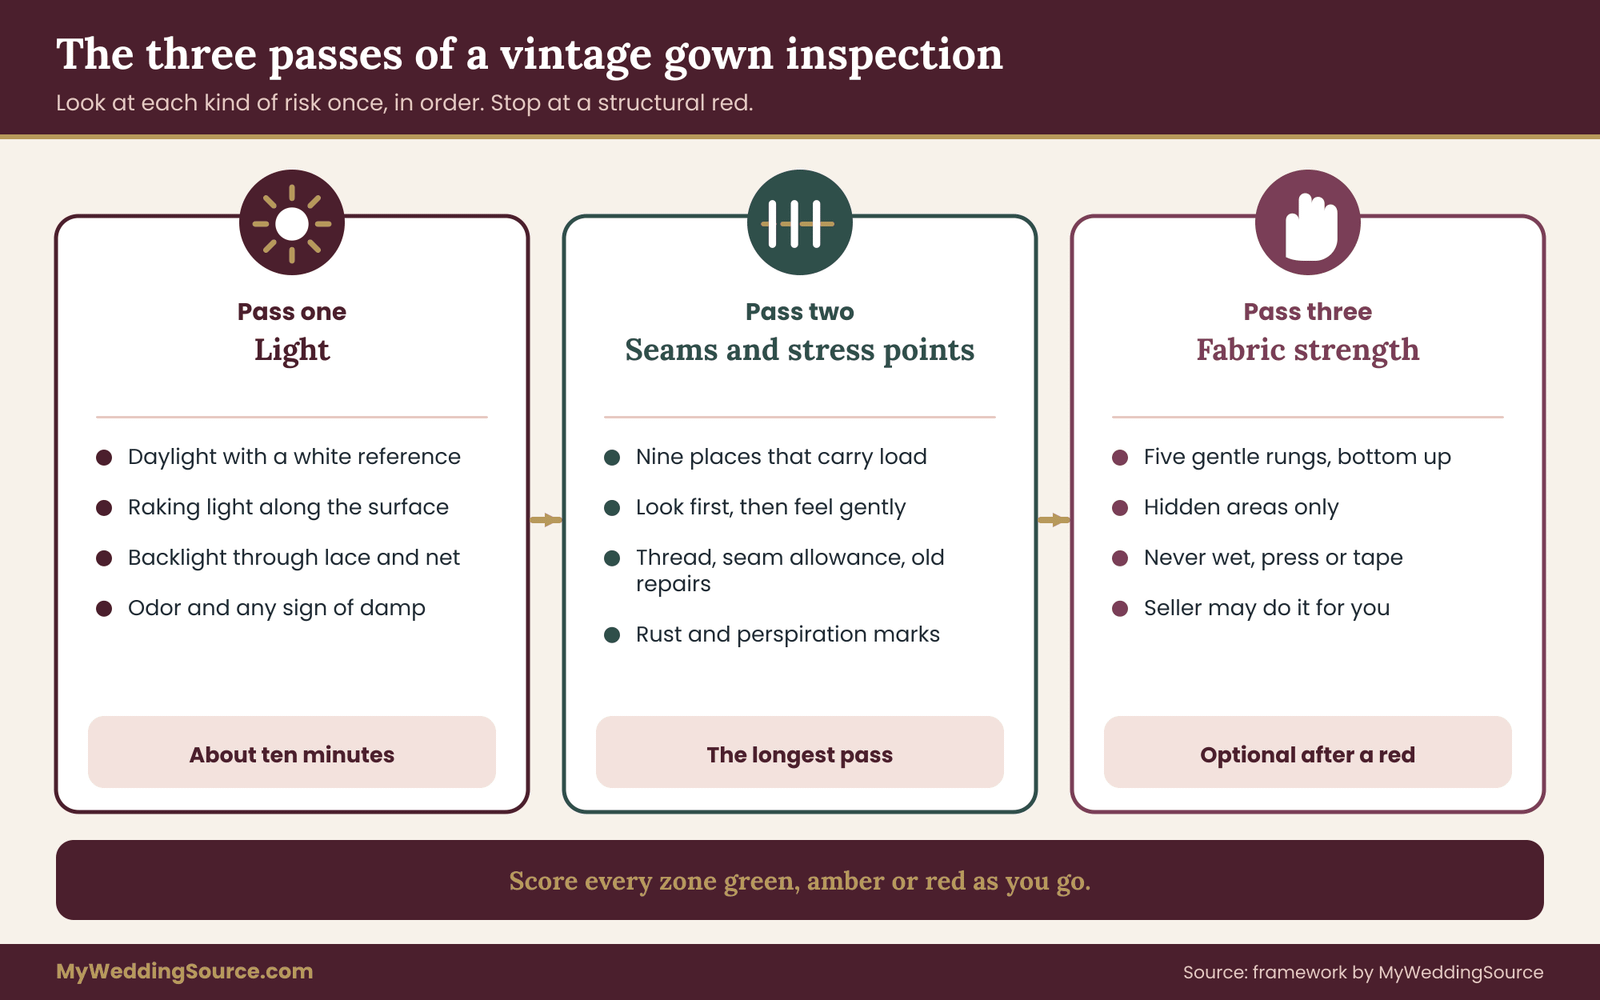
The method is built around a simple idea: look at each kind of risk once, in the right order, so that an early red result stops you before you spend more time or money. Each pass has a short list of checks, a way to record what you saw, and a stop rule.
Pass one is light. You look at the whole gown in daylight, then in raking light, for color, stains, odor and surface condition. This pass takes ten minutes and rules out the dresses that are visibly compromised.
Pass two is seams and stress points. You examine the places where a vintage gown carries load or friction. This pass is where most hidden damage lives, and it is the part most buyers skip because the dress looks fine from a distance.
Pass three is fabric strength. You use gentle, reversible tests to judge whether the fabric will survive being worn, altered and cleaned. This pass is optional if passes one and two already ended in a red result.
The scoring habit
Throughout the passes you record each finding against a zone and give the zone a color. Green means no concern. Amber means a concern with a known fix and a price you can write down. Red means a concern you cannot fix, cannot price, or cannot reverse.
Two rules keep the scoring honest. A zone is amber only if someone qualified has named the fix, and you have an estimate in writing or at least in a message. If not, it stays red until you do. And one red in a structural zone, such as the waist seam or the main body fabric, outweighs any number of greens elsewhere. A beautiful neckline does not carry a vintage gown whose skirt is separating from its bodice.
The scoring section later in this guide shows how to combine the colors into a decision, and a worked example shows the whole process on an invented gown.
Tools to bring
You need very little. Bring a good flashlight or a phone light you can hold at a low angle, a clean white sheet or sheet of white paper to hold behind sheer fabric, a soft tape measure, a few clean white cotton gloves if the seller wants you to wear them, and a phone for photos. A small magnifier helps with thread condition but is not required.
Before you plan a visit, spend a few minutes vetting the seller with the same questions you would ask any vendor. Leave the following at home: anything damp, anything sticky, tape of any kind, safety pins, a steamer, and any cleaning product. Do not rub, brush or press a vintage gown to see what happens. The point of the inspection is to learn about the dress without changing it.
If you are inspecting in a shop, tell the seller what you plan to do and ask permission first. A good seller will be glad to see a careful buyer. If you are buying from photos, the same passes apply, but you will ask the seller to run them for you, and the photo checklist later in this guide explains exactly what to request.
Pass one: light, yellowing and stains on a vintage gown
Color is the first thing you see and the easiest thing to misjudge. A vintage gown that reads as soft ivory in a listing can be yellow, gray or patchy once it is next to a white sheet. Pass one is about getting an honest look at the color and surface before you let the dress charm you.
Start in daylight. Window light on an overcast day is ideal, because it is even and does not hide anything. Avoid direct sun for the first look, since it flatters some fabrics and washes out others. Hold a clean white sheet or piece of paper beside the fabric so you have a reference. Shop lighting, especially warm bulbs, can make a yellowed gown look creamy, so ask to move toward a window.
Read the whole gown before the details
Stand back about two meters and look at the vintage gown as a single object. You are checking for evenness. Aging that is uniform, with the whole dress gently warmed in tone, is common and often acceptable. Aging that is patchy is a different matter, because it tells you the fabric was exposed unequally: to sweat, to light, to a storage box, to a spill, or to a cleaning that was never rinsed out.
Look for these patterns, and note which ones you see.
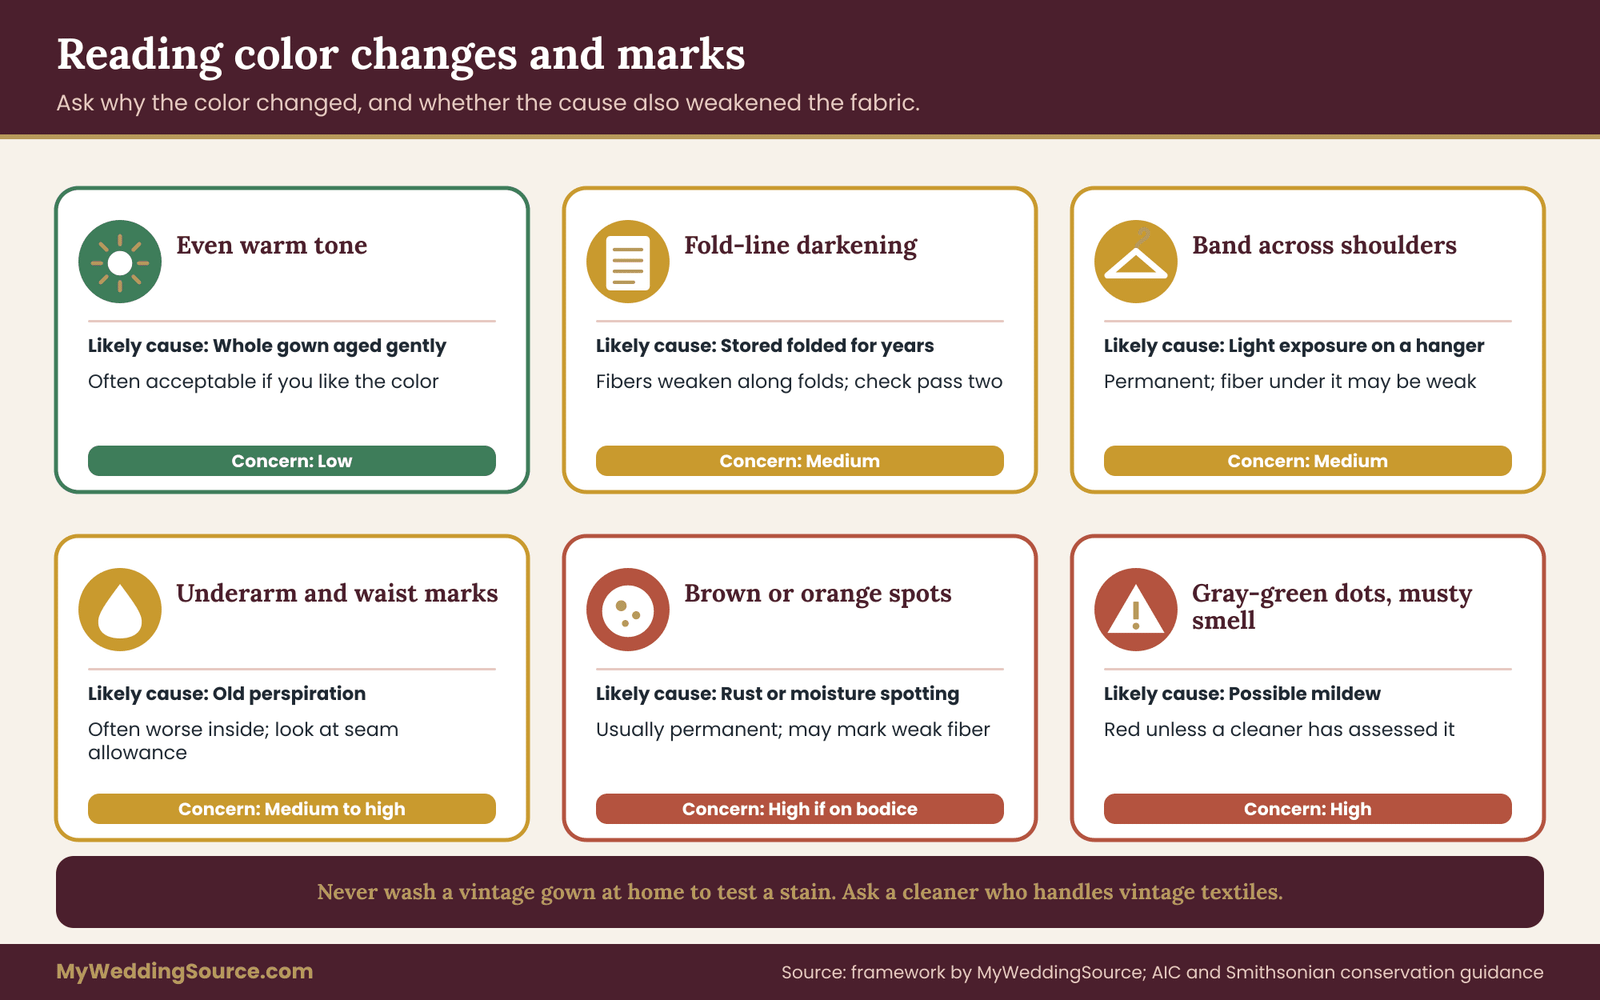
Darker color along fold lines suggests the vintage gown was stored folded for a long time. Fold lines are also where fibers weaken, so treat them as a pointer to pass two, not only a cosmetic flaw.
A band of different color across the shoulders or along one side suggests light exposure on a hanger or in a display. Light damage is permanent and often weakens the fiber under the color change.
Dark or yellow-brown patches near the underarms, collar and waist suggest perspiration. Old perspiration can attack fabric over time, and it often shows up on the lining and seam allowance before it shows on the outer fabric.
A gray or dingy hem usually means dirt, and sometimes damp. Hems carry the heaviest dust and the greatest abrasion, so some darkening is normal. Holes, thin patches and torn net or tulle at the hem are not.
Yellowing: what it can and cannot mean
Yellowing is the word buyers use most, and it covers several different things. The useful question is not whether the vintage gown is yellow but why, and whether the cause also weakened the fabric.
Even, light yellowing across the whole gown often reflects age and the natural behavior of the fiber or dye. It may be acceptable to a buyer who likes the warm tone, and some brides choose a vintage gown precisely for that color. Ask yourself honestly whether you would be happy with the color in photographs, in daylight, next to white flowers and a white-shirted partner.
Spot yellowing is a stain, not an aging pattern. Clear spills such as sugary drinks, some body products and some foods dry invisible and darken later. A cleaner may or may not be able to reverse it, and the response depends on the fiber and on how long the stain has been there.
Yellowing that is worse on the inside than the outside, or worse along seam allowances, points back to storage conditions or to perspiration. These areas are protected from view, so they are a good place to look for what the vintage gown has really been through.
Be careful with any seller who says yellowing “will come out with a wash.” Washing a vintage gown at home is a common way to lose it. Whether and how a vintage gown can be cleaned depends on fiber, dye, trims, construction and age, and that is a decision for a cleaner who works with vintage textiles. Treat a statement that it will wash out as a claim to test, not as a fact.
Stains, spots and what they suggest
Look slowly across the skirt, the bodice front and the sleeves. You are looking for three kinds of marks.
Brown or orange spots, often small and scattered, can be rust from metal or foxing-type spotting from moisture and storage. They are usually permanent or difficult to remove, and they can mark places where the fiber has started to degrade. A few isolated spots on a hem may be acceptable. Spotting across the bodice is another matter.
Gray-green or black dots in clusters can indicate mildew. A mildewed gown is a risk to your health and to your other textiles, and mildew can weaken fiber. Treat it as red unless a qualified cleaner has examined the dress and you accept the outcome in writing.
Sticky, shiny or stiff patches can be spilled sugar, adhesive, old repair glue or a failed coating. They are worth asking about directly, since glue repairs on a vintage gown are rarely reversible.
Photograph every mark you find, with a coin or a tape measure beside it for scale. The photo is useful for your own comparison, and for any discussion with the seller about price or return.
Odor
Smell the vintage gown, including the inside of the bodice and the hem. A faint stored-fabric smell is normal. A strong musty smell points to damp, and it can mean mildew even when you cannot see it. A sharp chemical or perfume smell may mean the vintage gown was treated or heavily scented to hide something. A smoke smell is common and is a cleaning question, though smoke can embed deeply and a cleaner may not fully remove it.
Smell is hard to check from photos, so ask the seller directly and in writing: has the vintage gown been stored in a smoke-free home, has it ever been wet, and has it been cleaned and by whom. The answer is part of your record.
The raking-light check
After daylight, hold your flashlight low and close to the fabric so the light skims across the surface, almost parallel to it. Slowly sweep the bodice and skirt. Raking light shows things that flat light hides: thin patches, pulled threads, snagged lace, crushed pile, old water marks and places where fibers have shredded.
Then hold the white sheet behind a sheer or lace area and look through it with the light behind. Thin spots and small holes show as bright dots, and a lace motif that has separated from its net shows as a gap. This check is especially useful for veils, overlays, sleeves and net skirts, because those areas often look intact until light passes through them.
An ultraviolet flashlight is sometimes suggested for finding residues. It can show some stains and repairs, but it is not a diagnostic tool, and many harmless materials also glow. If you use one, treat what you see as a question for the seller or a cleaner, not as an answer.
What storage history tells you
Where and how a vintage gown was kept often explains what you see. A vintage gown stored folded in a cardboard box for decades may show sharp fold lines, acid transfer from the box and creases that have cut into the fibers. One stored on a hanger may show stretched shoulders, strap strain and a sagging waist seam, since a heavy skirt pulls on the bodice for years. A gown kept in a plastic bag may have trapped moisture, which is where mildew and odor come from.
Attics, basements and garages are poor storage for any textile because heat, damp and temperature swings are hard on fibers. A dry closet in a climate-controlled home is far better. You cannot always learn this from a seller, but you can ask, and the answer helps you read the marks you find. A vintage gown with a documented, careful history and a few honest flaws is often a better buy than a perfect-looking one with no history at all.
Ask also about previous cleaning. A gown that was cleaned and then sealed in a box without being rinsed free of residue may show yellowing along folds years later. A gown that has never been cleaned may carry old perspiration and body products that have slowly changed color. Neither is automatically a problem, but both are worth knowing before you pay.
Recording pass one
At the end of pass one you should have a note for four areas, each with a color. The overall color evenness is one. The interior surfaces and seam allowances are another. The hem and train edge are the third. Odor and any sign of damp make up the fourth.
A reasonable stop rule is this. If you see mildew, widespread spot damage across the bodice, or color change that reaches the fabric strength, mark the zone red and stop. A gown with several amber results and no red can move to pass two. A gown with one clean, explained amber, such as an even warm tone you like, is usually safe to continue with.
One more practical point. Take your pass-one photos before you try anything on, because trying on adds risk. A vintage gown that has been sitting for years is often least forgiving the first time it takes weight and movement again. If the seller wants you to try it on, do it after the structural checks in pass two, and ask for help getting in and out so nobody pulls on a seam.
Pass two: seams and stress points on a vintage gown
Pass two is where hidden damage lives. A gown is not one piece of fabric. It is a set of panels, each held to the next by thread, and the thread is often older, thinner and more fragile than the cloth. A vintage gown may look flawless on a hanger and still be ready to open along a seam the first time you raise your arms.
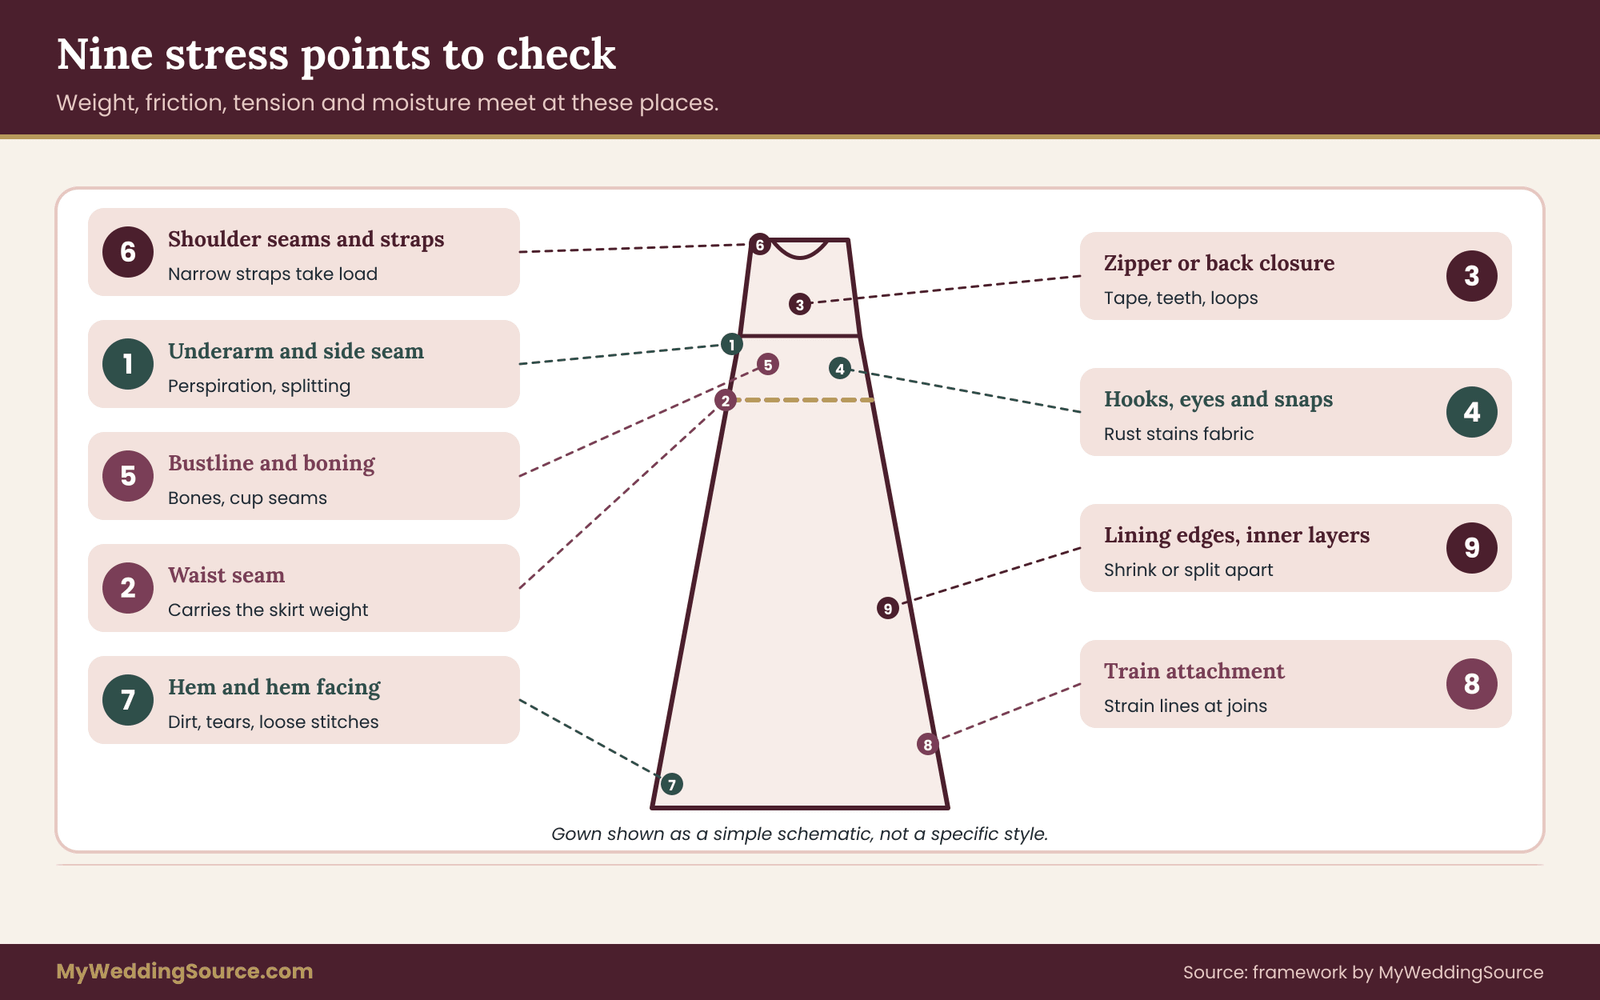
The method here is to visit nine stress points in a fixed order. At each one you look, then feel gently, then record a color. You never pull, stretch or twist to see what happens. If a place needs force to examine, that fact is already a finding.
What stress means on a gown
Stress is any place where the vintage gown carries weight, friction, tension or moisture. Weight sits at the waist seam, the shoulder straps and wherever a heavy skirt attaches to a bodice. Friction happens at the underarm, the hem, the back of the neck and wherever the vintage gown touches a chair or a partner. Tension concentrates at closures, at the bustline and across the back when you reach forward. Moisture collects at the underarm, the waist and the collar.
Old thread behaves differently from old cloth. Cotton thread holds up reasonably well. Silk thread can weaken with the silk around it. Synthetic thread may outlast the fabric. Because you cannot always tell which thread was used, you judge by condition: does the stitching look even and tight, or is it loose, frayed, broken or missing in patches?
The nine points
One, the underarm and side seam. Lift the arm opening and look at the seam and lining beneath it. This is the most common site of perspiration damage and of splitting. Look for darkening, brittle or powdery fabric, tiny splits parallel to the seam, and repairs. Fabric that has been mended here more than once is telling you the gown was worn hard.
Two, the waist seam. Look inside at where the skirt attaches to the bodice. Check that stitching is continuous, that seam allowances are not fraying to the stitching line, and that any waist stay, tape or ribbon is present and intact. This seam carries the weight of the skirt, so a problem here is structural. A waist seam that has separated in a small area can be repaired by hand in some cases, but a seam allowance that has frayed away is harder to fix.
Three, the zipper or back closure. Look at the closure from both sides. Check the tape for staining, brittleness or detachment from the seam. Check that metal teeth are not rusted, and that slides move without catching, though you should test it only if the seller agrees and only a short way. A zipper that was replaced is normal and often a good sign. Buttons and loops need a closer look: check that each loop is anchored, that the thread is sound and that buttons are fixed in place.
Four, hooks, eyes and snaps. Rust is the enemy here. Look at each metal fastener for orange staining on the fabric around it. A rusted hook can stain permanently and the stain can weaken the fabric beneath it. Replacement of hooks is a small job for a seamstress. Staining around them is not.
Five, the bustline and boning. Look at the inside of the bodice. Check that boning channels are intact and that bones are not poking through, rusted or bent. Check the cup seams and any inner support. Older boning can be metal or early plastic, and either can fail. Look for puckering, which can mean broken stitching beneath a lining.
Six, shoulder seams and straps. Check where straps join the bodice and where each shoulder seam sits. Narrow straps carry real load. Look at the stitching and at the fabric around it for thinning. If the vintage gown has sleeves, check the armscye seam, where sleeve meets bodice, since it takes friction and tension every time the arm moves.
Seven, the hem and hem facing. Turn the hem edge and check the inside. Look for hand-stitched hems that have loosened, for dirt, for fraying and for places where a heel has caught and torn the fabric. Check any layered skirt for tears between layers. Check horsehair braid or stiffening for breaks.
Eight, the train attachment and bustle points. If there is a train, check where it joins the skirt and where any bustle loops or buttons are sewn. These carry the weight of the train when it is lifted. Look for strain lines radiating from each attachment point, which show where the fabric has been pulled.
Nine, lining edges and inner layers. Check the edge of the lining, which can shrink or split apart from the outer fabric at different rates. Check net, tulle and organza underlayers for holes and for discoloration. An inner layer in a different fiber from the outer may be in much worse condition than the outside.
How to touch without harming
You may need to feel a seam to judge it. Do this with clean, dry hands, or with clean cotton gloves if the seller prefers. Support the weight of the fabric with your other hand so no part hangs unsupported. Press the fabric lightly between your fingers, the way you would feel for a thin spot in a handkerchief. You are feeling for crispness, brittleness or powdering.
Never tug a seam to see if it holds. Never stretch a bodice to check give. Never pinch a fold of silk and twist it. If a seam shows any gap, even small, do not work at it. Mark it and move on. The point is that any test strong enough to prove a seam is sound is also strong enough to harm a seam that is not.
A route for in-person visits
In a shop or a private viewing, a fixed route keeps you calm and keeps you from skipping the places that matter. Start with the vintage gown on its hanger and ask the seller to hang it near a window. Walk once around it. Then ask whether you may turn the bodice inside out or lift the lining, and whether the seller prefers to do it.
Begin with the underarms, move to the waist seam, then the closure, then the bustline, then the straps, then the hem, then the train, and finish with the lining edges.
Take photographs as you go, with the seller’s permission. If you plan to try the vintage gown on, do it last and only if the structural points are green or amber with a clear fix. Ask the seller or a helper to open the closure and lower the vintage gown over your head or step you into it.
Do not zip, hook or button yourself in a way that pulls on one point. If you hear a sound, stop. A tight fit on an old gown is a warning, not a challenge to overcome, since altering a vintage gown to fit you comes later and needs a seamstress.
Plan the visit for a time when you are not hurried and when you can see well. If you bring a friend, brief them on the plan so that nobody grabs the skirt or tugs a sleeve out of enthusiasm.
Reading the thread
Look closely at stitches along each of the nine points, using the magnifier if you have one. Good stitching is even and flat, with thread that sits in the fabric and does not stand proud. Warning signs include thread that has turned brittle or fuzzy, stitches that are missing in a pattern, loops that stand up where thread has snapped, and needle holes that have widened into small gaps.
A few more signs deserve attention. Seam allowances that look narrower than expected may have been trimmed during an earlier alteration, which leaves little to work with for any future change. Different thread colors in one seam suggest repairs. Mixed stitch lengths suggest hand repair, which can be fine when done neatly and troubling when it is clumsy.
Machine-stitched seams in an older garment are not a sign of poor quality. Vintage gowns can combine machine-sewn long seams with hand finishing. What matters is whether the stitching is consistent and whether the material it holds is still strong.
Old repairs
A repaired gown is not a damaged gown, and many sound vintage pieces have been mended well. The question is whether a repair is neat, reversible and stable. Fine hand stitching that follows the original line is a good sign. Visible glue, iron-on mending tape, large machine stitches over delicate fabric, and patches in a different fiber are all red flags, since they are hard to undo and can damage the fabric around them.
Ask the seller what was repaired, when and by whom, and whether the repair is documented. Note the answer. A seller who can show what was done is giving you information, and one who does not know is also giving you information.
Recording pass two
Give each of the nine points a color. Green means no concern at that point. Amber means a concern with a known, priced fix, such as replacing hooks or restitching a short length of hem. Red means a split in structural fabric, a failed waist seam, rust staining that has reached the fabric, or any condition no one has agreed to fix.
Some points carry more weight than others. The waist seam, the underarm and the main body fabric are structural, so a red at any of these is usually enough to stop. The hem, hooks and zipper are the most repairable, so ambers there are common and often acceptable. If you reach the end of pass two with only ambers at repairable points, you have a workable gown. If you have a structural red, the next pass is usually unnecessary, and you should consider moving on.
Pass three: gentle fabric strength checks for a vintage gown
Passes one and two tell you what the vintage gown looks like and how it is joined. Pass three asks whether the cloth itself can still do its job. A vintage gown has to be handled during fittings, steamed or cleaned, hemmed, zipped, danced in and then packed away. If the fabric is brittle, any of those steps can end it.
Pass three is cautious by design. The tests are reversible, they use no tools and they stop at the first sign of trouble. If you are not allowed to touch the vintage gown, or if the seller prefers to do the handling, that is fine. Ask them to run the checks and describe what they see, and ask them to photograph each one.
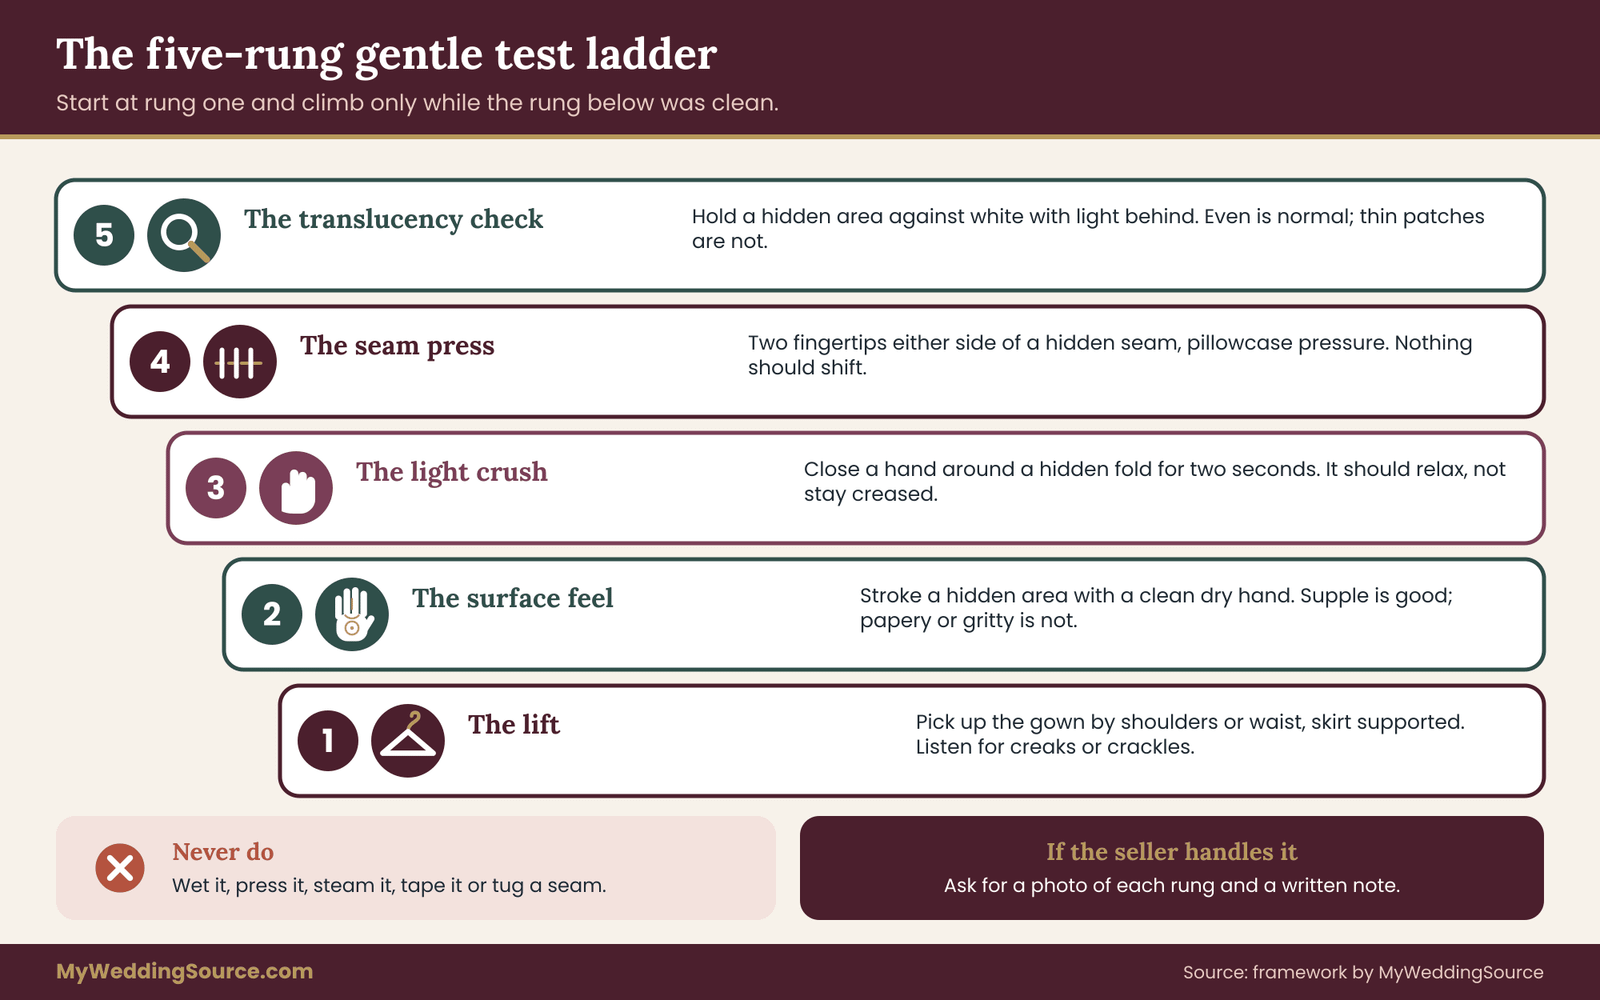
The five-step ladder
Think of pass three as a ladder. You start on the bottom rung, which is the gentlest, and you climb only if the rung below was clean. Stop at any rung where you see a problem.
Rung one, the lift. Pick the vintage gown up by the shoulders or inside the waist, supporting the skirt weight with your other arm. Watch for sounds and for any movement in seams. A gown that creaks, crackles or shows threads pulling as it comes off the hanger has already told you something. A sound vintage gown lifts without complaint.
Rung two, the surface feel. With a clean dry hand, stroke the fabric lightly in a hidden area such as the inside of the skirt. Silk should feel supple. If it feels crisp, papery or gritty, the fiber has aged badly. Cotton should feel soft and dry. If it feels powdery or sticky, that deserves a note.
Rung three, the light crush. Close your hand lightly around a small fold of fabric in a hidden area, hold for a couple of seconds, then release. A sound fabric springs back or relaxes. A damaged fabric may show a sharp crease that stays, a crackling sound or a slight shedding of tiny fibers. Do not repeat this in a visible area, and do not squeeze hard.
Rung four, the seam press. Place two fingertips on either side of a hidden seam, such as the lower side seam, and press apart with the pressure you would use to smooth a pillowcase. You are not stretching the seam. You are checking that nothing opens, shifts or squeaks. If the stitching shifts at all, stop and record it.
Rung five, the translucency check. Hold a hidden area of fabric against the white sheet with the light behind. Even translucency is normal. Dark or thin patches that are different from the rest suggest areas where the fiber has been lost.
If you reach the top rung without concerns, the fabric is probably in good enough condition to be altered by a skilled seamstress, with caution. That is not a promise, only a better-than-average starting point.
What you should never do
Never test fabric by wetting it, even in a hidden area. Water can leave rings, move dyes, shrink fibers and cause staining on aged silk and on certain rayons. Never apply a cleaning product, an adhesive remover or a stain remover to see what happens. Never press, iron or steam to test for wrinkles. Never put tape on fabric, even briefly, because the adhesive can leave residue and lift surface fibers.
Do not rely on the burn test or any other destructive fiber identification at a purchase stage. If you need to identify the fiber, a textile conservator or a cleaner experienced with vintage textiles can do it with proper methods.
Shattering and splitting
Some older silks split in long, thin lines, often along folds or in areas exposed to light or perspiration. The word often used is shattering. A shattered silk can look fine until it is touched or moved, then open in a clean line. It is rarely repairable in a way that supports normal wear.
You can look for it without handling. In raking light, check for fine parallel cracks, a surface that looks dry or crazed, small holes with clean edges, or fabric that looks like it is separating into strips. Silk that was treated with metal salts to add weight and body in earlier decades is more prone to this kind of decay, though you cannot tell by looking alone.
If you see signs of shattering on the skirt or bodice, treat the zone as red, even if the rest of the dress is lovely. This is a condition that rarely improves, and a buyer who accepts it should accept that the vintage gown may be better displayed than worn.
Matching the tests to the era
The ladder works for every vintage gown, but the emphasis shifts with age. For an early gown, spend most of your attention on rungs one to three and on shattering, because natural fibers and older finishes are the likeliest to fail. A short, careful look is better than many repeated touches.
For a mid-century gown, give extra attention to the zipper, the foundation and any boning, because these years brought new fibers and new construction that were not always stable. Check acetate and rayon areas for weakness along stress points, and check any underskirt for brittle net.
For a later vintage gown, spend your time on the inside: foam, elastic, glue and plastic boning. The outer fabric may be in excellent shape, yet the parts that give the vintage gown its shape can have failed. A vintage gown that looks perfect and smells slightly of old foam or adhesive deserves a closer look inside the bodice, with the seller’s permission.
Whatever the era, remember that this is a screening, not a laboratory test. It tells you whether to keep going. It does not tell you how many years of wear the fabric has left.
Fiber by fiber: what age does to a vintage gown
You do not need to be a textile expert to inspect a vintage gown. You do need to know a few broad tendencies, because they tell you where to look hardest. Treat the lists below as rules of thumb. Condition varies enormously from one gown to the next, and storage, wear and cleaning history often matter more than the fiber.
Silk
Silk is soft, drapes beautifully and is often the fabric people picture when they think of a vintage gown. It is also sensitive to light, perspiration and storage. Look for splitting along folds, fading in bands, weakened underarms, and watermarks. Silk satin and silk taffeta show fold damage clearly. Silk crepe and chiffon tend to hide it until they are handled. A gown with a lot of silk in the skirt is worth inspecting twice.
Cotton, linen and lace
Cotton and linen are often tougher than silk, and many cotton gowns survive remarkably well. The risks are staining, mildew, and weakness from past bleaching. Cotton lace and net can be stiff or thin at the edges. Look at lace joins, since motifs applied to net can separate, and at the hem where lace takes abuse.
Rayon and acetate
Rayon and acetate came into use in the early twentieth century and were common in mid-century gowns. They can look like silk but behave differently. Some rayons are weaker when wet. Acetate can be damaged by heat and by certain solvents, which includes some nail-polish removers and perfumes. If a label says acetate, check that no one has treated stains with a solvent. If there is no label, assume fragility until proven otherwise.
Nylon and polyester
Later vintage gowns often use nylon, polyester or a blend. The fabric can be tough, and it may survive better than a silk of the same age. Common problems include yellowing that does not clean out, odor held in the fibers, melted spots from past pressing, and snags in the weave. The seams may be sound while inner parts have failed, so pass two still matters.
Beads, sequins and trims
Beads and sequins add weight and put strain on the fabric under them. Check for loose beads, missing areas, broken threads and rust on metal elements. Some very early sequins were made from gelatin and can dissolve or warp when moisture reaches them, and some plastic trims turn brittle or sticky with age. For gowns with heavy beading, ask a specialist in beaded work to look at the dress before you commit.
Inner parts
Foam shoulder pads can crumble into a powder. Elastic can lose its stretch or turn sticky. Hot-melt or glue-based interfacings can bleed through. Netting under skirts can become brittle. None of these may be visible from the outside, so ask the seller whether anything inside has been replaced, and check the lining by touch with the seller’s permission.
The photo checklist to request from any seller
If you cannot inspect the vintage gown in person, photographs are your only passes, and ordinary listing photos are not enough. They are taken to flatter. A fixed list of requested photos turns a sales gallery into evidence, and it makes a seller’s reaction informative. A seller with a sound gown can usually send the set within a day. A seller who refuses, delays or sends only softened, filtered pictures is giving you information.
Send the list in a single message so the request is clear and a copy exists. Keep the reply. It becomes part of your records, and it is useful if there is later a disagreement about what the vintage gown looked like when it was sold.
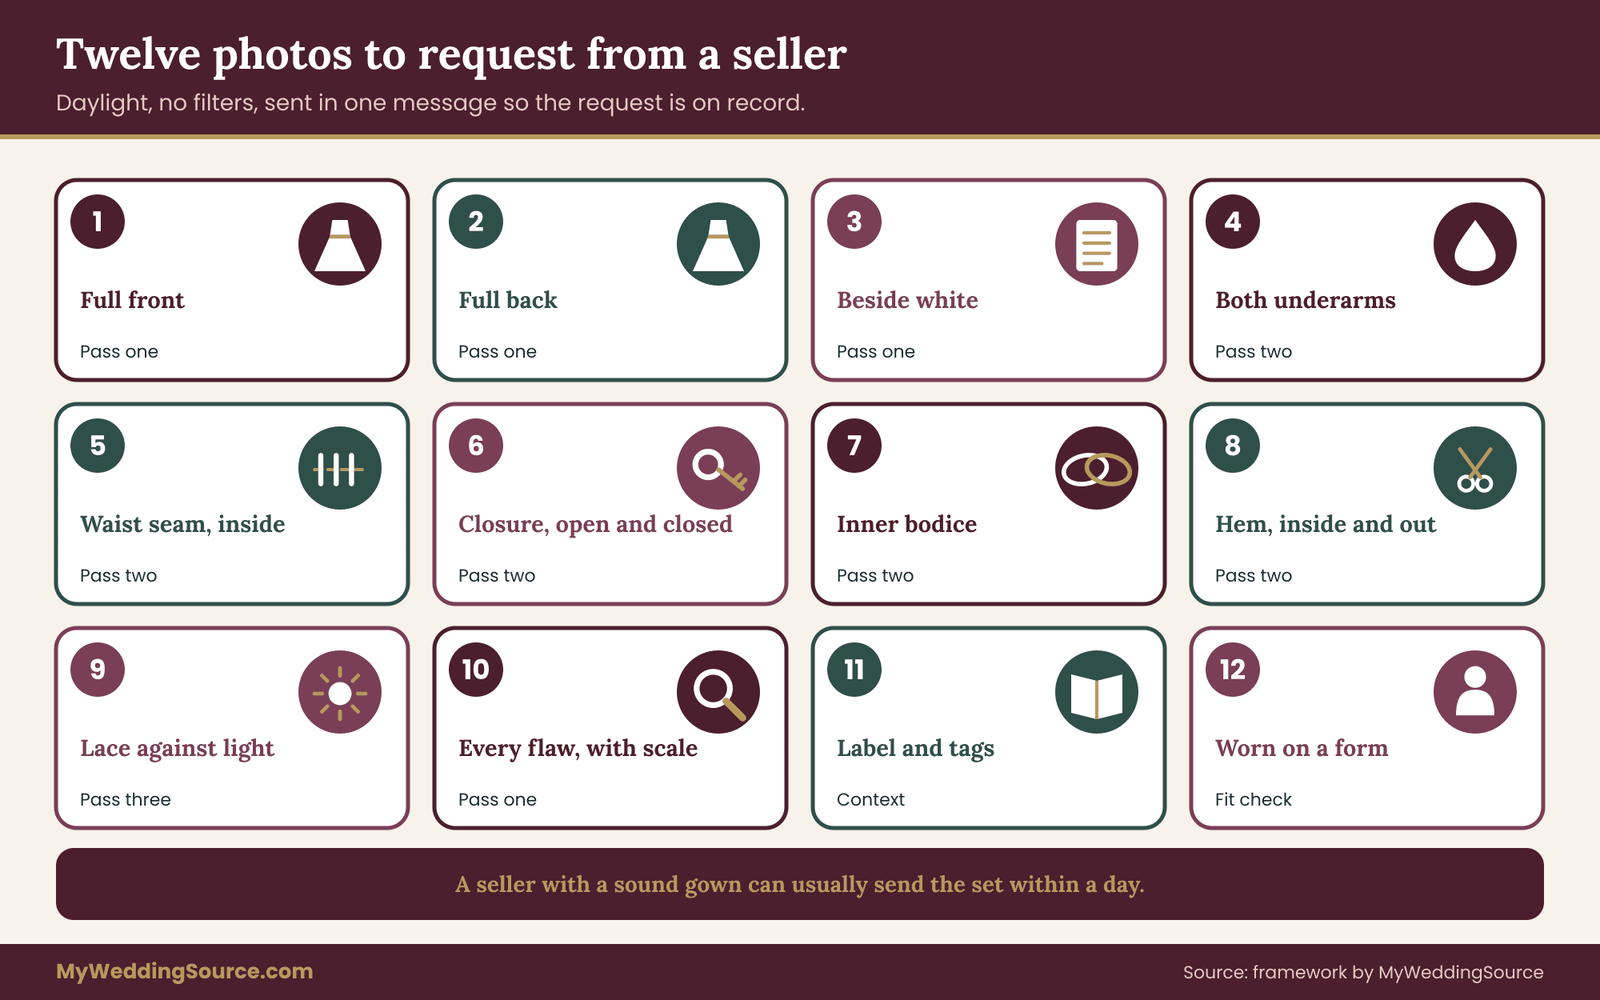
The twelve photos
The set below is built from the three passes. Each photo answers a specific question, and you can tell the seller why you want it.
One, the full gown in daylight, front. On a hanger or a form near a window, with nothing behind it but a plain wall or white sheet. No filters, no editing, and no shop lighting.
Two, the full gown in daylight, back. The same conditions, showing the closure and the back seams.
Three, the vintage gown beside a white reference. A sheet of plain white paper or a white cloth held against the fabric, so color can be judged. This is the single most useful photo for yellowing.
Four, both underarms, inside and outside. The lining and seam allowance, with the arm opening held gently open. This is the first stress point and the most common site of hidden damage.
Five, the waist seam, inside. The skirt-to-bodice join, turned so the stitching and any waist tape are visible.
Six, the closure, open and closed. Zipper, buttons or hooks, front and back, with a close shot of any metal fasteners.
Seven, the bustline and inner bodice. The inside of the bodice, showing boning channels, cup seams and any lining or foam.
Eight, the hem, inside and outside. A section of hem laid flat, plus a close shot of the lowest edge of the skirt and any train.
Nine, the lace, net or overlay with the light behind. Held up against a window or a bright light, so thin spots and holes show.
Ten, a close shot of any stain, spot, repair or flaw. With a coin or a ruler beside it for scale. The seller should photograph every flaw they know about, and you can ask for any you spot in other pictures.
Eleven, the label and any inner tags. Not to prove a date, but to learn fiber content, maker and any care instructions that exist. A missing label is not a flaw. Note what is there.
Twelve, the vintage gown on a person or form, front and side. To check that it hangs evenly, with no strain lines or puckering at the waist and bust.
How to ask
Keep the request short and polite. Something like this works.
“Before I decide, could you send daylight photos of these twelve areas, with no filters? I’m checking seams and color, not looking for perfection.”
The wording matters because it signals that you are a careful buyer and not an adversary. Most sellers respond well to it.
If the seller offers a video call, accept. A short live look at the underarm, the waist seam and the hem, with the vintage gown moved gently in front of a window, is more informative than ten still photos. Ask them to hold the white reference beside the fabric during the call, and take screenshots only with their permission.
What the photos tell you
Compare the set against the passes. For pass one, use photos one to three and ten. For pass two, use four to eight and twelve. For pass three, use nine and any extra shots the seller offers. You will not be able to complete the touch tests from photos, so a vintage gown judged only by photos should score one step more cautiously than one you handled. In practice, that means treating an unclear amber as red until the seller clarifies it.
Pay attention to what is missing as well as what is shown. If every photo avoids the underarm, or the hem is always cropped out, ask why. If the lighting changes from photo to photo, ask for the daylight set again. An honest seller will usually understand.
Questions to ask the seller about a vintage gown
Photos show the surface. Questions bring out the history. Ask in writing so there is a record, and keep the answers with the photos. This is also where the quality of the seller becomes clear, which is part of the decision. The wedding vendor due diligence checklist explains the general habit of verifying a seller before paying, and it applies here, though a resale seller is not always a business.
Condition and history
Ask when and where the vintage gown was bought, how many owners it has had and how it was stored. Ask whether it has been cleaned, when, by whom and with what method. Ask whether any repair, alteration or replacement has been made, and whether the seller has documentation. Ask whether the vintage gown has been worn, and if so how often.
Ask about the known flaws, and ask the question openly: what are the things you would want to know about this vintage gown if you were buying it? A seller who answers fully and without defensiveness is likely to be reliable.
Terms
Ask whether returns are accepted, for how long, under what conditions and who pays shipping. Many vintage sales are final, and that is not unreasonable, but it changes your risk. Ask how the vintage gown will be packed. Ask whether payment through a method with buyer protection is possible. If the answer to every question is “no returns, no questions, cash only,” treat the vintage gown as red regardless of its condition.
Ask whether the seller will write the main facts into the listing or the invoice: the condition notes, the known flaws and the return terms. A written description that matches what arrives is your best protection if you need to raise a problem later. Consumer rules on online sales differ by seller type and by place, and the Federal Trade Commission and the Consumer Financial Protection Bureau publish plain-language guidance, so use their pages to check the current rules instead of relying on a seller’s summary.
What a good answer sounds like
A good answer is specific. “Bought new in the early sixties, worn once, kept in an acid-free box in a closet, cleaned once by a specialist who gave us a receipt” is the kind of detail you can check. A weak answer is vague. “It’s been in the family forever, it’s perfect” tells you nothing.
None of this proves the seller is honest, and a smooth answer is not evidence. But specific answers can be verified, and vague ones cannot. If you decide to buy, keep the whole message thread with your wedding records, because it documents what you were told about the condition.
Red flags in conversation
A few patterns are worth noticing. Pressure to decide quickly, because “others are interested,” is common and rarely needed. Reluctance to provide the requested photos suggests that the vintage gown has something to hide. Refusal to allow a pre-purchase inspection by a local seamstress or cleaner, at your cost, is a concern. And a price far below comparable listings, with a story that explains it, deserves extra care.
Scoring the findings and deciding on a vintage gown
By now you have a set of colors: four from pass one, nine from pass two, and a short result from pass three. Scoring turns them into a decision. The rules below are deliberately simple, because a method you cannot apply in your head, on a shop floor or on a phone call, is a method you will not use.
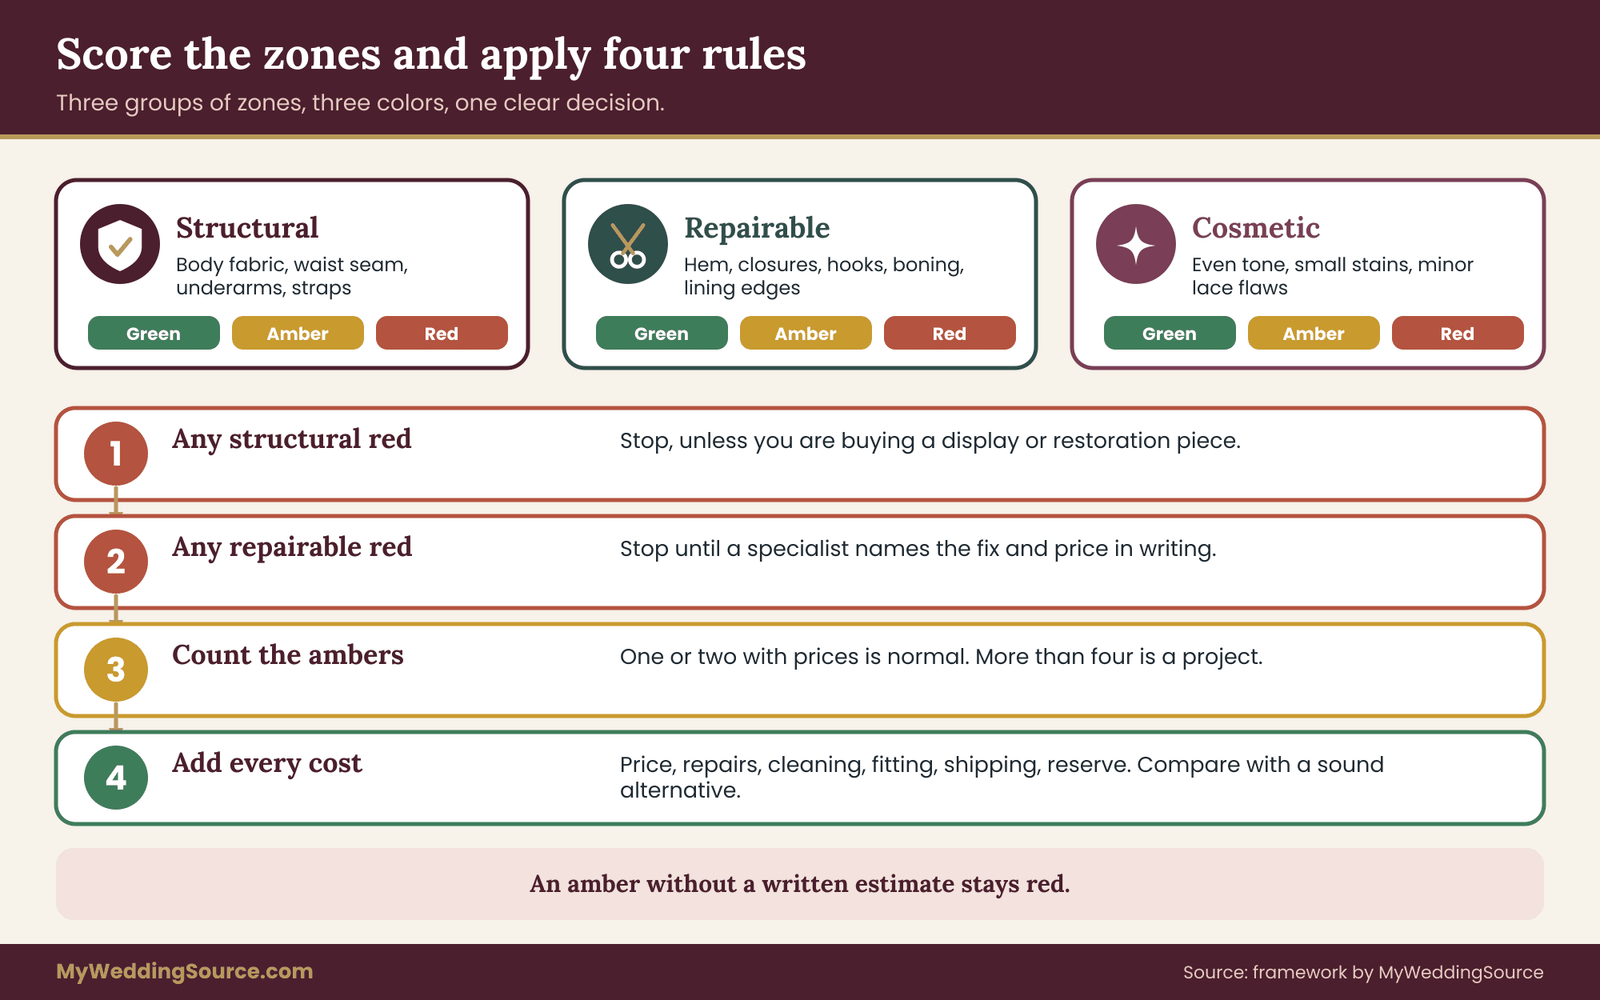
Group the zones
Sort every result into three groups. The first group is structural: the main body fabric, the waist seam, the underarms and the shoulder or strap seams. These hold the vintage gown together. The second group is repairable: the hem, closures, hooks, boning and lining edges. A skilled seamstress can usually address these. The third group is cosmetic: even yellowing, small stains on non-structural areas, minor lace flaws and odor that a cleaner has said can be treated.
The decision rule
Apply these four rules in order.
First, any red in the structural group means stop, unless you are buying the vintage gown as a display or restoration project and not to wear. One structural red outweighs every green.
Second, any red in the repairable group means stop until someone qualified has named a fix and a price in writing. If they do, the zone becomes amber with a number attached. If they do not, it stays red.
Third, count the ambers. One or two ambers with priced fixes is a normal vintage gown. Three or four deserve a hard look at the total. More than four usually means the vintage gown is a project, whether or not the seller describes it that way.
Fourth, add the costs. Take the price of the vintage gown, the quoted repairs, cleaning, alterations to fit, shipping and insurance, and a reserve for what you will find once the vintage gown is open. The reserve is a judgment, not a formula, and a reasonable approach is to set it at a share of the repair total that you would be comfortable losing.
If the all-in figure is more than you would pay for a sound gown that you like equally well, the vintage gown is not saving you money, and you should be buying it for a reason other than price.
Why the structural rule is strict
It can feel harsh to walk away from a beautiful dress because of one weak seam. The rule exists because structural problems are the hardest to fix and the most expensive to ignore. A seamstress can reattach a hook in minutes. Replacing a failed waist seam means working into fabric that is no longer strong enough to take stitches, and the repair may not hold. The cost is real and so is the risk of damage during the repair.
If you love the vintage gown despite a structural red, make the decision with open eyes. Ask a seamstress with vintage experience to look at the problem, in person if possible, and ask directly whether she believes the vintage gown can be worn safely for a full wedding day. If she hesitates, treat that as an answer. Consider a different use: a ceremony-only wear, a later display, or a redesign for a modern piece in a different fabric.
Put money beside each amber
An amber without a number is only a hope. For each amber, ask for a written estimate from the person who would do the work, or at least a range from them in a message. Add the estimates. This habit protects you from the trap of thinking each small repair is trivial, when together they equal a large fraction of the price.
Keep in mind that estimates for vintage work can change once the work starts. Ask the specialist what could change the estimate and what they would do if they found more damage. Settle that in advance, and put it in writing. The wedding vendor contract guide covers the general idea of writing down scope, price and what happens when the scope changes, and a repair or restoration job deserves the same treatment as any other vendor job.
Cost logic without made-up numbers
Because repair costs vary by region, by fabric and by the specialist, this guide does not offer typical prices. Build your own from quotes. Write one line for each of these: the asking price, shipping and insurance, gentle cleaning if any, each repair by name, alterations for fit, replacement closures or trims, a reserve for the unexpected, and the cost of any second opinion. Fill each line with a quote or a range from the person who would do the work, and mark any line that is only your guess.
Then compare the total with a sound alternative. The comparison is the point. If a modern gown that you like about as much costs less than the total, the vintage gown must be earning its place for reasons beyond price: a cut you cannot find new, a family link, or a fabric you love. Those reasons are legitimate. Money is simply easier to decide about when you know the real figure.
Keep the reserve honest. Old gowns surprise people. A gown that opens at one seam may reveal another once the first is repaired. Decide in advance what you will do if the reserve is exhausted: pause, reassess, or stop. Having that rule before the work begins is far easier than inventing it halfway through a repair.
Link the result to your budget
Add the all-in cost into your wider plan. A vintage gown is often chosen to save money, and that is a fair goal, but only if you count everything. The wedding budget guide shows how to lay out the dress category beside the other lines, so a vintage gown that appears to be cheap does not quietly take money from catering or photography.
Worked example: a silk crepe gown from the early sixties
The following example is invented to show the method. The people, the vintage gown and the amounts are illustrative, and nothing here describes a real sale. The amounts are placeholders to show the logic, not typical costs.
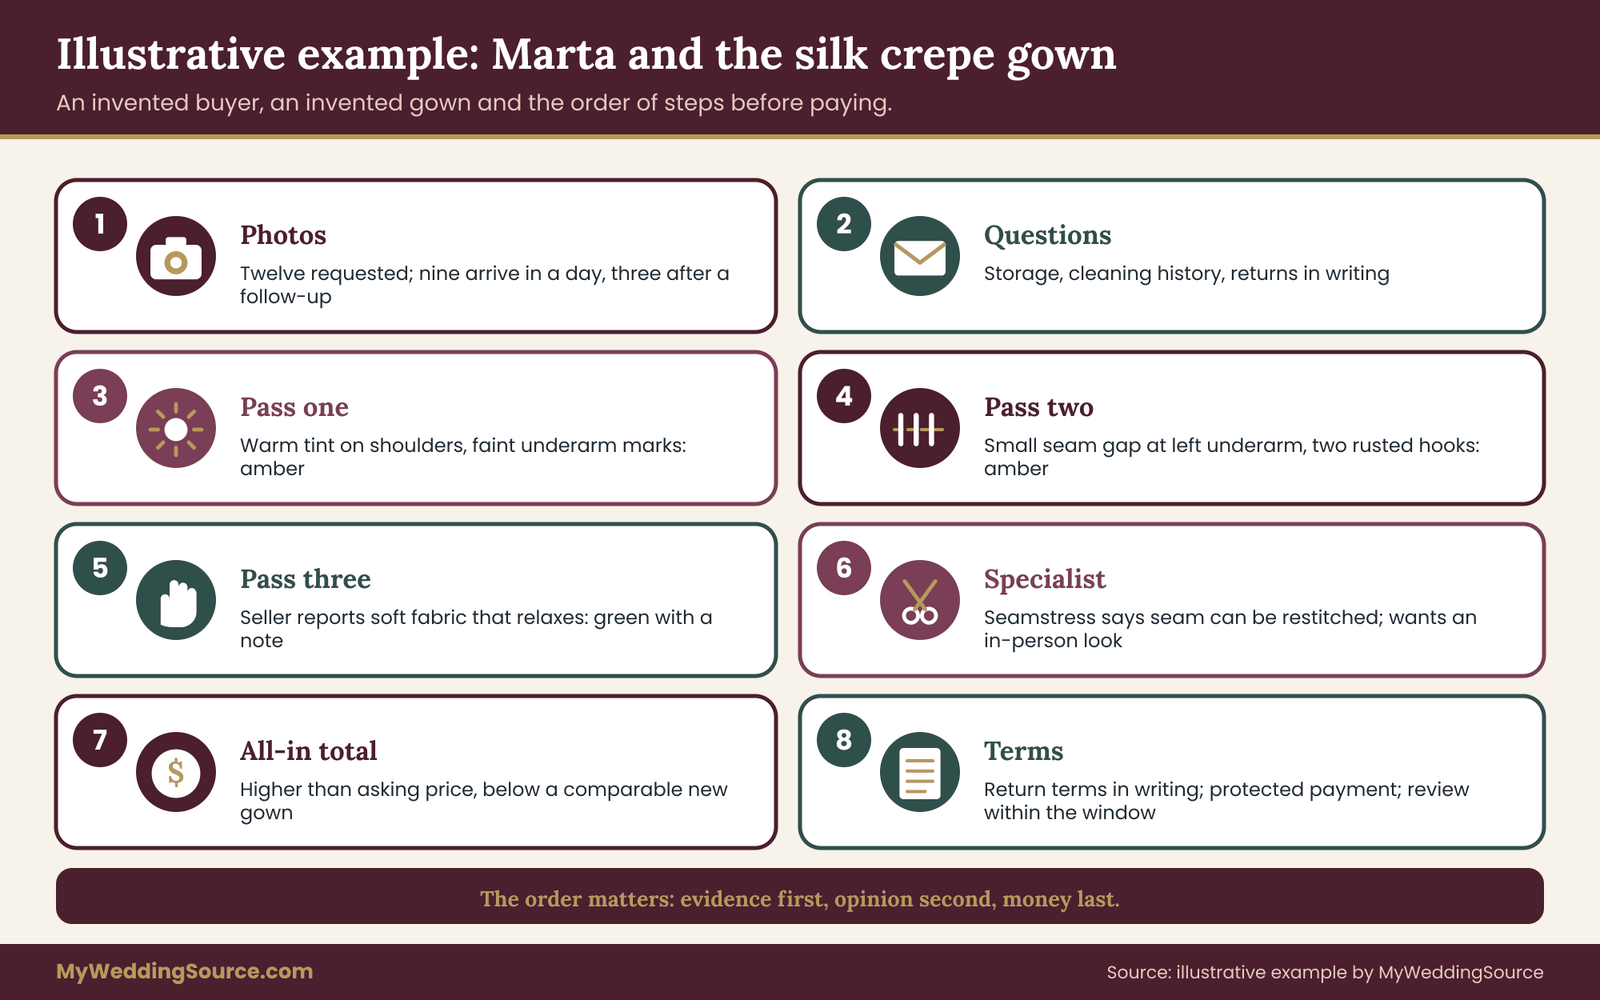
Marta finds a silk crepe gown listed by a private seller. The listing says “excellent condition, ivory, size to be taken in.” The price is a placeholder of 900 dollars. Marta asks for the twelve photos and three questions: how it was stored, whether it was cleaned and whether returns are possible. She gets nine photos in a day and three more after a polite follow-up.
The seller says it was stored in a closet in a garment bag, cleaned once years ago by a local cleaner with no receipt, and that returns are accepted within seven days if the vintage gown arrives different from the description.
Pass one
In daylight with the white reference, the ivory has a visible warm tint along the shoulders and the back, and a fold line across the skirt. The shoulder band suggests hanger light exposure. The interior photos show faint yellow-brown near both underarms. The hem is gray at the edge but intact. Marta records amber for color, amber for underarm discoloration, amber for hem, green for odor, because the seller says the vintage gown is smoke-free and has no musty smell.
Pass two
The underarm photos show a seam with a tiny gap on the left side, perhaps a centimeter, where the stitching has opened. The waist seam looks intact, with the original tape in place. The zipper is a replacement metal zipper in good condition. Two of the hooks show rust. The hem has one section where the hand stitching has loosened. The train attachment is not applicable.
Marta scores: underarm left, amber leaning red, because a seam gap in a structural zone plus perspiration marks needs a seamstress’s opinion. Waist, green. Zipper, green. Hooks, amber, with a cheap fix but rust staining to check. Hem, amber.
Pass three
Marta cannot touch the vintage gown, so she asks the seller to do a light crush on a hidden area of the skirt and to hold a hidden fabric area against the window. The seller reports that the fabric is soft, springs back and shows even light. That is a good sign, though it comes from the seller and not from Marta, so she scores it as green with a note.
The decision
Marta has no structural red, but one structural amber that leans red. She sends the underarm and waist photos to a seamstress who works with older garments. The seamstress says the left seam can be restitched by hand and the lining reinforced, gives a placeholder range, and says the discoloration looks like old perspiration on the lining, not on the outer fabric. She cannot judge fiber strength from photos and recommends an in-person look before the final decision.
Marta adds the figures: the asking price, the seamstress’s range for the underarm and hem, a small figure for hooks, a cleaner’s estimate for gentle cleaning with no promise on the shoulder band, an alteration estimate to take it in, and shipping with insurance. The total comes to a number noticeably higher than the asking price, but still below what a comparable new gown would cost her.
She asks the seller to put the return terms and condition notes in writing, buys with a payment method that has buyer protection, and plans an in-person seamstress review in the first days after delivery, within the return window.
The point of the example is not the number. It is the order: photos first, questions second, passes third, a written opinion from a specialist fourth, an all-in total fifth, written terms last. Each step reduced the unknowns before more money was committed.
Getting a second opinion on a vintage gown
Your own inspection narrows the field. A second opinion settles the close calls. The question is whom to ask, because three kinds of professional see a vintage gown differently, and the right one depends on what is worrying you.
A seamstress or bridal alterations specialist knows how gowns are built and how they behave when altered. She is the right person for questions about seams, fit, closures and whether the fabric will take stitches. Look for one who has worked on older garments, and ask her directly. The wedding dress fit and alterations guide covers timing and what to expect from fittings, and it is a good companion once you know the vintage gown is sound.
A cleaner who handles vintage and heirloom textiles knows what cleaning can and cannot do. She is the right person for stains, yellowing and odor. Ask what methods she uses, what she will not attempt, and whether she gives a written condition note before starting.
A textile conservator looks at the material itself. This is the right person for a vintage gown of real historical or sentimental value, or for one with signs of shattering, mildew or heavy repair. A conservator’s time costs more, and for many weddings it is more than the situation needs. The American Institute for Conservation and the Canadian Conservation Institute both publish guidance for finding conservation professionals and for caring for textiles.
How to run a useful consultation
Bring or send the photos from the checklist, your colored notes and your questions. Ask three things in the same order each time. What are you most worried about on this gown? What can be done about it, and at what cost? What would you do if the gown were yours?
Ask for the answers in writing, even a short message. If two professionals disagree, ask each to explain the difference. Often the gap reflects different goals: one is thinking of wearing the gown for a day, the other of preserving it for decades. Tell them which you want.
When the gown arrives: the first days and the edge cases
An inspection does not end at purchase. The first few days after delivery are your last cheap chance to catch a problem, and most return windows are short. Treat arrival as a fourth pass.
The first forty-eight hours
Open the package in a clean, dry room with good light. Photograph the box and packing before you unpack, in case there was shipping damage. Lift the gown out carefully with both arms, supporting the skirt. Lay it on a clean white sheet on a bed or a large table, not on the floor.
Repeat the twelve photos in daylight and compare them with the seller’s. Look for anything that differs: a stain not shown before, a seam that looks different, a smell that was not mentioned, a color that does not match. If anything differs, take clear photos and write to the seller the same day, referring to the written description and the return terms.
Do not wash, steam, press or hang the gown for a long time. If it needs hanging while you wait for a seamstress, support the weight at the waist or shoulders as the construction allows, and avoid hanging a heavy skirt from thin straps. Keep it away from direct light, heat and damp. Store it in breathable cotton cover, and not in plastic, until you have a plan.
Book the seamstress review and any cleaner’s assessment inside the return window. If you cannot get an appointment in time, ask the seller in writing whether they will extend the window. Keep the written reply.
Returns and payment
Keep your records together: the listing, the photos, the messages, the payment receipt, the shipping receipt and the insurance details. If something goes wrong, you will need them. The wedding records guide shows a tidy way to store them.
If a seller does not respond or refuses a return that their written terms allowed, start with a clear written request that names the issue and the term. If that fails, contact the payment provider or card issuer promptly, since dispute windows are short. The Consumer Financial Protection Bureau and the Federal Trade Commission explain consumer rights for card disputes and online purchases, and they are the right places to check current rules. This guide cannot tell you how a particular dispute will turn out.
Edge cases
A family gown. Inheritance changes the pressure, not the physics. A gown from a relative has the same weak points as one from a shop, and the emotional cost of a split seam is higher. Run the same passes, perhaps with a conservator’s opinion, and plan a gentle wearing strategy.
A gown sold as restored. Ask who did the restoration, what was done, what was replaced and whether it is documented. Restoration can mean anything from a clean to a full rebuild. A restored gown still needs the three passes, because the work may have been done well or badly.
A gown with no returns. Raise your threshold. Require a video call, require the full photo set, require a written condition description, and consider a pre-purchase inspection by a local seamstress at your cost. If the seller refuses all of these, the risk may be too high.
A gown that is almost right but weak in one area. Ask whether the weak area can be hidden by a design change, such as a jacket, a wrap, an overskirt or a modest modification that is reversible. Reversible changes protect the gown’s future. Cutting into original fabric does not.
A gown that is lovely but frail. Consider a wear plan: a ceremony only, with a change for the reception, or a lighter modern outfit for dancing. The wedding day accessories planning guide explains how to plan the pieces around a gown, including backups, and it helps if you decide to protect a delicate gown from a long day.
A gown with unusual closures or construction. Early gowns may close with hooks, loops, buttons or lacing, and may include stays that do not match modern habits. Make sure you can get in and out without strain, and that you have a helper who has practiced it.
Planning for the wedding day
A sound vintage gown still needs care on the day. Assign one person to look after it, and brief them. Remind everyone that hugging, sitting and dancing put strain on seams. Have a small kit of needle, matching thread and spare hooks, and have the seamstress show someone how to use it. Avoid safety pins on delicate fabric. Keep the gown away from candles, drinks and perfume sprays. Give the dress its own hanger in a clean space, and plan how it will be stored the next day.
Your next steps
Start with the photo checklist, and send it to the seller before you travel or pay. Run pass one the moment the photos arrive. Score the zones, and stop if you find a structural red. If you reach pass two, mark the nine points, and put a price beside every amber. Ask a seamstress with older-garment experience to review the structural zones.
Add the all-in total and compare it with the price of a sound alternative. Get the return terms and condition notes in writing, and keep the whole thread. After delivery, repeat the photos within the return window, and book the second opinion before the window closes.
If at any point the gown fails the rule, walk away without guilt. A dress is not the only source of a good wedding day, and another one will come along.
FAQ
How long does a vintage gown inspection take?
A first pass on photos takes about half an hour once the twelve images arrive. An in-person look at a shop takes thirty to forty-five minutes if you work through the three passes in order. Add time for a seamstress review, and for any second opinion. Rushing is the usual cause of missed damage, so plan the time before you visit.
Can I wash a vintage gown at home to remove yellowing?
It is risky and usually unwise. Water can move dyes, leave rings, weaken aged silk and damage trims. Whether a gown can be cleaned depends on fiber, construction and condition, so ask a cleaner who handles vintage textiles. Ask for a written note on what they will and will not attempt, and accept that some yellowing may not change.
What is the most serious hidden damage in a vintage gown?
Weak fabric and failed structural seams are the most serious, because they are the hardest to repair and may fail during wear. Shattering silk, a separating waist seam and mildew are common examples. Stains and yellowing are often cosmetic by comparison. Treat any structural problem as a reason to stop, unless someone qualified has agreed in writing to fix it.
Can I inspect a vintage gown from photos alone?
You can do a useful first screening, but not a complete one. Ask for the twelve checklist photos in daylight, including underarms, waist seam and hem, and a video call if possible. Photos cannot show brittleness or odor. Score cautiously, and plan an in-person seamstress review within the return window if the seller allows returns.
Should I hire a textile conservator?
For most weddings, a seamstress with older-garment experience and a cleaner who handles vintage textiles are enough. A conservator makes sense for gowns of real historical or sentimental value, or when you see shattering, mildew or heavy repair. Conservators examine the material itself and can explain risks. Their fees are higher, so decide based on the gown’s importance.
What should I ask a seller about a vintage gown?
Ask how it was stored, who owned it, whether it was cleaned and by whom, what repairs were made and what flaws they know about. Ask about returns, shipping and packing, and request the condition and terms in writing. Specific answers can be checked. Vague answers or refusal to send photos are reasons to be careful.
Is it safe to wear a fragile vintage gown for a whole wedding?
It depends on the fabric and seams, and a seamstress with older-garment experience can advise after seeing it. Fragile gowns often work better for the ceremony and photos, with a change for dancing. Reinforce stress points where possible, assign a helper, avoid pins, and plan how the dress will be stored afterward.
What if the gown arrives different from the listing?
Photograph everything the same day, compare with the seller’s images and write to the seller citing the written description and return terms. Do not clean or alter the gown. If the seller does not respond, contact your payment provider quickly, since dispute windows are short. The Federal Trade Commission and the Consumer Financial Protection Bureau explain current rights.