
A wedding jumpsuit and a wedding pantsuit can both look polished in a mirror and still behave very differently once you walk an aisle, sit through vows, hug forty people and dance. This guide gives you a six-gate mobility check, tailoring limits, illustrative cases and a written-confirmation list, so you can choose between them on evidence instead of a single flattering fitting photo.
Choose a wedding jumpsuit when you want one clean line from shoulder to hem and you can pass three tests in the actual garment: sitting and rising without pulling at the torso, a restroom plan that works without help from a crowd, and a full hug-and-dance circuit without the waist shifting. Choose a pantsuit when you want separates that can be altered piece by piece, a jacket you can remove, and an easier restroom. Either way, test movement in your real shoes before you pay a final balance.
Most advice about a wedding jumpsuit stops at style: wide leg or tapered, strapless or sleeved, ivory or color. That matters, but it is the easy half. The harder half is mechanical. A one-piece garment has to fit your shoulders, your torso length, your hips and your legs all at once, and it has no waistband that can slide to make up the difference. A pantsuit splits those jobs between a jacket and trousers, which gives a tailor more room to work.
This guide covers fit, styling and ceremony practicalities for both choices. It treats the wedding jumpsuit as the more demanding garment, because it is, and it treats the pantsuit as the more forgiving one, with its own pitfalls around matching pieces and jacket movement. You will find a repeatable method, not a verdict, because the right answer depends on your body, your venue and the day you are planning.
A note on scope. This is general planning information, not legal, tax or financial advice. Garment construction differs by designer and by workroom, so nothing here replaces a fitting with a qualified alterations professional (the wedding dress fit and alterations guide explains how fittings work in general), and where consumer rules or fees matter, the article points you to the agency that issues them.
Wedding jumpsuit vs pantsuit: what each one actually is
The two words get used loosely in shops, so start with plain definitions. A jumpsuit is a single garment that joins a top and trousers, usually through a seam at or near the waist, closed with a zipper in the back, side or front. A pantsuit is a matching set of separate pieces, most often a tailored jacket with trousers, sometimes with a vest, a shell top or a cape layer.
That difference sounds small and drives almost everything else. A wedding jumpsuit has one set of measurements that must all agree. A pantsuit has two or three sets, and each can be adjusted on its own. If your shoulders sit in one size and your hips in another, a pantsuit can follow your body more easily than a wedding jumpsuit can.
The common silhouettes
Within each category the shapes vary a lot, and the shape changes the movement test more than the label does.
Wide-leg wedding jumpsuit. Long, flowing trouser legs that can read almost like a skirt when you stand still. These often move well, but the fabric can catch under a heel and billow in wind.
Tapered or straight-leg wedding jumpsuit. A cleaner, more tailored line. It shows the shoe and the ankle, and it puts more demand on the rise and the knee room when you sit.
Jumpsuit with an overskirt. A detachable or wraparound skirt layered over trousers, often chosen for the ceremony and removed for the reception. The skirt adds fabric to manage on stairs and in restrooms.
Cape or sleeved jumpsuit. A cape, sleeves or a bolero adds coverage and drama. It also adds a layer that can slide, snag or overheat.
Classic pantsuit. A fitted jacket and straight or slightly flared trousers in a matching fabric, in white, ivory, blush, black or a color.
Tuxedo-style or three-piece set. A jacket, trousers and a vest or corset-style top, often with satin lapels. It reads as formal and gives you the most layers to adjust.
Cropped jacket and high-waist trouser. A shorter jacket sits at the natural waist, so the trouser rise and waistband become the visible, hard-working parts.
Why movement matters more than the mirror
A dress that does not fit well tends to hide the problem under skirt fabric. Trousers do not hide much. The seat, the rise, the knee and the hem all show, and they all move with you. A small fit issue that disappears in a still photograph can become obvious the moment you sit on a folding chair or raise your arms for a hug.
That is why the method in this guide starts with movement. A garment that photographs beautifully but restricts breathing at the ceremony is a poor choice. A garment that moves well and photographs a little less dramatically often turns out to be the better one by the end of the day.
The six-gate mobility check for a wedding jumpsuit
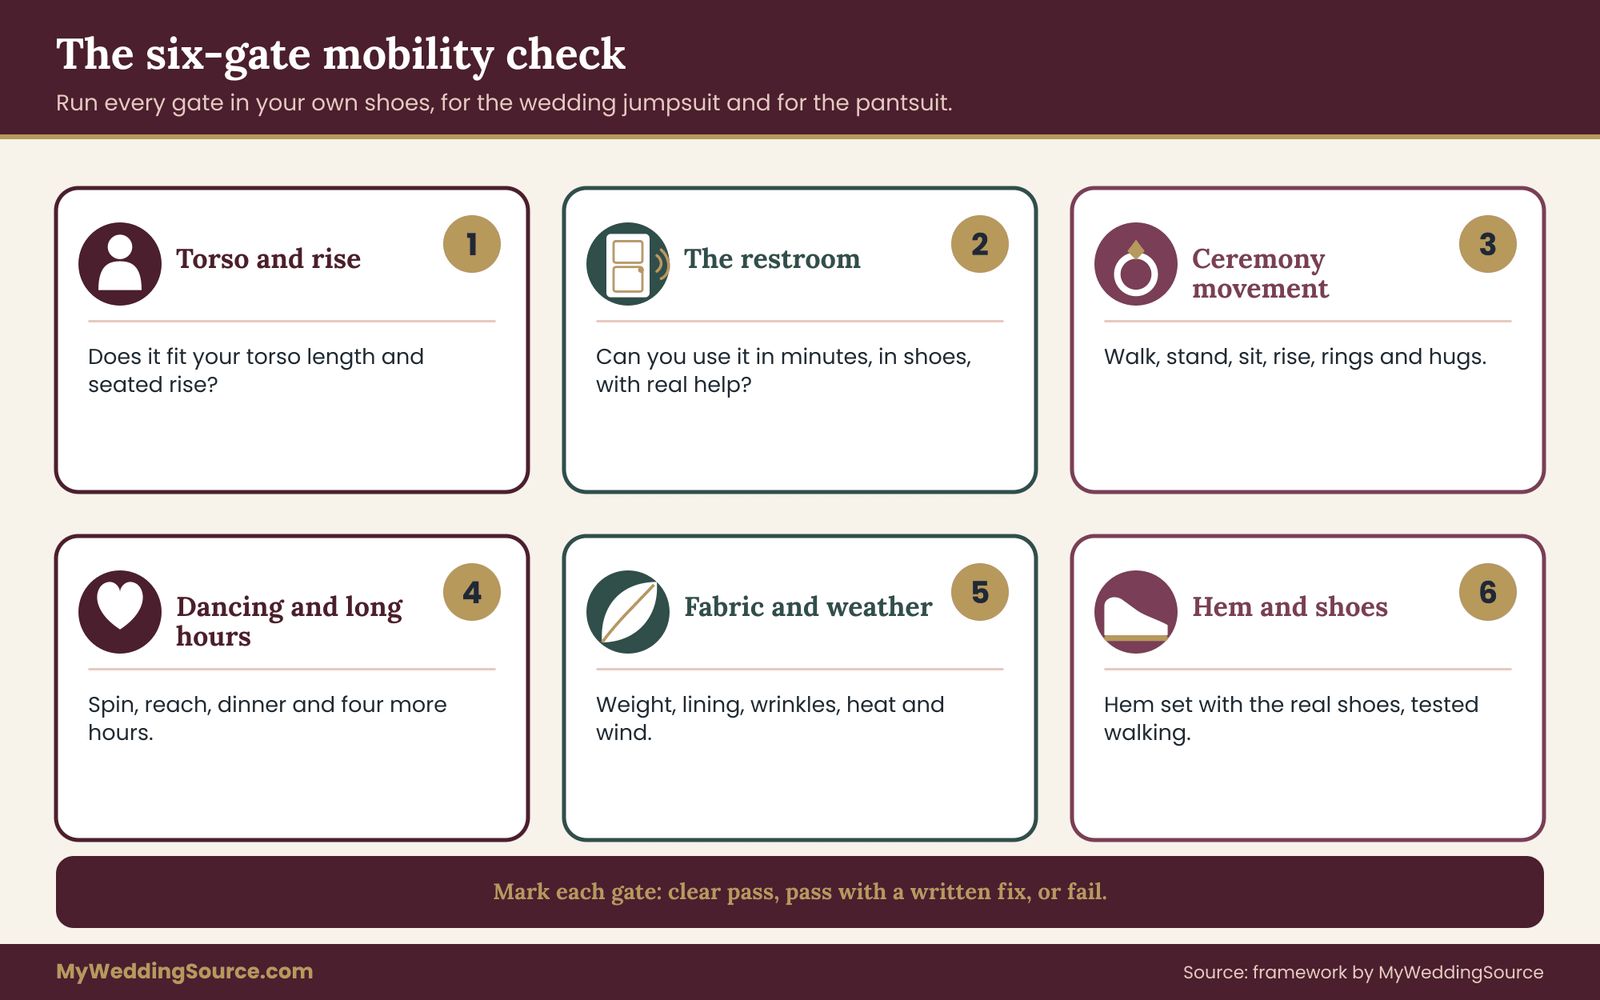
The framework in this guide is a set of six gates. Each gate is a question the garment must pass in your own body and in your own shoes. You run all six gates on a wedding jumpsuit and on a pantsuit, then compare how each one did. If a garment fails a gate, you either fix the problem through tailoring, change the plan around it, or move to a different garment.
Gate one: torso and rise. Does the garment fit the length of your torso and the depth between waist and crotch, standing and sitting?
Gate two: the restroom. Can you use a restroom within a few minutes, in your shoes, with the help you actually have?
Gate three: ceremony movement. Can you walk, stand for long stretches, sit, rise, kneel if needed and exchange rings without the garment shifting or pulling?
Gate four: dancing and long hours. Does it hold up through hugging, lifting your arms, dancing and sitting through dinner?
Gate five: fabric and weather. Does the fabric, lining and weight suit the temperature, the venue and the time of day?
Gate six: hem, shoes and accessories. Does the hem work with your shoes, your heel height and the surface you will walk on?
The gates are ordered by how hard they are to fix. Torso and rise come first because they are the hardest to change after you buy. The restroom comes second because it can rule out a style entirely. Fabric and hem come last because a tailor can often adjust a hem and a lining, though not always cheaply.
How to score the gates
Give each gate one of three marks: clear pass, pass with a fix, or fail. A clear pass means you did the movement several times and nothing needed attention. A pass with a fix means you found a specific, named problem and a tailor or the designer confirmed in writing that it can be corrected. A fail means the garment cannot do the thing, or the fix is unknown.
Write the marks down on the day of each fitting, not from memory. A failed gate that nobody wrote down tends to get forgotten in the glow of a good mirror moment, and it reappears at the ceremony. Two or more fails on a wedding jumpsuit is a strong signal to try a pantsuit or a different cut. One fail is a conversation with the designer about what can be done.
The one rule that sits above the six gates
Never decide on a wedding jumpsuit from a single fitting in shoes you will not wear. Heel height changes the hem, the break of the trouser and how the garment hangs through the hip. Bring the actual shoes, the actual undergarments and any shapewear you plan to wear, and do the movement test in them. The wedding day accessories planning page covers the shoes, belts and backups that change how a garment behaves. If you do not have them yet, you are not ready to make the final decision, only a provisional one.
Why not just pick the one you love?
You can, and many people do, and it often works out. The six gates do not argue against love at first sight. They protect it. If you love a wedding jumpsuit, the gates tell you what to confirm so the garment you love is also a garment you can wear for eight hours. If it passes, you go forward with confidence and a paper trail. If it fails, you learn that while there is still time to change course, rather than at the final fitting.
The next sections take the gates one at a time, with specific tests, scripts for the conversation with a fitter and notes on how a pantsuit compares.
Gate one: torso length and rise in a wedding jumpsuit
Torso length is the single biggest reason a wedding jumpsuit that looks right on the hanger fails on a body. Ready-to-wear sizing is built around a typical proportion between the length of your torso and the length of your legs. Plenty of people are not that proportion. If your torso is longer than the pattern assumes, the crotch seam pulls upward whenever you stand tall. If it is shorter, the waist seam sags and the fabric bunches at the middle.
Standards groups publish voluntary body-measurement tables, and ASTM is one of them, but brands are free to use their own fit models. Two labels with the same size number can be very different garments. Treat the size tag as a starting guess and let the fitting decide.
Measuring before you shop
Before any fitting, take three measurements and write them down. Use a soft tape and wear thin clothing.
Full torso. Start at the top of one shoulder, run the tape down the front of your body, between your legs, and up the back to the same shoulder point. Hold it snug but not tight. This is the measurement that a wedding jumpsuit lives or dies on, and many shops will tell you what length their pattern assumes.
Waist to crotch while seated. Sit on a firm chair, measure from your natural waist to the surface of the chair. Seated rise is longer than standing rise, and a wedding jumpsuit has to allow for it.
Inseam and outseam. Measure to the floor in the shoes you will wear, because the hem depends on them. You will need a second person for the outseam.
Bring these numbers to the first appointment and ask how the designer’s pattern compares. A good consultant will not be offended. If the answer is vague, ask to speak with the alterations person directly.
The sit-and-rise test
This is the core test for gate one, and it takes about a minute. Put on the garment with the shoes and undergarments you plan to wear. Sit on a standard chair with a hard seat, the kind used at ceremonies. Stay seated for two or three minutes, then stand up and look in the mirror.
Check four things. First, did the waist seam hold its place, or did it ride up your ribs? Second, did the shoulder straps or sleeves pull at your neck or collarbone when you leaned forward? Third, can you breathe in fully while seated? Fourth, are there creases across the lap, the knee or the seat that look worse than you expected?
Repeat it three times. Many garments feel fine the first time and show strain on the third. Take a phone video of the test from the side, because you will not see it clearly while you move.
What the rise tells you
The rise is the distance from the crotch seam to the waist. A high rise sits at or above the natural waist, a mid rise sits a little below. In a wedding jumpsuit, rise is built into the bodice, so a tailor cannot change it by moving a waistband. That is what makes a wedding jumpsuit harder to fit than trousers.
If the rise is too short, you will feel the pull in the crotch seam when you stand straight or reach up. If it is too long, the seat will sag, the crotch will drop below where it should be, and the legs will look shorter. A tailor can sometimes add or remove length at the waist seam, but the cost and the result depend on the design, the fabric and the seam allowance. Ask before you buy, and get the answer in writing.
How a pantsuit changes gate one
A pantsuit separates the torso from the legs. The jacket is fitted on its own to your shoulders and bust, and the trousers are fitted on their own to your waist and hips. If your torso is long, you can wear a trouser with a higher rise and a longer jacket without conflict. For many bodies, this is a clear advantage over a wedding jumpsuit.
The trade-off is that you now have two garments to fit and keep matched. The sections on tailoring cover that in detail. For gate one, the practical conclusion is simple: if you fail the torso test in two different wedding jumpsuit cuts, a pantsuit is not a retreat, it is the garment that suits your proportions.
Gate two: the restroom plan for a wedding jumpsuit
Almost no one wants to write a section about restrooms. Almost every person who has worn a wedding jumpsuit to a long event wants it to exist. The restroom gate is practical and a little awkward, and it can decide the whole choice, so it gets its own plan.
A wedding jumpsuit needs to come down far enough to use a restroom, and it has to go back up without help. Whether it can depends on the closure, the cut and the number of layers. A back zipper that ends at the waist usually does not solve the problem, because the top and trousers are still joined at the waist. A garment with a bodice that can be fully lowered, or one with a two-piece construction hidden under a belt, behaves differently from a true one-piece.
Questions to ask before you buy
Ask the designer or consultant these questions in plain words, and note the answers.
“How do people use the restroom in this garment? Can you show me?”
“Does the closure open far enough to lower the garment without removing it?”
“What happens if I need help? Which closure is easiest for another person to work?”
“Is the lining attached at the waist, or does it float?”
Consultants who sell these garments regularly will have answers, and some will demonstrate. If a consultant dodges the question, treat that as information about the garment.
The restroom test in the fitting room
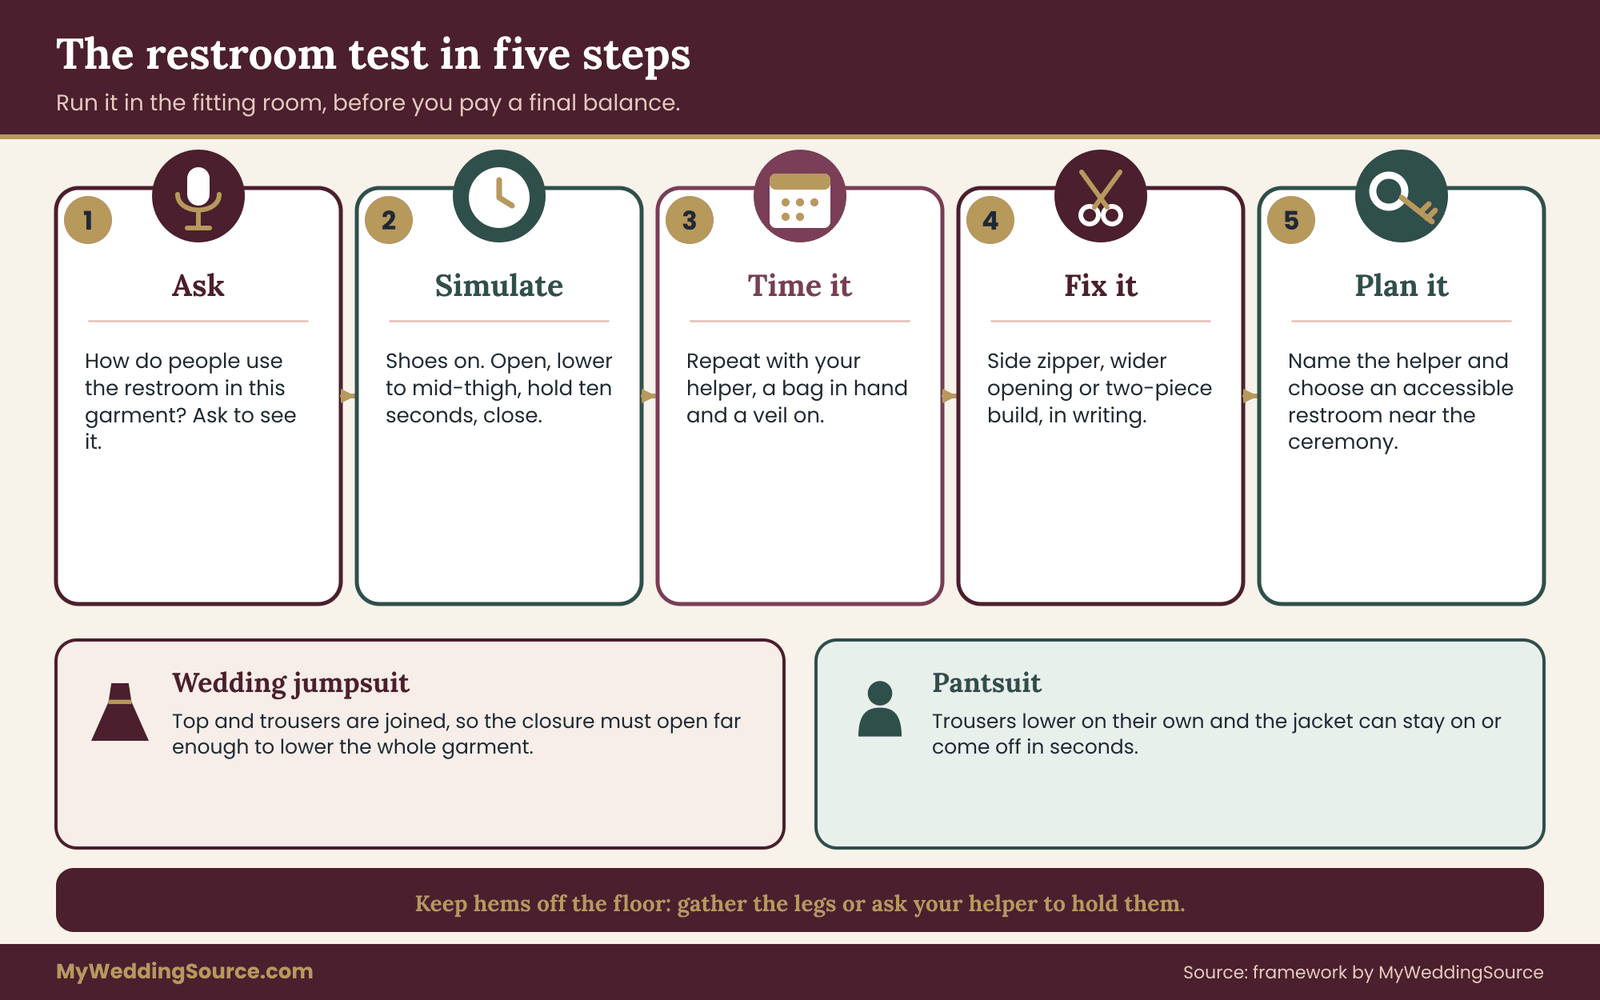
You do not need to use the restroom in the shop. You can simulate it. Put the wedding jumpsuit on with your actual undergarments and shoes. Without help, open the closure, lower the garment to mid-thigh, hold it there for ten seconds, and then bring it back up and close it. Time yourself. Do it again with a friend or relative who would realistically be your helper.
Then do the part nobody likes: do it while holding a clutch or a phone, wearing a veil or a shawl, and pretend you are in a narrow stall. If the zipper is at your back, can you reach it yourself? If you cannot, is your helper someone you are comfortable with, and will they be nearby at the right times?
A reasonable benchmark is that you can finish the process in a few minutes with minimal help. If it takes much longer in the quiet of a fitting room, it will take longer in a restroom with a long line and a ceremony schedule.
Building a restroom plan for the day
Even a garment that passes the test benefits from a plan. Decide who your helper is, and tell them. Agree on a location near the ceremony space, ideally an accessible or single-user restroom where you have more room. Ask the venue where those are and whether they are open to guests, and whether the route avoids stairs.
Time your last restroom stop before photos and before the processional. Wedding schedules often run late, so build in a margin. Add a few minutes to the family photo block for a quick restroom break, and tell your photographer, so no one is surprised when you disappear. A ceremony outline helps you pick a realistic window, and the next section points to one.
Hygiene and fabric considerations
Floor-length wide-leg trousers will touch the floor in many restrooms. Keep the legs off the ground by gathering the fabric in one hand or draping it over a forearm. A helper can hold the hem. Some people carry a clean pillowcase or a small cloth bag to lay the hem on, which is practical and inexpensive.
Delicate fabrics and light colors show marks. A damp mark from a restroom floor on ivory crepe is a real risk. Keep a spare pair of shoes and a small stain pen in your day-of kit, and read the care label on the garment. Federal rules generally require clothing to carry permanent care instructions, and the Federal Trade Commission explains those rules on its website, so you can check what the label must say.
How the pantsuit compares on gate two
A pantsuit is the clear winner on this gate. The trousers come down on their own, with no top attached, and the jacket can stay on or come off in seconds. You can handle the process alone, and the fabric is easier to keep off the floor.
If your wedding jumpsuit does not pass the restroom test and you do not want to change garments, there is a middle option: a jumpsuit-look two-piece, made from a matching top and high-waist trouser. It reads as one garment from a distance, and it behaves like a pantsuit in the restroom. Ask a designer whether they can make one in the same fabric, and treat it as its own garment with its own fitting and its own gate scores.
When the restroom gate is a fail
A fail on gate two does not always mean the garment is wrong, but it does mean you need an honest plan. If you must have a true one-piece, and you cannot use it without a helper, say so to yourself clearly, and then decide whether that trade is worth it for your day. For some couples it is. For others, a long ceremony in a venue with only distant restrooms makes it a poor trade.
Gate three: ceremony movement in a wedding jumpsuit or pantsuit
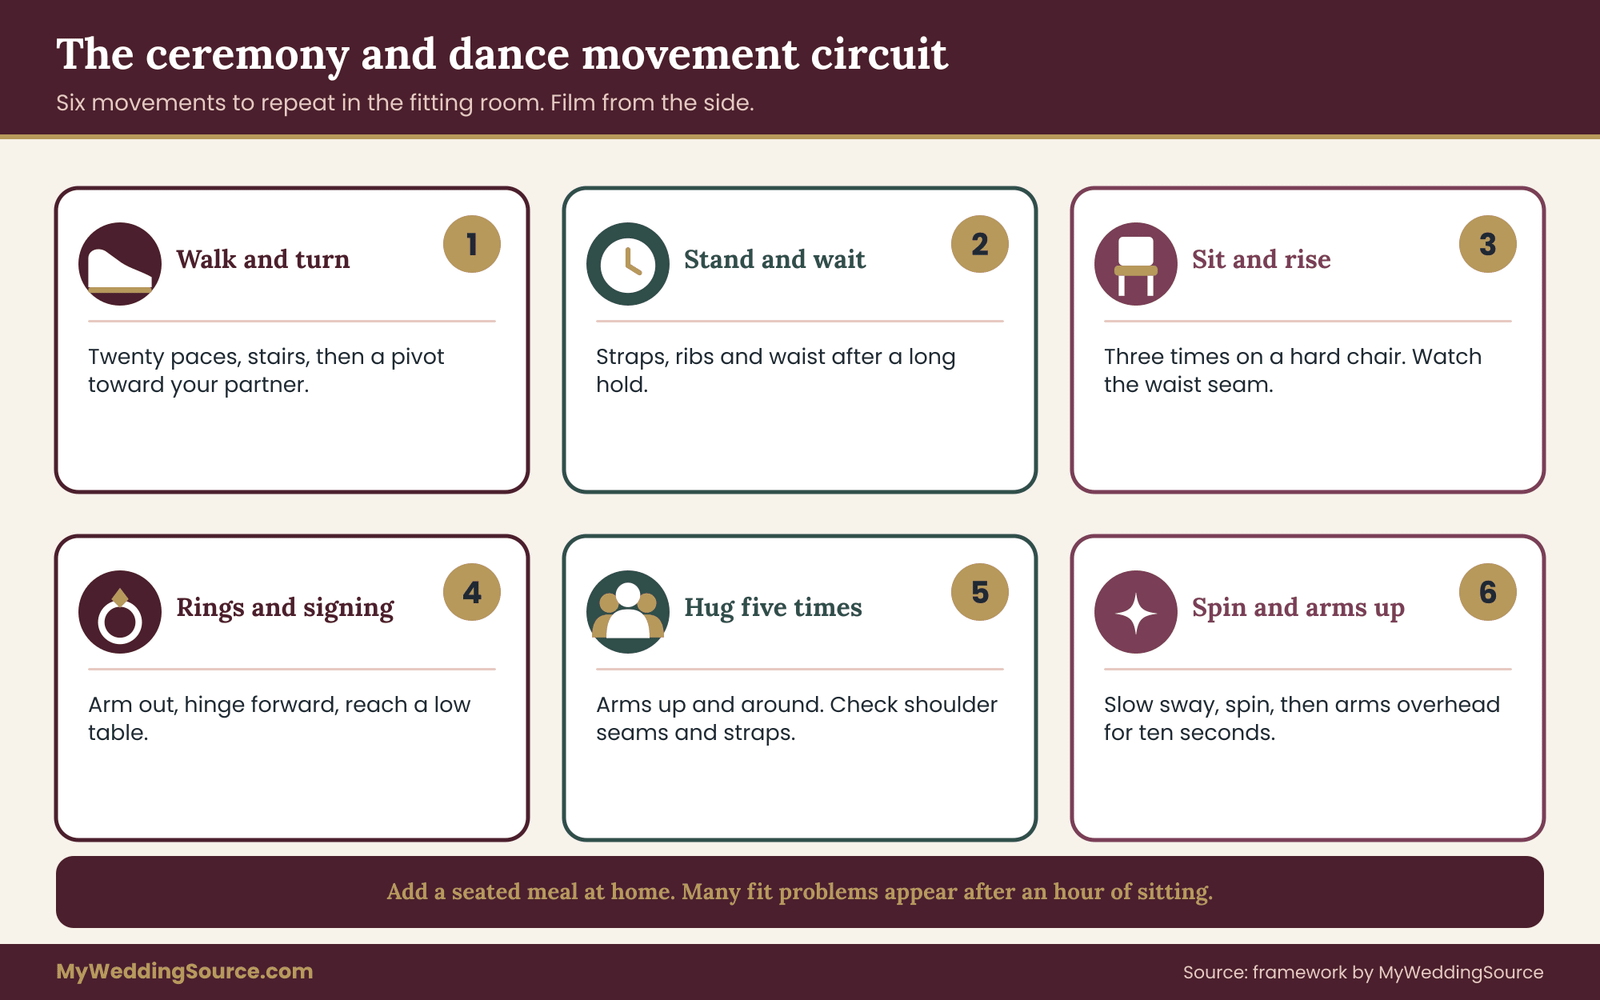
A ceremony looks calm, but it asks a garment to do a surprising amount. You walk, stop, turn, stand for ten to thirty minutes, sit and rise at some point, hold hands, exchange rings, perhaps kneel or sign a document at a low table, and walk out. Each of those is a small movement test. A wedding jumpsuit that passes gate one and gate two can still fail gate three, so run it as its own step.
Write down your own ceremony outline first. If you do not have one, the ceremony step-by-step guide shows the usual order. Then match each moment to a movement, and test those movements in the garment.
The processional and the aisle
Walking in trousers is different from walking in a skirt. A skirt hides your stride and moves around it. Trousers follow your legs. A wide-leg wedding jumpsuit sways as you walk and can look striking, but the hem can catch under the toe of a heel. Walk at least twenty paces in the fitting room, then try stairs if the venue has them, and watch the hem each time your foot lifts.
On grass, gravel or a sloped aisle, the hem will pick up debris and the heel will sink. If the ceremony is outdoors, ask the venue about the surface and bring that information to the fitting. Block heels, wedges and flat shoes behave very differently on soft ground from stilettos, and each one changes the hem length you need. Gate six returns to that point.
Pay attention to what the garment does when you turn. Trousers with a lot of fabric can twist around the leg, especially in a slippery satin. If the legs rotate when you pivot toward your partner, a tailor may be able to add a small weight or adjust the drape. If you feel tugging at the seat when you pivot, treat it as a gate one issue.
Standing for a long time
Most couples stand for the whole ceremony, often longer than they expect. A wedding jumpsuit with a fitted bodice and a seam that sits at the waist can feel fine for five minutes and tight at twenty-five, particularly if you have eaten, if it is warm or if you are nervous. Do the standing test: stay on your feet in the garment for at least twenty minutes, doing nothing but standing and talking, and notice when and where it starts to bother you.
Check the straps, the neckline and any halter tie. These tend to dig when you hold one position. Also check for pressure at the waist and ribs. A garment that is uncomfortable at twenty minutes in a quiet room is almost certainly going to be worse in a crowd.
Sitting and rising during the service
Many ceremonies include a moment when the couple sits, for a reading, a song or a ritual. If you are in a wedding jumpsuit, repeat the sit-and-rise test on the kind of seating the venue will provide. A cushioned armchair behaves differently from a folding chair, and a low bench behaves differently from both. Ask the venue or your planner what you will sit on, and try to match it.
When you sit, check that the fabric does not pull across the lap, that the hem does not ride up above your shoe, and that you can cross your ankles or sit with knees together without strain. When you rise, check that the waist seam does not catch. If you wear a cape or a long jacket with your garment, check that it does not twist under you.
Rings, vows and reaching
Exchanging rings involves a small, precise arm movement. It usually goes fine, but it can reveal a tight sleeve or a bodice that pulls at the shoulder blade. Practice lifting your hand and holding it out at chest height with your arm straight, then bending to take your partner’s hand. If you wear a pantsuit jacket, button it, and test again.
Signing a license at a low table, or kneeling at a ritual, adds a deeper bend. Hinge forward at the hips, not the waist, and test whether the garment lets you. A rigid corset-style bodice often does not. If your tradition includes kneeling, bowing or touching the floor, tell the designer at the start, not at the final fitting. For gate three, the practical point is simple: any ritual that asks for a deep bend or a long hold should be tested in the garment.
Hugs, photographs and the receiving line
After the ceremony, you will hug many people, often in rapid succession. Practice with a friend. Raise your arms around their shoulders and see whether the back of the garment pulls up, whether the shoulder seam digs, and whether a strap slips. Do it four or five times in a row, since fatigue is part of the test.
Group photographs usually involve standing close to others, leaning in and turning your shoulders. Ask your photographer which poses they plan to use, and test two or three. A pantsuit jacket that buttons only when you stand straight is a quiet risk, because it may pop or gape when you lean.
How the pantsuit compares on gate three
A pantsuit jacket creates an extra layer that you can manage. Many people remove a jacket for photographs or for the reception. That gives you a way to react to heat and movement that a wedding jumpsuit lacks. On the other hand, the jacket has its own constraints: the armhole, the shoulder seam and the closure all affect how far you can raise your arms.
Test the jacket the same way as the garment. Raise both arms to shoulder height. Reach forward as if to hug. Bend to pick something up. If the jacket rides up your back or restricts your reach, a tailor can sometimes adjust the sleeve pitch or add ease, but only in certain constructions. Ask first.
Gate four: dancing, sitting and long hours in a wedding jumpsuit
A reception asks different things from a garment than a ceremony does. You sit for dinner, you stand to greet tables, you dance and you may sit again for speeches and cake. The dress code for the evening is whatever you decide, but the physical demands are real, and a wedding jumpsuit that was fine for the ceremony may not be fine for four more hours.
The dance circuit
Build a short circuit and run it in the fitting room with music if you can. Do a slow sway, a faster side step, a spin and a dip if you plan one. Then raise your arms overhead, as you would for a group song, and hold it for a few seconds.
Check whether the garment moves with you or against you. Trousers that are too narrow at the knee limit your step. A bodice that is too snug limits your arm lift. Fabric that clings can ride up through the hips. A wide-leg wedding jumpsuit often performs well in a spin, because the legs open, but it can tangle with a partner’s feet in close dancing.
If you plan a choreographed first dance, ask your instructor how the garment affects the moves. Lifts and dips put stress on seams, especially at the crotch and under the arm. Tell your tailor about them, and ask whether a reinforced seam or a stretch panel is possible.
Dinner and the seated hours
Dinner may last ninety minutes or more, and you will sit for most of it. A wedding jumpsuit that fit well during a short fitting can feel restrictive after a meal. Ask your fitter to leave a little ease at the waist and ribs, especially if the fabric does not stretch. Remember that your body changes slightly across a day: you may be warmer, a little puffier or more tired by evening.
A practical approach is to do the dinner test at home: wear the garment for a full seated meal, with the shoes, and notice what you want to change. Many people feel uncomfortable at the waist or under the arm and could not tell in a short fitting. This is one of the most useful tests, and it costs nothing but an evening.
Planning a mid-evening change
Some people solve the long-hours problem by planning a second outfit. That may be a simpler pantsuit, a pair of flat shoes, a lighter layer or a removable overskirt. If you are comparing a wedding jumpsuit and a pantsuit, a second look is a legitimate third option. The key is the handoff: who carries the clothes, where you change, how long it takes and what happens to the first outfit. Plan the logistics in advance, as you would for any vendor handoff.
A wedding jumpsuit with a detachable skirt is a built-in version of this. Ask how the skirt attaches and detaches, and whether you can do it without help. Test it in the fitting room, and test it while wearing the garment for at least an hour, since attachments can shift.
Heat, sweat and cooling
If the venue will be warm, test the garment for heat before you commit. A wedding jumpsuit in a non-breathable fabric holds heat across the entire torso and legs. A pantsuit lets you remove the jacket, and the trousers alone are often cooler. Gate five covers fabric in more detail. For gate four, the question is simple: can you stay comfortable for the hours the day will actually take?
Gates five and six: fabric, weather, hem and shoes for a wedding jumpsuit
The last two gates are the ones couples most often skip, because fabric and hems feel like details. They are not. Fabric decides how a wedding jumpsuit wrinkles, breathes and photographs, and the hem decides whether you can walk. Both are easier to get right before the final order than after it.
Gate five: fabric behavior in a wedding jumpsuit
Fabric matters more in a wedding jumpsuit than in a dress for a simple reason: trousers bend at the hip and the knee, and a wedding jumpsuit bends at the torso too. Every bend creates a crease, and the fabric decides whether that crease falls out in a minute or stays all night.
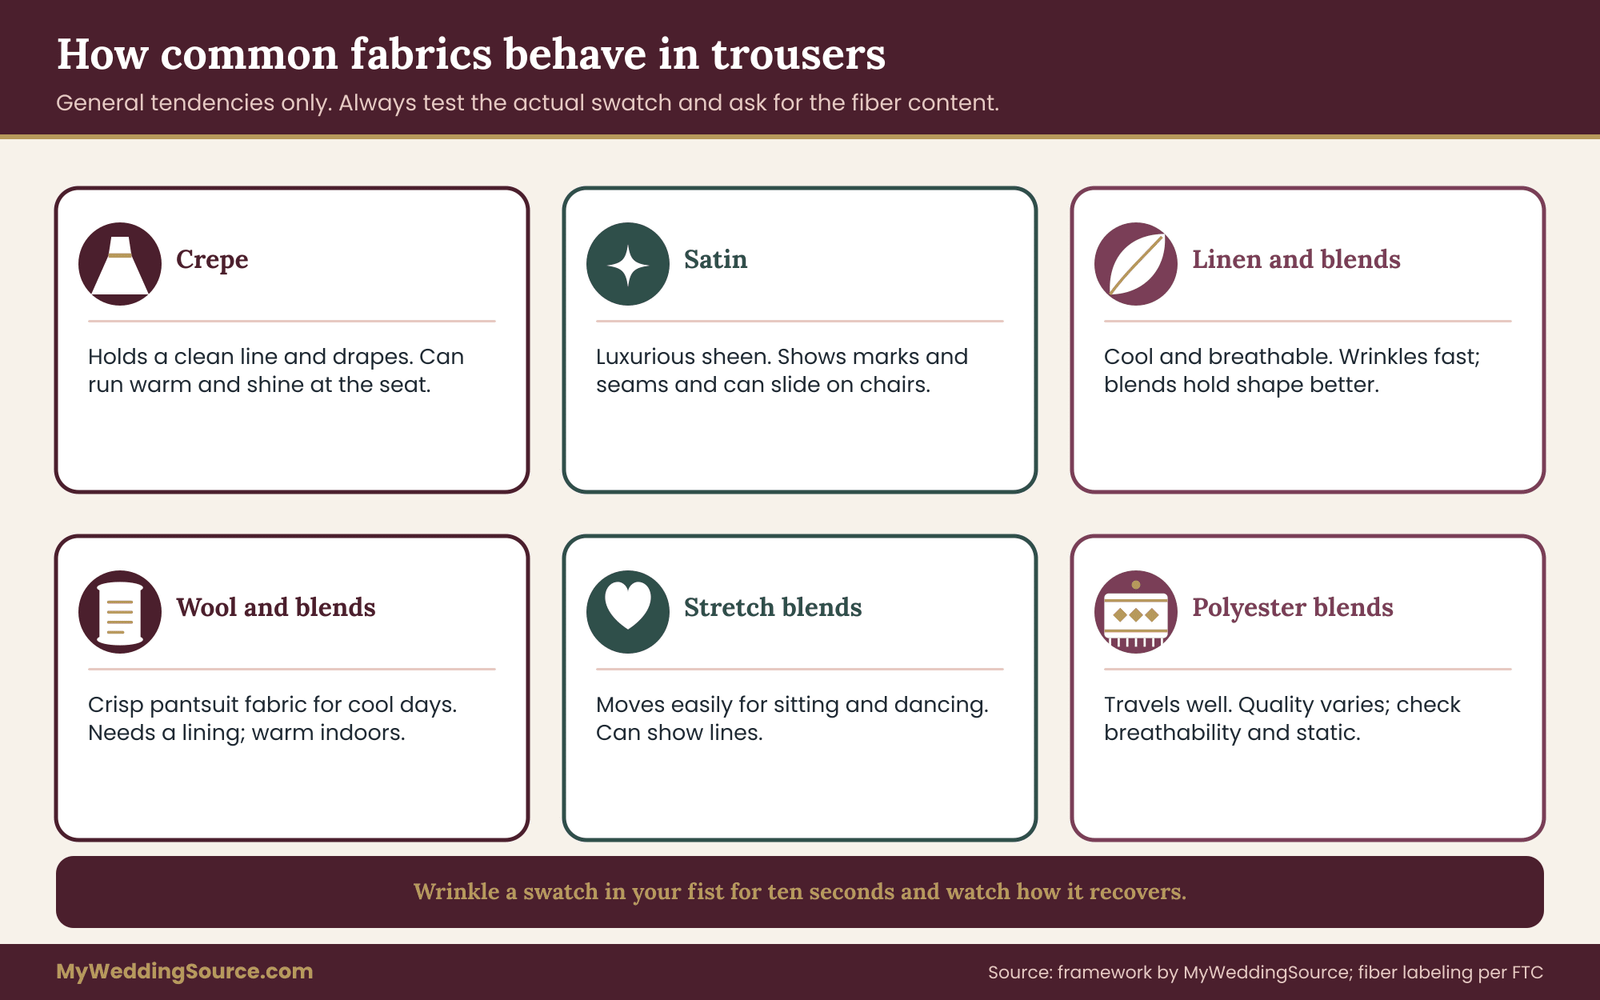
Crepe. Heavier crepes drape well, resist wrinkles and hold a clean line. They can be warm, and cheaper versions can shine at the seat after hours of sitting. Look closely at the weight and ask for the fiber content.
Satin and charmeuse. These have a lovely sheen and can look luxurious in a wedding jumpsuit. They also show every mark, water spot and seam, and they can slide on a slippery chair. They tend to be unforgiving of a poor fit.
Linen and linen blends. Cool and breathable, and a natural choice for warm weather. They wrinkle quickly, and that is part of their character. If you want a crisp look, a blend with a stable fiber helps, though the trade is less breathability.
Wool and wool blends. Often used in pantsuits for cooler weather. A lightweight wool crepe can work in a wedding jumpsuit, but it needs a lining and a careful hand, and it is warm in a heated room.
Stretch fabrics. A small amount of elastane gives movement, which helps with the sit-and-rise test. It can also reveal every undergarment line and can lose shape over a long day.
Polyester blends. Practical and affordable, and they travel and wash well. Quality varies widely. Some breathe poorly, and some hold static. Ask to see the fabric in motion, not only on the hanger.
Reading a label and asking for fabric details
Ask for the fiber content, the weight and the lining. In the United States, textile products are generally required to disclose fiber content, and the Federal Trade Commission explains the labeling rules. Fiber content is a fact you can verify, while words like luxe or silky are marketing. The U.S. Consumer Product Safety Commission also publishes information on flammability standards for clothing fabrics, which matters mostly if you buy fabric yourself.
For made-to-order garments, ask for a swatch before you pay a deposit. Wrinkle the swatch in your fist for ten seconds and see how it recovers. Rub it against a dark surface to test for color transfer. Hold it near your skin to check for itch or heat. A swatch costs little, and it replaces guesswork with a test.
The wrinkle test for sitting
After you have worn the garment seated for a few minutes, look at the lap, the back of the knee and the seat. Some creases are normal and will relax as you stand. A crease that stays after two minutes standing will probably stay in photographs, too. If it is in a high-visibility area, such as across the lap, ask about a different fabric or a lining that supports the shape.
Steaming helps with most fabrics, but you cannot steam a garment while you wear it. Consider who will steam it before photographs, and with what. A small travel steamer in your day-of kit is practical.
Lining, sheerness and undergarments
A lining changes how a fabric hangs, how warm it is and whether it shows what is beneath. A wedding jumpsuit without a lining in light fabric may need a slip, shorts or seamless underwear in a shade close to your skin. Try the garment in bright light and in front of a window, because sheerness is much more obvious in daylight than in a fitting room.
Wear your actual undergarments to every fitting. A strapless bra, shapewear or anti-chafe shorts all change fit. If you plan to wear shapewear, tell the fitter at the start so the garment is fitted over it. Adding it later changes the waist, the rise and the hem.
Weather and venue temperature
Look up the typical weather for your date and location from official sources, such as the National Weather Service, and treat a forecast as a guess until the last week. Outdoor ceremonies amplify the weather: wind lifts wide legs and capes, sun heats dark fabric, and damp ground stains hems.
Heat deserves respect. The Centers for Disease Control and Prevention publishes guidance on heat illness and on how heat and humidity combine, and wedding days often involve long hours outdoors in formal clothing. If you expect a hot day, choose lighter fabric, add a lining that breathes and plan shade, water and a place to sit. A jacket you can remove is an advantage for a pantsuit in that setting.
Cold has its own issues. A wedding jumpsuit leaves little room for layers beneath, so plan outer layers that fit over it, such as a cape, a coat or a wrap. Check that a coat will go over the shoulders and sleeves without crushing them.
Color, undertone and the palette
White and ivory show marks. Black and deep colors show lint and dust. Metallic fabrics reflect light and can be difficult to photograph. If your look has to fit a color palette for the wedding, the wedding color palette guide explains how to choose and test colors together. For a garment, the most useful test is to look at the fabric in natural daylight and under warm indoor light, because ivory can look yellow, gray or pink depending on the light.
Gate six: the hem, shoes and accessories
A trouser hem is not a small detail. It is the difference between a clean line and a trip. And because you may wear heels, flats or boots, the correct length can change by an inch or more from one pair to another.
Why the shoes come first
Never hem a wedding jumpsuit before you have chosen the shoes. A tailor measures the hem with the shoes on, standing straight, and the correct length depends on the heel height and the style of the trouser. If you change the shoes afterward, the hem is wrong, and you may not be able to fix it.
Choose the shoes early, break them in, and bring them to every fitting. If the heel height is uncertain, ask the tailor to pin the hem long and make the final cut after you have chosen. For a second pair of shoes, such as flats for dancing, ask whether the hem can work with both, or whether you need a different plan, such as a longer trouser with a small hook or a hem tape that can be adjusted.
Hem styles and how they behave
Floor-grazing wide leg. The hem sits a fraction above the floor in heels. It looks elegant, but it is only correct for one heel height, and it collects dirt.
Ankle or cropped. The hem sits above the ankle. It shows the shoe and is easier to walk in, but it commits to a specific shoe style.
Pooling hem. The fabric touches the floor and bunches slightly. This is a style choice, and it needs more maintenance and a plan for the ceremony.
Cuffed hem. A cuff adds weight and a structured look. It can catch stray debris and should be tested on the walking surface.
The walking test
Walk the length of the room in the shoes, at a normal pace. Climb a few stairs, turn, then step backward a pace. Watch the hem and notice whether it brushes the floor, catches a heel or lifts. A hem that is correct while standing can be wrong while walking, because the leg moves forward and the fabric sags beneath it.
Accessories that interact with the garment
Belts, sashes, capes, jewelry and veils all interact with a wedding jumpsuit. A belt can hide a waist seam or add an extra point of pressure. A cape can catch on a jacket. Long necklaces can tangle with a halter tie. A veil can snag on a button or a strap. Choose them together and test them at the same fitting.
If you are planning a veil, the bridal hair and makeup planning page covers how hair and makeup choices interact with headpieces, which matters because a high neckline or a hood changes what works. A garment that looks complete without any accessory is easier to manage, and you can add pieces one at a time after you have confirmed the base.
Tailoring a wedding jumpsuit: what can change and what cannot
Alterations decide whether a wedding jumpsuit that is close becomes one that fits. They also decide how much risk you carry. Some changes are routine and inexpensive, some depend on how the garment was built, and some are not realistic at all. Ask about each one before you pay a deposit, and do not assume that a good seamstress can fix anything.
For general guidance on fittings, timelines and finding a qualified fitter, the wedding dress fit and alterations guide covers the process that applies to most formal garments. This section focuses on what is different about a wedding jumpsuit with trousers.
The alteration ladder
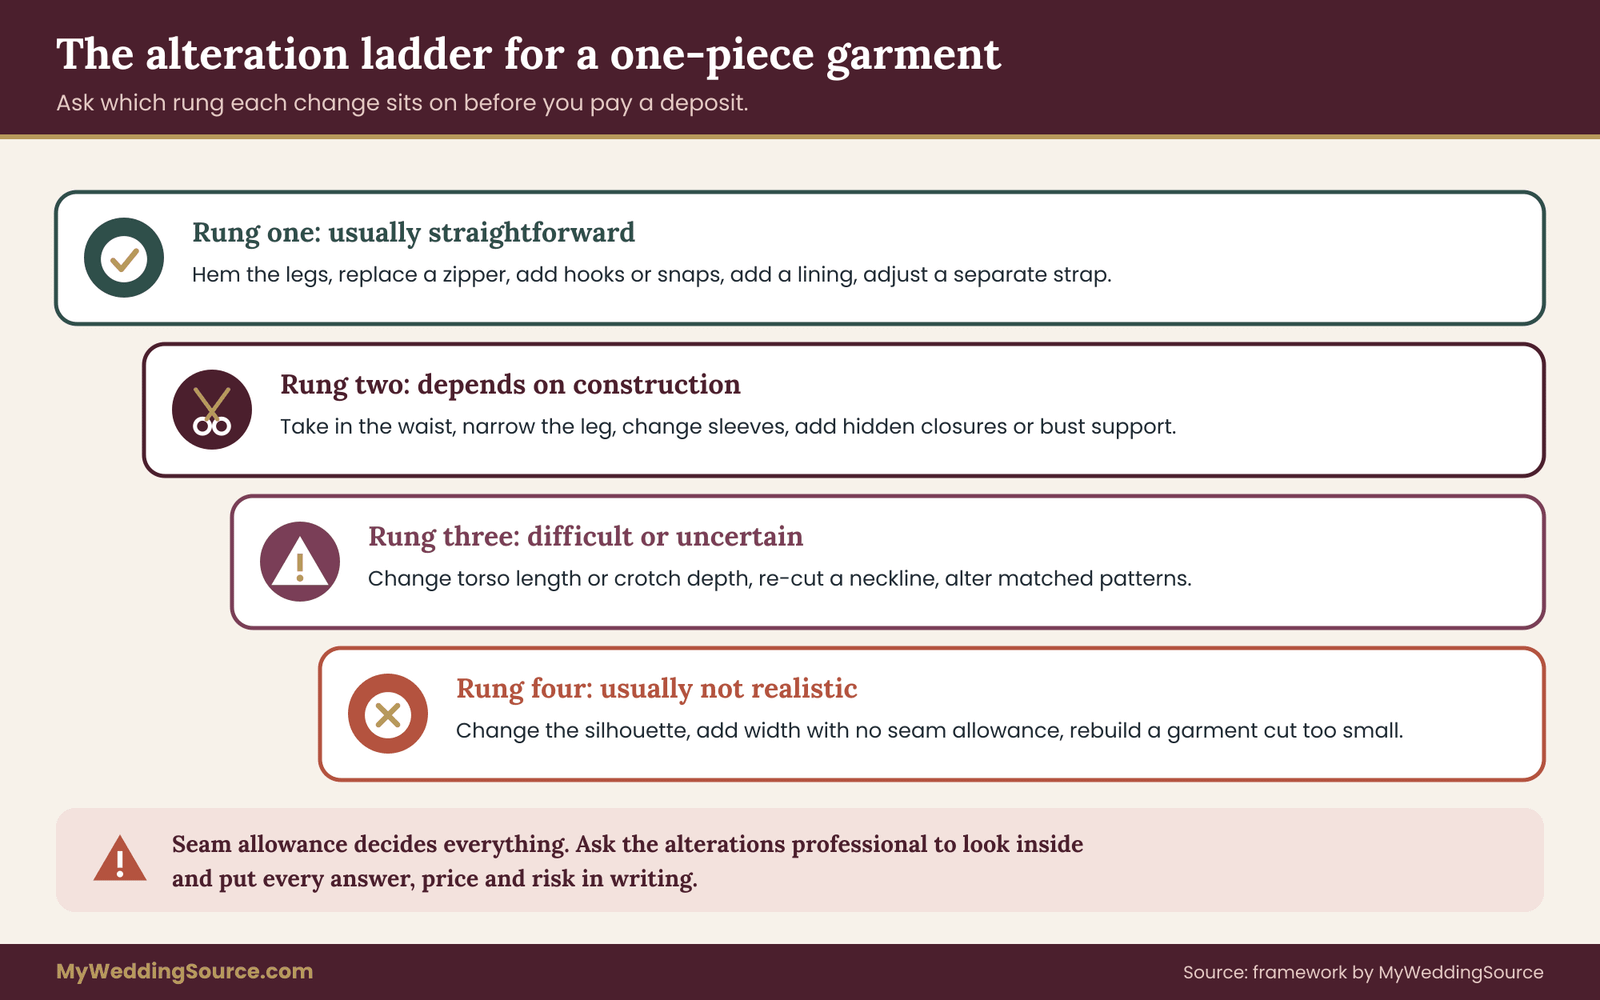
Think of alterations as four rungs, from low risk to high risk.
Rung one: usually straightforward. Hemming trouser legs, adjusting strap length where the strap is a separate piece, taking in or letting out a side seam by a small amount where the fabric has enough allowance, replacing a zipper, adding hooks or snaps, adding a lining or a modesty panel, and pressing and steaming.
Rung two: often possible, depends on construction. Taking in the waist or bodice by more than a small amount, narrowing the leg from knee to hem, adjusting the sleeve length or the sleeve width, adding a hidden closure, and adding bust support or boning to a bodice.
Rung three: difficult, costly or uncertain. Changing the length between the shoulder and the waist, changing the depth of the crotch, shortening or lengthening a bodice through a complex seam, altering a garment with a patterned fabric that must match across seams, and re-cutting a neckline.
Rung four: usually not realistic. Changing the overall silhouette, adding substantial width where the seam allowance does not exist, significantly changing the torso length in a garment with a waist seam that carries structure, and rebuilding a garment that has been cut too small.
Why seam allowances decide everything
A seam allowance is the extra fabric inside a seam that can be released to make the garment larger. Ready-to-wear garments often have small allowances, sometimes only a fraction of an inch in some seams. Made-to-order and bridal-specific garments often have larger allowances, but not always. The only way to know is to ask the alterations professional to look inside the garment and tell you.
Ask them to measure the allowances at the side seams, the waist and the crotch. Ask whether the fabric can be let out without leaving marks, because pressed seams in some fabrics show a permanent line. A good professional will explain what they see and will tell you if they think a change is risky.
Torso length: the hard one
If a wedding jumpsuit fails gate one because the torso is too short or too long, the alteration is often the hardest in the garment. The correction usually happens at the waist seam, which may carry a belt, a lining, boning or a patterned fabric. Some tailors can do it, and some will decline. Ask before you buy, and ask for a quote and a written description of the work.
If a tailor says it can be done, ask what the garment will look like after. Will the proportions of the bodice change? Will a pocket or a pattern end up in the wrong place? Will the waist seam still sit where it flatters you? A good answer is specific.
Fitting over what you will wear
Wear the same undergarments and the same shoes to every alteration appointment. If you plan to gain or lose weight before the wedding, tell the tailor, and discuss how much room the garment has. Avoid fitting a garment tightly with the intention of fitting into it later. A garment that fits snugly today may fit differently after a month of ordinary change, and a wedding jumpsuit cannot absorb the change as easily as a skirt can.
Custom, made-to-measure and ready-to-wear
Ready-to-wear garments are made to a standard pattern and altered afterward. Made-to-measure garments use a base pattern adjusted to your measurements. Custom garments are cut from your own pattern. Each approach carries different costs, timelines and risks.
For a wedding jumpsuit, made-to-measure or custom construction can be worth considering because the torso and rise are built to your numbers. The trade is that you cannot try it on before you commit, and you rely on the accuracy of your measurements. Ask for a muslin or a toile, a trial garment in cheap fabric, if the maker offers one. It lets you test fit and movement before the final fabric is cut.
Pantsuit tailoring and the fitting timeline
A pantsuit is easier to alter, but it adds its own set of problems. You are managing two or three pieces that need to fit separately and look as though they belong together.
Jacket tailoring
The jacket has a few critical points: the shoulder seam, the sleeve length and pitch, the waist suppression and the length. The shoulder seam is the hardest to change, and a tailor can only do so much. If the shoulders do not fit, the jacket is the wrong jacket. If the sleeve is too long, the tailor can shorten it, but only if there is a working buttonhole or the design permits it.
Ask about lining, shoulder pads and interfacing. These shape the jacket and affect how it moves. A jacket with heavy interfacing holds its shape but may restrict your arm lift. A lighter construction moves better but wrinkles more.
Trouser tailoring
Trousers are among the most alterable garments. A skilled tailor can adjust the waist, the seat, the thigh, the knee and the hem. Ask about the rise, because an adjustment to the rise at the back seam is possible in many trousers but depends on fabric and construction. Confirm the number of fittings that the quoted price includes.
The matching problem
A pantsuit’s pieces must match. When you buy a set from one maker, the pieces come from the same fabric lot. When you buy separates, even from the same label, slight color and texture differences can appear. They are minor in a showroom and obvious in daylight and in photographs.
If you plan to order a jacket and trousers in different sizes, ask the maker whether they sell them as separates in matching fabric from the same dye lot. Request a written statement of lot and dye consistency, and ask to see the pieces together in natural light. If the maker will not provide it, treat that as a risk.
Planning the fitting timeline
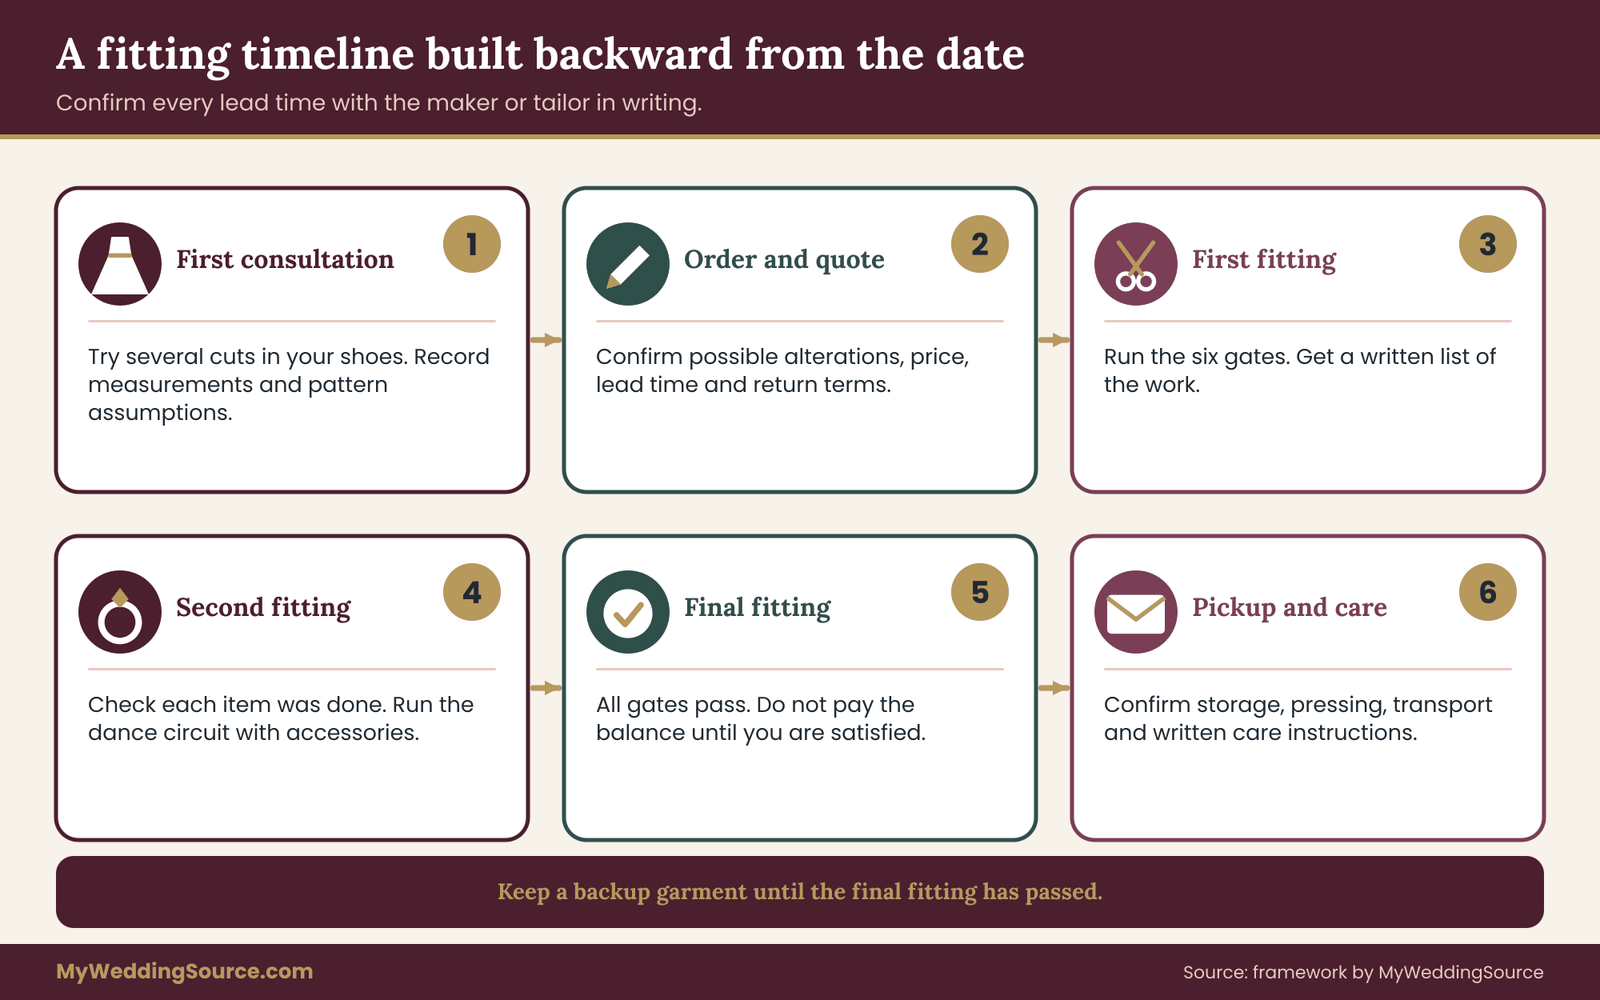
Fittings take time, and alterations take longer than most people expect, especially during busy wedding seasons. The wedding vendor timeline page covers how to sequence vendors and deadlines more broadly. For garments, a workable approach is to build the schedule backward from the wedding date and confirm each lead time with the maker or the tailor in writing, since lead times differ widely and change with demand.
First consultation. Try several cuts in your shoes and your undergarments. Run the six gates informally. Record your measurements and the designer’s pattern assumptions.
Order or decision. Choose the garment, confirm the alterations that are possible, and get a written quote and a lead time.
First alteration fitting. Test the fit, run the sit-and-rise test, the restroom test and the walking test. Note every issue, and ask for a written list of what will be done.
Second fitting. Check that every item from the list was done. Run the dance circuit. Test with accessories and with the shoes.
Final fitting. Confirm that the garment is complete, that it passes all six gates and that you can move in it. Do not accept a final fitting that is rushed, and do not pay a final balance until you are satisfied.
Pickup and care. Confirm how the garment will be stored, pressed and transported. Ask for care instructions in writing.
What to do if the schedule slips
Fabric delays, workroom backlogs and shipping problems happen. Ask the maker or the tailor in writing what they will do if the garment is late, and what your options are. If you ordered online, the Federal Trade Commission explains its rule about shipping times for merchandise ordered by mail, phone or the internet, which generally requires sellers to ship within the time they promised or within thirty days if no time was stated. Check the current rule on the FTC website before relying on it.
Have a backup plan from the first consultation. A second garment that you can wear if the first one does not arrive or does not fit is the most reliable insurance. It can be a simple pantsuit, a dress you already own or a rental. It is not a pessimistic choice. It is the same logic that a venue or a caterer would apply to a contingency.
What to ask the alterations professional
Ask who will do the work, how many people touch the garment, how long they have been doing this type of alteration and whether they have worked with the fabric before. Ask to see examples of similar work. Ask what happens if a mistake is made and who pays for repair. Ask whether they offer a final press and whether the garment can be delivered or must be collected. A professional who welcomes these questions is a good sign.
Four illustrative cases: how the six gates change the choice
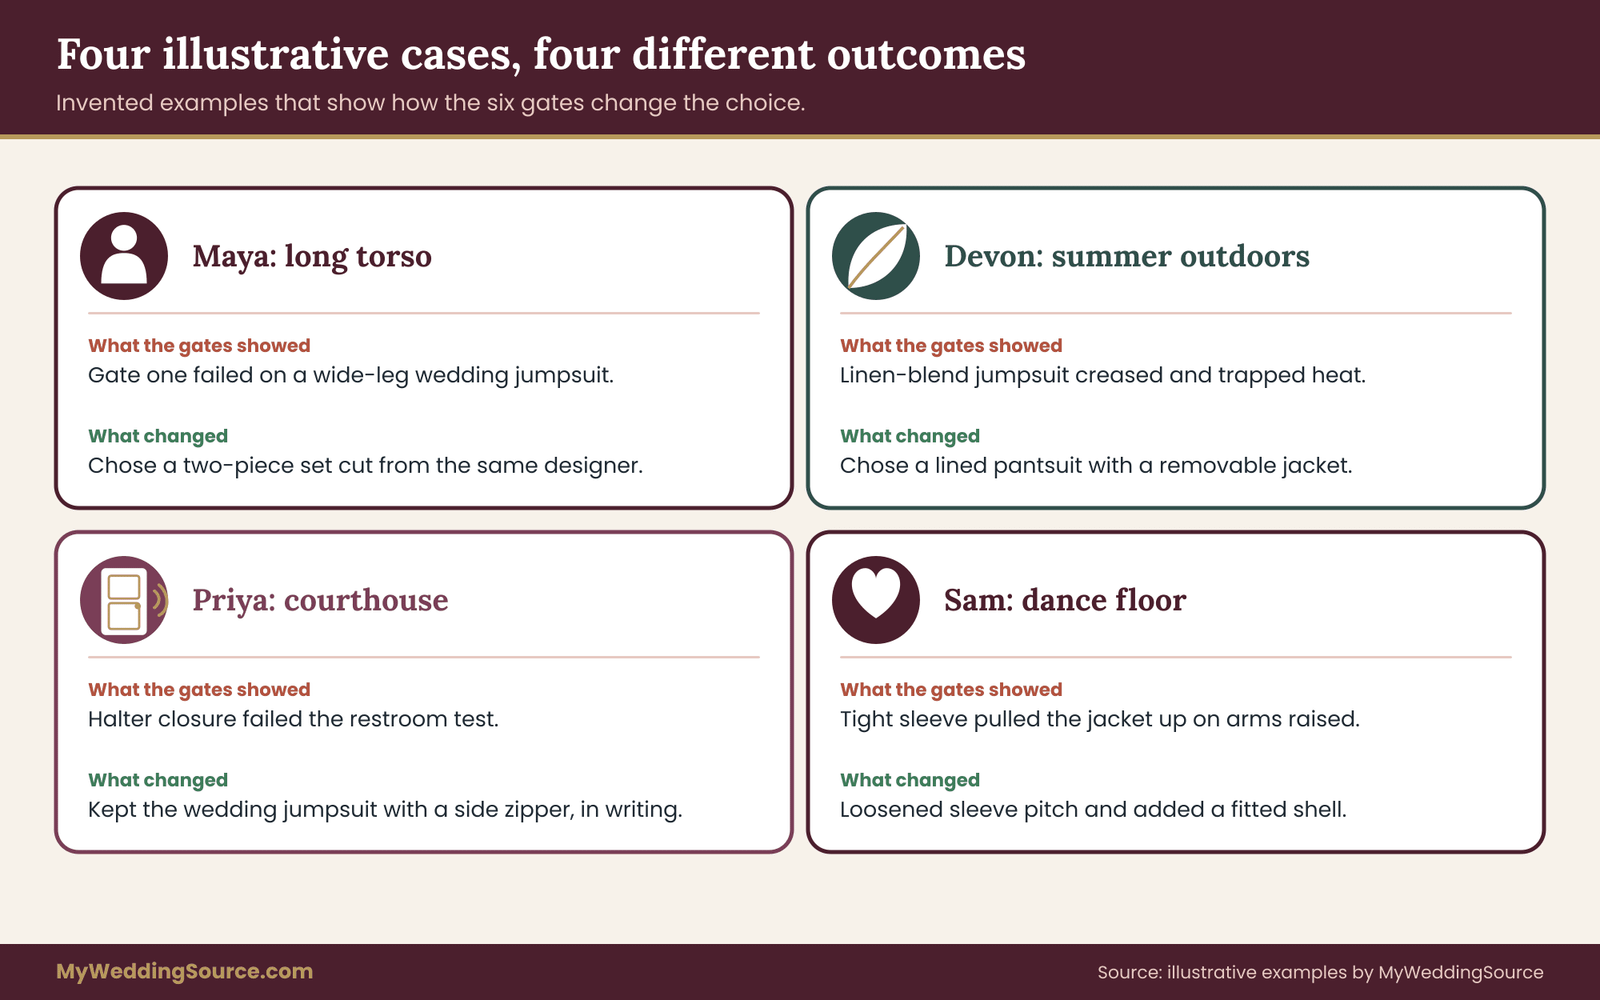
The cases below are invented for this guide. They are not reviews, studies or reports of real fittings, and the people are fictional. They show how the six gates produce different answers for different bodies and days, so you can see the method working before you apply it to your own.
Case one: the long torso and the wide-leg wedding jumpsuit
Maya is planning an indoor evening ceremony of about eighty guests. She falls in love with a wide-leg wedding jumpsuit in heavy crepe. At the first consultation she measures her full torso and finds that the pattern assumes a shorter one. In the sit-and-rise test the waist seam climbs toward her ribs on the third repetition.
She marks gate one as a fail and asks the alterations professional whether the waist seam can be lowered. The professional looks inside, finds a narrow allowance and a lined bodice, and says the change is risky. Maya asks for that answer in writing. She then tries a two-piece set from the same designer, with a longer high-waist trouser and a matching sleeveless top. It passes gate one, passes the restroom gate easily and reads as one line in photographs. She chooses it.
The lesson is not that wedding jumpsuits fail long torsos. It is that she learned this in the first appointment, from a specific test, and kept the look she wanted by changing the construction rather than the style.
Case two: the summer ceremony and the lined pantsuit
Devon is marrying outdoors in a warm month, with a ceremony that starts in the early afternoon and a reception in a tent. Devon likes a tuxedo-style pantsuit in a lightweight wool crepe, and also tries a linen-blend wedding jumpsuit.
The pantsuit passes the walking test and the sit-and-rise test. The linen-blend wedding jumpsuit passes both but creases heavily across the lap, and the stand-and-wait test shows the bodice trapping heat. Devon asks the tailor about removing the jacket for the reception, confirms the vest will sit well alone and asks for the trousers to be hemmed for both heels and flat shoes with a hem tape. The jacket comes off after photographs and the trousers stay crisp.
The lesson here is about layers. The pantsuit gave Devon a cooling option that the wedding jumpsuit could not. Devon also checked the forecast closer to the date through the National Weather Service and kept a lightweight wrap in reserve.
Case three: the courthouse ceremony and the restroom gate
Priya and her partner are marrying at a county office on a weekday, followed by dinner in a restaurant. She is drawn to a halter-neck wedding jumpsuit in satin. The ceremony is short, so the standing and sitting tests are less demanding, but the day involves public transit and a restaurant restroom with a narrow stall.
The restroom test is the deciding factor. The halter ties at the back of the neck, and the closure sits at the center back. She cannot manage either alone while holding a bag. She asks for a side zipper, and the designer says it is possible but will change the line of the bodice. She tests the modified version at the second fitting and finds she can lower it alone. The change is confirmed in writing.
The lesson is that a gate can be passed by a specific, documented fix. Priya did not give up the garment. She gave the designer a precise problem and got a precise answer.
Case four: the second outfit and the dance floor
Sam wants a classic ivory pantsuit for the ceremony and to dance for hours afterward. The jacket has a structured shoulder and a tight sleeve. At the dance circuit, Sam finds that raising both arms lifts the jacket and pulls at the back.
Sam asks the tailor to loosen the sleeve pitch and add a small amount of ease, which the tailor says is possible in this construction. Sam also plans to remove the jacket after the first dance and wear a coordinating silk shell beneath it. The shell is fitted at the same appointment so that it works with the trouser waist. A friend is assigned to take the jacket and keep it safe.
The lesson is about planning a handoff. A removable layer is useful only if someone is responsible for it and the layer beneath is finished and tested.
Turning the gate marks into a decision
After two or three fittings you will have a page of marks for each garment. Use three plain rules to turn them into a choice.
Rule one: any fail on gate one or gate two is a stop sign for the wedding jumpsuit. Torso length and the restroom are the hardest problems to fix and the most uncomfortable to discover at the venue. If the designer cannot name a fix and put it in writing, move to a two-piece or a pantsuit.
Rule two: count the fixes, not only the fails. One fix on a wedding jumpsuit, such as a hem or a side zipper, is ordinary. Four fixes, with two on the torso, is a sign that you are forcing a pattern onto a body it was not cut for. Compare that count with the pantsuit, where the same number of fixes would be spread across a jacket and trousers.
Rule three: break ties with the day itself. If both garments pass, ask which one suits the hours, the heat and the surface of your actual wedding. A long outdoor day favors the garment with removable layers. A short indoor ceremony followed by a seated dinner often favors the wedding jumpsuit you love.
Write the decision and the reason in one sentence. A sentence like “We chose the wedding jumpsuit because every gate passed with two documented fixes” is easy to check later, and it keeps you from reopening the question at three in the morning two weeks before the date.
Questions to put to the designer in writing
Send the questions by message or email and keep the replies. Spoken answers fade, and consultants change jobs. Ask whether the pattern assumes a particular torso length and what it is, whether the waist seam can be raised or lowered and what that does to the look, how much seam allowance the side seams and crotch hold, how the wedding jumpsuit closes and how a person uses the restroom in it, and whether a two-piece version can be cut from the same fabric.
Also ask about the fabric fiber content and weight, the lining, the care label, the lead time and what happens if the order is late, the alterations included in the price, the number of fittings, and the refund or exchange terms for a made-to-order garment. If any answer is “it depends,” ask what it depends on. A wedding jumpsuit is a considered purchase, and a vague answer to a direct question is useful information.
What the cases share
In each case, the person tested movement in real shoes, asked a specific question, recorded the answer and changed something concrete. None of them relied on a general belief that one garment type is better. None of them waited for the final fitting to find the problem. That habit is the real framework behind the six gates.
Styling, budget and vendor terms for a wedding jumpsuit
Once a garment passes the gates, styling and money decisions become easier, because they sit on a stable base. Styling should not undo what you tested, and the cost should not hide in an item you forgot to ask about.
Styling choices that keep the garment working
Overskirt or train. A detachable overskirt can give a ceremony look and come off for the reception. Test the attachment, the weight and the way it moves on stairs, and ask who will detach it.
Cape or jacket. A cape adds drama and warmth, but it shifts when you hug and can catch on a necklace. Try it with your accessories and your hair.
Belt or sash. A belt can define the waist and hide a seam, and it can also add a pressure point. Wear it for the standing test before you commit.
Veil. A veil with a wedding jumpsuit works, and it is a deliberate choice. A long veil can catch on trouser fabric and a cape. A short veil or a comb-mounted piece is simpler.
Jewelry. Choose earrings or a necklace that match the neckline. A high neckline suits earrings, a plunging neckline suits a pendant or no necklace at all, and a halter often works best with bold earrings.
Hair and makeup. A neckline or a high collar changes which hairstyles work. Plan hair after the garment is final, and bring a photo of the garment to your stylist.
Budget logic
A wedding jumpsuit is not automatically cheaper or more expensive than a dress. The cost depends on the designer, the fabric and the alterations. Build the full cost before you compare: the garment, the alterations for every fitting, a second pair of shoes if needed, undergarments, a lining or slip, a steamer or cleaning, and any second outfit. For a framework on tracking costs, the wedding budget page explains how to set categories and keep a running total.
Alterations are the item most often forgotten. If the garment needs rung two or rung three work, the cost can be a meaningful share of the garment price. Ask for a written estimate before you order, and ask what is included in it. Do not use averages from the internet. Use quotes from your own tailor.
A rental or a resale purchase can lower cost, and it adds a different set of questions: Can it be altered? Does the rental allow alterations at all? Is the garment final sale? Ask these in writing before you pay.
Vendor terms to read before you pay
Read the contract or the order form line by line. Look for the deposit amount, the balance and its due date, the production and delivery timeline, what happens if the garment is late, whether alterations are included, who is responsible for alterations, whether the garment is returnable and under what conditions, and whether a custom or made-to-order garment is final sale.
Return policies are set by the seller. There is no general federal right to return a garment you simply changed your mind about, though some sellers allow returns and some do not. Custom items are often final. The Federal Trade Commission explains consumer rights on its website, and it is worth reading the plain-language pages before you sign.
Pay by a method that offers protection when possible. The Consumer Financial Protection Bureau explains how to dispute a charge on a credit card, and the window to report an error is short, so keep every receipt, order confirmation and message. If you order from a seller outside the United States, customs rules and duties may apply, and U.S. Customs and Border Protection publishes information on importing goods. Factor possible delays into your timeline.
Disclosure and honest recommendations
Be wary of rankings and recommendations that do not disclose how a site is paid. A garment recommendation is only as useful as the evidence behind it. This guide does not rank brands or garments, because fit differs by designer and by body, and the only reliable evidence is a fitting in your own shoes.
A cost-logic example without invented prices
Prices differ too much by designer, region and season to quote averages, so here is the logic with placeholders you fill from real quotes. Suppose garment A is a ready-to-wear wedding jumpsuit with a price you call J, and garment B is a pantsuit set with a price you call P. Add the quoted alterations for each, the cost of a second hem for a second pair of shoes, a lining or slip, shapewear, steaming and cleaning, and a backup garment if you plan one.
The totals, not the sticker prices, are what you compare. A wedding jumpsuit that needs a costly torso alteration can end up above a pantsuit that needs only a sleeve and hem adjustment, and the reverse is just as possible. Only your own quotes can tell you which, and the exercise takes an evening with a spreadsheet and three phone calls.
Documenting what you decide
Keep a single note or folder for the garment. Include the six-gate scores from each fitting, the written answers from the designer and tailor, the quotes, the contract, the receipts and the care instructions. If a dispute arises, a clear record is your strongest tool.
Edge cases and a day-of kit for a wedding jumpsuit
Some situations change the six gates enough that they deserve their own notes. None of these replace advice from your own fitter, and some call for a medical or accessibility professional rather than a stylist.
Pregnancy and changing bodies
A wedding jumpsuit is the least forgiving choice if your body may change before the wedding. A wedding jumpsuit has a fixed torso length and a fixed rise, and a small change in the middle can alter both. If pregnancy, medical treatment or planned weight change is possible, tell the designer at the first consultation and ask about adjustable closures, lace-up panels, stretch inserts or a two-piece version. A pantsuit with an adjustable waistband and a jacket that can stay open is easier to adapt.
Mobility aids and seated wear
If you use a wheelchair or another mobility aid, test the garment seated for long periods, because the rise, the waist and the hem behave differently. Check that the fabric does not bunch or put pressure on the skin, that the closure is accessible while seated, and that the legs will not catch in wheels.
The ADA website explains accessibility requirements for public venues, and it is worth confirming the route, the restroom and the ceremony space with the venue in writing. The accessible wedding venue red flags page is a useful companion when you are checking the space itself.
Religious or cultural expectations
Some ceremonies expect particular coverage, headwear or footwear, or restrict what you can wear in a worship space. Ask your officiant or the venue early, and test the garment against the requirement. A wedding jumpsuit with a wrap, a long sleeve or a matching head covering can often meet expectations, and a pantsuit with a long jacket is another option. Speak with the people who will be at the ceremony, because expectations differ widely among families and communities.
Travel and destination weddings
A wedding jumpsuit travels well because it is one garment and often packs flat, but it wrinkles in a suitcase. A pantsuit takes more space and two hangers. If you are traveling, ask the maker for packing guidance, bring a steamer or find one at the destination, and plan for a fitting with a local tailor in case of change. Carry the garment in your cabin luggage, not in checked bags, so a delay does not strand it.
Photographs and video
Dark or shiny fabric can shift in color on camera, and wide legs can read as a skirt in a still photograph and as trousers in video. Ask your photographer to see the garment before the wedding, if possible, and mention it when you share your shot list. Tell them about the hem, the closure and the fabric so they can plan light and angles.
The day-of kit
Pack a small bag that stays with a helper. A garment steamer or a clean cloth, a stain pen and spare safety pins, double-sided fashion tape, a sewing kit with matching thread, a lint roller, spare undergarments, a second pair of comfortable shoes, a clean pillowcase for restroom hems, water and a snack, and a printed copy of the tailor’s phone number. The emergency backups checklist on accessories planning goes into more detail.
Assign one person to know where the kit is and to carry it. Share the restroom plan and the hem plan with that person.
Your next steps
Start with measurements and a written list. Take your torso, seated rise and inseam measurements, and write down which shoes you will wear. Choose two wedding jumpsuit cuts and one pantsuit to try, in the same fitting window if you can, so you compare them fairly.
At each fitting, run the six gates and write down the marks: torso and rise, restroom, ceremony movement, dancing and long hours, fabric and weather, hem and shoes. For every gate that is not a clear pass, ask for the specific fix, the cost and the answer in writing. Make your decision from the marks, not from the mirror, and keep a backup garment until the final fitting has passed.
FAQ
Is a wedding jumpsuit harder to alter than a pantsuit?
Usually, yes. A wedding jumpsuit has one set of linked measurements, and changes to torso length or rise are often difficult or risky. A pantsuit lets a tailor adjust the jacket and trousers separately, which gives more room. Ask the alterations professional to inspect the seam allowances and to describe each change and its risk in writing before you buy.
How do you use the restroom in a wedding jumpsuit?
It depends on the closure and the construction. Many people lower the garment to mid-thigh, which needs a closure that opens far enough and a plan for the hem. Test it in the fitting room in your shoes, time it, and decide who your helper is. A side closure or a two-piece build can make it much easier.
Can a wedding jumpsuit be worn with a veil?
Yes. A veil is a style choice, and it needs a few checks. A long veil can snag on trouser fabric, a cape or a strap, so try it in a fitting and walk with it. A shorter veil or a comb-mounted piece is often easier. Plan your hair after the garment is final.
Is a pantsuit more comfortable than a wedding jumpsuit for a long day?
Often, because the jacket can come off and the trousers are easier to manage. Comfort still depends on fit, fabric and weather, so do not assume it. Run the sit-and-rise test, the dance circuit and a seated meal test in both garments, with your shoes and undergarments, then compare your notes.
What fabric works best for a wedding jumpsuit?
There is no single best fabric. Heavier crepe holds a clean line, linen breathes but wrinkles, satin shines and shows marks, and stretch blends move easily. Choose by season, venue and how you will move. Ask for the fiber content, the weight and a swatch, and wrinkle the swatch before you commit.
When should we schedule fittings for a wedding jumpsuit?
Ask the maker or tailor for their current lead times in writing, then work backward from your date. Plan a first consultation, a first alteration fitting, a second fitting and a final fitting, and leave time for delays. Busy seasons and custom work take longer, so start earlier than seems necessary.
Can we return a wedding jumpsuit if it does not fit?
It depends on the seller. There is no general federal right to return an item because you changed your mind, and custom or made-to-order garments are often final sale. Read the contract before you pay, ask about alterations and returns in writing, and check the Federal Trade Commission website for consumer rules that apply.
What should we bring to a fitting?
Bring the actual shoes, the undergarments or shapewear you will wear, any accessories such as a belt or veil, a helper if possible, and your measurements. Bring a phone to record movement tests from the side. Bring your written list of questions and take notes on each gate, so you can compare fittings later.
Sources
- Federal Trade Commission
- Consumer Financial Protection Bureau
- National Weather Service, National Oceanic and Atmospheric Administration
- Centers for Disease Control and Prevention
- ADA.gov, U.S. Department of Justice Civil Rights Division
- U.S. Customs and Border Protection
- U.S. Consumer Product Safety Commission
- ASTM International
- USAGov consumer information