
Sensory wedding attire is clothing chosen and tested for how it feels on the body for many hours, not only for how it looks in photos. This guide gives couples who dislike restrictive clothing a written way to test fabric, seams, labels and closures before they buy, plus a worked example, backup options and clear rules for when to stop and choose something else.
Treat sensory wedding attire as a test you run, not a style you pick. Collect small fabric samples or try-on pieces, then score each one on a one-page touch trial sheet: surface, weight, stretch, seams, labels, closures, heat, sound, smell and pressure points. Repeat the scoring after twenty minutes and again after two hours of wear. Choose only options with no zero scores and no low scores in the body zones you named as priorities. If nothing passes, change the garment, add a layer, or swap outfits during the day.
Some people can put on a stiff collar, a boned bodice or a wool jacket and stop noticing it within five minutes. Others cannot stop noticing it for the whole day. A waistband that presses, a seam that rides across a shoulder, a label that scratches the back of the neck, a fabric that rustles every time an arm moves: for some people these are minor annoyances, and for others they use up the attention and patience that the day needs.
A wedding is a long day with long sitting, standing, hugging and photographing, and clothing sits against the body through all of it.
This article is written for couples where one or both partners dislike restrictive clothing, whatever the reason. You do not need a diagnosis, a label or a reason to use it. The method works the same for a person with a sensory processing difference, a skin condition, a recovering injury, or a plain and strong preference for soft, loose things. It does not assume that two partners have the same needs, and it does not assume that either partner’s needs are a problem to be fixed.
A note on scope. This is general planning information, not medical, legal or financial advice, and it does not diagnose anything. For questions about skin, pain, sensory needs or accessibility rights, ask a qualified clinician such as an occupational therapist, and check the agency sources listed at the end.
What sensory wedding attire means in practice
The phrase sounds specialized, but the idea is simple. Sensory wedding attire is any outfit where how it feels is a requirement alongside how it looks, fits the dress code and suits the venue. It is not a category of clothing. A tailored suit can be sensory-friendly if the lining is smooth, the waistband is forgiving and the shirt has no scratchy label. A ball gown can fail the test if the bodice is boned tightly and the tulle itches. The garment type matters less than the details of fabric, construction and wear time.
Three features set this approach apart from ordinary wedding clothing advice. The first is that comfort is measured against specific body zones and specific moments, not described in general terms such as “soft” or “breathable.” The second is that you test before you commit, with samples and trial wear, because the first minute in a fitting room tells you very little about hour five of a reception. The third is that you write the results down, so the decision survives fatigue, family opinions and a persuasive sales associate.
The four things a sensory test has to separate
When people say a garment is uncomfortable they usually mean one of four different problems, and each has a different fix. It helps to name them before you shop. Sorting problems this way keeps sensory wedding attire decisions specific.
Contact problems come from how a surface feels against skin: scratchy weaves, stiff lace edges, coarse linings, labels, beading on the inside of a garment, or rough thread ends at a seam.
Pressure problems come from how a garment squeezes or pulls: a snug waistband, a tight armhole, a corset-style back, shoulder straps that dig, a collar that closes the throat, or shoes that compress the foot.
Environmental problems come from the interaction between clothing and the room: heat trapped by layers, damp fabric after dancing, noise from stiff or synthetic cloth, or the smell of fabric finish, dry-cleaning chemicals or a new garment.
Movement problems come from what the garment does when you move: riding up, twisting, dragging, catching, or needing constant adjustment. A garment that is soft when you stand still can still be exhausting if it needs fixing every ten minutes.
A single outfit can have problems in more than one category, and a fix in one category can create trouble in another. Adding a lining solves contact problems but can raise heat. Loosening a waistband solves pressure but may change how the garment hangs. This is why a written sheet is more useful than a general impression: it makes the trade-offs visible.
Why a restrictive outfit is a planning risk, not a personality quirk
Many couples feel they should push through. They assume that a wedding outfit is supposed to be a little uncomfortable, that the discomfort will fade once the day gets going, or that mentioning it will look fussy. That assumption has a cost that is easy to underestimate. Treating sensory wedding attire as part of the plan removes the guesswork.
Wedding days are long. A morning of getting ready, a ceremony, photographs, a cocktail hour, a seated meal, toasts, dancing and a farewell can span ten or more hours. Discomfort that is tolerable for an hour can become the main thing a person thinks about by the second half of the evening.
People in that state tend to withdraw, leave early, change clothes in a hurry or snap at people they love. None of that is a character flaw. It is a predictable response to a day that was planned around appearance and tested only for fit.
There is also a quieter cost. If one partner is visibly comfortable and the other is quietly suffering, the day becomes uneven. Planning around sensory wedding attire is therefore a way of protecting the couple’s shared experience, not only one person’s comfort.
A good outfit is one you stop thinking about by the end of the first hour.
What this guide does and does not cover
This guide focuses on one decision: how to choose and verify clothing when restrictive garments are a problem. It does not cover dress code etiquette, general fit and alteration timelines, or the full range of sensory planning for the venue, lighting and schedule. For the mechanics of tailoring and fittings, the wedding dress fit and alterations guide is the better starting point.
For shoes, wraps, gloves, jewelry and other add-ons that touch the body, the guide to wedding day accessories planning covers compatibility and backups. Everything below applies to sensory wedding attire for either partner, in any style.
What this guide adds is a testing method. It gives you a sheet to fill in, a way to compare options fairly, a worked example, and a list of conditions that mean an option has failed. You can use it for a gown, a suit, a jumpsuit, a kilt, a caftan, a traditional garment or a pair of ordinary trousers and a shirt.
Starting honestly: name your zones and your triggers
Before you test anything, take ten quiet minutes each, separately, to write down what you already know. Do not edit it for how it sounds. Include the zones where clothing bothers you most, such as neck, shoulders, underarms, waist, wrists, thighs, ankles or feet. Include the textures and constructions you already avoid, such as wool, stiff lace, polyester satin, tight elastic, rigid collars, tags or ribbed seams.
Include the clothing you reach for on bad days, because that is useful evidence. A favorite pair of soft pants or a well-worn shirt tells you a great deal about the target. These notes are the raw material for your sensory wedding attire sheet.
Then compare the two lists. Partners often discover that they dislike different things. One may be bothered by pressure around the waist, the other by rough surfaces at the neck. A single shared look can still work, but only if each person’s list is respected on its own terms.
Keep the lists short and concrete. “Nothing tight” is hard to test. “No waistband that leaves a mark after an hour of sitting” is easy to test. Where you can, describe a trigger by what you feel and when you feel it, not by a judgment of the garment.
Setting the stakes: which moments matter most
Not every moment of the day asks the same thing of clothing. Getting ready and the early photographs are brief. The ceremony may involve standing still for a set period. The meal means sitting, often with a tighter waistline and slower movement. The dance floor adds heat, sweat and big motion. The farewell often involves hugging many people. Knowing the hard moments tells you where sensory wedding attire needs the most care.
Write a short list of the three moments when comfort matters most for each of you. For one person it might be the long seated dinner. For another it might be the half hour of formal photographs. Those moments become the basis for the wear-time tests later in this guide. They also help you decide where to spend effort, because a garment that fails only in the last hour may be solved by an outfit change, while one that fails in the first ten minutes needs to be replaced.
A short word on money and timing
Testing costs a little, and it saves more than it costs. Fabric swatches are cheap or free from many mills and shops. Some retailers let you order items to try at home and return them within a stated window, so check the return terms before you buy, and keep in mind that final sale and custom orders often cannot be returned.
The Federal Trade Commission publishes general guidance on consumer rights for mail and online orders, and the terms on a specific order come from the seller. Starting early is the cheapest way to get sensory wedding attire right.
Timing matters more than money. Made-to-measure and custom garments can take months, and alterations often come late in the schedule. A twelve-month wedding checklist is a good place to see where clothing decisions normally sit, and a touch test is best done before any non-refundable deposit. Starting early gives you room to fail a sample without panic.
The touch trial sheet for sensory wedding attire
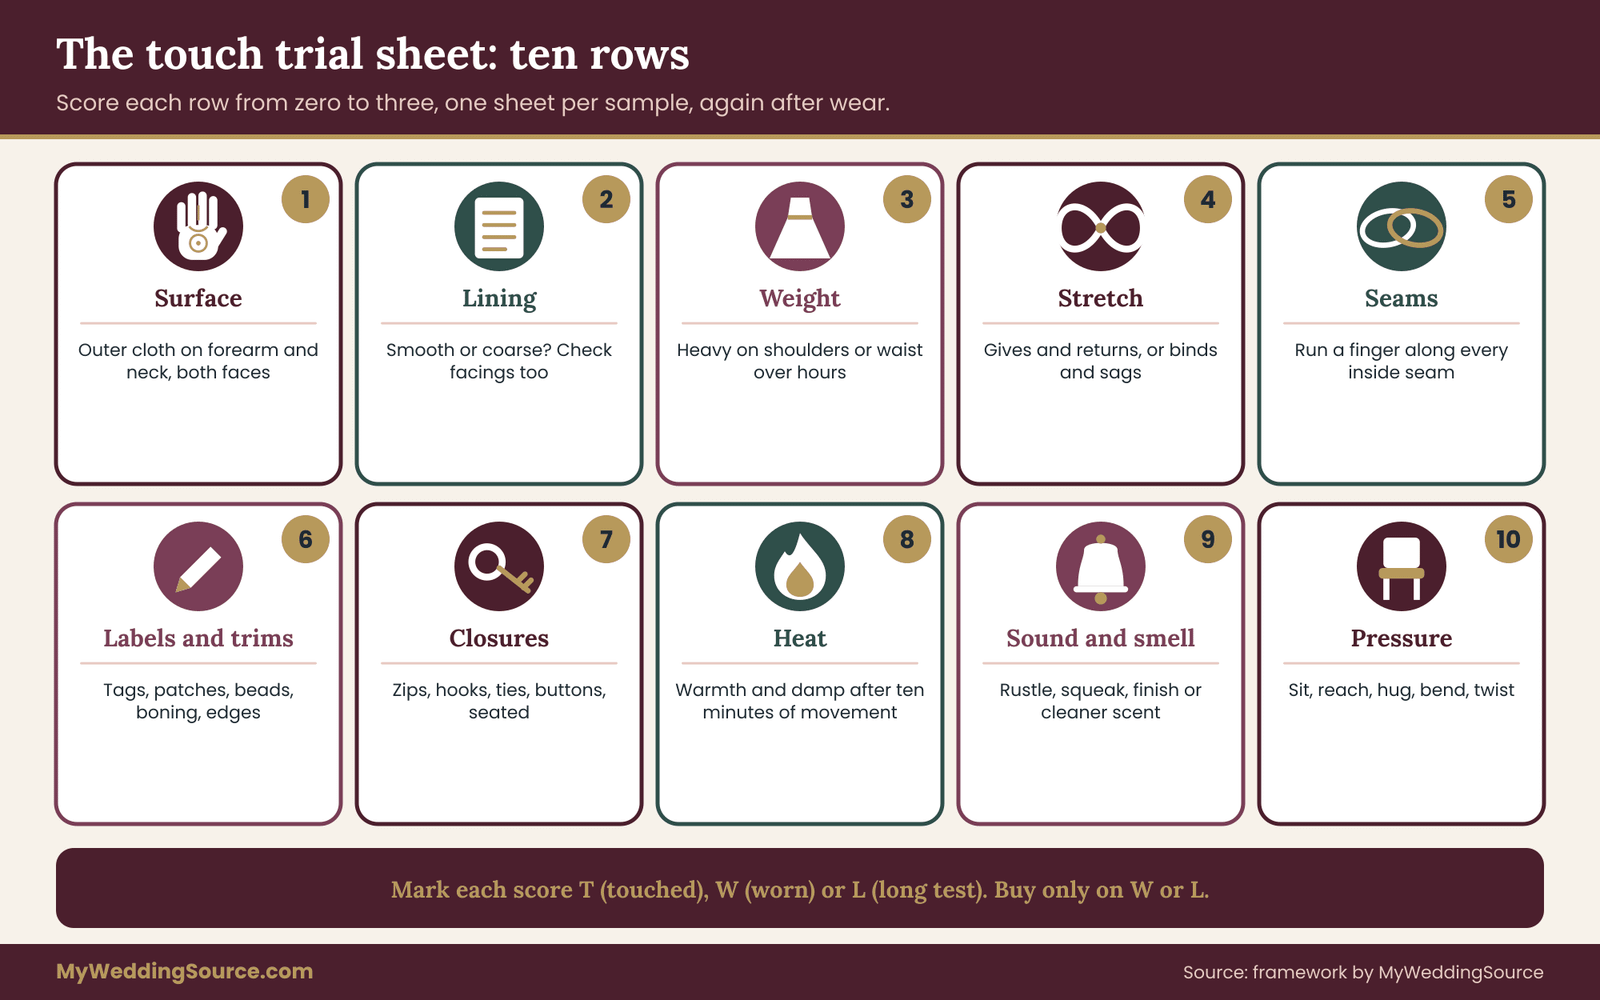
The core of this method is a single page you fill in for every option. Call it the touch trial sheet. It has ten rows, one per quality of the garment, and each row gets a score from zero to three. You complete one sheet per sample or per garment, and you complete it again after wear. The sheet is deliberately plain. Its job is to slow down a decision that is usually made in a bright fitting room under social pressure.
The ten rows
Each row names one thing that touches, presses, sounds or smells. Read them as questions you answer with your body, not with your eyes. Together the ten rows describe sensory wedding attire from skin to room.
- Surface. How does the outer fabric feel against bare skin on the forearm and the side of the neck? Test the inside face too, since the inside is what actually touches you.
- Lining and facing. Is there a lining, and does it feel smooth? Facings along necklines and waistbands are common places for stiff interfacing.
- Weight and drape. Does the cloth feel light, heavy, clingy or stiff? Weight on the shoulders and waist adds up over hours.
- Stretch and recovery. Does the fabric give when you move and return to shape, or does it bind and then sag?
- Seams and stitching. Run a fingertip along each seam on the inside. Look for ridges, thick overlocking, exposed thread ends and seams that land on a priority zone.
- Labels and trims. Check care labels, size tags, brand patches, inner beading, boning channels, hooks and decorative edges.
- Closures. Zippers, hooks, buttons, ties, laces and snaps can press into skin or catch hair and fabric. Check how each closure feels when sitting.
- Heat and moisture. Does the fabric hold warmth or dampness against the skin after a few minutes of movement?
- Sound and smell. Listen for rustle, squeak or crunch when you move an arm. Notice any lingering scent from finishes, dye or dry cleaning.
- Pressure and movement. Raise your arms, sit, bend, twist, hug a friend, and reach behind you. Note any place that pinches, rides up or needs adjusting.
The order is not a ranking. A person who is mostly bothered by pressure may care more about row ten than row one. That is why the sheet has a second layer, covered below, for priority zones.
The zero to three scale
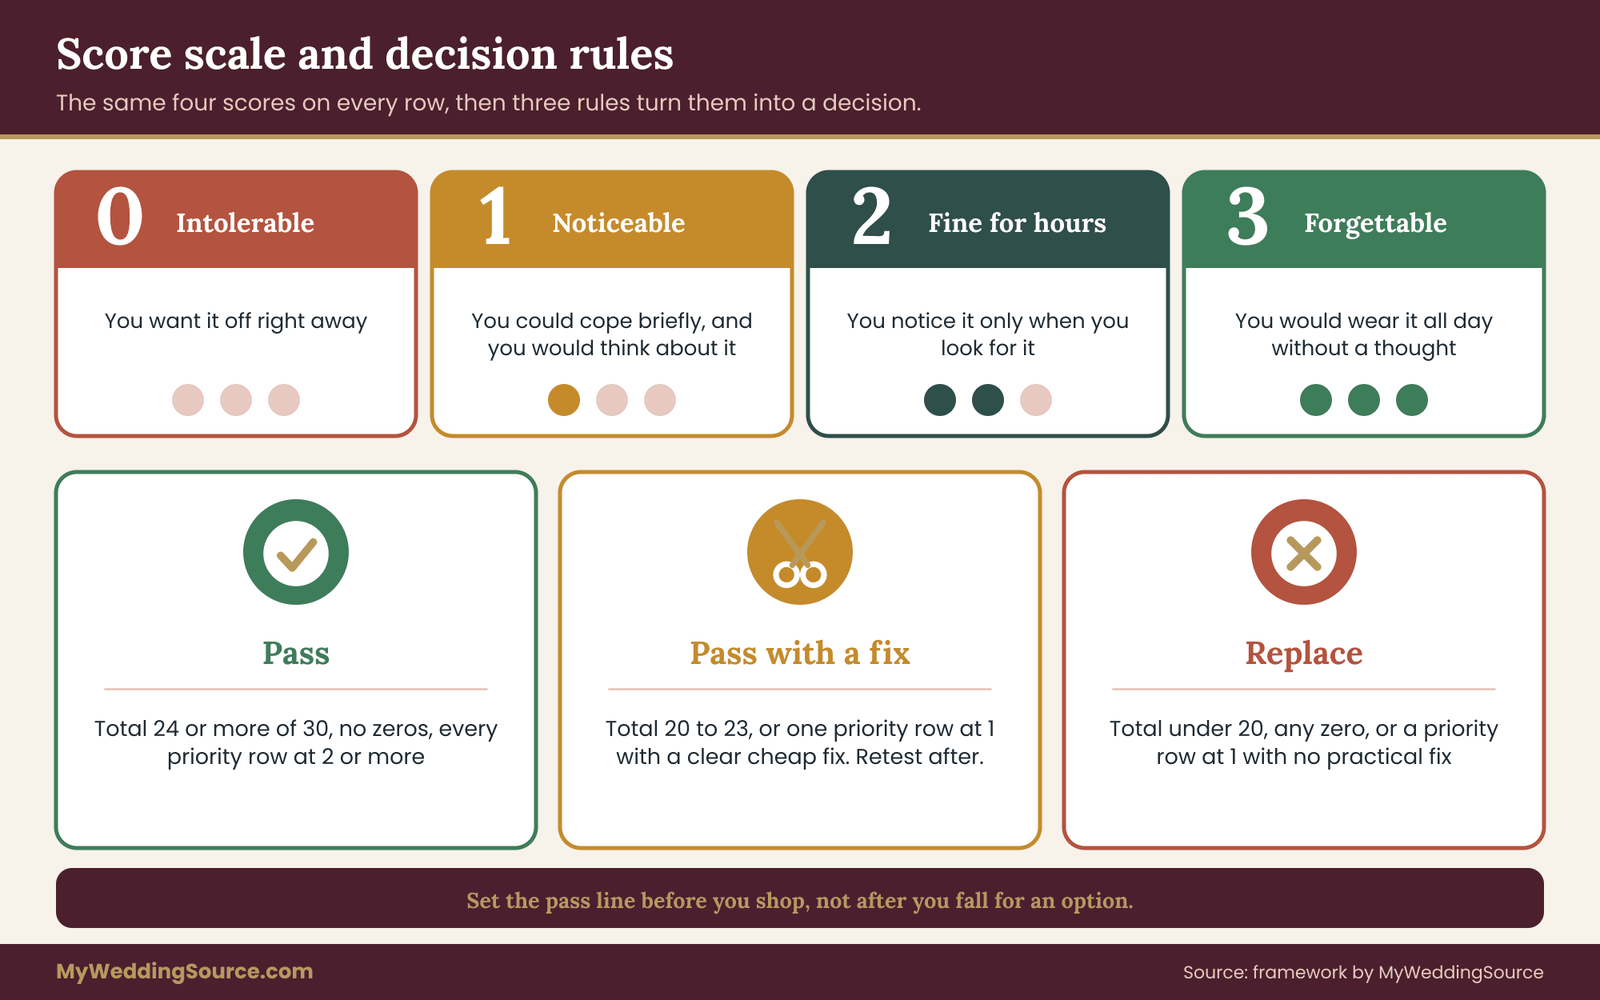
Scores mean the same thing on every row, which keeps comparisons honest. Keep the scale identical across every sample of sensory wedding attire you test.
- Zero: intolerable or distracting right away. You want to take it off.
- One: noticeable and unpleasant. You could manage it for a short time, but you would think about it.
- Two: fine for a few hours. You notice it when you look for it.
- Three: forgettable. You would wear it all day without a second thought.
Ten rows at a maximum of three gives a top score of thirty. The total is useful as a quick comparison between options, but the total is not the decision. A garment can score twenty-six and still fail because of a single zero in the wrong place. The rules below handle that.
Priority zones: the second layer
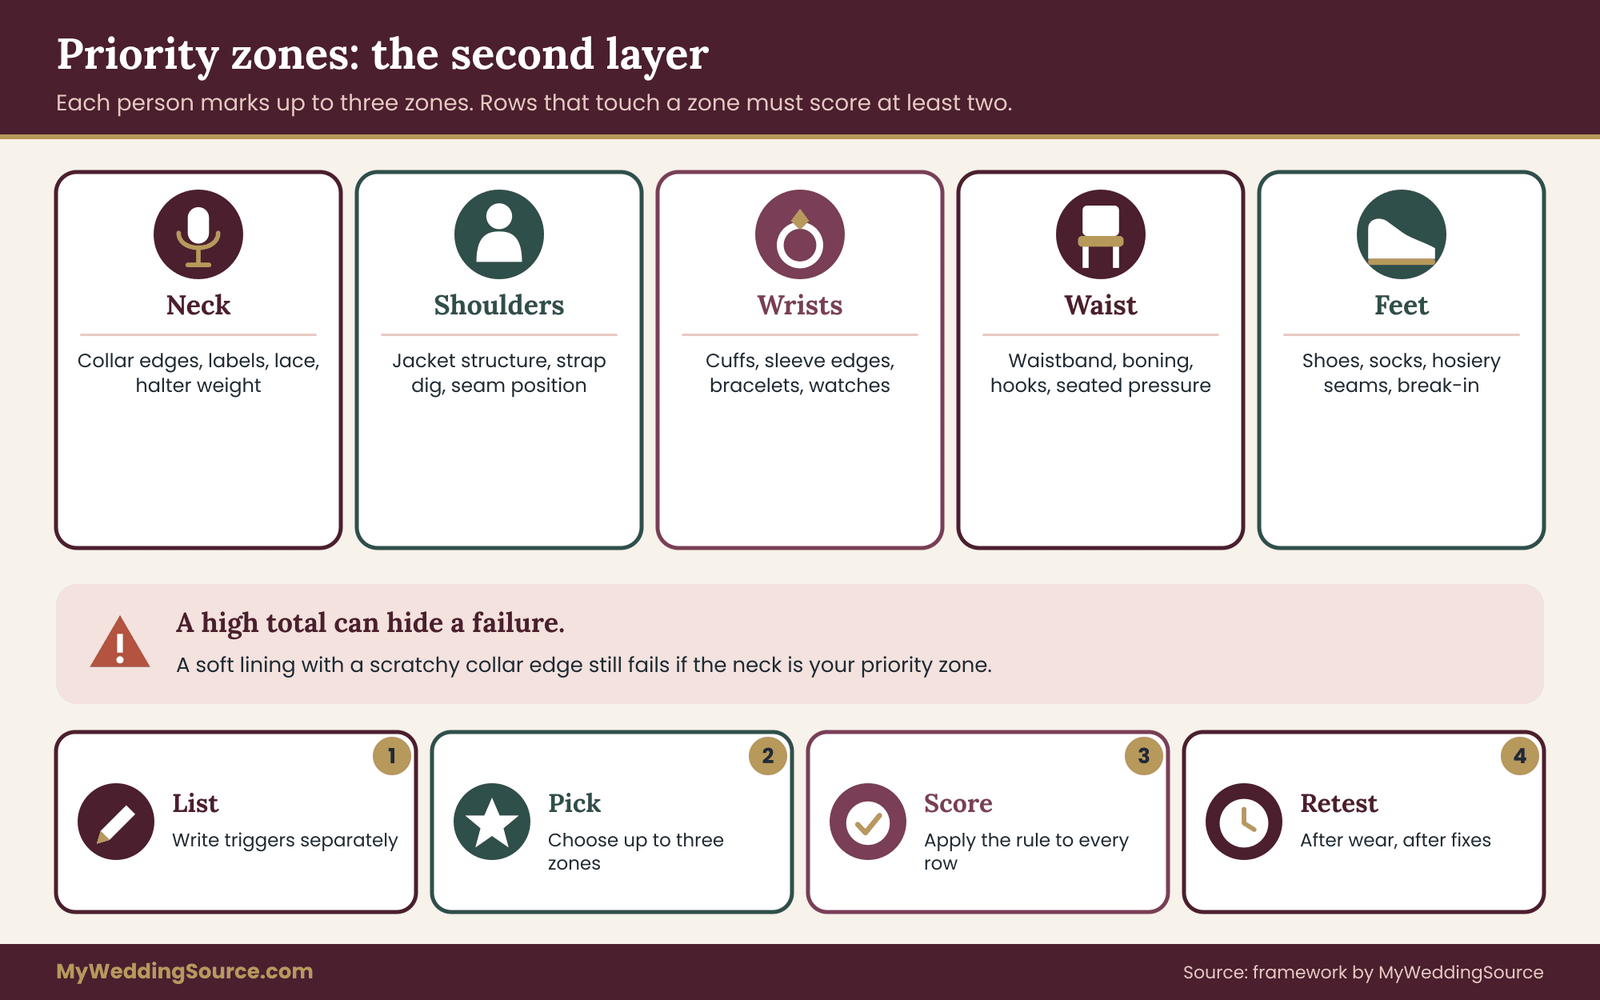
Before you start scoring, mark up to three body zones as priority zones for each person. These come from the honest list you wrote earlier. Examples include the neck, the waist, the wrists, the underarms or the feet. A priority zone gets stricter treatment: any row that touches that zone must score at least two, regardless of how good the total is. Priority zones turn a general wish for sensory wedding attire into a testable rule.
This one rule prevents the most common mistake in outfit shopping, which is falling for an option that is wonderful in nine places and unbearable in the one place that matters most to you. Imagine a person who marks the neck as a priority. A suit jacket with a beautifully soft lining but a stiff, scratchy collar edge fails, even with a total of twenty-six. The collar edge is the problem the person said they have.
The decision rules
Use these rules in order. They are simple enough to apply when you are tired. Apply these rules the same way to every option for sensory wedding attire.
Pass. The total is at least twenty-four of thirty, there are no zeros anywhere, and every row touching a priority zone scores at least two.
Pass with a fix. The total is between twenty and twenty-three, or one priority-zone row scores one and the fix is clear and cheap, such as cutting a label, replacing a hook, adding a soft facing or choosing a different undershirt. You retest after the fix.
Replace. The total is below twenty, or any row scores zero, or a priority-zone row scores one with no practical fix. Move on to a different sample or garment.
The thresholds are this guide’s own working rule of thumb, not a clinical standard. If your needs are stricter or looser, change them, but change them before you start testing, so you do not adjust the pass line to rescue an option you have fallen for.
What to bring to a testing session
You do not need a lab. A kitchen table, a window and a little time are enough. Gather the samples or garments you are testing, a printed copy of the sheet for each, a pen, a timer, a soft cloth for comparison, and a mirror. If you are testing fabric swatches, ask the seller for pieces at least as large as a hand, and for fabrics with a nap, such as velvet, note the direction.
If you are testing finished garments, wear the same undergarments, socks and shoes you plan to use on the day, because they change how everything else feels. A calm, unhurried setup makes testing sensory wedding attire more reliable.
Do the first pass separately. Each partner scores independently, without discussing, then you compare. Talking first tends to pull both scores toward whichever person is more confident. Comparing afterward shows where your needs actually differ.
Touching, wearing and waiting: three kinds of evidence
Good testing uses three kinds of evidence, and the sheet should say which you used for each score. Each kind of evidence answers a different question about sensory wedding attire.
Touch evidence comes from handling fabric: rubbing it on the inside of the forearm, which is sensitive and easy to test, and on the neck or wrist if those are priority zones. Touch evidence is fast and works for swatches.
Wear evidence comes from having the garment on your body, moving through ordinary positions. It is the only way to learn about pressure, movement and heat.
Time evidence comes from wearing the garment long enough for the first impression to fade. Some problems appear at ten minutes and some at two hours. The next sections of this guide explain how to run those longer tests.
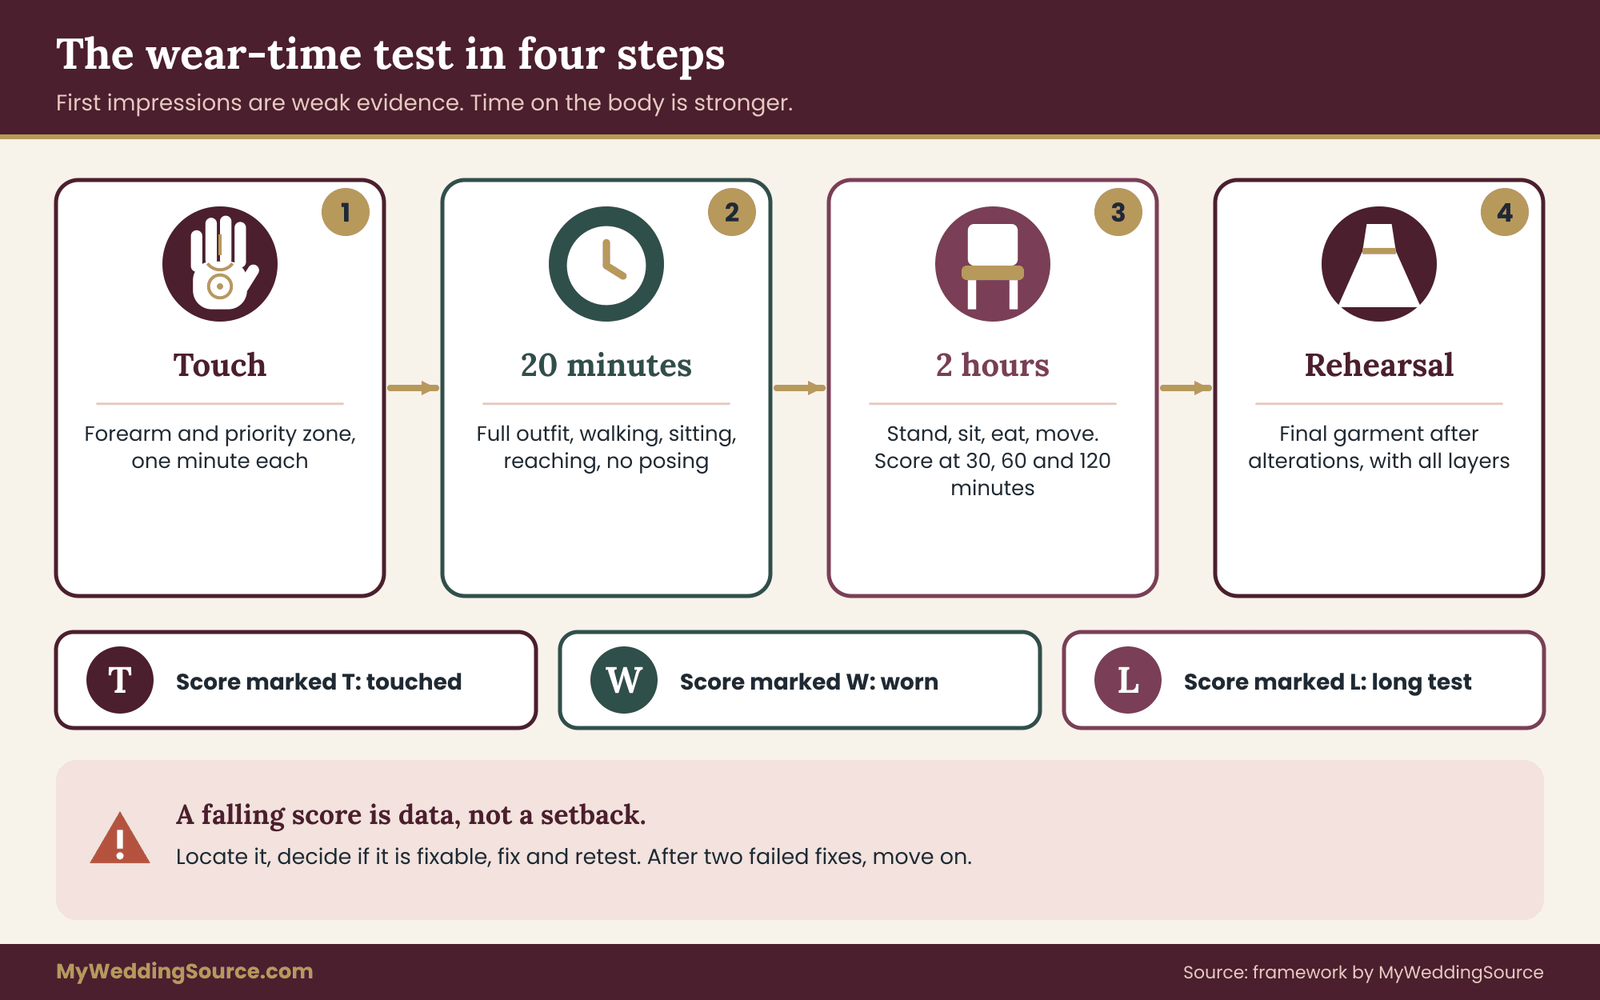
A score based on touch alone is provisional. Mark it with a small “T” so you remember that it still needs wear and time. When the same row is confirmed by wear, change it to “W,” and after a long test, “L.” A garment should not be bought until the rows touching priority zones carry at least a “W.”
Keeping the sheet useful for a vendor or tailor
One advantage of a written sheet is that it can be shared. A tailor can read that a seam scored one at the left shoulder and do something about it. A retailer can see that a lining failed and suggest a replacement. A family member who wants to help can see what is being tested and why, without a long explanation. A shared sheet makes requests about sensory wedding attire easier to act on.
When you share a sheet, share the rows and scores, not the reasons behind them. You are not required to explain your sensory profile to anyone. “The inside seam at the waist scores one, and I need it flat” is a complete and polite request. The section on talking with tailors and vendors later in this guide gives wording you can adapt.
How many options to test
Most couples do well testing three to five options per person at the swatch or try-on stage, then narrowing to one or two for long wear. Fewer than three gives you little to compare. More than five makes the pile hard to track and tends to produce decision fatigue, which is exactly what a sensory test is meant to avoid. A short field of candidates keeps sensory wedding attire testing manageable.
Label each sample with a short code, such as A, B and C, and note the fiber content, the construction and the price on the sheet. Keep any receipts and the return terms with the sheet. If you later need to return an option or compare it with an alternative, the record is already in one place. The article on wedding vendor contracts explains what to look for in terms before you pay a deposit on custom work.
Common ways the sheet gets misused
A few patterns come up often enough to name. Knowing these habits helps you keep sensory wedding attire scoring honest.
Scoring what you hope, not what you feel. If you love the look, you may round up. Score the sensation, and add a note about how much you want the option. Wanting it is information too, but it is separate from comfort.
Testing in the wrong conditions. A fabric tested in a cool shop can feel different in a warm ballroom. If the venue is outdoors in summer, test warm. If the ceremony is in an unheated hall, test cool.
Skipping the undergarments. Seams of an undershirt, the band of underwear and the fabric of socks are part of the outfit. Test the whole stack.
Letting a salesperson set the pace. A helpful associate may suggest “it will relax with wear.” Sometimes that is true, but you can only judge it by wearing the garment, not by trusting a promise. Run the time test.
Using the total as the decision. A high total with a zero in a priority zone is a fail. The rules exist for exactly this case.
A well-run sensory wedding attire test is slow on purpose. It trades a few evenings of attention for a day without distraction. The next section looks at the first and biggest row on the sheet, the fabric itself. ## Fabric testing for sensory wedding attire: surface, weight and stretch
Fabric is the largest part of the touch trial, and it is where most people start. The difficulty is that fabric names are poor guides. “Satin,” “crepe,” “jersey” and “linen” each cover a wide range of feels, because fiber, yarn thickness, weave or knit, and finishing treatment all change the result. Two garments sold under the same name can feel nothing alike. That is why you test the actual cloth, not the label on the rack.
Fiber is a starting point, not an answer
Fiber content tells you where to look, but not what you will find. In general terms, cotton, linen, silk, wool, viscose, polyester, nylon and elastane all behave differently, and blends mix their traits. A few rules of thumb are useful, as long as you treat them as hypotheses to test. For sensory wedding attire, the fiber label tells you where to start looking, nothing more.
Natural fibers such as cotton and linen tend to breathe well and feel less slick, but a coarse or new linen can be scratchy until it is washed several times. Silk can be extremely smooth, but some weaves, such as dupioni, have a crisp, slubby surface that some people find rough. Wool ranges from fine and soft to prickly, depending on the fiber and the finishing.
Polyester and nylon can be soft in brushed or microfiber form, but a slick, tightly woven polyester can trap heat and make noise. Elastane adds stretch to a blend, and the amount changes how a garment presses on the body.
The Federal Trade Commission requires fiber content labels on most clothing sold in the United States, and care labeling rules govern washing instructions. The label can tell you the blend and how to launder it, so look at both before buying. It cannot tell you how the fabric feels, so the label stays a starting point.
The forearm test and the neck test
Touch testing is the quickest way to screen fabric. Use the inside of the forearm first, because the skin there is thin and easy to compare from sample to sample. Draw the fabric slowly across the skin in one direction, then the other. Note whether the surface drags, catches, prickles or slides. This quick screen narrows a long list of sensory wedding attire candidates fast.
Then test the neck or any other priority zone with the same fabric. People are often surprised that a fabric that passes on the forearm fails at the neck, because skin sensitivity differs across the body. If you can, rest the sample against the zone for a full minute. A first touch can feel fine, and a steady contact can become irritating.
Test both faces of the cloth. The inside of a garment, the lining side, is what touches you. A beautiful outer surface can sit on top of a coarse backing, such as a fusible interfacing or a stiff net underlay.
Weight and drape over time
Weight is easy to overlook in a fitting room because you wear a garment for a few minutes. Over ten hours, a heavy skirt pulls on the waist, a heavy jacket loads the shoulders and a thick train drags on the hips. Hold a sample in your hand and compare it with a favorite piece of clothing that you wear for long days. If it is clearly heavier, mark it. Weight is one of the least noticed factors in sensory wedding attire.
Drape tells you how the cloth moves against the body. A stiff fabric holds its shape and may press away from you in some places and into you in others. A fluid fabric follows the body and can cling, which some people dislike and others find calming. There is no correct answer. The goal is to find out which you tolerate, and to place that information on the sheet.
If the garment uses several layers, such as a skirt with a petticoat or a jacket with a vest, weigh the whole stack, not each layer separately. Layers add up, and each one also adds seams.
Stretch and recovery
Stretch is often treated as the cure for restrictive clothing, and it helps, but it comes with its own failure modes. A fabric with a lot of stretch can still press if its recovery is strong, because it pulls back toward its original size. A fabric with little stretch and a generous cut can feel freer than a snug stretch garment. Stretch helps sensory wedding attire only when the recovery suits your body.
To test stretch, pull a sample gently in each direction and let it go. Watch whether it returns to shape or stays baggy. Then wear the garment and sit, bend and reach. Notice whether the stretch comes with a feeling of being held, which some people like and others do not. A garment that feels fine standing and compresses the abdomen when seated is a common problem with fitted trousers and fitted dresses.
For fabrics that stretch in one direction only, such as many woven blends with a little elastane, find out which direction the stretch runs and whether that direction lines up with your movement.
Knits versus wovens
A basic split helps many people narrow options. Woven fabrics, such as poplin, twill and crepe, are made by crossing threads at right angles. They hold shape and can feel crisp, and they usually have less natural stretch. Knit fabrics, such as jersey and interlock, are made from looped yarn and tend to give more, drape softly and feel closer to casual clothing. Either construction can work for sensory wedding attire if it passes the sheet.
Neither is better for sensory comfort. Knits often win on pressure and movement. Wovens can win on structure and on photographs, because they hold their shape. A common compromise is a woven outer garment over a knit base layer, or a woven garment with a stretch panel at the waist.
Finishes, treatments and the first wash
Some fabrics change after washing. Many garments carry a finish when new, such as sizing in cotton or a coating on a synthetic, and that finish can feel stiff or have a smell. Washing can soften the garment and remove odor, or it can change the surface in ways you do not want. If a garment can be washed, ask the seller whether you can wash a swatch before deciding.
If it must be dry-cleaned, find out whether the cleaning process leaves a lingering scent, since solvent smell is a common complaint and can last a day or two. Scoring a swatch before and after washing is a sound habit for sensory wedding attire.
When you test a washable swatch, wash and dry it the way you would care for the final garment, then score it again. Record both scores on the sheet. A fabric that goes from a one to a three after washing is a good candidate, provided the final garment will be washed before the wedding. A fabric that goes from a three to a one after washing is a warning.
Skin products and finishes interact too. Laundry detergents and fabric softeners can bother some people more than the fabric does. If you have a preferred detergent, use it when preparing the garments, and tell your tailor or cleaner if you need a fragrance-free process.
Linings, interfacing and the hidden layers
Many garments contain materials that you never see. Linings, interlinings, interfacing and underlays all sit between the outer cloth and your body. A suit jacket may have a lining of acetate or polyester, and the collar and lapels may have stiff interfacing. A gown bodice may hold boning, mesh and cups. Each of those layers is a place where a good outer cloth can fail. Hidden layers decide a surprising share of sensory wedding attire results.
Ask about the lining and interfacing before you commit. If a lining is the problem, it can often be changed, since tailors can replace a lining with a softer fabric such as cotton, silk or a smooth viscose. If interfacing is the problem, it may be possible to substitute a lighter material, or to remove it at the neckline. For more on what tailors can and cannot change, a tailor can explain typical limits and timelines.
Embellishments and the inside of beaded work
Beads, sequins, appliqué and embroidery add beauty and a lot of tactile risk. The outside of a beaded bodice may be a delight, and the inside may carry rows of knots, thread ends and the backs of hundreds of beads. Run a fingertip across the inside before you buy. Look for padding, a smooth backing or a separate lining that covers the work. Decoration is where sensory wedding attire and ornate styles most often collide.
Scalloped lace edges at a neckline or sleeve can also scratch, particularly where the edge sits against the neck, wrists or underarms. A narrow band of soft fabric sewn behind an edge can solve the problem, if the seller or a tailor is willing. If the garment cannot be modified, a priority-zone score of one on that row is a good reason to look elsewhere.
Putting fabric scores on the sheet
Record the surface, lining, weight and stretch rows from your fabric work, and add short notes. “Surface 2, rough at the neck, passes on the forearm” is more useful than a bare number. Note whether each score came from touch, wear or time, using the T, W and L marks. These notes feed straight into your sensory wedding attire comparison.
If a fabric scores well, do not stop. Fabric is one third of the picture. The next section looks at the parts that often fail even when the cloth itself is excellent: seams, labels and closures. ## Seams, labels and closures: where soft fabric still fails
A soft cloth can still produce a hard day. Many of the complaints people have about restrictive clothing come from construction, not from fabric: the line of stitches inside a seam, a label stitched at the nape, a zipper that presses on the spine when sitting, a hook that digs into the ribs. These details are small, so they are easy to skip when you are looking at the front of a garment in a mirror. They are also the details that sit against your skin for hours.
Reading a seam from the inside
Turn the garment inside out and look at how it is made. A well-finished seam in a comfortable garment is usually flat, has little bulk and keeps thread ends away from skin. Common types you may see include plain seams with the edges overlocked, French seams that enclose raw edges, flat-felled seams with the edge folded and stitched down, bound seams with a strip of fabric wrapped around the edge, and flatlock seams in knits that lie nearly flat.
Most sensory wedding attire complaints about construction start with a seam you cannot see in the mirror.
Each has a different feel. An overlocked seam is common and often fine, but the stitching can form a ridge, especially on thicker fabric. A French seam is usually smoother. A flat-felled seam is durable but can be stiff at the fold. A flatlock seam is designed to sit flat against the body and is common in comfort-focused clothing, although the stitching itself can have a texture some people notice.
You do not need to memorize these names. You need to run a fingertip along each seam, and then press it against your skin, particularly at a priority zone. Ask where each major seam lands when the garment is worn. Shoulder seams, side seams and the center back seam sit in predictable places, and a seam that lands on a bony point or a sensitive spot is worth marking.
Seam placement is a design choice you can change
Sometimes the seam itself is acceptable, but its placement is not. A shoulder seam that sits too far forward, an underarm seam that rubs, or a waist seam that sits on the hipbone can often be shifted or reshaped in alterations. A tailor can reposition a seam in some garments, add a soft binding or recut a section.
Whether that is possible depends on the garment and how much fabric is available. Ask early, and describe the sensation instead of prescribing the repair. A skilled tailor often knows more than one fix. Seam placement is among the most useful levers for sensory wedding attire.
For a made-to-measure or custom garment, you can ask in advance for specific construction choices: flat seams, bound or enclosed edges, a particular lining, no interfacing at the neckline, or seams moved away from a priority zone. Writing these on the order is better than hoping they will happen. The same logic as any vendor agreement applies: specifications and approval steps belong in writing.
Labels, tags and printed marks
Labels are the best-known source of trouble. Neck labels, side-seam care labels, waistband size tags and brand patches can all irritate. The fix seems obvious, which is to cut them out, but it is worth doing carefully. Labels are small, but they top many lists of sensory wedding attire complaints.
Care labels in the United States are required for most garments under rules the Federal Trade Commission enforces, and the information on them is useful. Before you remove a care label, copy or photograph it so you still know how to clean the garment. Some people prefer to keep the information on a small card stored with the garment, or on the sheet itself.
Cutting a label can leave a stiff stub of stitching, so use small sharp scissors or a seam ripper and remove the stitches, not the fabric. Then run a finger over the spot. If the thread ends still scratch, cover them with a soft patch or ask a tailor to finish them. Printed labels, sometimes called tagless labels, can feel smoother, but the ink can also feel stiff or itchy for some people, and they can trigger a reaction in a few cases. Test that too.
If a garment is rented, rules differ. Rental shops usually do not allow alterations, and removing a label from a rental garment is generally not permitted. Ask before you test whether a label can be covered with a soft tape or a piece of cloth instead. A self-adhesive soft cover between the label and your skin can sometimes help, and removing it afterward leaves the garment unchanged.
Closures: zippers, hooks, buttons, ties and laces
Closures are the most overlooked row on the sheet because they look small and sit in places you do not see. In practice, they may be the largest source of pressure. Closures decide whether sensory wedding attire is workable once you sit down.
A back zipper in a fitted bodice can press on the spine when seated. A hook-and-eye closure at the waist can dig into the ribs. A button fly can pinch at the lower belly. A row of covered buttons down the back looks beautiful and can be hard to fasten alone and uncomfortable to lean against. A lace-up corset back is adjustable, which helps with pressure, but it can be hard to tighten evenly and needs a helper.
Test closures while seated, not only standing. Sit on a hard chair, lean back and notice where the closure presses. Lean forward and notice where it pulls. Fasten it yourself if you can, because on the day you may need to use the bathroom without assistance.
Consider the ease of getting in and out. If a closure requires a helper, plan who that helper will be, and whether the arrangement works for a bathroom break during the reception. A garment that is lovely but impossible to take on and off without help can fail the sheet at row seven even though it never feels unpleasant while worn.
Alternatives to standard closures
Many garments can be adapted. Elastic waists, adjustable ties, side zippers, hidden snaps and drawstrings are all options, and tailors often change closures. A suit trouser can use an extender waistband or a side adjuster. A dress can use a side zipper instead of a back zipper. A shirt can use snaps in place of buttons. A tie can be replaced by a pre-tied band or a soft scarf-like wrap. Wraps, belts and similar add-ons can serve similar goals. Closure swaps are a common, low-cost route to sensory wedding attire that passes.
Adaptive clothing makers also design garments with comfort closures in mind. These are worth a look if standard garments consistently fail your sheet, and some make formal styles. Check fit, materials and return terms as with any other purchase, and treat their claims as hypotheses to verify with your own scoring.
Collars, cuffs and necklines
Three zones deserve their own attention, because they are common priority zones. Collars, cuffs and necklines are the zones most often named in sensory wedding attire planning.
Collars. A dress shirt collar sits against the neck, often with a stiff interfacing, a stay and a top button. A collar can be loosened by moving the button, choosing a larger neck size and getting the shirt fitted in the body, or by choosing a softer collar style such as a band collar or a soft spread. Check the inside edge of the collar for stitching, and ask your tailor what can be changed.
Cuffs and sleeves. Tight cuffs and buttoned sleeves press on the wrists. Consider a looser cuff, a single-button cuff worn open or a soft knit cuff. For gowns, sleeve openings that catch at the elbow or armhole can restrict arm movement and make hugging hard.
Necklines. High necklines can restrict the throat, and low necklines can shift or need adjustment. Halter styles put weight on the neck. Wide-set straps may slip. Lace edges can scratch. Test each with arms raised.
Shoes, socks and hosiery
Feet are often forgotten until late in the planning process. Shoes carry seams, stiff counters and tight toe boxes, and socks and hosiery add their own seams and pressure. Test shoes with the socks or hosiery you will wear, and break them in for several short sessions before the day.
Any gradual schedule works, such as ten minutes the first day and a little longer each day after. Consider a second pair of comfortable shoes for the reception if the first pair passes only for the ceremony. Footwear belongs in any serious plan for sensory wedding attire.
For hosiery and tights, check waistbands and toe seams. Seamless or flat-seam styles exist. If you wear stockings, test for waistband pressure, since the waistband sits where a gown or trousers also sit.
Closing the row: recording construction scores
After a hands-on review of seams, labels and closures, update rows five, six and seven on the sheet. Use the T, W, L marks again. If you removed a label or modified a closure, note it with the date, and retest the row. A fix that you did not retest is a hope, not a result. Careful notes here make your sensory wedding attire decision easy to defend later.
The next section moves from touch to the rest of the sensory picture: sound, smell and temperature. ## Heat, sound and smell: the quiet parts of sensory wedding attire
Touch gets the most attention, but three other qualities decide whether a garment is livable: how it manages heat and moisture, what sound it makes, and how it smells. These rows on the sheet, eight and nine, tend to fail late in the day, when the room is crowded and the body is tired. They are also the rows most likely to be missed in a fitting room, because a shop is usually cool, quiet and lightly scented.
Heat and moisture
A garment that feels fine in a climate-controlled boutique can become oppressive in a packed ballroom or a summer garden. Heat builds under layers, in dark colors and in fabrics that do not let moisture escape. Moisture adds another problem: a damp shirt clings, a sweat-darkened bodice chafes, and synthetic linings can turn clammy. Heat is a frequent late-day failure for sensory wedding attire.
Test heat by wearing the full outfit in a room warmer than comfortable, with the layers you plan to use. Move around for ten minutes. Notice whether warmth builds quickly, whether any area becomes damp first, and whether the cloth clings once damp. Natural fibers and open weaves often move moisture better, though a thin synthetic made for athletic wear can also perform well. As with other claims, test it.
Consider how many layers the plan needs. A gown with a petticoat, a bodice with cups and a wrap may be three or four layers. A suit with a vest, jacket and tie can be five. Every layer adds heat and seams. If heat is a priority, ask whether a layer can be removed, whether the jacket can come off after the ceremony, and whether a lighter lining is possible.
Cold counts too. Some venues are chilly, particularly in the evening or in a stone building. A person who dislikes restrictive clothing may also dislike a heavy coat, so plan a soft, loose layer that can go over the outfit, such as a wrap, a cardigan or a cape. The question to answer is simple: what will keep you comfortable at both ends of the temperature range without adding pressure?
Checking the venue, not only the clothes
Heat is a property of the setting as much as the garment. If you can, find out whether the ceremony is indoors or out, whether the room has air conditioning, how many guests will be present, and whether the dance floor is crowded. Your venue contact may be able to tell you what the temperature usually is at the time you will be there.
The wedding venues guide covers questions that help you learn about a room before you commit to it, and one of them is how the space handles heat and airflow. The room is part of your sensory wedding attire test.
If the room is likely to be warm, plan an outfit change, a lighter second garment, or a way to remove a layer. If the room will be cold, plan layers that add warmth without adding restriction. Having an explicit plan in writing is more reliable than hoping to cope.
Sound: the rustle row
Some fabrics make noise. Taffeta, stiff satin, crinoline, certain nylons and many synthetic suiting blends rustle, swish or squeak with each movement. Corduroy can whisper when thighs rub. Boning can creak. Hard soles click on a wooden floor. Sound is easy to miss when judging sensory wedding attire in a quiet shop.
For a person who is sensitive to sound, a garment that rustles with every step can become a source of constant background noise. For others, the rustle is invisible. Test by moving your arms, walking and sitting down in a quiet room, and listen closely. If you cannot tell, ask your partner to listen, or record a short clip on your phone and play it back. The sound that seems small in a quiet room can seem larger in the body once you are in it.
Also think about what the noise does to others. A loud petticoat may interfere with audio recorded during vows. A videographer or an audio technician will have views, and it is worth asking them before the day.
Smell and chemical finishes
Smell is easy to forget and hard to ignore for people who notice it. New garments may carry the scent of dye, sizing, finishing chemicals or packaging. Dry-cleaned garments can retain a solvent odor. Garments stored for a long time can pick up the smell of a closet, cedar or mothballs. Rented garments may carry the scent of the previous cleaning process. Smell is a real factor in sensory wedding attire for people who notice it.
Air a new or cleaned garment outdoors for a day or two if possible, away from direct sunlight that might fade it. Ask the dry cleaner about fragrance-free or low-odor processes, and understand that not every cleaner offers them. If you are washing at home, use the detergent you already tolerate. Avoid spraying perfume or scented products on garments, and ask the people who will help you dress to do the same.
Smell can also come from other people. A hug in a formal outfit presses fabric to fabric, and some fabrics hold scents from perfume, smoke or food. If you are sensitive, put this on your plan: a spare shirt or a spare wrap that you can swap into if the first one picks up something you cannot ignore.
Visual comfort: shine, pattern and glare
A smaller category belongs here, though it is not touch: how the garment looks to the person wearing it. Strong patterns, high shine and sequins can be visually tiring, and glitter can catch the light and cause glare for people who are sensitive to it. This is less common as a clothing complaint, but if it applies to you or to someone close to you, note it. Matte fabrics and simple surfaces are easier on the eye. Visual comfort is a smaller but valid part of sensory wedding attire.
Pressure while still, pressure while moving
Row ten of the sheet covers the pressure and movement of the whole garment. Test it in a deliberate series of positions, and give each position a short time, about thirty seconds. Movement testing shows what a mirror cannot about sensory wedding attire.
Stand with feet together and arms at sides. Raise both arms overhead. Reach one arm across the body. Bend forward as if to pick something up. Sit on a hard chair with a straight back. Sit on a low sofa. Cross your legs if you do that. Lean back. Twist at the waist. Hug a person your size, then a smaller person and a taller one. Walk up and down stairs, if the venue has them.
For each position, ask whether anything pulls, pinches, rides up, slides, gapes or presses. Mark any problem on the sheet, with the position noted. A garment that fails in only one position, such as sitting on a low sofa, may be fixable with a small change. A garment that fails in several is probably the wrong shape for your body, regardless of fabric.
Using a trusted observer
A partner, friend or relative can help by watching while you move. They can see a pulling seam you cannot feel, a bunching waistband, a gap at the back or a strap that has slipped. Ask them to watch, not to comment on how you look. Give them a short list: tell me when something pulls or shifts. A calm observer improves any test of sensory wedding attire.
Be mindful of who you ask. A person who has opinions about weight, shape or style may add pressure of a different kind. Choose an observer who can stay neutral and keep to the task.
The first hour is a trap
One more principle concerns timing. The first few minutes of wearing a garment are not representative. The body adjusts to some sensations quickly, and adjusts poorly to others. A scratchy label may seem minor at first, then become intolerable once your attention returns to it. A snug waist may seem fine standing and feel awful after a meal.
A cool fabric warms to body temperature and loses its comfort. Tests that stop at ten minutes miss the problems that matter on a ten-hour day. The first hour is the weakest evidence you have about sensory wedding attire.
That is the reason the sheet has a time column. The next section describes how to run wear-time tests that match the long day of a wedding.
Wear-time tests: twenty minutes, two hours and a dress rehearsal
A wear-time test is a deliberate period of wearing a garment while doing the things you would do at a wedding. It checks the sensations that show up only with time and activity. This section gives a three-stage test that couples can run at home with no special equipment. Use it for any garment that passes the first sheet at the “pass” or “pass with a fix” level.
Stage one: the twenty-minute check
The first stage catches early failures. Put on the full outfit, with the undergarments, socks or hosiery and shoes you plan to use. Set a timer for twenty minutes. Spend the time doing ordinary activities: walking around, sitting, standing, reaching for things on a shelf, bending to pick something up, drinking a glass of water. Do not stand still or pose. This first stage filters weak options in your sensory wedding attire shortlist.
At the end, rescore the sheet. Compare the new scores with the first ones. Most garments hold steady. If any row falls by one point or more, mark it. A fall at this stage points to a problem that will probably get worse, such as a seam that was fine when you first put the garment on but started to rub, or a closure that pressed more as you moved.
Stage two: the two-hour seated and standing test
The second stage tests endurance. Wear the outfit for two hours, matching the pattern of the wedding day as closely as you can. If you have a ceremony standing for thirty minutes, then a long seated meal, do the same: stand for half an hour, then sit for an hour, then stand and mingle for the rest.
Eat a meal, since a full stomach changes how waistbands feel. Include a few minutes of dancing or energetic movement if the day will include it. This stage is the core of testing sensory wedding attire for a long day.
Check in with yourself at thirty minutes, one hour and two hours, and jot down scores on the sheet. Use a short note such as “waist 2 at one hour, 1 at two hours.” The pattern matters more than any single number. A steady score is good. A score that falls steadily is a failure condition, even if it is still two at the end.
If you can, do this test with your partner, each in your own outfit, and see how it feels to be dressed together. You may notice things such as who is the first to fidget, or who has quietly changed position several times.
Stage three: the dress rehearsal
The third stage is a full rehearsal, wearing the actual garment in the same way you plan to wear it on the day. It should happen close enough to the wedding to catch changes from alterations, but far enough ahead to fix any new problems. Many couples can do this at the final fitting. A few weeks before is a good target, and the exact timing depends on the alteration schedule. The rehearsal confirms that sensory wedding attire still passes after alterations.
At the rehearsal, repeat the position series from the previous section, then wear the outfit for the full two-hour test again if the final garment differs from what you tested before. If the garment changed through alterations, rescore the sheet from scratch. Alterations are a common cause of new problems, such as a new seam, a changed neckline or a shifted waistband.
If you plan an outfit change, rehearse the change itself: how long it takes, who helps, where it happens and what you do with the first outfit.
What to do when a score falls
A fall in scores is not a failure of you. It is the test doing its job. When a row drops, use a simple response ladder. A falling score is useful data about your sensory wedding attire, not a setback.
First, locate the problem. Is it a seam, a label, a closure, a fabric, a fit issue or a layer? Point to the place and describe the sensation in plain words.
Second, decide whether it is fixable. A label can be removed, a closure changed, a seam bound or a lining replaced. A fabric that is itself the problem can only be avoided or covered, and a fit problem in a garment that cannot be altered is a reason to switch.
Third, apply the fix and retest the row after the same period of wear. Record the new score and the date.
Fourth, if two attempts fail, move on. This stop rule keeps you from sinking time and money into a garment that was never going to work. It also helps with the emotional side, since walking away from something beautiful is easier when you decided in advance that you would.
Testing with hair, makeup and accessories
Wear-time tests are most useful when they include everything that touches the body. Hair accessories, headpieces, veils and combs press on the scalp. Jewelry sits on the neck, ears and wrists. Rings can feel different after hours of swelling. Gloves, belts, ties, cufflinks and boutonnieres can all add pressure or irritation. The planning guide for bridal hair and makeup covers trial runs for hair and makeup, and the same idea of a timed trial applies.
If a trial for hair is scheduled, wear the outfit to it, so you test the neckline against the hairstyle in one session. Accessories count as part of sensory wedding attire once they touch the body.
Nickel in jewelry and metal closures causes skin reactions for some people. If that is a concern, ask about the metal content, and consider hypoallergenic alternatives. A clinician can advise on skin reactions.
Recording the time test
Add a third column to the sheet for the two-hour scores, and mark each row with an L. A row that has an L and holds steady is as trustworthy as the sheet gets. A row that only has a T is a guess. Before buying or finalizing a garment, review the sheet and ask whether any priority-zone row lacks an L. If it does, run another test. The time column is what separates tested choices from hopeful ones.
The next section shows the method in action, with an invented example to demonstrate how the sheet, the rules and the alternatives work together. ## A worked case: two invented samples, scored side by side
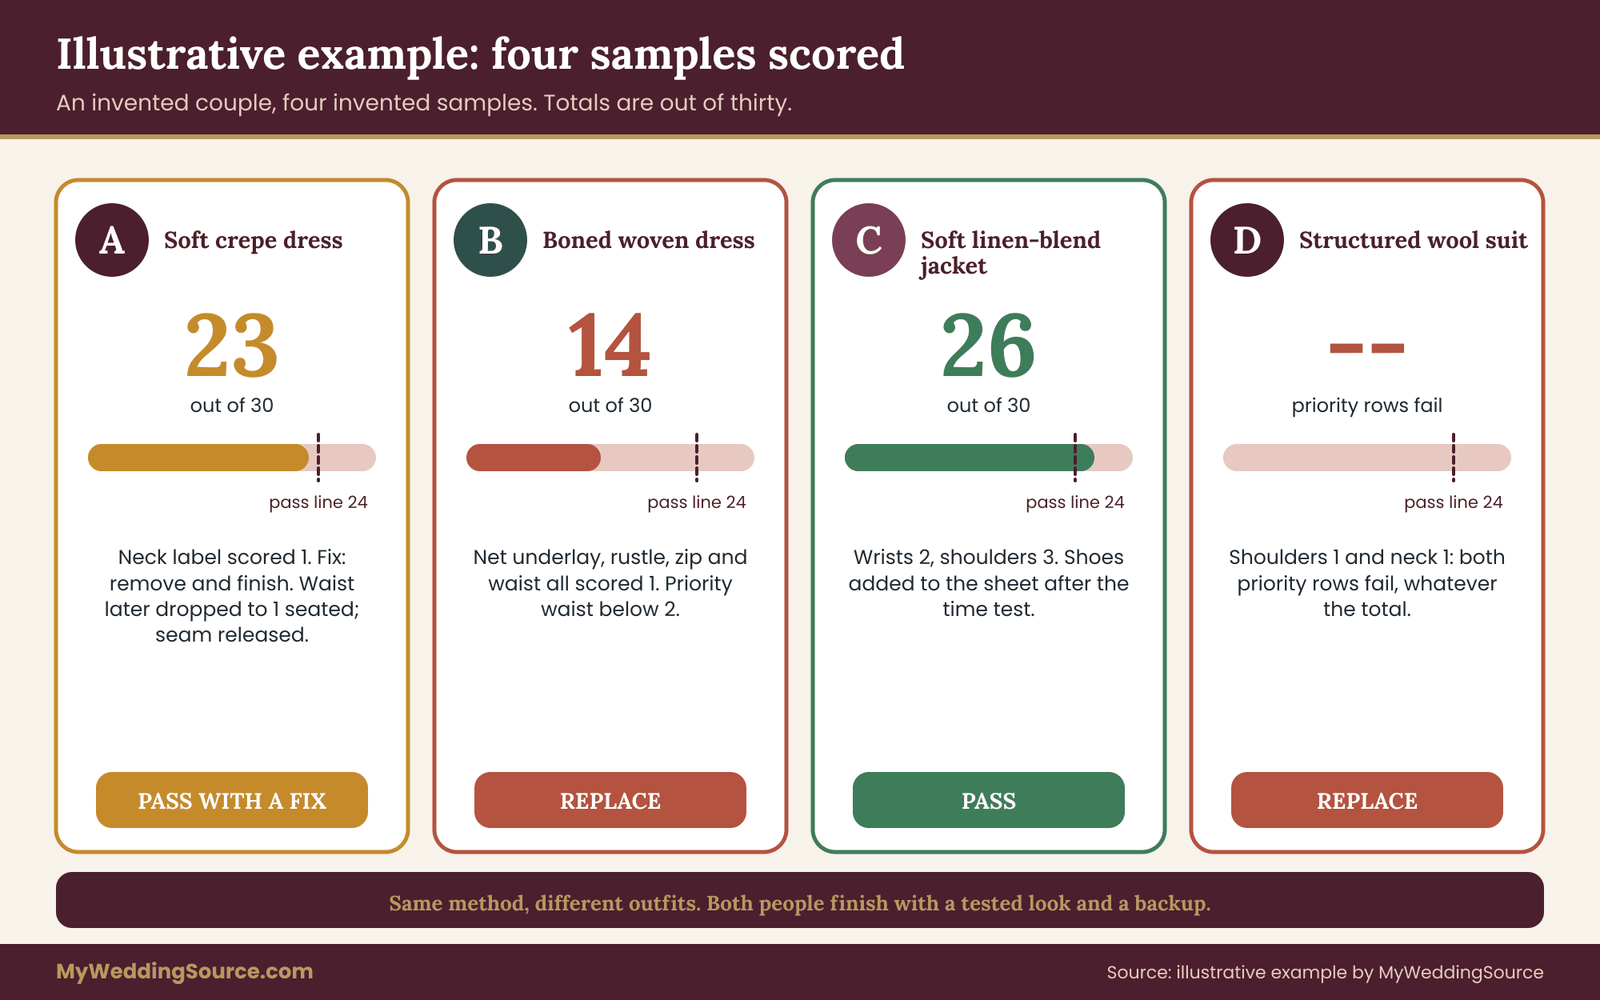
The example below is illustrative. The couple, the garments and the scores are invented to show how the sheet works, and they do not describe a real test or a real product. Use it as a pattern for your own sheet, not as evidence about any fabric.
Dana and Mateo are planning a late-afternoon wedding in a converted hall with no air conditioning, in early autumn. The ceremony runs thirty minutes, the seated dinner about ninety minutes, and dancing follows. Both dislike restrictive clothing, but for different reasons.
Dana’s priority zones are the neck and the waist. A high or stiff neckline makes her feel she cannot swallow comfortably, and she dislikes any waistband that leaves a mark. Mateo’s priority zones are the wrists and the shoulders. Cuffs and snug sleeves bother him, and a structured jacket across the shoulders feels like a weight pressing down. Neither has a formal diagnosis or wants one. They simply know what they cannot stand.
Step one: shortlist and sample
Dana likes a long, simple dress with a soft skirt. She orders swatches of two candidate fabrics and finds two ready-made dresses she can try on at home with a return window. Mateo is considering a lightweight suit and a soft, unstructured jacket with a casual look, and he has a favorite shirt he already wears often. Their sensory wedding attire search begins with a short list, not a shopping trip.
They number the samples. Dana’s options are A, a drapey crepe-type dress with an elastic-free skirt, and B, a woven dress with a boned bodice and a back zipper. Mateo’s options are C, an unstructured jacket in a cotton-linen blend with trousers, and D, a classic structured wool suit he can borrow.
Step two: the first pass, scored separately
Each fills in a sheet alone. Dana’s sheet for A and B reads like this in plain language. Separate scoring keeps each partner’s sensory wedding attire results honest.
For A, surface scores three on the forearm and two at the neck, because the neckline has a narrow bound edge she can feel. Lining scores three, since the dress is unlined and soft. Weight scores two. Stretch scores two, with little give but a loose cut. Seams score three, because they are French-finished.
Labels score one, because a stiff care label sits at the back of the neck. Closures score three, since it is a pull-on style with a side zipper. Heat scores two, sound three, and pressure and movement two. The total is twenty-three.
For B, surface scores two, lining one because of a scratchy net underlay, weight two, stretch one, seams two, labels two, closures one because the back zipper presses when seated, heat one, sound one because the stiff skirt rustles, and pressure one at the waist. The total is fourteen.
Under the rules, B is a replace. It has several ones, including the waist, which is a priority zone, and the total is far below twenty. A is a pass with a fix, because its total is twenty-three, but the neck label scores one in a priority zone. The fix is clear and cheap: remove the label and finish the spot.
Mateo’s sheet for C scores surface three, lining two, weight three, stretch two, seams two, labels three, closures three, heat three, sound three and pressure three at the shoulders but two at the wrists, because the cuffs are a little snug. His total is twenty-six, with a wrist score of two, so C passes. D, the wool suit, scores one at the shoulders and one at the neck from a scratchy collar. Priority-zone rows are below two, so it fails regardless of total.
Step three: fixes and a time test
Dana removes the care label from A, photographs it first, and finishes the spot with a few stitches over the raw edge. She retests row six and scores it a two, since a small ridge remains. She asks a tailor to add a soft strip of cotton over the area, then rescores to three. Fixes and time tests are where their sensory wedding attire choices get proven.
Both then run the two-hour test, wearing the full outfit with their chosen shoes. At thirty minutes, all scores hold. At one hour, Dana notes the waist drops from two to one while seated for the meal. At two hours it is still one, and a faint red mark has appeared. Mateo’s wrists hold at two, but his shoes, which he had not scored, have started to pinch. He adds a shoe row to the sheet.
Step four: respond to what the test showed
Dana’s waist problem is a fit and cut issue, not a fabric one. The dress has a fitted seam at the natural waist that presses when she sits. She asks a tailor whether the waist seam can be dropped or released, and whether an inset panel could add ease. The tailor suggests letting out the seam allowance and adding a soft panel.
It costs a modest amount and takes a couple of weeks. After the change, Dana repeats the seated test and scores the waist at two, holding steady at the two-hour mark. The response follows the cause, which is how sensory wedding attire problems get solved.
Mateo’s shoes are a separate issue. He tries a pair of soft leather loafers in a wider fit, scores them, and wears them at home for a week in short sessions. They pass. He decides to bring a spare pair of comfortable shoes to the reception, in case dancing makes the first pair tight.
Step five: the day-of plan
With scores recorded, Dana and Mateo write a one-page day-of plan. It lists what each will wear and in which order, who helps with dressing, what is packed in the backup bag, and what signals each uses if something becomes unbearable. Mateo’s backup is a soft shirt he already wears often. Dana’s backup is a looser second dress that passed the sheet at twenty-four, which she will change into after dinner if she chooses. The plan protects the sensory wedding attire they worked to choose.
The change itself has a small timing plan: a ten-minute window in a quiet room after the toasts, one helper and a bag labeled with her name. The core idea is simply to decide the details beforehand so that a change feels routine, not like a crisis.
What the example shows
Three things stand out. The sheet found problems that a mirror alone would not have found, such as the neck label and the waist drop at the seated meal. The priority-zone rule prevented Dana and Mateo from choosing a high-scoring option with a hidden failure in the place that mattered. And the stop rule saved them from investing in garments B and D, which could have been rescued only with significant changes. The pattern applies to any sensory wedding attire search.
The example also shows that two partners can follow the same method and reach different outfits. Dana’s and Mateo’s looks are not matched, but their experience of the day is similar: both are dressed in clothes they have tested and both have a backup.
When sensory wedding attire samples fail: alternatives that still work
Sometimes nothing passes. You test several options and each one falls short in a place that matters, or the one you love cannot be fixed. This section covers what to do next. The aim is to preserve the look you want where possible, and to protect comfort where it counts.
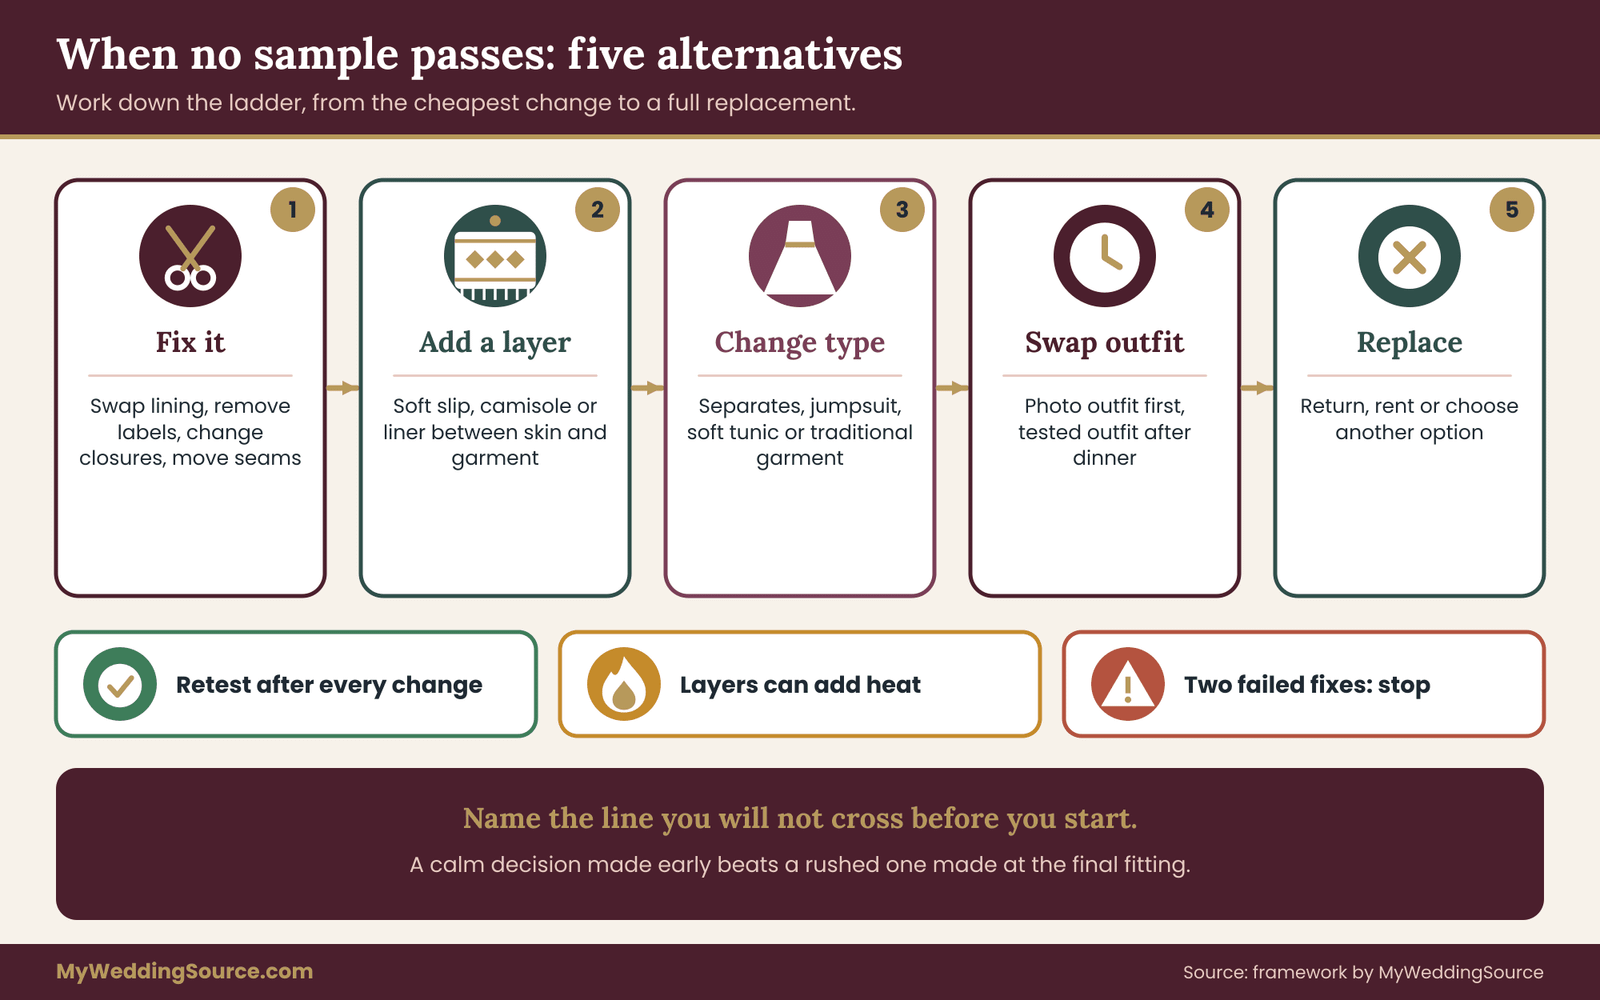
Fix the existing garment
The first alternative is to change the garment you already have. Most fixes fall into a small set. Fixing is usually the cheapest path for sensory wedding attire that almost passes.
Replace the lining. A tailor can often swap a coarse lining for a softer fabric. This addresses surface complaints inside jackets, skirts and trousers.
Remove or relocate labels and trims. Labels, inner tags and decorative hardware can often be removed or moved.
Modify closures. A zipper can become a side zipper, a hook can become a snap, a button waist can gain elastic extensions.
Reshape seams. Seams can sometimes be moved, bound, flattened or released.
Add ease. If the garment is simply too tight, letting out seams or adding panels can solve pressure problems, within the limits of the available fabric.
Not every garment can be changed. Fabric that was cut tightly has no extra allowance, and some constructions, such as boned bodices or tailored jackets, are hard to alter without changing the look. A tailor will say so, and you should believe them.
Add a layer between you and the garment
A second option is to leave the garment alone and change what touches you. A soft slip, a cotton camisole, a smooth undershirt or a thin base layer can create a barrier between skin and a scratchy lining or seam. Look for seamless or flat-seam styles, and test the base layer on its own, since it is now a part of the outfit. Layering is a practical tool for sensory wedding attire when fixes run out.
Layering can raise heat, so check row eight again after adding a layer. It can also change fit, so recheck pressure. A layer that solves a contact problem and creates a pressure problem is a trade, not a fix.
For hosiery, soft liners or sock liners can help with shoes. For necklines, a soft scarf or a lightweight collar piece can protect the skin from a stiff edge, as long as it matches the look of the outfit.
Change the garment type
When the problem is built into the garment, change the garment. The couple who loves a boned gown may find that a two-piece set, a jumpsuit or a soft-structured gown gives a similar silhouette with less pressure. Someone who dreads a tailored suit may find a soft separates set, a tunic, a long shirt-jacket or a traditional garment from their own culture more comfortable and just as formal. Changing type is often the cleanest answer when sensory wedding attire cannot be fixed.
Dress codes matter less than people fear. If you set the tone as the couple, guests will take their cues from you. The wedding etiquette guide explains how couples set expectations about attire, and a clear statement on the invitation or the website can handle most questions.
Plan an outfit swap
A third approach is to wear the most photographable outfit for a limited stretch, such as the ceremony and formal portraits, then change into something you have tested thoroughly. Many couples already plan a second outfit for the reception for practical reasons, such as dancing. Framing it as a sensory plan makes it a deliberate choice rather than a compromise. A swap lets you keep the look and still protect sensory wedding attire comfort.
Plan the swap carefully. Decide when it happens, where, who helps and how long it takes. Pack the second outfit and a bag for the first. Consider what happens in photographs, since the two outfits should look good together in group shots taken near the change.
If an outfit swap is not possible, a simpler version is a layer change, such as taking off a jacket, a veil, a wrap or a petticoat after the ceremony, leaving a lighter base outfit that passed the sheet.
Choose ready-made with a generous return window
Custom garments are hard to return, and they are the most common source of regret. If you are uncertain, choose ready-made garments from a seller with a clear return policy and test them at home within the window. The Consumer Financial Protection Bureau and the Federal Trade Commission publish general consumer guidance on purchases and disputes, and the seller’s own policy sets the actual terms. Read them before paying, and keep records of the order, the delivery and any messages. Return windows give sensory wedding attire testing a safety net.
Pre-owned and rented options can also work. They may have been softened by use and washing, and rental shops often stock a range of cuts. A pre-owned garment can be tested before purchase if the seller allows local pickup. For rentals, ask about alterations and whether a try-on is possible before the day.
Custom made-to-measure with written specifications
If you commission a custom garment, put your requirements in writing before you pay. List the fabric by name and fiber content, the lining, the seam finishes, the label approach, the closures and the priority zones. Ask for a swatch of the exact fabric and lining before cutting, and ask for a fitting stage where you can test and still request changes.
The wedding vendor timeline can help you place custom orders and fittings early enough in the schedule that you have room to fail a test and start again. Written specifications are how sensory wedding attire gets built correctly the first time.
Be clear about who approves what and when. A written approval step for the sample, the first fitting and the final garment gives you the chance to catch problems while a fix is still possible.
Know what you are willing to trade
Every option involves trade-offs, and writing them down helps. You may accept a slightly heavier garment for the ceremony because you will change after. You may accept a plainer look in exchange for a better score. You may accept a higher cost for a custom fix. You may not accept any option that fails your priority zones. Trade-offs are normal in sensory wedding attire, as long as you choose them on purpose.
Name the line you will not cross before you start. If you write it down, you are less likely to talk yourself across it when time and money are short. A calm decision made early, with the sheet in hand, is a better guide than a rushed decision made at the final fitting. ## One look, two bodies: planning sensory wedding attire as a couple
Most advice about wedding clothing assumes that one person is the focus and the other is background. In a couple where both people dislike restrictive clothing, or where only one does, the planning has a different shape. You are building two outfits that need to coexist in photographs and in the room, while serving two different bodies and two different priority lists.
Differences are normal
Partners rarely share the same sensory profile. One may dislike tight waistbands and tolerate scratchy textures. The other may handle snug clothing well and find tags unbearable. A common trap is to assume that what works for one will work for both, or that the more sensitive partner sets the standard for both. Neither assumption holds. Each person scores their own sheet and is the authority on their own results. Different results are expected when two people test sensory wedding attire.
When needs differ, say so plainly and without apology. “My waist is the problem, yours is the neck” is a useful sentence, and it makes the planning easier. It also guards against the quiet resentment that appears when one person’s needs are treated as the problem and the other’s as the default.
Matching the look without matching the fabric
You can create visual unity with color, formality, silhouette and a few shared details, without using the same fabric or construction. Two outfits in the same color family can use entirely different materials. A soft knit suit and a woven dress can both be the same warm ivory. A shared accent, such as a flower, a pocket square or a trim, ties the look together. Visual unity does not require identical sensory wedding attire.
For a couple who both want loose clothing, a shared silhouette might be flowing, with long lines and relaxed fits, in different cuts. Photographers and videographers can work with that, and a clear conversation about the look beforehand removes any surprise.
Deciding together without pressure
Decisions about clothing can bring in strong feelings, since appearance, family expectations and personal comfort all collide. The guide on wedding decision rights explains how couples can share input with family and friends without losing control of choices that belong to them. The same principle applies here: the people who wear the clothes make the final call on what touches their skin. Each person owns the final call on their own sensory wedding attire.
Settle on a few agreements before you start. Each person decides their own pass line. Neither partner pushes the other to accept a lower score. Opinions from outside the couple are heard but not binding. A good agreement is short enough to remember.
Helping family and the wedding party
Family members and the wedding party often ask what to wear, and some have their own sensory needs. If your wedding party outfits are coordinated, apply the same sheet logic in a lighter form. Share a short list of acceptable options and let people choose within it. Offering a choice of fabrics, necklines or cuts reduces the chance that someone suffers quietly in an outfit they chose to please you. Guests can benefit from the same thinking about sensory wedding attire.
If a close family member has needs of their own, a private conversation is better than a group message. Ask what would make it easy, and let them decide.
Shared fittings and shared rehearsals
If possible, schedule fittings and rehearsals at the same time, so you can see each other’s outfits together and run the time tests side by side. Seeing the pair together early helps catch visual issues, such as a mismatch in formality, while fixes are still cheap. It also gives each of you a chance to support the other through a test that can be tiring. Seeing both people’s sensory wedding attire side by side catches clashes early.
During rehearsals, practice any moments that involve both outfits: standing together for photographs, the first embrace, a first dance, a recessional. Notice whether one person’s clothing restricts the other’s movement, such as a stiff skirt that keeps a partner at arm’s length or a jacket that stops a hug.
Talking with tailors, shops and vendors about sensory wedding attire
Clear requests save time. Many tailors and shop staff are used to fit requests, but sensory requests may be new to them, and a vague one such as “make it comfortable” does not give them anything to act on. The sheet gives you specific language.
What to say, and what you do not have to say
You can explain as little or as much as you like. A request framed around the garment is enough: “I need the inside seams flat, no stiff labels, and a waistband that stays comfortable seated.” You do not have to disclose a diagnosis, a history or a reason. If you choose to give context, one sentence is plenty: “I’m sensitive to scratchy fabrics and tight closures, so I’m testing everything for long wear.” You can ask for sensory wedding attire changes without sharing any personal history.
If a staff member pushes back, such as saying that a garment “will stretch” or “everyone feels that way at first,” restate the request calmly: “I’d like to test it for two hours before I decide.” A reasonable seller will accommodate a try-on or a return window. If they will not, that is information about whether to buy there.
Some businesses are covered by accessibility laws that govern how they serve customers with disabilities. The U.S. Department of Justice publishes information about the Americans with Disabilities Act at ada.gov, and the specific obligations depend on the business and the situation. You do not need to cite the law to ask for reasonable help, and most conversations never get that far.
A short script for a fitting appointment
Before the appointment, send a short note listing your requests. During the appointment, bring your sheet and refer to it. Here is a sample you can adapt. A prepared script keeps sensory wedding attire requests short and clear.
“Before we start, I need to test how things feel for a long day. Could we check the seams and labels inside, and could I sit and move in each option? I’ll also want to wear my choice for a couple of hours before finalizing.”
If you are working with a tailor, add specifics: which seams, which zones, what you tried. “The left shoulder seam scored one. Can it be moved back or bound with a soft strip?” gives the tailor a task.
Asking about return and alteration terms
Before you pay for any garment, ask about the return policy, the alteration policy and the deadlines. Custom, made-to-order and sale items are often final. Alterations may be included, charged separately or limited in scope. Some shops will not alter a garment bought elsewhere, and some will not remove labels from garments they sell. Write down what they say, with the date and the name of the person who said it, or ask for it in an email. Terms decide how much risk your sensory wedding attire purchase carries.
The Federal Trade Commission explains general consumer rights around returns and advertising, and the seller’s written terms control the specific answer. If a seller describes a garment as “stretch,” “soft” or “breathable,” treat those words as claims to test, not as results.
Working with a made-to-measure maker
Custom makers can build sensory preferences in from the start, which is an advantage. Send the maker a short specification: fiber content preferences, lining, seam finish, label approach, closure type and priority zones. Ask for fabric samples, and use the sheet on them. Ask how many fittings are included and whether a revision to a seam or closure after the first fitting is covered. A good maker can build sensory wedding attire around your sheet.
Ask what happens if the finished garment fails your test. Some makers will adjust, some will remake and some treat the work as final once approved. Knowing this before you pay changes how much risk you take.
Telling the photographer, planner and venue
You do not need to tell everyone about your clothing, but a few people benefit from a short heads-up. A photographer may need to know you will take breaks, that some poses may be limited by comfort, or that you may change outfits. A planner or coordinator can protect time for a change, hold a quiet room and keep the day on schedule. A venue contact can tell you about temperature and about a space for changing. These few notes support your sensory wedding attire plan on the day.
A one-sentence note is enough: “We have planned an outfit change after dinner and may need a quiet room for ten minutes.” The accessories guide linked earlier also covers backup items, and the same backup-bag approach used for shoes and wraps works for clothing.
Making the backup bag
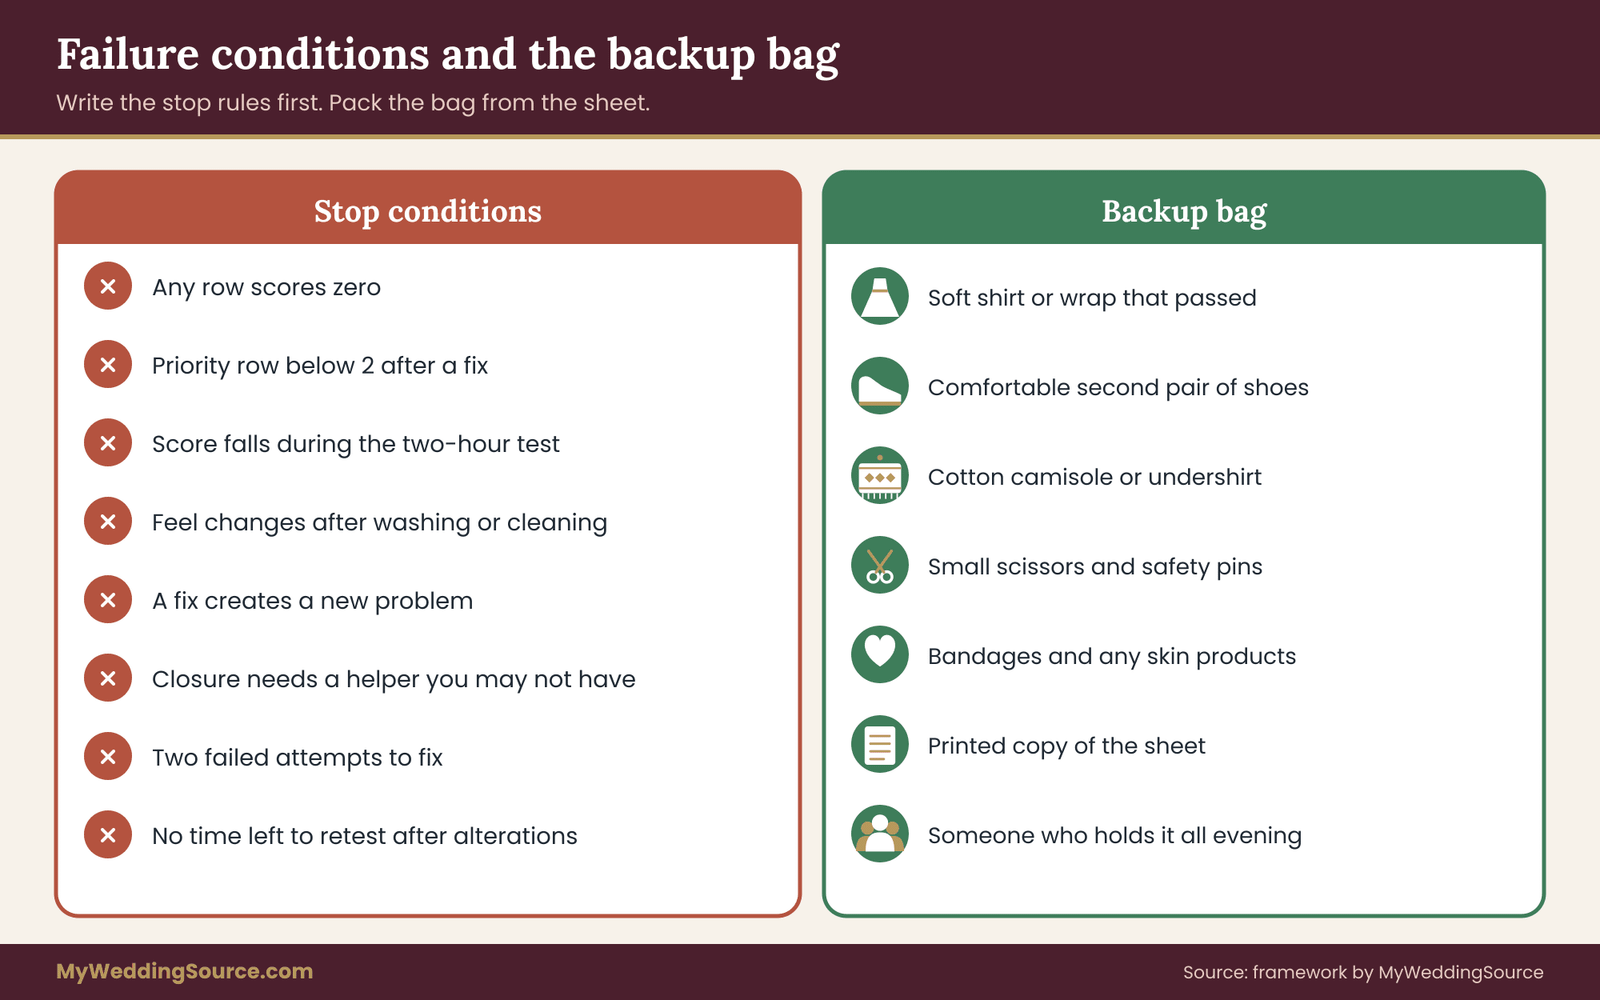
Pack a small bag for the day with items from your sheet: a spare soft shirt or wrap, a pair of comfortable shoes, a cotton camisole or undershirt, small scissors for a surprise label, a few safety pins, adhesive bandages for blisters and a small kit for any skin products you rely on.
Add a copy of the sheet, so a helper can read what you need. Put the bag in the hands of someone who will be at the reception for the whole evening and knows where to find you. The bag is your insurance for sensory wedding attire surprises.
Failure conditions and the day-of plan for sensory wedding attire
A test is only useful if it can fail. Before you buy, set the conditions under which an option is out, and write them on the sheet. Failure conditions turn a vague worry into a decision you made in advance.
Conditions that mean stop
Use the following as a starting list and edit it. Writing stop rules early protects sensory wedding attire decisions from late-stage pressure.
A zero on any row. If any quality of a garment is intolerable, the option is out.
A priority-zone row below two after a fix. The zone you named matters most, and a low score there means the option is out, however good the rest.
A score that falls during the two-hour test. A steady decline signals trouble on the day. If the fall is one point and the fix is clear, retest. If the fall is two points or the cause is unclear, replace.
A change after washing or cleaning. If a garment changes feel after laundering, and the final care routine is the one you tested, believe the second score.
A fix that creates a new problem. If shortening a lining adds a seam on a priority zone, or loosening a waist changes the neckline, count the new problem.
A problem that needs a helper you may not have. A closure that cannot be managed alone is a risk if you cannot guarantee help.
Two failed attempts to fix. Stop and choose something else.
A deadline that leaves no room to retest. An alteration finished two days before the wedding cannot be tested, so be careful about last-minute changes.
What to do if something fails late
Even with testing, things go wrong. A zipper breaks, an alteration comes back with a problem, a fabric reacts to humidity. The best protection is a backup option that has already passed the sheet. If you are inside the final two weeks and the main outfit fails, switch to the backup and enjoy the day. A garment that passed at twenty-four is better than a beautiful one that did not pass. A tested backup is the best answer when sensory wedding attire fails close to the date.
If you have no backup, simplify. Remove a layer, replace a closure, wear your own soft shirt under a jacket or choose a looser style. A simpler outfit that you can wear comfortably beats an elaborate one that you cannot.
The day-of plan
On the day, a short written plan reduces stress. It should fit on one page and cover five things. The plan keeps sensory wedding attire details from landing on one person’s memory.
Order of dressing. Who dresses first, how long it takes and where. Allow extra time. A rushed dress-up is the most common reason a carefully tested outfit still goes wrong.
Helpers. Who is on call for closures, steaming or repair, and how they can be reached.
Backup bag. What is in it, who holds it and where it is.
Signals. A simple code you and your partner use if something becomes unbearable, such as a phrase or a touch on the arm. This makes it possible to step out or change without a conversation.
The change window. When and where the outfit swap or layer change happens, if planned.
Share the plan with the few people who need it. Keep it light. The purpose is to make a hard moment easy.
After the wedding
Keep the sheet. It holds information that helps again, for an anniversary, a second event or a future formal occasion. Garments that passed can be kept for reuse, and the sheet tells you why. If you plan to resell, rent out or donate a garment, a short note on fabric and construction helps the next wearer. For records of purchases, receipts and return terms, the guide to organizing wedding records after the event explains how to keep them. The sheet remains useful for sensory wedding attire on future occasions.
Keeping perspective
Planning for sensory wedding attire can sound like a heavy task, and the method has several steps. In practice it takes a few evenings and a modest budget, and it produces something useful: two people dressed in clothes they chose on purpose. Most of the work lies in being honest about what you feel and in giving yourselves permission to follow the results.
Your next steps
Start this week with three small tasks. First, each of you writes your short list of priority zones and triggers, separately. Second, print or copy the ten rows of the touch trial sheet and set your pass line before you shop. Third, gather three to five samples or try-at-home garments each, and run the first pass with touch and wear.
Then work in order. Score, fix, run the twenty-minute test, run the two-hour test, and rehearse the final outfit with every layer. Choose a backup that has passed, and write a one-page day-of plan. Place the dates on your calendar, leaving room for a second round if something fails. If you want help with fit, the dress fit and alterations guide covers fittings, and the accessories planning guide covers the extras.
Sensory wedding attire does not need to be a compromise. With a sheet, a pass line and a plan for failure, you can choose clothing that looks the way you want and feels fine for the whole day.
FAQ
Do we need a diagnosis to plan sensory wedding attire?
No. The touch trial sheet works for anyone who dislikes restrictive clothing, whatever the reason. You do not need to explain or label your needs to use it, or to ask a tailor or shop for specific changes. If you have a medical question about skin, pain or sensory processing, a qualified clinician such as an occupational therapist can advise on your situation.
How early should we start testing outfits?
As early as you can, ideally before any non-refundable deposit or custom order. Swatches and try-at-home garments can be tested months ahead, and fittings and alterations often take weeks. Leaving room for a second round of testing means a failed option costs you time, not panic. Check seller timelines and return terms for each purchase.
What if our wedding has a strict dress code or tradition?
Many traditional and formal garments can be adapted, with softer linings, different closures, flat seams or a looser cut. Talk with the tailor, the family or the officiant about what is essential and what is flexible. If part of an outfit is fixed, concentrate your testing and fixes on the parts that touch your skin, which are often hidden.
Can we use the sheet for rented or borrowed outfits?
Yes, with limits. Test the garment on, run a wear-time test if the lender or shop allows, and ask before removing labels or altering anything. Rental shops often forbid alterations, so a covered label or a soft base layer may be the only fix. If the rental fails your sheet and cannot be adjusted, choose a different one.
Is a higher score always better?
Not quite. The total helps compare options, but the pass rules matter more. A garment with a high total and a zero, or a low score in a priority zone, still fails. A garment that scores a bit lower overall but passes every priority zone and holds steady in the time test is the better choice.
What if we disagree about what is comfortable?
Each person’s sheet is their own. Compare results after scoring separately, and accept that partners often differ. You can match color and style without matching fabric or construction. If a family member or vendor disagrees, remember that the person wearing the clothing decides what is tolerable.
Should we plan a second outfit?
It is a sensible backup, and many couples already plan one for dancing or heat. Pick one that has passed the sheet, rehearse the change, and decide who helps and where it happens. A simpler version is removing a layer, such as a jacket, veil or petticoat, after the ceremony.
What do we do if something fails close to the wedding?
Switch to the backup that passed the sheet. If there is no backup, simplify: remove a layer, wear a soft shirt or garment you already tolerate, change a closure or choose a looser style. Contact the tailor or shop straight away about repair options. Plan for a spare outfit earlier next time, and keep the sheet for future occasions.
Sources
- Americans with Disabilities Act, U.S. Department of Justice
- Autism spectrum disorder, Centers for Disease Control and Prevention
- Occupational therapy and sensory processing, American Occupational Therapy Association
- Mental health information, National Institute of Mental Health
- Business guidance on textile and clothing labeling, Federal Trade Commission
- Clothing and textile safety, U.S. Consumer Product Safety Commission
- Sensory and workplace accommodation information, Job Accommodation Network
- Consumer complaints and purchase guidance, Consumer Financial Protection Bureau
- Consumer protection information, USAGov
- Health information from the National Institutes of Health