
A wedding gown redesign turns a dress that belonged to your family into one that fits you, and the safest version of that project is written down before anyone picks up scissors. This guide gives you a preservation-first alteration agreement checklist: how to define the story, rank the changes by how reversible they are, vet the person doing the work, and put the limits in a contract you can actually use.
Before a wedding gown redesign begins, write a short story ledger (who wore the gown, what is original, what the family cares about most). Rank every proposed change on a reversibility ladder, from no change at all to permanent cutting. Have a qualified person assess the fabric before you promise a design. Then sign an alteration agreement that names what may be cut, what must be kept, how pieces are labeled and returned, and who pays if the fabric fails.
An heirloom gown is not a normal purchase. It has no return policy, no replacement size, and often no way to be copied if something goes wrong. A mother’s silk crepe from the 1980s, a grandmother’s satin with a hand-sewn hem, a great-aunt’s lace collar: each one carries both a material problem (old fabric behaves differently from new) and an emotional one (relatives will notice what changed). Most regret after a wedding gown redesign comes from the second problem getting no attention until the first has already been solved with a pair of shears.
A wedding gown redesign done this way is deliberately slow at the start and quick at the end. The slow part is the thinking and the paperwork. The quick part, once the agreement exists, is the sewing, because a seamstress who knows exactly what she may and may not do can work with confidence, and a wedding gown redesign with clear limits is calmer for everyone involved.
A note on scope. This is general information, not legal, tax or financial advice, and the right choices depend on your gown, your family and the professionals you hire.
What a wedding gown redesign should and should not change
People use the phrase wedding gown redesign for very different jobs. Some want a hem raised. Some want sleeves added, a neckline lowered, a train removed, a skirt split into a separate top and skirt, or the whole gown taken apart and rebuilt as a different silhouette. These are not the same size of decision, and treating them as one project is how heirlooms get damaged.
A useful way to separate them is to ask what the gown will look like to the next person who holds it. If a daughter, a niece or a museum volunteer opened the box in fifty years, could they still tell what the dress was in the year it was first worn? If yes, the change is a respectful one. If no, you have made a new dress out of old materials, and that may still be the right choice, but it should be a deliberate one and not an accident of momentum.
Three kinds of change
Fit changes. These adjust the gown to your body without changing its design: taking in a side seam, adjusting a strap, moving a closure, shortening a hem with a deep fold-up. A good fit change leaves most of the fabric in place.
Style changes. These alter how the gown looks while keeping most of its parts: adding sleeves, changing a neckline, adding a bustle, covering a closure, removing a bow. Style changes begin to touch original seams and surfaces.
Structural changes. These rebuild the gown: cutting a train away, splitting a skirt, dyeing, replacing a bodice, or taking the dress apart to reuse the fabric in another form. Structural changes are usually permanent, and they are where a wedding gown redesign stops being an alteration and becomes a remake.
Nothing about this ranking says a structural wedding gown redesign is wrong. A gown that has been in a cedar chest for forty years and is too small for any living relative may be best honored by a remake. The point is to choose the level of change knowingly, and to choose it before you meet the person who will do the sewing.
What the story is made of
The words “without destroying its story” in a wedding gown redesign are easy to say and hard to apply. Stories live in specific places on a dress. A mother’s hem may carry a repair she made the night before her own wedding. A button loop may have been replaced by a grandmother who disliked the original. A small stain near the waist may be what a family remembers about a toast that went wrong. Some of these details are beautiful, some are plain damage, and the family is the only authority on which is which.
That is why the first deliverable of a wedding gown redesign is not a sketch. It is a record, which the next section calls the story ledger.
Write the story ledger before anyone cuts
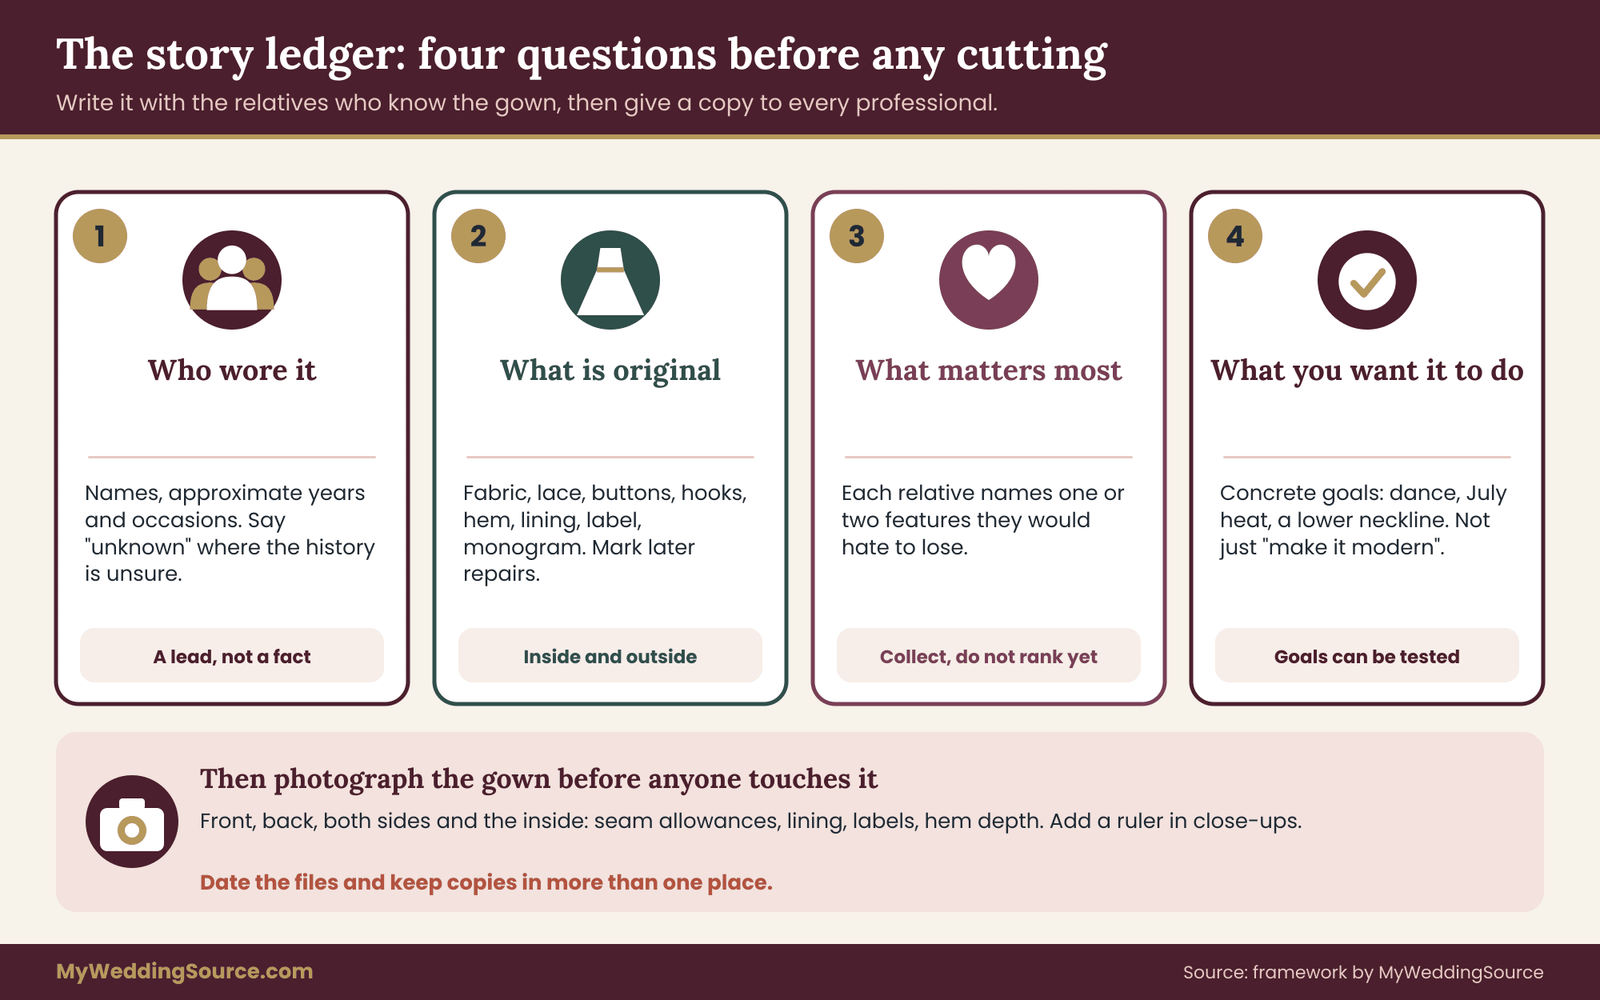
A story ledger is a one- or two-page document, written in ordinary language, that answers four questions about the gown. You write it yourself for your own wedding gown redesign, ideally with the relatives who know the history, and you hand a copy to every professional who touches the dress. It takes an evening or two, and it changes the quality of every later conversation.
Who wore it, and when. Names, approximate years, and the occasions if you know them. If the history is uncertain, say so plainly. “We believe this was worn in a 1970s wedding by my mother’s cousin, but nobody is sure” is more useful than a confident guess, because a professional will treat it as a lead to check and not as a fact.
What is original. Walk around the gown and list the parts that appear to be original to its first wearing: fabric, lace, buttons, hooks, beading, hem, lining, label, any monogram or embroidery. Mark anything you know was added or repaired later. When you cannot tell, write “unknown.” A conservator or experienced bridal seamstress can help refine this list, but start with what the family can see and remember.
What the family cares about most. This is the heart of the ledger. Ask each relative who will be affected to name one or two features they would be sad to lose. It might be the sleeves, the buttons down the back, the lace on the hem, the way the skirt moves. Do not try to rank these yet. Just collect them.
What you want the gown to do. Be concrete. Not “make it modern,” but “I want to be able to dance, I want to wear it at a ceremony in July, and I would like the neckline to sit lower.” Specific goals can be tested against specific changes. Vague goals produce open-ended work.
Photograph before you do anything else
Before the first appointment, photograph the gown in even light, front, back, both sides, and in close-up for each detail you listed. Include the inside: seam allowances, lining, labels, hem depth, and any internal stays or boning. Put a ruler or tape measure in a few shots so that scale is clear. Date the files and store them in more than one place.
These photographs do two jobs. They are the baseline against which any later damage or disagreement is measured, and they are the record of the gown as it was, which the family may value more than any finished design. If you are also tracking contracts and receipts for the rest of the wedding, the same folder logic applies, and the wedding vendor contract guide on this site explains what to look for in any agreement before you sign it.
Decide who has a say, and how much
Every wedding gown redesign of a family dress comes with relatives. A mother may feel strongly that the original sleeves stay. A sister who also hopes to wear the gown someday may prefer that nothing permanent happen. A grandmother who is still living may be happiest when she sees the gown worn exactly as she remembers it.
You do not owe everyone a vote, and you also should not ignore anyone whose opinion will shape how the family feels afterward. A simple approach is to sort relatives into three groups: the person who owns the gown, people who must agree before anything permanent happens, and people who should simply be told what you plan and why. If the family is large, the wedding decision-making guide describes how to share input without losing control of the final call. Whatever you decide, write it into the ledger so there is no later debate about what was agreed.
The ledger as a protection for the professional too
A well-made ledger helps the person you hire for the wedding gown redesign as much as it helps you. A seamstress who has never seen the gown cannot know that the buttons were sewn on by a great-grandmother, or that your aunt would prefer the hem be taken up from the inside and not cut. Giving her the ledger in advance lets her quote the work sensibly, ask better questions, and tell you honestly when something you want is not safe for the fabric.
Keep the ledger short enough that it will actually be read. One page that names the gown, the original features, the two or three things the family wants kept, and the goals for the day is better than eight pages that nobody opens. ## The reversibility ladder for a wedding gown redesign
Once the story ledger exists, you can rank possible changes by one simple question: how easily could this be undone? That ranking, which this guide calls the reversibility ladder, is the most useful decision tool in any wedding gown redesign, because it turns a fuzzy worry about “ruining” the dress into a list of specific steps with specific consequences.
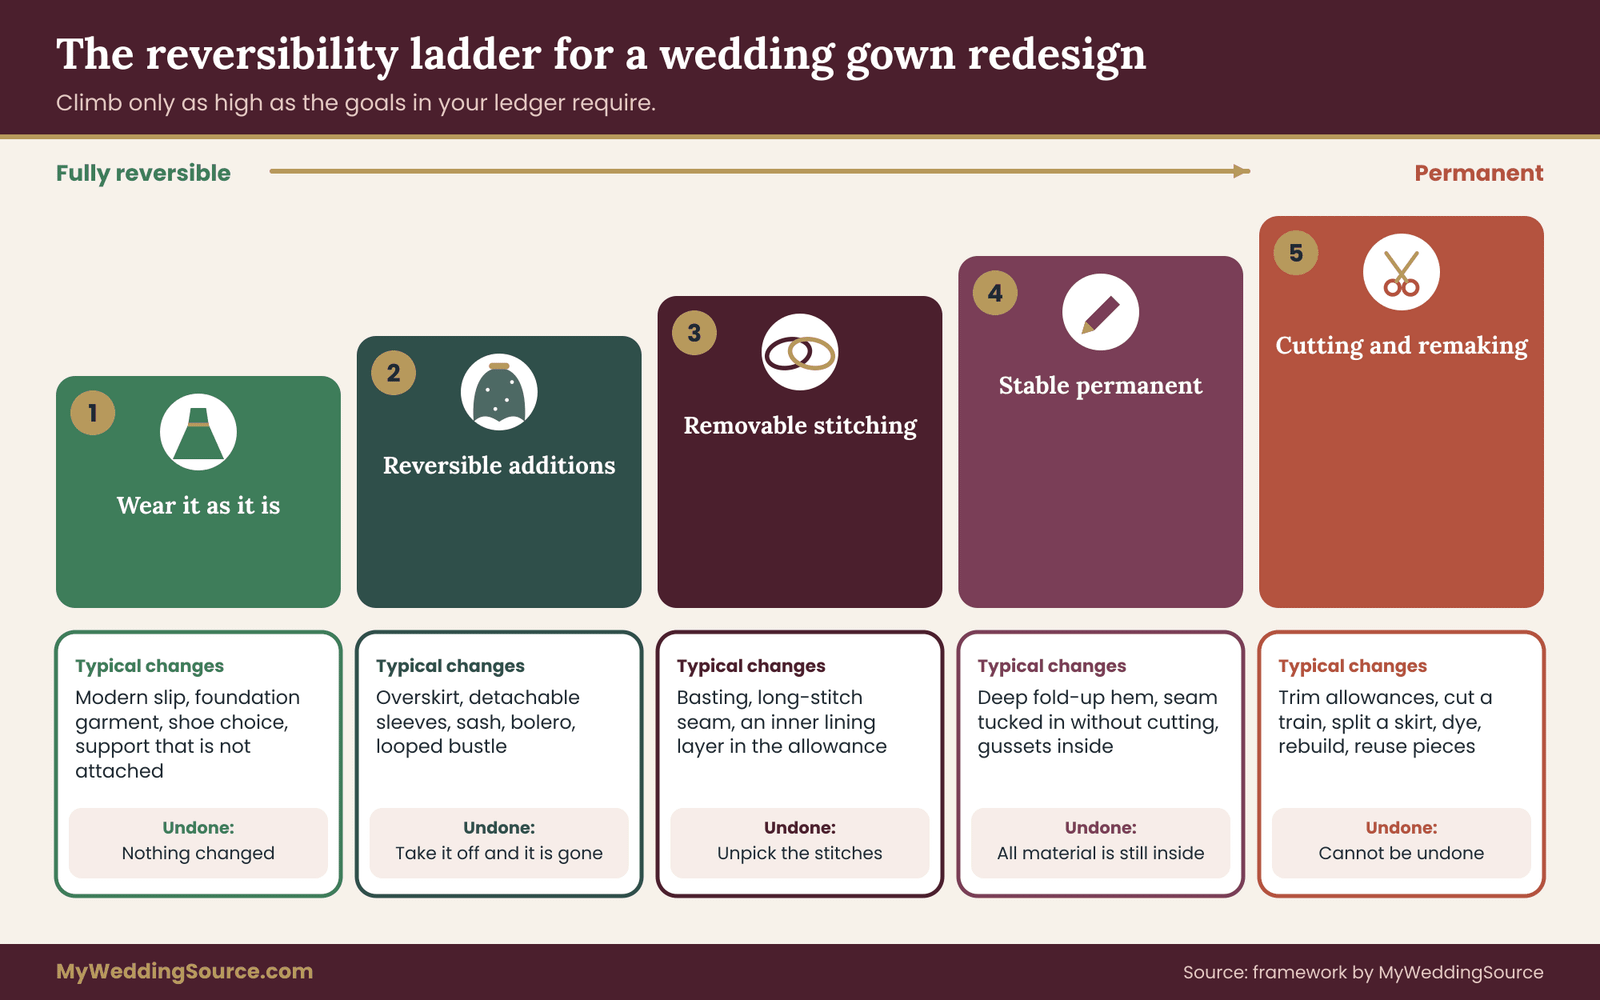
The ladder for a wedding gown redesign has five rungs. Lower rungs can be reversed without leaving a trace. Higher rungs cannot. A responsible wedding gown redesign climbs only as high as the goals in your ledger require.
Rung one: wear it as it is
No change at all. The gown is worn, supported with undergarments or a modern slip, and perhaps pinned with temporary safety measures. This rung is more capable than people expect. A gown that is slightly large can sometimes be worn over a structured foundation. A gown that is slightly short can be paired with different shoes. A gown with a fragile closure can be closed with a discreet overlay panel that is not attached to the fabric.
Rung one is also the right answer to a wedding gown redesign request when the fabric is too fragile to handle. If a professional tells you the silk is shattering along the fold lines, the kindest design may be a photograph, a framed detail, and a different dress for the day.
Rung two: reversible additions
Anything attached in a way that can be removed without leaving a mark. Examples include a separate overskirt that ties at the waist, a detachable sleeve or capelet that clips or hooks to existing stitching points, a sash, a belt, a bolero worn over the gown, a separate veil, or a modern bustle held by loops that are not sewn through the original fabric.
The key test is the word “separate.” If the new piece can be taken off, folded and stored in a box without changing the original gown at all, it sits on rung two. Many couples find that a thoughtful rung-two plan solves most of what they wanted from a wedding gown redesign: a more modern neckline from an overlay, sleeves from a detachable pair, a shorter train from a looped bustle.
Rung three: removable stitching
Temporary stitching that is meant to be removed later, such as basting a new hem fold in place without cutting, taking in a seam with a long stitch that can be unpicked, or sewing a new lining layer into an inner seam allowance. These changes touch the gown but leave all the original fabric intact.
Rung three is where the details of the wedding gown redesign agreement start to matter. A seamstress who says she will “just baste it” needs to specify the thread, the stitch length, where the needle will go through the fabric, and how a future restorer would find and remove the stitches. Fragile fabrics can be marked by needle holes even when no thread remains, so the agreement should also say whether the fabric has been judged strong enough for needle work at all.
Rung four: stable permanent changes
Changes that alter original fabric or seams but leave all the material in place. Examples include taking in a seam without cutting the extra away, folding up a hem without cutting it, adding fabric gussets inside the seam allowance, or tucking and then stitching extra length inside an existing fold. In principle a future restorer could reopen these changes, because the extra fabric is still there, folded inside.
This is the highest rung many family heirlooms can safely reach in a wedding gown redesign. It lets the gown fit a new body while preserving enough material that another person could someday put it back. The agreement for a rung-four job should state clearly that no fabric is to be trimmed, and that every folded allowance is to be left in the garment.
Rung five: cutting and remaking
Trimming seam allowances, cutting away a train, splitting a skirt, dyeing the gown, replacing a bodice, adding new fabric panels sewn into the old, or taking the gown apart to reuse pieces in another design. Once material has been removed or chemically changed, the gown cannot be returned to its earlier state.
Rung five is not forbidden in a wedding gown redesign. It is simply the rung where the preservation-first approach asks for the most care. At this level the agreement should say what happens to every removed piece. Cut-off fabric, lace, buttons and trims can become something else: a handkerchief, a ring pillow, a veil edge, a christening gown, a framed piece. Keeping the removed material labeled and returned is both a practical safeguard and a statement about respect.
How to use the ladder in a conversation
Bring the ladder into the first meeting with any professional you consider for the wedding gown redesign. Show your list of goals and ask a plain question: “Which rung is needed for each of these?” A good answer usually sounds like this: “The neckline can be done with a rung-two overlay. The waist needs a rung-four seam adjustment. I would not recommend cutting the train, but if you want it removed, here is what I would save.”
Notice what that answer does. It ties each goal to a rung, it names a reversible option where one exists, and it flags the one place where the project steps up the ladder. If a professional skips straight to the highest rung without describing the lower ones, ask why. Sometimes the answer is a good one, such as a gown with fabric so brittle that no needle work is safe. Sometimes it is simply the way the shop usually works.
A short test for each proposed change
For any change that is proposed, ask four things.
First, can it be undone without leaving a mark? If so, it belongs on rung two or lower. Second, if it cannot be undone completely, is all the original material still inside the gown? If so, it is rung four at most. Third, if material will be removed, where will it go? Fourth, does the change serve one of the goals written in the ledger, or is it a flourish added because it was suggested?
Changes that fail the fourth question are the most common source of regret. A designer may suggest removing a lace trim because it looks dated, but if your aunt wrote “the lace on the hem” in the ledger, that suggestion fails its test. Having the ledger in hand makes it easy to decline without an argument.
What the ladder does not decide
The ladder ranks reversibility. It does not rank beauty, cost, or the quality of the finished dress, and a lower rung is not always a better outcome. A gown that is permanently remade by a skilled person can look better, fit better and last longer than one held together with reversible clips. Family history also matters in the other direction. A gown that has already been altered several times by earlier relatives may have little original material left to protect.
What the ladder gives you is a way to make the tradeoffs in a wedding gown redesign visible. A project that climbs to rung five because the gown is beyond saving is very different from one that climbs there because nobody asked about alternatives, and the agreement should show which of the two you chose.
Matching goals to rungs
Here is how common wedding gown redesign goals tend to map onto the ladder. These are general patterns, not rules, and a professional who has handled your fabric may see exceptions.
A request to make a gown more comfortable in warm weather often begins on rung one or two, with a modern slip or a detachable layer, before anyone considers changing the fabric. A request for sleeves is often a rung-two job with detachable sleeves that attach at existing stitching points. A hem that is too long can usually be handled at rung four with a deep fold, and the wedding dress fit and alterations guide explains how hem length interacts with shoes and movement. A request to change the whole silhouette is almost always a rung-five job.
Writing the rung next to each goal in your ledger turns a list of wishes into a wedding gown redesign plan that a professional can price and a family can approve. ## Reading the fabric: condition checks that decide what is possible
A wedding gown redesign is limited by the weakest part of the gown, not the strongest. Silk that looks fine on a hanger can split along a fold the first time it is pinned. Lace that seems sturdy can pull apart at the ground when it is gently lifted. Before you settle on any rung of the ladder for a wedding gown redesign, you need an honest reading of the material, and you should treat that reading as information gathered, not a verdict about the dress.
This section covers what you can check yourself in an afternoon and what is better left to a professional. This guide assumes the gown is already in your family, so the checks below are about what the fabric can tolerate, not whether to buy it.
What you can check at home
Work on a clean, flat, well-lit surface covered with a clean white sheet. Wash and dry your hands, remove rings and bracelets, and have a second person help you lift. Never pick the gown up by the shoulders or the waist alone, because the weight of the skirt can tear a bodice from its seams. Slide your forearms underneath and carry it flat.
Look first, touch second. Photograph any visible problem before you handle the area. Then check these points with light, gentle contact.
Color and surface. Yellowing, browning along folds, gray dullness and rust-colored spots are all common in older white fabrics. Note whether the discoloration is even or patchy. Patchy browning on a fold line often means the gown was stored folded in acidic tissue or cardboard.
Fabric strength. Do not stretch or tug. Instead, hold a small area of fabric near a seam and look for tiny splits, thin patches where light shows through, or fibers that look powdery. Silk that has begun to shatter often feels dry and may make a faint crackling noise when moved. If you see or hear this, stop and ask a professional before doing anything further.
Seams and stitching. Look inside at seam allowances. Check whether thread is intact, whether seams are pulling away from the fabric, and whether older repairs are present. Gentle pressure at a seam with a fingertip can reveal looseness without stress.
Closures and hardware. Test hooks, eyes, snaps, zippers and buttons by looking, not by forcing them. Rust at a metal closure can stain surrounding fabric if it gets damp, and an old zipper may separate at the first pull.
Odor and moisture. A musty smell suggests dampness at some point in the gown’s life. Mildew and mold are more than a cosmetic concern, and a conservator can advise on cleaning options that avoid spreading them.
Weight and drape. Heavy beading or sequins pull on the fabric beneath, and over decades that pull can thin the base cloth. Compare how the gown hangs near the beaded zones with plain zones.
What to leave to a professional
Any test that involves liquid, heat, stretching or cleaning chemicals belongs to a professional. That includes spot-cleaning, steaming, pressing, color tests, strength tests and any attempt to stabilize a split. Home cleaning of an old gown is a frequent cause of permanent damage, and the sensible rule is that if you are tempted to clean it first, ask first.
For general principles of textile care, public institutions such as the National Park Service, the Smithsonian Museum Conservation Institute and the Library of Congress publish free guidance on handling and storing fabric objects. They are written for museum collections, not wedding projects, but their basic principles about clean hands, support, light and humidity carry over to a gown in a closet.
Who counts as a professional here
Two kinds of professionals matter in a wedding gown redesign, and they do different things.
A textile conservator assesses condition, advises on what the fabric can survive, and carries out stabilization and conservation treatment. The American Institute for Conservation offers a directory where you can look for conservators by specialty and location. A conservator is generally the right person when the gown is very old, very fragile, valuable or documented, or when the family wants to keep the option of future preservation open.
A bridal alterations specialist or experienced seamstress carries out the fitting and sewing. Many are skilled with vintage fabrics, and many are not. The difference is experience with old silk, lace, beading and construction methods that are no longer common, not title or price.
For a modest family gown from recent decades, a wedding gown redesign might never need a conservator. For anything older, or any gown where the fabric concerns you, an assessment from a conservator before a seamstress begins is a sensible use of a short appointment. Some seamstresses welcome that step, and a good one will not be offended by it.
Turning observations into a condition note
Write what you and any professional find into a one-page condition note that becomes part of the wedding gown redesign agreement. Use plain statements: “Silk crepe bodice is stable. Hem lace shows thinning at left side. Rust spot at hook two, back closure. Beading is intact but heavy near the waist.” Attach the photographs. The note matters for two reasons. It lets you compare the gown after the work with its condition before, and it is the evidence you would use if a dispute arose about damage.
If the professional does not offer a condition note, you can write one yourself and ask her to sign or initial it at drop-off. The point is a shared record.
Letting condition set the ceiling
Once the note is written, use it to cap the ladder for the wedding gown redesign. A stable gown may be eligible for rung four with a careful seamstress. A gown with thinning fabric near the waist might be limited to rung two for that area. A gown with shattering silk might be limited to rung one. Setting these ceilings in advance protects the gown from enthusiasm, which can be a bigger threat than neglect.
Write the ceiling next to each area of the gown in the condition note. “Bodice: rung four. Skirt: rung three. Hem lace: rung one, do not stitch.” That single page becomes the instruction sheet the seamstress follows.
Redesign, duplicate, or wear it as it is: comparing the alternatives
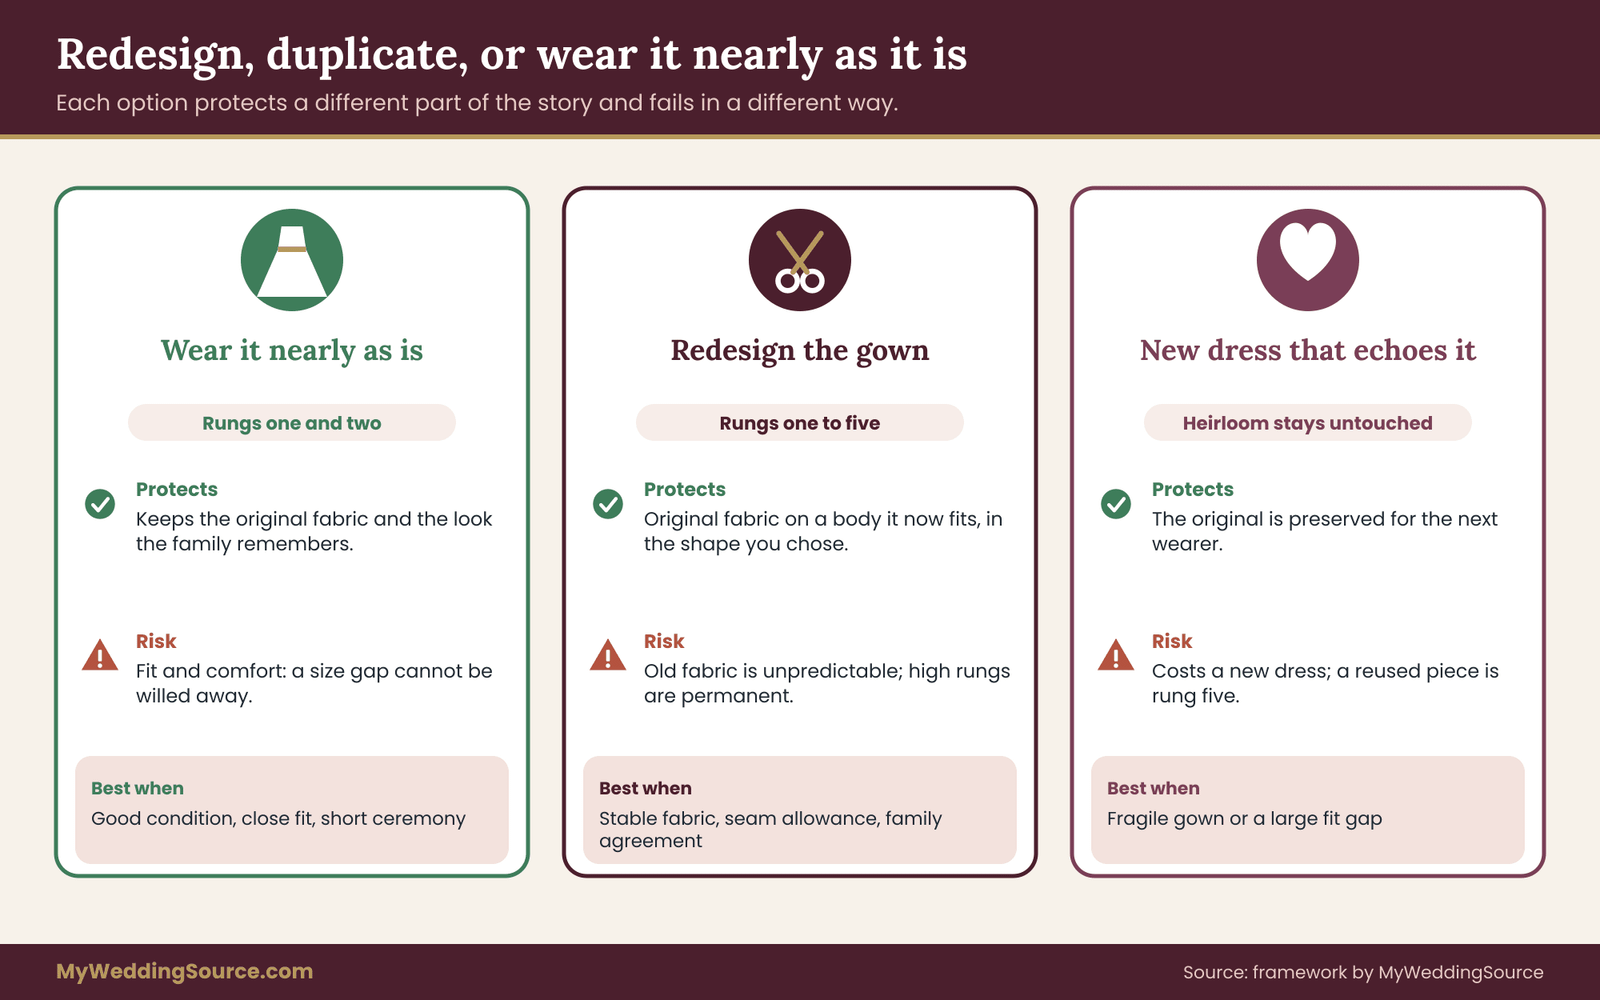
A wedding gown redesign is one of three honest ways to bring an heirloom gown into your wedding. The other two are wearing the gown nearly as it is and making a new dress that echoes it. Each one protects a different part of the story, and each fails in a different way.
Option one: wear it nearly as it is
You keep the original fabric and construction and accept the fit as it comes, with only rung-one and rung-two support. The advantage is that the gown stays whole, and the family sees exactly what it remembers. The cost is comfort and fit. A gown that is half a size small cannot be made to fit by willpower, and a gown that is too long will catch under heels unless you plan for it.
This option suits gowns in good condition that already roughly fit, couples whose ceremony is short and controlled, and families who value the original appearance above everything. It is a poor choice if you plan to dance for hours in warm weather, or if the fit problems are large.
Option two: redesign the gown
You alter the original gown with a wedding gown redesign, choosing rungs from the ladder. The advantage is that the wearer gets a dress that fits her body and her day, and the family still sees the original fabric. The cost is risk and, at higher rungs, permanence. Old fabric is unpredictable, the work needs a skilled hand, and some alterations cannot be undone.
This option suits gowns with stable fabric and enough seam allowance to work with, wearers who want the original dress and not a copy, and families that agree on what must be kept. A wedding gown redesign is the choice that most benefits from the agreement described later in this guide.
Option three: make a new dress that honors the original
You leave the heirloom gown untouched and commission a new gown that borrows from it: the same lace motif, a similar neckline, a sleeve shape, a button style, a reused trim. Sometimes a small piece of the original, such as a lace panel or a row of buttons, is carefully removed and added to the new dress. A related approach is a careful duplicate, where a seamstress copies the original pattern in new fabric.
The advantage is that the original gown is preserved for the future while you wear something that fits. The cost is that the new dress is a new dress, with the price, lead time and fitting schedule that implies, and some relatives may feel it is not the same as wearing the gown itself. If you do reuse a piece of the original, that piece has moved to rung five, because material is being removed from the heirloom.
A simple way to choose
Ask three questions in this order.
Does the gown survive the condition check at a level that allows any needlework? If not, option one or option three is the answer, and which of those depends on whether the gown can be worn at all. Does the gown fit, or nearly fit, without structural change? If yes, option one with a rung-two addition may be enough. If the fit gap is large, does the family agree that permanent changes are acceptable? If not, option three is the safest route.
The answers rarely come out neatly. A common middle path is a hybrid: wear the gown with rung-two or rung-three changes for the ceremony, then change into a separate outfit for the reception. Plan the switch like any other handoff: where the gown goes, who carries it, and where the second outfit waits.
What each option does to the story of the wedding gown redesign
Option one keeps the story visible and adds no new chapter. Option two, the wedding gown redesign, writes a new chapter in the same book, and the quality of the writing depends on the care taken. Option three keeps the old book on the shelf and starts a new one that cites it. None is the correct answer for every family. The ledger tells you which part of the story matters most, and the choice follows from that. ## Choosing a wedding gown redesign professional: questions that reveal how they work
Most bridal shops and seamstresses take in new gowns every week. Far fewer take in a fifty-year-old gown from someone’s closet and agree to treat it as a one-of-one object. The most useful screening happens before you pay for anything, and it consists mostly of questions. Treat the first conversation about a wedding gown redesign as an interview in which you are the one asking.
The general habits of checking any wedding vendor, including reading reviews, confirming a business is real and keeping written records, are covered in the vendor due diligence checklist. This section adds the questions that matter specifically when the wedding gown redesign involves an heirloom.
Start with experience, in specifics
Ask what kinds of old gowns the person has worked on, and ask them to describe, without names, a project that did not go as planned and what they changed afterward. You are not looking for perfection. You are looking for someone who has thought about failure and can talk about it without defensiveness.
Useful questions include these. “How many gowns more than fifty years old have you worked on in the past few years?” “What fabrics do you decline to alter, and why?” “When do you refer a client to a textile conservator?” “Have you ever told a client that the best choice was not to alter the dress?” A professional who has said no to a job at least once is usually more trustworthy than one who has never done so.
Do not expect exact numbers, and treat a precise-sounding statistic with caution. A direct, modest answer such as “a handful each year, mostly silk and lace” is more credible than a bold claim.
Ask to see work, and ask what you are looking at
Ask to see finished alterations on older gowns, in person or in photographs. Look at the inside of the garment if you can. Neat internal seams, even stitching and clear labeling of any added parts say more than the outside. Ask what was done to the original fabric in each example and what was left intact.
If the shop shows only gowns from current collections, that is a signal about where its experience lies, not necessarily about its skill. It may still be the right choice for a rung-two project, such as adding a detachable layer, where heirloom experience matters less. Match the professional to the rung, because a rung-two wedding gown redesign needs different experience from a rung-five one.
Questions about method
These questions reveal how the person would handle your gown specifically.
How do you handle and store the gown while it is in your care? Look for answers that mention clean hands, flat or padded hanging, no direct sunlight, no plastic bags, a locked or controlled space, and who has access.
What do you use to mark the fabric? Pins and chalk can mark fragile fabric. Some professionals use fine silk pins, basting thread, or removable tape. Ask what they plan to use on your gown and why.
What thread and needles do you use? The right thread for old silk is usually fine and similar in fiber to the original, not a modern polyester thread that is stronger than the fabric and can cut it. The right needle is fine and sharp. You do not need to be an expert, but the person should be able to explain choices in plain words.
Will you test anything before working on the gown itself? Careful workers often test a technique on a scrap, a hidden allowance or a similar fabric first. A sample or muslin mock-up, which is a trial version in cheap cloth, lets you see the changed shape without touching the heirloom at all.
What will you do if the fabric starts to fail during the work? The correct answer is “stop and call you.” Anyone who says they will “fix it as I go” is giving you a chance to hear how the project would feel if it went wrong.
Questions about records and communication
Ask how the shop documents work in progress. A professional who photographs the gown at drop-off, takes progress photographs and writes down each change is much easier to work with than one who relies on memory. Ask whether they will send photographs between fittings and whether you can see the gown whenever you like.
Ask who will actually do the work. In some shops the person you meet is not the person who sews, and subcontracting is not unusual. It should be disclosed, and for an heirloom you should know the name of everyone who will touch the dress.
Questions about the removed pieces
At rung five, ask directly what happens to anything that is cut off or replaced. “Will you return every piece, labeled with where it came from?” is a reasonable request. Ask whether it will be returned flat or folded, in what kind of packaging, and whether the shop keeps any scraps for testing. For a family gown, no scrap should be kept without your permission.
Questions about timing and capacity
Old gowns take longer than new ones. For a wedding gown redesign, ask for a schedule that includes the assessment, any mock-up, each fitting, the final check and a buffer before the wedding. Ask what happens if you need a second adjustment late. A shop that fills its calendar to the day before weddings has no room to handle a surprise, and a surprise is more likely with an old gown.
Ask also about the shop’s own busy seasons. Spring and early summer are often crowded, and an old gown that needs extra care should not be rushed into a crowded week.
Questions about fees and what happens when things change
Ask how the work will be priced: by the hour, by the task, or as a flat quote. Ask what is included in the quote and what is not. Ask what happens to the price if the work grows, and whether you will be asked to approve additional work in writing before it begins. The vendor agreement basics page describes how deposits, change orders and cancellation terms normally work in a vendor agreement, and those ideas apply here without modification.
Never accept a quote that is only a verbal estimate for a wedding gown redesign. A short written scope is the minimum, and the agreement in the next section is the better version.
A note on credentials for a wedding gown redesign
Some bridal alterations specialists belong to trade associations, and some have formal training in costume or textile work. These can be useful signs but are not required, and they are not a guarantee of skill. Treat any credential as a prompt for another question, such as “What did that training cover?” Do not treat it as a substitute for seeing work and hearing method.
Red flags during the interview
A few responses are worth treating as reasons to look elsewhere.
The person has not asked to see the gown, or has quoted a price for an old gown from a description over the phone. The person promises that nothing can go wrong. The person dismisses the idea of a written condition note or says they “do not do paperwork.” The person refuses to say who will do the sewing. The person will not return removed pieces. The person suggests that you do not need to tell relatives what is being changed. Any one of these is worth a pause. Several together are a clear signal.
Checking the answers
After the interview about your wedding gown redesign, compare what you heard with what you can verify. Read reviews with attention to those that describe older gowns. Ask for a reference from a client who had a similar project. If the person is a member of a professional association, confirm that directly with the association. If you used a credit card for any deposit, the Consumer Financial Protection Bureau explains how card disputes work, including the time limits that apply to billing errors, which makes a card a more flexible way to pay a deposit than cash.
Choosing between two reasonable candidates
If two people both seem capable of the wedding gown redesign, choose the one who explains the reversible options more fully, who is more willing to put things in writing, and who asks more questions about the gown’s history. Price matters, but a lower quote that ignores the ledger is not actually cheaper. A project that needs rework or ends with lost fabric costs more in every sense than one that was quoted slightly higher and done carefully.
When you have chosen, tell the professional you will be sending a short agreement and a condition note. How they react to that sentence is your last piece of information before you commit. ## The wedding gown redesign agreement, clause by clause
This is the original part of this guide: a twelve-clause alteration agreement checklist built around preservation. It is not a legal form, and it will not replace advice from a lawyer if the gown has high financial value or the project is complicated. It is a list of things a sensible wedding gown redesign agreement should say, in plain language, so that you and the professional both know what was promised.
You can adapt it into a one- or two-page document. Many alterations specialists have their own forms for a wedding gown redesign, and if so, you can ask them to add the clauses below as an addendum. A professional who refuses to add anything is telling you something about how the shop treats exceptions.
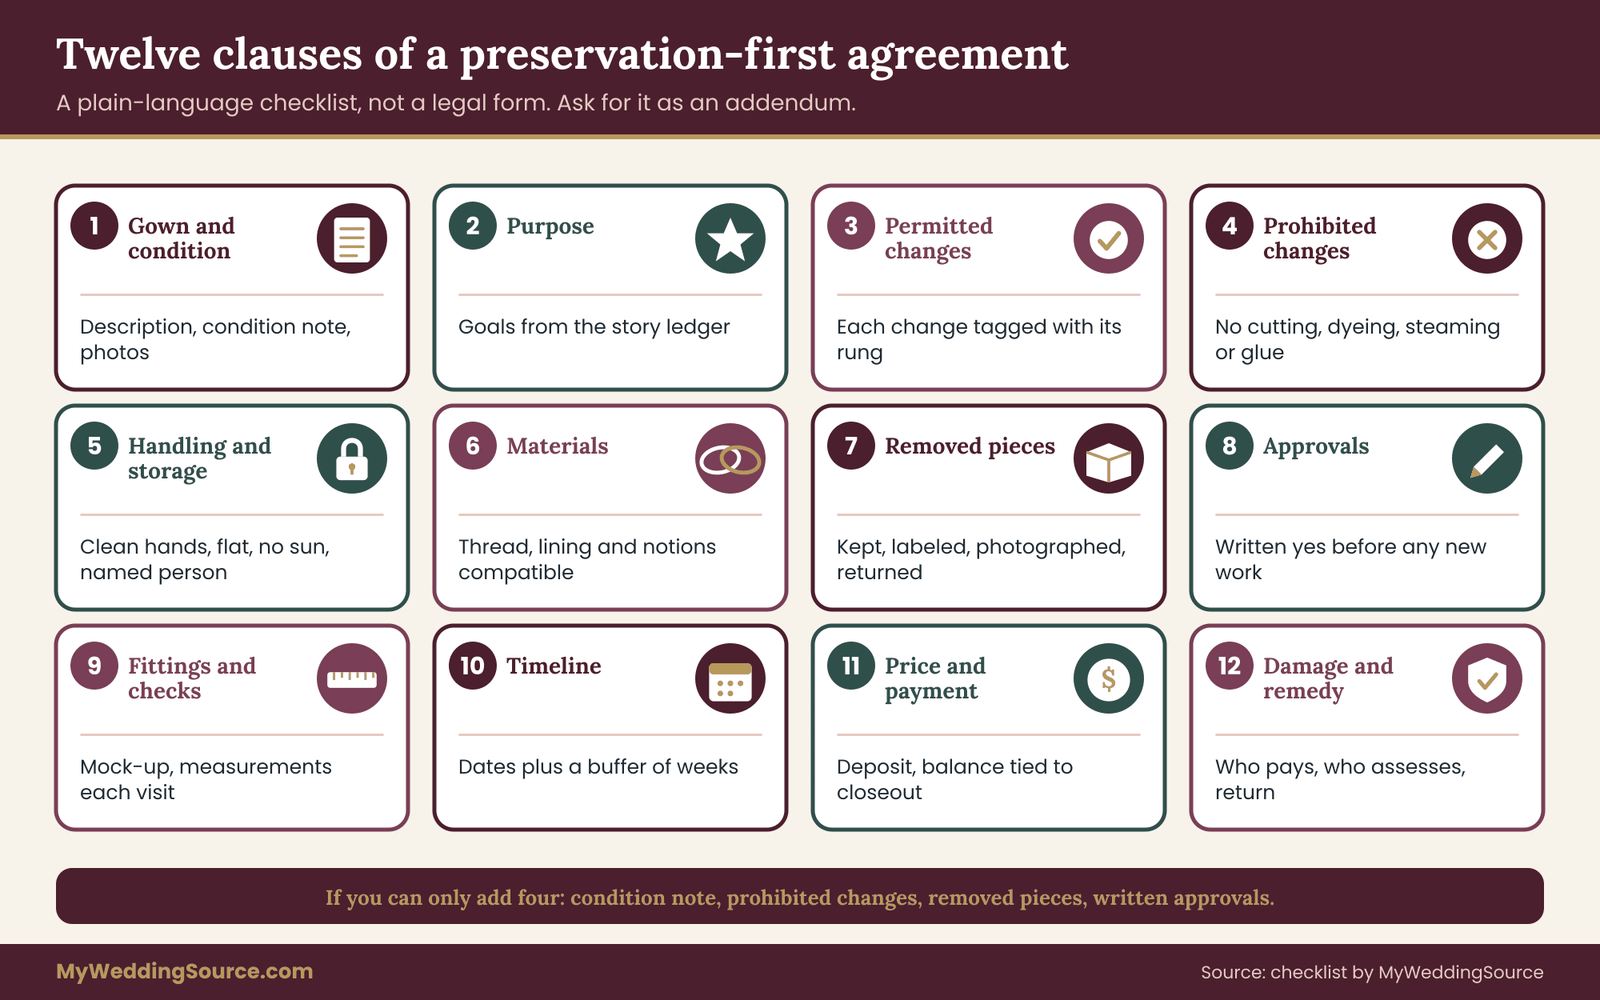
Clause one: the gown and its condition
Name the gown (owner, approximate date, color, fabric) and attach the condition note and photographs from the intake. State that both parties have reviewed them and agree they describe the gown at drop-off. Everything later in the agreement is measured against this record.
Clause two: the purpose of the work
Summarize the goals from your ledger in two or three sentences. “To fit the wearer for a ceremony in July, to add sleeves without cutting the original bodice, and to shorten the hem without trimming.” Including goals keeps the work aimed at what the family actually wants and gives both sides something to check the result against.
Clause three: permitted changes, by rung
List every change that may be done and attach a rung number to each. “Add detachable sleeves (rung two). Take in side seams by folding allowance inward without cutting (rung four). Raise hem with a deep internal fold (rung four).” If you can, include a short sketch or marked photograph. The more specific the list, the less room there is for improvisation.
Clause four: prohibited changes
State what must not happen without separate written permission. Typical entries are cutting or trimming any original fabric, removing original buttons, lace, trims or labels, dyeing, bleaching or washing, steaming or pressing, using adhesives or fusible products, and using staples or permanent markers. Add anything the family named in the ledger as most important. This clause is the single strongest protection in a wedding gown redesign agreement.
Clause five: handling, storage and access
Say how the gown will be handled and stored while it is in the professional’s care. Clean hands, flat or padded storage, no direct light, no plastic bags, no leaving it on a mannequin overnight with weight on the shoulders, and a named person responsible. State who else may touch the gown, whether subcontractors are used, and that you will be told before the gown leaves the premises for any reason.
Clause six: materials
Name the thread, fabric, lining, notions and fasteners that may be used for any additions, and say that new materials will be chosen to be compatible with the age and fiber of the original. If new fabric must match the old, say whether samples will be shown to you before cutting. Materials that are removed from the gown belong in the next clause.
Clause seven: removed pieces
State that every piece removed, whether cut away, replaced or unpicked, will be kept, labeled with its original position on the gown, photographed and returned with the finished work. Include small items such as buttons, hooks and loose threads from a replaced closure. State that nothing will be discarded, kept or used for testing without your written permission.
Clause eight: approvals and changes in scope
Say that no work outside the permitted list will begin without written approval from you, and that “written” includes a text message or email that you reply to with a clear yes. Add that if the professional finds a problem, such as a weak seam or a hidden stain, they will stop, photograph it and contact you. This is the clause that prevents “I fixed it as I went.”
Clause nine: fittings and measurable checks
List the number of fittings, the stage each one covers and the checks that will be made. The measurable checks are listed in the next section. A short sentence is enough here: “A mock-up fitting will be done before any work on the gown, and the wearer’s measurements and the hem height will be recorded at each fitting.”
Clause ten: timeline
List the dates for drop-off, mock-up, each fitting and return, and a final date by which the gown must be back with you, which should be well before the wedding. State what happens if either side needs to move a date. A buffer of several weeks is wise for an old gown. If a deadline is missed because of the professional’s schedule, the agreement should say what happens, whether that is a partial refund, a priority slot or a transfer to someone else.
Clause eleven: price, deposit and payment
State the price or hourly rate, what the price includes, how much is due as a deposit and when the balance is due. State that additional work will be priced and approved before it begins. Keep records of every payment. If you pay the deposit by credit card, the Consumer Financial Protection Bureau explains the dispute rights that may apply, and keeping a card receipt is easier than tracking cash.
Clause twelve: damage, remedy and return
State what happens if the gown is damaged, lost or altered beyond what the agreement allows. A reasonable agreement names who is responsible, how the problem will be assessed, whether an independent conservator will be asked to review, and what remedy is offered. Remedies can include repair at no cost, payment toward repair by another professional, a refund of fees or a payment toward the gown’s value if there is a documented appraisal.
A frank point belongs here. Many alteration shops limit liability in their standard forms, sometimes to the cost of the service. You cannot assume the limit is absent. Read the clause, ask what it means for an irreplaceable gown, and decide whether you are comfortable. If the gown is valuable, ask whether your homeowner’s or renter’s insurance covers items in someone else’s care, and speak with your insurer. That conversation is better held before the gown leaves your house than after.
Signing and keeping the agreement
Both parties sign and date the wedding gown redesign agreement, and each keeps a copy. Add initials at the bottom of each page if there are several. Store the signed agreement with the ledger, the condition note and the photographs in one folder, on paper and in a digital copy. The folder is the project’s memory. If the project ever ends in a dispute, it is the first thing a mediator or a card issuer will ask to see.
If the shop uses its own form
Most shops hand over a standard form for a wedding gown redesign. Read it as you would any contract, and compare it to the twelve clauses above. Note which are missing. Ask politely for an addendum that adds them, and bring a printed copy so the conversation is concrete. Some shops accept the addendum immediately. Some negotiate. A few refuse. If a shop refuses to include clauses four, seven and eight, which protect the original fabric, removed pieces and scope, consider whether that shop is the right place for an heirloom.
The wedding vendor contract guide covers the general terms such as cancellation, force majeure and payment schedules, which your agreement can reference instead of repeating. You can also use the vendor purchase order checklist as a model for how to confirm scope, price and delivery in writing.
What to do if the professional resists the wedding gown redesign terms
Pushback on a wedding gown redesign agreement is not automatically a red flag. A busy specialist may find a long addendum annoying, and a shorter document may serve just as well. The test is substance, not length. If the agreement shows that the gown will be handled carefully, nothing will be cut without permission, every removed piece will be returned, and any change in scope will be approved in writing, the length hardly matters. If any one of those four things is missing, ask for it again.
If you have to choose between a longer form and a better professional, choose the better professional and shorten the form to the four essentials: condition note, permitted and prohibited changes, return of removed pieces, and written approval for changes.
Where to turn if things go wrong
If a wedding gown redesign dispute cannot be settled by talking, keep everything in writing. For a card payment, ask the issuer about a billing dispute within the time limit. The Federal Trade Commission’s consumer site and USAGov both explain how to report a business and file a complaint with the relevant agencies, and the CFPB accepts complaints about financial products. These are last resorts, and the best protection is the agreement you signed at the start. ## Fittings with measurable checks
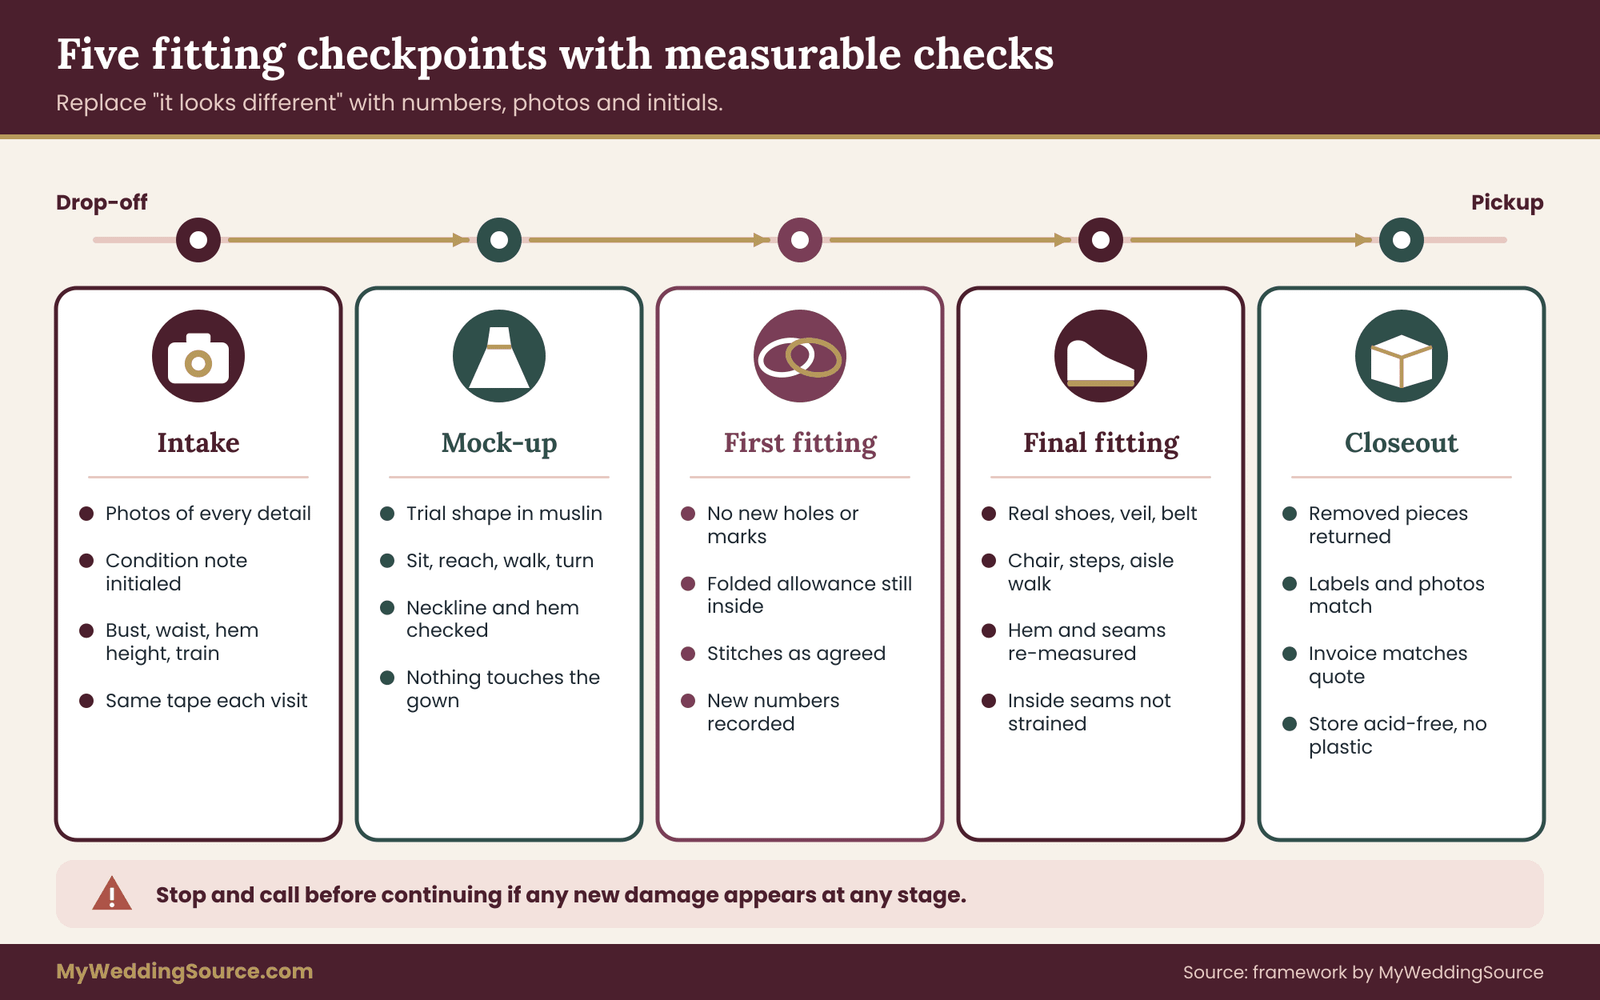
A fitting is more than trying the gown on, and the wedding gown redesign needs several of them. In a preservation-first wedding gown redesign, each fitting is a checkpoint with a short list of things that can be measured, photographed and written down. Measurable checks keep the conversation calm because they replace “it looks different” with “the hem is one inch higher than the first fitting, and the fold is still inside.”
Stage one: intake and baseline
At drop-off, the gown is photographed on a flat surface, front and back, with close-ups of every item in the condition note. The professional and the owner both initial the condition note. Record the gown’s measurements at this point: bust, waist and hip lines, hem circumference if possible, hem height from a fixed reference point such as the waistline seam, sleeve or strap length, and train length. Measure the same places every time, using the same tape, and write the numbers on the intake sheet.
The measurements do not need to be fancy. Their purpose is to detect change. If the hem is thirty-nine inches from the waist seam at intake and thirty-seven at the final fitting, both people should know why.
Stage two: the mock-up
For any rung-three, four or five change, ask for a mock-up, also called a muslin. The seamstress makes a trial version of the shape in inexpensive fabric, using the gown’s measurements and, if possible, a pattern traced from the original without damaging it. You try the mock-up on, and everyone looks at neckline, waist, sleeve and hem before a single stitch is made on the heirloom.
This is the least glamorous step of a wedding gown redesign and the most protective. Mistakes made in muslin cost an hour. Mistakes made in a wedding gown redesign of a family gown can cost the gown. If a professional says a mock-up is unnecessary, ask what they would do instead to confirm the shape.
Checks at the mock-up: the wearer can sit, raise her arms, walk up a few steps and turn without strain. The neckline sits where it was planned. The waist does not ride up when she moves. The hem clears the shoes she will wear. Take photographs from front, back and side, and keep them with the agreement.
Stage three: first fitting on the gown
Now the wedding gown redesign on the heirloom itself begins, and the first fitting shows the first changes. Check these points.
Original fabric intact. No new holes, no pulled threads, no fresh marks. Compare against the intake photographs, area by area.
Reversibility confirmed. For rung-four changes, ask to see the folded allowance inside the gown. The material that was tucked in should still be there, and it should be flat and clean.
Stitching matches the agreement. Stitches are the kind and length agreed. Temporary stitches are easy to see and remove.
Measurements recorded. Write down the new hem height, the new seam positions and any other changes. Compare to intake.
Wearer’s comfort. She should be able to stand, sit, raise her arms and walk across the room. If she needs to hold her breath to close the gown, the fit is wrong.
Stage four: final fitting and function test
The final fitting of a wedding gown redesign should be a rehearsal as much as an inspection. The wearer puts on the gown with the exact undergarments, shoes, veil and accessories she will use on the day, including any belt or detachable piece. She stands, sits in a chair like the ones at the ceremony, walks a distance equal to the aisle, climbs a few steps if the venue has them, and dances a few bars with someone.
Then measure again. Compare the hem height, seam positions and overall dimensions against the earlier fittings. Look at the inside for any stitches that pull or any fabric that is under visible tension. Photograph the finished gown in the same angles as at intake.
The wedding day accessories planning guide explains how to test accessories for compatibility and movement, which matters more than usual when the gown is fragile and cannot be pinned or clipped freely.
Stage five: return and closeout
At pickup, check what you are given against the agreement. Is the gown clean and packed as agreed? Are the removed pieces returned, labeled and photographed? Is the final invoice what you were quoted? Are the notes and photographs from the process included? Sign the closeout only when each of these is true. If you are not able to inspect the gown right away, ask for a short window, in writing, after pickup to notice any problem.
When the wedding gown redesign is finished, store the gown properly. The Library of Congress and the National Park Service both publish public guidance on storing textiles, with advice about acid-free materials, avoiding plastic and avoiding extremes of temperature and humidity. After the wedding, the same care continues, and a conservator can advise on long-term storage if the family wants to keep the gown for another generation.
A worked example: the Hartwell family gown
The following wedding gown redesign example is invented to show how the process fits together. The Hartwell family, the gown and the choices are illustrative, not a real case, and no results here should be read as typical outcomes.
Maya is getting married in July and is planning a wedding gown redesign. Her grandmother’s ivory silk crepe gown, worn in the late 1960s, has been in the family since. It has a high neckline, long fitted sleeves, thirty-one covered buttons down the back, a chapel-length train and a lace trim on the hem. Maya is taller than her grandmother was and wants to dance outdoors in warm weather.
The ledger. Maya and her mother write a one-page ledger. Original features: silk crepe, covered buttons, lace hem, sleeves. The family’s stated priorities: the buttons and the lace. Maya’s goals: to dance, to stay cool, to have a neckline she can breathe in. They photograph the gown and record measurements.
The condition check. A textile conservator spends a short appointment looking at the gown. Her note says the bodice and sleeves are stable, the silk near the underarms has thinned, three buttons are loose, the lace at the left hem is fragile, and the train shows light creasing along one old fold. Her ceilings: bodice rung four, sleeves rung two, lace rung one, train rung three.
The choices. Maya considers the three options. Wearing the gown as it is would leave her too hot and the hem too short for her heels. A new dress honoring the old one would lose the buttons and lace her family cares about.
So she chooses a wedding gown redesign with a modest ladder: a lowered neckline panel attached with reversible hooks (rung two), detachable sleeves in place of the original long sleeves for the ceremony (rung two), a hem extended by letting down an existing fold (rung four), and a looped bustle for the train (rung two). Nothing will be cut.
The professional. She interviews two seamstresses. The first quotes over the phone without seeing the gown. The second asks for the ledger, asks to see the condition note and offers a mock-up. Maya chooses the second.
The agreement. The seamstress agrees to the twelve clauses with two adjustments, a longer timeline and a limit on liability, which Maya reads closely, discusses with her insurer and accepts. Clause seven is short, since nothing is being removed except the original sleeves’ temporary stitching, which is returned in a labeled envelope.
The fittings. The mock-up shows the neckline panel sits too low, and it is raised a half inch in muslin before anything is cut. The hem fold is checked at each fitting. The final test includes a chair, a flight of three steps and a few minutes of dancing in her heels.
The result. On the wedding day, the gown is worn with the detachable sleeves for the ceremony and without them for the reception. After the wedding, the hooks are removed and the gown is returned to its original appearance, with the added hem length folded back inside. The family has new photographs and a gown that is still whole.
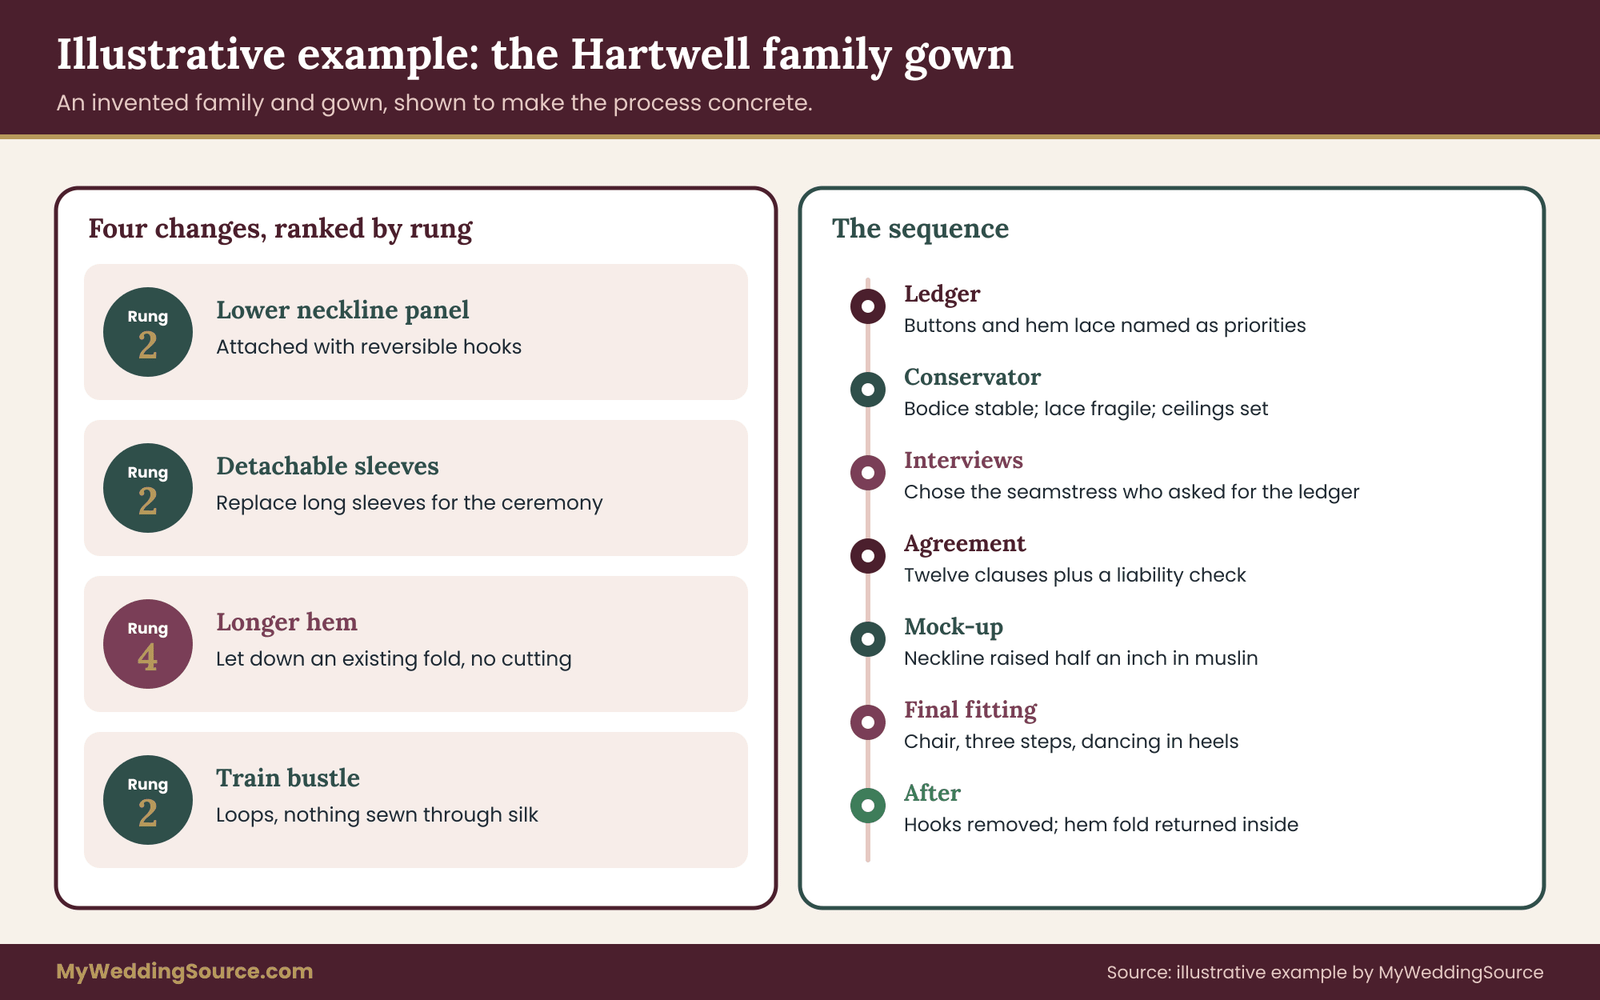
The worked example shows what a wedding gown redesign looks like when each step is done in order: story first, condition second, rung choices third, agreement fourth, fittings with checks last. It is slower at the start than simply hiring a seamstress, but each step removes a way for the project to go wrong. ## Edge cases that change the plan
Most wedding gown redesign projects follow the path above. A few do not, and it helps to recognize them early, because each one shifts which rung is safe and what the agreement needs to say.
The silk is already shattering
Old silk, especially weighted silk from the early twentieth century, can split along folds and surfaces as if it were dry paper. Handling alone may cause more damage. In this case, the wedding gown redesign question changes: the realistic choices are usually rung one or option three. A conservator may recommend support such as a padded mount or a fine net backing, and some may suggest the gown be exhibited, not worn.
This is a hard message to hear. The kinder way to take it is to remember that a gown that survives another century is also part of the story.
A stain the family remembers
Not every mark is damage. A stain may carry a story. Before cleaning or covering any mark, ask the family whether it matters, and ask the conservator whether it is stable. Some stains continue to spread or weaken the fabric, and those need attention. Others can be left alone and simply photographed. Write the decision into the ledger, with a line explaining why, so a later relative does not wonder.
The gown has been altered before
Earlier alterations are part of the gown’s history and also a risk for any wedding gown redesign. A previous hem may have been cut, a previous seam taken in and trimmed, a bodice lined with modern fabric. Ask whether you can see the older changes from the inside and whether any original material was lost. The ceiling for each area has to account for the current state, not the original.
If an earlier alteration was poorly done, reversing it can be a project of its own, and the agreement should say whether that work is included.
Pieces are missing
Many heirloom gowns have lost a veil, a belt, a sleeve, a collar or a set of buttons over the decades. Decide whether to leave the gap, to replace with a close match, or to make a new piece that clearly reads as new. Replacement pieces on rung two, such as a new veil or a detachable sleeve, are easy to undo. Sewing replacement buttons in place of lost originals sits at rung three or four, depending on how they are attached.
More than one person wants to wear it
When siblings or cousins hope to wear the same gown, permanent changes for one wearer can close the door for the others. The simple protection is to stay on rungs one through four, so the gown can later be put back, and to agree among relatives in writing that nobody will do a rung-five change without consulting the group. The wedding decision-making guide offers language for family discussions about who decides what, and the same approach works when the question is a dress.
A different body, a different identity, a different style
The original wearer and the new wearer may differ in height, shape or in how they want to present themselves. A gown made for a slender person may need gussets or panels to fit a larger body.
A gown cut for a feminine silhouette may be redesigned as a suit, a jumpsuit or a skirt and top for a groom or a nonbinary partner. These are legitimate uses of an heirloom, and they usually land on rung four or five. Be especially careful with the ledger and ask each relative what the garment means to them. For some families, honoring the original wearer means seeing the fabric worn in a new way, and a conversation can establish this.
The gown has monetary value
If the gown is by a known designer, is documented, or has been appraised, the financial stakes rise. Altering it may affect its value, and insurance and liability need more attention. Ask a conservator or appraiser before work begins, and read the insurance question under clause twelve with extra care. Do not rely on a seller’s or shop’s statements about authenticity or value. A written appraisal from a qualified, independent person is evidence; a verbal opinion is not.
The wedding is soon
A tight timeline pushes a wedding gown redesign toward rungs one and two.
Shorter lead times do not respect old fabric, and rushing is when pins go through silk that should have been left alone. If the wedding is within a few weeks, choose a plan that does not need long fittings: a modern slip, a detachable layer or an overskirt, and perhaps a plan to do the larger redesign after the wedding, once there is time. A project that starts after the wedding and ends in time for an anniversary photograph is a perfectly good plan.
Travel
If the wedding is away from home, the gown must be carried, steamed and stored in a way that suits fragile fabric. Do not check a heirloom gown as luggage. Carry it, and plan for support and padding. Any steaming or pressing should be done only by someone who knows the fabric. The risk of getting the gown wet, hot or crushed is greater than for a new dress.
Money and time: cost logic without guesswork
Prices for a wedding gown redesign vary widely by region, by shop, by fabric and by the amount of handwork, and any specific number printed in a general guide would soon be out of date. A better approach is to understand what drives cost and ask for quotes that make the drivers visible.
What drives the cost
Assessment. A conservator’s assessment usually carries its own fee, often by the hour or as a flat visit. It is a small cost relative to the cost of a mistake.
Mock-up. A muslin takes the seamstress’s time and some fabric, and the time is usually the larger piece. Ask for it as a separate line so you can see it.
Handwork. Careful work on delicate fabric is slower than machine work. Lace, beading and fine silk are usually quoted by the hour or by the task for that reason. A price that seems low for an old gown may reflect a plan that is faster and riskier than you want.
Materials. New fabric, lining, thread, hooks and notions are usually small relative to labor, but matching an old fabric can be difficult and sometimes expensive.
Fittings. Each fitting uses time. A plan with more checkpoints costs more per hour but less in risk.
Storage and packaging. Acid-free storage and a proper box have a cost, and many families already budget for it as part of preservation after the wedding.
How to compare quotes
Ask each professional to quote in the same format: assessment, mock-up, each rung of work by task, fittings, materials, return and packaging. A quote that lumps everything into one number cannot be compared. If two quotes are far apart, ask each to explain what is different. The difference may be a mock-up, a better storage plan, or a fabric that one person is willing to touch and the other is not.
Be cautious about estimates that rely on ranges, averages or “typical” costs you cannot verify. For your own budget, ask for written quotes for your specific gown. The wedding budget guide shows how to track a line like this against the rest of the plan, and you can add a contingency for a second fitting, a conservator’s visit or replacement materials.
Timeline logic
Work backward from the wedding when you plan a wedding gown redesign. Put the date you need the gown back at least several weeks before the event. Then place the final fitting before that, the first fitting before that, the mock-up before that, and the assessment and agreement at the start. Add a buffer between each stage, because an old gown may need a pause to rest between steps, and because professionals fill calendars in popular months.
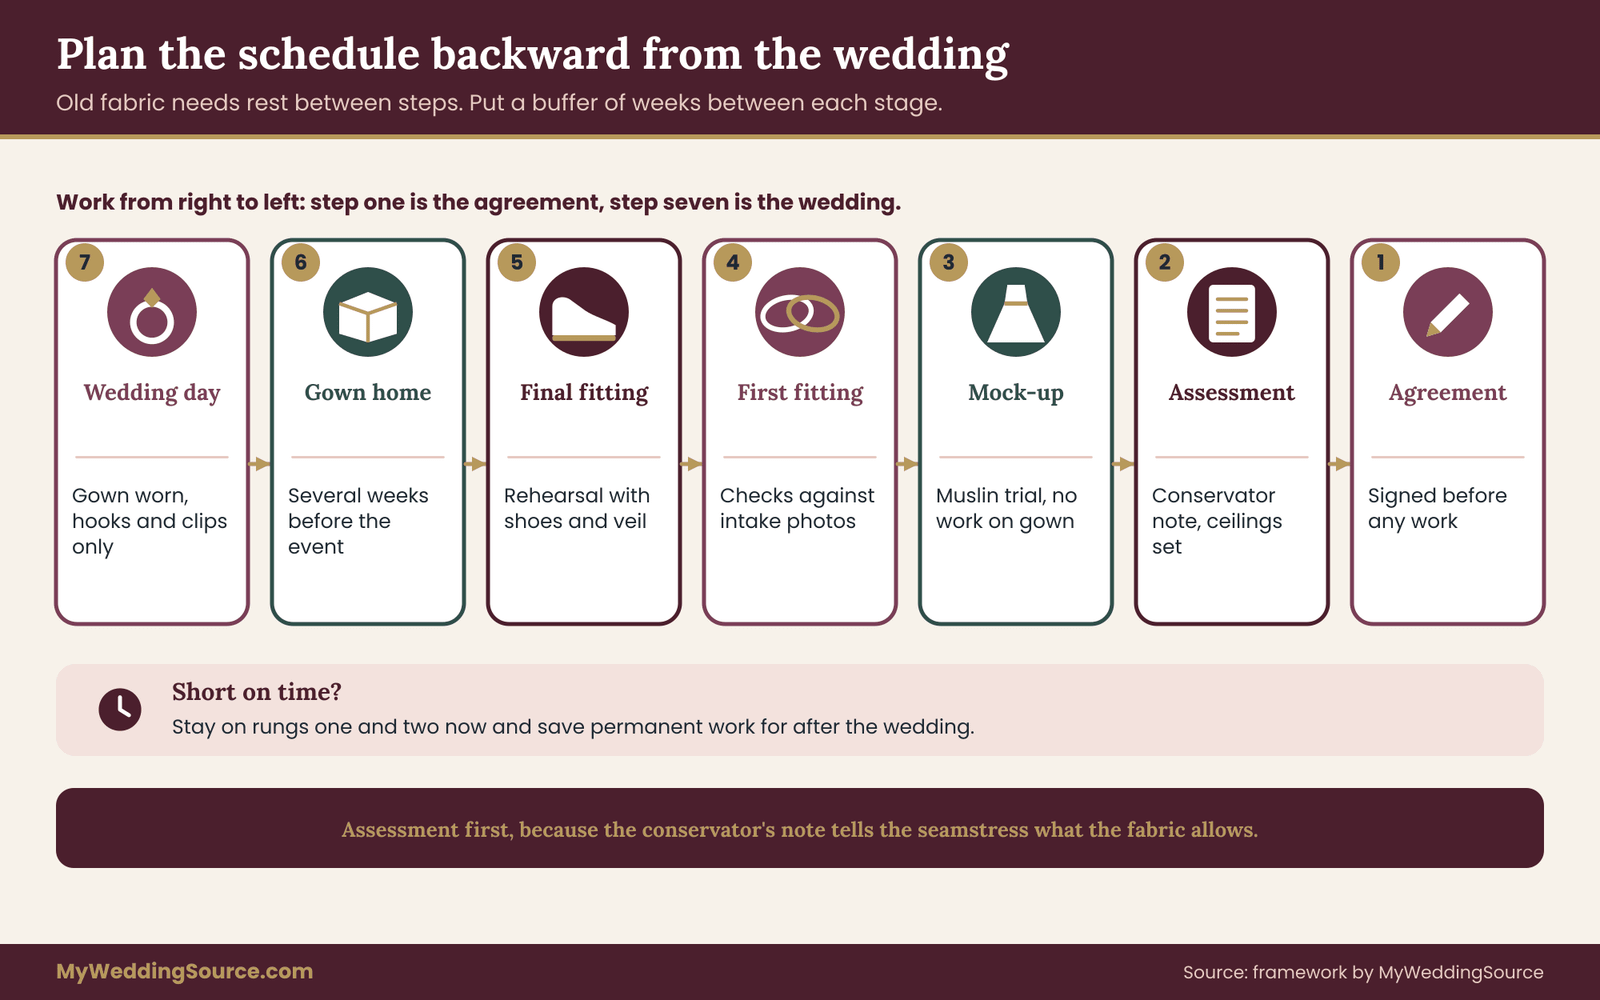
If you are working with a conservator and a seamstress on the wedding gown redesign, schedule the conservator first. Her note defines the ceilings, and the seamstress cannot plan without it. If the schedule is tight, ask whether the two can speak directly. A short phone call between professionals can save several weeks of back and forth.
Paying safely
Pay wedding gown redesign deposits in a way that gives you a record. A card payment gives both a receipt and, for billing errors, the dispute process the CFPB describes, including a written notice within sixty days of the statement that shows the error. Avoid paying the full balance before the work is complete. Tie the final payment to the closeout in clause eleven, after you have inspected the gown and received the removed pieces.
Whatever the form of payment, keep every invoice and receipt with the agreement. If you also manage other wedding records, the same folder approach covers all of it, and the guide to fit and movement alterations is a useful companion for the practical side of fittings once the heirloom decisions are made.
Talking with relatives about the plan
A wedding gown redesign agreement protects the gown from the seamstress. A short conversation protects the family from surprise. People are rarely upset by a change they understood in advance, and they are often upset by one they discovered afterward.
Choose the moment and the person carefully. Start with the relative who cares most. Bring the ledger, the condition note and a short list of changes, in order from reversible to permanent. Say what you want and why. Ask what you may have missed.
A few sentences can help. “I would like to wear Grandma’s gown, and I want to do it in a way that lets us put it back the way it was. Here are the changes I am thinking about, and here is what we would keep.” Or, for a change that is permanent: “This one cannot be undone. I wanted you to know before it happens, and I would like to hear what matters most to you about that part of the dress.”
If someone objects, listen first. Ask whether the objection is to the change itself, to the permanence, or to not having been asked. Often it is the last. Offering a reversible alternative, such as a detachable piece in place of cutting, can settle a disagreement that would otherwise take months.
When you reach an agreement, write it down, share it, and keep a copy with the ledger. The point is not to create a legal document within the family. It is to make sure that in ten years nobody remembers the conversation differently.
Your next steps
Start your wedding gown redesign with the ledger. Spend one evening writing it, photographing the gown and listing the three things your family would most hate to lose. Then rank your goals on the reversibility ladder and decide the highest rung you are willing to climb.
Next, arrange a condition check with a textile conservator or an experienced bridal alterations specialist, and write a one-page condition note. Interview at least two professionals using the questions in this guide, and ask each for a written quote in the same format. Choose one, send the twelve-clause agreement as an addendum, and sign it before any work begins.
Schedule the mock-up and fittings backward from the wedding date, with a buffer, and use the measurable checks at each stage. When the gown comes home, check the removed pieces, sign the closeout and store the gown properly. A careful wedding gown redesign ends with two things: a dress that fits and a story that is still whole.
FAQ
What is a preservation-first wedding gown redesign agreement?
A wedding gown redesign agreement is a short written contract between you and the person altering an heirloom gown. It records the gown’s condition, lists permitted and prohibited changes, requires that any removed material be kept and returned, and requires written approval before any new work. Its purpose is to protect the original fabric and the family’s history while still allowing the gown to be worn.
Can an heirloom wedding gown be altered and later restored?
Sometimes. Changes that leave all the original material inside the gown, such as folding a hem or taking in a seam without cutting, can often be reversed by a skilled restorer. Cutting, trimming, dyeing or removing parts cannot. Ask the professional which of the planned changes are reversible, and write that answer into the agreement before work begins.
Do I need a textile conservator, or is a seamstress enough?
For a modest, recent and stable gown, an experienced seamstress may be enough. For a very old, fragile, documented or valuable gown, a conservator’s assessment before any sewing is a sensible step. Many families use both: the conservator assesses condition and sets limits, and the seamstress carries out the fitting within those limits.
What should be returned when a gown is cut or remade?
Everything removed. That includes cut fabric, lace, trims, buttons, hooks, labels and any original thread you want to keep. Ask that each piece be labeled with its original position on the gown, photographed and returned with the finished work. Pieces can become keepsakes, such as a handkerchief, a ring pillow or a framed detail.
How much does a wedding gown redesign cost?
It depends on the gown, the fabric, the amount of handwork and your region, so no honest general figure is available. Ask for written quotes that separate the assessment, the mock-up, each task, fittings, materials and packaging. Compare quotes line by line, and budget a contingency for an extra fitting or an unexpected repair.
How far ahead should I start a wedding gown redesign?
Earlier than for a new dress, because a wedding gown redesign involves more steps. An old gown needs an assessment, a mock-up and several fittings with rest periods in between, and good professionals book ahead. Working backward from the wedding date, plan to have the gown home several weeks before the event. If time is short, choose reversible rung-one or rung-two changes and save larger work for later.
What if a relative disagrees with the changes?
Talk to them early, show them the ledger and the plan, and ask what they care about most. Many disagreements are about not being consulted, not about the change itself. Offering a reversible alternative, such as detachable sleeves in place of cutting, can often resolve it. Write down what you agree and keep a copy with the gown’s records.
What if the gown is damaged during the wedding gown redesign?
The agreement should have said what happens. Stop work, photograph the damage and compare it to the intake record. Ask the professional for a written account. If you cannot settle it, an independent conservator can assess the damage. If you paid a deposit by card, ask your issuer about dispute options, and keep every document, because the signed agreement is your strongest evidence.
Sources
- Consumer advice: Federal Trade Commission
- Care Labeling Rule guidance, Federal Trade Commission
- Submit a complaint, Consumer Financial Protection Bureau
- How do I dispute a charge on my credit card bill?, Consumer Financial Protection Bureau
- Consumer complaints, USAGov
- American Institute for Conservation
- Find a conservator, American Institute for Conservation
- Conserve O Gram series, National Park Service Museum Management Program
- Preservation, Library of Congress
- Museum Conservation Institute, Smithsonian Institution